19692 - Bread maker Lakeland - Free user manual and instructions
Find the device manual for free 19692 Lakeland in PDF.


| Product Type | Bread Maker |
| Brand | Lakeland |
| Model | 19692 |
| Dimensions (approx.) | 30 x 25 x 30 cm (11.8 x 9.8 x 11.8 in) |
| Weight (approx.) | 5 kg (11 lbs) |
| Power Supply | 220-240V AC, 50/60 Hz, 600W (estimated) |
| Loaf Sizes | 750g and 1000g |
| Crust Control | Light, Medium, Dark |
| Timer Delay | Up to 13 hours |
| Keep Warm Function | Up to 60 minutes after baking |
| Programmes | 12 programmes: Basic, French, Whole Wheat, Quick, Sweet, Ultra Fast, Gluten Free, Dough, Jam, Cake, Sandwich, Bake |
| Viewing Window | Yes, in lid |
| Bread Pan | Removable, non-stick, with handle and lid (for Sandwich programme) |
| Kneading Paddle | Single paddle, removable with hook provided |
| Measuring Cup & Spoon | Included (cup 230ml, spoon 5ml/15ml) |
| Ingredients Alert | Beeper after ~30 min to add extras |
| Power Failure Backup | Up to 10 minutes memory |
| Care & Cleaning | Bread pan, lid, paddle, measuring cup and spoon are dishwasher safe. Wipe exterior with damp cloth. Do not immerse unit. |
| Safety Features | Auto shut-off after programme, cool-down period, child safety (for ages 8+ with supervision), do not cover or block vents. |
| Spare Parts & Repairability | Contact Lakeland customer care for replacement parts or service (015394 88100). |
| Warranty | Standard manufacturer's warranty (refer to manual for details) |
Frequently Asked Questions - 19692 Lakeland
User questions about 19692 Lakeland
0 question about this device. Answer the ones you know or ask your own.
Ask a new question about this device
Download the instructions for your Bread maker in PDF format for free! Find your manual 19692 - Lakeland and take your electronic device back in hand. On this page are published all the documents necessary for the use of your device. 19692 by Lakeland.
USER MANUAL 19692 Lakeland
natural_image
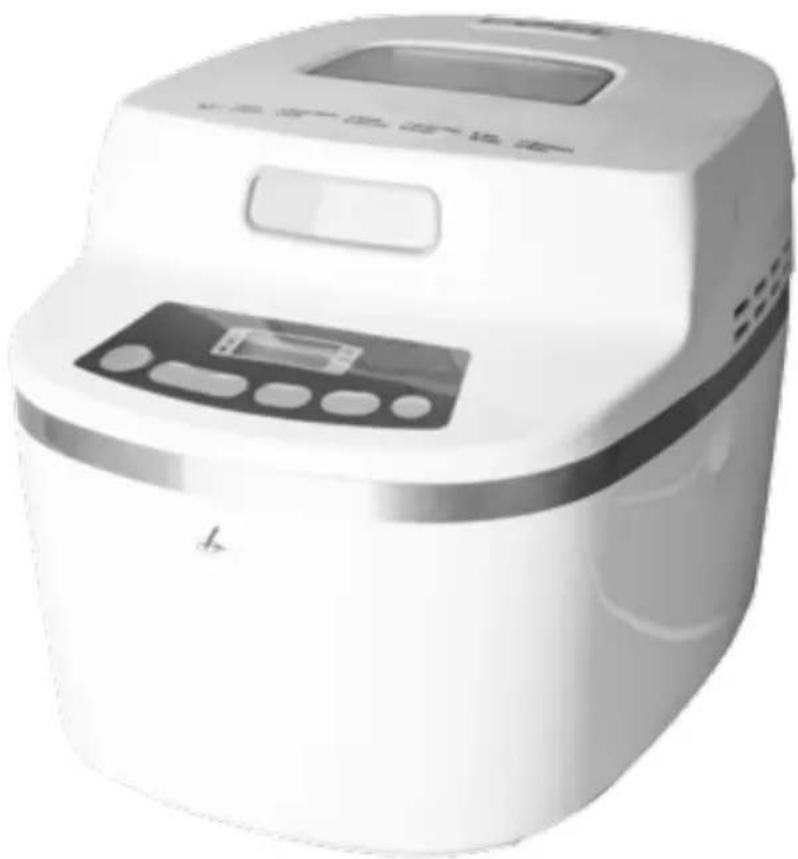
White rice cooker with digital display and control panel (no visible text or symbols)LAKELAND SMALL SPACE BREAD MAKER
Thank you for choosing the Lakeland Small Space Bread Maker.
Please take a little time to read this booklet before you use your machine and keep it in a safe place for future reference.
Your Small Space Bread Maker is a smaller, shorter, worktop-friendly Bread Maker with all the features of a larger machine. With a choice of two loaf sizes, variable crust control, it has 12 easy-to-use settings to create your perfect loaf; including basic bread, French, whole wheat, sweet, gluten-free and sandwich; and baking settings for quick, ultra fast, dough and bake. It even has jam and cake making settings for sweeter treats.
An award winning family-owned business, here at Lakeland we still have the same values of excellent quality, value for money and exceptional customer care as we did when we first set up the company in the 1960s.
Our products are carefully selected and rigorously tested to meet our high standards, so you can be assured that any product you purchase will be easy-to-use and highly durable.
CONTENTS
Product features....4
Safety cautions....5-6
The control panel 7-8
Before using the Bread Maker for the first time....9
The Bread Maker programmes....10-12
Measuring your ingredients....13
Placing your ingredients into the bread pan....14
Instructions for use 15-17
A guide to flours and other ingredients 18-20
A guide to adding flavourings 21
Adapting your own recipes....22
Hints and tips....23
Recipes 24-32
Troubleshooting 33-36
Care and cleaning 37
Recycling your electricals 38
Electrical connections....38
PRODUCT FEATURES
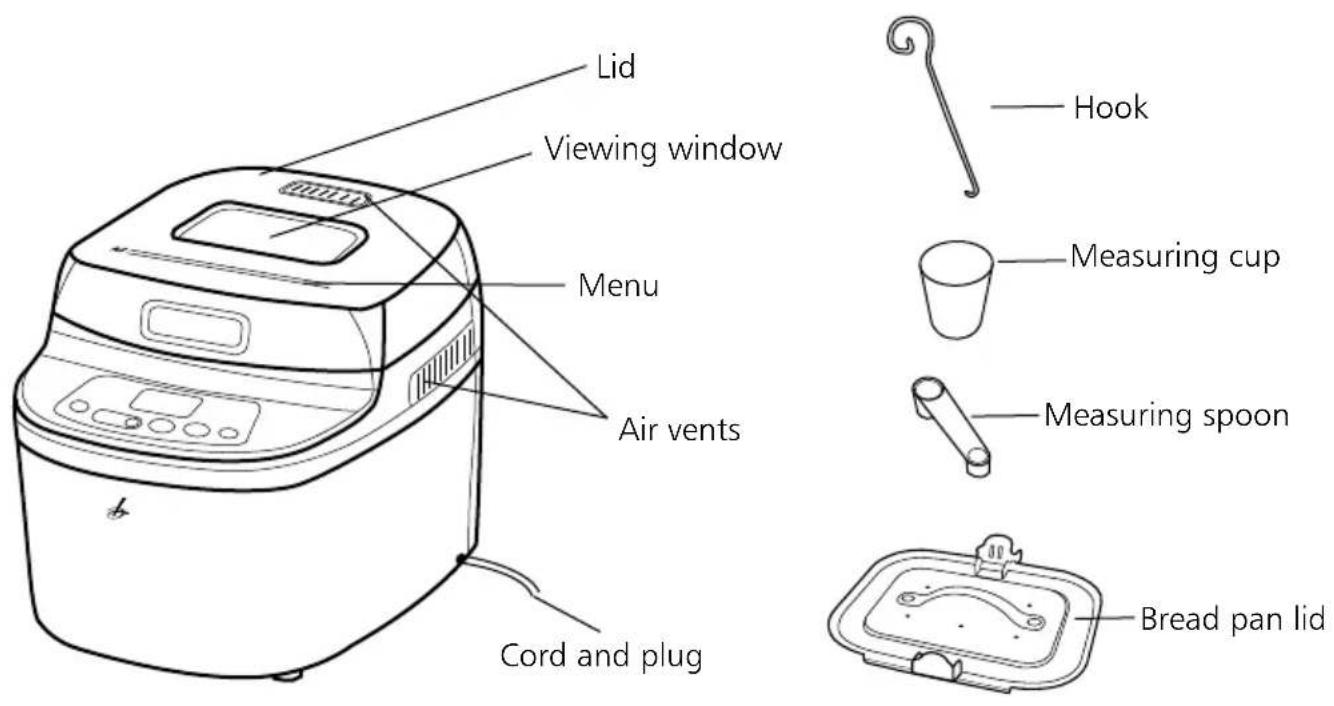
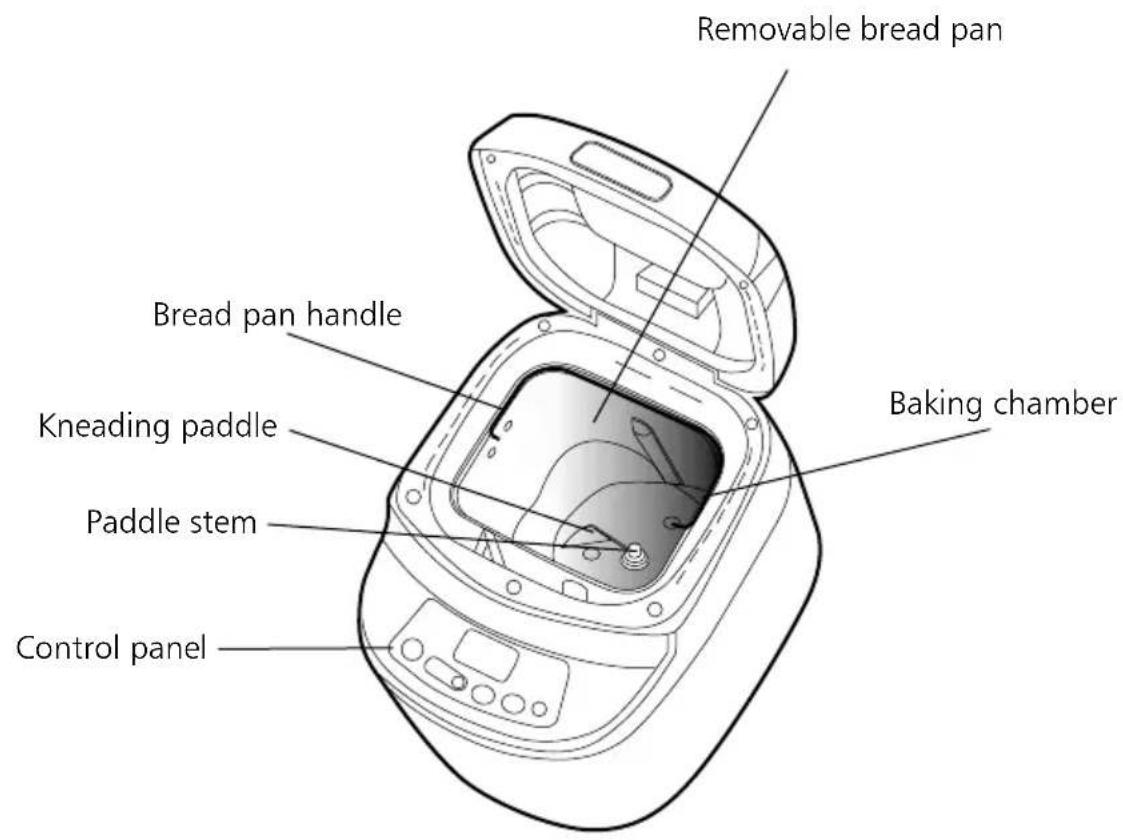
SAFETY CAUTIONS
Carefully read all the instructions before using the appliance and keep in a safe place for future reference. Always follow these safety cautions when using the appliance to avoid personal injury or damage to the appliance. This appliance should be used only as described in this instruction book.
- This appliance can be used by children aged from 8 years and above and persons with reduced physical, sensory or mental capabilities or lack of experience and knowledge if they have been given supervision or instruction concerning use of the appliance in a safe way and understand the hazards involved. Children shall not play with the appliance. Cleaning and user maintenance shall not be done by children unless they are older than 8 and supervised.
- Make sure your electricity supply matches the voltage shown on the appliance.
- Ensure all packaging materials and any promotional labels or stickers are removed from the appliance before the first use.
- Always inspect the appliance before use for noticeable signs of damage. Do not use if damaged or has been dropped. In the event of damage, or if the appliance develops a fault contact the Lakeland customer care team on 015394 88100.
- Do not use this appliance if the lead is damaged. If the lead is damaged it must be replaced with a special lead contact the Lakeland customer care team on 015394 88100.
- Always use the appliance on a dry, level, heat resistant surface.
- Unplug from the mains when not in use and before cleaning. Allow to cool before cleaning the appliance. To disconnect, turn the socket to "off" and remove the plug from the mains socket.
- Do not use any accessories or attachments with this appliance other than those recommended by Lakeland.
- To protect against fire, electric shock or personal injury, do not immerse cord, plug or unit in water or other liquids.
- Do not leave the lead hanging over the edge of a kitchen table or worktop. Avoid contact between the lead and hot surfaces.
- For indoor use only.
- For domestic use only.
- This appliance should be used for preparation of food as described within the instructions for use that accompany it.
- Always ensure that your hands are dry before removing the plug from the mains socket. Never pull the plug out of the mains socket by its lead.
- To avoid injury or possible fire, do not cover the appliance when in use.
- Do not connect this appliance to an external timer or remote control system.
- An extension cable may be used with care. The electrical rating of the cable should be at least as great as the appliance. Do not allow the cable to hang over the edge of the worktop or touch any hot surfaces.
- This appliance complies with the basic requirements of Directives 04/108/EC (Electromagnetic Compatibility) and 06/95/EC (Safety of Domestic Electrical Appliances)
- WARNING: A cut off plug inserted into a 13amp socket is a serious safety (shock) hazard. Ensure the cut off plug is disposed of safely.
- The surfaces of the appliance will be hot when in use and after use. DO NOT TOUCH these surfaces as possible injury could occur. Allow to cool completely before handling or moving this appliance.
- CAUTION: The plastic bags used to wrap this appliance or the packaging may be dangerous. To avoid risk of suffocation, keep these bags out of reach of babies and children. These bags are not toys.
- Do not operate empty unless the instructions advise otherwise e.g. for the first use.
- Do not touch any moving parts whilst in use.
- Do not lift or move the Bread Maker whilst in use or when still hot.
- Do not cover the Bread Maker or block the air vents when in use. Make sure the Bread Maker is positioned away from walls and other surfaces when in use, to allow plenty of air circulation around appliance.
- The bread pan and kneading paddle will be very hot after use – always use oven gloves to remove the hot bread pan from the oven chamber, and remove the paddle from your bread.
- The oven chamber will remain very hot after the bread pan has been removed, do not place hands inside and allow to cool completely with the lid open.
THE CONTROL PANEL
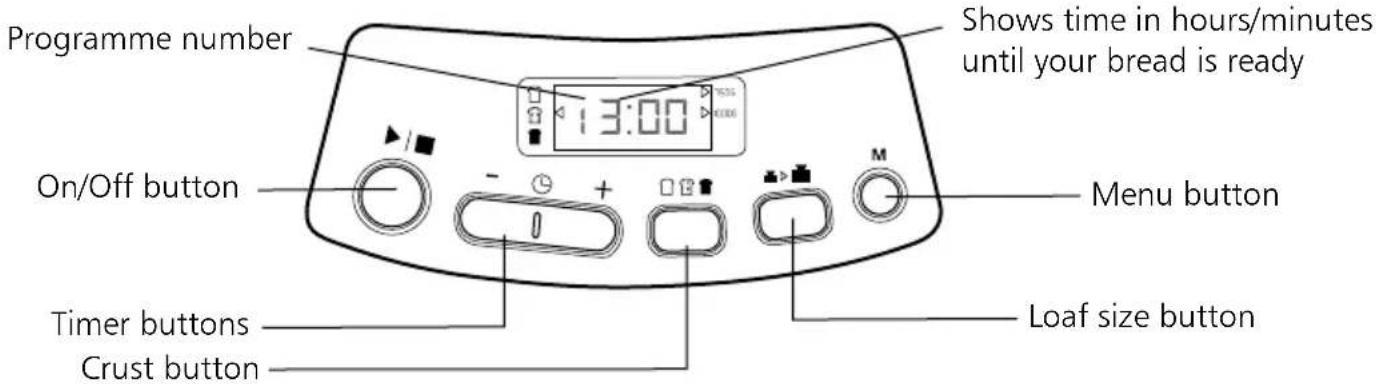
- Plug in and switch on the Small Space Bread Maker at the socket.
- The display screen will briefly illuminate and you will hear a beep.
- The display will look like the image above, showing the default setting of "1, 3:00".
ON/OFF BUTTON
- This button starts and stops the programme you have selected.
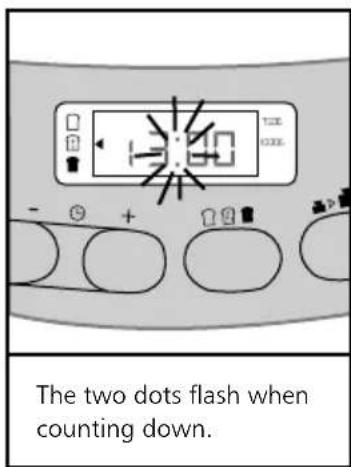
- Press this button to start. There will be a short beep and the two dots between the 'hour' and 'minute' on the display will flash, to show the programme has started.
- Press this button and hold until the maker bleeps to stop the programme. The display will go back to the default setting again.
MENU BUTTON
- This button sets the programme you have selected.
- Press this button repeatedly to scroll through each programme, using the menu on the lid as a guide. The maker will bleep each time and the programme number will show in the display screen.
• See 'Bread Maker Programmes' to help you select your programme.
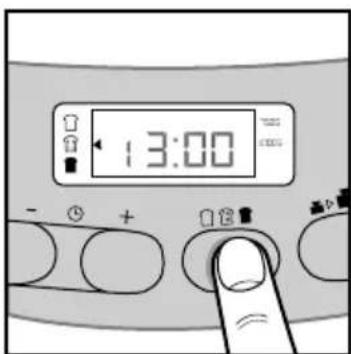
CRUST BUTTON
- This button allows you to select the colour you would like your crust.
- Press the button to select a light, medium or dark coloured crust, the arrow will move through the icons on the left hand side of the display.
- See the table of Bread Maker Programmes to see which you can use the crust button on.
LOAF SIZE BUTTON
- This button allows you to select the size of loaf you are baking.
- Press the button to select a 750 gram or 1000 gram loaf, the arrow will move between the sizes on the right hand side of the display.
• See the table of Bread Maker Programmes to see which you can use the size button on.
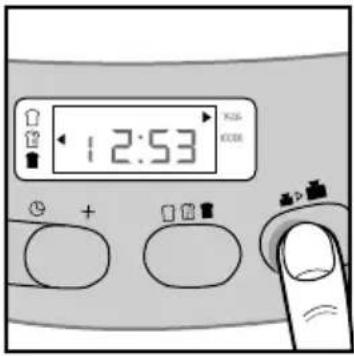
TIMER BUTTONS
• These buttons allow you to add time to the bread programme you are using. The timer can be set up to 13 hours in advance, so you can have a fresh loaf ready when you get up for breakfast.
- First, select your programme, size and crust. The time the programme takes will be shown in the display.
- Press “+ and -” to add additional time to when you would like your loaf ready. The time is set in 10 minute increments.
- For example, it is 8.30pm and you want your bread ready at 7am the following day, so in 10 hours and 30 minutes. Select your programme, and use the '+ and -' buttons to increase the time on the display to '10:30'.
- Press the on/off button to start the time counting down, the display will show the remaining time and the dots will flash.
- Note: Do not use the timer when using ingredients which may spoil like eggs, milk, cream or cheese.
• See the table of Bread Maker Programmes to see which you can use the timer on.
BREAD PAN LID
- You can clip this to your bread pan when using Programme 11 – SANDWICH to bake an evenly shaped loaf which is perfect for slicing. See page 32 Programme 11 – SANDWICH.
BEFORE USING BREAD MAKER FOR THE FIRST TIME
- When you switch on the Bread Maker for the first time there may be an slight burning smell, this is normal for a new heating element and will stop after a few uses.
- Wash the bread pan and kneading paddle in hot, soapy water, rinse and dry thoroughly.
- You will need to operate the Bread Maker empty for the very first use.
- Place the Bread Maker on a flat, dry surface.
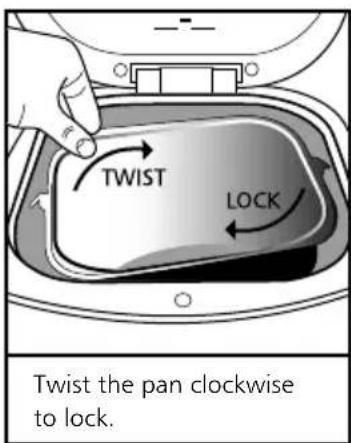
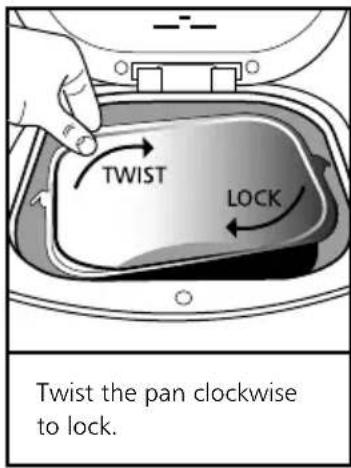
- Put the bread pan into the baking chamber, sitting the lock on the base onto the lock in the centre of the chamber at a slight angle. Twist it clockwise until it clicks into place.
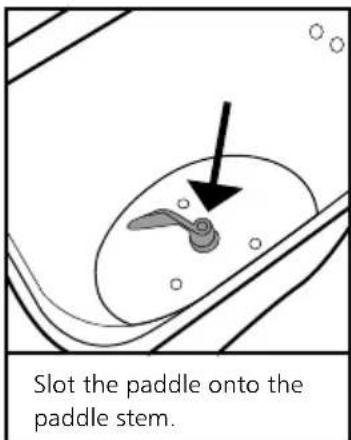
- Slot the kneading paddle onto the paddle stem inside the bread pad.
- Close the lid.
- Plug in and switch on at the socket.
- The Bread Maker will beep and the display screen will illuminate briefly and show the default setting '1 3:00'.
- Press the MENU button repeatedly and select Programme 12 – BAKE. The display will show '12 1:00'.
- Press and hold the on/off button to start the machine.
- The Bread Maker will begin to count down on the display screen. Leave it on for 10 minutes. You may hear some intermittent clicks during this time.
- Press and hold the on/off button to stop the programme after 10 minutes.
- Open the lid and allow the Bread Maker to cool completely.
- Lift out the paddle, then lift out the bread pan by holding the handle and twisting it anti-clockwise.
- Wash, rinse and dry the bread pan and kneading paddle again and replace.
- You are now ready to make your first loaf.
THE BREAD MAKER PROGRAMMES
PROCESSES
Knead - Two kneads are standard for most settings. The first knead will mix the ingredients.
Rise - These are periods of rising in which the unit will not be active except for the display counting down.
Bake - The loaf is in the final baking cycle. Baking time and temperature will be regulated according to the programme.
Here is a summary of each programme, the type bread it makes and the time it takes:
| Options | Timings of each process | |||||||
| Programme Type of Bread Cycle 1 | Size | Crust | Timer | Knead/Rise | Cycle 2 Knead/Rise | Bake Total | ||
| 1.BASIC For kneading, rising and baking normal white or brown bread. | ● | ● | 750g loaf | |||||
| 23min 90 | min 55-65 | min | 2hr48min-2hr58min | |||||
| 1000g loaf | ||||||||
| 25min 90 | min 60-70 | min | 2hr55min-3hr5min | |||||
| 2.FRENCH For kneading, rising and baking with a longer rise time. The bread will have a crisper crust and a lighter texture. | ● | ● | 750g loaf | |||||
| 23min 13 | 2min 60-70 | min | 3hr35min-3hr45min | |||||
| 1000g loaf | ||||||||
| 25min 13 | 5min 65-75 | min | 3hr45min-3hr55min | |||||
| 3. WHOLE WHEAT | For kneading, rising and baking bread made with whole wheat flours. Use this programme for all whole wheat, brown and granary loaves. It has a longer second rising time. | ● | ● | 750g loaf | ||||
| 22min 13 | 0min 55-65 | min | 3hr27min-3hr37min | |||||
| 1000g loaf | ||||||||
| 25min 13 | 0min 60-70 | min | 3hr35min-3hr45min | |||||
| 4. QUICK For kneading, rising and baking bread in a shorter time than the BASIC programme, but longer time than the ULTRA FAST programme. This programme has shorter rising times. It produces an excellent loaf with a slightly smaller denser texture than the BASIC programme. | - | ● | ● | 20min 45 | min 60-70 | min | 2hr05min-2hr15min | |
| 5. SWEET For kneading, rising and baking sweet bread. | • | • • | 750g loaf | |||||
| 25min 90 | min 50-60 | min | 2hr45min-2hr55min | |||||
| 1000g loaf | ||||||||
| 25min 90 | min 55-65 | min | 2hr50min-3hr | |||||
| 6. ULTRA-FAST For kneading, rising and baking in the shortest time. This programme has only one rise and one knead. Loaves require warm water, extra yeast and less salt. The loaf will be smaller with a denser texture than bread made using the QUICK programme. Ideal for very fast baking. | • | • • | 750g loaf | |||||
| 13min 30 | min 40-50 | min | 1hr23min-1hr33min | |||||
| 1000g loaf | ||||||||
| 13min 35 | min 45-55 | min | 1hr33min-1hr43min | |||||
| 7. GLUTEN FREE A special programme for gluten free flours and baking mixes. The programme has a long second rising time. The dough used is usually more like a batter, and is wetter than ordinary dough.We do not recommend using the timer on this programme. | • | • • | 750g loaf | |||||
| 25min 11 | 5min 50-60 | min | 3hr10min-3hr20min | |||||
| 1000g loaf | ||||||||
| 25min 11 | 5min 55-65 | min | 3hr15min-3hr25min | |||||
| 8. DOUGH This setting is for kneading and rising, with no bake function. Then remove the raw dough and shape it into rolls, pizzas etc. to oven bake in a conventional oven. | - - | - | 20min 70 | min 1hr30min | ||||
| 9. JAM For making jam and marmalade. This programme will produce approximately 400g of jam or marmalade. Ideal for using up smaller quantities of fruit. | - - | - | 15min 45 | min 20min | 1hr20min | |||
| 10. CAKE | Produces cakes and tea loaf recipes containing baking powder or baking soda and eggs, rather than yeast dough. This programme mixes and bakes the cake. Cakes will be smaller and denser than those baked in a conventional oven, but just as moist. | - | • | • | 16min 14 | min 50-60 | min | 1hr20min-1hr30min |
| 11. SANDWICH For | kneading, rising and baking light textured bread with a thinner crust - ideal for making sandwiches. | • | • • | 750g loaf | ||||
| 25min 95 | min 50-60 | min | 2hr50min-3hr | |||||
| 1000g loaf | ||||||||
| 25min 95 | min 55-65 | min | 2hr55min-3hr05min | |||||
| 12. BAKE This programme can be used with the DOUGH programme, when adding other ingredients. After making your dough, knead in the additional ingredients such as nuts, fruit. Then return the dough to the bread pan to BAKE. Leave the dough to rise for approximately 30 - 40 minutes.You can also use this programme to darken crusts if the finished loaf is too light at the end of another programme. Use the viewing window and take the loaf out of the machine when you are happy with the colour.You can also crisp and freshen bread using this programme. | - - - - - | 10-60 min | 10-60 min | |||||
MEASURING YOUR INGREDIENTS
One of the most important steps for making good bread is to use the exact measure of ingredients. Always use the measuring cup and spoon included with your Bread Maker.
If you prefer to use kitchen scales, metric measurements have also been included in our recipes.
- Any liquids should be measured with the measuring cup or spoon provided. Observe the level of the measuring cup and spoon at eye level, to ensure the quantities are precise.
- After measuring cooking oil or other liquids, wash, rinse and dry the measuring cup and spoon thoroughly before measuring any other ingredients.
- Dry measuring must be done by gently spooning ingredients into the measuring cup, then once filled, level off with a knife. Do not be tempted to add more of the ingredient than required, or to pack them down tightly into the cup as this will affect the recipe.
- The maximum quantity of flour you should use is 600g (or 4^2/3 cups). The maximum amount of yeast you should use is 5g (or 112 teaspoons).
- The measuring spoon measures 1 teaspoon (5ml) and 1 tablespoon (15ml). The measuring cup holds 230ml (130g).
PLACING YOUR INGREDIENTS INTO THE BREAD PAN
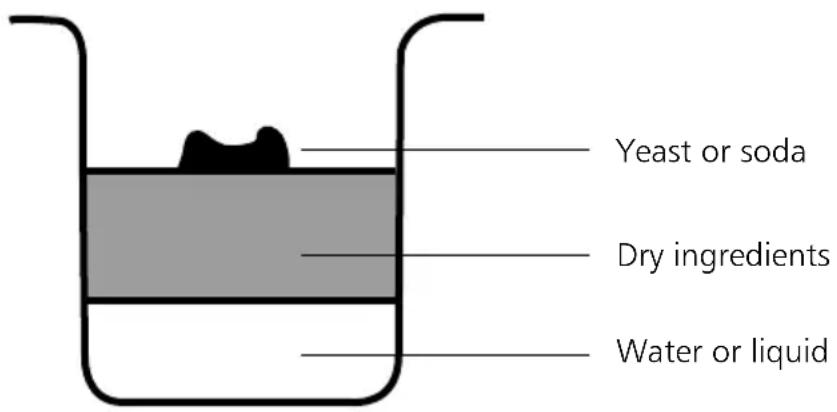
Ensure the ingredients are put into the Bread Maker in the exact order given in the recipe; or as follows:
- First, liquid ingredients at room temperature.
- Second, dry ingredients. Add the flour gently and make sure it is evenly distributed over the liquid. If you tip it onto the liquid too fiercely the liquid may seep up through the flour and affect the action of the yeast. This is particularly important if you are using the timer buttons to delay the Bread Maker.
- Lastly, yeast. The yeast must be kept separate from the wet ingredients and salt. Create a small hole in the dry ingredients using your finger or a spoon and place the yeast in the hole. Make sure the yeast is fresh – check the use by date.
Ensure the ingredients are at room temperature unless otherwise stated. Water should be cold unless the recipe states otherwise (e.g. the ULTRA-FAST programme).
INSTRUCTIONS FOR USE
Select your recipe. We suggest starting with the BASIC bread recipe we have included in this booklet.
-
Put the bread pan into the baking chamber, sitting the lock on the base onto the lock in the centre of the chamber at a slight angle. Twist it clockwise until it clicks into place.
-
Rub a little margarine or butter onto the kneading paddle before you slot it onto the paddle stem inside the bread pan. This prevents the dough from sticking to the paddle and makes it easier to remove the paddle from the bread after baking.
-
Add your ingredients to the Bread Pan in the order recommended in the recipe or in 'Placing your ingredients into the bread pan'. Close the lid.
Plug in and switch on at the socket.
-
The maker will beep and the display will illuminate briefly and show the default setting '1 3.00'.
-
Press the MENU button repeatedly to select your programme. Press the crust button to select your crust. Press the loaf size button to select your size. Set the timer if you need to change the time your loaf will be ready.
-
Press the on/off button to start. The programme will start. There will be a short beep and the two dots between the 'hour' and 'minute' on the display will flash.
The Bread Maker will work through each step of the bread making process until your loaf is completely baked. The time remaining until your loaf is ready will countdown on the display.
ALERT TO TELL YOU WHEN TO ADD EXTRA INGREDIENTS
Approximately 30 minutes into each programme (this varies depending on the programme); the machine will beep 10 times.
This alert tells you when you can add additional ingredients such as fruit, olives, nuts etc. (see 'A guide to adding flavourings' for ideas).
Open the lid, quickly add the ingredients and close the lid again.
-
Look at the dough through the viewing window after a few minutes, to make sure all the flour is incorporated into the dough. Sometimes flour may be left in the corners of the bread pan. If this happens, quickly open the lid and use a non stick spatula to loosen any flour, so it can be evenly mixed in.
-
When the programme cycle has finished, the Bread Maker will beep 10 times and the display will show '0:00'. Indicating that the machine is in keep warm mode.
KEEP WARM
The Bread Maker will automatically keep bread warm for serving for 60 minutes after it has finished baking if you do not switch the Bread Maker off.
This helps minimize moisture build up if the loaf is not removed from the Bread Maker immediately after baking.
This function does not work on Programme 8 – DOUGH and Programme 9 – JAM.
For best results, remove the bread as soon as the programme is complete and allow it to cool on a cooling rack.
-
To switch the Bread Maker off, press the on/off button and hold until the maker bleeps. The display will go back to the default setting (1 3:00). Switch off and unplug the socket.
-
Open the lid. Using an oven glove, hold the bread pan handle and turn the bread pan anti-clockwise to unlock and gently take the pan out of the machine.
-
Using oven gloves turn the bread pan upside down and gently shake the loaf onto a cooling rack. If the loaf does not fall out straight away gently loosen the sides of the loaf with a non stick spatula, knock the corner of the bread pan on a wooden board, or rotate the base of the paddle stem underneath the bread pan, to help release it.
-
The kneading paddle may have stayed in the loaf when you take it out of the bread pan. Use the hook supplied to remove the paddle from the loaf. Take care and use oven gloves as the paddle will be very hot.
-
Leave the loaf to cool for at least 20 to 30 minutes, to allow the steam to escape; the bread will be difficult to slice if hot.
The oven chamber will remain very hot after the bread pan has been removed. Do not place hands inside, and allow it to cool completely with the lid open.
STORING BREAD
Home-made bread does not contain any preservatives, so it should be eaten within 2 to 3 days of baking. If you are not eating it immediately, wrap it in foil or put it in a plastic bag and seal.
Crispy, French-style bread will soften when stored so it is best left uncovered until sliced.
If you are freezing your bread, slice the loaf beforehand so you can defrost slice by slice as you need it.
PROGRAMME BACKUP
If the power is accidentally switched off, or there is a power failure when the Bread Maker is in use, it will 'remember' where it is up to in the programme cycle for up to 10 minutes.
When power is resumed the Bread Maker will continue automatically.
This function does not work beyond 10 minutes, please discard your ingredients and start the programme again. If the programme has not yet started the 'rising' process, you can press the on/off button to start the programme again from the beginning.
A GUIDE TO FLOURS AND OTHER INGREDIENTS
The main ingredient in bread making is flour, so selecting the right one is the key to a successful loaf.
WHEAT FLOURS
Wheat flours make the best loaves. Wheat consists of an outer husk, often referred to as bran, and an inner kernel which contains the wheat germ and endosperm. It is the protein within the endosperm which, when mixed with water, forms gluten. Gluten stretches like elastic and the gases given off by the yeast during fermentation are trapped, making the dough rise.
STRONG WHITE BREAD FLOURS
These flours have the outer bran and wheat germ removed, leaving the endosperm which is milled into a white flour. It is essential to use strong white flour or white bread flour when making bread because this has a higher protein level essential for the development of the gluten. Do not use ordinary plain white flour or self raising flour for making yeast risen breads in the Bread Maker, because you will not get a good result. There are several brands of white bread flour in the shops – look for STRONG or BREAD flour on the bag.
STRONG WHOLEMEAL OR WHOLE WHEAT BREAD FLOURS
Wholemeal flours include the bran and wheat germ and have a nutty flavour. Wholemeal flour gives a courser textured bread. Look for STRONG wholemeal bread flour in the shops. If you make a loaf using just wholemeal flour it will be denser than a white loaf. Wholemeal dough rises slowly, which is why there is a special programme on this machine. For a lighter loaf replace part of the wholemeal flour with a white flour.
STRONG GRANARY BREAD FLOURS
A combination of white, wholemeal and rye flours with malted whole wheat grains, which adds texture and flavour. You can use this on its own or in combination with strong white flour.
NON WHEAT FLOURS
Other flours such as rye can be used with white and wholemeal bread flours to make traditional breads like pumpernickel or rye bread. Adding even a small amount can add an interesting tang to your loaf. Do not use these flours on their own or the dough will be very sticky and the loaf will be heavy and very dense.
OTHER GRAINS
Other grains, for example millet, barley, buckwheat, cornmeal and oatmeal cannot be used alone to make bread but they can be added in small quantities to white bread flour. Try these by replacing 10 to 20% of white bread flour in your recipe with these other grains.
SALT
A small quantity of salt is essential for bread making. It helps to develop the dough and gives flavour. Use fine table salt or sea salt rather than course ground salt (keep this for sprinkling on top of hand shaped rolls to give a crunchy texture).
Low salt substitutes are best avoided as most do not contain sodium.
Salt strengthens the gluten structure and makes the dough more elastic. It inhibits the growth of yeast to prevent over-rising and stops the dough collapsing.
Take care to add the correct amount as too much salt will kill the yeast or prevent it rising sufficiently.
SWEETENERS
Use white or brown sugars, honey, malt extract, golden syrup, maple syrup, molasses or treacle to sweeten your recipes when using Programme 5 – SWEET.
Sugar and liquid sweeteners help with the colour of the bread and add a golden colour to the crust. Sugar also attracts moisture which improves the keeping quality of the bread.
Sugar provides food for the yeast. It is not essential as modern types of dried yeast are able to feed on the natural sugars and starches found in the flour but it will help to make the dough more active.
If you are substituting a liquid sweetener for sugar then the total liquid quantity of the recipe will need to be reduced slightly.
FATS AND OILS
A small amount of fat or oil will give a softer crumb and helps to extend the freshness of the loaf. Use butter, margarine or lard in small quantities. Do not use low fat spreads as they contain up to 40% water and can affect the overall quantities in your recipe.
LIQUID
Some form of liquid in your recipe is essential. Usually water or milk is used, water gives a crisper result. Water can be combined with skimmed milk powder. If using the time delay it important to use water and skimmed milk powder as ordinary milk will deteriorate if it is left to stand for too long.
For most programmes you can use water straight from the tap, but use warm water if you are using Programme 6 – ULTRA-FAST.
- If your tap water is very cold, leave it to stand and warm up to room temperature for 30 minutes before use.
- Don't use milk straight from the fridge, leave it to stand and warm up to room temperature for 30 minutes before use.
- Buttermilk, yoghurt, sour cream and soft cheeses such as ricotta, cottage or fromage frais can all be used as part of the liquid content and will give a moister crumb.
- Eggs can be added to enrich your dough. They will also improve the colour and add structure and stability to the gluten during rising. If using eggs, reduce the liquid content accordingly. Place the egg inside the measuring cup and top it up with the rest of the liquid to the correct level for the recipe.
YEAST
All the recipes in this book have been written using easy blend; fast action yeast which does not require dissolving in water first, is very easy to use and tends to give better results. Place the yeast in a well in the flour, to keep it dry and separate from the liquid until mixing starts.
- For best results use easy blend, fast action yeast.
- Only use the amount of yeast stated in the recipe. If too much is added it will cause the dough to spill out over the top of the bread pan.
- Once a sachet of yeast is opened it should be used within 48 hours.
• Always use yeast before its use by date. - When using dried yeast that has been specially designed for use in bread makers, always follow the instructions on the packet.
PACKET BREAD MIXES
You can use packet bread mixes in the Small Space Bread Maker. Instructions for use will be on the packet. Make sure you do not exceed the maximum amount of ingredients the Bread Maker can work with; the maximum amount of flour you can use is 600g (4 ^2/_3 cups).
Do not use bread mixes with the timer buttons. These will not work as you cannot separate the yeast from the liquid.
A GUIDE TO ADDING FLAVOURINGS
You can add different flavours and ingredients to make a wide variety of delicious breads. For example nuts, seeds, fresh or dried herbs, sun dried tomatoes, olives, fruit or chocolate.
There are several ways you can add these:
1. AT THE VERY START, WITH THE MAIN INGREDIENTS
If you add the ingredients at the start, they will be very finely distributed throughout the bread because they will be subjected to each vigorous bread making cycle.
For example, if you add sun dried tomatoes at the start you will not have pieces of tomato in the dough; you will lose the texture of the tomatoes but will get an attractive coloured bread with a delicious flavour and aroma.
Foods such as herbs and small seeds e.g. sunflower, sesame, poppy seeds or cheese, can be added at the start because they will not lose their texture in the same way.
2. BEFORE THE FINAL KNEADING, RISING AND BAKING CYCLE
Approximately 30 minutes into each programme (this varies depending on the programme); the machine will beep 10 times. Open the lid, quickly add the ingredients and close the lid again.
Ingredients added at this point will be distributed throughout the dough and retain more of their shape and texture. You can add additional ingredients such as fruit, olives or nuts.
3. USE THE DOUGH AND THEN THE BAKE PROGRAMMES.
Make your dough using Programme 8 – DOUGH, and then place your dough on a lightly floured board. Remove the kneading paddle and put it back onto the paddle stem inside the bread pan (take care it will be hot). Then manually fold in your additional ingredients, reshape the dough and return to the bread pan.
Close the lid and leave the dough to rise for 30 to 40 minutes.
Now select Programme 12 – BAKE to finish the loaf, or you can bake the loaf in your conventional oven.
The ingredients will retain their shape and texture.
Note: You can add some ingredients at the very start to add an overall flavour and colour to the dough, and keep some to add later in the cycle so the finished bread has some bigger pieces.
If you are using the timer to delay your programme, you will need to put all the ingredients into the bread pan at the beginning. You will also need to consider the moisture content of additional ingredients. Juicy dried apricots or roasted red peppers may add as much as a tablespoon of juice as they go through the kneading process. Also, too much sugar can interfere with the action of yeast, so high sugar additives like candied peel should be added later in the kneading cycle.
ADAPTING YOUR OWN RECIPES
After you have made some of the recipes supplied you may wish to adapt a few of your own recipes. Start by selecting one of the recipes in this booklet, which is similar to your own and use this as a guide.
Here are some guidelines, but be prepared to make adjustments as you go along.
- Make sure you use the correct quantities for the Bread Maker. This Bread Maker makes a 750g or a 1000g loaf. Do not exceed the recommended maximum. If using your own recipe books always use the quantities given for a 750g or a 1000g loaf size.
- The maximum quantity of flour you should use is 600g (or 4^2/3 cups). The maximum amount of yeast you should use is 5g (or 112 teaspoons).
- Always ensure the ingredients are put into the Bread Maker in the exact order given in the recipe, or in 'Placing your ingredients into the bread pan.'
- To replace fresh yeast in a recipe with easy blend dried yeast use 1 teaspoon (5ml) of dried yeast for 6g of fresh yeast.
- Use skimmed milk powder and water instead of fresh milk of you are delaying the start time on your programme.
- If your recipe uses eggs, add the egg as part of the total liquid measurement unless the recipe states otherwise.
- Check the consistency of the dough during the first few minutes of the Bread Maker starting mixing. Bread makers require slightly softer dough so you may have to add extra liquid. The dough should be wet enough to gradually relax back when you shape it.
HINTS AND TIPS
- The Bread Maker is not a sealed unit and will be affected by the temperature and humidity of the room. If it is a very hot day or the machine is used in a hot kitchen, then the bread is likely to rise more than if it is cold.
- On very cold days let the water from the tap stand at room temperature to warm up for 30 minutes before use. Likewise for ingredients from the fridge.
- Use all the ingredients at room temperature, and cold water unless stated in the recipe.
- Add the ingredients to the bread pan in the order suggested in the recipe. Keep the yeast dry and separate from any other liquids added to the pan, until mixing commences.
- Accurate measuring is vital for a successful loaf. Follow either metric or imperial measurements, do not mix the two. Use the measuring cup and spoon included or use accurate kitchen scales.
- Always use fresh ingredients, within their use by date. Perishable ingredients such as milk, cheese, vegetables and fresh fruits may deteriorate, especially in warm conditions. These should only be used in breads which are being made immediately.
- Do not add too much fat as it forms a barrier between the yeast and flour, slowing down the action of the yeast, which could give a heavy, dense loaf.
- Cut butter and other fats into small pieces before adding to the bread pan.
- Give the kneading paddle a light coating of oil or butter; this will make it easier to remove if it bakes into the loaf.
RECIPES
The Small Space Bread Maker makes a 750g and a 1000g loaf. Use the measuring cups and spoons included, or weigh ingredients using your kitchen scales following quantities accurately.
The measuring spoon measures 1 teaspoon (5ml) and 1 tablespoon (15ml). The measuring cup holds 230ml (130g).
These lists of ingredients also show the sequence the ingredients need to be added to the bread pan.
Programme 1 - BASIC BREAD
| Ingredients 750g | 1000g | ||
| Water | 300ml | 380ml | |
| Oil 112 tablespoons | 112 tablespoons | ||
| Salt 112 teaspoons | 112 teaspoons | ||
| Strong white bread flour | 450g, 312 cups | 600g, 4 | ^2/_3 cups |
| Milk powder | 4 teaspoons | 5 teaspoons | |
| Caster sugar | 1 tablespoon | 4 teaspoons | |
| Easy blend yeast | 112 teaspoons | 112 teaspoons | |
Additional ingredient suggestions – see 'A guide to adding flavourings'.
| Nuts e.g. walnuts | 25g | 30g | |
| Poppy seeds | 15g | 25g | |
| Cheese, grated | 50g | 75g | |
| Sunflower seeds | 25g | 50g | |
| Seeds e.g. fennel, caraway, cumin | 15g | 25g |
Follow the steps in 'Instructions for use', selecting Programme 1 – BASIC from the menu, and the loaf size and crust you require.
Programme 2 – FRENCH
| Ingredients | 750g | 1000g | |
| Water | 310ml | 400ml | |
| Salt 1 12 teaspoons | 1 12 teaspoons | ||
| Strong white bread flour | 450g, 3 12 cups | 600g, 4 | ^2/_3 cups |
| Caster sugar | 2 teaspoons | 2 teaspoons | |
| Easy blend yeast | 1 12 teaspoons | 1 12 teaspoons | |
Follow the steps in 'Instructions for use', selecting Programme 2 – FRENCH from the menu, and the loaf size and crust you require.
Programme 3 – WHOLE WHEAT
| Ingredients | 750g | 1000g | |
| Water | 310ml | 380ml | |
| Oil 1 tablespoon | 1 tablespoon | ||
| Lemon juice | 1 tablespoon | 1 tablespoon | |
| Salt 2 teaspoons | 2 teaspoons | ||
| Strong wholemeal bread flour | 425g, 3^1/4 cups | 500g, 3^3/4 cups | |
| Strong white bread flour | 80g, | ^2/_3 cup | 100g, ^3/_4 cup |
| Milk powder | 4 teaspoons | 5 teaspoons | |
| Caster sugar | 1 tablespoon | 1 tablespoon | |
| Easy blend yeast | 1 teaspoon | 1 teaspoon | |
Additional ingredient suggestions – see 'A guide to adding flavourings'.
| Nuts e.g. walnuts | 25g | 30g | |
| Poppy seeds | 15g | 25g | |
| Cheese, grated | 50g | 75g | |
| Sunflower Seeds | 25g | 50g | |
| Seeds e.g. fennel, caraway, cumin | 15g | 25g |
Follow the steps in ‘Instructions for use’, selecting Programme 3 – WHOLE WHEAT from the menu, and the loaf size and crust you require.
Programme 4 – QUICK
GINGERBREAD
| Ingredients | Quantity |
| Butter, cut into pieces | 100g |
| Golden syrup | 110g |
| Black treacle | 45g |
| Soft light brown sugar | 110g |
| Milk | 160ml |
| Egg, medium | 1 |
| Plain flour | 260g, 2 cups |
| Ground ginger | 112 teaspoons |
| Baking powder | 112 teaspoons |
| Bicarbonate of soda | 34 teaspoon |
| Walnuts, chopped | 45g |
- Put the butter, syrup, treacle and sugar in a small saucepan. Heat gently over a low heat, until melted.
- Pour into the bread pan and add the milk and egg.
- Sift together the flour, ginger, baking powder and bicarbonate of soda, and add them to the pan. Put the walnuts on top.
- Close the lid, press the menu button and select Programme 4 – QUICK, and a light crust. Press the on/off button to start.
- A few minutes into the programme, open the bread pan lid and run around the sides of the bread pan with a non-stick spatula, to ensure the ingredients are evenly mixing. Close the lid.
- At the end of the programme, lift out the bread pan using oven gloves and turn the Gingerbread out onto a cooling rack.
The Gingerbread improves as it is stored, keep in an airtight tin.
Programme 5 – SWEET
CRANBERRY, ORANGE AND NUT BREAD
| Ingredients | 750g |
| Water 170ml | |
| Natural yoghurt 140ml | |
| Salt 1 teaspoon | |
| Strong white bread flour 425g, 314 cups | |
| Ground almonds 50g | |
| Orange rind, grated 1 | |
| Caster sugar 50g | |
| Easy blend yeast 112 teaspoons | |
| Pecan nuts, roughly chopped 40g | |
| Dried cranberries 25g | |
Follow the steps in 'Instructions for use', selecting Programme 5 – SWEET, from the menu, medium crust and loaf size 750g.
Programme 6 – ULTRA FAST
| Ingredients | 750g | 1000g |
| Water – warmed to 32° - 35°C 310ml | 380ml | |
| Oil 1 12 tablespoons 1 12 tablespoons | ||
| Salt 1 12 teaspoons 1 12 teaspoons | ||
| Strong white bread flour 450g, 3 12 cups | 600g, 4 | ^2/_3 cups |
| Milk powder | 1 tablespoon | 2 tablespoons |
| Caster sugar 1 tablespoon | 4 teaspoons | |
| Easy blend yeast 1 12 teaspoons | 1 12 teaspoons |
Follow the steps in 'Instructions for use', selecting Programme 6 – ULTRA-FAST from the menu, and the loaf size and crust you require.
Ensure you use warm water (32°C - 35°C) for this recipe.
Programme 7 – GLUTEN FREE
| Ingredients | 750g | 1000g |
| Milk – warmed to 32°C - 35°C 310ml | 400ml | |
| Oil – warmed with the milk 100ml | 130ml | |
| Eggs, medium | 2 | 3 |
| Salt 1 teaspoon 114 teaspoons | ||
| Cider vinegar 1 teaspoon 114 teaspoons | ||
| Gluten free white bread flour blend 450g, 312 cups | 600g, 4 | ^2/_3 cups |
| Caster sugar 2 tablespoons 212 tablespoons | ||
| Easy blend yeast 2 teaspoons 212 teaspoons | ||
- Pour the milk and oil into a small saucepan and heat gently until the temperature reaches 32^ - 35^ . Pour into the bread pan.
- Add the eggs, salt and vinegar.
- Add the flour, sugar and yeast, close the lid.
- Press the menu button and select Programme 7 – GLUTEN FREE, and the loaf size and crust you require. Press the on/off button to start.
- A few minutes into the programme, open the bread pan lid and run around the sides of the bread pan with a non-stick spatula, to ensure the ingredients are evenly mixing. Close the lid.
- At the end of the programme, lift out the bread pan using oven gloves and turn the bread out onto a cooling rack.
Programme 8 - DOUGH
MEDITERRANEAN FIESTA PIZZA
Ingredients
Base
| Water 140ml |
| Oil 1 tablespoon |
| Salt 1 teaspoon |
| Strong white bread flour 225g, 134 cups |
| Caster sugar 12 teaspoon |
| Easy blend yeast 12 teaspoon |
Topping
| Tomato purée 4 tablespoons | |
| Dried oregano 2 teaspoons | |
| Tomatoes, sliced 4 large | |
| Cheddar cheese, grated 125g | |
| Mozzarella, sliced 125g | |
| Ham, torn into strips 4 slices | |
| Pitted black olives 10 | |
| Olive oil | drizzle |
- Put all of the Base ingredients into the bread pan, in the order listed.
- Close the lid, press the menu button and select Programme 8 – DOUGH. Press the on/off button to start.
- When the programme has finished, tip the dough onto a lightly floured board and pull out the kneading paddle with the hook.
- Preheat your oven to 220^ C, or fan oven to 200^ C/ 425^ F. Grease a large baking tray.
- Place the dough on the tray and gently stretch the dough out to fit. Pinch up the edges to make a lip around the pizza base.
- Spread the tomato purée over the dough and sprinkle with the oregano.
- Add the tomato slices, sprinkle on the grated cheese, then arrange the mozzarella, ham and olives on top.
- Drizzle your pizza with a little olive oil and place in the preheated oven for 20 -25 minutes, or until well risen and golden.
Programme 9 – JAM
RASPBERRY JAM – makes approx. 1 x 400g jar
Ingredients Quantity
Fresh raspberries 300g
Preserving sugar 300g
Lemon Juice of 1 large
ORANGE MARMALADE – makes approx. 1 x 400g jar
Ingredients Quantity
Oranges, finely shredded zest, 4 large roughly chopped flesh and juice
Preserving sugar 300g
Lemon juice 1 large
Liquid pectin 4 tbsp
- Put all the ingredients for the jam or marmalade into the bread pan.
- Close the lid, press the menu button and select Programme 9 – JAM. Press the on/off button to start.
- When the programme has finished, leave the jam or marmalade to stand for 10 minutes. Remove the bread pan with oven gloves and carefully pour it into a sterilised jar. Seal and label.
Programme 10 – CAKE
CHOCOLATE AND ALMOND CAKE
Ingredients Quantity
Oil 135ml, plus a little for greasing
| Milk | 135ml |
| Soft light brown sugar 135g | |
| Black treacle 2 teaspoons | |
| Eggs, medium 2 | |
| Self raising flour 170g, 1 | ^1/_3 cups |
| Baking powder ^1/_4 teaspoon | |
| Cocoa powder 70g | |
| Ground almonds 45g |
CHOCOLATE BUTTER CREAM FILLING
Ingredients Quantity
Butter, softened 75g
Icing sugar, sifted 175g
Plain chocolate, melted 40g
Walnuts, halved 3
- Lightly grease the bread pan with a little oil. Add the rest of the oil, milk, sugar, treacle and eggs.
- Sift together the flour, baking powder and cocoa and add them to the bread pan. Sprinkle the almonds on top of the mixture.
- Close the lid, press the menu button and select Programme 10 – CAKE, press the crust button to select a light crust. Press the on/off button to start.
- For the filling, cream the softened butter. Gradually beat in the icing sugar and add the chocolate. Mix together well.
- At the end of the programme, lift out the bread pan with oven gloves and turn the cake out onto a cooling rack. Leave the cake to cool completely. If you prefer your cake cooked further, select the Programme 12 – BAKE and cook for a further 10-12 minutes.
- Cut the cake in half and spread half of the filling in the middle, sandwich the cake together and spread the rest of the filling on top. Top with the walnut halves.
Programme 11 – SANDWICH
| Ingredients | 1000g |
| Water | 360ml |
| Butter, melted 2 tablespoons | |
| Salt 2 teaspoons | |
| Caster sugar 2 tablespoons | |
| Milk powder 2 tablespoons | |
| Strong white bread flour 600g, 4 | ^2/_3 cups |
| Easy blend yeast 1 teaspoon |
- Follow the steps in 'Instructions for use', selecting Programme 11 – SANDWICH from the menu, loaf size 1000g and the crust you require. Press the on/off button to start.
- Use the bread pan lid to bake an evenly shaped loaf which is perfect for sandwiches. Add the bread pan lid, when you have put your ingredients into the bread pan.
Programme 12 – BAKE
| Ingredients | |
| Water | 140ml |
| Oil 1 tablespoon | |
| Salt 1 teaspoon | |
| Strong white bread flour 225g, 1^3/_4 cups | |
| Caster sugar 12 teaspoon | |
| Easy blend yeast 12 teaspoon | |
- Put the ingredients into the Bread Pan. Close the lid, press the menu button and select Programme 8 – DOUGH. Press the on/off button to start.
- At the end of the programme, using oven gloves tip the dough onto a lightly floured board and pull out the kneading paddle with the hook.
- Place the bread pan back into the Bread Maker, without the paddle.
- Shape the dough into 4 rolls, and place them evenly in bottom of the bread pan.
Close the lid, press the menu button and select Programme 12 – BAKE, and the crust you require. Press the on/off button to start.
- At the end of the programme, lift out the bread pan using oven gloves and turn the rolls out onto a cooling rack.
TROUBLESHOOTING
The following are some common problems that can occur when using the Small Space Bread Maker. Please review the problems, their possible cause and any corrective action that should be taken.
| Problem Possible cause Solution | ||
| Loaf size and shape | ||
| The bread has not risen enough. Wholemeal breads will not rise as well as white breads because they contain less gluten.There is not enough liquid in the recipe.Sugar has been left out of the recipe or not enough has been added.The wrong type of flour has been used.The wrong type of yeast has been used.Not enough yeast has been added or the yeast is too old.The liquid used was too hot or too cold, and the yeast was killed or not activated.The yeast and sugar came into contact with each other before the kneading cycle.The lid was opened during the rising cycle which allowed warm air to escape. | This is normal for these different flours.Increase the liquid content by 15ml/3 tsp.Add the ingredients as listed in the recipe. If you are making sweet bread, reduce the sugar content slightly if you are adding other sugary ingredients such as candied fruits etc.You may have used ordinary flour instead of strong bread flour – check the flour.For best results use fast action “easy blend” yeast.Check you have used accurate measurements and check the use by date on packet.Check the liquids are at room temperature before use.Make sure the yeast and sugar remain separate when added to the bread pan.Do not open lid during rising. | |
| The loaf is flat and hasn’t risen. The yeast has been left out of the recipe.The yeast is too old.The liquid was too hot.Too much salt was added. The salt came into contact with yeast, or the timer was used and the yeast became wet before the Bread Maker started. | Check ingredients have been used as listed in the recipe.Check the use by date on the packet.Use liquids at room temperature, unless otherwise stated in your recipe.Add the ingredients to the bread pan in the correct order making sure the yeast and liquid ingredients stay separate from each other. | |
| The top of the loaf is inflated, it looks like a mushroom. | Too much yeast has been usedToo much sugar has been used.Too much flour has been used.Not enough salt has been used.The Bread Maker has been used in warm, humid weather. | Reduce the yeast by 1/4 tsp.Reduce the sugar by 1 tsp.Reduce the flour by 6 – 8 tsp.Use the correct amount of salt in the recipe.Reduce the liquid by 15ml/3 tsp and the yeast by 1/4 tsp. |
| The top and the sides of the loaf have caved in. | Too much liquid has been used.Too much yeast has been used.High humidity and warm weather may have caused the dough to rise too much. | Reduce the liquid by 15ml/3 tsp or add a little extra flour.Use the correct amount of yeast in the recipe or try a quicker programme next time.Chill the water or add milk straight from the fridge. |
| The top of the loaf is not smooth, it's rough and uneven. | Not enough liquid has been used.Too much flour has been used. | Increase the liquid by 15ml/3 tsp.Measure the flour in your recipe accurately. |
| The loaf collapsed while it was baking. | The Bread Maker may have been placed in a draught or been knocked during rising.The recipe quantity is above the capacity of the bread pan.Not enough salt has been used or it has been left out.Too much yeast has been used.The Bread Maker has been used in warm, humid weather. | Reposition the Bread Maker.Use the recommended amount of ingredients.Use the correct amount of salt.Measure the yeast carefully.Reduce the liquid by 15ml/ 3 tsp and reduce the yeast by 1/4 tsp. |
| The loaf is uneven and shorter at one end. | The dough is too dry. Increase the liquid by 15ml/3 tsp. | |
| Bread texture | ||
| The loaf has a heavy, dense texture. | Too much flour has been used.Not enough yeast has been used.Not enough sugar has been used. | Ensure you accurately measure the ingredients in the recipe. |
| The load has an open, course texture, it has air holes in it. | Salt has been left out.Too much yeast has been used.Too much liquid has been used. | Use the ingredients listed in the recipe.Measure the yeast accurately.Reduce the liquid by 15ml/3 tsp. |
| The centre of the loaf is raw, and not baked enough. | Too much liquid has been used.There has been a power cut during the programme cycle.The ingredient quantities used have been too large for the maker. | Reduce the liquid by 15ml/3 tsp.For power cuts lasting more than 10 minutes, you will need to discard the unbaked ingredients and start again with fresh ingredients.Only use the maximum quantities recommended for the maker. |
| The bread does not slice well and is sticky. | It is being sliced whilst still hot.The wrong type of knife is being used. | Let the bread cool for at least 30 minutes to allow steam to escape before slicing.Use a good quality bread knife. |
| Crust colour and thickness | ||
| The crust it too dark and too thick. The DARK crust setting has been used. | Use the MEDIUM or LIGHT setting next time. | |
| My loaf is burnt. The Bread Maker has developed a fault. | Contact the Lakeland customer care team on 015394 88100. | |
| The crust is too light. The bread has not been baked long enough.The LIGHT crust setting has been used. | Carry out a Programme 12 – BAKE cycle to darken the crust.Use the DARK or MEDIUM setting next time. | |
| Bread pan problems | ||
| The kneading paddle cannot be removed from pan. | Add water to the bread pan to cover the kneading paddle, and leave it to soak for 10 minutes. | Twist the kneading paddle after soaking to loosen, and remove. |
| My bread is stuck to the pan, or is difficult to shake out. | Loosen the sides of the loaf with a non stick spatula, knock the bread pan on a wooden board, or rotate the base of the paddle stem underneath the bread pan.Lightly wipe the inside of the bread pan with vegetable oil before next use. | |
| Bread Maker | ||
| The Bread Maker is not working, the kneading paddle is not moving. | The Bread Maker is not switched on at the socket.The bread pan not correctly locked in position.The timer has been set. | Check the socket is switched on, and the on/off button has been pressed.Check the pan is twisted onto the bread pan lock correctly.The Bread Maker will not start until the start time for the programme is reached. |
| The ingredients have not mixed. The | Bread Maker as not started.The kneading paddle was not put into the bread pan. | After selecting the programme, press the on/off button to start.Always make sure the kneading paddle is slotted correctly onto the paddle stem inside the bottom of the bread pan before adding ingredients. |
| There is a burning odour when I start the Bread Maker. | Ingredients have spilled from the bread pan into the Bread Maker. | Take care when adding ingredients into the bread pan. They will burning inside the baking chamber. |
| Warnings on the display | ||
| The display shows “H HH” and bleeps continuously. | The temperature inside the Bread Maker is too high – machine still hot after the previous baking procedure. | Stop the programme, open the lid and allow the Bread Maker to cool down for 10 – 20 minutes. |
| The display shows “L LL” and bleeps continuously. | The temperature inside the Bread Maker is too low. | Stop the programme, open the lid and allow the Bread Maker to return to room temperature for 10 – 20 minutes. |
| The display shows “E EO” or “E E1”. | The temperature sensor inside the Bread Maker has developed a fault. | Contact the Lakeland customer care team on 015394 88100 for advice. |
CARE AND CLEANING
- Unplug the Bread Maker and allow it to cool completely before cleaning.
- Before the first use and after every use, clean each part thoroughly.
- Periodically check all parts before reassembly.
- Do not use metal tools inside the non-stick bread pan – always use plastic, wooden, nylon or silicone spatulas.
- To clean the Bread Maker and display, wipe with a clean, damp cloth and dry before storing.
- Never immerse the unit in water or any other liquid.
- Wash the bread pan, lid, kneading paddle, measuring cup and spoon in hot, soapy water. Rinse and dry thoroughly.
- Do not use abrasive cleaners or materials, steel wool or cleansers.
- The bread pan, lid, kneading paddle are dishwasher safe.
- If the kneading paddle is difficult to remove from the bread pan, fill the pan with warm soapy water to cover the paddle, and leave it to soak for 10 – 15 minutes to loosen. If it still cannot be removed, hold the paddle stem from underneath the pan and twist back and forth until the paddle is released.
- To clean the baking chamber, remove any crumbs by tipping them out or wiping them away with a clean damp cloth.
- If food residue is burnt onto the heating element, allow the element to cool completely, and then wipe it with a clean damp cloth.
- Store the Bread Maker with the power cable loosely coiled. Never wrap it tightly around the Bread Maker.
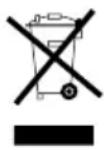
RECYCLING YOUR ELECTRICALS
Along with many other high street retailers, Lakeland has joined a scheme whereby customers can take their unwanted electricals to recycling points set up around the country.
Visit www.recycle-more.co.uk to find your nearest recycling point.
ELECTRICAL CONNECTIONS
THIS APPLIANCE MUST BE EARTHED.
This appliance is fitted with a fused three-pin plug to BS1363 which is suitable for use in all homes fitted with sockets to current specifications. If the fitted plug is not suitable for your socket outlets, it should be cut off and carefully disposed of. To avoid an electric shock, do not insert the discarded plug into a socket.
Fitting a new plug
If for any reason you need to fit a new plug, the flexible mains lead must be connected as shown here. The wires in the mains lead fitted to this appliance are coloured in accordance with the following code:
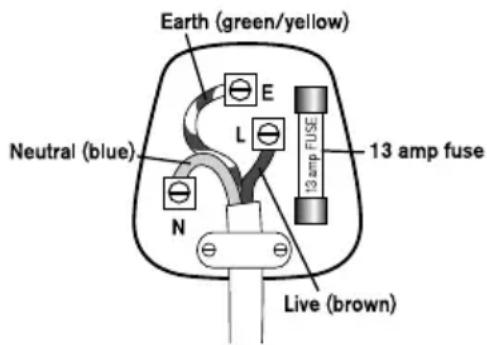
Connect BLUE to Neutral (N)
Connect GREEN & YELLOW to Earth (E)
Connect BROWN to Live (L)
13 amp fuse to be used
If the colours of the wires in the mains lead of this appliance do not correspond with the coloured markings identifying the terminals in your plug, proceed as follows. The wire which is coloured green and yellow MUST be connected to the terminal which is marked with the letter E (Earth). The wire which is coloured blue MUST be connected to the terminal which is marked with the letter N (Neutral). The wire which is coloured brown MUST be connected to the terminal which is marked with the letter L (Live).
Before refitting the plug cover, check that there are no cut or stray strands of wire inside the plug. Use a 13 amp BS1362 fuse. Only BSI or ASTA approved fuses should be used. If you are at all unsure which plug or fuse to use, always refer to a qualified electrician.
Note: after replacing or changing a fuse on a moulded plug which has a fuse cover, the cover must be refitted to the plug; the appliance must not be used without a fuse cover. If lost, replacement fuse covers can be obtained from an electrical shop. This appliance complies with the following EU Directives: 2006/95/EC (Low Voltage Directive) and 2004/108/EC (EMC Directive).
GEBRAUCHSANWEISUNG
PLATZSPARENDER BROTBACKAUTOMAT
natural_image
White rice cooker with digital display and control panel (no visible text or symbols)PLATZSPARENDER BROTBACKAUTOMAT VON LAKELAND
Alexandra Buildings, Windermere, Cumbria, UK LA23 1BQ
Tel: +44(0)15394 88100 www.lakeland.co.uk
D Tel: 0800 444 1500 www.lakeland.de
- LAKELAND SMALL SPACE BREAD MAKER
- CONTENTS
- PRODUCT FEATURES
- SAFETY CAUTIONS
- THE CONTROL PANEL
- ON/OFF BUTTON
- MENU BUTTON
- CRUST BUTTON
- LOAF SIZE BUTTON
- TIMER BUTTONS
- BREAD PAN LID
- BEFORE USING BREAD MAKER FOR THE FIRST TIME
- THE BREAD MAKER PROGRAMMES
- PROCESSES
- MEASURING YOUR INGREDIENTS
- PLACING YOUR INGREDIENTS INTO THE BREAD PAN
- INSTRUCTIONS FOR USE
- ALERT TO TELL YOU WHEN TO ADD EXTRA INGREDIENTS
- KEEP WARM
- STORING BREAD
- PROGRAMME BACKUP
- A GUIDE TO FLOURS AND OTHER INGREDIENTS
- WHEAT FLOURS
- STRONG WHITE BREAD FLOURS
- STRONG WHOLEMEAL OR WHOLE WHEAT BREAD FLOURS
- STRONG GRANARY BREAD FLOURS
- NON WHEAT FLOURS
- OTHER GRAINS
- SALT
- SWEETENERS
- FATS AND OILS
- LIQUID
- YEAST
- PACKET BREAD MIXES
- A GUIDE TO ADDING FLAVOURINGS
- AT THE VERY START, WITH THE MAIN INGREDIENTS
- BEFORE THE FINAL KNEADING, RISING AND BAKING CYCLE
- USE THE DOUGH AND THEN THE BAKE PROGRAMMES.
- ADAPTING YOUR OWN RECIPES
- HINTS AND TIPS
- RECIPES
- Programme 4 – QUICK
- GINGERBREAD
- Programme 5 – SWEET
- Programme 8 - DOUGH
- MEDITERRANEAN FIESTA PIZZA
- Programme 9 – JAM
- ORANGE MARMALADE – makes approx. 1 x 400g jar
- Programme 10 – CAKE
- CHOCOLATE AND ALMOND CAKE
- CHOCOLATE BUTTER CREAM FILLING
- TROUBLESHOOTING
- CARE AND CLEANING
- RECYCLING YOUR ELECTRICALS
- ELECTRICAL CONNECTIONS
- THIS APPLIANCE MUST BE EARTHED.
- Fitting a new plug
- GEBRAUCHSANWEISUNG
- PLATZSPARENDER BROTBACKAUTOMAT
- PLATZSPARENDER BROTBACKAUTOMAT VON LAKELAND
Brand : Lakeland
Model : 19692
Category : Bread maker