
Deskphone 9650C - Phone AVAYA - Free user manual and instructions
Find the device manual for free Deskphone 9650C AVAYA in PDF.


| Product Type | IP Phone |
| Brand | Avaya |
| Model | Deskphone 9650C |
| Display | Backlit LCD, 2x24 characters |
| Number of Lines | 6 programmable line/appearance keys |
| Speakerphone | Full-duplex |
| Headset Jack | 2.5 mm headset jack (with adapter) |
| Audio Codecs | G.711, G.729A, G.722 wideband |
| Network Interface | 10/100 Ethernet |
| Power Source | Power over Ethernet (802.3af) or AC adapter (included) |
| Dimensions (HxWxD) | 7.5 x 8.5 x 5.5 in (19 x 21.6 x 14 cm) |
| Weight | 2.2 lbs (1.0 kg) |
| Keypad | 12-key dial pad, 4 navigation keys, 4 softkeys |
| Additional Keys | Hold, Transfer, Conference, Redial, Speaker, Mute, Headset, Volume up/down |
| Maintenance | Clean with dry or slightly damp cloth; do not use solvents |
| Safety | Use only with PoE or provided power supply; avoid liquid exposure |
| Spare Parts | Handset, handset cord, base, power adapter, Ethernet cable |
| Regulatory | FCC Part 15, CE, RoHS |
| Mounting | Desk stand with adjustable tilt; wall-mountable (optional kit) |
Frequently Asked Questions - Deskphone 9650C AVAYA
User questions about Deskphone 9650C AVAYA
0 question about this device. Answer the ones you know or ask your own.
Ask a new question about this device
Download the instructions for your Phone in PDF format for free! Find your manual Deskphone 9650C - AVAYA and take your electronic device back in hand. On this page are published all the documents necessary for the use of your device. Deskphone 9650C by AVAYA.
USER MANUAL Deskphone 9650C AVAYA
9650C connected to Integral Enterprise
User Manual
Version 1.1 - 022010
from Software T.15xSp3.bin
Contents
Contents 2
Familiarizing yourself with your telephone
Important information ....9
Which systems can you connect your telephone to? 9
Declaration of conformity 9
License information 9
Tips on phone location 11
Repairs 11
Notes on description of the operating steps 11
Additional functions ......11
User manual in other languages 11
Always dispose of old equipment correctly – keep our environment tidy .....12
Your Avaya IP telephone at a glance 13
All the keys at a glance 15
Getting to know your telephone
The display helps you 18
Basic rules of operation ....19
Selecting functions in the menu 19
Canceling or exiting an action 19
What does the idle display show? 20
Softkeys 20
Function keys (9650/9650C) 21
Functions in several levels (9630–50) ......21
Entering text 22
... telephoning made easy ....24
Initial operation of your telephone 25
Connecting the telephone 25
If no gatekeeper is found on automatic search run 25
Selecting the gatekeeper when logging in 27
Telephoning as usual
Making a call 29
Making a call within your system 29
Making a call outside of your system 29
Making a call with a destination key 30
Automatic callback 30
Delete automatic callback 30
Callback request ....31
Deleting a callback request ....31
Repeatedly dialing a number* 32
Deactivating phone number and charge display 32
Contents
Reactivating phone number and charge display 32
Cutting in on another call* 33
Ending cut-in* 33
Making calls remotely via the system* 34
Answering calls 35
When you are called 35
When another telephone receives a call (pick-up call) 36
Putting a call on hold 36
Making calls without the handset 37
Hearing the caller through the speaker (monitoring) 37
Making a call with the handset on-hook (handsfree) 37
Continuing a call handsfree with the handset off-hook 38
Handsfree – continuing the call with the handset 38
Handsfree – ending the call 38
Making several connections 39
Forwarding additional callers 39
Answering an additional call (second call) 40
Consultation during a call (refer-back) 40
Speaking to parties alternately 41
Forwarding additional callers 41
Three-way conference 42
Multiple conference* 45
Diverting calls 52
Diverting all calls for your telephone 52
Diverting calls if your line is busy* 53
Diverting internal calls after a certain amount of time* 53
Diverting external calls after a certain amount of time* 53
Setting up and activating the double call destination* 54
Disabling call diversion 54
Changing call diversion remotely* 55
Automatic call diversion 56
Answering calls elsewhere (follow-me)* 59
Preparing follow me on your own telephone 59
Activating follow me at a different telephone 59
Deactivating follow me on your own telephone 59
Deactivating follow me at a different telephone 60
Making calls with ease
Editing the call log 62
Symbols in the call log 62
Filtering call log displays: Redial, call list, completed calls 63
Dialing an entry from the call log 63
Contents
Deleting an entry 64
Deleting all entries 64
Adding an entry to the phone book 64
Viewing audio data 65
Editing a redial list (call log – outgoing) ......66
Open Redial list 66
Editing a call list (call log – missed) 67
Open call list 67
Function list 68
Switching between the function list and the telephone status (standard display) 68
Entering a function in the function list ....68
Entering a function in the function list ....69
Deleting functions or destinations from the function list ....70
Using the phone book 71
Creating a new entry in the phone book 71
Dialing an entry from the phone book 72
Editing entries in the phone book 72
Deleting an entry 73
Dialing an entry from the main phone book* 73
Saving an entry from the main phone directory in the local phone directory* 74
Saving an entry from the central phone book to a destination* ....74
Requesting messages 75
Diverting calls to voicemail 75
Listening to voice messages* 75
Deactivating call diversion to voicemail 76
Deleting a message ^* ....76
Deleting all messages* 76
Viewing charges 77
Viewing the charge display ....77
Deleting call charges 77
Switching the charge display to units 78
Recording charges for private calls and projects* 78
Set reminders (appointments) 79
Entering a new appointment ....79
Viewing appointments 80
Appointment message 80
Deactivating appointments 81
Deleting appointments 81
Locking the telephone 82
Contents
Changing the PIN (Personal Identification Number) 82
Locking the telephone 83
Unlocking the telephone 83
Automatic locking 84
Lock at 85
Telephoning with partners\*
Setting up partner names 87
Information about partners on the display 89
Information about partners on function keys (9650/9650C) 90
Calling a partner 91
Answering a call for a partner 92
Assigning partners to another key 93
Hiding partner keys 94
Activating partner beep 95
Assigning partners on the Button Module* 97
Partner diversion 98
Diverting calls to a partner 98
Diverting partner calls to your telephone 99
Diverting calls from one partner to another 100
Extended partner diversion 101
Setting the deputy key 103
Extending a partner group* 105
Reducing a partner group* 106
Restricting partner signaling* 107
Assigning a line as the executive line 108
Setting up a connection for partners 109
Filtering 110
Secretary 111
Executive line 111
Customizing your telephone
Do not disturb 113
Assigning functions/numbers to keys 114
Assigning functions to keys 114
Creating a destination key 115
Destination key from phone book 116
Changing an existing destination 117
Clearing key assignments 118
Display key assignment 119
Functions keys with LED (9650/9650C) 119
Setting up macro functions 120
Contents
Setting up a macro (call diversion and pick-up) 120
Partner diversion macro 121
Macro-enhanced partner diversion 123
Coming/going macro 124
Anonymous call* 125
Deactivating second call 126
Deactivating direct dialing 127
Deactivating Automatic tone dialing (DTMF) 128
Changing the DTMF pulse duration 129
Change DTMF duration 130
Time zones 131
Private User Mobility* 132
Logging on to the telephone 132
Logging out from the telephone 133
Saving emergency numbers 134
Setting up own name 135
Relocating with the telephone* 136
Saving personal data 137
Carrying out immediate central data saving* 137
Blocking central data saving 138
Setting up VIP functions* 139
Using the executive telephone as a two-way intercom system to the secretary 139
Announcements from the executive telephone 142
Using the VIP functions 145
Activating Handsfree Answer Back* 146
Audio, contrast and language settings 147
Audio settings 147
Select ringer melody ....148
Set receiver sound 149
Setting contrast and brightness 150
Selecting the language for the display 151
Displaying the function list in the idle display 152
Activating function keys in idle status (only 9630, 9640) ....153
Activating CSTA Answer Call* 154
Leaving a hunt group* 155
Logging in to automatic call distribution* 156
Viewing/modifying user data 157
Log out user 157
Changing the PIN 158
Deleting your PIN 159
Contents
Viewing/changing IP settings 160
Viewing your IP settings 160
Send ping 161
Barring the telephone from access via the browser 162
Registering a CTI application* 163
Setting 802.1X registration data* 164
Saving user data* 166
Load user data 167
Recognition of partial numbers 168
Creating new partial number entries 169
Editing partial number entries 170
Deleting partial number entries 171
Customizing the call list* 172
Add-on equipment\*
Button module* 174
Display keys with partner function 175
Display keys as destination keys 175
Display keys as function keys 176
Headset 177
Operating corded headsets 177
Operating cordless headsets 178
Setting the CTI application 179
Consulting the manual as required
Function keys 181
Information in the idle display 184
Ringing and handset tones 186
Tones for internal and external calls 186
Tones in the handset 186
Call melodies 187
Menu overview 188
Call diversion 188
Appointments 189
Charges 189
Lock 190
Time zones 190
Settings 190
Troubleshooting 193
Index 195
Familiarizing yourself with your telephone
Familiarizing yourself with your telephone
Familiarizing yourself with your telephone
Important information 9
Your Avaya IP telephone at a glance 13
All the keys at a glance ....15
Important information
Important information
Which systems can you connect your telephone to?
This telephone is intended solely for connecting to Avaya communication servers.
Declaration of conformity
We, Avaya GmbH & Co.KG, declare that the telephones Avaya IP Deskphone 9620/9620L, Avaya IP Deskphone 9630, Avaya IP Deskphone 9640 and Avaya IP Deskphone 9650/9650C as well as the Avaya IP Deskphone SMB24 Button Module comply with the fundamental requirements and other relevant provisions of Directive 1999/5/EU (Radio and Telecommunications Terminal Equipment, R&TTE).
These telephones are intended for connection to Ethernet/LAN interfaces of IP-capable Avaya telecommunications systems and fulfill the basic requirements of Directive 1999/5/EU (R&TTE).
The Avaya IP Deskphone SMB24 Button Modules are only intended for use with the above-mentioned telephones.
The design of these telephones makes them unsuitable for direct operation on interfaces of public telecommunications networks. Avaya cannot guarantee successful operation of the IP telephones in LAN or Intranet environments in which no Avaya telecommunications system is present.
If any problems should occur during operation, please initially contact your specialist dealer or your system administrator.
The complete declaration of conformity can be requested at the following Internet address: www.avaya.de/gcm/emea/de/includedcontent/conformity.htm or look for "declaration of conformity" in the index.
CE
License information
License
By USING OR INSTALLING THE PRODUCT, the end user accepts the GENERAL LICENSE TERMS AND CONDITIONS, which can be accessed ON THE AVAYA WEBSITE AT
support.avaya.com/LicenseInfo/
("GENERAL LICENSE TERMS AND CONDITIONS")
If you do not wish to comply with these license terms and conditions, you can return the product within ten (10) days after receipt for a refund of the purchase price. THE FOLLOWING LICENSE TERMS AND CONDITIONS REGARDING THE PRODUCT APPLY IN ADDITION TO THE GENERAL TERMS AND CONDITIONS.
Important information
Avaya is granting the end user a license within the scope of the license types described below. The permitted number of licenses and activity units for which the license is being granted is one (1), unless a different number of licenses or activity units is stipulated in the documentation or in other materials available to the end user. "Assigned computer" means one single, autonomous computer. A "server" is an assigned computer that acts as a central computer for a software application which can be accessed from several computers. "Software" signifies computer programs in machine-readable format (object code) for which an original license exists on the part of and that are utilized by the end user either as autonomous products or in the form of a pre-installation in the hardware. "Hardware" signifies standard hardware products that were originally sold by Avaya and are utilized by the end user.
License type(s):
A license assigned to a system/systems (DS). The end user may only install and use the software on an assigned computer, unless a different number of allocated computers is stipulated in the documentation or in other materials available to the end user. Avaya is authorized to require identification of the assigned computer(s) by means of indication of the type, the serial number, the key for the feature, the location or other specific description and is also authorized to require that the end user provides these by means of electronic media that were specially designed by Avaya for this purpose.
Third-party components
Certain software programs or parts thereof that are contained in the product can contain software that was sold as a result of third-party agreements("third-party components"). These agreements can contain provisions that expand or limit the rights of use of certain parts of this product ("third-party provisions"). For information regarding the identification of third-party components or provisions that are applicable to third parties, visit the Avaya website at: support.avaya.com/ThirdPartyLicense/
Important information
Tips on phone location
Place the telephone on a non-slip surface, especially if the furniture is new or has recently been cleaned or polished. Varnishes or cleaning agents may contain substances which soften the base parts of your telephone, and softened bases can leave undesirable marks on furniture. Avaya cannot assume liability for damage of this kind.
Repairs
The equipment may only be opened or repaired by a qualified technician. Do not open the telephone yourself. Doing so could damage the unit and cause it to malfunction.
Notes on description of the operating steps
All the procedures described in this user manual assume a standard assignment of the function keys.
If you reassign function keys, please bear in mind that this may change the operating procedures.
Additional functions
Functions marked by an asterisk (*) are not supplied as standard with your telephone.
Other functions may be blocked or, depending on the system software, unavailable. If you wish to use one of these functions, please contact your system administrator.
User manual in other languages
Would you prefer to read these operating instructions in a different language? Go to the Avaya support page at support.avaya.com where you can access our document database. Look there to find out whether the language version you want is available for download.
Important information
Always dispose of old equipment correctly – keep our environment tidy

Old electrical and electronic equipment marked with this symbol can contain substances hazardous to human beings and the environment. Never dispose of these items together with unsorted municipal waste (household waste). In order to protect the environment, public collection points have been set up to ensure the correct disposal of old electrical and electronic equipment marked with this symbol.
To reduce the risk of these substances being released into the environment and to reduce the burden on natural resources, it is also possible to participate in Avaya's used equipment return system. This system ensures the correct recycling of old equipment as well as the reuse of individual components.
Your Avaya IP telephone at a glance
Your Avaya IP telephone at a glance
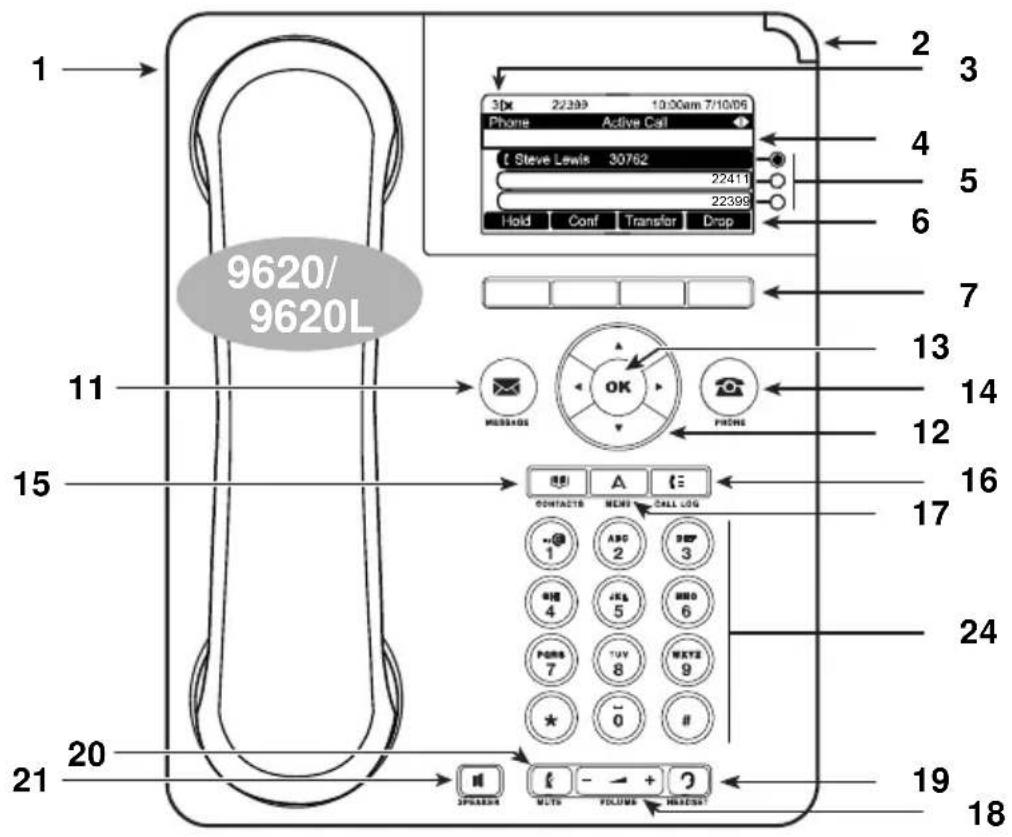
text_image
1 30X 22399 10:00am 7/10/06 Phone Active Call Steve Lewis 30762 22411 22399 Hold Conf Transfer Drop 2 3 4 5 6 7 9620/ 9620L 11 13 14 15 16 17 20 21 24 19 18 CONTACTS NEW CALL LOG ABC 2 NEW 3 4 J& 5 BBD 6 PORTS 7 TUV NEXT 9 * - 0 # SPHARNA WITH FOLUM HIGESAT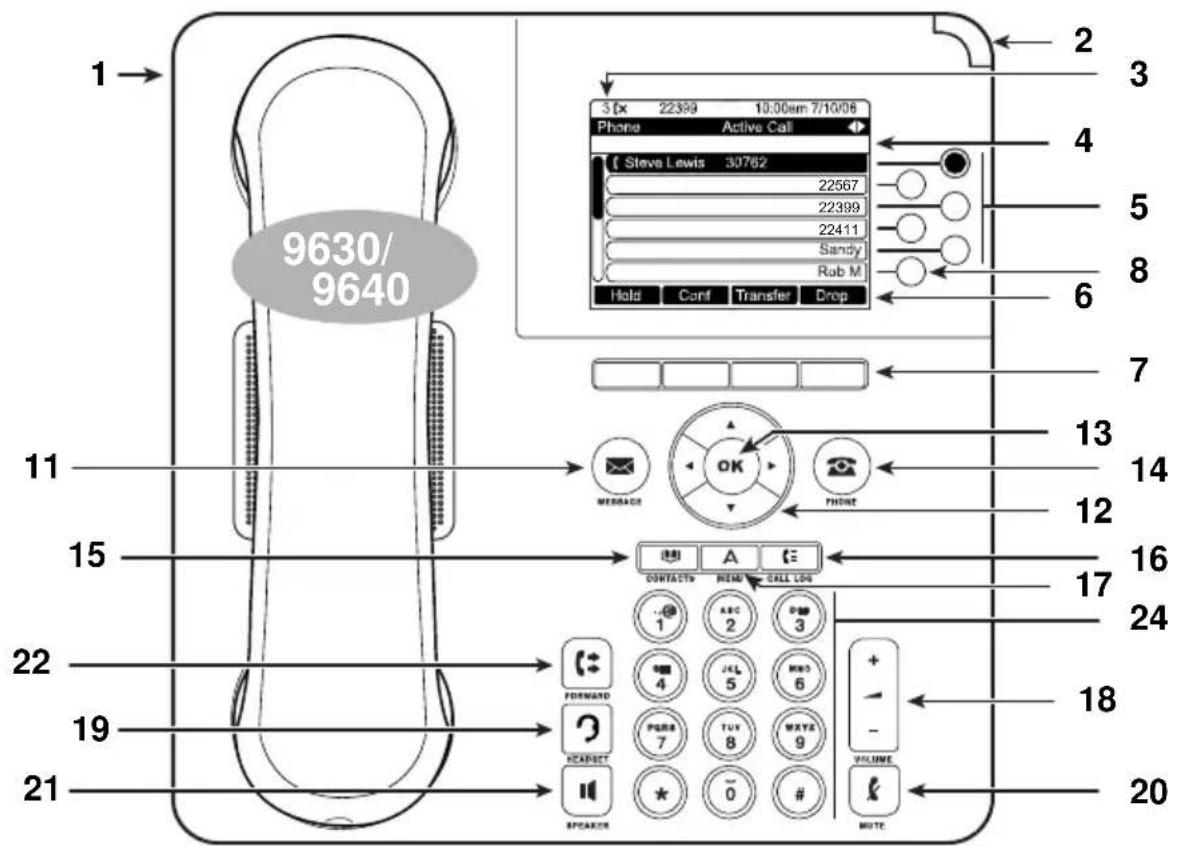
text_image
1 9630/ 9640 2 3 4 5 6 7 11 15 22 19 21 3 [fx 22399 10:00am 7/10/06 Phone Active Call [ Steve Lewis 30762 22567 22399 22411 Sandy Rob M Hold Conf Transfer Drop MESSAGE OK PHONE CONTACTS A CALL LOG 1 ABC 2 D 4 JCL 5 INFO 6 + FORWARD PAGE 7 TUX WAYE 9 VOLUME RECEPT *# LATE
Your Avaya IP telephone at a glance
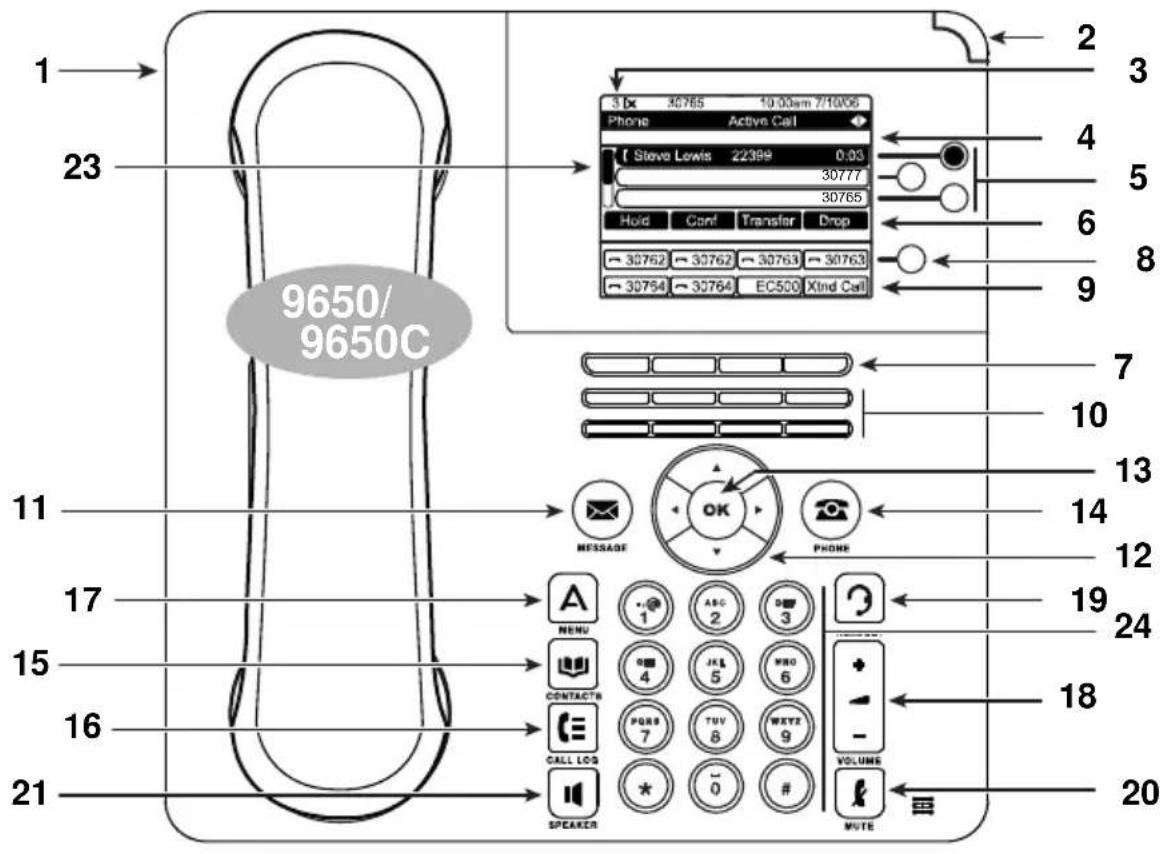
text_image
1 23 9650/ 9650C 11 17 15 16 21 2 3 4 5 6 8 9 7 10 13 14 12 19 24 18 20 31x 30765 10:00am 7/10/06 Phone Active Call Steve Lewis 22399 0:03 30777 30765 Hold Conf Transfer Drop 30762 30762 30763 30763 30764 30764 EC500 XInd Call MESSAGE OK PHONE MENU ABC 2 D 3 CONTACTN J&L WHO PQRS TUV VOLUME CALL LOG WNTS SPEAKER # MUTE1 USB port (rear of the casing) 13 OK key
2 Message indicator 14 P
HONE
3 Call list entry 15 P
HONE BOOK (CONTACTS)
4 Information line
16 CALL LOG
5 Display keys or LEDs (9620/9620L) next to menu items
17 Avaya M ENU
6 Assignment of softkeys 18 V
OLUME
7 S o f t k e y s
1 9 H EADSET
8 Switch level functions 20 M
UTE
9 Function key functions 21 LOUDSPEAKER (SPEAKER)
10 Function keys 22 C
ALL DIVERSION (FORWARD)
11 MESSAGE
23
Scroll bar
12 Navigation keys
24 Key block
All the keys at a glance
All the keys at a glance

Number keys with letters: To dial phone numbers and vanity
numbers.

Star and pound keys: For special functions.


"Up arrow" and "down arrow": Move the cursor up or down.

Depicted this way in the processes.


(VOLUME): Increases or reduces the volume, contrast or
brightness.

Depicted this way in the processes.

"Right arrow" and "left arrow": Toggles between menus or moves the cursor during text entry.

Used this way in the processes.

OK: Shortcut key for executing the current standard function (marked display line). For example, when a call log entry is selected you can select the number with the OK key.
Switch level (9630/9640/9650): Switches the active level of the softkeys or function keys. When this key's LED is flashing rapidly it means that a partner is being called who has been assigned to a softkey or function key (also at a non-displayed level).
○ ● ≡ ≡ Display keys(9630/9640/9650): Accesses the displayed function in the menu item located next to it. Display keys can also be illuminated and flash at varying speeds.
All the keys at a glance

MESSAGE: Connects you to your voicemail.

PHONE: For displaying and managing your calls.
Return to idle display from a menu.

CALL DIVERSION (FORWARD): Opens the call diversion menu.

A MENU: For configuring options and settings, accessing the browser, g of and displaying network information.

PHONE BOOK (CONTACTS): Shows the entries in you phone book.

CALL LOG: Displays a list of your incoming, outgoing and missed calls.

LOUDSPEAKER (SPEAKER): Activates the loudspeaker or the handsfree ment.

H EADSET: Activates a connected headset.

M UTE: Turns off your microphone during a call.
□ Softkeys: Keys with alternating functions. The function is displayed above every key in white lettering on a black background. Each telephone has four softkeys.
Function keys with LED (only 9650/9650C): Functions, call numbers and partners that are assigned to these keys can be accessed with one touch of a key. The function is shown on the display above each key.
Getting to know your telephone
Getting to know your telephone
The display helps you 18
Basic rules of operation 19
... telephoning made easy 24
Initial operation of your telephone 25
The display helps you
The display helps you
The displays guide you step-by-step phone operation. The display gives you a lot of information, e.g. about your current call.
The phone number of all external callers appears in the display, assuming they have not disabled number ID display. This allows you to see who is calling. If your phone book already contains the name and phone number of the caller, their name will displayed when they call.
All softkeys, functions and display keys can have various functions. You can see the current function of each key on the display.
Basic rules of operation
Basic rules of operation
The following pages provide a short description of the basic operating rules for your telephone:
Selecting functions in the menu
A Press the MENU key. Or Scroll to the desired menu item. When you reach the end of the list, pressing takes you back to the first menu item. Pressing at the beginning of the list takes you to the last item in the list.
OK Confirm selection. The selected function is displayed. A submenu also appears in many cases. You can scroll through the submenu the same way as in the menu.
If you press the MENU key during a call or when the receiver has been lifted, you can view information about the IP settings and also implement settings yourself.
Speed dial with display keys
For 9630–50 telephones you can directly select the functions in the menu items by pressing a key:
Press the display key. The function that is displayed in the adjoining menu item is selected.
Scroll bar
Not all menu entries can be displayed at the same time in very large menus. In this case the scroll bar on the left edge of the display shows you where you are in the menu.
Canceling or exiting an action
If you have made a mistake in an entry or a setting in the menu:
☐ Press the "Cancel" key to cancel the action. Unsaved changes will be discarded.
☐ Press the "Back" key to cancel the action. You then move up one menu level or go to the idle display.
Basic rules of operation
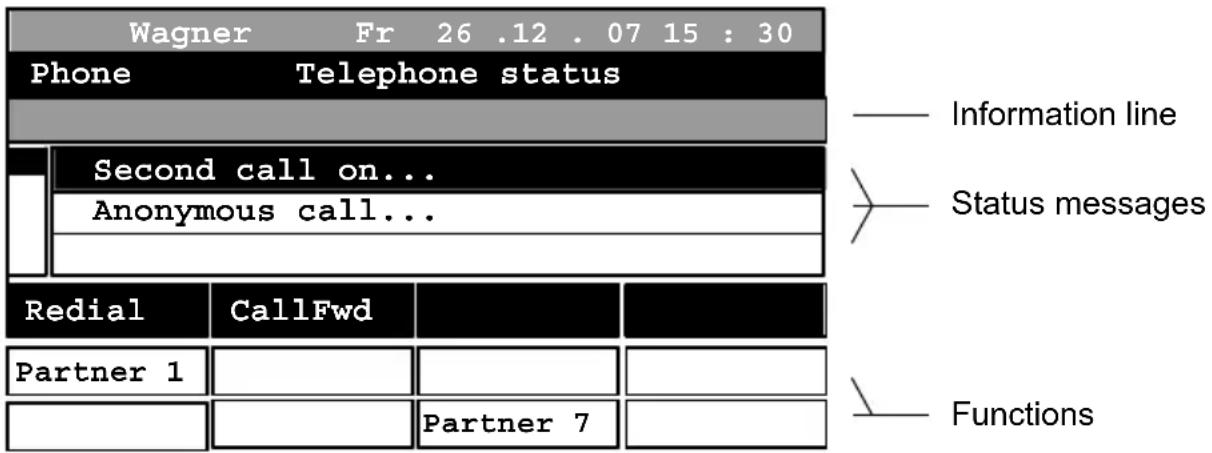
What does the idle display show?
flowchart
graph TD
    A["Wagner Fr 26.12.07 15:30"] --> B["Phone Telephone status"]
    B --> C["Second call on..."]
    B --> D["Anonymous call..."]
    C --> E["Redial CallFwd"]
    D --> F["Partner 1"]
    D --> G["Partner 7"]
    style A fill:#f9f,stroke:#333
    style B fill:#ccf,stroke:#333
    style C fill:#cfc,stroke:#333
    style D fill:#fcc,stroke:#333
    style E fill:#ffc,stroke:#333
    style F fill:#fcc,stroke:#333
    style G fill:#fcc,stroke:#333
The idle display shows:
- A symbol indicating missed calls, if applicable
- Name or phone number
- Day, date, time
-
The active level of the function keys (965/9650C) or softkeys (9620/9620L-40)
• Additional information on the status of your telephone, e.g. "Second call on" -
You can also configure the phone to display the function list when the phone is idle (↑68).
- Press the PHONE key to place the phone in idle mode.
Softkeys
flowchart
graph TD
    A["Redial"] --> B["Partner1"]
    B --> C["CallFwd"]
    C --> D["Partner7"]
    D --> E["Softkeys"]
    E --> F["Function keys"]
    style A fill:#000,stroke:#000,color:#fff
    style B fill:#000,stroke:#000,color:#fff
    style C fill:#000,stroke:#000,color:#fff
    style D fill:#000,stroke:#000,color:#fff
    style E fill:#000,stroke:#000,color:#fff
    style F fill:#000,stroke:#000,color:#fff
    subgraph Legend
        direction TB
        L1["Meaning of softkeys"] --> L2["Switch level"]
        L2 --> L3["Functions"]
    end
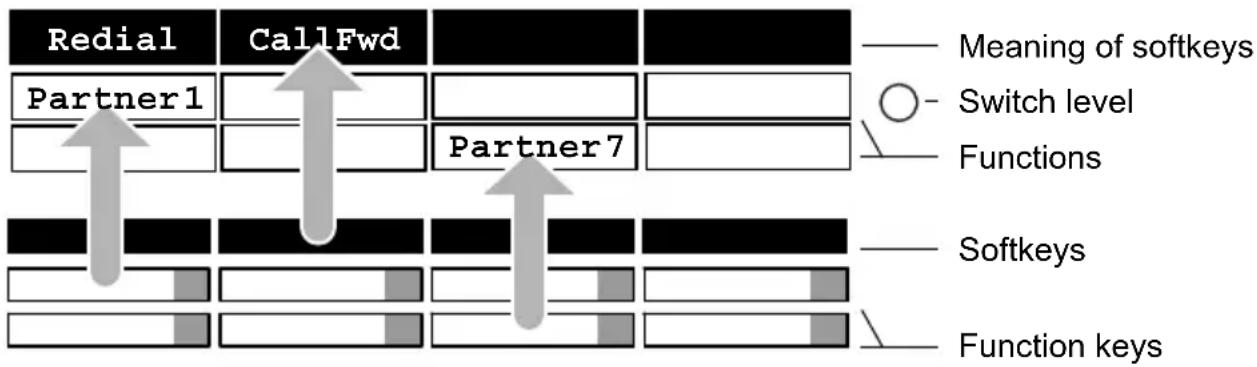
The four Softkeys (☐ - 9620/9620L, 9630, 9640; ■ - 9650/9650C) have alternating functions. These functions depend on the current status of the telephone. The current function of each key is displayed directly above it in a lower display line as text or as a symbol. It is written in white lettering on a black background.
Basic rules of operation
In the illustration above, the second black softkey is being used to select the "Call forwarding" function.
The "More" softkey is provided if the four softkeys are not sufficient for displaying all possible functions. Use this key to switch to additional new functions.
Function keys (9650/9650C)
The 9650/9650C phone has eight function keys with an LED (☐). The current function of each key is displayed directly above the keys in both lower display lines as text or as a symbol.
In the illustration on the previous page, "Partner1" is being selected with the first light-colored function key. The lower third function key is selecting "Partner7".
Functions in several levels (9630–50)
In addition to the softkeys, other functions can be displayed in display 8 (9650/9650C) or 4 (9630, 9640). These functions can be accessed by pressing the function keys (9650/9650C) or softkeys (9630, 9640).
In the 9650/9650C you can assign functions to up to seven levels; in the 9630 and 9640 you can assign up to five levels.
○ Press the "Switch level" key to switch to the next level. The display switches to the functions of this level.
The information line shows the level in which you currently are. Level 3 of the function keys is active in the following illustration. After a certain amount of time level 1 is displayed again.
| Wagner | Fr. 26 . 12 . 07 15 : 30 |
| Phone | Telephone status |
| 3 |
If you have the authorization you can assign the desired functions to the function keys yourself.
○ 9630, 9640: After the last level the system switches back to the softkey assignment (lower display line). When you press the Long switch level key, the system will immediately switch to the softkey assignment.
After a certain amount of time the system automatically switches to the softkey assignment. You can change this automatic process ( 153 ).
Basic rules of operation
Entering text
In phone book entries, the first letter of a word is automatically capitalized.
You enter the desired text using the number keys with letters.
Using the following table, you can see how many times you have to press the relevant key to get the desired character:
| K | e | y | 1 | 2 | 3 | 4 | 5 | 6 | 7 | 8 | 9 |
| 1 | ? | ! | . | , | 1 | ; | : | " | , | ¿ | i |
| 2 | Aa | Bb | Cc | 22 | Ää | Áá | Ââ | À‘ | Âå | Çç | |
| 3 | Dd | Ee | Ff | 33 | Éé | Êê | Èè | Ëë | |||
| 4 | Gg | Hh | Ii | 44 | Gğ | Íí | Îî | ìì | ïï | Ýý | |
| 5 | Jj | Kk | Ll | 55 | |||||||
| 6 | Mm | Nn | Oo | 68 | Ññ | Öö | Óó | Ôô | Òò | ||
| 7 | Pp | Rr | Ss | 77 | \ş | Şß | ß | ||||
| 8 | Tt | Uu | Vv | 88 | Üü | Úú | Ûû | Ùù | |||
| 9 | Ww | Xx | Yy | Zz | 99 | ||||||
| 0 | E | m | p | t | y | 0 | @ | & | % | € | $ |
| * | * | + | - | = | ( | ) | / | ||||
| # | Upper/lower |
Example: You want to enter the name "Böhm":
Press number key "2" twice: B
Press number key "6" six times: ö
Press number key "4" twice: h
Press number key "6" once: m
Basic rules of operation
General key controls
- Deleting characters with the "Back" softkey:
If the cursor is to the right of the text entered, the "Bksp" key has a backspace function (the characters entered are deleted from right to left). - If the cursor is in the middle of the text, characters are entered in front of the cursor position.
- In phone book entries, the first letter of a word is automatically capitalized. You can use the "#" key to switch between upper and lower case within a word.
... telephoning made easy
... telephoning made easy
You can configure the following settings immediately or during your first telephone calls:
- Adjust the volume ( ↑ 147) of the ring, the handset and the handsfree settings to your environment.
- Adjust the contrast or the brightness of the display to the lighting conditions where you are ( ↑ 150).
- Select the language ( ↑ 151) in which you want all displays to appear. The standard available languages are English, French and German. French, Italian, Dutch, Slovenian, Polish, Czech, Russian and Turkish can be downloaded.
- Save frequently used numbers in your phone book ( ↑ 71).
Initial operation of your telephone
Initial operation of your telephone
Connecting the telephone
After connection to the power supply and to the LAN (Local Area Network) a search run for a gatekeeper (responsible for access rights) is automatically started in the telephone. Usually a gatekeeper is found, and you can then make a call right away. However, it will not yet be possible to take calls. To do this you first have to enter your number and PIN in the "User administration" menu (see Entering your own number and PIN (↑26)).
- From the time it is commissioned, the IP phone checks repeatedly whether there is another device in the network with the same IP address which is therefore interfering with network access. This is indicated in the status line and the information line with IP address conflict. If this is the case, the phone is not functional. Your system administrator must resolve the error in the network.
- Instead of the standard gatekeeper, you can select a different gatekeeper when logging in (↑27).
If no gatekeeper is found on automatic search run
The automatic search for a gatekeeper yields no result. The display of your telephone has been displaying the message "....Searching network..." for some time. However, you now have the option of selecting a gatekeeper from the gatekeeper list, if entries are available there:
Scroll to the Gatekeeper list menu item.
OK
Confirm selection.
Select a gatekeeper, e.g. GKxyz 123.456.000.123.
OK
Confirm selection. The search for the specified gatekeeper is now started. After at most 10 seconds, a message appears in the display if the login has been successful.
Initial operation of your telephone
Entering your own phone number and PIN

Scroll to the Log in new user status message.

Confirm selection.

... Enter extension number.

Scroll to the SecPIN or PIN menu item.

... Enter the PIN.

Confirm selection. The display then shows the message "Secure logon complete" or "Logon complete." From now on you can also be reached under the number (extension number) that you have entered.
- For unencrypted communication the default setting for the PIN is 0000 (if user is asked for a PIN).
- For secure encrypted communication your system administrator will tell you the default setting for the PIN (if user is asked for a SecPIN).
- After the first time you log on to secure communication, an information message will ask you to change your PIN. It is advisable to change your PIN right away so that no one who knows your default PIN can log on to another phone using this phone number.
- You can only ever be reached on one telephone under your number (extension number).
So if you log on to a second telephone with PIN and extension number, you can then be reached there under your number (extension number) but no longer on the first telephone.
Initial operation of your telephone
Selecting the gatekeeper when logging in
You can select a gatekeeper other than the standard gatekeeper when you log in. This requires your system administrator to have compiled a list of gatekeepers.
The phone shows the logon display.

Scroll to status message Gatekeeper list.

Confirm selection.

Scroll to the desired gatekeeper, e.g. GK 2.

Confirm selection.
Now enter your own number and PIN ( 26 ) as usual.
Telephoning as usual
Telephoning as usual
Telephoning as usual
Making a call ....29
Answering calls 35
Making calls without the handset 37
Making several connections 39
Diverting calls 52
Answering calls elsewhere (follow-me)* 59
Making a call
Making a call
You can telephone as usual inside and outside of your system.
Internal: Dial the desired extension number directly.
External: Depending on the system, first dial the external line code, e.g. "0".
You can call the last ten numbers dialed again (redial ( 66 )) and select frequently used numbers using the destination keys.
You can have calls returned automatically within your telephone system when a busy line is free again.
You can also switch off phone number and charge displays.
You can cut in on another call within your system if you have something urgent to tell one of the subscribers.
Making a call within your system
In the idle display:

... Enter the desired number.

Lift the handset.
- Of course you can pick up the handset first and then dial the number. However, in this case you cannot correct an input error.
- If you do not want the other person to hear what you are saying, press the Mute function key. The opposite party will be able to hear you again after you press this key again.
Making a call outside of your system
In the idle display:

Enter external line code, e.g. "0".

... WXYZ Enter the desired number.

Lift the handset.
Telephoning as usual
Making a call
Making a call with a destination key
☐ Press the destination key for the desired subscriber.

Lift the handset.
- Instructions for assigning a number to a destination key can be found in the chapter Assigning functions/numbers to keys (↑114).
Automatic callback
The internal number you dialed is free or busy:

Scroll to the Automatic callback menu item.

Confirm selection.

Replace the handset. Your telephone rings as soon as the other line is free.

Lift the handset. The other line is called automatically via the communication server.
Delete automatic callback
In the idle display:

Scroll to the Callback enabled status message.

Confirm selection.
☐ Press the "Delete" softkey.
Making a call
Callback request
Callback request allows you to enter an explicit callback request in the subscriber's Call list ( 67 ) when their phone is free or busy. The callback request is also entered in your Redial list ( 66 ).
Dialed subscriber is free or busy:

Scroll to the Callback request menu item.

Confirm selection.

Replace the handset.
Deleting a callback request
You can delete a callback request initiated by you in the redial list. This deletes the callback request from the call list of the desired subscriber.
Press the "Redial" softkey.

Scroll to the desired entry.
☐ Press the "Delete" softkey. A prompt is displayed.
☐ Press the "Delete" softkey again to confirm.
Making a call
Repeatedly dialing a number\*
The connection dialed is busy.

Scroll to the Automatic redial menu item.

Confirm selection.

Replace the handset. Dialing is repeated up to nine times at intervals of conds. If you press any key or lift the handset, automatic redial will stop.
i
- Automatic redial is stopped if you press any key or pick up the handset to perform some operation. After you have performed this operation, you will be asked whether you want automatic redialing to resume.
- Automatic redialing is canceled when a call is accepted. No prompt will follow.
Deactivating phone number and charge display
During a call:
☐ Press the "Display" softkey.
Your caller's name and number will no longer be displayed. The number is not saved in the redial or in the call log.
The charge display is deactivated. However, the charges continue to be counted internally.
Reactivating phone number and charge display
☐ Press the "Display" softkey again.
Making a call
Cutting in on another call\*
You want to speak to a party whose line is busy:

Scroll to the Cut-in menu item.

Confirm selection. All subscribers hear a cut-in tone. You are now included in the conversation and can give the subscribers your message.
- Cutting in is only possible within your system and must be programmed for your telephone and the other telephone concerned. If you require this option, contact your system administrator.
Ending cut-in\*

Scroll to the End cut-in menu item.

Confirm selection.
- You can also replace the handset to end cut-in.
Telephoning as usual
Making a call
Making calls remotely via the system\*
You can call your communication server from outside, e.g. to make expensive overseas calls via the system. The charges are then incurred by the system. This is possible from any telephone with DTMF suffix dialing.

text_image
0 MNO WXYZ PQRB JKL 0 JKL 6 9 7 5 5Dial the phone number of your
server, e.g. 069 7505, from the external telephone.
TUV 8 WXYZ 9 Enter the source discrimination code for your system, e.g. 89. You will hear a dial tone as confirmation.
1 ABC 2 DEF 3 GBI If necessary, enter your secret PIN number, e.g. 1234.

text_image
0 0 0 4 1 9 7 5 4 3E n t e r t l
code and the phone number you want to call via the communication server, e.g. 0004197543. This number is dialed immediately.
- "Making calls remotely via the system" must be enabled by the system administrator. The system administrator will also tell you the source discrimination code and whether a secret PIN number is required.
- In some cases, you can only make calls through the system from certain pre-set telephones. The system administrator will inform you of this.
Answering calls
Answering calls
You can lift the handset and speak with the caller as usual.
It is also possible to answer calls using the SPEAKER key and then to telephone with the receiver on-hook.
If another subscriber within your system receives a call, you can divert the call to your phone (pick-up).
It is also possible not to answer calls immediately but to put them on hold. This allows you to complete any operating procedures you have already started (e.g. editing a phone book entry).
When you are called
Your telephone rings. The call is shown on the display.

Lift the handset.
- Making calls without the handset: Press S PEAKER key.
- Internal and external calls can be differentiated by the different ringer tones. You can find more information in the chapter Tones for internal and external calls (↑186).
- If you do not want the other person to hear what you are saying, press the Mute function key. The opposite party will be able to hear you again after you press this key again.
- You can disable the ringer tone while your phone is ringing: Press the "Calling" softkey.
Answering calls
When another telephone receives a call (pick-up call)
Another telephone rings.

... With your receiver on-hook, enter the number of the ringing telephone.

Scroll to the Pick-up menu item.

Confirm selection. Your telephone rings and you answer the call as usual.

- You can also create a macro (↑120) to pick up calls from a specific telephone. When this telephone rings, you will then be able to pick up the call by pressing a single key.
- If your communication server is configured accordingly, you have another option for picking up a call. All you have to do is enter a code. After picking up the handset, enter "*6" for the "Pick-up" function, for example, and then dial the number of the ringing phone. You will then hear a special dial tone for approx. one second. The call is then directly transferred. If you have any questions please contact your system administrator.
Putting a call on hold
You receive a call but want to finish what you're doing on your telephone first.

Scroll to the Put on hold menu item.

Confirm selection. You can now continue with your operating procedure. The ringer tone is turned off, the call LED continues to flash. After completion of the operating procedure, the ringer tone sounds again and you can answer the call.
Making calls without the handset
Making calls without the handset
The Monitoring function (you can hear the person with whom you are talking over the loudspeaker) and Handsfree function (the person with whom you are talking can be heard over the loudspeaker and you can speak to him/her using the built-in microphone) can be accessed via the SPEAKER key.
You can activate handsfree operation before making a call by pressing the SPEAKER key.
If you press the SPEAKER function key during a call, monitoring is activated. Pressing the function key again then results in a switch to handsfree mode.
You can see whether "Monitoring" or "Handsfree" is enabled from the status of the LED:
• LED on: Monitoring (speaker is on)
• LED flashes: Handsfree (speaker and handsfree microphone are on)
- LED off: Speaker and handsfree microphone are off
Hearing the caller through the speaker (monitoring)
While calling with the handset lifted:
Press the SPEAKER function key (LED lights up). You are now in monitoring mode and can hear the other party out loud in the room.
The desired speaker volume can be set using the and keys. You can switch to handsfree mode (LED flashes) by pressing SPEAKER again. Pressing the key again deactivates the handsfree microphone and the speaker (LED off). You can continue the conversation using the handset.
Making a call with the handset on-hook (handsfree)



Press the SPEAKER key (LED flashes).
When the desired party answers, you can hear them out loud and you can also talk to them with the handset on-hook. To end the call, press the SPEAKER function key again.
Telephoning as usual
Making calls without the handset
Continuing a call handsfree with the handset off-hook
During a call:

Press the SPEAKER key twice (LED flashes).

Replace the handset.
You can hear the other person out loud and you can also talk to them with the handset on-hook.
Handsfree – continuing the call with the handset
During a handsfree call:

Lift handset (LED off).
Handsfree – ending the call
During a handsfree call:

Press the SPEAKER key (LED flashes).
Making several connections
Making several connections
You can answer an additional call (Second call ( 126)) during a call. You can speak to several parties alternately and switch back and forth between them as you wish. You can speak with two callers simultaneously (conference).
Forwarding additional callers
Now you want to forward the additional caller to number 1234, for example:

Scroll to the New call to... menu item.

Confirm selection. The first party is waiting.


number of the extension you want to connect yourple 1234. When that extension answers you can announce the

Press the "Transfer" softkey.

Confirm selection.
- When the called extension answers, you can also put the first caller through simply by hanging up.
- If the called extension does not answer, you can return to the first caller by pressing the "Drop" softkey.
Making several connections
Answering an additional call (second call)
Someone calls you while you are on the phone, e.g. from number 06975058. The call is shown on the display, e.g. ▲ 06975058, and the display key or LED next to it flashes.

Answer the call.
You are connected to the second caller. The first caller is on hold and cannot hear your other conversation.
- If you want to end the existing call because you have a second call: Press the "Drop" softkey.
Consultation during a call (refer-back)
During a call:

Scroll to the new call to ... menu item.

Confirm selection.

... Enter the number you wish to consult.
- You can maintain three connections at the same time.
Making several connections
Speaking to parties alternately
If you want to speak with a call party (e.g. 06975058) who has been put on hold:

Scroll to the menu item with the rapidly flashing display key/LED, e.g.

06975058.

Confirm selection.
The other party is now on hold.
Forwarding additional callers
Someone calls you while you are on the phone, e.g. from number 06975058. The call is shown on the display, e.g. 06975058, and the display key or LED next to it flashes.

Answer the call.
You are connected to the second caller. Your initial party is on hold.

Scroll to the new call to ... menu item.

Confirm selection.


caller to, in this example 1234. You can now announce the caller. The first party is on hold.

Scroll to the Transfer to 06975058 menu item.

Confirm selection. You are now connected again to the first party.
Making several connections
Three-way conference
You can set up a conference with a maximum of two callers.

- If the "multiple conference" feature has not been enabled in your communication server, you can always work with a three-way conference.
- If the "multiple conference" feature has been enabled, then you can involve up to seven subscribers in a conference (multiple conference (↑45)).
Adding a conference participant to a call
During a call:

Scroll to the Conference with ... menu item.

Confirm selection.


1 ... 9 Enter number of second conference participant. When you are connected with the participant, you can immediately hold a three-party conference.

- If the third participant whom you are calling does not answer, press the "Drop" key to switch back to the first party.
Making several connections
Adding a conference participant to a call via refer-back
During a call (e.g. with 06975058):
☐ Press the "Refer-back" function key. The other party is on hold.


...⑨ Enter number of second conference participant. When you are cted to this participant, you can initiate the conference.

Scroll to the Conference with 06975058 menu item.

Confirm your selection.
- If the third participant whom you are calling does not answer, press the "Drop" softkey to switch back to the first party.
- You can also configure a "Conference" function key. More details on configuring function keys can be found in the Chapter Assigning functions/ numbers to keys ( ↑114).
- A conference between a second caller and the first party is not possible.
Speaking with just one conference participant
You wish to speak only with conference participant 06975058, for example:

Scroll to the 06975058 menu item.

Confirm selection. You can now speak one-to-one with the desired subscriber. want to speak to both again, select the Conference with ... display line.
Telephoning as usual
Making several connections
Connecting conference participants with each other
During the conference:

- Scroll to the Transfer to ... menu item.

Confirm your selection.
- You can also connect the two conference participants with one another by replacing the handset.
Ending a conference
During the conference:
☐ Press the "Drop" softkey. There is no longer a connection between the conference participants.
Making several connections
Multiple conference\*
Multiple conference allows a subscriber to set up a conference with up to seven other subscribers. The person setting up the conference is the designated Controller, while the others are designated as passive participants.
- If a multiple conference cannot be activated from the phone or communication server, then a three-way conference is set up automatically from the phone. The operations are described under Three-way conference (↑42).
Conference controller
The conference controller can call each of the conference participants individually using the refer-back function. When the connection has been established, the controller can then connect them to the conference. Alternatively, the controller can have several subscribers on hold first and then connect the waiting connections into the conference one after another.
The controller can also call a subscriber via refer-back by selecting the Conference with ... line. Once the subscriber answers the call, he is automatically included in the conference.
If the controller receives calls during the multiple conference, he can include these in conference by selecting Conference with ... once a connection has been established.
The controller can view the participants and their status in the list of all conference users. He can disconnect subscribers from the multiple conference using the list of all conference users.
- The controller cannot transfer calls during a multiple conference.
- The controller cannot cut in on calls during a multiple conference.
- Only the controller can see the participants of the multiple conference in the list of all conference users.
- Only "Conference" is shown on the displays of passive participants.
Making several connections
List of all conference users
The conference controller has a list of all conference users at his disposal in order to manage the multiple conference. The list of all conference users appears automatically when the third conference participant is added to a conference.
The list of all conference users shows the number of conference participants and each participant's name, number and status.
There are three values for the status:
- No details: the subscriber is participating in the conference
- "Hourglass": the subscriber is on hold, if the subscriber initiated a consultation, for example
- "!": the subscriber is taking part in the conference on behalf of the previous subscriber.
The controller can disconnect a participant from the conference in the list of all conference users.

Scroll to the desired entry.

Press the "Drop" softkey. You are prompted to confirm your selection.

Confirm selection. The conference participant is removed from the conference.
If there are only three participants in the multiple conference, the display is almost identical to the display of a three-way conference. The list of all conference users menu item is not offered to the user.
Making several connections
Adding a participant
During a call:

Scroll to the Conference with ... menu item.

Confirm selection. The multiple conference is put on hold.


Enter the number of the conference participant. When you are with the participant, he is added to the conference immediately and reference is reactivated.
- If the subscriber you are calling does not answer, press the "Drop" softkey.
- The selection line is only available if more participants can be added to the conference.
Adding a participant via refer-back
During a call:
☐ Press the "Refer-back" function key. The multiple conference is put on hold.

... Enter the number of the next conference participant. Once you are elected with this participant, you can add him to the conference.

Scroll to the Conference with ... menu item.

Confirm selection. The participant is added to the existing conference and the multiple conference is reactivated.
Telephoning as usual
Making several connections
Switching to waiting subscribers
There are several refer-backs waiting:

- Scroll to the appropriate refer-back back to ...

Confirm selection.
You are now reconnected with the desired subscriber.
You can
- Disconnect this connection by pressing the "Drop" key
- Add this connection to the multiple conference by selecting
Conference with ...
If the waiting subscriber is a multiple conference, it is possible to switch back to the multiple conference by selecting Back to conference. The original caller is put back on hold.
Making several connections
Disconnecting participants from the conference
The conference controller has the option of disconnecting a caller. If the conference has more than two conference participants, use the list of all conference users.
In the case of a three-way conference, the controller can use:

To scroll to the Remove from conf ... menu item.

Confirm selection. The subscriber is removed from the conference.
Transferring a multiple conference
If the multiple conference consists of a total of three participants, then the controller can transfer the conference to the participants using the Transfer to ... menu line.
The conference controller can leave the multiple conference without ending it.

Scroll to the Transfer conference ... menu item.

Confirm your selection.
The controller's own connection is disconnected from the multiple conference.
The conference continues without a controller at the expense of the original controller.
Making several connections
Ending a multiple conference
The conference controller can end the multiple conference as follows:

Replace the handset.
The controller's connection is disconnected. The conference continues without a controller at the expense of the original controller. The telephone returns to the idle state.

Pressing the "Drop" softkey disconnects all connections, ending the multiple conference. Dialing a new number may be possible, depending on the local setting.
Passive conference participants
The passive conference participant is added to the multiple conference by the conference controller. The header of the passive conference participant's display indicates "Conference."
The passive conference participant can:
- Not set up any more conferences.
- Place his connection in the queue (wait status) via refer-back and then switch back to the conference.
- Transfer his conference connection to another subscriber via refer-back.
• End his participation in the conference.

- Only the conference controller can see the conference participants in the list of all conference users (↑46).
Making several connections
Passive conference participants – refer-back
The passive participant in a multiple conference can place his participation in the queue (wait status) using "refer-back". The controller is made aware of this. In addition, the passive participant can also bring another participant into the conference in his place. This is indicated to the conference controller in the list of all conference users.
☐ Press the "Refer-back" softkey.


1 ... Enter the number of the new conference participant. You can transfer the conference once you are connected to this subscriber.
The "Refer-back" key is locked for passive participants in a three-way conference.
Passive conference participants – Ending participation
The passive participant in a multiple conference can end participation as follows:

Replace the handset. The participant is disconnected from the conference The phone returns to the idle state.
or
☐ Press the "Drop" softkey. The participant is disconnected from the conference Dialing a new number may be possible, depending on the local setting.
Diverting calls
Diverting calls
You can divert your calls to another line.
You can also activate an additional call diversion destination to divert calls only when your line is busy.
You also have the option of setting up a call diversion after a certain amount of time. In this case, you can set your telephone so that internal or external calls are only forwarded to the set destination after three rings, for example. You can therefore decide whether to answer the call or not.
In the call diversion menu, you can also set up your telephone so that it and another telephone both ring at the same time when there is a call (double call).
If voicemail is connected to your communication server, you can have your calls diverted there. Callers can then leave messages for you as if they were speaking to an answering machine.
Diverting a call can be greatly simplified by creating a macro ( 120 ). You can then enable or disable this call diversion by pressing a single key.

- Call diversion keys can also be configured through the "Call diversion" menu.
Diverting all calls for your telephone
Press the softkey "Call div." or ☐ the key CALL DIVERSION (9630, 9640).

- Scroll to the to: menu item.
.,@ 1 ABC 2 DEF 3 GH 4 Enter the number to which you want to divert the calls, e.g. to 1234.

Confirm selection. Call diversion is now activated. Call div. to 1234 appears in the display and the call diversion key lights up.
Diverting calls
Diverting calls if your line is busy\*
Press the softkey "Call div." or ☐ the key CALL DIVERSION (9630, 9640).
Scroll to the on busy: menu item.
1 ABC DBP 4 Enter the internal number to which you want to divert calls, e.g. to 1234.
OK Confirm selection. Call diversion is now activated. The message Call div. on busy to 1234 appears in the display.
Diverting internal calls after a certain amount of time\*
Press the softkey "Call div." or ☐ the key CALL DIVERSION (9630, 9640).
Scroll to the Int. after time menu item.
1 ABC 2 DEF 3 GM Enter the internal phone number to which you want to divert the external calls after the set period of time, e.g. to 1234.
OK Confirm selection. Call diversion is now activated. The status Delayed internal call div. to 1234 is shown on the display.
Diverting external calls after a certain amount of time\*
Press the softkey "Call div." or ☐ the key CALL DIVERSION (9630, 9640).
Scroll to the Ext. after time: menu item.
1 ABC 2 DBF GHI Enter the internal phone number to which you want to divert the external calls after the set period of time, e.g. to 1234.
OK Confirm selection. Call diversion is now activated. The status Delayed external call div. to 1234.
Telephoning as usual
Diverting calls
Setting up and activating the double call destination\*
Press the softkey "Call div." or ☐ the key CALL DIVERSION (9630, 9640).
Scroll to the Double call menu item.
.,@ 1 ABC DBF GHI Enter the internal phone number of your double call destination.
OK Confirm selection. Double call is now activated. The message Double call to 1234 appears in the display.
Disabling call diversion
Press the softkey "Call div." or the key CALL DIVERSION (9630, 9640).
Select active call diversion (indicated by "On"), for example to [1234] On.
OK Confirm selection. Call diversion is now deactivated.
- You can also select the active call diversion in the display and then deactivate it, as described above.
Diverting calls
Changing call diversion remotely\*
You can call your communication server from outside to set up or change call diversion for your telephone or for other telephones. This is possible from any telephone with DTMF suffix dialing.
Select the subscriber whose call diversion is to be changed:

text_image
0 MNO WXYZ PQRS JKL 0 JKL 6 9 7 5 5Dial the phone number of yo
server, e.g. 069 7505, from the external telephone.
TUV 8 WXYZ 9 Enter the source discrimination code for your system, e.g. 89. You will hear a dial tone as confirmation.
MNO 6 0 JKL 5 JKL Enter the phone number of the subscriber for which you want to change the call diversion, e.g. 6055.
1 ABC 2 DBP 4 Enter your secret PIN number, e.g. 1234.
Now you can set up, change or deactivate call diversion:
Setting up or changing call diversion:
* Enter codes for "Activate follow me", e.g. star key, 14.

text_image
0 0 TUV WXYZ PQRS JKL DEP GBI 8 9 7 5 3 4Enter the system's external line code
the phone number to which you want to divert calls, e.g. 00897543. As confirmation, an acknowledgement tone sounds after a short time.
Deactivating call diversion:
# 1Enter the code for "Deactivate follow me", e.g. pound key, 14.
- "Changing call diversion remotely" must be approved by your system administrator. The service department will also tell you the source discrimination code and the secret PIN number.
- In some cases, you can only set up call diversion from certain, pre-set telephones. You can obtain more information about this from your system administrator.
Diverting calls
Automatic call diversion
By granting appropriate authorization, the Service Department can allow users to activate call diversion at a certain time and then deactivate this call diversion at a later point in time. Two destinations with different time slots can be programmed.
The Call diversion menu is expanded by the following extra menu items:
- Automatic 1
- Automatic 2
-
Set automatic
-
Your system administrator will grant you authorization.
- Automatic call diversion can "overwrite" call diversion that was set up manually. The status of the manual call diversion is indicated by an hourglass. Once automatic call diversion has finished, manual call diversion becomes active again.
- A "follow me" that was activated before the automatic start time is not reactivated with the stop time.
- If call diversion with a time window that contains the current time is switched on, then call diversion is activated immediately.
- If call diversion with a time window that contains the current time is switched off, then call diversion is deactivated immediately.
- Automatic call diversion is controlled by times and weekdays.
- "Call diversion on busy," "Delayed call diversion" and "Double Call" cannot be controlled using time windows.
Diverting calls
Set automatic
This is where you set up the time slots for automatic call diversion. This does not switch on or activate call diversion. You do this with the Activate automatic menu item.
Press the softkey "Call rout." or ☐ the key Call diversion (9630, 9640).
Scroll to the Set automatic menu item.
OK Confirm selection.
1 ABC 2 D4 GHI Enter the number to which you want to divert the calls, e.g. to 1234.
Scroll to Start time.
1 ABC 0 0 Enter the start time, e.g. "12:00".
Scroll to Stop time.
1 4 0 0 Enter the stop time, e.g. "14:00".
Scroll to Weekday.
OK Confirm selection.
Select pattern e.g., Mon-Fri.
Once you activate automatic call diversion, Automatic 1 will start Mondays to Friday from 12:00 pm to 2:00 pm.
☐ Press the "Save" softkey. The setting is saved.
Configure additional automatic call diversion if necessary.
- This menu item will only be displayed if you have the corresponding authorization granted by your system administrator.
- If you set up two automatic call diversions, the start and stop times can be nested within each other.
Diverting calls
Automatic 1/Automatic 2

text_image
Press the softkey "Call div." or 📋 the key Call diversion (9630, 9640). Scroll to the Automatic 1 or Automatic 2 menu item.
Confirm selection.
The call diversion window will be activated. This is indicated in the call diversion status display by a check mark in front of the call diversion status. The call diversion status indicates whether call diversion is currently active.
- This menu item is only displayed if authorization has been granted by the your system administrator.
Answering calls elsewhere (follow-me)\*
Answering calls elsewhere (follow-me)\*
You can also use another telephone to set up call diversion to your own phone. You first have to prepare this function on your own telephone. The follow me function is set, activated and deactivated with particular codes. Please ask your system administrator for the valid codes.
Preparing follow me on your own telephone

Lift the handset.


Press the "star" key and enter the code, e.g. "13".

Replace the handset.
Activating follow me at a different telephone
At another phone:

Lift the handset.


Press the "star" key and enter the code, e.g. "14".



Replace the handset. Incoming calls to your telephone are then diverted to the phone.
Deactivating follow me on your own telephone

Lift the handset.


Press the "pound" key and enter the code, e.g. "13".

Replace the handset.
Telephoning as usual
Answering calls elsewhere (follow-me)\*
Deactivating follow me at a different telephone
At another phone:

Lift the handset.


Press the "pound" key and enter the code, e.g. "14".



Replace the handset.
Making calls with ease
Making calls with ease
Editing the call log 62
Editing a redial list (call log – outgoing) 66
Editing a call list (call log – missed) 67
Function list 68
Using the phone book 71
Requesting messages 75
Viewing charges 77
Set reminders (appointments) 79
Locking the telephone 82
Editing the call log
Editing the call log
The call log provides you with an overview of all of your telephone activities. It lists your missed calls (call list, max. 30 entries), your outgoing calls (redial list, max. 10 calls) and your answered calls (max. 10 calls).
You can tell what type of entry it is by the symbol. The most recent entry is at the top of the list.
You can selectively retrieve individual numbers and, if necessary, dial them. You can easily transfer phone numbers from the call log into your phone book.
Symbols in the call log
You can tell the type of an entry in the call log by means of the symbols:
| ←[ | Numbers that you dialed (call log – outgoing) |
| [= | Numbers that you dialed with a callback request (call log – outgoing) |
| [× | Calls you did not answer (call log – missed) |
| →[ | Calls you answered (call log – answered) |
| 1234 Chopin Name/number of the person | called |
| 25.07 Date of the last call | |
| 10:17 Time of the last call | |
| 2 Number of calls | |
| VIP Call from VIP number | |
| ! New entry which you have not | yet viewed |
If you press the "Details" softkey, the phone will display a detailed list of entries, including the time of the call.
Editing the call log
Filtering call log displays: Redial, call list, completed calls
You can choose to display only the part of the call log entries that interests you, e.g., only the call list entries.
All entries are sorted there in the same manner as in the call log. Each of the lists is operated in the same manner.
Press the ⓕ keyCALL LOG.

Press the "right arrow". Only missed calls are shown (call list).

Press the "right arrow" again. Only answered calls are shown (call list).

Press the "right arrow" again. Only outgoing calls are shown (redial list).

Press the "right arrow" again. All entries are displayed.
Dialing an entry from the call log
Press the ☐ keyCALL LOG.

Scroll to the desired number, e.g. 006975051234.

Lift the handset.
- You can also select the desired entry straightaway using "OK", so that the connection can then be made using "Dial." Your telephone automatically switches to handsfree.
Editing the call log
Deleting an entry
Press the ☐ keyCALL LOG.

Scroll to the desired number, e.g. 006975051234.
☐ Press the "Delete" softkey. A prompt appears in the info line.
☐ Press the "Delete" softkey again.
- If a redial with callback request is deleted, then the corresponding entry is also deleted in the call list of the person you want to call back.
- In the detail view, entries without confirmation prompts are deleted immediately.
Deleting all entries
Press the ☐ keyCALL LOG.
☐ Press the "Clear All" softkey. A prompt appears in the info line.
☐ Press the "Clear All" softkey again.
Adding an entry to the phone book
Press the ☐ keyCALL LOG.

Scroll to the desired entry, e.g. 0069123456.
☐ Press the "Contacts" softkey. The entry is added to the phone book.
If an entry with the same phone number already exists in the phone book the message "Number already exists" will be displayed. Press the "OK" softkey to save the entry.
Editing the call log
Viewing audio data
The call log also contains the audio data for every call entered there (this is information about the voice quality during the call).
Press the keyC
ALL LOG.

Scroll to the desired entry, e.g. 0069123456.
☐ Press the "Details" softkey.
☐ Press the "Audiod..." softkey.
You will now see some parameters relating to voice quality during this connection.
Editing a redial list (call log – outgoing)
Editing a redial list (call log – outgoing)
The redial list can contain up to 30 entries. Up to ten of these are reserved for the most recently dialed numbers. The system administrator can, however, change the number of entries.
The remaining entries are generated by callback request. Each callback request that you initiate is its own entry in the redial list.
You can dial the individual entries, delete them or save them in the phone book just like all call log entries.
Open Redial list
☐ Press the "Redial" softkey.
- You can access the redial list through the call log (↑63).
Editing a call list (call log – missed)
Editing a call list (call log – missed)
If you do not answer a call, it is saved to the call list with its time and date. The LED in the CALL LOG key then lights up. In addition, the top display line shows the symbol for missed calls and the number of missed calls.
You can display this list at any time and return calls to the subscribers entered in it. The list contains the 30 most recent entries.
You can dial the individual entries, delete them or save them in the phone book just like all call log entries.
- The LED in the C ALL LOG key remains lit:
- Until you have viewed the details of each new call list entry; or
- You have called back all the new entries from the call list; or
- If calls with a request for callback are on the list.
- If you want to return a call to a caller from the call list and a connection is made, the entry in the call list will be deleted automatically.
Open call list
You can access the call list through the call log ( 63 ).
Function list
Function list
The function list contains all functions and destinations that you can reach with a push of a button. Here you can save all functions and destinations that you use frequently.
A maximum of two entries are possible.
- You can also configure the phone to display the function list when the phone is idle (↑152).
Switching between the function list and the telephone status (standard display)
In idle state:
( ◀()Press "right arrow" and "left arrow."
Entering a function in the function list

Press the MENU key.

Scroll to the Settings menu item.

Confirm selection.

Scroll to the Keys menu item.

Confirm selection.

Scroll to the Set function keys menu item.

Confirm selection.

Scroll to the function you want to assign to the key, e.g. Charges.

Confirm selection.
Function list

Scroll to the Add to function list menu item.

Add the selected function.
Entering a function in the function list

Press the MENU key.

Scroll to the Settings menu item.

Confirm selection.

Scroll to the Keys menu item.

Confirm selection.

Scroll to the Set destination keys menu item.

Confirm selection.

Scroll to the Edit destination menu item.

Confirm selection.

Press the destination key that you wish to add to your function list.

Scroll to the Add to function list menu item.

Confirm selection.
Function list
Deleting functions or destinations from the function list
( ◀() ) Open the function list by pressing the "right arrow" and "left arrow." Scroll to the function or destination that you wish to delete.
☐ Press the "Delete" softkey. You are prompted.
☐ Press the "Delete" softkey again.
Using the phone book
Using the phone book
Your telephone has a personal phone book. In it, you can store up to 267 phone numbers with their associated names, which will only be available on your telephone. You can then dial these numbers quickly and easily. You can modify the individual phone book entries yourself.
If you have authorization to access the main phone book, you can also find and dial entries there.
Entries fro the redial list ( 66 ), call list ( 67 ) and call log ( 62 ) can be quickly and easily saved in the phone book.
You can easily assign a phone book entry to a destination key ( 116).
Creating a new entry in the phone book

Press the PHONE BOOK key.

Press the "New" softkey.

... Enter the name.

Scroll to the Call number menu item.

... Enter the desired number.

Press the "Save" softkey.
- With the Ringing tone menu item you can define a melody (↑187) as a ringing tone.
- With the Comment menu item you can save a short comment (max. 12 letters).
- You can add a caller's phone number to the phone book while you are talking to them: Press the "+Contact" softkey.
- The number of free slots in your local phone book are displayed in the status line, e.g. "free 233".
Using the phone book
Dialing an entry from the phone book

Press the PHONE BOOK key.

Scroll to the desired entry, e.g. Chopin 0069123456.

Lift the handset.
- You can use the "Details" softkey to display additional information about the selected entry.
- Press the "Call" key to initiate a call. Your telephone automatically switches to handsfree.
- To reach the desired entry more quickly, you can also enter one or more of the first letters in the name.
- You can also search for a name or phone number by using an asterisk "*" as a wild card (as you can on your PC). For example, if you input "*mobile", all entries which include the string "mobile" will be displayed.
Editing entries in the phone book

Press the PHONE BOOK key.

Scroll to the desired entry, e.g. Chopin 0069123456.

Press the "Details" softkey.

... Edit the number, if necessary.

If necessary, scroll to further menu options and edit their settings.

Press the "Save" softkey.
- To reach the desired entry more quickly, you can also enter one or more of the first letters in the name.
Using the phone book
Deleting an entry

Press the PHONE BOOK key.

Scroll to the desired entry, e.g. Chopin 0069123456.

Press the "Delete" softkey. A prompt appears in the info line.

Press the "Delete" softkey again.
- You can also select the desired entry straightaway with the "Details" softkey, and then select "Delete".
Dialing an entry from the main phone book\*

Press the PHONE BOOK key.

Press the "Main" softkey.

... Enter one or more of the first letters in the name.

Scroll to the desired entry, e.g. Wagner 4321.

Lift the handset.
- You can also select the desired entry straightaway using the "Details" softkey, so that the connection can then be made using "Dial". Your telephone automatically switches to handsfree.
- You can also search for a name or phone number by using an asterisk "*" as a wild card (as you can on your PC). For example, if you input "*mobile," all entries which include the string "mobile" will be displayed.
Using the phone book
Saving an entry from the main phone directory in the local phone directory\*

Press the PHONE BOOK key.

Press the "Main" softkey.

... Enter one or more of the first letters in the name.

Scroll to the desired entry, e.g. Wagner 4321.

Press the "Details" softkey.

Scroll to the Save in local phone book menu item.

Confirm selection.
Saving an entry from the central phone book to a destination\*

Press the PHONE BOOK key.

Press the "Main" softkey.

... Enter one or more of the first letters in the name.

Scroll to the desired entry, e.g. Wagner 4321.

Press the "Details" softkey.

Scroll to the Save to destination key menu item.

Confirm selection.
☐ Press the function key that you wish to assign. The display indicates the function or call number to which the key was previously assigned.
☐ Confirm new key assignment by pressing the "Save" softkey.
Requesting messages
Requesting messages
If your communication server is connected to voicemail, callers can leave messages for you in a similar way to an answering machine. You can call to request these voice messages. It is also possible to receive conventional text messages from a server. The voicemail system used determines whether voice and text messages are signaled by the LED next to the MESSAGE function key. You can obtain more details from your system administrator.
Diverting calls to voicemail
Press the softkey "Call div." or ☐ the key CALL DIVERSION (9630, 9640).
Scroll to the to: menu item.
GHI 4 DBP 3 ABC 1 Enter the internal phone number which is set up for voicemail on your system, e.g. 4321.
OK Confirm selection. Call diversion is now activated. Call div. to 4321 appears in the display and the LED in the call diversion key lights up.
Listening to voice messages\*
The LED in the MESSAGE key remains lit:


Press the MESSAGE key.
Scroll to the desired entry, e.g. Voicemail 1 069123456.

Confirm selection. Your telephone automatically switches to handsfree and dials the voicemail number. You are then guided through voicemail operation.
Requesting messages
Deactivating call diversion to voicemail

Press the MESSAGE key.

Select active call diversion to voicemail (marked by "on"), e.g. to: 4321 (on)

Confirm selection. Call diversion is now deactivated.
Deleting a message\*

Press the MESSAGE key.

Scroll to the desired message, e.g. Voicemail 1 069123456.
☐ Press the "Delete" softkey. A prompt appears in the info line.
☐ Press the "Delete" softkey again.
- In the detail view, messages without confirmation prompts are deleted immediately.
Deleting all messages\*

Press the MESSAGE key.

Scroll to the Delete all entries menu item.
☐ Press the "Clear All" softkey. A prompt appears in the info line.
☐ Press the "Clear All" softkey again.
Viewing charges
Viewing charges
All call charges incurred since the last reset are stored and totaled in your telephone system. You can view the charges for your last four calls and delete the displays.
You can also have the current charges displayed during a call in units or in your local currency.
Furthermore, your communication server can also record and account for the call charges for single projects or private calls separately.
Viewing the charge display
text_image
Press the MENU key. Scroll to the Charges menu item. OK Confirm selection.Deleting call charges
text_image
Press the MENU key. ✓ Scroll to the Charges menu item. OK Confirm selection. ✓ Scroll to the Delete single co
text_image
OK Confirm selection. The charges for the individual call are cleared.- If you also want to clear the totals for all calls, you must have this function enabled by your system administrator.
Viewing charges
Switching the charge display to units

Press the MENU key.

Scroll to the Charges menu item.

Confirm selection.

Scroll to the Charge display Amount menu item.
☐ Press the "Modify" softkey. The display switches to Charge display Units.
☐ Press the "Save" softkey.
Recording charges for private calls and projects\*
You want to dial a number with a project PIN or private PIN.

Enter the external line code that is set up in your telephone system for dialing a project or private code, e.g. "1". This external line code may have 1 to 5 digits.



private calls or the relevant project, e.g. "3433". This code may have 1 to 12 digits.



Lift the handset. The charges for this call are now recorded and accounted in system with the appropriate project or private code.
- For security reasons, the code is not shown in the display or in the redial list or call log. The number with the code cannot be transferred to the phone book. If you would like to call back a phone number from the call list or the call log with a project code, you have to manually enter the external line code and project code in the call list or call log display.
Set reminders (appointments)
Set reminders (appointments)
You can set your telephone to remind you of important appointments. You can enter and be reminded of up to 10 appointments. You can select whether you wish to be reminded once or every day.
When the time of the appointment arrives, a signal tone sounds and the message you have entered for the appointment appears in the display.
You can delete entered appointments specifically.
Entering a new appointment

Press the MENU key.

Scroll to the Appointments menu item.

Confirm selection.

Scroll to the Enter new appointment menu item.

Confirm your selection and enter the desired appointment data and text.

Scroll to the One-time appointment menu item.

Implement any required changes using the "Modify" key.

Press the "Save" softkey.
The message Appointment enabled appears in the idle display.
- In the "Number" field, you can also enter the number of a party you would like to speak to after the appointment message appears. The icon → appears in the list of appointments.
- The maximum text length is 26 characters.
Set reminders (appointments)
Viewing appointments
In idle state:

Scroll to the Appointment enabled menu item.

Confirm selection.
The existing appointments are shown.
Appointment message
At the relevant time, the signal tone sounds and the appointment message appears on the display.
☐ Press the "OK" key to turn off the signal tone. The Appointment expired status message now appears in the idle display and the LED in the corresponding display key lights up.
- If you have entered a number when entering the appointment, it is shown in the display after acknowledgement of the appointment signal. You then only need to lift the handset or press the SPEAKER function key to call the subscriber with that number.
- The "Appointment expired" message appears in the idle display until you have scrolled through all the expired entries in the "Appointments" menu.
Set reminders (appointments)
Deactivating appointments

Press the MENU key.

Scroll to the Appointments menu item.

Confirm selection.

Scroll to the desired appointment.

Confirm selection.

Scroll to the Appointments One-time appointment or Daily appointmentmenu item.

Set to
Appointments off.

Press the "Save" softkey.
Deleting appointments
In idle state:

Scroll to the Appointment enabled menu item.

Confirm selection.

Scroll to the desired appointment, e.g. 22.03.01 15:00 Meeting (on).

Press the "Delete" softkey. A prompt appears in the info line.

Press the "Delete" softkey again.
Locking the telephone
Locking the telephone
You can protect your telephone against unauthorized use by locking it with a PIN (Personal Identification Number). You can enter this PIN yourself and also change it at any time. The following functions are still available in the locked state:
- Answering calls
- Dialing internal numbers
- Dialing specified emergency numbers (↑134)
- Activating and deactivating call diversion
Changing the PIN (Personal Identification Number)
A Press the MENU key.
Scroll to the Lock menu item.
OK Confirm selection.
Scroll to the Change PIN menu item.
OK Confirm selection.
1 ... Enter the current PIN (default setting: "0000"; see also below)
Scroll to the New PIN menu item.
.,@ 1 ... WXYZ Enter the new PIN.
Scroll to the Reenter PIN menu item.
.,@ 1 ... wxyz Enter the new PIN again to verify.
☐ Press the "Save" softkey.
- If central locking is enabled in your communication server, the default setting may also be "00000" (if five-digit) or "000000" (if six-digit). If you have any questions please contact your system administrator.
- The lock PIN is identical to the PIN for logging on the IP telephone.
Locking the telephone
• The PIN may have four to six digits.
- The first digit of the PIN may not be 0 or 1. The PIN must not be the same as your phone number.
- If you forget the PIN, contact your system administrator.
Locking the telephone
text_image
Press the MENU key. ✓ Scroll to the Lock menu item. OK Confirm selection. ✓ Scroll to the Lock menu item. OK Confirm your selection.- You can only lock the phone if you have changed the default PIN.
Unlocking the telephone
In the idle display:
Scroll to the Telephone locked status message.
OK Confirm selection.
1 ... WXYZ Enter the current PIN.
OK Confirm input. If you enter the wrong PIN three times in succession, the telephone will be blocked for 15 minutes.
• The PIN may have four to six digits. If you have any questions please contact your system administrator.
Locking the telephone
Automatic locking
The automatic lock can be activated or deactivated.

Press the MENU key.

Scroll to the Lock menu item.

Confirm selection.

Scroll to the Automatic lock menu item.

Confirm selection.

Scroll to the desired setting.

Confirm selection.
- This lock function is only activated after the phone has returned to idle (where applicable).
• Automatic locking is not applied if the phone has already been locked. - If Automatic lock has been activated, the phone will be locked every day at the same time.
Locking the telephone
Lock at

Press the MENU key.

Scroll to the Lock menu item.

Confirm selection.

Scroll to the Lock at menu item.
The cursor will flash under the first number where you can enter the hour (ten's place). You can enter the following: 0, 1, 2. Afterwards, you can specify the one's place for the hour and then the minutes.

Confirm selection.
- The time can only be changed if the automatic lock function has been deactivated.
Telephoning with partners\*
Telephoning with partners\*
Setting up partner names 87
Information about partners on the display 89
Information about partners on function keys (9650/9650C) 90
Calling a partner 91
Answering a call for a partner 92
Assigning partners to another key 93
Hiding partner keys 94
Activating partner beep 95
Assigning partners on the Button Module* 97
Partner diversion 98
Extending a partner group* ....106
Reducing a partner group* ....107
Restricting partner signaling* 108
Assigning a line as the executive line ....109
Setting up a connection for partners ....110
Filtering 111
Your system administrator can connect several telephones on your system to a partner group (9650/9650C: max. 16 partners; 9630, 9640: max. 10 partners). The display tells you what each partner is doing. You can set your telephone to sound a short tone whenever one of your partners receives a call (partner beep). You can also set up and, if required, delete several partner diversions just by pressing a few keys. To do this, the "Deputy key" function key must be set up.
Setting up partner names
Setting up partner names

Press the MENU key.

Scroll to the Settings menu item.

Confirm selection.

Scroll to the Applications/Partner menu item.

Confirm selection.

Scroll to the Partners menu item.

Confirm selection.

Scroll to the Adapt my partners menu item.

Confirm selection.

Scroll to the Set partner name menu item.

Confirm selection.

Scroll to the partner phone number to which you want to assign a name.

Confirm selection.
You can now allocate the relevant name to the selected number. Two fields are available for this purpose. In the "Long name" field, you can enter up to seven letters. If no partner call diversion is set up, this text then appears in the display. However, if a call diversion to the partner or from the partner is set up, then the text that appears in the display is what you have entered in the "Short name" field (up to three letters).

Press the "Save" softkey.
Setting up partner names
- If nothing has been entered in the "Short name" field, then the first three letters of the name entered in the "Long name" field appear when a call diversion is set up to the partner or from the partner.
- To reach the partner menu more quickly, you can assign a "Partner" function key or, with the receiver on-hook, press a partner key and then select the "Partner setup" menu item.
Information about partners on the display
Information about partners on the display
By default, all partners are assigned to function keys. You are informed about your partners' activities in the assigned display fields.
| 4711 | Partner "4711" is free. |
| 4711 | Partner "4711" is being called. |
| 4711 | Partner "4711" is being called by two different callers simultaneously. |
| 4711 | Partner "4711" is busy. |
| 4711 | Partner "4711" is busy and will be called additionally. |
| 711715 | Partner "4711" has set up a partner diversion to partner "4715". |
Information about partners on function keys (9650/9650C)
Information about partners on function keys (9650/9650C)
In the 9650/9650C, the partner statuses are additionally displayed for the assigned display fields by the LEDs of the function keys:
| Partner status LED | |
| Available Off | |
| Call Flashes quickly | |
| Call/diversion destination Flashes quickly | |
| Second call Flashes quickly | |
| Busy On | |
| Busy/call On | |
| Free/call diversion to ...active | Flashes slowly |
| Free/diversion destination Off | |
| Partner diversion Flashes slowly |
- Signaling can be changed by the system administrator.
Calling a partner
Calling a partner

Lift the handset.
☐ Press the function key for the desired partner.
Telephoning with partners*
Answering a call for a partner
Answering a call for a partner
A partner telephone rings and the corresponding display flashes:

Press the Partner key and wait until the call reaches you.

Lift the handset.
Assigning partners to another key
Assigning partners to another key

Press the MENU key.

Scroll to the Settings menu item.

Confirm selection.

Scroll to the Applications/Partner menu item.

Confirm selection.

Scroll to the Partners menu item.

Confirm selection.

Scroll to the Adapt my partners menu item.

Confirm selection.

To scroll to the Change partner position menu option.

Confirm selection.

Select the partner you want to assign to another key, e.g. Liszt.

Confirm selection.
☐ Press the partner or function key that you want to assign. The previous key assignment is displayed.
☐ Press the "Save" softkey. The partner is now assigned to the new key.
Telephoning with partners\*
Hiding partner keys
Hiding partner keys

Press the MENU key.

Scroll to the Settings menu item.

Confirm selection.

Scroll to the Applications/Partner menu item.

Confirm selection.

Scroll to the Partners menu item.

Confirm selection.

Scroll to the Adapt my partners menu item.

Confirm selection.

Scroll to the Hide/show partner keys menu item.

Confirm selection.

Select the partner key that you no longer want to appear in your display, e.g. tner key Liszt.

Press the "Modify" softkey. The display switches to Partner key Liszt off.

Press the "Save" softkey. The partner key is no longer displayed.
Activating partner beep
Activating partner beep

Press the MENU key.

Scroll to the Settings menu item.

Confirm selection.

Scroll to the Applications/Partner menu item.

Confirm selection.

Scroll to the Partners menu item.

Confirm selection.

Scroll to the Adapt my partners menu item.

Confirm selection.

Scroll to the Set partner beep menu item.

Confirm selection.

Scroll to the partner for which you want to activate the partner beep, e. .g. for di.

Confirm selection.

Scroll to the Acoustics Off menu item.
Press the "Modify" softkey several times, if necessary, until the desired signaling is displayed. For example, the display switches to Acoustics Beep.
☐ Press the "Save" softkey. The signaling is saved.
Telephoning with partners\*
Activating partner beep
If you have set the beep or ringing tone and now wish to select and confirm the partner, new menu items appear. With this menu item you can activate a display indicator in addition to the beep. You can also configure a delay in seconds before the beep sounds as well as a filter of the "Partn. div. from my phone" destinations.

Scroll to the Display indic. menu item.
☐ Press the "Modify" softkey. The display switches to Display indic. Units.

Scroll to the Delay menu item.
☐ Press the "Modify" softkey several times, if necessary, until the desired delay is displayed e.g. Delay 10 sec.

Scroll to the Partn. div. from my phone Off menu item.
☐ Press the "Modify" softkey. The display switches to Partner div. from me phone On.
☐ Press the "Save" softkey. The settings are saved.
You will only receive notification of those calls from the partner Verdi (beep or display) diverted to the partner Verdi due to your call diversion setting. The delay is 10 seconds. You can now answer the call if you wish.
If your partner is called, you now hear a short tone (beep).

- If you set "Ringing tone" instead of "Beep", the normal ringing tone sounds on your telephone when your partner is called.
Assigning partners on the Button Module\*
Assigning partners on the Button Module\*
You can transfer all your partners from your telephone's function keys to the display fields of a Button Module.

Press the MENU key.

Scroll to the Settings menu item.

Confirm selection.

Scroll to the Applications/Partner menu item.

Confirm selection.

Scroll to the Partners menu item.

Confirm selection.

Scroll to the Adapt my partners menu item.

Confirm selection.

- Scroll to the Assign partner to DSS module menu item. The partners are transferred to the display fields of the Button Module in their current order. The previous key assignments on the button are overwritten.
- Using the "Assign partner to telephone" menu item, you can transfer the partners back to the telephone. All old key assignments of the Button Module are re-established.
- The Button Module is not supplied as standard with your telephone.
Partner diversion
Partner diversion
Diverting calls to a partner

Press the MENU key.

Scroll to the Settings menu item.

Confirm selection.

Scroll to the Applications/Partner menu item.

Confirm selection.

Scroll to the Partners menu item.

Confirm selection.

Scroll to the Set/delete partner diversion menu item.

Confirm selection.

Scroll to the Partn. div. from my phone menu item.

Confirm selection.

Scroll to the partner to whom you want to divert calls, e.g. to Verdi Off.

Press the "Modify" softkey. The display switches to to Verdi On.

Press the "Save" softkey. Partner diversion is now activated.

- You can also activate diversion to a partner by scrolling to the Partner div. from my phone menu item and then pressing the key of the partner to whom your calls are to be diverted. Partner diversion is then activated immediately.
- Diverting a call can be greatly simplified if you create a macro to set up a partner call diversion. You will find a detailed description in the chapter Setting up a macro (partner diversion) ( 121).
Partner diversion
Diverting partner calls to your telephone

Press the MENU key.

Scroll to the Settings menu item.

Confirm selection.

Scroll to the Applications/Partner menu item.

Confirm selection.

Scroll to the Partners menu item.

Confirm selection.

Scroll to the Set/delete partner diversion menu item.

Confirm selection.

Scroll to the Partner div. to my phone menu item.

Confirm selection.

Scroll to the partner from whom you want to divert calls to yourself, e.g. from Verdi Off.

Press the "Modify" softkey. The display switches to from Verdi On.

Press the "Save" softkey. Partner diversion is now activated.

- Partner diversion keys can also be set and deleted using the "Call Diversion Menu/Partner Diversion". Operation using the "Settings/Applications/Partners" menu is described here for illustrative purposes.
- You can also activate diversion from a partner by scrolling to the Partner div. to my phone menu item and then pressing the key of the partner from whom your calls are to be diverted.
Partner diversion is then activated immediately.
- It is also possible for you to divert calls from several partners to yourself.
Telephoning with partners\*
Partner diversion
Diverting calls from one partner to another

Press the MENU key.

Scroll to the Settings menu item.

Confirm selection.

Scroll to the Applications/Partner menu item.

Confirm selection.

Scroll to the Partners menu item.

Confirm selection.

Scroll to the Set/delete partner diversion menu item.

Confirm selection.

Scroll to the Partner diversion from/to others menu item.

Confirm selection.

Scroll to the partner from whom you wish to divert calls, e.g. from Verdi.

Confirm selection.

Now you have select the partner to whom you want to divert calls, e.g. from
Verdi to Liszt.

Confirm selection.
Partner diversion

Scroll to the from Verdi to Liszt Off menu item.
☐ Press the "Modify" softkey. The display switches to from Verdi to Liszt On.
☐ Press the "Save" softkey. Partner diversion is now activated.
- Instead of having to scroll through the selection list to find the desired partner, you can simply press the key assigned to that partner.
Extended partner diversion
If they have the appropriate authorization, subscribers of a partner group can set up a call diversion to any number for every subscriber in the partner group.
This means that call diversion can be activated to a partner's mobile or home number.

Press the MENU key.

Scroll to the Settings menu item.

Confirm selection.

Scroll to the Applications/Partner menu item.

Confirm selection.

Scroll to the Partners menu item.

Confirm selection.

Scroll to the Set/delete partner diversion menu item.

Confirm selection.

Scroll to the CFF partner diversion key 1..5.

Confirm selection.
Telephoning with partners\*
Partner diversion
☐ Press the "Entry" softkey.
Scroll to the partner being diverted.

Confirm selection.

... Now enter the number.

Confirm selection.
The function key is allocated.
- Authorization for extended partner diversion is locked by default.
- A maximum of five status displays for extended partner diversion can be shown in the display.
- Partner names are replaced by the number in extended partner diversion.
- You can program a macro (↑123) to a function key in order to set a certain partner diversion faster. In the 9650/9650C the LED of the function key shows the current status.
Partner diversion
Setting the deputy key

Press the MENU key.

Scroll to the Settings menu item.

Confirm selection.

Scroll to the Applications/Partner menu item.

Confirm selection.

Scroll to the Partners menu item.

Confirm selection.

Scroll to the Set/delete partner diversion menu item.

Confirm selection.

Scroll to the Set deputy key menu item.

Confirm selection.

Scroll to the partner being diverted.

Confirm selection.

Scroll to the Deputy after menu item.

Confirm selection.

Scroll to the partner to whom you want to divert calls, e.g. to Liszt.

Confirm selection.
Partner diversion

Scroll to the Select partner menu item.

Confirm selection. Then select the partners for whom calls are to be diverted.

Press the "Modify" softkey. The display switches to On.

Press the "Save" softkey.

Scroll to the Divert selected partners menu item.

Confirm selection.
The calls for the selected partners will now be diverted to the partner you entered. This diversion destination can be your own phone number.
You can now set up a Function key ( 114 ) with the name "Deputy key". This key activates the partner diversions in the idle menu according to the following pattern:
First press of the key: Set up selected partner diversion
Second press of the key: Delete selected partner diversion
Extending a partner group\*
Extending a partner group\*

Press the MENU key.

Scroll to the Settings menu item.

Confirm selection.

Scroll to the Applications/Partner menu item.

Confirm selection.

Scroll to the Partners menu item.

Confirm selection.

Scroll to the Adapt partner group size menu item.

Confirm selection.

Scroll to the Expand partner group menu item.

... Enter the phone number of the subscriber you want to add to your other group.

Press the key to which you want to assign the partner's number.
• After inputting the partner's number, you can also press the OK key. The phone number of the partner will then be entered into the next free display field.
- The phone numbers of the subscribers in the partner groups must be set up by your system administrator.
Telephoning with partners*
Reducing a partner group\*
Reducing a partner group\*

Press the MENU key.

Scroll to the Settings menu item.

Confirm selection.

Scroll to the Applications/Partner menu item.

Confirm selection.

Scroll to the Partners menu item.

Confirm selection.

Scroll to the Adapt partner group size menu item.

Confirm selection.

Scroll to the Reduce partner group menu item.

Confirm selection.

Scroll to the partner who you want to delete, e.g. Verdi.

Press the "Delete" softkey.
Restricting partner signaling\*
Restricting partner signaling\*

Press the MENU key.

Scroll to the Settings menu item.

Confirm selection.

Scroll to the Applications/Partner menu item.

Confirm selection.

Scroll to the Partners menu item.

Confirm selection.

Scroll to the Adapt partner group size menu item.

Confirm selection.

Scroll to the Restrict signaling Off menu item.

Press the "Modify" softkey. The display switches to On.

Press the "Save" softkey.
The partners can no longer see in their display whether you are on a call, whether you are being called, whether there call diversion exists for you, etc.
- The "Restrict partner signaling" function must be enabled by your system administrator.
- You can enable partner signaling again by setting signaling to "On".
Assigning a line as the executive line
Assigning a line as the executive line
Within a partner group, you can create a connection for another partner telephone (executive) from your telephone. In this way, for example, a secretary can assign a line for her boss. To do this, an "Executive line" function key must be set up on the secretary's telephone.
☐ Press the "EXLN" function key.
☐ Press the key for the partner for whom you want to assign a line. The status message "Line busy" appears in the display of the partner telephone. The partner can continue to telephone as usual. You can now set up a connection for this partner ( 109 ). Calls for the partner come to you.
Setting up a connection for partners
Setting up a connection for partners
You have assigned a line ( 108 ) for a partner telephone (executive) and you want to set up a connection for this partner.



Lift the handset.
If the other party answers:

Scroll to the new call to ... menu item.

Confirm selection.

Press the partner key.

Replace the handset. The partner is now connected to the other party. Your telephone is now free again. The partner call diversion is lifted.
- If you have lifted the receiver and replace it immediately, the line is enabled, unless you have started "Automatic redial".
Filtering
Filtering
Filtering is the targeted establishment of a partner diversion for internal and/or external calls.
Filtering is an executive secretary function. When filtering is active, incoming calls to the executive line are first signaled to the reception's devices. The call can be accepted here and then put through to the executive.
Filtering and filtering groups are set up in your communication server. Subscribers cannot change the filtering group. This is why the Partner menu is limited for the filtering subscribers. Name and partner beep can be programmed.
Which subscriber can activate filtering to which subscriber is also determined in the communication server. It is possible to activate filtering for one executive line to several reception desks for example. And one reception desk can activate filtering for several executive lines.
Subscribers can only program the filtering key in the function key menu when filtering has been initialized by the communication server. Filtering keys that have already been programmed are shown first.
Function keys:
- INT and EXT for internal calls and external calls to the executive phone.
• FILTER on reception's phone.
On the 9650/9650C the functions can be assigned to function keys. The respective status is then also shown with the LED.
The status is shown on the display for all subscribers of the filter groups. The status differentiates according to:
- "> " from this executive line,
-
"<" to this reception desk.
-
The filtering group is set up in the communication server.
- Limited Partner menu.
- Calls cannot be accepted within the filtering group.
- One reception desk can be assigned to a maximum of five executive lines.
- One executive line can be assigned to a maximum of 10 reception desks.
- Up to 10 filtering subscribers can be shown in the display.
Filtering
Secretary
Function key programming allows you to assign filtering to one key with FILTER.
☐ Press the "FILTER" function key.
Filtering for all internal and external calls for the allocated executive line is activated.
Filtering status is shown in the display. If a function key has been defined on the 9650/9650C, the LED also indicates the status. The status display and LED remain active as long as filtering is active for at least one executive line. The display also shows from which executive line (">") calls are being diverted. Other reception desks also active for filtering are indicated with "<".
- When filtering is active, a filtering call is signaled on all reception desk devices in the filtering group. When the handset is lifted or the handsfree set switched on, the connection is established to the device that accepted the call first.
- One reception desk can be assigned a maximum of five executive lines in the filtering group.
- A maximum of ten filtering group subscribers with status can be shown in the display.
Executive line
Function key programming allows you to assign keys for filtering with INT and EXT. If a function key has been defined on the 9650/9650C, the LED also indicates the status.
☐ Press the "INT" or "EXT" function key. Filtering to the allocated reception desks is activated/deactivated for the corresponding call type.
Activation/deactivation requires no further action by reception.
These function keys can be used to change the current filtering settings. For example, if a reception desk activated filtering for all internal and external calls.
Filtering status is shown on the display.
- One executive line can be assigned to a maximum of ten reception desks.
- The display shows a maximum of ten filtering group subscribers with their respective status.
- Signaling "<" to reception, "> " from executive line.
Customizing your telephone
Customizing your telephone
Do not disturb 113
Assigning functions/numbers to keys 114
Setting up macro functions ....120
Anonymous call* 125
Deactivating second call ....126
Deactivating direct dialing 127
Deactivating Automatic tone dialing (DTMF) 128
Changing the DTMF pulse duration 129
Activating key beep tones ....130
Time zones 131
Private User Mobility* 132
Saving emergency numbers ....134
Setting up own name 135
Relocating with the telephone* 136
Saving personal data 137
Setting up VIP functions* 139
Activating Handsfree Answer Back* 146
Audio, contrast and language settings ....147
Activating CSTA Answer Call* 153
Leaving a hunt group* 154
Logging in to automatic call distribution* 155
Viewing/modifying user data 156
Viewing/changing IP settings 159
Recognition of partial numbers 167
Customizing the call list* 171
Do not disturb
Do not disturb
You can switch off the ringing tone, the signal tone and the VIP ringing tone, e.g. if you are in a meeting. If you are then called, you will only hear the alert tone.

Press the MENU key.

Scroll to the Settings menu item.

Confirm selection.

Scroll to the Display/Acoustics menu item.

Confirm selection.

Scroll to the Do not disturb menu item.

Confirm selection.

Scroll to the desired menu item, e.g. Signal tone On.

Press the "Modify" softkey. The display changes to Signal tone Off.

Confirm the change by pressing the "Save" softkey. The new setting is then d.
- To re-activate any of these tones, scroll to the respective menu item and change the setting as described above.
Assigning functions/numbers to keys
Assigning functions/numbers to keys
Functions ( 181) and numbers that you use frequently can be assigned to softkeys (9630, 9640) or function keys (9650/9650C). You can then execute the functions or dial the phone numbers simply by pressing the key.
- All the procedures described in this user manual assume a standard assignment of the function keys.
- If you reassign function keys, please bear in mind that this may change the operating procedures.
Assigning functions to keys

Press the MENU key.

Scroll to the Settings menu item.

Confirm selection.

Scroll to the Keys menu item.

Confirm selection.

Scroll to the Set function keys menu item.

Confirm selection.

Scroll to the function you want to assign to the key, e.g. Charges.

Confirm selection.
☐ Press the function key to which you want to assign the new function. You can now see the function or number previously assigned to the key.
☐ Confirm new key assignment by pressing the "Save" softkey.
Assigning functions/numbers to keys
Creating a destination key

Press the MENU key.

Scroll to the Settings menu item.

Confirm selection.

Scroll to the Keys menu item.

Confirm selection.

Scroll to the Set destination keys menu item.

Confirm selection.

Confirm Set new destination and then enter the name and phone number.
☐ Press the "Assign" softkey. You will be prompted to press the key to which you wish to assign the destination
☐ Press the function key that you wish to assign. The display indicates the function or call number to which the key was previously assigned.
☐ Confirm new key assignment by pressing the "Save" softkey.
- In the idle state you can also press an unprogrammed key directly. You can then enter the number you want to store there immediately.
In general you work with a "Consultation call" (refer-back). If you press a destination key during a call, a new connection is immediately established through refer-back. You can, however, allocate destinations with explicit DTMF suffix dialling. You must change another detail when entering a destination, however.
After you enter the number:

Scroll to the Consultation call On menu item.
☐ Press the "Modify" softkey. The setting changes to Off.
☐ Confirm the setting by pressing the "Save" softkey.
Assigning functions/numbers to keys
Destination key from phone book

Press the MENU key.

Scroll to the Settings menu item.

Confirm selection.

Scroll to the Keys menu item.

Confirm selection.

Scroll to the Set destination keys menu item.

Confirm selection.

Confirm Set new destination.

Scroll to the Copy entry from phone book menu item.

Confirm selection.

Scroll to the desired entry, e.g. Ligeti 0069123456.

Confirm selection.
☐ Press the "Assign" softkey. You will be prompted to press the key to which you wish to assign the destination.
☐ Press the function key that you wish to assign. The display indicates the function or call number to which the key was previously assigned.
☐ Confirm new key assignment by pressing the "Save" softkey.
i
- In the idle state you can also press an unassigned key directly. You can then enter the number you want to store there immediately.
- To reach the desired entry more quickly, you can also enter one or more of the first letters in the name.
Assigning functions/numbers to keys
Changing an existing destination

Press the MENU key.

Scroll to the Settings menu item.

Confirm selection.

Scroll to the Keys menu item.

Confirm selection.

Scroll to the Set destination keys menu item.

Confirm selection.

Scroll to the Edit destination key menu item.

Confirm selection.
☐ Press the key that you want to edit. You can now change the name and the number.
☐ Confirm the change by pressing the "Save" softkey.
- You can also change the existing destination by pressing the associated function key and select the "Edit destination key" menu item.
Customizing your telephone
Assigning functions/numbers to keys
Clearing key assignments

Press the MENU key.

Scroll to the Settings menu item.

Confirm selection.

Scroll to the Keys menu item.

Confirm selection.

Scroll to the Set function keys or Set destination keys menu item.

Confirm selection.

Scroll to the Delete entry or Delete destination key menu item.

Confirm selection.
☐ Press the key whose assignment you want to clear. You can now see the function or destination previously assigned to the key.

Scroll to the Delete function or Delete destination key menu item.

Confirm using the OK key.
Assigning functions/numbers to keys
Display key assignment
You can use your telephone display to see which function, destination, partner or line a key on your telephone or Button Module is assigned to.

Press the MENU key.

Scroll to the Settings menu item.

Confirm selection.

Scroll to the Keys menu item.

Confirm selection.

Scroll to the Display key assignment menu item.

Confirm selection.
☐ Press the desired display key, function key or key on the Button Module. You can now see which function or destination is currently assigned to this key.
- You can exit the menu by pressing the "Back" key.
Functions keys with LED (9650/9650C)
Your telephone has 8 function keys with LEDs. The LED shows you the current status of the key function. You can then, for example, see whether the function is switched on or off.
Setting up macro functions
Setting up macro functions
You can assign multi-step macro functions to your telephone's function keys (not available in the 96209620L). This means that you can, for example, activate and deactivate a fixed call diversion by pressing a single key. If you assign a partner diversion to a function key, you can activate a partner diversion or switch between two fixed diversion destinations by pressing a single key.
Setting up a macro (call diversion and pick-up)

Press the MENU key.

Scroll to the Settings menu item.

Confirm selection.

Scroll to the Keys menu item.

Confirm selection.

Scroll to the Set macro function menu item.

Confirm selection.

- Scroll to the macro function you want to assign to the key, e.g. Call diversion 1.

Confirm selection.

... Enter the phone number to which you want to divert calls (call sion) or from which you want to pick up calls on your telephone (pick-up).

Press the "Assign" softkey.

Press the key to which you want to assign the macro function. You can now use the function or number previously assigned to the key.

Confirm new key assignment by pressing the "Save" softkey.
Setting up macro functions
Partner diversion macro

Press the MENU key.

Scroll to the Settings menu item.

Confirm selection.

Scroll to the Keys menu item.

Confirm selection.

Scroll to the Set macro function menu item.

Confirm selection.

Scroll to the macro function you want to assign to the key, e.g. Partner diversion 1.

Confirm selection.

Press the "Assign" softkey.

Scroll to the partner from whom you wish to divert calls, e.g. from Verdi.

Confirm selection.

Now you have select the partner to whom you want to divert calls, e.g. from Verdi to Liszt.

Confirm selection.

Now you have to select whether you require another alternative call diversion destination (e.g. from Verdi to Liszt or Frank) or whether you only require one destination (in this example: from Verdi to Liszt).

Confirm selection.
Setting up macro functions
☐ Press the key to which you want to assign the macro function. You can now see the function or number previously assigned to the key.
☐ Confirm new key assignment by pressing the "Save" softkey.

- If you have set up the partner diversion with two destinations, then you can switch between these two destinations by pressing a single key.
- You can now only activate the partner diversion with two destinations using the menu. Call up the basic Partner menu and select the menu item "Partner diversion from/to others" in the "Set/delete partner diversion" menu. Then select the desired diversion from the list to deactivate the partner diversion.
- If you have only selected one destination, then the function key activates and deactivates the call diversion entered.
Setting up macro functions
Macro-enhanced partner diversion

Press the MENU key.

Scroll to the Settings menu item.

Confirm selection.

Scroll to the Keys menu item.

Confirm selection.

Scroll to the Set macro function menu item.

Confirm selection.

Scroll to the macro function you want to assign to the key, e.g. CFF Partner diversion 1.

Confirm selection.

Press the "Assign" softkey.

Scroll to the partner from whom you wish to divert calls, e.g. from Verdi.

Confirm selection.

... Now enter the destination.

Confirm selection.
☐ Press the key to which you want to assign the macro function. You can now see the function or number previously assigned to the key.
☐ Confirm new key assignment by pressing the "Save" softkey.
Customizing your telephone
Setting up macro functions
Coming/going macro
You can activate a call diversion and partner diversions at the push of a button.

Press the MENU key.

Scroll to the Settings menu item.

Confirm selection.

Scroll to the Keys menu item.

Confirm selection.

Scroll to the Set macro function menu item.

Confirm selection.

Scroll to the Going menu item.

Confirm selection.
You can now specify up to three from/to partner diversions and one call diversion. Use the digits and partner keys to make your entry.

Switches the selected diversion on/off.
☐ Press the "Assign" softkey.
☐ Press the key to which you want to assign the macro function. You can now see the function or number previously assigned to the key.
☐ Confirm new key assignment by pressing the "Save" softkey.
Anonymous call\*
Anonymous call\*
You can determine whether your phone number is to be shown to the other parties. This function must be enabled in the communication server.

Press the MENU key.

Scroll to the Settings menu item.

Confirm selection.

Scroll to the Dial settings menu item.

Confirm selection.

Scroll to the Anonymous call Off menu item.

Press the "Modify" softkey. The setting changes to Off.
Anonymous call On.

Press the "Save" softkey. The new setting has been saved.
Anonymous call appears in the status display.
- If you assign the function to a function key, you can enable and disable it with one push of a button.
Deactivating second call
Deactivating second call
If you want to answer an additional call (Second call) during a call, you can activate Second call.

Press the MENU key.

Scroll to the Settings menu item.

Confirm selection.

Scroll to the Display/Acoustics menu item.

Confirm selection.

Scroll to the Second call Off menu item.

Press the "Modify" softkey. The setting switches to Second call On.

Press the "Save" softkey. The new setting has been saved. Second callars in the status display.
- If you assign the function to a function key, you can enable and disable it with one push of a button.
Deactivating direct dialing
Deactivating direct dialing
By default, dialing will be started immediately a destination or numeric key is pressed. However, this feature can be disabled.

Press the MENU key.

Scroll to the Settings menu item.

Confirm selection.

Scroll to the Dial settings menu item.

Confirm selection.

Scroll to the Direct dial menu item.

Press the "Select" softkey.

Select the menu item that you wish to change, e.g. Direct digit dial.

Change setting.

Press the "Save" softkey. The new setting has been saved.
- If you want to reactivate direct dialing for destinations, then scroll to the Direct dest. dial (Off) menu item and select On.
Deactivating Automatic tone dialing (DTMF)
Deactivating Automatic tone dialing (DTMF)
Your telephone is set at factory so that all post-dialed numeric keys are sent as tones during a connection. For example, you can listen to voicemail or control an answering machine remotely. These digits are neither displayed nor entered into the redial memory.

Press the MENU key.

Scroll to the Settings menu item.

Confirm selection.

Scroll to the Dial settings menu item.

Confirm selection.

Scroll to the Tone dial DTMF switchover (On) menu item.
☐ Press the "Modify" softkey. The setting changes to DTMF switchover Off.
☐ Confirm the change by pressing the "Save" softkey. The new setting has been saved.
- If you want to re-activate tone dialing, then scroll to the Tone dial DTMF switchover (Off) menu item and select On.
Changing the DTMF pulse duration
Changing the DTMF pulse duration
You can change the DTMF pulse duration (DTMF = dual tone multi frequency dialing method). This can be of use when, for example, an answering machine does not react to signals from your telephone. With certain answering machines, a pulse duration of 1000 ms (slow) is required, with others 500 ms (average). Your telephone is preset to 100 ms (fast).

Press the MENU key.

Scroll to the Settings menu item.

Confirm selection.

Scroll to the Dial settings menu item.

Confirm selection.

Scroll to the Tone DTMF duration quick menu item.
☐ Press the "Modify" softkey several times if required and select the desired setting, e.g. DTMF duration average.
☐ Confirm the change by pressing the "Save" softkey. The new setting has been saved.
Change DTMF duration
Change DTMF duration
You can change the DTMF duration (DTMF = dual tone multi frequency dialing method). This can be of use when, for example, an answering machine does not react to signals from your telephone).

Press the MENU key.

Scroll to the Settings menu item.

Confirm selection.

Scroll to the Keys menu item.

Confirm selection.

Scroll to the Key beep Off menu item.
☐ Press the "Modify" softkey. The setting switches to Key beep On.
☐ Confirm the entry by pressing the "Save" softkey. The new setting has been saved.
- If you wish to deactivate the key beep, scroll to the Key beep On menu item and change it as described above.
Time zones
Time zones
You can have the current date and time in 26 cities around the world displayed.

Press the MENU key.

Scroll to the Time zones menu item.

Confirm selection. The display shows the current date and time in 26 cities.
- The time that your telephone shows for a city can differ from the actual time in that city, as the change between summer and winter time is different in the various countries.
Private User Mobility\*
Private User Mobility\*
The Private User Mobility feature allows you to log on to any telephone within your system. You can then be reached on this telephone with your phone number and the charging units incurred will be allocated to your phone number. This function is protected by a PIN. In order to be able to use the function, it must be enabled in the communication server and two function keys must have the functions "Log on" and "Log off" assigned to them.

- The PIN is identical to your locking PIN. If you want to use PUM, the PIN must be exactly 6 digits long.
Logging on to the telephone
☐ Press the "Log on user" function key or the "IN" display key (depending on whether you have assigned the function to a function or display key).



Scroll to the Code: menu item.


display.

Press the "Log on" softkey.
A status message appears in the display. You are now logged in to this telephone and you can use it exactly like your own line.
Private User Mobility\*
Logging out from the telephone
☐ Press the "Log out user" function key or the "OUT" display key (depending on whether you assigned the function to a function key or a display key). You are now logged out of this telephone. Your personal settings (call log, call list, redial, call diversion, callbacks entered) are cleared.
- You are logged off automatically if another subscriber logs on to this telephone with his personal number.
- You can also log off by selecting the PUM user Chopin status message by
pressing , followed by "Log off" softkey.
Saving emergency numbers
Saving emergency numbers
You can save two emergency numbers which can be dialed even when your telephone is locked.

Press the MENU key.

Scroll to the Settings menu item.

Confirm selection.

Scroll to the Security menu item.

Confirm selection.

Scroll to the Set emergency numbers menu item.

Confirm selection.

Scroll to the desired Emergency number.

Confirm the entry and then enter the name and phone number.

Press the "Assign" softkey.

Press the key to which you want to assign the emergency number. You can see the function or number previously assigned to the key.

Confirm new key assignment by pressing the "Save" softkey.
- Warning: The emergency numbers must also be set up in your communication server, otherwise they cannot be selected when the phone is locked!
- If you press the function key to which the emergency number is assigned, your telephone automatically switches to handsfree and dials the saved emergency number.
- When using the central lock in your communication server, the emergency numbers defined there apply.
Setting up own name
Setting up own name
You can save your name to have it shown on the display.

Press the MENU key.

Scroll to the Settings menu item.

Confirm selection.

Scroll to the Display/Acoustics menu item.

Confirm selection.

Scroll to the Set own name menu item.
☐ Press the "Select" softkey and enter or change your name.
☐ Confirm the change by pressing the "Save" softkey. The new setting has been saved.
Relocating with the telephone\*
Relocating with the telephone\*
If you move to a different location in the same telephone system, you can log on with your previous phone number and previous PIN in order to access your personal settings and phone book there.
Before relocating:
Before relocating, you need to log out ( 157). Your personal settings and your phone book will then be saved and no longer be available at that telephone.
After relocating:
To be able to access your personal settings and phone book again, you will need to log on (↑26) with your own number and PIN.
Saving personal data
Saving personal data
You can save your personal phone settings centrally in your communication server as a backup – when this feature has been enabled by your system administrator. In the communication server, your data is protected with a password. Your system administrator can save or copy your personal telephone data from a central location. This can be avoided by blocking central data saving.
Carrying out immediate central data saving\*
A Press the MENU key.
Scroll to the Settings menu item.
Confirm selection.
Scroll to the Security menu item.


Confirm selection.

Scroll to the Save data menu item.

Confirm selection.

Scroll to the Save data centrally menu item.

Confirm selection.

... ⑨ Enter your PIN. The digits of the PIN are shown as asterisks "*" in the way.
☐ Confirm data save by pressing the "Save" softkey.
The message "Saving your settings" will appear for a time in the display. Your data has now been saved.
Customizing your telephone
Saving personal data
Blocking central data saving

Press the MENU key.

Scroll to the Settings menu item.

Confirm selection.

Scroll to the Security menu item.

Confirm selection.

Scroll to the Save data menu item.

Confirm selection.

Scroll to the Access to save data centrally Blocked menu item.

Confirm selection.
☐ Press the "Modify" softkey. The display switches to Access to save data centrally Free.
☐ Confirm the change by pressing the "Save" softkey. Your data cannot now be saved from a central location.
- If you want to deactivate central data saving, then scroll to the Access to save data centrally free menu item and select blocked.
Setting up VIP functions\*
Setting up VIP functions\*
You can set up special functions between telephones of your system, provided you have made the appropriate preparations. To do this, certain pre-settings on both the sending and the receiving telephone have to be the same. The following pages describe typical cases for the application of VIP functions. The sending telephone is called the "executive telephone" and the receiving telephone the "secretary telephone".
Using the executive telephone as a two-way intercom system to the secretary
Setting up the executive telephone
A Press the MENU key.
Scroll to the Settings menu item.
OK Confirm selection.
Scroll to the VIP menu item.
OK Confirm selection.
.1 @ ... WXYZ Enter the current PIN.
OK Confirm input.
Scroll to the Send VIP functions menu item.
☐ Press the "Modify" softkey several times, if necessary, until the setting Authorized is displayed.
Scroll to the Set VIP partner menu item.
☐ Press the "Select" softkey.
Scroll to the Entry from phone book or Entry from key assign. or Personal emergency callor Partner menu item.
OK Confirm selection.
Setting up VIP functions\*

Scroll to the entry for the secretary telephone.

Confirm selection.

Scroll to the Send to user menu item.
☐ Press the "Modify" softkey several times, if necessary, until the setting Announce&Ackn. is displayed.
☐ Confirm the setting by pressing the "Save" softkey.
- If you select on instead of Announce&Ackn., only the VIP ring tone will be heard on the secretary phone when the secretary phone is called by the executive phone.
For this it will also be necessary to make several more settings ( 140 ) for the secretary phone.
Setting up the secretary telephone

Press the MENU key.

Scroll to the Settings menu item.

Confirm selection.

Scroll to the VIP menu item.

Confirm selection.

... Enter the current PIN.

Confirm input.

Scroll to the Receive VIP functions menu item.
☐ Press the "Modify" softkey several times, if necessary, until the desired setting is displayed.
- "All callers" if you want VIP functions to be possible with all subscribers;
- "Authorized" if you want VIP functions to only be available to subscribers you specify or have already specified in the "Set VIP partner" menu.
Setting up VIP functions\*

Scroll to the Set VIP partner menu item.

Confirm selection.

- Scroll to the Entry from phone book or Entry from key assign. or Personal emergency call or Partner menu item.

Confirm selection.

Scroll to the entry for the executive telephone.

Confirm selection.

Scroll to the Receive from user menu item.
☐ Press the "Modify" softkey. The setting changes to On.
☐ Confirm the setting by pressing the "Save" softkey.
Setting up VIP functions\*
Announcements from the executive telephone
If the user has been granted authorization by the system administrator, he can program an "Announcement" function key. As a result, VIP announcements with reply can be made significantly faster.
Press the function key and then enter the dial digits using the digit or destination keys. If the called subscriber has activated "Receive VIP functions" the call results in "Announcement with reply". A call window opens for both the person called and the person being called.
Setting up the executive telephone

Press the MENU key.

Scroll to the Settings menu item.

Confirm selection.

Scroll to the VIP menu item.

Confirm selection.

... Enter the current PIN.

Confirm input.

Scroll to the Send VIP functions menu item.
☐ Press the "Modify" softkey several times, if necessary, until the setting Authorized is displayed.

Scroll to the Set VIP partner menu item.

Confirm selection.

Scroll to the Entry from phone book or Entry from key assign. or sonal emergency call or Partner menu item.

Confirm selection.
Setting up VIP functions\*

Scroll to the entry for the secretary telephone.

Confirm selection.

Scroll to the Send to user menu item.
☐ Press the "Modify" softkey several times, if necessary, until the setting with announc. is displayed.
☐ Confirm the setting by pressing the "Save" softkey.
- If you select on instead of with announcm., only the VIP ring tone will be heard on the secretary phone when the secretary phone is called by the executive phone. For this it will also be necessary to make several more settings ( 144) for the secretary phone.
Customizing your telephone
Setting up VIP functions\*
Setting up the secretary telephone

Press the MENU key.

Scroll to the Settings menu item.

Confirm selection.

Scroll to the VIP menu item.

Confirm selection.

... Enter the current PIN.

Confirm input.

Scroll to the Receive VIP functions menu item.
☐ Press the "Modify" softkey several times, if necessary, until the desired setting is displayed.
- "All callers" if you want VIP functions to be possible with all subscribers;
- "Authorized" if you want VIP functions to only be available to subscribers you specify or have already specified in the "Set VIP partner" menu.

Scroll to the Set VIP partner menu item.

Confirm selection.

- Scroll to the Entry from phone book or Entry from key assign. or Personal emergency callor Partner menu item.

Confirm selection.

Scroll to the entry for the executive telephone.

Confirm selection.

Scroll to the Receive from user menu item.
Setting up VIP functions\*
☐ Press the "Modify" softkey several times, if necessary, until the setting On is displayed.
☐ Confirm the setting by pressing the "Save" softkey.
Using the VIP functions
Using the announcement or two-way intercom system:
☐ Press the relevant destination key for the secretary telephone or select the phone book entry.
☐ Press the SPEAKER function key or pick up the handset. "Handsfree" is automatically activated on the secretary telephone. The two parties can now speak to one another. For "Announcement", the loudspeaker is activated on the secretary telephone. You can make an announcement.
Activating Handsfree Answer Back\*
Activating Handsfree Answer Back\*
You can set up your telephone so that calls are answered immediately. If you receive a call, you will hear only a short signal tone and your telephone's microphone and loudspeaker are activated immediately. This means that you can speak to the caller right away.

Press the MENU key.

Scroll to the Settings menu item.

Confirm selection.

Scroll to the Applications... menu item. .

Confirm selection.

Scroll to the Answer call menu item.

Confirm selection.

Scroll to the Handsfree Answer Back (off) menu item.
Select whether the headset should answer a call automatically

Scroll to the Headset Off menu item

Change setting.

Press the "Save" softkey.
The status display Handsfree Answer Back on appears in the display.
i
- You can disable Handsfree Answer Back in the same manner.
- If Handsfree Answer Back is set to On the call is answered immediately in handsfree mode.
- If Headset is set to On the call is answered on the headset only.
Audio, contrast and language settings
Audio, contrast and language settings
You can modify various audio settings and the display contrast and brightness to suit your requirements.
You can change the display language at any time. The standard available languages are English, French and German. French, Italian, Dutch, Slovenian, Polish, Czech, Russian and Turkish can be downloaded.
Audio settings

Press the MENU key.

Scroll to the Settings menu item.

Confirm selection.

Scroll to the Display/Acoustics menu item.

Confirm selection.

Scroll to the Set acoustics menu item.

Confirm selection.

Scroll to the desired menu item, e.g. Ringing tone volume.

Increase or reduce volume. New ring settings are sounded immediately you can check them.

Confirm the change by pressing the "Save" softkey. The new setting is then d.
- You can also change any setting by pressing the numeric key of the desired setting, by pressing the arrow keys (or with the keys.
- To reset all audio settings to the default, press the "Default" softkey.
Customizing your telephone
Audio, contrast and language settings
Select ringer melody
You can assign various ringer melodies to various types of calls (internal calls, external calls, VIP, partner):

Press the MENU key.

Scroll to the Settings menu item.

Confirm selection.

Scroll to the Display/Acoustics menu item.

Confirm selection.

Scroll to the Set acoustics menu item.

Confirm selection.

Scroll to the Select ringer melody menu item.

Confirm selection.

Scroll to the relevant call type, e.g. Internal call Melody 1.

Confirm selection.

Select the melody you want to use, e.g. Melody 2.

Confirm selection. This melody will now be saved and also replayed immediately as a check.
- You can change the melody's playback speed under Set melodies.
Audio, contrast and language settings
Set receiver sound
The receiver sounds can be set in the handset*:

Press the MENU key.

Scroll to the Settings menu item.

Confirm selection.

Scroll to the Display / Acoustics menu item..

Confirm selection.

Scroll to the Set acoustics menu item.

Confirm selection.

Scroll to the Headset Audio or Handset Audio menu item..

Confirm selection.
( ◀() ▶ ). Select the audio quality, e.g. Balanced Best or Best Sound, or Best Voice.
☐ Confirm the setting by pressing the "Save" softkey. The new setting is then saved.
* This setting is also available for the headset
Customizing your telephone
Audio, contrast and language settings
Setting contrast and brightness

Press the MENU key.

Scroll to the Settings menu item.

Confirm selection.

Scroll to the Display/Acoustics menu item.

Confirm selection.

Scroll to the Set contrast* or Set brightness menu item.

Confirm selection.

Increase or reduce contrast.
☐ Confirm the entry by pressing the "Save" softkey. The new setting has been saved.
- You can also change any setting by pressing the numeric key (1–8) of the desired setting, by pressing the arrow keys (or with the keys.
- * the 9640 and 9650C don't have a Contrast menu item; Exception: connected SBM24 module the Brightness menu has a DSS-Modul 1 menu item.
Audio, contrast and language settings
Selecting the language for the display

Press the MENU key.

Scroll to the Settings menu item.

Confirm selection.

Scroll to the Display/Acoustics menu item.

Confirm selection.

Scroll to the Switch language menu item.

Confirm selection.

Select the desired language for display texts, for example, English.

Confirm the setting by pressing the "Save" softkey.
Your telephone will reset itself. All display texts will now be in the selected language.
Customizing your telephone
Audio, contrast and language settings
Displaying the function list in the idle display
You can set your phone to show the function list instead of the telephone status in the idle display.

Press the MENU key.

Scroll to the Settings menu item.

Confirm selection.

Scroll to the Display/Acoustics menu item.

Confirm selection.

Scroll to the Function list active Off menu item.
☐ Press the "Modify" softkey. The setting switches to Function list active On.
☐ Confirm the setting by pressing the "Save" softkey. The new setting has been saved.
Audio, contrast and language settings
Activating function keys in idle status (only 9630, 9640)
In the idle display, various softkey functions are normally assigned to softkeys. You can configure the phone so that your programmed first function key level is activated by default (displayed inversely).

Press the MENU key.

Scroll to the Settings menu item.

Confirm selection.

Scroll to the Display/Acoustics menu item.

Confirm selection.

Scroll to the Function keys Off menu item.
☐ Press the "Modify" softkey. The setting changes to Function keys On.
☐ Confirm the setting by pressing the "Save" softkey. The new setting has been saved.
Activating CSTA Answer Call\*
Activating CSTA Answer Call\*
If your telephone network and your PC network are linked together for CSTA (Computer Service Telephony Application) and the CSTA Answer Call function is activated, you can also answer calls on your PC. When the phone rings, click the icon for CSTA Answer Call on your PC monitor screen. The telephone is automatically set to "handsfree" mode and you can speak with the caller.

Press the MENU key.

Scroll to the Settings menu item.

Confirm selection.

Scroll to the Applications menu item.

Confirm selection.

Scroll to the Answer call menu item

Confirm selection.

Scroll to the CSTA Answer Call... menu item

Enter PIN [ ].

Confirm selection.

Scroll to On... / Off...

Change setting.

Press the "Save" softkey.
- To deactivate, repeat these steps and select Off instead of On.
Leaving a hunt group\*
Leaving a hunt group\*
If you are a member of a hunt group you can leave the hunt group temporarily. Calls will then be diverted to the next hunt group subscriber.

Press the MENU key.

Scroll to the Settings menu item.

Confirm selection.

Scroll to the Applications menu item.

Confirm selection.

Scroll to the Participate in a hunt group On menu item.

Change setting.

Press the "Save" softkey. The new setting has been saved.
Customizing your telephone
Logging in to automatic call distribution\*
Logging in to automatic call distribution\*
Your system administrator must provide your telephone with a personal number (max. 5 digits) and a personal password (6 digits) for call center functions. You have to log on using the phone number and password.

Press the MENU key.

Scroll to the Settings menu item.

Confirm selection.

Scroll to the Applications menu item.

Confirm selection.

Scroll to the CC user function menu item.

Confirm selection.

... Enter your personal phone number, maximum 5 digits.

Scroll to the Password menu item.

... Enter your personal six-digit password.

Log in using the "Login..." softkey.
- To log off, confirm with "OK" when you see the status message User: xxx and then select Log out.
Viewing/modifying user data
Viewing/modifying user data
The number you have set up is displayed in the "User administration" menu. You can also log out of the telephone, change your PIN or delete it completely.
Log out user
A Press the MENU key. Scroll to the Settings menu item.
OK Confirm selection. Scroll to the User administration menu item.
OK Confirm selection.
OK Confirm the displayed number. Scroll to the Log out user menu item.
OK Confirm selection.
.1@ 1 ... WXYZ Enter the current PIN.
OK Confirm selection. Next the message "Log out complete" appears in the display.
- If you have appropriate authorization, you can also log out without entering the PIN.
- If you "communicate securely", logging out without a PIN is not configurable.
- You can configure an "ON/OUT" function key (↑114) for logging out quickly. If a user is logged in, then the function key is labelled "OUT IP". The user can log out directly. If you have the proper authorization, you can log out without entering the PIN. If no user is logged in, then the function key displays "ON IP". Pressing the function key initiates user login (↑26).
Customizing your telephone
Viewing/modifying user data
Changing the PIN

Press the MENU key.

Scroll to the Settings menu item.

Confirm selection.

Scroll to the User administration menu item.

Confirm selection.

Confirm the displayed number.

Scroll to the Change PIN menu item.

Confirm selection.

... Enter the current PIN.

Scroll to the New PIN menu item.

... Enter the new PIN.

Scroll to the Reenter PIN menu item.

... Enter the new PIN again to verify.
☐ Confirm the entry by pressing the "Save" softkey. The new setting is then saved.

- This PIN is identical to the lock PIN that you can use to lock your phone (↑82).
Viewing/modifying user data
Deleting your PIN

Press the MENU key.

Scroll to the Settings menu item.

Confirm selection.

Scroll to the User administration menu item.

Confirm selection.

Confirm the displayed number.

Scroll to the Delete PIN menu item.

Confirm selection.

... Enter the current PIN.

Confirm selection. Next the message "PIN deleted" appears in the display.
- If you "communicate securely," you cannot delete the PIN.
Viewing/changing IP settings
Viewing/changing IP settings
In the "IP settings" menu you can view various IP-specific settings (IP = Internet Protocol).
You can also test whether individual network components can be reached ("Send ping") and load or save user data.
Your telephone has been released in order for your system administrator to be able to access your telephone and adjust certain settings via a Web browser on a PC. You can bar this access.
In addition, you can also make settings to allow CTI applications to log onto your telephone.
Viewing your IP settings

Press the MENU key.

Scroll to the Settings menu item.

Confirm selection.

Scroll to the IP settings menu item.

Confirm selection.

Scroll to the Gatekeeper list or Network settings menu item.

Confirm selection. You now see various IP settings such as the gatekeeper your telephone's IP address.
Viewing/changing IP settings
Send ping

Press the MENU key.

Scroll to the Settings menu item.

Confirm selection.

Scroll to the IP settings menu item.

Confirm selection.

Scroll to the Send ping menu item.

Confirm selection.

Scroll to the network component whose accessibility you want to test, e.g.
Def. GK.

Confirm selection. You will then receive an info message stating whether the selected network components have been reached.
- Under IP address you can yourself input an IP address whose accessibility you want to test.
Customizing your telephone
Viewing/changing IP settings
Barring the telephone from access via the browser

Press the MENU key.

Scroll to the Settings menu item.

Confirm selection.

Scroll to the IP settings menu item.

Confirm selection.

Scroll to the Security menu item.

Confirm selection.

Scroll to the Web terminal access Off menu item.
☐ Press the "Modify" softkey. The setting switches to Web terminal access On.
☐ Press the "Save" softkey. The new setting has been saved.
Viewing/changing IP settings
Registering a CTI application\*
To be able to control your telephone using a CTI application (e.g. Avaya Com4Tel), the CTI application must first be registered:

Press the MENU key.

Scroll to the Settings menu item.

Confirm selection.

Scroll to the Security menu item.

Confirm selection.

Scroll to the CTI application menu item.

Confirm selection.

Scroll to the Login mode menu item.

Confirm selection.

... Enter the PIN.

Press the "Save" softkey.
The login mode is now activated for 1 minute. You must start the CTI application (e.g. Avaya Com4Tel) on the PC during this time. After successful registration, login mode is immediately ended and the message "CTI application registered" is displayed.
- If you wish to register a CTI application on a different PC on your telephone, you must first select "Delete registration" in the "CTI application" menu and enter the PIN. You can then register the CTI application on the other PC under "Login mode" (see procedure above).
Customizing your telephone
Viewing/changing IP settings
Setting 802.1X registration data\*
Your telephones's 802.1X registration data are verified in order to authenticate it in the IP network. You can change the 802.1X ID and the associated password.

Press the MENU key.

Scroll to the Settings menu item.

Confirm selection.

Scroll to the IP settings menu item.

Confirm selection.

Scroll to the Security menu item.

Confirm selection.

Scroll to the 802.1X registration data menu item.

Confirm selection.

Scroll to the 802.1X ID menu item. Change the ID, if necessary.

Scroll to the Password menu item.

... Enter old PIN.

Scroll to the New password menu item.

... Enter the new PIN.

Scroll to the Reenter password menu item.

... Re-enter the new PIN.
Viewing/changing IP settings
☐ Press the "Save" softkey. The new setting is then saved.
- Your system administrator will give you the password.
- In order to save a change in the 802.1X you must always change the password at the same time. The new password may not be identical to the old password.
Customizing your telephone
Viewing/changing IP settings
Saving user data\*

Press the MENU key.

Scroll to the Settings menu item.

Confirm selection.

Scroll to the IP settings menu item.

Confirm selection.

Scroll to the User data menu item.

Confirm selection.

Scroll to the User data download menu item.
☐ Press the "Save" softkey. Your personal settings and your phone book will now be saved.
- By default this feature is not enabled. If you have any questions please contact your system administrator.
Viewing/changing IP settings
Load user data

Press the MENU key.

Scroll to the Settings menu item.

Confirm selection.

Scroll to the IP settings menu item.

Confirm selection.

Scroll to the User data menu item.

Confirm selection.

Scroll to the User data upload menu item.

Confirm selection. If data have been saved they will now be loaded.
- By default this feature is not enabled. If you have any questions please contact your system administrator.
Recognition of partial numbers
Recognition of partial numbers
Up to 10 partial number and name allocations can be listed for displaying names for external calls with partial number recognition.
Partial number recognition is used for incoming calls and in all lists.

Press the MENU key.

Scroll to the Settings menu item.

Confirm selection.

Scroll to the Display/Acoustics menu item.

Confirm selection.

Scroll to the Recogn. partial nos menu item.

Confirm selection.
A list of partial numbers assigned to date opens.
You can create, edit and delete entries as usual.
- The local telephone number uses the number-name translation first, then the partial number list.
- The first suitable partial number will be used for name translation. Example:
1st partial number: 089 – Munich
2nd partial number: 0892245 – Bank
Incoming calls from 0892245889 results in a display of Munich
Recognition of partial numbers
Creating new partial number entries

Press the MENU key.

Scroll to the Settings menu item.

Confirm selection.

Scroll to the Display/Acoustics menu item.

Confirm selection.

Scroll to the Recogn. partial nos menu item.

Confirm selection.
A list of partial numbers assigned to date opens.

Scroll to the Create new entry menu item.

Confirm selection. Enter the number and name.

Press the "Save" softkey.
Customizing your telephone
Recognition of partial numbers
Editing partial number entries

Press the MENU key.

Scroll to the Settings menu item.

Confirm selection.

Scroll to the Display/Acoustics menu item.

Confirm selection.

Scroll to the Recogn. partial nos menu item.

Confirm selection.

Select a list entry.

Confirm selection.
You can change the number and name in the individual view.

Press the "Save" softkey.
Recognition of partial numbers
Deleting partial number entries

Press the MENU key.

Scroll to the Settings menu item.

Confirm selection.

Scroll to the Display/Acoustics menu item.

Confirm selection.

Scroll to the Recogn. partial nos menu item.

Confirm selection.

Select a list entry.

Press the "Delete" softkey.
Customizing your telephone
Customizing the call list\*
Customizing the call list\*
If users have been granted appropriate authorization by the system administrator, they can change call list entries to some extent. For example, remove internal calls from the call list. An entry is included in the call list only when the internal caller explicitly requests a callback.

Press the MENU key.

Scroll to the Settings menu item.

Confirm selection.

Scroll to the Show call list menu item.

Confirm selection.

Scroll to the desired entry, e.g. Internal calls.

Confirm selection.

Select the desired setting, for example: No.

Confirm selection.
Add-on equipment\*
Add-on equipment\*
Button module* 173
Headset 176
Setting the CTI application 178
Button module\*
Button module\*
The Avaya IP Deskphone SBM24 Button Module has over 24 display keys that show the assigned functions. The display keys of the Button Module can be assigned to:
- Partners
• Abbreviated dialing destinations - Functions
All keys and settings of the Button Module are treated by your phone just like the keys and settings set up on the phone.
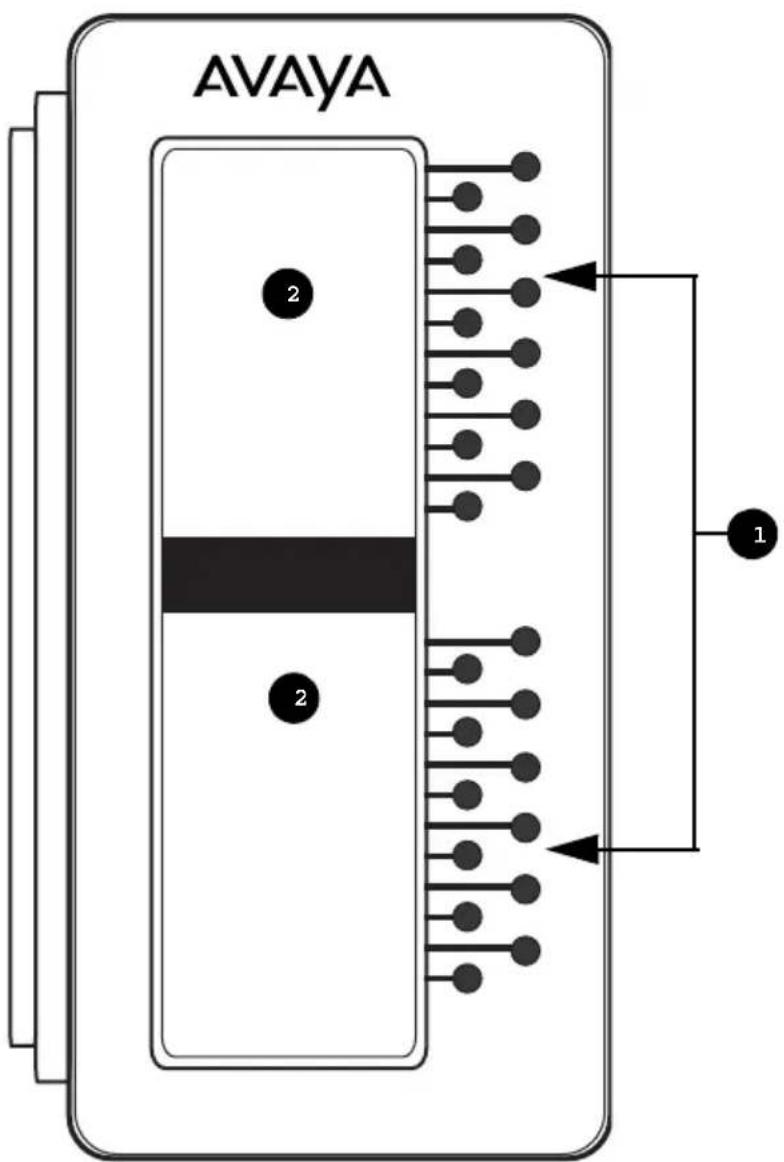
text_image
AVAYA 2 2 1- Display keys
- Display areas
Button module\*
Display keys with partner function
If you have assigned partners on your Button Module, calls to partners will be displayed and you can answer these calls.
Display of partner statuses on the Button Module
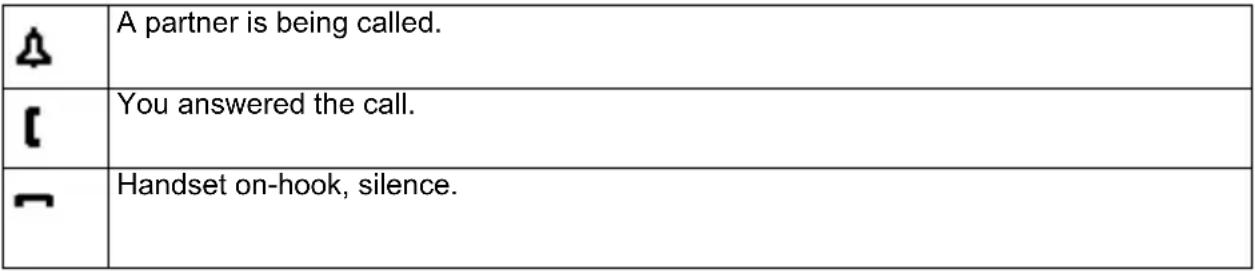 |
Answering a call
The Button Module displays a call for your partner.

Lift the handset.
○ Press the display key.
- When you press the flashing display key without lifting the handset you answer the call in handsfree mode.
Display keys as destination keys
If your system administrator has enabled call numbers on your Button Modules, you can use the display keys as destination keys.

Lift the handset.
○ Press the display key.
- When you press the display key without lifting the handset you call the destination in handsfree mode.
- You can also configure the destination keys if this function has been enabled for you (↑115).
Button module\*
Display keys as function keys
The display keys of your Button Module can be assigned with functions, e.g. call diversion, pick-up or automatic callback. You can then used them as you use the function keys and softkeys of your telephone.
You can assign functions to the Button Module's display keys yourself ( 114).
Setting display contrast and brightness

Press the MENU key.

Scroll to the Settings menu item.

Confirm selection.

Scroll to the Display/Acoustics menu item.

Confirm selection.

Scroll to the Brightness or Contrast menu item.

Confirm selection.

Scroll to the DSS Module menu item.

Increase or decrease the brightness.
☐ Confirm the entry by pressing the "Save" softkey. The new setting has been saved.
Headset
Headset
You can use a headset if you want to use the telephone without using the handset. Ask your system administrator which Avaya headsets you can use and how to connect them to your phone.
Operating corded headsets
Calling someone


ter the desired number.
Press the HEADSET function key (LED lights up).
When the called party answers you can talk with them through your headset.
Answering calls
If you receive a call.
Press the HEADSET key.
You are now speaking to the other party via the headset.
Continuing a call through the headset with the handset picked up
During a call:
☐ Press the HEADSET function key (LED lights up).

Replace the handset.
You are now speaking to the other party via the headset.
Continuing a headset call using the handset.
During a call with the headset:

Lift the handset.
? Press the HEADSET key (LED off).
Ending a call
During a call with the headset:
Press the HEADSET key (LED off).
Headset
Operating cordless headsets
Operating a cordless headset is different from operating a corded one:
- Instead of pressing HEADSET on the telephone, you have to press the Talk button on the headset itself.
Do not press the HEADSET key on the telephone. Otherwise you will not be answer or end calls as usual.
• Second calls are not signaled in the headset.
- The ringing tone on the telephone may not be set to "Off". Otherwise calls will not be signaled in your headset.
- When "Automatic line seizure" has been set (IntelliStand): You immediately dial when you lift the headset from the cradle. Replace the headset in the cradle to automatically disconnect the call.
Additional information für SAVI ^TM OFFICE cordless headset:
This headset can be operated via the headset itself or on the phone. There is no restriction similar to the one described above.
Setting the CTI application
Setting the CTI application
The "TAPI" CTI application is set on your telephone as a default. Therefore, when you want to operate a TAPI application (e.g. Avaya Com4Tel), you do not need to change any other settings. However, if another CTI application has been connected, you must proceed as follows:
Press the MENU key.
Scroll to the Settings menu item.
Confirm selection.
Scroll to the CTI application (TAPI) menu item.
Press the "Modify" softkey several times, if required, until the setting changes to CTI application (Other CTI).
Press the "Save" softkey.
You now need to use the "CTI setup" menu item to carry out additional settings for this CTI application, e.g. protocol type or dialing method.
- Instructions on logging on a CTI application can be found in the section entitled Registering a CTI application (↑ 163).
Consulting the manual as required
Consulting the manual as required
Function keys ....180
Information in the idle display 183
Ringing and handset tones ....185
Menu overview 187
Troubleshooting 192
Function keys
Function keys
Look it up if you do not know what a function name such as "code dialing" means. This alphabetical list contains the functions that can be assigned to the programmable function keys or the display keys.
| ANONYMOUS | Anonymous callingYou can determine that your phone number is not shown to the other party. |
| TRAP Trap | a call*Register the number of an undesired caller in the system. |
| Deactivating the ring toneSet the ring tone to off. You will hear a single alert tone when being called.Do not disturb (↑113) | |
| OFF | Cut-in*If you want to speak to someone while he is still on a call, you can cut into the call. This function must be enabled in the communication server. |
| OFF Log out | user* (PUM)This function key is used for logging out if you have logged onto another telephone in your system. In order to be able to use this function, it must be enabled in the communication server. |
| ON Log in | user* (PUM)If this function has been enabled in the communication server, you can log onto any telephone in your system with your extension number and a personal PIN. |
| Log in/out Log | in/out userThe function key showsOFF IP for a logged in user and ON IP when no user is logged in.The IP user can log on and out directly. If you have authorization from the system administrator, you can log out without entering the PIN. |
| CC CC user | function*Activates the CC user function for logging onto or off automatic call distribution. The CC user function must be set up by your system administrator. |
| EXLN Executive line* | Within a partner group, you can use this function key to create a connection for another partner telephone from your telephone. |
| CODE Code | dialingThis function can be used to dial numbers which are stored in the system – regardless of your authorization. If you enter the code dial number, the entire phone number is dialed automatically. You can dial other digits as a suffix in addition to the code dial number (e.g. a direct dial number). |
Function keys
| → | PagingAnnouncement to the allocated numbers. |
| →5 | Extended partner diversionYou can route calls for partners, also to an external destination. |
| EXT External* | External call filters. |
| FILTER Filtering* | Activating filters. |
| 121 | ChargesYou can view a list of the telephone costs incurred.Viewing charges(↑77) |
| GKLIST | Gatekeeper list*You can select a different gatekeeper other than the default gatekeeper from the list. |
| HOLD Hold* | You can put a call on hold for the time being in order to be able, for example, to speak to another caller first. |
| Pick-upYou can use this to pick up calls from another telephone, whose number is shown in the display. Enter the relevant number and press the Pick-up key. If you have activated "Direct dial" you also have to press this key before pressing the first numeric key.When another telephone receives a call (pick-up)(↑36) | |
| INT Internal* | Filtering internal calls. |
| CONF Conference | Speak to two callers simultaneously. |
| Setting contrastSet the contrast according to the prevailing lighting conditions where you are.Set contrast(↑150) | |
| Partner*You can divert calls to other partners, deactivate diversions, have calls for a partner signaled on your telephone and change the partner display.Telephoning with partners*(↑86) | |
| RECALL Callback | You can have calls returned automatically within your telephone system when a busy line is free again. |
| Callback requestCalls with callback request |
Function keys
| Display Local phone number displayDeactivate displaying the other party's phone number on your display during a call. The phone number is not entered in the call log or in the redial list. | |
 | Call diversionYou can divert calls to other telephones within your system. Diverting calls (↑52) |
| HG Hunt group on/off*You can leave and join the hunt group. This function must be enabled by your system administrator. | |
 | LockYou can protect your telephone against unauthorized use. Locking the telephone (↑82) |
| LANG Setting the languageSet the language in which you want the display to appear. | |
 | TimeframeYou can enter an appointment with a short text. The text is shown in the display at the time entered. A signal tone also sounds. Setting reminders (appointments) (↑79) |
 | Tone dial onDuring a call, you can change the dialing method if, for example, you want to control an answering machine remotely. Deactivating automatic tone dialing (DTMF) (↑128) |
 | TransferYou can answer an additional call during a call. You then forward it to another subscriber in a consultation. You can also connect the two other parties with one another during a three-way conference. Forwarding additional callers (↑41) |
 | Deputy keyYou can use this key in the idle menu to set up (first key press) or delete (second key press) the selected partner diversions. Setting the deputy key (↑103) |
 | Time zonesYou can get a display of the current time in other parts of the world. Universal time (↑131) |
| INFO Time/PartnerUpdate time and partner display on the LED as well as the displays on the Button Module. | |
 | Second call (on/off)If you deactivate second call, no additional calls are signaled while you are already on a call. Deactivating second call (↑126) |
Information in the idle display
Information in the idle display
| Ringer tone offYou can deactivate the ringer tone during a call. |
| Double call to 5595If you are called, the call is also signaled on the line specified, e.g. on 5595. |
| User data upload failureIt was not possible to load your user data. If you have any questions please contact your system administrator. |
| User data download failureIt was not possible to save your user data. If you have any questions please contact your system administrator. |
| Handsfree Answer Back onHandsfree Answer Back is activated. Your telephone is set up in such a way that calls are answered immediately. If you receive a call, you will hear only a short signal tone and your telephone's microphone and loudspeaker are activated immediately. This means that you can speak to the caller right away. |
| No networkYour telephone is not connected to the LAN. If you have any questions please contact your system administrator. |
| IP address conflictFrom the time it is commissioned, the IP phone checks repeatedly whether there is another device in the network with the same IP address and is therefore interfering with network access. If this is the case, the terminal is not functional; other devices also experience malfunctions. Your system administrator must resolve the error in the network. |
| Seize line for PAxx("PAxx" is a placeholder for the name of the partner from your partner group.) You have seized an external line for a telephone in your partner group. You can now make a connection for this partner. |
| Line busyThis status message appears in your display: An external line has been assigned for your line by a partner telephone. You can now dial or have the connection made from the partner telephone. |
| Server message waitingThere is a voice or text message for you on the server. |
| Restricted partner signalingThe partners can no longer see in their display whether you are on a call, whether you are being called, whether there is a call diversion for you, etc. |
| PUM user: 5595 SchneiderYou are logged in to another telephone and you can use it exactly like your own line. The number and name are given here are an example. |
Information in the idle display
| Callback enabled You have initiated an automatic callback. Your telephone will ring as soon as the subscriber's line is free again. |
| Call div. on busy to xxxx If you are on a call, all calls are diverted to another telephone. |
| Call div. on busy to xxxx for xxxx If this line is busy, all calls are diverted to another line. |
| Delayed external call div to xxxx External calls are diverted to another telephone after a set amount of time. |
| Delayed internal call div to xxxx Internal calls are diverted to another telephone after a set amount of time. |
| Call div. to xxxx All calls to your telephone are diverted to another telephone. |
| Call div. to xxxx for xxxx All calls for line xxxx are diverted to another telephone. |
| Call diversions enabled Call diversions have been set up for several of your own numbers. |
| Hunt group x off You have removed your telephone from hunt group x. |
| Searching network/Gatekeeper cannot be reached...The LAN has been successfully accessed but registration at a gatekeeper has still failed. |
| Telephone locked Your telephone is locked. Select the "Telephone locked" menu item, confirm with "OK" and enter your PIN to unlock the telephone. |
| Telephone not logged on No gatekeeper was found and the search was stopped. Restart the search by selecting this menu item and pressing "OK". If you have any questions please contact your system administrator. |
| Appointment expired An appointment has expired. You can either change or delete it. |
| Appointment enabled This appears if you have activated an appointment. |
| Second call on Additional callers are allowed during a call. You can activate "Second call" in the "Display/Acoustics" menu. |
Ringing and handset tones
Tones for internal and external calls
| Normal ring tone for external calls You can deactivate this tone (↑113). | |
| Normal ring tone for internal calls: You can deactivate this tone (↑113). | |
| Alert tone Additional call during a conversation, partner beep. | |
| Executive call: VIP function; you can deactivate this tone(↑113). | |
| Call for "Handsfree Answer Back": Announcement (also with reply), Message on busy: special tone. |
Tones in the handset
| Tone during a cut-in call. | |
| Signal tone:When switching on monitoring,handsfree and dialing with thehandset on-hook. The other partycan also hear this tone. | |
| Appointment signal:You candeactivate this tone (↑113). |
Ringing and handset tones
Call melodies
- Melody 1
- Melody 2
• T3D3
• Tivoli - Sabah
- Springtime
- Waterfall
- Rondeau
- Jumping
- Infantryman
Menu overview
Menu overview
The following contains an overview of the menu structure of the Avaya 9600 IP telephone.
The first three menu levels are shown. The menu structure shown here may differ from the actual menu structure on your telephone. Deviations from the menu overview shown here may arise due to the features used, the accessories in use and the assignment of the function keys.
Remarks and notes are shown in italic font.
Call diversion
| Menu line in basic menu | ...One menu level lower | ...One menu level lower | ||
| Call diversion > to | ||||
| to | ||||
| On busy | ||||
| Ext. after time | ||||
| Int. after time | ||||
| Double call | ||||
| Automatic 1 | ||||
| Automatic 2 | ||||
| Set automatic > to | ||||
| Start time 1 | ||||
| Stop time 1 | ||||
| Weekday 1 | ||||
| to | ||||
| Start time 2 | ||||
| Stop time 2 | ||||
| Weekday 2 | ||||
| Call diversion key 1 > | Number: | |||
| Call diversion key 2 > | Number: | |||
| Partner diversion | ||||
Menu overview
Appointments
| Menu line in basic menu | ...One menu level lower | ...One menu level lower | ||
| Timeframe > Appointment | nt data(only if appointment entered) | |||
| Enter new appointment | > | Time 00:00 | ||
| Date XX.XX.XX | ||||
| Text | ||||
| Call number | ||||
| Timeframe | ||||
Charges
| Menu line in basic menu | ...One menu level lower | ...One menu level lower | ||
| Charges > Charge display | ay for last call | |||
| ... for next-to-last call | ||||
| ... for third-last call | ||||
| ... for fourth-last call | ||||
| Total call charges | ||||
| Charges > On | ||||
| Off | ||||
| Charge displ. > Amount | ||||
| Units | ||||
| Delete single counter | ||||
Menu overview
Lock
| Menu line in basic menu | ...One menu level lower | ...One menu level lower | ||
| Lock > Lock telephone | ||||
| Change PIN > Old PIN | ||||
| New PIN | ||||
| Re-enter PIN | ||||
| Save PIN | ||||
| Automatic locking > On | ||||
| Off | ||||
| Lock at 00:00 | ||||
Time zones
| Menu line in basic menu | ...One menu level lower | ...One menu level lower | ||
| Time zones > Current time zones | ||||
Settings
| Menu linein basicmenu | ...One menu levellower | ...One menu levellower | ...One menu levellower | |||
| Settings > Display/Acoustics > Second call | ||||||
| Do not disturb | ||||||
| Set acoustics > Handset | ||||||
| Loudspeaker | ||||||
| Ringing tone | ||||||
| Alerting tone | ||||||
| Signal toneHeadset | ||||||
| Select ringermelody... | ||||||
| Headset Audio | ||||||
| Handset Audio | ||||||
Menu overview
| Set contrast (not 9640, 9650/9650C) | ||||||
| Set brightness (only 9620/9620L, 9630, 9640) | ||||||
| Switch language | ||||||
| Own name | ||||||
| Request time/partner... | ||||||
| Partial numbers | ||||||
| Function list enabled | ||||||
| Function keys enabled | ||||||
| Keys > Set destination keys | ||||||
| Set function keys | ||||||
| Set macro function | ||||||
| Display key assignment | ||||||
| Key beep | ||||||
| Dial settings > Anonymous us calling | ||||||
| DTMF duration | ||||||
| DTMF switchover | ||||||
| Direct dial Direct destination dial Direct digit dial Refer back with dest. Headset | ||||||
| Applications/partner | > Part of hunt group | |||||
| Partner | ||||||
| CC user function | ||||||
| CSTA Answer Call | ||||||
| Answer call | > | CSTA Answer Call | ||||
| Handsfree Answer Call | ||||||
| Headset | ||||||
| Security > Save data | > | |||||
Menu overview
| Set emergency numbers | ||||||
| Relocate telephone | ||||||
| CTI application > TAPI > | ||||||
| Other CTI | ||||||
| Off | ||||||
| CTI setting (only appears if "Other CTI" has been set) | > | P r o t o c o l | > | |||
| Dialing procedure | ||||||
| Info/Service > Info > | ||||||
| Ringer | ||||||
| Display | ||||||
| Keyboard | ||||||
| User administration > No. xxxx > | ||||||
| Log out user | ||||||
| Change PIN | ||||||
| Delete PIN | ||||||
| IP settings > Gatekeeper list > | ||||||
| Network settings | ||||||
| Send ping | ||||||
| Security | ||||||
| User data | ||||||
| VIP (PIN entry) > Receive VIP functions | > | |||||
| Send VIP functions | ||||||
| Set VIP partner | ||||||
| Display call list (if authorized) | > | Internal calls > | ||||
| External calls | ||||||
| Answering position | ||||||
| Remote Headset | > | Off | > | |||
| On | ||||||
Troubleshooting
Troubleshooting
Incorrect date and time are displayed
Select the Request time/partner menu item. The time and date are updated by the system.
Unknown message on the display
Check what the display means in the Information in the idle display ( 184) chapter.
The number of a caller is not displayed
Call is transmitted without caller's number, e.g. an analogue call, or the caller has switched off the caller ID function.
Partner display has disappeared
The partner display was deactivated in the Partner menu. You can reactivate them in the same menu.
or
Select the Request time/partner menu item. The partner display is updated by the communication server.
Note: The display is automatically updated when a partner or one of your colleagues uses their telephone.
Short tones during a call
A second call is being signaled. Consult the Making several connections simultaneously ( 39 ) section to find out about possible operating steps.
or
You have activated monitoring or handsfree.
You and the other party hear a short alert tone.
or
Cut-in tone
You are participating in a cut-in call.
or
Appointment signal
An appointment is signaled.
A function does not work
It is possible that the function has not yet been activated by your system administrator.
Telephone cuts off prematurely when programming
No key has been pressed for approx. 60 seconds. This will terminate every programming procedure. You also terminate programming if you answer a call during the procedure.
Troubleshooting
A number cannot be set up
Ask your system administrator whether this feature has been activated for your telephone.
A phone number dialed by code dialing cannot be extended
Possibly the "Extension" feature for the code dial destination was not enabled in the communication server. For more information, contact your system administrator.
A call is shown in the display but your telephone does not ring
Check whether the ringing tone is deactivated (in the Do not disturb menu).
Prolonged IP address conflict
From the time it is commissioned, the IP phone checks repeatedly whether there is another device in the network with the same IP address and is therefore interfering with network access. If this is the case, the terminal is not functional; other devices also experience malfunctions. This message will continue to be displayed as long as the conflict exists.
Your system administrator must resolve the error in the network.
Index
Numerics
802.1X registration data 164
A
Acoustic signal 113
Activating CSTA Answer Call* 154
Activating partner beep 95
Adding a participant via refer-back 47
Additional call 40, 41
Additional functions 11
Add-on equipment* 173
Announcements from the executive telephone 142
Appointment 79
Appointment message 80
Deactivating 81
Deleting 81
Menu 189
New entry 79
Viewing 80
Assigning a line as the executive line 108
Assigning numbers to keys 114
Automatic callback 30
Automatic connection 146
Automatic locking 84
Automatic redial 32
B
Basic rules of operation 19
Being called 35
Block 82
Blocking central data saving 138
Brightness display 150
Busy 30, 32
C
Call diversion 52, 188
Automatic 56
Deactivating 54
Deactivating to voicemail 76
Remotely 55
With automatic, activating 58
Index
Call list 67
Adapting 172
Dialing an entry 66
Editing 67
Call log 62
Delete all entries 64
Deleting an entry 64
Dialing an entry 63
Editing 62
Call melodies 187
Call number ID 18
Disabling 32
Callback 30
Callback request 31
Delete 31
Calling anonymously* 125
Calling outside your telephone system 29
Calling within your telephone system 29
Calls
Answering 35
Answering elsewhere (follow-me) 59
Answering for a partner 92
Diverting 52
Diverting all 52
Diverting from partner to partner 100
Diverting on busy 53
Diverting partner calls to your telephone 99
Diverting to partner 98
Diverting to voicemail 75
During a conversation 40
Forwarding 41
Picking up from another phone 36
Pick-up 36
Putting on hold 36
Cancel entry 19
Canceling automatic callback 30
Canceling or exiting an action 19
Carrying out immediate central data saving* 137
Change DTMF duration 130
Changing the DTMF pulse duration 129
Charges 77
Deactivate display 32
Menu 189
Recording for private calls and projects 78
Index
Reset counter 77
Switching to units 78
Viewing 77
Clearing key assignments 118
Conference 42, 43
Adding a participant 42
Adding a participant via refer-back 43
Connecting participants to each other 44
Controller 45
Disconnecting participants 49
Ending 44
Speaking with just one conference participant 43
Connect 39
Connecting
To which systems? 9
Consultation during a call (refer-back) 40
Consulting as required 180
CTI application, setting 179
Cut-in
Ending 33
On another call 33
D
Date/time 20
Deactivate automatic tone dialing (DTMF) 128
Deactivating direct dialing 127
Declaration of conformity 9
Delayed internal call diversion* 53
Destination key 30
Creating 115
From phone book 116
Modify number 117
Display 18, 20
Display keys 18
Speed dial 19
Displaying key assignment 119
Disposing of old equipment correctly 12
Diverting calls 52
Diverting partners 98
Do not disturb 113
Double call 95
DTMF post dialing number 128
Index
E
Editing entries in the phone book 72
Enter name 22
Enter phone number 26
Entering text 22
Entering your own phone number and PIN 26
Executive line 111
Executive phone
Setting up 139, 142
Using as a two-way intercom system to the secretary 139
External 29
External calls
Delayed call diversion 53
External line code 29
F
Filtering 110
Follow me
Activating at a different telephone 59
Deactivating at a different telephone 60
Deactivating on your own telephone 59
Preparing on your own telephone 59
Forward 39
Forwarding callers 39
Function keys 21, 90, 181
Information in the idle display 153
Setting up 120, 121
with LED 119
Function list 68
Idle display 152
Functions 181
Assigning to keys 114
In several levels 21
Selecting in the menu 19
G
Gatekeeper 25
Entering manually 25
None found on autom. Search run 25
Search 25
Selecting 27
Selecting when logging in 27
Index
H
Handset
Making calls without 37
Handsfree 37, 177
Continuing the call with the handset 38
Ending a call 38
With the handset off-hook 38, 177
Handsfree Answer Back 146
Headset 177
Calling someone 177
Cordless 178
Hiding partner keys 94
Hunt group 155
Leaving 155
|
Idle display 20
Displays 20
Information about partners on display keys 89
Information about partners on function keys 90
Information in the idle display 184
Internal 29
IP address conflict 25
IP settings 160
Viewing 160
K
Keys 15, 29, 90
At a glance 15
L
LED display 90
Letters 22
Levels 21
License 9
List of all conference users 46
Listening to a caller out loud (monitoring) 37
Listening to voice messages* 75
Location
Tips 11
Lock 82, 190
Lock at 85
Locking 83
Log in 132
Index
Log out 133
Log out user 157
Logging in 25, 132
Logging in to automatic call distribution* 156
Logging on to the telephone 132
Logging out from the telephone 133
Lower case letters 22
M
Macro
Call diversion and pick-up 120
Coming/going 124
Extended partner diversion 123
Partner diversion 121
Setting up 120
Main phone book
Dialing an entry 73
Saving an entry in the local phone book 74
Making calls
As usual 28
Easily 24
Remotely via the system 34
With ease 61
With partners 86
Making several connections 39
Menu 19, 188
Message 75
Messages
Delete 76
Deleting all 76
Listening to 75
Monitoring 37
Multiple conference 45, 47
Controller 45
Ending 50
Passive participants 45
Transferring 49
Mute 29, 35
N
Notes
Operating steps 11
Troubleshooting 193
Number, saving in a different location 63, 64, 76
Index
O
Open Source 9
Overview 13, 15, 29
P
Partial numbers
Deleting an entry 171
Editing entries 170
New entry 169
Partner 86
Assigning to another key 93
Assigning to Button Module 97
Calling 91
Diverting 99, 100
Partner diversion 98
Extended 101
Partner group
Expanding* 105
Reducing 106
Passive conference participants 50
Ending participation 51
Refer-back 51
Phone book 71
Adding call log entries 64
Deleting an entry 73
Dialing an entry 72
New entry 71
Saving an entry as a destination 74
Using 71
Phoning made easy 24
Pick-up 36
PIN 82
PIN (Personal Identification Number) 82
Changing 82, 158
Deleting 159
Entering 26
Placing a call 29, 91
With a destination key 30
Private User Mobility* 132
Programming 19
Protection 82
Putting groups together 105
Index
R
Reception 111
Recognition of partial numbers 168
Redial list 66
Redialing
Automatic 32
Reducing groups 106
Refer-back 40
in consultation 115
Registering CTI application* 163
Relocating with the telephone 136
Repairs 11
Repeatedly dialing a number 32
Requesting messages
Requesting 75
Restricting partner signaling* 107
Restricting signaling 107
Ringer tone 113
Disabling 35
Melody selection 148
Ringing and handset tones 186
Ringing, deactivating 113
S
Saving emergency numbers 134
Saving personal data 137
Second call 40, 41
Disabling 126
Selecting the language for the display 151
Send ping 161
Set acoustics 147
Set automatic call diversion 57
Set receiver sound 149
Setting audio, contrast and language 147
Setting contrast 150
Setting the deputy key 103
Setting up a connection for partners 109
Setting up and activating the double call destination* 54
Setting up own name 135
Setting up partner names 87
Setting up the secretary telephone 140, 144
Setting up VIP functions* 139
Settings 24, 190
Softkeys 20
Index
Status 20
Switch 39
Switch off microphone 29, 35
Switching between calls 41
Switching between parties 41
Switching dialing method 128
Switching to waiting subscribers 48
Symbols in the call log 62
T
Telephone
Barring browser access 162
Connectable to which systems? 9
Connection 25
Customizing 112
Familiarization 8
Getting to know 17
Locking 82, 83
Operating 25
Placement 11
Unlocking 83
Telephone systems for your telephone 9
Three-way conference 42
Time zones 131, 190
Tones for internal and external calls 186
Tones in the handset 186
Two-way intercom system 139
U
Unlocking 83
Upper case letters 22
User data
load 167
Saving 166
Viewing/modifying 157
User manual in other languages 11
User manual language versions 11
Using VIP functions 145
V
Viewing audio data 65
VIP functions, using 145
VIP ringing tone 113
AVAYA
Avaya GmbH & Co. KG
Kleyerstraße 94
D-60326 Frankfurt am Main
(Germany)
T 0 800 266 - 10 00
F 0 800 266 - 12 19
(International)
T +49 69 7505 - 28 33
F +49 69 7505 - 5 28 33