
20F640 - Microcontroller SHARP - Free user manual and instructions
Find the device manual for free 20F640 SHARP in PDF.

| Product Type | Cathode Ray Tube (CRT) TV |
| Brand | SHARP |
| Model | 20F640 |
| Screen Size | 20 inches (diagonal) |
| Screen Type | Cathode Ray Tube (CRT) |
| Screen Aspect Ratio | 4:3 |
| Power Supply | 120 V AC, 60 Hz |
| Power Consumption | Approximately 100 W |
| Weight | Approximately 20 kg |
| Main Functions | Remote control, volume adjustment, channel selection, on-screen menu, video/audio inputs (AV), antenna/cable input, line audio output |
| Video Inputs | 3 inputs (RCA jacks) |
| Audio Outputs | Line out (RCA jacks) |
| Remote Control | Yes, with phosphorescent keys |
| Remote Control Batteries | 2 AA batteries (estimate) |
| Safety | Surge protection, antenna grounding, unplug before cleaning |
| Maintenance | Clean with a damp cloth, do not use liquid or aerosol cleaners |
| Spare Parts | Use replacement parts specified by the manufacturer |
| Repairability | Have repairs done by qualified personnel |
| OSD Languages | English, French, Spanish (estimate) |
| Warranty | Limited warranty (see manual) |
| Included Accessories | Registration card, remote control, batteries |
Frequently Asked Questions - 20F640 SHARP
User questions about 20F640 SHARP
0 question about this device. Answer the ones you know or ask your own.
Ask a new question about this device
Download the instructions for your Microcontroller in PDF format for free! Find your manual 20F640 - SHARP and take your electronic device back in hand. On this page are published all the documents necessary for the use of your device. 20F640 by SHARP.
USER MANUAL 20F640 SHARP
• Supplied Accessories 5
• Before Operating Your Television 5
- Antenna Connections 5 \~ 6
- Quick Reference Control Operation .... 7 \~ 8
- EZ SETUP during First Use 9
- Demo Mode 10
- Accessing the MAIN MENU screen without Remote Control.... 10
- Language 11
- Sleep Timer 12
- Video Adjust 13
- Audio Adjust....14
- Audio Select.... 15 \~ 16
MTS (Multichannel TV Sound) 15
INTERNAL SPEAKER SWITCH 15
FAO (Fixed Audio Output) 15
This operating manual includes basic operating instructions in Spanish and French.
SPANISH is on page 47 \~ 52.
FRENCH is on page 53 \~ 58.
PAGE
- Closed Caption 17
- Parental Control 18 \~ 28
V-CHIP 18\~25
View Timer 26 \~ 28
- Ch Setup 29 \~ 34
EZ Setup 29
Channel Setting 30 \~ 32
Personal Preference 33
Universal Plus Function 34
- Set Up 35 \~ 36
Energy Save 35
Blue Screen 36
• Using the Video and Audio Input Jacks ..... 37 \~ 38
• Using the Audio Output Jacks 39
• Operation of Remote Control 40 \~ 44
• Before Calling for Service 45
- Calling for Service 45
- Specifications 46
- Limited Warranty 60
Welcome to the SHARP Family. We are pleased that you are now the owner of a SHARP Color Television – built for outstanding quality, reliability and performance.
Every SHARP Color Television set is tuned and adjusted for proper color and sound, and has passed through the most stringent quality control tests at the factory. We have prepared this OPERATION MANUAL so that you may adjust the picture and color to your personal viewing preference.
We sincerely hope that you receive the greatest satisfaction and enjoyment from your new SHARP Color Television set for years to come.
Please read these instructions carefully, and keep them handy for your future reference.
IMPORTANT
To aid reporting in case of loss or theft, please record the TV's model and serial numbers in the space provided. The numbers are located at the rear of the TV.
Model No.:
Serial No.:
IMPORTANT INFORMATION
There are two important reasons for prompt warranty registration of your new SHARP television set. Use the REGISTRATION CARD packed in with the set.
FIRST – WARRANTY
This is to assure that you will immediately receive the full consumer benefit of the parts, service and labor warranty applicable to your purchase.
SECOND – CONSUMER PRODUCT SAFETY ACT
To assure that you will promptly receive any safety notification on inspection, modification or recall that SHARP may be required to give under the 1972 Consumer Product Safety Act. PLEASE READ CAREFULLY THE IMPORTANT "LIMITED WARRANTY" CLAUSE ON THE LAST PAGE.
WARNING: TO REDUCE THE RISK OF FIRE OR ELECTRIC SHOCK, DO NOT EXPOSE THIS APPLIANCE TO WET LOCATIONS.

CAUTION
RISK OF ELECTRIC SHOCK DO NOT OPEN

CAUTION: TO REDUCE THE RISK OF ELECTRIC SHOCK,
DO NOT REMOVE COVER (OR BACK).
NO USER-SERVICEABLE PARTS INSIDE.
REFER SERVICING TO QUALIFIED SERVICE PERSONNEL.

The lightning flash with arrowhead within a triangle is intended to tell the user that parts inside the product are a risk of electric shock to persons.

The exclamation point within a triangle is intended to tell the user that important operating and servicing instructions are in the papers with the appliance.
“Note to CATV system installer: This reminder is provided to call the CATV system installer's attention to Article 820-40 of the National Electrical Code that provides guidelines for proper grounding and, in particular, specifies that the cable ground shall be connected to the grounding system of the building, as close to the point of cable entry as practical.”
WARNING – FCC Regulations state that any unauthorized changes or modifications to this equipment not expressly approved by the manufacturer could void the user's authority to operate this equipment.
PRODUCT DISPOSAL
This product utilizes a Cathode Ray Tube (CRT) containing lead and tin-lead solder.
Disposal of these materials may be regulated due to environment considerations. For disposal or recycling information, please contact your local authorities or the Electronics Industries Alliance: www.eiae.org
IMPORTANT INFORMATION (Continued)
CAUTION:
- Do not place the AC power cord under the TV set or other heavy items.
• To prevent fire, never place any type of candle or naked flames on the top or near the TV set. - To prevent fire or shock hazard, do not expose this products to dripping or splashing. No objects filled with liquids, such as vases, should be placed on the product.
IMPORTANT SAFEGUARDS
CAUTION: Please read all of these instructions before you operate your television and save these instructions for later use.
Electrical energy can perform many useful functions. This unit has been engineered and manufactured to assure your personal safety. BUT IMPROPER USE CAN RESULT IN POTENTIAL ELECTRICAL SHOCK OR FIRE HAZARDS. In order not to defeat the safeguards incorporated in this equipment, observe the following basic rules for its installation, use and servicing.
- Unplug this television equipment from the wall outlet before cleaning.
- Do not use liquid cleaners or aerosol cleaners. Use a damp cloth for cleaning.
- Do not use attachments not recommended by the television equipment manufacturer as they may cause hazards.
- Do not use this television equipment near water — for example, near a bath tub, washbowl, kitchen sink or laundry tub, in a wet basement, or near a swimming pool, etc.
-
Do not place this equipment on an unstable cart, stand, or table. The television equipment may fall, causing serious injury to a child or an adult, and serious damage to the equipment. Use only with a cart or stand recommended by the manufacturer or sold with the television equipment.
-
Television equipment and cart combination should be moved with care. Quick stops, excessive force, and uneven surfaces may cause the equipment and cart combination to overturn.
-
Wall or shelf mounting should follow the manufacturer's instructions, and should use a mounting kit approved by the manufacturer.
-
Slots and openings in the cabinet and the back or bottom are provided for ventilation. To insure reliable operation of the television equipment and to protect it from overheating, these openings must not be blocked or covered. This television equipment should not be placed in a built-in insulation such as a bookcase unless proper ventilation is provided.
-
The openings should never be covered with a cloth or other material, and the bottom openings should not be blocked by placing the television equipment on a bed, sofa, rug, or other similar surface. This television equipment should never be placed near or over a radiator or heat register.
-
This television equipment should be operated only from the type of power source indicated on the marking label. If you are not sure of the type of power supplied to your home, consult your television dealer or local power company.
For television equipment designed to operate from battery power, refer to the operating instructions.
- As a safety feature, television equipment is equipped with a 2-wire polarized plug (one plug blade bigger than the other). The 2-wire polarized plug will fit only one way into the power outlet.
If the plug does not fit, ask your electrician to replace your obsolete outlet. Do not modify the plug and defeat this safety feature.
- Do not allow anything to rest on the power cord. Do not locate this television equipment where the cord will be abused by persons walking on it.

IMPORTANT SAFEGUARDS (Continued)
- Follow all warnings and instructions marked on the television equipment.
- If an outside antenna is connected to the television equipment, be sure the antenna system is grounded so as to provide some protection against voltage surges and built-up static charges. Section 810 of the National Electrical Code provides information with respect to proper grounding of the mast and supporting structure, grounding of the lead-in wire to an antenna discharge unit, size of grounding conductors, location of antenna-discharge unit, connection to grounding electrodes, and requirements for the grounding electrode.
EXAMPLE OF ANTENNA GROUNDING AS PER NATIONAL ELECTRICAL CODE
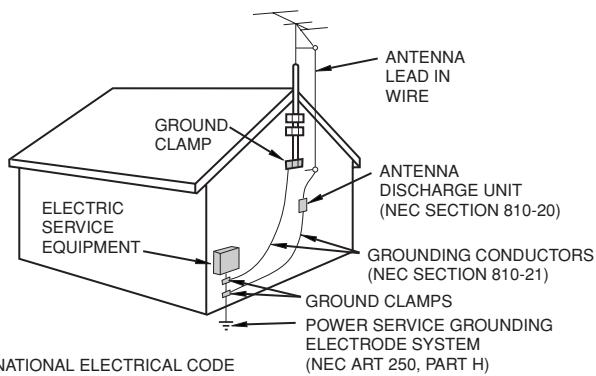
- For added protection for this television equipment during a lightning storm, or when it is left unattended and unused for long periods of time, unplug it from the wall outlet and disconnect the antenna. This will prevent damage to the equipment due to lightning and power-line surges.
- An outside antenna system should not be located in the vicinity of overhead power lines or other electric light or power circuits, or where it can fall into such power lines or circuits. When installing an outside antenna system, extreme care should be taken to keep from touching such power lines or circuits as contact with them might be fatal.
- Do not overload wall outlets and extension cords as this can result in fire or electric shock.
- Never push objects of any kind into this television equipment through cabinet slots as they may touch dangerous voltage points or short out parts that could result in a fire or electric shock. Never spill liquid of any kind on the television equipment.
- Do not attempt to service this television equipment yourself as opening or removing covers may expose you to dangerous voltage or other hazards. Refer all servicing to qualified service personnel.
- Unplug this television equipment from the wall outlet and refer servicing to qualified service personnel under the following conditions:
A. When the power cord or plug is damaged or frayed.
B. If liquid has been spilled into the television equipment.
C. If the television equipment has been exposed to rain or water.
D. If the television equipment does not operate normally by following the operating instructions. Adjust only those controls that are covered by the operating instructions as improper adjustment of other controls may result in damage and will often require extensive work by a qualified technician to restore the television equipment to normal operation.
E. If the television equipment has been dropped or the cabinet has been damaged.
F. When the television equipment exhibits a distinct change in performance — this indicates a need for service.
-
Upon completion of any service or repairs to this television equipment, ask the service technician to perform routine safety checks to determine that the television is in safe operating condition.
-
When replacement parts are required, be sure the service technician has used replacement parts specified by the manufacturer that have the same characteristics as the original part. Unauthorized substitutions may result in fire, electric shock, or other hazards.
Supplied Accessories
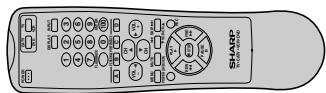
Infrared Remote Control/Part Number RRMCGA108WJSA
Dry batteries size "AA"/1.5 V cc
Before Operating Your Television
Location
- For normal operation, your TV should be located in an area of the room where cool adequate ventilation is provided. Do not place the back of the television set in a place where free airflow will be restricted.
- Any magnetic force may disturb the color picture. Make sure that magnets, electric clocks, toys using magnets or any other magnetic substance, such as iron are kept well away from the TV set.
Power
Your TV operates on 120 Volts, 60 Hz (normal household current) and has a polarized plug. If you are unable to insert the plug fully into the outlet, try reversing the plug. Should it fail to fit, contact an electrician. Do not defeat the safety feature of the polarized plug.
Note:
- If the set will not be used for a long period, such as during a vacation, unplug the set from the wall outlet to economize power. (If the TV set is plugged in, a slight current still flows, even with the POWER BUTTON in the OFF position.)
- Lines and other noise may appear in TV broadcast images when an FM tuner or radio is located near the TV and both radio and TV broadcasts are being received. Should such noise appear, turn off either the TV or the radio.
- If you are listening to an AM broadcast, turn the TV off. AM broadcast signals may not be received due to interference from the TV.
■ Before using the television, prepare the Remote Control
To use the remote control, insert batteries first.
Insert the batteries
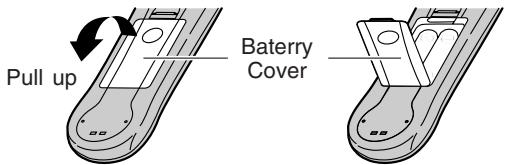
- With your thumbnail, pull up the slit as indicated by the arrow to remove the back cover. Insert two batteries (size "AA"/1.5 V cc). Be sure to match the battery / terminals with the / marks inside the compartment.
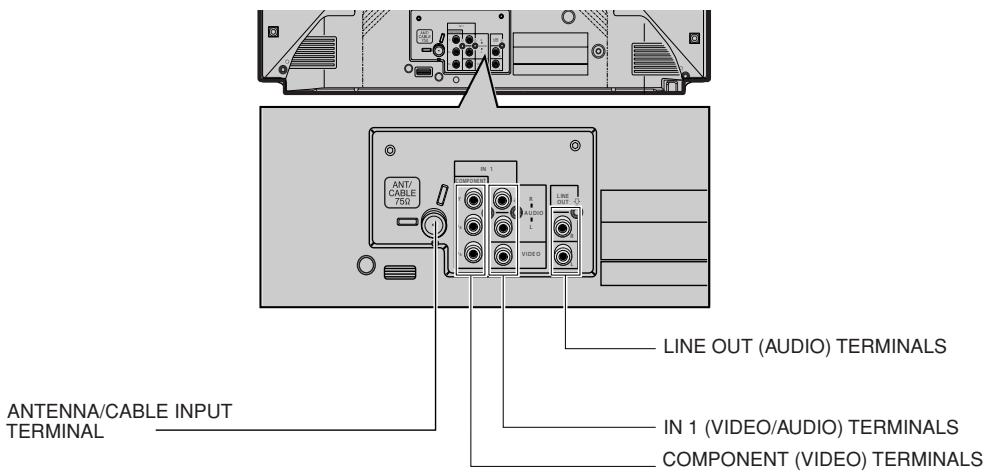
Antenna Connections
Antennas
- The antenna requirements for good color television reception are more important than those for black & white television reception. For this reason, a good quality outdoor antenna is strongly recommended. The following is a brief explanation of the type of connections that are provided with the various antenna systems:
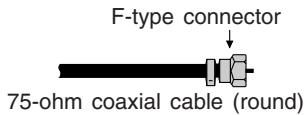
- A 75 ohm system is generally a round cable with F-type connector that can easily be attached to a terminal without tools (not supplied).
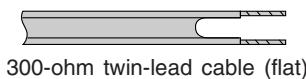
- A 300 ohm system is a flat "twin-lead" cable that can be attached to a 75 ohm terminal through a 300-75 ohm ADAPTOR (not supplied).
Antenna Connections (Continued)
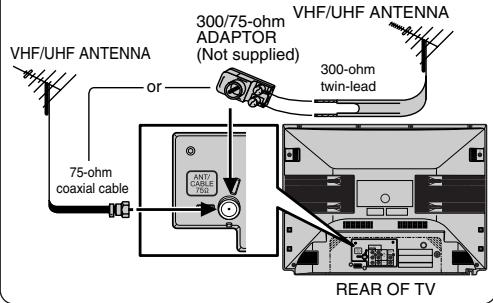
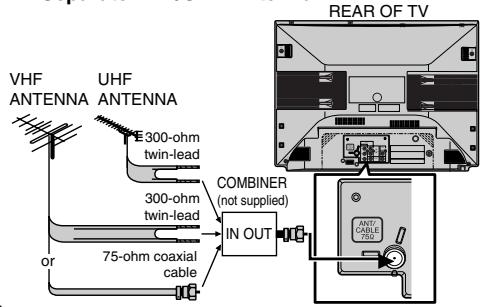
OUTDOOR ANTENNA CONNECTION
- Use one of the following two diagrams if you connect an outdoor antenna.
A: Using a VHF/UHF combination outdoor antenna.
B: Using separate VHF and/or UHF outdoor antenna.
- Connect an outdoor antenna cable lead-in to the COAXIAL CABLE CONNECTOR on the rear of the TV set.
A. Combination VHF/UHF Antennas
B. Separate VHF/UHF Antenna
NOTICE
F-type connector
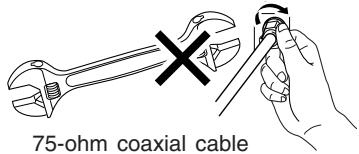
F-type connector should be finger tightened only
When connecting the RF cable to the TV set, do not tighten F-type connector with tools.
If tools are used, it may cause damage to your TV set.
(The breaking of Internal circuit, etc.)
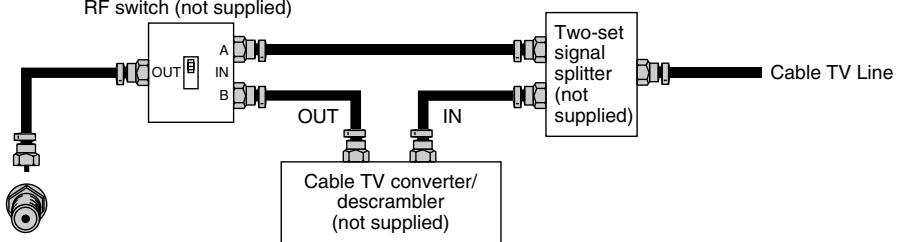
CABLE TV (CATV) CONNECTION
- A 75 ohm coaxial cable connector is built into the set for easy hookup. When connecting the 75 ohm coaxial cable to the set, screw the 75 ohm cable to the COAXIAL CABLE CONNECTOR.
- Some cable TV companies offer “premium pay channels”. Since the signals of these premium pay channels are scrambled, a cable TV converter/descrambler is generally provided to the subscriber by the cable TV company. This converter/descrambler is necessary for normal viewing of the scrambled channels. (Set your TV on channel 3 or 4. Typically one of these channels is used. If this is unknown, consult your cable TV company.) For more specific instructions on installing cable TV, consult your cable TV company. One possible method of utilizing the converter/descrambler provided by your cable TV company is explained below.
Please note: RF switch equipped with position A/B (not provided) is required.
"A" position on the RF switch (not supplied):
You can view all unscrambled channels using the TV's channel keys.
“B” position on the RF switch (not supplied):
You can view the scrambled channels via the converter/descrambler using the converter's channel keys.
flowchart
graph LR
    A["RF switch (not supplied)"] --> B["OUT"]
    B --> C["A IN B"]
    C --> D["Two-set signal splitter (not supplied)"]
    D --> E["Cable TV Line"]
    F["Cable TV converter/descrambler (not supplied)"] --> G["OUT"]
    G --> H["IN"]
    H --> D
    I["Cable TV converter/descrambler (not supplied)"] --> J["OUT"]
Note:
- Consult your SHARP Dealer or Service Center for the type of splitter, RF switch or combiner that might be required.
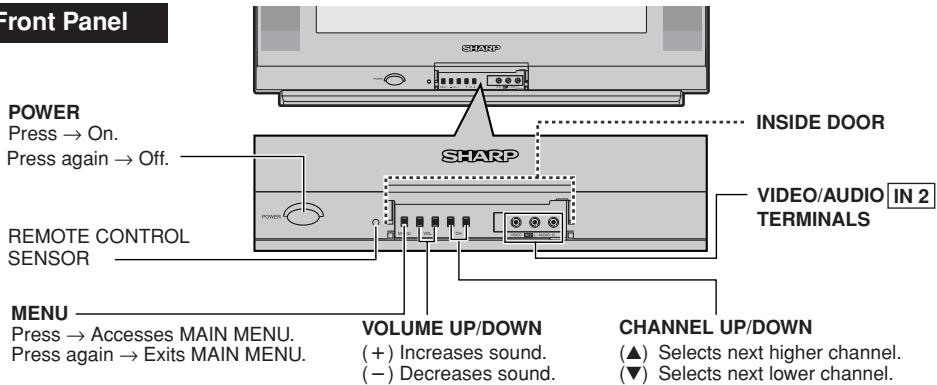
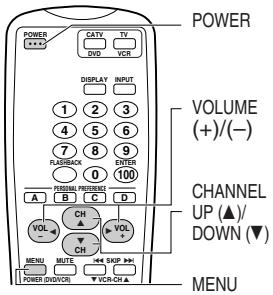
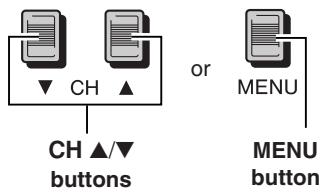
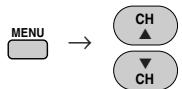
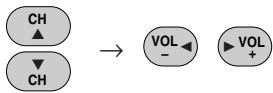
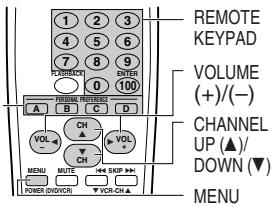
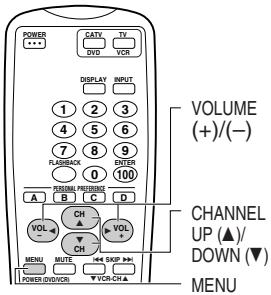
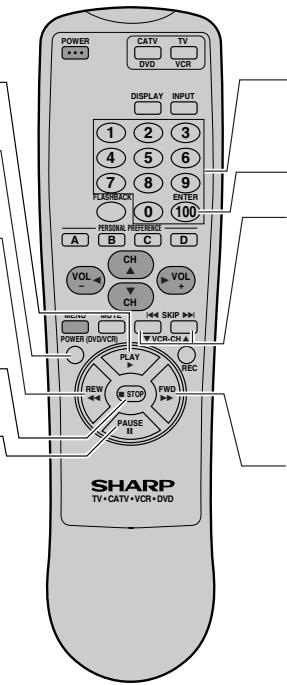
Quick Reference Control Operation
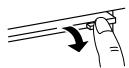
- Part Names
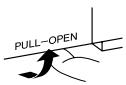
To open the door
Using the projection located under the "PULL-OPEN" indication, pull and lift the door open.
To close the door
Using the projection, lower the door until closed.
Caution:
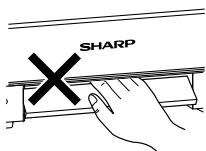
- When opening or closing the door, do not insert your fingers into the gap between the door and front panel. This may result in an injury.
Rear Panel
Note:
- The TV set and remote control illustrations and the on-screen displays in this manual may differ from their actual appearance.
Quick Reference Control Operation (Continued)
- Part Names
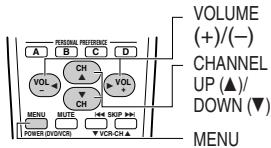
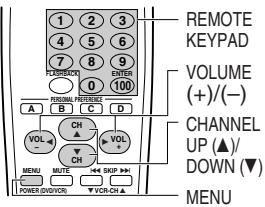
Basic Remote Control Functions
POWER
Press → On.
Press again → Off.
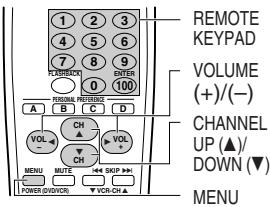
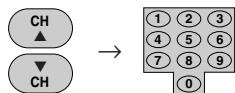
REMOTE KEYPAD
Accesses any channel from keypad.
FLASHBACK
Returns to previous channel.
PERSONAL PREFERENCE
With the Personal Preference buttons, you can program your favorite programs by using the 4 categories A, B, C and D. The channels can be accessed quickly by using these buttons. (See page 33.)
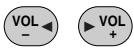
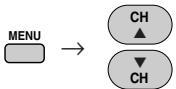
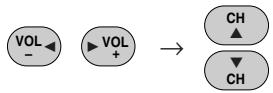
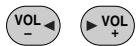
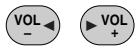
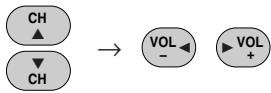
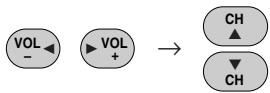
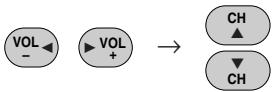
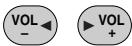
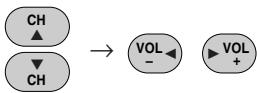
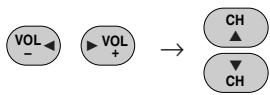
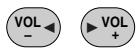
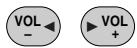
VOLUME UP/DOWN
(+) Increases sound.
(−) Decreases sound.
• Changes or selects the TV adjustments on On-Screen Display.
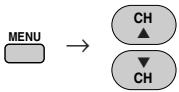
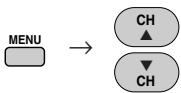
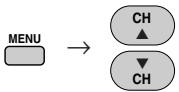
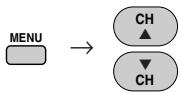
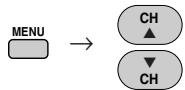
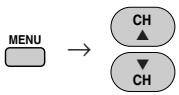
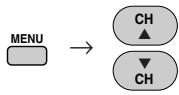
MENU
Press → Accesses MAIN MENU.
Press again → Exits MAIN MENU.
MUTE
Press → Mutes sound.
Press again → Restores sound
- When sound is muted, CLOSED CAPTION appears if available.
POWER (DVD/VCR)
Press → On.
Press again → Off.
DVD/VCR CONTROL
(See page 40.)
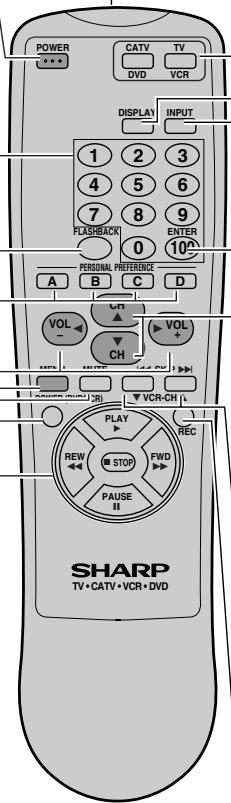
Infrared Transmitter Window
CATV/DVD-TV/VCR MODE buttons
Press TV/VCR → Signals sent will be for TV and VCR control.
Press CATV/DVD → Signals sent will be for cable TV converter and DVD control.
DISPLAY
Press Displays receiving channel for 4 seconds.
Press again → Removes display.
- Temporarily displays receiving channel when in Closed Caption mode.
INPUT
Press → Switches to external video INPUT 1 mode.
Press twice → Switches to external video INPUT 2 mode.
Press 3 times → Switches to external video INPUT 3 mode or COMPONENT mode.
Press 4 times → Switches back to the original TV mode. (See page 38.)
ENTER
Used in some instances where a Cable Converter Box requires an "enter" command after selecting channels, when using the REMOTE KEYPAD button.
(See page 40.)
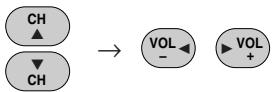
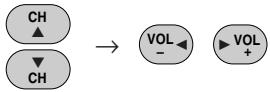
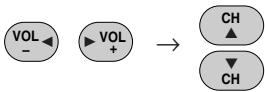
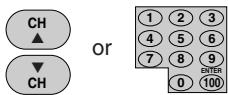
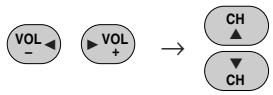
CHANNEL UP/DOWN
(▲) Selects next higher channel.
(▼) Selects next lower channel.
• See pages 30–32 for Channel Setting.
- Moves the "●" mark on the MENU screen
SKIP/VCR-CH
(See page 40.)
REC
(See page 40.)
Note:
- The above shaded buttons on the Remote Control glow in the dark. To use the glow-in-the-dark display on the remote control, place it under a fluorescent light or other lighting.
- The phosphorescent material contains no radioactive or toxic material, so it is safe to use.
- The degree of illumination will vary depending on the strength of lighting used.
- The degree of illumination will decrease with time and depending on the temperature.
- The time needed to charge the phosphorescent display will vary depending on the surrounding lighting.
- Sunlight and fluorescent lighting are the most effective when charging the display.
EZ SETUP during First Use
■ When you turn on the TV for the first time, it will automatically memorize the broadcast channels.
Please perform the following instructions before pressing the POWER button.
(1) Insert the batteries into the remote control. (See page 5)
(2) Connect the antenna cable to the TV set. (See page 5 \~ 6)
(3) Plug in the AC POWER cord to the wall outlet.
1 Press POWER on the TV set or on the Remote Control to turn on the TV. The SELECT LANGUAGE mode will be displayed.
(On the Set)

(Remote Control)

SELECT LANGUAGE
●ENGLISH
ESPAÑOL
FRANCAIS
SELECT:CH ▲/▼
SET : VOL + / -
(SELECT LANGUAGE mode)
2 Press CH ▲/▼ to select “ENGLISH”, “SPANISH (ESPAÑOL)” or “FRENCH (FRANCAIS)”.

SELECT LANGUAGE
●ENGLISH
ESPAÑOL
FRANCAIS
SELECT:CH ▲/▼
SET : VOL + / -
3 Press VOL +/- to SET LANGUAGE and access EZ SETUP mode.


CONNECT ANTENNA OR CABLE
START EZ SETUP?
- STOP
START
(EZ SETUP mode)
4 Press VOL +
The tuner will automatically search for the broadcast and cable TV channels. (The CH No. will automatically increase when it appears.)
If you want to stop the EZ SETUP process once it has started, press VOL – and it will be canceled.
If you want to SETUP again, please refer to page 29 on CH SETUP.
To cancel EZ SETUP
Press VOL -

PLEASE WAIT
AUTO PROGRAMMING
125
STOP
- START
5 Once EZ SETUP is completed, the lowest channel number memorized will be displayed.
2
Note:
- If EZ SETUP does not memorize all the channels in your region, please refer to page 30 for more information on manually memorizing the channels using CHANNEL SETTING.
- It may be difficult to PRESET when the broadcast signals are weak, the channel cycle frequency is incorrect or frequency jamming is occurring around the area. Please refer to pages 30 \~ 32 for more information on manually memorizing the channels using CHANNEL SETTING.
Demo Mode
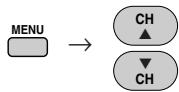
- To quickly learn more about the TV set, press and hold for more than three seconds both CH ▲ and CH ▼ or MENU on the TV set. The TV set will go into DEMO mode and briefly explain the various features.
- To cancel DEMO mode, again press and hold for more than three seconds both CH ▲/▼ or MENU on the TV set.
(On the Set)
Example:
DEMO mode display
SHARP
From SHARP Minds Come SHARP Products
Note:
- Without signal on COMPONENT IN, video input and antenna in, the DEMO mode cannot be activated.
Accessing the MAIN MENU screen without Remote Control
- If you misplaced your Remote Control you can still access most settings via the MAIN MENU screen when you press MENU on the TV set.
- Some features of your TV set will not be accessible without the Remote Control. If you lost your Remote Control, contact a Sharp Service Center for a replacement.
(On the Set)

MENU
MENU
button
Language
The language for the ON SCREEN DISPLAY can be set to ENGLISH, SPANISH or FRENCH.
■ Setting the ON SCREEN DISPLAY Language.
1 Press MENU to access the MAIN MENU screen.

MENU
●SLEEP TIMER
VIDEO ADJUST
AUDIO ADJUST
AUDIO SELECT
CLOSED CAPTION
PARENTAL CONTROL
CH SETUP
SETUP
(MAIN MENU screen)
2 Press CH ▲/▼ to move the “●” mark to “SETUP”.

MENU
SLEEP TIMER
VIDEO ADJUST
AUDIO ADJUST
AUDIO SELECT
CLOSED CAPTION
PARENTAL CONTROL
CH SETUP
- SETUP
3 Press VOL +/− to access SETUP mode.
SETUP
● LANGUAGE
ENERGY SAVE
BLUE SCREEN
(SETUP mode)
4 Press VOL +/- to access LANGUAGE change mode.

LANGUAGE
●ENGLISH
ESPAÑOL
FRANCAIS
(LANGUAGE change mode)
5 Press CH ▲/▼ to select "ENGLISH", "SPANISH (ESPAÑOL)" or "FRENCH (FRANCAIS)".

IDIOMA
↑ENGLISH
- ESPAÑOL
↓ FRANCAIS
6 Press MENU to exit.

Sleep Timer
■ You can preset your television to turn off automatically in increments of 30, 60, 90 or 120 minutes.
1 Press MENU to access the MAIN MENU screen.
2 Press VOL +/- to access SLEEP TIMER mode.

MENU
●SLEEP TIMER
VIDEO ADJUST
AUDIO ADJUST
AUDIO SELECT
CLOSED CAPTION
PARENTAL CONTROL
CH SETUP
SETUP
(MAIN MENU screen)
3 Press VOL +/− to set a sleep time of 30, 60, 90 or 120 minutes.
SLEEP TIMER
120M REMAIN
(SLEEP TIMER mode)
4 Press MENU to exit.

Note:
- To turn off the SLEEP TIMER, repeat the above SLEEP TIMER steps and select “— — — M REMAIN” during step 3.
- While SLEEP TIMER is active, the time remaining will be briefly displayed on-screen at regular intervals or when the remote's DISPLAY key is pressed.
Video Adjust
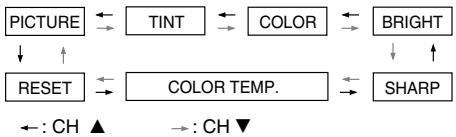
Description of Adjustment Items
| Selected item | VOL + button | VOL — button |
| PICTURE | To increase contrast | To decrease contrast |
| TINT | To make skin tones greenish | To make skin tones purplish |
| COLOR | To increase color intensity | To decrease color intensity |
| BRIGHT | To increase brightness | To decrease brightness |
| SHARP | To increase sharpness | To decrease sharpness |
| COLOR TEMP. | To choose a MH, HIGH, LOW or ML COLOR TONE. | |
| RESET | To return all adjustments to factory preset levels. | |
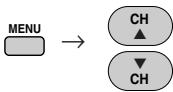
1 Press MENU to access the MAIN MENU screen.
2 Press CH ▲/▼ to move the “●” mark to “VIDEO ADJUST”.
MENU
SLEEP TIMER
●VIDEO ADJUST
AUDIO ADJUST
AUDIO SELECT
CLOSED CAPTION
PARENTAL CONTROL
CH SETUP
SETUP
(MAIN MENU screen)
3 Press VOL +/- to access PICTURE adjust mode.

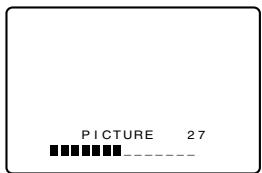
(PICTURE adjust mode)
4 Press CH ▲/▼ to select the desired mode. (Refer to the diagram below.)
flowchart
graph TD
    A["PICTURE"] --> B["TINT"]
    B --> C["COLOR"]
    C --> D["BRIGHT"]
    D --> E["SHARP"]
    E --> F["COLOR TEMP."]
    F --> G["RESET"]
    G --> H["↔"]
    H --> I["↔"]
    I --> J["↔"]
    J --> K["↔"]
    K --> L["↔"]
    L --> M["↔"]
    M --> N["↔"]
    N --> O["↔"]
    O --> P["↔"]
    P --> Q["↔"]
    Q --> R["↔"]
    R --> S["↔"]
    S --> T["↔"]
    T --> U["↔"]
    U --> V["↔"]
    V --> W["↔"]
    W --> X["↔"]
    X --> Y["↔"]
    Y --> Z["↔"]
    Z --> AA["↔"]
    AA --> AB["↔"]
    AB --> AC["↔"]
    AC --> AD["↔"]
    AD --> AE["↔"]
    AE --> AF["↔"]
    AF --> AG["↔"]
    AG --> AH["↔"]
    AH --> AI["↔"]
    AI --> AJ["↔"]
    AJ --> AK["↔"]
    AK --> AL["↔"]
    AL --> AM["↔"]
    AM --> AN["↔"]
    AN --> AO["↔"]
    AO --> AP["↔"]
    AP --> AQ["↔"]
    AQ --> AR["↔"]
    AR --> AS["↔"]
    AS --> AT["↔"]
    AT --> AU["↔"]
    AU --> AV["↔"]
    AV --> AW["↔"]
    AW --> AX["↔"]
    AX --> AY["↔"]
    AY --> AZ["↔"]
    AZ --> BA["↔"]
    BA --> BB["↔"]
    BB --> BC["↔"]
    BC --> BD["↔"]
    BD --> BE["↔"]
    BE --> BF["↔"]
    BF --> BG["↔"]
    BG --> BH["↔"]
    BH --> BI["↔"]
    BI --> BJ["↔"]
    BJ --> BK["↔"]
    BK --> BL["↔"]
    BL --> BM["↔"]
    BM --> BN["↔"]
    BN --> BO["↔"]
    BO --> BP["↔"]
    BP --> BQ["↔"]
    BQ --> BR["↔"]
    BR --> BS["↔"]
    BS --> BT["↔"]
    BT --> BU["↔"]
    BU --> BV["↔"]
    BV --> BW["↔"]
    BW --> BX["↔"]
    BX --> BY["↔"]
    BY --> BZ["↔"]

5 Press VOL +/- to adjust the setting.


6 Repeat steps 4 to 5 to adjust other settings.
7 Press MENU to exit.

Note:
• VIDEO ADJUST setting is available for AIR or CABLE/INPUT 1/INPUT 2 and COMPONENT respectively.
Audio Adjust
| Selected item | VOL + button | VOL – button |
| TREBLE | To increase treble response | To decrease treble response |
| BASS | To increase bass response | To decrease bass response |
| BALANCE | To emphasize the right speaker's volume | To emphasize the left speaker's volume |
| RESET | To return all adjustments to factory preset levels. | |
1 Press MENU to access the MAIN MENU screen.
2 Press CH ▲/▼ to move the “●” mark to “AUDIO ADJUST”.
MENU
SLEEP TIMER
VIDEO ADJUST
●AUDIO ADJUST
AUDIO SELECT
CLOSED CAPTION
PARENTAL CONTROL
CH SETUP
SETUP
(MAIN MENU screen)
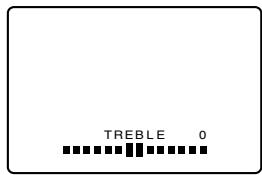
3 Press VOL +/- to access TREBLE adjust mode.
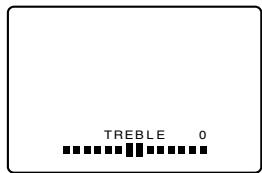
(TREBLE adjust mode)
4 Press CH ▲/▼ to select the desired mode. (Refer to the diagram below.)

flowchart
graph LR
    TREBLE <--> BASS <--> BALANCE <--> RESET
    BASS <--> BALANCE <--> RESET
    style TREBLE fill:#f9f,stroke:#333
    style BASS fill:#ccf,stroke:#333
    style BALANCE fill:#cfc,stroke:#333
    style RESET fill:#fcc,stroke:#333

5 Press VOL +/- to adjust the setting.
6 Repeat steps 4 to 5 to adjust other settings.
7 Press MENU to exit.

Audio Select
■ MTS (Multichannel TV Sound)
This circuit allows reception of stereo or bilingual TV sound.
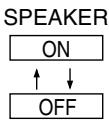
■ INTERNAL SPEAKER SWITCH
This function turns the TV's internal speakers "ON" or "OFF" when listening to sound from external speakers by using the AUDIO OUTPUT JACKS on page 39.
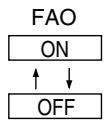
■ FAO (Fixed Audio Output)
This function turns the TV's internal speakers “OFF” and allows fixed audio output from the AUDIO OUTPUT JACKS on page 39. With FAO, the TV's volume control is disabled.
1 Press MENU to access the MAIN MENU screen.
2 Press CH ▲/▼ to move the “●” mark to “AUDIO SELECT”.
MENU
SLEEP TIMER
VIDEO ADJUST
AUDIO ADJUST
●AUDIO SELECT
CLOSED CAPTION
PARENTAL CONTROL
CH SETUP
SETUP
(MAIN MENU screen)
3 Press VOL +/- to access AUDIO SELECT mode.
4 Press CH ▲/▼ to move the “●” mark to “MTS”, “SPEAKER” or “FAO”.
flowchart
graph LR
    A["VOL-"] --> B["VOL+"]
    B --> C["CH-"]
    B --> D["CH"]
AUDIO SELECT
●MTS : SAP
SPEAKER: ON
FAO : OFF
(AUDIO SELECT mode)
5 Press VOL +/- to select "STEREO", "SAP" or "MONO" when the "●" mark is at "MTS" position.

flowchart
graph TD
    A["MTS"] --> B["STEREO"]
    B --> C["SAP"]
    C --> D["MONO"]
    D --> A
    B <--> C
    C <--> D


AUDIO SELECT
●MTS : STEREO
SPEAKER: ON
FAO : OFF
(AUDIO SELECT mode)
6 Press MENU to exit.
MENU

Ex: Actual screen indicating ON AIR when receiving STEREO broadcasts
Actual channel number
“← ON AIR” will appear next to STEREO or
SAP when receiving STEREO or SAP broadcasts.
1 2
● STEREO←ON AIR
SAP ←ON AIR
MONO
(CHANNEL call on screen)
Audio Select (Continued)
■ You can enjoy Hi-Fi stereo sound or SAP broadcasts where available.
- Stereo broadcasts
Live television transmission of sports, shows, concerts, etc. can be received in dynamic stereo sound. - SAP broadcasts
Television broadcast can be received with either MAIN or SAP sound.
MAIN sound: The normal program soundtrack. (Monaural or stereo where available.)
SAP sound: Second language, supplementary commentaries, etc. (SAP sound is monaural.)
■ If stereo sound is difficult to hear.
- You can obtain clearer sound by manually switching to the fixed monaural mode.
Note:
- Once MONO mode is selected, the TV sound remains monaural even if the TV set receives a stereo broadcast. You must switch the mode back to STEREO if you want to hear stereo sound again.
- MTS while in the INPUT mode does not change the type of sound; in this case, sound is determined by the video source.
- If the “FAO” mode is selected “ON”, the “SPEAKER” mode will automatically turn “OFF”. “SPEAKER” selecting will not affect “FAO” mode.
Closed Caption
■ HOW TO SET CLOSED CAPTION
- Your TV is equipped with an internal Closed Caption decoder. "Closed Caption" is a system which allows you to view conversations, narration, and sound effects in TV programs and home videos as subscript on your TV screen as shown on the right.
- Not all the programs and videos will offer closed caption. Please look for the “cc” symbol to ensure that captions will be shown.
- Closed Caption broadcast can be viewed in two modes: CAPTION and TEXT. For each mode, two channels are available, CH1 and CH2: The [CAPTION] mode subscripts dialogues and commentaries of TV dramas and news programs while allowing clear view of the picture. The [TEXT] mode displays over the picture other various information (such as TV program schedule, weather forecast, etc.) that is independent of the TV programs.

1 Press MENU to access the MAIN MENU screen.
2 Press CH ▲/▼ to move the “●” mark to “CLOSED CAPTION”.
MENU
SLEEP TIMER
VIDEO ADJUST
AUDIO ADJUST
AUDIO SELECT
●CLOSED CAPTION
PARENTAL CONTROL
CH SETUP
SETUP
(MAIN MENU screen)
3 Press VOL +/- to access CLOSED CAPTION setting mode.
CLOSED CAPTION
●MODE:CAPTION
DATA:CH1
(CLOSED CAPTION setting mode)
4 Press CH ▲/▼ to move the “●” mark to either “MODE” or “DATA”.

CLOSED CAPTION
MODE:CAPTION
●DATA:CH1
5 Press VOL +/- to change the CLOSED CAPTION setting.
MODE:

DATA:

CLOSED CAPTION
●MODE:CAPTION
DATA:CH1
6 Press MENU to exit.

Note:
- If a broadcast has CLOSED CAPTION and the MUTE button is pressed, the set enters [CAPTION] mode automatically. Pressing MUTE again will return the set to its previous condition.
- CLOSED CAPTION may malfunction (white blocks, strange characters, etc.) if signal conditions are poor or if there are problems at the broadcast source. This does not necessarily indicate a problem with your TV.
- If any button is pressed to call up the ON SCREEN DISPLAY while viewing a CLOSED CAPTION broadcast, the CLOSED CAPTION will disappear momentarily.
- When viewing in TEXT mode, if no TEXT broadcast is being received, for some programs the screen may become dark and blank. Should this occur, set the CLOSED CAPTION mode to "OFF".
Parental Control (V-CHIP Operation)
V-CHIP
- This function allows you to restrict TV programs and also allows you to control TV usage based on FCC data. This function is to prevent your children from watching violence or sexual scenes that may be harmful.
- Restriction of TV programs includes two characters that contain information about the program's MPAA rating and the TV Parental Guidelines. MPAA is restricted by age. TV Parental Guidelines are restricted by age and contents.
- Since a TV program may use either the MPAA rating or the TV Guidelines you should adjust both for complete control.
[1] MPAA RATING
| RATING | ||
| age base | G | GENERAL AUDIENCES. All ages admitted. |
| PG | PARENTAL GUIDANCE SUGGESTED. Some material may not be suitable for children. | |
| PG-13 | PARENTAL STRONGLY CAUTIONED. Some material may be inappropriate for children under 13. | |
| R | RESTRICTED. Under 17 requires accompanying parent or adult guardian. | |
| NC-17 | NO ONE 17 AND UNDER ADMITTED. | |
| X | X Rating is an older rating that is unified with NC-17 but may be encoded on older movie's data. | |
• MPAA RATING (Example)
Example 1.
"PG-13" in the age based RATING is blocked, this will automatically block the high ratings "R", "NC-17", "X" also.
Example 2.
“R” in the age based RATING is blocked, this will automatically block the high rating “NC-17”, “X” also.
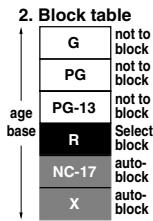
Note:
• MPAA RATING is only age based ratings.
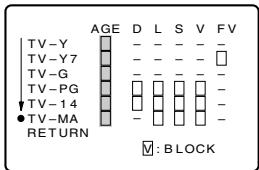
[2] TV PARENTAL GUIDELINES
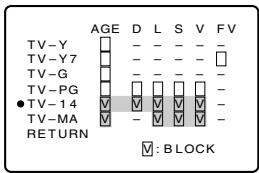
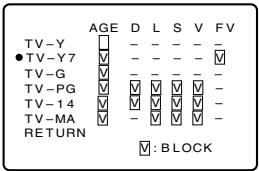
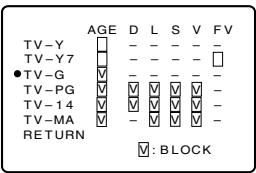
| RATING | ←→ content base → | ||||||
| AGE | D (Sexually Suggestive Dialog) | L (Adult Language) | S (Sexual Situation) | V (Violence) | FV (Fantasy Violence) | ||
| ↑Age base↓ | TV-Y (All children) | √ | - | - | - | - | - |
| TV-Y7 (Direct to Older Children) | √ | - | - | - | - | √ | |
| TV-G (General Audience) | √ | - | - | - | - | - | |
| TV-PG (Parental Guidance Suggested) | √ | √ | √ | √ | √ | - | |
| TV-14 (Parents Strongly Cautioned) | √ | √ | √ | √ | √ | - | |
| TV-MA (Mature Audience Only) | √ | - | √ | √ | √ | - | |
V : Content Rating can be set.
- : Content Rating cannot be set (not normally broadcast by TV station).
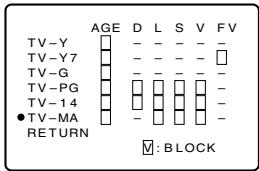
Parental Control (V-CHIP Operation Continued)
• TV-PARENTAL GUIDELINES (Example)
Example 1.1 : Age Based setting
Go through all select ratings and select unblocked for "AGE".
This will automatically unblock everything.
Example 1.2 : Age Based setting
For “TV-G” select “BLOCK” for “AGE”. This will automatically block the higher age ratings “TV-PG”, “TV-14” and “TV-MA” as well as “TV-G”.
Furthermore, the content ratings “D”, “L”, “S”, “V”, “FV” are automatically blocked as well for “TV-PG”, “TV-14” and “TV-MA” as well as “TV-G”.

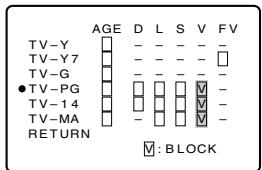
Example 2.1 : Content Based setting
For “TV-PG”, “TV-14” and “TV-MA” select unblocked for each content ratings (“D”, “L”, “S”, “V”, “FV”) by leaving “AGE” unblocked for “TV-PG”, “TV-14” and “TV-MA”. If you choose to unblock for each one in content base.
Example 2.2 : Content Based setting
Then for “TV-PG” and select “BLOCK” for only “V” (Violence). This will automatically block the higher ratings “TV-14-V” and “TV-MA-V” (“TV-14” and “TV-MA” for Violence content only).
Please note that with these settings blocking does NOT occur. If a program is rated only “TV-MA”; it must be rated “TV-MA-V” to be blocked.
Example 3 : Reset an Age Based setting
For "TV-14" and select again "BLOCK" for "AGE".
This will again automatically block the content ratings “D”, “L”, “S”, “V”, “FV” for “TV-MA” as well as “TV-14”.
Please note that the lower age rating “TV-PG” did not change from its previous settings.
Note:
- Content ratings can be modified but only in the combinations indicated by an in the table on page 18.
- Changing a lower age rating's content setting to "BLOCK" automatically changes the same higher age rating's content setting to "BLOCK" regardless of their previous settings.
- Changing a lower rating's “AGE” setting to “BLOCK” automatically changes all higher ratings to “BLOCK” regardless of their previous settings.
- Any rating's "AGE" set to unblocked must have its content settings individually set.
[3] ADDITIONAL MODE
Besides the above “MPAA RATINGS” and “TV PARENTAL GUIDELINES” new ratings system’s data can be downloaded when they become available. (See page 22.)
Parental Control (V-CHIP Operation Continued)
■ HOW TO SET V-CHIP
[1] MPAA RATING
1 Press MENU to access the MAIN MENU screen.
2 Press CH ▲/▼ to move the “●” mark to “PARENTAL CONTROL”.
![SHARP 20F640 - [1] MPAA RATING - 1](/content/2024/12/78339/images/9536b1b90d1759c39b06ded18f3576289aab2c9c0a77cba03f6fa2c99eabcb70.jpg)
MENU
SLEEP TIMER
VIDEO ADJUST
AUDIO ADJUST
AUDIO SELECT
CLOSED CAPTION
●PARENTAL CONTROL
CH SETUP
SETUP
(MAIN MENU screen)
3 Press VOL +/- to access PARENTAL CONTROL mode.
![SHARP 20F640 - [1] MPAA RATING - 2](/content/2024/12/78339/images/fab0a9e35488b5fdffb476c314f51d672083a0d3d2f24d79df2a65c927db79d3.jpg)
PARENTAL CONTOL
●V-CHIP BLOCK
VIEW TIMER
(PARENTAL CONTROL mode)
4 Press VOL +/- to access V-CHIP BLOCK select mode, then press VOL +/- to select "MPAA RATING".
![SHARP 20F640 - [1] MPAA RATING - 3](/content/2024/12/78339/images/2fc996c1ce7943e3adfb874721d5d9499b6378356fc3d4217418052c8f9e0c88.jpg)
V-CHIP BLOCK
●MPAA
TV GUIDELINES
OPTION
SECRET No.:----
STATUS:OFF
(V-CHIP BLOCK select mode)
5 Press CH ▲/▼ to move the “●” mark to “PG”, then press VOL +/- to select BLOCK. If you set “PG” to BLOCK, “PG-13”, “R”, “NC-17” and “X” are automatically blocked.
![SHARP 20F640 - [1] MPAA RATING - 4](/content/2024/12/78339/images/120c3ac7e406216cf632bc17448f62867e213ef673e67f4532b34e0f43a3c7d3.jpg)
flowchart
graph LR
    A["CH ▲"] --> C["VOL -"]
    B["CH ▼"] --> C["VOL +"]
MPAA
G : ----
● PG : BLOCK
PG-13 : BLOCK
R : BLOCK
NC-17 : BLOCK
X : BLOCK
RETURN
6 Press CH ▲/▼ to move the "●" mark to "RETURN", then press VOL +/− to exit V-CHIP BLOCK select mode.
![SHARP 20F640 - [1] MPAA RATING - 5](/content/2024/12/78339/images/361e9e55de851bacd161df8be3f3f6d5332d2f780f7afb985e958f37b7c181ec.jpg)
flowchart
graph LR
    A["CH ▲"] --> C["VOL -"]
    B["CH ▼"] --> C["VOL +"]
MPAA
G : ----
PG : BLOCK
PG-13 : BLOCK
R : BLOCK
NC-17 : BLOCK
X : BLOCK
- RETURN
Note:
Ex.
- If you set "G" to BLOCK, all RATING are automatically blocked.
- If you set "X" to BLOCK, "G", "PG", "PG-13", "R" and "NC-17" are not blocked.
Parental Control (V-CHIP Operation Continued)
[2] TV GUIDELINES
1 Repeat steps 1 to 3 of [1] MPAA RATING.
2 Press VOL +/- to access V-CHIP BLOCK select mode, then press CH ▲/▼ to move the “●” mark to “TV GUIDELINES”.
![SHARP 20F640 - [2] TV GUIDELINES - 1](/content/2024/12/78339/images/8e834da3b324da93530af26aa4c4c0702326faae16e280267d19eb00ee7dd8a3.jpg)
flowchart
graph LR
    A["VOL-"] --> B["VOL+"]
    C["CH"] --> D["CH"]
V-CHIP BLOCK
MPAA
●TV GUIDELINES
OPTION
SECRET No.:----
STATUS:OFF
(V-CHIP BLOCK select mode)
3 Press VOL +/- to access TV GUIDELINES mode.
![SHARP 20F640 - [2] TV GUIDELINES - 2](/content/2024/12/78339/images/c3ba46130b87adb13270301253eaa1918e230b8d7fe2ffa3f3def605fc68ef77.jpg)
(TV GUIDELINES mode)
4 To change CONTENT SETTING, press CH ▲/▼ to move the “●” mark to the desired rating and then press VOL +/− to select.
![SHARP 20F640 - [2] TV GUIDELINES - 4](/content/2024/12/78339/images/863dd09a3eb0825e4945ab3cf0a60a2585b769f758c5f1efcbced647ca6f4afb.jpg)
flowchart
graph LR
    A["CH ▲"] --> C["VOL -"]
    B["CH ▼"] --> C["VOL +"]
5 Press CH ▲/▼ to move the “●” mark to the desired content and then press VOL +/- to select either “BLOCK” or unblock (“- - - - - ”).
![SHARP 20F640 - [2] TV GUIDELINES - 5](/content/2024/12/78339/images/300e6368763e19cbcfe269730ab73fb5a7068e68b448f3466cd74bd5ff233dc3.jpg)
flowchart
graph LR
    A["CH ▲"] --> C["VOL -"]
    B["CH ▼"] --> C["VOL +"]
![SHARP 20F640 - [2] TV GUIDELINES - 6](/content/2024/12/78339/images/6d77e812c27b92436503b8a160177d3a2292401052336835f93bf30fb7d259ed.jpg)
6 Press CH ▲/▼ to move the “●” mark to "RETURN", then press VOL +/− to return to TV GUIDELINES mode.
![SHARP 20F640 - [2] TV GUIDELINES - 7](/content/2024/12/78339/images/acc02ce0eb5efc26e61e25b05219455e5a63e141af8035b32676f0aeff305434.jpg)
flowchart
graph LR
    A["CH ▲"] --> C["VOL -"]
    B["CH ▼"] --> C["VOL +"]
7 Repeat steps 4 to 5 until all ratings and their contents are set.
8 When done, press MENU to exit.
![SHARP 20F640 - [2] TV GUIDELINES - 9](/content/2024/12/78339/images/6a4c613adeb936342c931f164c71980917ab3344c8f5ff81804b291686c4a6f8.jpg)
Parental Control (V-CHIP Operation Continued)
[3] ADDITIONAL MODE (DOWNLOAD)
There will be an additional new rating system. In that case, please set up as follows. Subsequently the new rating system will set up automatically.
1 Repeat steps 1 to 3 of [1] MPAA RATING.
2 Press VOL +/- to access V-CHIP BLOCK select mode, then press CH ▲/▼ to move the “●” mark to “OPTION”.
![SHARP 20F640 - [3] ADDITIONAL MODE (DOWNLOAD) - 1](/content/2024/12/78339/images/f79386da5f8de17c07ca3d5f6b21716e74acbf5f2756d6bed77bf2b93520c8e9.jpg)
flowchart
graph LR
    A["VOL-"] --> B["VOL+"]
    B --> C["CH▲"]
    B --> D["▼CH"]
V-CHIP BLOCK
MPAA
TV GUIDELINES
●OPTION
SECRET No.:----
STATUS:OFF
(V-CHIP BLOCK select mode)
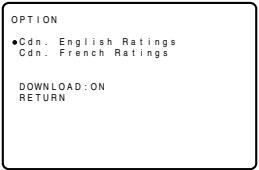
3 Press VOL +/- to access OPTION mode, then press CH ▲/▼ to move the “●” mark to “DOWNLOAD”, then press VOL +/- to “DOWNLOAD : ON”.
![SHARP 20F640 - [3] ADDITIONAL MODE (DOWNLOAD) - 2](/content/2024/12/78339/images/0d945d4d3ca32ef86191fdba170906e671fe63c110df0700cdbc77a50d9f8375.jpg)
flowchart
graph LR
    A["VOL-"] --> B["▶ VOL+"]
    B --> C["CH▲"]
    C --> D["▼ CH"]
    D --> E["VOL-"]
    E --> F["▶ VOL+"]
OPTION
- DOWNLOAD: ON RETURN
(OPTION mode)
4 Press MENU to exit.
MENU
![SHARP 20F640 - [3] ADDITIONAL MODE (DOWNLOAD) - 3](/content/2024/12/78339/images/647608459b4909e908c5023fa4254228d734a608db01e0d949cc929a68bf9bc6.jpg)
1 If you watch the program containing "New Rating System Data", the DOWNLOAD screen will be displayed.
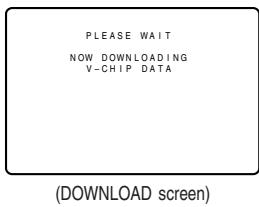
2 The DOWNLOAD screen will disappear, once downloading is finished.
Note:
- DOWNLOAD will not start, if you do not watch a program containing “New Rating System Data”.
Parental Control (V-CHIP Operation Continued)
- How to set Additional mode (Example)
1 Repeat steps 1 to 2 of [3] ADDITIONAL MODE.
2 Press CH ▲/▼ to move the “●” mark to “Cdn. English Ratings”, then press VOL +/−.
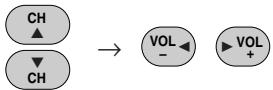
flowchart
graph LR
    A["CH ▲"] --> C["VOL -"]
    B["CH ▼"] --> C["VOL +"]
(After download the rating data)
3 You can select "BLOCK" or "----" (unblock) from each RATING mode by pressing CH ▲/▼ and VOL +/- .

flowchart
graph LR
    A["CH ▲"] --> C["VOL -"]
    B["CH ▼"] --> C["VOL +"]
(ENGLISH THRESHOLD BLOCK mode)
4 You can select "BLOCK" or "----" (unblock) from each RATING mode by pressing CH ▲/▼ and VOL +/− if you select "Cdn. French Ratings" in step 2.
flowchart
graph LR
    A["CH ▲"] --> C["VOL -"]
    B["CH ▼"] --> C["VOL +"]
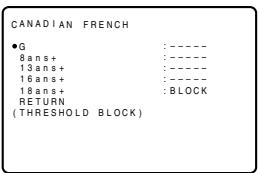
(FRENCH THRESHOLD BLOCK mode)
Note:
• In additional mode
Including two types (English mode, French mode), altogether you are able to download 4 different modes.
Parental Control (V-CHIP Operation Continued)
■ Turning On (Activating) the V-Chip Blocks
1 Repeat steps 1 to 3 of [1] MPAA RATING.
2 Press VOL +/− to access V-CHIP BLOCK select mode, then press CH ▲/▼ to move the “●” mark to “SECRET No.”.
flowchart
graph LR
    A["VOL-"] --> B["VOL+"]
    B --> C["CH▲"]
    B --> D["▼CH"]
V-CHIP BLOCK
MPAA
TV GUIDELINES
OPTION
- SECRET No.:----
STATUS:OFF
(V-CHIP BLOCK select mode)
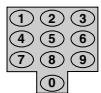
3 Enter a 4-digit SECRET No. using the REMOTE KEYPAD.
V-CHIP BLOCK
MPAA
TV GUIDELINES
OPTION
- SECRET No.:1234
STATUS:OFF
4 Press CH ▲/▼ to move the “●” mark to “STATUS”, then press VOL +/− to activate the V-CHIP BLOCK. (If STATUS is OFF, V-CHIP BLOCK will not operate.)
flowchart
graph LR
    A["CH ▲"] --> C["VOL -"]
    B["CH ▼"] --> C["VOL +"]
V-CHIP BLOCK
MPAA
TV GUIDELINES
OPTION
SECRET No.:1234
●STATUS:OFF
5 When done, press MENU to exit.
MENU

■ To cancel the V-CHIP BLOCK screen while V-CHIP BLOCK has been activated.
1 "V-CHIP HAS BEEN ACTIVATED" will be displayed if you view a program containing Program Rating data as same as you configured.
Note:
- "V-CHIP HAS BEEN ACTIVATED" will not be displayed if STATUS is not configured to "ON".
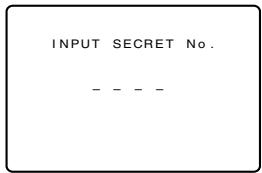
2 Press MENU, then "INPUT SECRET No." will be displayed.
MENU

V-CHIP HAS BEEN 23 ACTIVATED
TV-Y7
FV
INPUT SECRET No.
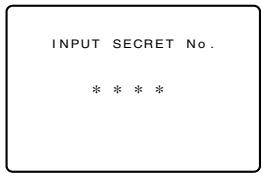
3 Enter the 4-digit SECRET No. using the REMOTE KEYPAD, then V-CHIP BLOCK temporarily will be canceled. If the wrong SECRET No. is chosen, "SECRET No. IS INCORRECT" will be displayed. Input the SECRET No. again in this case.

INPUT SECRET No.
* * * *
Note:
- If you turn the power from OFF, the V-CHIP BLOCK will automatically reset to ON again.
Parental Control (V-CHIP Operation Continued)
■ To change the V-CHIP BLOCK setting. (Secret No. is registered.)
1 Repeat steps 1 to 3 of [1] MPAA RATING, then "INPUT SECRET No." will be displayed.
2 Enter the 4-digit "INPUT SECRET No." using the REMOTE KEYPAD and the V-CHIP select mode will be displayed. Repeat configuration of the V-CHIP BLOCK.

If you forget or need to change your Secret No., clear the original Secret No. and set up a new one.
1 Repeat steps 1 to 3 of [1] MPAA RATING, or 1 to 2 of [■ To cancel the V-CHIP BLOCK screen while V-CHIP BLOCK has been activated], then "INPUT SECRET No." will be displayed.
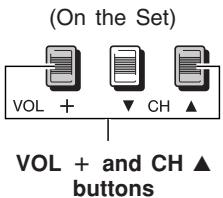
2 Press and hold both VOL + and CH ▲ on the TV set simultaneously until the message "INPUT SECRET No." disappears.

3 Press the MENU button to exit.

Parental Control (VIEW TIMER)
VIEW TIMER
This function allows you to restrict TV viewing time and also allows you to control TV usage. This function is to prevent your children from watching too much TV.
VIEWING TIME (an accumulative timer: counts only the time duration acquired while the TV is on.)
- VIEWING TIME can be set from 30M (30 minutes) to 10H00M (10 hours) in 30 minutes intervals.
OFF TIME (Restricts TV watching after the VIEWING TIME reaches zero.)
- OFF TIME can be set from 30M (30 minutes) to 10H00M (10 hours) in 30 minutes intervals.
STATUS (ON/OFF setting of VIEW TIMER)
VIEW TIMER
● VIEWING TIME --H --M
OFF TIME
--H --M
SECRET No.:----
STATUS:OFF
■ How to set VIEW TIMER.
1 Press MENU to access the MAIN MENU screen.
2 Press CH ▲/▼ to move the “●” mark to “PARENTAL CONTROL”.
MENU
SLEEP TIMER
VIDEO ADJUST
AUDIO ADJUST
AUDIO SELECT
CLOSED CAPTION
●PARENTAL CONTROL
CH SETUP
SETUP
(MAIN MENU screen)
3 Press VOL +/- to access PARENTAL CONTROL mode.
4 Press CH ▲/▼ to move the “●” mark to “VIEW TIMER”.
flowchart
graph LR
    A["VOL-"] --> B["VOL+"]
    B --> C["CH-"]
    B --> D["CH"]
PARENTAL CONTROL
V-CHIP BLOCK
● VIEW TIMER
(PARENTAL CONTROL mode)
5 Press VOL +/- to access VIEW TIMER mode.
VIEW TIMER
● VIEWING TIME --H --M
OFF TIME
H --M
SECRET No.:----
STATUS:OFF
(VIEW TIMER mode)
6 Press CH ▲/▼ to select "VIEWING TIME" and "OFF TIME". For each selection, press VOL +/− to set the time duration.
flowchart
graph LR
    A["CH ▲"] --> C["VOL -"]
    B["CH ▼"] --> C["VOL -"]
    C --> D["VOL +"]
VIEW TIMER
VIEWING TIME
2H 00M
●OFF TIME
H --M
SECRET No.:----
STATUS:OFF
7 Press CH ▲/▼ to select "SECRET No.". Enter a 4-digit SECRET No. using REMOTE KEYPAD.
VIEW TIMER
VIEWING TIME
2H 00M
OFF TIME
5H 00M
- SECRET No.:----
STATUS:OFF
8 Press CH ▲/▼ to select "STATUS". Press VOL +/- to turn ON the "VIEW TIMER". (If STATUS is OFF, VIEW TIMER will not operate.)
flowchart
graph LR
    A["CH ▲"] --> C["VOL -"]
    B["CH ▼"] --> C["VOL +"]
VIEW TIMER
VIEWING TIME
2H 00M
OFF TIME
5H 00M
SECRET No.:1234
- STATUS : ON
Parental Control (VIEW TIMER Continued)
9 Press MENU to exit.
MENU

Example
- To restrict anybody from watching the TV for 5 hours, after watching the TV for 2 hours, your settings would look like this:
- They can choose to watch the 2 hours of TV however they wish. For example, they could watch 1 hour of TV, turn TV off for 30 minutes, then turn TV on and watch the remaining 1 hour on the VIEWING TIMER.
VIEW TIMER
VIEWING TIME
2H 00M
OFF TIME
5H 00M
SECRET No.:1234
- STATUS: ON
■ To change the VIEW TIMER settings. (SECRET No. is registered)
1 Repeat "How to set VIEW TIMER" steps and select "PARENTAL CONTROL VIEW TIMER" during step 3. Press VOL +/- , and "INPUT SECRET No." will be displayed.


INPUT SECRET No.
2 Enter the 4-digit SECRET No. using the REMOTE KEYPAD, and the VIEW TIMER mode will be displayed. Repeat step 6 \~ 9.

VIEW TIMER
VIEWING TIME
2H 00M
OFF TIME
5H 00M
SECRET No.:1234
●STATUS:OFF
Note:
- When you choose the correct SECRET No., the VIEW TIMER mode is displayed. If the wrong SECRET No. is chosen, “SECRET No. IS INCORRECT” is displayed. Input the SECRET No. again in this case.
SECRET No. IS
INCORRECT
■ To cancel the VIEW TIMER (While the TV set is OFF but the VIEW TIMER is set)
1 Turn on TV; a blue screen message "TIME OVER" will appear. If you do nothing, the TV will turn off in approximately 30 seconds.
TIME OVER
INPUT SECRET No.
2 Enter the 4-digit SECRET No. using the REMOTE KEYPAD. When you choose the correct SECRET No., the VIEW TIMER is canceled. If the wrong SECRET No. is chosen, "SECRET No. IS INCORRECT" is displayed. Input the SECRET No. again in this case.

TIME OVER
INPUT SECRET No.
* * * *
■ To cancel the VIEW TIMER setting or change the SECRET No. (When you forget the SECRET No.)
1 Repeat "How to set VIEW TIMER" steps and select "PARENTAL CONTROL VIEW TIMER" during step 3. Press VOL +/-, and "INPUT SECRET No." will be displayed.
INPUT SECRET No.
Parental Control (VIEW TIMER Continued)
2 Press and hold both VOL + and CH ▲ on the TV set simultaneously until the VIEW TIMER mode is displayed. Now you can cancel the VIEW TIMER settings or change the SECRET No. while “INPUT SECRET No.” is displayed.
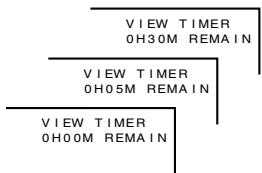
■ Notice of Remaining VIEWING TIME
- For every 30 minute interval, the “remaining time” will be displayed for 4 seconds. For the last 5 minutes, the “remaining time” will be displayed every minute.
- "OH00M REMAIN" will be displayed for 10 seconds just before the VIEWING TIME is complete.
Ch Setup
EZ SETUP
By operating the channel preset functions, you can preset your TV to the desired channels for viewing.
1 Press MENU to access the MAIN MENU screen.
2 Press CH ▲/▼ to move the “●” mark to “CH SETUP”.
MENU
SLEEP TIMER
VIDEO ADJUST
AUDIO ADJUST
AUDIO SELECT
CLOSED CAPTION
PARENTAL CONTROL
●CH SETUP
SETUP
(MAIN MENU screen)
3 Press VOL +/- to access CH SETUP mode, then press CH ▲/▼ to move the “●” mark to “EZ SETUP”.
flowchart
graph LR
    A["VOL-"] --> B["VOL+"]
    B --> C["CH-"]
    B --> D["CH"]
CH SETUP
AIR/CABLE
CH MEMORY
CH SEARCH
PERSONAL PREF
UNIVERSAL PLUS
- EZ SETUP
(CH SETUP mode)
4 Press VOL +/- to access EZ SETUP mode.

CONNECT ANTENNA OR CABLE
START EZ SETUP?
- STOP
START
(EZ SETUP mode)
5 Press VOL +
The tuner will automatically search for the broadcasting and cable TV channels. (The CH No. will automatically increase when it appears.)
If you want to stop the EZ SETUP process once it has started, press VOL –. Search will be canceled.
To cancel EZ SETUP
Press VOL –

PLEASE WAIT
AUTO PROGRAMMING
125
STOP
●START
6 Once EZ SETUP is completed, the lowest channel number memorized will be displayed.
2
Ch Setup (Continued)
■ CHANNEL SETTING
If EZ SETUP does not memorize all the channels in your region, follow the instructions below to manually memorize the channel.
1 AIR/CABLE setting
1 Press MENU to access the MAIN MENU screen.
2 Press CH ▲/▼ to move the “●” mark to “CH SETUP”.
MENU
SLEEP TIMER
VIDEO ADJUST
AUDIO ADJUST
AUDIO SELECT
CLOSED CAPTION
PARENTAL CONTROL
●CH SETUP
SETUP
(MAIN MENU screen)
3 Press VOL +/- to access CH SETUP mode.


CH SETUP
●AIR/CABLE
CH MEMORY
CH SEARCH
PERSONAL PREF.
UNIVERSAL PLUS
EZ SETUP
(CH SETUP mode)
4 Press VOL +/− to access AIR/CABLE mode.


AIR/CABLE
●AIR
CABLE STD
CABLE HRC
CABLE IRC
(AIR/CABLE mode)
5 Press CH ▲/▼ to move the “●” mark to the desired mode.

flowchart
graph LR
    A["AIR"] <--> B["CABLE STD"]
    B <--> C["CABLE HRC"]
    C <--> D["CABLE IRC"]
    D --> A

AIR/CABLE
↓ AIR
CABLE STD
●CABLE HRC
CABLE IRC
(AIR/CABLE mode)
6 Press MENU to exit.
MENU

Note:
• Receivable channels of your TV set are:
AIR channels:
VHF: 2 through 13.
UHF: 14 through 69.
CABLE channels:
1 (HRC and IRC mode only)
2 through 125 (STD, HRC and IRC)
Ch Setup (Continued)
2 How to save broadcast TV channels into memory.

1 Press MENU to access the MAIN MENU screen, then press CH ▲/▼ to move the “●” mark to “CH SETUP”.
2 Press VOL +/- to access CH SETUP mode, then press CH ▲/▼ to move the “●” mark to “CH SEARCH”.
3 Press VOL +/- to access CH SEARCH mode.
flowchart
graph LR
    A["VOL -"] --> B["VOL +"]
    B --> C["CH ▲"]
    B --> D["CH ▼"]
CH SETUP
AIR/CABLE
CH MEMORY
●CH SEARCH
PERSONAL PREF.
UNIVERSAL PLUS
EZ SETUP
(CH SETUP mode)
To start:
Press VOL +. The tuner will search through all available channels in your area and add them into the TV's memory.
To stop:
Press VOL -.CH SEARCH will stop at the current channel and will not add any higher channels.
4 Press MENU to exit.
(START)

(STOP)

CH SEARCH
AIR 12
- STOP START
(CH SEARCH mode)
MENU

Note:
- If you press VOL + again while in the CH SEARCH mode, autoprogram will start again, and the previously memorized channels will be lost.
Ch Setup (Continued)
3 How to add or erase weak, additional or unwanted channels from TV memory.
1 Press MENU to access the MAIN MENU screen, then press CH ▲/▼ to move the “●” mark to “CH SETUP”.
MENU
SLEEP TIMER
VIDEO ADJUST
AUDIO ADJUST
AUDIO SELECT
CLOSED CAPTION
PARENTAL CONTROL
-CH SETUP
SETUP
(MAIN MENU screen)
2 Press VOL +/- to access CH SETUP mode, then press CH ▲/▼ to move the “●” mark to “CH MEMORY”.

flowchart
graph LR
    A["VOL-"] --> B["VOL+"]
    B --> C["CH▲"]
    B --> D["CH▼"]
CH SETUP
AIR/CABLE
●CH MEMORY
CH SEARCH
PERSONAL PREF.
UNIVERSAL PLUS
EZ SETUP
(CH SETUP mode)
3 Press VOL +/- to access CH MEMORY mode.
CH MEMORY
AIR 12
ERASE ●ADD
(CH memory mode)
4 Use CH ▲/▼ or REMOTE KEYPAD to select each desired channel to add or erase.
5 Press VOL + to add a channel to the TV's memory or press VOL - to erase a channel from the TV's memory.

6 Press MENU to exit.

Ch Setup (Continued)
■ PERSONAL PREFERENCE
By setting the PERSONAL PREFERENCE channels in advance, you can select your favorite channels easily.
PERSONAL PREFERENCE
1 Press MENU to access the MAIN MENU screen.
2 Press CH ▲/▼ to move the “●” mark to “CH SETUP”.
MENU
SLEEP TIMER
VIDEO ADJUST
AUDIO ADJUST
AUDIO SELECT
CLOSED CAPTION
PARENTAL CONTROL
●CH SETUP
SETUP
(MAIN MENU screen)
3 Press VOL +/- to access CH SETUP mode, then press CH ▲/▼ to move the “●” mark to “PERSONAL PREFERENCE”.
flowchart
graph LR
    A["VOL-"] --> B["VOL+"]
    B --> C["CH▲"]
    B --> D["CH▼"]
CH SETUP
AIR/CABLE
CH MEMORY
CH SEARCH
●PERSONAL PREF.
UNIVERSAL PLUS
EZ SETUP
(SETUP mode)
4 Press VOL +/- to select PERSONAL PREFERENCE select mode in which you can program 4 favorite channels, in 4 different categories. (total of 16 channels)
PERSONAL PREF.
● --- --- --- ---
(PERSONAL PREFERENCE select mode)
5 Press CH ▲/▼ to move the “●” mark to the desired position.

PERSONAL PREF.
6 Press REMOTE KEYPAD on the Remote to input the CHANNEL Number into the memory.
Example:
125 — Press “100” followed by “2” and then “5”.
25 — Press "2" and then "5".
4 — Press "0" and then "4".

PERSONAL PREF.
7 Repeat steps 4 to 6 to input the next CHANNEL Number.
8 Press MENU to exit.

To select the PERSONAL PREFERENCE channel.
If the channels are memorized as shown to the right, press the Remote's "A" button to select the Channels below.

PERSONAL PREF.
● 1 25 85 38 --- 25 1 23 30 --- 40 55 --- --- 4 --- --- ---
Ch Setup (Continued)
■ UNIVERSAL PLUS FUNCTION
VCR or DVD input mode will be selected automatically by pressing the VCR or DVD PLAY buttons on the UNIVERSAL REMOTE CONTROL.
flowchart
graph TD
    A["FORMUL Preference"] --> B["A"]
    A --> C["B"]
    A --> D["C"]
    A --> E["D"]
    B --> F["VOL"]
    C --> G["CH▲"]
    D --> H["CH▼"]
    E --> I["VOV+"]
    F --> J["MENU"]
    G --> K["MUTE"]
    H --> L["SKIP"]
    I --> M["SOUP"]
    J --> N["POWER (DVD/VO)"]
    K --> O["VECR-CH▲"]
    L --> P["VOL"]
    M --> Q["SOUP"]
    N --> R["SOUP"]
    O --> S["SOUP"]
    T["VOLUME (+)/(-)"] --> U
    V["CHANNEL UP (▲)/DOWN (▼)"] --> W
    X["MENU"] --> Y
    Z["MENU"] --> AA
1 Press MENU to access the MAIN MENU screen.
2 Press CH ▲/▼ to move the “●” mark to “CH SETUP”.
MENU
SLEEP TIMER
VIDEO ADJUST
AUDIO ADJUST
AUDIO SELECT
CLOSED CAPTION
PARENTAL CONTROL
●CH SETUP
SETUP
(MAIN MENU screen)
3 Press VOL +/- to access CH SETUP mode, then press CH ▲/▼ to move the “●” mark to “UNIVERSAL PLUS”.
flowchart
graph LR
    A["VOL-"] --> B["VOL+"]
    C["CH"] --> D["CH"]
CH SETUP
AIR/CABLE
CH MEMORY
CH SEARCH
PERSONAL PREF
●UNIVERSAL PLUS
EZ SETUP
(CH SETUP mode)
4 Press VOL +/- to access UNIVERSAL PLUS to select VCR or DVD mode.
UNIVERSAL PLUS
●VCR:OFF
DVD:OFF
(EZ SETUP mode)
5 Press CH ▲/▼ to select the VCR or DVD, and press VOL +/- to select "CH3, CH4", "INPUT 1 (or COMPONENT)", "INPUT 2" or "OFF".

flowchart
graph LR
    A["CH3"] <--> B["CH4"]
    B <--> C["INPUT 1 (or COMPONENT)"]
    C <--> D["OFF"]
    D <--> E["INPUT 2"]
Set model to the input in which your VCR or DVD is connected to. If done through RF, select either channel 3 or 4 to match the setting of the VCR or DVD.
flowchart
graph LR
    A["CH ▲"] --> C["VOL ←"]
    B["CH ▼"] --> C["VOL ←"]
    C --> D["VOL +"]
UNIVERSAL PLUS
●VCR:CH3
↓ DVD : OFF
(UNIVERSAL PLUS select mode)
6 Press MENU to exit.
MENU

Set Up
ENERGY SAVE
This feature lets you lower the power consumption of your TV set which in turn saves you money and minimizes the impact on the environment. When this feature is turned on, it reduces the brightness of the TV to a level that consumes approximately 20 percent less energy than when the feature is turned off.
The reduction in brightness will be less noticeable under low room lighting conditions.
1 Press MENU to access the MAIN MENU screen.
2 Press CH ▲/▼ to move the “●” mark to “SETUP”.
MENU
SLEEP TIMER
VIDEO ADJUST
AUDIO ADJUST
AUDIO SELECT
CLOSED CAPTION
PARENTAL CONTROL
CH SETUP
- SETUP
(MAIN MENU screen)
3 Press VOL +/- to access SETUP select mode, then press CH ▲/▼ to move the “●” mark to “ENERGY SAVE”.
flowchart
graph LR
    A["VOL-"] --> B["VOL+"]
    B --> C["CH-"]
    B --> D["CH"]
SETUP
LANGUAGE
●ENERGY SAVE
BLUE SCREEN
(SETUP mode)
4 Press VOL +/- to access ENERGY SAVE select mode.

ENERGY SAVE :OFF
(ENERGY SAVE select mode)
5 Press VOL +/− to select "ON".
ENERGY SAVE : ON
6 Press MENU to exit.

Set Up (Continued)
BLUE SCREEN
Automatically turns the screen blue if a broadcast signal is not received.
1 Press MENU to access MAIN MENU screen.
2 Press CH ▲/▼ to move the “●” mark to “SETUP”.
MENU
SLEEP TIMER
VIDEO ADJUST
AUDIO ADJUST
AUDIO SELECT
CLOSED CAPTION
PARENTAL CONTROL
CH SETUP
- SETUP
(MAIN MENU screen)
3 Press VOL +/- to access SETUP mode, then press CH ▲/▼ to move the “●” mark to “BLUE SCREEN”.
flowchart
graph LR
    A["VOL-"] --> B["VOL+"]
    B --> C["CH-"]
    B --> D["CH"]
SETUP
LANGUAGE
ENERGY SAVE
- BLUE SCREEN
(SETUP mode)
4 Press VOL +/- to access BLUE SCREEN select mode.
BLUE SCREEN
:OFF
(BLUE SCREEN select mode)
5 Press VOL +/− to select "ON".
BLUE SCREEN
: ON
6 Press MENU to exit.
MENU

When BLUE SCREEN is set to "ON".
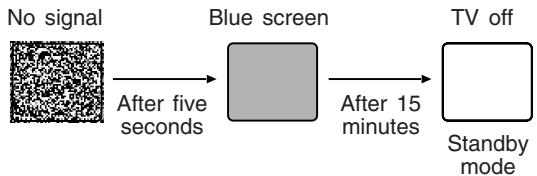
flowchart
graph LR
    A["No signal"] --> B["After five seconds"]
    B --> C["Blue screen"]
    C --> D["After 15 minutes"]
    D --> E["TV off Standby mode"]
Note:
- Poor reception due to weak signals, or too much noise might activate the BLUE SCREEN function despite the presence of a broadcast signal. To continue watching TV under these conditions, switch the BLUE SCREEN "OFF".
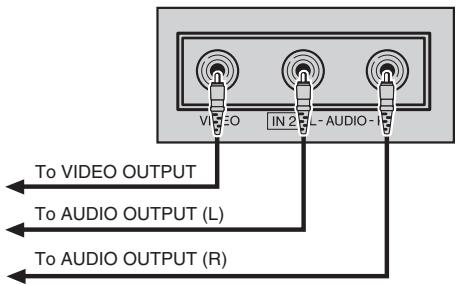
Using the Video and Audio Input Jacks
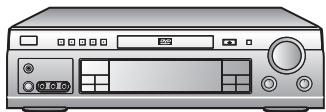
■ Connecting video equipment for playback of video material.
- When the television is connected to video equipment as shown below, the material being played back on the video equipment can be seen on the television screen.
Connecting video device equipped with video output terminals.
CONNECTIONS
VIDEO EQUIPMENT

natural_image
Illustration of a modern video camera with no visible text or symbols on the device bodyCAMCORDER

natural_image
Illustration of a vintage electronic device with a handheld controller and cable (no text or symbols)TV GAME
natural_image
Illustration of a silver desktop computer with front panel, control knobs, and indicator lights (no text or symbols)VCR
natural_image
Front view of a gray electronic device with ports and control buttons (no visible text or symbols)DVD
(Front connection terminals of TV)
(Pull open for inside door)
(Rear connection terminals of TV)
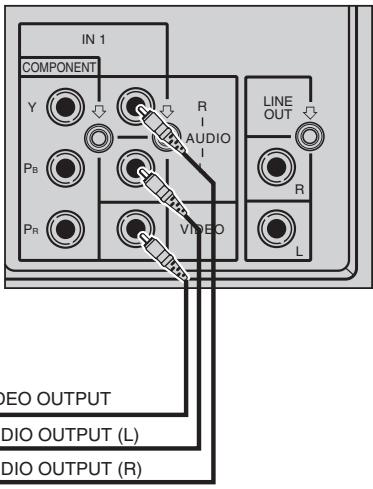
Using the Video and Audio Input Jacks (Continued)
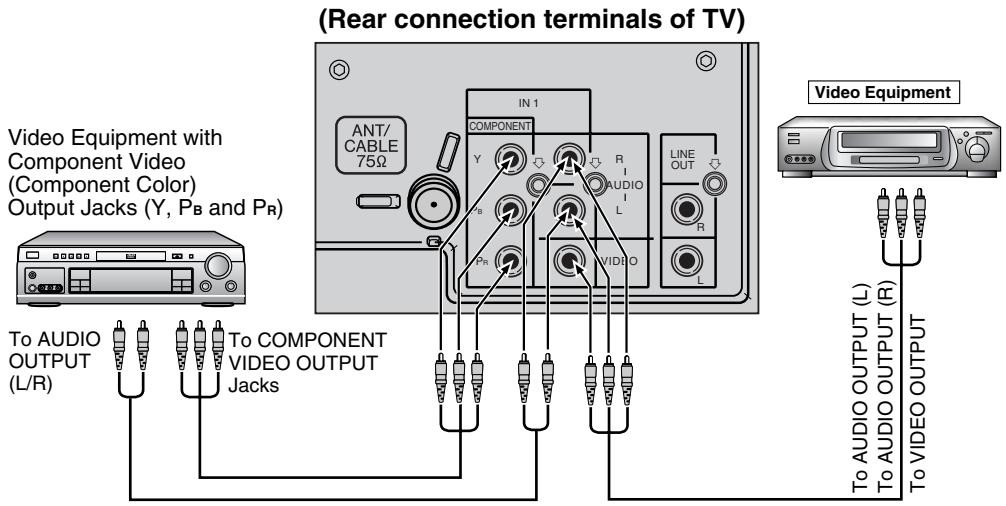
■ To watch video material playback.
- Press the Remote's INPUT button to select the VIDEO INPUT mode for the video equipment you wish to play.
- The external VIDEO INPUT mode will change as follows each time the INPUT button is pressed.

flowchart
graph LR
    A["AIR"] --> B["INPUT 1 (or COMPONENT)"]
    C["CABLE"] --> D["(IN 1)"]
    D --> E["Rear"]
    E --> F["INPUT 2 (IN 2)"]
    F --> G["Front"]
- When the AV cables are being connected to the VIDEO INPUT 1 and COMPONENT Y terminals simultaneously, the COMPONENT terminal has priority over the VIDEO terminal.
- INPUT mode can be selected by pressing either the CH ▲ on the TV remote control when the TV is set to the highest channel stored in memory, or by pressing the CH ▼ when it is set to the lowest channel.
Note:
- When connecting video or audio equipment to the television, be sure that the power is turned off in order to prevent damage to either the television or the equipment being connected.
- It is the intent of SHARP that this product be used in full compliance with the copyright law of the United States and that prior permission be obtained from copyright owners whenever necessary.
- For detailed information on the connection and use of auxiliary equipment, refer to the instruction manuals of the equipment being used.
- The connection cords can be obtained from your local video store.
Using the Audio Output Jacks
These jacks are used for connecting an external audio amplifier. The STEREO/MONO/SAP, VOLUME, MUTE and FAO functions can all be controlled via the television's remote control or directly on the TV itself. These jacks relay the audio signal of all programs being displayed on the TV screen.
(AUDIO OUTPUT JACKS are located on the rear of the cabinet.)
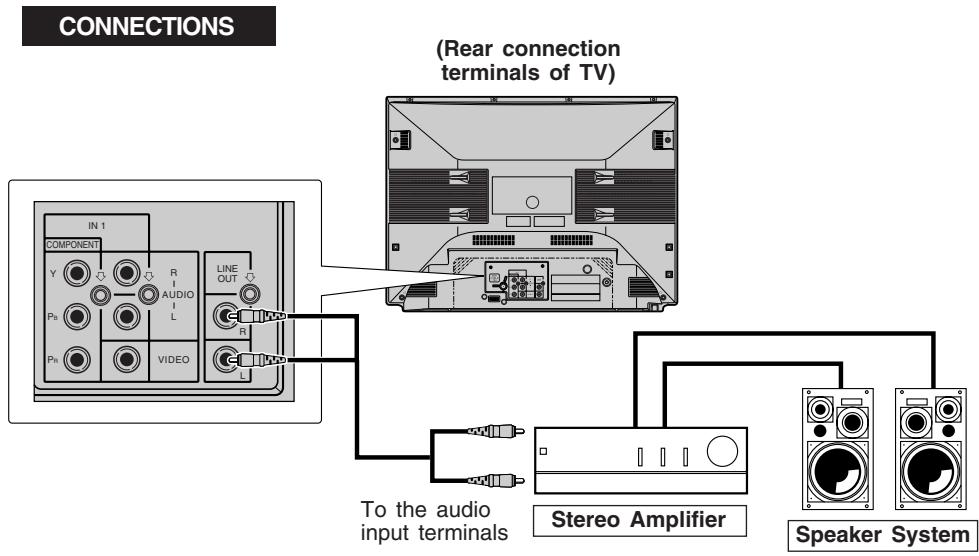
(1) Before connecting the cables, turn on the TV and adjust the VOLUME control on the TV to a moderate listening level.
(2) Turn off the TV and connect the audio cables to the AUDIO LINE OUTPUT JACKS on the TV.
(3) Turn the TV set and stereo amplifier on.
(4) If you desire, you can turn off the sound to the TV's internal speakers by accessing the TV's AUDIO SELECT mode. See page 22 \~ 23.
(5) Adjust the VOLUME control on the stereo amplifier for a moderate listening level.
(6) Control of the audio can be adjusted using the audio controls (STEREO/MONO/SAP, VOLUME, MUTE and FAO), from either the remote control, or directly from the TV set.
Note:
- For detailed information on the connection and use of auxiliary equipment, refer to the operation manuals of the equipment being used.
- When connecting monaural equipment to the AUDIO INPUT or OUTPUT of this set, use an audio connection cord and plug adaptor as shown below.
- For optimal sound quality, we recommend you to keep the TV's audio output level high.

flowchart
graph LR
    A["To the TV"] --> B["Pin plug x 2"]
    B --> C["Pin Plug"]
    C --> D["Plug adapter"]
    D --> E["Pin jack/Mini plug"]
    E --> F["To the equipment being connected"]
Operation of Remote Control
■ Universal Remote Control
With the purchase of your television set you also have received the latest innovation in remote control technology. With its easy-to-use push button keyboard, your Remote can control your television set and most infrared remote controlled VCRs, cable TV converters and DVDs as well.
Note:
- Depending on the model, year produced, brand and type of VCR, cable TV converter and DVD, some models may not be compatible with the remote control.
- Some brands may not enable channel selection until the ENTER button is pressed.
Example:
When you select channel 24,
(1) Press REMOTE KEYPAD "2".
(2) Press REMOTE KEYPAD "4".
(3) Press ENTER.
For detailed information on the use of the Cable TV converter Box refer to their operating manuals.
■ Using Your Remote With Your TV
After installing the batteries, press the TV/VCR on the remote to select the TV mode. (If you can change the channel of the TV by pressing CH ▲/▼ on the Remote Control, it is the TV mode.)
■ “Identifying” Remote VCRs, cable TV conveters and DVDs
Your Remote Control has been set at the factory to operate your TV and many remote control VCRs, cable TV converters and DVDs. However, in some cases an easy one-time setup may be necessary before the Remote will operate accessory VCRs, cable TV converters and DVDs.
- In this set-up step, the Remote locates and memorizes the remote control transmitter code for the VCR, cable TV converters and DVDs.
- Once “identified”, the Remote sends the proper remote signals to operate your accessory.
- This identify step will not have to be repeated until power to the Remote is interrupted due to a battery failure.
■ USING YOUR REMOTE CONTROL WITH A VCR
Once you make certain the Remote Control has "identified" your remote controlled VCR or DVD, the Remote Control is ready to operate your unit. The various VCR or DVD function buttons on the Remote Control will not operate your VCR or DVD if those features are not already found on your unit.
- All VCR buttons will operate whether the Remote Control is in TV or VCR modes.
- For detailed information on the use of the VCR or DVD, refer to the operation manual of the VCR or DVD.
PLAY
Press to playback a tape or disc.
POWER (DVD/VCR)
Press to turn the VCR or DVD on and off.
REWIND
Press to rewind a tape or reverse a disc. For some VCRs or DVDs you may need to press STOP first, then REWIND.
STOP
Press to stop the tape or disc.
PAUSE II
Press to temporarily stop the tape or disc during playback or recording (VCR only).
Press again to release Pause.
REMOTE KEYPAD
Use to enter two-digit code numbers when identifying your VCR.
ENTER
VCR CH ▲/▼
Press to scan up or down through channels on the VCR.
DVD SKIP
Press to jump forward to the beginning of the next chapter/track, or backward to the beginning of the current chapter/track, and automatically start to play that chapter/track.
FF ▶▶
Press to rapidly advance the tape or disc. For some VCRs or DVDs, you may need to press STOP first, then FF.
Operation of Remote Control (Continued)
■ HOW TO IDENTIFY A VCR
The remote control may already be set to operate your VCR. Try this initial check before going on to the following “identify” section.
(1) Press TV/VCR button.
(2) Point remote towards VCR and press POWER (DVD/VCR).
(3) Does the remote turn the VCR ON and OFF?
- If yes, the remote is ready to operate the VCR and no further steps are needed.
- If no, continue to the "identify" section.
■ To Identify Your VCR – Direct Entry Method.
Use the following steps and list to quickly find the remote control code for your accessory VCR.
- First look up your VCR's remote control code number before going through the direct code entry steps control.
- If this procedure does not identify your accessory VCR, use the Search method of identification (described in the next section).
(1) Press TV/VCR button.
(2) Press and hold down DISPLAY and CH ▼ on your remote control.
Then release both buttons.
(3) Within ten seconds after releasing DISPLAY and CH ▼, enter your VCR's two-digit remote control code number using the REMOTE KEYPAD (refer to list).
- The remote control is now ready to send commands to your VCR.
Some brands have more than one remote code listed, due to changes in the remote codes from early to later model years, or due to format differences (VHS/BETA). In such cases, you may have to try more than one code to find the code your VCR accepts.
Depending on the model, year produced, brand, and type of VCR, some models may not be compatible with the remote control.
■ To Identify Your VCR – Search Method.
(1) Press TV/VCR button.
(2) Press POWER on the VCR to ON.
(3) Stand at least six feet away from the front of the VCR.
Point the remote towards the VCR.
Hold down DISPLAY and CH▲ at the same time. KEEP HOLDING THE BUTTONS DOWN.
(4) Watch the Channel Number indicator on the VCR, Channel numbers will scan up when the VCR has been identified.
Release DISPLAY and CH ▲ as soon as the channel numbers start to scan up.
The VCR's remote control code number has been identified, and the remote is ready to operate the VCR.
Operation of Remote Control (Continued)
TIPS ON IDENTIFYING YOUR VCR:
If your VCR model does not have the CHANNEL UP function on its remote control, it cannot be identified using the SEARCH method for identifying. For such models, please try the DIRECT ENTRY method of identifying.
Be Patient: a minute or two can seem a lot longer when you're waiting for something to happen, but the code should be identified within 2 minutes. Remember, it is only a one-time set-up.
Be careful not to let the VCR scan more than five channels when the indicator starts to move up. If you continue holding down the CH ▲/▼ after five channel scans, the proper remote code can be passed up, and the two minutes identify cycle will have to be repeated.
If a channel change does not occur on the VCR within two minutes, read the identifying instructions again and repeat the steps. Should a channel change still not occur the remote will not operate with the desired VCR.
| VCR BRAND | REMOTE CONTROL CODE NUMBER |
| Akai | 25, 26, 37 |
| Audio Dynamics | 15, 22, 30 |
| Broksonic | 32 |
| Canon | 04 |
| Capehart | 34 |
| Craig | 10, 31 |
| Curtis Mathis | 04 |
| Daewoo | 34 |
| DBX | 15, 22, 30 |
| Dynatech | 29 |
| Emerson | 21, 32, 35 |
| Fisher | 09, 10, 11 |
| Funai | 28, 29 |
| GE | 04 |
| Goldstar | 24 |
| Hitachi | 06 |
| Instant Replay | 04 |
| JC Penney | 04, 06, 24, 30 |
| JVC | 15, 41, 42 |
| Kenwood | 14, 15 |
| Lloyds | 29 |
| Magnavox | 04, 05, 08 |
| Magnin | 31 |
| Marantz | 30 |
| Memorex | 04, 10, 24, 29 |
| Minolta | 06 |
| Mitsubishi | 17, 18, 39, 40 |
| Montgomery Ward | 02, 43 |
| Multitech | 29 |
| NEC | 15, 22, 30 |
| Panasonic | 04, 44 |
| Pentax | 05, 06 |
| Philco | 04, 05 |
| Philips | 04, 05, 08 |
| Quasar | 04 |
| RCA | 06, 07, 33 |
| Realistic | 01, 02, 10, 24 |
| Samsung | 23, 31 |
| Sanyo | 14, 10 |
| Scott | 20 |
| Sears | 06, 11, 24 |
| Sharp | 01, 02, 03 |
| Shintom | 36 |
| Sony | 12, 13, 38 |
| Sound Design | 29 |
| Sylvania | 04, 05, 08 |
| Symphonic | 29 |
| Tatung | 15 |
| Teac | 15, 29 |
| Teknika | 27, 29 |
| Thomas | 29 |
| TMK | 21 |
| Toshiba | 19, 20 |
| Video Concepts | 30 |
| Yamaha | 15, 29, 30 |
| Zenith | 16 |
Operation of Remote Control (Continued)
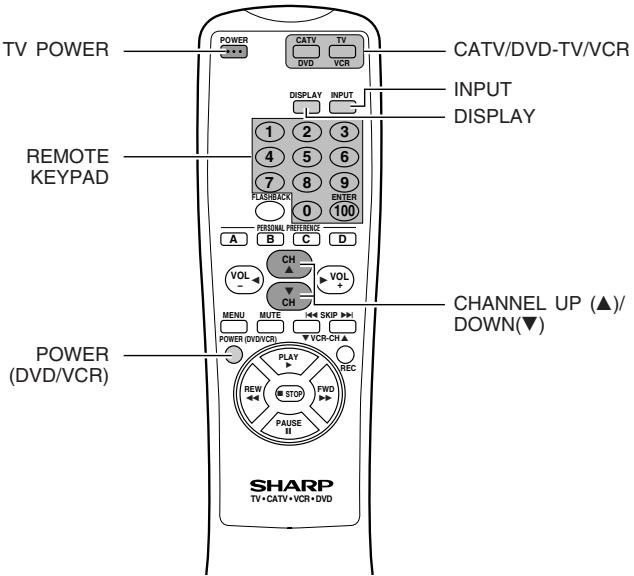
■ HOW TO IDENTIFY A DVD
The remote control may already be set to operate your DVD. Try this initial check before going on to the following “identify” section.
(1) Press CATV/DVD button.
(2) Point remote towards DVD and press POWER (DVD/VCR).
(3) Does the remote turn the DVD ON and OFF?
- If yes, the remote is ready to operate the DVD and no further steps are needed.
- If no, continue to the "identify" section.
■ To identify your DVD – Direct Entry Method.
Use the following steps and list to quickly find the remote control code for your accessory DVD.
- First look up your DVD's remote control code number before going through the direct code entry steps control.
(1) Press CATV/DVD button.
(2) Press and hold down INPUT and CH ▼ on your remote control.
Then release both buttons.
(3) Within ten seconds after releasing INPUT and CH ▼, enter your DVDs two-digit remote control code number using REMOTE KEYPAD (refer to list).
- The remote control is now ready to send commands to your DVD.
| DVD BRAND | REMOTE CONTROL CODE NUMBER |
| Denon | 02 |
| JVC | 09 |
| Magnavox | 04 |
| Marantz | 04 |
| Mitsubishi | 06 |
| Panasonic | 02 |
| Philips | 04 |
| Pioneer | 08 |
| Proscan | 03 |
| RCA | 03 |
| Samsung | 07 |
| Sharp | 01, 10 |
| Sony | 05 |
| Toshiba | 04 |
| Yamaha | 02 |
| Zenith | 04 |
Note:
Depending on the model, year produced, brand, and type of DVD, some models may not be compatible with the remote control.
Operation of Remote Control (Continued)
■ HOW TO IDENTIFY A CABLE CONVERTER
■ To Identify Your Cable Converter –Direct Entry Method.
Use the following steps and list to quickly find the remote control code for your cable TV converter.
- First look up your converter's remote code number before going through the direct code entry steps below.
- If this procedure does not identify your converter, use the Search method for identification.
(1) Press CATV/DVD button.
(2) Press and hold down DISPLAY and CH ▼ on your remote control.
Then release both buttons.
(3) Within ten seconds after releasing DISPLAY and CH▼, enter your converter's two-digit code number using REMOTE KEYPAD (refer to list).
- The remote control is now ready to send commands to your converter.
- Some brands have more than one remote code listed due to changes in the remote codes from early to later model years. In such cases, you may have to try more than one code to find the code your converter accepts.
Note:
Depending on the model, year produced, brand, and type of CATV converter, some models may not be compatible with the remote control.
■ To Identify Your Cable Converter – Search Method.
(1) Press CATV/DVD button.
(2) Press the POWER button on the cable converter to ON.
(3) Stand at least six feet away from the converter. Point the remote towards the converter.
Hold down the DISPLAY and CH ▲ at the same time. KEEP HOLDING THE BUTTONS DOWN.
(4) Watch the Channel Number indicator on the converter.
Channel numbers will scan up when the converter has been identified.
Release the DISPLAY and CH ▲ as soon as the channel numbers start to scan up.
The converter's remote control code number has been identified, and the remote is ready to operate the converter.
| CATV CONVERTER BRAND | REMOTE CONTROL CODE NUMBER |
| Anvision | 07, 08 |
| Cable Star | 07, 08 |
| Eagle | 08 |
| General Instrument | 04, 05, 15, 23, 24, 25, 30, 36 |
| Jerrold | 04, 05, 15, 23, 24, 25, 30, 36 |
| Magnavox | 07, 08, 19, 25, 28, 29, 32, 33, 40, 41 |
| Oak Sigma | 18 |
| Panasonic | 27, 39 |
| Philips | 07, 08, 19, 26, 28, 29, 32, 33, 40, 41 |
| Pioneer | 18, 20 |
| Randtek | 07, 08 |
| RCA | 27, 43 |
| Scientific Atlanta | 03, 22, 42 |
| Sony | 44 |
| Viewstar | 07, 08, 19, 26, 28, 29, 32, 33, 40, 41 |
| Zenith | 14 |
TIPS ON IDENTIFYING YOUR CABLE CONVERTER:
Be Patient: a minute or two can seem a lot longer when you're waiting for something to happen, but the code should be identified within 2 minutes. Remember, it is only a one-time setup.
Be careful not to let the CATV converter scan more than five channels when the indicator starts to move up. If you continue holding down the DISPLAY and CH ▲ after five channel scans, the proper remote code can be passed up, and the two minute identify cycle will have to be repeated.
If a channel change does not occur on the cable converter within two minutes, read the identifying instructions again and repeat the steps. Should a channel change still not occur, the remote will not operate with the desired converter.
Note:
Some satellite receivers can be operated by the REMOTE CONTROL. If you have a Satellite Receiver, you can use the above method to search for available channels.
Before Calling for Service
Check these items and see if you can correct the trouble with a slight adjustment of the controls.
| QUICK SERVICE CHECK LIST | PROBLEM | No Playback of VCR and Disc Player | No Picture or Sound from External Video/Audio Products | Remote Control Doesn't Work | Bars on Screen | Picture Distorted | Picture Rolls Vertically | No Color | Poor Reception on Some Channels | Weak Picture | Lines or Streaks in Picture | Ghosts in Picture | Picture Blurred | Sound OK, Picture Poor | Picture OK, Sound Poor | No Picture or Sound | Dark and Blank Picture | External Electrical Noise Interfering with TV's Operation | Color on Part of the Screen Appears Distorted |
| POSSIBLE REMEDY | |||||||||||||||||||
| Try a new channel, if OK, then there is a possible station trouble. | X | X | X | X | X | X | X | X | X | X | X | ||||||||
| Is TV plugged in? Power at outlet? | X | X | X | ||||||||||||||||
| Is TV's POWER button on? | X | X | |||||||||||||||||
| Is antenna connected to terminal on the back of the set? | X | X | X | X | X | X | |||||||||||||
| If outside antenna is being used, check for broken wire. | X | X | X | X | X | X | X | X | X | X | X | ||||||||
| Check for local interference or external electrical noise. | X | X | X | X | X | X | X | X | X | X | |||||||||
| Turn off the POWER and then turn it on after about a minute. | X | X | |||||||||||||||||
| Adjust COLOR control. | X | ||||||||||||||||||
| Adjust PICTURE control. | X | X | |||||||||||||||||
| Check external Video/Audio products: look for loose/broken connection leads. (Refer to pages 39-41) | X | X | X | X | X | ||||||||||||||
| Check batteries of Remote Control. | X | ||||||||||||||||||
| Press TV/VCR button on the Remote to select TV mode. | X | ||||||||||||||||||
| Are audio cables connected firmly? Check the volume level. | X | X | |||||||||||||||||
| Is SPEAKER ON? See pages 13,14. | X | ||||||||||||||||||
| Change Closed Caption mode to "OFF"/Energy Save mode to "OFF". | X | ||||||||||||||||||
| Unplug the TV and plug it in again after 2 minutes or longer. | X | X | X | X | X | X | X | X | X | X | X | ||||||||
Note:
- If no TEXT broadcast is being received while viewing in the TEXT mode, the screen may become dark and blank for some programs. Should this occur, switch the Closed Caption mode to "OFF".
natural_image
Illustration of a smiling man sitting at a desk with a plant, no text or symbols present(Dark and Blank Picture)
Calling for Service
For location of the nearest Sharp Authorized Servicer, or to obtain product literature accessories, supplies, or customer assistance, please call 1-800-BE-SHARP.
Specifications
| MODEL | 20F640 | ||
| Receiving System | NTSC | ||
| Stereo Broadcast | MTS/SAP | ||
| Reception Channels | |||
| AIR | VHF | 2-13 ch | |
| UHF | 14-69 ch | ||
| CATV | 1-125 ch | ||
| Channel Tuning | 181-channel Reception PLL tuning system | ||
| Antenna Input Impedance | VHF/UHF 75 ohm Unbalanced | ||
| Screen Size(Visible Area) | 21" Diagonally Measured(50.8 cm) | ||
| Terminals | Audio/Video input × 2 (Front x 1, Rear x 1),COMPONENT-IN × 1 (Rear), Audio Output × 1 (Rear) | ||
| Sound Output | 2.5 W (RMS) × 2 | ||
| Power Source | AC 120 V, 60 Hz | ||
| Power Consumption | 90 W | ||
| Dimensions(W) x (H) x (D) | 23^25/_64'' × 18^1/_2'' × 19^3/_32'' [594 mm × 470 mm × 485 mm] | ||
| Weight (approx.) | 56.22 lbs. (25.5 kg) | ||
- Design and specifications are subject to change without notice.
Pulsando nuevamente → Apaga (Off).
TECLADO A DISTANCIA (REMOTE KEYPAD)
Pulsando nuevamente → Apaga (Off).
natural_image
Illustration of a person sitting at a desk with a potted plant, no text or symbols presentRISQUE D'ELECTROCUTION NE PAS OUVRIR

ATTENTION : POUR REDUIRE LE RISQUE D'ELECTROCUTION,
NE RETIREZ PAS LE CAPOT (OU LE PANNEAU ARRIERE). L'APPAREIL NE CONTIENT AUCUNE PIECE A ENTRETENIR PAR L'UTILISATEUR.
CONSULTEZ UN PERSONNEL QUALIFIE POUR LA MAINTENANCE.


MISE AU REBUT DU PRODUIT
INFORMATIONS IMPORTANTES (Suite)
ATTENTION:
natural_image
Illustration of a smiling man sitting at a desk with a potted plant, no text or symbols presentSHARP ELECTRONICS CORPORATION warrants to the first consumer purchaser that this Sharp brand product (the "Product"), when shipped in its original container, will be free from defective workmanship and materials, and agrees that it will, at its option, either repair the defect or replace the defective Product or part thereof with a new or remanufactured equivalent at no charge to the purchaser for parts or labor for the period(s) set forth below.
This warranty does not apply to any appearance items of the Product nor to the additional excluded item(s) set forth below nor to any Product the exterior of which has been damaged or defaced, which has been subjected to improper voltage or other misuse, abnormal service or handling, or which has been altered or modified in design or construction.
In order to enforce the rights under this limited warranty, the purchaser should follow the steps set forth below and provide proof of purchase to the servicer.
The limited warranty described herein is in addition to whatever implied warranties may be granted to purchasers by law. ALL IMPLIED WARRANTIES INCLUDING THE WARRANTIES OF MERCHANTABILITY AND FITNESS FOR USE ARE LIMITED TO THE PERIOD(S) FROM THE DATE OF PURCHASE SET FORTH BELOW. Some states do not allow limitations on how long an implied warranty lasts, so the above limitation may not apply to you.
Neither the sales personnel of the seller nor any other person is authorized to make any warranties other than those described herein, or to extend the duration of any warranties beyond the time period described herein on behalf of Sharp.
The warranties described herein shall be the sole and exclusive warranties granted by Sharp and shall be the sole and exclusive remedy available to the purchaser. Correction of defects, in the manner and for the period of time described herein, shall constitute complete fulfillment of all liabilities and responsibilities of Sharp to the purchaser with respect to the Product, and shall constitute full satisfaction of all claims, whether based on contract, negligence, strict liability or otherwise. In no event shall Sharp be liable or in any way responsible, for any damages or defects in the Product which were caused by repairs or attempted repairs performed by anyone other than an authorized servicer. Nor shall Sharp be liable or in any way responsible for any incidental or consequential economic or property damage. Some states do not allow the exclusion of incidental or consequential damages, so that above exclusion may not apply to you.
THIS WARRANTY GIVES YOU SPECIFIC LEGAL RIGHTS. YOU MAY ALSO HAVE OTHER RIGHTS WHICH VARY FROM STATE TO STATE.
| Model Specific Section | |
| Your Product Model Number & Description: | 20F640, 20 inch Color Television(Be sure to have this information available when you need service for your Product.) |
| Warranty Period for this Product: | One (1) year parts and 90 days labor. The warranty period continues for an additional one (1) year, for a total of two (2) years, with respect to the picture tube(s) in the Product for parts only. Labor and service are not provided free of charge for this additional period. |
| Additional Item(s) Excluded from Warranty Coverage (if any):Where to Obtain Service: | Non-rechargeable batteries.From a Sharp Authorized Servicer located in the United States. To find the location of the nearest Sharp Authorized Servicer, call Sharp toll free at 1-800-BE-SHARP. |
| What to Do to Obtain Service: | Contact your Sharp Authorized Servicer to obtain in-home service for this Product. The Servicer will come to your home and if it is necessary to remove the Product, the Servicer will reinstall it. Be sure to have Proof of Purchase available. |
TO OBTAIN ACCESSORY OR PRODUCT INFORMATION, CALL 1-800-BE-SHARP OR VISIT www.sharpusa.com