K4100 - Label printer Kroy - Free user manual and instructions
Find the device manual for free K4100 Kroy in PDF.


| Product Type | Desktop Label Printer |
| Brand | Kroy |
| Model | K4100 |
| Power Supply | AC adapter 12V DC, minimum 4.0A |
| Display | LCD with contrast adjustment |
| Print Technology | Thermal transfer (cartridge-based) |
| Max Print Width | 1 inch (25.4 mm) using 1" tape |
| Supported Tape Sizes | 0.375", 0.5", 0.8", 1.0" (tape, tube, die-cut, wire wrap) |
| Bar Code Capabilities | Codabar, Code 39, EAN-8, EAN-13, Interleaved 2 of 5, UPC-A, UPC-E, Code 128, MSI Plessey, PDF417 |
| Character Styles | Bold, Italic, Underline, Mirror, Frame, Justify, Vertical, Rotate |
| Font Options | Built-in Block font; downloadable TrueType fonts from PC |
| Print Speed | Unlimited (default) or selectable: 0.5, 0.8, 1.0 (units unspecified) |
| Label Memory | Internal file management; up to 8-character file names; multiple pages per file |
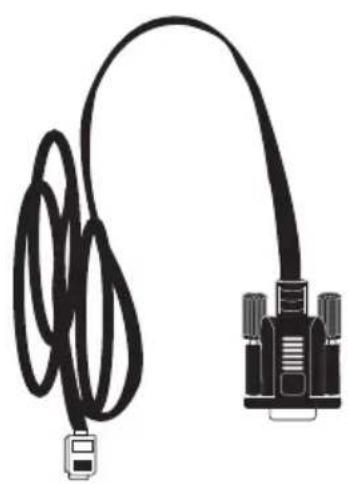
| PC Connectivity | Serial port (RS-232) for PC connection |
| Software Included | Kroy Label Designer (KLDS) and Windows printer drivers |
| Time/Date Stamp | Prints current date/time on label edge; settable clock |
| Sequential Printing | Numeric and alphabetic sequencing with variable increments |
| Language Support | English, Spanish, French, German |
| Maintenance | Clean printhead and rollers with 90% isopropyl alcohol after each cartridge |
| Warranty | 6 months limited warranty |
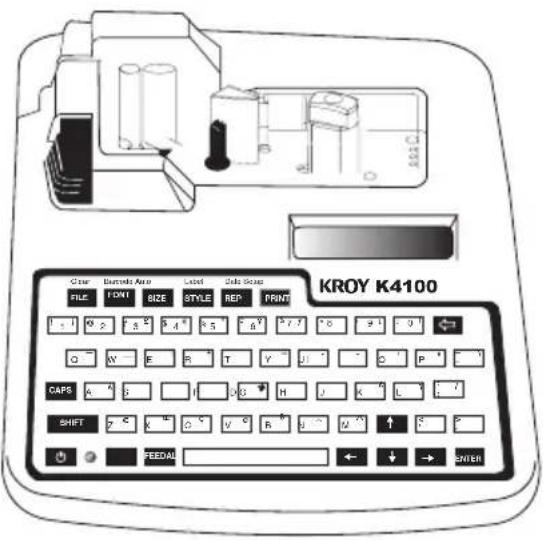
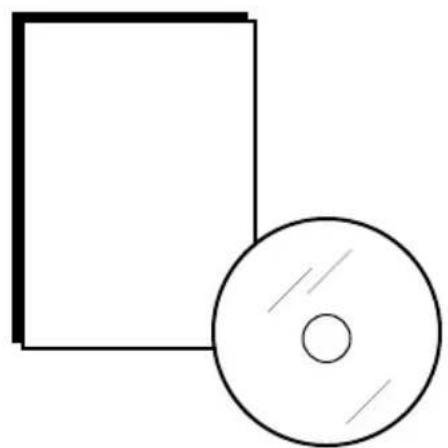
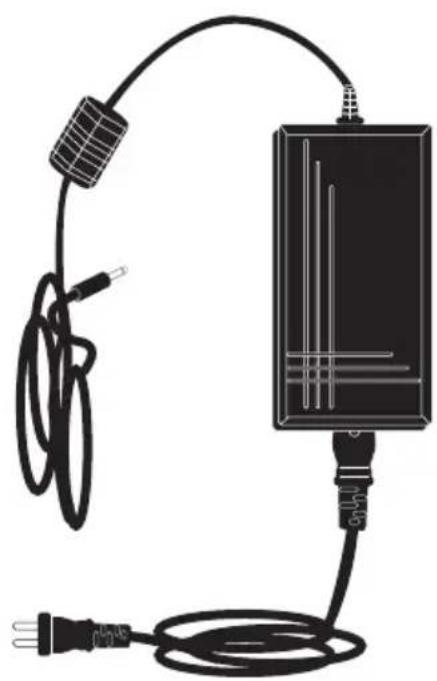
| Included Accessories | AC adapter with power cord, serial cable, owner's manual, CD-ROM with software |
Frequently Asked Questions - K4100 Kroy
User questions about K4100 Kroy
0 question about this device. Answer the ones you know or ask your own.
Ask a new question about this device
Download the instructions for your Label printer in PDF format for free! Find your manual K4100 - Kroy and take your electronic device back in hand. On this page are published all the documents necessary for the use of your device. K4100 by Kroy.
USER MANUAL K4100 Kroy
Read this manual before using your K4100
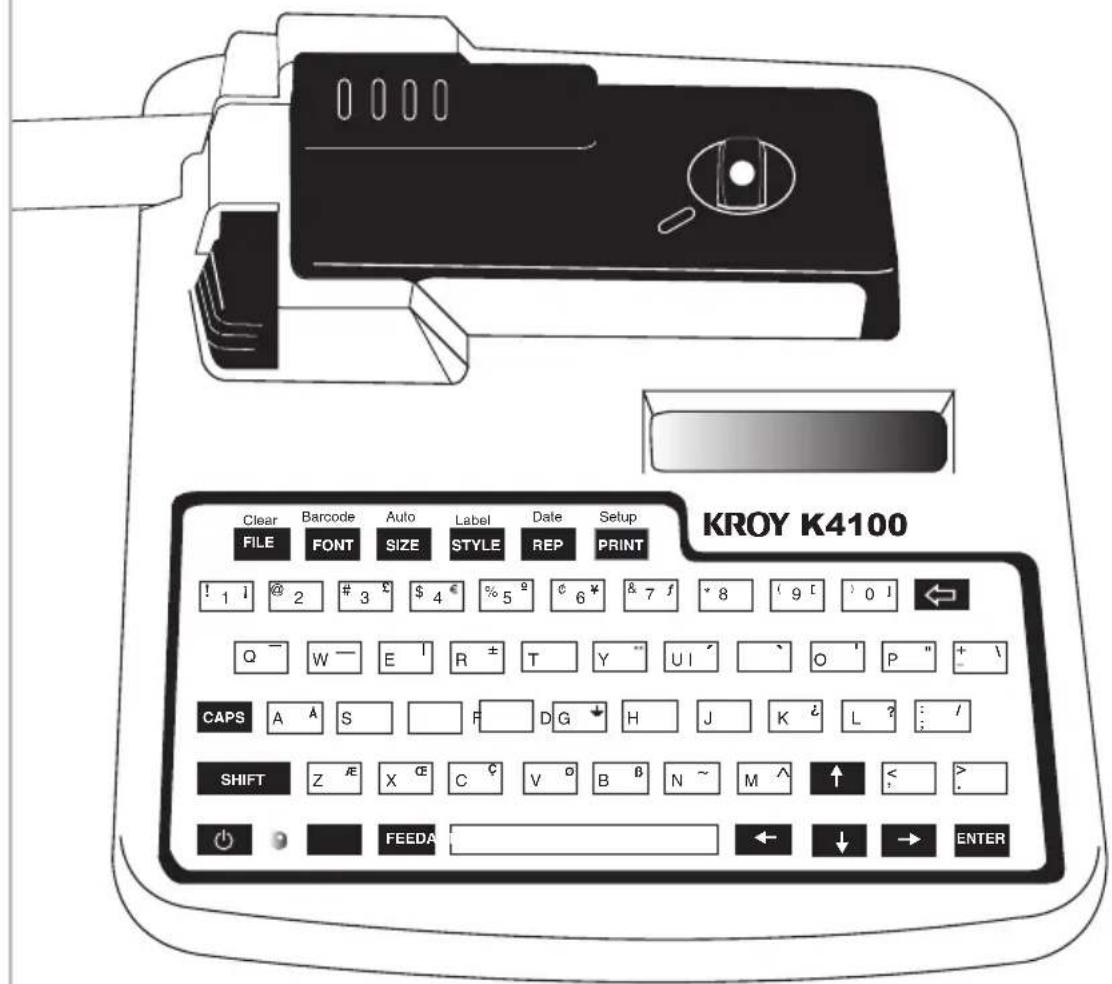
text_image
KROY K4100 Clear Barcode Auto Label Date Setup FILE FONT SIZE STYLE REP PRINT ! 1 ! @ 2 # 3 $ 4 € % 5 ° € 6 ¥ & 7 f * 8 ( 9 [ ] 0 ! ← Q - W - E I R ± T Y " UI ' ` O ' P " + \ CAPS A A S F D G ↓ H J K ? L ? : / SHIFT Z /E X CE C ¢ V ° B B N ~ M ^ ↑ : > FEEDA ← ↓ → ENTERK4100 Desktop Label Printer
Introduction
Kroy Limited Warranty
Kroy LLC (“Kroy”) warrants its labeling system equipment against defects in material and workmanship for a period of six (6) months from the date of purchase. At no charge to the customer except for inbound freight to Kroy’s service center, Kroy will, at Kroy’s option, repair or replace any product determined to be defective. Kroy will pay return UPS ground charges. A purchase receipt or other evidence of purchase will be required before warranty service is rendered. This warranty does not cover cosmetic damage or any damage caused by accident, misuse, abuse, negligence or modification or attempted repair by anyone other than Kroy or a Kroy authorized repair agent. THERE ARE NO EXPRESS WARRANTIES EXCEPT AS SET FORTH IN THIS PARAGRAPH.
KROY SHALL NOT BE LIABLE FOR ANY INCIDENTAL OR CONSEQUENTIAL DAMAGES FOR BREACH OF ANY EXPRESS OR IMPLIED WARRANTY ON THIS PRODUCT. ALL EXPRESS AND IMPLIED WARRANTIES, INCLUDING WARRANTIES OF MERCHANTABILITY AND FITNESS FOR A PARTICULAR PURPOSE ARE LIMITED TO THE APPLICABLE WARRANTY PERIOD SET FORTH ABOVE.
Some states do no allow the exclusion or limitation of incidental or consequential damages, or limitations on how long an implied warranty lasts, so the above exclusions or limitations may not apply to you. This warranty gives you specific legal rights, and you may have other rights which vary from state to state.
If a problem develops with your Kroy labeling system during or after this warranty period, you may contact Kroy customer service at 800.729.5769.
FCC Notice
This equipment has been tested and found to comply with the limits for a Class A digital device, pursuant to part 15 of the FCC Rules. These limits are designed to provide reasonable protection against harmful interference when the equipment is operated in a commercial environment. This equipment generates, uses and can radiate radio frequency energy and, if not installed and used in accordance with the instruction manual, may cause harmful interference to radio communications. Operation of this equipment in a residential area is likely to cause harmful interference in which case the user will be required to correct the interference at his own expense.
Any changes or modifications not expressly approved by the manufacturer could void the user's authority to operate the equipment.
CDC Notice
This digital apparatus does not exceed Class A limits for radio noise for digital devices as set out in the radio interference regulations of the Canadian Department of Communications.
Battery and AC Adapter Notice
This product is intended to be supplied by a Listed Power Unit AC adapter rated 12V DC, minimum 4.0A.
CAUTION: (for Lithium Battery) Risk of explosion if battery is replaced by an incorrect type. Dispose of used batteries according to the manufacturer's instructions.
CAUTION: (for rechargeable Ni-Cd Batteries) Risk of explosion if batteries are replaced by an incorrect type. Replace only with C size Ni-Cd batteries rated 1.2V maximum 2500 mAH. DO NOT USE ALKALINE BATTERIES IN THIS PRODUCT.
The K5100 Printer and Cartridges are protected by U.S. Patents including: 5,411,339 5,533,818
Product Disposal Instructions
The symbol shown here and on the product means that the product is classed as Electrical or Electronic Equipment and should not be disposed of with other household or commercial waste at the end of its working life.
The Waste of Electrical & Electronic Equipment (WEEE) Directive (2002/96/EC) has been put in to effect to recycle products using the best available recovery and recycling processes to minimise the impact on the environment, treat any hazardous substances and avoid increasing landfill.
Product Disposal Instructions for domestic / home users
When you have no further use for the product, please remove any batteries and dispose of them and the product as per your local authority's recycling processes. For more information please contact your local authority or the distributor / retailer from where the product was purchased.
Product Disposal Instructions for business / commercial users
Business users should ensure that this product is not mixed with other commercial waste for disposal. Please contact the distributor from where the product was purchased to check the terms of your purchase contract.
Alternatively please contact Kroy Europe Ltd:
Tel: +44 (0)118 986 5200
Fax: +44 (0)118 986 5205
Email: info@kroyeurope.com
Kroy Europe Ltd WEEE Producer No.: WEE/KA0053TQ
Table of Contents
Chapter 1: Getting Started
Contents of Box.... 3
Printer Description.... 4
Important Safety Precautions.... 5
Connecting AC Adapter....6
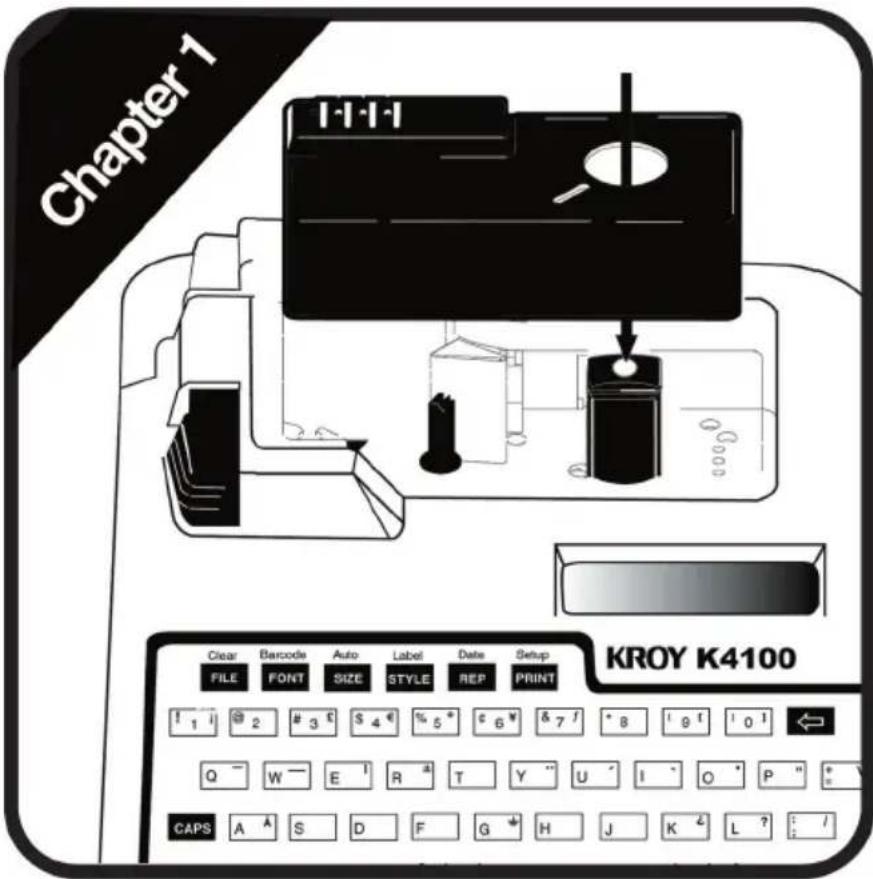
Installing the Supply Cartridge....7
Chapter 2: Printing Your First Label
Printing a Label....9
Turning Printer On....9
Cursor Movement....9
Default Printer Settings....9
Editing Text.... 10
Adding a Character Style.... 10
Printing on Shrink Tube.... 11
Printing a Self-Laminating Wire Wrap.... 12
Frequently Used Keys.... 13
Chapter 3: Operating Your Printer
Font Function....15
Size Function....16
Character Styles- 17-18
Bold, Italic, Underline
Other Styles - 19-21
Mirror, Frame, Justify, Vertical, Rotate
Label Setup....22-23
Length, Cutmark, Left Margin, Vertical Margin
Shortcuts and Hot Keys....24
Multiple Copies & Sequencing....25-30
Printer Setup....31-32
Reset, Unit of Measure, Density, Auto Off, Advance Cut, Language,Printspeed, LCD Contrast
Bar Codes....33-34
File Management....35-36
New, Open, Save, Delete
Multiple Page Documents.... 37
Time/Date Stamp 38-39
Chapter 4: PC Operations
Introduction....41
KLDS Software and Driver Installation.... 42
KLDS Operation....43-44
Downloading Fonts....45-46
Using Your Printer with Other PC Applications.... 47-48
Appendices
Maintaining Your Printer.... A-1
System Messages...... B-1
Troubleshooting...... C-1
Updating Printer Firmware....D-1 D-2
Using Accent Characters.... E-1
Using the Character Map ...... F-1
text_image
Chapter 1 I-I-I-I Clear Barcode Auto Label Date Setup FILE FONT SIZE STYLE REP PRINT KROY K4100 I 1 # 2 # 3 S 4 % 5 * & 6 f * 8 ! 9 ! 10 I ← Q - W - E ' R ' T Y " U ' I ' O ' P " * CAPS A S D F G H J K L ? : /Getting Started
text_image
KROY K4100 Clear Burndie Auto Load Side Scan FILE FONT SIZE STYLE REP PRINT 1 - 1 2 - 3 °C 5 4 °C R 5 °C 6 °F 7 °F 8 9 °F 9 O - Y - E - R - T - Y - J - C - P - S CAPS A - S - I - G - H - J - K - L - M - N SHIFT Z - X - O - V - W - X - Y - Z - AA FEEDAL ← → ← → ← ENTER(1) K4100 Desktop Label Printer
natural_image
Simple line drawing of a rectangular box next to a CD (no text or symbols)(1) Owner's Manual and (1) CD-ROM with KLDS Software and Drivers
natural_image
Illustration of a black electrical plug connected to a cable with a power outlet, no text or symbols present.(1) AC Adapter with Power Cord (1) Serial Cable
natural_image
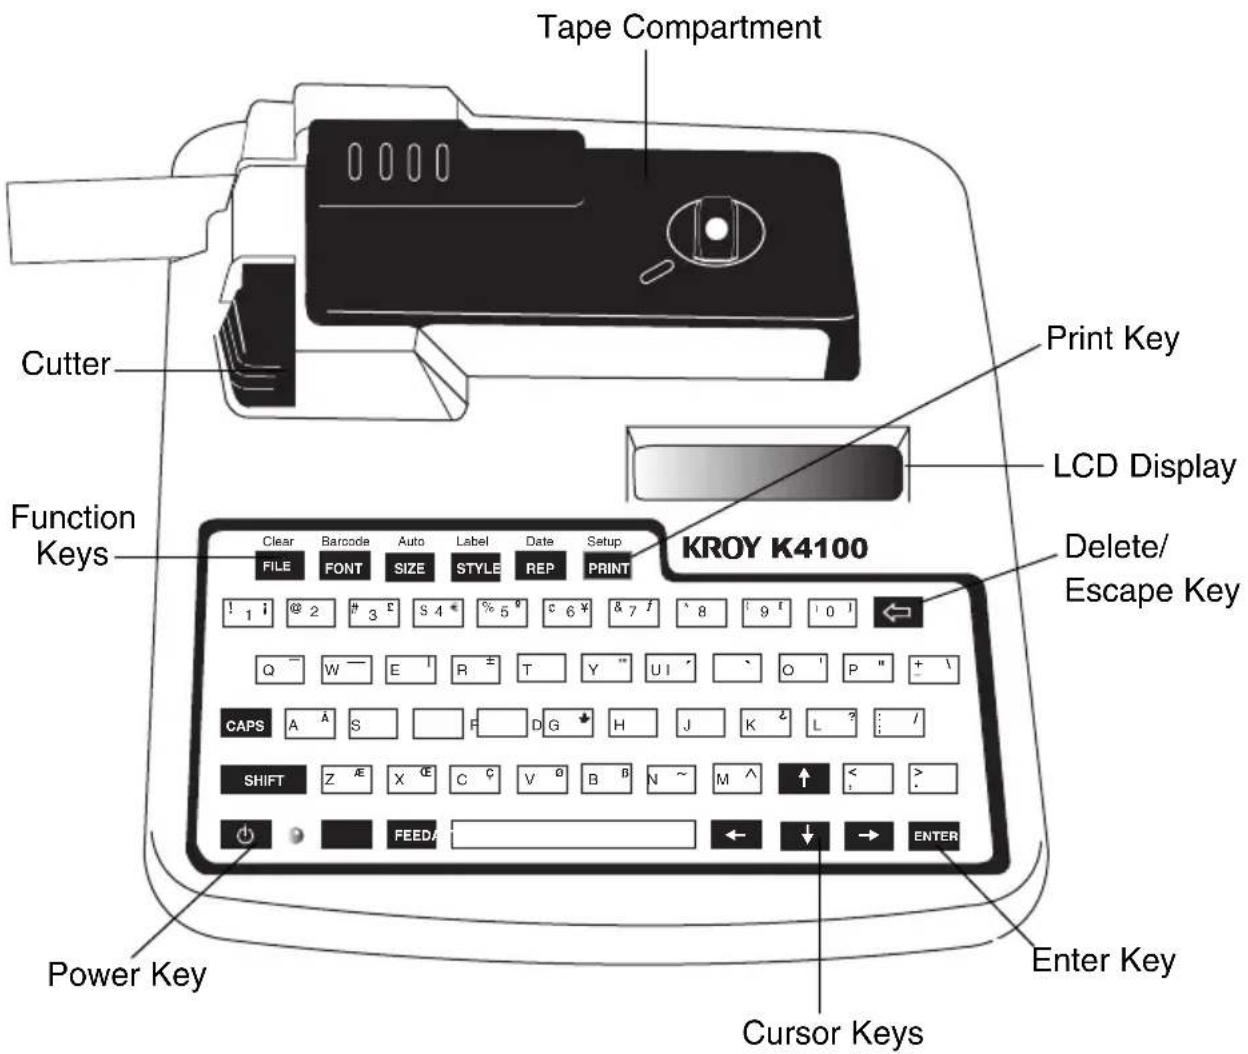
Illustration of a black cable with a connector and its connector to a U2D model (no text or symbols)Figure 1: Top View of Printer
text_image
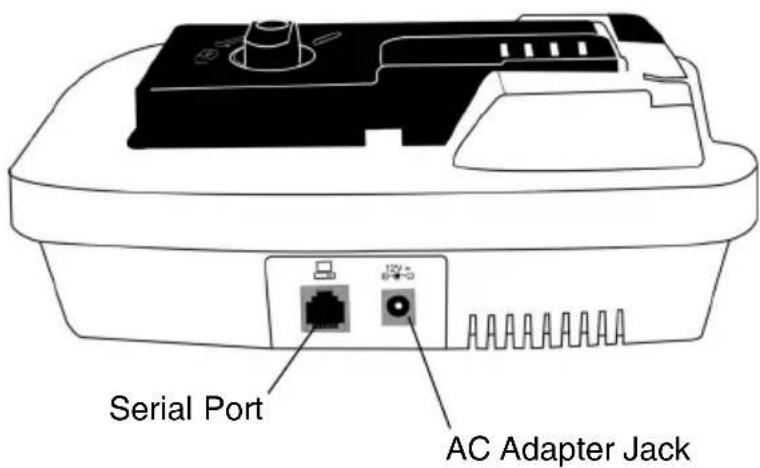
Tape Compartment Cutter Function Keys Print Key LCD Display Delete/ Escape Key KROY K4100 Power Key Enter Key Cursor KeysFigure 2: Back View of Printer
text_image
Serial Port 12V~ AC Adapter JackWhen using your printer, always follow these important safety precautions:
- Read all instructions carefully.
- Do not immerse the printer in water or other liquids, you could receive an electrical shock.
- Do not apply adhesive labels to your skin.
- Do not put objects onto or into the printer.
- Do not expose to high temperatures or high humidity. Never leave on the dashboard or in the trunk of your car.
- Do not use in dusty places and avoid direct exposure to sunlight and rain.
- Do not pull on the tape, you could damage the tape cartridge.
- Do not attempt internal repairs to the printer. If service or repair is needed, contact a qualified Kroy service representative.
- Do not touch the printhead ceramic or rollers with your fingers.
Connecting AC Adapter
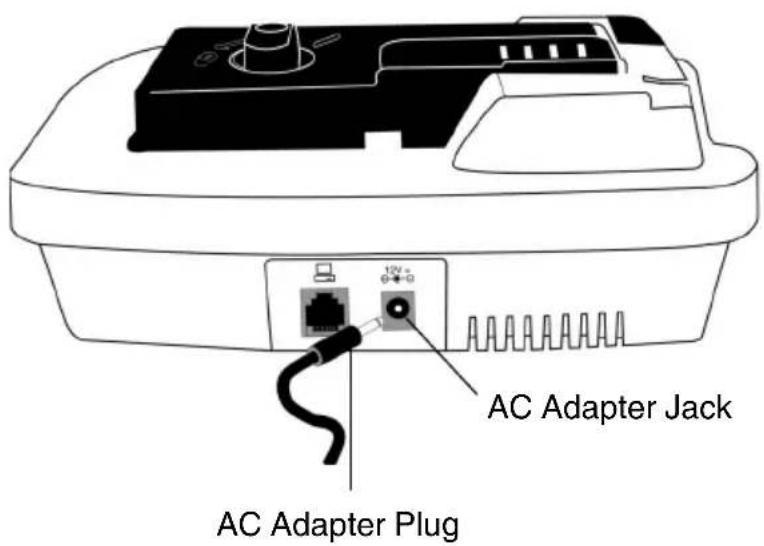
The AC adapter is required to power the K4100. Warning: Only use the AC adapter provided with this machine. Use of any other AC adapter will damage your K4100, make it unusable and void the warranty.
Connecting the AC Adapter
- Insert the AC adapter plug into the AC adapter jack on the back of the machine (See Figure 3).
- Plug the other end of the AC adapter into the nearest standard electrical outlet.
Figure 3: AC Adapter Connection
text_image
AC Adapter Jack AC Adapter PlugWARNING: K2500, K3000-PC and K240 AC adapters are NOT compatible with the K4100.
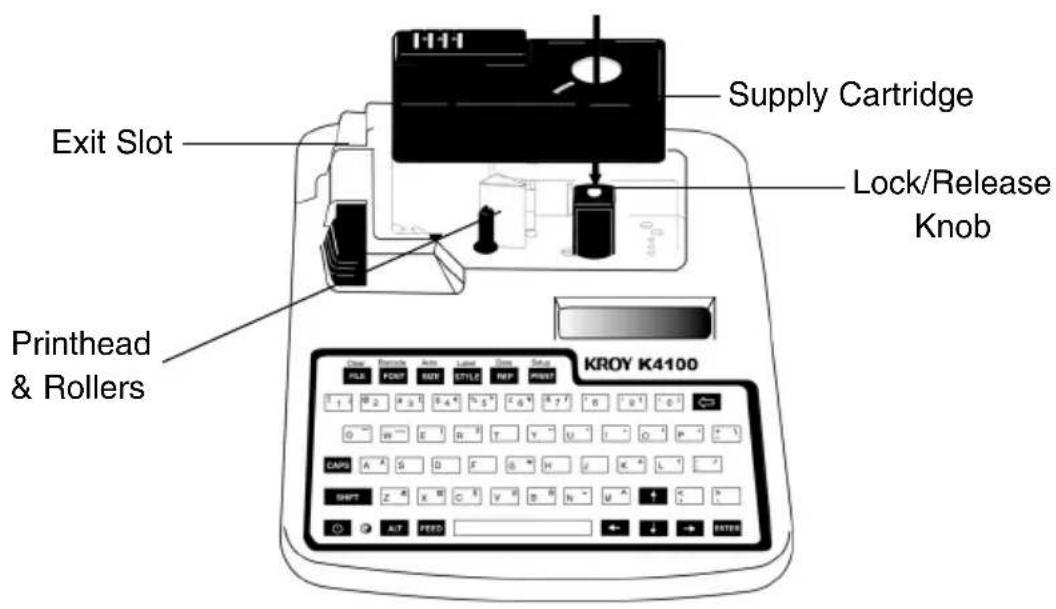
Figure 4: Installing the Supply Cartridge
text_image
Supply Cartridge Exit Slot Lock/Release Knob Printhead & Rollers KROY K4100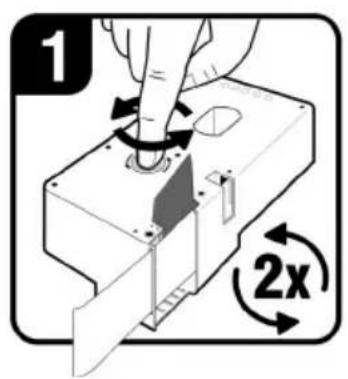
text_image
1 2x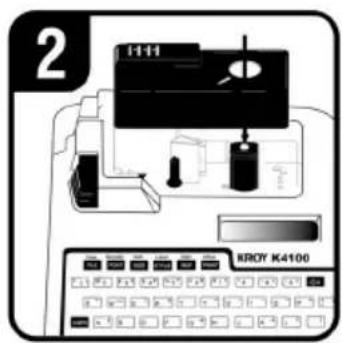
text_image
2 KROY K4100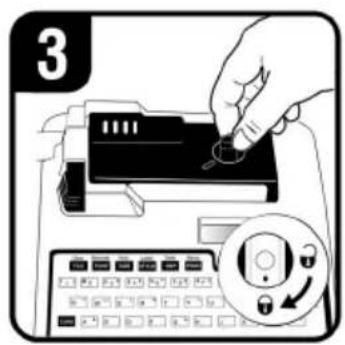
text_image
3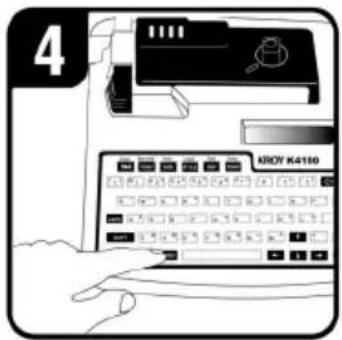
text_image
4 KNOY K4180- Wind the ribbon spool on the bottom of the supply cartridge counter-clock wise two full turns in the direction of the arrow with your finger.
- Insert cartridge into the cartridge cavity with the lock/release knob turned counter-clockwise and the excess material threaded in the exit slot.
- Turn the lock/release knob clockwise to lock the cartridge into place.
- Press FEED and you are ready to create a label.
text_image
Chapter 2 Floor 2 Clear Barcode Auto Label Data Setup FILE FONT SIZE STYLE REP PRINT KROY ! 1 i @ 2 # 3 £ $ 4 € % 5 ° € 6 ¥ & 7 f * 8 i 9 Q - W - E I R ± T Y " U ' I 'Printing Your First Label
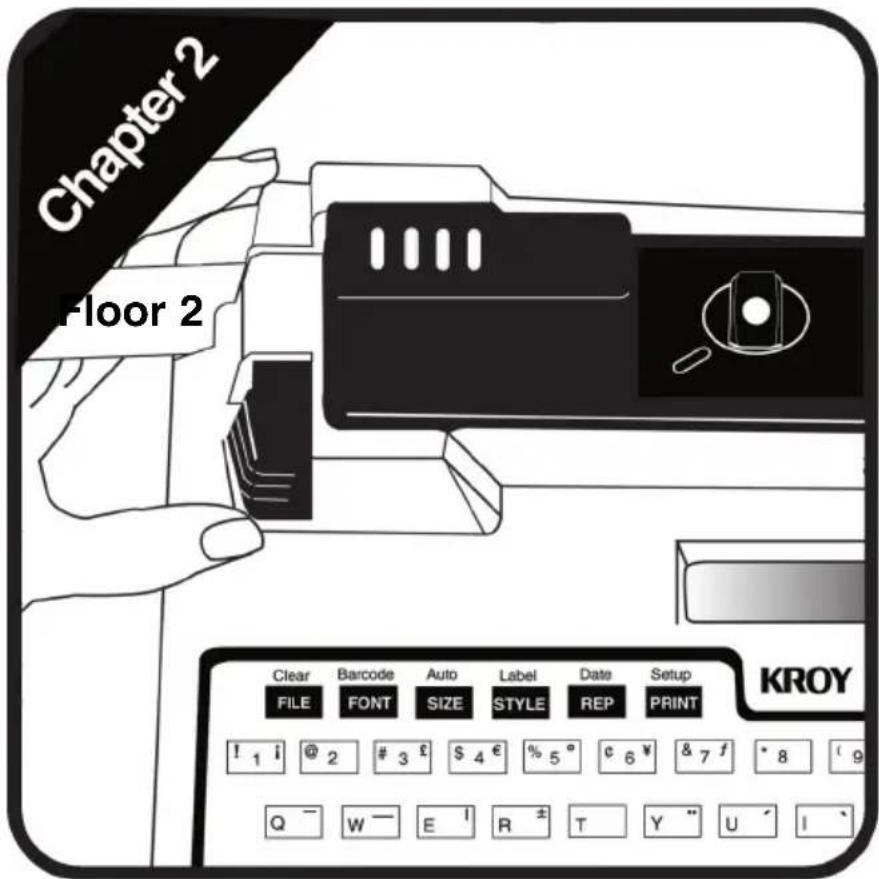
After you have connected the AC adapter, plugged the AC adapter into the nearest outlet and installed the label cartridge, you are ready to make your first label.
Turning the Printer On
Press the Power 🔒 located on the front left corner of the keyboard to turn the printer on. The following displays will appear:
Kroy K4100
Version 1.0A
1:
2:
Cursor Movement
The underline seen above is the cursor. The cursor shows you the current typing position. Cursor keys move the cursor through text without changing it and through options without selecting any. The left and right cursor keys move left and right, one option or one character at a time; the up and down cursor keys move the cursor up and down through lines of text, one line at a time.
Default Printer Settings
When the power is turned on for the first time, there are pre-programmed printer settings. One of these is the Auto Size feature. This feature auto sizes the text of your label to the current cartridge supply and size of media. You can find this function by pressing the Size key. You can always turn auto sizing off and type in a designated size, but for our example we will have auto sizing ON. The default font is "Block". No other font is installed on your K4100, however, other fonts of your choice can be downloaded into your K4100. The default justification is left. For more information on formatting and label setup see Chapter 3.
In the following examples, we have kept the default settings ON.
Type in the text "Cable 2E45"
1: Cable 2E45_
2:
Now that your label is typed, you will press the Print Key and the auto sizing feature automatically sizes the text for the cartridge you are using.
Cable 2E45
To make a two line label, press Enter at the end of line 1 and you will see the cursor go to line 2. Type in the text "Floor 2C" on line 2.
1: Cable 2E45_
2:
1: Cable 2E45
2: Floor 2C_
Now that you have two lines typed, press the Print key and the auto sizing feature automatically sizes the two lines for you.
Cable 2E45
Floor 2C
To add additional lines, perform the same function again.
Editing Text
You can correct or change characters by using the left and right cursor keys to move the cursor to the right of the character to be changed. Use the Delete key
to delete the character and type in the correction. Below we changed the "E" on line 1 to "F" in our example.
Move the cursor to the right of “E” on line 1, press the Delete key and type in the letter “F”.
1: Cable 2E45
2: Floor 2C
1: Cable 2F45
2: Floor 2C
Adding a Character Style
You can change the style of text previously entered by using the left and right cursor keys to position the cursor to the beginning of your text. Press the Style key to select your character style of choice. To turn styles on and off use your Enter key.
In the following example, the cursor is moved to the beginning of the word "Floor" and Bold was then selected in the Style Menu. Note: Only text to the right of the cursor will be changed.
1: Cable 2F45
2: Floor 2C
Style Menu
■ Rotate *Bold _Italic
Now that your label has been edited and styled press the Print Key.
Cable 2F45
Floor 2C
Printing on Shrink Tube
Kroy offers flattened shrink tube cartridges for wire marking. Insert a shrink tube cartridge for this example.
You will start with a New file. To create a New file, press the File key and select New with the Enter key. Or use Shift and File as a shortcut.
For our example, we kept Auto Size ON.
Type in the following text "File Server"
1: File Server_ 2:
Press the Print key. Cut the shrink tube label and insert the wire.
File Server
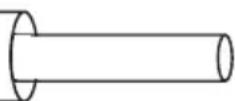
The tubing can be shrunk around the wire with a heat gun.
For further information on formatting the text of your shrink tube See Chapter 3.
Printing a Self-Laminating Wire Wrap
Kroy offers self-laminating wire wrap cartridges ideal for marking terminated wires and cables. Insert a self-laminating wire wrap cartridge for this example.
For our example, we kept Auto Size ON.
You will start with a New file. To create a New file, press the File key and select New with the Enter key. Or use Shift and File as a shortcut. When using a wire wrap cartridge, this will activate the automatic rotation feature. Rotation is necessary because the printable area of a wire wrap is vertical and represents a small portion of the label.
Type in the following text "300E"
1: 300E_
2:
Press the Print key then Feed and you have a wire wrap ready to apply.
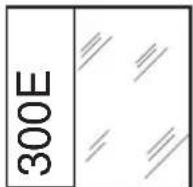
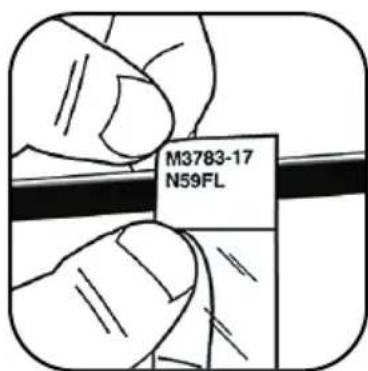
Apply the printed portion of the label to your wire and wrap the laminated tail around the wire.
text_image
M3783-17 N59FLFor further information on formatting the text of your wire wrap See Chapter 3.
Frequently Used Keys
The keyboard is used to enter label text and access menus. You will hear an audible click whenever a key is depressed. The frequently used keys on the keyboard are described below.
Function keys (File, Font, Size, Style, Repeat), will automatically prompt a list of selections to choose from. When using some function keys, the printer will display submenus or prompt you for information. These function keys also act as “toggles” which allow you to turn an option on or off.
The Alt Key accesses special character symbols shown in blue on particular keys. To enter a special character, (such as Å), hold down ALT and press the key of choice at the same time. To abort a print job, use the Alt and the Print keys together.
The Cursor (Arrow) Keys move the cursor through text without changing it and through options without selecting any. The left and right Cursor keys move left and right, one option or one character at a time; the up and down Cursor keys move up and down through lines of text, one line at a time. When used with SHIFT, the up and down Cursor keys act as Page up (previous label) and Page Down (next label) keys and the left and right Cursor keys move the cursor one word at a time.
The Caps Key locks capital letters on. Pressing the Caps key again turns off the function. The Caps key does not effect the number keys.
The delete Key allows you to cancel functions or escape ____ from menus. Delete erases characters to the left of the cursor. To Delete an entire line, hold down Shift and the Delete key together.
The Enter Key in typing mode, moves the text or the cursor to the next line. In function mode, the Enter key selects specific menu options, file names and default printer settings.
The Feed Key advances the tape from the printer.
The Print Key prints the current label and advances the tape far enough to clear the cut mechanism.
The Shift Key capitalizes individual letters and accesses the black characters on the number keys (such as!). Using the Shift and File key creates it clears text allowing you to create a new label.
text_image
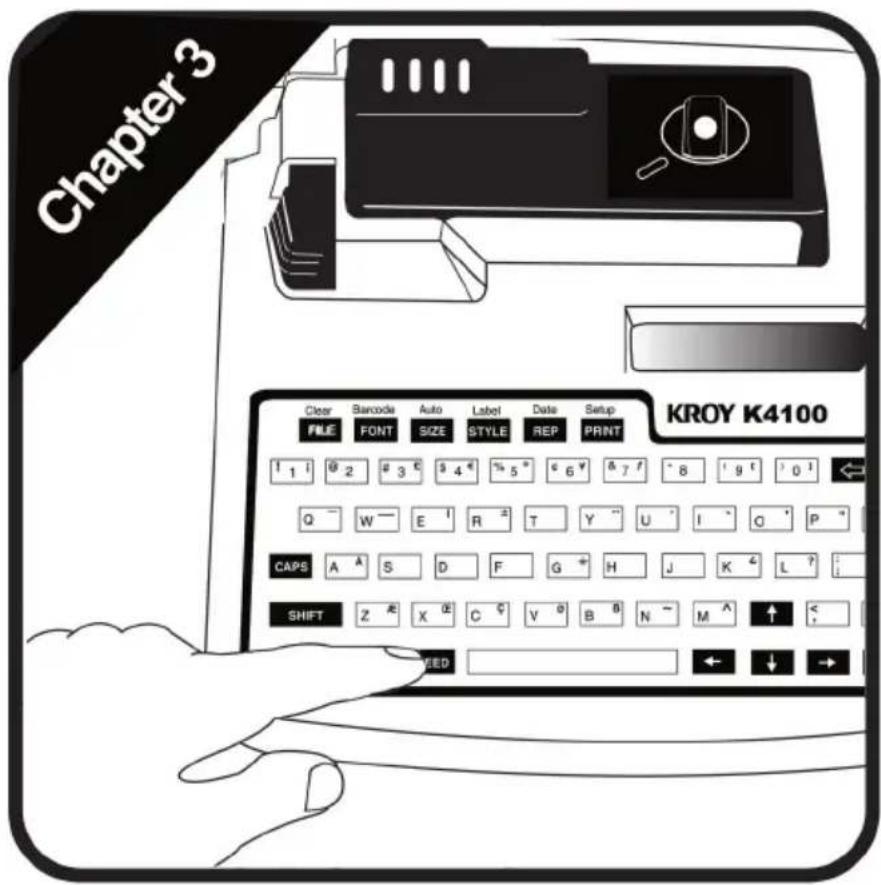
Chapter 3 Clear Barcode Auto Label Date Setup FILE FONT SIZE STYLE REP PRINT KROY K4100 1 2 3 4 5 6 & 7 8 9 0 Q W E R T Y U I C P CAPS A S D F G H J K L ? SHIFT Z X C V B N M ↑ ← ↓ → KREDOperating Your Printer
Font Function
Using the Font Menu
When you select the Font key the printer displays the default "Block" font seen below. This is the only font included with the K4100.
Font Menu
Block
K4100 has the option of downloading fonts from your PC. When you download a font, it will be added to your Font menu.
Font Menu
■ Block_times_arial
Press Enter to accept the current Block font or use the left and right cursor keys to move the cursor to the left of the font you want and press Enter to select it.
See Downloading Fonts on Pages 41-42 for further information.
Size Function
Using the Size Menu
Select Size to specify the print size for your text. The printer displays the default Auto Size function and waits for your entry. Press Delete to accept auto sizing or type a different size and press Enter. Valid sizes of 4-72 pt can be entered.
Size Menu
Size ■ 24
*Auto
Auto Size OFF
When printing, the K4100 will show what point size is being printed in the auto size mode. See below.
Printing.....
Auto Size xx pt
If you select Auto Size, the K4100 will automatically adjust the print size based on the number of lines of your label and the width of the label media. If you turn auto size off, the size of the print you select must take into account the number of lines of your label and the width of the media.
Error
Size Too Small
If auto size calculates a point size smaller than 4 point, an error message will be displayed.
Error
FontSize Too Big
If the text you have typed is too large, an error message will be displayed.
See the table below which can be used as a guide. The table assumes using characters of all the same size (capital letters). When using characters of varying size (such as lower case letters or accent characters) or using character styles (such as bold, italic etc.) the maximum point sizes will vary slightly.
| Tape Size | 1 Line | 2 Line | 3 Line | 4 Line | 5 Line | 6 Line |
| 0.375” | 28 pt 11 | pt 8 pt N/A | N/A N/A | |||
| 0.50” | 38 pt 19 | pt 12 pt 8 | pt N/A N/A | |||
| 0.80” | 60 pt 30 | pt 20 pt | 15 pt | 11 pt | N/A | |
| 1” | 72 pt 36 | pt 24 pt | 18 pt | 14 pt | 12 pt |
Character Styles
This section explains how to use the Style key to assign text formatting attributes to your label text. There are three types of text attributes: character, line and page. These attributes, as well as their defaults and options, are shown in the following table.
| Attribute | Defaults | Options |
| Font | Block | Download True Type Fonts from PC |
| Size | Auto Size On | .50” 4-30 point size .80” 4-55 point size 1” 4-72 point size |
| Justification † | Left | Left, Center, Right |
| *Bold | Off | On, Off |
| *Italic | Off | On, Off |
| *Mirror ‡ | Off | On, Off |
| *Vertical ‡ | Off | On, Off |
| *Frame | OffOff | Page: On, OffLine: On, Off |
| *Underline | Off | On, Off |
| Rotate ‡ | Off | On, Off |
* Attributes marked with a asterisk are toggles. † are line attributes. They affect the entire line of text that the cursor is positioned on. ‡ are page attributes. They affect the entire page (label). All other attributes (except Frame) are character attributes only and affect the text from the point that the cursor is positioned.
The following style settings are available on the K4100: Rotate, Bold, Italic, Underline, Justify, Mirror, Frame and Vertical.
To Select Multiple Styles, with less keystrokes, use the Space Bar and the cursor keys to turn styles on and off. For more Shortcuts, See page 24.
Note: When the Style menu is selected, all selections are not visible on the LCD display - you will have to use your left and right cursor keys to scroll through all the choices.
The most common character styles used are Bold, Italic and Underline.
To emphasize the text of your label using Bold, move the cursor to the position where you want to apply the Bold attribute and press the Style key. Use the left and right cursor keys to move the cursor to the left of Bold and press Enter. When turned on, an asterisk will appear. To turn Bold off, press Enter again or to exit press Delete.
1: ATTENTION
2:
Style Menu
■ Rotate *Bold _Italic
Bold Example:
ATTENTION
To italicize the text of your label using Italic, move the cursor to the position where you want to apply the Italic attribute and press the Style key. Use the left and right cursor keys to move the cursor to the left of Italic and press Enter. When turned on, an asterisk will appear. To turn Italic off, press Enter again or to exit press Delete.
1: ATTENTION
2:
Style Menu
■ Rotate _Bold *Italic
Italic Example:.
ATTENTION
To underline the text of your label using Underline, move the cursor to the position where you want to apply the Underline attribute and press the Style key. Use the left and right cursor keys to move the cursor to the left of Underline and press Enter. When turned on, an asterisk will appear. To turn Underline off, press Enter again or to exit press Delete.
1: ATTENTION
2:
Style Menu
* Underline _Justify
Underline Example:
ATTENTION
Other Styles
Other character styles include Mirror, Frame, Justify, Vertical and Rotate.
To reverse the text of your label using Mirror press the Style key. Use the left and right cursor keys to move the cursor to the left of Mirror and press Enter. When turned on, an asterisk will appear. To turn Mirror off press Enter again or to exit press Delete. When using mirror image, use clear tape for best results.
1: ATTENTION
2:
Style Menu
* Mirror _Frame
Mirror Example:
ИОІТИЭТТА
To draw a box around the text of your label using Frame press the Style key. Use the left and right cursor keys to move the cursor to the left of Frame and press Enter. When turned on, an asterisk will appear. The printer displays the frame menu and waits for you to select the type of frame you want. To turn Frame off, press Enter again or to exit press Delete.
Style Menu _Mirror *Frame
Once Frame is selected, the Frame Menu will appear. To frame all the text on the label, select Page by pressing the Enter key. When turned on, an asterisk will appear
1: ATTENTION
2: EMPLOYEES
Frame Menu * Page _Line
Page Frame Example:
ATTENTION EMPLOYEES
To frame just a line of text, move the cursor to the line of your text and select Line by pressing the Enter key. When turned on, an asterisk will appear
1: ATTENTION
2: EMPLOYEES
Frame Menu
_ Page *Line
Line Frame Example:
ATTENTION EMPLOYEES
To justify the text of your label using Justify press the Style key. Use the left and right cursor keys to move the cursor to the left of Justify and press Enter. The printer displays the justify menu and waits for you to select the justification of your choice. To exit the Justify menu press Enter or the Delete key. Note: The default justification is left.
1: ATTENTION
2: PLEASE
Justify Menu * Left _Center _Right
Left Justification
ATTENTION PLEASE
Center Justification
ATTENTION PLEASE
Right Justification
ATTENTION PLEASE
To print the text of your label vertically instead of horizontally using Vertical, press the Style key. Use the left and right cursor keys to move the cursor to the left of Vertical and press Enter. When turned on, an asterisk will appear. To turn Vertical off press Enter again or to exit press Delete.
1: ATTENTION
2:
Style Menu
* Vertical _Rotate
Vertical Example:
◄◄►►►►►►►►►►►►►►►►►►►►►►►►►►►►►►►►►►►►►►►►►►►►►►►►►►►►►►►►►►►►►►►►►►►►►►►►►►►►►►►►►►►►►►►►►►►►►►►►►►►► ►
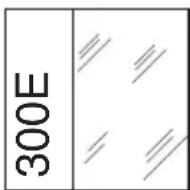
To rotate the text of your label using Rotate, press the Style key. Use the left and right cursor keys to move the cursor to the left of Rotate and press Enter. When turned on, an asterisk will appear. To turn Rotate off, press Enter again or to exit press Delete.
Rotation and Vertical are not the same. Note: Mirror is ignored when rotation is selected.
1: 300E_
2:
Style Menu
* Rotate _Bold
Rotate Example:
Auto Rotation
When a self-laminating wire wrap cartridge is installed, the K4100 will automatically rotate and auto size the text using the instructions below.
You will start with a New file. To create a New file, press the File key and select New with the Enter key. Or use Shift and File as a shortcut. This will activate the auto rotation feature.
Label Setup
To select the Label Setup press the Shift and the Style key together. The prompt below will appear. The menu options are length, cutmark, left margin and vertical margin.
Label Setup
■ Length _Cutmark
In the default setting, the Length of a printed label automatically adjusts to fit the length of text. If you want to specify the length of a label, the Length function allows you to set the length between 0.3" and 20". To turn Auto off, type in your specific length and press Enter. To exit the length menu without making any changes press Delete.
Length Menu
Len■ 0.3 *Auto
The Cutmark function creates cutmarks along a print job. Use the left and right cursor keys to move the cursor to the left of Cutmark and press Enter. When turned on, an asterisk will appear. To turn Cutmark off press Enter again or to exit the menu without making any changes press Delete.
Label Setup
■ Length *Cutmark
Room 5 Room 6
Floor 2C, Floor 2C
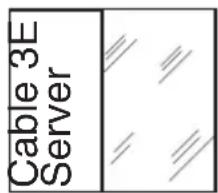
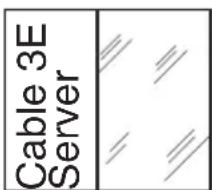
The Left margin function allows you to increase the size of your left margin by moving text from the left to the right of your label. The amount is measured in pixels. Use the left and right cursor keys to move the cursor to the left of Leftmargin and press Enter. A prompt will appear. Use the right and left cursor keys to select an increment up to 30 pixels. Press Enter to select the increment of choice. See the example below.
This function is used with die cut labels and self-laminating wire wraps only.
text_image
Cable 3E ServerThe text seen here has printed right to the edge.
Left Margin
Margin: ■+5
text_image
Cable 3E ServerThe text is now adjusted.
The Vertical margin function allows you to move text from the top to the bottom by pixel on your label. Use the left and right cursor keys to move the cursor to the left of Vertmargin and press Enter. A prompt will appear below. Use the right and left cursor key to select an increment up to 30 pixels. Press Enter to select the increment of choice. See the example below.
ATTENTION EMPLOYEES
The text seen here has printed to the bottom of the label.
Vert Margin
Margin: ■ +2
ATTENTION EMPLOYEES
The text is now adjusted upward on the label.
Shortcuts and Hot Keys
A Shortcut will provide a direct route to some submenus and options. See the listing below. To use a shortcut, first press and hold the Shift or Alt key and then press the second key.
Shift + File Creates a New File / Erases All Text
Shift + Font Bar Code Menu
Shift + Size Toggle Auto Size On/Off
Shift + Style Label Setup
Alt + Style All Styles Reset
Shift + Repeat Time/Date Menu
Shift + Print Printer Setup
Alt + Print Stops Print Job
Shift + Delete Erase Current Line
The Space Bar can be used to select multiple items on a menu. For example, in the Style Menu, if you want Bold and Italic on at the same time simply use your cursor key and the Space Bar to select these options and then exit the menu using the Delete key.
Hot keys are represented by a capitalized letter in most function key menus (i.e. _New _Open _Save). For example, the File Menu is selected. By pressing the letter "N", a new file will be selected without using the cursor keys and the enter key. Hot keys turn menu options on and off. And they also act as a shortcut to submenus. Note: The function key must be selected first before using the hot key. Hot keys work only in function mode.
Below is a listing of some of the function menu's hot keys.
File Menu Hot Keys
"N" New File
"O" Open File Menu
“S” Save File Menu
Size Menu Hot Keys
"A" Auto Size On/Off
Style Menu Hot Keys
“R” Rotate On/Off
"B" Bold On/Off
"I" Italic On/Off
"U" Underline On/Off
"J" Justify Menu
“L” Left Justify On/Off
"C" Center Justify On/Off
"R" Right Justify On/Off
"M" Mirror On/Off
"F" Frame On/Off
"V" Vertical On/Off
Repeat Menu Hot Keys
“S” Sequence Menu
"I" Insert
"A" Alpha On/Off - Sequence Start/End
“N” Numeric On/Off - Sequence Start/End
Multiple Copies and Sequencing
This section explains how to use the Repeat key to print multiple copies of a file or sequence text either numerically or alphabetically.
Press the Repeat key to make copies or sequence labels. The prompt below will appear.
Repeat Menu ■ Sequence _Copies
Select Copies to specify the number of copies you want to print (1-999). Use the left and right cursor keys to move the cursor to the left of Copies and press Enter. The printer displays the current setting for this option (see the following example) and waits for your entry. Press Delete to accept the number of copies shown, or type in your specific number and press Enter. Press Print.
Copies Menu Copies: ■ 2
Select Sequence to automatically generate and print labels containing a sequence of one letter or one to three numbers (101 102 103, ABC....etc.) without having to type the text of each label yourself. You simply tell the printer what characters to print on the first and last labels an how much to increment between labels (see following table).
Printing Sequential Labels
| Start Stop | Increment | Individual Labels Printed |
| 1 1001 10001 10 | 1 2 3 4 51 01 02 031 001 002 | 6 7 8 9 1004 05 06 07 0803 004 005 006 007 008 009 010 |
| 2 12 2 | 2 4 6 8 10 | 12 |
| A J 1 | A B C D E F | G H I J |
| a z 4 a | e i m q u y |
The sequence character takes on the current character attributes previously defined. Optionally, you can redefine the sequence character's attributes like any other character. Note: You can only define one sequence type (numeric or alpha) per document/file, but you can place the sequence character in your document/file once on each line.
Select Sequence from the Repeat menu. The Sequence menu will appear.
Sequence Menu ■ Insert *Alpha _Num
Use the left and right cursor keys to move to the left of the option you want and press Enter to select it.
Example 1
If you choose Alphabetic, the printer prompts you to enter the first letter to start the sequence. Type the first letter of your choice and press Enter.
For our example, we have selected the letter "A".
Sequence Start Start: ■ A
The printer then prompts you to enter the last letter to end the sequence. Type the last letter of your choice and press Enter.
Sequence End End: ■ C
The next prompt you will enter the increment amount. Press Enter.
Sequence Inc Inc: ■ 1
You will then select Insert from the Sequence menu by pressing Enter. This will place the sequence where you would like it to begin. A black box will be seen where the sequence will start. See example below.
1: Wire_■ 2:
Press the Print key.
Wire A Wire B Wire C
For multiple labels, Press the Repeat key and the Repeat menu will appear. Toggle your cursor to the left of Copies and press Enter to select.
Repeat Menu _Sequence ■ Copies
The number of copies can either be typed in or you can use your up and down cursor keys. In our example, we have selected 2 copies. Press Enter.
Copies Menu Copies: ■ 2
Press the Print key.
If you choose Numeric, the printer prompts you to enter the first number to start the sequence. Type the first number of your choice and press Enter.
For our example we have selected two digits.
Sequence Start Start: ■06
Enter the last number to end the sequence. Type the last number of your choice and press Enter.
Sequence End End: ■12
The next prompt you will enter the increment amount. Press Enter.
Sequence Inc Inc: ■ 2
You will then select Insert from the Sequence menu by pressing Enter.
A black box will be seen where the sequence will start.
1: A■ 2:
Press the Print key.
A06
A08
A10
A12
Example 3
Here is another example of a numeric sequence using an increment of 2 and triple digits.
Enter the first number to start the sequence. We chose "006" for this example. Press Enter.
Sequence Start Start: ■006
Enter the last number to end the sequence. We chose "12" for this example. Press Enter.
Sequence End End: ■12
The next prompt you will enter the increment amount. Press Enter.
Sequence Inc Inc: ■ 2
You will then select Insert from the Sequence menu by pressing Enter. A black box will be seen where the sequence will start.
1: ■ 2:
Press the Print key.
006
008
010
012
Example 4
Here is an example of using multiple pages and numeric sequencing. For our example, we have typed "Line In" on the label (Page 1).
1: Line In_
2:
Press the Repeat key and select Sequence by pressing Enter. Toggle the cursor to the left of Numeric and press Enter again.
Sequence Menu ■ Insert _Alpha *Num
Enter the first number to start the sequence. We chose "1" for this example. Press Enter.
Sequence Start Start: ■ 1
Enter the last number to end the sequence. We chose "2" for this example. Press Enter.
Sequence End End: ■ 2
The next prompt you will enter the increment amount. Press Enter.
Sequence Inc Inc: ■ 1
You will then select Insert from the Sequence menu by pressing Enter. A black box will be seen where the sequence will start.
1: Line In ■ 2:
continued on page 30
To start a new page, use the Shift and the Down Cursor key to move to the next page. A prompt will appear with the page number.
We have typed "Line Out" on the label (Page 2).
1: Line Out_ 2:
Follow the same steps for the sequence setup on Page 1 and Insert the sequence. A black box will be seen where the sequence will start.
1: Line Out ■ 2:
Press the Print key.
Line In 1 Line Out 1 Line In 2 Line Out 2
Printer Setup
To select the Printer Setup press the Shift and the Print key together. The prompt below will appear. The menu options are reset, unit of measure, density, auto off, advance cut, language, printspeed and lcd contrast.
Printer Setup ■ Reset _Unit _Density
Select Reset to restore all factory settings and defaults. To select Reset press Enter or to exit press Delete.
1:■ 2:
The Unit of Measure function allows you to choose the unit of measure you want to use for setting label width and margin. The options are tenths of an inch (default) and millimeters. Select Unit from the printer setup menu by using the cursor keys and pressing Enter. The unit menu will appear. Use the arrow keys to move to the left of the option you want and press Enter. To accept the current setting press Delete.
Unit Menu ■*Inch _MM
Select Density to specify the density (0-7) for printing the current label. Density will make the label darker or lighter per unit measure. The printer displays the current density setting and waits for your entry. Press Delete to accept the value shown, or use the left cursor key to add density and press Enter.
Density Menu D: ####■
If the characters are smeared on a label or are not completely filled in, you can attempt to fix the problem by adjusting the print density. If the characters are smeared, specify a lower number in the field; if the characters are not completely filled in, specify a higher number. You may need to adjust the density after installing a new tape.
Select Auto Off to activate auto shut off. The factory default is to shut off the printer after 5 minutes of non-use. When the printer is turned off, all current label text and text attributes settings are saved. All files in memory are still saved. Press Delete if you decide you do not wish to change the current setting. Or press Enter to activate auto shut off. When turned on, an asterisk will appear. By default, this function is on.
The Advance to Cut function advances the label material to the cut position. The default setting is advance to cut enabled. If you do not need this function you may disable the advance to cut function by using the cursor keys to move to the left of Advance in the printer setup menu and press Enter.
The Language function allows you to choose from 4 different languages. The default language is English. Other options are spanish, french and german. Select Language from the printer setup menu by using the cursor keys and press Enter. The language menu will appear. Use the cursor keys to move to the left of the language you want and press Enter. To accept the current setting press Delete.
Languages Menu * English _eSpanoL _Francai _Deutsch
Printspeed is the rate at which the label advances from the printer when printed. The default printspeed is unlimited. To specify a printspeed, select PrtSpeed from the printer setup menu by using your cursor keys and press Enter. The printspeed menu will appear and by using your cursor keys you can select from the options below by pressing Enter. To accept the current setting press Delete.
PrtSpeed Menu *Unlimit _0.5 _0.8 _1.0
The LCD Contrast allows you to lighten or darken the LCD of your printer. Select Lcdcontrast from the printer setup menu by using the cursor keys and press Enter. The lcd contrast menu will appear. Use the right cursor to lighten or the left cursor to darken. As you use the cursors, you will see a difference in your screen. Press Enter to accept the your setting. To accept the current setting press Delete.
LCD Contrast Use Left - Right
Bar Codes
To print a Bar Code, press the Shift and the Font key together. Use the Bar Code Menu to specify the type of bar code you want to print.
BARCODE Menu
■ None _codaBar _Code39 _Ean8 _eAn13 _I2of5
BARCODE Menu
_Upca _uPce _coDe128 _Msiplessey _pdF417
K4100 has ten bar codes built-in. The following table summarizes information on these bar codes. The
| Bar Code Type | Valid Characters | Checksum Options Available | Fixed Length | Special Restrictions & Other Information |
| Codabar | 0 -9 A - D. - / + % | None, mod 10, mod 16 | < 32 characters | First and last characters must always be either A, B, C, or D. Letters not allowed in body of bar code |
| Code 39 | 0 -9 A - Z. - / + % space | None, mod 43 | < 32 characters | Lowercase letters not allowed |
| EAN-8 | 0 -9 | EAN-8 | 7, 9 or 12 digits | Length varies because of optional 2 or 5 digit supplemental |
| EAN-13 | 0 -9 | EAN-13 | 12, 14 or 17 digits | Length varies because of optional 2 or 5 digit supplemental |
| Interleaved 2 of 5 | 0 -9 | None, mod 10 | Even number of digits | Printer adds leading zero, if needed, to make the length even |
| UPC-A | 0 -9 | None | 11, 13 or 16 digits | Length varies because of optional 2 or 5 digit supplemental |
| UPC-E | 0 -9 | None | 6, 8 or 11 digits | Length varies because of optional 2 or 5 digit supplemental |
| Code 128 | 128 ASCII Character Set | None | < 32 characters | See Appendix D |
| MSI Plessey | 0 -9 | None, mod 10, mod 11 | < 16 characters | Mode 11 checksum cannot equal 10 |
| PDF 417 | All ASCII characters | 0 to 400 levels of security | < 700 characters | None |
After the bar code selection has been made, press the Shift and Font keys together to go back to the Bar Code menu. The menu will change allowing you to customize the bar code selected using code, text and resolution.
BARCODE Menu
■ Code _Text _Resolution
Select Code to change the type of bar code you want to print. The printer displays the types of bar codes available. Use the left and right cursor keys to move to the left of the option you want and press Enter. If an asterisk displays to the left of the option, selecting it turns code off.
Depending on the bar code you have selected, some bar codes allow you to choose whether to include a checksum and change the resolution at which the bar code is printed as well as whether to print text or the checksum.
Select Text to print text as part of the bar code. Use the left and right cursor keys to move to the left of the option you want and press Enter. If an asterisk displays to the left of the option, selecting it turns text printing off. Text is printed in the following manner:
- Code 39, Code 128, Interleaved 2 of 5 and MSI Plessey: text is printed immediately beneath the symbol.
- EAN8, EAN13 and UPC: text for the number system is printed at the left of the symbol; text for the product and manufacturer code is printed beneath the symbol; text for the supplemental is drawn above the symbol.
- PDF 417 has no text option.
Resolution specifies whether you want to print the bar code at normal or high resolution. Use the left and right cursor keys to select the option you want and press Enter.
Resolution Menu * Medium _High
CheckSum specifies the type of error checking you want to use. The type of bar code selected at Code determines the prompt that displays next. For example, if you selected 12 of 5, the following prompt displays:
BARCODE CheckSum * Mod10 _Mod16
Some bar code symbologies allow you to print the checksum value as part of the bar code
File Management
To select the File Menu press the File key. Use the File Menu to create new files, open files, save files and delete files.
File Menu
■New_Open_Save_Delete
Select New to create a new document. The printer clears any text displayed on the screen, returns all attributes to factory defaults and displays a blank edit screen so you can enter new text. To create a New file, press the File key and select New with the Enter key. Or use Shift and File as a shortcut.
1:■ 2:
Select Open to access an existing document you want to edit or print. The printer displays a list of file(s) you have saved (see the following example) and waits for you to select the file you want to work with. Press the File key and use the cursors to scroll to the left of Open and press Enter. The Open File Menu is now displayed. Use the left and right cursor keys to scroll to the left of the file want to open and press Enter to select it. See example below.
Open File Menu ■ Address _Job 4048 _ww
Select Save to save the current document. You must save the label you are working on before you select either New or Open. If you do not save first, it will be lost. Press the File key and use the cursors to scroll to the left of Save and press Enter. The Save File Menu is now displayed prompts you to enter a file name..
Save File Menu
File names can be any combination of letters and numbers, 8 character maximum, with no punctuation or file name extensions.
If you enter a file name for an already existing file, you will see the following message:
Overwrite?
OK? (Y,N)
Press Y to overwrite or N to enter a different file name. If you decide not to save the file, simply press Delete.
Select Delete to delete files that you no longer need. Press the File key and use the cursors to scroll to the left of Delete and press Enter. The Delete File menu displays a list of files you have saved (see the following example) and waits for you to select the file you want to delete. Use the left and right cursor keys to move the cursor to the left of the file you want to delete and press Enter to select it. If you decide not to delete a file, simply press Delete.
Delete File
■ Address _Job 4048 _ww
Multiple Page Documents
You can enter multiple labels in a file by using Page Up an Page Down to access additional pages (labels). In this case, you can think of a file as a single document containing one or more pages (labels). Each label can be up to six lines.
1:■ 2:
To start a new page while you are in a file, use the Shift and the Down Cursor key to move to the next page. A prompt will appear with the page number.
Page 2
To move back to the preceding page, use Shift and the Up Cursor key. When you press the Print key, all pages in the file will be printed.
Time/Date Stamp
To select the Time/Date Menu press the Shift and Repeat keys together. Use the Time/Date Menu to print labels with
Time/Date Menu ■ Time_datE_stamP_setclOck_24Hourmode
To use the Time/Date functions you must first set the real time clock with the local time and date. This will lock the time and date into memory. This will have to be done once with the exception of summer and winter time changes.
Select Set Clock to enter the current time and date in the printer. Use the cursor keys to scroll to the left of Set Clock and press Enter. The prompt below will appear. Use the Up and Down cursor keys to scroll through the menu.
The information will be entered in the order shown here:
Year_ Month_ Day_ Hour_ Minute_ Second_
Set Clock Parameters
| Prompt Parameters | |
| Year Last | two digits of the year |
| Month Number | from 1 to 12 |
| Day Number | from 1 to 31 |
| Hour* Number | from 0 to 23 |
| Minute Number | from 0 to 59 |
| Second Number | from 0 to 59 |
* Hour is entered in 24 hour mode (i.e. 1PM would be entered as 13)
Select Time to add the current time to your label. Use the cursor keys to scroll to the left of Time and press Enter. The time will be added to the label where the cursor is positioned. The time can be formatted or deleted just as you had physically typed it in.
1:03:48:33PM
2:
Select Date to add the current date to your label. Use the cursor keys to scroll to the left of Date and press Enter. The Date Menu will appear offering 6 formats (mm/dd/yy, dd/mm/yy, mm/dd/yyyy, dd/mm/yyyy, dd.mm.yy, dd.mm.yyyy). Use the cursor keys to scroll to the left of the format you want and press Enter.
Date Menu
■ mm/dd/yy _dd/mm/yy _
The current date will be added to the label where the cursor is positioned. The date can be formatted or deleted just as you had physically typed it in.
1:02/01/04
2:
Note: Do not confuse the Time and Date options with the Stamp option. Time and Date enters the current time/date into your label at the insertion point, once entered they are now considered text by the printer (as if you typed them by hand). The Stamp function will always use the current time clock at the time of print job.
Select Stamp to have the current date and time (at the time of print) printed vertically on the very edge of the label. Every time you press print a stamp with the current date and time will be printed in ddhhmmMMMyy format. Use the cursor keys to scroll to the left of Stamp and press Enter. This will turn Stamp on and an asterisk will be displayed. To turn it off, press Enter again.
1612-01Feb04 File Backup - Marketing
Note: Using the stamp on tape supply sizes 0.50" and smaller is not recommended.
Select 24 Hour Mode causes time entered in the text of a label via the Time option to be in 24 hour mode (i.e., 1 PM as 13). Use the cursor keys to scroll to the left of 24 Hour Mode and press Enter. This will turn 24 Hour Mode on and an asterisk will be displayed. To turn it off, press Enter again.
text_image
Chapter 4PC Operations
Introduction
The K4100 will operate either standalone or as a PC printer. This new printer will operate with Microsoft Windows 98, ME, 2000 or XP. Any standard windows application such as Word, Excel or other programs can print to the K4100 via a standard Windows printer driver.
Kroy also includes the Kroy Label Designer Software (KLDS) application with your printer that contains easy to use, preformatted templates for your printer.
The communications between your printer and your PC are controlled by a windows printer device driver.
The printer device drivers are located on the included software CD-ROM or current drivers are available at www.kroy.com
Installing the KLDS Software
Close all programs prior to installation. Insert the Kroy Label Designer into the CD-ROM drive. On most systems the installation program will automatically start. See the steps below to help you along with your setup.
- The InstallShield Wizard will appear and prepare to install.
- Kroy Label Designer Setup will appear. Click Next to continue installation.
- The License Agreement will appear: Click Yes.
- Choose the Destination: the default will be C:\Program\Kroy Click Next.
- You will then choose the Setup Type. The default is Typical and is recommended for most users. Click Next.
- Click Finish to complete.
Installing the Printer Drivers
The drivers for the KLDS will automatically setup. You will see the following prompts once the software portion is complete.
- Do you wish to install Kroy Printers. Click Yes.
- The Kroy Printer Driver Setup will then appear. Click Next to continue.
- You can now select to add your Kroy Label Printer under Setup Type. Click Next to continue.
- Select the mode of printer installation. Choose Automatic and connect the printer to your PC using the serial cable. Turn the printer on.
- Setup will then scan the COM ports on your system for the new printer, Click Next.
- Name your Kroy Printer and select it as your default label printer by selecting Yes. Click Next.
- Recommended Port Setting will appear and click OK.
- Click Finish to complete.
KLDS Operation
Creating a Label
Double click the KLDS Icon or go to your Start Menu\Programs\Kroy Label Designer and select it. The main screen will appear.
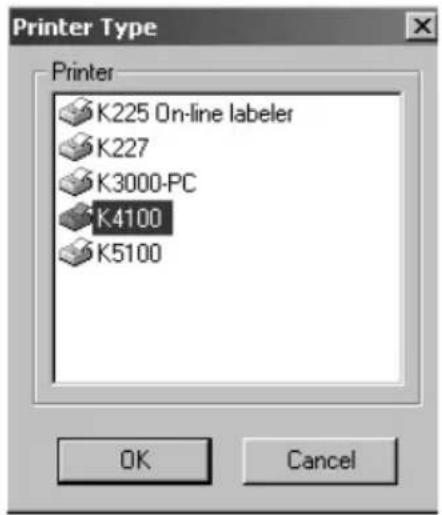
- Go to the Label Menu and select Label Setup. Click on the K4100 printer. Click OK to verify.
text_image
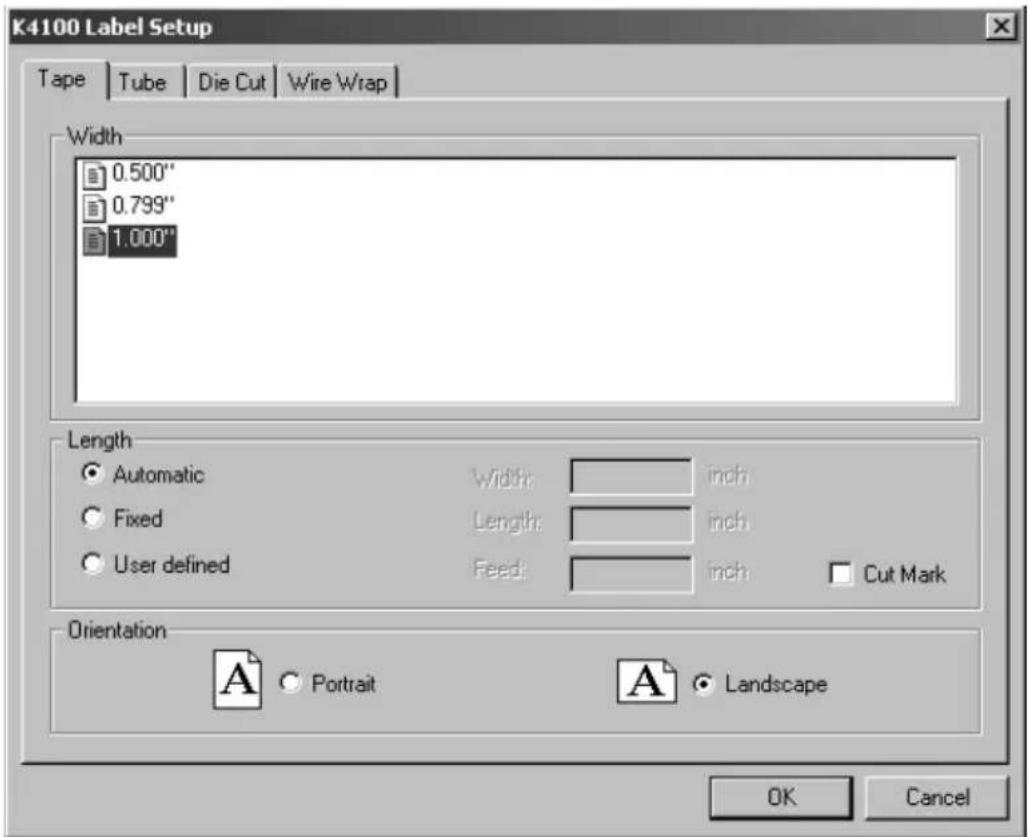
Printer Type Printer K225 On-line labeler K227 K3000-PC K4100 K5100 OK Cancel- Select the appropriate Supply Type, Size and Label Orientation that you are using in your K4100.
text_image
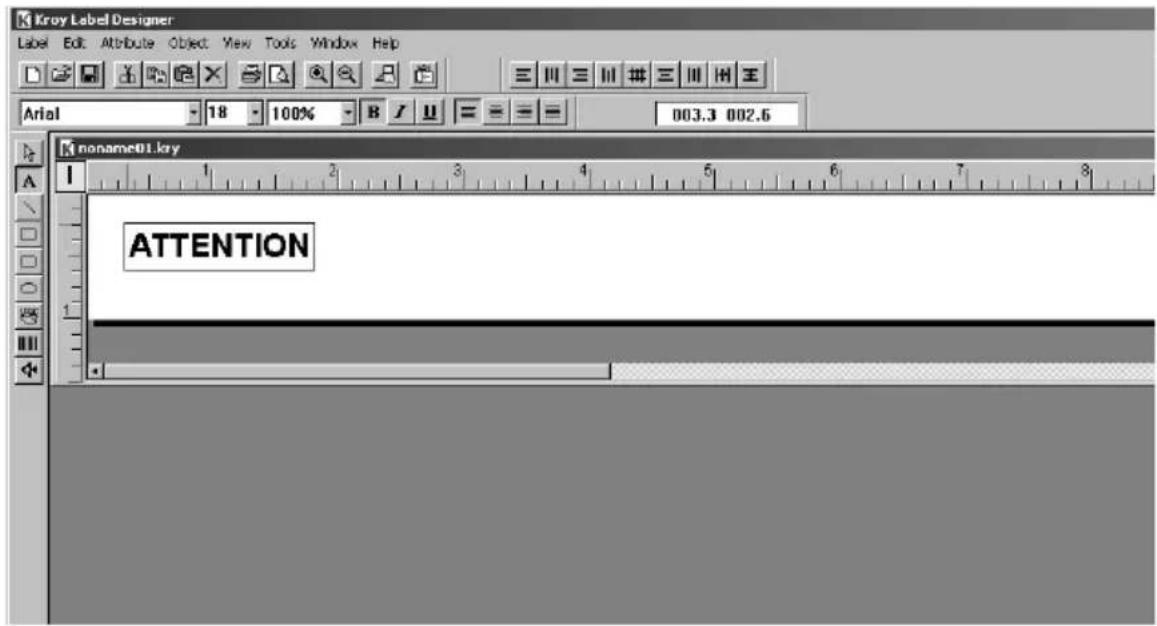
K4100 Label Setup Tape | Tube | Die Cut | Wire Wrap | Width 0.500" 0.799" 1.000" Length Automatic Width: inch Fixed Length: inch User defined Feed: inch Cut Mark Orientation A Portrait A Landscape OK Cancel- A label template will appear on the Main Menu Screen. Select the Text Tool "A" from the Main Tool Bar, click your left mouse button on the label template and input text at the blinking cursor.
text_image
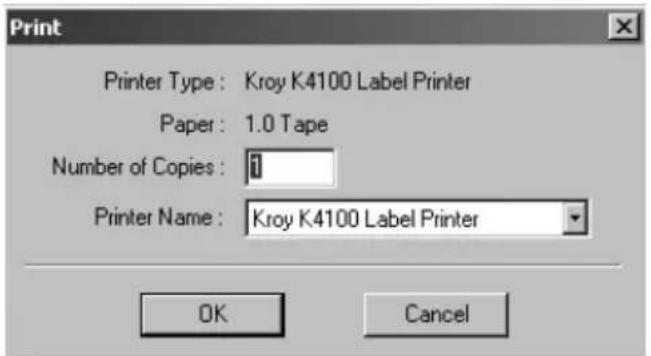
Kroy Label Designer Label Edit Attribute Object View Tools Window Help Arial 18 100% B I U = = = 003.3 002.6 noname01.kry ATTENTION- After creating your label, click on the Print Icon from the top tool bar, or go to the Label Menu and select Print. Select the number of copies and click OK to print your label.
text_image
Print Printer Type : Kroy K4100 Label Printer Paper : 1.0 Tape Number of Copies : 1 Printer Name : Kroy K4100 Label Printer OK Cancel- The K4100 will then print your label.
For further assistance, go to the Help Menu of your KLDS Software.
Downloading a Font
The K4100 has the option of downloading fonts from the PC into your Font Menu. Follow the steps below.
- Connect the serial cable to the com port of choice and to your printer.
- Go to the Start Menu of your PC and go to Settings and select Printers.
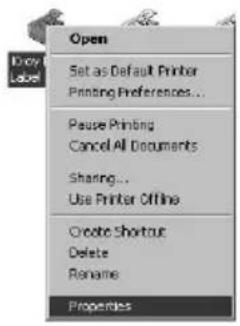
- Right click on the K4100 driver and go to Properties.
text_image
Open Set as Default Printer Printing Preferences... Pause Printing Cancel All Documents Sharing... Use Printer Offline Create Shortcut Delete Rename Properties- Click on Control and go to Advance Options...
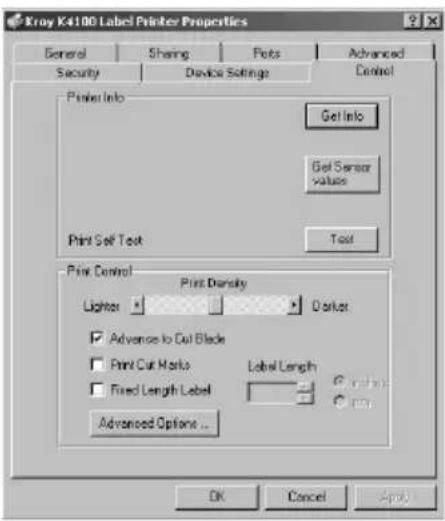
text_image
Kray K4100 Label Printer Properties General Sharing Posts Advanced Security Device Settings Cancel Printer Info Get Info Get Sensor values Print Self Test Test Print Control Print Density Lighter darker ✓ Advance to Cut Blade □ Print Cut Marks Label Length □ Fixed Length Label Advanced Options... OK Cancel Apply- Select Download Fonts from the Menu and click Update.
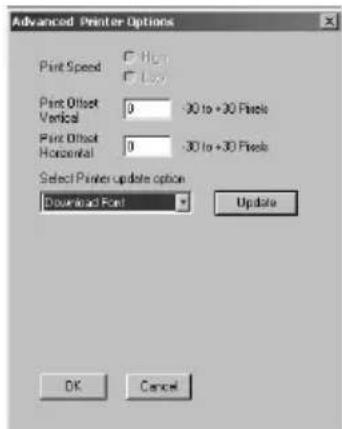
text_image
Advanced Printer Options Print Speed □ High □ Low Print Offset Vertical 0 -30 to +30 Pixels Print Offset Horizontal 0 -30 to +30 Pixels Select Printer update option Downloaded Print Update OK Cancel- Go to the Font folder on the C drive of your PC and click OK.
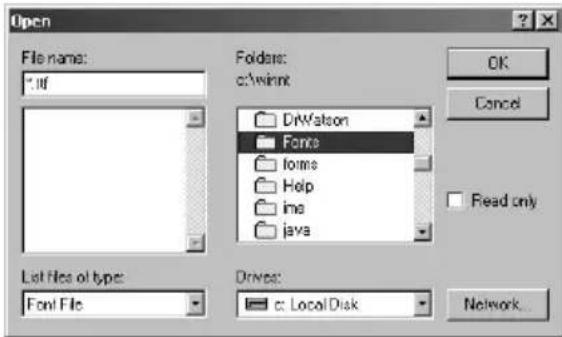
text_image
Open File name: *.iff Folders: c:\winnt DrWatson Fonts forms Help ime java List Files of type: Font File Drivers: c: Local Disk OK Cancel Read only Network...- Select the Font or Font Family of your choice and click OK.
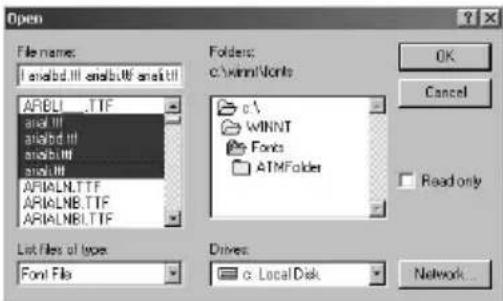
text_image
Open File name: 1.asiabd.ill.asiabuW.asiabt ARBLI...TTF asnlll asnibd.ill asnibbW asnlll ARIALNLTTF ARIALNB.TTF ARIALNBLTTF Folders: c:\winnt\Works c\ WINNT Fonts ATMFolder OK Cancel Read only List Files of type: Font File Drives: c: Local Disk Network...- The LCD Display of the printer will show the progress of the download using the pound sign(#) across the bottom. The printer will show a receiving and an updating display.
Receiving...
Updating...
- The download is now complete and you can find the font in your Font Menu. Press the Delete key to accept the current Block font or use the left and right cursor keys to move the cursor to the left of the font you want and press Enter to select it.
Font Menu ■ Block_times_arial
Using Your Printer with Other PC Applications
You may also use other Windows applications to create labels with the K4100 printer. This is an example using Microsoft Word to create a label.
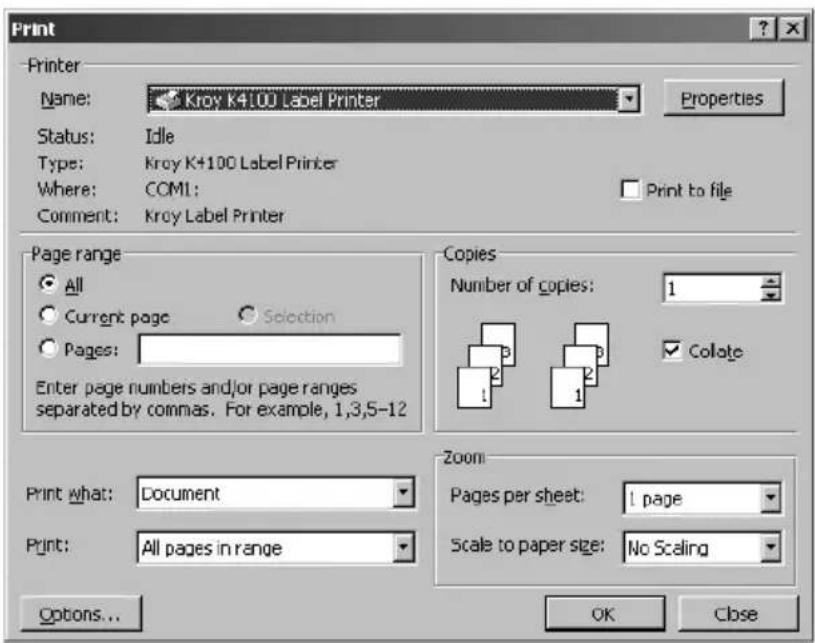
- Click on the File menu and select Print.
text_image
Print Printer Name: Kroy K4100 Label Printer Status: Idle Type: Kroy K4100 Label Printer Where: COML: Comment: Kroy Label Printer Properties Print to file Page range All Current page Selection Pages: Enter page numbers and/or page ranges separated by commas. For example, 1,3,5-12 Copies Number of copies: 1 Colate Print what: Document Print: All pages in range Zoom Pages per sheet: 1 page Scale to paper size: No Scaling Options... OK Close- Select the Kroy K4100 Label Printer in the drop down box and Click Close.
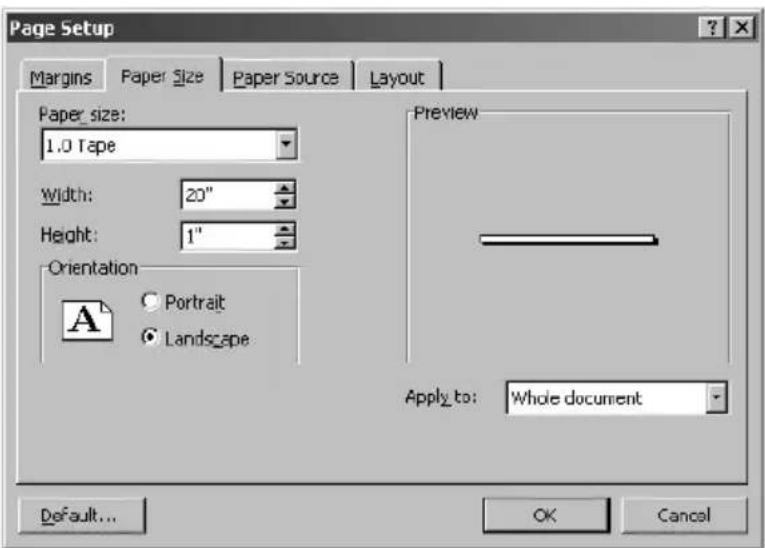
- Click on the File Menu and select Page Setup.
text_image
Page Setup Margins Paper Size Paper Source Layout Paper_size: 1.0 Tape Width: 20" Height: 1" Orientation Portrait Landscape Preview Apply_to: Whole document Default... OK Cancel-
Click on the Paper Size tab and select the supply type. This size should match the size of the width on the supply cartridge currently installed in your K4100 printer. Usually you will want Landscape orientation selected.
-
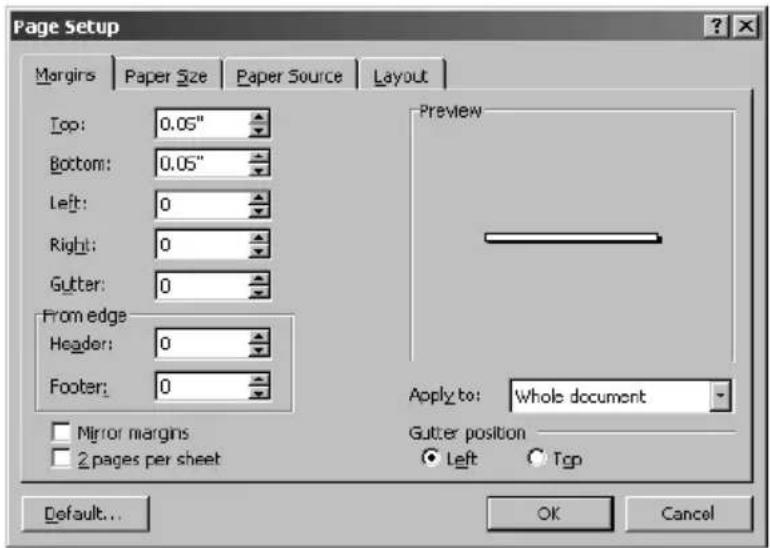
Select the Margins tab and change the top, bottom, left, right, gutter, header and footer to "0" or desired margin values. The default margins must be changed since you are not printing to a full 8.5" x 11" page. For some media, Word will want to "Fix" the margins based on the maximum printable area of the media selected. In this case, 1" tape requires a 0.05" top and bottom margin. Click on OK.
text_image
Page Setup Margins | Paper Size | Paper Source | Layout | Top: 0.05" Bottom: 0.05" Left: 0 Right: 0 Gutter: 0 From edge Header: 0 Footer: 0 Mirror margins 2 pages per sheet Preview Apply to: Whole document Gutter position ● Left ○ Top Default... OK Cancel- It is recommended to click on the View menu and select Page Layout mode.
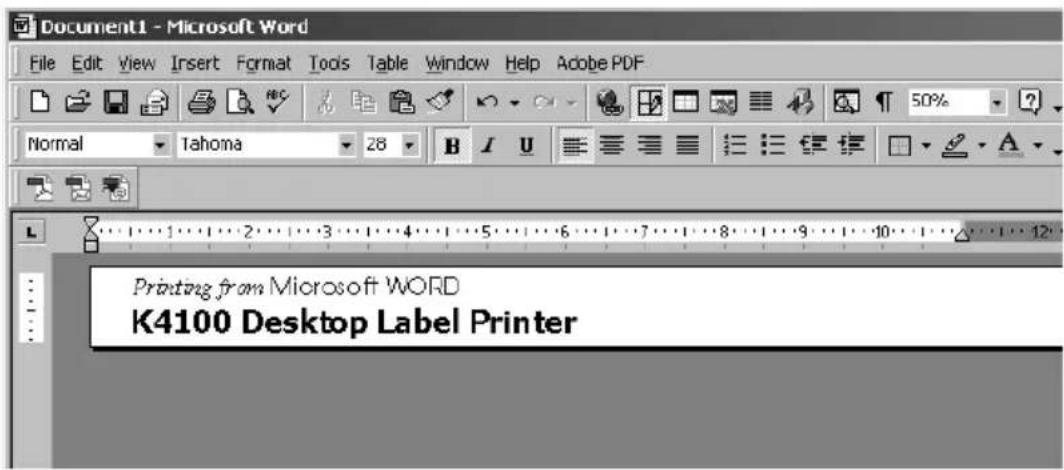
- A blank label template with a blinking cursor will appear on your PC monitor.
- Enter the label text.
text_image
Document1 - Microsoft Word File Edit View Insert Format Tools Table Window Help Adobe PDF Normal Tahoma 28 B I U Printing from Microsoft WORD K4100 Desktop Label Printer- Select Print from the File menu. Make sure that the K4100 is selected and Click OK to print the label. Note: When printing and the cartridge runs out of tape, remove and install a new cartridge, and press Feed to continue printing. DO NOT TURN OFF THE PRINTER.
To Save your label, go to the File menu and select Save. You can also save the document as a template to start other label files.
Appendix A: Maintaining Your Printer
The printer requires no lubrication and only minimal maintenance. Occasional cleaning of the exterior surfaces and regular cleaning of the printhead and rollers are all that is required. This appendix explains how to clean these parts of your printer.
Cleaning the Printhead and Rollers
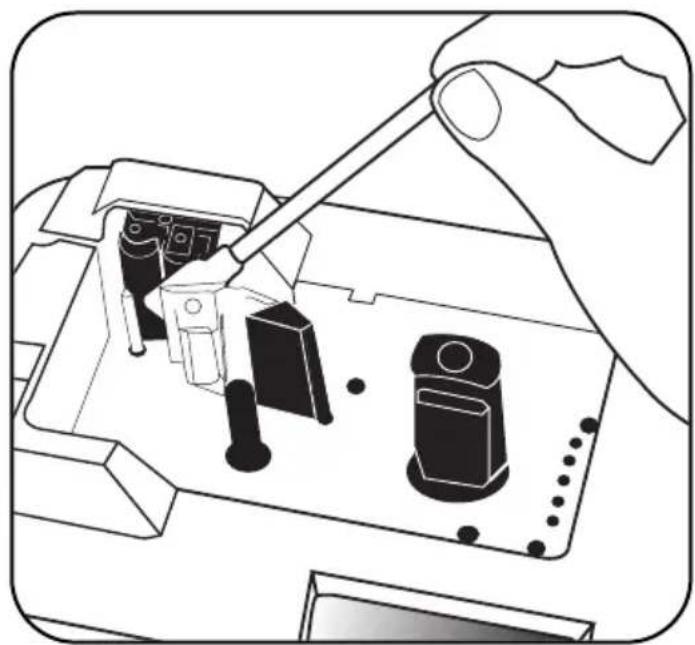
The printhead and rollers should be cleaned after every cartridge Use isopropyl 90% alcohol on a soft cotton swab to remove adhesive buildup and tape and ribbon residue. Make sure the alcohol has evaporated before loading a supply cartridge.
Note: Avoid touching the surface of the printhead with your finger. Acids and oils on your skin will damage the printhead.
natural_image
Illustration of a hand using a tool to adjust or install electronic components on a circuit board (no text or symbols visible)Appendix B: System Messages
The following are system messages that the K4100 will display and an explanation of each message.
Cannot Save (1) There is not enough memory to save your file.
No Memory Either delete unneeded files or simplify labels by reducing the amount of text or the number of formatting options they contain. (2) You tried to save a file to drive B when it is write protected.
Cartridge Empty Cartridge supply is empty. Install a new cartridge.
Font Size Too Big The point size is too large for the number of lines you have entered. Reduce the point size or select fewer lines.
Size Too Small Auto size has calculated a size smaller than the minimum size of 4 pt.
Font Error! You entered the wrong number of characters for the bar code. Check the requirements for the type of bar code you are using and enter the correct number of characters.
No Cartridge Install a cartridge in order to print.
No Files Found You selected Open or Delete but have no files saved in memory. You must save files before you can open or delete them.
Printer Too Hot The printer is too hot to print labels. Wait about five minutes and then resume printing. This message may also appear when the printer is used in an ambient temperature below its minimum rated operating temperature.
Printing... The printer is printing labels. No action required.
Appendix C: Troubleshooting
This appendix explains how to solve some common problems that may arise when you are using the printer. If you are unable to correct the problem contact your Dealer or Kroy Customer Service. In the United States, call (800)347-5769; in Europe call +44-(0)118-986-5200.
| Display stays black/blank • Adjust the LCD Contrastafter printer is turned on • Make sure the AC Adapter is firmly connected | |
| Printer does not print • Ensure the lock/release knob is in the locked position• Check the supply cartridge and its position• Check that the AC adapter and/or serial cable is firmly connected | |
| Printed characters are not • Adjust the print densityformed properly • Clean the printhead and rollers | |
| Printed characters have a • Turn off printer and use a Kroy Cleaning line through them and/or Kit (Part#255900) or use 90% or better voids isopropyl alcohol on a cotton swab toclean the printhead and rollers (See Appendix A) for instructions. | |
| Printer isn't working • Reset the printerproperly • Turn the printer on and off | |
| Printer has locked up • Turn the printer on and off |
Appendix D: Updating Firmware
Updating Firmware
Updates for firmware can be found at www.kroy.com. Go to support and click on downloads.
- Connect the serial cable to your Com port of choice and to your printer.
- Download the updated file from our site.
- Save the file to your PC.
- Go to your Start Menu of your PC and go to Settings and select Printers.
-
Right click on the K4100 driver and go to Properties.
-
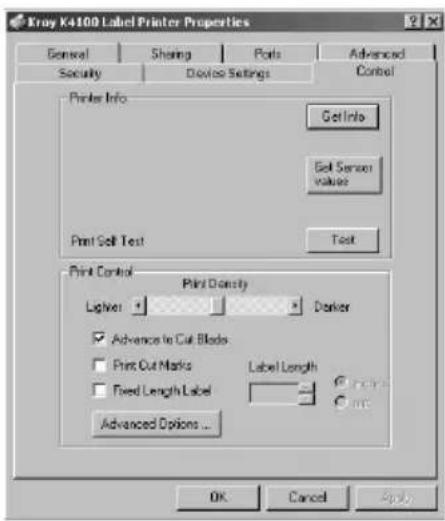
Click on Control and go to Advance Options...
text_image
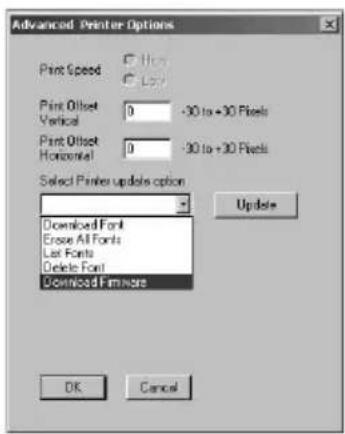
Kray K4100 Label Printer Properties General Sharing Ports Advanced Security Device Settings Control Printer Info Get Info Get Sensor values Print Self Test Test Print Control Print Density LogNet Darker ✓ Advance to Cut Blades ☐ First Cut Marks Label Length ☐ Fixed Length Label ✓ Advanced Options... OK Cancel Apply- Select Download Firmware from the menu and click Update.
text_image
Advanced Printer Options Print Speed Print Offset Vertical Print Offset Horizontal -30 to +30 Pixels -30 to +30 Pixels Select Pinters update option Downloaded Font Erase All Fonts Let Fonts Delete Font Downloaded Firmware Update OK Cancel- A warning will appear below and click Yes to continue.

text_image
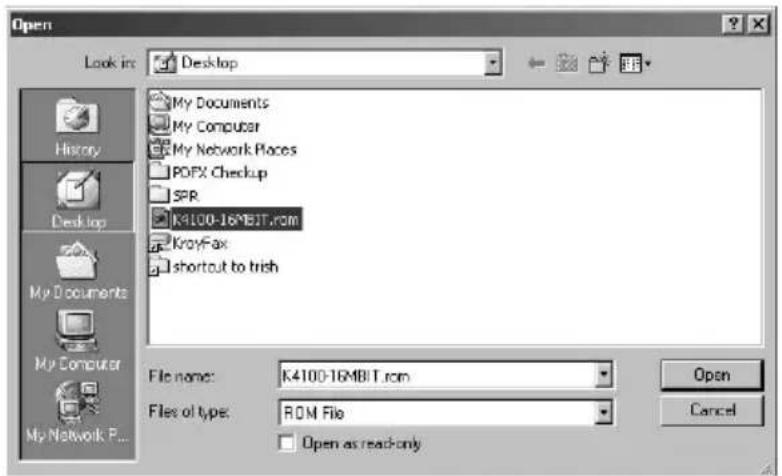
K4100 Firmware Update WARNING Do not update the firmware unless advised to do so by Kroy Technical Support. This may cause permanent damage to your printer. Do you want to continue? Yes No- Select the firmware file and click Open.
text_image
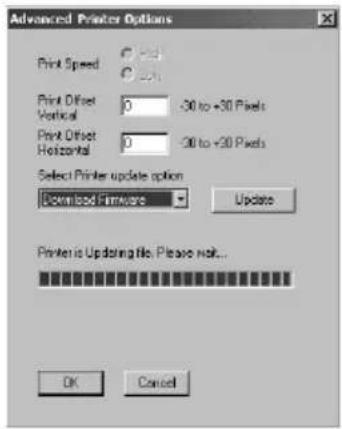
Open Look in: Desktop My Documents My Computer My Network Places PDFX Checkup SPR K4100-16MBIT.com KrayFax shortcut to Irish History Desktop My Documents My Computer My Network P... File name: K4100-16MBIT.com Files of type: ROM File Open as read-only Open Cancel- The printer will then update the file.
text_image
Advanced Printer Options Print Speed Print Offset Vertical 0 -30 to +30 Pixels Print Offset Horizontal 0 -30 to +30 Pixels Select Printer update option Download Firmware Update Printer is Updating file. Please note... OK CancelThe LCD Display will show the progress of the download using the pound sign(#) across the bottom. The printer will show a receiving and an updating display.
Receiving...
Updating...
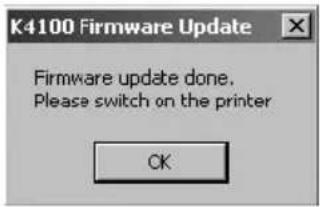
- The download is now complete.
text_image
K4100 Firmware Update Firmware update done. Please switch on the printer OKAppendix E: Using Accent Characters
K4100 has a variety of international characters and symbols found in Blue on the keypad. Use the Alt key + the accent character and/or symbol to print out these special accent characters.
In our example, we will use the 'accent character and add it to the letter "i" in "Factoría" (Factory).
The “i” in “Factoría” must be accented. To do this, you will hold down the Alt + u’ key on the keypad. This activates the accent character. You will then press the letter “l” on the keypad. The printer will then display the accented character in the text of the label.
1:Factoría _ 2:
Accent Character Guide
| ^ | aAeEiloOuU |
| ~ | aAnNoO |
| .. | aAeEiloOuUyY |
| 、 | aAeEiloOuU |
| 、 | aAeEiloOuUyY |
Appendix F: Using the Character Map
The K4100 has the capability to accept code to print characters not found on the keyboard. To use the character map, the Extended Mode must be on. To turn the Extended Mode on press the Alt and Space Bar together. To turn this mode off, press the Alt and Space Bar together again. See the character set below for ASCII codes to assist you.
To enter characters in extended mode, enter the 4 digit code shown in the table below. Most of the characters will be properly displayed on the LCD. For some characters, a solid block place holder will display on the LCD, but the selected character will print on the label.
| ASCII Code | Character |
| 0123 {0124 | 0125 }0126 ~0140 CE0156 oe0159 Ẏ0162 ¢0163 £0165 ¥0168 "0176 °0177 ±0180 '0191 ¿0192 Å0193 Á0194 Å0195 Å0196 Ä0197 Å0198 Æ0199 Ç0200 È0201 É0202 Ê0203 Ê |
| ASCII Code | Character |
| 0204 ì | |
| 0205 Í | |
| 0206 Í | |
| 0207 Ï | |
| 0208 Ó | |
| 0209 Ñ | |
| 0210 ò | |
| 0211 Ó | |
| 0212 Ê | |
| 0213 Õ | |
| 0214 Õ | |
| 0215 × | |
| 0216 ∅ | |
| 0217 Ú | |
| 0218 Ú | |
| 0219 Ù | |
| 0220 Ü | |
| 0221 Ý | |
| 0222 Þ | |
| 0223 ß | |
| 0224 à | |
| 0225 á | |
| 0226 á | |
| 0227 ã | |
| 0228 ä | |
| 0229 á | |
| 0230 æ |
| ASCII Code | Character |
| 0231 ç | |
| 0232 è | |
| 0233 é | |
| 0234 ê | |
| 0235 ë | |
| 0236 ì | |
| 0237 í | |
| 0238 î | |
| 0239 ï | |
| 0240 õ | |
| 0241 ñ | |
| 0242 ò | |
| 0243 ó | |
| 0244 ô | |
| 0245 õ | |
| 0246 Õ | |
| 0247 ÷ | |
| 0248 ø | |
| 0249 ù | |
| 0250 ú | |
| 0251 û | |
| 0252 ü | |
| 0253 ÿ | |
| 0254 ÿ | |
| 0255 ÿ |