L4350 - Label printer Kroy - Free user manual and instructions
Find the device manual for free L4350 Kroy in PDF.


User questions about L4350 Kroy
0 question about this device. Answer the ones you know or ask your own.
Ask a new question about this device
Download the instructions for your Label printer in PDF format for free! Find your manual L4350 - Kroy and take your electronic device back in hand. On this page are published all the documents necessary for the use of your device. L4350 by Kroy.
USER MANUAL L4350 Kroy
KROY – K4350 / K4350C Thermal Transfer Printer Series
USER'S MANUAL
CONTENTS
1. PRODUCT INTRODUCTION.... 1
1.1 Compliances.... 1
1.2 Warranty Information.... 1
1.2.1 Thermal Print Head 2
1.2.2 Warranty Service Procedures 2
1.2.3 General Warranty Provisions 2
1.2.4 Limitation of Liability 3
2. GETTING STARTED....4
2.1 Unpacking and Inspection 4
2.2 Equipment Checklist....4
2.3 Printer Parts....5
2.4 External Label Roll Mount 8
2.5 Buttons and Indicators....9
3. SET UP....10
3.1 Setting Up the Printer 10
3.2 Loading Label and Tag Stock....10
3.3 Self-Peeling Function 13
3.4 Ribbon Loading Instructions....15
3.5 Install External Label Roll Mount....18
3.6 Install Memory Module....19
3.7 Self Test 20
3.8 Dump Mode 21
4. USING K4350/4350C 22
4.1 Power-on Utilities....22
4.1.1 Self Test Utility 22
4.1.2 Gap Sensor Calibration Utility 22
4.1.3 Printer Initialization....23
4.2 Error Messages....24
4.3 Troubleshooting Guide 25
5. SPECIFICATIONS, OPTIONS, & SUPPLIES 26
5.1 Specifications 26
5.1.1 Printer 26
5.1.2 Indicators and Buttons.... 26
5.1.3 Communication Interface....26
5.1.4 Power Requirements 26
5.1.5 Environment 27
5.1.6 Printer Body....27
5.2 Options 27
5.3 Supplies....28
5.3.1 Label Stock....28
5.3.2 Ribbon....28
1. PRODUCT INTRODUCTION
Thank you very much for purchasing Kroy K4350/4350C printer. The attractive desktop printer delivers superior performance at an economical price. Both powerful and easy-to-use, K4350/4350C printer is your best choice among desktop direct thermal and thermal transfer label printers.
K4350/4350C printer offers both thermal transfer and direct thermal printing at selectable speeds of 1.5 and 2.0 inches per second. It can accept a wide range of media, including roll feed, die-cut, and fan-fold labels or tags for both thermal transfer and direct thermal printing. All of the most frequently used bar code formats are available. Fonts and bar codes can be printed in any one of four directions. K4350/4350C printer provides a choice of five different sizes of alphanumeric fonts. By using font multiplication, an even greater range of sizes is possible. Smooth fonts can be downloaded from provided user friendly label design software. In addition, K4350/4350C is capable of independently executing BASIC programming functions, including arithmetic, logical operation, loop, flow-control and file management, among others. This programming capability provides the greatest efficiency in label printing. The status of printer and error messages may either be printed out or viewed on a monitor by means of the RS-232 connection.
1.1 Compliances
CE, FCC, UL, CUL, TÜV-GS, CNS
1.2 Warranty Information
Kroy warrants to the customer that under normal use and service the printer (with the exception of the print head) purchased hereunder shall be free from defects in material and workmanship for a period of one year, from the date of shipment by Kroy.
Expendable items or parts such as labels, ribbons are not covered by this warranty. This warranty does not cover equipment or parts which has been misused, altered, neglected, carelessly handled, or used for purposes other than those for which the printer was manufactured. This warranty also does not cover loss, damages resulting from accident, or damages resulting from unauthorized service.
1.2.1 Thermal Print Head
The warranty of the thermal print head is limited to ninety days (90) from the date of shipment to buyer. The warranty does not cover thermal print head which have been misused, altered, neglected, handled carelessly, or damaged due to improper cleaning or unauthorized repairs.
1.2.2 Warranty Service Procedures
If defect should occur during the warranty period, the defective unit shall be returned, freight and insurance prepaid, in the original shipping container to your purchased reseller or distributor. Include a contact name, action desired, and a detailed description of the problem and examples when possible. We shall not be responsible for any loss or damages incurred during shipping. Any warranty repairs to be performed by your purchased reseller or distributor shall be subject to said company's confirmation that such product meets warranty guidelines. In the event of a defect covered by its warranty.
1.2.3 General Warranty Provisions
Kroy makes no warranty as to the design, capability, capacity, or suitability of any of its hardware, supplies or software. Software is licensed on an “as is” basis without warranty.
Except and to the extent expressly provided in this warranty and in lieu of all other warranties, expressed or implied, including, but not limited to any warranties of merchantability or fitness for a particular product.
Purchaser shall be solely responsible for the selection, use, efficiency and suitability of Kroy products.
1.2.4 Limitation of Liability
In no event shall Kroy be liable to purchaser for any indirect, special, or consequential damages or lost profits arising out of or relating to Kroy products, or if the performance or a breach thereof, even if Kroy has been advised of the possibility thereof. Kroy liability, if any, to the purchaser or to the customers of purchaser hereunder shall in no event exceed the total amounts paid to Kroy hereunder by the purchaser for a defective product.
In no event shall Kroy be liable to purchaser for any damages resulting from or related to any failure or delay of Kroy in the delivery or installation of the computer hardware, supplies, or software in the performance of any services.
The remedies set forth here are the sole and exclusive remedies available to any person for any damages of any kind and nature including incidental, consequential, or special, whether arising from warranty (including implied warranties), contract, negligence, tort or otherwise. In the event that any implied warranties (including but not limited to the implied warranties of merchantability and fitness for a particular purpose) are found to exist, such warranties are limited in duration to the period of the warranties.
2. GETTING STARTED
2.1 Unpacking and Inspection
The printer has been specially packaged to withstand damage in the shipping process. However, for fear that unexpected damage might occur, upon receiving the printer, carefully inspect the package and the device. In case of evident damage, contact the carrier directly to specify the nature and extent of the damage. Please retain the packaging materials in case you need to reship the printer.
2.2 Equipment Checklist
● K4350/4350C printer unit
- Ribbon paper core
- Ribbon supply/rewind spindle (2 pcs.)
- Label supply roll spindle
● External label roll mount
- Power supply
- Power cord
- Centronics interface cable
- Compact disk with label design software and driver
Separately purchased items may also be included. These additional items may include:
- Additional labels
- Additional ribbons
● Memory module
● Cutter (available as standard with the K4350C) - Portable LCD keyboard
If any parts are missing, please contact the Customer Service Department of your purchased reseller or distributor.
2.3 Printer Parts
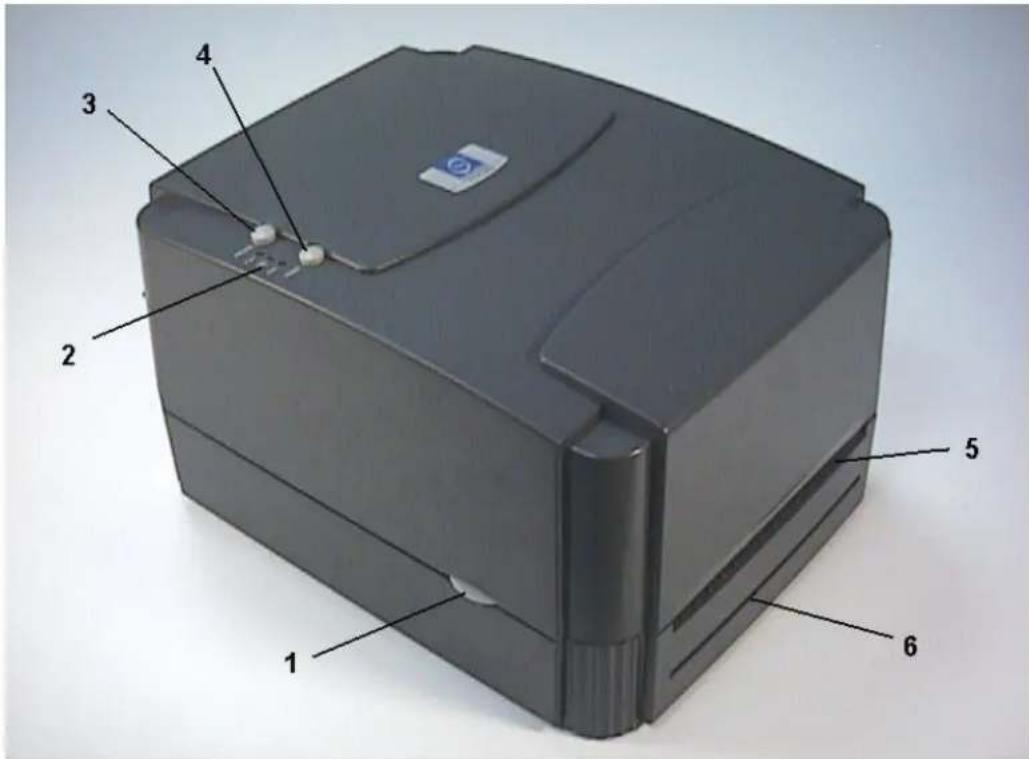
text_image
Labeled diagram of a black rectangular electronic device with numbered parts from 1 to 6Figure 1. Top front view
- Cover Release Button
- PWR., ON-LINE and ERR. Indicators
- PAUSE Button
- FEED Button
- Label Dispense Opening
- Backing Paper Opening (for use with self-peeling function)
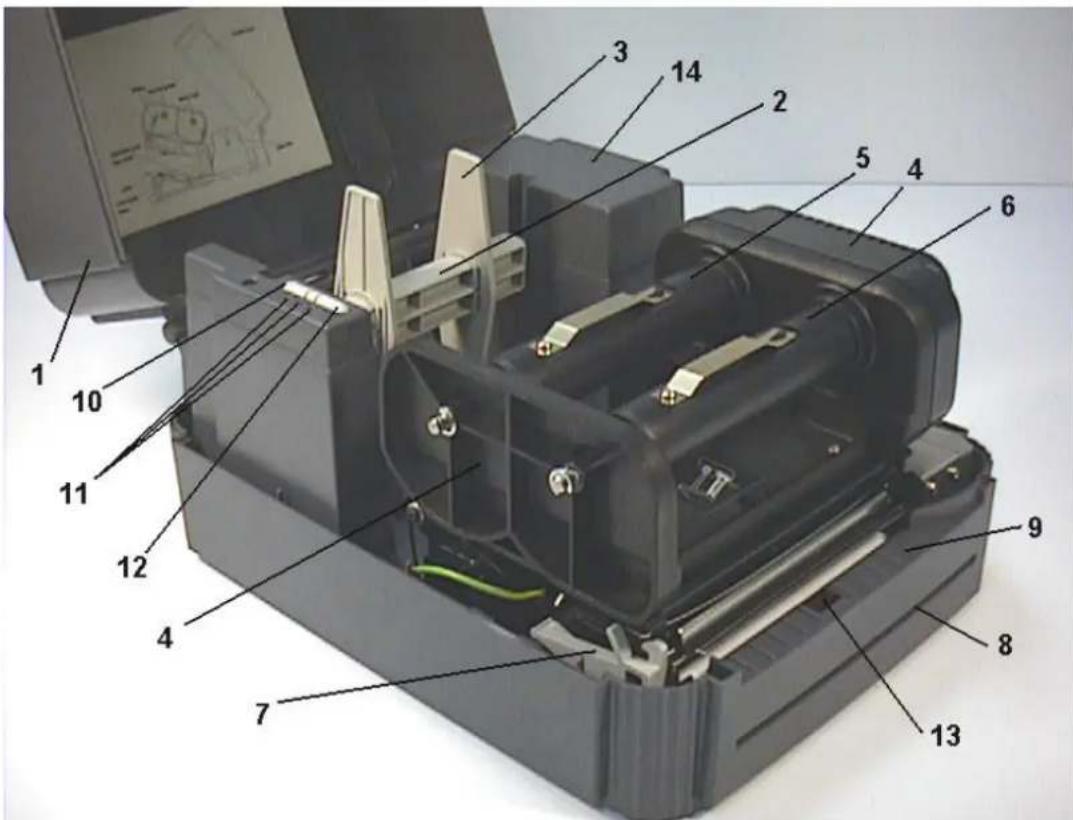
text_image
Labeled diagram of a mechanical device with numbered components for identificationFigure 2. Interior view
- Printer Cover (in open position)
2.Label Supply Roll Spindle - Fixing Tabs
- Ribbon Mechanism
- Ribbon Supply Spindle
- Ribbon Rewind Spindle
- Printer Carriage Release Lever
- Backing Paper Opening
- Detachable Front Panel
- PAUSE Button
- PWR., ON-LINE, ERR. Indicators
- FEED Button
- Peel-Off Sensor
- Memory Module Slot (with cover on)
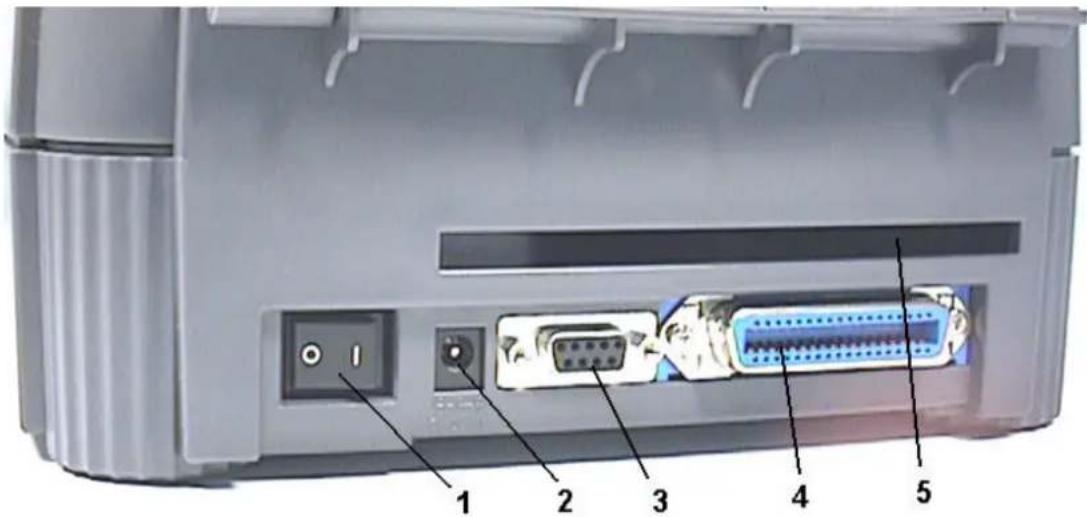
text_image
Diagram of an electronic device rear panel with labeled ports and connectorsFigure 3. Rear view
- Power On/Off Switch
- Power Supply Connector
- RS-232 DB-9 Interface Connector
- Centronics Interface Connector
- Label Insert Opening (for use with external labels)
2.4 External Label Roll Mount
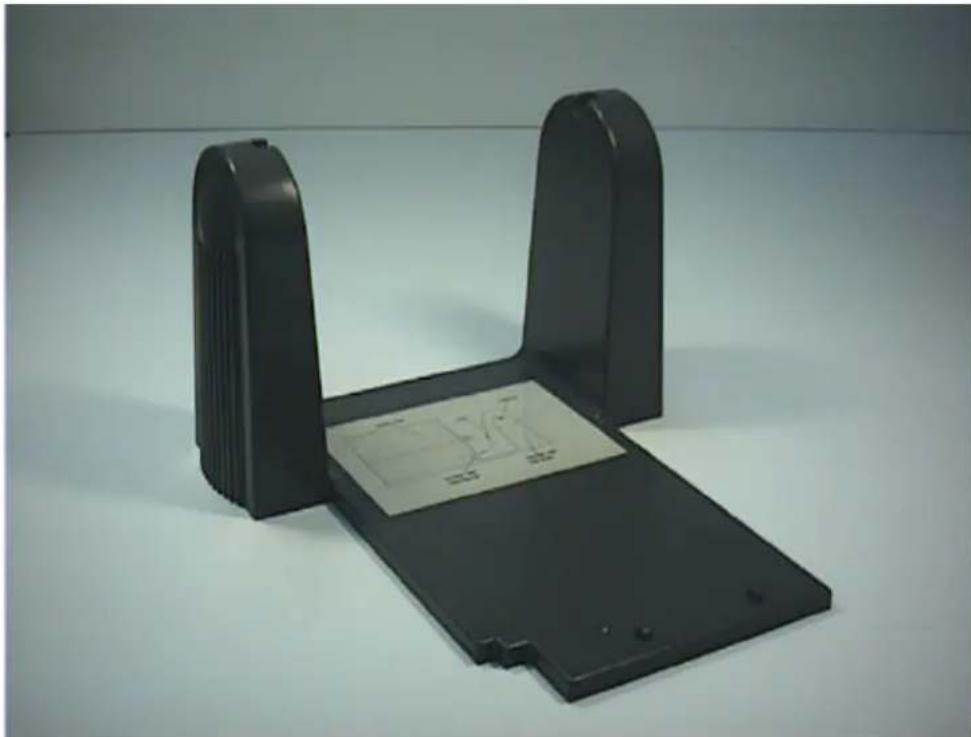
natural_image
Black plastic electronic device with a printed circuit board on its side (no visible text or symbols)Figure 4. External label roll mount
2.5 Buttons and Indicators
PWR. (POWER) Indicator
The green PWR. indicator illuminates when the POWER switch is turned on.
ON-LINE Indicator
The green ON-LINE indicator illuminates when the printer is ready to print. When PAUSE button is pressed, the ON-LINE indicator flashes.
ERR. Indicator (Error/Paper Empty)
The red ERR. indicator illuminates in the event of a printer error, such as memory error, syntax error, and so forth. For a full list of error messages, please refer to section 4.2, Error Messages.
PAUSE Button
The PAUSE button allows the user to stop a print job and then continue the printing with a second depression of the button. By pressing the PAUSE button: (1) the printer stops printing after the printing label, (2) the PAUSE LED flashes, and (3) the printer will hold all data in memory. This allows for trouble-free replacement of label stock and thermal transfer ribbon. A second depression of the PAUSE button will restart the printer.
Note: If the PAUSE button is held down for more than 3 seconds, the printer will be reset and all data of the previous printing job will be lost.
FEED Button
Press the FEED button to feed the label to the beginning of the next label.
3. SET UP
3.1 Setting Up the Printer
- Place the printer on a flat, secure surface.
- Make sure the POWER switch is off.
- Connect the printer to the computer mainframe with the provided RS-232C or Centronics cable.
- Plug the power cord into the power supply connector at the rear of the printer, and then plug the power cord into a properly grounded receptable.
3.2 Loading Label and Tag Stock
- Open the printer cover
- Disengage the printer carriage by pulling the printer carriage release lever on the left side of the platen.
- Slide the label supply roll spindle through the core of a label roll and attach the fixing tabs onto the spindle.
- Place the label roll into the label roll mount. Feed the label under the carriage and over the platen.
- Adjust the label guide to fit the width of the media.
- Engage the printer carriage.
- Wind the label roll until it becomes adequately taut.
- Close the printer cover and press the FEED button three or four times until the green ON-LINE indicator illuminates.
- When the printer is out of ribbon or media, the ON-LINE LED will not illuminate and the ERR. LED will flash. Reload the ribbon or media without turning off the printer power. Press the FEED button three or four times until the ON-LINE LED illuminates. The printing job will be resumed without data loss.
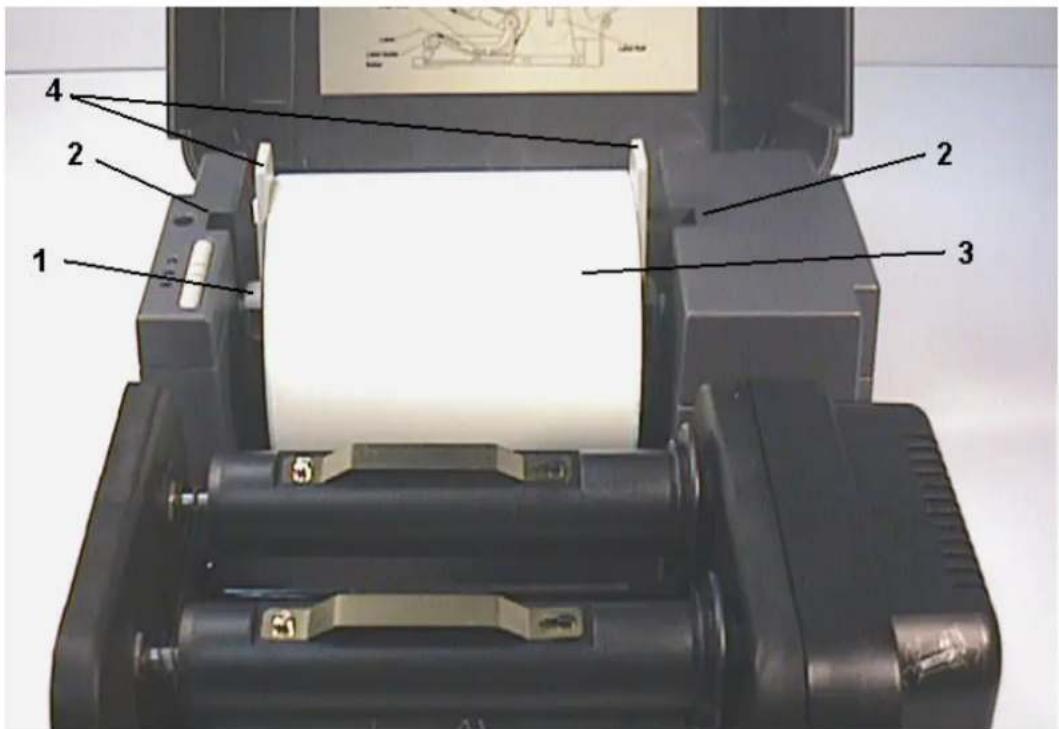
text_image
Labeled diagram of a printer or scanner showing parts numbered 1 to 4, including a paper roll and mechanical components.Figure 5. Inserting label supply roll into label roll mount
- Label Supply Roll Spindle
- Label Roll Mount
- Label Roll
- Fixing Tabs
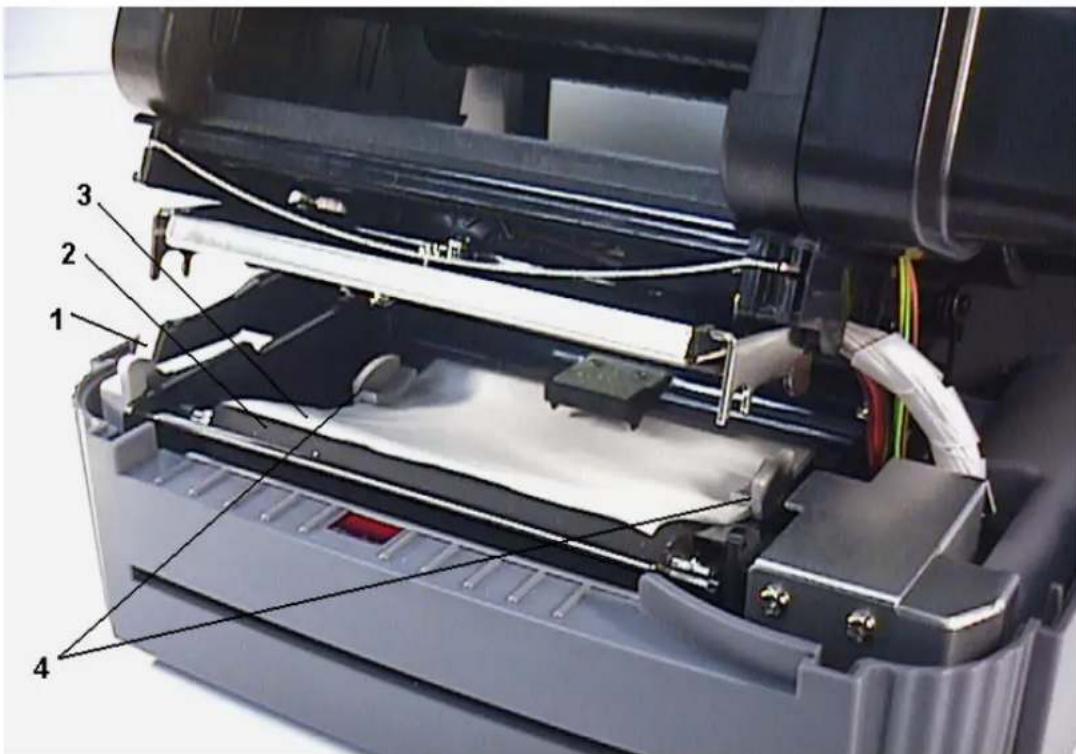
text_image
Labeled diagram of a printer internal structure showing numbered components for assembly or maintenance reference.Figure 6. Feed labels through adjustable label guide
- Printer Carriage Release Lever
- Platen
- Label Media
- Adjustable Label Guide
3.3 Self-Peeling Function
To employ the self-peeling function, load the label stock according to the following steps.
- Remove the front panel.
- Tear off the foremost one or two labels of the label stock, as befits the case. Feed the backing paper between the platen and the white "self-peeling" roller, as shown in Figure 7.
- Feed the backing paper through the backing paper opening in the front panel, as shown in Figure 8.
4 Put back the front panel.
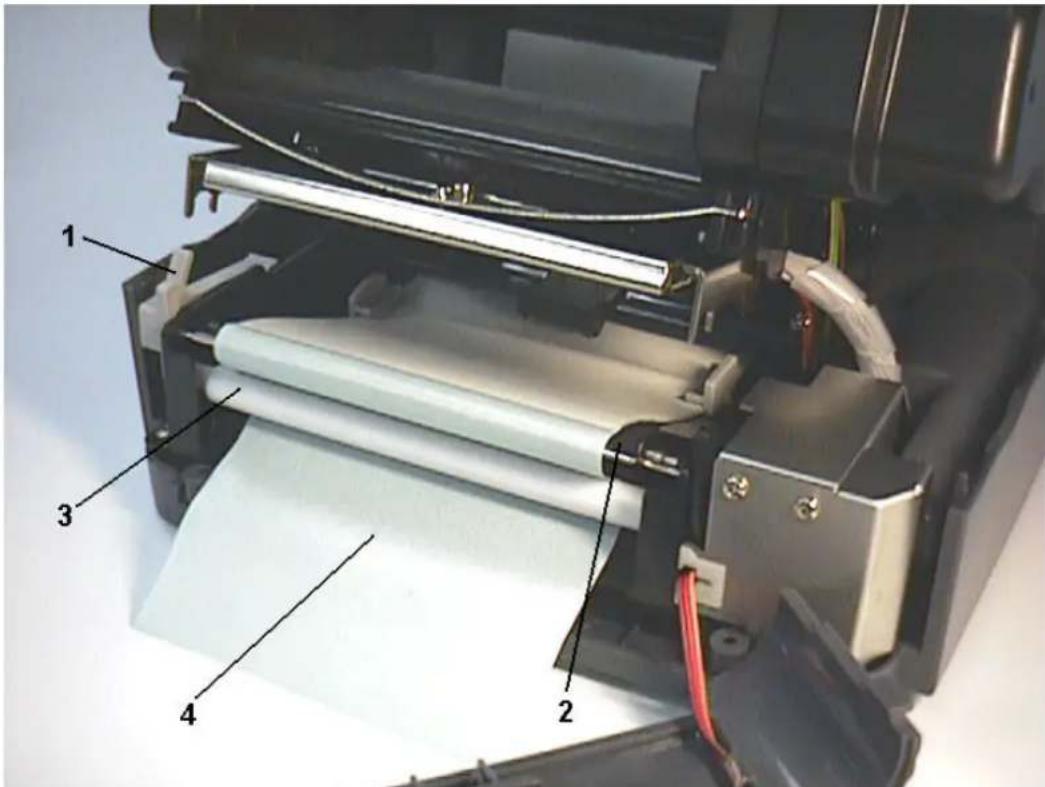
text_image
Labeled diagram of a printer's internal structure showing paper roll, paper sheet, and printer componentsFigure 7. Setting up printer for self-peeling function
- Printer Carriage Release Lever
- Platen
- Self-Peeling Roller
- Backing Paper
Note: It is recommended that the print speed be set at 2 inches (1.5 inches for K4350/4350C) per second when using the self peeling function of the printer.
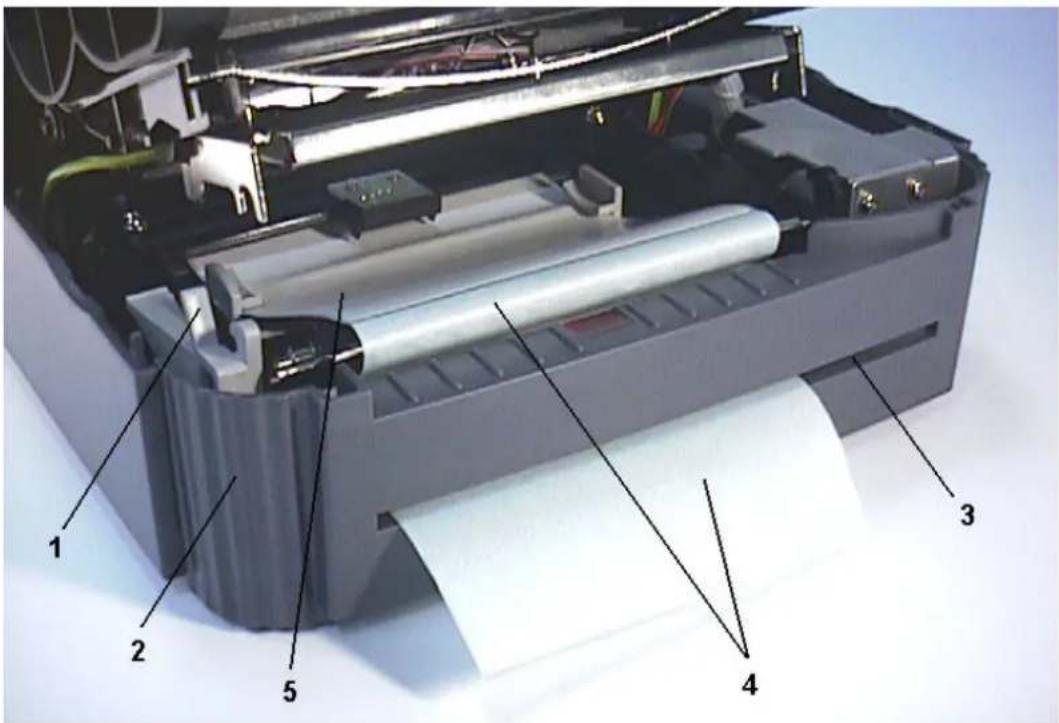
text_image
Labeled diagram of a printer internal structure showing paper rolls, rollers, and components numbered 1 to 5.Figure 8. Printer ready for self-peeling function
- Printer Carriage Release Lever
- Printer Front Panel
- Backing Paper Opening
- Backing Paper
- Label
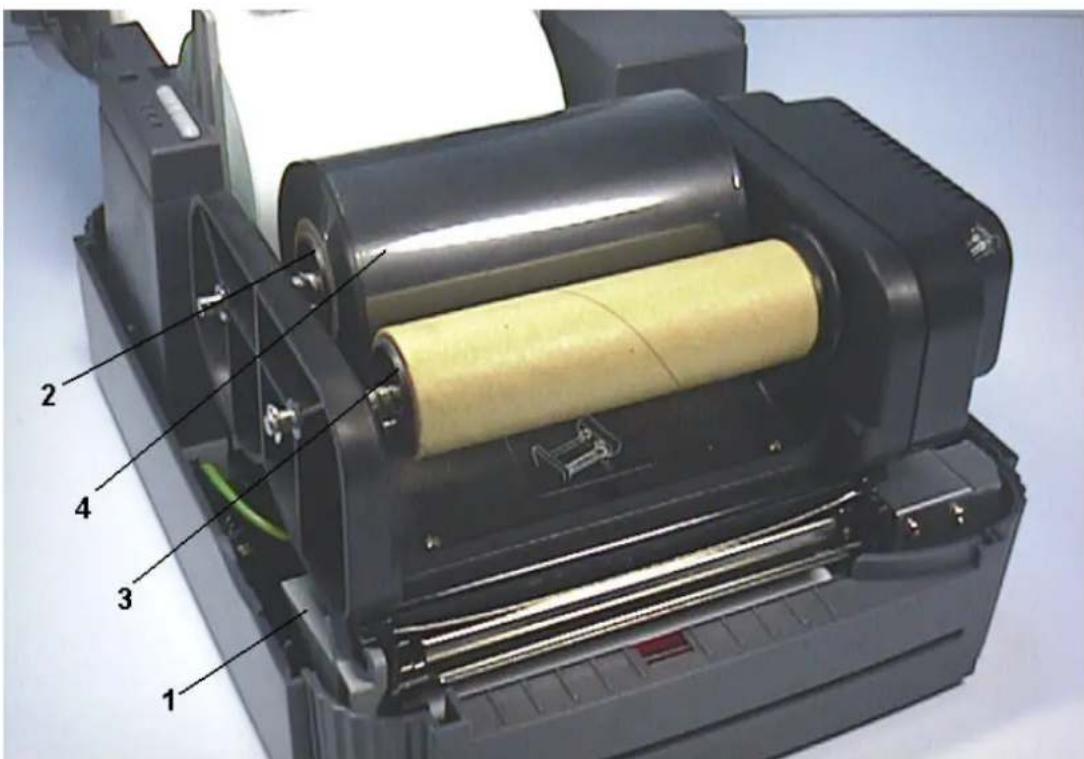
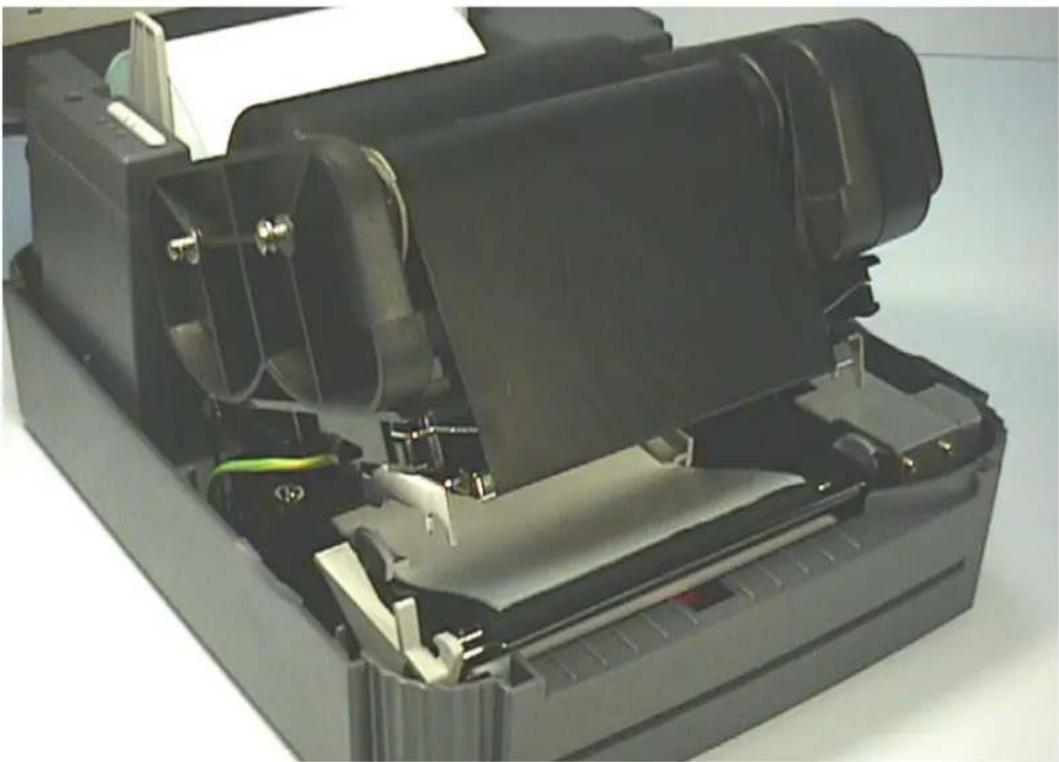
3.4 Ribbon Loading Instructions
- Place an empty paper core on the ribbon rewind spindle.
- Install the ribbon on the ribbon supply spindle.
- Disengage the printer carriage.
- Pull the ribbon leader to the front from beneath the printer carriage. Attach the ribbon leader to the ribbon rewind paper core.
- Rotate the ribbon rewind roller until the ribbon leader is thoroughly, firmly encompassed by the black section of the ribbon.
- Engage the printer carriage.
- Close the printer cover and press the FEED button until the green ON-LINE LED illuminates.
text_image
Labeled diagram of a printer internal structure showing numbered componentsFigure 9. Placement of ribbon supply roll
- Printer Carriage Release Lever
- Ribbon Supply Spindle
- Ribbon Rewind Spindle
- Thermal Transfer Ribbon
natural_image
Interior view of a black plastic printer case with visible internal components and no text or symbolsFigure 10. Installation of label stock and thermal transfer ribbon
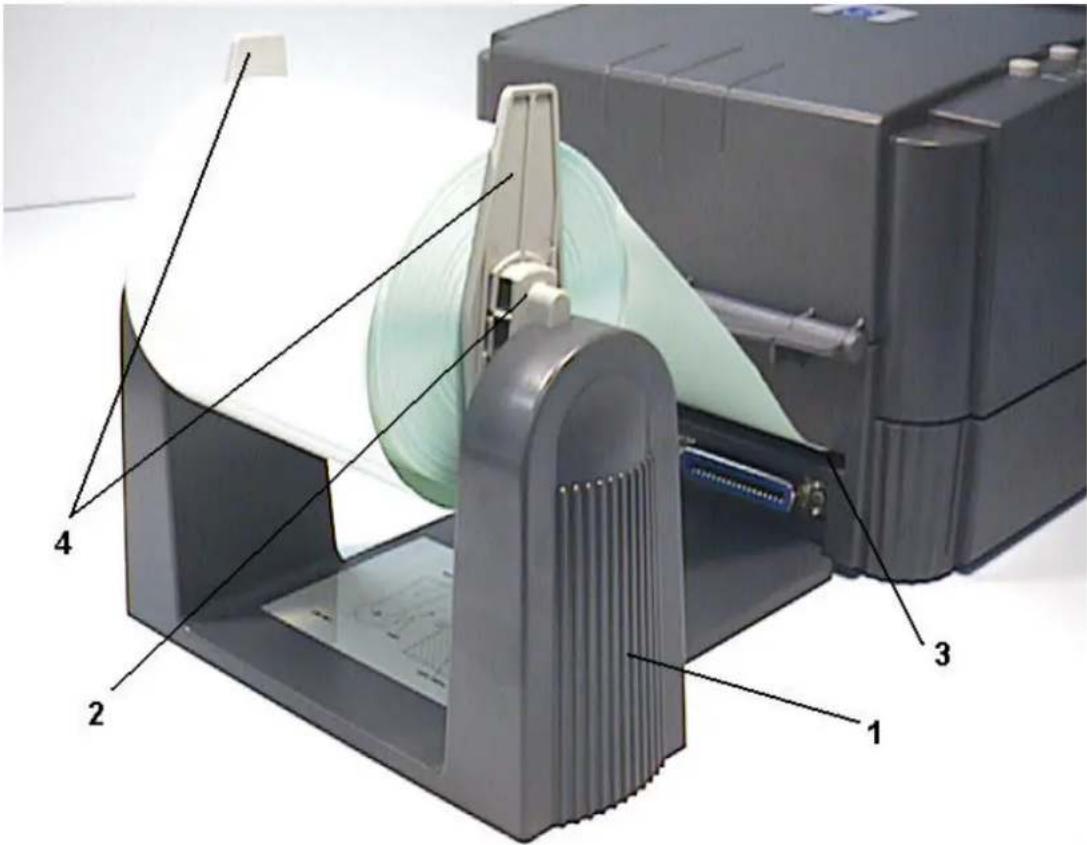
3.5 Install External Label Roll Mount
text_image
Technical diagram of a printer with labeled parts including paper spool, printer, and paper holderFigure 11. Installation of external label roll mount
- External Label Roll Mount
- Label Supply Roll Spindle
- External Label Feed Opening
- Fixing Tabs
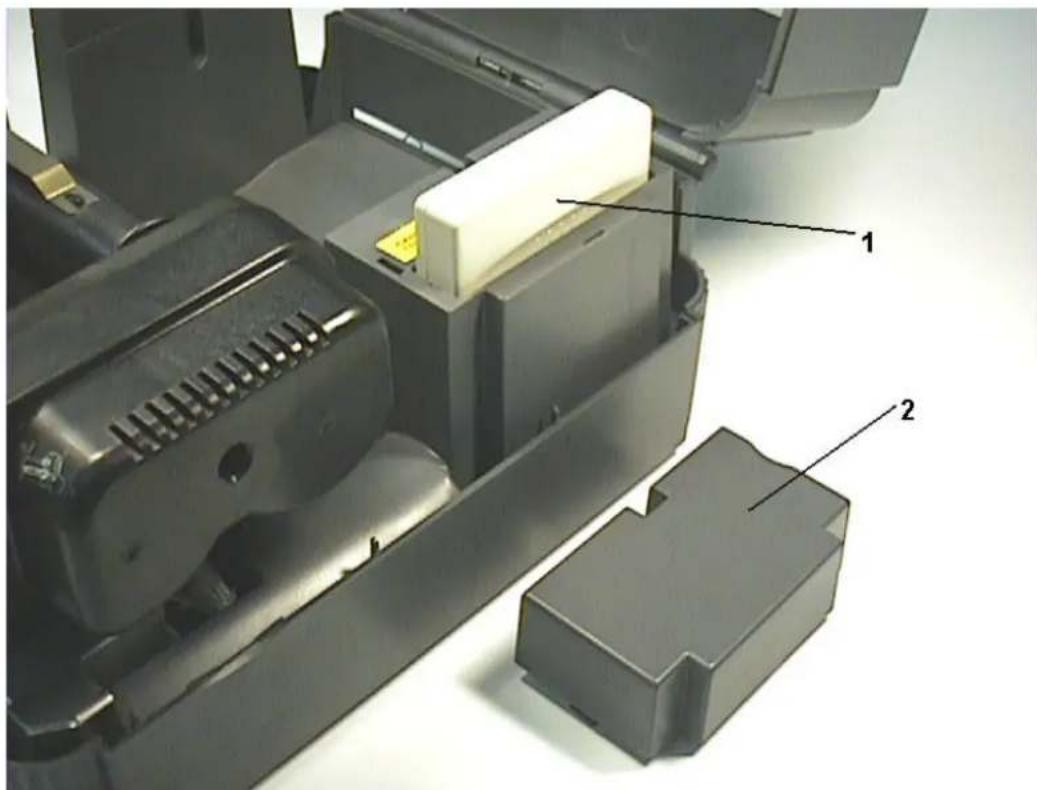
3.6 Install Memory Module
- Power off the printer.
- Remove the cover.
- Insert the memory module.
- Put the cover back.
- Turn on the power
natural_image
3D mechanical assembly diagram showing internal components with numbered labels (1 and 2), no readable text or symbols beyond labels.Figure 12. Installation of memory module (Option)
- Memory Module.
- Cover.
3.7 Self Test
To initiate the self test mode, depress the FEED button while turning on the printer power. The printer will calibrate the label length. If the label gap is not detected within 7", the printer stops feeding labels and the media is treated as continuous paper. In self test, a check pattern is used to check the performance of the thermal print head. Following the check pattern, the printer prints internal settings as listed below:
- Printer model and firmware version
- Mileage
- Flash times
- Check sum
- Serial port setting
- Code page setting
- Country code setting
- Print speed setting
- Print density setting
- Label size setting
- Gap (Bline) width and offset setting
- Backing paper transparence
- File list
- Memory information (Total, Available)
When the self test is completed, the printer enters the dump mode. Please turn the printer's power off and then on to resume normal printing.

text_image
PRINTER INFO.K4350 VER 1.00
MILAGE(Km):0.26
FLASH TIMES:2
CHECK SUM:2CFB
SERIAL PORT:96,N,8,1
CODE PAGE:437
COUNTRY CODE:001
SPEED:2 INCH
DENSITY:08
SIZE:3.80,4.01
GAP(BLINE):0.13,0.00
TRANSPARENCE:04,04,04
****************************************************************************************
FILE LIST
TOTAL FLASH: 704 K BYTES
AVAIL FLASH: 704 K BYTES
TOTAL RAM: 1984K BYTES
AVAIL RAM: 1855K BYTES
END OF FILE LIST
****************************************************************************************
NOW IN DUMP MODE
3.8 Dump Mode
After the self test, the printer enters the dump mode. In this mode, any characters sent from the host computer will be printed in two columns, as shown. The characters received will be shown in the first column, and their corresponding hexadecimal values, in the second. This is often helpful to users for the verification of programming commands or debugging of printer programs. Reset the printer by turning the POWER switch off and on.
| ********** | ||||||||||||
| NOW IN DUMP MODE | ||||||||||||
| DOWNLOAD "DE | 44 | 4F | 57 | 4E | 4C | 4F | 41 | 44 | 20 | 22 | 44 | 45 |
| MO2.BAS" SI | 4D | 4F | 32 | 2E | 42 | 41 | 53 | 22 | 0D | 0A | 53 | 49 |
| ZE 4.00,5.00 | 5A | 45 | 20 | 34 | 2E | 30 | 30 | 2C | 35 | 2E | 30 | 30 |
| CLS SPEED | 0D | 0A | 43 | 4C | 53 | 0D | 0A | 53 | 50 | 45 | 45 | 44 |
| 1.5 DENSIT | 20 | 31 | 2E | 35 | 0D | 0A | 44 | 45 | 4E | 53 | 49 | 54 |
| Y 10 DIRECT | 59 | 20 | 31 | 30 | 0D | 0A | 44 | 49 | 52 | 45 | 43 | 54 |
| ION 0 SET C | 49 | 4F | 4E | 20 | 30 | 0D | 0A | 53 | 45 | 54 | 20 | 43 |
| UTTER OFF S | 55 | 54 | 54 | 45 | 52 | 20 | 4F | 46 | 46 | 0D | 0A | 53 |
| ET DEBUG LAB | 45 | 54 | 20 | 44 | 45 | 42 | 55 | 47 | 20 | 4C | 41 | 42 |
| EL REFERENC | 45 | 4C | 0D | 0A | 52 | 45 | 46 | 45 | 52 | 45 | 4E | 43 |
| E 0,0 A=100 | 45 | 20 | 30 | 2C | 30 | 0D | 0A | 41 | 3D | 31 | 30 | 30 |
| 0 Y=100 FO | 30 | 0D | 0A | 59 | 3D | 31 | 30 | 30 | 0D | 0A | 46 | 4F |
| R I=1 TO 3 | 52 | 20 | 49 | 3D | 31 | 20 | 54 | 4F | 20 | 33 | 0D | 0A |
| BARCODE 100, | 42 | 41 | 52 | 43 | 4F | 44 | 45 | 20 | 31 | 30 | 30 | 2C |
| Y,"39",96,1, | 59 | 2C | 22 | 33 | 39 | 22 | 2C | 39 | 36 | 2C | 31 | 2C |
| 0,2,4,STR$(A) | 30 | 2C | 32 | 2C | 34 | 2C | 53 | 54 | 52 | 24 | 28 | 41 |
| ) A=A+1 Y= | 29 | 0D | 0A | 41 | 3D | 41 | 2B | 31 | 0D | 0A | 59 | 3D |
| Y+150 NEXT | 59 | 2B | 31 | 35 | 30 | 0D | 0A | 4E | 45 | 58 | 54 | 0D |
| PRINT 1 EO | 0A | 50 | 52 | 49 | 4E | 54 | 20 | 31 | 0D | 0A | 45 | 4F |
| P DEMO2 | 50 | 0D | 0A | 44 | 45 | 4D | 4F | 32 | 0D | 0A | ||
4. USING K4350/4350C
4.1 Power-on Utilities
There are three power-on utilities to set up and test K4350/4350C hardware. These utilities are activated by pressing the FEED or PAUSE button and turning on the printer power simultaneously. The utilities are listed as below:
- Self-test
- Gap sensor calibration
- Printer initialization
4.1.1 Self Test Utility
Install the label first. Press the FEED button and then turn on the printer power. Do not release the FEED button until the printer feeds labels. The printer performs the following items:
- Calibrate label pitch
- Print out thermal print head check pattern
- Print the internal settings
- Enter dump mode
Regarding the self-test and dump mode, please refer to section 3.7 "Self Test" and section 3.8 "Dump Mode" for more information.
4.1.2 Gap Sensor Calibration Utility
This utility is used to calibrate the sensitivity of gap sensor. Users may have to calibrate the gap sensor for two reasons:
- The media is being changed to a new type.
- Initialize the printer.
Note: The ERR. LED may flash if gap sensor is not calibrated properly.
Please follow the steps below to calibrate gap sensor:
- Turn off the printer power and install blank labels (without any logo or character) on printer.
- Hold down the PAUSE button then turn on printer power.
- Release PAUSE button when the printer feeds labels. Do not turn off printer power until the printer stops and two green LEDs light on.
4.1.3 Printer Initialization
Printer initialization clears all downloaded files resident in flash memory, and sets printer parameters to default values.
| Parameter Default | Value Cleared by Initialization | |
| MILEAGE N/A No | ||
| FLASH TIMES N/A No | ||
| CHECK SUM N/A No | ||
| SERIAL PORT 96,N,8,1 Yes | ||
| CODE PAGE 437 (8 bit), USA (7 bit) Yes | ||
| COUNTRY CODE 001 Yes | ||
| SPEED | 2.0"/sec | Yes |
| DENSITY | 09 | Yes |
| SIZE | N/A Yes | |
| GAP(BLINE) | N/A Yes | |
| TRANSPARANCY | 05,05,05 | Yes |
Please follow the steps below to initialize the printer:
- Turn off the printer power.
- Hold down the PAUSE and FEED buttons and turn on the printer power.
- Do not release the buttons until the three LEDs flash in turn.
Note: Printing method (thermal transfer or thermal direct printing) will be set automatically at the activation of printer power.
4.2 Error Messages
Syntax Error
The command format is incorrect.
The serial port setting is incorrect.
Out of Range
Numeric input is too large to be processed.
The input string is too long to be stored.
The size of the text or bar code exceeds that of the label.
Download Error
The download file format is incorrect.
There is not enough memory to store the file.
Stack Overflow
A mathematical expression is too complicated. Divide it into several expressions.
The nested routine is too deep.
Memory Error
Too many variables defined.
RS-232 Error
The serial port setting is incorrect.
File not Found
Cannot open the file specified. Download the file again.
Type Mismatch
Variable type mismatch.
Gap not Found
Cannot detect label gap. Calibrate the label again.
Clock Access Error
Can not read from / write to the real time clock.
4.3 Troubleshooting Guide
The following guide lists some of the most common problems that may be encountered when operating the K4350/4350C printer. If the printer still does not function after all suggested solutions have been invoked, please contact the Customer Service Department of your purchased reseller or distributor for assistance
Problem Solution
Ribbon does not advance or rewind Check the setting of print method.
(SET RIBBON ON)
Poor print quality Clean the thermal print head.
Adjust the print density setting.
Ribbon and media are not compatible.
Power indicator does not illuminate Check the power cord, see whether it is properly connected.
ON-LINE indicator is off
Out of paper or out of ribbon
Calibrate the sensitivity of gap sensor.
ERR. indicator is on
Command syntax is not correct.
Rewind ribbon paper core is not installed.
Serial port baud rate setting is not correct.
Continuous feeding when printing labels
Calibrate the gap sensor.
5. SPECIFICATIONS, OPTIONS, & SUPPLIES
5.1 Specifications
5.1.1 Printer
● Type: Direct thermal or thermal transfer
● Print speed: Selectable speeds of 1.5 or 2.0 inches per second
● Resolution: 300 DPI, or 12 dots per mm
- Font styles: Five alphanumeric fonts from 0.059"H (1.5 mm) to 0.23" (6.0 mm), expandable vertically and horizontally up to 8x.
- Bar codes: Code 39, Code 93, Code 128 UCC, Code 128 (Subsets A, B and C), Codabar, Interleaved 2 of 5, EAN-8, EAN-13, UPC-A, UPC-E, EAN and UPC with 2 or 5 digit add-on, Postnet
● 2D bar codes: Maxicode, PDF-417, DataMatrix
● Graphics: Mono PCX format
5.1.2 Indicators and Buttons
- Indicators: PWR., ON-LINE, ERR.
- Buttons: POWER, PAUSE, FEED,
Note: The functions of buttons and LEDs can be redefined by commands.
5.1.3 Communication Interface
● Communications: RS-232C(DB-9) at 2400, 4800, 9600 or 19200 baud and standard Centronics interface.
● Character set: ANSI ASCII character set
- Word length: 7 or 8 data bits, 1 or 2 stop bits, even, odd or none parity.
● Handshaking: Xon/Xoff (on receive mode only) and DSR/DTR
- Input buffer: 60KB
5.1.4 Power Requirements
● Input voltage: Switching power, 110-240 VAC, 50-60 Hz
● Output voltage: 24 VDC
● Circuit protection: 2A maximum
5.1.5 Environment
- Operating temperature: 40°F to 104°F (5°C to 40°C)
● Storage temperature: 40^ F to 140^ F( 5^ C to 60^ C)
● Humidity: 10% to 95% non-condensing
● Ventilation: Free air movement
5.1.6 Printer Body
- Dimensions:
6.14"H x 9.13"W x 11.34"D (15.6 cm H x 23.2 cm W x 28.8 cm D); with external roll mount 17.95" D (45.6 cm D) - Weight:
K4350/4350C: 6.0 lbs. (2.7 kg), or 6.5 lbs. (2.9 kg) with external roll mount K4350/4350C: 5.2 lbs. (2.4 kg), or 5.8 lbs. (2.6 kg) with external roll mount
5.2 Options
A number of different options may be added to the K4350/4350C printer for even greater convenience and versatility. The available options include:
● Foreign character fonts, including Chinese, Japanese and others
- Expandable FLASH memory module
- Cutter
- Portable LCD keyboard
5.3 Supplies
5.3.1 Label Stock
K4350/4350C is capable of both direct thermal and thermal transfer printing. Many different direct thermal or thermal transfer stocks can be used. Refer to the following list for specifications of compatible label media.
| Specification\Media | Label Tag | |
| Paper Width | Min. 0.22" (5.6 mm) | |
| Max. 3.97" (100.8 mm) | ||
| Paper Weight Less | than 240 g/m | 2 |
| Length (Pitch) | 0.4" (10 mm) ~ 40" (1016 mm) | |
| Thickness | 0.002" (0.05 mm) ~ 0.008" (0.20 mm) | |
| Max. Roll Diameter.(1" core) | Inner roll diameter. Max. 4.3" (110 mm)External roll diameter. Max. 8.4" (214 mm) | |
| Roll Up Method Print surface is wound outside as standard | ||
| Paper Core ID. | 25.7 ± 0.3 mm | |
5.3.2 Ribbon
Standard 300m by 60 or 110mm thermal transfer ribbons with wax, wax-resin, or resin coating (wound outside) are available from Kroy. Of ribbon selection, it is recommended that the ribbon be at least as wide as the print media. Also, the ribbon end should be transparent.
KROY
TEL: (UK) +44-118-986-5200
(USA) +1-216-426-5600
Web site: www.kroy.com
P/N: 39-0000086-00
REV.: A