
PAC 10 - Air-conditioner Equator - Free user manual and instructions
Find the device manual for free PAC 10 Equator in PDF.


| Brand | Equator |
| Model | PAC 10 |
| Product Type | Portable Air Conditioner |
| Functions | Cooling, Dehumidifying, Heating, Ventilation (Fan) |
| Cooling Capacity | Not specified (typical for 10,000 BTU class) |
| Power Supply | 110-115V / 60Hz |
| Power Cord | 3-prong plug, accessible after installation |
| Refrigerant | Not specified (likely R-32 or R-410A, but not mentioned) |
| Exhaust Duct Length | 23.6" - 70.8" (stretchable) |
| Window Kit | Adjustable slider kit: 26-5/8" to 48-3/8" |
| Temperature Setting Range | 63°F - 88°F (17°C - 31°C) |
| Fan Speeds | High, Middle, Low |
| Timer Range | 1 - 12 hours (On/Off) |
| Remote Control | Yes, with clock and timer setting |
| Water Drainage | Auto pump function; continuous drain option with connector |
| Water Full Indicator | Yes, with alarm and error code E5 |
| Self-Diagnosis | Error codes: E2, E3, E4, E5, E8 |
| Air Filter Cleaning | Every 2 weeks; wash with warm water and neutral detergent |
| Installation Clearance | At least 20" from walls or obstacles |
| Operating Temperature (Cooling) | 63°F - 95°F (17°C - 35°C) |
| Noise Level | Not specified (described as "especially low") |
| Warranty | 1 year (personal), 90 days (commercial), limited parts only if >50 mi from urban area |
| Certification | ETL Listed (equivalent to UL and CSA) |
Frequently Asked Questions - PAC 10 Equator
User questions about PAC 10 Equator
0 question about this device. Answer the ones you know or ask your own.
Ask a new question about this device
Download the instructions for your Air-conditioner in PDF format for free! Find your manual PAC 10 - Equator and take your electronic device back in hand. On this page are published all the documents necessary for the use of your device. PAC 10 by Equator.
USER MANUAL PAC 10 Equator
natural_image
Line drawing of a portable air conditioner unit with ventilation slots and control panel (no text or symbols)Color: White
TABLE OF CONTENTS
Warranty....2-3
Introduction ....4
Important Safety Instructions ....5
Portable Air Conditioner Views 6
Installation 7-10
Control Panel....11
Using the Control Panel....12
Using the Remote Control....13
Water Drainage 14
Maintenance & Service 15-16
Safety 17
Troubleshooting 18
Company Information 19
Please read the Owner's Manual carefully before using your new Equator Portable Air Conditioner
WARRANTY INFORMATION
Your Equator® appliance is protected by this warranty under normal, personal, family or household use (1 Year), and limited commercial use (90 days) in the USA and Canada.
WARRANTY
Equator Corporation undertakes to the consumer-owner to repair or, at Equator Corporation's option, to replace any part of this product which proves to be defective in workmanship or material under normal personal, family or household use, in the USA and Canada, for a period of one year from the date of original purchase. For commercial use, the product is warranted for a period of 90 days. During this period, Equator Corporation will provide all labor and parts necessary to correct such defect, free of charge, if the appliance has been installed and operated in accordance with Equator Corporation's written instructions with the appliance. Ready access to the appliance, for service, is the responsibility of the consumer-owner.
Geographic Exception: If the product is installed at a location more than 50 miles from an urban area (minimum population 25,000), Equator Corporation may, at its option, offer a 2-year parts only Warranty, if a service agent cannot be found. Responsibility for labor, in such instances will be that of the consumer-owner. Equator Corporation will, however provide free technical assistance for repairs.
EXCLUSIONS
In no event shall Equator Corporation be liable for incidental or consequential damages or for damages resulting from external causes such as abuse, misuse, incorrect voltage or acts God. This warranty does not cover service calls which do not involve defective workmanship or materials covered by this warranty. Accordingly, diagnosis and repair costs for a service call which does not involve defective workmanship or materials will be the responsibility of the consumer-owner.
Specifically, the following work is not covered under warranty and does not constitute warranty work:
- Installation – e.g. improper hook-up
- Maintenance – e.g. cleaning of filters
- Damage – e.g. replacing cosmetically damaged parts
Most work is covered. The defining factor is, has the machine malfunctioned (Equator is responsible) or has the customer omitted or done something to cause machine to malfunction (customer is responsible). Some States do not allow the exclusion or limitation of incidental or consequential damages, so the above limitation or exclusion may not apply to you.
This warranty is given by:
Equator Corporation,
Equator Plaza,
2801 W. Sam Houston Parkway N.
Houston, TX 77043-1611
Service under this warranty must be obtained by the following steps, in order:
Call an Equator Corporation Authorized Service Agent (obtain number of nearest agent from your dealer or on the web at www.equatoronline.com). Under normal circumstances, Service will be provided during regular business hours (9:00 a.m. to 5:00 p.m. weekdays).
GENERAL
Since it is responsibility of the consumer-owner to establish the warranty period by verifying the original purchase date, Equator Corporation recommends that a receipt, delivery slip or some other appropriate payment record be kept for that purpose. Remember to send in your Warranty Registration Card so that a proof of your purchase exists with Equator. You can also register online at www.equatoronline.com. This warranty gives you specific legal rights, and you may also have other rights which vary from State to State.
Corporate Office
EQUATOR CORPORATION
Equator Plaza
2801 W. Sam Houston Parkway N.
Houston, Texas 77043-1611
Tel: 713-464-3422
Fax: 713-464-2151
Toll Free: 800-935-1955

European Testing Laboratories
US
CANADA
The ETL Listed Mark is the legal equivalent to the UL and CSA Listed Marks
EQUATOR CONTACTS
Service:
service@equatorappliances.com
Parts & Accessories: parts@equatorappliances.com
Technical Support: tech@equatorappliances.com
INTRODUCTION
Congratulations on your new Equator Portable Air Conditioner. This is a highly sophisticated engineered product that will give you many years of satisfaction. Portable Air conditioners are appliances of high value. In order to ensure your lawful rights and interests, please have the professional technicians to do the installation for you. This Instruction Manual is the universal-purpose version for the models of Portable Air Conditioners manufactured by Equator Corporation. The appearance of the units that you purchase might be slightly different from the ones described in the Manual, but it does not affect your proper operations and usage.
Before you use your PORTABLE AIR CONDITIONER, please read this instruction manual carefully so that you get the best performance from the unit.
This instruction manual is used for guidance and does not form part of a contract. We reserve the right to make technical changes without prior notice.
Here are some of the best reasons for buying your Equator Portable Air Conditioner
- This Portable Air Conditioner can adjust the temperature and humidity in a room.
- Its flexibility makes it easy to use in different rooms.
- It also has multiple functions, including cooling, dehumidifying and ventilation.
- This unit was designed to be used in residences and offices.
- It has a compact design compared to others with the same cooling capacity.
- Power consumption is low and the noise especially low.
- Features of heating operation: The air is heated by the electrical heater before being blown out. The function is not affected by ambient temperature.
- Features of cooling operation: This Portable Air Conditioner's provides the most efficient cooling when the ambient temperature is between 63^ and 95^ .
IMPORTANT SAFETY INSTRUCTIONS
Your safety and that of you children
Your washing machine has been built in compliance with safety regulations, to protect you and all your family.
WARNING - To reduce the risk of fire, electric shock, or injury to persons when using your appliance, follow basic precautions, including the following:
- Read all instructions before using the appliance.
- The appliance is not intended for use by young children or infirm poisons without supervision.
- Young children should be supervised to ensure that they do not play with the appliance.
- The plug shall be accessible after install the appliance.
- The appliance shall be installed in accordance with national wiring regulations
- The appliance should never be installed in laundry room
- If the power cord is damaged, it must be replaced by the manufacturer or its service agent or a similarly qualified person in order to avoid hazards.
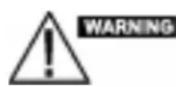
This symbol refers to a hazard or unsafe practice which can result in severe personal injury or death.
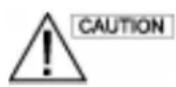
This symbol refers to a hazard or unsafe practice which can result in severe personal injury or product or property damage.
SAVE THESE INSTRUCTIONS
PORTABLE AIR CONDITIONER VIEWS
FRONT
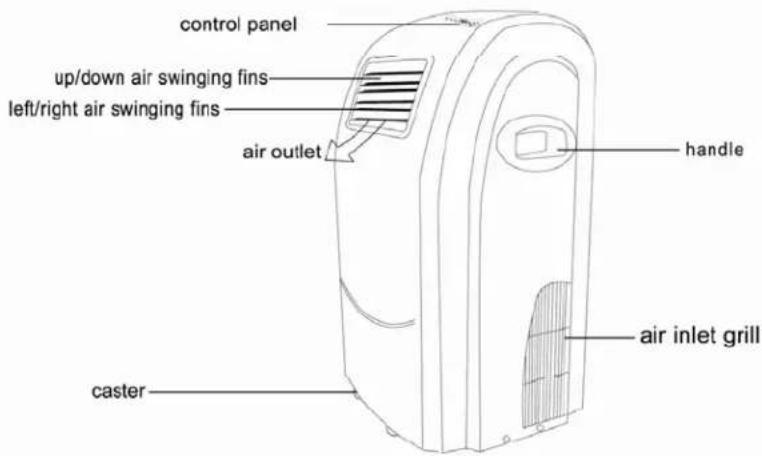
BACK
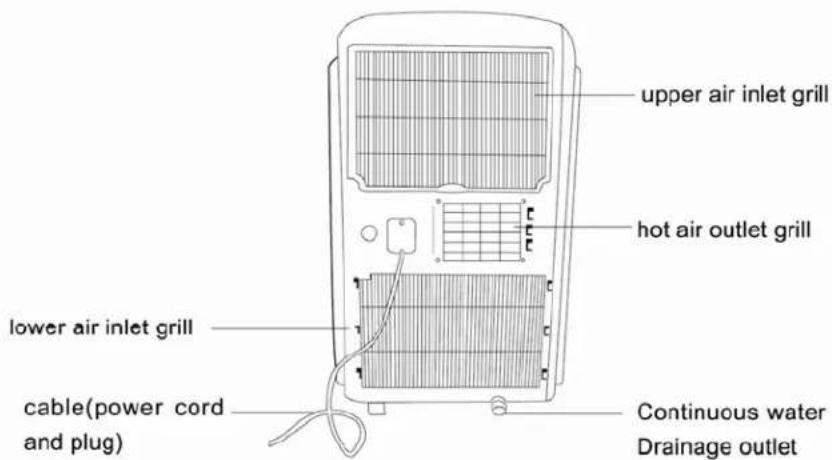
2
INSTALLATION
Selection of installation location
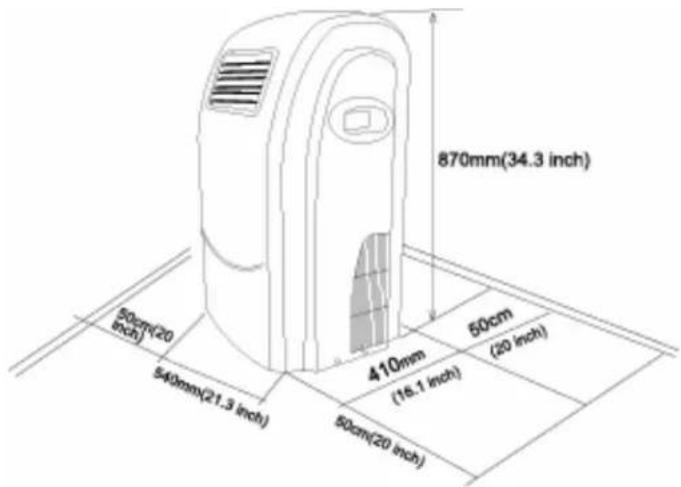
Put the Portable air conditioner in a fiat location where the air outlets cannot be covered up. Place the unit at least 20" away from a wall or other obstacles.
Procedure for Mounting the Air Exhaust Duct
1) Fix the square end of the exhaust dust to the exhaust terminal of the unit
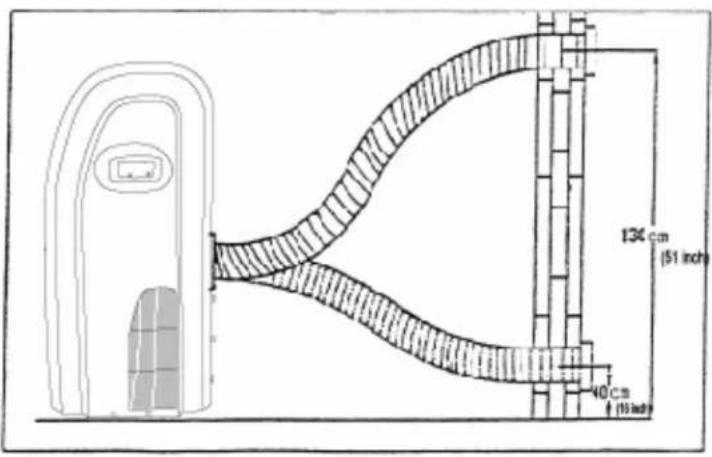
2) Put the other end(discharge) to the nearest window Attention: The length of the air exhaust should be between 23.6" - 70.8". Use the Minimum possible length for best results. When mounting, try to keep the air exhaust horizontal.

INSTALLATION
Correct mounting shown below (if mounting in the wall, the height of the hole should be 16" - 51")
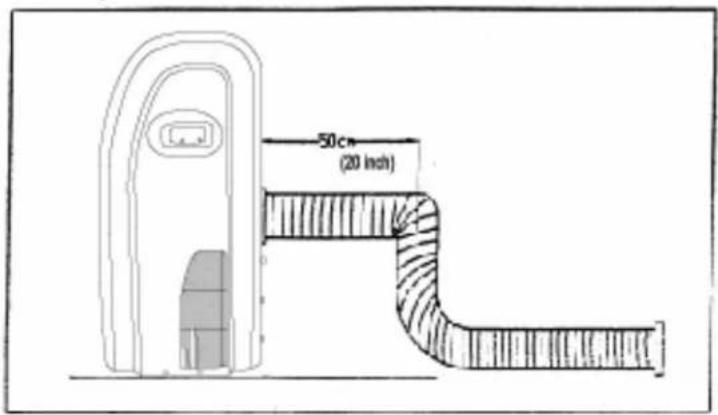
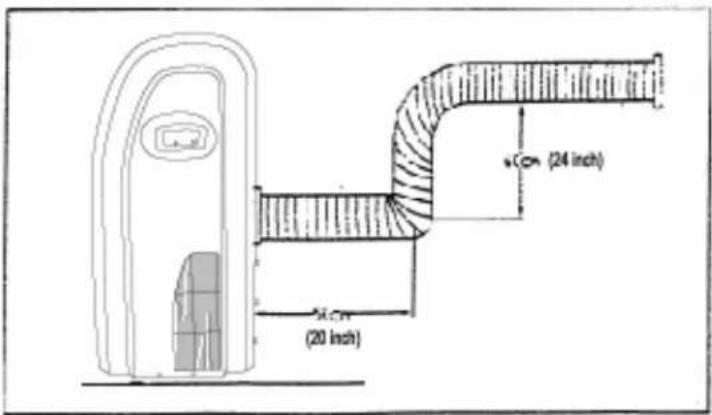
If the air exhaust requires bending, see below.
INSTALLATION
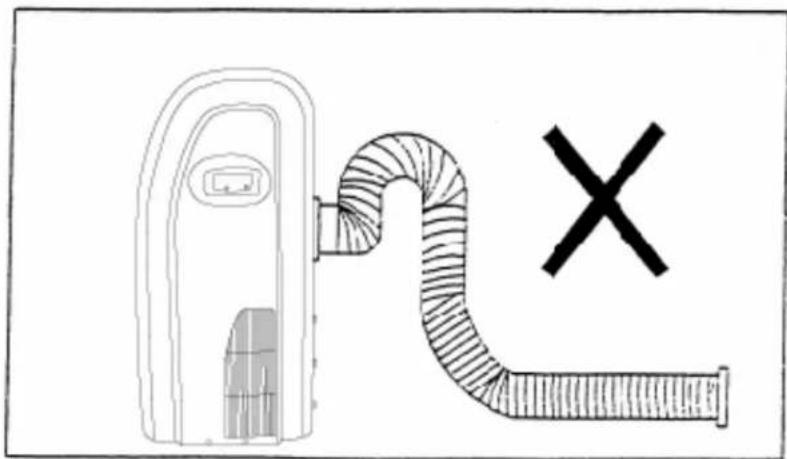
Incorrect hose mounting (Air exhaust bend is too large and can cause a malfunction).
natural_image
Diagram of a gas outlet connected to a pipe with a cross symbol (no text or labels)Window Kit installation
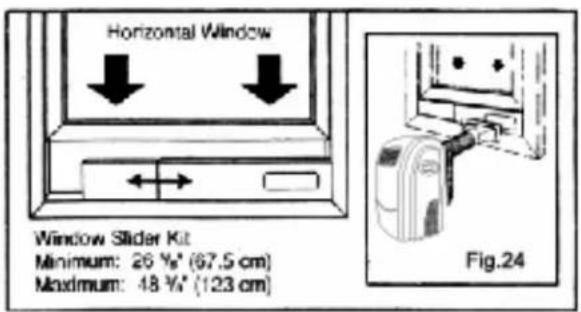
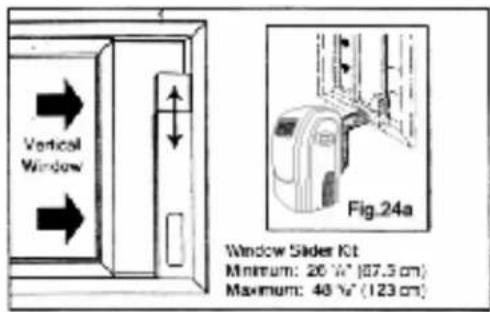
Your window kit has been designed to fit most standard "vertical" and "horizontal" window applications. However, it may be necessary for you to improvise/modify some aspects of the installation procedures for certain types of windows. Please refer to Fig. 24 & Fig. 24a for minimum and maximum window openings.
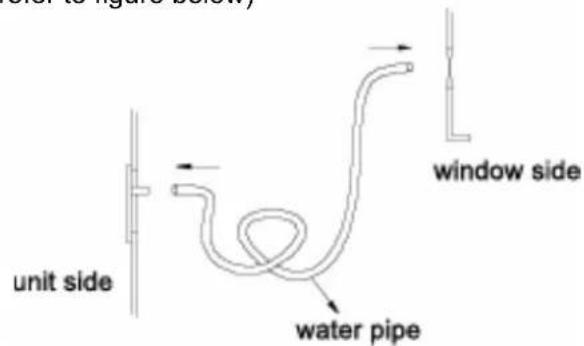
Fixing the water pipe (refer to figure below)
INSTALLATION
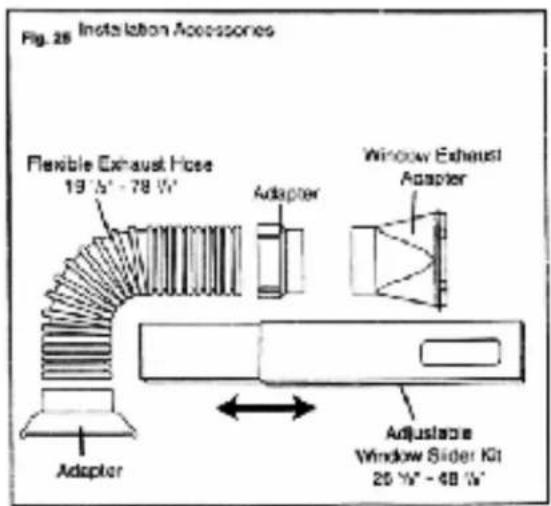
Installation Accessories Fig. 25
Description
Flexible exhaust hose with adapters: 3/set stretches from 19 12 "up to 78 34 "
Window exhaust adapter (flat mouth): 1 pc
Adjustable window slider kit 2/set from 26-5/8" up to 48-3/8"
Drain hose connector 1 pc continuous drain option (hose not included)
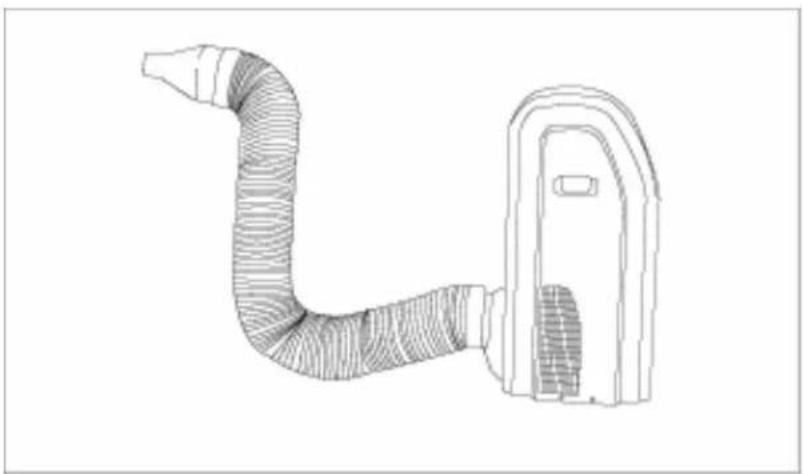
Exterior Wind Suction Adapter: 1 pc (optional)
Customer could select and assemble the Exterior Wind Suction Adapter - a tube that draws in fresh air from outdoors, which cools down the condenser. The installation is as following figure.
natural_image
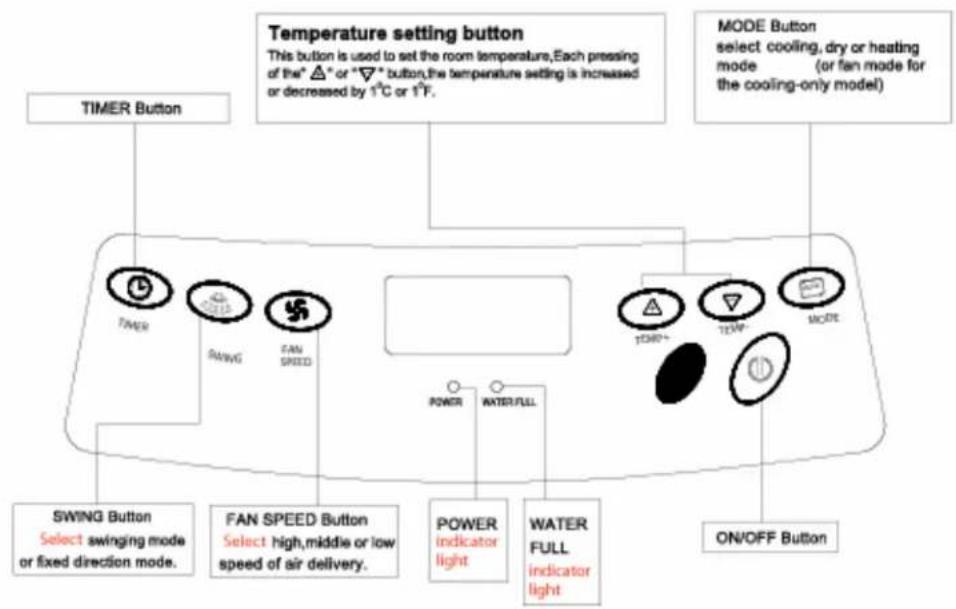
Line drawing of a curved pipe or duct assembly with a rectangular housing (no text or symbols)THE CONTROL PANEL
flowchart
graph TD
    A["TIMER Button"] --> B["TEMPER"]
    B --> C["SWING"]
    B --> D["FAN SPEED"]
    C --> E["POWER"]
    D --> F["POWER indicator light"]
    E --> G["ON/OFF Button"]
    F --> H["WATER FULL indicator light"]
    G --> I["MODE"]
    H --> J["MODE"]
    I --> K["ON/OFF Button"]
    style A fill:#f9f,stroke:#333
    style B fill:#ccf,stroke:#333
    style C fill:#cfc,stroke:#333
    style D fill:#fcc,stroke:#333
    style E fill:#ffc,stroke:#333
    style F fill:#cfc,stroke:#333
    style G fill:#fcc,stroke:#333
    style H fill:#cfc,stroke:#333
    style I fill:#fcc,stroke:#333
    style J fill:#cfc,stroke:#333
    style K fill:#fcc,stroke:#333
    style_L["TEMPER setting button"] --> M["This button is used to set the room temperature, each pressing of the* △* or **▽* button, the temperature setting is increased or decreased by 1°C or 1°F."]
    N["MODE Button"] --> O["select cooling, dry or heating mode (or fan mode for the cooling-only model)"]
    P["SWING Button"] --> Q["Select swinging mode or fixed direction mode."]
    R["FAN SPEED Button"] --> S["Select high, middle or low speed of air delivery."]
    T["POWER indicator light"] --> U["POWER indicator light"]
    V["WATER FULL indicator light"] --> W["POWER indicator light"]
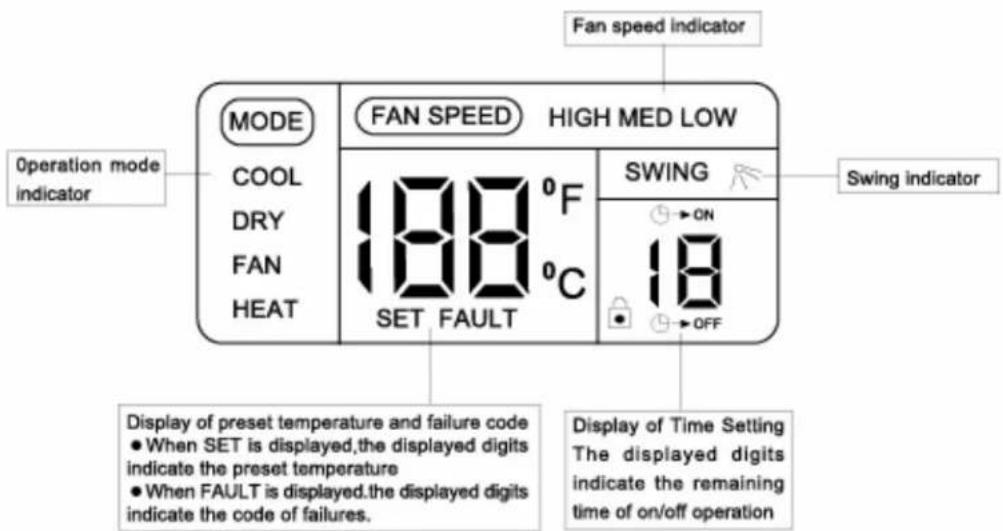
USING THE CONTROL PANEL
POWER SOURCE
- The AC socket must be firm and reliable.

- Don't connect the Portable air conditioner to a multiple socket outlet which is also being used for other electrical appliances.
- Insert the AC power plug securely into the AC socket before using the unit. Two seconds after it beeps, press the "ON/OFF" button to start the unit.
COOLING OPERATION
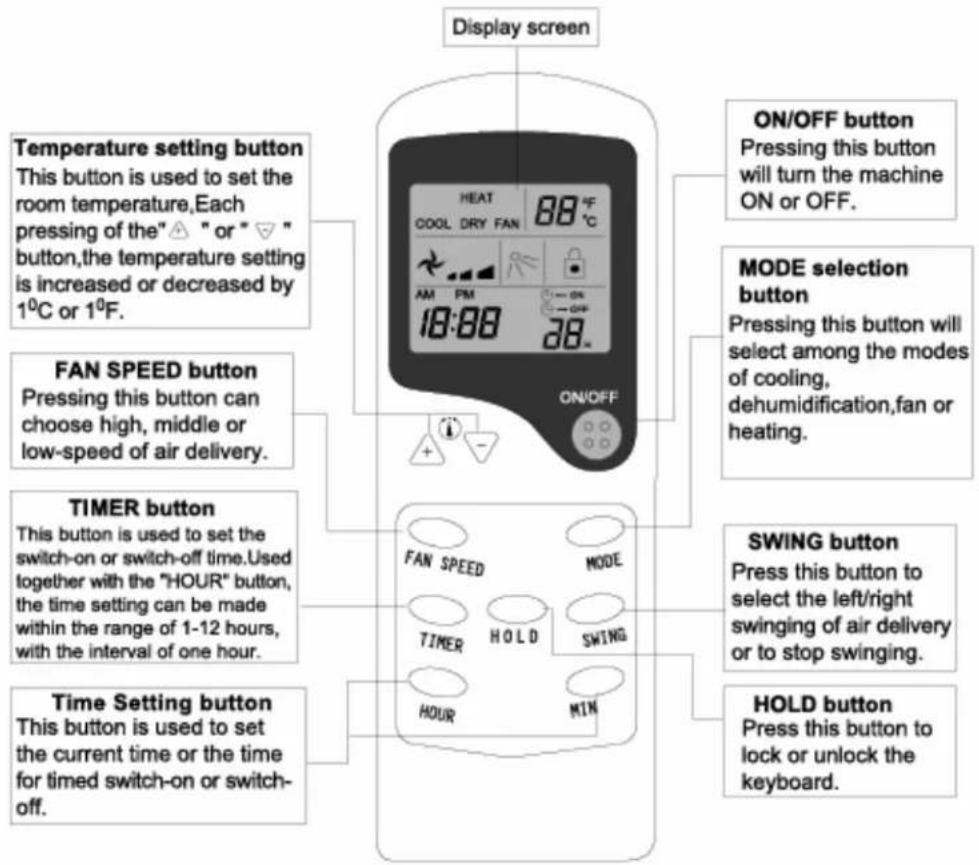
-
Repeatedly press 'MODE' button to choose the cooling mode, LCD window will show "COOL". During the cooling operation, always place the duct through an open window to exhaust warm air from the room.
-
Repeatedly press "TEMP+" or "TEMP - " button to set a proper room TEMP at 63°F-88°F.
- Press "FAN SPEED" button to choose a proper fan speed, high, middle, or low speed.
- Press "SWING "button to adjust the air delivery direction. The LCD window will show"
NOTE:
In order to improve the cooling efficiency, be careful that:
a) If your room is directly exposed to the sun, please draw the curtains.
b) Do not place near other heat source.
- Keep the windows and the doors closed to aid in effectively dehumidifying the room.
- Repeatedly press" MODE" button to choose the dehumidifying mode, LCD window will show "DRY", the fan speed cannot be adjusted.
- When used as dehumidifier only, do not use the air exhaust duct.
HEATING OPERATION
- Repeatedly press the" MODE' button, select the heat mode, The LCD window shows "HEAT".
- Press 'TEMP +" or "TEMP-" button to set a proper room temperature at 63°F-88°F (or 17°C-31°C).
- Press 'FAN SPEED' button to choose the high-middle-low fan speed
- Press 'S WING' button to adjust the air delivery direction, The LCD window will show'
TIME SET FUNCTION
- To set time to start the machine with the unit off (but power supplied), press" TIMER" button, the LCD window will show" "press the TIME button, set the time to start as you like. The setting range is 1-12 hour
- To set time to stop the machine with the unit running, press "TIMER' button, the LCD window will show"® —OFF', press the TIME button set the time to stop the machine as you like. The setting range is 1-12 hours.
- If you have set switch on/off after 12 hours, press this key again then could cancel the timing.
AUTO SWING FUNCTION
- Press the "SWING" button, the LCD window will show and then begin to swing automatically.
- Press the "SWING" button again, the symbol "in the LCD window will disappear, the swing mode will stop.
Attention:
If you Press the "A" and "V" buttons together for more than two seconds the keys will lock, LCD window will show" \~ ",press the two buttons again can unlock the keys, the symbol "\~" will disappear.
USING THE REMOTE CONTROL
PRESENT TIME SETTING PROCEDURE
When cells are inserted, the present is automatically set to AM 12:00. EX:Set to AM 10:30
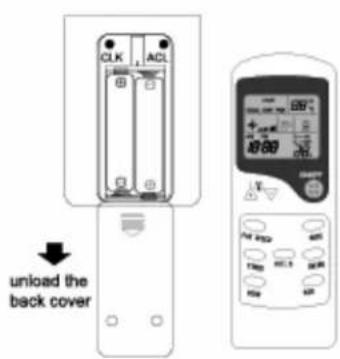
| 1 | Press the CLK button. Unload the back cover push the clock button with the tip of a ball pen, etc. The time indicator is flickering and can set the present time. |
| 2 | Press the HOUR button. (Set to AM 10:) |
| 3 | Press the MIN button. (Set to 30) |
| 4 | Press the CLK botton again,then reattach the back cover. |
NOTE The timer is set on the basis of the present time. So set the present time correctly.
WATER DRAINAIGE
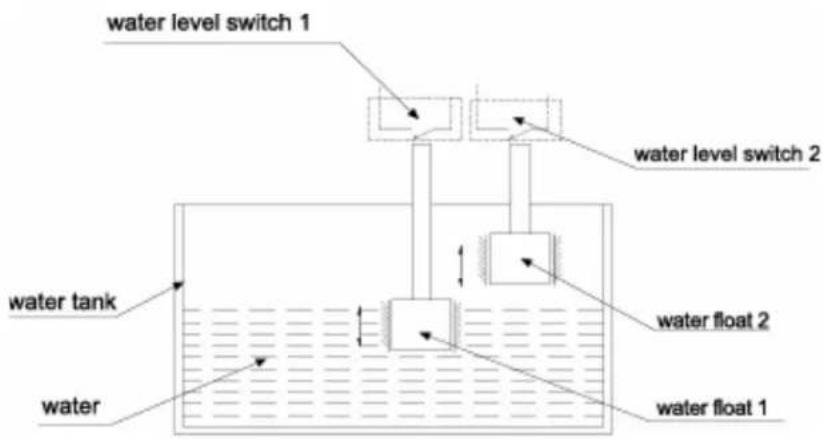
Auto pump water function of water pump
I. Under random mode, if the water level in the water tank is over water level I, the switch of water level I will close, and the water pump will start to work. The main engine will operate under the previous mode.
2. If the water level in the water tank is below water level 1, the switch of water level will disconnect and the water pump will stop after 2 minutes, and the operation mode for main engine will be unchanged.
Water level auto alarm function in water tank
In random mode, if the water level in the water tank is over 2. the water level 2 switch will dose and the water full light will illuminate. The buzzer alarm will sound, and the LCD window will indicate failure code E5. The main engine will shut off automatically, and the water pump will stop after 20 minutes.
After the water level in the water tank is below 1, the switch of water level will disconnect, and without the alarm, the indication of trouble code E5 will disappear. The main engine will resume standby.
MAINTENANCE/SERVICE
MAINTENANCE METHODS
- Pull the plug out of the socket before cleaning.
- Make sure there is no power to the unit before beginning maintenance or repair.
- Do not use chemical solvents (like benzene, alcohol glazer) to clean the surface of the unit, Doing so could scratch, damage, or warp the surface.
AIR FILTER
If the air filter is blocked with a lot of dust, the air flow volume will be reduced. Clean the filter once every two weeks.
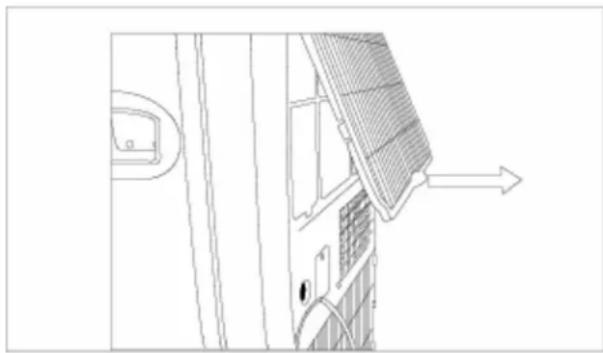
Open the air filter
- Open the air filter cover upwards
- Take the air filter out of filter cover.
natural_image
Technical line drawing of a door with a sloped roof and window, showing an arrow indicating direction (no text or symbols)Clean
Wash the air filter by immersing it gently into warm (about 40^ C or 104^ F) water with a neutral detergent, rinse the filter of detergent and dry it thoroughly in a shaded place.
Mounting
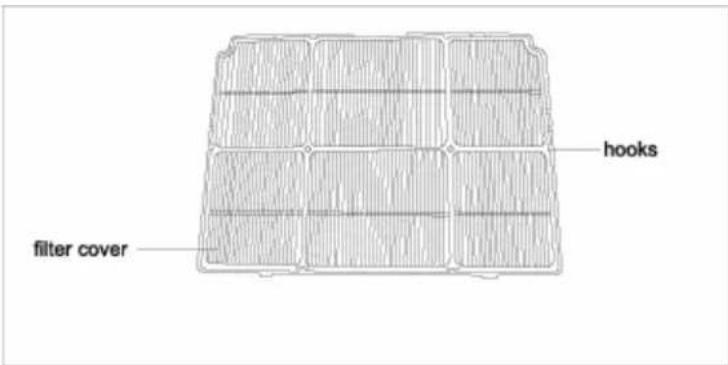
- Attach the filter to the filter cover with the attachment hooks on the inside surface of the cover.
- Place the hooks at the bottom of the filter cover into the holes in the case, push it back into its original position.
MAINTENANCE & SERVICE
KEEP SURFACE CLEAN
Clean the surface of the unit with a damp cloth, then dry using a dry cloth.
STORAGE METHODS
END OF SEASON OPERATIONS
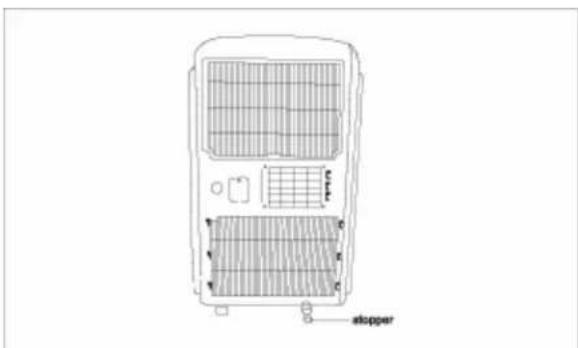
I. To remove the stopper of continuous water drainage. Then operate the unit in fan mode for half a day until the pipe is dry.
2. Switch off the unit and disconnect the plug from the power supply.
3. Tie the cable with a string.
4. Wrap the machine with the plastic bag, and keep it in a cool, dry place.
SAFETY
OCCASION
- Do not use the unit in a very narrow room with obstacles.
- Do not use the unit in direct sunlight to avoid color fading.
- Do not use the unit in water or near water.
- Do not use near gas appliances, fires or in the vicinity of flammable liquids.
POWER SOURCES
- Do not use a damaged or improper NC socket.
- When unplugging the unit, hold the power plug securely and pull it out carefully.
OTHERS
- Keep the unit at least 2-3 feet away from TV sets or radios to avoid the risk of electromagnetic interference.
- Do not use with the air outlet close to walls or cover the outlet to avoid overheating.
SERIOUS CAUTION
- Do not toggle over or incline, if the unit does toggle please unplug at once and seek advice from your dealer.
- Do not spray with insecticide or other chemicals as the plastic case may be deformed.
- When the air conditioner heats the room air, the compressor does not work – only the PTC electric tube works.
TROUBLESHOOTING
Before seeking repair or service, please check the following.
| Trouble Check Action | ||
| Air Conditioner does not operate at all | Is there power?Is the unit plugged in?Did the fuse or circuit breaker break off?Is SET TIME suitable? | It is normal.Push the plug into the wall socketChange the fuse.Change SET TIME |
| Cooling efficiency is not good | Is air inlet or outlet blocked?Is there any other heat source in room?Are air filters very dirty?Is SET TEMP suitable?Is indoor fan speed set at low? | Clear the blockageMove the heat sourceClean the air filterSet temperature suitableSet suitable fan speed. |
| Too noise and vibration It is the inner liquid (refrigerant) flowing inside.Is unit leveled? | it is normalPlace it in a horizontal floor | |
| The machine start and stop frequently | Is the voltage of the power source normal?Is the air exhaust fixed correctly?Are you adding air exhaust yourself? | Make sure the power source is rated at 110-115V/60HzTry to keep the air exhaust horizontalDon't add air exhaust yourself and remove it |
Call for service when:
The fuse and switch often break.
The power cord superheats or the sleeve of the cord broken.
You detect something abnormal.
Self diagnosis function
Our company provides the end-users with thoughtful services by installing various diagnostic systems to indicate the following irregular performances.
| Check code Diagnosis of malfunction | |
| FAULT E8 Overheating protection | |
| FAULT E3 Faulty coils | |
| FAULT E2 Room temperature faults | |
| FAULT E4 Units faults | |
| FAULT E5 | Condensed water in water tank is over limited level. |
EQUATOR CONTACT NUMBERS
SERVICE: (800) 776-3538
PARTS, ACCESSORIES & DETERGENT ORDERING: (888) 483-9627
TECHNICAL SUPPORT: (888) 935-1565
Equator Corporation
Equator Plaza,
2801 W Sam Houston Pkwy N, Houston, Texas 77043-1611
Phone (800) 935-1955 • Fax (713) 464-2151
All rights reserved.
Manual subject to change without notice
- TABLE OF CONTENTS
- Please read the Owner's Manual carefully before using your new Equator Portable Air Conditioner
- WARRANTY INFORMATION
- WARRANTY
- EXCLUSIONS
- GENERAL
- EQUATOR CONTACTS
- INTRODUCTION
- Here are some of the best reasons for buying your Equator Portable Air Conditioner
- IMPORTANT SAFETY INSTRUCTIONS
- Your safety and that of you children
- SAVE THESE INSTRUCTIONS
- PORTABLE AIR CONDITIONER VIEWS
- INSTALLATION
- Selection of installation location
- Procedure for Mounting the Air Exhaust Duct
- Window Kit installation
- Description
- THE CONTROL PANEL
- USING THE CONTROL PANEL
- POWER SOURCE
- COOLING OPERATION
- NOTE:
- HEATING OPERATION
- TIME SET FUNCTION
- AUTO SWING FUNCTION
- Attention:
- USING THE REMOTE CONTROL
- PRESENT TIME SETTING PROCEDURE
- WATER DRAINAIGE
- Auto pump water function of water pump
- Water level auto alarm function in water tank
- MAINTENANCE/SERVICE
- MAINTENANCE METHODS
- AIR FILTER
- Open the air filter
- Clean
- Mounting
- MAINTENANCE & SERVICE
- KEEP SURFACE CLEAN
- STORAGE METHODS
- END OF SEASON OPERATIONS
- SAFETY
- OCCASION
- POWER SOURCES
- OTHERS
- SERIOUS CAUTION
- TROUBLESHOOTING
- Call for service when:
- Self diagnosis function
- EQUATOR CONTACT NUMBERS
- SERVICE: (800) 776-3538
- PARTS, ACCESSORIES & DETERGENT ORDERING: (888) 483-9627
- TECHNICAL SUPPORT: (888) 935-1565
Brand : Equator
Model : PAC 10
Category : Air-conditioner