
OAC 2000 - Air-conditioner Equator - Free user manual and instructions
Find the device manual for free OAC 2000 Equator in PDF.


| Type of Product | Portable Air Conditioner |
| Model | OAC 2000 |
| Brand | Equator |
| Cooling Capacity (BTU) | 12,000 BTU/h |
| Power Consumption (Cooling) | 1,200 W |
| Voltage / Frequency | 115 V / 60 Hz |
| Dimensions (H x W x D) | 28.5 x 17.5 x 13.5 in (72.4 x 44.5 x 34.3 cm) |
| Weight | 55 lbs (24.9 kg) |
| Airflow (CFM) | 350 CFM |
| Noise Level (dB) | 52 dB (high speed) |
| Refrigerant Type | R-410A |
| Operating Modes | Cool, Fan, Dehumidify, Auto |
| Fan Speeds | 3 (Low, Medium, High) |
| Dehumidification Capacity | 1.5 L/h (approx.) |
| Thermostat Control | Digital, remote control included |
| Timer Function | 24-hour programmable timer |
| Installation Type | Window kit included, portable with exhaust hose |
| Filter Type | Washable mesh filter |
| Filter Cleaning Frequency | Every 2 weeks |
| Maintenance | Clean filter regularly; store unit in dry place |
| Safety Features | Auto restart, overheat protection, anti-freeze sensor |
| Warranty | 1 year limited warranty |
Frequently Asked Questions - OAC 2000 Equator
User questions about OAC 2000 Equator
0 question about this device. Answer the ones you know or ask your own.
Ask a new question about this device
Download the instructions for your Air-conditioner in PDF format for free! Find your manual OAC 2000 - Equator and take your electronic device back in hand. On this page are published all the documents necessary for the use of your device. OAC 2000 by Equator.
USER MANUAL OAC 2000 Equator
OUTDOOR AIR CONDITIONER
Model - OAC 2000
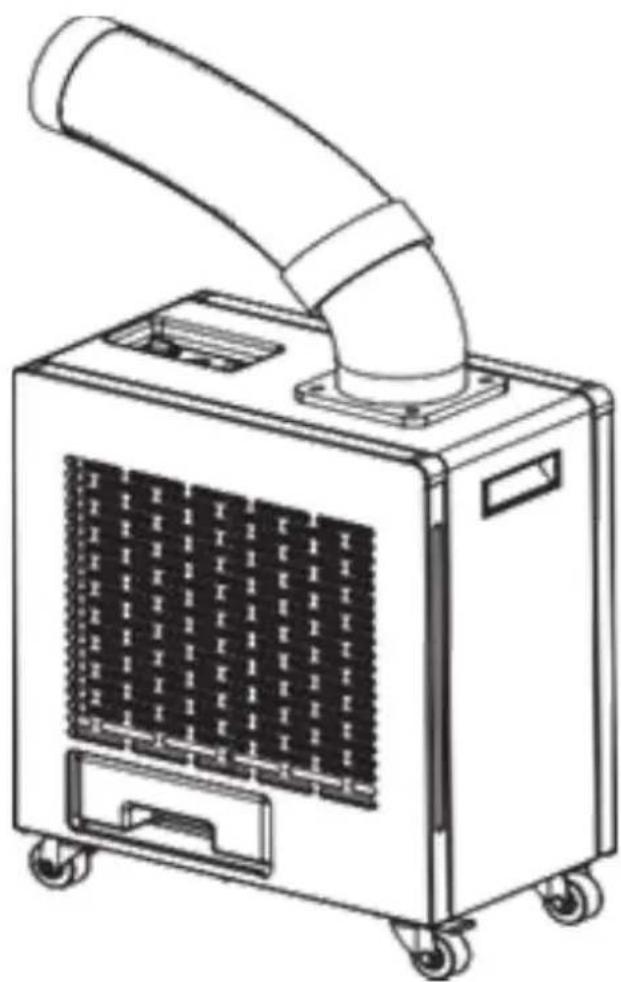
natural_image
Line drawing of a portable air conditioner unit with a cylindrical nozzle and grid-patterned vent (no text or symbols)OWNER'S MANUAL
Warranty
Equator Appliances undertakes to the consumer-owner to repair or, at our option, to replace any part of this product which proves to be defective in workmanship or material under normal personal, family or household use, in USA and Canada, for a period of one year from the date of original purchase. During this period, we will provide all labor and parts necessary to correct such defect, free of charge, if the appliance has been assembled and operated in accordance with the written instructions with the appliance.
Exclusions
In no event shall Equator Appliances be liable for incidental or consequential damages or for damages resulting from external causes such as abuse, misuse, incorrect voltage or acts of God. This warranty does not cover service calls which do not involve defective workmanship or materials covered by this warranty. Accordingly, diagnosis and repair costs for a service call which does not involve defective workmanship or materials will be the responsibility of the consumer-owner.
Specifically, the following work is not covered under warranty and does not constitute warranty work:
Installation - e.g. installing as built-in Maintenance - e.g. cleaning appliance using solvents Mishandling - e.g. breakage of hose and casters
Most work is covered. The defining factor is, has the machine malfunctioned (Equator Appliances is responsible) or has the customer omitted or done something to cause the appliance to malfunction (customer is responsible). Some States do not allow the exclusion or limitation of incidental or consequential damages, so the above limitation or exclusion may not apply to you.
This warranty is given by:
Equator Appliances
10216 Georgibelle Drive, Suite 900D
Houston, TX 77043-5249
For Customer Service:
Appliance Desk
Business hours: 9:00 am to 5:00 pm weekdays
You can register your Warranty by any of the following methods:
- Mail in the Warranty Registration Card
- Register online at www.ApplianceDesk.com
- Scan the QR Code

GENERAL
Since it is a responsibility of the consumer-owner to establish the warranty period by verifying the original purchase date, Equator Appliances recommends that a receipt, delivery slip or some other appropriate payment record be kept for that purpose.
This warranty gives you specific legal rights, and you may also have other rights which vary from State to State.
All rights reserved. Manual subject to change without notice.
Safety
Keep the appliance away from volatile and flammable substances.
Keep ventilation openings clear of obstructions.
When positioning the appliance, ensure the electrical cord is not trapped or damaged.
Do not place multiple portable socket-outlets at the rear of the appliance.
Never unplug the appliance by pulling on the power cord. Grip the plug firmly and pull straight out to remove from wall socket.
Do not use a damaged power cord.
Do not use an extension cord.
Do not operate the unit with wet hands, to prevent electric shock.
Children should be supervised to ensure that they do not climb on or play with the appliance.
This appliance is not intended for use by persons (including children) with reduced physical, sensory or mental capabilities, or lack of experience and knowledge, unless they have been given supervision or instruction.
Please dispose of this appliance in accordance with local regulations.
California Proposition 65
WARNING: This product contains chemical known to the State of California to cause cancer and birth defects or other reproductive harm.
Description
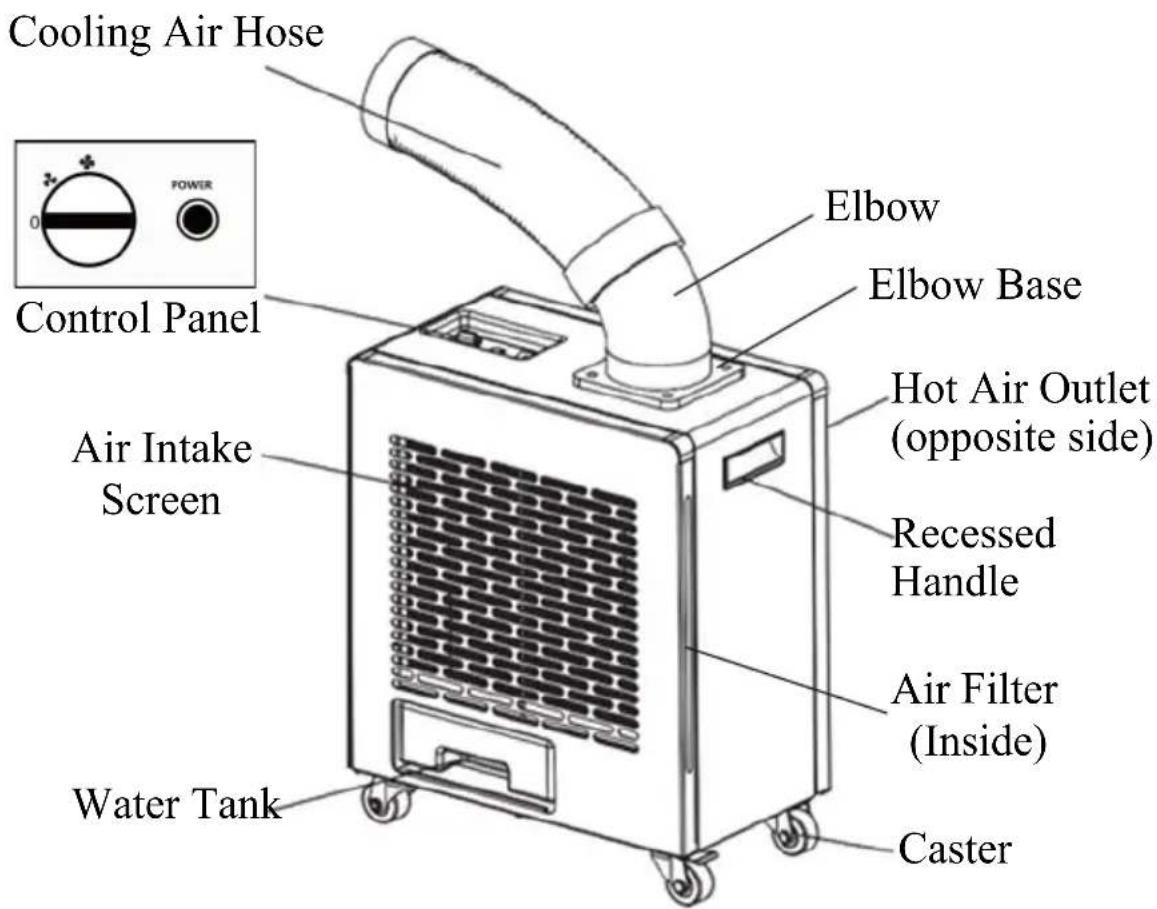
The Outdoor Air Conditioner (OAC) is a portable appliance that can be used outdoors. The OAC pulls ambient air through the Air Intake Screen, circulates it through the compressor and blows out cool air through the Cooling Air Hose. The Cooling Air Hose is flexible, can be rotated 360 degrees and can be positioned to blow to a desired area. The Control Panel at the top of the OAC is used to select low or high fan speed to regulate the cool air flow.
Hot air is exhausted through the back of the unit. Condensate is collected in a Water Tank below the unit or can be discharged directly to a designated area.
For ease of moving the portable OAC, there is a convenient Recessed Handle and four Casters.
Assembly
The Outdoor Air Conditioner (OAC) is easy to use and requires only a few quick steps to assemble the parts. Most of the appliance is already assembled and only requires the Air Cooling Hose to be attached to the main unit.
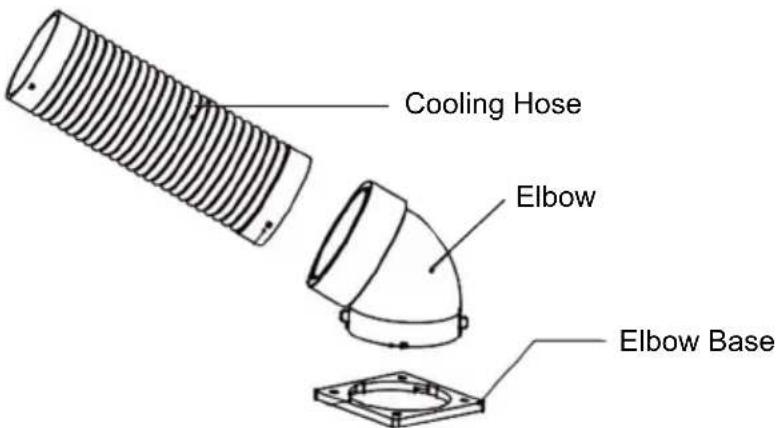
Attach the Elbow to the Elbow Base by turning counter-clockwise. When firmly installed there will be a click.
Attach the Cooling Air Hose to the other end of the Elbow by turning counter-clockwise.
Placement
The OAC is designed for outdoor use and is portable. The compact size and casters enable it to be moved easily.
When moving the OAC do not tilt it more than 45 degrees.
Place the appliance away from sources of heat and high humidity.
Place the OAC in a covered area to protect from direct sunlight and heavy rainfall for greater longevity.
Ensure there is adequate ventilation around the OAC. The Air Intake Screen and Cooling Air Hose should be more than 1 foot (30 cm) away from walls or other obstructions. The vent exhausting the hot air should be 3 feet (80 cm) from any object or structure.
Place the OAC on a flat level surface and lock the casters.
Operation
Check the plug and cable before connecting the power and ensure it is 110 voltage.
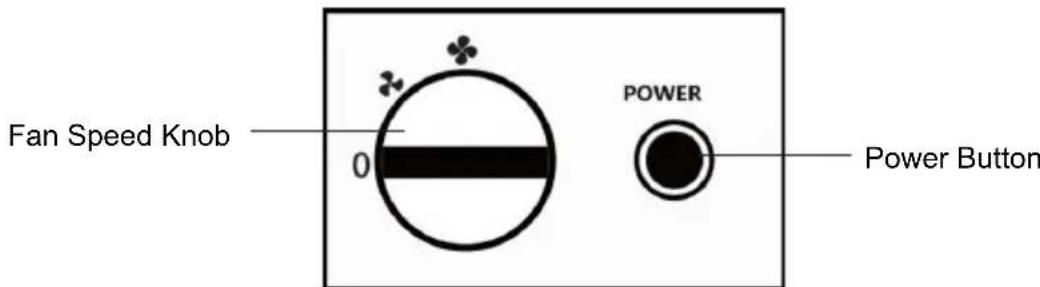
Press the Power Button to turn the OAC on.
Rotate the Fan Speed Knob from the 0 (Off) position to either low or high cool setting.
The Cooling Air Hose can be rotated 360 degrees, allowing for maximum flexibility in positioning the flow and direction of cool air.
After turning off the OAC, wait 5 minutes before turning it on again. It cannot be turned on immediately.
The OAC is equipped with overheat and overload protection for the compressor. If the compressor overheats because of voltage fluctuations or high ambient temperature, the compressor power supply shuts off and the OAC will blow only ambient air.
Water Tank and Drainage Hose
In the course of operating the OAC, condensate water is produced. The water can either be collected in the Water Tank or can be discharged directly outdoors through a Drainage Hose included with the unit.
Water Tank
The Water Tank is located at the bottom of the OAC. It is important to empty the tank in a timely manner. Check the water level every 2-3 days.
Turn the power off before emptying the Water Tank.
Remove the Water Tank, discard the water and then replace it again before turning the OAC on. Do not move the OAC when it is full of water.
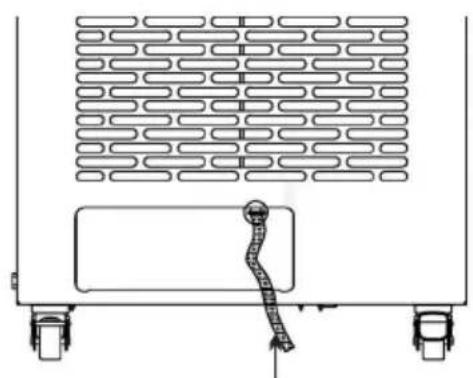
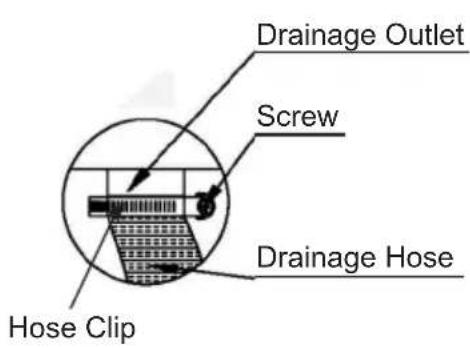
Drainage Hose
Remove the Water Tank.
Attach the Drainage Hose directly onto the outlet where it enters the Water Tank cavity. The Hose can be held in place with the Hose Clip provided.
Use a Phillips screwdriver to screw on the Hose Clip. This will keep the Drainage Hose secured.
natural_image
Diagram of a vehicle rear view showing a ladder attached to the side of a vehicle chassis (no text or symbols present)Drainage Hose
Maintenance
Make sure the power cord is unplugged before moving or cleaning the OAC.
Clean the outside and inside of the appliance regularly, using water and mild detergent.
Remove the filter by pulling straight out from the slot. Clean/wash the filter. Before reinstalling, should be completely dry.
Before storing for an extended time:
• Empty the Water Tank and let it dry completely.
- Once dry, cover the OAC and store in an upright position.
Troubleshooting
| Possible Cause and SolutionPr | |
| Not Working | Check the fuse.Check if it is plugged in correctly to the power source. |
| Not Cooling | Heat exchanger surface is blocked.Clean and remove blockage.Filter needs cleaning.Ambient temperature is very high (above 113°F).Cooling line clogged. Remove obstruction.Move it if near a heat source or in direct sunlight.Check for proper ventilation and that air inlet or outlet is not blocked.Voltage is not correct.Compressor overheating. Shut down and restart after some time. |
| Water Leak | Drain is blocked. Needs to be cleared.Water Tank is not placed correctly.Water Tank is full and needs to be emptied. |
Technical Specifications for OAC 2000
| Model | OAC 2000 |
| Capacity | 2000W / 6800BTU |
| Air Flow 135.4 cu.ft / min | |
| Voltage | 110V 60Hz |
| Current | 6.4 Amps |
| Power | 700 W |
| Refrigerant | R410A |
| Working Temperature | 64.4°F - 113°F |
| Weight Net / Gross | 56.2 / 66 lbs |
| Product Dimensions (HxWxD) | 22.4 x 18.9 x 11 (inch) |
| Packaging Dimensions (HxWxD) | 25 x 22 x 15 (inch) |
Electrical Diagram
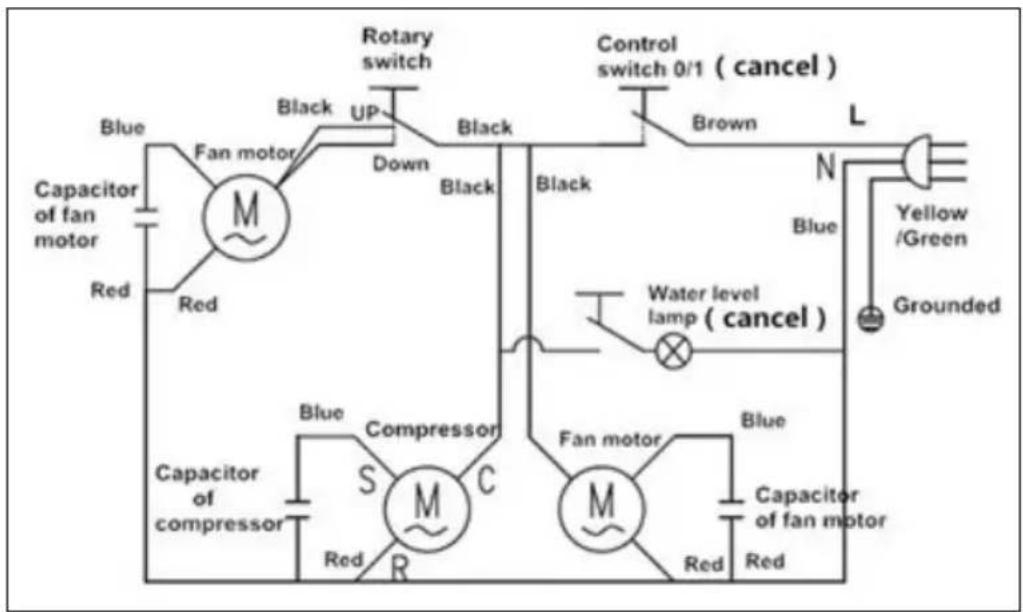
flowchart
graph TD
    A["Capacitor of fan motor"] --> B["Fan motor"]
    B --> C["Black UP"]
    C --> D["Rotary switch"]
    D --> E["Control switch 0/1 (cancel)"]
    E --> F["Brown"]
    F --> G["L"]
    G --> H["Grounded"]
    H --> I["Yellow /Green"]
    I --> J["N"]
    J --> K["Water level lamp (cancel)"]
    K --> L["Black"]
    L --> M["Compressor"]
    M --> N["Blue Compressor"]
    N --> O["Capacitor of fan motor"]
    O --> P["Red Red"]
    P --> Q["S"]
    Q --> R["Capacitor of compressor"]
    R --> S["Black Red"]
    S --> T["M"]
    T --> U["Control switch 0/1 (cancel)"]
    U --> V["Brown"]
    V --> W["L"]
    W --> X["N"]
    X --> Y["Grounded"]
- OUTDOOR AIR CONDITIONER
- OWNER'S MANUAL
- Warranty
- Exclusions
- Equator Appliances
- For Customer Service:
- Appliance Desk
- GENERAL
- Safety
- California Proposition 65
- Description
- Assembly
- Placement
- Operation
- Water Tank and Drainage Hose
- Water Tank
- Drainage Hose
- Maintenance
- Troubleshooting
- Technical Specifications for OAC 2000
- Electrical Diagram
Brand : Equator
Model : OAC 2000
Category : Air-conditioner