
DL500 - Radio JENSEN - Free user manual and instructions
Find the device manual for free DL500 JENSEN in PDF.


| Product Type | AM/FM Radio |
| Brand | Jensen |
| Model | DL500 |
| Dimensions (W x H x D) | 12.4 x 3.5 x 8.2 inches |
| Weight | 2.8 lbs |
| Power Source | AC 120V 60Hz or 6 D-size batteries |
| Power Consumption | 15W |
| Radio Bands | AM (530-1710 kHz) and FM (88-108 MHz) |
| Preset Stations | 20 AM and 20 FM |
| Speaker Size | 5 inches |
| Audio Output Power | 5W RMS |
| Headphone Jack | 3.5mm stereo |
| Antenna | Built-in ferrite bar for AM, telescopic rod for FM |
| Display | Digital LCD with backlight |
| Clock Features | Alarm clock with snooze and sleep timer |
| Other Functions | Auxiliary input (3.5mm), volume control, tone control |
| Material | ABS plastic and metal |
| Cleaning Instructions | Wipe with a soft, dry cloth; avoid liquids |
| Safety Warnings | Keep away from water; unplug during storms |
| Spare Parts | Contact customer service for replacement antenna or knobs |
| Repairability | User-replaceable fuse and battery compartment |
| General Information | Includes user manual, warranty card, and power cord |
Frequently Asked Questions - DL500 JENSEN
User questions about DL500 JENSEN
0 question about this device. Answer the ones you know or ask your own.
Ask a new question about this device
Download the instructions for your Radio in PDF format for free! Find your manual DL500 - JENSEN and take your electronic device back in hand. On this page are published all the documents necessary for the use of your device. DL500 by JENSEN.
USER MANUAL DL500 JENSEN
natural_image
Exterior view of a Jensen Scandinavian radio device (no visible text or symbols on the device body)Jensen® SCANDINAVIA
Bruksanvisning 3
Instruction manual 30
DL500 DAB+/FM radio
Dynamic Label Segment (DLS)
Inngang AC 100–240 V/50–60 Hz
DAB-frekvensområde:
Bånd III, 174 MHz–240 MHz
FM-frekvensområde:
87,5 MHz–108 MHz
Thank you for purchasing this DL500 DAB+/FM radio. Please read the instructions and warnings carefully before use to ensure safe and satisfactory operation of this product.
Contents
Important safety information .. 31
Your DAB+ digital/FM radio ... 32
Instructions for use ..... 33
Check the package contents.33
Where to put your radio ... 33
Setting up. 33
Time and date 34
Changing modes ..... 34
NFC touch point ..... 34
Adjusting the volume ..... 34
Switch on/off 34
5 Step guide to getting started 35
Using your DAB+ radio ..... 37
Changing DAB stations ..... 37
Scanning for DAB stations .. 38
Secondary services ..... 38
Manual tune 38
Prune DAB stations ..... 39
Storing a DAB station preset 39
Tune to a DAB preset station 40
DAB display information .... 40
Dynamic range control ..... 41
Using your FM radio ..... 42
Tuning to an FM station .... 42
Storing an FM station preset.42
Tune to an FM preset station 43
FM display information ..... 43
Bluetooth mode ..... 45
NFC touch point ..... 45
Connecting or 'pairing' ..... 45
Listening to music using Bluetooth 46
Disconnect a Bluetooth connection 46
Aux-in mode 47
Using the Alarm 48
Turn off the Alarm.....49
Snooze function ..... 49
System settings 50
Sleep timer 50
Set the date and time ..... 50
Display backlight ..... 51
Display language ..... 51
Factory reset 52
Simple solutions ..... 53
Technical information ..... 55
General information ..... 56
Guarantee 56
⚠️ Important safety information
It is most important this instruction leaflet be retained with the product for future reference. These warnings have been provided in the interest of safety. You MUST read them carefully before using the appliance.
- This product is not intended for use by persons (including children) with reduced physical, sensory or mental capabilities, or lack of experience and knowledge, unless they have been given supervision or instruction concerning use of the appliance by a person responsible for their safety.
- Do not expose to liquids, high or low temperatures, moisture or dusty environments as this could affect the product.
- The normal function of this product may be disturbed by strong Electro-Magnetic Interference. If so, reset the product (see page 52). You may need to use this product in another location.
• To protect against fire, electric shock and injury to persons DO NOT IMMERSE CORD, plug or unit in water or other liquids. - Unplug from the mains when not in use, before putting on or taking off parts and before cleaning.
- Do not operate any product with a damaged cord or plug, or after the product malfunctions or has been damaged in any
manner. Return the product to the place of purchase.
- Do not let the power cord hang over the edge of a table or counter, or touch hot surfaces.
- In the event of a fault, return the appliance to the place of purchase. No repair should be attempted by the consumer, as this will void your warranty.
- Do not use harsh chemicals, cleaning solvents or detergents to clean the product. Wipe with a damp (not wet) soft cloth to clean.
- Do not use the product for anything other than intended use and only use the power supply that is included with the product.
- Do not use your DAB digital/FM radio near emergency/intensive care medical equipment; if you have a pacemaker fitted or during an electrical storm.
• For household use only. - Do not use outdoors.
- WARNING! Polythene bags over the product or packaging may be dangerous. To avoid danger of suffocation, keep away from babies and children.
Your DAB+ digital/FM radio
Front view:
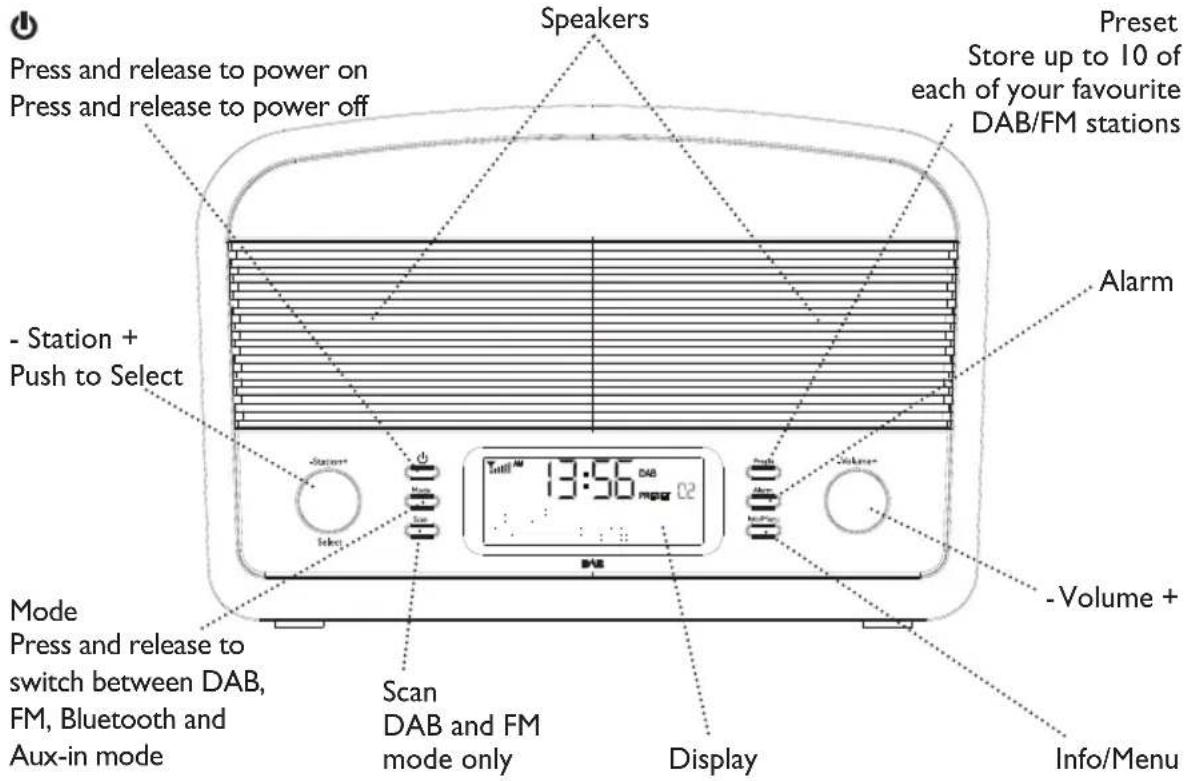
Side view:
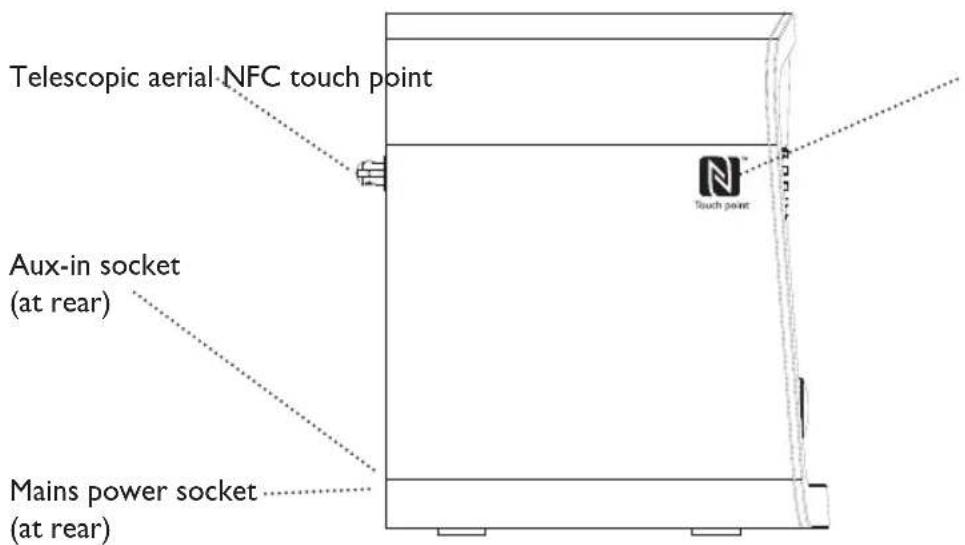
Instructions for use
Check the package contents
The package contains:
• I DAB+ digital/FM radio
- I mains adaptor
• I instruction manual
Where to put your radio
It is important that you consider carefully in advance where your radio will be situated and make sure that it is:
* on a flat and stable surface
Note: Never place your radio on antique or polished surfaces.
* within 1.4 metres of a power socket
* where you can fully extend the telescopic aerial
* away from bright sunlight or heat sources, such as a radiator
* not in a humid or very damp place such as a bathroom
Setting up
I. Connect the mains power lead into the socket on the back of the radio.
2. Fully extend the radio aerial in a vertical position to obtain the maximum signal strength.
3. Plug the power adaptor into the mains power wall socket and switch on. 'Welcome to Digital Radio' will be displayed.
4. Press and release the ⏻ button on the front of the radio. Your radio will switch on and begin an automatic scan for DAB radio stations. A progress bar will show the progress of the scan and the number of stations found during the scan will also be displayed.
When the scan is complete your radio will select the first available station and begin to play. Stations are listed in numerical and then alphabetical order by default.
Note: The DAB radio station list is stored in the memory and so the next time you switch your radio on, the station search does not take place. It is possible to scan manually for stations. Please see page 38.
Time and date
The first time you listen to DAB radio, the time and date of your product will be synchronised automatically to that broadcast by the DAB service in 24 hour mode; which is in line with daylight saving, so there is no need to set the time and date manually.
Changing modes
Your radio has 4 modes available, these are DAB, FM, Bluetooth and Aux-in.
I. Press and release the 'Mode' button on the front of the radio each time you wish to change the mode.
NFC touch point
Your radio has an NFC touch point to enable quick and easy Bluetooth pairing with other NFC enabled devices.
I. In Bluetooth mode, just touch your other NFC enabled device to the NFC touch point logo on the side, top left, of your radio to pair.
Adjusting the volume
I. Use the right hand rotary control to adjust the volume. Turn clockwise to increase the volume and anti-clockwise to decrease the volume.
Switch on/off
I. Press and release the ⏻ button on the front of the radio to switch on and off. The radio will go into standby mode and the time will be displayed.
5 Step guide to getting started
Switch on/off
I. Press and release the ⏻ button on the front of the radio.
DAB+
I. Press and release the 'Mode' button until you are in DAB mode.
2. Press and hold the 'Scan' button to scan for DAB stations.
3. Use the left hand rotary control to move through the station list.
4. Press and release the left hand rotary control to 'Select' when the station you would like to listen to is displayed.
5. Adjust the volume using the right hand rotary control.
FM
I. Press and release the 'Mode' button until you are in FM mode.
2. Press and release the 'Scan' button to scan for FM stations, your radio will stop at the next available station.
3. Use the left hand rotary control to fine tune each frequency.
4. RDS information for each station will be displayed, if available.
5. Adjust the volume using the right hand rotary control.
Bluetooth
I. Press and release the 'Mode' button until you are in Bluetooth mode.
2. The product will be in pairing mode and the bluetooth indicator and symbol ✝ on the display will flash for up to 3 minutes.
3. On the device that you would like to connect to your radio via Bluetooth (e.g. iPhone/iPad/Android/other phone/Computer), turn on Bluetooth connectivity and ensure that it is 'discoverable'.
Note: If necessary, refer to the instructions for your device to add or set up Bluetooth.
- When found, the bluetooth connection to your radio will be displayed as 'Jensen DAB'. Select the device name to begin pairing.
- When pairing is complete, the bluetooth symbol ⚙(next to the clock) will stop flashing and remain on continuously.
Aux-in
I. Press and release the 'Mode' button until you are in Auxiliary Input mode.
2. Connect one end of an Aux-in audio lead (not supplied) to the headphone (or auxiliary out) socket of your secondary device, connect the other end to the AUX-IN socket on the back of your radio.
3. For optimal volume levels, adjust the output volume level on both the secondary device and on your radio.

Using your DAB+ radio
What is DAB Digital Radio?
DAB means Digital Audio Broadcasting. The difference between a DAB radio and a conventional AM/FM radio is that broadcasts are transmitted digitally resulting in a high quality audio sound*, without any hiss, fading or crackles.
Your DAB radio will automatically scan and find all the available stations for you. Each station name, is shown on the display; all you need to do is scroll through the station names and select the one that you would like to listen to, so it's very easy and quick to use.
For more information about DAB services and to find a list of stations available in your area visit www.digitalradionow.com.
* Please note that the sound quality is dependent on a strong signal strength. Signal strength can vary from area to area. To check the signal strength in your area visit www.digitalradionow.com
Telescopic aerial
Please make sure that the aerial on the back of the radio is fully extended and adjusted when you scan for DAB stations and listen to DAB radio (a vertical position is recommended). This will ensure that the maximum signal strength is available as well as the best possible sound quality.
DAB mode
Press and release the 'Mode' button on the front of your radio until 'DAB' is displayed.
If you were listening to a DAB station when you switched the radio off then this station will be automatically selected when you switch the radio back on.
Changing DAB stations
I. If you are not already in DAB mode, press and release the 'Mode' button on the front of your radio until 'DAB' is displayed.
2. Use the left hand rotary control to scroll through the station list.
3. When the station that you would like to listen to is displayed, press and release the left hand rotary control to 'Select'.
Scanning for DAB stations
With DAB radio, additional stations and services regularly become available so it's a good idea to carry out a scan every now and then to make sure that you have the most up to date station listing stored within the memory of your radio.
If you have moved your radio to another location, e.g. if you go on holiday, then it's also a good idea to carry out a scan.
I. If you are not already in DAB mode, press and release the 'Mode' button on the front of your radio to go to DAB mode.
- Press and hold the 'Scan' button on the front of your radio to carry out scan. 'Scanning', will be displayed and a progress bar will show the progress of the scan and the number of stations found during the scan will also be displayed.
Note: See ‘Changing DAB stations’ on page 9 for how to change DAB stations after a scan.
Secondary services
You may see a ‘>’ symbol after the name of a DAB station. This indicates that there are secondary services available on that station, e.g. a sports station with additional commentaries.
To select the secondary service, turn the left hand rotary control clockwise when the ‘>’ appears in the display. When the secondary service ends, your radio will automatically go back to the primary station.
Manual tune
Using the manual tune feature you can select a specific digital radio channel frequency and then manually adjust the aerial, or the location of the radio, to get the strongest possible signal for that channel in your location.
I. Press and hold the 'Info/Menu' button on the front of the radio until '
-
Use the left hand rotary control to scroll to '
'. Press the left hand rotary control to 'Select'. -
Turn the left hand rotary control to scroll through the digital radio frequencies. Stop when the frequency you would like to listen to is displayed. Press the left hand rotary control to 'Select'.
An empty □will appear on the second line of the display to indicate the minimum signal strength for acceptable listening. After a few seconds, the row of solid rectangles will indicate the actual signal strength that you are receiving. The stronger the signal, the further to the right the row of solid rectangles will be.
Note: You may need to adjust the aerial or move your radio to get the strongest possible signal.
- Press and hold the 'Info/Menu' button to return to the station display.
Prune DAB stations
You can remove the DAB stations in the station list that cannot be received in your area. These are listed with a '?' prefix.
I. Press and hold the 'Info/Menu' button on the front of the radio until '
-
Use the left hand rotary control to scroll to '
'. Press the left hand rotary control to 'Select'. -
'Prune
Yes' is displayed. Use the left hand rotary control to scroll to 'Yes'. Press the rotary control to 'Select' and prune the station list. Stations with a '?' prefix will now no longer be displayed. -
Press and hold the 'Info/Menu' button to return to the station display.
Storing a DAB station preset
Your radio can store up to 10 DAB stations in its preset memories for instant access to your favourite stations.
Note: When you store DAB radio station presets, these do not overwrite your FM station presets.
I. Tune your radio to the station that you wish to preset (see changing DAB stations on page 9).
-
Press and hold the 'Preset' button on the front of your radio. 'Preset Store I (Empty)' is displayed if no previous station has been stored.
-
Use the left hand rotary control to move to the preset location that you would like to store the radio station to (1-10).
-
Press the left hand rotary control to 'Select'. The display will confirm 'Preset X stored', where 'X' is the number of the preset (1-10).
Note: If there is already an existing DAB station stored under a preset, it will be over written when you store the new station.
Tune to a DAB preset station In DAB mode:
I. Press and release the 'Preset' button on the front of the radio. 'Preset Recall I' is displayed and the name or frequency of the station stored there, or Preset Recall X (Empty)' if no previous station has been stored.
- Use the left hand rotary control to move to the preset location that you would like.
- Press the left hand rotary control to 'Select'. The radio will tune to that station and begin to play.
Note: If no DAB station has been stored under the preset, 'Preset Empty' will be displayed and the radio will revert to the previously selected radio station after a few seconds.
DAB display information
When listening to a DAB station you can change the information that will appear on the second line of the display by pressing the 'Info/Menu' button multiple times to select your preferred display information. There are several different types of information that are sent by the broadcaster.
Dynamic Label Segment (DLS)
This is scrolling text information supplied by the broadcaster. Information could be the name of an artist or music title, DJ's name, contact details for the radio station etc.
Signal strength
The information provided gives details of the signal strength you are receiving. An empty☐ will appear on the second line of the display to indicate the minimum signal strength for acceptable listening. The row of solid rectangles indicate the actual signal strength that you are receiving. The stronger the signal, the further to the right the row of solid rectangles will be.
Program Type (PTY)
Such as 'Rock', 'Pop', Talk' or 'News'
Multiplex name
Displays the broadcasting area and collection of radio stations on this frequency e.g. BBC National DAB, Digital I Network.
Channel and Frequency eg: 12B 225.64 MHz
Signal error
This is displayed as a number between 0-99. It would not be possible to satisfactorily listen to a ratio station with a signal error rate of 30 or above. Try adjusting the aerial or relocating your radio to improve reception.
Signal information
The data rate at which the signal is being transmitted.
Time and date
Supplied by the broadcaster.
I. Repeatedly press and release the 'Info/Menu' button on the front of the radio to cycle through the different information options.
Dynamic Range Control (DRC)
In DAB mode:
The dynamic range for each radio programme is set by the broadcaster for each radio station and may be different for the types of programme broadcast, such as pop or classical music or a chat show. The dynamic range control signal is transmitted in parallel with the audio signal for each programme and with your radio you can use this control signal to expand or compress the dynamic range (the difference between the loudest and quietest sounds) of the reproduced audio signal. Changing the dynamic range can
affect the ‘loudness’ and/or ‘quality of sound’ of the programme that you hear so that it will be more suited to your listening conditions and your own personal listening requirements. e.g. in a noisy environment, where quiet sounds might be swamped, setting the compression to maximum will ‘boost’ the quiet sounds, whilst keeping the loudest sounds at their original level.
There are 3 levels of compression:
DRC Off - no compression. This is the default setting.
DRC Low - medium compression.
DRC High - maximum compression.
I. Press and hold the 'Info/Menu' button on the front of the radio until
-
Use the left hand rotary control to scroll to ‘
’. Press the left hand rotary control to ‘Select’. The current DRC setting will have an ‘*’ next to it. -
Use the left hand rotary control to scroll through the options and press the left hand rotary control to 'Select'.
-
Press and hold the 'Info/Menu' button to return to the station display.
Using your FM radio
FM mode
Press and release the 'Mode' button on the front of your radio until 'FM' is displayed.
When your radio is in FM mode it can receive Radio Data System or 'RDS' information if this is being transmitted by the broadcaster. RDS information will often include the station name, detail about the programme and the current time. If you were listening to an FM station when you switched the radio off then this station will be automatically selected when you switch the radio back on.
Telescopic aerial
Please make sure that the aerial on the back of the radio is fully extended and adjusted before you attempt to tune to an FM station (a vertical position is recommended). This will ensure that the maximum signal strength is available when the radio begins to scan. Extending the aerial also ensures the best possible sound quality.
Tuning to an FM station
I. Press and release the 'Scan' button on the front of your radio to scan up the frequency band. Press and hold the 'Scan' button to scan down the frequency band. Your radio will search for the next available station and then stop on that station.
- Use the left hand rotary control to fine tune each frequency.
The RDS information for each station will be displayed, if available.
Note: If reception is still poor adjust the position of the aerial or try moving the radio to another location.
Storing an FM station preset
Your radio can store up to 10 FM stations in its preset memories for instant access to your favourite stations.
Note: When you store FM radio station presets, these do not overwrite your DAB station presets.
I. Tune your radio to the station that you wish to preset (see Tuning to an FM station on this page).
- Press and hold the 'Preset' button on the front of your radio. 'Preset Store I (Empty)' is displayed if no previous station has been stored.
- Use the left hand rotary control to move to the preset location that you would like to store the radio station to (1-10).
- Press the left hand rotary control to 'Select'. The display will confirm 'Preset X stored', where 'X' is the number of the preset (1-10).
Note: If there is already an existing FM station stored under a preset, it will be over written when you store the new station.
Tune to an FM preset station In FM mode:
I. Press and release the 'Preset' button on the front of the radio. 'Preset Recall I' is displayed and the name or frequency of the station stored there, or Preset Recall X (Empty)' if no previous station has been stored.
2. Use the left hand rotary control to move to the preset location that you would like.
3. Press the left hand rotary control to 'Select'. The radio will tune to that station and begin to play.
Note: If no FM station has been stored under the preset, 'Preset Empty' will be displayed and the radio will revert to the previously selected radio station after a few seconds.
FM display information
When listening to an FM station you can change the information that will appear on the second line of the display by pressing the 'Info/Menu' button multiple times to select your preferred display information. There are several different types of information that are sent by the broadcaster.
Radiotext (RT)
This is scrolling text information supplied by the broadcaster. Information could be the name of an artist or music title, DJ's name, contact details for the radio station etc.
Program Type (PTY)
Such as 'Rock', 'Pop', Talk' or 'News'
Frequency
Such as 93.30MHz
Station name
Such as BBC R4
Audio mode
The radio will automatically switch between Stereo and Mono, depending on the quality of the signal being received but you can override this function and manually switch between ‘Stereo’ and ‘Mono’.
I. When ‘Stereo’ or ‘Mono’ is displayed, press and release the left hand rotary control to ‘Select’ and toggle between each mode.
Time and date
Supplied by the broadcaster.
I. Repeatedly press and release the 'Info/Menu' button on the front of the radio to cycle through the different information options.
Bluetooth mode
Bluetooth (BT) mode
Press and release the 'Mode' button on the front of your radio until 'Bluetooth' is displayed.
NFC touch point
Your radio has an NFC touch point to enable quick and easy Bluetooth pairing with other NFC enabled devices.
I. In Bluetooth mode, just touch your other NFC enabled device to the NFC touch point logo on the side, top left of your radio to pair.
Note: The Bluetooth name of your radio is 'Jensen DAB'.
- To disconnect an NFC bluetooth connection, just touch your other NFC enable device to the NFC touch point logo again.
Connecting or ‘Pairing’ with your radio if you do not have an NFC enabled device.
In Bluetooth (BT) Mode:
I. Press and release the 'Mode' button until you are in Bluetooth mode.
-
The product will be in pairing mode and the bluetooth indicator and symbol *on the display will flash for up to 3 minutes.
-
On the device that you would like to connect to your radio via Bluetooth (e.g. iPhone/iPad/Android/other phone/Computer), turn on Bluetooth connectivity and ensure that it is 'discoverable'.
Note: If necessary, refer to the instructions for your device to add or set up Bluetooth.
- Select to 'Add new device', if necessary.
Note: Some products will automatically search for a new device and so the 'Add new device' option is not available.
- When found, the bluetooth connection to your radio will be displayed as 'Jensen DAB'. Select the device name to begin pairing.
Note: If you are prompted for a password, enter '0000'.
-
When pairing is complete, the bluetooth symbol ✝(next to the clock) will stop flashing and remain on continuously.
-
Now that you have paired your device with the radio, it will connect to it when it is within range, which is about 10 metres or less (33 feet or less), line of sight.
Note: Please disconnect any bluetooth connections to the radio, before setting up a new connection or 'pairing'.
Listening to Music/Audio using Bluetooth, via your radio
In Bluetooth mode:
I. Select and start the music or audio that you wish to listen to on your paired Bluetooth device.
Note: If your previously paired device is within range but does not automatically connect with the radio, go to the Bluetooth connectivity settings on your device and select 'Jensen DAB' to reconnect.
- You can use the controls on your Bluetooth device as normal when it is paired with the radio but you can also use the following controls on the front of your radio:
Play/Pause
Press and release the 'Preset' button on the front of the radio.
Next track or song
Turn the left hand rotary control clockwise one click.
Previous track or song
Turn the left hand rotary control anti-clockwise one click.
Disconnect a Bluetooth connection
In Bluetooth (BT) Mode:
I. Press and hold the 'Mode' button on the radio to disconnect the current Bluetooth connection. The bluetooth indicator *on the display will begin to flash and the radio will be in pairing mode. You can now pair your radio with another Bluetooth device.
Aux-in mode
Aux-in mode
Press and release the 'Mode' button on the front of your radio until 'Auxiliary Input' is displayed.
Using an Aux-in connection lead (not supplied), Aux-in mode allows for a quick and easy connection to an external sound source. Your radio is then transformed into a high quality digital audio speaker system.
I. Connect one end of an Aux-in audio lead to the headphone (or auxiliary out) socket of your secondary device, connect the other end to the AUX-IN socket on the back of your radio.
- To gain optimal volume levels, adjust the output volume level on both the secondary device and on the your radio.
Using the Alarm
Setting the Alarm
Notes:
Your radio must be switched on (not in Standby mode) when you set an Alarm.
Also, please check that the radio has the correct time and date from the DAB signal before you set an alarm.
There are 2 alarm settings available.
I. Press and release the 'Alarm' button on the front of the radio.
2. The Alarm I icon will flash in the display. Press and release the left hand rotary control to 'Select'. The hour digits will flash.
-
Use the left hand rotary control to display the correct hour for your alarm in 24 hour clock. Press to 'Select'.
-
The minutes for the alarm will flash. Use the left hand rotary control to display the correct minutes for your alarm. Press to 'Select'.
-
The duration for the alarm will flash. Use the left hand rotary control to display the duration for your alarm. You can choose from 15, 30, 45, 60 and 90 minutes. Press to 'Select'.
-
The sound source for the alarm will now flash. Use the left hand rotary control to display the source for your alarm. You can choose from DAB, FM and Buzzer. Press to 'Select'.
Note: If you choose DAB or FM as the sound source, you are prompted to select the station you Last Listened to or one of your preset radio stations. Use the left hand rotary control to choose. Press to 'Select'.
- The frequency options for the alarm will now flash. Use the left hand rotary control to display the frequency for your alarm. You can choose from Daily, Once, Weekends and Weekdays. Press to 'Select'.
Note: If you have selected 'Once', you will then be prompted to enter the day, month and year for your alarm. Use the left hand rotary control and press to 'Select' and confirm each step.
-
The alarm volume level will now be displayed. Use the left hand rotary control to set the volume for your alarm. Press to 'Select'.
-
Alarm on will now flash in the display. Use the left hand rotary control to display Alarm on or Alarm off. Press to 'Select'.
- 'Alarm saved' is displayed and the alarm 🔒 icon will appear in the display to confirm that an alarm has been set.
II. To set Alarm 2, press and release the 'Alarm' button on the front of the radio twice. 'Alarm 2 Setup' is displayed. Follow steps 2-9 above.
Note: If you have selected 'DAB' or 'FM' for your alarm, please check that the volume on your radio is set to a level that will wake you up.
Stop the Alarm
When the alarm sounds press and release the ⏻ button on the front of the radio. Alternatively, you can press and release ‘Alarm’ button on the front of the radio to ‘Snooze’ (see Snooze function below).
Note: If you press the ⏻ button on the front of the radio to stop the alarm, the 🔒 icon will remain in the display and the alarm will sound again at the same time the next day.
Turn off the Alarm
Follow the steps for ‘Setting the Alarm’ (page 20) and select ‘Off’ in step 9.
Alternatively, in Standby mode, you can repeatedly press and release the 'Alarm' button on the front of the radio to turn Alarm 1 and Alarm 2 'On' or 'Off'.
Snooze function
When the alarm sounds, you can press and release the 'Alarm' button on the front of the radio to Snooze. The Snooze time countdown will be displayed and the alarm icon will flash in the display. The alarm will sound again in approximately 5 minutes.
System settings
Your radio must be switched on (not in Standby mode) when you change the system settings.
Sleep timer
You can set your radio to turn off automatically using the sleep timer. You can choose from 15, 30, 45, 60 and 90 minutes or Off.
I. Press and hold the 'Info/Menu' button on the front of your radio.
2. Use left hand rotary control to scroll to '
3. '
4. Use the left hand rotary control to display the sleep time you would like. Press to 'Select' and confirm.
The number of minutes until your radio will automatically switch off will appear in the far right of the display
Note: To cancel the sleep time, follow the steps above and in step 4., use the left hand rotary control to display 'Sleep off'. Press to 'Select' and confirm.
Manually set the date and time
I. Press and hold the 'Info/Menu' button on the front of your radio.
2. Use left hand rotary control to scroll to ‘
3. Use the left hand rotary control to scroll to '
- You can now use the left hand rotary control to scroll through the other options available. Press the left hand rotary control to 'Select' as required.
You can change the settings for:
- 12/24 hour clock display
- date format, DD-MM-YYYY or MM-DD-YYYY
-
to auto update the time from the DAB signal, FM signal, DAB or FM signal or no update.
-
Press and hold the 'Info/Menu' button to return to the station display.
Display backlight
You can adjust the brightness of the display backlight for both the 'Standby' and 'Normal' modes of your radio.
I. Press and hold the 'Info/Menu' button on the front of your radio.
2. Use left hand rotary control to scroll to '
3. Use the left hand rotary control to scroll to '
4. You can now use the left hand rotary control, to scroll and choose to change the backlight brightness setting for the 'Standby' or 'Normal' modes of your radio. Press the left hand rotary control to 'Select' as required.
Note: An '*' will be displayed next to the current setting.
- Press and hold the 'Info/Menu' button to return to the station display.
Display language
You can change the display language of your radio, there are 5 options available; English, French, German, Norwegian and Dutch.
I. Press and hold the 'Info/Menu' button on the front of your radio.
2. Use left hand rotary control to scroll to '
3. Use the left hand rotary control to scroll to '
- Use the left hand rotary control to scroll to the display language you would like. Press to 'Select'.
Note: As soon as you select a different display language, all of the display information will be in this new language.
- Press and hold the 'Info/Menu' button to return to the station display.
Factory reset
You can reset your radio and restore all of the original factory settings.
Note: If you reset your radio all of your DAB and FM station presets will be deleted.
I. Press and hold the 'Info/Menu' button on the front of your radio.
2. Use left hand rotary control to scroll to ‘
3. Use the left hand rotary control to scroll to '
4. 'Factory Reset? (No) Yes' will be displayed. Use the left hand rotary control to scroll to '
5. Press to 'Select' and confirm.
6. 'Restarting...' is displayed. After a few seconds the display will change to 'Welcome to Digital Radio'.
7. Press and release the 'button on the front of the radio and your radio will scan for DAB stations. Remember to extend the telescopic aerial.
Simple solutions
If you are experiencing problems with your radio, there are some quick and easy checks that you can do, which may help to solve the problem.
Radio reception is poor
- Please check that the aerial is FULLY extended for the maximum signal strength and improved reception.
- Try moving your radio to an alternative location to see if the reception improves. Please remember to scan for DAB stations again once you have moved your radio. See page 38.
- Check that you do not have other electrical equipment too close to your radio, causing interference.
- Visit www.digitalradionow.com for information about DAB reception in your area.
No sound
- Adjust the volume using the right hand rotary control.
- Check that the mains power lead is connected at the back of the radio and the mains power wall socket is switched on.
- You may need to re-scan if the station you last listened to is no longer available. See page 38.
The function buttons do not respond
- Check that you are using the function buttons for the mode that you are in.
- Check that the power lead is plugged into the back of the radio and that the mains adaptor is plugged in and switched on. Press and release the ⏻ button on the front of the radio.
- Turn off the radio and unplug the mains power. Leave for one minute and then reconnect your radio.
- Try a factory reset. See page 52.
Unable to pair with a Bluetooth device
- Check that you are in Bluetooth mode. Press and release the 'Mode' button on the front of the radio until 'Bluetooth' is displayed.
-
Ensure that you are within range of the radio for Bluetooth functionality (less than 10 metres, line of sight).
-
Ensure that any previously ‘paired’ devices have been disconnected.
- If possible, turn off other nearby Bluetooth devices or disable their Bluetooth functionality.

Technical information
Technical specification
Power adaptor:
Output 9V/2A
Input 100-240V/50-60Hz
DAB frequency range:
Band III, 174 MHz - 240 MHz
FM frequency range:
87.5 MHz to 108 MHz
General information
Guarantee
For 1 year in respect of defects found to be due to faulty workmanship or material. Proof of purchase is required for validity of the guarantee. This guarantee is no longer valid if the damage has been caused by fall, alteration or repair by any unauthorised persons.
This guarantee in no way affects your statutory rights.
Service
- This product should only be repaired or serviced by an authorised Service Engineer and only genuine approved spare parts should be used.


- DL500 DAB+/FM radio
- Dynamic Label Segment (DLS)
- Contents
- ⚠️ Important safety information
- Your DAB+ digital/FM radio
- Instructions for use
- Check the package contents
- Where to put your radio
- Setting up
- Time and date
- Changing modes
- NFC touch point
- Adjusting the volume
- Switch on/off
- Step guide to getting started
- DAB+
- FM
- Bluetooth
- Aux-in
- Using your DAB+ radio
- What is DAB Digital Radio?
- Telescopic aerial
- DAB mode
- Changing DAB stations
- Scanning for DAB stations
- Secondary services
- Manual tune
- Prune DAB stations
- Storing a DAB station preset
- Tune to a DAB preset station In DAB mode:
- DAB display information
- Signal strength
- Program Type (PTY)
- Multiplex name
- Signal error
- Signal information
- Dynamic Range Control (DRC)
- Using your FM radio
- FM mode
- Tuning to an FM station
- Storing an FM station preset
- FM display information
- Radiotext (RT)
- Frequency
- Station name
- Audio mode
- Bluetooth mode
- Bluetooth (BT) mode
- Disconnect a Bluetooth connection
- Aux-in mode
- Using the Alarm
- Setting the Alarm
- Notes:
- Stop the Alarm
- Turn off the Alarm
- Snooze function
- System settings
- Sleep timer
- Manually set the date and time
- Display backlight
- Display language
- Factory reset
- Simple solutions
- Radio reception is poor
- No sound
- The function buttons do not respond
- Unable to pair with a Bluetooth device
- Technical information
- General information
- Guarantee
- Service
Brand : JENSEN
Model : DL500
Category : Radio