RSV135 - Alarm Clock JOHNSON - Free user manual and instructions
Find the device manual for free RSV135 JOHNSON in PDF.


| Product Type | Alarm Clock Radio |
| Brand | Johnson |
| Model | RSV135 |
| Power Supply | AC 230V~50Hz |
| Battery Backup | 1x9V (6LR61) (not included) |
| Frequency Range AM | 530 - 1600 kHz |
| Frequency Range FM | 88 - 108 MHz |
| Display | LED Digital Clock |
| Alarm Modes | Radio or Buzzer |
| Snooze Duration | Approximately 9 minutes |
| Sleep Timer | 1 minute to 1 hour 59 minutes |
| FM Antenna | Wire antenna (unwind fully) |
| AM Antenna | Internal directional aerial (rotate unit) |
| Controls | Volume, Tuning, Waveband, Snooze, Alarm Set, Time Set, Sleep Set, Minute Set, Hour Set, Function Selector |
| Cleaning | Soft cloth with water or mild detergent |
| Safety | Do not immerse in water; keep away from heat sources |
| Battery Type | 9V (6LR61) |
| Warranty | 2 years |
| Environmental Disposal | WEEE symbol; recycle appropriately |
| Usage | Indoor domestic use only |
Frequently Asked Questions - RSV135 JOHNSON
User questions about RSV135 JOHNSON
0 question about this device. Answer the ones you know or ask your own.
Ask a new question about this device
Download the instructions for your Alarm Clock in PDF format for free! Find your manual RSV135 - JOHNSON and take your electronic device back in hand. On this page are published all the documents necessary for the use of your device. RSV135 by JOHNSON.
USER MANUAL RSV135 JOHNSON
230V\~ 50Hz
Battery Back Up: 1x9V (6LR61)
(Battery Not Including)


AVVERTENZE GENERALI
Carefully read the requirements in this manual and keep in a safe place. It contains important instructions on the safety, use and future of your appliance.
This appliance is only for domestic use and must only to be used for the purpose it was specifically designed. Any other use is considered improper and dangerous.
The manufacturer cannot be held responsible for any damages caused by improper, incorrect and negligent use.
The installation must be carried out according to the manufacturer's instructions.
The manufacturer shall not be held responsible for any damages to people, animals or objects caused by incorrect installation.
The safety of the electrical equipment is only guaranteed if it is connected to an electrical installation equipped with a suitable earthing system in compliance with the current standards on electrical safety. Do not leave parts of packaging (plastic bags, foam polystyrene, nails, etc) within reach of children or incapacitated people since they are potential sources of danger.
Before connecting the appliance, check that the technical data on the rating label corresponds to those of the main electricity network.
In case of incompatibility between the outlet and the plug, contact a qualified electrician for the necessary adjustments.
Do not use adaptors, multiple plugs and extension leads.
However, if absolutely necessary only use materials that conform to the current safety standards and that are compatible with the appliance and the main electricity network.
On using the appliance for the first time, remove any labels or protective sheets.
If the appliance is equipped with air inlets, make sure they are never blocked not even partially.
The use of any electrical appliance involves the observance of some fundamental rules. In particular:
Do not immerge the appliance in water and do not wet; do not use it near water, in the tub, washbasin or near other recipients with liquids. If the appliance should accidentally fall in water, DO NOT try to touch it but immediately disconnect the plug from the mains power.
Then bring it to an authorised service centre for the necessary controls.
During use, the appliance must be kept away from any inflammable objects or substances or explosives.
Do not touch the appliance with wet hands or feet.
Do not use the appliance with bare feet.
Do not pull on the power cord or on the appliance itself to disconnect the plug from the power outlet.
Do not leave the appliance exposed to atmospheric agents (sun, rain...).
Keep the appliance out of reach of children or incapacitated people and do not let them use it.
Disconnect the plug from the power outlet when the appliance is not being used and before carrying out any cleaning or maintenance.
The power cord must be completely unwound to prevent it from over-heating.
The power cord must be kept away from heat sources and/or sharp edges.
If power cord is damaged, have it replaced by qualified personnel.
Switch off and contact a qualified technician if the appliance should breakdown and/or not function properly.
Any tampering or interventions executed by unqualified people will cancel the guarantee.
Use a soft and non-abrasive cloth to clean the appliance.
When the appliance is unserviceable and must be eliminated, remove its cords and dispose of it at an authorised disposal centre in order to protect the environment.
- Warranty does not cover any glass parts of the product.
ATTENTION:
The damages of the power supply cord, originate by the wear aren't covered by guarantee; the repair will be in charge to the owner.
ATTENTION:
Warranty does not cover any plastic parts of the product.
ATTENTION:
If the need should arise to take or send the appliance to an authorised service centre, make sure to clean all its parts thoroughly.
For hygienic purposes, the service centre shall reject appliances that are not perfectly clean on the outside or inside without making any controls or repairs.
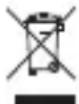
The symbol 📁 on the product or on its packaging indicates that this product may not be treated as household waste. Instead it shall be handed over to the applicable collection point for the recycling of electrical and electronic equipment. By ensuring this product is disposed of correctly, you will help prevent potential negative consequences for the environment and human health, which could otherwise be caused by inappropriate waste handling of this product.
For more detailed information about recycling of this product, please contact your local city office, your household waste disposal service or the shop where you purchased the product.
LOCATION OF CONTROLS
-
LED Digital Clock Display
-
Volume Control - Buzz On/Off
-
Tuning Control
-
Waveband Selector
-
Snooze Control
-
Alarm Set Button
-
Time Set Button
-
Sleep Set Button
-
Minute Set Button
-
Hour Set Button
-
Function Selector
-
FM Antenna
-
Auto Indicator
-
Battery Door
REAL TIME SETTING
A. Set the Function Selector (11) to "OFF". Connect the mains lead to the power supply.
The clock display will flash on and off indicating a power interruption and that the displayed time is incorrect.
B. To set the correct time, press the Time Set Button (7) and Hour Set Button (10), or Minute Set Button (9), together, until the correct time is displayed.
C. Open the clock Battery Door (14) at the backside of the unit and put in a 6LR61/6F22 (or equivalent) 9-volt battery. The purpose of this battery is to store the information relating to alarm time and to keep the clock functioning in the event of disconnection from the mains supply or power interruption. Should this occur, the clock would continue to keep time, but will not display.
PLEASE NOTE: When operating from battery only, the clock will only remain accurate for a short period of time.
It is important that the mains supply is restored as soon as possible.
ALARM TIME SETTING
A. Press the Alarm Set Button (6) and simultaneously press the Hour Set Button (10) or Minute Set Button (9) as appropriate until the required alarm time is reached.
B. To double check the alarm time, simply press the Alarm Set Button (6) then the display will show the pre-set alarm time.
RADIO OPERATION
For AM reception this unit uses an internal directional aerial, rotate the unit for best reception. For FM reception, the wire FM Antenna (12) on the back of the unit should be fully unwound.
A. Set the Function Selector (11) to the "ON" position.
B. Set the Waveband Selector (4) to the required waveband.
C. Use the Tuning Control (3) to select the desired station.
D. Adjust the Volume Control (2) to the desired listening level.
E. To turn off the radio, set the Function Selector (11) to "OFF".
If the radio does not switch off this may be caused by inadvertent operation of the Sleep Set Button (8).
To cancel this, press the Snooze Button (5) once.
WAKE TO RADIO
Having selected your desired station and adjusted the desired listening level, proceed as follows:
A. Follow the instructions for "ALARM TIME SETTING" above.
B. When the desired alarm time has been selected, set the Function Selector (11) to the "AUTO" position.
C. The radio will switch on automatically at the pre-set alarm time.
D. The alarm can be temporarily stopped for approximate 9 minutes by pressing the Snooze Button (5) once.
E. Depress the Alarm Set Button (6) to turn off the radio.
The alarm will activate again after 24 hours unless the Function Selector (11) is set to "OFF".
WAKE TO ALARM
A. Follow the instructions for "ALARM TIME SETTING" above.
B. When the desired alarm time has been selected, set the Function Selector (11) to the "AUTO position.
C. Turn the Volume Control – Buzz On / Off (2) fully clockwise to select the BUZZ function.
D. The alarm tone will switch on automatically at the pre-set alarm time.
E. The alarm can be temporarily stopped for approximate 9 minutes by pressing the Snooze Button (5) once.
F. Depress the Alarm Set Button (6) to turn off the buzzer.
The alarm will activate again after 24 hours unless the Function Selector (11) is set to "OFF".
SLEEP TO RADIO
The radio can be set to switch off automatically after a period of time from 1 minute to 1 hour and 59 minutes, by following this procedure: With all the controls pre-set in the "WAKE TO RADIO", or the Function Selector (11) in the "OFF" position, depress the Sleep Set Button (8) and the Minute Set Button (9), or Hour Set Button (10) until the display shows the exact sleep time you wish the radio to continue to play before switch off.
To switch off the radio before the end of the registered sleep time period, simply press the Snooze Button (5) once.
CLEANING
Clean the cabinet with a soft cloth moistened with water or mild detergent.
Do not use solvents such as alcohol, benzene or thinner, as they may damage the cabinet finish. Make sure to disconnect the mains lead from the supply before cleaning.
CAUTION
A. Ensure minimum distances around the apparatus for sufficient ventilation. The ventilation should not be impeded by covering the ventilation openings with items, such as newspapers, table-cloths, curtains, etc. B. No naked flame sources, such as lighted candles, should be placed on the apparatus.
C. It shall not be exposed to dripping or splashing and that no objects filled with liquids, such as vases, shall be placed on the apparatus.
D. Do not place the product in closed bookcases or racks without proper ventilation.
E. Where the mains plug is used as the disconnect device, the disconnect device shall remain readily operable.
F. Attention should be drawn to the environmental aspects of battery disposal.
G. The use of apparatus in moderate climates.
H. Danger of explosion if battery is incorrectly replaced. Replace only with the same or equivalent type.
I. The batteries (battery pack or batteries installed) shall not be exposed to excessive heat such as sunshine, fire or the like.
SPECIFICATION
Power Source:
AC 230V\~50Hz
Frequency Range:
AM 530 - 1600 kHz
FM 88 - 108 MHz
GARANZIA
The validity of the guarantee starts from the purchasing date certified by the seller's stamp and expires at the end of the indicated period, even when the device has not been used. The guarantee covers all substitutions or repairs due to material or manufacturing defects. The guarantee has no validity in case of device tampering or when the defect is due to incorrect or improper use of the same. Substitutions and repair covered by the guarantee are made free of any charge for goods delivered free our service company representative. Only the freight will be at buyer's expense. All replaced parts or devices will become our property.
2 ANNI YEARS
internet: www.johnson.it
e-mail: com @johnson.it
MOD. RSV135
DATA ACQUISTO PURCHASE DATE
DATA RIPARAZIONE REPARE DATE
TIMBRO CENTRO ASSISTENZA AFTER SALES SERVICE CENTER STAMP
MOD. RSV135
Brand : JOHNSON
Model : RSV135
Category : Alarm Clock