WT8E-B11 - Tumble dryer PKM - Free user manual and instructions
Find the device manual for free WT8E-B11 PKM in PDF.


| Product Type | Condenser Tumble Dryer |
| Brand | PKM |
| Model | WT8E-B11 |
| Capacity | 8.0 kg |
| Energy Efficiency Class | B |
| Energy Consumption (Standard Cotton Programme Full Load) | 4.74 kWh |
| Energy Consumption (Standard Cotton Programme Partial Load) | 2.56 kWh |
| Annual Energy Consumption | 561 kWh |
| Condensation Efficiency Class | B |
| Noise Emission | 69 dB(A) |
| Power Consumption | 2700 W |
| Power Consumption (Off Mode) | 0.28 W |
| Power Consumption (Left On) | 0.80 W |
| Programmes | 12 (Cotton, Synthetics, Warm/Cool, Quick, Refresh, etc.) |
| Delayed Start | 1 - 24 hours |
| Drum Material | Zinc |
| Dimensions (H x W x D) | 84.5 x 59.5 x 61.5 cm |
| Net Weight | 43.0 kg |
| Gross Weight | 47.0 kg |
| Child Lock | Yes (press Anti-Crease + Gentle for 3 seconds) |
| Anti-Crease Function | Yes (30 min default, 120 min when activated) |
| Gentle Function | Yes (reduces heat, extends drying time by 20 min) |
| Moisture Sensor | Yes (automatic drying adjustment) |
| Lint Filter | Clean after each use |
| Air Condenser | Clean every 3 months |
| Water Container | Empty after each use |
Frequently Asked Questions - WT8E-B11 PKM
User questions about WT8E-B11 PKM
0 question about this device. Answer the ones you know or ask your own.
Ask a new question about this device
Download the instructions for your Tumble dryer in PDF format for free! Find your manual WT8E-B11 - PKM and take your electronic device back in hand. On this page are published all the documents necessary for the use of your device. WT8E-B11 by PKM.
USER MANUAL WT8E-B11 PKM
natural_image
Front view of a white portable washing machine with control panel and side door (no visible text or symbols)Deutsch
English
Seite 2
Page 22
www.pkm-online.de
natural_image
Three identical line drawings of a washing machine with a circular head and cross marks, mounted on a base (no text or symbols)natural_image
Diagram of a washing machine with a tool and a red button, no text or symbols present3. Bedienung
1 Behälter
natural_image
Technical line drawing of a device rear panel with internal tubing and a close-up view of the internal components (no text or symbols)natural_image
Diagram of a hand using a U-shaped device to lift a test tube into a container (no text or symbols present)natural_image
Technical line drawing of a mechanical component with internal grid structure (no text or symbols)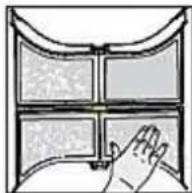
4.2 Luftkondensator
natural_image
Line drawing of a computer monitor with ventilation grilles and a scroll wheel (no text or symbols)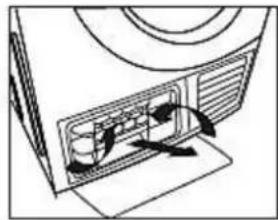
natural_image
Diagram of a computer monitor with ventilation slots and directional arrows indicating airflow (no text or symbols)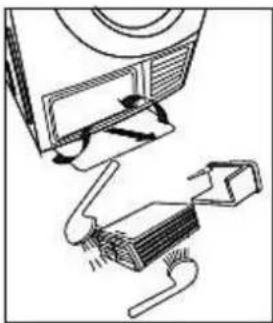
natural_image
Diagram of a device with a computer monitor and attached electronic components (no text or symbols)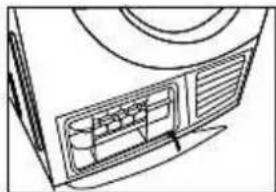
natural_image
Line drawing of a refrigerator interior with ventilation grilles (no text or symbols)4.3 Wasserbehälter

natural_image
Line drawing of hands installing or adjusting a mechanical component (no text or symbols)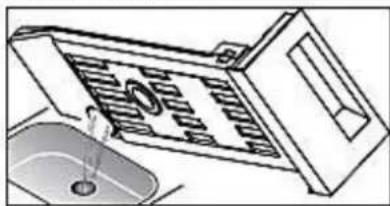
natural_image
Illustration of a kitchen appliance with a drain and water outlet (no text or symbols)4.4 Fehlermeldungen

Dear customer! We would like to thank you for purchasing a product from our wide range of domestic appliances. Read the complete instruction manual before you operate the appliance for the first time. Retain this instruction manual in a safe place for future reference. If you transfer the appliance to a third party, also hand over this instruction manual.
Index
- Safety instructions....23
- Installation 27
2.1 Unpacking and positioning.... 27
2.2 Levelling.... 28
- Operation....28
3.1 Appliance 28
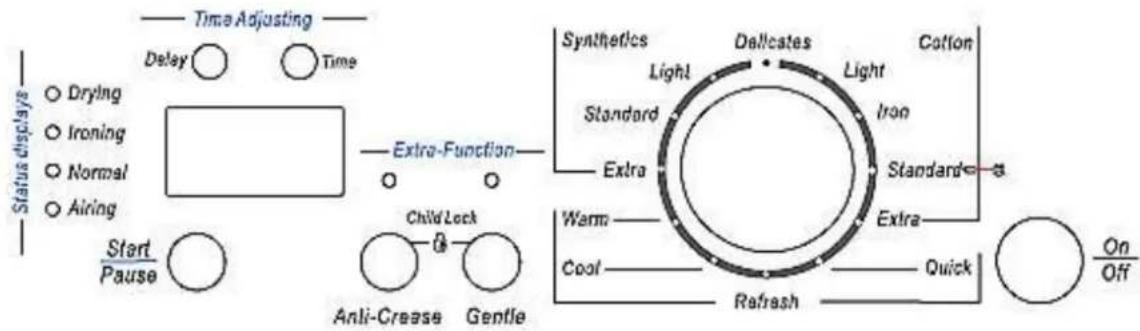
3.2 Control panel.... 30
3.3 Initializing of a programme.... 31
3.4 Schedule of the programmes 31
3.5 Special functions 32
3.5.1 Moisture sensor.... 32
3.5.2 Additional time setting.... 32
3.5.3 Delayed start.... 33
3.5.4 Child lock.... 33
3.5.5 Anti-crease function 33
3.5.6 Gentle function.... 34
- Cleaning and maintenance.... 34
4.1 Lint filter 34
4.2 Air condenser 34
4.3 Water container 35
4.4 Error codes.... 36
4.5 Trouble shooting....36
- Technical Data.... 37
- Waste management....38
- Guarantee conditions 39
EU - Declaration of Conformity
★ The products, which are described in this instruction manual, comply with the harmonized regulations.
★ The relevant documents can be requested from the final retailer by the competent authorities.
The figures in this instruction manual may differ in some details from the current design of your appliance. Nevertheless follow the instructions in such a case. Delivery without content.
i Any modifications, which do not influence the functions of the appliance. shall remain reserved by the manufacturer. Please dispose of the packing with respect to your current local and municipal regulations.
The appliance you have purchased may be an enhanced version of the unit this manual was printed for. Nevertheless, the functions and operating conditions are identical. This manual is therefore still valid. Technical modifications as well as misprints shall remain reserved.
1. Safety instructions
i Read the safety instructions carefully before you operate the appliance for the first time. All information included in those pages serve for the protection of the operator. If you ignore the safety instructions, you will endanger your health and life.
⚠️ DANGER! indicates a hazardous situation which, if ignored, will result in death or serious injury.
WARNING! indicates a hazardous situation which, if ignored, could result in death or serious injury.
CAUTION! indicates a hazardous situation which, if not avoided, may result in minor or moderate injury.
NOTICE! indicates possible damage to the appliance.
RISK OF FIRE!
Oil-affected items can ignite spontaneously when exposed to heat sources such as in a tumble dryer. The items become warm, causing an oxidation reaction in the oil. Oxidation creates heat. If the heat cannot escape, the items can become hot enough to catch fire. Piling, stacking or storing oil-affected items can prevent heat from escaping and so create a fire hazard.
If it is unavoidable that fabrics which contain vegetable or cooking oil or have been contaminated by hair care products are placed in a tumble dryer, they should be washed in hot water with extra detergent first - this will reduce, but not eliminate, the fire hazard.
Store this manual in a safe place so you can use it whenever it is needed. Strictly observe the instructions to avoid damage to persons and property.
Check the technical periphery of the appliance! Do all wires and connections to the appliance work properly? Or are they time-worn and do not match the technical requirements of the appliance? A check-up of existing and newly made connections must be done by an authorized professional. All connections and energy-leading components (incl. wires inside a wall) must be checked by a qualified professional. All modifications to the electrical mains to enable the installation of the appliance must be performed by a qualified professional.
i The appliance is intended for private use only.
The appliance is intended for drying laundry in a private household only.
i The appliance is intended for indoor-use only.
The appliance is not intended to be operated for commercial purposes, during camping and in public transport.
i Operate the appliance in accordance with its intended use only.
Do not allow anybody who is not familiar with this instruction manual to operate the appliance.
This appliance may be operated by children aged from 8 years and above as well as by persons with reduced physical, sensory and mental capabilities or lack of experience and knowledge if they are supervised or have been instructed concerning the safe use of the appliance and do comprehend the hazards involved. Children must not play with the appliance. Cleaning and user-maintenance must not be carried out by children unless they are supervised.
DANGER!
-
All electrical work must be carried out by a qualified professional. Do not modify the energy supply. The connection must be carried out in accordance with the current local and legal regulations
-
Do not connect the appliance to the mains if the appliance itself or the power cord or the plug are visibly damaged.
-
Never try to repair the appliance yourself. Repairs carried out by unauthorized persons can cause serious damage. If the appliance does not operate properly, please contact the aftersales service. Original spare parts should be used only.
-
When the power cord is damaged, it must be replaced by the manufacturer or an authorized aftersales service or a qualified professional only.
WARNING!
- Disconnect the appliance from the mains before you clean or maintain it.
- Operate the appliance with 220\~230V AC only. Use a suitable safety-socket near of the appliance.
- The appliance must always be grounded and protected corresponding to the requirements of your local energy supplier. The main current circuit must be equipped with a safety shut-down device.
- All modifications to the electrical mains to enable the installation of the appliance must be performed by a qualified professional.
- In case of an event caused by a technical malfunction, disconnect the appliance from the mains. Report the malfunction to your service centre so it can be repaired.
- Do not use adapters, multiple sockets and extension cords for connecting the appliance to the mains.
- Do not pull on the power cable. Pull on the plug.
- The plug must be secured on the power cable properly.
- Do not bend the power cord.
- Do not place any electrically-powered appliances on the dryer.
- Do not carry out any modifications to your appliance.
- The room the appliance is installed in must be dry and well-ventilated. When the appliance is installed, an easy access to all control elements is required.
- Do not install the appliance in rooms or at areas which contain flammable substances as petrol, gas or paint. Do not put any laundry which is contaminated by such materials in or near of the appliance.
- Do not install the appliance on a soft carpet or wooden floor.
- When any fuels or gases are set free near of the appliance:
▶ open all windows for proper ventilation.
➢ do not unplug the appliance and do not use the controls of the appliance.
➢ do not touch the appliance unless the gas has been discharged completely. - otherwise sparks can occur. RISK OF FIRE!
- Never use a steam cleaner to clean the appliance. The steam will cause serious damage to the electric components of the appliance. Risk of electrical shock!
- Do not install the appliance near of sources of heat.
- Do not put candles or cigarettes on the appliance.
-
Do not install the appliance in a place where it can come in contact with rain or high levels of moisture. Otherwise the electric components can be damaged.
-
Do not spray the appliance with water.
- If you have used a stain removal agent before or when washing, operate the rinse-programme of your washer before you put the relevant laundry in the dryer.
- Check before drying that there are no lighters or matches in your laundry.
- Do not dry the following items in the appliance as they store heat. RISK OF FIRE!
▶ pillows, quilts, bedspreads
clothes and items which are soaked or splattered with fat, oil or any other flammable liquid.
clothes and items which have come into contact with volatile petroleum compounds.
- items made of foam material or containing parts of foam material.
▶ swimming caps and waterproof textiles.
▶ rubberised items or clothes.
- Children must not play with the appliance.
- Always supervise children if they are near the appliance.
- Check that children or pets have not get into the appliance before drying. Check the drum carefully before closing.
CAUTION!
- Do not use any aggressive, abrasive and acrid detergents or sharp-edged items to clean the appliance.
- Never operate the appliance without the filter installed.
NOTICE
- When you move the appliance, hold it at its base and lift it carefully. Keep the appliance in an upright position.
- Never use the door for moving the appliance as you will damage the hinges.
- The appliance must be transported and installed by at least two persons.
- When you unpack the appliance, you should take note of the position of every part of the interior accessories in case you have to repack and transport it at a later point of time.
- Do not operate the appliance unless all components are installed properly.
- Do not stand or lean on the base, the drawers, the doors etc of the appliance.
- The air vents of the appliance or its built-in structure (if the appliance is suitable for being built-in) must be completely open, unblocked and free of any kind of dirt.
- Remove all fluffs before operating the appliance.
- Never dry unwashed laundry.
- When you use fabric conditioner or a similar product, observe the information
given on their packaging.
- Dry dryer-proof fabrics only. Observe the information on the labels.
- If you install the appliance on a carpet or carpeted floor, ensure proper air circulation by adjusting the adjustable feet.
- Do not place any items liquid can escape from on the appliance as the liquid can damage the control panel.
- Metal-made items, e.g. keys, screws, coins etc., can damage the appliance. Check that your laundry is free of such items.
- Do not overload the appliance.
- Do not put dripping-wet laundry in the appliance.
- The room temperature should not be less than +5 °C and not more than +35°C when operating the appliance.
- Clean the filter after operating the appliance.
2. Installation
2.1 Unpacking and positioning
- Unpack the appliance carefully. Dispose of the packaging as described in chapter waste management.
- Completely remove the transport-protection. Be very careful and do not use any aggressive or abrasive detergents to remove residuals of the transport-protection.
- Check that the appliance and the power cord are not visible damaged.
- Do not install the appliance in a place where it may come in contact with water or rain; otherwise the insulation of the electrical system will be damaged.
- Install the appliance on a level, dry and solid floor. Check the correct installation with a bubble level.
- Remove the complete packaging material (inside and outside the appliance) before initial operation.
- The nameplate is situated inside the appliance or at the back.
2.2 Levelling
-
Allow adequate distance to the floor to avoid vibrations and noise.
-
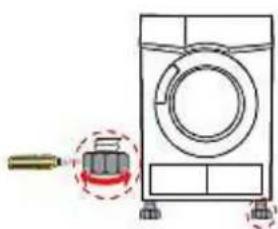
If the appliance does not stand horizontally, adjust the 4 feet by turning them clockwise/anticlockwise until the appliance is level.
Do not put any blankets or ropes or piles of items on the floor. They could generate heat so that the appliance will not properly work.
natural_image
Diagram of a washing machine with a hand operating the valve, showing no text or symbols.3. Operation
3.1 Appliance
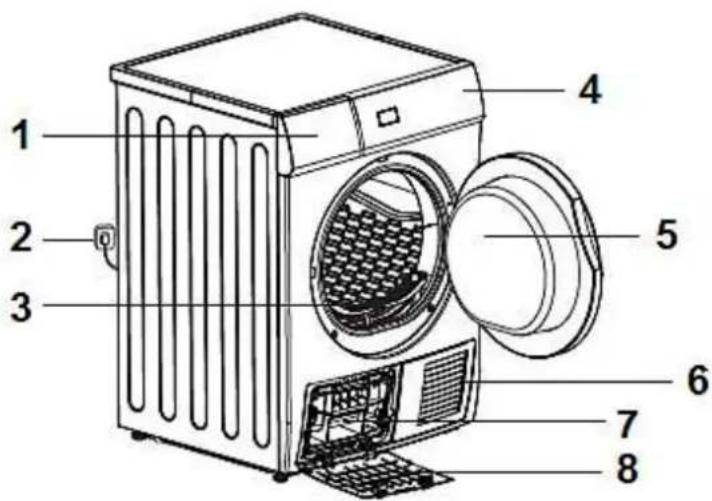
1 Container
3 Lint filter
5 Door
7 Handle
2 Power cord
4 Control panel
6 Air inlet
8 Maintenance flap
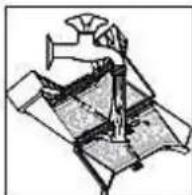
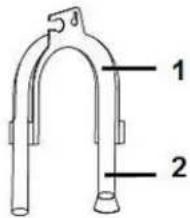
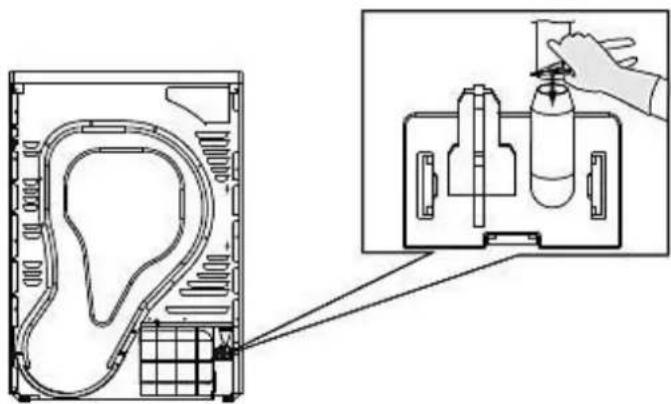
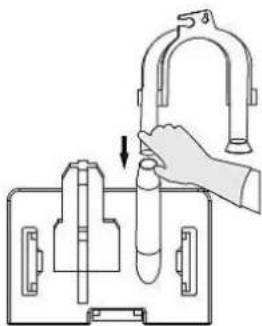
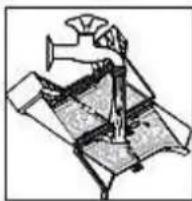
The following parts are optional for specific models. Please wear gloves while installing as follows:
1: Hose holder (optional)
2: External drain hose (optional)
- Remove the drain hose from the hose connector using pliers.
natural_image
Technical line drawing of a mechanical assembly with an inset showing a hand operating a component (no text or symbols present)- Insert the external drain hose.
natural_image
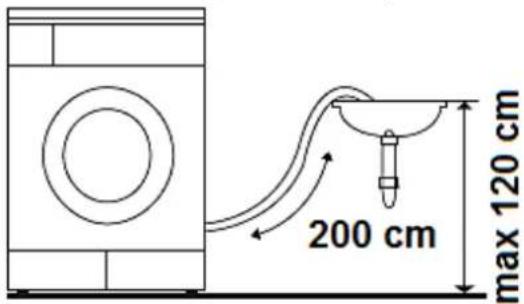
Illustration of a hand using a U-shaped device to lift a test tube into a container (no text or symbols)- Put the hose holder on the washing basin or any other sink.
3.2 Control panel
flowchart
graph TD
    A["Start Pause"] --> B["Anti-Crease"]
    B --> C["Child Lock"]
    C --> D["Extra-Function"]
    D --> E["Extra"]
    E --> F["Synthetics"]
    F --> G["Dellecates"]
    G --> H["Cotton"]
    H --> I["Light"]
    I --> J["Iron"]
    J --> K["Standard"]
    K --> L["Extra"]
    L --> M["Extra"]
    M --> N["Warm"]
    N --> O["Quick"]
    O --> P["On/Off"]
    style A fill:#f9f,stroke:#333
    style B fill:#ccf,stroke:#333
    style C fill:#cfc,stroke:#333
    style D fill:#fcc,stroke:#333
    style E fill:#cff,stroke:#333
    style F fill:#ffc,stroke:#333
    style G fill:#cfc,stroke:#333
    style H fill:#fcc,stroke:#333
    style I fill:#ffc,stroke:#333
    style J fill:#cfc,stroke:#333
    style K fill:#cfc,stroke:#333
    style L fill:#cfc,stroke:#333
    style M fill:#cfc,stroke:#333
    style N fill:#cfc,stroke:#333
    style O fill:#cfc,stroke:#333
    style P fill:#cfc,stroke:#333
Display
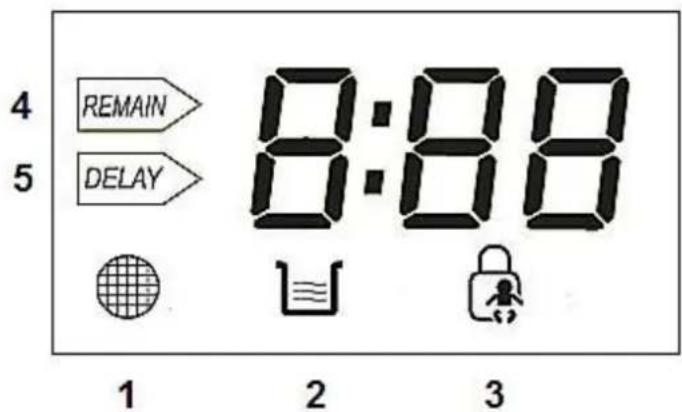
1 Icon is flashing: clean the filter after end of programme.
2 Icon is flashing: Empty the container after end of programme.
3 Child lock.
4 Remaining drying time.
5 Delayed start.
indicates the stand-by mode. Press any key or open the door to activate the appliance.
Delay
You can set delayed start from 1 to 24 hours.
Time
You can set drying time from 20 to 60 minutes.
Status displays
The 4 LEDs indicate the status of drying.
Start/Pause
To activate start or pause function.
Anti Crease
To protect delicate textiles from being creased.
| Gentle |
| Pressing this key will reduce heat to protect heat-sensitive textiles. |
| Rotary knob |
| Choose a suitable programme using the rotary knob. |
| On/Off |
Press to switch the appliance on or off.
The symbol marks the energy efficiency test-programme STANDARD, which is most suitable to dry a normal load of cotton laundry.
3.3 Initializing of a programme
- Press the ON/OFF-button.
- Set the ROTARY KNOB to the desired programme.
- Select an additional function (TIME, ANTI CREASE, GENTLE) if needed.
- Press the START/PAUSE-button.
3.4 Schedule of the programmes
| Programmes | Weight (max.) | Application |
| CottonFor textiles and coloureds made of cotton or linen. | ||
| Light | 8.0 kg | For cotton textiles.Degree of drying: suitable for line-drying. |
| Iron | For cotton textiles.Degree of drying: suitable for ironing. | |
| Standard | For cotton textiles.Degree of drying: suitable to store the textiles in a linen-closet. | |
| Extra | For cotton textiles.Degree of drying: Extra dry. | |
| SyntheticsFor non-iron textiles (synthetic/blended fabric, cotton). | ||
| Light | 3.5 kg | For thin synthetic textiles, which can also be dried on a line or by an iron, e.g. knitwear, shirts.Degree of drying: suitable for line-drying/ironing |
| Standard | For thin non-iron synthetic textiles, e.g. easy-care shirts, table linen, baby clothing, socks.Degree of drying: suitable to store the textiles in a linen-closet. | |
| Extra | For thick or multi-layered synthetic textiles.Degree of drying: Extra. | |
| Warm/Cool | 3.0 kg | Timer programme for delicate textiles made of acrylic fabrics or for small pieces.Use the WARM-button to set the TIME-drying period. |
| Quick | 3.0 kg | For textiles which can be dried quickly, e.g. acrylic fabrics, or individual, small textiles. Also suitable for subsequent drying.. |
| Refresh | 1.0 kg | To refresh textiles or to clean textiles with a commercially available dry-cleaning product. |
The description above is only recommended for use, the user can select a suitable programme relevant to their needs. Thick or multi-layered textiles, e.g. bed linen, jeans, jackets etc. are not easy to dry; therefor you should select COTTON EXTRA when drying such textiles.
3.5 Special functions
3.5.1 Moisture sensor
The sensor detects the moisture of the textiles automatically and adjusts the drying period needed relevant to the amount of load.
This function is activated automatically for all programmes except WARM, COOL and REFRESH.
3.5.2 Additional time setting
For WARM only. You can adjust the drying period from 20-60 minutes yourself. Select a period of time from 1-24 hours. Press the TIME-button. This function was
designed to dry a small number of small textiles, e.g. one facecloth or two pairs of socks.
3.5.3 Delayed start
You can adjust the delayed start of a programme from 1-24 hours by continuously pressing the DELAY-button. The drying starts as soon as the set delayed time has elapsed. When the delay-period begins, the display indicates the delay-time. The DELAY icon flashes. After 30 seconds the display indicates
Modus operandi:
- Load the appliance and close the door properly.
- Press the ON/OFF-button and select the desired programme.
- Select ANTI CREASE or GENTLE if desired.
- Press the DELAY-button.
- Press and hold the DELAY-button until the desired delay-time has been set.
- When you press the ON/OFF-button, the appliance enters operating condition. The drying begins when the set delay-time has elapsed.
- If you press the START/PAUSE-button again, the delayed start is paused.
- Press the ON/OFF-button to cancel the delayed programme start.
3.5.4 Child lock
- This appliance is equipped with a child lock, so children cannot use the control elements or cause faulty operation.
- The appliance must be in operating status. Press ANTI CREASE and GENTLE simultaneously for more than 3 seconds for activation. The relevant icon on the display goes on. You cannot use any button now except the ON/OFF-button. Press ANTI CREASE and GENTLE simultaneously for more than 3 seconds for deactivation.
3.5.5 Anti-crease function
For all programmes except WARM, COOL and REFRESH. At the end of a programme a 30-minutes (default) anti-crease period is running. When you activate the anti-crease function, the duration of this period is 120 minutes. The relevant LED goes on and the drum rotates intermittently during the programme to protect delicate textiles.
3.5.6 Gentle function
For all programmes except WARM, COOL and REFRESH. When activated, the duration of the drying time is 20 minutes longer (indicated on display), the relevant LED goes on and the programme reduces the heat to protect heat-sensitive textiles.
4. Cleaning and maintenance
WARNING! Disconnect the appliance from the mains before cleaning and maintenance. Unplug the appliance. RISK OF ELECTRIC SHOCK!
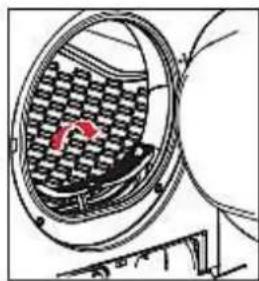
4.1 Lint filter
NOTICE! Accumulated contamination on the filter reduces the air circulation, causes longer drying-times and increased energy consumption and contaminates the inside of the appliance. Clean the filter after each use of the appliance. Do not operate the appliance without the lint filter.
- Allow the appliance to cool down.
- Pull the filter upwards.
- Clean the filter. Remove any contamination by hand or under flowing water (dry carefully).
- Reinstall the filter properly.
natural_image
Technical diagram of a mechanical component with internal grid structure and mounting bracket (no text or symbols)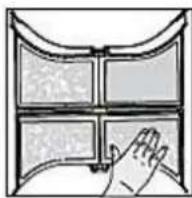
4.2 Air condenser
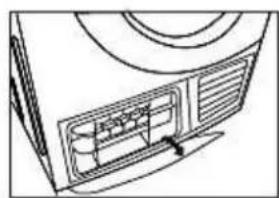
Clean the air condenser approx. once every 3 months when the appliance is frequently used.
⚠️ CAUTION! Remaining water may escape while cleaning. Place an absorbent cloth under the maintenance flap.
WARNING! Clean the air condenser using water only. Never use any hard or sharp-edged objects. Never operate the appliance without the air condenser.
- Unlock the maintenance flap.
- Open the maintenance flap completely.
- Screw both locking levers towards each other.
- Pull out the air condenser.
- Clean the air condenser completely (drain thoroughly).
- Clean the seals.
- Insert the air condenser (hold the bottom!).
- Unscrew both locking levers.
- Close the maintenance flap until it locks.
natural_image
Line drawing of a computer monitor with ventilation grilles and a scroll wheel (no text or symbols)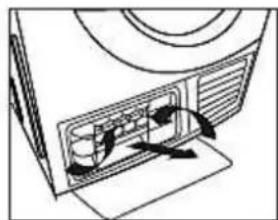
natural_image
Diagram of a computer monitor with ventilation slots and fan blades (no text or symbols)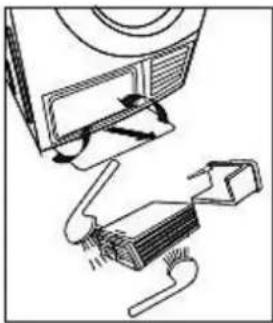
natural_image
Diagram of a device with arrows indicating motion or force, showing mechanical components and a device (no text or symbols present)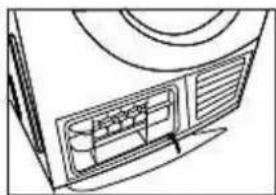
natural_image
Line drawing of a computer monitor with ventilation grilles and ventilation duct (no text or symbols)4.3 Water container

WARNING! Never drink the condensate!
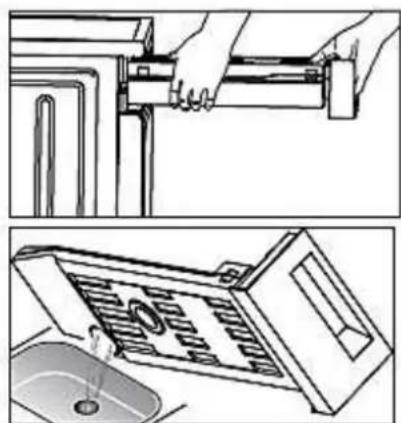
- Empty the container after each use.
- If the container is full while the appliance is operating, the programme pauses and the icon goes on. When you have emptied the container, you can restart the programme by pressing the START/PAUSE-button.
- Pull out the container; hold it with both hands.
- Tilt the container and empty it.
- Insert the container.
natural_image
Two-step diagram showing hand operating a door panel and drain sink, with no visible text or symbols.4.4 Error codes

WARNING!
Any repairs needed must be carried out by authorised
professionals only.

flashes.
- Container is full.
-
Pump malfunction.
-
Check the container.
-
Check the pump.

flashes.
Air circulation is blocked..
Check filter and air circulation.
E30*
Heater malfunction.
Check heater and thermostat.
E32*
Moisture sensor malfunction.
Check moisture sensor and PCB.
E33*
Temperature sensor malfunction.
Check front temperature sensor.
E34*
Temperature sensor malfunction.
Check rear temperature sensor.
* The error code flashes on the display. An acoustic signal sound every 15 minutes.
4.5 Trouble shooting

WARNING!
Any repairs needed must be carried out by authorised
professionals only. If you cannot handle the malfunction yourself without carrying out repair work, switch off the appliance using the ON/OFF-button und unplug. Contact the aftersales service.
| Malfunction | Measures |
| Display does not work.. | Plug in the appliance.Check fuses of the fuse box (house).Check selected programme. |
| flashes. | Empty the container.Check the drain hose. |
| flashes. | Clean the air condenser.Clean the lint filter. |
| Appliance does not start. | Press the START/PAUSE-button.Close the door properly.Check selected programme. |
| Water is not drained. | Align the appliance horizontally.▸ Clean the air condenser and door seal. |
| Door opens unintentionally. | ▸ Close the door until you hear a click.. |
| ▸ Check that the appliance is not overloaded. | |
| Significant increase of humidity. | ▸ Ventilate the room properly. |
| ▸ Clean the cooling grid. | |
| ▸ Ensure that the air condenser is inserted properly. | |
| Drying degree has not been reached/drying-time is too long. | ▸ Clean air condenser and lint filter. |
| ▸ Empty the water container. | |
| ▸ Check proper installation of the water drainage. | |
| ▸ Clean the moisture sensors. | |
| ▸ Use the next higher drying programme. |
If the appliance shows a malfunction not noted on the schedule above or if you have checked all items on the above schedule but the problem still exists, please contact the aftersales service.
5. Technical Data
| Type | Condenser dryer |
| Nominal capacity | 8.00 kg |
| Energy efficiency class1 | B |
| Energy consumption2 | 3.50 kW/h |
| Annual energy consumption3 | 561 kW/h |
| Energy consumption standard-cotton programme/full load | 4.74 kW/h |
| Energy consumption standard-cotton programme/partial load | 2.56 kW/h |
| Condensation efficiency class1 | B |
| Noise emission | 69 dB(A) |
| Power | 2700 W |
| Power consumption/switched off | 0.28 W |
| Power consumption/left on | 0.80 W |
| Duration standard drying cycle | 140 minutes |
| Duration standard-cotton programme/full load | 140 minutes |
| Duration standard-cotton programme/partial load | 90 minutes |
| Material of drum | zinc |
| Programmes | 12 |
| Delayed start | 1-24 h |
| Adjustable feet | 2 front/2 back |
| Dimensions H*W*D in cm | 84.50*59.50*61.50 |
| Weight net/gross in kg | 43.00/47.00 |
1 On a scale from A (highest efficiency) to G (lowest efficiency).
2 Standard cotton programme with full load and partial load.
3 Based on 160 drying cycles for the standard cotton programme with full load and partial load and the consumption of the operating modes with the lowest energy consumption. The actual energy consumption depends on the type of use of the appliance.
Ambient temperatures for proper operation: from +5 ^ to +35 ^ .
6. Waste management
- While unpacking, the packaging materials (polythene bags, polystyrene pieces, etc.) should be kept away from children. CHOKING HAZARD!
- Old and unused appliances must be send for disposal to the responsible recycling centre. Never expose to open flames.
- Before you dispose of an old appliance, render it inoperative. Unplug the appliance and cut off the entire power cord. Dispose of the power cord and the plug immediately. Remove the door completely so children are not able to get into the appliance as this endangers their lives!
- Dispose of any paper and cardboard into the corresponding containers.
- Dispose of any plastics into the corresponding containers.
- If suitable containers are not available at your residential area, dispose of these materials at a suitable municipal collection point for waste-recycling.
- Receive more detailed information from your retailer or your municipal facilities.

Materials marked with this symbol are recyclable.

Please contact your local authorities to receive further information.
for large electric appliances. PKM GmbH & Co. KG, Neuer Wall 2, 47441 Moers.
This appliance includes a 24-month guarantee for the consumer given by the manufacturer, dated from the day of purchase, referring to its flawless material-components and its faultless fabrication. The consumer is accredited with both the dues of the guarantee given by the manufacturer and the vendor's guarantees. These are not restricted to the manufacturer's guarantee. Any guarantee claim has to be made immediately after the detection and within 24 months after the delivery to the first ultimate vendee. The guarantee claim has to be verified by the vendee by submitting a proof of purchase including the date of purchase and/or the date of delivery. The guarantee does not establish any entitlement to withdraw from the purchase contract or for a price reduction. Replaced components or exchanged appliances demise to us as our property.
The guarantee claim does not cover:
- fragile components as plastic, glass or bulbs;
- minor modifications of the PKM-products concerning their authorized condition if they do not influence the utility value of the product;
- damage caused by handling errors or false operation;
- damage caused by aggressive environmental conditions, chemicals, detergents;
- damage caused by non-professional installation and haulage;
- damage caused by non common household use;
- damages which have been caused outside the appliance by a PKM-product unless a liability is forced by legal regulations.
The validity of the guarantee will be terminated if:
- the prescriptions of the installation and operation of the appliance are not observed.
- the appliance is repaired by a non-professional.
- the appliance is damaged by the vendor, the installer or a third party.
- the installation or the start-up is performed inappropriately.
- the maintenance is inadequately or incorrectly performed.
- the appliance is not used for its intended purpose.
- the appliance is damaged by force majeur or natural disasters, including, but with not being limited to fires or explosions.
The guarantee claims neither extend the guarantee period nor initiate a new guarantee period. The geographical scope of the guarantee is limited with respect to appliances, which are purchased and used in Germany, Austria, Belgium, Luxembourg and the Netherlands.
Aftersales service information on the leaflet inside this instruction manual.
Subject to alterations
Updated 11/09/2015
- Bedienung
- Luftkondensator
- Wasserbehälter
- Fehlermeldungen
- Index
- EU - Declaration of Conformity
- Safety instructions
- RISK OF FIRE!
- DANGER!
- WARNING!
- CAUTION!
- NOTICE
- Installation
- Unpacking and positioning
- Levelling
- Operation
- Appliance
- Control panel
- Delay
- Time
- Status displays
- Start/Pause
- Anti Crease
- Initializing of a programme
- Schedule of the programmes
- Special functions
- Moisture sensor
- Additional time setting
- Delayed start
- Modus operandi:
- Child lock
- Anti-crease function
- Gentle function
- Cleaning and maintenance
- Lint filter
- Air condenser
- Water container
- WARNING! Never drink the condensate!
- Error codes
- flashes.
- Trouble shooting
- Technical Data
- Waste management
- The guarantee claim does not cover:
- The validity of the guarantee will be terminated if:
Brand : PKM
Model : WT8E-B11
Category : Tumble dryer