USER MANUAL S 9055 IX Becken
We thank you for purchasing this product.
This appliance was submitted to several laboratorial tests, which certify its quality. To simplify the use of this appliance, this instruction manual has been provided. The instructions must ensure a quick and safe use.
Please read carefully the instructions and safety measures described in this manual.
We wish our clients great satisfaction in using their new appliance.
Index
1. Safety Instructions....4
1.1. Energy Supply.... 5
1.2. Power Cord and Other Cables 5
1.3. Moisture and Water.... 5
1.4. Cleaning....5
1.5. General Precautions ...... 6
2. Use and Operation ...... 9
2.1. Gas Connection 9
2.2.1 Cookers with Bottle Compartment.... 10
2.2. Conversion to other type of Gas 10
2.3. Gas Valves Maintenance and Cleaning 12
2.4. How to Use the Gas Burners ...... 13
2.4.1. Burners of the Cooking Surface.... 13
2.4.2. Ignition of the Hot Plate Burners.... 13
2.4.3. Gas Oven Burner.... 14
2.4.4. Ignition of the Oven gas.... 14
2.5. Recommendations for Use.... 15
2.6. Instructions for Maintenance and Cleaning 15
2.6.1. Burners Cleaning.... 16
2.6.2. Oven Cleaning.... 16
2.6.3. How to Remove the Interior Glass of the Oven's Door for Cleaning..... 16
2.7. Tables 18
- Technical Data.... 19
- Aftermarket.... 20
- Environment Conservation ...... 21
1. Safety Instructions
 | ATTENTION |  |
| Risk of Electric ShockDo Not Open |
| Attention: to avoid the risk of electric shock, do not remove the cover. The interior does not contain any parts that may be repaired by the user. Ask for assistance to qualified personnel. |
Important Warnings
Before using your appliance, read carefully this instruction manual and keep it in a safe place, as you may need it for future consultations.
Before you start your appliance, and to ensure a correct use, do not use it if:
- It has fallen on the ground;
- You notice any evidence of damage;
- Any anomaly occurs during its operation;
To avoid hazards and deterioration of your appliance by an incorrect use, it is advisable to read the instructions carefully and attentively.
Your appliance must not be used to other ends than the ones foreseen in the instructions manual. Your safety is only guaranteed in a household use and not for commercial use. The incorrect use will not be covered and automatically cancels the right to warranty.
Assistance
Be sure that, in case of malfunction, you take your appliance to a qualified technician for assistance.
DO NOT ALLOW CHILDREN TO USE ELECTRIC APPLIANCES WITHOUT SUPERVISION.
DO NOT ALLOW CHILDREN OR ADULTS WITH REDUCED PHYSICAL, SENSORIAL OR MENTAL CAPACITIES, OR PEOPLE WITHOUT EXPERIENCE/KNOWLEDGE, TO USE ELECTRICAL APPLIANCES WITHOUT SUPERVISION.
1.1. Energy Supply
Check if the voltage of the electric power is compatible with the one mentioned on the appliance. If not, please contact your seller or the Customer Service.
1.2. Power Cord and Other Cables
Unplug your appliance whenever you are not using it.
Do not roll nor pull the cable to unplug the appliance. Keep the power cord away from hot surfaces.
Never use this appliance if it has a damaged cord or plug, nor if it is not working correctly.
If the power cord is damaged, do not use your appliance, take it to an authorized technical assistance to be replaced.
1.3. Moisture and Water
Do not use your appliance in moist environments. Do not let your appliance subject to get wet in any way, since it may be dangerous. TO AVOID FIRE OR ELECTRIC HAZARD DO NOT EXPOSE THE APPLIANCE TO WATER NOR MOISTURE. Do not put your appliance under water (for example, to wash it).
1.4. Cleaning
Unplug the appliance before you clean it. Later, clean it with a soft and dry cloth. Do not use cleaning products.
1.5. General Precautions
- This appliance belongs to class 1 (gas equipment) kitchen appliance isolated and free installation and is designed for non-professional use by private, adults, and within installations
- This appliance must be installed and connected according to the installation rules in force.
- The gas conditions are indicated on the labels near the gas inlets.
- The cooker installation should be executed only by qualified and authorised personnel.
- The walls of the sided furniture must resist to a temperature 75^ higher than the ambient temperature.
- The back wall must be of non-combustible material.
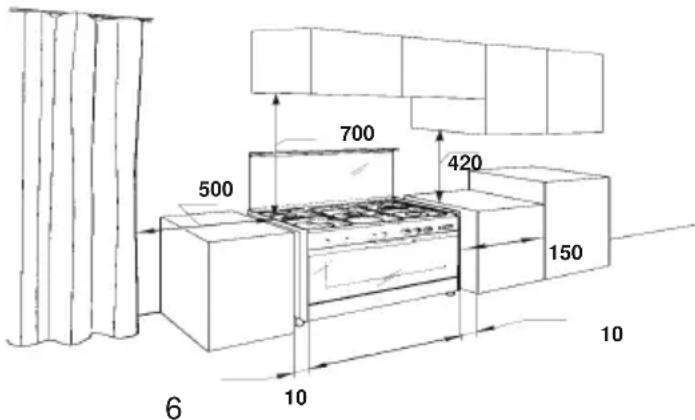
- Combustible materials, like curtains, must be at a minimum distance of 500mm.
- The furniture on the side of the cooker, if higher than the cooking plan, must be at a minimum distance of 150mm from the side of the appliance.
- In case there is a suspended element over the cooker, it must be placed at a minimum distance of 700mm from the cooking plan.
- The furniture over and on the sides of the appliance must have a minimum clear space of 420mm from the cooking surface.
- Any range hood above the cooker must be installed according to the manufacturer's instructions, with a minimum distance of 650mm from the cooking surface.
- The walls adjacent to the appliance must have a minimum distance of 10mm from the sides of it that are below the desk.
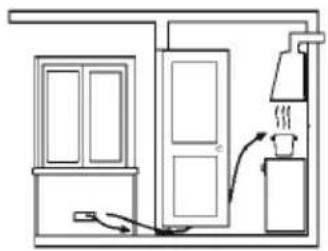
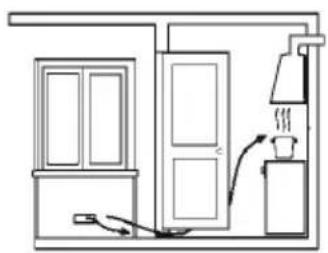
- The appliance must be installed in places with proper conditions related with dimensions, ventilation and exhaust of combustion products.
- This appliance is not designed to be connected to an exhaust combustion products device.
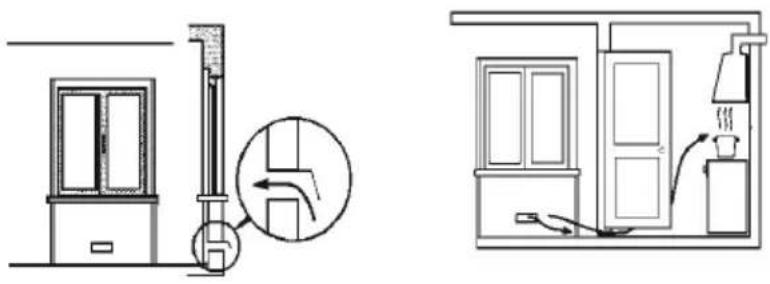
- The airflow should be exit directly through permanent openings made in walls separating the compartment with the outside or the air supply ducts.
- The airflow can also be obtained indirectly from the installation local, provided that such sites have direct vent, do not present fire dangers and are not sleeping rooms.
natural_image
Technical line drawing of a two-part electrical cabinet and adjacent building interior (no text or symbols)
- The flow of air between the adjacent site and the installation local must be carried out freely through permanent openings (which can be obtained by increasing the space between the door and the floor, for example).
- The air intake openings must have a minimum section of 100cm^2 and must not be blocked accidentally.
- For devices without safety valves on the desktop, the air intake openings must have a minimum section of 200 ~cm^2 .
■ Before installing the device you must remove the adhesive plastic film that protects the metal parts.
- If the appliance is placed on a base, you must ensure that the base does not slide.
■ The appliance must be firm and levelled (with the help of the supplied foot).
- The accessible parts of the cooker can be hot, especially when the oven is operating.
- Do not let children get close to the appliance.
■ The cooker should always be installed by qualified and authorised personnel.
- This appliance is of type X: category for overheating.
- Before switching on the appliance check that it is correctly regulated for the type of gas available.
- When burners are on check if the flames are always regular.
■ Before removing the saucepans from the cooker turn off the burners.
- The use of a gas appliance requires regular air ventilation. Make sure that the installation complies with the respective instructions.
Before using the oven for the first time, pre-heat an empty oven at the maximum temperature for about 30 minutes to remove residual smells and smokes caused by the manufacturing process, without passing them to the food.
- Gas appliance produces warm and the products of combustion get moist.
- Be sure that the location is well vented: keep a window open or install a range hood or exhaust fan which vents to the outside.
- In the case of intensive and prolonged use, it may be necessary to increase the ventilation by opening more windows or increasing the speed setting of the range hood or exhaust fan, if one is installed.
- The materials surrounding this appliance must be resistant to a temperature of 90^ C.
- Use the cover only to protect the cooker and for no other purpose.
- Pay attention if cooking with grease or oil as they can ignite if overheated.
- During cooking the appliance becomes very hot. Never touch any parts on the top or inside of the oven without wearing protective heatproof gloves.
- All waste resulting from oil spills should be removed before closing the lid.
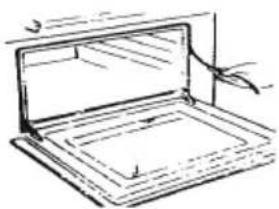
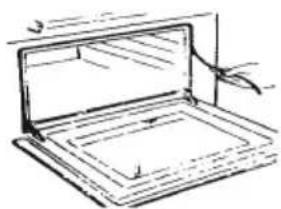
- WARNING: The glass lid must always be opened when the cooker is operating and also while the burners are hot.
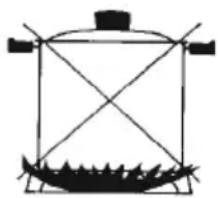
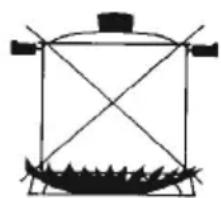
- Use exclusively pots and pans with a flat base.
- Use containers that do not exceed the edges of the cooking surface.
- The glass lid has the screen-printed symbol, which means it must not close the lid while the burners are functioning and while they do not have cooled
- The manufacturer does not recommend the use of protection at the table, and warns that the use of these when inappropriate can cause accidents
2. Use and Operation
2.1. Gas Connection
- The cooker is provided with a label placed on the rear panel near the gas inlet, showing the type of gas and pressure for which the appliance has been originally adjusted.
- Before connecting this appliance check if it is prepared for the type of gas and pressure available in your home. If not, it is necessary to convert the appliance to another gas as indicated in section 2.2.
- All possible types of gas and pressures are shown on the data plate and in table nr. 1.
- The butane gas bottles are unable to function in places with low temperatures. In this case it is advisable to replace the Butane for Propane gas (operation to be done by a qualified installer). Never place a propane gas bottle inside a building.
-
You may connect the appliance to a gas bottle fitted with its respective regulator or to a gas network tap. Since this is a movable unit, the following types of tubes can be used:
-
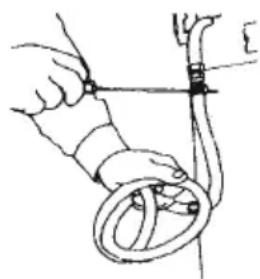
Flexible rubber or elastomeric tube certified according to an applicable standard fixed to an adequate inlet gas connection and held tight by a clamp on both ends.
- Flexible stainless steel tube certified according an applicable standard, with threaded connections.
- Flexible rubber or elastomeric tube certified according to an applicable standard, with threaded connections.
Notes:
- Ensure that the tube is not bent or twisted.
- Ensure that the tube is not in contact with the rear panel.
- The tube must be replaced before the expiring date.
- You must check that the cable goes along the whole length of the tube.
- The clamps should be adequate for a good tight.
natural_image
Illustration of hands holding a rope tied with a tool, no text or symbols present
- The maximum length of the flexible rubber tube must be of 1500mm.
The connection to the cooker must be done on the same side of the point of feeding, in a way that the tube doesn't cross the back of appliance. If necessary, change the gas inlet or request to the technical assistance the adaptation tube so that the entrance of gas in the appliance is done on the correct side.
After connecting the unit, check for eventual leaks with a frothy product. Never use a flame.
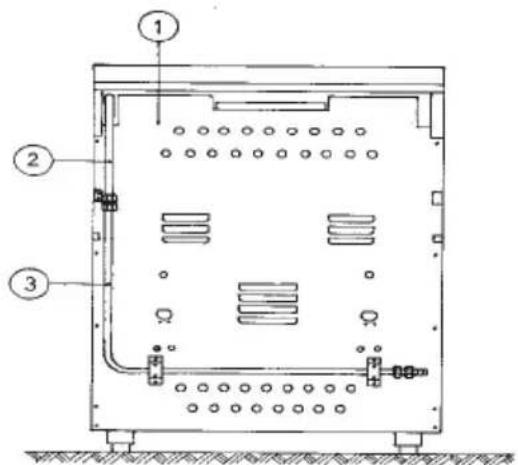
- Back Shield
- Commutator
- Extension of the Commutator
2.2.1 Cookers with Bottle Compartment
The maximum high of the bottle with reducer must be of 610mm and the maximum width of 310mm.
In these cookers the flexible rubber tube must have a minimum of 400mm and a maximum of 1150mm and must never touch the left side of the bottle compartment.
2.2. Conversion to other type of Gas
This appliance has been designed to function with Butane Propane or Natural gas. This appliance is provided with a label on the rear panel, near the gas inlet, indicating the type of gas and pressure for which the cooker has been adjusted.
The indication of the gas and pressure that the cooker has been adjusted to, can also be found on the data label or on the package of the appliance.
In order to convert from one type of gas to another, proceed as follows:
a) Choose the inlet gas connection according to the type of gas available in your home.
b) Cooking top burners:
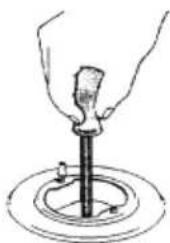
■ Remove the pan supports from the hob, the burner covers, the burner spreaders and the burner skirts.
- Unscrew and remove the injectors and replace them with those corresponding to the available gas (see table 1).
- Replace all burner components and the pan supports.
natural_image
Illustration of a hand using a tool to press or install a mechanical component, with no visible text or symbols.
c) Oven
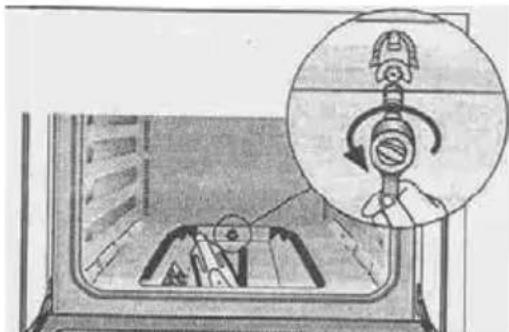
- Open the oven door and remove all internal accessories and the oven bottom.
- Remove the burner by losing the screw placed in the front and turning it up.
- Unscrew and remove the injector and replace it with those corresponding to the available gas see (table 1).
- Screw the burner and put in place the oven bottom and the internal accessories.
natural_image
Diagram showing a device inside a container with an inset close-up of the handle (no text or symbols present)
d) Regulating the primary air - oven burner only
- Put the burner for a few minutes at maximum.
- With the screwdriver loose the screw fixing the burner.
■ Move the burner forward or backward until the flame is present with a bluish color, stable, without noise and without yellow tips.
- Tighten the screw to fix the burner.
e) Low flow adjustment
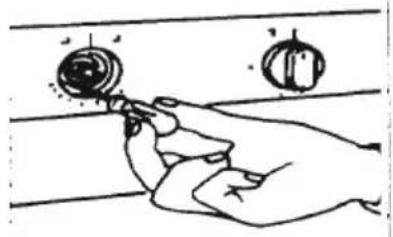
■ Light the burner on and put the knob in the Low Position.
- In this position, remove the knob of the tap.
- With a screwdriver adjust the taps screw until the flame is conveniently regulated to the low position and stable.
■ Reassemble the knob and pass quickly from the Full On Position to the Low Position, several times, to ensure that the flame remains stable.
natural_image
Illustration of a hand holding a tool near a circular component, with two small icons above (no text or symbols)
f) After connecting the unit, check for gas leaks with a soap and water solution. Never Use A Flame.
g) Near the inlet gas connection, place a label indicating the type of gas for which the appliance is now prepared. "Appliance prepared for..."
2.3. Gas Valves Maintenance and Cleaning
If the gas valve is hard to turn, do not force it. It might need lubrication.
This operation must be executed always by qualified and authorised personnel.
To access the valves, pull the burner heads and remove the cooking top.
To lubricate the valves, follow these instructions:
■ With a screwdriver, remove the cover.
- Pull the cone out of its housing.
- Clean the cone with a dry lint-free cloth.
- Lubricate the cone carefully, with recommended grease (Molykote, Staburgs N32, Rocol HT, Optitemp HT2 EP), and take off the excess grease to avoid obstructing the gas passages.
■ Introduce the cone and the spring and screw the cover.
- Turn the cone several times, to ensure it is not stuck.
- Check for gas leaks, with the tap opened and closed. Never use a flame.
2.4. How to Use the Gas Burners
If the gas supply is deficient or if the flame is extinguished accidentally, the gas circuit will be automatically closed. To restart it is necessary user intervention. In this case and after verifying that there isn't a gas supply problem, wait at least one minute and repeat the lighting.
For ignite this type of burner it is necessary to maintain the knob under pressure for 10 seconds. After this time release the knob of the burner which must be in function.
2.4.1. Burners of the Cooking Surface
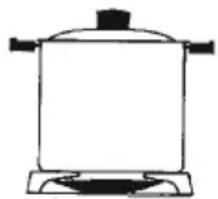
If you use the burners properly, the consequence will be a maximum efficiency, thus saving energy. The power of the burners is shown on table 1.
In order to obtain this, you must choose pans according to the size of the burner (see table 2). If the flame is wider than the pan you are wasting energy.
natural_image
Simple line drawing of a cooking pot with a lid and base (no text or symbols)
YES
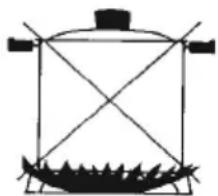
natural_image
Simple line drawing of a rectangular structure with diagonal lines and a base, resembling a lamp or container (no text or symbols)
NO
IMPORTANT - In models with triple burner pay attention to this point: put in the correct position the cover spreader of the middle and screw down the cover spreader, to guarantee a good burning.
2.4.2. Ignition of the Hot Plate Burners
To ignite the burners proceed as follows:
- Bring a burner flame.
- Select the burner to use, push the corresponding knob and turn it counter clockwise to the “full position”, indicated by a large flame and keep the knob pressed for about 10 seconds.
- By the end of this time release the knob and it should remain lit. Otherwise repeat the operation.
- To reduce the power turn the knob to the “low position”, indicated by a small flame.
- To switch off the burner turn the knob clockwise to the “off position”, indicated by a black circle in the upper position of the panel.
2.4.3. Gas Oven Burner
If you use the burners properly, the consequence will be a maximum efficiency, thus saving energy. To achieve this, during the oven operation the oven door must rest completely closed. The power of the oven burner is shown on table 1.
2.4.4. Ignition of the Oven gas
To ignite the burners proceed as follows:
- Bring a burner flame.
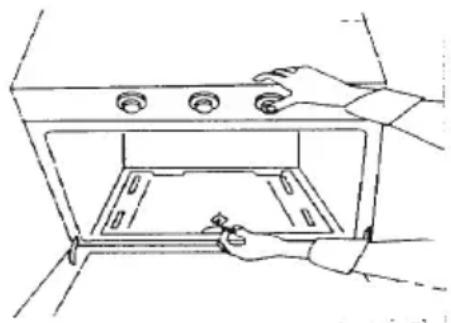
- Press the knob of the oven valve placed under the symbol □ and turn it counterclockwise until the maximum position indicated by a large flame and keep the knob pressed for about 10 seconds.
- By the end of this time release the knob and it should remain lit. Otherwise repeat the operation.
- To reduce the power turn the knob to the "low position", indicated by a small flame.
- To switch off the burner turn the knob clockwise to the “off position”, indicated by a black circle in the upper position of the panel.
natural_image
Line drawing of a person opening a microwave oven with three outlets (no text or symbols)
2.5. Recommendations for Use
- The accessible parts of the cooker can be hot if the oven is in operation. Do not let children get close to the appliance.
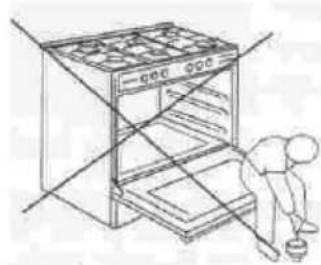
- Do not let children sit down or play with the oven door.
- Do not use the open door as a stool to reach above cabinets.
■ Pre-heat of the oven until it reaches the temperature before you put the food into the oven.
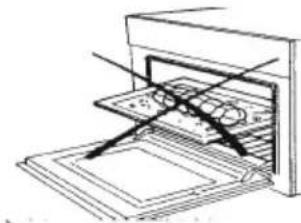
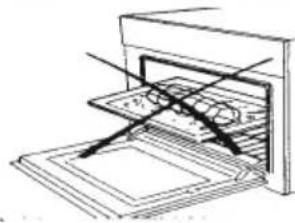
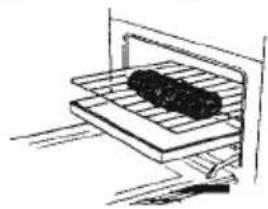
- Never use low-edged containers or trays as baking-pan for roasts in order to soil the minimum possible the walls of the oven, thus preventing fat splashes, sauce burning and smoke production.
- If the grease falls down into the oven burner it could inflame.
- When the food is directly on the grate, you must put the basin for collecting.
- Never use the oven without the rubber seal.
- During the functioning of the oven the oven door must rest completely closed.
- It is advisable to place the cooking tray on the middle level of the oven.
- Avoid opening the door during while cooking, since the temperature changes will spoil your cooking and increase energy consumption.
- The oven can be turned off some minutes before the food is completely roasted; the residual temperature will be enough for completing the roasting.
natural_image
Line drawing of a person cleaning or repairing a large oven with a bucket (no text or symbols)
natural_image
Diagram of a mechanical assembly with layered components and intersecting lines (no text or symbols)

natural_image
Simple line drawing of a kitchen appliance with two stacked plates and a handle (no text or symbols)
natural_image
Simple line drawing of a laptop with an open screen and a hand pointing to it (no text or symbols)
2.6. Instructions for Maintenance and Cleaning
■ Before maintenance or cleaning of the cooker, switch off the circuit breaker, turn off the isolating gas valve or the gas mains and allow the cooker to cool down.
- Adequate maintenance and cleaning will prolong the life of the appliance, as well as ensure trouble-free service.
- Cleaning and maintenance procedures should be performed when the appliance is cold.
- Never use scouring powder, steel wool or acids to clean the cooker.
- The stainless steel parts should be washed, after use, with water and dried with a soft cloth. If the spots still persist, it is necessary to use a non-abrasive detergent or warm vinegar.
- Avoid scrubbing the front panel as this will erase the designs stencilled over each knob.
The enamelled grids of the knob can be washed in the dishwasher.
■ The cooker must not be cleaned with steam cleaning equipments.
2.6.1. Burners Cleaning
- The burners should be cleaned with soapy warm water and well rinsed and dried.
■ Ensure they are completely dry before using.
2.6.2. Oven Cleaning
- The oven should be washed with warm water and a nylon pad soaked in ordinary detergent.
- The oven has "Easy to Clean" enamel so you will not need abrasive detergents to clean it.
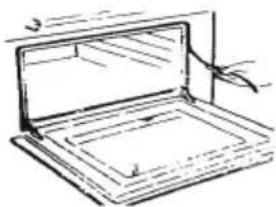
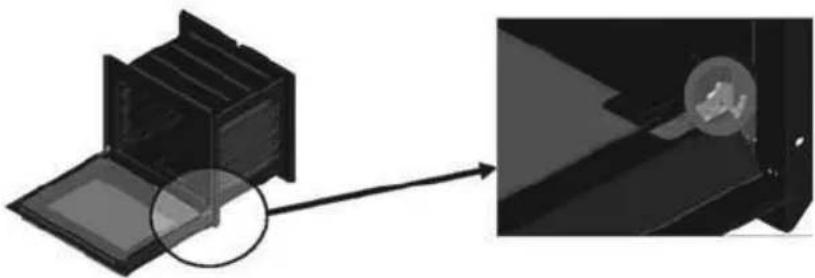
2.6.3 REMOVING THE OVEN DOOR FOR CLEANING
For complete cleaning, we advise removing door working as follows:
- Set the door wide open
- Turn the brackets of the lower hinges upwards until hooking the upper hinges
- Set the door ajar, then lift lightly to remove the lower hinges from the slots
- Remove the door and the two upper hinges from their seats
- Clean the door and reassemble reversing the above mentioned steps.
natural_image
Diagram showing a device with a lid removed from a box, and a close-up of its internal component (no text or symbols present)
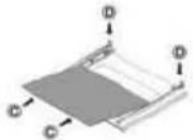
How to remove the interior glass on the oven's door for cleaning:
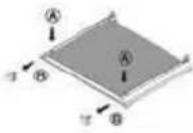 | - Press the (A), and remove the upper plastic tops (B) |
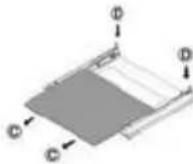 | -Release the interior glass (C), from the inferior tops (D)- Remove the interior glassClean the glass with warm water and a nylon pad soaked in ordinary detergent |
 | - Place the glass in the supports- slide in the guide till engage the groove (D) of the inferior tops |
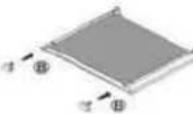 | - Introduce the upper tops (B) |
2.7. Tables
| TABLE 1 - BURNERS |
| | GAS |
| | BUTANE | PROPANE |
| Pressure nominal operation, mbar 28 | -30 37 20 | |
| Pressure nominal operation, mbar 35 | 45 25 | | |
| Pressure nominal operation, mbar 20 | 25 17 | | |
| Power W | (P.C.S.) | Rate Injector | Rate | Injector | Rate | | |
| Burners | Normal | Minimum | g/h | mm | g/h | mm | L/h |
| Auxiliary | 1000 | 500 | 73 | 0,50 | 72 | 0,72 | 95 |
| Semi Rapid | 1750 | 500 | 127 | 0,65 | 125 | 0,97 | 167 |
| Rapid | 3000 | 1250 | 218 | 0,85 | 215 | 1,15 | 286 |
| Wok | 4000 | 1500 | 295 | 0,10 | 236 | 1,50 | 314 |
| Oven | 2750 | 1100 | 200 | 0,80 | 197 | 1,20 | 262 |
| TABLE 2 - TABLE OF RECIPIENTS (To use pots with a plane base) |
| Recommended diameters (cm) |
| Burners | minimum | maximum |
| Auxiliary ∅ 42 | 10 | 16 |
| Semi-rapid ∅ 62 | 15 | 22 |
| Rapid ∅ 92 | 22 | 28 |
| Wok ∅ 130 | 24 | 30 |
Important: the containers used must not exceed the edge of the cooking surface.
3. Technical Data
This appliance belongs to class 1: isolated kitchen appliance, free-standing installation.
| BURNERS | | POWER | (W) MODELS |
| EE Burner % | GAS | S 5050 IX A S 5050 IX  | S 6060 IX A S 6060 IX  | S 9055 IX A S 9055 IX 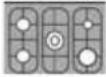 |
| Auxiliary | 67 | 1000 | | 1 | 1 |
| Semi - rapid 66 | 1750 2 2 2 | | | | |
| Rapid | 64 | 3000 | | 1 | 1 |
| Wok | 61 | 4000 | --- | --- | 1 |
| Oven | --- | 2750 | G | G | G |
| Oven volume (l) | 55 | 55 | 55 |
| IEE Oven (%) – classe energética | 96,8 - A 96,8 | - A 96,8 | - A |
| EE Gas Work table (%) | 66 | 66 65 | |
| Maximum gas power KW (PCS) | 10,25 | 10,25 | 14,25 |
| Maximum consumption butane gas - G 30 (g/h) | 745 | 745 | 1040 |
| Maximum consumption propane gas - G 31(g/h) | 734 | 734 | 970 |
| Maximum consumption natural gas - G 20 (L/h - 1013 mbar, 15o C) | 977 | 977 | 1291 |
| Dimensions: L x F x A mesa (mm) Coocker | 535x565x850 | 600x600x850 | 880x545x820 |
| Dimensions: L x F x A mesa (mm) Package | 570x610x900 | 660x690x900 | 940x635x900 |
| Weight: Net / Gross (kg) | 45/48 | 45/48 | 59/63 |
EE Burner – EE Table – IEE Oven – According ( EU 66/2014 )
4. Aftermarket
BECKEN has designed this appliance in order to guarantee the maximum reliability.
Do not attempt to open the appliance – there is a risk of electrical shock.
If you are not able to solve the problem, please contact your seller or manufacturer.
WARNING: any attempt of fixing the appliance without contacting the manufacturer will nullify the warranty.
In case the problem persists, take your appliance to an aftermarket section of any Worten, Modelo or Continente store in order to solve the problem.
Worten Equipamentos para o Lar ensures for a period of 2 years, counting from the date of purchase of this appliance, a warranty against any found manufacturing defect. The warranty supposes a correct use and maintenance of the appliance, namely according to the instructions expressed in this manual. In case otherwise identified, the malfunctions will not be under the warranty.
The repairing of electrical appliances must only be made by qualified technicians, as otherwise there may occur future complications on the appliances.
To avoid unnecessary dangers, in case there are malfunctions on the cables or other components, repairing must be done by specialized technical assistance, due to the need of appropriate tools.
https://www.suporteworten.pt/
5. Environment Conservation
Aiming to protect the environment, we try to reduce to a maximum the volume of the packages which are confined to three easy separation materials: cardboard, paper and plastic.
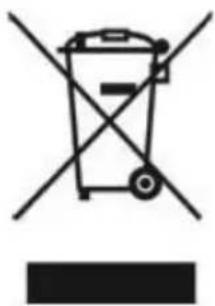
The appliance is made of recyclable material, once disassembled by a specialized company. Follow the local legislation concerning recycling of all materials.
natural_image
Symbol of a trash bin crossed with diagonal lines, no text or numbers present
BECKEN®
Product Information (Regulation UE 66/2014)
(Gas Oven - EN15181;UE65/2014)
| Model Type of oven N° Cavities Heat Source V (L) | | EC Conventional kWh | MJ -> kWh | EC forced kWh MJ -> kWh | ECauxiliar (kWh) | Energetic Class | EEI |
| S 5050 IX A | N60 1 Gás | 55 5,76 1,60 | -- A 96,8 | | | | | | | |
| S 6060 IX A | N60 1 Gás | 55 5,76 1,60 | -- A 96,8 | | | | | | | |
| S 9055 IX A | N60 1 Gás | 55 5,76 1,60 | -- A 96,8 | | | | | | | |
Cocina BECKEN
natural_image
Technical diagram of a vertical structure with an inset showing internal components (no text or labels)
natural_image
Simple line drawing of a kitchen or bathroom interior with doors, chairs, and a shower (no text or symbols)
natural_image
Illustration of a rope being tied with a tool, showing rope routing and angle (no text or symbols)
natural_image
Simple line drawing of a hand using a tool to press or install a circular component (no text or symbols)
c) Horno
natural_image
Diagram of a mechanical device inside a vehicle, showing a close-up of the component (no text or symbols present)
natural_image
Hand holding a tool interacting with two circular objects on a horizontal surface (no text or symbols visible)
natural_image
Simple line drawing of a cooking pot with a lid and base (no text or symbols)
sí
natural_image
Simple line drawing of a rectangular structure with diagonal lines and a curved base, no text or symbols present.
NO
natural_image
Line drawing of hands installing or adjusting a cabinet inside an oven (no text or symbols)
natural_image
Line drawing of a person cleaning a large kitchen appliance with a tool, no text or symbols present
natural_image
Diagram of a device with layered components and intersecting lines (no text or symbols)
natural_image
Simple line drawing of a kitchen appliance with a tray and stove (no text or symbols)
natural_image
Simple line drawing of a closed oven with a hand pointing to the lid (no text or symbols)
natural_image
Diagram showing a device with internal components before and after assembly, no text or symbols present
LIMPIEZA DEL CRISTAL INTERIOR:
https://www.suporteworten.pt/
natural_image
Symbol of a trash bin crossed with no text or numbers, accompanied by a black rectangular block below (no text or symbols present)
BECKEN®
Ficha de Produto ( Regulamiento UE 66/2014 )
(Hornos Gas - EN15181;UE65/2014)
| Modelo Horno | N° Cavidades | Fonte Aquecimiento da cavidade | Volume (L) | Consumo Convencional (MJ ou kWh) | MJ -> kWh | Consumo Ventilación forçada (MJ ou kWh) | MJ -> kWh | Consumo Auxiliar (kWh) | Classe Energética | IEE |
| S 5050 IX A | N60 1 Gás | 55 5,76 1,60 | - - A 96,8 | | | | | | | | |
| S 6060 IX A | N60 1 Gás | 55 5,76 1,60 | - - A 96,8 | | | | | | | | |
| S 9055 IX A | N60 1 Gás | 55 5,76 1,60 | - - A 96,8 | | | | | | | | |
natural_image
Technical line drawing of a door and elevator assembly with a magnified inset showing internal components (no text or symbols)
natural_image
Simple line drawing of a room interior with doors, chairs, and a chimney (no text or symbols)
natural_image
Illustration of hands connecting a rope to a cable with a measuring rod (no text or symbols)
natural_image
Simple line drawing of a hand using a tool to press or test a circular object (no text or symbols)
c) Forno
natural_image
Diagram of a mechanical device inside a container with an inset showing a rotating component (no text or symbols present)
natural_image
Illustration of a hand holding a circular object with two small objects above it, no text or symbols present.
natural_image
Simple line drawing of a cooking pot with a lid and base (no text or symbols)
SIM
natural_image
Simple line drawing of a cylindrical structure with diagonal lines and a base, resembling a container or tank (no text or symbols)
NÃO
natural_image
Line drawing of a person opening a microwave oven with a tray and three outlets (no text or symbols)
natural_image
Diagram showing a kitchen oven with a tray and an oven with a tray, both without any text or symbols.
natural_image
Simple line drawing of a laptop with an open screen and a hand pointing to it (no text or symbols)
natural_image
Simple line drawing of a kitchen appliance with a tray and stove (no text or symbols)
natural_image
Diagram showing a device with internal compartments and an external close-up view of a mechanical component (no text or symbols)
LIMPEZA DO VIDRO INTERIOR:
https://www.suporteworten.pt/
natural_image
Symbol of a trash bin crossed with no text or numbers, representing waste sorting or disposal (no text present)
BECKEN®