
HCT60FL - Cooker NORDMENDE - Free user manual and instructions
Find the device manual for free HCT60FL NORDMENDE in PDF.


User questions about HCT60FL NORDMENDE
0 question about this device. Answer the ones you know or ask your own.
Ask a new question about this device
Download the instructions for your Cooker in PDF format for free! Find your manual HCT60FL - NORDMENDE and take your electronic device back in hand. On this page are published all the documents necessary for the use of your device. HCT60FL by NORDMENDE.
USER MANUAL HCT60FL NORDMENDE
OPERATING AND INSTALLATION INSTRUCTIONS
BUILT-IN VITROCERAMIC HOB
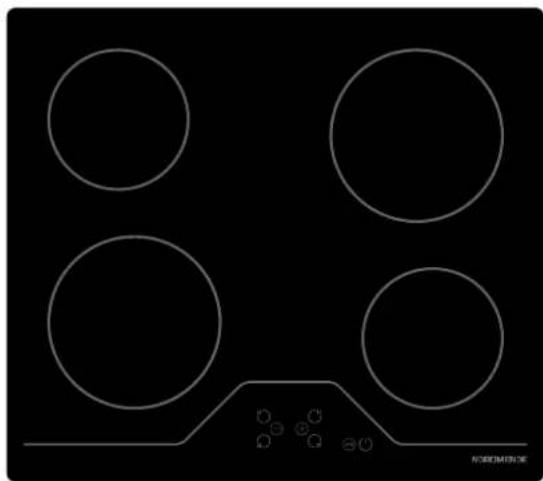
natural_image
Pure electrical circuit lines without any symbolsNORDMENDE™
HCT60FL
CONTENTS
- DESCRIPTION OF THE HOB
- SAFETY INSTRUCTIONS
- INSTALLATION
- ELECTRICAL CONNECTION
- USAGE
- TOUCH CONTROL SAFETY FUNCTIONS
- CLEANING AND CARE
Dear Customer,
Thank you for purchasing this Proline Cooking Hob. The safety precautions and recommendations in these instructions are for your own safety and that of others. They will also provide a means by which to make full use of the features offered by your appliance.
Please keep this booklet in a safe place. It may be useful infuture, either to yourself or to others in the event that doubts should arise relating to its operation.
This appliance must be used only for its intended purpose, that is for the domestic cooking of foodstuffs. Any other form of usage is to be considered as inappropriate and therefore dangerous.
The manufacturer declines all responsibility in the event of damage caused by improper or incorrect use of the appliance.
CE Declaration of conformity
- This cooking hob has been designed to be used only for cooking. Any other use (such as heating a room) is improper and dangerous.
- This cooking hob has been designed, constructed, and marketed incompliance with:
- Safety requirements of the "Low voltage" Directive 2006/95/EC;
- Safety requirements of the "EMC" Directive 89/336/EC;
- Requirements of the Directive 93/68/EC.
BEFORE USING FOR THE FIRST TIME
Read the instructions carefully before installing and using the appliance. After unpacking the appliance, make sure it is not damaged. In case of doubt, do not use the appliance and contact your supplier or a qualified engineer.
Remove all packaging and do not leave the packing material (plastic bags, polystyrene, bands etc) in easy reach of children as they may cause serious injury. The packaging materials are recyclable.
The appliance should be installed and all the electrical connections made by a qualified engineer in compliance with local regulations in force and following the manufacturers instructions.
Do not attempt to modify the technical properties of the appliance, as it may become dangerous to use.
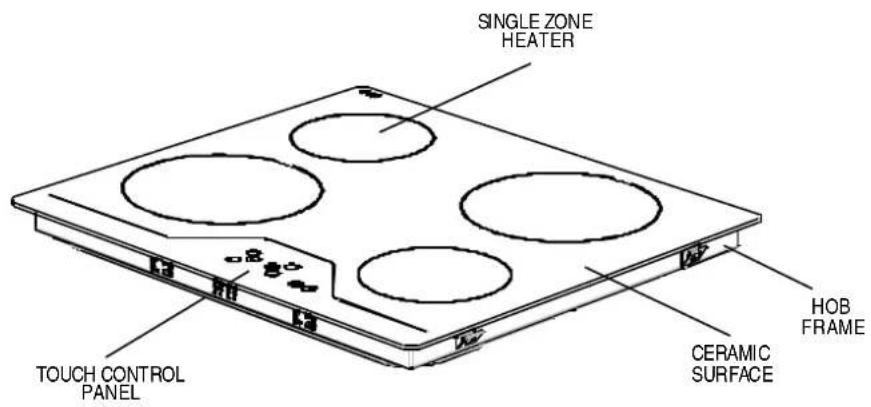
text_image
SINGLE ZONE HEATER TOUCH CONTROL PANEL CERAMIC SURFACE HOB FRAMENote: Appearance of your hob maybe different than the model shown above due to production changes.
Please comply with these instructions. If you do not, any damage resulting from improper, incorrect or negligent use or improper connection or installation is not covered by the warranty.
- This appliance is intended for domestic use only, any other use may invalidate the warranty and might be dangerous.
- This appliance must only be used for the purpose of heating or cooking food, any other use, for example heating rooms, working surface or storage surface, is dangerous.
- Additions or modifications to the appliance are not permitted.
- Do not place or store flammable liquids, highly inflammable materials or fusible objects on or near the appliance.
- Children must be kept away from the appliance.
- The appliance may only be installed and connected by an authorised and qualified installer.
- The electrical safety of this hob is guaranteed only if it is connected to a properly earthed system, which complies with the electrical safety standards.
- Built-in appliances may only be used after they have been installed in suitable built-in units and work surfaces that meet the standards.
- Do not put pressure on the power supply cable while fitting the hob.
- Power supply cable length should not exceed 2m for isolation safety.
- In the event of faults with the appliance or damage to the glass ceramic (cracks or splits), the appliance must be switched off and disconnected from the electrical supply to prevent the possibility of an electric shock.
- Repairs to the appliance must only be carried out by authorised service personal.
- Make sure all the packaging has been removed before you use the appliance.
- Cables from electrical appliances must not touch the hot surface of any appliance or hot cookware.
- Never leave the hob unattended when cooking with fat or oil. They can rapidly catch fire if overheated.
-
Do not cut any food on the glass of the ceramic hob. Glass panels should not be used as working surfaces.
-
Be careful when using small household appliances, such as irons, near the elements.
- Do not use the cooking zones with empty cookware or without cookware.
- Make sure all the controls are in the off position when not in use.
- For cleaning, the appliance must be switched off at the supply and cooled down.
- Do not use a steam cleaner to clean the appliance as this could damage the product and may invalidate the warranty.
- Use only stable flat-based pans.
WARNING
When correctly installed, your product meets all safety requirements laid down for this type of product category. However special care should be taken around the underneath of the appliance as this area is not designed or intended to be touched and may contain sharp or rough edges, that may cause injury.
Fire Risk! Do not leave inflammable materials on the Hob top. Make sure that electrical cords connecting other appliances in the proximity cannot come in to contact with the hob top.
Do not allow heavy or sharp objects to drop on the ceramic hob. If the hob is cracked or damaged, unplug and call the after-sales service. Do not scratch the hob with sharp objects. Don't use the hob as a work surface.
Before disposing of an unwanted appliance, it is recommended that it is made inoperative and that all potentially hazardous parts are made harmless.
Important: This appliance has been designed for domestic use only. The appliance is NOT suitable for use within a semi-commercial, commercial or communal environment.
If the supply cord is damaged, it must be replaced by the manufacturer, its service agent or similarly qualified person in order to avoid an electrical hazard.
The electrical connection of this hob should be carried out by an authorised service personal or a qualified electrician, according to the instructions in this guide and in compliance with the current regulations.
- Prior to installation, ensure that the local distribution conditions and the adjustment of the appliance are compatible.
- The laws, ordinances, directives and standards in force in the country of use are to be followed (safety regulations, proper recycling in accordance with the regulations, etc.)
Locating your built-in hob
After removing the packaging material from the appliance and its accessories, ensure that the hob is not damaged. If you suspect any damage, do not use the appliance, contact an authorised service personal or a qualified electrician immediately.
- This built-in hob is to be inserted into a cut out of a worktop. It will be electrically connected with the switch box below counter level, especially provided for this purpose.
- Cut an opening with the dimensions shown in the picture below.
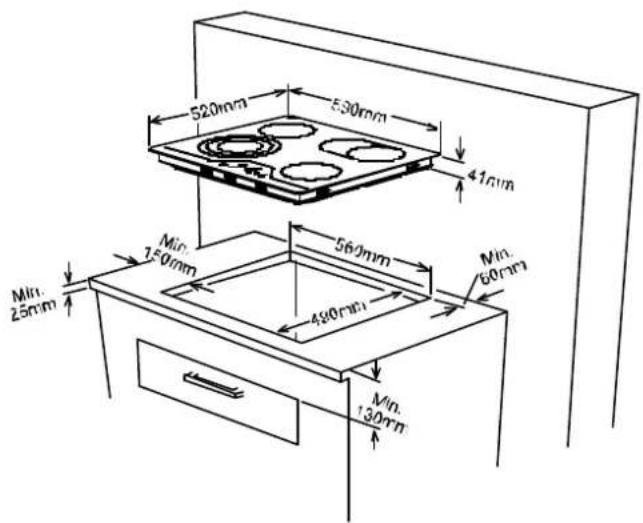
text_image
520mm 530mm 41mm 560mm 490mm Min. 60mm Min. 130mm Min. 150mm Min. 25mm- Apply the one-sided self-adhesive sealing tape supplied all the way round the lower edge of the cooking surface along the outer edge of the glass ceramic panel. Do not stretch it.
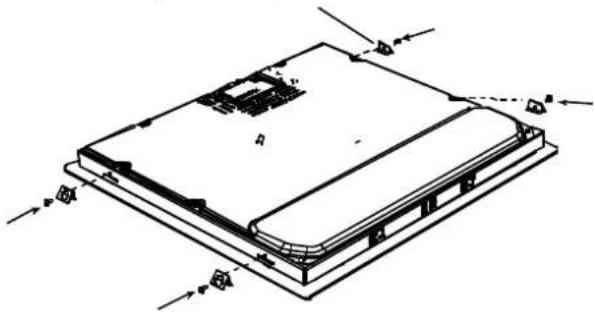
- Screw the 4 worktop mounting brackets on the side walls of product.
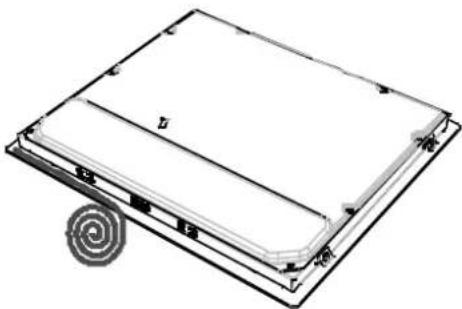
natural_image
Line drawing of a rectangular electronic device with a spiral coil on the side (no text or symbols)worktop mounting bracket
natural_image
Technical line drawing of a layered electronic device with mounting holes and control buttons (no text or symbols)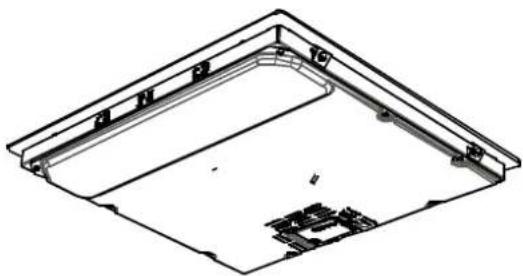
natural_image
Isometric technical drawing of a structural frame with mounting holes and internal components (no text or symbols)Electrical connection of your hob
- Before proceeding with the electrical connection, verify that the current carrying capacity of the system and the socket is adequate for the maximum power rating of the hob.
- Electrical installation of the residence and the electrical current plug in use must be earthed and conform with safety regulations.
- If there is no dedicated hob circuit and fused switch, they must be installed by a qualified electrician before the hob is connected.
- The fused switch must be easily accessible once the hob has been installed.
- Do not use adaptors, multiple sockets and/or extension leads.
-
This appliance conforms with the requirements of the following EEC Directives:
-
Vitroceramic hob EEC/73/23 and 93/68, EEC/89/336 relating to radio interference,
- EEC/89/109 relating to contact with foods.
- A circuit breaker with a contact opening of at least 3 mm, rated 20 A and delayed functioning type must be installed in the supply circuit.
text_image
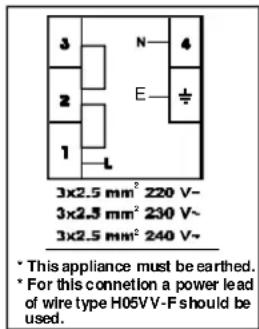
3x2.5 mm² 220 V~ 3x2.5 mm² 230 V~ 3x2.5 mm² 240 V~ * This appliance must be earthed. * For this connection a power lead of wire type H05VV-F should be used.- The supply cable must be H05VV-F 3X2,5 mm ^2 / 60227 IEC 53. You will find the connection diagram shown on the back of your appliance.
- During installation, please insure that isolated cables are used. An incorrect connection might damage your appliance. The guarantee will not cover such damages.
- All repairs must be carried out by an authorised service personal or a qualified electrician.
- Unplug your appliance before each maintenance. For reconnection, follow the connection diagrams.

USAGE
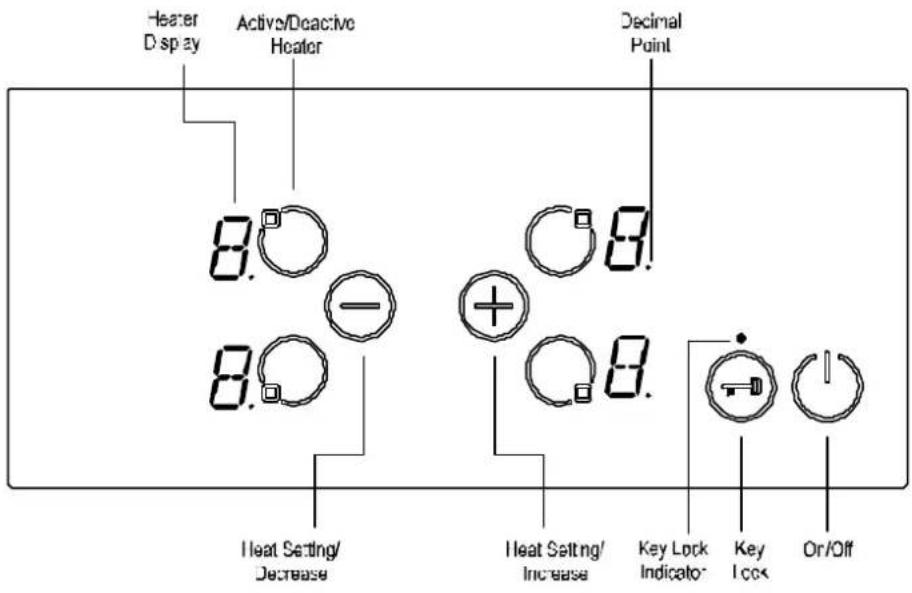
The appliance is operated by touching buttons and the functions are confirmed by displays and acoustic signals.
NOTE: See the section on HOB RESET if you see a flashing H in any of the displays.
text_image
Heater Display Active/Deactive Heater Decimal Point 8.0 - 8.0 Heat Setting/ Decrease 8.0 + 8.0 Heat Setting/ Increase Key Lock Indicator Key Lock Or/Off| Stand-By-Mode | S-Mode | The mains are applied to the hob control and all heater displays are off or a residual heat display is active. |
| Operating-Mode | B-Mode | At least one heater display shows a heat setting between '0' and '9' |
| Lock Mode | VR-Mode | The hob control is locked. |
Mode Descriptions
Turning the appliance on / off.
If the appliance is in Stand-By-Mode, it is put in Operating-Mode by pressing the On/Off button ⏻ at least 1 second. A beep indicates a successful operation.
On all heaters a '0' appears and all Decimal Point of the heater flashes.
If there is no operation within 10 sec, the display of all heaters will turn off.
If the displays are turned off, the heater will be set to off.
If ⏻ is pressed more than 2 sec (in Operating-Mode), the appliance is switched off and is set into the off mode again. The appliance can be turned off by pressing ⏻ at any time; even if other buttons are pressed simultaneously.
If there is residual heat remaining, this will be indicated by a flashing H in the corresponding Heater Display.
Select Heater
If a single heater is chosen with the corresponding Active/Deactive Heater Button ☐, the Decimal Point of the related Heater Display flashes. For the selected heater, you can set the heat level between 1-9 by touching the Heat Setting Buttons ⊕ or ⊖.
The buttons must be pressed within 3 sec, otherwise the heater selection is erased and heat setting dot will disappear (Decimal Point). If there is no further operation within 10 sec, the heater falls back into off mode.
The heat setting can always be changed by pressing ⊕ or ⊖ between level 1-9.
Each button operation or each display change is accompanied by a beep.
Set Cooking Level With and Without Heat Boost
All heaters are equipped with heat boost functionality.
If the heat boost is active, then the heater will be operated with maximum power for the period of the heat boost time, which is dependent on the selected heat setting. This is indicated by a flashing 'A', alternating with the heat setting value (e.g. 'A' and then '9') in the heater display. Once the heat boost time has ended, only the heat setting will be displayed.
If you want to use heat boost level 9 must be selected by pressing starting from level 0. After setting the heat to level 9, 'A' and the heat setting will be displayed alternately. This means that level 9 and heat boost is active. Continue to press the button to set a lower heat setting.
The heat boost can be turned off by pressing until heat setting '0' is selected.
If the heat boost should be used, it can always be activated by actuating again if the heat setting is set to level 9. In the heat display 'A/9' flashes.
Turn Off Individual Heaters
A selective heater can be turned off in two ways:
. Simultaneous operation of ⊕ and ⊖ buttons
- Reduction of the heat setting to '0' by operating button
Simultaneous operation of ⊕ and ⊖ buttons
The corresponding heater must be chosen with one of the Active/Deactive Heater Button ☐ the Decimal Point of the selected Heater Display flashes. To turn off the heater, ☑ and ☑ must be pressed at the same time. A beep signal sounds and '0' appears in the heat setting display.
If there is a residual heat for this heater remaining, this will be indicated by a static display 'H' in the heat setting display.
Reduction of the heat setting to '0' by operating ⊖ button
The heater can also be turned off by reducing the heat setting to '0'. When Heater Display indicates '0', the Decimal Point of the selected heater will also turn off.
If there is a residual heat for this heater remaining, this will be indicated by a static display 'H' in the heat setting display.
Key Lock
Key lock functionality is for blocking and set the appliance into a save modus during operation. Touch modifications as for example rise heat settings and others should not be possible. It is only possible to switch the appliance off.
To lock the current operating mode, press the Key Lock button Ⓧ for at least 2 seconds. This operation is acknowledged by a beep. The Key Lock Indicator flashes and the controls are locked. The heater can only be locked in Operating Mode.
If the heater is locked, only ⏻ can be operated, all other buttons are disabled. Only the On-Off switch ⏻ will operate. If you switch off the appliance, you must switch it on again and press the lock button to unlock the appliance before you can use it.
After pressing Ⓞ 2 sec, the Key Lock Indicator disappears. Now, the hob control is unlocked and can be operated normally.
TOUCH CONTROL SAFETY FUNCTIONS
The following safety functions are available to avoid unintended operations of the hob control.
Sensor Safety Cut Off
To prevent the appliance from unwanted, random sensor operation, sensor monitoring is included.
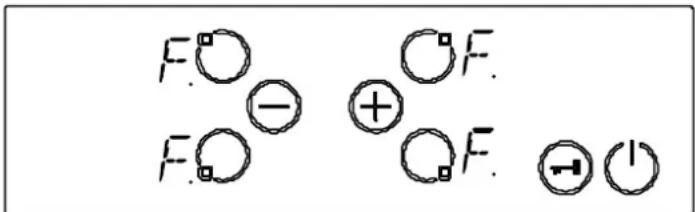
In case of one or more buttons are pressed longer than 12 sec, the sensor monitoring routine indicates with a beep, that wrong operation (pot or other object placed on the button, sensor failure, etc.) and switches off the appliance.
The safety turn off causes the hob to turn off to standby. An 'F' will flash in all heater displays once before switching to standby.
chemical
Simple diagram showing electrostatic interaction between F and Q, with positive and negative charges labeledIf residual heat is present, 'H' will be displayed in the appropriate heater displays.
Over Temperature Switch Off
Due to the control panel being close to the front two heaters it can get too hot to touch if the pans have been badly placed so the bottom edge of the pan is close to but not touching the control buttons.
To prevent the hob control unit from damage, the control monitors the temperature and switches off, if the control panel exceeds 60^ C. All 4 heater displays show 't', until the hob cools down.
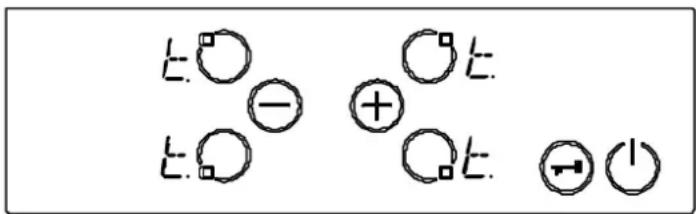
After the hob cools the 't' displays will be erased and the hob control enters standby mode. This means that the user can reactivate the appliance by touching ^① .
Residual Heat Functions
After the hob is turned off when cooking is finished, there is some heat stored in the vitroceramic glass called residual heat. The hob can calculate roughly how hot the glass is. If the calculated temperature is higher than +60 °C, the corresponding heater display will flash an 'H' symbol. The residual heat display is shown as long as the calculated heater temperature is higher than +60 °C.
The display of the residual heat has the lowest priority and is overwritten by every other display value such as safety turn off's and displaying error codes.
HOB RESET
When the Hob is first turned on after installation or after a power outage during operation, the Hob will display a flashing 'H' on all or some heater displays.
Which displays flash an 'H' depends on mode of operation when the power outage happened.
This is due to the Hob retaining heater information in its memory, this is not a fault and is normal.
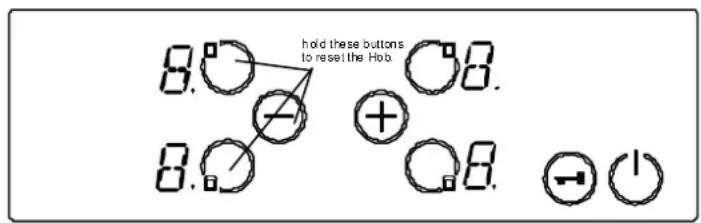
To reset the Hob, press and hold the top left heater, bottom left heater and the ⊖ buttons at the same time for roughly 2 seconds.
text_image
hold these buttons to reset the Hob.Cookware with rough bottoms should not be used since these can scratch the ceramic surface. The bottom of the cookware should be as thick and flat as possible. Before use, make sure that cookware bottoms are clean and dry.
Always place the cookware on the cooking zone before it is switched on. If possible, always place the lids on the cookware. Bottom of the cookware must not be smaller or larger than the cooking zones, they should be at the proper size as indicated below.

text_image
CORRECT FALSE FALSE FALSEBefore cleaning the hob, first disconnect from the electrical supply socket. Then ensure that there is no residual heat stored in the appliance. Vitroceramic glass is very resistant to high temperature and overheating. If there is residual heat stored in the appliance, 'H' is flashing in the Heater Display. In order to avoid burns, let the appliance cool down.
CLEANING THE CERAMIC HOB
Before you begin cleaning make sure that the hob is switched off. Remove spillages and other types of encrustations.
Dust or food particles can be removed with a damp cloth. If you use a detergent, please make sure that it is not abrasive, Do not use abrasive cleaners or scouring powders as these can damage the ceramic surface of the hob.
All traces of the cleaner must be removed with a damp cloth. Dust, fat and liquids from food that has boiled over must be removed as soon as possible.
If they are allowed to harden they become increasingly difficult to remove.
This is especially true in the case of sugar/syrup mixtures which could permanently pit the surface of the hob if left to burn on it. If any of these products has melted on the ceramic surface, you should remove it immediately (when the surface is still hot) by using a scraper to avoid any permanent damage to the surface of the hob (available from the store where you purchased this appliance).
Do not put articles on the hob which can melt: i.e. plastic, aluminium foil, sugar, sugar syrup mixtures etc.
Avoid using a knife or other sharp utensil as these may damage the ceramic surface.
Do not use steel wool or an abrasive sponge which could scratch the surface permanently.
The symbol on the product or on its packaging indicates that this product may not be treated as household waste. Instead it shall be handed over to the applicable collection point for the recycling of electrical and electronic equipment. By ensuring this product is disposed of correctly, you will help prevent potential negative consequences for the environment and human health, which could otherwise be caused by inappropriate waste handling of this product. For more detailed information about recycling of this product, please contact your local city office, your household waste disposal service or the shop where you purchased the product.
natural_image
Black background with four white circular outlines and a central electrical circuit breaker (no text or symbols)NORDMENDE™
HCT60FL