Prego da5 - Camera ROLLEI - Free user manual and instructions
Find the device manual for free Prego da5 ROLLEI in PDF.
| Product Type | 35mm Film Compact Camera |
| Film Format | 35mm (135) ISO 25-3200 |
| Lens | Rollei 35-70mm f/4.5-6.7 |
| Focus System | Multi-zone autofocus |
| Flash | Built-in auto flash with red-eye reduction |
| Self-Timer | Electronic, approx. 10 seconds |
| Date Back | Imprint date or time on film (unless optional) |
| Dimensions (W x H x D) | 127 x 68 x 43 mm (5.0 x 2.7 x 1.7 in) |
| Weight (without batteries) | Approx. 220 g (7.8 oz) |
| Power Source | 2 x 3V CR123A lithium batteries |
| Battery Life | Up to 20 rolls of 24 exposures |
| Shutter Speed Range | 1/2 to 1/300 sec (program auto) |
| Exposure Metering | Center-weighted average |
| Film Transport | Automatic advance and rewind |
| Flash Range | 0.5 - 5.5 m (1.6 - 18 ft) |
| Camera Body Material | Polycarbonate with metal accents |
| Cleaning | Soft dry cloth; avoid solvents |
| Storage Conditions | Cool, dry place; remove batteries if unused |
| Repair Servicing | Contact Rollei authorized service centers |
Frequently Asked Questions - Prego da5 ROLLEI
User questions about Prego da5 ROLLEI
0 question about this device. Answer the ones you know or ask your own.
Ask a new question about this device
Download the instructions for your Camera in PDF format for free! Find your manual Prego da5 - ROLLEI and take your electronic device back in hand. On this page are published all the documents necessary for the use of your device. Prego da5 by ROLLEI.
USER MANUAL Prego da5 ROLLEI
natural_image
Silver Roledi 5.0 Megris digital camera with visible lens and control buttons (no text-heavy elements)Rollei Prego da5
This manual is designed to assist you in using this 5 Mega Pixels Digital Camera. Information in this document has been carefully checked for accuracy; however, no guarantee is given to the correctness of the contents. The information in this document is subject to change without notice.
Edition
First Edition, 2004
Copyright
© Copyright 2004
This document contains proprietary information protected by copyright. All rights are reserved. No part of this manual may be reproduced by any mechanical, electronic or other means, in any form, without prior written permission of the manufacturer.
Federal Communications Commission (FCC) Compliance
This equipment has been tested and found to comply with the limits for a Class B digital device, pursuant to Part 15 of the FCC Rules. These limits are designed to provide reasonable protection against harmful interference in a residential installation. This equipment generates, uses, and can radiate radio frequency energy and, if not installed and used in accordance with the instructions, may cause harmful interference to radio communications. However, there is no guarantee that interference will not occur in a particular installation. If this equipment does cause harmful interference to radio or television reception, which can be determined by turning the equipment off and on, the user is encouraged to try to correct the interference by one or more of the following measures:
- Reorient or relocate the receiving antenna.
- Increase the separation between the equipment and the receiver.
- Connect the equipment to an outlet on a circuit different from that to which the receiver is connected.
- Consult the dealer or an experienced radio/TV technician for help.
Warning: A shielded-type power cord is required in order to meet FCC emission limits and to prevent interference to the nearby radio and television reception. Use only shielded cables to connect I/O devices to this equipment.
You are cautioned that changes or modifications not expressly approved by the party responsible for compliance could void your authority to operate the equipment.
Declaration of Conformity
This device complies with part 15 of the FCC rules. Operation is subject to the following conditions:
- This device may not cause harmful interference.
- This device must accept any interference received, including interference that may cause undesired operation.
Trademark Recognition
Windows, Windows 98, Windows 2000, Windows ME, Windows XP are registered Trademarks of the Microsoft Corporation of the U.S. registered in the USA and other countries. Windows in an abbreviated term referring to the Microsoft Windows Operation System. Adobe is a trademark of Adobe Corporation. Ulead is the trademark of Ulead Systems, Inc..
Other companies or product names are trademarks or registered trademarks of the respective companies.
Safety & Handling Precautions
Camera Information
- Do not take apart or attempt to service the camera yourself.
- Do not expose the camera to moisture, or extremes in temperature.
- Let the camera warm up when moving from a cold to a warm temperature.
- Do not touch the lenses of the camera.
- Do not expose the lens to direct sunlight for extended periods.
Battery Information
- Turn off the camera before installing or removing batteries.
- Use only AA NiMH batteries or CRV3 Lithium battery.
- Always replace batteries with two new or freshly charged batteries.
- Do not use batteries that are leaking, corroded, or damaged.
- Do not attempt to recharge non-rechargeable batteries.
- When charging rechargeable batteries, use a battery charger specifically designed for the type of battery. If the charger is designed to accommodate multiple battery types, be sure to adjust its settings to match the type of battery you are recharging.
- Download all pictures and remove the batteries from the camera if you are going to store the camera for extended periods.
Contents
Unpack Your Camera....1
Package Contents.... 1
Optional Accessories .... 1
System Requirements.... 1
Important Notes....1
Getting Acquainted with Your Camera 2
Top & Front View....2
Rear & Bottom View....2
LCD Monitor Display 3
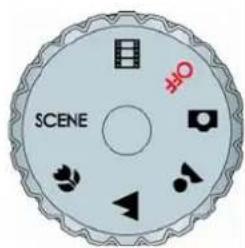
Mode Dial Selector....4
LED Status 4
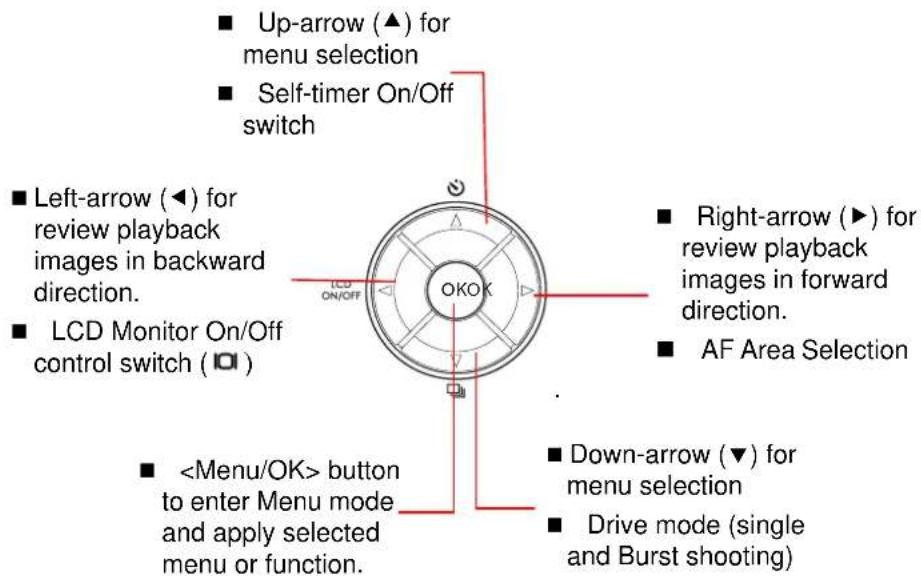
Navigation Switch 5
Shutter Button 5
Getting the Camera Ready....6
Installing Memory SD/MMC Card and Battery 6
Switching the Camera ON/OFF 6
Viewing the Total/Remaining Shots Available 6
Battery Low Alert....6
Setting the Language and Date & Time....7
Setting Language....7
Setting Date & Time....7
Capturing Still Images....8
Full Auto Mode 8
Portrait Mode....8
Landscape Mode 8
Close-up Mode....8
Shooting with Scene Mode 9
Sports Mode....9
Night Landscape Mode....9
Night Portrait Mode....9
Museum Mode 9
Backlight Mode 9
Recording Videos 10
Setting Self-Timer....11
Playback Still Images 12
Playback a Still Image.... 12
Magnifying a Still Image 12
Playback Video Images 12
Playback Images in Slideshow 13
Setting the Slideshow Display Time Interval.... 13
Setting the Single-loop/Endless-loop Slideshow 13
Playback on TV 14
Display Image Properties.... 15
Deleting Images 16
Deleting Single Image in QuickView.... 16
Deleting Single Image in Playback 16
Deleting All Images 17
Formatting Memory Card or Internal Memory.... 17
Settings Capture Mode 18
Switching LCD Off between Shots.... 18
Setting LCD Off When Camera Power On 18
Setting Flash 19
Setting Drive Mode 19
Setting Auto Focus (AF) Selection.... 20
Setting Image Resolution.... 20
Setting Image Quality....21
Setting Exposure Compensation 21
Setting White Balance....21
ISO Speed 22
Setting Auto-Exposure (AE) Metering 22
Setting Sharpness 22
Setting Color Mode 23
Setting DPOF Print 24
Setting DPOF for Printing a Single Image 24
Setting DPOF for Printing All Images in the Memory 24
Setting Protect Image 25
Move Images from Internal Memory to Card 26
Camera Setup.... 27
Factory Default Settings....27
Reset Camera Settings....28
Setting Digital Zoom....28
Setting Camera Sound Volume 29
Setting Image Storage 29
Setting Date Stamp 30
Setting Customize.... 31
Software Installation 32
Installation Software/Hardware Driver 32
Automatic Installation 32
Custom Installation 33
Dowloading & Transfering Files to Computer 33
How to download Pictures via Ulead Photo Explorer 34
Troubleshooting 35
Specification 36
Unpack Your Camera
Package Contents
- Digital Camera
- Wrist Strap
- USB Cable
- AV Cable
- 2 AA Batteries
- Software CD containing
-Camera Driver for Windows 98SE
-Ulead Photo Explorer
-Ulead Video Studio
-Adobe Acrobat Reader
-Owner's Manual (PDF)
- Quick Start Guide
Optional Accessories
- Tripod
• AC adapter (3V, 2.5 A, center positive) - SD/MMC card
System Requirements
For optimal use of this camera, your computer should have the following minimum system requirements:
• PC Pentium processor
• Microsoft Windows XP/2000/ME/98SE
- 128 MB RAM
- 90 MB of hard drive space
- USB interface
- CD-ROM drive
- VGA monitor
Important Notes:
- Due to varying compatibility among USB HUBS, compatibility is not guaranteed.
- Due to varying compatibility among USB interface cards, compatibility is not guaranteed.
Getting Acquainted with Your Camera
Congratulations on your purchase of this digital camera. Your digital camera has been designed with a 5 Mega Pixels CCD image sensor and 3X optical zoom lens which allow you to quickly and easily take high quality digital pictures.
Top & Front View
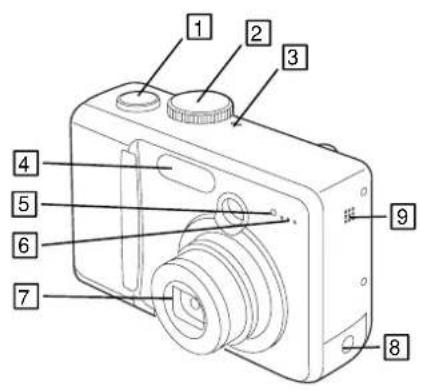
text_image
Labeled diagram of a digital camera with numbered parts for identification- Shutter button
- Mode Dial Switch
- Power LED
- Flash
- Self-timer LED
- Microphone
- 3X Optical Zoom Lens
- DC-in Jack, USB/AV connector compartment
- Speaker
Rear & Bottom View
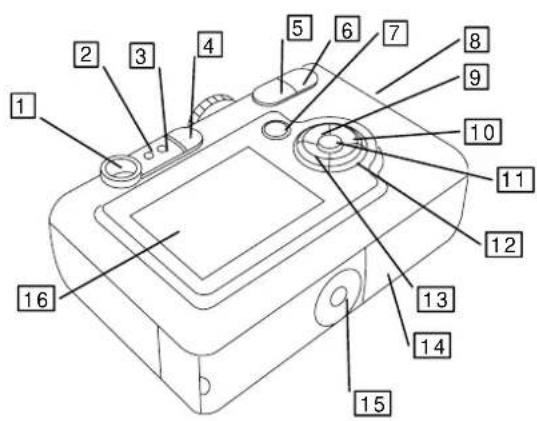
text_image
Labeled diagram of a device with numbered parts for identification- Viewfinder
- AF LED (green)
- Flash LED (red)
- Flash/Delete button (☐/☐)
- Zoom-out button ( ☐, )
- Zoom-in button ( [ ] , + )
- Playback button ( ▶ )
- Strap eyelet
- Up-arrow/Self-timer button (▲)
10.Right-arrow button (▶)
11. - Down-arrow/Burstbutton (▼/☐)
- Left-arrow/LCD on-off button (◄/IOI)
- Battery/Memory card compartment
- Tripod socket
16.LCD Monitor
LCD Monitor Display
text_image
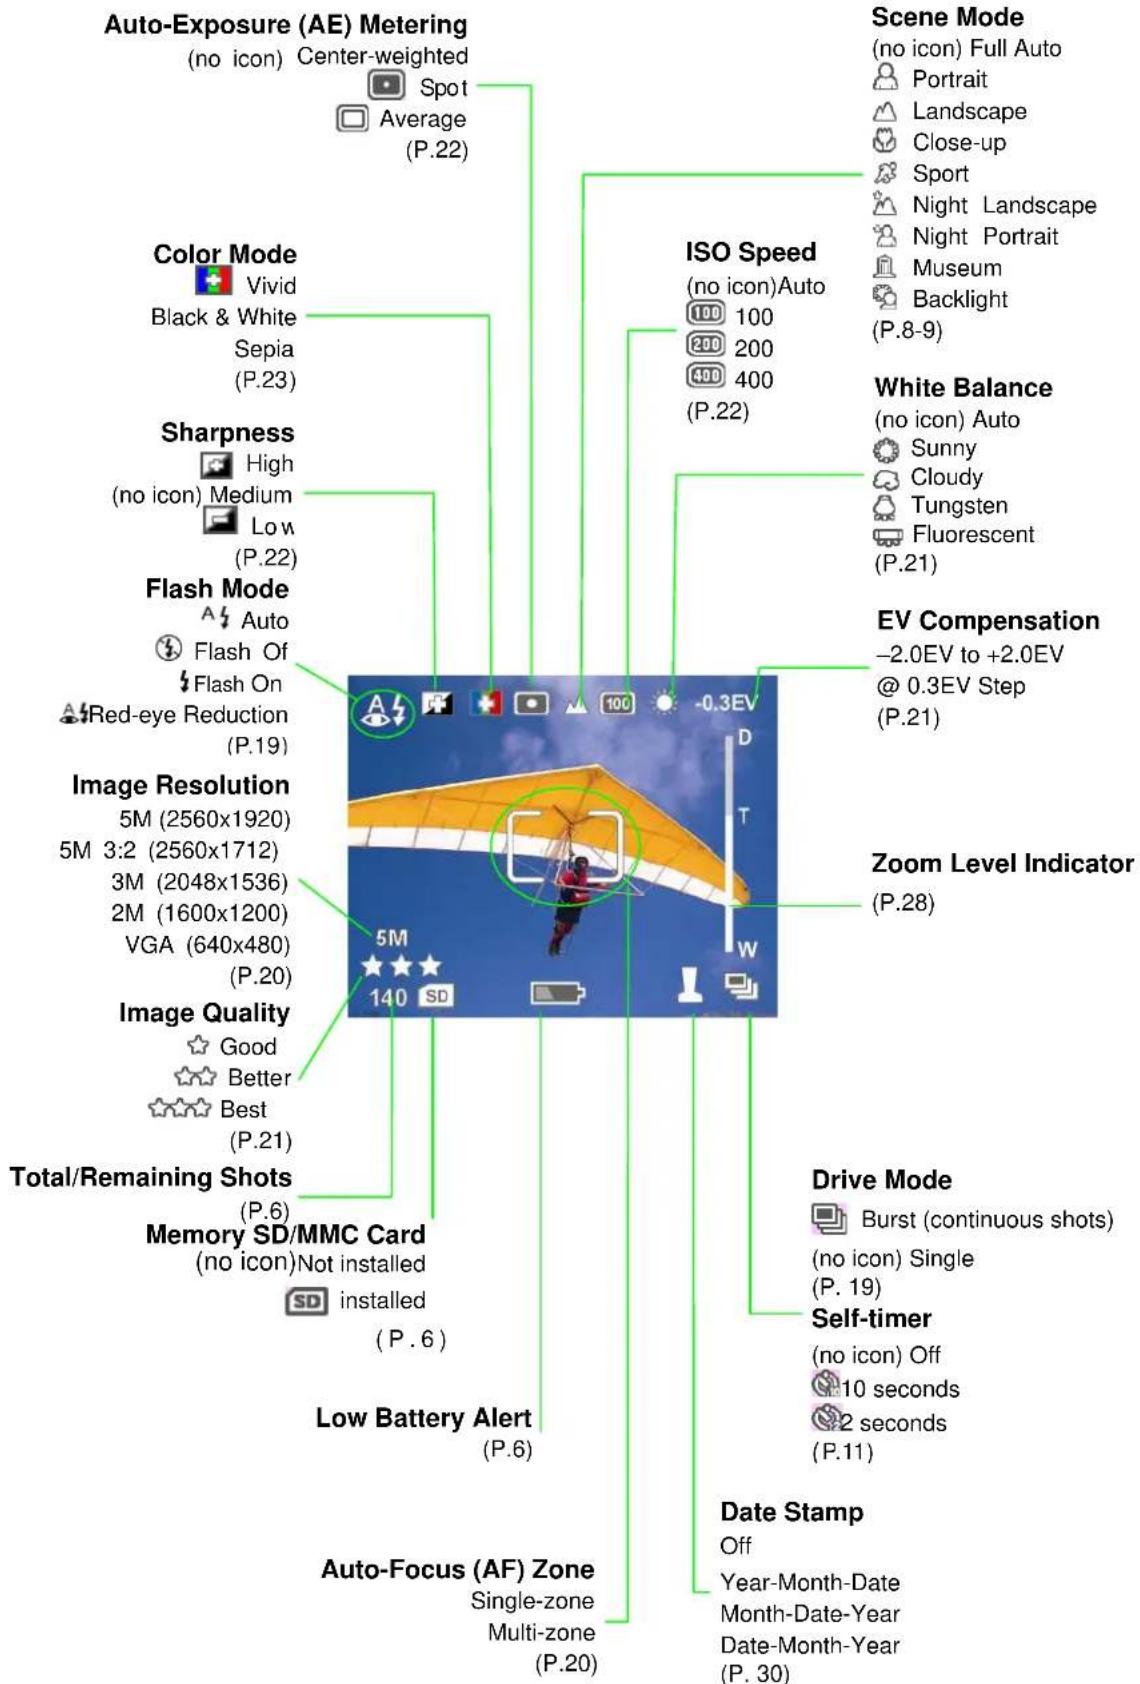
Auto-Exposure (AE) Metering (no icon) Center-weighted Spot Average (P.22) Color Mode Vivid Black & White Sepia (P.23) Sharpness High (no icon) Medium Low (P.22) Flash Mode Auto Flash Of Flash On Red-eye Reduction (P.19) Image Resolution 5M (2560x1920) 5M 3:2 (2560x1712) 3M (2048x1536) 2M (1600x1200) VGA (640x480) (P.20) Image Quality Good Better Best (P.21) Total/Remaining Shots (P.6) Memory SD/MMC Card (no icon) Not installed Installed (P.6) Low Battery Alert (P.6) Auto-Focus (AF) Zone Single-zone Multi-zone (P.20) ISO Speed (no icon) Auto 100 200 400 (P.22) Scene Mode (no icon) Full Auto Portrait Landscape Close-up Sport Night Landscape Night Portrait Museum Backlight (P.8-9) White Balance (no icon) Auto Sunny Cloudy Tungsten Fluorescent (P.21) EV Compensation -2.0EV to +2.0EV @ 0.3EV Step (P.21) Zoom Level Indicator (P.28) Drive Mode Burst (continuous shots) (no icon) Single (P. 19) Self-timer (no icon) Off 10 seconds 2 seconds (P.11) Date Stamp Off Year-Month-Date Month-Date-Year Date-Month-Year (P. 30)Mode Dial Selector

text_image
SCENE #O| Icon | Mode | Function |
| OFF | Off | |
| Full Auto | Capture- Full Auto Mode | |
| Movie | Capture- Movie mode. | |
| Portrait | Capture -Portrait mode. | |
| Landscape | Capture -Landscape mode. | |
| Close-up | Capture –Macro mode. | |
| SCENE | Scene | More Scene modes available for Capture. |
(Refer to P. 8 to 9 for details.)
LED Status
| LED Type LED Status Camera Status | ||
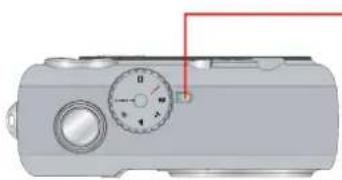
Power LED | Off | Power OFF |
| Green Steady | Ready for taking pictures | |
| Green Blinking | Busy mode when camera in-Processing of image reproduction-PC link | |
| Red Steady | Camera in error modes:-Card/memory full-Card corrupted-Card protected | |
| Red Blinking | Insufficient battery | |
| Self-timer LED | Off | Self-timer off. |
| Red Steady | Video is recording. | |
| Red Blinking Slow | Self-timer countdown for the first 8 seconds | |
| Red Blinking Fast | Self-timer countdown for the last 2 seconds | |
| Flash LED | Off | Flash off |
| Red Steady | Flash will fire at next shooting. | |
| Red Blinking | Flash is charging. | |
| AF LED | Off | Shutter at released position |
| Green Steady | Auto Focus is achieved while shutter is pressed down halfway (S1 position). | |
| Green Blinking | Auto Focus is in progress while shutter is pressed down halfway (S1 position). | |
Navigation Switch

text_image
■ Up-arrow (▲) for menu selection ■ Self-timer On/Off switch ■ Left-arrow (◀) for review playback images in backward direction. ■ LCD Monitor On/Off control switch ( □ ) ■Shutter Button
S0 Released position. Shutter is OFF.
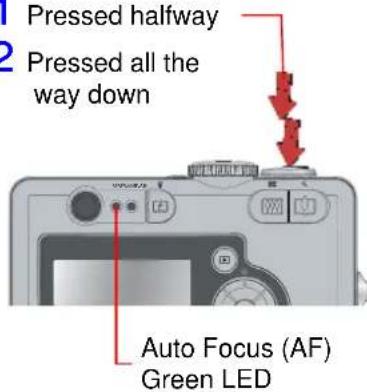
S1 Focus position. Shutter is pressed down halfway and the AF Green LED blinks while camera is doing Auto Focus (AF), Auto Exposure (AE) and Auto White Balance (AWB).
S2 Capture position. When the AF Green LED ceases to blink, Shutter is pressed all the way down to capture the image.
S0 Released position
S1 Pressed halfway
S2 Pressed all the way down
text_image
1 Pressed halfway 2 Pressed all the way down Auto Focus (AF) Green LEDGetting the Camera Ready
Installing Memory SD/MMC Card and Battery
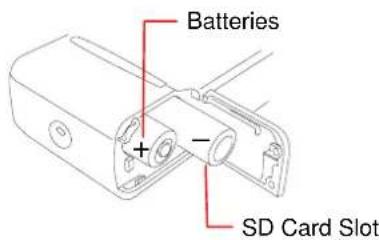
1 Open the battery/memory card cover and slide the memory SD/MMC card (optional) and two new AA Ni-MH batteries or one CRV3 Lithium battery into compartments.
2 Close cover securely until it clicks shut.
3 Battery level is shown in 3 stages, Full Battery, Low Battery, and Insufficient Battery. Only Low Battery and Insufficient Battery are indicated on LCD screen.
text_image
Batteries + - SD Card SlotNOTE
■ Be sure the correct orientations of the batteries and SD/MMC card.
■ Remove batteries if camera is not used.
■ Danger of explosion if battery is incorrectly replaced. Replace only with the same or equivalent type recommended by the manufacturer. Dispose of used batteries properly..
Switching the Camera ON/OFF
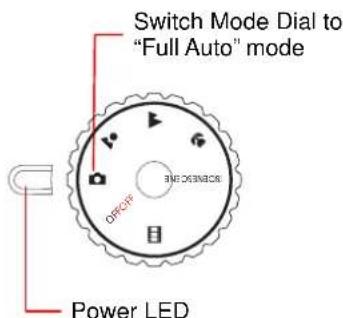
1 To switch ON, turn Mode Dial from OFF to the desired shooting mode ( 🔍 🔍 🔍 🔍). Use "Full Auto" 🔍 mode if it's your first time to use. Green power LED lights up when power is ON.
2 To switch OFF, simply return the Mode Dial back to "Off" position and the Green Power LED lights OFF.
text_image
Switch Mode Dial to "Full Auto" mode Power LEDNote: The camera will power off automatically if camera inactivity for 8 minutes from the LCD time out.
Viewing the Total/Remaining Shots Available
1 Turn ON the camera.
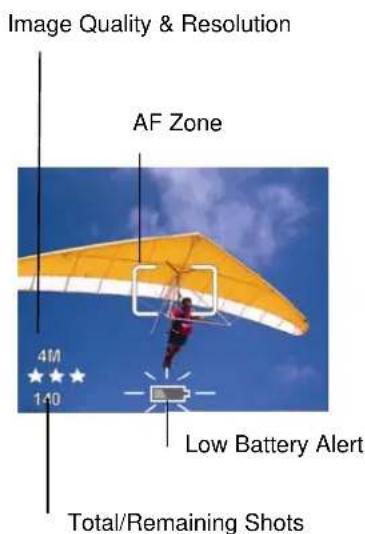
2 The total/remaining shots number of internal memory is displayed. If a memory SD/MMC card is installed, the LCD will display the total/remaining shots number of the SD/MMC card.
Note: The displayed remaining shots number will vary according to the set of image resolution and quality.
Battery Low Alert
When the battery becomes low, a low battery icon will display and the red Power LED will blink. Replace batteries when power is low.
text_image
Image Quality & Resolution AF Zone 4M 140 Low Battery Alert Total/Remaining ShotsSetting the Language and Date & Time
The Language selection will display the first time you power on the camera. After selecting the language, the Date & Time Menu will bring up automatically.
Setting Language
1 Press Up or Down arrow (▲▼) button to select the desired language.
2 Press
- When Digital Zoom function is enabled, the AF Area Selection cannot function.
● The AF Bracket will be in red color if AF cannot function.
Setting Image Resolution
This camera provides 4 kinds of image resolution for settings – 5M (2560 x 1920 pixels), 5M 3:2 (2560 x 1712 pixels), 3M (2048x1536 pixels), 2M (1600 x 1200 pixels) and VGA (640 x 480 pixels).
1 Press

2 Press Down-arrow (▼) or Up-arrow (▲) to select "RESOLUTION".

text_image
RESOLUTION * IMAGE QUALITY + EV COMPENSATION WB WHITE BALANCE ISO ISO SPEED3 Press
4 Press Up-arrow (▲) or Down-arrow (▼) button to select.

text_image
IMAGE RESOLUTION ✓ 5M (2560X1920) 5M 3:2(2560X1712) 3M (2048X1536) 2M (1600X1200) VGA (640X480)5 Press
Setting Image Quality
This camera can set up the compression ration of JPG image. The best Image Quality is selected, the less image ratio is compressed but more image capacity will be occupied the memory. Three optional modes-- Best★★★), Better (★★) and Good (★) are offered.
1 Press the
2 Press UP/Down arrow (▲▼) button to select "IMAGE QUALITY". Press

text_image
IMAGE QUALITY EV COMPENSATION WB WHITE BALANCE ISO ISO SPEED AE METERING3 Press UP/Down arrow (▲▼) button to setup the quality mode. Press the

text_image
★ IMAGE QUALITY ✓ ★★★ BEST ★ ★ BETTER ★ GOODSetting Exposure Compensation
1 Press the
2 Press Up-arrow (▲) or Down-arrow (▼) button to select "EV COMPENSATION".

text_image
EV COMPENSATION WB WHITE BALANCE ISO ISO SPEED AE METERING COLOR3 Press the
4 Press

text_image
EV COMPENSATION +0.0 EVSetting White Balance
This camera provides Auto (no icon), Sunny (★), Cloudy (♡), Tungsten (♡) and Fluorescent (♡) for White Balance settings.
1 Press
2 Press Up-arrow (▲) or Down-arrow (▼) button to select "WHITE BALANCE".

text_image
WB WHITE BALANCE ISO ISO SPEED AE METERING COLOR SHARPNESS3 Press
4 Press Up-arrow (▲) or Down-arrow (▼) button to select the white balance settings.
5 Press

text_image
WB WHITE BALANCE AUTO SUNNY CLOUDY TUNGSTEN FLUORESCENTISO Speed
1 Press the
2 Press Up/Down arrow (▲/▼) button to select "ISO SPEED".
3 Press the
4 Select "Auto, ISO100/200/400".
5 Press

text_image
ISO ISO SPEED AE METERING COLOR SHARPNESS SET UP
text_image
ISO ISO SPEED ✓ AUTO 100 ISO 100 200 ISO 200 400 ISO 400Setting Auto-Exposure (AE) Metering
This camera provides three modes of AE metering- Average (☐), Center-weighted and Sport (☐) metering.
1 Press
2 Press Up-arrow (▲) or Down-arrow (▼) button to select the "AE METERING"
3 Press
4 Press Up-arrow (▲) or Down-arrow (▼) button to select the Metering Mode.
5 Press

text_image
ISO ISO SPEED AE METERING COLOR SHARPNESS SET UP
text_image
AE METERING ✓ CENTER-WEIGHTED ● SPOT □ AVERAGESetting Sharpness
This camera provides 3 levels of image sharpness- High, Medium and Low.
1 Press
2 Press Up-arrow (▲) or Down-arrow (▼) button to select "SHARPNESS".
3 Press
4 Select Sharpness level.
5 Press

text_image
ISO ISO SPEED AE METERING COLOR SHARPNESS SET UP
text_image
SHARPNESS ✓ HIGH ✓ MEDIUM ✓ LOWSetting Color Mode
This camera provides 4 levels of color mode- Normal, Vivid (☑), Black & White and Sepia.
1 Press
2 Press Up/Down arrow (▲▼) button to select the "COLOR".

text_image
ISO ISO SPEED AE METERING COLOR SHARPNESS SET UP3 Press
4 Set up the Color level.

text_image
COLOR ✓ NORMAL VIVID BLACK & WHITE SEPIA5 Press
Setting DPOF Print
The DPOF (Digital Printer Order Format) settings allow you to select photo stores on a SD card. It is very convenient when you make a direct-print from a DPOF compatible printer.
Set DPOF for Printing a Single Image
1 Press Playback (▶) button.
2 Press Left-arrow (◀) or Right-arrow (▶) button to select the image to be printed.
3 Press
4 Press Down-arrow (▼) button to highlight "PRINT ORDER" and press
5 Press Down-arrow (▼) or Up-arrow (▲) button to highlight "THIS IMAGE" and press

text_image
PROTECT PRINT ORDER SLIDESHOWN DELETE SETUP6 Press Up-arrow (▲) button or Down-arrow (▼) button to setup the copy quantity from 0 to 99.

7 Press

Set DPOF for Printing All Images in the Memory
1 Follow Step 1 to 4 of "Set DPOF for Printing a Single Image".
2 Select "ALL IMAGES" and press
3 Repeat Step 6-7 of "Set DPOF for Printing a Single Image".
Note : DPOF is not function in video mode.

text_image
PRINT ORDER EXIT THIS IMAGE ALL IMAGES
text_image
Set print copies of all imagesSetting Protect Image
To prevent the stored images to be deleted by accident, you may protect the images stored in the memory card or internal memory by this setting.
1 Press Playback (▶) button.
2 Press Down-arrow (▼) or Up-arrow (▲) button to highlight "PROTECT IMAGE" and press

text_image
EXIT MENU INFO ? PICTURE INFO PROTECT IMAGE PRINT ORDER SLIDESHOW3 A protect icon (☐) will display on the upper-right corner of LCD display.

natural_image
Aerial view of a person in mid-air against a blue sky with clouds, no visible text or symbols.4 Press Up-arrow (▲) button to select "EXIT MENU" and press

text_image
EXIT MENU INFO ? PICTURE INFO PROTECT PRINT ORDER SLIDESHOWMove Images from Internal Memory to Card
The camera has a built-in 16MB internal memory. When a memory card is inserted into the camera, you may move the images from the internal memory into the card.
Note : This feature is only function when the memory card is inserted.
1 Press Playback (▶) button.
2 Press
3 Press Up/Down (▲▼) arrow button to select "MOVE IMAGE". Press

text_image
EXIT MENU DELETE MOVE IMAGE SET UP4 Select "THIS IMAGE" or "ALL IMAGES" to card and press

text_image
MOVIE IMAGE THIS IMAGE EXIT ALL IMAGE5 If "ALL IMAGES" is selected, a confirmation screen will pop out.

text_image
Move all images from internal to the card? CANCEL YES6 Select "YES" and press

text_image
1 Moving...Camera Setup
Factory Default Settings:
| Function | Factory | D |
| Pre-set Scene Sports | ||
| Self-timer | Off | |
| Slide Show Interval 5 Seconds | ||
| Slide Show Loop Off | ||
| Live View On | ||
| Flash Mode Auto | ||
| Drive Mode Single | ||
| AF Area Selection Central | ||
| Image Resolution 5M | ||
| Image Quality Best | ||
| EV Compensation 0 | ||
| White Balance Auto | ||
| ISO Speed Auto | ||
| AE Metering Center-weighted | ||
| Sharpness | Medium | |
| Color | Normal | |
| Camera Sound Volume | Low | |
| Digital Zoom | Enable | |
| Date Stamp Off |
Default
Setl
Reset Camera Setting
1 Press
2 Press Up/Down (▲▼) arrow button to move highlight to "SETUP" Menu.
3 Press
4 Select "RESET SETTING".
5 Press
6 Select "RESET" and press
7 Select "EXIT MENU" by pressing UP/Down arrow (▲▼) button. Press
8 Select "EXIT MENU" by pressing Down arrow (▼) button. Press
Setting Digital Zoom
1 Press
2 Press Up/Down (▲▼) arrow button to select "SETUP" Menu.
3 Press
4 Select "DIGITAL ZOOM" by pressing Up/Down (▲▼) arrow button.
5 Press
6 Press "OFF" to disable Digital Zoom and press
Note: To activate the Digital Zoom function, the LCD display must turn on and the Optical Zoom of this camera must reach its maximum 3 times. Digital Zoom is increased from 1.1X to 5.0X with 17 steps.

text_image
EXIT MENU DELETE MOVE IMAGE SET UP
text_image
EXIT MENU RES RESET SETTING IMAGE STORAGE DIGITAL ZOOM DATE STAMP
text_image
RES RESET SETTING Reset All Camera Parameters to Factory Default? CANCEL RESET
text_image
EXIT MENU RES RESET SETTING IMAGE STORAGE DIGITAL ZOOM DATE STAMP
text_image
EXIT MENU RESOLUTION IMAGE QUALITY EV COMPENSATION WB WHITE BALANCE
text_image
EXIT MENU DELETE MOVE IMAGE SET UP
text_image
EXIT MENU RES RESET SETTING IMAGE STORAGE DIGITAL ZOOM DATE STAMP
text_image
DIGITAL ZOOM ON ✓ OFFSetting Camera Sound Volume
The volume level of this camera can be set to High, Low and Off.
1 Press
2 Select "SETUP" Menu by pressing Up/Down (▲▼) arrow button.

text_image
EXIT MENU DELETE MOVE IMAGE SET UP3 Press
4 Press Up/Down (▲▼) arrow button to select "CAMERA SOUNDS".

text_image
CAMERA SOUNDS LIVE VIEW DATE & TIME VIDEO OUT LANGUAGE5 Press
6 Select the desired sound level and press

text_image
CAMERA SOUNDS HIGH ✓ LOW OFFSetting Image Storage
This camera allows you to download images to either internal memory or card as memory storage.
1 Press
2 Move highlight to "SETUP" Menu by pressing Up/Down (▲/▼arrow button.

text_image
EXIT MENU DELETE MOVE IMAGE SET UP3 Press
4 Press Up/Down (▲▼) arrow button to select "IMAGE STORAGE". Press

text_image
EXIT MENU RES RESET SETTING IMAGE STORAGE DIGITAL ZOOM DATE STAMP5 Select "AUTO" to save the images into SD/MMC card. Select "INTERNAL" to save the images into the internal
memory. Press

text_image
IMAGE STORAGE ✓ AUTO INTERNAL
text_image
Reading Memory Card...
text_image
Reading Internal Memory...Setting Date Stamp
This camera can have a Date Stamp function on images. The Date Stamp can be set by Off, Y(Year)-M(Month)-D(Date), M(Month)-D(Date)-Y(Year), D(Date)-M(Month)-Y(Year).
1 Press
2 Move highlight to "SETUP" Menu by pressing Up/Down (▲▼) arrow button.

text_image
EXIT MENU DELETE MOVE IMAGE SET UP3 Press
4 Press Up/Down (▲▼) arrow button to select "DATE STAMP". Press

text_image
EXIT MENU RESET SETTING IMAGE STORAGE DIGITAL ZOOM 1 DATE STAMP5 Press Up/Down (▲▼) arrow button to setup Date, Month and Year. Press

text_image
DATE STAMP OFF ✓ Y - M - D M - D - Y D - M - YSetting Customize
This camera can be set to your favorite personal camera Opening Screen.
1 Press
2 Move highlight to "SETUP" Menu by pressing Up/Down (▲/▼arrow button..
3 Press
4 Press Up/Down (▲▼) arrow button to select "CUSTOMIZE". Press
5 Select "NEW" to select an image from current image storage. Press Left/Right arrow button to navigate the images and press
6 Press Left/Right arrow (◀▶) button to navigate the images in the favorite image buffer. Press Down arrow (▼) button to select "CHANGE TO", and press

text_image
EXIT MENU DELETE MOVE IMAGE SET UP
text_image
LIVE VIEW DATE & TIME VIDEO OUT LANGUAGE CUSTOMIZE
text_image
CUSTOMIZE ✓ NEW CHANGE TO DELETE
text_image
CUSTOMIZE NEW ✓ CHANGE TO DELETEimage is the default Welcome Screen. Once the favorite image buffer is full, to delete an image from the favorite image buffer is required before you add any new image into the favorite image buffer.
Software Installation
Installation Software/Hardware Driver
Insert the software CD into the CD-ROM drive. The CD should auto run and the installer menu will appear (see below). If the CD does not auto run; go to: Start → Run, and type in "D:\setup.exe" where D:\ is the CD-ROM drive

text_image
5 Mega Pixels Digital Camera Automatic Installation Please select this option if you want the following software to be automatically installed on your computer. Click "Next" to continue. • Install Driver (For Win98SE ONLY) • Ulead Photo Explorer • Ulead Video Studio • Adobe Acrobat Reader • Owner's Manual (PDF) Custom Installation Please select this option if you want to customize your software installations. Click "Next" to continue. << Back Next >> ExitTwo installation options: Automatic Installation and Custom Installation. Automatic Installation is recommended..
Automatic Installation
The automatic installation will install all the software on the CD to the computer. When prompted to accept a license agreement with the third party software company at the beginning of the software installation, click "Yes" and continue the installation.
Ulead License Agreement

text_image
Upload Photo Explorer / Video Studio License Agreement Please read the following license agreement carefully Press the PAGE 10/15/92 to use the exit of the agreement. End-Use License Agreement The following is a legal software license agreement between you, the software and user and client. You can't help us to create an agreement before using the product. Using the product indicates that you have received this license agreement and agree to its terms. Unit of License: The license permits you to use one copy of the software included in the package on any computer. For each software license, the program can be "in" or "out" on any computer as any generic. The software is "in" or "out" which is either Do you accept at the terms of the preceding License Agreement. To install Usered programs, you must accept the agreement. If you choose No, the setup will help it. OK HelpWhen prompted to restart the computer, save and close all running programs to prevent any loss of data, and then select "Yes, I want to restart my computer now." and click "OK" to finish the software installation. After restarting the computer, the driver will automatically install Acrobat Reader program. (Note: Please keep the CD inside the CD-ROM drive after restarting the computer. Remove the CD after all applications are successfully installed.)
Custom Installation
The custom installation allows individual selection of the software provided on the CD.
From the previous Installer Menu select "Custom Installation" and click "Next". The following screen will appear:

text_image
5 Mega Pixels Digital Camera -Custom Installation- Install Driver (For Win!SE ONLY) Install Ulead Photo Explorer Install Ulead Video Studio Adobe Acrobat Reader Owner's Manual (PDF) « Back Next » Exit1 Check the desired application(s) and click "Next" to continue the software installation.
2 Follow the on-screen instructions to complete installing each software. The installation will be in the order of the menu above.
3 After ALL software are installed, select "Yes, I want to restart my computer now" and click "Finish".
Note : For information on how to use Ulead Photo Explorer and Video Studio, please visit its website at www.ulead.com.
Downloading & Transferring Files to Computer
1 Plug the small end of the USB cable to the USB/AV port of your camera. Plug the other end of the USB cable to the USB port of your computer
2 Set the camera to Power ON. Be sure batteries are inside of the battery compartment.
3 Go to "My Computer" and open "Removable Disk (D:)" or the next available alphabet for the removable disk. (This camera uses mass storage so the computer will detect a hardware device.) You will see a folder labeled "DCIM" is inside this drive. Click to open this folder, and then click again to open the next folder "nnnSX530".(where nnn =100\~999). Your video and image files are stored under this folder.
NOTE: If you're using Windows XP, the Windows Wizard will open and you can select the operations offered by Windows to download, view, or play your digital files (shown next page).

text_image
Reasonable Disk (1.1) This disk is device contains more than one type of content. What do you want Windows to do? Play using Windows Media Files Find, Fix, and Share Photoshop using Adobe Photoshop Album Open folder to view files using Windows Explorer Take no action Copy pictures to a folder on my computer using Microsoft iShares and Camera Wizard View a deflection of the images OK Cancel4 To download the files to your computer, highlight the files that you want to save, and choose one of the following way to move your files.
a. Copy & Paste
Right-click on the highlighted files with and select "Copy" from the resulting menu. Go to the target location on your computer and right-click on it again, and select "Paste" from the resulting menu.
b. Drag & Drop
With both source and target locations on display, click and hold on the highlighted files on source location. Drag the files to target location, and release the button.
How to Download Pictures via Ulead Photo Explorer
Follow the instructions below to transfer your digital files using third party applications.
1 Connect the camera to the computer.
2 Power on the camera
3 Launch Ulead Photo Explorer by clicking Start > Programs > Ulead > Ulead Photo Explorer → Photo Explorer 8SE Basic.
4 Open the "Folders" from the top bar of the Photo Explorer screen.
5 Click Removable Disk (D:) or the next available letter for the removable disk.
6 Open the folders "DCIM" → "nnnSX530".
7 The digital files are stored under this folder.
Note : Use Ulead Photo Explorer to open digital still images only. Use Ulead Video Studio or Windows Media Player to open digital video files.
Troubleshooting
| Condition | Corrective |
| Camera cannot power on. The batteries may be exhausted.Replace new batteries.The batteries are installed incorrectly.Reinstall the batteries with correct polarities. | |
| Camera turns off automatically. | Press any button to restore power to the camera. |
| LCD turns off automatically. | Press any button to turn on the LCD. |
| Empty battery icon is displayed on LCD and turns off camera quickly. | Batteries are exhausted.Replace new batteries. |
| LCD display “The Card Requires Formatting”. | Improper formatting of the memory card.Re-format the memory in the camera. |
| LCD display “Card Full”. | Memory card has no more space to store the picture being taken.Replace new memory card or delete unnecessary images from the existing card. |
| The card is locked. The card is protected by protect switch mechanism.Switch the protection switch to unlock position. | |
| Insufficient memory space to complete request. | Insufficient room in the memory to rotate an image.Delete unnecessary images in the memory. |
| No image appears on the TV screen. | Incorrect TV out type was selected.Set correct TV out type to match your TV system. |
| Insufficient space on the card. | Delete unnecessary images from the memory. |
Action
Specifications
| DESCRIPTION | SPECIFICATION. |
| Image sensor 1/2.5" CCD with 5 million square pixels | |
| Still image output resolution | 5M (2560 x 1920 pixels)5M 3:2 (2560x x 1712 pixels)3M (2048x1536 pixels)2M (1600 x 1200 pixels)VGA (640 x480 pixels) |
| Still image file formats JPEG | (Exif 2.2) |
| Movie mode resolution 320X | 240 @ 20 fps with audio |
| Movie file format MJPEG | |
| Image ratio 4:3 | |
| Internal memory 16MB | |
| Memory card slot SD/MMC | |
| LCD monitor 1.8" TFT | |
| Aperture F2.8 - F4.9 | |
| Zoom 3X optical zoom, 5.0X | digital zoom |
| Focal length | f = 5.6 - 16.8 mm (equipollent 135, f=36 - 108mm) |
| Focus range | Auto : 0.5M~ infinityMacro : 15cm ~ 50cm |
| Viewfinder | Optical |
| Date Stamp Yes, user selectable | |
| ISO equivalent Auto, ISO100 | /200/400 |
| Flash | Auto, On, Off, Red eye reduction |
| Shooting mode | Movie, Full Auto, Portrait, Landscape, Close-up, Preset Scene |
| Preset Scene | Sports, Night Landscape, Night Portrait, Museum, Backlight |
| Tripod mount Yes | |
| DPOF | Version 1.1 |
| Exposure mode | Auto, Manual |
| Exposure time | Auto |
| Exposure compensation | Selectable +/-2.0 EV with 0.3 EV steps |
| Exposure control | Center weighted, Average evaluation, Spot |
| Self Timer | 10 seconds, 2 seconds, Off |
| White Balance | Auto, Sunny, Cloudy, Tungsten, Fluorescent |
| Image parameter | Sharpness: High/Normal/LowColor Mode: Normal, Vivid, Black & White, Sepia |
| Audio/Video Out | PAL、NTSC |
| Speaker | Yes, Mono |
| Battery | 2 x AA NiMH batteries (recommended) or 1x CRV3 Lithium battery |
| Host Platform | Windows 98SE/ME/2000/XP |
| Dimensions | 95 mm (W) x 65 mm(H) x 34 mm(D)3.7" (W) x 2.6" (H) x 1.3" (D) |
| Weight | 165 g (without battery)5.8 oz. (without battery) |
Power LED