
32LT555C - Television SCHAUB LORENZ - Free user manual and instructions
Find the device manual for free 32LT555C SCHAUB LORENZ in PDF.


| Product Type | 32-inch LCD TV with digital tuner |
| Screen Size | 32 inches (81 cm diagonal) |
| Resolution | 1366 x 768 pixels (HD ready) |
| Dimensions (with stand) | 776 x 567 x 212 mm |
| Dimensions (without stand) | 776 x 542 x 94 mm |
| Weight (with stand) | 10.40 kg |
| Weight (without stand) | 9.70 kg |
| Power Consumption (max) | 150 W |
| Power Consumption (standby) | < 1 W |
| Operating Voltage | 220-240 V AC, 50 Hz |
| Audio Output Power | 2 x 6 W RMS (10% THD) |
| Sound System | German + Nicam Stereo |
| Tuner | DVB-T/C (MPEG2/MPEG4 HD) |
| Channel Capacity | 1000 (analogue + digital) |
| Connections | 3x HDMI, 2x SCART, 1x VGA, 1x USB, 1x Component (YPbPr), 1x SPDIF Coaxial, 1x CI Slot, 1x Headphone, Side AV |
| Special Features | Media Browser (video/photo/music), EPG, Teletext, Game Mode, Child Lock, Sleep Timer, Auto Power Down |
| Remote Control | Yes, with batteries included |
| Energy Efficiency | Power Save Mode available |
| Wall Mount Compatibility | Yes (VESA standard, not specified) |
Frequently Asked Questions - 32LT555C SCHAUB LORENZ
User questions about 32LT555C SCHAUB LORENZ
0 question about this device. Answer the ones you know or ask your own.
Ask a new question about this device
Download the instructions for your Television in PDF format for free! Find your manual 32LT555C - SCHAUB LORENZ and take your electronic device back in hand. On this page are published all the documents necessary for the use of your device. 32LT555C by SCHAUB LORENZ.
USER MANUAL 32LT555C SCHAUB LORENZ
natural_image
Illustration of a computer monitor with 'SCHAUB LORENZ' printed on the screen (no additional text or symbols)Inhalt
Funktionen 2
Einleitung 2
Vorbereitung ....2
natural_image
Top-down and side-view diagram of a computer monitor showing front and interior layout (no text or symbols)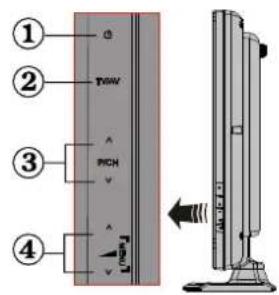
natural_image
3D diagram of a mechanical device with lever and base plate (no text or symbols)PAL/SECAM B/G D/K K' I/I' L/L'
KANÄLE EMPFANGEN
VHF (BAND I/III)
UHF (BAND U)
HYPERBAND
German + Nicam Stereo
AUDIO-AUSGANGSLEISTUNG (W _RMS. ) (10% THD)
2×6
STROMVERBRAUCH (W)
150 W (max.)
< 1 W (Standby)
PANEL
CLASS 1 LASER PRODUCT
HB Austria electronic products Vertiebs GmbH
Pfarrgasse 52
1230 Wien
AUSTRIA
www.hb-europe.com
Safety Precautions 41
Package Contents 42
Environmental Information 43
Repair Information 43
Remote Control Buttons 44
LCD TV and Operating Buttons 45
Viewing the Back side Connections 45
Viewing the Connections - Side Connectors ..... 46
Power Connection 46
Aerial Connection 46
Using Digital Multimedia Connectors.... 47
USB Memory Connection 47
Side HDMI Connection 47
Connecting the LCD TV to a PC 47
Connecting to a DVD Player.... 48
Using Side AV Connectors 48
Using Other Connectors 48
Remote Control Handset 48
Inserting Batteries 48
Switching On/Off 49
To Switch the TV On 49
To Switch the TV Off 49
Digital Teletext ( ^** for UK only) 49
Analogue Teletext 49
Input Selection 49
Operation with the Buttons on the TV 49
Volume Setting 49
Programme Selection 49
Viewing Main Menu 49
AV Mode 49
Operation with the Remote Control 49
Volume Setting 49
Programme Selection (Previous or Next
Programme) 50
Programme Selection (Direct Access) ..... 50
First Time Installation....51
Auto Tuning 52
Auto Channel Scan Menu Operation 52
Manual Tuning 52
Digital Aerial Manual Search.... 52
Digital Cable Manual Search 52
Analogue Manual Search 53
Analog Fine Tune....53
Network Channel Scan 53
Clear Service List (*) 53
Managing Stations: Channel List 54
Operating the Channel List 54
Moving a Channel 54
Deleting a Channel 54
Renaming a Channel 54
Locking a Channel 54
Managing Stations: Favourites 54
Button Functions 55
Managing Stations: Sorting Channel List .... 55
On-Screen Information 55
Media Playback Using Media Browser 55
Viewing Videos via USB 56
Viewing Photos via USB 56
Media Browser Settings 57
Changing Image Size: Picture Formats 57
Configuring Picture Settings 58
Operating Picture Settings Menu Items .... 58
Picture Settings Menu Items 58
PC Picture Settings.... 58
Configuring Sound Settings 59
Operating Sound Settings Menu Items 59
Sound Settings Menu Items.... 59
Configuring Your TV's Settings 59
Operating Settings Menu Items 59
Settings Menu Items 59
Using a Conditional Access Module 60
Viewing Conditional Access Menu (*) 60
Configuring Language Preferences 60
Parental Control....60
Parental Settings Menu Operation (*) 61
Timers 61
Setting Sleep Timer 61
Setting Programme Timers 61
Adding a Timer 61
Editing a Timer 61
Deleting a Timer 61
Configuring Date/Time Settings 62
Configuring Source Settings 62
Configuring Other Settings 62
Operation 62
Power Save Mode 62
Other Features 63
Teletext 64
Tips 64
Appendix A: PC Input Typical Display Modes ..... 65
Appendix B: AV and HDMI Signal Compatibility
(Input Signal Types) 65
Appendix C: Supported DVI Resolutions.... 66
Appendix D: Supported File Formats for USB
Mode....66
Appendix E: Software Upgrade 67
Specifications 68
Digital Reception (DVB-T) 68
Digital Reception (DVB-C) 68
English - 39 -
Features
Remote controlled colour LCD TV.
Fully integrated Terrestrial digital-cable TV (DVB-T C-MPEG2) (DVB-T-C MPEG4).
HDMI connectors for digital video and audio. This • connection is also designed to accept high definition signals.
USB input.
1000 programmes (analogue+digital).
OSD menu system.
Integrated tuner DVB-T-C HD, MPEG 2 / MPEG 4 · compatible.
Scart socket for external devices (such as video, video games, audio set, etc.).
Stereo sound system. (German+Nicam)•
Teletext, fastext, TOP text.
Headphone connection.
Automatic programming system.
Forward or backward manual tuning.
- Sleep timer / Child lock.
Automatic sound mute when no transmission. - NTSC playback.
• AVL (Automatic Volume Limiting). - Auto power down.
- PLL (Frequency Search).
- PC input.
Plug&Play for Windows 98, ME, 2000, XP, Vista, Windows 7.
- Game Mode
Introduction
Please read the corresponding instructions of this handbook prior to the first usage of the device, even when the usage of electronic devices is familiar to you. Notice especially the chapter SAFETY PRECAUTIONS. Carefully keep the handbook as future reference. When selling the device or giving it away, absolutely give these direction for use.
Thank you for choosing this product. This manual will guide you for the proper operation of your TV. Before operating the TV, please read this manual thoroughly. Please do keep this manual in a safe place for future references.
This device is intended to receive and display TV programs. The different connection options make an additional expansion of the reception and display sources possible (receiver, DVD player, DVD recorder,
VCR, PC etc.). This device is only suitable for the operation in dry interiors. This appliance is intended solely for private domestic use and may not be used for industrial and commercial purposes. We exclude liability in principle, if the device is not used as intended, or unauthorized modifications have been made. To operate your LCD TV in extreme ambient conditions may cause the damage of the device.
Preparation
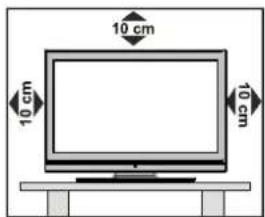
For ventilation, leave a free space of at least 10 cm all around the set. To prevent any fault and unsafe situations, please do not place any objects on top of the set. Use this device in moderate climates.
Safety Precautions
Read the following recommended safety precautions carefully for your safety.
Power Source
The TV set should be operated only from a 220-240 V AC, 50 Hz outlet. Ensure that you select the correct voltage setting for your convenience.
Power Cord
Do not place the set, a piece of furniture, etc. on the power cord (mains lead) or pinch the cord. Handle the power cord by the plug. Do not unplug the appliance by pulling from the power cord and never touch the power cord with wet hands as this could cause a short circuit electric shock. Never make a knot in the cord or tie it with other cords. The power cords should be placed in such way that they are not likely to be stepped on. A damage power cord can cause fi re or give you an electric shock. When it is damaged and needs to be replaced, it should be done by qualified personnel.
Moisture and Water
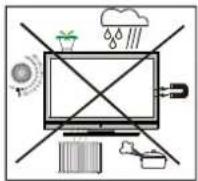
Do not use this device in a humid and damp place (avoid the bathroom, the sink in the kitchen, and near the washing machine). Do not expose this device to rain or water, as this may be dangerous and do not place objects filled with liquids, such as flower vases, on top. Avoid from dripping or splashing.

If any solid object or liquid falls into the cabinet, unplug the TV and have it checked by qualified personnel before operating it any further.
Cleaning
Before cleaning, unplug the TV set from the wall outlet. Do not use liquid or aerosol cleaners. Use soft and dry cloth.

Ventilation
The slots and openings on the TV set are intended for ventilation and to ensure reliable operation. To prevent overheating, these openings must not be blocked or covered in anyway.
Heat and Flames
The set should not be placed near to open flames and sources of intense heat such as an electric heater. Ensure that no open flame sources, such as lighted

candles, are placed on top of the TV. Batteries should not be exposed to excessive heat such as sunshine, fire or the like.
Lightning
In case of storm and lightning or when going on holiday, disconnect the power cord from the wall outlet.

Replacement Parts
When replacement parts are required, make sure that the service technician has used replacement parts, which are specified by the manufacturer or have the same specifications as the original one. Unauthorized substitutions may result in fire, electrical shock or other hazards.
'Servicing
Please refer all servicing to qualified personnel. Do not remove the cover yourself as this may result in an electric shock.

Waste Disposal
Instructions for waste disposal:
Packaging and packaging aids are recyclable and should principally be recycled. Packaging materials, such as foil bag, must be kept away from children. Batteries, including those which are heavy metal-free, should not be disposed of with household waste. Please dispose of used battery in an environment friendly manner. Find out about the legal regulations which apply in your area.
- Don't try to recharge batteries. Danger of explosion. Replace batteries only with the same or equivalent type.
This symbol on the product or on its packaging means that your electrical and electronic device should be disposed at the end of its service life
separately from your household wastes. There are separate collection systems for recycling in EU. For more information, please contact the local authority or the dealer where you purchased the product.

Disconnecting the Device
The mains plug is used to disconnect TV set from the mains and therefore it must remain readily operable.
Headphone Volume
Excessive sound pressure from earphones and headphones can cause hearing loss.

Installation
To prevent injury, this device must be securely attached to the wall in accordance with the installation instructions when mounted to the wall (if the option is available).
English -41-
LED / LCD Screen
The LED / LCD panel is a very high technology product with about a million thin film transistors, giving you fine picture details. Occasionally, a few non-active pixels may appear on the screen as a fixed blue, green or red point. Please note that this does not affect the performance of your product.
This TV is following ISO-Norm "ISO-13406-2" (ISO 13406-2:2001(E)). According to this there could be no warranty claims in case those mentioned limits are not exceeded.
Warning! Do not leave your TV in standby or operating mode when you leave your house.
The Standby / On button doesn't separate this device completely from mains. Moreover the device consumes power in the standby operation. In order to separate the device completely from mains, the mains plug has to be pulled from the mains socket. Because of that the device should be set up in a way, that an unobstructed access to mains socket is guaranteed, so that in case of emergency the mains plug can be pulled immediately. To exclude the danger of fire, the power cord should principally be separated from the mains socket prior to a longer period of non-usage, i.e. during vacations.
Electrical device not in the hands of children
Never let children use electrical device unsupervised. Children can't always recognize properly the possible dangers. Batteries / accumulators can be life threatening when swallowed. Store batteries unreachable for small children. In case of swallowing a battery medical aid has to be sought immediately. Also keep the packaging foils away from children. There is danger of suffocation.
Connection to a Television Distribution System (Cable TV etc.) from Tuner
Device connected to the protective earthing of the building installation through the mains connection or through other apparatus with a connection to protective earthing-and to a television distribution system using coaxial cable, may in some circumstances create a fi re hazard.
English -42-
Connection to a cable distribution system has therefore to be provided through a device providing electrical isolation below a certain frequency range (galvanic isolator, see EN 60728-11).
High temperature, humidity, cold or artic climate
Take care when using the device in very hot, humid, tropical areas or tropical climate that no humidity or ice will infi trate the device. This could case defects of the device, destroy it or could cause a short circuit.
Package Contents
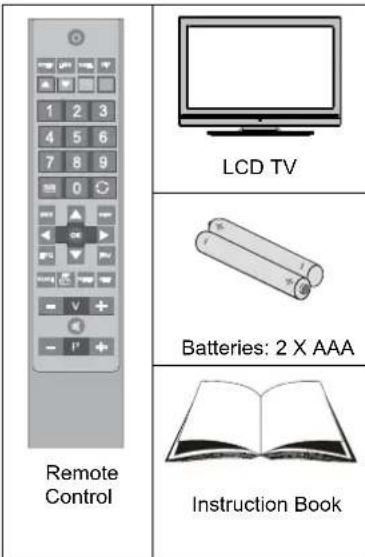
Note: You should check the accessories after purchasing. Make sure that each accessory is included.
Environmental Information
This television is designed to consume less energy to save environment.
You not only help to save the environment but also you can save money by reducing electricity bills thanks to the energy efficiency feature of this TV. To reduce energy consumption, you should take the following steps:
You can use Power Save Mode setting, located in the Feature menu. If you set Power Save Mode as On, the TV will switch to energy-saving mode and luminance level of TV set will be decreased to optimum level. Note that some picture settings will be unavailable to be changed when the TV is in Power Save Mode.
Power Save Mode
Off
When the TV is not in use, please switch off or disconnect the TV from the mains plug. This will also reduce energy consumption.
Disconnect power when going away for longer time.
Note that annually, using the TV set in Power Save Mode has more power efficiency than disconnecting the • TV from the mains plug instead of keeping stand-by mode. Therefore it is highly recommended to activate Power Save Mode setting to reduce your annual power consumption. And also it is recommended to disconnect the TV from the mains plug to save energy more when you do not use.
- Please helps us to save environment by following these steps.
Repair Information
Please refer all servicing to qualified personnel. Only qualified personnel must repair the TV. Please contact your local dealer, where you have purchased this TV for further information.
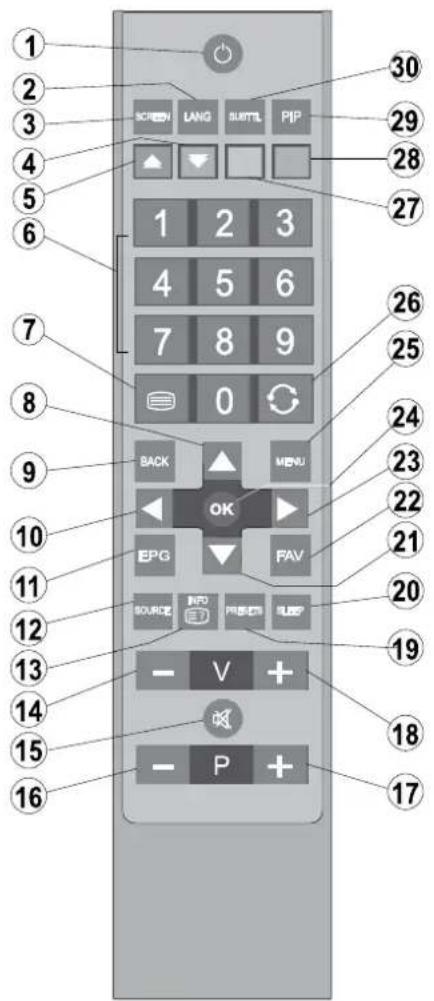
Remote Control Buttons
Standby / On1.
Mono/Stereo - Dual I-II / Current Language (*)2. (in DVB channels)
Image size / Zooms videos (in Media Browser 3. video mode)
Green buttonList Schedule(in EPG)/Tag/Untag 4. All(in favourite list)/Play-Slideshow(in Media Browser)
Red button/Stop(in Media Browser)5.
Numeric buttons6.
Teletext / Mix (in TXT mode)7.
Cursor Up 8.
Exit / Back / Index page (in TXT mode)9.
Cursor Left 10.
Electronic programme guide (EPG)11.
AV / Source selection12.
Info / Reveal (in TXT mode)13.
-
Volume Down
-
Mute
Programme Down / Page up(in DVB channels)16,
Programme Up / Page down(in DVB channels)17.
-
Volume Up
-
Picture mode selection. / Changes picture mode (in Media Browser video mode)
-
Sleep Timer
Cursor Down21.
-
Favourite Mode Selection(in DVB channels)
-
Cursor Right / Subpage (in TXT mode)
-
Okay (Confir rm) / Hold (in TXT mode)/ Edit Channel List
-
Menu
-
Previous programme
-
Yellow button/Pause (in Media Browser)/Timeline Schedule(in EPG)
-
Blue button/Edit Channel List/Filter (in Favourite List&EPG)/Loop-Shuffle (in Media Browser)
-
No function
-
Subtitle on-off (in DVB channels)
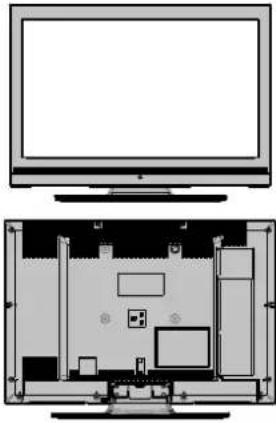
LCD TV and Operating Buttons
FRONT and REAR VIEW Control buttons VIEW Control Buttons
natural_image
Top-down and side-view diagram of a computer monitor showing front and interior layout (no text or symbols)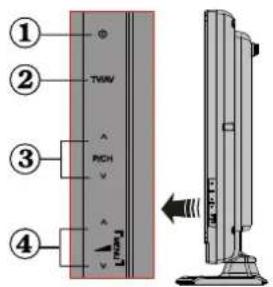
- Standby/On button
- TV/AV button
- Programme Up/Down buttons
- Volume Up/Down buttons
Note: Press "→" and + buttons at the same time to view main menu.
Viewing the Back side Connections
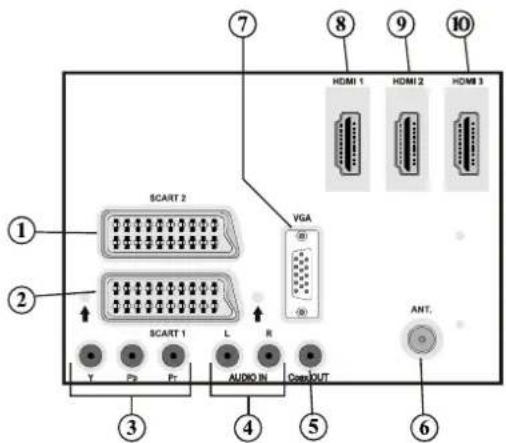
SCART 21. inputs or outputs for external devices.
- SCART 1 input or output for external devices. Connect the SCART cable between SCART socket on TV and SCART socket on your external device (such as a decoder, a VCR or a DVD player).
Note: If an external device is connected via the SCART socket, the TV will automatically switch to AV mode.
Note: To connect external device, please use to supplied scart connection cable.
Component Video Inputs (YPbPr)3. are used for connecting component video.
You can connect the component video and audio sockets with a device that has component output.
Connect the component video cables between the COMPONENT VIDEO INPUTS on on the TV and the component video outputs of your device. While connecting, be sure that the letters on your TV, "Y", "Pb", "Pr" correspond with your device's connectors.
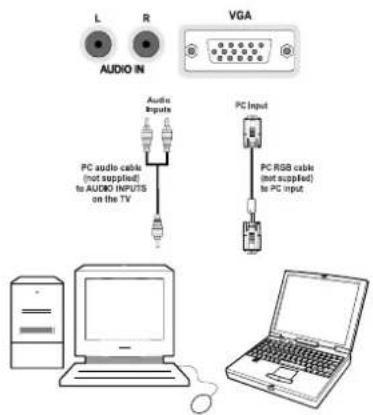
- PC/YPbPr Audio Inputs are used for connecting audio signals of a PC or a device that connects to the TV via YPbPr. Connect the PC audio cable between the AUDIO INPUTS on the TV and audio output of your PC to enable PC audio. Connect the audio cable between AUDIO INPUTS on the TV and audio
English - 45 -

outputs of your device to enable component audio.
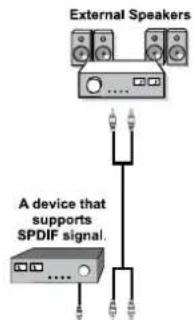
S/PDIF Coaxial Out5. outputs digital audio signals of the currently watched source.
Use an SPDIF coaxial cable to trasfer audio signals to a device that has S/PDIF input
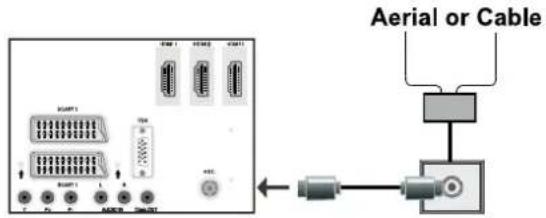
RF Input6. connects to an aerial antenna system or a cable.
Note that if you use a decoder or a media recorder, you should connect the aerial cable through the device to the television with an appropriate antenna cable, as shown in the illustration in the following pages.
PC Input7. is for connecting a personal computer to the TV set.
Connect the PC cable between the PC INPUT on the TV and the PC output on your PC
HDMI 1: HDMI Input8.
HDMI 2: HDMI Input9.
HDMI 3: HDMI Input10.
HDMI Inputs are for connecting a device that has an HDMI socket. Your LCD TV is capable of displaying High Defi nition pictures from devices such as a High Defi nition Satellite Receiver or DVD Player. These devices must be connected via the HDMI sockets or Component Socket. These sockets can accept either 720p or 1080p signals. No sound connection is needed for an HDMI to HDMI connection.
Viewing the Connections - Side Connectors
CI Slot is used for inserting a CI card. A CI card allows you to view all the 1. channels that you subscribe to. For more information, see "Conditional Access" section.
Side USBs2.
Side HDMI Input is for connecting a device that has an HDMI socket.3.
Headphone jack is used for connecting an external headphone to the system. Connect to the HEADPHONE jack to listen to the TV from headphones (optional).
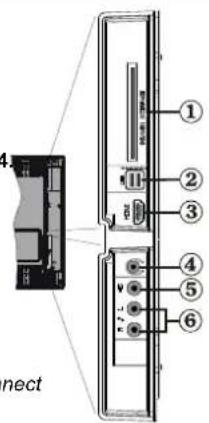
- Video Input is used for connecting video signals of external devices. Connect the video cable between the VIDEOIN socket on the TV and the VIDEOOUTjack on your device.
- Audio Inputs are used for connecting audio signals of external devices. Connect the audio cable between the AUDIO INPUTS on the TV and the AUDIO OUTPUT jacks on your device.
Note: If you connect a device to the TV via the VIDEO INPUT, you should also connect your device with an audio cable to the AUDIO INPUTS of the TV to enable audio.
Power Connection
IMPORTANT: The TV set is designed to operate on 220-240V AC, 50 Hz.
• After unpacking, allow the TV set to reach the ambient room temperature before you connect the set to the mains. Plug the power cable to the mains socket outlet.
Aerial Connection
- Connect the aerial or cable TV plug to the AERIAL INPUT socket located at the rear of the TV.
English - 46 -
Using Digital Multimedia Connectors
You can connect USB devices to your TV by using the USB inputs of the TV. This feature allows you to display/play JPG, MP3 and video files stored in a USB stick.
It is possible that certain types of USB devices (e.g. MP3 Players) may not be compatible with this TV. You may back up your files before making any connections to the TV set in order to avoid any possible data loss. Note that manufacturer will not be responsible for any file damage or data loss.
Do not pull out USB module while playing a file.
CAUTION: Quickly plugging and unplugging USB devices, is a very hazardous operation. Especially, do not repeatedly quickly plug and unplug the drive. This may cause physical damage to the USB player and especially the USB device itself.
USB Memory Connection
IMPORTANT: The TV should be switched off while plugging or unplugging a USB device. Plug your USB device to the USB inputs of the TV. You can connect two usb device to your TV by using the USB inputs of the TV at the same time.
Note: It is possible certain types of hard disk drives are not supported.
Side HDMI Connection
You can use side HDMI input to connect a device that has an HDMI connector to your TV. Use an appropriate HDMI cable to make such a connection. Note that you should switch to the HDMI source to view the content from the connected device. Power off both the TV and the device before making any connections. Side HDMI Input supports connections between HDMI devices such as DVD players. You can use side HDMI input of the TV to connect to an external HDMI device. Use an HDMI cable to connect.
Connecting the LCD TV to a PC
For displaying your computer's screen image on your LCD TV, you can connect your computer to the TV set. Power off both computer and display before making any connections. Use 15-pin D-sub display cable to connect a PC to the LCD TV. When the connection is made, switch to PC source. See "Input selection" section. Set the resolution that suits your viewing requirements. Resolution information can be found in the appendix parts.
English - 47 -
Connecting to a DVD Player
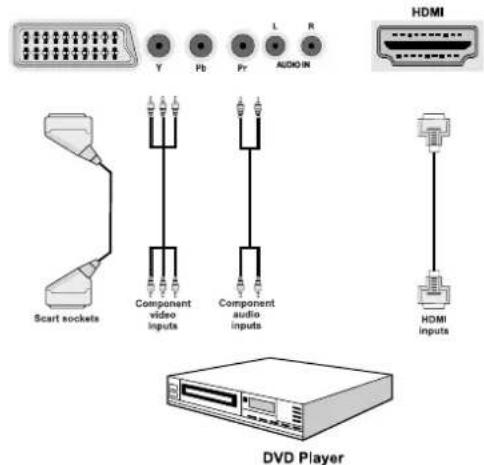
If you want to connect a DVD player to your LCD TV, you can use connectors of the TV set. DVD players may have different connectors. Please refer to your DVD player's instruction book for additional information. Power off both the TV and the device before making any connections.
Note: Cables shown in the illustration are not supplied.
If your DVD player has an HDMI socket, you can connect via HDMI. When you connect to DVD player as illustrated below, switch to HDMI source. See, "Input Selection" section.
- Most DVD players are connected through COMPONENT SOCKETS. Use a component video cable to connect video input. For enabling audio, use a component audio cable as illustrated below. When the connection is made, switch to YPbPr source. See, "Input selection" section.
You may also connect through the SCART 1 or SCART 2. Use a SCART cable as shown below.
Note: These three methods of connection perform the same function but in different levels of quality. It is not necessary to connect by all three methods.
Using Side AV Connectors
You can connect a range of optional equipment to your LCD TV..
For connecting a camcorder, connect to the VIDEO • IN socket and the AUDIO SOCKETS. For selecting the related source, see the section "Input selection" in the following parts.
To listen the TV sound from headphones, connect to the HEADPHONE jack of theTV.
Using Other Connectors
You can connect a range of optional equipment to your LCD TV. Possible connections are shown below. Note that cables shown in the illustration are not supplied.
For connecting a to a device that has SPDIF support, use an appropriate SPDIF cable to enable sound connection.
Remote Control Handset
Inserting Batteries
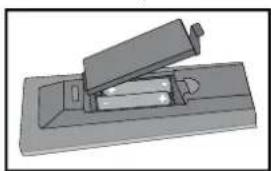
Remove the battery cover located on the back of the handset by gently pulling backwards from the indicated part.
Insert two • AAA/R3 or equivalent type batteries inside. Observe the correct polarity (+/-) when inserting batteries and replace the battery cover.
natural_image
3D rendering of a mechanical device with a lever and base plate (no text or symbols visible)Note: Remove the battery from remote control handset when it is not to be used for a long period. Otherwise it can be damaged due to any leakage of batteries. Remote range is approximately 7m/23ft.
Switching On/Off
To Switch the TV On
Connect the power cord to the 220-240V AC 50 Hz. Press STANDBY touch button. Then the standby LED lights up.
To switch on the TV from standby mode either:
- Press the "O" button, P+ / P- or a numeric button on the remote control.
- Press the -P/CH or P/CH+ touch button on the TV. The TV will then switch on.
Note: If you switch on your TV via PROGRAMME UP DOWN buttons on the remote control or on the TV set, the programme that you were watching last will be reselected.
By either method the TV will switch on.
To Switch the TV Off
Press the "○" button on the remote control or press the STANDBY touch button on the TV, so the TV will switch to standby mode.
To power down the TV completely, unplug the power cord from the mains socket.
Note: When the TV is switched to standby mode, standby LED can blink to indicate that features such as Standby Search, Over Air Download or Timer is active. The LED can also blink when you switch on the TV from standby mode.
Digital Teletext ( ^** for UK only)
- Press the "button.
• The digital teletext information appears.
- Operate it with the coloured buttons, cursor buttons and OK button.
The operation method may differ depending on the contents of the digital teletext.
Follow the instructions displayed on digital teletext screen.
- When Press "SELECT" button or similar message appears on the screen, press the OK button.
- When the "☐" button is pressed, the TV returns to television broadcasting.
- With digital broadcasting (DVB), in addition to digital teletext broadcasting together with the normal broadcasting, there are also channels with just digital teletext broadcasting.
- The aspect ratio (picture shape) when watching a channel with just digital teletext broadcasting is the same as the aspect ratio of the picture viewed previously.
- When you press the "☐" button again, the digital teletext screen will be displayed.
Analogue Teletext
Use of teletext and its functions are identical to the analogue text system. Please do refer to the "TELETEXT" explanations.
Input Selection
Once you have connected external systems to your TV, you can switch to different input sources. Press "SOURCE" button on your remote control consecutively for directly changing sources.
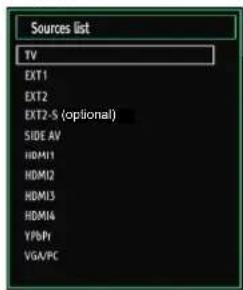
You can operate your TV using both the remote control and onset buttons.
Operation with the Buttons on the TV
Volume Setting
- Press "—" button to decrease volume or + m button to increase volume, so a volume level scale (slider) will be displayed on the screen.
Programme Selection
- Press "P/CH+" button to select the next programme or "P/CH -" button to select the previous programme.
.Viewing Main Menu
- Press the "V+"/ "V-" button at the same time to view main menu. In the Main menu select sub-menu using "AV" button and set the sub-menu using "-" or "-" buttons. To learn the usage of the menus, refer to the menu system sections.
AV Mode
- Press the "AV" button in the control panel on the TV to switch between AV modes.
Operation with the Remote Control
The remote control of your TV is designed to control all the functions of the model you selected. The functions will be described in accordance with the menu system of your TV.
Volume Setting
- Press "V+" button to increase the volume. Press "V-" button to decrease the volume. A volume level scale (slider) will be displayed on the screen.
English - 49 -
Programme Selection (Previous or Next Programme)
Press “• P -” button to select the previous programme.
Press “• P +” button to select the next programme.
Programme Selection (Direct Access)
Press numeric buttons on the remote control to select programmes between 0 and 9. The TV will switch to the selected programme. To select programmes between, press the numeric buttons consecutively. When the pressing time is due for the second numeric button, only the first digit programme will be displayed. Press directly the programme number to reselect single digit programmes.
Viewing Electronic Programme Guide (EPG)
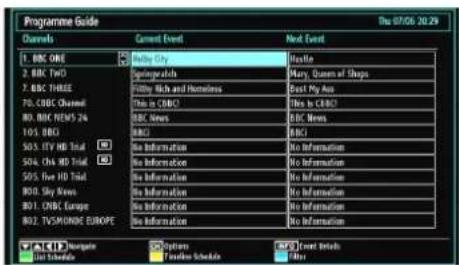
You can view the electronic programme guide (EPG) to view information about available programmes. To view the EPG menu please press GUIDE button on the remote control.
Press ▼ "▲" buttons to navigate through channels.
Press◀▶" buttons to navigate through the progra list.
- EPG menu displays available information on all channels.
- Please note that event information is updated automatically. If there are no event information data available for channels, EPG will be displayed with blanks.
OK (Options): Displays programme options including "Select Channel" option.
INFO (Event Details): Displays the programmes in detail.
Green button: Programme schedule will be listed
Yellow button: Display EPG data in accordane with t schedule
Blue button (Filter): Views filtering options.
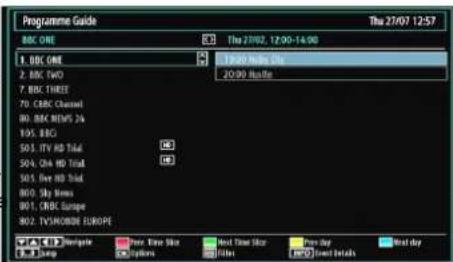
Red button (Prev Time Slice): Displays the programmes of previous time slice.
Green button (Next Time Slice): Displays the programmes of the next time slice.
Yellow button (Prev Day): Displays the programmes of previous day.
Blue button (Next day): Displays the programmes of the next day.
Numeric buttons (Jump): Jumps to the preferred channel directly via numeric buttons.
OK (Options): Displays programme options including Select Channel' option.
Text button (Filter): Views filtering options.
INFO (Details): Displays the programmes in detail.

Red button (Prev Day): Displays the programmes of previous day.
Green button (Next day): Displays the programmes of the next day.
Yellow button (Zoom): Expands programme information.
Blue button (Filter): Views filtering options.
INFO (Details): Displays the programmes in detail.
Numeric buttons (Jump): Jumps to the preferred channel directly via numeric buttons.
OK(Options): Displays programme options including "Select Channel" option.
Text (Search): Displays "Guide Search" menu.
SUBTTL: Press SUBTITLE button to view Select Genre menu. Using this feature, you can search the programme guide database in accordance with the genre. Info
English - 50 -

available in the programme guide will be searched and results matching your criteria will be listed.
© (Now) : Shows the current programme.
First Time Installation
IMPORTANT: Ensure that the aerial or cable is connected and a Common Interface module is not inserted before switching on the TV for the first time installation.
When the TV is operated for the first time, installation wizard will guide you through the process. First, language selection screen will be displayed:
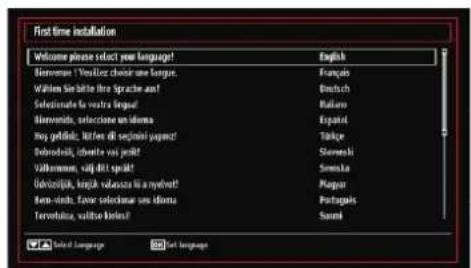
Use "▼" or "▲" buttons to select your language and press OK button to set selected language and continue.
After selecting the language, “• Welcome!” screen v be displayed, requiring you to set Country, Teletext Language and Scan Encrypted options.
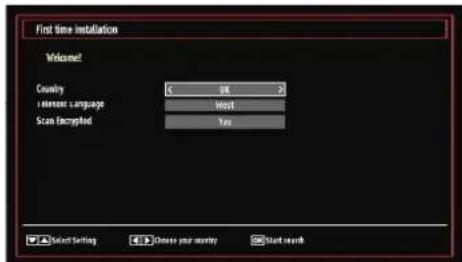
- By pressing “◀” or “▶” button, select the country you want to set and press “▼button to highlight Teletext Language option. Use “◀” or “▶” button to select desired Teletext Language.
- Press "▼" button after setting Teletext Language option. Scan Encrypted will be then highlighted. You can set Scan Encrypted as Yes if you want to scan coded stations. Afterwards select the desired Teletext Language.
- Press OK button on the remote control to continue and the following message will be displayed on the screen:
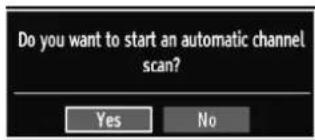
To select the "Yes" or "No" option, highlight the item by using "◀" or "▶" buttons and press OK button. Afterwards, the following OSD will be displayed on the screen:
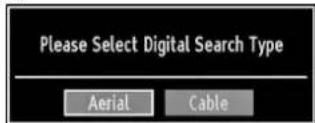
If you select CABLE option, the following screen will be displayed:
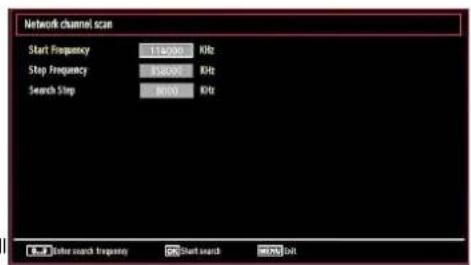
You can select frequency ranges from this screen. For highlighting lines you see, use ▼ or “▲” button. You can enter the frequency range manually by using the numeric buttons on the remote control. Set Start and Stop Frequency as desired by using numeric buttons on the remote control. After this operation, you can set Search Step as 8000 KHz or 1000 KHz. If you select 1000 KHz, the Tv will perform search process in a detailed way. Searching duration will thus increase accordingly. When fi nished, press OK button to start automatic search.
If you select AERIAL option from the Search Type screen, the television will search for digital terrestrial TV broadcasts.
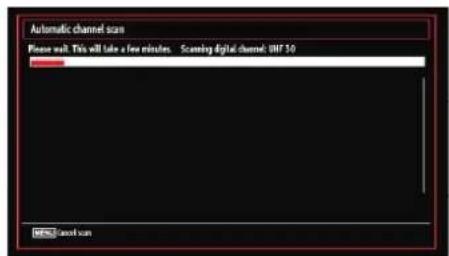
Note: You can press MENU button to cancel.
English - 51 -

After all the available stations are stored, Channel List will be displayed on the screen. If you like the sort channels, according to the LCN, please select "Yes" and then press "OK".
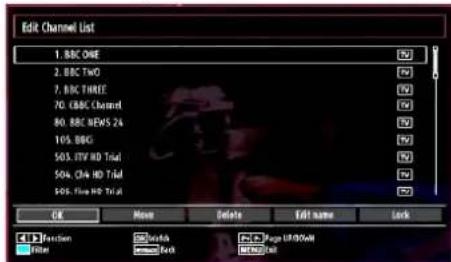
Press • OK button to quit channel list and watch TV
Auto Tuning
HINT: Auto tuning feature will help you to retune the set in order to store new services or stations.
Press MENU button on the remote control and select Installation by using "◀or" "▶button. Press OK button and the following menu screen will be displayed.
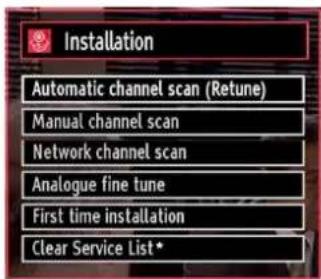
Select Automatic Channel Scan (Retune) by using▼"/"▲button and press OK button. Automatic Channel Scan (Retune) options will be displayed. You can select options by using "▼" ▲nd OK buttons.
Auto Channel Scan Menu Operation
Digital Aerial: Searches and stores aerial DVB stations.
Digital Cable: Searches and stores cable DVB stations.
Analogue: Searches and stores analogue stations.
Digital Aerial & Analogue: Searches and stores both analogue and aerial DVB stations.
Digital Cable & Analogue: Searches and stores both analogue and cable DVB stations.
Whenever you select an automatic search type and press OK button, a confirmation screen will appear on the screen. To start installation process, select Yes, to cancel select No by using "or" and OK button.
After auto channel scan type is set and selected • and confirmed, installation process will start and progress bar will move along. Press MENU button to cancel process. In such a case, located channels are not stored.
Manual Tuning
HINT: This feature can be used for direct broadcast entry.
- Select Manual Channel Scan from the Installation menu by using "▼"/"▲and OK buttons. Manual Scan options screen will be displayed.
- Select the desired Search Type using “◀” or “▶” button. Manual search options will change accordingly. Use “▼/” ▲ button to highlight an item and then press “◀” or “▶” button to set an option. You can press MENU button to cancel.
TVDigital Aerial Manual Search
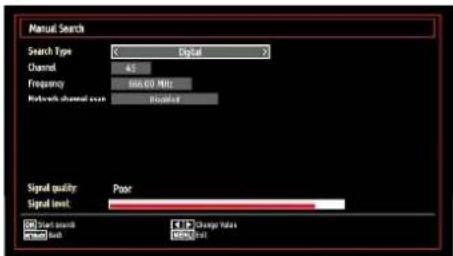
In manual channel scan, the number of the multiplex or frequency are entered manually and only that multiplex or frequency are searched for the channels. After selecting search type as Digital, you can enter the multiplex or frequency number using the numeric buttons and press OK button to search.
Digital Cable Manual Search
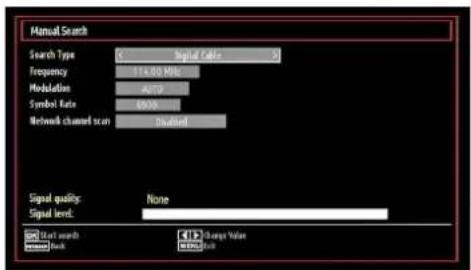
In cable manual scan, you can enter frequency, modulation, symbol rate and network channel scan options. After selecting search type as Digital Cable, you can set the desired options and press OK button to search.
English - 52 -
Analogue Manual Search
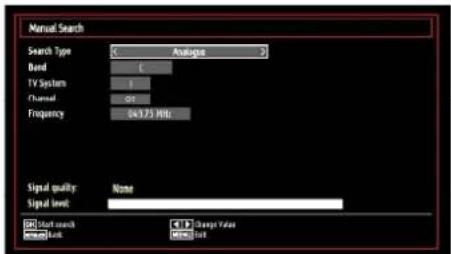
After selecting search type as analogue, you can use "▼" "button to highlight an item and then press "◀" or "◀" button to set an option.
Enter the channel number or frequency using the numeric buttons. You can then press OK button to search. When the channel is located, any new channels that are not on the list will be stored.
Analog Fine Tune
Select · Analog Fine Tune from the Installation me by using ▼ or “▲ and OK buttons. Analog fi ne tune screen will be displayed. Analog Fine Tune feature will not be available if there are no analog channels, digital channels and external sources stored.
Press • OK button to proceed. Use "or" button to set Fine Tune. When finished, press OK button again.
Network Channel Scan
Select Network Channel Scan from the installation menu by using "◀" or "▶" and OK buttons. Network Channel Scan selection screen will be displayed. Select Digital Aerial or Digital Cable and press OK button to continue. The following message will be asked. Select Yes to continue or select No to cancel.
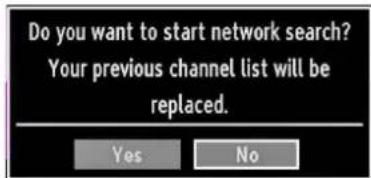
If you start Digital Aerial scan process, automatic scanning will start. You can press MENU button to cancel.
If you start Digital Cable scan process, the following screen will be displayed.
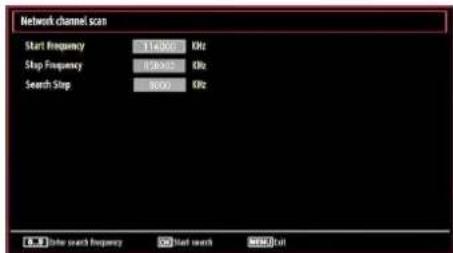
You can select frequency ranges from this screen. For highlighting lines you see, use "▼" or ▲" button. You can enter the frequency range manually by using the numeric buttons on the remote control. Set Start and Stop Frequency as desired by using numeric buttons on the remote control. After this operation, you can set Search Step as 8000 KHz or 1000 KHz. If you select 1000 KHz, the Tv will perform search process in a detailed way. Searching duration will thus increase accordingly. When finished, press OK button to start automatic search. Automatic searching screen will be displayed during the process.
Note: If you select an extended gap between Start and Stop frequency rate, automatic search duration will take a longer time.
Clear Service List (\*)
(*) This setting is visible only when the Country option is set to Denmark, Sweden, Norway or Finland. Use this setting to clear channels stored. Press "▼" or "▲button to select Clear Service List and then press OK. The following OSD will be displayed on the screen:
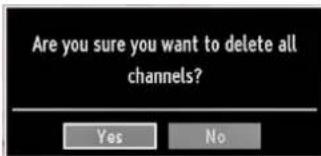
Select YES and press OK to continue or select NO and press OK button to cancel.
English - 53 -
Managing Stations: Channel List
The TV sorts all stored stations in the Channel List. You can edit this channel list, set favourites or active stations to be listed by using the Channel List options.
Press • MENU button to view main menu. Select Channel List item by using "◀ or " ▶button. Press OK to view menu contents.
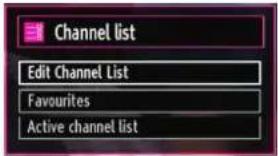
Select Edit Channel List to manage all stored channels. Use "◀or " ▶ and OK buttons to select Edit Channel List.
Operating the Channel List
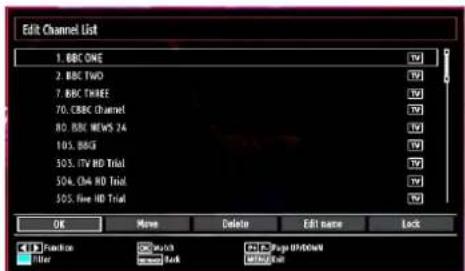
Press “▼” or “▲button to select the channel that will be processed. Press “◀ or “▶button to select a function on Channel List menu.
Use • P+/P- buttons to move page up or down.
Press • BLUE button to view fi Itering options.
Press • MENU button to exit.
Moving a Channel
- First select the desired channel. Select Move option in the channel list and press OK button.
- Edit Number screen will be displayed. Enter the desired channel number by using the numeric buttons on the remote control. If there is a previously stored channel on that number, a warning screen will be displayed. Select Yes if you want to move the channel and press OK.
- Press OK button to process. Selected channel is now moved.
Deleting a Channel
You can press GREEN button to tag/untag all channels; YELLOW button to tag/untag channel.
- Select the channel that you want to delete and select Delete option. Press OK button to continue.
- A warning screen will appear. Select YES to delete, select No to cancel. Press OK button to continue.
setRenaming a Channel
Select the channel that you want to rename and select Edit Name option. Press OK button to continue.
- Pressing “◀” or “▶” button moves to the previous/next character. Pressing “▼” or “” ▶ button toggles the current character, i.e., ‘b’ character becomes ‘a’ by “▼” and ‘c’ by “” ▶ pressing the numeric buttons ‘0...9’ replaces the highlighted character with the characters printed above the button one by one as the button is pressed.
- When finished, press OK button to save. Press MENU to cancel.
Locking a Channel
You can press GREEN button to tag/untag all channels; YELLOW button to tag/untag a single channel.
- Select the channel that you want to lock and select Lock option. Press OK button to continue.
You will be asked to enter parental control PIN. Default PIN is set as 0000. Enter the PIN number.
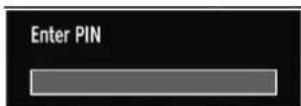
- Press OK button when the desired channel is highlighted to lock/unlock the channel. Lock symbol will be displayed next to the selected channel.
Managing Stations: Favourites
You can create a list of favourite programmes.
Press • MENU button to view main menu. Select Channel List item by using "◀ or " ▶button. Press OK to view menu contents.
- Select Favourites to manage favourite list. Use "▼"/"▲and OK buttons to select Favourites.
- You can set various channels as favourites so that only the favourite channels are navigated.
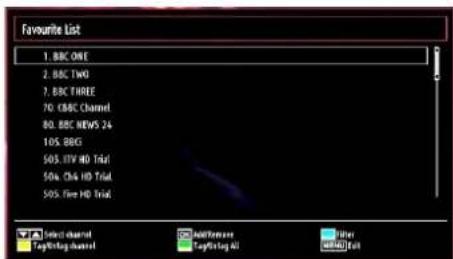
Select a channel by using "▼" or "▲button. Press OK button to add selected channel to favourites list. Press OK button again to remove.
Button Functions
OK• : Add/remove a station.
YELLOW• : Tag/untag a channel.
GREEN• : Tag/untag all channels.
BLUE• : Displays fi ltering options.
Managing Stations: Sorting Channel List
You can select broadcasts to be listed in the channel list. To display specific types of broadcast, you should use Active channel list setting.
Select Active channel list from the Channel list menu by using "◀" or "▶" button. Press OK button to continue.
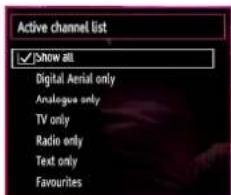
You can select a broadcast type option from the list by using "▼/" ▲nd OK buttons.
On-Screen Information
You can press INFO button to display on-screen information. Details of the station and current programme will be displayed on the information banner.

The information banner gives information on the channel selected and the programmes on it. The name of the channel is displayed, along with its channel list number.
Hint: Not all channels broadcast the programme data. If the name and time of the programme are not available, then information banner will be displayed with blanks.
If the selected channel is locked, you must enter the correct four-digit numeric code to view the channel (default code is 0000). "Enter PIN" will be displayed on the screen in such a case:
Media Playback Using Media Browser
If the USB stick is not recognized after power off/on or First Time Installation, first, plug the USB device out and power off/on the TV set. Plug the USB device in again.
To display Media Browser window, press either "MENU" button on the remote control and then select Media Browser by pressing "◀" or "▶" button. Press OK button to continue. Media Browser menu options will be displayed.
Also, when you plug USB devices, media browser screen will be displayed automatically:
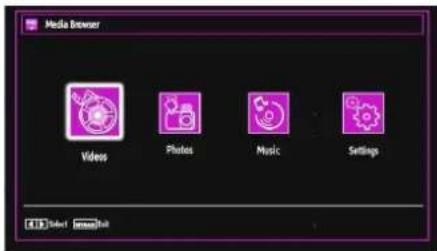
You can play music, picture and video files from the connected USB memory stick. Use "◀" or "▶" button to select Videos, Photos, Music or Settings.
You can connect two USB devices to your TV. If both USB devices include music, picture or video fi les, USB selection osd will be displayed on the screen. The fi rst USB device connected to the TV will be named as USB Drive1.
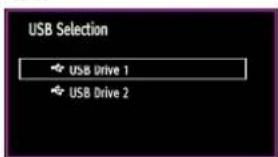
Select a device by using "▼ or " " button and press OK.
English - 55 -
Viewing Videos via USB
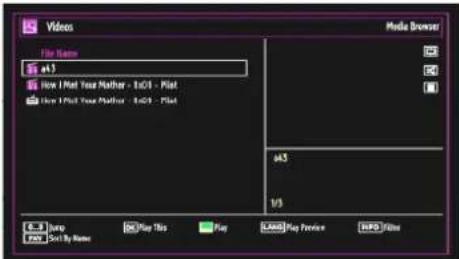
When you select Videos from the main options, available video fi les will be fi Itered and listed on this screen. You can use▼" or "▲" button to select a video fi le and press OK button to play a video. If you select a subtitle fi le and press OK button, you can select or deselect that subtitle fi le. The following menu will be displayed while playing a video fi le:
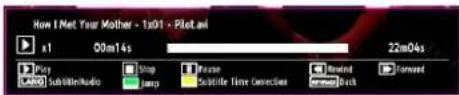
Play (RED button): Starts the video playback.
Stop (BLUE button): Stops the video playback.
Pause (OK button): Pause the video playback.
Rewind (button): Goes backward.
Forward (▶button): Goes forward.
Subtitle/Audio (LANG. button): Sets subtitle/Audio.
Yellow: Opens subtitle time correction menu
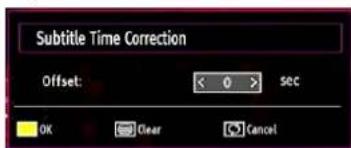
Press RETURN (Exit) button to switch back to previous menu.
Viewing Photos via USB
When you select Photos from the main options, available image fi les will be fi itered and listed on this screen.
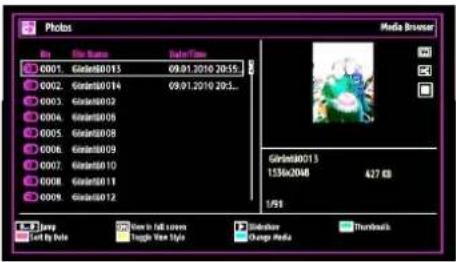
Jump (Numeric buttons): Jump to selected file using the numeric buttons.
OK: Views the selected picture in full screen.
Slideshow (GREEN button): Starts the slideshow using all images.
Loop/Shuffle (BLUE button): Press once to enable Loop. Press again to enable both Loop and Shuffle. Press once more to enable only Shuffle. Press again to disable all. You can follow the disabled functions with the change of the icons.
FAV: Sorts files by date.
TEXT: Views images in thumbnails.
INFO: Changes fi Iter options.
Slideshow Options

Pause (YELLOW button) : Pauses the slideshow.
Continue (GREEN button) : Continues the slideshow.
Previous/Next (Left/Right buttons): Jumps to previous or next file on slideshow.
Rotate (Up/Down buttons): Rotates the image using up/down buttons.
Loop/Shuffle (BLUE button): Press once to disable Loop. Press again to disable both Loop and Shuffle. Press once more to enable only Shuffle. Press again to enable all. You can follow the disabled functions with the change of the icons.
RETURN (Exit): Back to fi le list.
INFO: Displays help screen.
Playing Music via USB
When you select Music from the main options, available audio fi les will be fi Itered and listed on this screen.
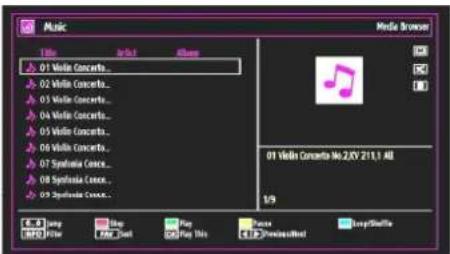
0..9 (Numeric buttons): Jumps to the selected file.
Play This (OK button) : Plays the selected file.
Play (GREEN button) : Plays all media files starting with the selected one.
Stop (RED button) : Stops playback.

Pause (YELLOW button) : Pauses the selected playback.
Previous/Next (Left/Right buttons) : Jumps to previous or next file to play.
FAV: Sorts files by Title, Artist or Album..
INFO: Changes fi Iter options.
Loop/Shuffle (BLUE button): Press once to disable Loop. Press again to disable both Loop and Shuffle. Press once more to enable only Shuffle. Press again to enable all. You can follow the disabled functions with the change of the icons.
Media Browser Settings
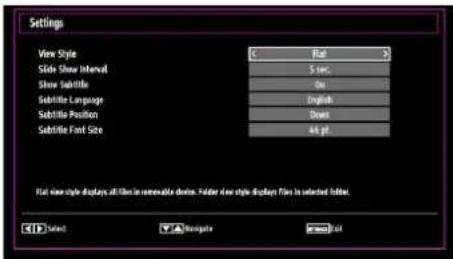
You can set your Media Browser preferences by using the Settings dialog. Press "▼ or " " button to highlight an item and use "◀ or " " button to set.
View Style: Sets default browsing mode.
Slide Show Interval: Sets slide show interval time.
Show Subtitle: Sets subtitle enabling preference.
Subtitle Position: Sets subtitle position as up or down.
Subtitle Font Size: Sets subtitle font size (max. 54pt).
Changing Image Size: Picture Formats
Programmes can be watched in different picture formats, depending on the transmission received.
You can change the aspect ratio (image size) of the TV for viewing the picture in different zoom modes.
Press • SCREEN button repeatedly to change the image size. Available zoom modes are listed below.
Auto
When a WSS (Wide Screen Signalling) signal, which shows the aspect ratio of the picture, is included in the broadcast signal or the signal from an external device, the TV automatically changes the ZOOM mode according to the WSS signal.
When the • AUTO mode does not function correctly due to poor WSS signal quality or when you want to
change the ZOOM mode, change to another ZOOM mode manually.
16:9
This uniformly stretches the left and right sides of a normal picture (4:3 aspect ratio) to fill the wide TV screen.
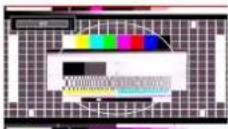
For 16:9 aspect ratio pictures that have been • squeezed into a normal picture (4:3 aspect ratio), use the 16:9 mode to restore the picture to its original shape.
Subtitle
This zooms up the wide picture (16:9 aspect ratio) with subtitles to the full screen.
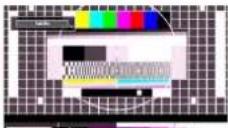
Note: You can shift to screen up or down by pressing "▼/ " ▲buttons while picture zoom is selected as panaromic, 14:9 Zoom, Cinema or Subtitle.
14:9
This zooms up the wide picture (14:9 aspect ratio) to the upper and lower limits of the screen.
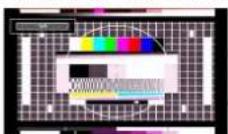
14:9 Zoom
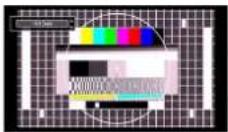
This option zooms to the 14:9 picture.
4:3
Use to view a normal picture (4:3 aspect ratio) as this is its original size.
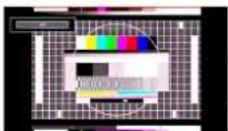
English - 57 -
Panoramic
This stretches the left and right sides of a normal picture (4:3 aspect ratio) to fill the screen, without making the picture appear unnatural.
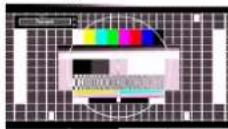
The top and bottom of the picture are slightly cut off.
Cinema
This zooms up the wide picture (16:9 aspect ratio) to the full screen.
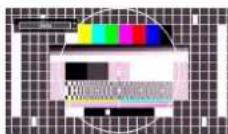
Configuring Picture Settings
You can use different picture settings in detail.
Press MENU button and select the Picture icon by using "◀ or "▶ button. Press OK button to view Picture Settings menu.

Operating Picture Settings Menu Items
Press "▼" or "▲button to highlight a menu item.
Use "◀" or "▶" button to set an item.
Press • MENU button to exit.
Picture Settings Menu Items
Mode: For your viewing requirements, you can set the related mode option. Picture mode can be set to one of these options: Cinema, Game, Dynamic and Natural.
Contrast: Sets the lightness and darkness values of the screen.
Brightness: Sets the brightness value for the screen.
Sharpness: Sets the sharpness value for the objects displayed on the screen.
Colour: Sets the colour value, adjusting the colors.
Colour Shift: Adjust the desired colour tone.
Hue (NTSC only): Adjusts the colour value.
Colour Temp: Sets the desired colour tone.
Setting Cool option gives white colours a slight blue stress.
For normal colours, select Normal option.
Setting Warm option gives white colours a slight red stress.
Noise Reduction: If the broadcast signal is weak and the picture is noisy, use Noise Reduction setting to reduce the noise amount. Noise Reduction can be set to one of these options: Low, Medium, High or Off.
Game Mode: When Game Mode is set to On, specific game mode settings, which are optimized for better video quality, will be loaded.
Note: When Game Mode is on, some items in the Picture Settings menu will be unavailable to be set.
Picture Zoom: Sets the picture size to Auto, 16:9, Subtitle, 14:9, 14:9 Zoom, 4:3, Panoramic or Cinema.
Reset: Resets the picture settings to factory default settings.
While in VGA (PC) mode, some items in Picture menu will be unavailable. Instead, VGA mode settings will be added to the Picture Settings while in PC mode.
PC Picture Settings
For adjusting PC picture items, do the following:
Press "◀" or "▶" button to select Picture icon. Picture menu appears on the screen.
Contrast, Brightness, Colour, Colour Temp and Picture Zoom settings in this menu are identical to settings defined in TV picture menu under "Main Menu System".
Sound, Settings and Source settings are identical to the settings explained in main menu system.
PC Position: Select this to display PC position menu items.
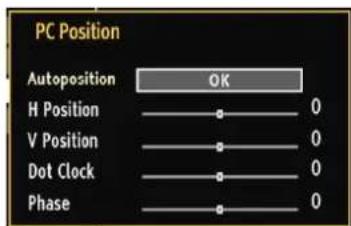
Autoposition: Automatically optimizes the display. Press OK to optimize.
H Position: This item shifts the image horizontally to right hand side or left hand side of the screen.
English - 58 -

V Position: This item shifts the image vertically towards the top or bottom of the screen.
Dot Clock: Dot Clock adjustments correct the interference that appear as vertical banding in dot intensive presentations like spreadsheets or paragraphs or text in smaller fonts.
Phase: Depending on the resolution and scan frequency that you input to the TV set, you may see a hazy or noisy picture on the screen. In such a case you can use this item to get a clear picture by trial and error method.
Configuring Sound Settings
Sound settings can be configured according to your personal preferences.
Press MENU button and select the Sound icon by using "◀ or "▶ button. Press OK button to view Sound Settings menu.
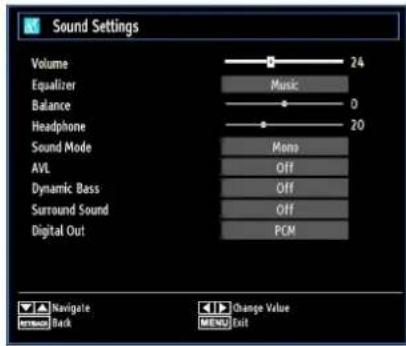
Operating Sound Settings Menu Items
Press "▼" or "▲button to highlight a menu item.
Use "◀" or "▶" button to set an item.
Press • MENU button to exit.
Sound Settings Menu Items
Volume: Adjusts volume level.
Equalizer: Press OK button to view equalizer submenu.

In equalizer menu, the preset can be changed to Music, Movie, Speech, Flat, Classic and User. Press the MENU button to return to the previous menu.
Note: Equalizer menu settings can be changed manually only when the Equalizer Mode is in User.
Balance: This setting is used for emphasizing left or right speaker balance.
Headphone: Sets headphone volume.
Sound Mode: You can select Mono, Stereo, Dual I or Dual II mode, only if the selected channel supports that mode.
AVL: Automatic Volume Limiting (AVL) function sets the sound to obtain fixed output level between programmes (For instance, volume level of advertisements tend to be louder than programmes).
Dynamic Bass: Dynamic Bass is used to increase bass effect of the TV set.
Surround Mode: Surround mode can be change as On or Off.
Digital Out: Sets digital out audio type.
Configuring Your TV's Settings
Detailed settings can be configured to suit your personal preferences.
Press MENU button and select Settings icon by using "◀ or " " button. Press OK button to view Settings menu.
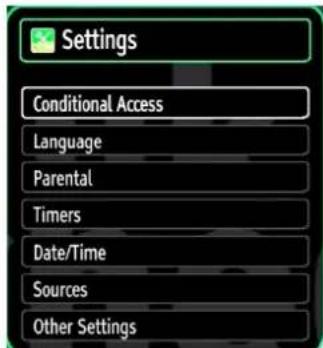
Operating Settings Menu Items
Press "▼" or "▲button to highlight a menu item.
Press • OK button to select an item.
Press • MENU button to exit.
Settings Menu Items
Conditional Access: Controls conditional access modules when available.
Language: Configures language settings.
Parental: Configures parental settings.
Timers: Sets timers for selected programmes.
Date/Time: Sets date and time.
Sources: Enables or disables selected source options.
English - 59 -
Other Settings: Displays other setting options of the TV set.
Using a Conditional Access Module
IMPORTANT: Insert or remove the CI module only when the TV is SWITCHED OFF.
In order to watch certain digital channels, a • conditional access module (CAM) can be necessary. This module must be inserted in the CI slot of your TV.
Obtain the Conditional Access Module (CAM) and the viewing card by subscribing to a pay channel company, then insert those to the TV using the following procedure.
Insert the CAM and then the viewing card to the slot that is located in the terminal cover at the rear side of the TV.
The CAM should be correctly inserted, it is impossible to insert fully if reversed. The CAM or the TV terminal may be damaged if the CAM forcefully inserted.
Connect the TV to the mains supply, switch on and then wait for few moments until the card is activated.
When no module is inserted, “• No Common Interface module detected” message appears on the screen.
Refer to the module instruction manual for details of the settings.
Viewing Conditional Access Menu (\*)
(*) These menu settings may change depending on the service provider.
Press MENU button and select the icon by using "◀" or "▶" button. Press OK button to view Settings menu. Use "▼" or "▲" button to highlight Conditional Access and press OK to view menu items.
Configuring Language Preferences
You can operate the TV's language settings using this menu.
Press MENU button and select the Settings icon by using "◀ or "▶ button. Press OK button to view Settings menu. Use "▼ or "▲ button to highlight Language and press OK to continue:
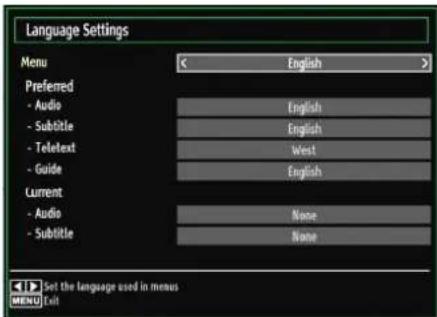
Use "▼or " " Button to set an item. Settings are stored automatically.
-Menu: displays the system language.
Preferred
These settings will be used if available. Otherwise the current settings will be used.
Audio• : Sets the preferred audio language.
- Subtitle: Sets the subtitle language. Selected language will be seen in subtitles.
- Teletext: Sets teletext language.
Guide• : Sets the preferred Guide language.
Current (\*)
(*) These settings can be changed if only the broadcaster supports. Otherwise, settings will not be available to be changed.
Audio• : Changes the audio language for the current channel.
- Subtitle: Sets the subtitle language for the current channel.
Parental Control
To prohibit viewing of certain programmes, channels and menus can be locked by using the parental control system.
This function enables or disables the menu protection system and allows the PIN code to be changed.
Press MENU button and select the Settings by using "◀" or "▶" button. Press OK button to view Settings menu. Use "▼or " " button to highlight Parental and press OK to continue:
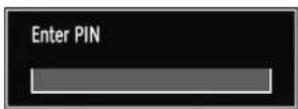
To display parental lock menu options, PIN number should be entered. Factory default PIN number is 0000. After coding the correct PIN number, parental settings menu will be displayed:
English - 60 -
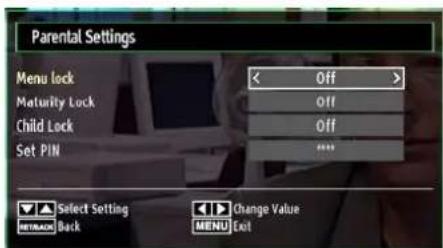
Parental Settings Menu Operation (\*)
Select an item by using "▼" or "▲button.
Use "◀" or "▶" button to set an item.
Press• OK button to view more options.
(*) If you set Country option as UK in the first time installation, Maturity Lock and Child Lock options will not be visible. This setting is available only for EU countries.
Menu Lock: Menu lock setting enables or disables the menu access. You can disable access to the installation menu or the whole menu system.
Maturity Lock: When set, this option gets the maturity information from the broadcast and if this maturity level is disabled, disables access to the broadcast.
Child Lock: When Child Lock is set, the TV can only be controlled by the remote control. In this case the control panel buttons will not work, except for the Standby/On button. When Child Lock is activated you are able to switch the TV into Standby mode with the Standby/On button. To switch the TV on again, you need the remote control. Hence, if one of those buttons is pressed, Child Lock Is On will be displayed on the screen when the menu screen is not visible.
Set PIN: Defi nes a new PIN number. Use numeric buttons to enter a new pin number. You will need to code your new pin a second time for verification purposes.
IMPORTANT: The factory default pin number is 0000, if you change the pin number make sure you write it down and keep it safe.
Timers
To view Timers menu, press MENU button and select Settings icon by using "or "button. Press OK button to view Settings menu. Use "or "button to highlight Timers and press OK to continue:
Setting Sleep Timer
This setting is used for setting the TV to turn off after a certain time.
Highlight Sleep Timer by using ▼
Use "◀ ▶" or " " button to set. The timer can be programmed between Off and 2.00 hours (120 minutes) in steps of 30 minutes.
Setting Programme Timers
You can set programme timers for a particular programme using this feature.
Press "▼" button to set timers on an event. Programme timer function buttons will be displayed on the screen.
Adding a Timer
- Press YELLOW button on the remote control to add a timer. The following menu appears on the screen:
Channel: Changes channel by using "◀or "▶"
Timer Type: This feature is unavailable to be set.
Date: Enter a date using the numeric buttons.
Start: Enter a starting time using the numeric buttons.
End: Enter an ending time using the numeric buttons.
Duration: Displays duration between the starting and ending time.
Mode: Sets a timer to be repeated as Once, Daily or Weekly. Use "◀or" "▶buttons to select an option.
- Press GREEN button to save the timer. Press RED button to cancel.
Change/Delete:Controls parental settings on timers.
Editing a Timer
Select the timer you want to edit by pressing "or "▲button.
- Press GREEN button. Edit Timer menu screen will be displayed.
- When finished with editing, press GREEN button to save. You can press MENU button to cancel.
Deleting a Timer
- Select the timer you want to delete by pressing "▼" or "▲button.
- Press RED button.
- Select YES by using "◀" or "▶" buttons to delete the timer. Select NO to cancel.
English - 61 -
Configuring Date/Time Settings
Select Date/Time in the Settings menu to configure Date/Time settings. Press OK button.
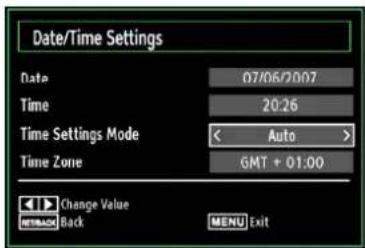
- Use "▼" or "▲" buttons to highlight Date/Time.
Date, Time, Time Settings Mode and Time Zone Setting will be available.
Use "▲or" "▼buttons to highlight the Time Settings Mode. Time Settings Mode is set using "◀or" "▼buttons. It can be set to AUTO or MANUAL.
When AUTO is selected, Date/Time and Time Zone options will not be available to be set. If MANUAL option is selected as the Time Zone can be altered:
- By pressing "▲or" "▼buttons select Time Zone.
Use "◀ or "▶buttons to change the Time Zone between GMT-12 or GMT+12. Date/Time on the top of the menu list will then change according to the selected Time Zone.
Changes are automatically stored. Press to exit.
Configuring Source Settings
You can enable or disable selected source options. The TV will not switch to the disabled source options when SOURCE button is pressed.
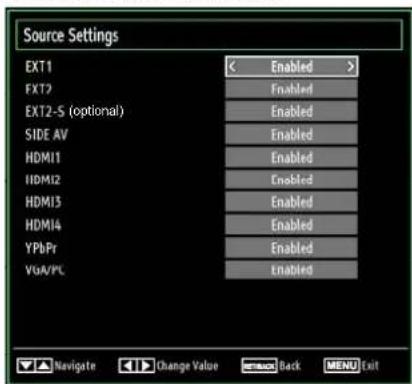
- Select Sources in the Settings menu and press OK button.
- Press“▼” or “▲buttons to select a source.
Use “◀ ▶” or “ ” button to enable or disable the selected source. Changes are automatically stored.
Configuring Other Settings
To view general configuration preferences, select Other Settings in the Settings menu and press OK button.
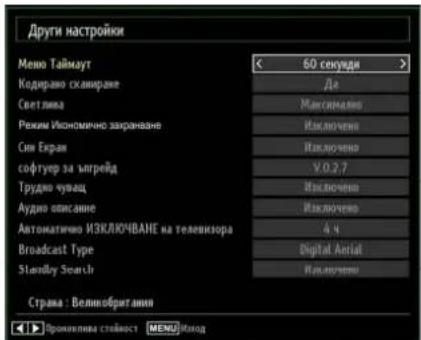
Operation
- Press "▼" or "▲" buttons to select an item.
- Use "◀" or "▶" button to set an option.
- Press OK button to view a sub-menu.
Menu Timeout: Changes timeout duration for menu screens.
Scan Encrypted: When this setting is on, search process will locate the encrypted channels as well. If it is set as Off, encrypted channels MENU be located in automatic search or manual search.
Backlight: This setting controls the backlight level and it can be set to Maximum, Minimum, Medium and Eco Mode (optional).
Power Save Mode
Use "▼" or "▲" button to select Power Save Mode.
Press "◀or" ▶button to set Power Save Mode as On or Off.
See the section, "Environmental Information" in this manual for further information on Power Save Mode.
Note : Backlight function will be invisible if Power Save Mode is set to on.
Blue Background: Activates or deactivates blue background system when the signal is weak or absent.
Software Upgrade: To ensure that your TV always has the most update information, you can use this setting. In order for the proper operation, please ensure that the TV is set to standby mode.
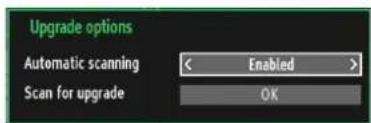
You can enable or disable automatic upgrade by setting Automatic Scanning option.
You can manually search for new software by selecting Scan for upgrade.
Hard of Hearing: If the broadcaster enables any special signal concerning the audio, you can set this setting as On to receive such signals.
Audio Description: Audio description refers to an additional narration track for blind and visually impaired viewers of visual media, including television and movies. The description narrator talks through the presentation, describing what is happening on the screen during the natural pauses in the audio (and sometimes during dialogue, if deemed necessary). You can use this feature, only if the broadcaster supports that additional narration track.
Auto TV Off: You can set the timeout value of auto off feature. After the timeout value is reached and the Tv not operated for selected time, the TV will go off.
Broadcast Type:
When you set the desired broadcast type by using "or button," the TV will display the related channel list. If the related source has does not include any stored channels, "No channels for this type have been found." message will be displayed on the screen. Standby Search (optional)
Use "▼or " ▲button to select Standby Search and then press ◀ or "▶button to set this setting as On or Off. If you change Standby Search to Off, this function will be unavailable. To use Standby search please make sure that you select Standby Search as On.
Other Features
Displaying TV Information: Programme Number, Programme Name, Sound Indicator, time, teletext, channel type and resolution information is displayed on the screen when a new programme is entered or "INFO/" button is pressed.
Mute Function: Press "abutton to disable sound. Mute indicator will be displayed in the upper side of the screen. To cancel mute, there are two alternatives; the first one is pressing the" button and the second one is increasing the volume level.
Picture Mode Selection: By pressing PRESETS button, you can change Picture Mode settings in accordance with your viewing requirements. Available options are Dynamic, Natural, Cinema and Game.
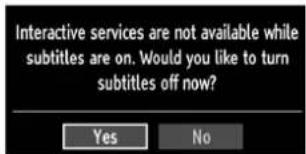
Displaying Subtitles: You can enable subtitles by pressing the SUBTITLE button of the remote control. Press SUBTITLE button again to disable subtitle function.
If "Subtitle" is On, pressing the "☐" button causes the following warning message display on the screen (** for UK only)
English - 63 -
Teletext
Teletext system transmits information such as news, sports and weather on your TV. Note that is the signa degrades, for example in poor/adverse weather conditions, some text errors may occur or the teletext mode may be aborted.
Teletext function buttons are listed below:
“teletext / Mix : Activates teletext mode when pressed once. Press again to place the teletext screer over the programme (mix).Pressing again will quit the teletext mode.
"RETURN" Index: Selects the teletext index page. "INFO/?" Reveal: Shows hidden information (e.g. solutions of games).
"OK" Hold: Holds a text page when convenient. Press again to resume.
Subcode Pages : Selects subcode pages if available when the teletext is activated.
P+ / P- and numbers (0-9): Press to select a page.
Note: Most TV stations use code 100 for their index pages.
Coloured Buttons (RED/GREEN/YELLOW/BLUE)
Your TV supports both FASTEXT and TOP text systems. When these systems are available, the pages are divided into groups or topics. When FASTEXT system is available, sections in a teletext page will become colour-coded and can be selected by pressing the coloured buttons. Press a coloured button that corresponds to with your needs. The coloured writings will appear, showing you which coloured buttons to use when TOP text transmission is present. Pressing ▼ or “▲ commands will request the next or previous page respectively.
Tips
Screen Care: Clean the screen with a slightly damp, soft cloth. Do not use abrasive solvents as they may damage the coating layer of the TV screen. For your safety, unplug the mains plug when cleaning the set. When moving the TV, hold it properly from the bottom part.
Image Persistence: Please note that ghosting may occur while displaying a persistent image. LCD TVs' image persistence may disappear after a short time. Try turning off the TV for a while.
To avoid this, do not leave the screen in still picture for extended periods.
No Power: If your TV system has no power, please check the main power cable and connection to the mains socket outlet.
Poor Picture: Have you selected the correct TV system? Is your TV set or house aerial located too close to a non-earthed audio equipment or neon lights, etc.? Mountains or high buildings can cause double pictures or ghost images. Sometimes you can improve the picture quality by changing the direction of the aerial. Is the picture or teletext unrecognisable? Check if you have entered the correct frequency. Please retune the channels. The picture quality may degrade when two peripherals are connected to the TV at the same time. In such a case, disconnect one of the peripherals.
No Picture: Is the aerial connected properly? Are the plugs connected tightly to the aerial socket? Is the aerial cable damaged? Are suitable plugs used to connect the aerial? If you are in doubt, consult your dealer. No Picture means that your TV is not receiving a transmission. Have you selected the correct button on the remote control? Try once more. Also make sure the correct input source has been selected.
Sound: You can not hear any sound. Did you perhaps interrupt the sound, pressing the button? Sound is coming from only one of the speakers. Is the balance set to one extreme? See Sound Menu.
Remote Control: Your TV no longer responds to the remote control. Perhaps the batteries are exhausted. If so you can still use the local buttons on the TV.
Input Sources: If you cannot select an input source, it is possible that no device is connected. Check the AV cables and connections if you have tried to connect a device
Appendix A: PC Input Typical Display Modes
The display has a maximum resolution of 1360 x 768. The following table is an illustration of some of the typical video display modes. Your TV may not support different resolutions. Supported resolution modes are listed below. If you switch your PC to an unsupported mode, a warning OSD will appear on the screen.
| Index Resolution Frequency | |
| 1 640x400 70 Hz | |
| 2 640x480 60 Hz | |
| 3 640x480 75 Hz | |
| 4 800x600 60 Hz | |
| 5 800x600 75 Hz | |
| 6 1024x768 60 Hz | |
| 7 1024x768 70 Hz | |
| 8 1024x768 75 Hz | |
| 9 1152x864 75 Hz | |
| 10 1280x768 60 Hz | |
| 11 1280x1024 60 Hz | |
| 12 1360x768 60 Hz | |
Appendix B: AV and HDMI Signal Compatibility (Input Signal Types)
| Source Supported Signals Available | ||
| EXT-1(SCART 1) | PAL 50/60 O | |
| NTSC 60 | O | |
| RGB 50 | O | |
| RGB 60 | O | |
| EXT-2(SCART-2) | PAL 50/60 O | |
| NTSC 60 | O | |
| RGB 50 | X | |
| RGB 60 | X | |
| SIDE AV | PAL 50/60 O | |
| NTSC 60 | O | |
| YPbPr | 480I 60Hz O | |
| 480P | 60Hz O | |
| 576I 50Hz O | ||
| 576P | 50Hz O | |
| 720P | 50Hz O | |
| 720P | 60Hz O | |
| 1080I | 50Hz O | |
| 1080I | 60Hz O | |
| 1080P | 50Hz O | |
| 1080P | 60Hz O | |
| HDMI1HDMI2HDMI3HDMI4 | 480I 60Hz O | |
| 480P | 60Hz O | |
| 576I 50Hz O | ||
| 576P | 50Hz O | |
| 720P | 50Hz O | |
| 720P | 60Hz O | |
| 1080I | 50Hz O | |
| 1080P | 60Hz O | |
| 1080P | 50Hz O | |
| 1080P | 60Hz O | |
| 1080P | 24 Hz O | |
(X: Not Available, O: Available)
In some cases a signal on the LCD TV may not be displayed properly. The problem may be an inconsistency with standards from the source equipment (DVD, Set-top box, etc.). If you do experience such a problem please contact your dealer and also the manufacturer of the source equipment.
English - 65 -
Appendix C: Supported DVI Resolutions
When connecting devices to your TV's connectors by using DVI converter cables (not supplied), you can refer to the following resolution information.
| 24Hz 25Hz 30Hz 50Hz 60Hz | |||||
| 480i | ☑ | ||||
| 480p | ☑ | ||||
| 576i | ☑ | ||||
| 576p | ☑ | ||||
| 720p | ☑ | ☑ | |||
| 1080i | ☑ | ☑ | |||
| 1080p | ☑ ☑ | ☑ ☑ ☑ | |||
Appendix D: Supported File Formats for USB Mode
| Supported Players | |||
| Player Stream | Video Decoder (MSVD) | Audio Decoder (MSAD) | |
| Audio MP3 | None MP3 | ||
| Audio WAV/A | IFF None-- | LPCM | |
| Windows Media (optional) | WMA / ASF | VC1 | WMA |
| MPEG1 Program Stream | MPEG-1 | MPEG1 | MP3, AC-3 and PCM |
| MPEG2 Program Stream | MPEG-2 | MPEG2 | MP3, AC-3 and PCM |
| MPEG4 | MPEG-4/H264 in MP4 container | H264 and MPEG4 | AAC |
| AVI (Xvid) | XVID | MPEG4 | MP3, AC-3 and PCM |
English - 66 -
Appendix E: Software Upgrade
- Your TV is capable of finding and updating new software upgrades over broadcast channels.
- For broadcast channels search, TV looks the available channels stored in your settings. So before software upgrade search, it is advised to auto search and update all available channels.
1) Software upgrade search via user interface
- It is possible manually to check if there is a new software upgrade for your TV set.
- Simply navigate on your main menu. Choose Settings and select Other Settings menu. In Other Settings menu navigate on to the Software Upgrade item and press OK button to open Upgrade Options menu.
- In Upgrade Options menu select Scan for upgrade and press OK button.
- If a new upgrade is found, it starts to download the upgrade. A progress bar indicates the remaining download progress. When download completes with success a message is displayed for reboot to activate new software. Press OK to continue with the reboot operation.
2) 3.AM search and upgrade mode
- If Automatic scanning in Upgrade Options menu is enabled, TV wakes up at 03:00 and searches broadcast channels for new software upgrade. If new software is found and downloaded successfully, with next power up TV opens with new software version.
Note on reboot operation: Reboot is the last step in software upgrade operation if download of new software is fi nished successfully. During reboot TV makes fi nal initializations. In reboot sequence panel power is closed and front led indicates the activity with blinking. Around 5 minutes later TV restarts with new software activated.
- If your TV fails to restart in 10 minutes, unplug power for 10 minutes and re-plug again. TV should open with new software safely. If you still can not get TV working, please kindly repeat unplug and plug sequence a few times more. If your set still can not operate, please call the service personnel to fix the problem for you.
Caution: While led is blinking during reboot do not unplug your TV's power. Doing this may cause your TV not to re-open again and can only be fixed by service personnel.
English - 67 -
Specifications
TV BROADCASTING
PAL/SECAM B/G D/K K' I/I' L/L'
RECEIVING CHANNELS
VHF (BAND I/III)
UHF (BAND U)
HYPERBAND
NUMBER OF PRESET CHANNELS
1000
CHANNEL INDICATOR
On Screen Display
RF AERIAL INPUT
75 Ohm (unbalanced)
OPERATING VOLTAGE
220-240V AC, 50 Hz.
AUDIO
German + Nicam Stereo
AUDIO OUTPUT POWER (W _RMS ) (10% THD)
2×6
POWER CONSUMPTION (W)
150 W (max)
< 1 W (Standby)
PANEL
16:9 display, 32" Screen Size
DIMENSIONS (mm)
DxLxH (With foot): 212 x 776 x 567
Weight (Kg): 10,40
DxLxH (Without foot): 94 x 776 x 542
Weight (Kg): 9,70
Digital Reception (DVB-T)
Transmission Standards:
DVB-T, MPEG2,DVB-T, MPEG4 HD
i. DEMODULATION
-Symbol rate: COFDM with 2K/8K FFT mode.
-Modulation: 16-QAM - 64-QAM FEC for all DVB • modes (automatically found)
MHEG-5 ENGINE compliant with ISO/IEC 13522-5 • UK engine Profi le (UK only)
Object carousel support compliant with ISO/IEC • 135818-6 and UK DTT profi le(UK only)
Frequency range: 474-850 MHz for UK models
ii. VIDEO
-H.264 (MPEG-4 part 10) main and high profi le level • 4.1/MPEG-2 MP@HL video decoder.
-HD display multi format capable (1080i, 720p, •576p)
-CVBS analogue output.(In HD channels, this will not be available
iii. AUDIO
-MPEG-1 layer I/II, MPEG-2 layer II, AAC, HEAAC, AC3, E-AC3
-Sampling frequencies supported are 32, 44.1 & 48 kHz
Digital Reception (DVB-C)
Transmission Standards:
DVB-C, MPEG2, DVB-C, MPEG4
i. DEMODULATION
-Symbolrate: 4.0 Msymbols/s to 7.2 Msymbols/s
- Modulation: 16-QAM, 32-QAM, 64-QAM, 128-QAM and 256-QAM
ii. VIDEO
- All MPEG2 MP@ML formats with up-conversion and fi ltering to CCIR601 format.
-CVBS analogue output
iii. AUDIO
-All MPEG1 Layer 1 and 2 modes
-Sampling frequencies supported are 32, 44.1 & 48 kHz
English - 68 -
Instructions
Safety Warnings

Attention: In order to prevent fire or electrical shock, do not open the casing or rear panel.

A lightning bolt with an arrowhead in an equilateral triangle should indicate to the user that dangerous voltage inside the product is strong enough to give a person an electrical shock.

CE Certification Symbol: We have conducted tests and demonstrated our compliance with all relevant EU guidelines and requirements.

An exclamation mark in an equilateral triangle should indicate to the user that important usage, maintenance and service instructions are located in the manual accompanying the device.
CLASS 1 LASER PRODUCT
A laser product symbol on the back of the device indicates that this device is a certified laser product. The laser is weak outside of the device and only emits innocuous radiation.
English - 69 -
CE



- Inhalt
- KANÄLE EMPFANGEN
- AUDIO-AUSGANGSLEISTUNG (W _RMS. ) (10% THD)
- STROMVERBRAUCH (W)
- PANEL
- Features
- Introduction
- Preparation
- Safety Precautions
- Power Source
- Power Cord
- Moisture and Water
- Cleaning
- Ventilation
- Heat and Flames
- Lightning
- Replacement Parts
- 'Servicing
- Waste Disposal
- Disconnecting the Device
- Headphone Volume
- Installation
- LED / LCD Screen
- Electrical device not in the hands of children
- High temperature, humidity, cold or artic climate
- Package Contents
- Environmental Information
- Power Save Mode
- Off
- Repair Information
- Remote Control Buttons
- LCD TV and Operating Buttons
- FRONT and REAR VIEW Control buttons VIEW Control Buttons
- Viewing the Back side Connections
- Viewing the Connections - Side Connectors
- Power Connection
- Aerial Connection
- Using Digital Multimedia Connectors
- USB Memory Connection
- Side HDMI Connection
- Connecting the LCD TV to a PC
- Connecting to a DVD Player
- Using Side AV Connectors
- Using Other Connectors
- Remote Control Handset
- Inserting Batteries
- Switching On/Off
- To Switch the TV On
- To Switch the TV Off
- Digital Teletext ( ** for UK only)
- Analogue Teletext
- Input Selection
- Operation with the Buttons on the TV
- Volume Setting
- Programme Selection
- .Viewing Main Menu
- AV Mode
- Operation with the Remote Control
- Programme Selection (Previous or Next Programme)
- Programme Selection (Direct Access)
- Viewing Electronic Programme Guide (EPG)
- First Time Installation
- Auto Tuning
- Auto Channel Scan Menu Operation
- Manual Tuning
- Digital Cable Manual Search
- Analogue Manual Search
- Analog Fine Tune
- Network Channel Scan
- Clear Service List (\*)
- Managing Stations: Channel List
- Moving a Channel
- Deleting a Channel
- setRenaming a Channel
- Locking a Channel
- Managing Stations: Favourites
- Button Functions
- Managing Stations: Sorting Channel List
- On-Screen Information
- Media Playback Using Media Browser
- Viewing Videos via USB
- Viewing Photos via USB
- Slideshow Options
- Playing Music via USB
- Media Browser Settings
- Changing Image Size: Picture Formats
- Auto
- 16:9
- Subtitle
- 14:9
- 14:9 Zoom
- 4:3
- Panoramic
- Cinema
- Configuring Picture Settings
- Operating Picture Settings Menu Items
- Picture Settings Menu Items
- PC Picture Settings
- Configuring Sound Settings
- Operating Sound Settings Menu Items
- Sound Settings Menu Items
- Configuring Your TV's Settings
- Operating Settings Menu Items
- Settings Menu Items
- Using a Conditional Access Module
- Viewing Conditional Access Menu (\*)
- Configuring Language Preferences
- Preferred
- Current (\*)
- Parental Control
- Parental Settings Menu Operation (\*)
- Timers
- Setting Sleep Timer
- Setting Programme Timers
- Adding a Timer
- Editing a Timer
- Deleting a Timer
- Configuring Date/Time Settings
- Configuring Source Settings
- Configuring Other Settings
- Operation
- Broadcast Type:
- Other Features
- Teletext
- Coloured Buttons (RED/GREEN/YELLOW/BLUE)
- Tips
- Appendix A: PC Input Typical Display Modes
- (X: Not Available, O: Available)
- Appendix C: Supported DVI Resolutions
- Appendix E: Software Upgrade
- 1) Software upgrade search via user interface
- 2) 3.AM search and upgrade mode
- Specifications
- TV BROADCASTING
- RECEIVING CHANNELS
- NUMBER OF PRESET CHANNELS
- CHANNEL INDICATOR
- RF AERIAL INPUT
- OPERATING VOLTAGE
- AUDIO
- AUDIO OUTPUT POWER (W _RMS ) (10% THD)
- POWER CONSUMPTION (W)
- DIMENSIONS (mm)
- Digital Reception (DVB-T)
- Transmission Standards:
- i. DEMODULATION
- ii. VIDEO
- iii. AUDIO
- Digital Reception (DVB-C)
- Instructions
- CE
Brand : SCHAUB LORENZ
Model : 32LT555C
Category : Television