
ECM153RVS - Microwaves ETNA - Free user manual and instructions
Find the device manual for free ECM153RVS ETNA in PDF.

| Product Type | Microwave |
| Brand | Etna |
| Model | ECM153RVS |
| Capacity | 20 Liters |
| Dimensions (W x D x H) | 440 x 360 x 258 mm |
| Net Weight | 11.5 kg |
| Power Consumption | 1200 W |
| Microwave Output Power | 800 W |
| Control Type | Digital with touch controls |
| Display | LED digital display |
| Timer | Up to 95 minutes |
| Defrost Function | Yes, by weight or time |
| Auto Cook Programs | 8 preset menus |
| Turntable | Yes, glass turntable |
| Interior Light | Yes |
| Child Lock | Yes |
| Door Safety Interlock | Yes |
| Frequency | 2450 MHz |
| Voltage / Frequency | 230 V / 50 Hz |
| Cleaning | Wipe interior with damp cloth; avoid abrasive cleaners |
| Spare Parts Availability | Turntable, fuse, door seals available from service centers |
| Reparability Index | 7.2 / 10 |
Frequently Asked Questions - ECM153RVS ETNA
User questions about ECM153RVS ETNA
0 question about this device. Answer the ones you know or ask your own.
Ask a new question about this device
Download the instructions for your Microwaves in PDF format for free! Find your manual ECM153RVS - ETNA and take your electronic device back in hand. On this page are published all the documents necessary for the use of your device. ECM153RVS by ETNA.
USER MANUAL ECM153RVS ETNA
English GB 3 – GB 26
Inhoud
■ Uw combi-magnetron 4
Beschrijving 4
Inleiding 5
Algemeen 6
■ Veiligheid 7 - 9
natural_image
Simple line drawing of a symmetrical oval structure with vertical bars and support legs (no text or symbols)hoog rooster
natural_image
Warning symbol of steam inside a triangle (no text or numbers)What you should pay attention to .....7
Operation 10 - 22
Bringing the oven into operation ..... 10
Setting the clock....11
Cooking using the microwave ..... 12
Hot-air cooking 13
Cooking using the grill 15
Combination cooking 16
Defrosting 17
Multistage cooking 18
Pre-set function 19
Auto menu 20
Cooking table auto menu 21
Checking the settings 22
Childproof lock 22
■ Maintenance 23
Cleaning 23
■ Faults 24
What should I do if....24
General 24
■ Environmental aspects ..... 25
Disposal of packaging and appliance ..... 25
■ General 26
Technical information 26
Description
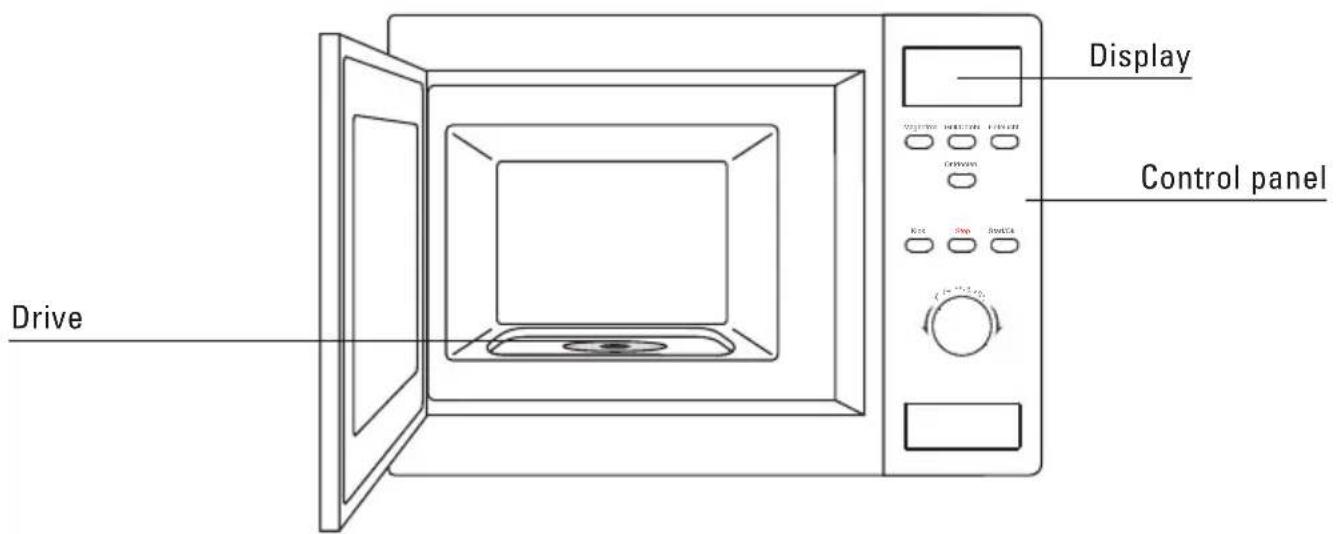
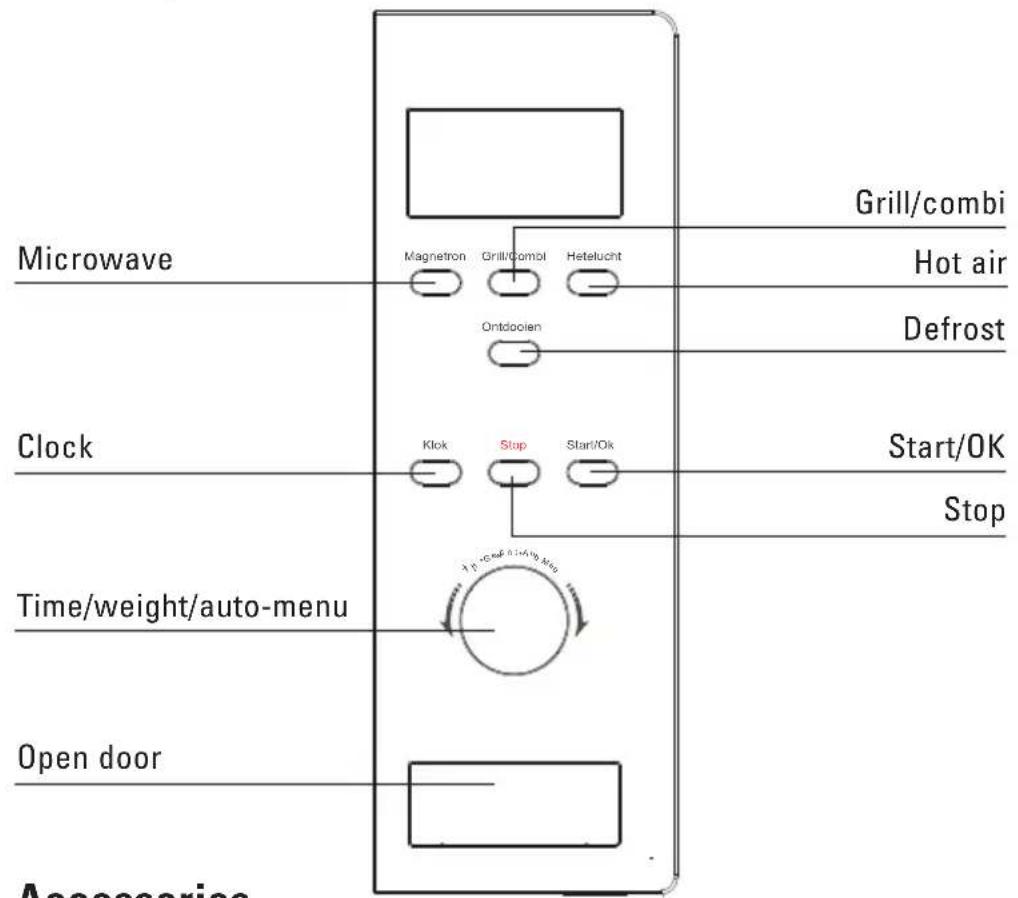
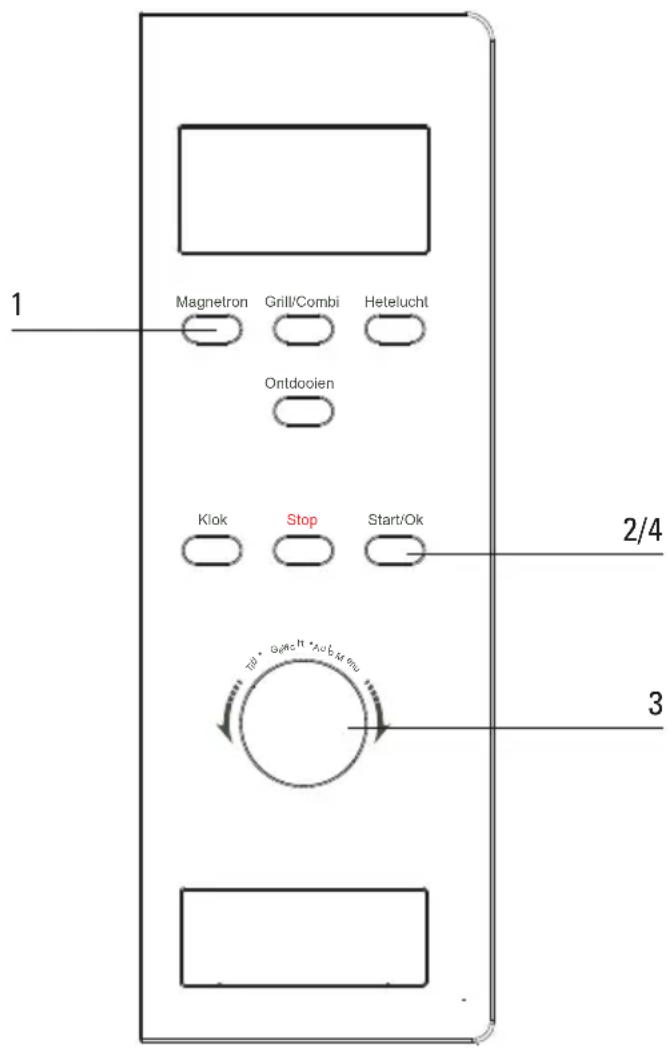
Control panel
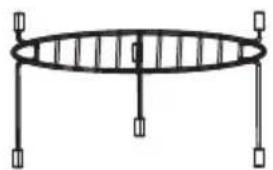
Accessories
natural_image
Simple line drawing of a symmetrical oval structure with vertical bars and four corner supports (no text or symbols)High rack
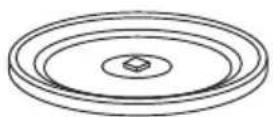
Turntable Roller stay
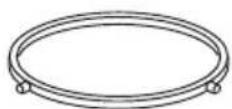

Cam for turntable
Introduction
You have chosen an Etna combi-microwave oven.
Optimum ease of use and simple operation were the most important factors in the development of this product.
The combi-microwave oven combines the characteristics of a microwave oven with those of a traditional oven.
The extensive range of settings available enables you to select the exact method of cooking that you have in mind. The design ensures easy to use, controls.
The functions are arranged conveniently on the control panel. Every function has its own button. The display provides information and helps you choose the settings.
The controls for this oven are very easy. What we particularly want to do in this manual is give you an idea of all the possibilities this appliance offers.
The various functions are arranged for easy-reference in the operation section. You will also find some useful tips.
Separate installation instructions have been enclosed for installing the appliance.
Please keep this manual carefully, since any subsequent user will also find it very useful.
We wish you much pleasure with your combi-microwave oven!
General
This combi-microwave oven is extremely safe. As with all products, however, there are a number of things you need to bear in mind.
Repairs must only be carried out by an authorised service engineer.
It is hazardous for anyone other than a trained person to carry out any service or repair operation which involves the removal of any cover which gives protection against exposure to microwave energy.
Do not use the appliance if it is damaged. If the supply cord is damaged, it must be replaced by the manufacturer or its service agent or a similar qualified person in order to avoid a hazard.
The appliance should be disconnected from the mains before being repaired or cleaned. Remove the plug from the socket or turn the switch in the meter cupboard to zero.
For electrical safety reasons, the appliance must not be cleaned using high-pressure cleaners or steam cleaners.
This combi-microwave oven has been designed for domestic use. Use the appliance only for cooking food and only if it has been built in according to the regulations.
What you should pay attention to
when using the grill or backing function
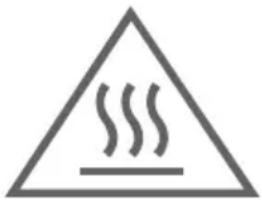
The oven is insulated. Despite this, there is always some transfer of heat, as a result of which the outside of the oven heats up. This heating falls well within the acceptable limits.
natural_image
Warning symbol with steam inside a triangle (no text or numbers)During use, the appliance becomes hot. Care should be taken to avoid touching heating elements inside the oven.
When cooking dishes that contain alcohol, the alcohol may evaporate due to the high temperature. The vapour could catch fire if it comes into contact with a hot heating element.
Do not use the combi-microwave oven for storing flammable or easily deformable materials.
Make sure that the food is always heated sufficiently. The time required for this depends on various factors, such as the quantity and type of food. Any bacteria in the food will only be killed if the food is heated to a temperature greater than 70 °C for at least 10 minutes. Allow the food to cook for a bit longer if you are not sure whether the food has been heated sufficiently.
Never heat food in sealed containers.
Pressure will build up inside the container and may cause it to explode.
Only allow children to use the oven without supervision when adequate instructions have been given so that the child is able to use the oven in a safe way and understands the hazards of improper use.
when using the microwave function
Place a plastic spoon in the cup if you want to boil a liquid (water, for example). The liquid may boil without you seeing any bubbles. As soon as you take the cup out of the oven, the liquid may suddenly start to boil violently and splash out of the cup, with the risk of you getting scalded.
The content of feeding bottles and baby food jars are to be stirred or shaken and the temperature is to be checked before consumption, in order to avoid burns.
Your microwave oven is safe only if the door is closing properly!
Never put anything between the oven door and make sure that the door and seal are always clean.
If the door or door seals are damaged, the oven must not be operated until it has been repaired by a trained person.
You should only use the microwave oven for defrosting and cooking food and not, for example, for drying clothes or paper. Clothes or paper could catch fire.
If you heat small quantities of dry or powdery products in the microwave oven (when drying herbs, for example), there is a chance that they will spontaneously combust.
If something in the combi-oven catches fire, switch the microwave oven off and take the plug out of the socket. Keep the oven door closed.
Do not switch the microwave function on if the combi-oven is empty. The oven could be damaged.
A microwave oven is not suitable for:
■preserving food;
■ cooking eggs in their shells, because they will burst due to the increase in pressure;
■ heating oil for deep frying.
Remove metal twists from plastic bags and use dishes and plates that are suitable for the microwave oven.
You should only heat liquids in airtight packaging after first pricking a few holes in the packaging. This is because of the increase in pressure during heating.
Do not heat food for longer than is necessary; allow for the 'continued cooking'.
Prick the skin of meat, chicken and fish with a fork or other pointed object. This prevents these foods spattering.
You can open the door when the microwave function is switched on; the microwave function then switches off automatically and the time set is stopped.
Not all materials can be used in the combimicrowave oven. The table below shows which materials can be used and which materials cannot be used.
Material Microwave Hot air Combi Grill
| paper yes* no no no aluminium foil yes** yes yes** yes cling film yes no no no aluminium trays no yes no yes freezer/microwave oven dishes yes no no no | |||
| heatproof plastic | yes no no no | ||
| unglazed earthenware | no yes no yes | ||
| metal cooking utensils | no yes no yes | ||
| normal glass | yes no no no | ||
| ovenproof glass and ceramics | yes yes yes | yes | |
| metallic decoration | no yes no yes | ||
| metallic twists | no yes no n/a | ||
| mercury thermometer | no yes no yes | ||
| bottle with narrow neck | no n/a | n/a | n/a |
| roasting bags | yes yes yes | no | |
Bringing the oven into operation
positioning
Place the microwave oven on a firm, flat surface.
Make sure that there is sufficient ventilation around the microwave oven. Keep a 30 cm space free at the top. At the rear and sides keep at least 7.5 cm free.
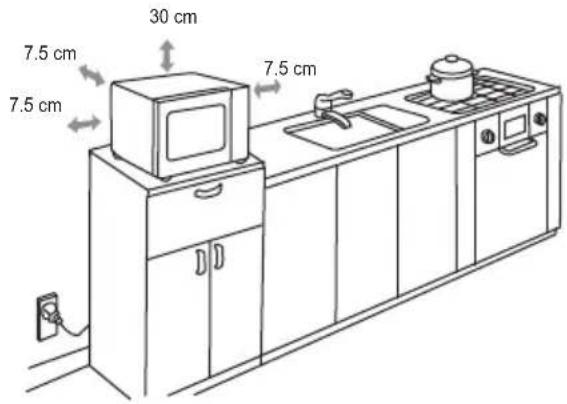
Do not cover the air vents.
The adjustable feet should not be removed.
Do not place the microwave oven near a heat source.
Transmitting and receiving equipment such as radios and televisions can affect the operation of the microwave oven.
cleaning the microwave oven and accessories
Remove the accessories from the combi-microwave oven and clean the oven with a mild cleaning agent.
Switch the hot-air function on for one hour at 230 °C (see page 13). Protective greases used during manufacture will then be removed.
remark
When the oven is heated strongly for the first time, it will have a 'new' smell. This is normal. Switch the extractor hood on if necessary or open a window.
After the oven has cooled down, clean it with warm water.
■Press the 'Start/OK' button to restart the cooking programme after the door has been opened.
If the 'Start/OK' button is not pressed within 5 minutes of selecting a cooking programme the programme will not start.
A beep sounds when a button is pressed. If no beep is heard then the button has not been pressed firmly enough.
■Five beeps will sound when a cooking programme finishes.
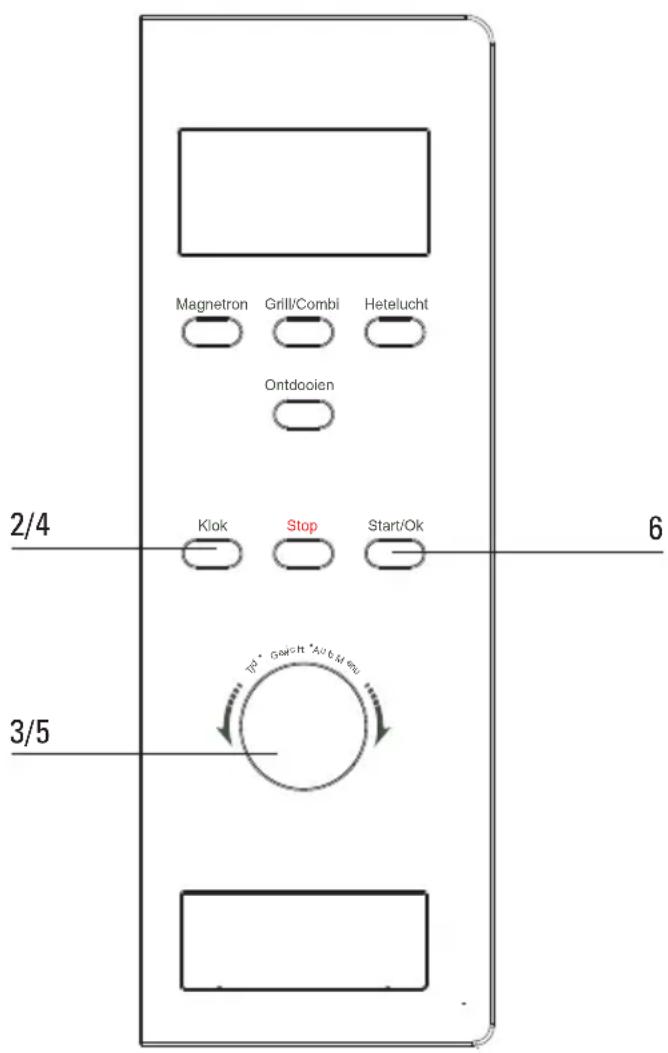
Setting the clock
1 Press the 'Klok' button. Select either 12-hour or 24-hour notation.
2 Turn the 'Tijd/Gewicht/Auto Menu' control knob. Set the hours (between 0 and 23 for 24-hour notation / between 1-12 for 12-hour notation).
3 Press the 'Klok' button. The minutes-display starts to flash.
4 Turn the 'Tijd/Gewicht/Auto Menu' control knob. Set the minutes (from 0-59).
5 Press the 'Klok' button. The time that you have set is displayed
(":" flashes). If you press 'Stop' while setting the clock the previous clock setting will be displayed.
remarks
When the microwave is connected to the electricity supply the display will show "0:00".

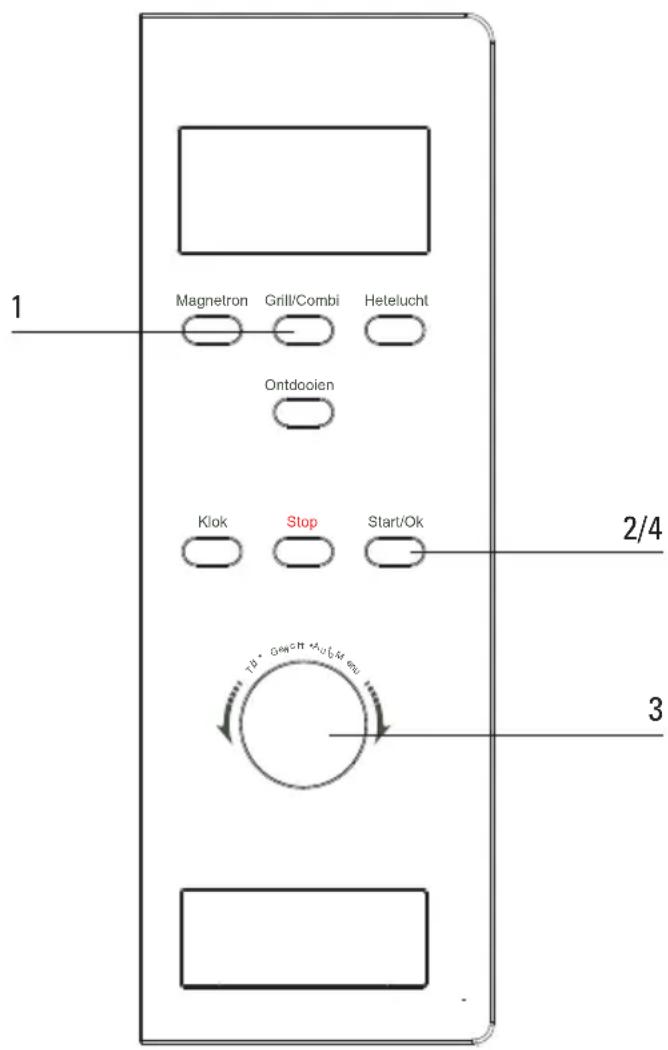
Cooking using the microwave
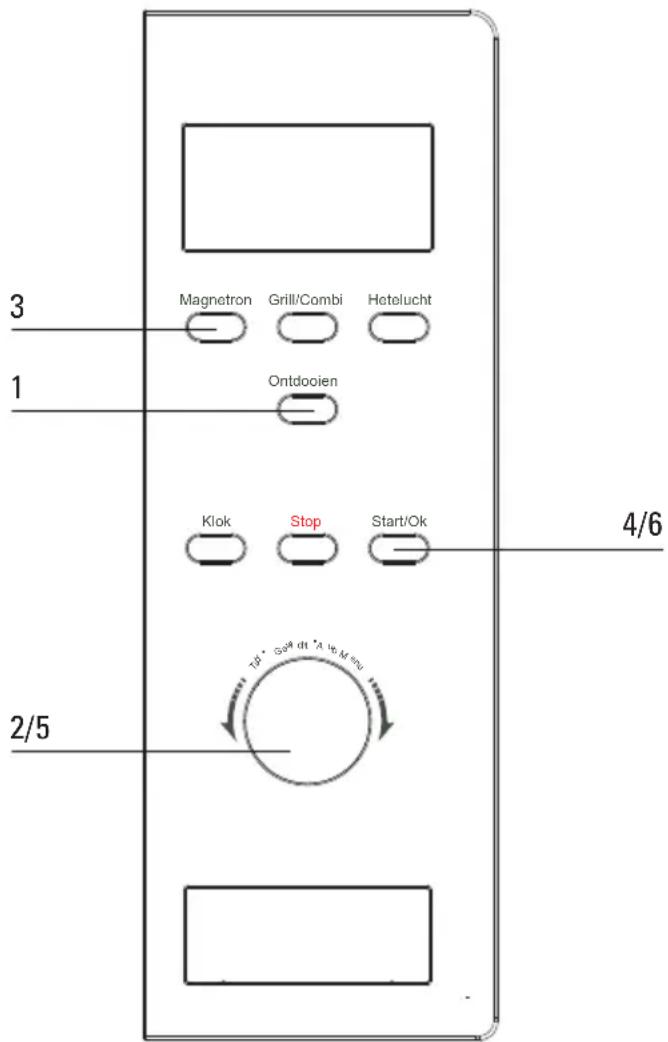
1 Press the 'Magnetron' button to select the microwave function. The display shows "P100".
2 Press the 'Magnetron' button repeatedly or turn the 'Tijd/Gewicht/Auto Menu' control knob to adjust the microwave power.
3 Press the 'Start/OK' button to confirm the microwave power.
4 Turn the 'Tijd/Gewicht/Auto Menu' control knob. Set the cooking time (the maximum cooking time is 95 minutes).
5 Press the 'Start/OK' button to start the set programme.
example:
You want to cook the dish at 80% of the microwave power level for 20 minutes.
1 Press the 'Magnetron' button once. The display shows "P100". Press the 'Magnetron' button again to set the power level to 80%. The display shows "P80".
2 Press the 'Start/OK' button.
3 Turn the 'Tijd/Gewicht/Auto Menu' control knob until the display shows "20:00" (the maximum cooking time is 95 minutes).
4 Press the 'Start/OK' button to start the set programme.
microwave power level table
Power level Press the 'Magnetron' button
100% (P100) 1x
80% (P80) 2x
50% (P50) 3x
30% (P30) 4x
10% (P10) 5x
Instant cooking
1 Press the 'Start/OK' button. Cooking will now be for 30 seconds at a microwave power level of 100%.
Each subsequent time you press the 'Start/OK' button the cooking process is extended by 30 seconds. The maximum cooking time is 95 minutes.
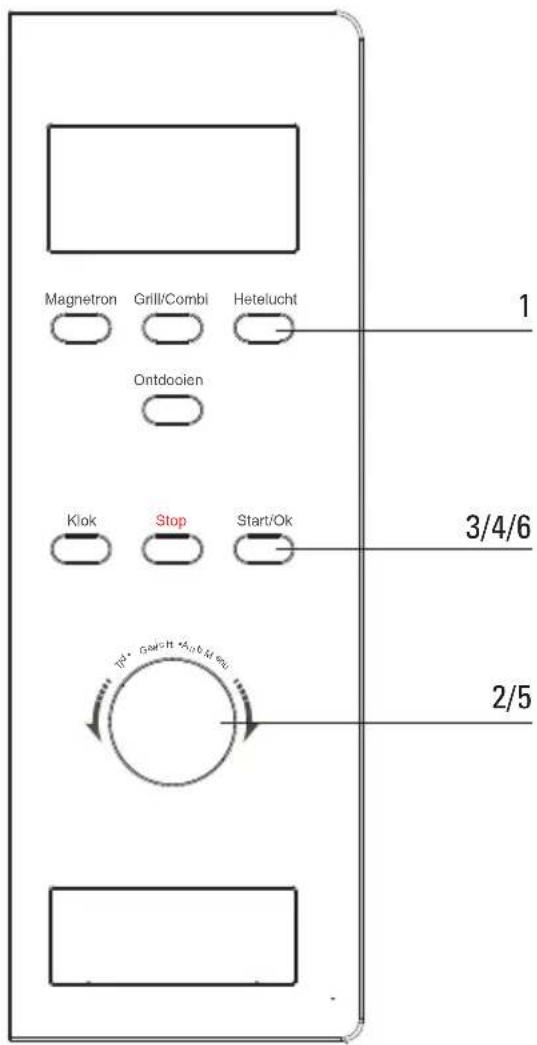
Hot-air cooking
using the pre-heating function
1 Press the 'Hetelucht' button once. The display shows "150".
2 Turn the 'Tijd/Gewicht/Auto Menu'. Set the desired temperature (the temperature can be set between 150 and 240 °C).
3 Press the 'Start/OK' button to confirm the temperature setting.
4 Press the 'Start/OK' button to start the set programme.
Two beeps will sound when the pre-heating temperature is achieved. The temperature can be seen flashing in the display.
5 Place the meal in the oven and close the door. Turn the 'Tijd/Gewicht/Auto Menu' control knob. Set the cooking time (the maximum cooking time is 95 minutes).
6 Press the 'Start/OK' button to start the set programme.
Hot-air cooking
without using the pre-heating function
1 Press the 'Hetelucht' button once. The display shows "150".
2 Turn the 'Tijd/Gewicht/Auto Menu' control knob. Set the desired temperature (the temperature can be set between 150 and 240 °C).
3 Press the 'Start/OK' button to confirm the temperature setting.
4 Turn the 'Tijd/Gewicht/Auto Menu' control knob. Set the cooking time (the maximum cooking time is 95 minutes).
5 Press the 'Start/OK' button to start the set programme.
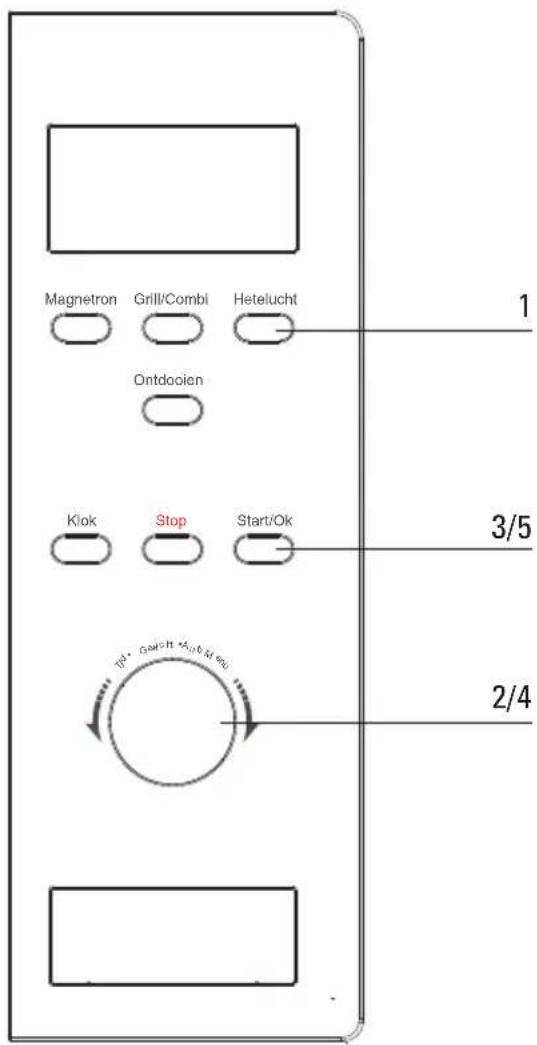
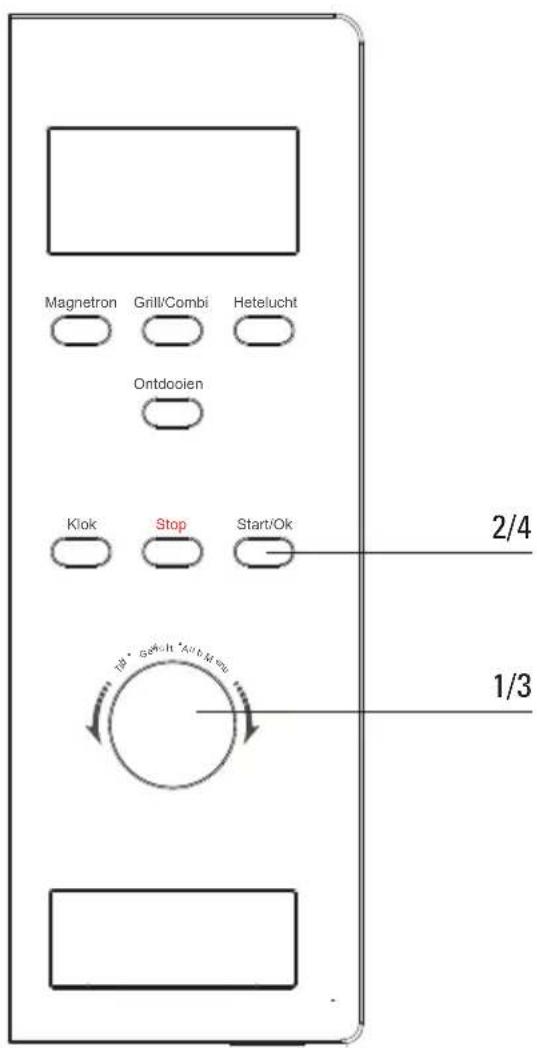
Cooking using the grill
1 Press the 'Grill/Combi' button once.
G-1 flashes.
2 Press the 'Start/OK' button to confirm the set programme.
3 Turn the 'Tijd/Gewicht/Auto Menu' control knob. Set the cooking time (the maximum cooking time is 95 minutes).
4 Press the 'Start/OK' button to start the set programme.
Two beeps will sound when the grilling time reaches the halfway point. We recommend turning the dish at this time to achieve a better result.
Press the 'Start/OK' button again to resume grilling.
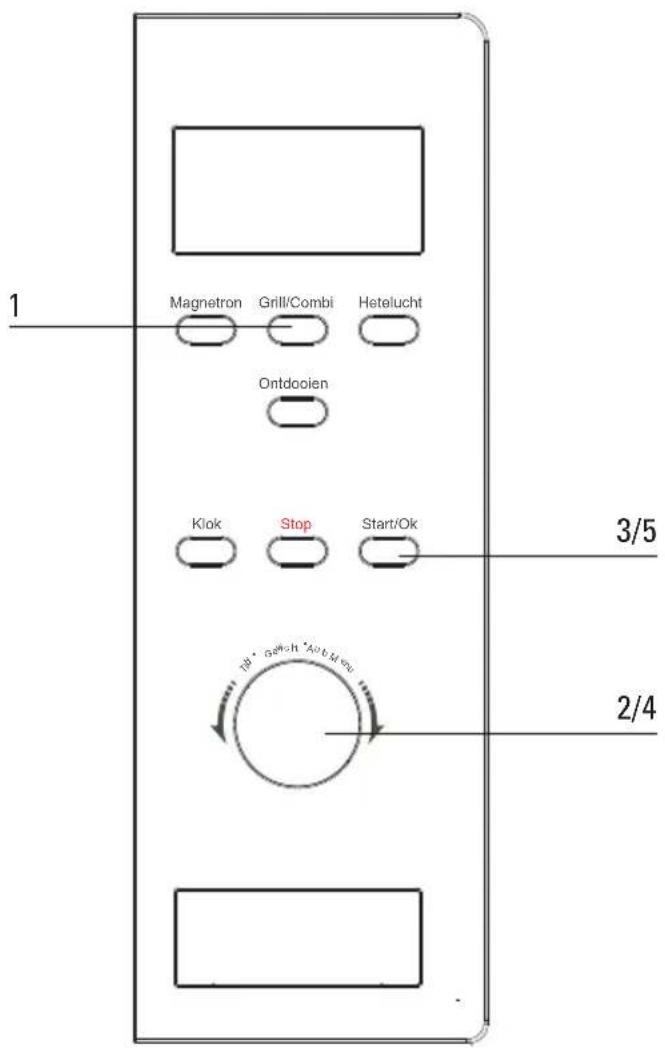
Combination cooking
1 Press the 'Grill/Combi' button once. G-1 flashes.
2 Turn the 'Tijd/Gewicht/Auto Menu' control knob. Select the desired combination programme (C-1, C-2, C-3 or C-4).
3 Press the 'Start/OK' button to confirm the set programme.
4 Turn the 'Tijd/Gewicht/Auto Menu' control knob. Set the cooking time (the maximum cooking time is 95 minutes).
5 Press the 'Start/OK' button to start the set programme.
table of combinations
Instructions|Display Microwave Grill Hot-air
| 1 C-1 | |||||
| 2 C-2 | |||||
| 3 C-3 | |||||
| 4 C-4 |
Defrosting
by setting the weight
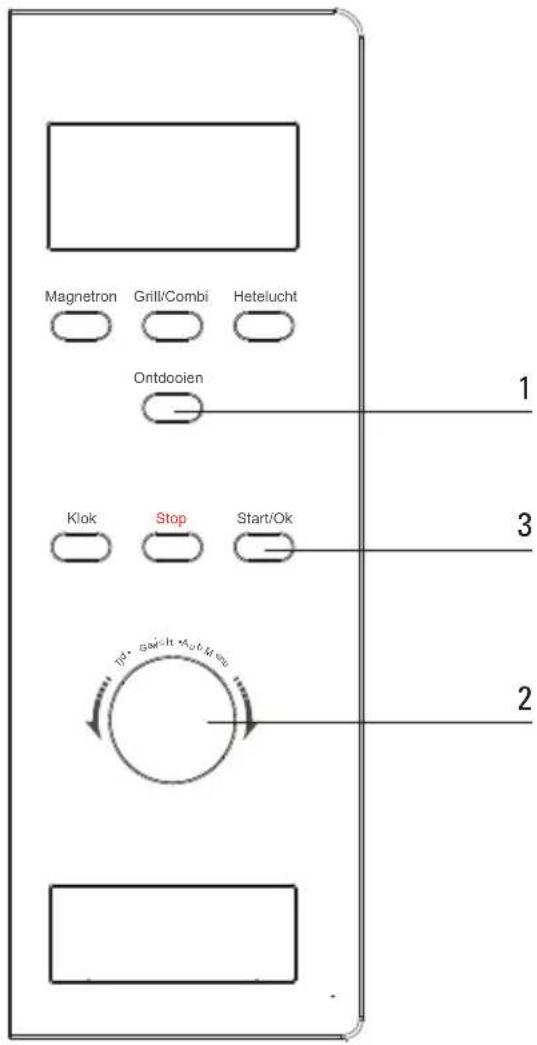
1 Press the 'Ontdooien' button once. The display shows "dEF1".
2 Turn the 'Tijd/Gewicht/Auto Menu' control knob. Set the desired weight (between 100 and 2,000 grams).
3 Press the 'Start/OK' button to start the set programme.
by setting a time
1 Press the 'Ontdooien' button twice. The display shows "dEF2".
2 Turn the 'Tijd/Gewicht/Auto Menu' control knob. Set the desired defrosting time (the max. time that you can set is 95 minutes).
3 Press the 'Start/OK' button to start the set programme.
Multistage cooking
You can set a maximum of 3 cooking stages. Set the defrost function (if applicable) as the first stage. A beep sounds after the end of each stage and the next stage will start.
The Auto-menu cannot be used with this mode.
example
You want to defrost for 5 minutes and to cook for 5 minutes at a microwave power level of 80%.
1 Press the 'Ontdooien' button twice. The display shows "dEF2".
2 Turn the 'Tijd/Gewicht/Auto Menu' control knob. Set the defrosting time to 5 minutes.
3 Press the 'Magnetron' button twice for a microwave power level of 80%.
4 Press the 'Start/OK' button to confirm the microwave power.
5 Turn the 'Tijd/Gewicht/Auto Menu' control knob. Set the cooking time to 7 minutes.
6 Press the 'Start/OK' button to start the set programme.
Pre-set function
first set the clock (see the chapter entitled "Setting the clock")
1 Set a cooking function. A maximum of 3 functions can be set (apart from the defrost function). When using the "Auto menu", only one function can be set.
2 Press the 'Klok' button. The current time is shown in the display. The hours flash.
3 Turn the 'Tijd/Gewicht/Auto Menu' control knob. Set the desired hours.
4 Press the 'Klok' button. The minutes flash.
5 Turn the 'Tijd/Gewicht/Auto Menu' control knob. Set the desired minutes.
6 Press the 'Start/OK' button to confirm the set programme. When the set time arrives two beeps will sound and the cooking programme will start.
Auto menu
1 Turn the 'Tijd/Gewicht/Auto Menu' control knob. Set the desired programme (A1, A2...A10).
2 Press the 'Start/OK' button to confirm the set programme.
3 Turn the 'Tijd/Gewicht/Auto Menu' control knob. Set the desired weight or quantity.
4 Press the 'Start/OK' button to start the set programme.
Cooking table auto menu
| Menu Weight/Quantity Display Power | |||
| A1reheat | 150 g 150 | 100% | |
| 250 g 250 | |||
| 350 g 350 | |||
| 450 g 450 | |||
| 600 g 600 | |||
| A2potato | 1 (appr. 230 g) 1 | 100% | |
| 2 (appr. 460 g) 2 | |||
| 3 (appr. 690 g) 3 | |||
| A3meat | 150 g 150 | 100% | |
| 300 g 300 | |||
| 450 g 450 | |||
| 600 g 600 | |||
| A4vegetables | 150 g 150 | 100% | |
| 350 g 350 | |||
| 500 g 500 | |||
| A5fish | 150 g 150 | 80% | |
| 250 g 250 | |||
| 350 g 350 | |||
| 450 g 450 | |||
| 650 g 650 | |||
| A6pasta | 50 g (with cold water 450 g) 50 | 80% | |
| 100 g (with cold water 800 g) 100 | |||
| 150 g (with cold water 1200 g) 150 | |||
| A7soup | 200 ml 200 | 100% | |
| 400 ml 400 | |||
| 600 ml 600 | |||
| A8cake | 475 g 475 Preheat at 160 | °C | |
| A9pizza | 200 g 200 | C-4 | |
| 300 g 300 | |||
| 400 g 400 | |||
| A10chicken | 500 g 500 | C-4 | |
| 750 g 750 | |||
| 1000 g 1000 | |||
| 1200 g 1200 | |||
Checking the settings
■Press the 'Magnetron', 'Grill/Combi' or 'Hetelucht' button during cooking. The set power level is shown on the display for 2-3 sec.
■Press the 'Klok' button while using the pre-set function. The current auto-start time is shown on the display for 2-3 sec.
■Press the 'Klok' button during cooking. The time is shown on the display for 2-3 sec.
Childproof lock
turn the childproof lock on
■Press the 'Stop' button for 3 seconds. A "long" beep will sound. The display shows '0:00'.
turn the childproof lock off
■Press the 'Stop' button for 3 seconds. A "long" beep will sound.
Cleaning
■Clean the inside immediately after use. Use a damp cloth to remove any condensation, liquid that has boiled over and food remains. Crumbs and liquid that remain behind absorb microwave energy and lengthen cooking times.
■Clean the inside and outside of the oven regularly using soapy water and dry it thoroughly with a dry cloth.
■Make sure that the microwave distributor cover (inside the oven on the right) is clean. A cover which is not clean may cause sparking.
■Clean the accessories regularly; use soapy water and a brush and dry the accessories thoroughly with a dry cloth. The accessories may also be washed in a dishwasher.
- Odours will disappear if you put a glass of vinegar or water with lemon juice added in the oven space. Switch the microwave on for two minutes on full power. Then wipe with a damp cloth.
- Check the door catch and the door seal regularly for damage.
- Do not use the combi-microwave oven if the door or door catch are damaged.
What should I do if...
If the appliance does not work properly, this does not always mean that it is defective. Try to deal with the problem yourself first. Phone the service department if the advice given below does not help.
Is the plug in the socket?
Is the door closed properly?
■Is the fuse in the meter cupboard defective?
■Have the power level and cooking time been set properly?
Is there anything in the microwave oven that should not be there?
■Have you used the correct utensils?
Are the ventilation openings blocked?
■Is the food sufficiently defrosted?
Did you turn or stir the food during cooking?
General
In case of faults phone the service department. See the guarantee certificate or consult the internet site www.etnaservice.nl. This site also contains tips on how to use and clean your microwave. You can also purchase various cleaning products on this site.
Disposal of packaging and appliance
The appliance packaging is recyclable. The following may have been used:
cardboard;
■polythene film (PE);
■ CFC-free polystyrene (PS hard foam).
Dispose of these materials responsibly and in accordance with government regulations.
On the data plate is put the symbol of a crossed-out wheeled dustbin:
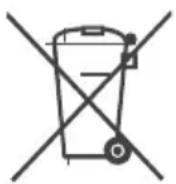
This means that at the end of its working life, the product must not be disposed of as urban waste. It must be taken to a special local authority differentiated waste collection centre or to a dealer providing this service.
Disposing of a household appliance separately avoids possible negative consequences for the environment and health deriving from inappropriate disposal and enables the constituent materials to be recovered to obtain significant savings in energy and resources.
As a reminder of the need to dispose of household appliances separately, the product is marked with a crossed-out wheeled dustbin.
Technical information
Power supply 230 V 50 Hz
Connected load 2400 W
Power microwave 900 W
Power grill 1100 W
Power hot air 2400 W
Volume oven 25 L
Weight 16.5 kg
Dimensions (wxhxd) 513 x 305 x 430 mm

natural_image
Blank gray image with no visible content, text, or symbols
When contacting the service department, have the production code (PCODE) and complete item number (ITEMNR) to hand.
Adressen en telefoonnummers van de serviceorganisatie vindt u op de garantiekaart. You will find the addresses and phone numbers of the service organisation on the guarantee card.