6100 - Phone Telstra - Free user manual and instructions
Find the device manual for free 6100 Telstra in PDF.


User questions about 6100 Telstra
0 question about this device. Answer the ones you know or ask your own.
Ask a new question about this device
Download the instructions for your Phone in PDF format for free! Find your manual 6100 - Telstra and take your electronic device back in hand. On this page are published all the documents necessary for the use of your device. 6100 by Telstra.
USER MANUAL 6100 Telstra
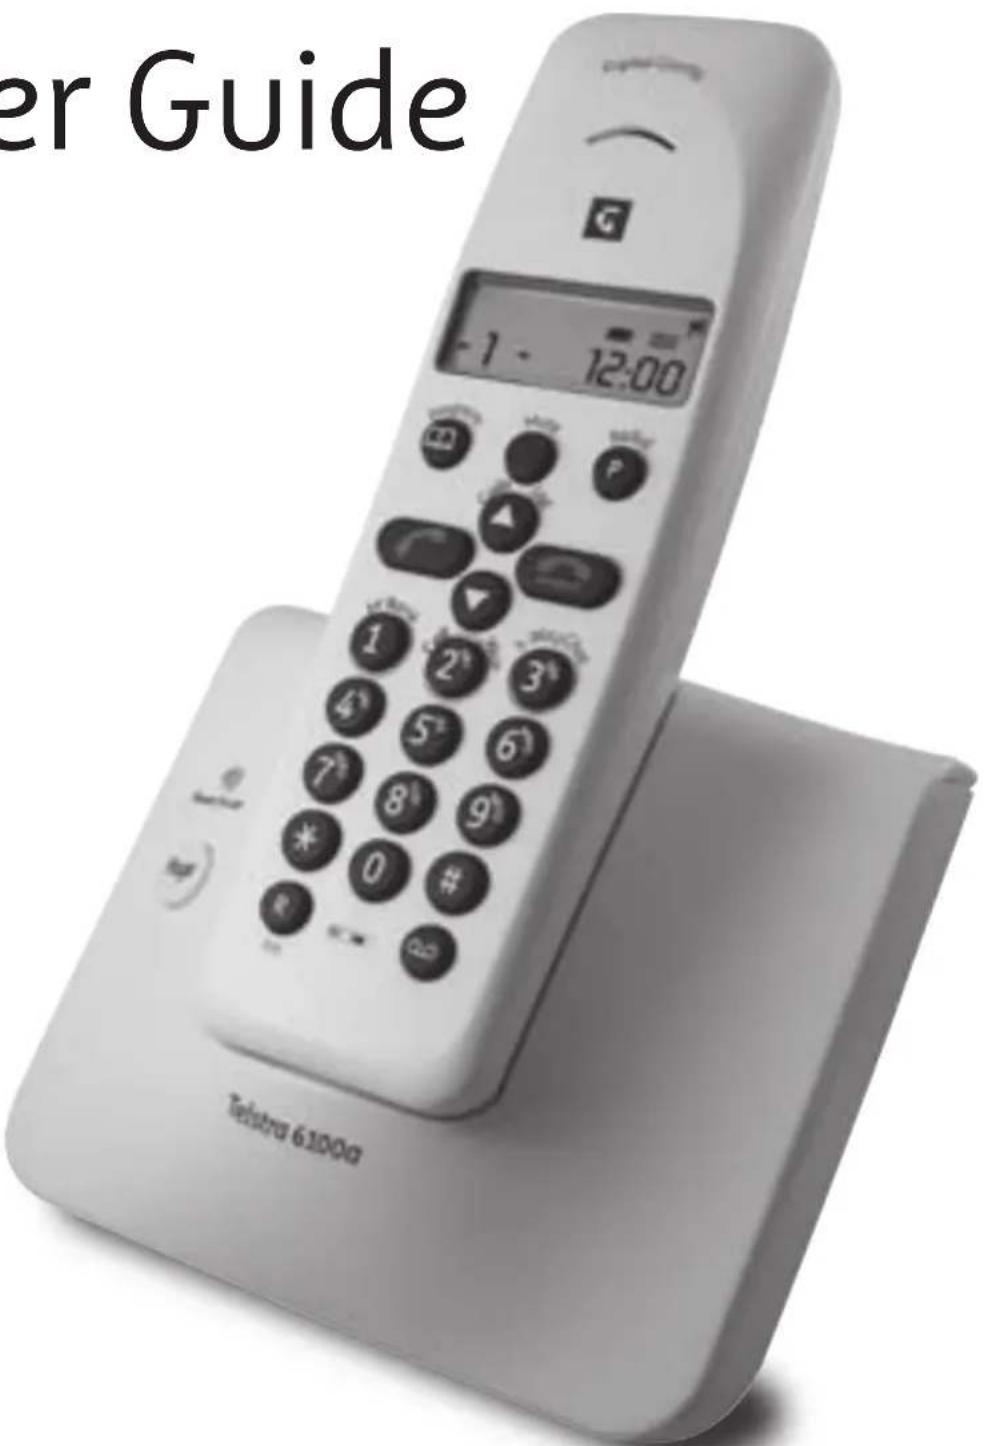
Digital DECT Cordless Telephone
User Guide
text_image
er Guide Telstra 6100aIntroduction
to your Telstra 6100/6100a Digital DECT Cordless Telephone
• 10 memories
- Calling Number Display
- Flashing Message Indicator
- 5 last number redial

INTERFERENCE FREE
PHONE FREQUENCY
As a Digitally Enhanced Cordless Telecommunications (DECT) product, your Telstra
6100/6100a provides: -
- Digital clarity
- Digital range
• Digital security
See Things you need to know on page 26 for important information
IMPORTANT
This equipment is not designed for making emergency telephone calls when the power fails. Alternative arrangements should be made to access emergency services. This User Guide provides you with all the information you need to get the most from your phone.
Before you make your first call you will needs to set up your phone. Follow the simple instructions in "Getting Started", on the next few pages.
Need help?
If you have any problems setting up or using your Telstra 6100/6100a please contact TecHelp on 1300 369 193.
Alternatively, you may find the answer in the 'Help' section at the back of this guide.
Got everything?
• Telstra 6100/6100a handset
• Telstra 6100/6100a base unit
• 2 x AAA NiMH rechargeable batteries
• AC power adaptor
- Telephone line cord
• Telephone adaptor plug
If you have purchased a Telstra 6100/6100a multiple pack you will also have the following items for each handset:
• Telstra 6100/6100a handset
• Telstra 6100/6100a charger unit
• 2 x AAA NiMH rechargeable batteries
• AC power adaptor (red plug)
In this guide
Getting started 4
Setting up
Telstra 6100/6100a Multi-pack (only)
setting up 6
Wall mounting your 6100/6100a 7
Getting to know your 6100/6100a 8
Handset buttons 8
Handset display icons 9
Base unit 10
Using the phone
Switch handset on/off
Making and receiving calls
Preparatory dialling
To receive a call 11
Earpiece volume
Mute 11
Redial
Paging 12
Keypad lock 12
To store a number in the memory
To dial a number in the memory
To delete a number in the memory
Internal calls 13
Transfer a call
Handset settings
Program menu 14
Ringer melody and volume 14
Date and time setting
Base melody and volume
Telstra Network Services
Using Calling Number Displ
Missed calls indicator 15
View and dial from the calls list
MessageBank ^® and
Telstra Home Messages 101 ^®
To listen to your messages 15
Flashing Message Indicator
Using Call Waiting
To answer an incoming call
whilst you are on the phone
3-way chat
Using the answering machine
(6100a only) 17
Message playback 17
Switching the answering machine on/off 17
Outgoing messages 18
Answer and Record 18
Answer Only 18
Reinstate pre-recorded outgoing
messages 18
Setting the day on your
answering machine 18
Memory full 19
Answer delay 19
To set the number of rings 19
Call screening 19
Record a memo 19
Delete individual messages 20
To delete all messages 20
Remote access 20
To change the security code 20
To set a new security code 20
For remote access 20
Help 21
Replacing the handset batteries 21
General information
Replacing the handset batteries 23
Safety information 23
Cleaning 24
Environmental 24
Technical information 24
How many telephones can I have? 24
Connecting to a switchboard 24
Inserting a pause 24
Recall 25
To alter the Recall setting 25
Product warranty and Customer service 26
Things you need to know 26
Wall mounting template 27
Getting started
Location
You need to place your Telstra 6100/6100a close enough to a mains power and telephone socket so that the cables will reach. Make sure it is at least 1 metre away from other electrical appliances to avoid interference.
WARNING Do not place your Telstra 6100a in the bathroom or other humid areas.
Your Telstra 6100/6100a works by sending radio signals between the handset and base. The strength of the signal depends on where you site the base. Putting it as high as possible can help to provide the best signal
Handset range The handset reception range from the base is up to 300m outdoors and up to 50m indoors. Thick walls can severely affect the range.
Range Indicator The 10 symbol on your handset display indicates when you are in range of the base. If the symbol flashes and you hear a warning beep, you are out of range and will need to move closer to the base.
Setting up
- Plug the mains power cable into the base. Then plug the power adaptor into the mains wall socket and switch the power on. The light on the base lights up.

text_image
Power adaptor cableIMPORTANT Do not connect the telephone line until the handset(s) is fully charged. The base must be plugged into the mains power at all times.
Which socket? Power socket Telephone line socket
Getting started
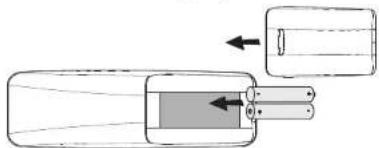
- Remove the battery compartment cover and insert the 2 x AAA NiMH batteries supplied into the handset. Slide the battery compartment cover back into place.
natural_image
Diagram of a mechanical device with internal components and directional arrows (no text or symbols)-
Charge the handset for at least 16 hours by placing it on the base. The charging indicator light on the base comes on. The screen will show the standby display and a scrolling battery icon to show that the handset is charging.
-
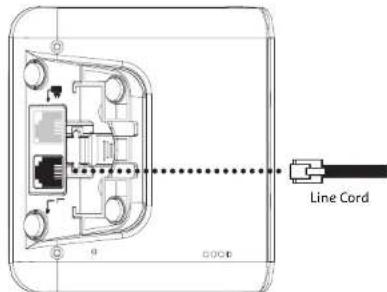
After 16 hours, plug the telephone line cord into your Telstra6100/6100a base unit and the other end into the wall socket.
text_image
Line CordYour Telstra 6100/6100a is now ready for use.
Battery performance When batteries are fully charged the display shows the battery is full. To keep your batteries in the best conditions, leave the handset off the base for a few hours at a time (after the initial 16 hour charge). Please note however, that new NiMH batteries do not reach full capacity until they have been in normal use for several days. Running the batteries right down at least once a week will help them last as long as possible. The charge capacity of rechargeable batteries will reduce with time as they wear out, so reducing the talk/standby time of the handset. Eventually they will need to be replaced. New batteries can be obtained from TecHelp on 1300 369 193 or your local electrical retailer.
Battery low warning When the battery charge is low the handset battery icon ▪vlt|show empty. Place the handset back on the base to recharge.
Replacing batteries Use only rechargeable 750mAh or higher AAA NiMH batteries.
Talk/Standby time Under ideal conditions, fully charged handset batteries should give up to 10 hours talk time or 100 hours standby on a single charge.
Getting started
Telstra 6100/6100a Multi-pack (Only) setting up
If you have purchased a Telstra 6100/6100a Multi-pack you will need to install the additional handset(s) charger(s) as follows: -
Location
You need to place your Telstra 6100/6100a charger unit close enough to a mains power socket so that the cable will reach.
Setting up the charger
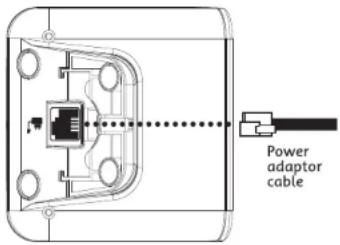
- Plug the power adaptor cable (red AC adaptor plug) into the underside of the charger unit.
text_image
Power adaptor cable- Plug the power adaptor into the mains socket and switch the power on.
- Install the batteries supplied and charge as per the instructions on page 5.
Wall mounting your Telstra 6100/6100
Your Telstra 6100/6100a main base unit (or extension handset charger if you have purchased one) can be wall mounted directly on to a wall.
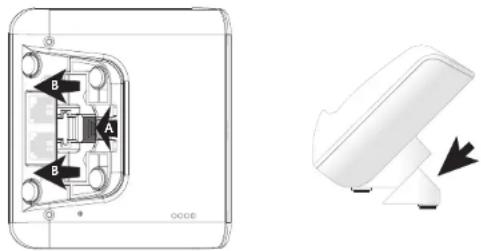
- Remove the desk stand from the back of the base unit or extension charger by pressing down on clip (A) and slide forward (B) the desk stand to reveal the mounting holes located under the base unit or charger.
text_image
Technical diagram showing internal components labeled A and B with directional arrows, alongside a 3D view of a device with a switch.- Using the template on page 27, drill 2 holes in your desired location. These holes should be made 25mm deep using a 3mm diameter drill.
NOTE: ensure you do not drill into any hidden wiring or pipes.
- Insert the wall plugs and insert a screw into each hole. Leave 3mm between the head of the screw and the wall.
- Position the base unit or extension charger on to the screws and slide down to secure.
Getting to know your 6100/6100a
text_image
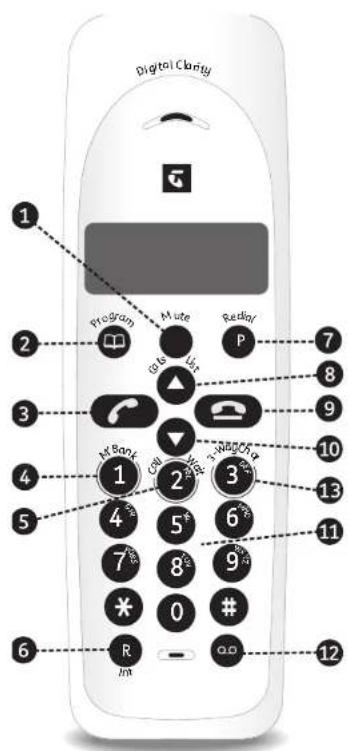
Digital Clarity 1 2 3 4 5 6 7 8 9 10 11 12 Program Mute Radio P M Bank Call Wks 3-Reg/CP 3 4 5 6 7 8 9 * 0 # R - RintHandset buttons
1. Mute
Used to activate and deactivate the microphone.
2. Program/ (Phonebook)
Use to access Phonebook memories and phone settings.
3. Talk
Use to make a call
4. MessageBank
For one-touch access to MessageBank or Home Messages 101.
5. Call Waiting
Long press: For one-touch access to Call Waiting.
6. Recall(R)/Intercom(Int)
Use to make internal calls between handsets & transfer external calls.
7. Redial/Pause
You can redial up to 5 of the last numbers called.
8. Calls List / UP scroll
Use to scroll up through menu options, Phonebook entries and the Calls list.
9. End call
Use to end a call.
10. DOWN scroll
Use to scroll down through menu options, Phonebook entries.
11. Keypad
Use to enter digits and characters.
12. Messages
6100 - use to access MessageBank ^® 6100a - use to access the answering machine menu
13. 3-way chat
Long press: For one-touch access to 3-way chat.
Getting to know your 6100/6100a
Handset display icons
| Flashing: You have new messages.Flashing rapidly: Answering machine memory is full.Steady: The answering machine is on | |
| EXT | You are making an external call.Flashing: You are receiving an external call. |
| INT | Flashing: You are receiving an internal call.Steady: You are making an internal call. |
| Steady: You are in the caller list.Flashing: There are new calls stored in the calls list (CND) | |
| This number in the caller list is a missed call. | |
| This number in the caller list was already taken. | |
| Steady: Indication of battery capacity.Cycling through the segments: The handset is being charged. | |
| When the Phonebook is being used. | |
| When in menu operation. | |
| The keypad lock is activated. | |
| Steady: The connection to the base unit is satisfactory.Flashing: Base unit is out of range. | |
| The number is longer than 12 digits. | |
| Flashing Message Indicator |
Getting to know your 6100/6100a
Base unit
text_image
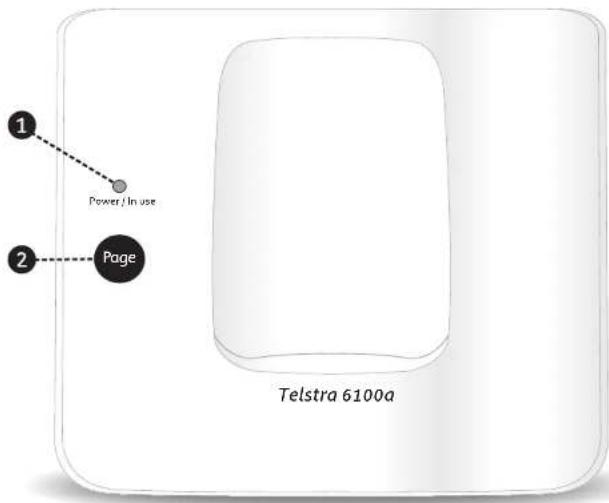
1 Power / In use 2 Page Telstra 6100a1. Power / In Use LED
6100
On: - indicates there is power to the base.
Flashes: - when the handset is in use; when receiving an incoming call; during registration mode.
Flashes: - when message left on MessageBank.
6100a
On: - Indicates the answering machine is switched on.
Flashes: - when the handset is in use; when receiving an incoming call; during registration mode.
Flashes: - when message left on answering machine.
2. Page button
Press and release to page handset(s).
Using the phone
Switch handset on/off
- Press and hold the button to switch the handset off.
- Press on or place it in the base to switch the handset back on.
Making and receiving calls
To make a call
- Press the 📄 on to dial out.
- Enter the telephone number and the number is dialled.
- Press the next on to end the call.
Preparatory dialling
- Enter the telephone number you wish to call. Press the button to delete an incorrect digit whilst dialling.
- Press the section and the number will be dialled automatically.
- Press the button to end the call.
To receive a call
When the telephone rings the power / in use light on the base will flash.
Press the hand-on or lift the handset from the base to answer.
Earpiece volume
There are 5 volume levels to choose from, 1 for low volume, 5 for high volume.
Whilst on a call, set the volume you desire by using the 📂 and key
Call timer: Your handset automatically displays the duration of every external call. The earpiece volume can only be changed when you are on a call.
If you have subscribed to Telstra Calling Number Display ^7 , your caller's number will be displayed. If the number is blocked or the person is calling from overseas the display shows ----
Mute
During a call, you can activate and deactivate the microphone by pressing the button. This allows you to speak to somebody nearby without your caller hearing you.
Using the phone
Redial
You can redial up to 5 of the last numbers called.
- Press the key to enter the redial list. Scroll on until the number you want is displayed.
- Press the on to dial the number.
Paging
You can use the page button on the base to alert handset users that they are wanted or locate a missing handset.
- Press Page on the base. The handset(s) ring.
- Press Page to stop the handsets ringing or press any button on the handset.
Paging calls cannot be answered by a handset
Keypad lock
You can lock the keypad to prevent accidental dialling while carrying the handset around.
- Press and hold the button. A symbol appears on the display and the keypad is locked.
- Press the button twice to unlock the keypad
You can still answer incoming calls by pressing off hook when the keypad is locked. You cannot make any calls, including 000 calls while the keypad is locked.
To store a number in the memory
You can program 10 of your most commonly used telephone numbers into the telephone. You can enter numbers up to 24 digits.
- Press the 📄 button. The first entry will be shown on the display.
- Press and hold the 📊 button until the ➕ icon appears on the display and you see a flashing 0.
- Enter the location (0-9) where you want to store the telephone number.
- Enter the number you would like to store
- Press the button to confirm. You will hear a confirmation tone and the next entry will appear.
- Press
If you wish to insert a pause, press the 📄 button
Using the phone
To dial a number in the memory
- Press the button and using the an keys to ate the number you would like to dial (0-9).
- Press the function and the number will be dialled.
- To end the call, press the button.
To delete a number in the memory
- Press the 📄 button. The first entry will be shown on the display.
- Press and hold the button until the icon appears on the display and you see a flashing 0.
- Enter the location (0-9) where you want to delete the telephone number.
- Press the key for each digit to delete the entry
- Press the button to confirm and you will hear a confirmation tone
If you wish to store another number in this location, after deleting the entry (step 4) enter the number you wish to store and press program to confirm. You will hear a confirmation tone
Internal calls
If you purchased the Telstra 6100/6100a with additional handsets, you can make internal calls between handsets & transfer calls.
- Press and hold R
- Enter the number of the handset you want to call. The other handset will ring.
- Press 📞 and the call.
Transfer a call
You can transfer an external call to another handset.
During the call:
- Press and hold our caller is put on hold.
- Enter the handset number you want (1-5).
- When the other handset answers you can tell them they have a call, then press it to external caller is transferred. If the other handset does not answer or you decide not to transfer the call, press it to talk to your caller again.
Using the phone
Handset settings
You can change the handset settings on your Telstra 6100/6100a by using the button. You press the
button to confirm a setting and move on to another setting.
Program menu
Press and hold the button until the icon appears on the display, then press;
button once for Handset melody and volume for external calls
button twice for Handset melody and volume for internal calls
button three times for Date and time setting
button five times for Tone or Pulse Dialling settings - default setting is 1 - Tone - which should remain unchanged
button six times for Recall setting - for further information see page 25
button seven times for Base melody and volume settings
Ringer melody and volume
There are 5 different ringer melodies to choose from.
-
Press and hold the button until the icon appears on the display.
-
Press the 📄 button again and you will hear the current melody. The EXT icon will flash.
-
Select the melody by pressing 1-5
-
Using the 📂 and key select your preferred volume (off or 1-5).
-
Press confirm and using the above steps, set the internal ringer melody and volume.
Date and time setting
To set the time and date:
-
Press and hold the button until the icon appears on the display.
-
Press the button 3 times and you will see a flashing cursor
-
Using the keypad set the time and date.
-
The flashing cursor can be moved by using the 📋 and buttons
-
Press the button again to confirm the setting
Base melody and volume
-
Press and hold the 📄 button until the icon appears on the display.
-
Press the button 7 times and you will hear the current melody
-
Select the melody by pressing 1-5
-
Using the 3d key7 elect your preferred volume (off or 1-5)
-
Press the button again to confirm the setting and return to standby
Telstra Network Services
Using Calling Number Display ^2
If you subscribe to Telstra's Calling Number Display ^2 service your Telstra 6100/6100a displays the telephone number of the person who is calling you, as well as the time and date of their call, even when you are on a call (unless the number is blocked).
Your Telstra 6100/6100a records a minimum of approximately 10 calls (answered and missed calls) in the Received Calls list
Missed calls indicator
When a call has not been answered the icon will flash on the display.
View and dial from the calls list
To view up to the last 10 calls missed and received by your Telstra 6100/6100a press the button and using the key scroll through the calls list. If you would like to know the time and date of the call, press the button.
To dial, press
To delete press ● button
Or
Press it
MessageBank® and Telstra Home Messages 101® 3
MessageBank ^® takes the message for you when you are on the phone or cannot answer it, so you can call back when it suits you. Message retrieval is free from most Telstra fixed phones. Telstra Home Messages 101 is free to turn on and use. ^1
To listen to your messages
- Press the 📁y. The telephone will dial your message service.
Telstra network services
Flashing Message Indicator ^4
If you subscribe to Telstra Home Messages 101 or MessageBank your Telstra 6100/6100a will indicate when you have received a new voice message.
If you have purchased a Telstra 6100, the 🔐 icon on the display and the power/in use light will flash when you receive a message.
If you have purchased a Telstra 6100a, the 📄on the display will flash when you receive a message.
Call 13 2200 to request activation of flashing Message Indicator on your telephone service
Using Call Waiting
Call Waiting tells you if a new caller is trying to contact you when you are already on the phone. A discreet tone alerts you to the new caller, so you can answer your second incoming call by putting the first caller on hold.
To answer an incoming call whilst you are on the phone
-
Press the button. Your first caller is put on hold and you can talk to your second caller.
-
To revert back to the original caller, press the cotton again.
NOTE: If you have subscribed to Telstra Calling Number Display ^2 , the second caller's number will appear on the handset display.
3-way chat
If you are already on a call, you can add another person and have a 3-way chat.
To put an existing call on hold and make a new call
-
Press R wait for the dial tone, dial the phone number and wait for an answer
-
When the third party answers your call, press the 📄 button
Using the answering machine (6100a only
Your Telstra 6100a can digitally record up to 10 minutes of messages. Each message can be up to a maximum of 2 minutes
Your Telstra 6100a comes with two pre-recorded outgoing messages, one for Answer and Record mode and one for Answer Only mode. You can also record your own outgoing message.
Your Telstra 6100a gives clear voice prompts to help you when using the answering machine.
If you have not already set the day you will need to do this so that you will know when each message was received, see page 18
Message playback
To begin operating your answering machine, press the button. The machine announces, "You have (n) new messages". All new messages will automatically be played to the handset.
The following functions are available under each numerical key:
To listen to the main menu
② Play all messages
Play new messages
To skip back during message playback
To delete messages
To skip forward during message playback
7 Set answer On or Off
8 Hear the outgoing message menu
To set the security code
To set the day
To set the answering delay
To record a memo
Switching the answering machine on/off
When first connected to the mains, your Telstra 6100a is set to ON and Answer and Record. To turn the answering machine On/Off press the Section followed by the button.
The 📄 will appear on the display when the answering machine is turned on and will start flashing if new messages have been received. If the answering machine is switched off, the 📄 will not appear on the display.
The ○○ icon will flash rapidly if the internal memory is full and no new messages can be recorded.
Using the answering machine (6100a only)
Outgoing messages
This is the message your caller hears when the answering machine picks up their call. Your Telstra 6100a comes with two pre-recorded outgoing messages to choose from. You can also record your own outgoing messages.
Press the cotton and then to enter the outgoing message menu.
The following options are available:
To hear the main menu
To play the current set outgoing message
To record your own 'answer and record' outgoing message 1. Follow the prompts.
To record your own 'answer only' outgoing message 2. Follow the prompts.
To select 'answer and record' outgoing message 1
To select 'answer only' outgoing message 2
To hear the outgoing message menu again
Answer and Record
This allows your caller to leave a message for you. The pre-recorded message is "Hello, your call cannot be taken at the moment, so please leave your message after the tone."
Answer Only
This does not allow your caller to leave a message. The pre-recorded message is "Hello, your call cannot be taken at the moment, and you cannot leave a message, so please call later."
Reinstate pre-recorded outgoing messages
This means deleting your own recorded outgoing message.
- Press the cotton followed by to or the outgoing message menu.
- Press play the current outgoing message. During the outgoing message, press . This will delete the user recorded outgoing message and restore the pre-recorded outgoing.
Setting the day on your answering machine
- Press the cotton
- Press followed by to hear the actual day.
- Press 0 followed by to set the day. Enter the day ' = Sunday, = Monday 2' = Saturday 7 If the day is correctly entered, the unit will announce the new setting.
Using the answering machine (6100a only)
Memory full
If the memory is full, the ☐ will flash rapidly on the display. If the answering machine is turned On and a call comes in, the answering machine will automatically switch to Answer Only mode and play outgoing message 2.
When listening to the messages, the internal voice will announce that the memory is full and then play back the messages. You must delete messages to allow for more messages to be recorded, see page 21.
Answer delay
Answer delay sets the number of times your Telstra 6100a will ring before the answering machine picks up your call. The default setting is 6 rings. You can change this setting to 2-9 rings or to time saver mode.
Time Saver can save you the cost of a call when you want to ring in to find out if you have new messages. If your answering machine answers after 2 rings, you have new messages. If you have no new messages it will answer after 6 rings. So if you hear a third ring, you can hang up before you are connected, saving you the cost of a call.
To set the number of rings
- Press the 40tton.
- Press the *y followed by . #
- Enter the number of rings you want or press toll saver
Check answer delay setting
- Press the button by key twice. A voice will playback the current number of rings.
Call screening
During an incoming call it is possible to identify the caller before deciding whether or not to take the call yourself. You can hear the outgoing message and the caller who is leaving a message by pressing the button.
Record a memo
You can record a memo message for other users of the answering machine. Memos are stored and played back just as messages.
The maximum recording time for a memo is 3 minutes.
Press the lazy and . St. speaking after the tone and press to stop the recording.
Using the answering machine (6100a only)
Delete individual messages
- Press the button during playback.
The machine announces, "Message deleted". The machine will start playing the next message.
To delete all messages
After playback of all messages, wait for the prompts and press 5 delete all messages. The internal voice confirms that all the messages have been deleted.
Remote access
You can operate your answering machine remotely from any tone dialling phone by calling your Telstra 6100a and entering a 3-digit security code.
The pre-set code is 1 2 3. You can change this for added security.
Keep a note of your remote access code.
To change the security code
The security code is set to '1 2 3' by default.
To hear the current security code
- Press the cotton. When you hear the internal voice, press followed by the key.
To set a new security code
- Press the button. When you hear the internal voice, press followed by the key. After the new code (3 digits) after the tone and confirm with the y.
For remote access
- Call your phone and let it ring out to the answering machine. The answering machine will pick up the line, you will hear the outgoing message and a beep.
- After the beep, press and hold the key.
- You will be prompted to enter the security code (default 123). If the security code is incorrect, the unit will confirm and ask you to re-enter. If the security code is correct and the answering machine has new messages, it will automatically play them. When all messages are played, the machine will ask you to press 5 delete current played messages, or to 1 for main menu.
Help
Replacing the handset batteries
After a time, you may find that the handset batteries are running out of charge more quickly. This is a standard sign of wear and the batteries will need replacing. For spare 2 x AAA rechargeable NiMH batteries, please contact your nearest electrical retailer or TecHelp on 1300 369 193. Remove the battery compartment cover and remove existing batteries. Insert new batteries and replace the compartment cover.
NOTE: Telstra accepts no responsibility for damage caused to your Telstra 6100/6100a handset by using any other type of batteries.
Problem Possible cause
No display • The batteries may be dead. Recharge or replace the batteries.
- Is the handset switched off? To switch the handset on, see page 11.
No dial tone • Check that the telephone line cord is plugged into the phone socket.
- Check that the base is connected to the mains power and switched on.
You cannot link up with · Is the display flashing an antenna icon? Check that the base is the base connected to the mains power and switched on.
- Are you are out of range? Move the handset closer to the base.
- Are the batteries low or flat? If so, charge the batteries or replace them if necessary.
No ring on the handset • Check that the ringer volume is switched on, see page 14.
- Check that the base is plugged into the phone socket and that it is also connected to the mains power and switched on.
Buzzing noise on my radio, • Sometimes, your Telstra 6100/6100a and other DECT compatible TV, computer or handsets can interfere with other electrical equipment if placed too hearing aid close. Try moving it at least one metre away from such appliances.
- If you have an ADSL internet service ensure the correct filters for a Digital DECT cordless telephone are installed to prevent interference.
Customer TecHelp If you are still experiencing difficulties please call the Telstra 6100/6100a TecHelp on 1300 369 193.
Help
Problem Possible cause
The charging does not • Check that the base is plugged into the mains socket and switched on. appear to be working • Check that you are using the correct power adaptor plug.
- Check that the handset has slotted correctly into the base.
- Check that the handset batteries have been correctly fitted.
Answering Machine
Problem Possible cause
Answering machine not • The memory may be full. Play and delete old messages, see page 20. recording new messages.
Answering machine • Set the correct day and time, see page 18. messages do not have the correct day and time added.
General information
Replacing the handset batteries
After a time, you may find that the handset batteries are running out of charge more quickly.
This is a standard sign of wear and the batteries will need replacing.
-
Remove the battery cover.
-
Remove the old batteries and replace with 2 new AAA NiMH batteries.
-
Push the battery compartment cover back on until it clicks into place.
New batteries should be rechargeable: Nickel Metal Hydride (NiMH), size AAA, capacity 600mAh.
Spare rechargeable batteries are available from the Telstra 6100/6100a TecHelp line on 1300 369 193.
WARNING Do not immerse batteries in water or throw them into a fire, or dispose of them with ordinary domestic refuse. Telstra accepts no responsibility for damage caused to your Telstra 6100/6100a by using any other types of batteries.
Safety information
- Only use the power supply suitable for the Telstra 6100/6100a range. Using an unauthorised power supply will invalidate your warranty and may damage the telephone.
- Use only the approved Nickel Metal Hydride rechargeable batteries supplied. Spare rechargeable batteries are available from your nearest electrical retailer or by contacting TecHelp on 1300 369 193.
- Do not open the handset (except to replace the handset batteries) or the base. This could expose you to high voltages or other risks. Contact TecHelp on 1300 369 193 for all repairs.
- If the keylock is switched on, it is NOT possible to make calls, including to the emergency numbers (000).
- Radio signal transmitted between the handset and base may cause interference to hearing aids.
- It is recommended that advice from a qualified expert be sought before using this product in the vicinity of emergency/intensive care medical equipment.
- It is recommended that if you have a pacemaker fitted you check with a medical expert before using this product.
- Your product may interfere with other electrical equipment, e.g. TV and radio sets, clock/alarms and computers if placed too close.
- It is recommended that you place your product at least one metre away from such appliances to minimise any risk of interference.
- Never dispose of batteries in a fire. There is a serious risk of explosion and/or the release of highly toxic chemicals.
General information
Cleaning
Clean the handset and base (or charger) with a damp (not wet) cloth, or an anti-static wipe. Never use household polish as this will damage the product. Never use a dry cloth as this may cause a static shock.
Environmental
- Do not expose to direct sunlight.
- The handset may become warm when the batteries are being charged or during prolonged periods of use. This is normal. However, we recommend that to avoid damage you do not place the product on antique/veneered wood.
- Do not stand your product on carpets or other surfaces which generate fibres, or place it in locations preventing the free flow of air over its surfaces.
- Do not submerge any part of your product in water and do not use it in damp or humid conditions, such as bathrooms.
- Do not expose your product to fire, explosive or other hazardous conditions.
• There is a slight chance your phone could be damaged by an electrical storm. - We recommend that you unplug the power and telephone line cord during an electrical storm.
Technical information
How many telephones can I have?
All items of telephone equipment have a Ringer Equivalence Number (REN), which is used to calculate the number of items which may be connected to any one telephone line. Your Telstra 6100/6100a has a REN of 0.1. A total REN of 3 is allowed. If the total REN of 4 is exceeded, the telephones may not ring. With different telephone types there is no guarantee of ringing, even when the REN is less than 3. Any additional handsets and chargers that you register have a REN of 0.
Connecting to a switchboard
This product is intended for use within Australia for connection to the public telephone network and compatible switchboards.
Inserting a pause
With some switchboards, after dialling the access code you may have to wait for a moment while the switchboard picks up an outside line so you will need to enter a pause in the dialling sequence.
Press to insert a pause (P) before entering the telephone number.
You may also need to enter a pause when storing international numbers or charge card numbers.
General information
Recall
You may need to use the recall function if you are connected to a PABX, contact your PABX supplier for further information. The recall function is set to timed break recall and is also used for Telstra Network Features.
Your Telstra 6100/6100a has two Recall settings, 100ms or 600ms. The default setting is 100ms which is suitable for Telstra network services such as Call Waiting.
To alter the Recall setting
- Press and hold the button until the icon appears on the display.
- Press the 📄 button six times.
- Select the desired Recall setting, 1 - 100ms, 2 - 600ms, by pressing the ⚡ but v ns.
- Press the button to confirm setting then press the button again to return to standby.
Customer service & Product warranty Wall mounting template
IMPORTANT
Please retain this booklet with your sales receipt as proof of the date of purchase
Customer Service
If you require assistance in operating this product please call the TecHelp Information Line on 1300 369 193 or contact us by e-mail at:
tcpsupport@ingrammicro.com.au
If you are trying to access a Telstra Network
Service and require assistance specifically related to the network service or would like to subscribe to the service, contact Telstra on 132200 for residential or 132000 for business.
Product Warranty
Subject to the conditions below, Telstra guarantees this product against any defect in materials or workmanship under conditions of normal use for a period of 13 months from date of purchase.
The benefits conferred by this warranty are in addition to other warranties and remedies that are implied under the Trade Practices Act and similar State and Territory laws (Statutory Rights). Subject to your Statutory Rights, the goods will not be eligible for service under this warranty if: a) Proof of purchase cannot be provided;
b) The defect was caused by an accident, misuse, abuse, improper installation or operation, vermin infestation, lack of reasonable care, unauthorised modification, loss of parts, tampering or attempted repair by a person not authorised by Telstra; or
c) The product has been damaged by lightning or a mains power surge.
To obtain service during the terms of this warranty call the TecHelp Information Line on 1300 369 193 or contact us by e-mail at: tcpsupport@ingrammicro.com.au
If It is necessary to have the product serviced, the Customer Service Representative will inform you of the product return process.
Please ensure that:
a) You provide proof of purchase;
b) Your product is suitably packaged; and
c) You have included all components from the original purchase.
Subject to your Statutory Rights:
a) Any claim under this warranty is limited to the cost of repair or replacement of the product; and b) If the goods are found to be in sound working order by the authorised service centre, you may be charged a fee for service and for any other direct costs associated with having the product delivered for service.
For your records
Date of purchase:
Place of purchase: ____
Serial number:
For guarantee purposes proof of purchase is required so please keep your receipt.
Things you need to know
1 For most Telstra or Telstra reseller customers for messages between compatible services. Charges apply.
2 Monthly charges apply. Service available in most areas. Not available for blocked calls.
3 Available most areas.
4 To arrange connection of the Flashing Message Indicator service, simply call Telstra on 13 2200.
Drill size 3 mm diameter
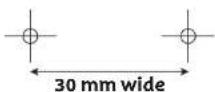
Guide for 6100a Base unit
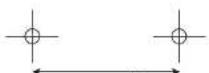
28 mm wide
Guide for 6100 Charger unit
© COPYRIGHT 2006 Telstra Corporation Limited
This work is copyright. All rights reserved. Other than for purposes and subject to conditions prescribed under the Copyright Act, no part of it may in any form or by any means (electronic, mechanical, photo copying, microcopying, scanning, recording or otherwise) be reproduced, stored in a retrieval system or transmitted without prior permission from Telstra Corporation.
Limited ABN 33 051 775 556
^TM Trade Mark of Telstra Corporation
© Registered Trade Mark of Telstra Corporation Limited