
CTV 722 - TV CLATRONIC - Free user manual and instructions
Find the device manual for free CTV 722 CLATRONIC in PDF.

| Product Type | LCD TV with DVB-T Receiver |
| Screen Size | 7 inches (18 cm) |
| Display Technology | TFT LCD |
| Dimensions (W x H x D) | 202 mm x 192 mm x 27.8 mm |
| Weight | Approx. 1 kg |
| Power Supply | AC adapter 230V/50 Hz or 12V car adapter |
| Power Consumption | < 10 W (DC 9V) |
| Input Frequency | VHF 177.5-226.5 MHz, UHF 474-858 MHz |
| Input Impedance | 75 Ohm |
| Video Input | CVBS (PAL/NTSC) |
| Audio Output | 1.4 Vrms (1 kHz, 0 dB) |
| Audio Input | 2.0 Vrms (1 kHz, 0 dB) |
| Loudspeaker | 2 x 8 Ohm/1 W |
| Tuner | DVB-T |
| Remote Control | Yes, with 2 x AAA batteries |
| Teletext | Yes |
| EPG | Yes |
| Parental Control | Yes, with PIN (default 9999) |
| Built-in Games | Minesweeper, Tetris, Gomoku, Calendar |
| Accessories Included | Remote control, earphones, car plug adaptor, AC adaptor, rechargeable battery, car bag, digital TV antenna, video/audio cable |
| Cleaning | Dry soft cloth; no alcohol, benzine, or thinner |
| Safety | Read all warnings; do not use in wet areas, avoid heat sources |
| Warranty | 24 months from purchase date |
Frequently Asked Questions - CTV 722 CLATRONIC
User questions about CTV 722 CLATRONIC
0 question about this device. Answer the ones you know or ask your own.
Ask a new question about this device
Download the instructions for your TV in PDF format for free! Find your manual CTV 722 - CLATRONIC and take your electronic device back in hand. On this page are published all the documents necessary for the use of your device. CTV 722 by CLATRONIC.
USER MANUAL CTV 722 CLATRONIC
Instruction Manual/Guarantee
LCD TV with DVB-T Receiver

CTV 722 LCD DVB-T
CE
DEUTSCH
Inhalt
Table of Contents......Page 22
Instruction Manual Page 22
Overview of the Components ......Page 23
Technical Data......Page 37
Guarantee......Page 37
Inhaltsverzeichnis
natural_image
Coiled black audio/video cable with three connected audio probes (no text or symbols visible)D-47906 Kempen/Germany
1 Warnings and Safety Information 22
2 Accessories.... 23
3 Controls.... 23
4 Remote Control.... 24
5 Basic Operation 25
5.1 Connexion to the Mains 25
5.2 Using the Adapter for the Vehicle Cigarette Lighter....
5.3 Connecting the External Antenna 25
5.4 Connecting Earphones
5.5 Connecting the AV Input / AV Output...... 25
5.6 Charge the battery on/off.... 25
6 Menu Overview 26
7 Operation of the Menu 27
7.1 Automatic Installation of the DVB-T Television Receiver......
7.2 System Conf i guration....
7.3 Receiving and Changing Channels.... 29
7.4 System Schedule (Timer Programming).... 30 7.5 Teletext....
7.6 Editing the Programme Table 31
7.7 Own Menu Depiction 33
7.8 Channel Search Function 33 7.9 Parental Control
7.10 Games Menu....35
7.11 Factory Setting....35
8 Picture Settings 36
9 Cleaning the Unit 36
10 Notes for the battery pack 36
11 Troubleshooting ....36
12 Technical Data....37
13 Guarantee ....37
14 Disposal ....37
1. Warnings and Safety Information
On Placement
- Do not use the unit in places which are extremely hot, cold, dusty, or humid.
- Place the unit on a flat and even surface.
- Do not restrict the air flow of the unit by placing it in a place with poor air flow, by covering it with a cloth, or by placing it on carpeting.
On Safety
- When connecting or disconnecting the AC cord, grip the plug and not the cord itself. Pulling the cord may damage it and create a hazard.
- When you are not going to use the unit for a long period of time, disconnect the AC power cord.
On Condensation
- When left in a heated room where it is warm and damp, water droplets or condensation may form inside the unit. When there is condensation inside the unit, the unit may not function normally. Let the unit stand for 1 to 2 hours before turning the power on, or gradually heat the room up and dry the unit before use.
Important Safety Instructions
- Read Instructions
All the safety and operating instructions should be read before the appliance is operated. - Retain Instructions
The safety and operating instructions should be retained for future reference. - Heed Warnings
25 All warnings on the appliance and in the operating instructions should be adhered to. - Follow Instructions
All operating and use instructions should be followed. - Water and Moisture
The appliance should not be used near water - for example, near a bathtub, washbowl, kitchen sink, laundry tub, in a wet basement, or near a swimming pool, and the like. - Ventilation
The appliance should be situated so that its location or position does not interfere with its proper ventilation.
31 For example, the appliance should not be situated on a bed, sofa, rug, or similar surface that may block the ventilation openings; or, placed in a built-in installation, such as a book case or cabinet, that may impede the flow of air through the ventilation openings. - Heat
The appliance should be situated away from heat sources such as radiators, heat registers, stoves, or other appliances (including amplifiers) that produce heat. Do not expose the set to direct sunshine! - Power Sources
The appliance should be connected to a power supply only of the type described in the operating instructions or as marked on the appliance. - Power-Cord Protection
Power-supply cords should be routed so that they are not likely to be walked on or pinched by items placed upon or against them, paying particular attention to cords at plugs, convenience receptacles, and the point where they exit from the appliance. - Cleaning
The appliance should be cleaned only as recommended by the manufacturer. - Power Lines
An outdoor antenna should be located away from power lines. - Non use Periods
The power cord of the appliance should be unplugged from the outlet when left unused for a long period of time. - Object and Liquid Entry
Care should be taken so that objects do not fall, and liquids are not spilled, into the enclosure through openings. - Damage Requiring Service
The appliance should be serviced by qualified service personnel when:
A. The power-supply cord or the plug has been damaged; or
B. Objects have fallen, or liquid has been spilled, into the appliance; or
C. The appliance has been exposed to rain; or
D. The appliance does not appear to operate normally or exhibits a marked change in performance; or
E. The appliance has been dropped, or the enclosure damaged.
15. Servicing
The user should not attempt to service the appliance beyond that described in the operating instructions. All other servicing should be referred to qualified service personnel.
16. Transport
Please do not transport the set in a container with other objects which could fall on to it during transport.
17. Pointed or Sharp Objects
Please do not touch the LCD monitor with sharp or pointed objects!
- Please note that it is not permitted to operate this device on the front seats of motor vehicles when the vehicle is in motion or when the engine is running.
- For safety reasons this device may only be used by passengers on the back seats of a motor vehicle.
SAFETY WARNING!
- This unit should never be used by the vehicle's driver or left unsecured in the vehicle while driving.
- If this unit is being used in your vehicle, be sure that it is secured or held safely, and does not obstruct any safety device, including air bags or seat belts.
- All passengers should wear seat belts when using this unit in a moving vehicle.
- If in doubt, please contact your vehicle manufacturer for further advice.
Special Safety Information
- On the LCD screen there may be some light or dark patches. This phenomenon is well-known upon activation of the matrix display technology and not an indication of damage or faults.
- Never try to repair this set yourself. In the case of faults or malfunctions please switch the set off immediately and contact the manufacturer or your local dealer.
- The screen consists of a number of precision electronic elements. Disassembly or modifications to these may cause faults or damage the set.
Warnings Concerning the Use of Earphones
- Make sure that the volume of your headphones or earphones is not too high, as otherwise this may damage your ears and you may endanger yourself or others.
- In order not to disturb those around you the volume should be set to a low level.
- If you suffer from tinnitus you should turn the volume down low or refrain from using this device.
- Ear doctors recommend that earphones should not be used continuously over a prolonged period.
2. Accessories
Remote control with battery.... x 1
Earphones x 1
Car plug adaptor....x 1
AC adaptor x 1
Integrated rechargeable battery x 1
Car bag....x 1
Digital TV antenna....x 1
Video/audio cable.... x 1
- Controls
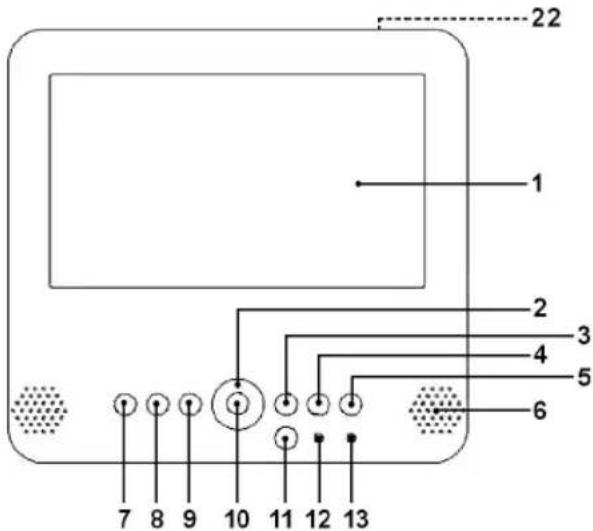
1 LCD Screen
2 ▲▼/▶◀ (Station selection/Volume)
3 GAME button
4 EPG button
5 TELETEXT button
6 Loudspeakers
7 MENU button
8 EXIT button
9 MODE button
10 Channel list / confirmation (OK) button
11 IR remote control
12 POWER control lamp
13 BATTERY control lamp
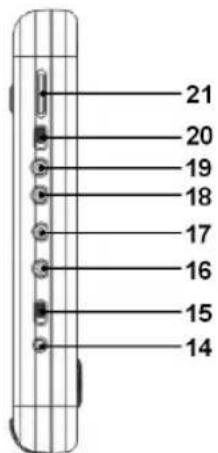
14 DC IN 9V input socket
15 ONOFF switch
16 ☎ 2 Headphone connection
17 1 Headphone connection
18 AUDIO IN/OUT socket
19 VIDEO IN/OUT socket
20 IN-AV-OUT switch
21 VOLUME (volume control)
22 Antenna socket
- Remote Control
Inserting the Batteries
- Open the lid of the battery compartment on the back of the remote control.
- Insert 2 batteries of type R03 „AAA“ 1.5V. Please ensure that the polarity is correct (see the floor of the battery compartment)!
- If the remote control is not used for a prolonged period, remove the batteries in order to prevent battery acid leaking.
Note:
- Please point the remote control at the television screen (which must be switched on).
- Please do not place any thing on the remote control; do not drop the remote control; do not allow it to become wet and do not dismantle it.
- Press the buttons brief y but not too quickly one after the other. The set needs at least two seconds before it turns over.
- Turn the set on before pressing the buttons for channel selection.
- Different types of batteries or new and used batteries must not be used together.
Note: Do not dispose of batteries in the domestic waste. Please return used batteries to the relevant collection points or the shop where they were bought.
Never throw batteries into a fire.
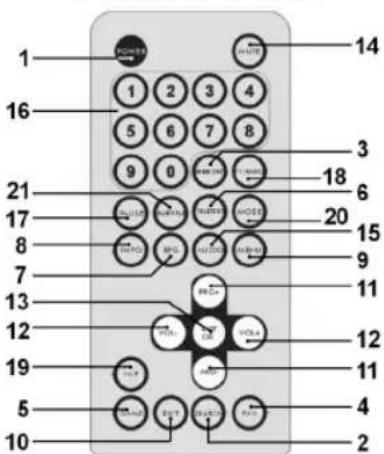
1 POWER (On/Off)
With this button the television set is switched on and off. If the button is pressed a second time the television set is switched off.
2 SEARCH (Automatic Search)
In DVB mode this takes you immediately to the automatic channel search.
3 MEMORY
With this button you can add the current channel to your favourites list.
24
4 FAV (Favourites List on/off)
With this button you can switch the favourites list on and off.
5 GAME
This button is used to call up the games menu.
6 TELETEXT
With this button you can switch the teletext on.
7 EPG (Electronic Programme Guide)
With this button you can display the electronic programme guide on the screen.
8 INFO
With this button you can show the channel information (signal strength/quality etc.) of the channel to which the television is currently tuned. Press the button again to hide the information.
9 MENU
This button is used to call up the main menu.
10 EXIT
With this button you can return to the previous menu, exit from the menu or return from OSD displays (e.g. teletext) to the television channel.
11 PRO+ / PRO- (Channel Selection)
With the PRO+ button you can select the next channel. With the PRO- button you can select the previous channel. If the menu is on the screen these buttons are used for navigating within the menu.
12 VOL+ / VOL- (Volume Control)
With VOL+ you can turn up the volume of the television set. With VOL- you can turn down the volume of the television set.
Note: The volume can't be adjusted louder than it is preset at the device.
13 LIST/OK (Confir rmation)
a) With this button you can call up the channel list in DVB mode.
b) When the menu is on the screen this button is used to confirm a selection.
14 MUTE
With this button the sound is switched on and off, or press the VOL+ / VOL- buttons to turn the volume back on.
15 AUDIO
With this button the menu window for the audio channel is displayed in order that you can adjust the sound mode (LR, LL or RR). Press the button again to return to the television channel.
16 0, 1, 2, 3, ..., 9
With these buttons you can enter a channel number directly or enter data (e.g. teletext pages).
17 PAUSE (only in DVB Mode)
With this button you can stop the picture (still frame). The sound is switched off. Press this button again to cancel the function.
18 TV/RADIO
With this button you can switch between the RADIO and television (TV) operating modes.
19 N/P (Video Output Signal)
With this button you can switch the colour system of the video output signal between PAL and NTSC.
Note: If you choose a colour system that is not supported, you will not receive any colour.
20 MODE
Each time this button is pressed the analogue values are called up, which you can then adjust with the VOL+ / VOL- buttons.
21 SUBTITLE
With this button you can activate the DVB subtitles provided that they are transmitted by the station.
5. Basic Operation
Basic Interface Connexion
5.1 Connexion to the Mains
with the Alternating Current Adapter
Connect the electric plug of the alternating current adapter to the socket marked „DC IN 9V“ on the set and then insert the mains plug of the alternating current adapter into a properly installed 230 V/50 Hz wall socket.
Cautions:
- The included AC power supply cord and AC adaptor are for use with this unit only. Do not use them with other equipment.
- When the unit is not going to be used for a long time, disconnect the AC power supply cord from the AV outlet.
- Use this unit only with a 9V or 12V AC adaptor, use with other AC adaptor could damage the unit.
5.2 Connexion using the Adapter for the Vehicle Cigarette Lighter
The 12 V cigarette lighter adapter is used for motor vehicles that have a 12 V power supply with negative earth.
Cautions:
- Use this unit only with the included 12 V car plug adaptor, use with other car adaptor could damage the unit.
- The included 12 V car plug adaptor are for use with this unit only. Do not use them with other equipment.
- Tampering with the set while driving a motor vehicle is forbidden. (See safety instructions.)
- Make sure the unit is fastened correctly to prevent from falling in the vehicle in the event of an accident.
- When the inside of the cigarette lighter socket is dirty with ashes or dust, the plug section may become hot due to poor contact. Be sure to clean the cigarette lighter socket before use.
• After use, disconnect the 12 V car plug adaptor from both the unit and cigarette lighter socket.
5.3 Connecting the External Antenna
Connect the end of the antenna cable supplied to the antenna socket on the television set.
5.4 Connecting Earphones
Connect the earphone plug to the earphone socket (Ω 1 or Ω2) on the television set.
Note:
When the earphones are inserted the sound can only be heard through the earphones. No sound comes out of the loudspeakers of the television set.
5.5 Connecting the AV Input / AV Output
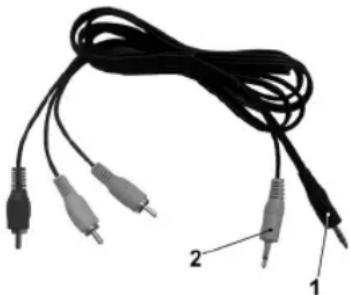
natural_image
Coiled black audio/video cable with three connected probes (no text or symbols visible)Connect the video cable supplied as follows:
- Connect the 3.5 mm stereo jack plug (1) to the audio IN/OUT socket (18) on the device.
- Connect the 3.5 mm jack plug (2) to the VIDEO IN/OUT socket (19) on the device.
- Now connect the yellow (video), the red (audio right) and the white (audio left) cinch plug to the external device that you would like to connect (e.g. VCR).
• AV IN/OUT Switch Positions
IN: In order to play back the picture from the external device on the LCD monitor.
OUT: In order to record the current channel of the LCD device with the external device.
Basic Operation of the Television Set
- Connect the set to the power supply and turn the mains switch on the left-hand side of the set to ON.
- Connect the antenna.
- Select the desired channel with the channel selection buttons ▲ / ▼.
- Adjust the volume of the television signal with the ▶ / ◀ buttons.
5.6 Charge the battery on/off (during operating)
Press the MODE button fi ve times to adjust the charge function (during operating) of the battery. With the VOL+/VOL- buttons you carry out the adjustment.
Note:
- If the device is switched off, the battery pack is charged permanently.
-
If the battery pack is completely charged the BATTERY control lamp change from red to green.
-
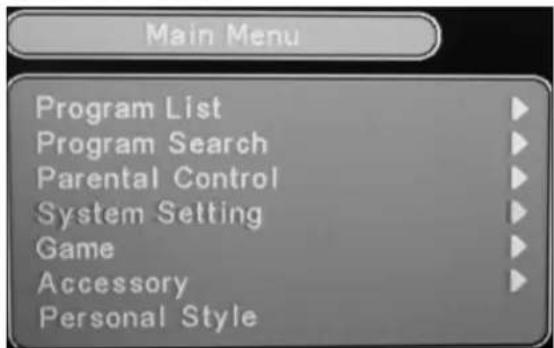
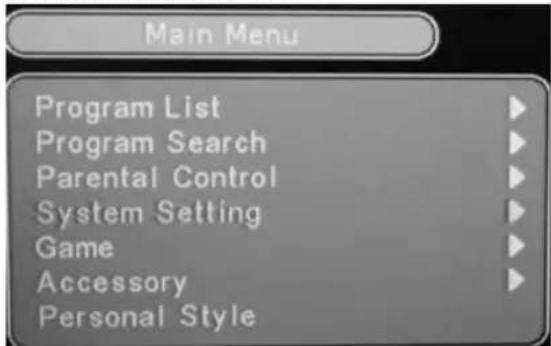
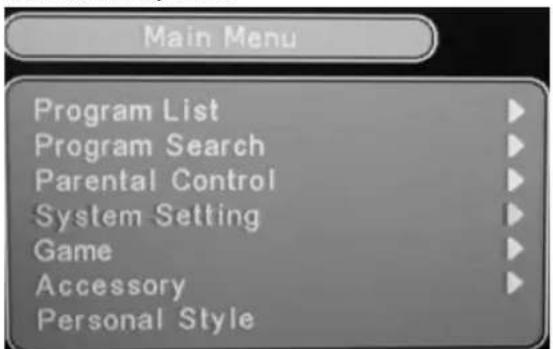
Menu overview
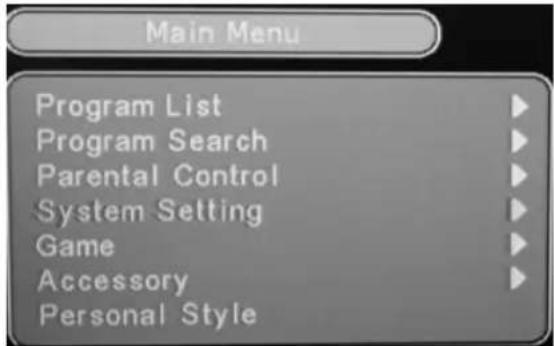
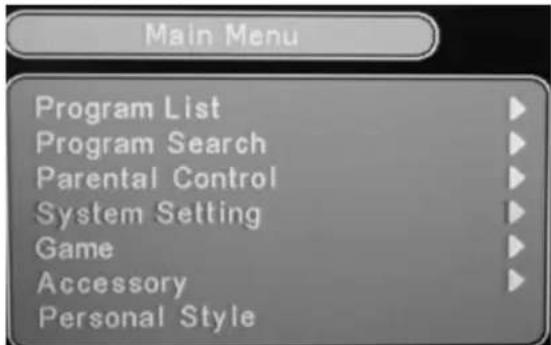
| Main Menu | ||
| Program List ▶ | Program List | |
| TV Program ListMusic Program ListSort ▶ | Sort | |
| By NameBy Service IDBy Channel No. | ||
| Program Search ▶ | Program Search | |
| Automatic SearchManual Search | ||
| Parental Control ▶ | Parental Control | |
| Channel Lock ▶Parental Setting YESChange PIN NO | Channel Lock | |
| System Setting ▶ | System Setting | |
| TV Standard ▶ | TV Standard | |
| PALNTSC | ||
| Display Type ▶ | Display Type | |
| 4:3 PS4:3 LB16:9 | ||
| Antenna power (5V) ▶ | Antenna Power (5V) | |
| OFFON | ||
| Regional Setting | ||
| Language | ||
| Time Setting | ||
| System schedule• Programmes the switch-on/switch-off time of the device. | ||
| Game ▶ | Game | |
| MineTetrisGomokuCalendar | ||
| Accessory ▶ | Accessory | |
| System Information ▶ | System Information | |
| System Version: | ||
| Factory Default ▶ | Factory Default | |
| NOYES | ||
| System update | ||
| Personal Style | ||
7. Operation of the Menu
7.1 Automatic Installation of the DVB-T Television Receiver
Initial Installation

The system automatically starts initial installation when the television set is switched on. Please carry out the installation as shown in the illustration.
It is possible that in the following operating modes the system does not start the initial installation:
- The initial installation has already been performed. (The channel overview is not empty.)
Note:
If you would like to start the initial installation again, please proceed as follows.
- Delete all channels in the channel overview.
- Reset the television set to the factory setting in the system configuration.
Move the cursor with the VOL+ / VOL- buttons over the words YES or NO. Press the LIST/OK button to confirm.
YES: Start of initial installation
NO: Do not perform initial installation
Country Selection / Language / Time Zone
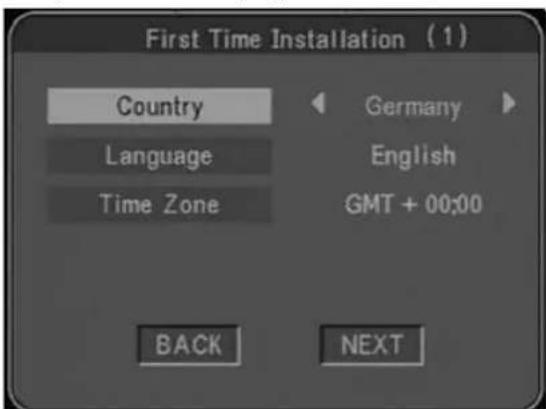
Select the country according to the local television standard with the buttons VOL+ or VOL-. Navigate the cursor with the PRO+ or PRO- buttons on the remote control to the next selection.
Select the menu language with the buttons VOL+ or VOL-. Move the cursor with the buttons PRO+ or PRO- to the next selection.
Set the local time zone with the buttons VOL+ or VOL-. Move the cursor with the buttons PRO+ or PRO- to the next selection.
Navigate the cursor with the buttons VOL+ or VOL- to the word BACK or NEXT. Press the LIST/OK button to confi rm.
BACK: Move to the previous menu page. NEXT: Move to the next menu page.
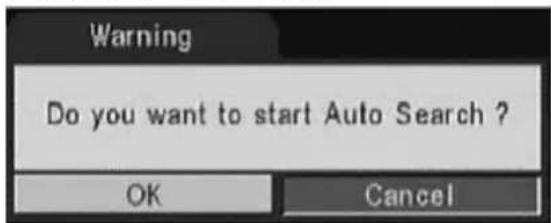
Starting Automatic Search
1st step
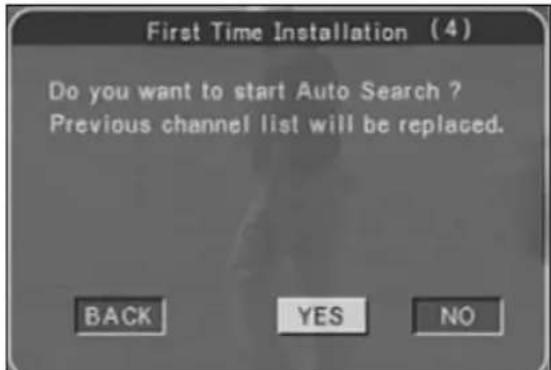
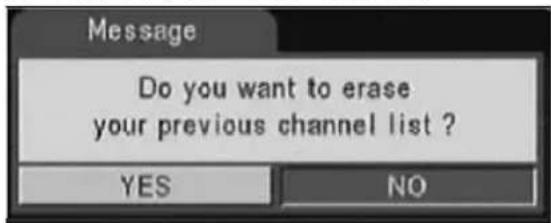
Move the cursor with the buttons VOL+ or VOL- to the word YES or NO. Press the LIST/OK button to confirm.
BACK: Move to the previous menu page.
YES: Delete the program list and start the automatic search.
NO: Stop the automatic search and return to the main menu.
2nd step
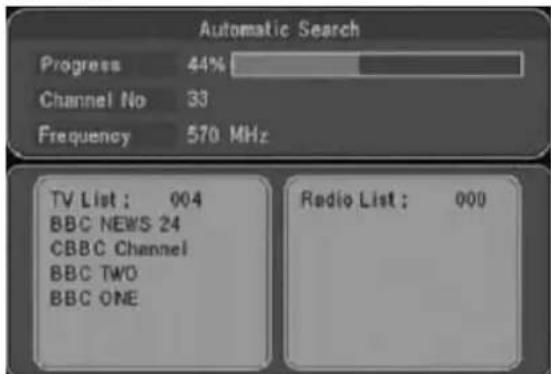
The automatic channel search starts and scans the frequency band for channels that can be received in your region. The channels that are found are listed in the TV/music list.
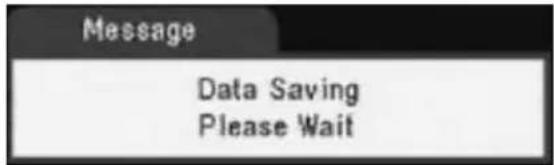
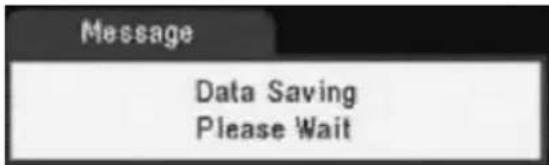
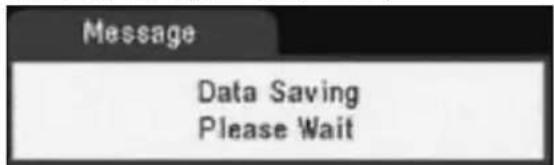
3rd step

The automatic channel search has fi nished and the data are stored. A television picture then appears. With the buttons PRO+ or PRO- you can now select the channels that have been found.
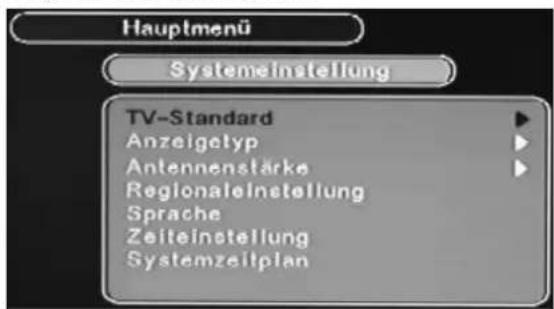
7.2 System Configuration
Press the MENU button to display the main menu. Move the cursor with the buttons PRO+ or PRO- to the submenu „System Setting“. Press the LIST/OK button to call up the system setting menu.
Setting the Television System:
In the TV standard menu select the desired television system with the buttons PRO+ or PRO-. Confirm your selection with the LIST/OK button. The system returns to the system setting menu.
PAL: European television system.
NTSC: American television system.
If the picture remains black and white after you have carried out the above adjustment, this means that the selected system is not compatible with your television set or monitor. With the N/P button you can select/set the correct television system directly.
Note: If you choose a colour system that is not supported, you will not receive any colour.
Setting the Picture Format:
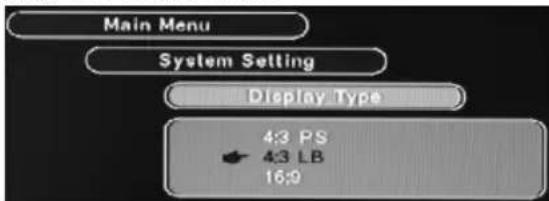
Move the cursor in the system setting menu using the buttons PRO+ or PRO- to the submenu „Display Type“. Press the LIST/OK button to call up the display type menu. In the display type menu select the picture format with the buttons PRO+ or PRO-. Press the LIST/OK button to confirm. The system returns to the system setting menu.
If the picture is distorted after you have performed the above operations the selected picture format is not suitable for your television set or monitor.
Note:
Please select 4:3LB for the DVB-T television set.
Regional Setting:
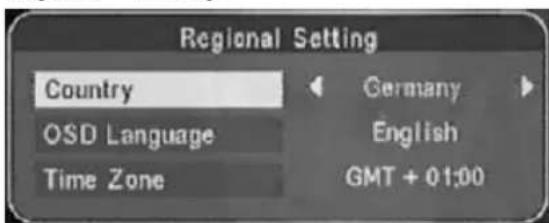
Move the cursor in the system setting menu with the buttons PRO+ or PRO- to the submenu „Regional Setting“. Press the LIST/OK button to call up the regional setting menu.
Move the cursor with the buttons PRO+ or PRO- to the word „Country“. Select a country with the buttons VOL- or VOL+.
Move the cursor with the buttons PRO+ or PRO- to the item „OSD Language“. Select the menu language with the buttons VOL- or VOL+.
Move the cursor with the buttons PRO+ or PRO- to the item „Time Zone“. Select the time zone with the buttons VOL- or VOL+.
Confir rm by pressing the LIST/OK button. The system returns to the system setting menu.
Setting the Language:
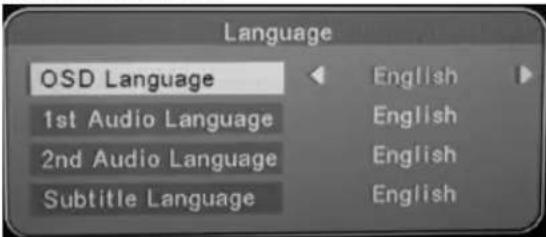
Move the cursor in the system setting menu with the buttons PRO+ or PRO- to the submenu „Language“. Press the LIST/OK button to call up the language menu.
Move the cursor with the buttons PRO+ or PRO- to the item „OSD Language“. Select the menu language with the buttons VOL- or VOL+.
Move the cursor with the buttons PRO+ or PRO- to the item „1st Audio Language“. Select the language with the buttons VOL- or VOL+.
Move the cursor with the buttons PRO+ or PRO- to the item „2nd Audio Language“. Select the language with the buttons VOL- or VOL+.
Move the cursor with the buttons PRO+ or PRO- to the item „Subtitle Language“. Select the language with the buttons VOL- or VOL+.
Confir rm by pressing the LIST/OK button. The system returns to the system setting menu.
Setting the Time:

Move the cursor in the system setting menu with the buttons PRO+ or PRO- to the submenu Time Setting". Press the LIST/OK button to call up the time setting menu.
Move the cursor with the buttons PRO+ or PRO- to the item „GMT usage“. Select ON or OFF with the buttons VOL- or VOL+.
ON: automatic time/date setting.
OFF: manual time/date setting.
In order to return to the normal TV channel press the EXIT button three times.
Note:
If you have selected OFF the words "Set the Date" and "Set the Time" appear automatically.
Move the cursor with the buttons PRO+ or PRO- to the item „Set the Date“. Now enter the correct date (year/month/day) with the number buttons on the remote control.
Move the cursor with the buttons PRO+ or PRO- to the item „Set the Time“. Now enter the correct time (hours/minutes) with the number buttons on the remote control.
Then press the EXIT button three times to return to the normal TV channel.
7.3 Receiving and Changing Channels
In addition to changing the channels with the buttons PRO+ or PRO-, a television channel can also be selected in the following ways:
Channel Preview
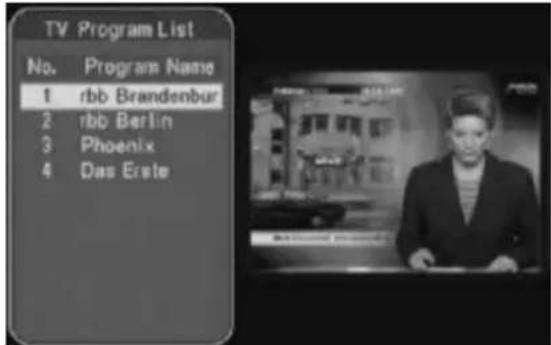
Call up a channel preview with the LIST/OK button. Move the cursor with the buttons PRO+ or PRO- to the desired channel (the currently selected channel is shown on the right-hand side of the screen). Press the LIST/OK button to select the channel.
Entering the Channel Number on the Remote Control
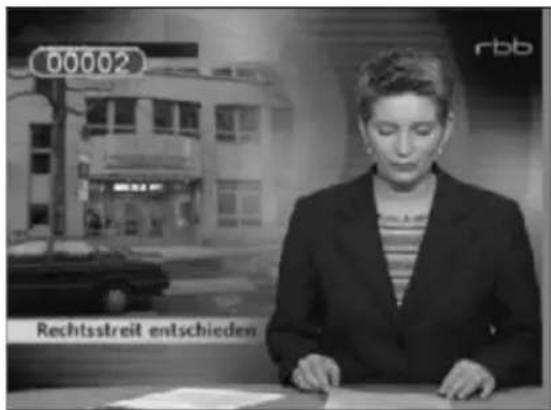
You can enter the channel number using the remote control in order to switch on the desired television channel.
Enter the desired channel number with the help of the number buttons on the remote control, e.g. 10, and then press the LIST/OK button.
Electronic Program Guide (EPG)
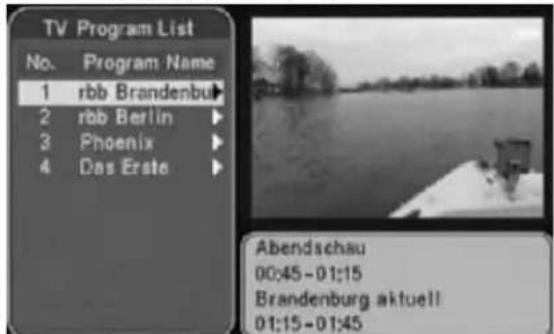
Press the EPG button to call up the electronic program guide. In order for it to be possible for the EPG to be activated the channel signal must contain EPG data.
EPG Timetable
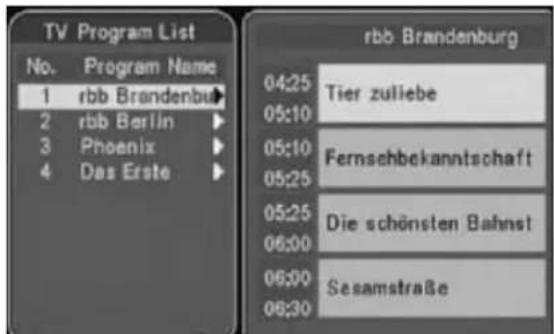
Press the VOL+ button to call up the EPG timetable. You can now leaf through today's programs. Move the cursor with the buttons PRO+ or PRO- to the desired programme information.
Note:
With the EXIT button you can move back to the previous page.
Programme Details
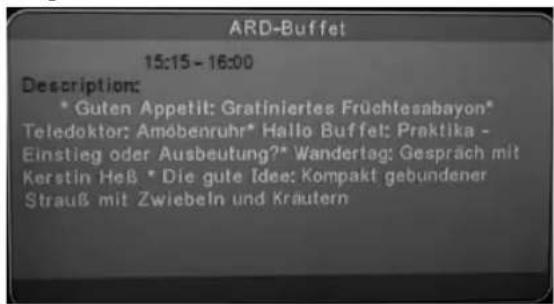
Press the VOL+ button when the program overview is displayed in order to call up the programme details. Depending on the amount of additional information available, this may be distributed over several pages. The symbol „▼“ now appears on the bottom right-hand side of the display. Press the PRO- button to move to the next pages. In order to move to the previous pages please press the PRO+ button (the symbol „▲“ appears on the bottom right-hand side of the display).
To return to the normal television programme please press the EXIT button three times.
Note:
If there is no additional information available on the programme, no further description is displayed.
EPG Timer Programming

Press the EPG button to call up the electronic program guide. Press the VOL+ button to call up the EPG timetable. Move the cursor with buttons PRO+ or PRO- to the desired programme information. Press the button LIST/OK to call up the system schedule. Activate timer programming by pressing the LIST/OK button.
To return to the normal television programme please press the EXIT button twice.
7.4 System Schedule (Timer Programming)
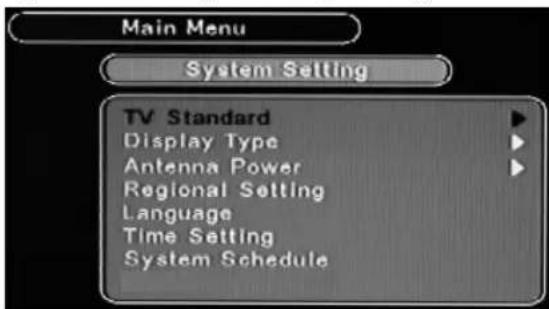
Press the MENU button to display the main menu. Move the cursor with the buttons PRO+ or PRO- to the submenu „System Setting“. Press the LIST/OK button to call up the system setting menu. Move the cursor with the buttons PRO+ or PRO- to the submenu „System schedule“. Press the LIST/OK button to call up the system schedule menu.
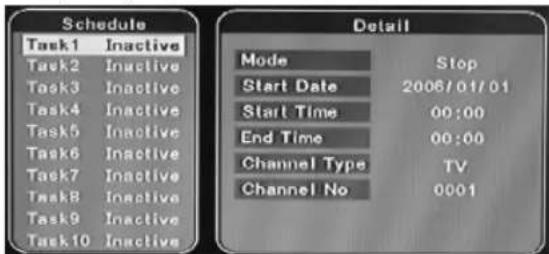
Press the LIST/OK button to change to the „Detail" window.
Select the mode with the VOL+ or VOL- buttons. Move the cursor with the buttons PRO+ or PRO- to the submenu „Start date“. Now enter the correct date (year/month/day) with the number buttons on the remote control.
Move the cursor with the buttons PRO+ or PRO- to the submenu „Start time“. Now enter the correct time (hours/minutes) with the number buttons on the remote control. Move the cursor with the buttons PRO+ or PRO- to the submenu „End time“. Now enter the correct time (hours/minutes) with the number buttons on the remote control. Move the cursor with the buttons PRO+ or PRO- to the submenu „Channel Type“. Use the VOL+ or VOL- buttons to select between „TV“ and „RADIO“. Move the cursor with the buttons PRO+ or PRO- to the submenu „Channel No.“. With the number keys on the remote control you can now enter the desired program location with which the device should switch on.
Press the LIST/OK button in order to change to the "Schedule" window. Activate timer programming by pressing the VOL+ button. To return to the normal television programme please press the EXIT button three times.
When the set time is reached the device will now switch itself on or off.
7.5 Teletext
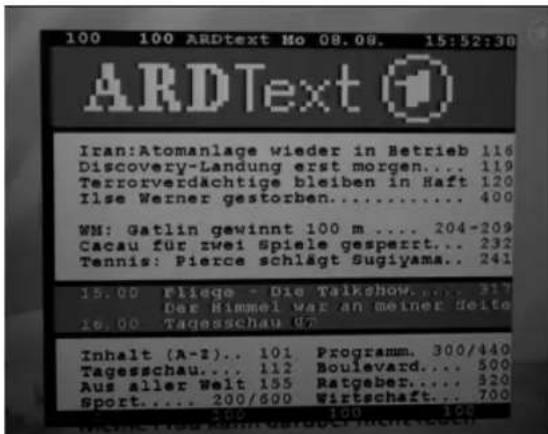
Press the TELETEXT button to call up the teletext function. Use the PRO+ or PRO- buttons to move the cursor to the desired text language. Confi rm with the LIST/OK button. Use the number buttons to enter the desired teletext page. The number you have entered is shown in the top left-hand corner of the screen. After you have entered the desired teletext page number your television set searches for the page. As the teletext pages cannot all be transmitted at the same time it may take a few seconds until your set has found the page.
In order to return to the normal television programme please press the EXIT button.
7.6 Editing the Programme Table
Press the MENU button to display the main menu. Move the cursor with the buttons PRO+ or PRO- to the submenu „Program List“. Press the LIST/OK button to call up the programme list menu.
Editing the TV/Music Programme List
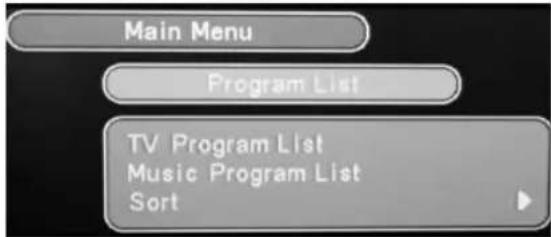
Move the cursor with the buttons PRO+ or PRO- to the submenu „TV Program List“ or „Music Program List“. Press the LIST/OK button to call up the channel configuration table.
Note: Radio programme aren't emanated nationwide.
Adding Channels to „My Favourite Stations“
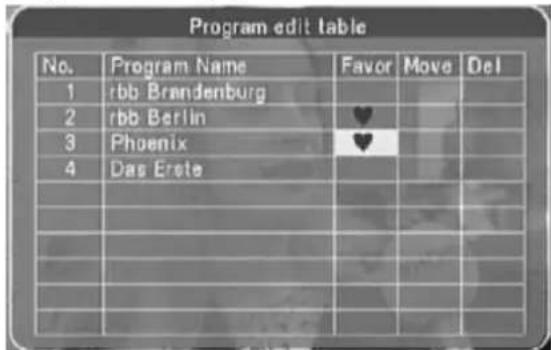
Move the cursor with the buttons PRO+ / PRO- / VOL- / VOL+ to the desired channel in the Favo(rite) column. Press the LIST/OK button once to select it, and a second time to cancel the selection. Carry out these steps with each channel that you wish to include in the "My Favourite Stations".

Then press the EXIT button three times. The system stores the settings automatically and returns to the normal television programme. Now press the FAV button to activate the "My Favourite Stations" list. The letters Fav on appear on the top right-hand side of the screen and you can select the channels as described in section 7.3 above. In order to switch off the "My Favourite Stations" list, press the button FAV again (Fav off appears top right).
Moving Channels
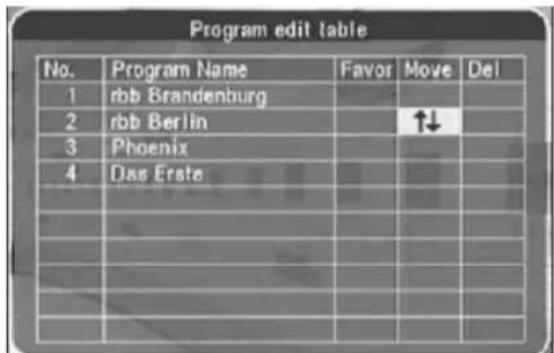
Call up the channel configuration table as described above. Move the cursor with the buttons PRO+ / PRO- / VOL- / VOL+ in the Move column to the channel that you wish to move. Press the LIST/OK button once to select it. The selected channel can now be moved to the desired position with the buttons PRO+ or PRO-. Confirm by pressing the LIST/OK button. Carry out these steps with each channel that you wish to move.
Then press the EXIT button three times. The system stores the settings automatically and returns to the normal television programme.
Deleting Channels
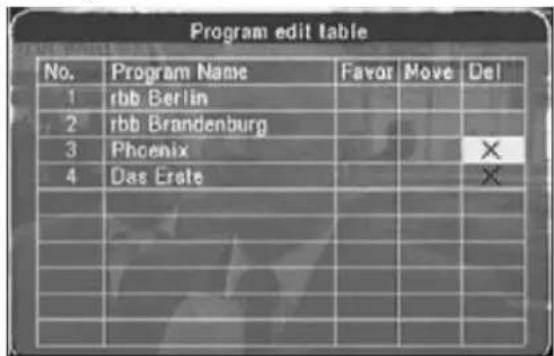
Call up the channel confi guration table as described above. Move the cursor with the buttons PRO+ / PRO- / VOL- / VOL+ to the desired channel in the Delete column. Press the LIST/OK button once to select it and a second time to cancel the selection. Carry out these steps with each channel that you want to delete.

Then press the EXIT button three times. The system stores the settings automatically and returns to the normal television programme.
Note:
A deleted channel can only be called up again by a new channel search.
Sorting Channels according to Name / Service Number / Channel Number
Press the MENU button to display the main menu. Move the cursor with the buttons PRO+ or PRO- to the submenu „Program List“. Press the LIST/OK button to call up the programme list menu.
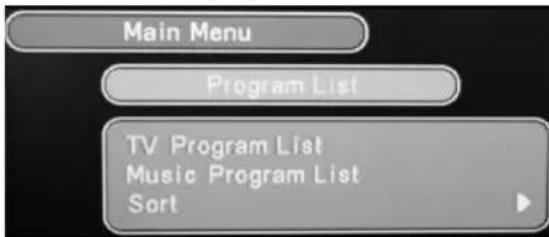
Move the cursor with the buttons PRO+ or PRO- to the submenu „Sort“. Press the LIST/OK button to call up the sort menu.
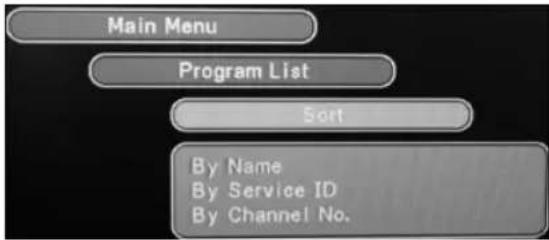
Now select the desired mode according to which the channels are to be sorted automatically.
The channel configuration table is then displayed.
Press the EXIT button four times. The system stores the settings automatically and returns to the normal television programme.
7.7 Own Menu Depiction
With this function you can set up your own personal menu.
Press the MENU button to display the main menu. Move the cursor with the buttons PRO+ or PRO- to the submenu „Personal Style“. Press the LIST/OK button to call up the personal style menu.
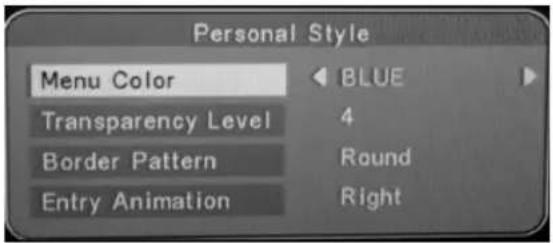
Move the cursor with the buttons PRO+ or PRO- to „Menu Colour“. Select the menu colour with the buttons VOL- or VOL+. Move the cursor with the buttons PRO+ or PRO- to the „Transparency Level“, „Border Pattern“ and „Entry Animation“. Make your selection with the buttons VOL- or VOL+. Store the settings with the EXIT button and return to the main menu. Press the EXIT button again to return to the normal television programme.
7.8 Channel Search Function

Press the MENU button to display the main menu. Move the cursor with the buttons PRO+ or PRO- to the submenu „Program Search“. Press the LIST/OK button to call up the programme search menu.
Automatic Search
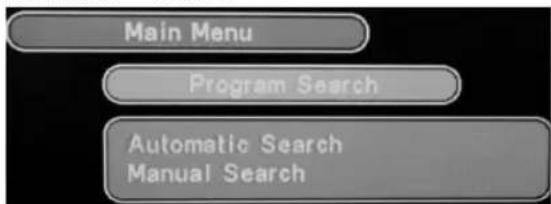
In the programme search menu use the buttons PRO+ or PRO- to select „Automatic Search“. Confirm by pressing the LIST/OK button.
Move the cursor with the buttons VOL- or VOL+ to the „OK” fi eld and press LIST/OK to continue.
Move the cursor with the buttons VOL- or VOL+ to the „OK” fi eld and press LIST/OK to continue.
YES: Delete programme list and start. NO: Keep programme list and start.
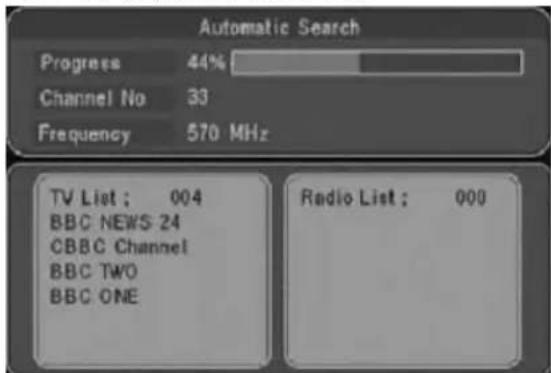
The automatic channel search starts and scans the frequency band for channels that can be received in your region. The channels found are listed in the TV/music list.
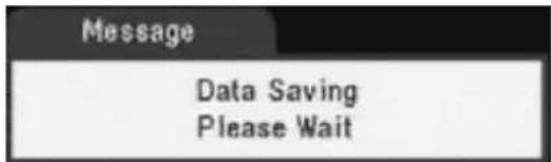
The automatic channel search has fi nished and the data are stored. A television picture then appears. With the buttons PRO+ or PRO- you can now select the channels found.
Manual Search
Note:
In the manual search you can enter the frequencies yourself by means of the number buttons on the remote control. This function is suitable for experienced users.
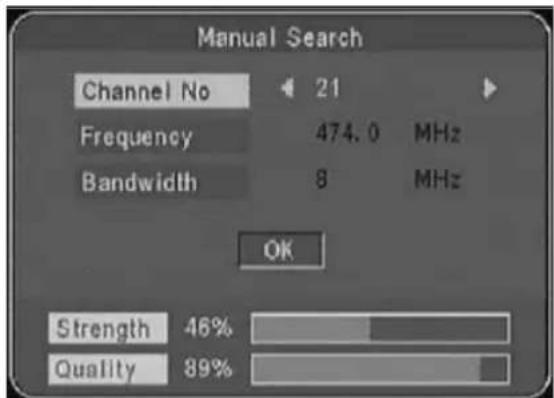
In the channel search menu use the buttons PRO+ or PRO- to select the item „Manual Search“. Press the LIST/OK button to confirm.
Select the desired channel number with the buttons VOL- or VOL+. Move the cursor with the buttons PRO+ or PRO- to the "OK" field. Press the LIST/OK button to start the manual search.
When the manual search has ended the system returns to the „Program Search“ menu.
Press the EXIT button twice; the system stores the data and returns to the normal television programme.
7.9 Parental Control
Some channels are not suitable for children or young people. For this reason parents can set up the parental control function to ensure that certain channels cannot be watched.
Press the MENU button to display the main menu. Move the cursor with the buttons PRO+ or PRO- to the submenu „Parental Control“. Press the LIST/OK button to call up the parental control menu.
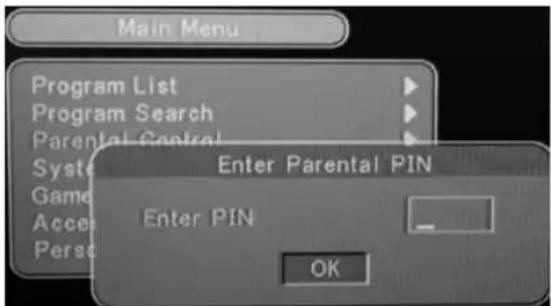
Enter your four-fi gure PIN and then confi rm by pres-sing the LIST/OK button twice.
Note:
The PIN code for this set when it leaves the factory is 9999.
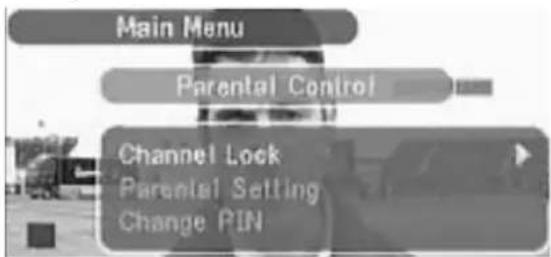
In the parental control menu use the buttons PRO+ or PRO- to select the item „Channel Lock“. Confirm by pressing the LIST/OK button.
Activating/Deactivating the Channel Lock

Move the cursor with the buttons PRO+ or PRO- to „YES“ or „NO“. Confirm by pressing the LIST/OK button. The system returns to the “Parental Control” menu.
YES: Activates the channel lock. NO: Cancels the channel lock.
Setting the Child Lock
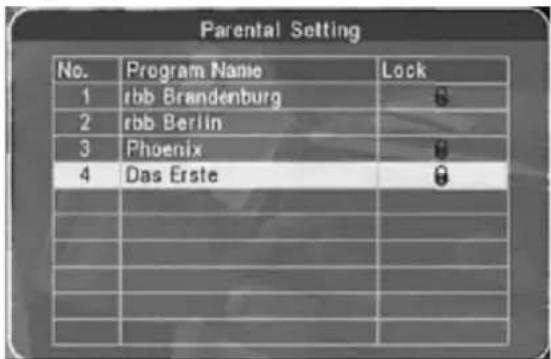
the parental setting appears. Move the cursor with the buttons PRO+ or PRO- to the desired channel. Press the LIST/OK button once to select it and a second time to cancel the selection. Carry out these steps with each channel that you wish to block. Press the EXIT button three times; the system stores the data and returns to the normal television programme.
Note:
In order to block the channels you have to activate the channel lock function.
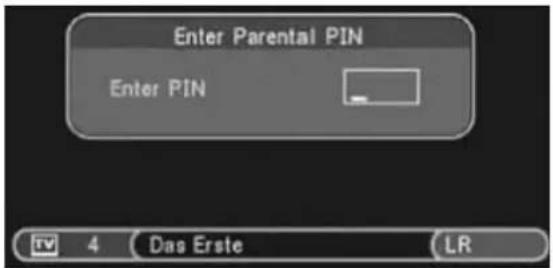
It is only possible to watch blocked channels by entering the correct PIN code. Enter the four-fi gure number and confirm by pressing the LIST/OK button.
Note:
The PIN code for this set when it leaves the factory is 9999.
Changing the PIN Code

In the parental control menu use the buttons PRO+ or PRO- to select the item „Change PIN“. Confir rm by pressing the LIST/OK button. Enter the old PIN and confi rm by pressing the LIST/OK button. Now enter your new PIN and press the LIST/OK button to confi rm. Now re-enter your new PIN and confi rm by pressing the LIST/OK button twice.
The message „PIN code changed“ appears on the screen. Press the LIST/OK button to return to the “Parental Control” menu. Press the EXIT button twice to return to the normal television programme.
Important:
Please remember your new code as after the change it applies to all password requests.
If you have forgotten your personal code you can assign a new one with the help of the Master-Password "9999".
7.10 Games Menu

Press the MENU button to display the main menu. Move the cursor with the buttons PRO+ or PRO- to the submenu „Game“. Press the LIST/OK button to call up the games menu.
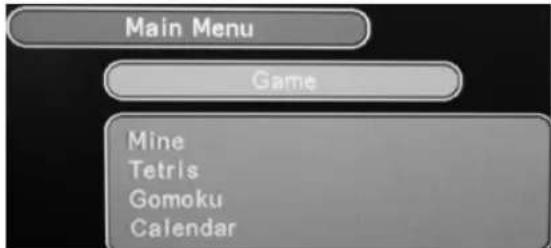
Use the buttons PRO+ or PRO- to select a game. Press the LIST/OK button to start the game. With the EXIT button you can return to the "Game" menu. Then press the EXIT button twice to return to the normal television programme.
7.11 Factory Settings
Press the MENU button to display the main menu. Move the cursor with the buttons PRO+ or PRO- to the submenu „Accessory“. Press the LIST/OK button to call up the accessories menu.
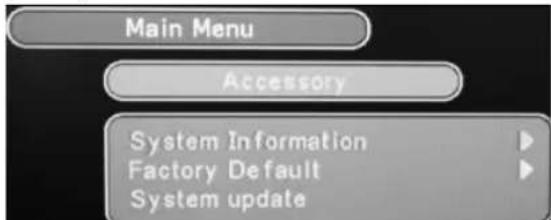
In the accessories menu use the buttons PRO+ or PRO- to select the item „Factory Default“. Confirm by pressing the LIST/OK button.
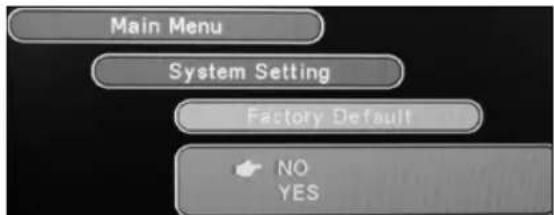
Move the cursor with the buttons PRO+ or PRO- to the word „YES“ or „NO“. Confirm by pressing the LIST/OK button.
YES: Restore factory settings.
NO: Return to the accessories menu without restoring the factory settings.
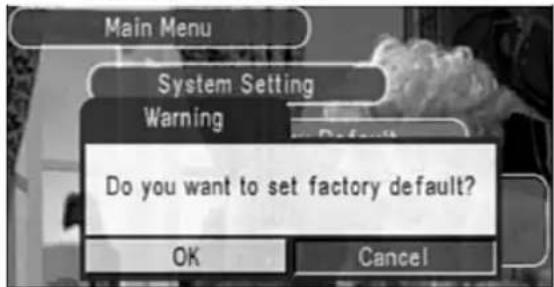
Move the cursor with the buttons VOL- or VOL+ to the "OK" fi eld and press LIST/OK to continue.

The system stores the data and returns to the accessories menu. Press the EXIT button twice; the system starts with the initial installation (see Section 7.1).
8. Picture Settings
BRIGHTNESS
Press the MODE button once to adjust the brightness. With the VOL+/VOL- buttons you can carry out the adjustment.
CONTRAST
Press the MODE button twice to adjust the contrast. With the VOL+/VOL- buttons you can carry out the adjustment.
HUE (Tint) (only in the NTSC System)
Press the MODE button three times to adjust the tint. With the VOL+/VOL- buttons you can carry out the adjustment.
Note:
You can only carry out this adjustment if the TV standard NTSC has been set in the system menu.
Colour
Press the MODE button four times to adjust the colour. With the VOL+/VOL- buttons you can carry out the adjustment.
Note:
The menu language for these adjustments is English and cannot be changed.
9. Cleaning the unit
- Be sure to turn the unit off and disconnect the AC power cord before maintaining the unit.
- Wipe the unit with a dry soft cloth.
If the surfaces are extremely dirty, wipe clean with a cloth which has been dipped in a weak soap-and-water solution and wrung out thoroughly, then wipe with a dry cloth.
- Never use alcohol, benzine, thinner, cleaning fluid or other chemicals. Do NOT use compressed air to remove dust.
10. Notes for the battery pack
- May explode if battery is incorrectly replaced or disposed of in fire.
- Do not short- circuit
- Danger of explosion if battery is incorrectly replaced. Replace only with the same or equivalent type.
- Only use with the specific power adapter by manufactory.
- Do not place the battery pack under direct sunlight or in excessively hot places such as the dashboard of cars.
11. Troubleshooting
| Problem Possible Causes | |
| No picture, no sound • | No connection to the alternating current or car adapter. Incorrect power supply. The power switch on the left-hand side of the device is turned to OFF. |
| No picture • Ensure that | the correct antenna, the correct station and the correct country have been selected. It is possible that you need to perform a new channel search. The station being received is too weak for reception via the telescopic antenna. Turn the antenna or connect an external antenna. |
| No sound • The sound | is switched off. The earphones are inserted. The station being received is too weak. |
| Mosaic-like picture • | The station being received is too weak. Realign the antenna. |
| No signal • It is possible | that the wrong country has been selected. The signal may be too weak. |
| Battery does not charge during operating. | Make sure that the charge is set to ON. (see section 5.6) |
| Strip on screen or black and white picture via AV OUT. | Device is adjusted to NTSC. Press the N/P button. |
12. Technical Data
Input:
Input frequency:...... VHF 177.5 MHz \~ 226.5 MHz, ......UHF 474 MHz \~ 858 MHz
Input resistance: 75 Ohm
Video Output: 1 Vp-p (75 Ohm)
Video Input: CVBS (PAL/NTSC)
Audio Output: 1.4 Vrms (1 kHz, 0 dB)
Audio Input: 2.0 Vrms (1 kHz, 0 dB)
General Technical Data
Display device: colour TFT LCD
Screen size: 7 inch (18 cm)
Loudspeaker: 2x 8 Ohm/1 W
Current consumption: ...... DC 9 V, <10 W
Permitted power consumption:
Two options: 1. Alternating current supply: alternating current adapter
- Car battery (12V):
Car
Dimensions: 202 mm x 192 mm x 27,8 mm
Weight: ....approx. 1 kg
This device has been tested according to all relevant current CE guidelines, such as electromagnetic compatibility and low voltage directives, and has been constructed in accordance with the latest safety regulations.
Subject to technical changes without prior notice!
13. Guarantee
The device supplied by our Company is covered by a 24 month guarantee starting on the date of purchase (receipt).
During the life of the guarantee any fault of the device or its accessories *) ascribable to material or manufacturing defects will be eliminated free of charge by repairing or, at our discretion, by replacing it. The guarantee services do not entail an extension of the life of the guarantee nor do they give rise to any right to a new guarantee!
Proof of the guarantee is provided by the proof of purchase. Without proof of purchase no free replacement or repair will be carried out.
If you wish to make a claim under the guarantee please return the entire machine in the original packaging to your dealer together with the receipt.
*) Damage to accessories does not mean automatic free replacement of the whole machine. In such cases please contact our hotline. Broken glass or breakage of plastic parts are always subject to a charge.
Defects to consumables or parts subject to wearing (e.g. motor pistons, kneading blades, drive shafts, spare remote control, spare toothbrushes, saw blades, etc.) as well as cleaning, maintenance or the replacement of said parts are not covered by the guarantee and hence are to be paid! adapter
The guarantee lapses in case of unauthorized tampering.
After the expiry of the guarantee
After the expiry of the guarantee repairs can be carried by the competent dealer or repair service against the payment of the ensuing costs.
- Disposal

Meaning of the "Dustbin" Symbol
Protect our environment: do not dispose of electrical equipment in the domestic waste.
Please return any electrical equipment that you will no longer use to the collection points provided for their disposal.
This helps avoid the potential effects of incorrect disposal on the environment and human health.
This will contribute to the recycling and other forms of reutilisation of electrical and electronic equipment.
Information concerning where the equipment can be disposed of can be obtained from your local authority.
In many EU countries the disposal of electrical and electronic equipment in the domestic waste is prohibited from August 13, 2005 on.
In Germany from March 23, 2006 on.