
MB800L DN - Heating MILL - Free user manual and instructions
Find the device manual for free MB800L DN MILL in PDF.


| Brand | Mill |
| Model | MB800L DN |
| Product Type | Panel heater with day/night thermostat |
| Color | White |
| Height | 25.0 cm |
| Width | 106.5 cm |
| Power | 800 W |
| Voltage | ~230 V / 50 Hz |
| IP Rating | IPx4 (suitable for bathroom zone 2) |
| Thermostat Type | Day/night with programmable setback |
| Mounting | Wall-mounted (bracket included) |
| Safety Features | Overheat protection, do not cover, child safety lock (for 3-8 years supervised) |
| Indicators | Power indicator (heating active), day/night control lights |
| Memory Function | Remembers temperature settings after power cut |
| Temperature Calibration | Adjustable if temperature deviation observed |
| Cleaning | Wipe with damp cloth; do not use detergents; do not immerse |
| Warranty | 2 years |
| Compliance | CE, IPx4, suitable for bathroom zone 2 |
| Manual Included | Yes (15 pages, English) |
| Series | Steel & Glass |
Frequently Asked Questions - MB800L DN MILL
User questions about MB800L DN MILL
0 question about this device. Answer the ones you know or ask your own.
Ask a new question about this device
Download the instructions for your Heating in PDF format for free! Find your manual MB800L DN - MILL and take your electronic device back in hand. On this page are published all the documents necessary for the use of your device. MB800L DN by MILL.
USER MANUAL MB800L DN MILL
ASSEMBLY AND INSTRUCTION MANUAL (EN)
mill®
Series: Steel & Glass
Please read the instructions carefully before use. Take good care of this manual for later use.
This assembly and instruction manual applies to the following panel heaters:
IB300, IB600DN, IB900DN, IB1200DN, IB800L DN, IB1000L DN
IB600DN G, IB1200DN G, IB800L DN G
MB300, MB600DN, MB900DN, MB1200DN, MB800L DN, MB1000L DN
PH600DN, PH1000DN, PH600L DN, PH800L DN
PH600DN S, PH1000DN S, PH600L DN S, PH800L DN S
PH600DN G, PH1000DN G, PH600L DN G, PH800L DN G
Contents
Important safety information .... 3
Description of the heater 6
Assembly 7
Electronic thermostat — Instructions....8
Day/night thermostat – Instructions 10
Maintenance 15
Warranty 15
Waste disposal 15
Important safety information
You must obey common safety guidelines when using electrical products, especially in the presence of children.
WARNING! To avoid electric shock or damage due to the heat, always make sure the plug is pulled out before the heater is moved or cleaned.
Read the instructions carefully.
The product is intended for home use only.
Make sure the heater is connected to the house's regular mains (230 V), as it indicated on the heater.
New heaters will produce a specific odor when used the first time. This will stop after a short time and is completely harmless.
Check for any pieces of packing foam or cardboard that may have fallen into the heating elements of the heater. These pieces must be removed in order to avoid unpleasant odors.
Prevent the heater from overheating - do not cover.
Always turn off the heater and unplug it when not used for a long time.
Pay special attention if the heater is used in rooms where children, the handicapped or elderly reside.
The heater should not be set up directly beneath an electrical socket outlet.
The cord must not be laid under any kind of carpet. Make sure the cord is laid in such a way that nobody can trip on it.
The heater must not be used if either the cord or plug is damaged. The heater must not be used if it has been dropped on the floor or is damaged in any other way causing it to malfunction.
The cord must be repaired by the manufacturer or by an expert if it has been damaged, to avoid dangerous situations.
Avoid using extension cords, which may overheat and could possibly start a fire.
Never cover the air vents on the heater. Avoid potential fire hazards by making sure the air intakes are not blocked or covered. The heater should be used in rooms with normal flat floors.
The heater should not be installed in close proximity to flammable materials of any kind because there can always be a risk of fire.
The heater must never be used in rooms where gasoline, paint or other flammable liquids are stored, such as in a garage.
The heater is approved for use in zone 2 in bathrooms.
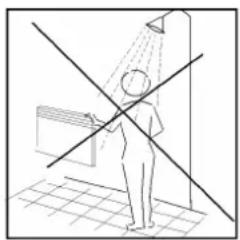
Never touch an electric heater with wet hands. The heater should be installed so a person showering or taking a bath cannot come into direct contact with it.
The heater becomes hot when it is on. Therefore, be careful and avoid burning or scorching your skin.
The heater must be switched off, the plug removed and the heater must cool down before it is moved.
Avoid overloading the mains (the circuit) where the heater is connected. The heater may overload the electrical circuit if other electrical devices are plugged into the same socket outlet.
The device cannot be used by children under 8 years of age and persons with reduced physical or mental abilities or lack of experience and knowledge unless they have been given supervision or instruction in the safe use of the device and understand the hazards involved.
Children should not play with the device. Cleaning and maintenance should not be done by unsupervised children.
Children under the age of 3 should be kept away from the device, unless they are under constant supervision.
Children aged 3 to 8 years are only permitted to turn the device ON/OFF, assuming the device is mounted according to the assembly instructions and the children have received instruction or supervision in the safe use of the device and understand the hazards involved.
STORE THIS INSTRUCTION MANUAL FOR FUTURE USE!
NEVER TOUCH YOUR PANEL HEATER OR ITS CASING WITH WET HANDS!
natural_image
Simple line drawing of a person standing under a showerhead with a diagonal cross, no text or symbols present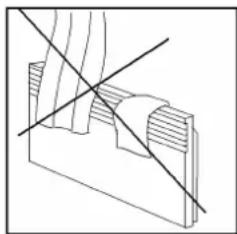
natural_image
Pure technical line drawing of a mechanical component with intersecting diagonal lines (no text or symbols)Specifications
| Model | Thermostat | Color | Height | Width | Amperage | Power (W) | IP rating |
| IB300 | Electronic | White | 30.0 cm | 35.0 cm | ~230 V / 50 Hz | 300 | IPx4 |
| IB600DN | Day/night | White | 40.0 cm | 65.0 cm | ~230 V / 50 Hz | 600 | IPx4 |
| IB900DN | Day/night | White | 40.0 cm | 85.0 cm | ~230 V / 50 Hz | 900 | IPx4 |
| IB1200DN | Day/night | White | 40.0 cm | 105.0 cm | ~230 V / 50 Hz | 1200 | IPx4 |
| IB800L DN | Day/night | White | 25.0 cm | 105.0 cm | ~230 V / 50 Hz | 800 | IPx4 |
| IB1000L DN | Day/night | White | 25.0 cm | 121.5 cm | ~230 V / 50 Hz | 1000 | IPx4 |
| IB600DN G | Day/night | Grey | 40.0 cm | 65.0 cm | ~230 V / 50 Hz | 600 | IPx4 |
| IB1200DN G | Day/night | Grey | 40.0 cm | 105.0 cm | ~230 V / 50 Hz | 1200 | IPx4 |
| IB800L DN G | Day/night | Grey | 25.0 cm | 105.0 cm | ~230 V / 50 Hz | 800 | IPx4 |
| MB300 | Electronic | White | 30.0 cm | 36.5 cm | ~230 V / 50 Hz | 300 | IPx4 |
| MB600DN | Day/night | White | 40.0 cm | 66.5 cm | ~230 V / 50 Hz | 600 | IPx4 |
| MB900DN | Day/night | White | 40.0 cm | 86.5 cm | ~230 V / 50 Hz | 900 | IPx4 |
| MB1200DN | Day/night | White | 40.0 cm | 106.5 cm | ~230 V / 50 Hz | 1200 | IPx4 |
| MB800L DN | Day/night | White | 25.0 cm | 106.5 cm | ~230 V / 50 Hz | 800 | IPx4 |
| MB1000L DN | Day/night | White | 25.0 cm | 123.0 cm | ~230 V / 50 Hz | 1000 | IPx4 |
| PH600DN | Day/night | White | 46.5 cm | 63.5 cm | ~230 V / 50 Hz | 600 | IPx4 |
| PH1000DN | Day/night | White | 46.5 cm | 101.5 cm | ~230 V / 50 Hz | 1000 | IPx4 |
| PH600L DN | Day/night | White | 23.0 cm | 100.0 cm | ~230 V / 50 Hz | 600 | IPx4 |
| PH800L DN | Day/night | White | 23.0 cm | 120.0 cm | ~230 V / 50 Hz | 800 | IPx4 |
| PH600DN S | Day/night | Black | 46.5 cm | 63.5 cm | ~230 V / 50 Hz | 600 | IPx4 |
| PH1000DN S | Day/night | Black | 46.5 cm | 101.5 cm | ~230 V / 50 Hz | 1000 | IPx4 |
| PH600L DN S | Day/night | Black | 23.0 cm | 100.0 cm | ~230 V / 50 Hz | 600 | IPx4 |
| PH800L DN S | Day/night | Black | 23.0 cm | 120.0 cm | ~230 V / 50 Hz | 800 | IPx4 |
| PH600DN G | Day/night | Grey | 46.5 cm | 63.5 cm | ~230 V / 50 Hz | 600 | IPx4 |
| PH1000DN G | Day/night | Grey | 46.5 cm | 101.5 cm | ~230 V / 50 Hz | 1000 | IPx4 |
| PH600L DN G | Day/night | Grey | 23.0 cm | 100.0 cm | ~230 V / 50 Hz | 600 | IPx4 |
| PH800L DN G | Day/night | Grey | 23.0 cm | 120.0 cm | ~230 V / 50 Hz | 800 | IPx4 |
The heater is approved for use in zone 2 in wet rooms (IPx4+approved)
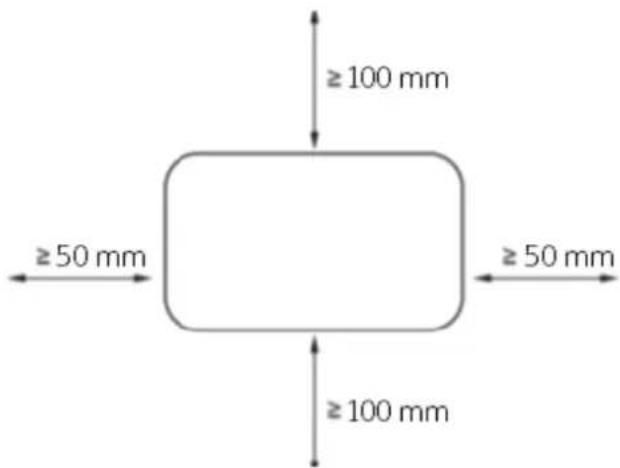
Minimum distances
Description of the heater
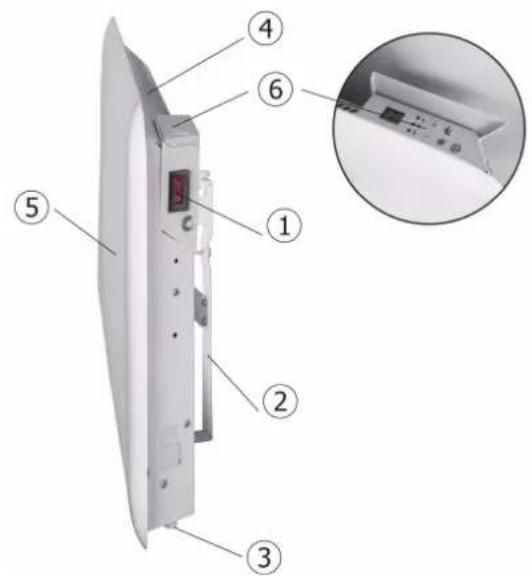
Mill Steel
- Off/On
- Wall bracket
- Temperature sensor
- Heat emission
- Steel front
- Thermostat
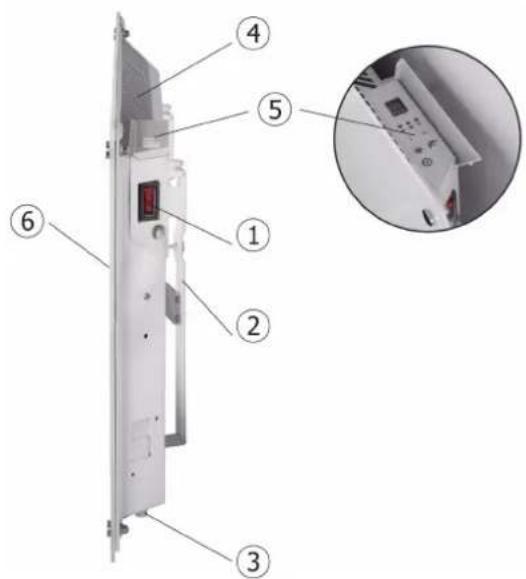
Mill Glass
Assembly
Use a tape measure and a spirit level to mount the bracket
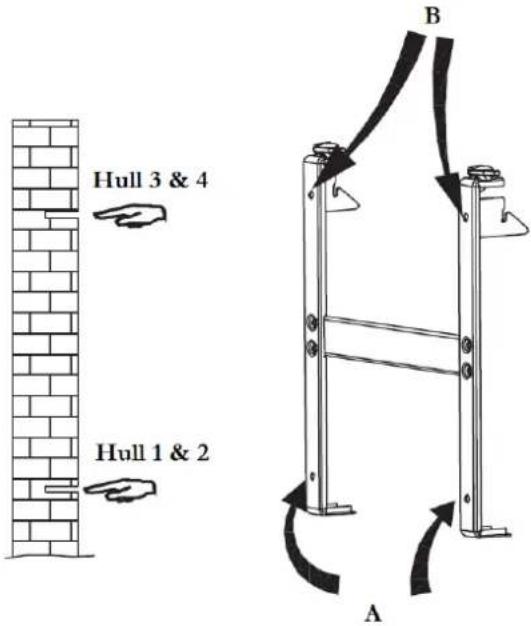
1.
Drill holes in the wall for holes 1 & 2. Then drill holes in the wall for the topmost holes (holes 3 & 4 by using B)
natural_image
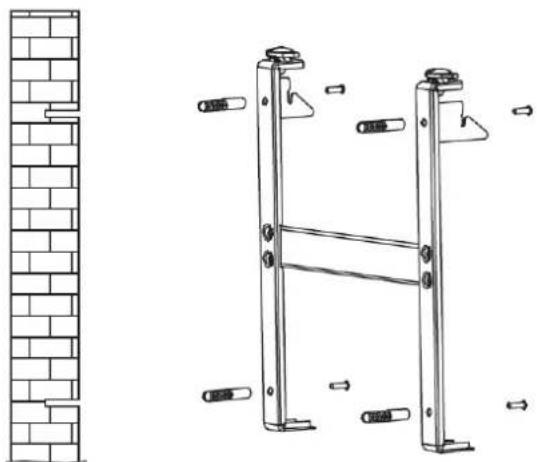
Technical line drawing of a brick wall and a ladder structure with mounting fixtures (no text or symbols)2.
Insert the wall plugs into the drilled holes and attach the bracket with 4 screws
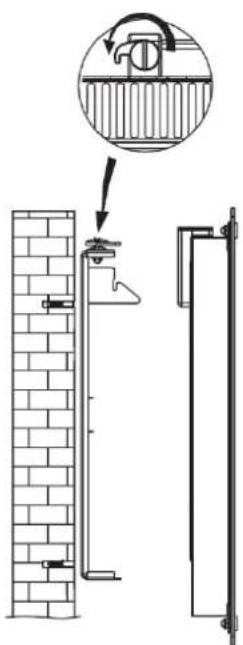
3.
Place the heater on the lower lugs on the bracket, then hang the heater on the upper lugs (lift the heater slightly to align the heater with for the upper lugs). Screw in the locking screws on the top of the bracket (clockwise)
Electronic thermostat – Instructions
CAUTION! In the event of a power cut, the thermostat will return to the last set temperature
The section concerning electronic thermostats is relevant for the following models:
•IB300
•MB300
Control panel for electronic thermostat:
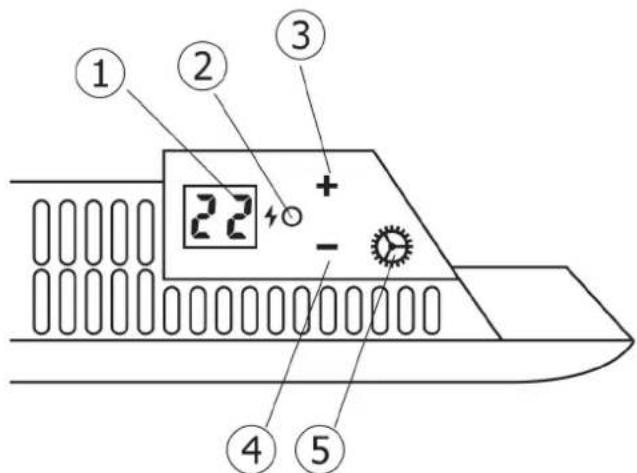
- Display (shows the desired room temperature by default)
- Power indicator — Shows whether the heater is using power or not
- Control button (+) (increase temperature)
- Control button (−) (reduce temperature)
- Function button (F)
Warning: Before the heater is turned on, it must be attached to a wall. If the heater is not installed correctly or is installed askew, this may cause the heater to malfunction or in the worst case, be damaged.
If the temperature sensor is not functioning properly, you will see the symbol below on the display. Please contact
the dealer or importer.

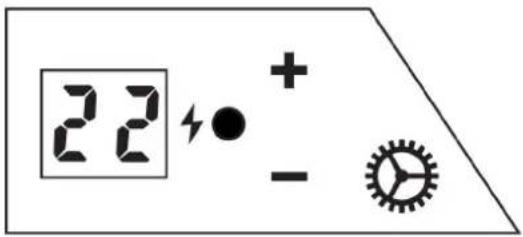
Power indicator
When the panel heater is using power (i.e. when it is heating), the power indicator is lit.
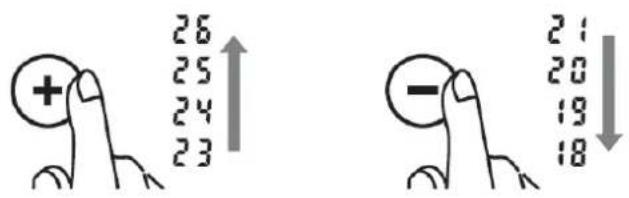
1) Set the desired temperature
Press the arrow buttons to set the desired temperature.
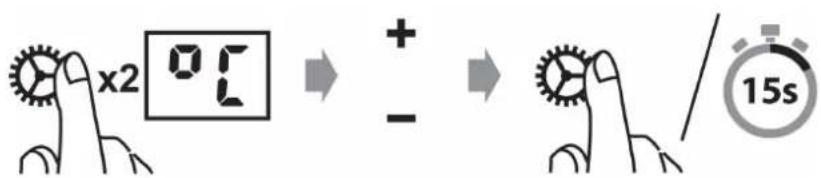
2) Temperature calibration
*Should any deviations occur between the desired and actual temperature in the room, it can be easily adjusted (the heater should have been set to the same setting for at least 12 hours in order to be sure a calibration is necessary).
Press the Function button and use the arrow buttons (+ or -) to set the actual temperature observed in the room. Confirm by pressing the Function button or wait 15 seconds for automatic confirmation.
Day/night thermostat – Instructions
CAUTION! In the event of a power cut, the thermostat will return to the last set temperature
The section concerning day/night thermostat applies to the following models:
IB600DN, IB900DN, IB1200DN, IB800L DN, IB1000L DN
IB600DN G, IB1200DN G, IB800L DN G
MB600DN, MB900DN, MB1200DN, MB800L DN, MB1000L DN
PH600DN, PH1000DN, PH600L DN, PH800L DN
PH600DN S, PH1000DN S, PH600L DN S, PH800L DN S
PH600DN G, PH1000DN G, PH600L DN G, PH800L DN G
Tip! The thermostat can be used as a regular electronic thermostat (i.e. the heater will maintain a constant temperature 24 hours a day). Please see the section on the electronic thermostat for further information
Control panel for day/night thermostat:
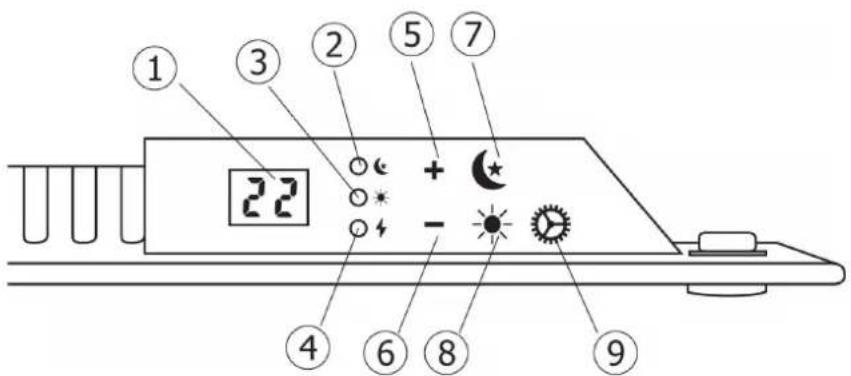
- Display (shows the desired room temperature by default)
- Control light – night function
- Control light – day function
- Power indicator – Shows whether the heater is using power or not
- Control button (+) (Increase temperature)
- Control button (−) (Reduce temperature)
- Night function
- Day function
- Function button
Warning: Before the heater is turned on, it must be attached to a wall. If the heater is not installed correctly or is installed askew, this may cause the heater to malfunction or in the worst case, be damaged.
If the temperature sensor is not functioning properly, you will see the symbol below on the display. Please contact
the dealer or importer.

Power indicator
When the panel heater is using power (i.e. when it is heating), the energy indicator is lit.
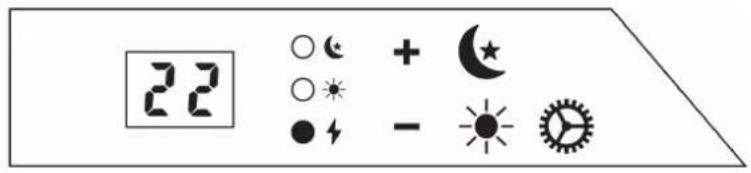
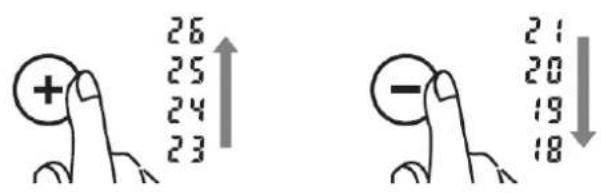
1) Set the desired temperature
Press the arrow buttons to set the desired temperature.
Note: Can only be carried out when the setback programs are inactive
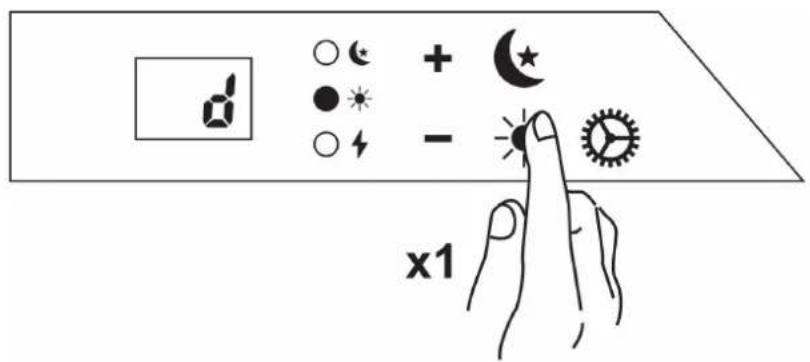
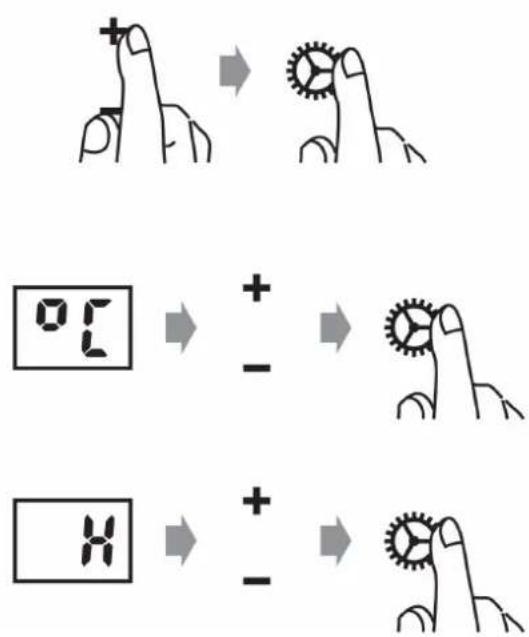
2) Daytime setback
When you want the heater to reduce the temperature during the day (set for weekdays from now on) press ⚙. The display shows "d".
Use the arrow buttons to enter the correct weekday. (Monday=1, Tuesday=2, Wednesday=3, Thursday=4, Friday=5, Saturday=6, Sunday=7). Save by pressing ⏱.
Enter the desired temperature for daytime setback. Save by pressing ⏱.
Enter the desired number of hours for daytime setback. Save by pressing ⏱.
*Control light - is steady green when the heater is in an active setback period. The control light is steady red when the setback period is inactive, but has been programmed.
3) Nighttime setback
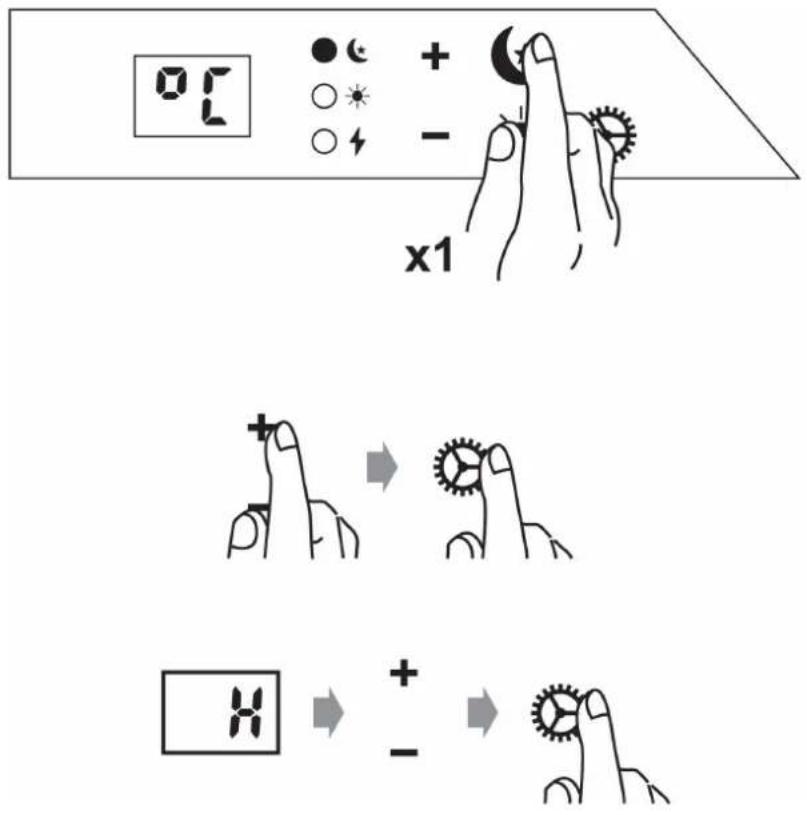
When you want the heater to reduce the temperature in the evening (applicable every evening/night from now on) press ⚙. The display shows °C.
Enter the desired temperature for nighttime setback. Save by pressing ⏱.
Enter the desired number of hours for nighttime setback. Save by pressing 🌿️.
*Control light ★ is steady green when the heater is in an active setback period. The control light is steady red when the setback period is inactive, but has been programmed.
4) Change setback temperature — Daytime
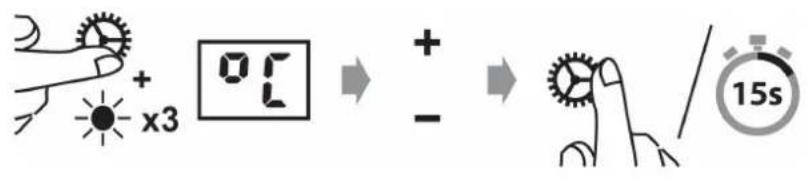
Press and hold ⚙ and press ⚙ 3 times.
Enter the desired temperature for daytime setback. Save by pressing 🌐 or wait 15 seconds for automatic confirmation.
5) Change setback temperature — Nighttime
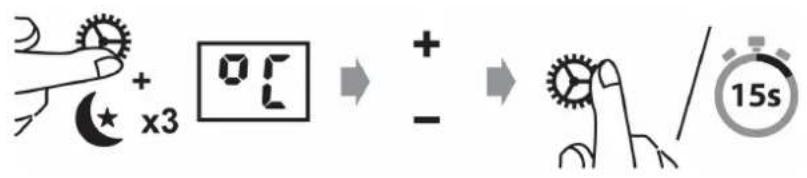
Press and hold ⏱ and press ⚡ 3 times.
Enter the desired temperature for nighttime setback. Save by pressing 📋 or wait 15 seconds for automatic confirmation.
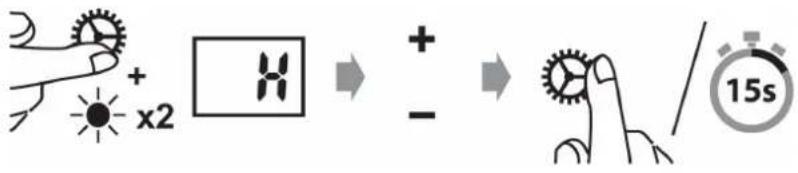
6) Change number of hours — Daytime
Press and hold ⏱ and press ⚡ 2 times.
Enter the desired number of hours for daytime setback. Save by pressing 📍 or wait 15 seconds for automatic confirmation.
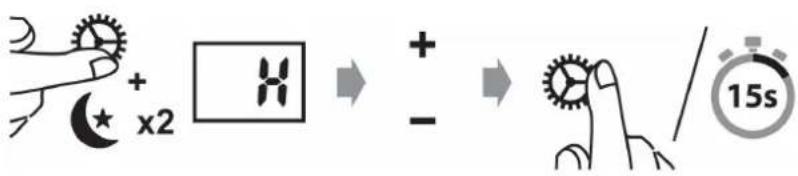
7) Change number of hours — Nighttime
Press and hold ⏱ and press ⚙ 2 times.
Enter the desired number of hours for nighttime setback. Save by pressing 🌐 or wait 15 seconds for automatic confirmation.
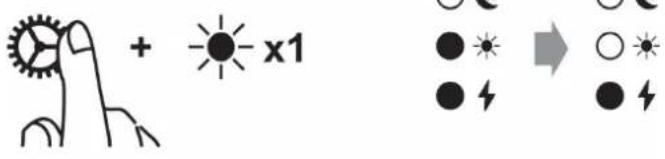
8) Cancel (skip) setback period
Press and hold ⚙ and press ⚙ or ⚙ once (depending on which setback period you want to cancel).
*The heater will skip an active setback period or the next setback period.
*During the next setback period, the heater will automatically resume the programmed temperature reduction.

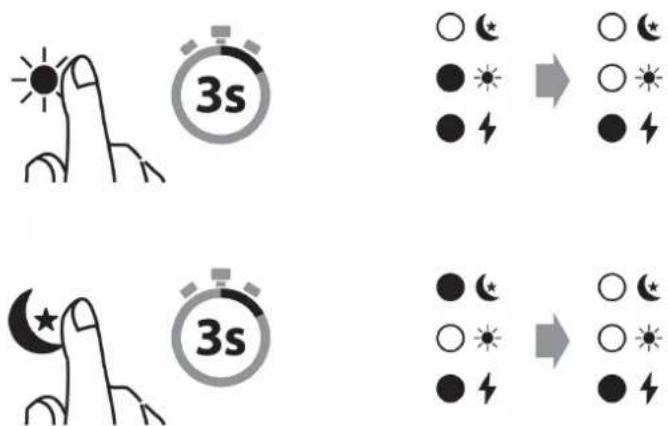
9) Delete a setback program
Press and hold ⚙ or ⚙ (depending on which setback period you want to cancel) for 3 seconds.
10) Calibration of temperature
*Should any deviations occur between the desired and actual temperature in the room, it can be easily adjusted (the heater should have been set to the same setting for at least 12 hours in order to be sure a calibration is necessary).
Press ⚙ 2 times and use the arrow buttons (+ or −) to set the actual temperature observed in the room. Confirm with ⚙ or wait 15 seconds for automatic confirmation.

11) Resetting the heater
Turn off the heater's main switch.
Press and hold ☑ while you turn on the heater's main switch.
12) Memory function
*The heater remembers all the temperature settings and will automatically return to the desired temperature after a power failure. If you have changed the temperature setting for the various setback programs, the heater will also remember it.
Maintenance
1) For cleaning, always unplug the heater and leave it to cool.
2) Wipe the heater regularly with a damp cloth and dry the surface before turning on the heater again.
3) The heater must be cleaned at least once a month during the heating season.
CAUTION! The heater should never be immersed in water.
Avoid using detergents to clean the heater.
Never let any water get inside the heater; this can be hazardous.
4) Dust etc. should be removed with a soft cloth.
5) The heater can be stored in a dry and clean place.
Warranty
The warranty is valid for 2 years. The heater will be repaired or replaced during this time should any malfunction occur. The warranty applies if the heater is used according to these instructions and the customer can present a purchase receipt. If the heater malfunctions in any way, please contact the store where it was purchased or the importer.
Waste disposal
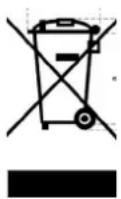
The symbol 📄 indicates that this product is not to be disposed of together with household waste. This product must be delivered to a recycling service or container for electrical appliances and electronic equipment. This is done to avoid health risks and prevent harm to the environment. Local businesses (or the environmental station in your neighborhood) are required by law to accept and recycle such products, as a means of environmentally sound disposal.
Mill International AS


- ASSEMBLY AND INSTRUCTION MANUAL (EN)
- mill®
- Contents
- Important safety information
- STORE THIS INSTRUCTION MANUAL FOR FUTURE USE!
- NEVER TOUCH YOUR PANEL HEATER OR ITS CASING WITH WET HANDS!
- The heater is approved for use in zone 2 in wet rooms (IPx4+approved)
- Mill Steel
- Mill Glass
- Assembly
- Electronic thermostat – Instructions
- Power indicator
- 1) Set the desired temperature
- 2) Temperature calibration
- Day/night thermostat – Instructions
- Control panel for day/night thermostat:
- 2) Daytime setback
- 3) Nighttime setback
- 4) Change setback temperature — Daytime
- 5) Change setback temperature — Nighttime
- 6) Change number of hours — Daytime
- 7) Change number of hours — Nighttime
- 8) Cancel (skip) setback period
- 9) Delete a setback program
- 10) Calibration of temperature
- 11) Resetting the heater
- 12) Memory function
- Maintenance
- Warranty
- Waste disposal
- Mill International AS
Brand : MILL
Model : MB800L DN
Category : Heating