
TE-7A - Véhicule pour personnes handicapées Shoprider - Free user manual and instructions
Find the device manual for free TE-7A Shoprider in PDF.


User questions about TE-7A Shoprider
0 question about this device. Answer the ones you know or ask your own.
Ask a new question about this device
Download the instructions for your Véhicule pour personnes handicapées in PDF format for free! Find your manual TE-7A - Shoprider and take your electronic device back in hand. On this page are published all the documents necessary for the use of your device. TE-7A by Shoprider.
USER MANUAL TE-7A Shoprider
Please read your owner's manual before driving your scooter.
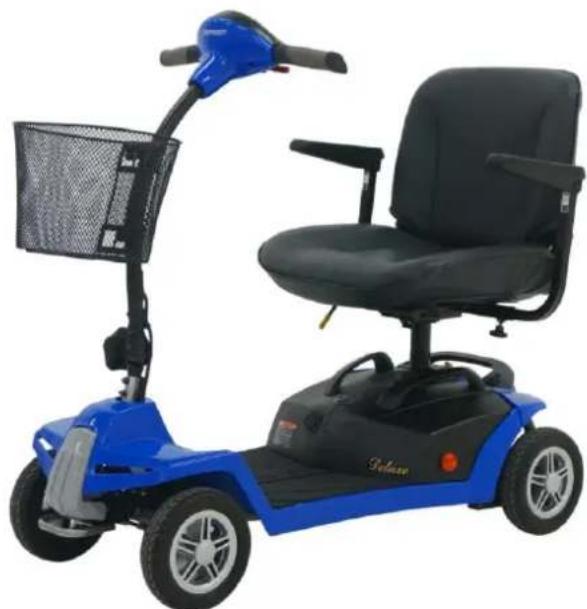
natural_image
Blue and black electric scooter with basket handle and seat, no visible text or symbolsTE-7A
Owner's Manual
SHOPRIDER®
CONTENTS
INTRODUCTION ....3
FEATURE GUIDE ....3
SAFETY ADVICE 4
EMI Warning 6
ADJUSTMENT 8
SCOOTER TILLER CONTROLS 10
TROUBLE SHOOTING GUIDE ......18
TECHNICAL SPECIFICATIONS 19
DISCLAIMER 20
SHOPRIDER®
INTRODUCTION
Congratulations on your purchase of the Shoprider® scooter. This scooter incorporates the latest innovative designs patented and only available on a Shoprider® scooter. This scooter can be used in confined spaces both indoors and outdoors. Direct drive transaxles and electromagnetic brakes give a safe and efficient ride. This Shoprider® scooter is designed for persons with limited mobility.
Please read this manual carefully and thoroughly before using your scooter and make sure you understand all the instructions.
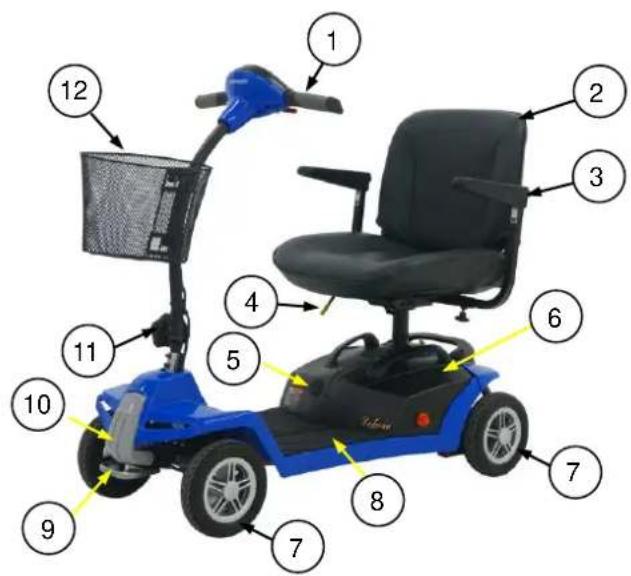
FEATURE GUIDE
- Tiller Handle Bar
- Detachable Seat
- Removable Armrests
- Swivel Seat / Release Lever
- Charging Port
- Dual Portable Battery Pack
- Puncture Proof Tires
- Floor Mat
- Handle
- Front Bumper
- Tiller Adjustment Knob
- Detachable Basket
- Rear Bumper
text_image
Diagram of a blue electric scooter with numbered parts for identification and assembly reference.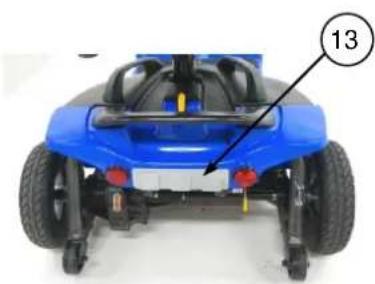
natural_image
Front view of a blue sports car with visible wheels and seat brackets, marked with number 13 (no text or symbols on the vehicle itself)SHOPRIDER®
SAFETY ADVICE
- Do not carry passengers.
- This mobility Product is intended to assist you. For your own safety, please read the Owner's Manual before using the Scooter. If in any doubt, contact your supplier directly for advice.
- Do not exceed inclines over 6 degrees (10% grade).
- Driver weight may exceed weight of the unit, speed must be reduced when turning.
- Do not get on or off the scooter unless the brake is on and the scooter is switched off.
- Do not switch off the scooter while the scooter is moving.
- Do not drive the scooter where you can not safely or legally walk.
- Do not attempt to drive over curbs greater than 15mm in height. Doing so could cause your scooter to turn over, causing personal injury or damage to the scooter. For curbs less than 15mm, always approach them at an angle of 90 degrees and at a low speed.
- Do not drink or use a mobile phone when driving your scooter.
- Do not exceed the suggested user weight limit to use the product. Doing so, could cause personal injury and invalidate the warranty.
• Always keep your feet on the scooter when moving. - Please make sure that you are physically fit to operate this unit. Consult your dealer/doctor for advice.
• Always slow down and proceed carefully when traveling over rough or uneven ground. - For individuals with balance problems, practice getting on the scooter with the assistance of a qualified healthcare professional.
- Do not operate the scooter without anti-tip wheels installed.
- Do not use an escalator to move a scooter between floors or serious injury could occur.
- Do not drive the scooter on an incline that has oil, water or ice film on it.
- Do not try to lift the scooter by its seat, tiller, rear chassis cover, or any removable parts. Any of these could cause injury to the user or damage to the scooter.
- Do not use parts or accessories that are not authorized by the original manufacturer of the scooter.
- Before sitting in or exiting the scooter, REMOVE the key from the ignition. This will insure the POWER is off and the scooter can not move under its own power. As a general precaution, always remove the key from the ignition while the scooter is not in use. This will prevent the use by untrained and unauthorized persons.
SHOPRIDER®
- Do not connect any foreign device to the scooter battery or charging port. This could cause failure of the device, the scooter and personal injury.
- Make sure the tiller is properly adjusted and locked to the user or damage and injury could result.
- It is not allowed to have any person sitting in the scooter when transported by a vehicle, otherwise any injury or damage that might result.
- Do not use the scooter in the rain, near a shower or in a damp bathroom. Direct exposure to rain or dampness could cause the scooter to electrically malfunction and prematurely rust.
- Do not lean against or pull forward on the tiller while mounting or dismounting the scooter. Otherwise, injury may occur.
- Do not operate the unit or turn the key on while charging.
- Whenever a center bolt of the wheel assembly has been loosened, please replace a specified new bolt from authorized dealers and secure with a torque of 240 ± 5 kg-cm together with Loctite 271 adhesive (or equivalent).
- Charge batteries daily after use.
- Charging plug has to be removed from the scooter after charging.
• Always secure any loose cables prior to driving the unit.
• Always verify how much battery charge is remaining before operating the unit.
• Always charge the batteries of the unit in a well ventilated area.
- If the unit went over or sank into deep water, please switch off power of the unit and consult with your authorized dealer for help right away.
- Switch off power of the unit while not in use or before charging, removing and installing the batteries. Otherwise, injury and/or damage to the unit or surrounding property may occur.
- Do not operate the unit in the way of exceeding to the product's specification listed in this owner's manual.
- Do not press the Throttle lever before the key switch is turned on, or the operation will be prohibited until the key is switched off and then on again.
- Avoid driving close to shoulder of the road
• Always use low speed when traveling downhill.
- Do not attempt to cross railroad crossings as the surface may be uneven, find an alternate route.
- Be sure to be well trained with full practice before using the mobility products on road
- Regularly check on your Battery Charge. Always Charge the unit daily after use.
SHOPRIDER®
EMI Warning
Shoprider® scooters may be susceptible to electromagnetic interference (EMI), which is a kind of interfering electromagnetic energy (EM) emitted from sources such as radio stations, TV stations, amateur radio (HAM) transmitters, two-way radio, and cellular phones. The interference (from radio wave sources) can cause the scooter to release its brakes, move by itself, or move in unintended directions. It can also permanently damage the scooter's control system. The sources of radiated EMI can be broadly classified into three types:
- Hand-held portable transceivers (transmitters-receivers) with the antenna mounted directly on the transmitting unit. Examples include: citizens band (CB) radios, "walkie talkie", security, fire and police transceivers, cellular telephones, and other personal communication devices.
NOTE! Some cellular telephones and similar devices transmit signals while they are ON, even when not being used.
- Medium-range mobile transceivers, such as those used in police cars, fire trucks, ambulances, and taxis. These usually have the antenna mounted on the outside of the vehicle.
- Long-range transmitters and transceivers, such as commercial broadcast transmitters (radio and TV broadcast antenna towers) and amateur (HAM) radios.
NOTE! Other types of hand-held devices, such as cordless phones, laptop computers, AM/FM radios, TV sets, CD players, and cassette players, and small appliances, such as electric shavers and hair dryers, so far as we know, are not likely to cause problems to the scooter.
Scooter Electromagnetic Interference (EMI)
Because EM energy rapidly becomes more intense as one moves closer to the transmitting antenna (source), the EM fields from hand-held radio sources (transceivers) are of special concern. It is possible to unintentionally bring high levels of EM energy very close to the scooter's control system while using these devices. This can affect scooter movement and braking. Therefore, the warnings listed below are recommended to prevent possible interference with the control system of the scooter.
SHOPRIDER®
WARNINGS
- Do not operate hand-held transceivers (transmitters-receivers), such as citizens band (CB) radios, or turn ON personal communication devices, such as cellular phones, while the scooter is turned ON.
- Be aware of nearby transmitters, such as radio or TV stations, and try to avoid coming close to them.
- If unintended movement or brake release occurs, turn the scooter OFF as soon as it is safe.
- Be aware that adding accessories or components, or modifying the scooter may make it more susceptible to EMI.
NOTE! There is no easy way to evaluate the overall immunity of the scooter.
- Report all incidents of unintended movement or braking to your Shoprider® dealer, and note whether there are sources of EMI nearby.
WARNING: The original manufacturer and the importer of the scooter is not responsible for damage or injury incurred due to improper and unsafe use of our scooter.
SHOPRIDER®
ADJUSTMENTS
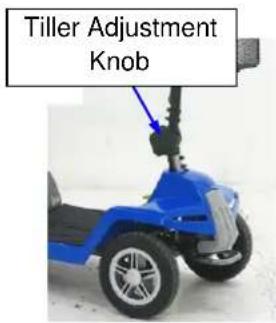
Tiller Angle Adjustment (Fig. 1)
At the base of the tiller is a round knob. Turn the knob counterclockwise to loosen the tiller and select the desired tiller angle. Turn the knob clockwise to securely lock the tiller into place.
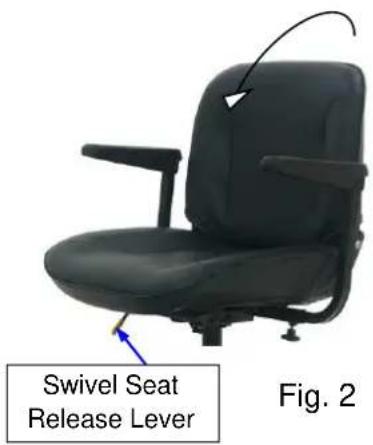
Seat Removal (Fig. 2)
Fold down the back of the seat. Lift the swivel seat release lever up to lift the seat up and off the seat post.
Armrest Width Adjustment (Fig. 3)
On the underside back of the seat there are two armrest hand knobs, one on each side. Turn hand knobs counterclockwise to loosen. Loosening the armrest hand knob allows the armrest width to be adjusted or armrest to be removed. Once the desired positions of the arm rests are set, tighten the hand knobs by turning clockwise to lock the armrests into place.
Do not use the scooter without the arms being fitted.
Armrest Adjustments (Fig. 3)
The armrests are hinged and can be pulled up and out of the way for sideways transfer. Pull armrest up and back.
text_image
Tiller Adjustment KnobFig. 1
text_image
Swivel Seat Release Lever Fig. 2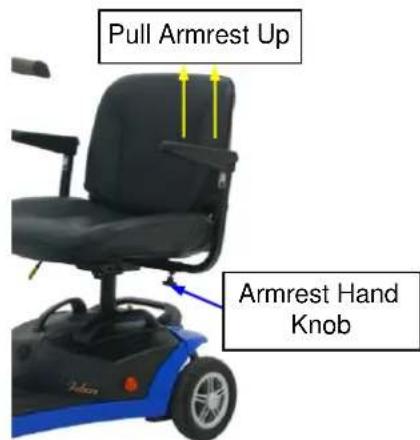
text_image
Pull Armrest Up Armrest Hand KnobFig. 3
SHOPRIDER®
Labels and Warnings
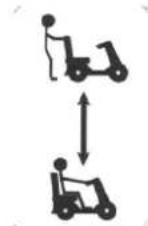
OFF-Brake-ON Label
text_image
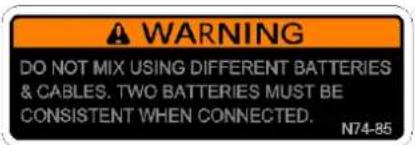
WARNING DO NOT MIX USING DIFFERENT BATTERIES & CABLES. TWO BATTERIES MUST BE CONSISTENT WHEN CONNECTED. N74-85Warning Sticker
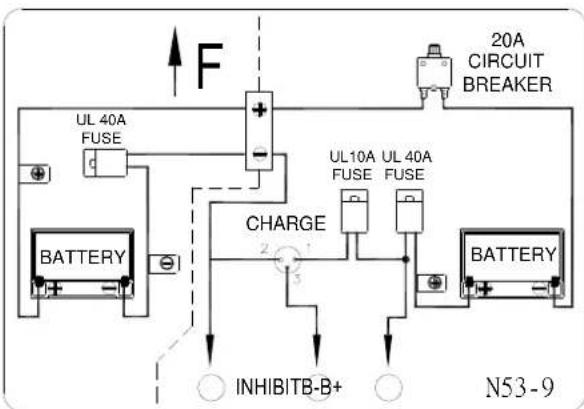
flowchart
graph TD
    A["BATTERY"] --> B["UL 40A FUSE"]
    B --> C["+"]
    C --> D["20A CIRCUIT BREAKER"]
    D --> E["BATTERY"]
    E --> F["UL10A UL 40A FUSE"]
    F --> G["+"]
    G --> H["INHIBITB-B+"]
    H --> I["N53-9"]
    style A fill:#f9f,stroke:#333
    style B fill:#ccf,stroke:#333
    style C fill:#cfc,stroke:#333
    style D fill:#fcc,stroke:#333
    style E fill:#cff,stroke:#333
    style F fill:#ffc,stroke:#333
    style G fill:#cfc,stroke:#333
    style H fill:#fff,stroke:#333
    style I fill:#fff,stroke:#333
Battery Wiring Diagram (for 22Ah)
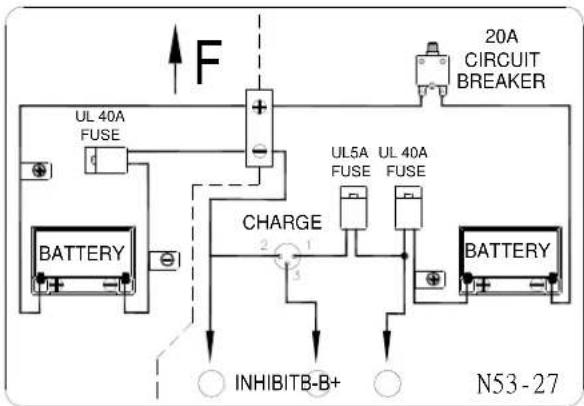
flowchart
graph TD
    A["UL 40A FUSE"] --> B["BATTERY"]
    C["UL5A FUSE"] --> D["BATTERY"]
    E["20A CIRCUIT BREAKER"] --> F["+"]
    G["INHIBITB-B+"] --> H["CHARGE"]
    I["N53-27"] --> J["+"]
    K["F"] --> L["Ground"]
    style A fill:#f9f,stroke:#333
    style C fill:#f9f,stroke:#333
    style E fill:#f9f,stroke:#333
    style G fill:#f9f,stroke:#333
    style I fill:#f9f,stroke:#333
Battery Wiring Diagram (for 14Ah)
SHOPRIDER®
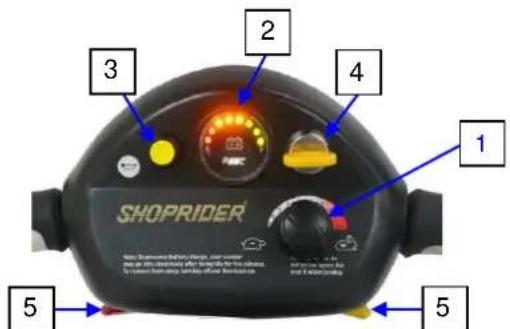
SCOOTER TILLER CONTROLS (Fig. 4)
text_image
SHOPRIDER 1 2 3 4 5Fig. 4
(1) Speed Controls
The speed control allows you to set a speed between 1 (minimum) and 10 (maximum). Turn the dial knob counter-clockwise to “minimum” to decrease speed, and clockwise towards “maximum” to increase your speed.
(2) LED Battery Level Indicator
The gauge is marked from "E" empty, to "F" full. For extra clarity there is a colored graduated scale ranging from RED, (E) through YELLOW to GREEN, (F).
GREEN indicates ready for use.
YELLOW indicates batteries to be charged as soon as possible.
RED indicates charge batteries immediately.
(3) Horn
A yellow button operates the horn.
(4) On/Off Key Switch
Insert the key in the right side of the tiller. Turn the key on and the needle arm indicator will indicate the battery charge. There is a delay before the thumb/finger lever control can be operated, while the controller is checking the circuits.
(5) Throttle Lever Controls
The left throttle lever controls the reverse and the right throttle lever controls the forward motion. The amount of pressure applied to each lever will determine the speed the scooter travels at. Release the lever and the scooter will slowly come to a stop and the electromagnetic brake will be applied.
Electromagnetic Brake
The brake is automatically operated when the control levers are released. There is a slight delay when the scooter decelerates; this allows the scooter to come to a smooth stop.
SHOPRIDER®
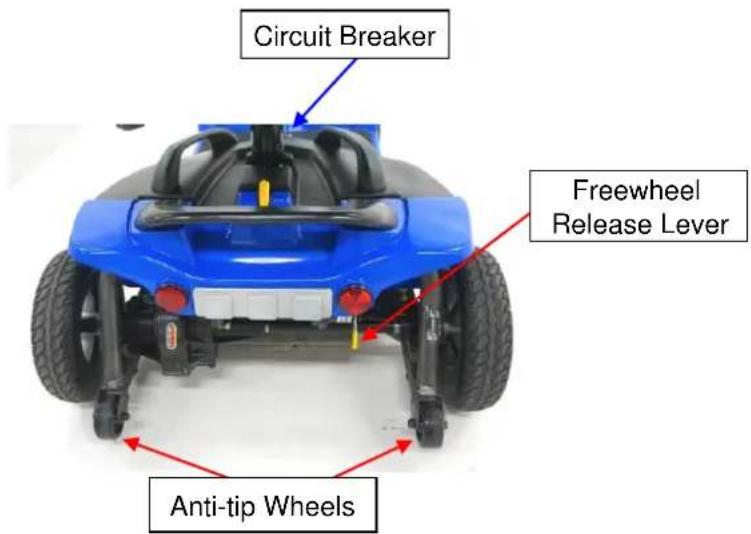
The free wheel release lever (yellow handle) is located inside the right rear wheel. To disengage the motor, lift up the lever (the scooter can now be pushed). To re-engage the motor push down on the lever. Never release the lever on an uneven surface.
WARNING! Always re-engage the free wheeling device after use.
Failure to do so may result in injury.
Anti-tip wheels
The anti-tip wheels are located at the rear of the scooter frame. The scooter should not be used unless the anti-tipping wheels are in place.
The original manufacturer and the importer of the scooter is not responsible for damage or injury incurred due to improper or misuse of the scooter.
text_image
Circuit Breaker Freewheel Release Lever Anti-tip WheelsFig. 5
SHOPRIDER®
TRANSPORT / STORAGE
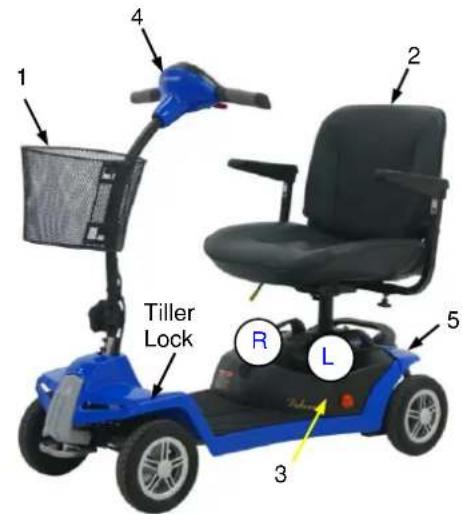
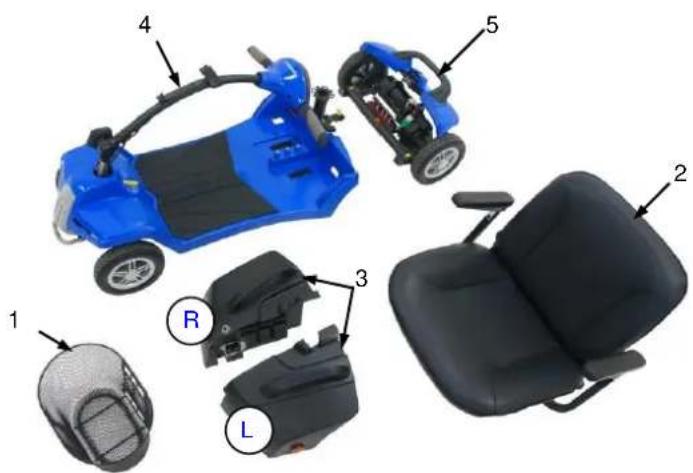
The portable scooter is designed to be quickly and easily disassembled into sections for transportation and storage. Follow these simple guidelines for disassembly:
Disassembly (Fig 6 & 7)
1) Remove the front basket: Lift basket up and off.
2) Fold the seat down and remove: Pull yellow swivel seat lever up and lift seat up and off.
3) Remove battery packs: Remove the left side battery pack first, and then remove right side battery pack.
Remark:
- The right side battery pack should be installed first before the left side one to be well engaged.
- The dual portable battery packs must be engaged together and installed onto a scooter properly before driving or charging.
4) Fold tiller down and lock into place: Lift the yellow lever upward to sideward for locking the steering and front wheels. Loosen tiller adjustment knob, lower tiller, and tighten adjustment knob.
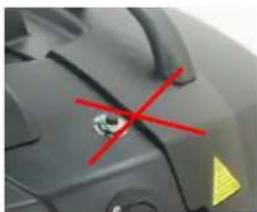
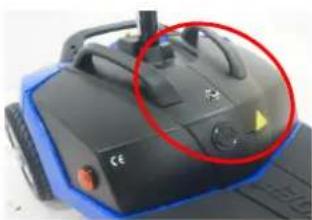
5) Detach rear section from front section: Detach lever (yellow) is located in the rear of the scooter next to the freewheel lever. Slide lever to "detach" and separate rear section from front section.
natural_image
Close-up of a mechanical component with red X marks and yellow triangular annotation (no readable text or symbols)(Incorrect)
Not securely locked
natural_image
Close-up of a cleaning or cleaning machine with a red circle highlighting the component (no visible text or symbols)(Correct)
Securely Locked
text_image
1 2 3 4 5 Tiller Lock R L
Zoom View of Tiller Lock
Figure 6
text_image
Exploded view diagram of a blue electric scooter with labeled parts including steering wheel, battery pack, seat, and rear seats.Figure 7
SHOPRIDER®
STARTING TO DRIVE YOUR SCOOTER
Getting Started
- Select a level area with plenty of space.
- Mount the scooter, either by lifting the arm and sliding on to the seat or rotate the seat outwards and then rotate the seat back to face the tiller.
- Adjust the tiller and seat as described previously.
Starting Scooter Movement
- Ensure that you are seated in a comfortable position.
- Turn the key to the ON position.
- Your speed setting should be on 1 or 2.
- Push your right hand throttle lever, the scooter will move forward slowly. The farther forward you push the faster the scooter goes but will only reach the speed level that has been selected.
- Release the lever and the scooter will slowly come to a stop and the magnetic brake will be applied.
Steering
Steering the scooter is light and easy. Ensure when starting off you give a wide clearance when turning so that the rear wheels clear any obstacle that you are passing. When steering through limited spaces such as a doorway or when turning around, turn the tiller handles where you want to go and apply power gently. The scooter will turn very tightly, but will still move with complete stability as long as the speed is not too high.
Reversing
Before reversing ensure that the area behind is free from any hazards or obstructions. Adjust your speed setting to a low setting before you reverse. Press the left throttle lever, and steer wide of all corners and obstacles.
Dismounting
Before dismounting ensure that the key is turned to the off position.
CAUTION: Please ensure that care is exercised when entering or leaving the scooter and that the tiller and foot rest is not used for support.
SHOPRIDER®
EXTRA GUIDELINES IN THE CONTROL OF YOUR SCOOTER
Ramps
The stability of your scooter is governed by several factors such as the seating position, the angle of the slope and your height and weight. When approaching an incline, do so directly and not at an angle and whenever possible avoid making turns. When going down a ramp or slope keep the speed settings to slow. This will ensure there is a safe controlled descent. When the finger levers are released the scooter will slowly stop.
Safe Climbing Angle
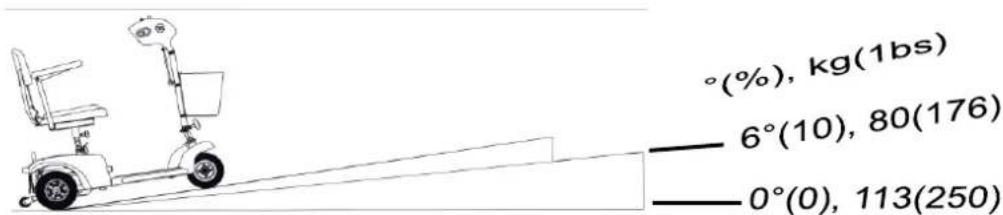
Always follow the guidelines of the safe climbing angle shown as shown in figure 8.
Caution - Do not turn off the control key while the unit is in motion
Grass and Gravel
Please follow the guidelines given previously and your scooter will perform admirably over many surfaces. Avoid long grass, loose gravel and sand.
NOTE: You should not operate your scooter in wet weather or on wet surfaces. This may cause the motor to sort out.
text_image
°(%, kg(1bs) — 6°(10), 80(176) — 0°(0), 113(250)(Single user)
Fig. 8
Angles and weights shown here for this scooter indicate the safe working angles for the user and equipment. Any scooter used outside these parameters may be unsafe and or cause future problems with the electrical systems
SHOPRIDER®
BATTERIES AND BATTERY CHARGER
The Shoprider® scooter is supplied with maintenance free, sealed lead acid batteries. Battery performance can be affected by temperature, terrain, condition of battery, type of battery charger, the weight of the user, wind speed, etc. The battery level indicator is only a guide and is most effective when the scooter is moving, only then is the true discharge level displayed.
- When the scooter stops the battery level indicator may indicate full.
- An active user can use up to 30% of battery capacity or more per day.
• Inactive users may only use 50% of battery capacity in a week.
• In both these instances the battery should be put on charge over night.
• Always replace the batteries with two identical batteries of the same chemistry, amp-hours, and capacity as a set and shall be made at the same time by your authorized dealer.
Battery Charger
The battery charger supplied is special to your scooter, and may not be suitable for any other power mobility product. Use only the charger supplied with your scooter; other makes of chargers may permanently damage your scooter batteries, and would void the warranty. All the information regarding the battery charger and its operation can be found in the user manual included with the charger in its packaging.
First Time Use
Prior to using your Portable scooter for the first time, you must charge the batteries fully (refer to Battery Charging Procedures). Charging may take up to 12 hours. Charging the batteries completely prior to first time use will benefit battery efficiency. Failure to do so may cause damage.
Charging
To charge the batteries connect the 3-pin male plug lead into the 3-pin female battery-charging socket located on the battery pack. Plug the A/C cord plug into the wall socket and the other end into the charger (2-pin). Please refer to the LED indicator description based on charging status of the charger's manual. Once the batteries are completely charged, unplug the A/C cord from the wall then unplug the 3-pin lead from the battery pack.
WARNING: Only use the original Shoprider® approved charger!
This charger is for indoor use only. DO NOT expose it to rain or water spray.
Do not leave the charger plugged into the charger port if the charger is not charging.
SHOPRIDER®
Battery Information
-
Do not mix using different batteries & cables. Two batteries must be consistent when connected.
-
The dual portable battery packs must be engaged together and installed onto a scooter properly before driving or charging.
-
Fully recharge new batteries prior to initial use.
-
It is recommended that the batteries be charged for 8 to 14 hours after daily use.
-
If the scooter is used infrequently (Once a week or less) the batteries will need to be charged once a week for 12 to 14 hours.
-
Do not charge the batteries for more than 24 hours at a charging cycle.
-
Batteries that go below a minimum voltage due to not being charged will be unable to be re-charged.
-
If you do not plan on using your scooter for an extended period it is recommended that you fully charge the batteries and then disconnect the battery harness prior to storage. Store the scooter in a warm dry environment. Never store the batteries where extreme temperatures are possible. Never attempt to charge a frozen battery. A cold or frozen battery should be warmed for several days prior to charging.
SHOPRIDER®
MAINTENANCE
Lubrication
At six-month intervals you should lubricate the following parts with a light oil or similar lubricant:
- Seat pivot post.
- Seat release lever pinion.
- Wheel bearings.
- Axle of scooter.
CAUTION – DO NOT USE WD40 TO LUBRICATE PARTS!! DO NOT LUBRICATE TRANSAXLE/GEAR BOX!! In the event of any difficulties please consult your dealer.
Cleaning
Your scooter should be cleaned as required however as with all electrical equipment you must ensure that extreme care is used to not cause water damage to any sensitive parts. Read the following warnings
- Only use a soft damp cloth.
- Never use a hose to wash your scooter.
- Do Not use abrasive cleaning products – Mild detergents only should be used.
Tires
Since your tires are flat free tires, there is no need to ever worry about tire air pressure.
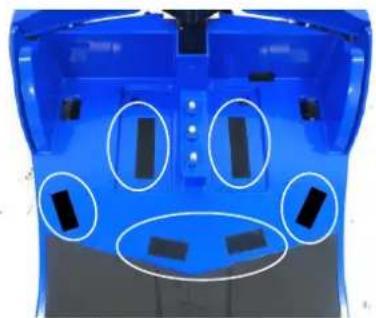
The Velcro (Hook/Loop) attached on the chassis cover (w/ Hook) and battery pack (w/ Loop) shown as below should be periodically cleaned or contact your authorized dealer for replacement of Velcro and check if all power contact points on your scooter are well intact.
natural_image
Blue transparent device with white circular annotations highlighting internal components (no text or symbols)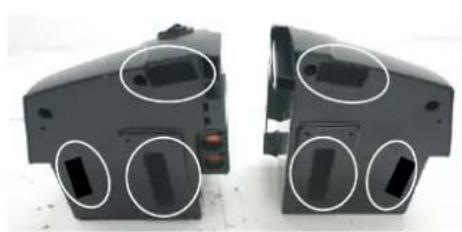
natural_image
Two black plastic electronic components with circular cutouts, shown from front and side views (no text or symbols visible)SHOPRIDER®
TROUBLE SHOOTING GUIDE
Circuit Breaker
Your scooter is fitted with the latest in electronic controls that are programmed to protect the electrical system from abnormal overloads. Fitted for extra protection is a circuit breaker, should there be a situation that your scooter stops for no apparent reason please check that the circuit breaker has not popped out. The circuit breaker located on the side of the battery pack.
Check List
If your scooter fails to operate, please check the following:
- Unit is switched on.
- All plugs and connectors are firmly fixed.
- Battery level shows full charge.
- Drive/Freewheel device is in the drive position.
If the free wheel device has been operated with the scooter left switched on, then the scooter will not operate until the ignition key has been switched off and then on again. Please consult your dealer if your scooter does not run after checking these points.
Please consult your authorized dealer if your scooter does not run after checking these points.
SHOPRIDER®
TECHNICAL SPECIFICATIONS
| Model Name | TE-7A | ||
| Overall Dimensions: L^1 x W x H | in | 43.7 x 21.3 x 36.4 | |
| Front Tire Diameter | pcs x in | 2 x 8 | |
| Rear Tire Diameter | pcs x in | 2 x 8 | |
| Suggested User Weight(on the Level Road) | lb | 250 | |
| Total Weight (w/ Dual PortableBattery Packs, Basket, Seat) | lb | 94.6(14Ah) | 110(22Ah) |
| Mass of the heaviest part (FrontChassis) | lb | 33 | |
| Battery Capacity | _V_Ah x Pcs | 12V 14Ah/22Ah x 2 | |
| Charger | V_Amp | AC 220/110 V / DC 24V 2A | |
| Output Power of Motor (ReferenceOnly) | W(Hp) | 300(0.4) | |
| Max. Speed^2 | mph | 3.8~4.4 | |
| Safe Climbing Angle | Degree(%) | Fig. 8 | |
| Range^3 per charge(Battery Capacity) | mile | 7.5~8.8(14Ah) | 12.5~13.8(22Ah) |
| Turning Radius | in | 46.1 | |
\*\*\*ALL SPECIFICATIONS ARE SUBJECT TO CHANGE WITHOUT PRIOR NOTICE\*\*\*
- To include the anti-tip wheels
- Driver weight may exceed weight of the unit; although the speed must be reduced when turning.
- The actual driving range varies with the factors shown below:
a) the weight of occupant
c) battery conditions
d) type of charger
e) ambient temperature
f) the way of driving
g) terrain
h) the wind speed
i) etc.
SHOPRIDER®
Disclaimer
Congratulations on receiving the scooter.
This scooter is not intended to be used by individuals with physical limitations that could prevent the user from operating the scooter safely. SHOPRIDER ^® disclaims all responsibility for any personal injury or property damage, which may occur as a result of improper or unsafe use of its products. Mechanical or electrical defects will be dealt with on a contingency liability basis.
Warranty is only valid when genuine SHOPRIDER® parts are used. All modifications on the Scooter, unless approved and authorized by SHOPRIDER® will automatically invalidate the warranties. Standard warranty does not extend to consumable items and parties other than the original user.
The preceding guidelines are intended to assist you in the safe operation of this Scooter. If you should have any questions about the correct operation of the Scooter, please contact your authorized SHOPRIDER® provider.
Provider Stamp
Serial No.: