
Gecko SL 3 - Véhicule pour personnes handicapées Shoprider - Free user manual and instructions
Find the device manual for free Gecko SL 3 Shoprider in PDF.


User questions about Gecko SL 3 Shoprider
0 question about this device. Answer the ones you know or ask your own.
Ask a new question about this device
Download the instructions for your Véhicule pour personnes handicapées in PDF format for free! Find your manual Gecko SL 3 - Shoprider and take your electronic device back in hand. On this page are published all the documents necessary for the use of your device. Gecko SL 3 by Shoprider.
USER MANUAL Gecko SL 3 Shoprider
natural_image
Blank white image with a small red 'X' in the top-left corner (no text or symbols)OWNERS MANUAL FOR THE GECKO
MODEL NO SL3 & SL4
natural_image
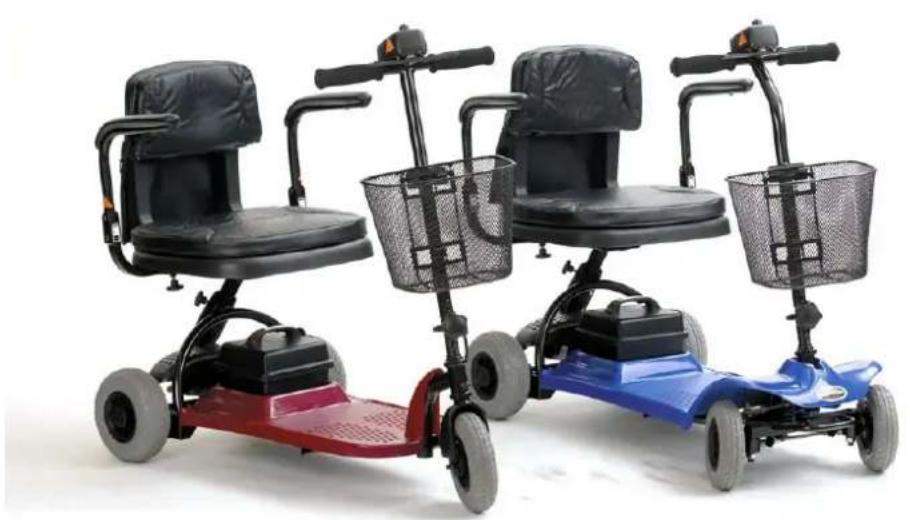
Three electric mobility scooters in black, red, and blue colors with shared front wheels and back brackets (no text or symbols visible)IMPORTANT NOTE: This scooter has been designed to climb angles up to 8 degrees. When driving the Gecko scooter as with all scooters the driver should lean forward with feet placed on the foot plate when going up an incline. This practice will ensure maximum stability.
Mounting
Make sure your Gecko Scooter is on level ground.
Seat yourself in the Scooter.
Turn the speed dial to slow. (Turn the dial to the left).
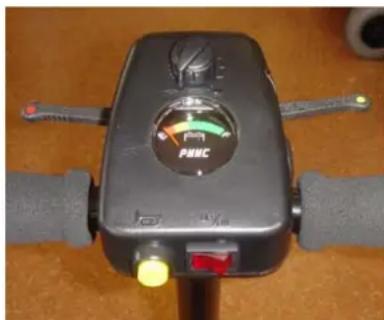
Turn the on/off switch to the ON position –Battery charge meter will be in the green.
Dismounting
Ensure that your Gecko Scooter has fully stopped.
Turn the on/off switch to the OFF position
You can now dismount from the seat.
natural_image
Close-up of a black PAMC motor with control knob and yellow indicator lights (no readable text or symbols beyond branding)Basic Driving
Make sure you have completed the details described under "mounting".
For the standard unit pull on the accelerator lever with your RIGHT index finger to start moving forward.
To STOP gently release the accelerator lever and the scooter will come to a stop.
Practise these two basic functions until you are proficient in their use.
Steering the Gecko scooter is easy and logical. Just be sure to remember to give a clearance when turning so that the rear wheels clear any obstacles.
When turning always turn your Gecko scooter to a LOW speed.
If it is a tight turn (entering a doorway or going around a blind corner) STOP your Gecko scooter. Turn your steering column in the direction you wish to proceed whilst still in the stationary position. Then apply the power gently to move forward The Gecko scooter will move gently and with complete stability.
REVERSING requires your attention
Always turn your Speed dial to SLOW before reversing.
Pull the accelerator lever with your left index finger.
Remember, when you reverse steer you turn in the OPPOSITE direction to the way you want to go. Always take your time.
The Gecko scooters are not designed for use in loose gravel, sand or soft grass. Your scooter is also not designed to be used in wet weather or rain.
Ramps
The stability of your scooter is governed by several factors such as the seating position of the occupant, the angle of the slope, your height and weight. When approaching an incline, do so directly, avoid driving up on an angle. Where ever possible avoid making turns on any incline or decline. When going down a slope set the speed setting to SLOW, this will ensure there is a safe controlled decent. When the finger levers are released the scooter will slow to a stop.
Do not turn off the control switch whilst the unit is in motion.
Please follow all the guidelines and your scooter will perform admirably over many surfaces.
Doors
Always ensure your speed is set at the SLOWEST setting.
Think in terms of using the power of the Gecko scooter to do the work for you. For doors that open outward, hold the door knob with your right hand and reverse the Gecko scooter as described earlier. Where the door opens inwards hold the door knob with your left hand and push your accelerator lever with your RIGHT thumb.
Transporting Your Scooter
Always ensure your scooter is turned OFF on the steering column.
Remove your basket by pulling it up gently.
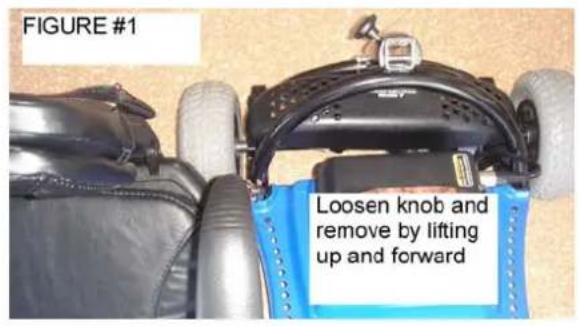
Remove your seat by loosening the seat knob and pulling forward on the seat gently and lifting off. (As indicated in figure #1)
Remove the battery pack by gently pulling out the power cable and pulling up on the battery pack handle to release the Velcro tabs holding the battery pack in place. (As indicated in figure #2)
Fold the front tiller down onto the scooter after turning the tiller knob anti clockwise until the small locking tab is disengaged. Now lay the tiller down. (As indicated in figure #3)
The scooter is now ready to be placed in the car.
Once the Scooter has been placed in the car the basket and battery pack can be placed loosely around the main components. (As indicated in figure #4)
CHARGING
The battery pack can be charged as an independent unit. It does not have to be connected to the scooter (See Figure #5)
The battery charge level indicator will be in the RED section when the battery is very low. Place the MALE socket of the battery charger into the female socket on the battery pack where the power cable connects taking care to ensure that the pins line up correctly.
Plug your charger into the wall and turn the power on. The charger light will glow RED indicating the batteries are NOT fully charged. When the batteries have reached their capacity the charger light will glow GREEN.
When you refit the battery pack to your Gecko scooter take care when reconnecting the power cable to line up the pins correctly before pushing the plug home.
text_image
FIGURE #1 Loosen knob and remove by lifting up and forward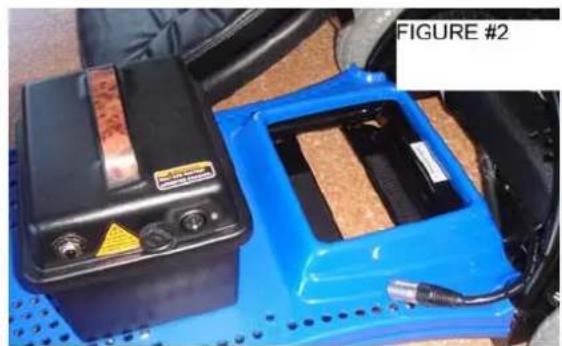
natural_image
Two blue electric vehicle battery modules on perforated metal surface, one black and one blue, with no visible text or symbols.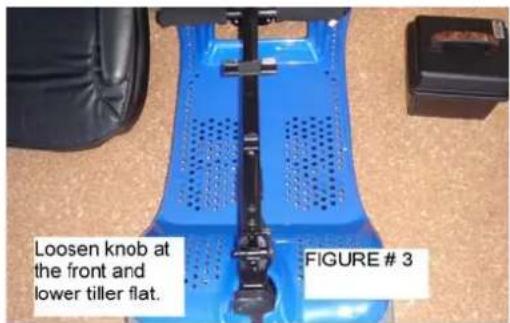
text_image
Loosen knob at the front and lower tiller flat. FIGURE # 3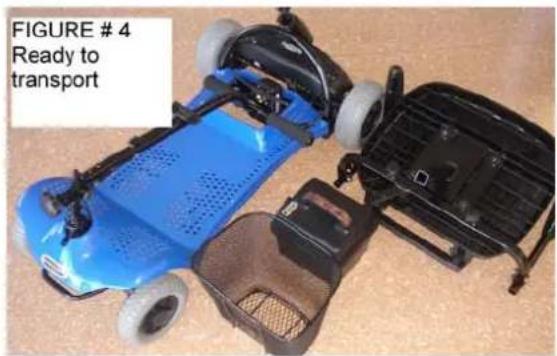
natural_image
Top-down view of a blue and black electric vehicle chassis with wheels and seats, labeled 'FIGURE # 4 Ready to transport' (no other text or symbols visible)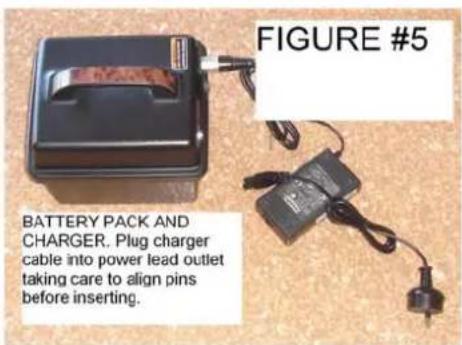
text_image
FIGURE #5 BATTERY PACK AND CHARGER. Plug charger cable into power lead outlet taking care to align pins before inserting.Important note: A warranty registration form must be returned to EMS within 2 weeks of purchase for warranty to be valid.
Structural Frame - 2 years Warranty
EMS will warrants that the frame will be free from defects under normal use for a period of 2 years from the date of purchase by the original customer.
EMS will repair or replace, at our option, free of charge any part found upon examination by EMS to be defective in material and/or workmanship within the warranty period.
All parts claimed under warranty must be returned to EMS in their present condition. Only an authorised WARRANTY DEALER of EMS, following approval by EMS, can undertake warranty.
12 Months Warranty:
EMS will repair or replace, at our option, free of charge any part found upon examination by EMS to be defective in material and/or workmanship for a period of twelve (12) months from the of purchase by the original customer.
All parts claimed under warranty must be returned to Shoprider Australia in their present condition. Only an authorised WARRANTY DEALER of EMS, following approval by EMS, can undertake warranty work.
Exclusions:
- All transport costs associated with the submission and return of parts for repair or replacement under warranty (as determined by EMS) are the responsibility of the original customer.
- Normal wear items are not covered under this warranty. These include such items as brushes, tyres, brake pads, upholstery, seating and arm rests.
- Damaged caused by:
- Excessive, abusive, misuse, negligence or accident.
- Improper maintenance, maintenance carried out by non-approved WARRANTY DEALER
- Commercial use,
Items not covered under this warranty.
-
Where an authorised dealer has not lodged all required documentation at the appropriate time the warranty is void
-
All warranties provided do not extend to purchasers of used or second hand equipment.
Batteries were supplied:
Batteries will be covered by 6 months warranty from the date of purchase by the original customer.
IMPORTANT NOTE: This scooter has been designed to climb angles up to 8 degrees.
When driving the Gecko scooter as with all scooters the driver should lean forward with feet placed on the foot plate when going up an incline. This practice will ensure maximum stability.

EMS
795 Marshall Rd
Malaga WA 6090