Shadow 502 - Phone AUDIOLINE - Free user manual and instructions
Find the device manual for free Shadow 502 AUDIOLINE in PDF.


User questions about Shadow 502 AUDIOLINE
0 question about this device. Answer the ones you know or ask your own.
Ask a new question about this device
Download the instructions for your Phone in PDF format for free! Find your manual Shadow 502 - AUDIOLINE and take your electronic device back in hand. On this page are published all the documents necessary for the use of your device. Shadow 502 by AUDIOLINE.
USER MANUAL Shadow 502 AUDIOLINE
natural_image
Black and white photo of a wireless phone with a digital display and base (no visible text or symbols on the device body)Operating Instructions 45.
D
Inhaltsverzeichnis
Zugangscode (Amtskennziffer)
[3] NACHR-SIGN AUS Visual Message Waiting Indica-
Please read this operating instruction manual thoroughly.
Intended use
The telephone is suitable for telephoning within a public telephone network system. Any other use is considered unintended use. Unauthorised modification or reconstruction is not permitted. Under no circumstances open the device or complete any repair work yourself.
Installation location
Prevent excessive exposure to smoke, dust, vibration, chemicals, moisture, heat and direct sunlight.
Do not use the handset in potentially explosive areas.
Power adapter plug
Attention: Only use the power adapter plug supplied because other power supplies could damage the telephone. Ensure access to the power adapter plug is not obstructed by furniture or such.
Rechargeable batteries
Attention: Never throw batteries into a fire. Only use batteries of the same type. Pay attention to correct polarity. There is a risk of explosion if batteries are improperly used.
Power failure
The telephone cannot be used to make calls in the event of a power failure. Always keep a cord connected telephone which operates without an external power supply available in case of emergency situations.
Medical equipment
Attention: Never use the telephone in the vicinity of medical equipment. Effects on such equipment cannot be fully ruled out. Maintain a clearance of at least 1 m.
DECT ^1 telephones can cause an unpleasant humming sound in hearing aids.
Disposal
If your device has come to the end of its service life, bring it to a collection point provided by your local public waste authorities (e.g. recycling center). The adjacent symbol indicates that the old device must be disposed of separate from domestic waste. According to laws on the disposal of electronic and electrical devices, owners are obliged to dispose of old electronic and electrical devices in a separate waste container.
Batteries must be disposed of at the point of sale or at appropriate collection points provided by the public waste authorities.
Packing materials must be disposed of according to local regulations.


^1 DECT: Digital Enhanced Cordless Telecommunication = Standard for cordless telephones.
Putting the Telephone into Operation
2 Putting the Telephone into Operation
Safety information
Attention: It is essential to read the Safety Information in Chapter 1 before starting up.
Package contents
The package contains:
| Content | Shadow model | |||
| 500 | 502 | * | 503* | |
| Base station(s) with power adapter plug | 1 | 1 | 1 | 1 |
| Charging station(s) with power adapter plug | - | 1 | 2 | 3 |
| Handset(s) 1 2 3 4 | ||||
| Telephone connection cable 1 1 | 1 | 1 | ||
| Batteries 3 6 9 12 | ||||
| Belt clip(s) 1 2 3 4 | ||||
| Operating manual 1 1 1 1 | ||||
Connecting the base station
Attention: Position the base station at least 1 m away from other electronic devices, otherwise there is a risk of mutual disturbance.
Connect the base station as illustrated in the diagram. For reasons of safety, only use the power adapter plug and telephone connection line supplied.
* Refer to www.audioline.de to see if this telephone set is already available.
Putting the Telephone into Operation
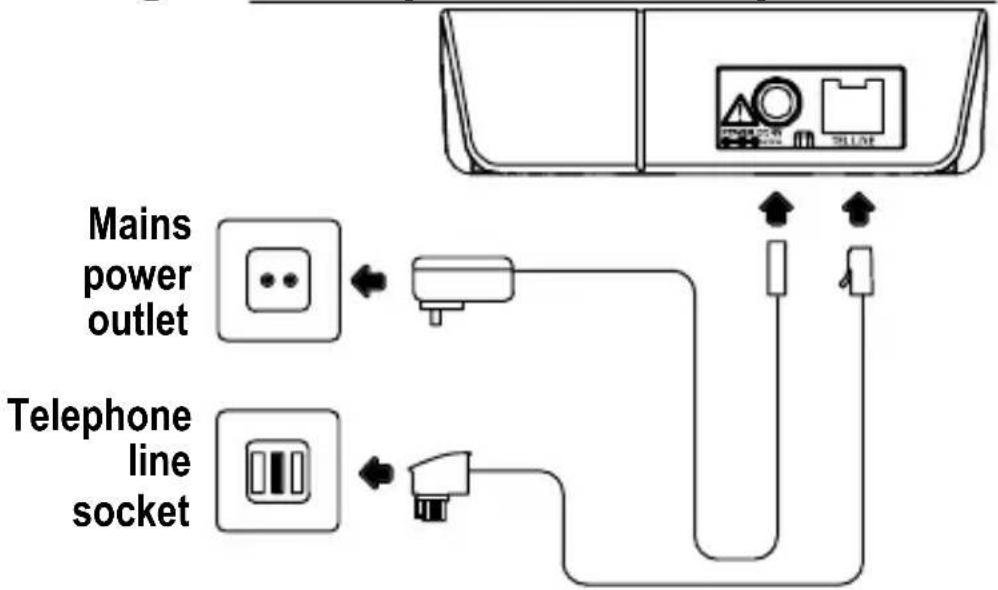
text_image
Mains power outlet Telephone line socketConnecting the charging station ^1
Connect the charging station as illustrated in the diagram. For safety reasons, only use the power adapter plug supplied.
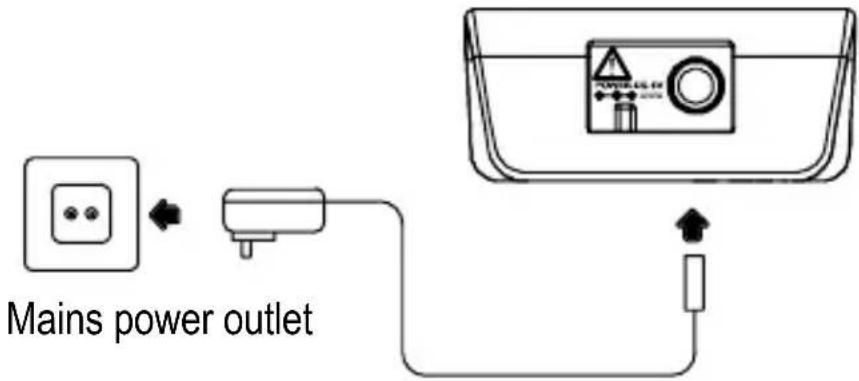
text_image
Mains power outletInserting the batteries
Insert the batteries in the open battery compartment. Only use batteries of the type AAA NiMH 1.2 V. Pay attention to correct polarity. Close the battery compartment.
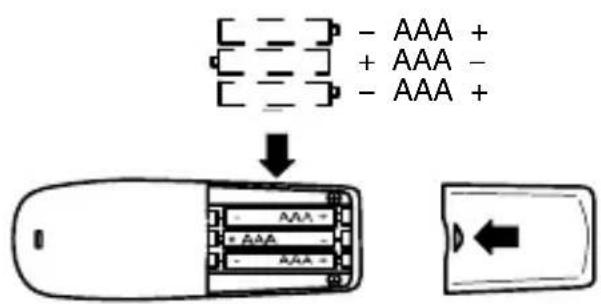
text_image
- AAA + + AAA - - AAA +GB
Putting the Telephone into Operation
Charging the batteries
Before the handset is used for the first time, insert it in the base station/charging station for at least 15 hours. When the handset is correctly inserted in the base station / charging station, the charge control lamp lights up. The handset warms up during the charging process. This is normal and does not represent a risk.
Do not charge the handset with charging units from other manufacturers.
The current battery charge status is indicated on the display:

Full Low

Attaching the belt clip
Turn the handset so that the rear side faces up and press the belt clip into the two recesses provided at the top of the handset on the sides.
Selecting the language
The information on Page 66 explains how to set the display language when putting it into operation for the first time.
Setting the time
The information on Page 68 explains how to set the time on the handset when putting it into operation for the first time.
Private branch exchanges
The information in Chapter 6 explains how to install your telephone in a private branch exchange.
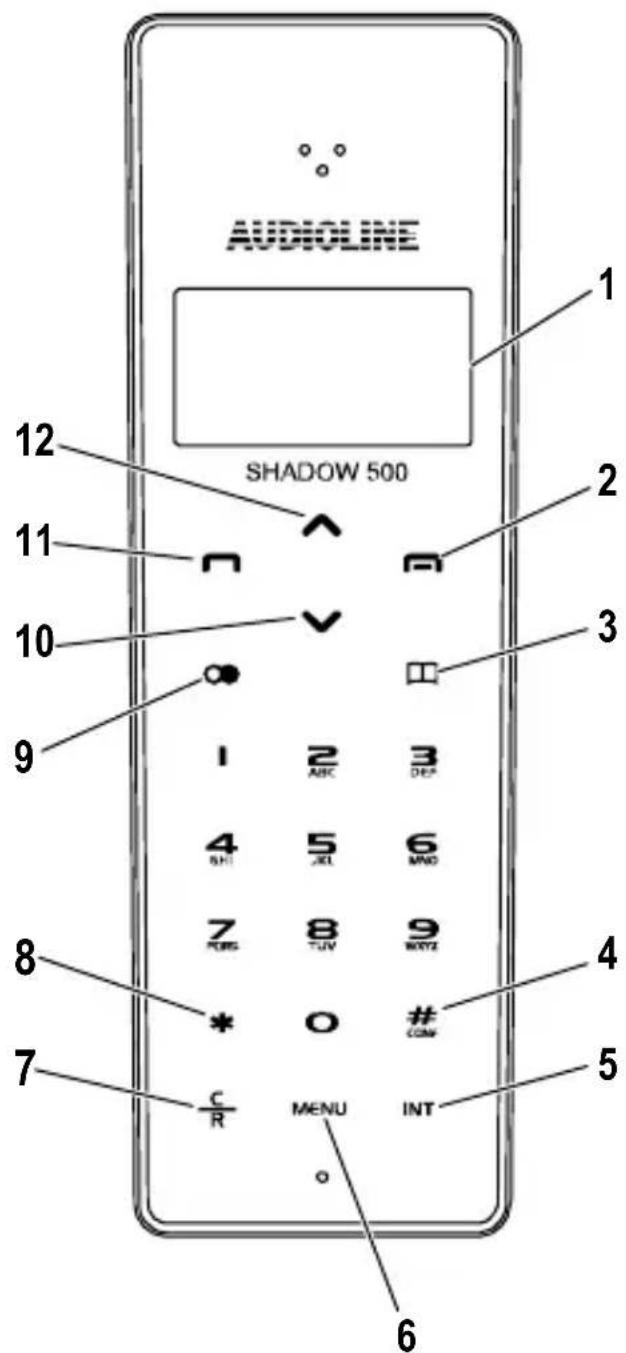
3 Operating Elements
Handset
1 Display
2 On-hook button, Standby mode button
3 Phone book
4 Upper/Lower case, AM/PM (12-hour format) Conference button #
5 INT button (for internal calls) INT
6 Menu button, OK button, Mute MENU
7 Delete button, Back button, R button C
8 Insert special characters when entering text, Temporary switch to tone dialling mode, Manual key lock ✱
9 Redialling, Dialling pause
10 Selection button: scroll down in the menu, Reduce receiver volume ▼
11 Speakerphone button
12 Selection button: scroll up in the menu, Increase receiver volume ▲
text_image
AUDIOLINE 1 SHADOW 500 2 3 4 5 6 7 8 9 10 11 12 C R MENU INT #CONV #DIVS #TUV #MND #DEC #ABC #FEN #FEN #FEN #FEN #FEN #FEN #FEN #FEN #FEN #FEN #FEN #FEN #FEN #FEN #FEN #FEN #FEN #FEN #FEN #FEN #FEN #FEN #FEN #FEN #FEN #FEM #FEM #FEM #FEM #FEM #FEM #FEM #FEM #FEM #FEM #FEM #FEM #FEM #FEM #FEM #FEM #FEM #FEM #FEM #FEM #FEM #FEM #FEM #FEM #FEM #FFM #FFM #FFM #FFM #FFM #FFM #FFM #FFM #FFM #FFM #FFM #FFM #FFM #FFM #FFM #FFM #FFM #FFM #FFM #FFM #FFM #FFM #FFM #FFM #FFM #FAM #FAM #FAM #FAM #FAM #FAM #FAM #FAM #FAM #FAM #FAM #FAM #FAM #FAM #FAM #FAM #FAM #FAM #FAM #FAM #FAM #FAM #FAMThe buttons on your telephone are depicted with uniform icons throughout this operating manual (see above). Slight deviations in the appearance of the icons on the buttons on your telephone and those used in this manual are possible.
Operating Elements
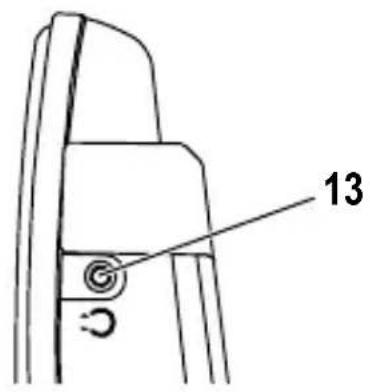
13 Headset connection port
text_image
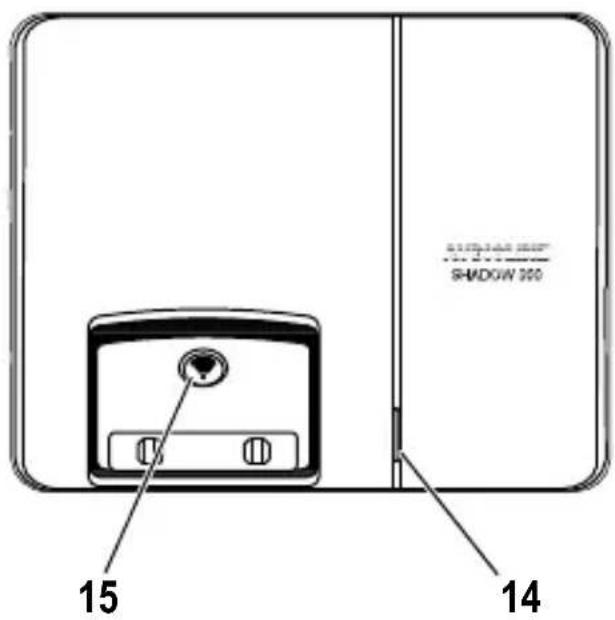
13Base station
14 LED:
Charge control lamp,
flashes with incoming calls
15 Paging button ●)
text_image
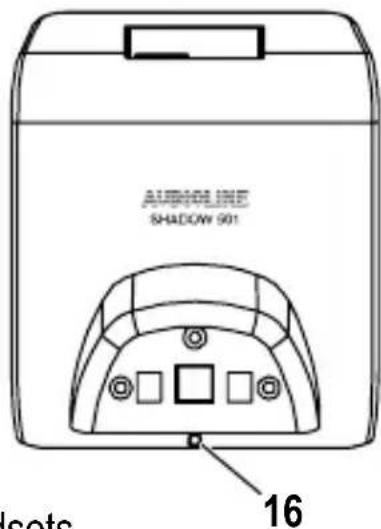
15 14 SHADOW 300Charging station ^1
16 LED, charge control lamp
text_image
AUDIO LINE SHADOW 901 sets 16GB
1 Only applies to models with at multi-handsets.
Section "Package contents" on Page 48
4 Operating the Telephone
Display and explanation of operation sequences
Enter digits or letters
* Press the button depicted briefly
3 sec ✱ Press the button depicted for 3 seconds
(<<) Handset rings
▲Remove handset from the base station
Place handset in the base station
MUTE or Text or icon in the display
Icons in the display
Icon Description

A connection to the base station is available. If the connection deteriorates, you will hear the acoustic Out Of Range warning signal.
OUT OF RANGE
The handset no longer has a connection to the base station. Move towards the base station.

The key lock is activated. ☐ Page 61

The ringing tone has been switched off. Page 60

The alarm clock is activated. 📄 Page 77

Entering text in small letters. Page 72
Operating the Telephone

Indicates a new voice message has been recorded when the answering machine in the telephone network is activated (optional service offered by your telephone network provider) Page 64

Full battery charge capacity.

Low battery charge capacity.
LOW BATTERY
You will also hear the battery warning signal. Please charge the telephone.

Run-through segments: The batteries are being charged. Page 50
HANDSET Name of the telephone. 📋 Page 70
OO:OO Display of the time. Page 68
SPKR Handsfree mode (speaker) has been activated. Page 61
MUTE The microphone is switched off. Page 61
TALK A normal telephone call is taking place.
Standby mode
The following operating instructions assume that the handset is in Standby mode.
The buttons and the display light up when Standby mode is active. In addition, the message READY appears in the display.
The handset is in Standby mode after pressing the 📞 button.
Energy-save mode
After a certain time in Standby mode, the handset switches to an Energy-save mode. The buttons and display are no longer lit up.
The time appears in the display.
Press any button to return to Standby mode.
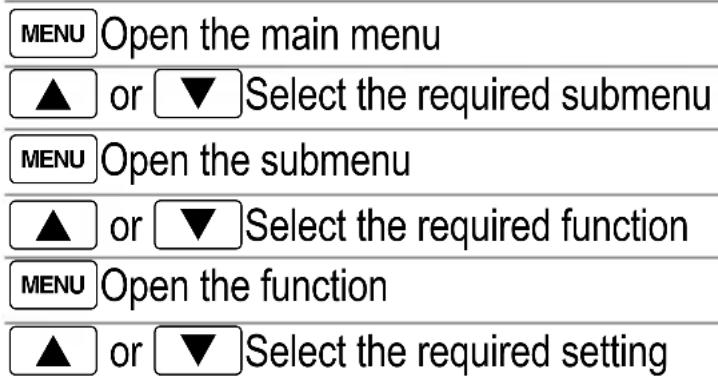
Navigating in the menu
All the functions can be accessed via the various menus. Refer to the menu structure to find how to access the respective functions. Chapter 7
text_image
MENU Open the main menu ▲ or ▼ Select the required submenu MENU Open the submenu ▲ or ▼ Select the required function MENU Open the function ▲ or ▼ Select the required settingEnter digits or letters using the relevant digit keys
MENU Confirm the input
c Move one level back
Return to Standby mode
Every process is automatically cancelled if there is no input within 20 seconds.
Creating phone book entries - example
The way in which to navigate through the menus and enter data is explained by means of the example Creating phone book entries. Proceed as in this example for all the settings.
Open the phone book
MENU Open the menu
▲ or ▼ MENU Select the function and confirm
MENU Enter the name and confirm it
Menu, Enter the phone number and confirm it
Operating the Telephone
Touch-sensitive buttons
The so called touch-sensitive buttons relate to the buttons on the surface of the handset which react when touched.
The touch-sensitive buttons must be “pressed” lightly with your finger. It is not necessary to press hard.
5 Telephoning
Taking a call
When a call is received, the telephone rings as long as you have not deactivated the ringing function. In addition, the LED on the base station lights up and the display and buttons light up on the handset.
(<<), or ▲Take the call

If the Auto Answer function is activated, you only need to take the handset from the base station to take the call. Page 69
Ending a call
or ▼End the call
Making a call
Enter the phone number
c Delete the last digit if incorrect
Dial the phone number
It is also possible to press the Call button first to obtain the dialling tone. The digits in the phone number then entered are dialled immediately. It is not possible to correct wrong digits individually using this dialling procedure.
Redialling
The telephone stores the last 20 records dialled in a redialling list.
Wait for the dialling tone
The last number dialled is
automatically redialled
or:
Open the redialling list
▲ or ▼,
Select an entry and dial the number
Telephoning
Missed calls
The telephone stores the numbers of the last 40 calls received in a calls log. ☐ Page 74
2x ▲ or ▼
Open the calls log
▲ or ▼ Select the entry required
Dial the number
Dialling phone numbers from the phone book
There must be phone numbers stored in the phone book.
Pages 71 and 72
There is a alphabetical telephone name search to jump directly. For example, if the telephone name is "Henry", just directly press "4" in phonebook record, then will jump to the phonebook name with the first record name with letter of "H". Then use
Open the phone book
▲ or ▼,
Select an entry and dial the number
Baby call
If you have activated the Baby Call function, a programmed phone number is dialled when any button on the handset is pressed (except the Menu button). Enter the required phone number after having activated the function. Page 69

If you want to dial another number, you must deactivate the Baby Call function first.
Internal calls
Making internal calls
In order to be able to make free internal calls, two or more handsets (HS1, HS2, ...) of the type Shadow 50X must be registered on the respective base station.
HS1: INT, ▲ or ▼ ↗ Initiate the internal call, dial the handset required
Alternatively to scrolling up and down, you can call the other handset directly by simply dialling the 1-digit phone number.
HS2: Take the internal call on the other handset
HS1/HS2: End the internal call
Transferring external calls internally
A call is taking place between HS1 and an external caller:
HS1: INT, ▲ or ▼ ↗ Initiate the internal call, dial the handset required
HS2: Take the internal call on the other handset
HS1: Transfer the call
If the handset called does not answer, take the external call back by pressing the INT button.
Holding a call / Brokering

Brokering is an optional service offered by your telephone network provider. Contact your provider for further information. Chapter 6
While an external call is in progress, it is possible to dial another internal handset in order to consult with someone. The external caller is put on hold while you converse with the second, internal person called. You can switch between the callers as often as necessary.
HS1: INT, ▲ or ▼ ↗ While an external call is in progress, initiate an internal call with the required handset
HS2: Take the internal call on the other handset
HS1: INT Switch callers
Making conference calls
The three-way conference is an optional service offered by your telephone network provider. Contact your provider for further information. Chapter 6
An external call can be transferred to another internal handset for a conference call.
HS1: INT, ▲ or ▼ ⬇ While an external call is in progress, initiate an internal call with the required handset
HS2: Take the internal call on the other handset
HS1: # Start the conference
HS1/HS2: The conference is terminated by one of the internal handset users ending the call
Call waiting
Call waiting is an optional service offered by your telephone network provider. Contact your provider for further information (on the flash time required etc.). Chapter 6
If another call is received while you are actually making a call, you hear an acoustic signal.
R 2 Take the new call and put the first caller on hold
R 2 Switch between the two callers.
Talk time display
The duration of a call is displayed in minutes and seconds during the call.
Ringing melody and volume
There are 14 different ringing melodies and 4 different ring volumes available as well as the "OFF" setting. Page 67
Receiver volume
The volume can be adjusted during a call.
▲ or ▼ Set the required volume
Muting the microphone in the handset
The microphone in the handset can be activated and deactivated during a telephone conversation. When deactivated, the caller can no longer hear you.
Proceed as follows during a call:
MENU Deactivate the microphone,
MUTE appears in the display.
MENU Activate the microphone
Handsfree
Use this function to listen to the caller via the loudspeaker.
Proceed as follows during a call:
Activate handsfree mode,
SPKR appears in the display.
Deactivate handsfree mode
Display contrast
The contrast of the display can be adjusted to suit current needs.
Page 68
Smart Keylock™
The Smart Keylock ^TM function prevents functions assigned to buttons being inadvertently activated during a call.
When the Smart Keylock™ function is on, the buttons are automatically disabled when you have dialled a number and placed the handset to your ear.
The Smart Keylock™ function is automatically deactivated when you move the handset away from your ear. Page 69
Telephoning
Manual key lock
The manual key lock function prevents operations being activated inadvertently.
During Standby mode MENU, ✱
Activate the key lock function
During Keylock is activated MENU, ✱
Deactivate the key lock function
Incoming calls can still be taken in the normal way even with the key lock activated. When the call is ended, the telephone key lock function remains activated.
When the key lock function is activated, only the Menu button can be operated and the programmed emergency numbers dialled.
Dialling emergency numbers
By default, the telephone is set up so that two emergency numbers, 112 and 110, can be dialled even if the key lock function is activated.
1 1 2 ^ABC Enter the emergency number and dial the number
or:
1 1 0 Enter the emergency number and dial the number
Searching for the handset (Paging)
If you have mislaid your handset, you can locate it with the aid of a search tone.
Start the search tone
or End the search tone
6 PABX / Supplementary Services
Private branch exchanges
Access code (number for an outside line)
In the case of private branch exchanges, it is necessary to dial a specific number (e.g. “9” or “0”) in order to obtain the dialling tone for an outside line.
Dialling pause
In the case of private branch exchanges, it is necessary to dial a specific number in order to obtain the dialling tone for an outside line. When using some older private branch exchanges, it takes a little time before the dialling tone becomes audible. Particularly in the case of such private branch exchanges, it is possible to insert a dialling pause after the number for the outside line so that the number can be dialled in a continuous process without having to wait for the dialling tone.
Insert a dialling pause
“P” appears in the display. After dialling the number for the outside line, the telephone then waits a few seconds before dialling the actual phone number.
The pause can also be entered with the phone numbers in the phone book.
R button on private branch exchanges
If your telephone is connected to a private branch exchange, it is possible to use the transfer calls and automatic call back functions via the R button ☐. Please refer to the operating manual supplied with your private branch exchange to determine which Flash time must be set in order to use these functions. The dealer where you purchased the exchange can provide information as to whether the telephone will work properly with the exchange. Flash (Recall) time ☐ Page 69
Flash time (recall time)
To operate the telephone in a private branch exchange, set the Flash time to 100 ms. Page 69
PABX / Supplementary Services
Supplementary services
Call number display (CLIP ^1 )
If this feature is available on your telephone line, the phone number of the caller appears when the telephone rings. Chapter 9 If the caller has suppressed transmission of his phone number, a corresponding message appears in the display. In this case, the phone number is not displayed and, as a result, is not stored in the calls log.
The CLIP (caller number display) function is an optional service offered by telephone network providers. Contact your provider for further information.
Answering machine in the telephone network
If your telephone network provider has an answering machine available for you in the telephone network (e.g. within the scope of T-Net provided by DEUTSCHEN TELEKOM), an envelope icon (VMWI ^2 ) indicates new messages have been recorded for you.
The answering machine in the telephone network (e.g. the T-Net-Box) is an optional service offered by your telephone network provider. Contact your network provider for further information.
To remove the envelope icon from the display, select the CLEAR MSG WAIT option from the menu. Page 70
R button and supplementary services
Telephone network providers, such as DEUTSCHE TELEKOM, offer various supplementary services e.g. brokering, call waiting and three-way conference for specific fees.
These supplementary services are optional services offered by your telephone network provider. Contact your provider for further information.
Your AUDIOLINE telephone supports these services. The supplementary services can be used in conjunction with the R button. Contact your telephone network provider with regard to enabling
^1 CLIP: Calling Line Identification Presentation
^2 VMWI: Visual Message Waiting Indication
PABX / Supplementary Services
supplementary services. Please also ask your telephone network provider which Flash time (recall time) must be set in order to use the supplementary services. Setting the Flash time ☐ Page 69
Flash time (recall time)
T-Net operates with a Flash time of 300 ms. Page 69
GB
7 Menu Structure
Main menu
Access the main menu by pressing the MENU button.
Use the ▲ and ▼ buttons to scroll through the menu and select functions.
As an alternative to scrolling, several functions and settings can be selected directly by pressing the digit key which precede the respective function and are listed in the following table (see below).
Confirm every selection or input by pressing the MENU button.
To move one level back, press the c button.
Activate Standby mode by pressing the 📞 button. 🏠 Page 54
[1] LANGUAGE
[1] ENGLISH
[2] FRANÇAIS
[3] ESPAÑOL
[4] PORTUGUÊS
[6] DEUTSCH
[7] ITALIANO
[8] SVENSK
[9] SUOMI
[0] DANSK
NORSK
[5] NEDERLANDS
[2] RING SETTING
| [1] RINGER VOLUME | |
| [1] EXTERNAL CALL | |
| [0] OFF mute | |
| [1] 4 arrows quiet | |
| [2] 8 arrows | |
| [3] 12 arrows | |
| [4] 16 arrows loud | |
| [2] INTERNAL CALL | |
| [0] OFF mute | |
| [1] 4 arrows quiet | |
| [2] 8 arrows | |
| [3] 12 arrows | |
| [4] 16 arrows loud | |
[2] RINGER TONE 10 polyphonic and
| [1] EXTERNAL CALL | |
| [1] RingTone 1 | |
| [2] RingTone 2 | |
| [3] RingTone 3 | |
| [4] RingTone 4 | |
| from [5]: 10 polyphonic melodies | |
| [2] INTERNAL CALL | |
| [1] Intercom Tone 1 | |
| [2] Intercom Tone 2 | |
4 standard ring tones are available.

Menu Structure
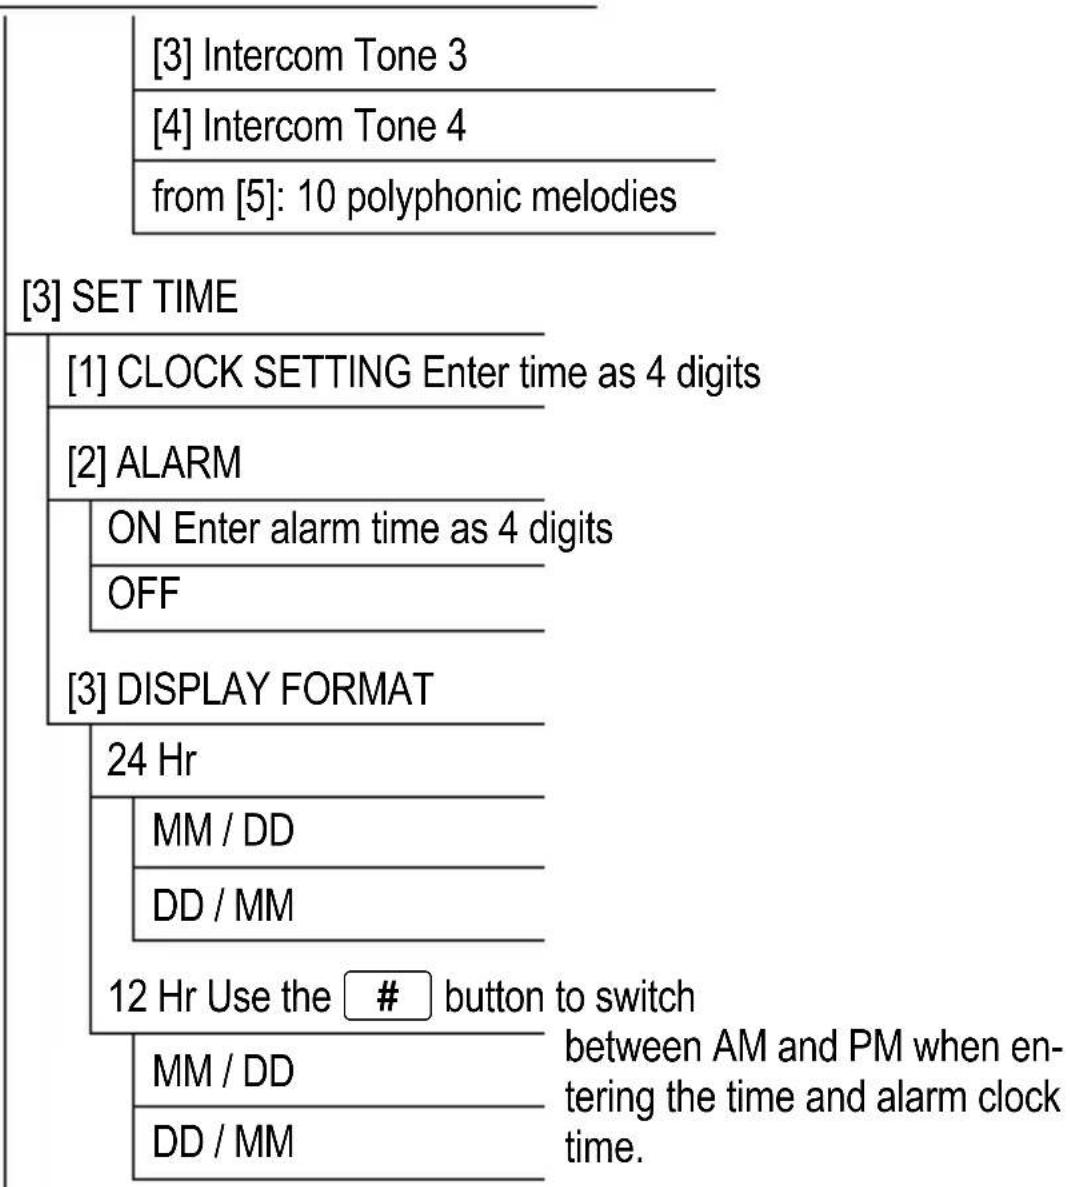
flowchart
graph TD
    A["3"] Intercom Tone 3] --> B["4"] Intercom Tone 4]
    B --> C["from [5"]: 10 polyphonic melodies]
    D["3"] SET TIME] --> E["1"] CLOCK SETTING Enter time as 4 digits]
    D --> F["2"] ALARM]
    F --> G["ON Enter alarm time as 4 digits"]
    F --> H["OFF"]
    H --> I["3"] DISPLAY FORMAT]
    I --> J["24 Hr"]
    J --> K["MM / DD"]
    J --> L["DD / MM"]
    K --> M["12 Hr Use the # button to switch between AM and PM when entering the time and alarm clock time."]
    L --> M
    M --> N["MM / DD"]
    M --> O["DD / MM"]
[4] PHONE SETUP
| [1] SET CONTRAST 16 levels Page 61 | |
| [2] KEY TONE | |
| [0] OFF | |
| [1] 1 | |
| [2] 2 | |
| [3] 3 | |
| [4] 4 | |
[3] SMART KEY LOCK
ON
OFF
Page 61
[4] AUTO ANSWER Automatic answering
ON
OFF
Page 57
[5] BABY CALL 📋 Page 58
ON Enter the phone number
OFF
[6] DIAL MODE Only change the dialling mode
TONE
PULSE
when recommended to by the telephone network provider.
[7] RECALL TIME Only change the Flash time
100 ms
270 ms
300 ms
600 ms
(Recall time) when recommended to by the telephone network provider.
[8] HANDSET NAME Enter the handset name
[9] BACKLIGHT TIME Duration of the backlighting for
60 s
50 s
40 s
30 s
20 s
display and buttons
GB
[5] SECURITY SET
| [1] REGISTRATION Register handset on base station | |
| 1 PIN-Code 1 | |
| 2 PIN-Code 1 | |
| 3 PIN-Code 1 | |
| 4 PIN-Code 1 | |
| [2] DEREGISTRATION Deregister handset from base station | |
| HANDSET 1 Default names of handsets | |
| HANDSET 2 | |
| HANDSET 3 | |
| HANDSET 4 | |
| [3] CLEAR MSG WAIT Deactivate Visual Message Waiting Indication2: Removes the envelope icon from display. | |
| NO | |
| YES | |
| [4] SELECT BASE | |
| 1 | |
| AUTO Automatic selection of base station | |
| [6] SET DEFAULT | |
| NO | |
| YES | |
Phone book
Open the phone book by pressing the 📁 button when in Standby mode. The phone book menu can be opened by pressing the MENU button directly after.
Confirm every selection or input by pressing the MENU button.
| [1] ADD RECORD | ||
| Enter the name1 | Enter the number | |
| [2] EDIT RECORD | ||
| Change the name1 | Change the number | |
| [3] DELETE RECORD | ||
| [4] DELETE ALL | ||
The functions [2] and [3] always relate to the phone book entry selected after the phone book was opened.
Calls log
Open the calls log from Standby mode by pressing the ▲ or ▼ button twice. The call log menu is opened by pressing the MENU button directly after.
Confirm every selection or input by pressing the MENU button.
| [1] ADD RECORD | Add to the phone book |
| Enter the name1 | Enter or confirm the number |
| [2] EDIT TO DIAL Edit the number to dial | |
| Change the number Continue with ADD RECORD(see above) | |
| [3] DELETE RECORD | |
| [4] DELETE ALL | |
| The functions [2] and [3] always relate to the entryselected. | |
1 Section "Text input" on Page 72
8 Phone Book
The phone book can store a maximum of 60 phone numbers together with the associated names. A phone number may have a maximum of 24 digits.
A name may have a maximum of 16 characters.
Saving phone book entries
Page 71
Always enter the area access code with the phone numbers so that the telephone can also assign incoming local calls to a phone book entry.
Text input
Letters are also imprinted on the digit keys. Pressing the respective key the necessary number of times enables letters and digits to be entered.
Example: You want to enter the name "Peter". Press
1 x button 7 ^PQRS , 2 x button 3 ^DEF , 1 x button 8 ^TUV , 2 x button 3 ^DEF and 3 x button 7 ^PQRS .
Further information on entering text:
To enter the same letter twice, press the relevant button until the letter appears then wait till the cursor automatically skips one position forward. You can then enter the same letter again.
The following options are also available:
c Delete the last entry
# Switch between upper
and lower case
Insert a dialling pause when
entering phone numbers
Even more characters are available by pressing the 1, * and 0 buttons several times:
| 1 | 1_-+=^.,;: |
| **#?!$&%/\|~ | |
| 00'“( )[]<>{} | |
Editing phone book entries
Page 71

To select an entry directly, press the first letters of the name of the entry you require. For example, to select "Peter" directly, press the 7PQRS button once.
Deleting phone book entries
Page 71
Dialling phone numbers from the phone book
Page 58
Caller Number Display (CLIP) / Calls Log
9 Caller Number Display (CLIP) / Calls Log
If the CLIP function is enabled for your telephone system (CLIP = Calling Line Identification Presentation), the phone number of the caller appears in the display when a call is received. If the caller's number is stored in the phone book, the name stored with the phone number appears.
- If the caller has suppressed transmission of his phone number, the number is not displayed. The WITHHELD NUMBER message appears in the display instead.
- If the message UNAVAILABLE appears, no information is available on the caller; this could also indicate an international call.

Caller number display (CLIP) and display of date and time are optional services offered by your telephone network provider. Contact your provider for further details.
Calls log
Up to 40 phone numbers can be stored in the calls log. When the list is full, the oldest phone number is deleted.
If new phone numbers have been stored in the calls log during your absence, this is indicated in the display.
The total number of all the incoming calls is displayed, including several calls from the same caller.
Display phone numbers in the calls log
Display overview


Open the calls log
Two different indicators show how many entries are in the calls log as a total and how many of them have been received since the calls log was last viewed.

This listonly displays the number of different calls; several calls from the same caller are not taken into account!
Caller Number Display (CLIP) / Calls Log
Display Description
ALL Total number of entries
NEW Number of new entries
Viewing individual entries

or

View entries
Each entry is assigned a 2-digit CALL# number which appears at the top right of the display. In addition, the caller's phone number is displayed as long as the information was transmitted with the phone number (CLIP) (see above). If the phone number received is stored in the phone book, the name of the caller also appears in the display.
If the caller has made several attempts to contact you, the message REPT appears under the CALL# number when the new number is viewed for the first time.
After viewing all the numbers in the log, the message END OF LIST appears in the display.
Storing numbers from calls log in the phone book
A phone number in the calls log can be transferred directly to the phone book and stored. To do this, select the ADD RECORD function. ☐ Page 71
Dialling phone numbers from the calls log
Page 58
Editing phone numbers in the calls log
It is possible to edit a phone number stored in the calls log. To do this, select the EDIT TO DIAL function. Page 71
To dial the edited number directly, simply press the Call button

To save the edited number in the phone book, confirm the changes by pressing the MENU button and proceed with the saving procedure.
Caller Number Display (CLIP) / Calls Log
Deleting phone numbers from the calls log
Deleting individual phone numbers
Page 71
Deleting all phone numbers
To delete all the phone numbers in the calls log, use the DELETE
ALL option. Page 71
10 Special Functions
Automatic answering
If the “automatic answering” function has been activated, a call is taken automatically on removing the handset from the base or charging station.
Pages 57, 69
Alarm clock
The “alarm clock” function can be used so that you are woken up by the handset at a specific time. Page 68
Baby call (direct dialling)
The "Baby Call" function enables a specific phone number to be saved which can then dialled automatically by pressing any button (except the MENU) button). Page 69
Headset connection port
The handset has a connection port, suitable for a 2.5 mm stereo jack, on the right-hand side with which to connect earphones / headsets.
There is no guarantee the headset will function properly.
Dialling mode
The telephone can be operated in new, digital exchanges (TONE) as well as analogue exchanges (PULSE). Page 69
Temporary tone dialling
If you only operate the telephone using the PULSE dialling mode, you can still make use of the advantages of TONE dialling mode (e.g.: for remote access of the answering machine in the conventional telephone network). You can temporarily switch to Tone dialling when a connection has already been made.
* Press the button during the call
When the call is ended, the equipment automatically switches back to Pulse dialling.
Expanding the Telephone System
11 Expanding the Telephone System
You can extend your AUDIOLINE Shadow 50X telephone system to up to 4 handsets and 4 base stations of the same type.
Multiple handsets
You can register a total of 4 handsets of the type Shadow 50X on your base station.
Registering handsets on a specific base station
Before starting with the registration process for a handset, switch the base station to Registration mode.
3 sec □ Activate Registration mode
The LED on the base station flashes as long as it remains in Registration mode.
To register a handset on a base station, open the menu and select the REGISTRATION function. Select one of the 4 memory locations for the base station. ☐ Page 70
Memory locations already assigned are identified by a tick following the memory location. These can be overwritten through a new registration process.
When registration is completed, the message ACCEPTED appears in the display. The handset is also assigned an internal call number which also appears in the display. This is important in order for making internal calls and performing other registration/deregistration processes.
If the registration process has failed, the message RETRY? appears in the display. Complete the registration process again.
To test whether the handset really is registered on the base station, press the Paging button. The handset should ring. Press the button again to stop the ringing.
Deregistering handsets from a base station
A handset registered on a base station can only be deregistered from it by another handset registered to the same base station.
Expanding the Telephone System
To deregister a specific handset from a base station, open the menu, select the DEREGISTRATION function and then select the name or number of the handset to be deregistered. Page 70 When deregistration is completed properly, the message
ACCEPTED appears in the display.
If the deregistration process has failed, the message RETRY? appears in the display. Complete the deregistration process again.
Multiple base stations
Your handsets can be simultaneously registered on up to 4 different base stations. Each base station requires its own telephone line socket. Connections can be used with the same call number or with different ones.
Page 70
Calls in progress, however, cannot be transferred from one base station to another.
Increasing the range
Position the base stations so that the ranges of the individual base stations overlap. Test the range of your handsets because obstructions in building restrict the range.
Register all the handsets on all the base stations. Activate the AUTO function (automatic selection of base stations).
Page 70
Regardless of where you are, the handset automatically attempts to connect to the next base station with the best connection.
In the Case of Problems
12 In the Case of Problems
Service hotline
Should problems arise with the telephone, please refer to the following information first. In the case of technical problems, you can contact our hotline service, tel. 0180 5 00 13 88 (cost via Telekom at time of going to print: 12 ct/min). In the case of claims under the terms of guarantee, contact your sales outlet. There is a 2 year period of guarantee.
Problems and solutions
Problems Solutions
| No connection to base station possible | - Check that the handset has been registered on the base station with the correct PIN code. ☐ Page 83 |
| No telephone calls possible | - The telephone line is not connected pro-perly or is defective. Only use the telephone connection cable supplied.- Test whether the telephone connection is in order by using another telephone.- The power adaptor plug is not plugged in or there is a complete power failure.- The rechargeable batteries are empty or defective.- The handset is too far from the base station.- Dialling mode is set incorrectly. ☐ Page 69 |
| Connection is disturbed or cut off | - The handset is too far from the base station.- The base station is in an unsuitable location. |
| The system no longer re-sponds | - Reset all the functions to their default set-tings. ☐ Page 70- Disconnect the power adapter plug briefly from the power socket. |
In the Case of Problems
| The batteries are empty in a short time | - Batteries are empty or defective.- Place the handset in the base station properly. Clean the contact surfaces on the handset and base station with a soft, dry cloth.- Place the handset in the base station for 15 hours. |
| The CLIP ^1 function does not work | - The caller number display function is an optional service offered by telephone network providers. Contact your network provider for further information.- The caller has suppressed the transmission of their phone number. |
GB
Technical Properties
13 Technical Properties
Technical data
| Feature Value | |
| Standard DECT | 1 |
| Power supply 230/240 V, 50 Hz | |
| Range Outdoors: Approx. 300 m | Indoors: Approx. 50 m |
| Standby Up to 120 hours | |
| Max. talk time Up to 5 hours | |
| Rechargeable batteries 3 x 750 m | Ah NiMH,size: AAA |
| Dialling mode Tone dialling mode | Pulse dialling mode |
| Permissibleoperating temperature | 0°C to 45°C |
| Permissible ambient tempera-ture | -20°C to 60°C |
| Permissible relative humidity 20% to 75% | |
| Flash function (recall) 100 ms, 270 ms,300 ms, 600 ms | |
GB
^1 DECT: Digital Enhanced Cordless Telecommunication = Standard for cordless telephones.
Default settings
Handset
| Language: Deutsch Handset name: HANDSET1 | |
| Receiver volume VOL2 PIN | 1: 0000 |
| External call Dialling method: TONE | |
| Ringing volume: 3 Clock display: 24-hour | |
| Ringing tone: 3 Date display: MM / DD | |
| Internal call Alarm clock: OFF | |
| Ringing volume: 3 Alarm time: 00:00 | |
| Ringing tone: 1 Smart Keylock: ON | |
| Key tone: 3 | Auto answer: ON |
| Contrast: 8 Baby call: OFF | |
| Backlight time: 20 s | Flash time: 100 ms |
Declaration of Conformity
This device fulfils the requirements stipulated in the EU directive:
1999/5/EU directive on radio equipment and telecommunications terminal equipment and the mutual recognition of their conformity. Conformity with the above mentioned directive is confirmed by the CE symbol on the device.
To view the complete Declaration of Conformity, please refer to the free download available on our web site www.audioline.de.

GB
Maintenance / Guarantee
14 Maintenance / Guarantee
Maintenance
Clean the surface of the housing with a soft, lint-free cloth and do not use cleaning agents or solvents.
Guarantee
AUDIOLINE equipment is produced and tested according to the latest production methods. The implementation of carefully chosen materials and highly developed technologies ensure trouble-free functioning and a long service life. The terms of guarantee do not apply where the cause of equipment malfunction is the fault of the telephone network operator or any interposed private branch extension system. The terms of guarantee do not apply to the batteries or power packs used in the products. The period of guarantee is 24 months from the date of purchase.
All deficiencies resulting from material or production faults which occur during the period of guarantee will be eliminated free of charge. Rights to claims under the terms of guarantee are annulled following intervention by the purchaser or third parties. Damage caused as a result of improper handling or operation, incorrect positioning or storing, improper connection or installation, Acts of God or other external influence are not covered by the terms of guarantee. In the case of complaints, we reserve the right to repair or replace defect parts or provide a replacement device. Replacement parts or devices become our property. Rights to compensation in the case of damage are excluded where there is no evidence of intent or gross negligence by the manufacturer.
If your device shows signs of defect during the period of guarantee, please return it to the sales outlet in which you purchased the AU-DIOLINE device together with the purchase receipt. All rights to claims under the terms of guarantee in accordance with this agreement must be asserted exclusively with regard to your sales outlet. Two years after the purchase and transfer of our products, claims under the terms of guarantee can no longer be asserted.
15 Index
A
Alarm clock, 77
AM/PM, 51
Answering machine in the telephone network, 64
Automatic answering, 77
B
Baby Call, 58
Baby call, 77
Back button, 51
Base station, 52
Batteries, 46
Batteries, 47
Battery charge status, 50
Battery warning signal, 54
Belt clip, 50
Brokering, 59, 64
C
Call number display, 64
Call waiting, 60, 64
Calls log, 74
Calls log: deleting all phone numbers, 76
Calls log: deleting individual phone numbers, 76
Calls log: overview, 74
Calls log: viewing individual entries, 75
Charging station, 52
Charging the batteries, 50
Conference button, 51
Conference calls, 60
Connecting the base station, 48
Connecting the charging station, 49
Creating phone book entries, 55
D
Declaration of Conformity, 83
Default settings, 83
Delete button, 51
Deleting phone book entries, 73
Deleting phone numbers from the calls log, 76
Deregistering handsets from a base station, 78
Dialling emergency numbers, 62
Dialling mode, 69, 77
Dialling numbers from the calls log, 75
Dialling pause, 63
Dialling phone numbers from the phone book, 58, 73
Direct call, 58
Direct dialling, 77
Display, 53
Display contrast, 61
Display phone numbers in the calls log, 74
Disposal, 47
E
Editing phone book entries, 73
Editing phone numbers in the calls log, 75
Ending a call, 57
Energy-save mode, 54
Expanding the telephone system, 78
Explanations, 53
F
Flash time, 69, 83
G
Guarantee, 84
Index
H
Handsfree, 61
Headset, 77
Headset connection port, 52, 77
Holding a call, 59
|
Icons in the display, 53
In the case of problems, 80
Increase receiver volume, 51
Increasing the range, 79
Inserting batteries, 49
Installation location, 46
INT button, 51
Intended use, 46
Internal calls, 58
K
Key lock, manual, 51, 62
L
Language selection, 50
LED, charge control lamp, base station, 52
LED, charge control lamp, charging station, 52
M
Main menu, 66
Maintenance, 84
Making a call, 57
Making internal calls, 58
Medical equipment, 47
Menu button, 51
Menu structure, 66
Microphone button, 51
Missed calls, 58
Multiple base stations, 79
Multiple handsets, 78
Mute, 51
Muting the microphone, 61
N
Navigating in the menu, 55
Number for an outside line, 63
0
OK button, 51
On-hook key, 51
Operating elements, 51
Operating the telephone, 53
P
Package contents, 48
Packing materials, 47
Paging, 62
Paging button, 52
Pause, 51
Phone book, 51, 71, 72
Power adapter plug, 46
Power failure, 46
Private branch exchanges, 63
Problems and solutions, 80
Pulse dialling mode, 77
Putting the telephone into operation, 48
R
R button, 51
R button on private branch exchanges, 63
R-button and supplementary services, 64
Range warning signal, 53
Recall time, 69
Flash time for T-Net, 65
Flash time on PABX, 63
Receiver volume, 61
Redialling, 51, 57
Reduce receiver □ volume, 51
Registering handsets on a specific base station, 78
Ringing melody, 60
S
Safety information, 46
Saving phone book entries, 72
Searching for the handset, 62
Select base, 79
Selection button: Down, 51
Selection button: Up, 51
Service hotline, 80
Setting the time, 50
Smart key lock, 61
Special characters, 51
Special functions, 77
Standby button, 51
Standby mode, 54
Storing number from calls log in phone book, 75
Supplementary services, 63, 64
T
Taking a call, 57
Talk time, 60
Technical data, 82
Telephoning, 57
Temporary tone dialling, 77
Text input, 72
Three-way conference, 60, 64
Tone dialling mode, 77
Touch-sensitive buttons, 56
Transferring, 59
Transferring external calls internally, 59
Troubleshooting, 80
U
Upper/Lower case, 51
V
VMWI, 64