Sprint 100 - Phone AUDIOLINE - Free user manual and instructions
Find the device manual for free Sprint 100 AUDIOLINE in PDF.


User questions about Sprint 100 AUDIOLINE
0 question about this device. Answer the ones you know or ask your own.
Ask a new question about this device
Download the instructions for your Phone in PDF format for free! Find your manual Sprint 100 - AUDIOLINE and take your electronic device back in hand. On this page are published all the documents necessary for the use of your device. Sprint 100 by AUDIOLINE.
USER MANUAL Sprint 100 AUDIOLINE
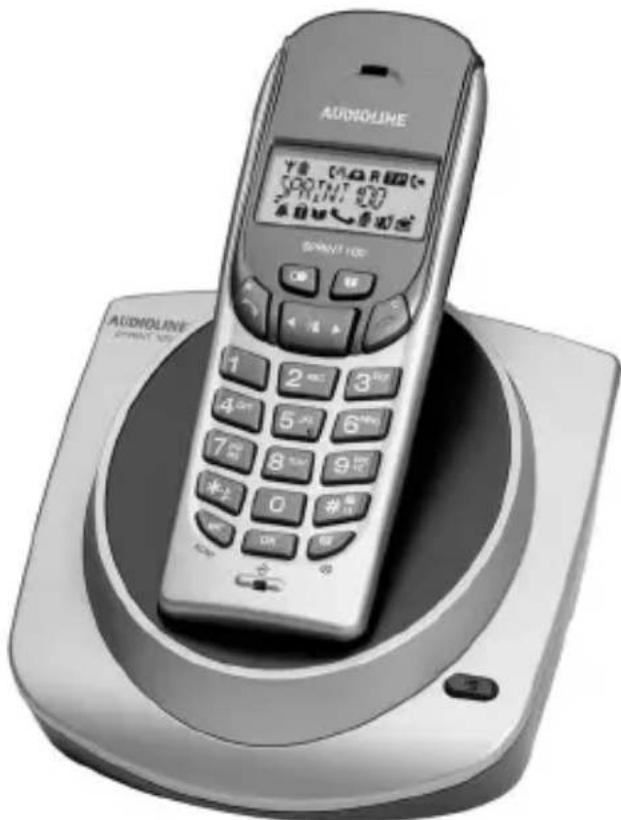
Schnurloses digitales DECT-Telefon Cordless digital DECT telephone
text_image
AUDIOLINE PRINT 400 PRINT 100 AUDIOLINE PRINT 100text_image
Collection of icons and labels including music, radio, TP, email, phone, lock, and email with corresponding symbols.1.2 Installation location 31
1.3 Power supply 31
1.4 Telephone connection cable 31
1.5 Rechargeable batteries 31
1.6 Power failure 31
1.7 Private branch exchanges 31
1.8 Note on medical equipment 32
1.9 Cleaning and upkeep 32
1.10 Disposal 32
1.11 Declaration of Conformity/CE mark 32
2 Operating Elements 33
2.1 Handset 33
2.2 Base station 33
3 Starting Up 34
3.1 Safety Information 34
3.2 Checking the package contents 34
3.3 Connecting the base station 34
3.4 Inserting the standard batteries 35
3.5 Charging the standard batteries 35
3.6 Tone or Pulse dialling method 35
4 Operation 36
4.1 Display 36
4.2 Icons Used and Display Texts 37
4.3 Taking a call 37
4.4 Taking two calls 37
4.5 Making a call 38
4.6 Displaying the call timer 38
4.7 Adjusting the receiver volume 38
4.8 Redialling button 38
4.9 Muting the microphone in the handset 39
4.10 Key lock 39
4.11 Activate/Deactivate ringing tone 39
4.12 Information on the range 39
4.13 Temporary tone dialling 39
- Contents -
4.14 External answering machine 40
4.15 Paging the handset from the base station 40
4.16 Chain dialling 40
5 Phone Book 41......
5.1 Information on the phone book 41
5.2 Information on entering names 41.....
5.3 Entering phone numbers in the phone book 42.
5.4 Dialling phone numbers stored in the phone book 42
5.5 Editing entries in the phone book 42
5.6 Deleting stored entries from the phone book 42
5.7 Deleting all entries from the phone book 42
6 Caller Number Display (CLIP Function) 43
6.1 Calls list 43
7 Private Branch Exchanges / T-Net 45
7.1 R button on private branch exchanges 45
7.2 R button and T-Net 45
7.3 Entering a dialling pause 45
8 Settings and Menu Structure 46
8.1 Menu structure 46
8.2 Navigating in the menu 46
8.3 Setting the ringing tones on the handset and base station ..... 47
8.4 Setting Recall (Flash time) 47
8.5 Tone or Pulse dialling mode 47
8.6 Restoring the default settings 48
9 Multiple Handsets 49
9.1 Registering and deregistering handsets 50
9.2 Internal calls (intercom function) 51
9.3 Forwarding external calls 52
9.4 Consultation / Brokering 52
9.5 Conference calls 52
10 Troubleshooting 53
11 Important Information 54
11.1 Technical data 54
11.2 Replacing the telephone connection cable 54
- Safety Information -
1 Safety Information
Please read this operating instruction manual thoroughly.
1.1 Intended use
The telephone is suitable for telephoning within a public telephone network system. Any other use is considered unintended use.
Unauthorised modification or reconstruction is not permitted. Under no circumstances open the device or complete any repair work yourself.
1.2 Installation location
The telephone is designed for use indoors in rooms with a temperature range from 10 °C to 30 °C. The base station should not be used in rooms exposed to moisture, such as bathrooms or laundries. Prevent excessive exposure to smoke, dust, vibration, chemicals, moisture, heat and direct sunlight. Position the base station with a distance of 1 m to other electronic devices or there is a risk of mutual disturbance.
Do not use the handset in potentially explosive areas.
1.3 Power supply
Only use the power adapter plug supplied because other power supplies could destroy the telephone. Ensure access to the power adapter plug is not obstructed by furniture or such.
1.4 Telephone connection cable
If the telephone connection cable supplied needs to be replaced, ensure the pin assignment is identical on the new one.
1.5 Rechargeable batteries
Do not throw batteries into a fire or immerse them in water.
1.6 Power failure
The telephone cannot be used to make calls in the event of a power failure. Always keep a cord connected telephone which operates without an external power supply available in the case of emergency situations.
1.7 Private branch exchanges
The telephone can be connected to a private branch exchange. There is no guarantee that the telephone will work on every private branch exchange.
- Safety Information -
1.8 Note on medical equipment
Never use the telephone in the vicinity of medical equipment. It cannot be fully ruled out that it will not affect heart pacemakers. DECT ^1 telephones can cause an unpleasant humming sound in hearing aids.
1.9 Cleaning and upkeep
Clean the housing surfaces with a soft, fluff-free cloth. Never use cleaning agents or solvents. The rubber footpads on the base station are not resistant to all cleaning agents.
1.10 Disposal
The implementation of European law in national laws and directives obliges you to dispose of consumable goods appropriately. The adjacent symbol on the telephone indicates that electrical and electronic apparatus and batteries no longer required must be disposed of separate from domestic waste.
Electrical and electronic devices must be disposed of at a suitable collection point provided by the public waste authorities.
Batteries must be disposed of at the point of sale or at the appropriate collection points provided by the public waste authorities.
Packaging materials must be disposed of according to local regulations.
1.11 Declaration of Conformity/CE mark
This unit fulfils the requirements of the EU Directive 1999/5/EC relating to Radio Equipment and Telecommunications Terminal Equipment, and the mutual recognition of conformity. Conformity with the above-mentioned Directive is confirmed by the CE mark on the unit.
For the complete Declaration of Conformity, please use the free download from our web site www.audioline.de.



^1 DECT: Digitally Enhanced Cordless Telephone = Standard for cordless telephones.
- Operating Elements -
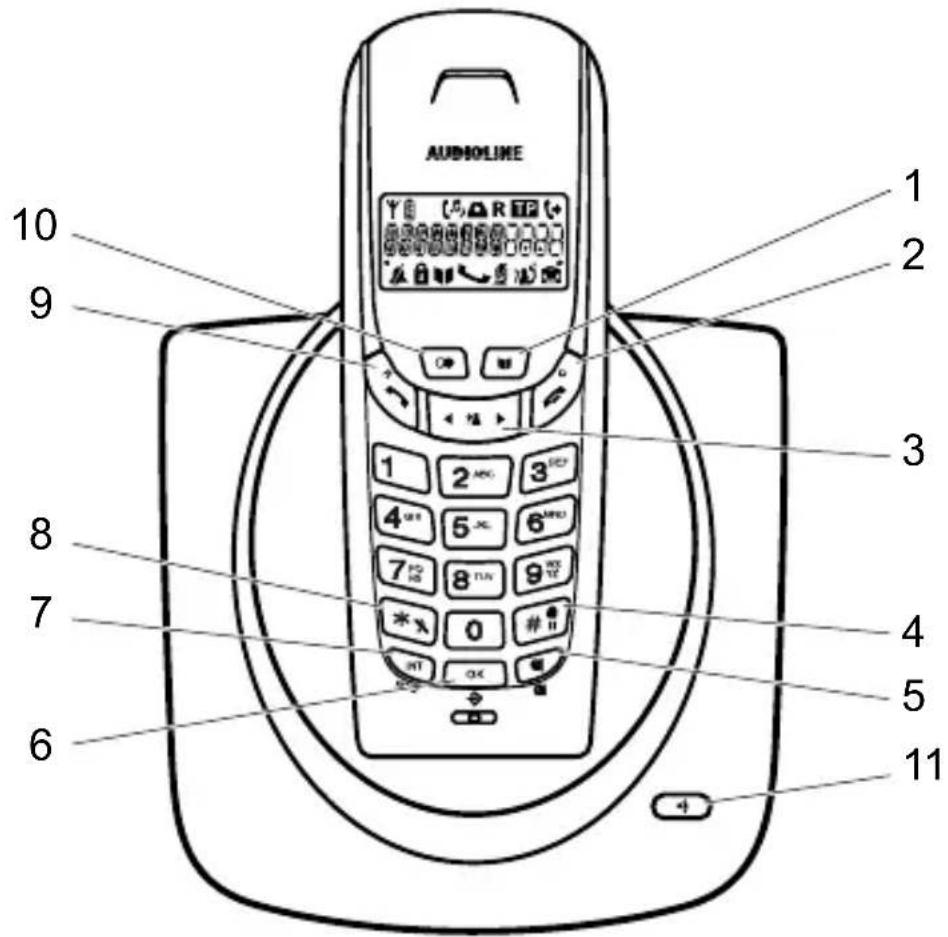
2 Operating Elements
2.1 Handset
- Phone book button
- End call / Exit menu button
- Calls list (CLIP) / Scrolling button
- Key lock / Pause
- Muting button / Delete
- Menu button / OK button
- Internal and conference calls
- Ringing on or off / Temporary tone dialling
- Call button / R button
- Redialling
2.2 Base station
- Paging button (locate handset)
text_image
AUDIOLIKE 1 2 3 4 5 6 7 8 9 10 11The buttons in this operating manual are depicted with a uniform contour. Variations in the symbols on the telephone buttons compared to those depicted here are possible.
- Starting Up -
3 Starting Up
3.1 Safety Information

Caution: It is essential to read the Safety Information in Chapter 1 before starting up.
3.2 Checking the package contents
The package contains:
| a base station | a telephone connection cable |
| a handset two standard batteries | |
| a power adapter plug an operating manual | |
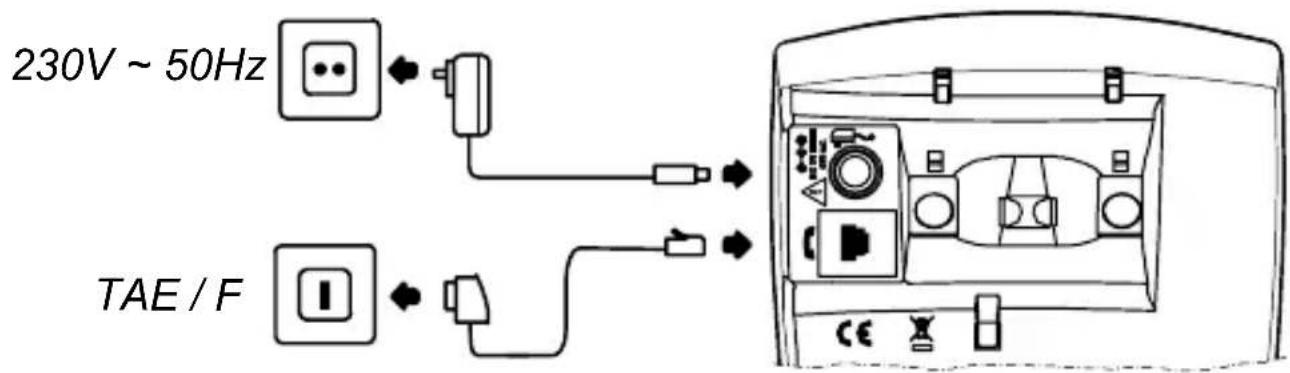
3.3 Connecting the base station
Connect the base station as illustrated in the diagram. For reasons of safety, only use the power adapter plug and telephone connection line supplied.

Ensure access to the power adapter plug is not obstructed by furniture or other objects.
text_image
230V ~ 50Hz TAE / F- Starting Up -
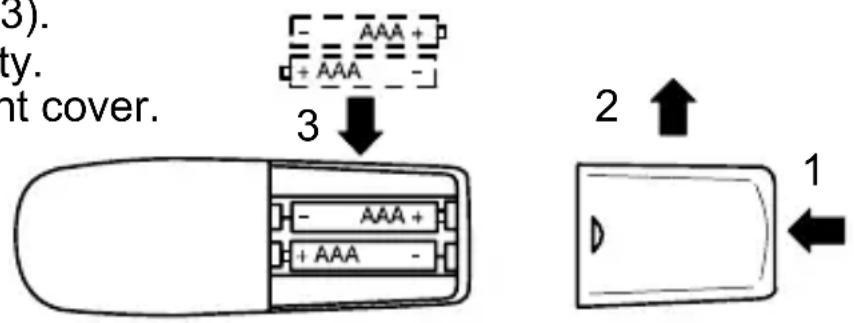
3.4 Inserting the standard batteries
Press on the lower edge of the battery compartment cover (1) and remove the battery compartment by lifting it up (2).
Insert the standard batteries (3).
Pay attention to correct polarity.
Close the battery compartment cover.
text_image
(3). ty. nt cover. 3 AAA + + AAA - 2 ↑ 13.5 Charging the standard batteries
When preparing to use the handset for the first time, place it in the base station, with its display facing, the front for at least 14 hours. When the handset is placed in the base properly, an acoustic signal is issued as confirmation. Failure to charge the standard batteries properly can lead to telephone malfunction.
The rechargeable standard batteries in the handset have a maximum standby time of 110 hours at room temperature. The maximum talk time is 8 hours.
The current battery charge status is indicated in the display:
| Full Half empty Low Empty |
When the battery charge level is very low, the BATTERIE message appears in the display.
3.6 Tone or Pulse dialling method
The telephone to be operated in a new, digital exchanges (TONE/DTMF) as well as analogue exchanges (PULSE). The equipment is set to TONE dialling (DTMF) at the factory. If the telephone does not work in Tone dialling mode, refer to Chapter 8.5 to learn how to set the telephone Pulse dialling mode.
- Operation -
4 Operation
4.1 Display
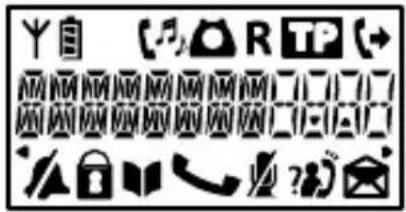
text_image
Collection of icons and labels including music, radio, TP, email, phone, and lock symbols| Display | Description |
 | Continuously on: The connection to the base station is good.Flashing: The connection to the base station is poor. |
 | Indicates the current battery charge status. |
 | You have activated the “Handset ringer” menu. |
 | You have activated the “Base ringer” menu. |
 | You have activated the “Flash time” menu. |
 | You have activated the “Tone - Pulse dialling” menu. |
 | You have activated the “Register handset” menu. |
 | There are more numbers in the full call number to the left or right. Press the OK button to display them. |
 | The ringing tone has been switched off. |
 | The key lock function is switched on. |
 | You are scrolling through the phone book. |
 | A call is currently being made or it flashes when a call is received. |
 | The microphone is deactivated during a call. |
 | In standby: New calls have been stored in the calls list (CLIP). In the calls list: The phone number has already been viewed. |
 | In the caller list: The phone number has not been viewed. |
 | A new message has been recorded. (Optional service offered by your telephone network provider, refer to Chapter 4.14) |
- Operation -
4.2 Icons Used and Display Texts
The icons used and display texts appear as follows throughout this manual:
Remove handset from the base station
Place handset in the base station
Enter digits and letters
2 sec ☑/#Press the button depicted for 2 seconds
< 1.5 sec OK Press the button depicted within 1.5 seconds
(Acoustic signal on handset
(Acoustic signal on base station
EXAMPLE or Appearance of text and icons in the display
4.3 Taking a call
(<<) and (<<) or 📞/R Take the call

When the handset is ringing, the ringing tone on the handset can be switched off for this incoming call.
Switch ringing tone off
or End the call
4.4 Taking two calls
You will hear acoustic signals (call waiting) if a second call is received while you are carrying out a telephone conversation. The number of the second caller appears in the display.
☐/R, 2 Switch to other caller
One caller is put on hold while you converse with the other.

In order to use the supplementary services provided by Deutsche Telekom, the Recall time must be set to 300 ms (refer to Chapter 8.4).

Caution: The caller number display and call waiting signal are optional services provided by your telephone network provider. Contact your network provider for further information.
- Operation -
4.5 Making a call
Enter the phone number (max. 20)

A maximum of 12 digits can appear in the display. In the case of longer phone numbers, only the last 12 digits are displayed.

Delete the last digit if incorrect

Dial the number

It is also possible to press the Call button 📞/R first to obtain the dialling tone for an outside line. In the case of private branch exchanges, it is necessary to dial a specific number (e.g. “9” or “0”) in order to obtain the dialling tone for an outside line (refer to Chapter 7). The phone number then entered is dialled immediately. It is not possible to correct wrong digits individually using this dialling procedure.
4.6 Displaying the call timer
The duration of a call is displayed in minutes and seconds during the call.

If the call exceeds 1 hour, the call timer appears in hours and minutes.
The call duration appears in the display 10 seconds after pressing the Call button 📞/R, replacing the number dialled. When the call is ended, the timer remains in the display for 5 seconds.
4.7 Adjusting the receiver volume
The volume can be adjusted to one of three settings during a call. □ is the lowest setting and □□□ the highest.


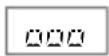
Press the button during the call
4.8 Redialling button
Your telephone stores the last phone number dialled.
The last number dialled is redialled

If the phone number is also stored in the phone book, the name and not the number automatically appears in the display.
- Operation -
4.9 Muting the microphone in the handset
The microphone in the handset can be deactivated during a telephone conversation.

Deactivate the microphone
Reactivate the microphone
4.10 Key lock
Lock the keys to ensure numbers or functions are not activated inadvertently. Calls can still be taken in the normal way even when the key lock function is activated.

Activate the key lock function
OK, TASTE OK < 1.5 sec OK Deactivate the key lock function
4.11 Activate/Deactivate ringing tone

Switch ringing tone off

Only the base station rings in the event of an incoming call, not the handset.
2 sec */Switch ringing tone on
4.12 Information on the range
The handset has a range of approx. 50 meters in closed rooms and approx. 300 meters outdoors. In the case of a good connection to the base station, the 🎨 icon appears continuously in the display.

If the handset is moved too far from the base station the icon flashes and acoustic warning signals are issued. Move towards the base station, otherwise the call will be disconnected. If the handset has lost connection to the base station the SUCHES message appears in the display during this period.
4.13 Temporary tone dialling
If you only operate the telephone using the Pulse dialling method (refer to Chapter 8.5), you can still make use of the advantages of the Tone dialling method (e.g.: remote access of the answering machine). During a call, you can temporarily switch to Tone dialling.
2 sec */ʃ
Switch to Tone dialling mode
When the call is ended, the equipment automatically switches back to Pulse dialling.
- Operation -
4.14 External answering machine
Some telephone network providers provide an external answering machine (e.g. the T-Net Box) for you. If the 📄 icon appears in the display, it means new messages have been recorded for you. After playing back all the messages on the external answering machine, the icon disappears from the display. The icon can also be cleared in the following way:
2 sec 📞 Icon is deleted

Caution: The external answering machine and information visual message indicator icon 📧 are optional services provided by your telephone network provider. Contact your network provider for further information.
4.15 Paging the handset from the base station
If you have mislaid your handset, you can locate it with the aid of this function.
Activate the function
or Deactivate the function
4.16 Chain dialling
This function is used to transmit numbers stored in the phone book (e.g. calling-card number, bank account number, call-by-call number) while a connection has already been established. It is also possible to combine numbers for transfer from the phone book with numbers entered manually (e.g. PIN number). Stored numbers can be linked and transmitted from the phone book as required.
Press the button during the call

Select the phone book entry and transmit the number
- Phone Book -
5 Phone Book
Up to 10 phone numbers can be stored, with associated names, in the phone book.
5.1 Information on the phone book
- Always enter the area access code with the phone numbers so that the telephone can also assign incoming local calls to a phone book entry.
- If the memory capacity of 10 phone numbers is reached, the message VOLL appears when an attempt is made to store another number. To create space, an existing entry must first be deleted.
- If a name entered already exists in the phone book, the message 📄OPPELT appears and you have to enter another name.
- The phone book entries are arranged alphabetically. To skip to the required phone book entry directly, enter the first letter of the corresponding entry.
5.2 Information on entering names
The digit keys are also labelled with letters for the entry of the respective letters. Pressing the respective key the necessary number of times enables capital letters and digits to be entered.
Example: To enter the name "Peter".
Press: 1 x button 7PQRS, 2 x button 3DEF, 1 x button 8TUV, 2 x button 3DEF, 3 x button 7PQRS
• To enter a space, press 1 once.
- To enter the same letter twice, press the button to enter the letter. Wait until the cursor skips one place forward. Enter the letter again.
- Delete any incorrect entries with the ⊗ button.
- Phone Book -
5.3 Entering phone numbers in the phone book
Enter the phone number (max. 20 places) and press the phone book button
OK Enter the name (max. 8 places) and confirm
23456789 OK Conform the phone number again
5.4 Dialling phone numbers stored in the phone book
OK, or ▶, 📞/R Select the phone book entry and dial the number
5.5 Editing entries in the phone book
☑, ◀ or ▶, ☐ Select the phone book entry and press the phone book button
Edit the name and confirm
Edit the phone number and confirm
5.6 Deleting stored entries from the phone book
Select the phone book entry and press the delete button
LOESOP OK Confirm deleting process
or
LOESCHP Cancel deleting process
5.7 Deleting all entries from the phone book
Open the phone book and press the Delete button
ALLET OK Confirm deleting process
or
ALLCP Cancel deleting process
- Caller Number Display (CLIP Function) -
6 Caller Number Display (CLIP Function)
If this function is provided by your telephone service, the number of the caller appears in the display when the telephone rings. If the caller's number is stored in the phone book, the name appears in the display instead of the phone number.
If the caller has suppressed transmission of their phone number, the message appears in the display. In this case, the phone number is not displayed and, as a result, is not stored in the calls list.

Caution: The caller number display function is an optional service offered by telephone network providers. The display of the date and time is not transferred by all telephone network providers. Transfer of the phone number or the date and time is not always possible either in some private branch exchanges. Contact your network provider for further information.
6.1 Calls list
A total of 10 calls can be stored in the calls list. As soon as the list is full, the oldest phone number is deleted from the list. If new phone numbers have been stored in the calls list in your absence, the icon appears in the display. The phone numbers received are arranged in order of receipt. The last number received appears as first in the list. If the calls list is empty, the message LEER appears in the display.
6.1.1 Viewing phone numbers
? , or ▶
Open the calls list and select a phone number
OK Call in information on the phone number
or ▶Return the calls list
The following information is provided:
• Further digits to the right or left of the phone number are displayed.
- Displays the phone number when the caller's name is stored in the phone book.
- Displays the date and time if this data was transferred with the call.
- Caller Number Display (CLIP Function) -
Two different display icons indicate whether the entry in the calls list has already been viewed or whether the entry is new.
| Display Description | |
| The phone number has already been viewed. | |
| The entry in the calls list is new. | |
6.1.2 Calling back the phone number

Open the calls list, select the phone number required and dial it
6.1.3 Storing phone numbers in the phone book
A phone number stored in the calls list can be transferred directly to the phone book.

Open the calls list, select the phone number required and press the phone book button
OK Enter the name (max. 8 places) and confirm
123456789 OK Confirm the phone number again

When the number in the phone book is stored together with a name, the number no longer appears in the display but the name instead.
6.1.4 Deleting phone numbers individually

Open the calls list, select the phone number required and press the Delete button
LOESCHP OK Confirm deleting process
or
LOESCHP Cancel deleting process
6.1.5 Deleting all the phone numbers

Open the calls list and press the Delete button
ALLEP OK Confirm deleting process
or
ALLEP Cancel deleting process
- Private Branch Exchanges / T-Net -
7 Private Branch Exchanges / T-Net
The 📞/R button on the handset is used in private branch exchanges and for taking advantage of T-Net functions provided by Deutsche Telekom.
7.1 R button on private branch exchanges
If the telephone is connected to a private branch exchange, all the functions linked to the 📞/R button, such as transferring calls, automatic call back, etc., can be used. A private branch exchange requires a Flash time of 100 ms (refer to Chapter 8.4). The dealer where you purchased the exchange can provide information as to whether the telephone will work properly with the exchange.
7.2 R button and T-Net
Your Audioline telephone supports the most important supplementary services provided by Deutsche Telekom (e.g. brokering, call waiting, three-way conferencing, etc.). T-Net operates with a Recall time of 300 ms (refer to Chapter 8.4 for settings). Please contact Deutsche Telekom with regard to enabling the T-Net functions
7.3 Entering a dialling pause
In the case of private branch exchanges, it is necessary to dial a specific number (e.g. “9” or “0”) in order to obtain the dialling tone for an outside line. When using some older private branch exchanges, it takes a little time before the dialling tone becomes audible. Particularly in the case of such private branch exchanges, it is possible to insert an automatic pause after the number for the outside line so that the number can be dialled in a continuous process without having to wait for the dialling tone.
2 sec /# P
Entering a dialling pause
After dialling the number for the outside line, the telephone then waits 3 seconds before dialling the actual phone number.

The pause can also be entered with the phone numbers in the phone book.
- Settings and Menu Structure -
8 Settings and Menu Structure
8.1 Menu structure
All the settings for the handset and base station can be set by accessing the relevant options in the user-friendly menu.
| Handset melody | (声) | MELODIE to 5 | LAUTST to 5 |
| AUS | |||
| Base melody | 声,图 | MELODIE to 5 | LAUTST to 5 |
| AUS | |||
| Recall time (100 ms) | R | ||
| 2 (300 ms) | |||
| Dialling method (Tone dialling) | |||
| 2 (Pulse dialling) | |||
| Registering handsets PIN | |||
The functions Reset default settings, Deregistering handsets and Change PIN can be accessed via button combinations (refer to Chapters 8.6, 9.1.4 and 9.1.5).
8.2 Navigating in the menu
| OK Open the main menu | |
| or, OK | Select and open the submenu |
| or, OK | Select the setting option and confirm |
| Move one level back | |
2 sec ☐ Activate Standby mode

Every programming process is automatically cancelled if there is no input within 30 seconds.
- Settings and Menu Structure -
8.3 Setting the ringing tones on the handset and base station
Five different ringing melodies and volume settings can be set on the handset and base station.
OK Open the main menu
◀ or ▶ or
OK Select and open the submenu
or ▶ MELLOJIE1 to
MELODIES, OK Select the melody and confirm
or LAUTSTI to
LASTSTS or RUS, OK Select the setting and confirm

If you have deactivated the ringing melody on the handset, the icon appears in the display. Incoming calls are then only signalled by the base station.
8.4 Setting Recall (Flash time)
Two Recall times of 100 ms (☐) or 300 ms (☐) are available for selection.
OK Open the main menu
or R, OK
Select and open the submenu
or ▶ or ☐, OK Select the setting and confirm
8.5 Tone or Pulse dialling mode
The telephone can be connected to the new digital exchanges (Tone dialling/DTMF 1) as well as to analogue exchanges (Pulse dialling 2).
OK Open the main menu
or TP, OK Select and open the submenu
or ▶ or ☐, OK Select the setting and confirm
- Settings and Menu Structure -
8.6 Restoring the default settings
This function resets the handset and base station settings to their status on leaving the factory.
8.6.1 Default settings handset
| Handset melody: 1 Handset volume: 3 | |
| Base melody: 1 Base volume: 3 | |
| Receiver volume: Middle Recall time: 1 (100 ms) | |
| Dialling method: 1 (DTMF) | |

The phone book, calls list and redialling function are not deleted during the reset process.
OK, 2 sec ⊗
Open the main menu and press the delete button
RESETP
OK Confirm the reset process
or
RESETP
cancel the reset process

The default factory settings are restored. The display then indicates the equipment is in Standby mode.
- Multiple Handsets -
9 Multiple Handsets
Up to four handsets can be registered on the base station. Each handset can only be registered on one base station at any particular time.
If a handset, registered on a base station, is to be registered on a new base station, that handset must be deregistered from the existing base station using the other handset.

Caution: If all four handsets are registered on a new base station without deregistering them from the initial base station first, all four registrations are still present on the old base station and no new handsets can be registered on it.

The standardised GAP Standard enables Audioline handsets and even those from other manufacturers to be integrated in the telephone system. In the same way, a Audioline handset can be registered on base stations from other manufacturers as long as they comply with the GAP Standard.
The following options are available if two handsets are used:
- Internal calls between the handsets (intercom),
- External calls can be transferred from the handset,
- Incoming external calls are received on all handsets.

If one handset is currently using the outside line, no further external call is possible.
GAP: Generic Access Profile = Standard for the interoperation of handsets and base stations from other manufacturers.
- Multiple Handsets -
9.1 Registering and deregistering handsets
9.1.1 Registering Sprint 100 handsets
2 sec □ ( )
Press the Paging button on the base station
OK Open the main menu
or ↗, OK Select and open the submenu
, OK Enter the PIN code and confirm

The handset is assigned an internal call number. The handset already registered has the internal call number 1. The second handset registered is assigned the internal call number 2. This internal call number appears in the display to the right of the name of the telephone.
9.1.2 Registering other DECT-GAP telephones on the base station
2 sec □ ( )
Press the Paging button on the base station
Follow the information in the operating manual provided by the device manufacturer. Use the PIN code to register (default setting: 0000).
9.1.3 Registering a handset on a DECT/GAP base station from another manufacturer
Follow the instructions in the operating manual from the original manufacturer to set the base station from the external manufacturer to Registration mode. Use the PIN code from the external manufacturer for the registration.
ok Open the main menu
or ↗, OK Select and open the submenu
停,OK Enter the PIN code and confirm
9.1.4 Deregistering handsets
A handset can only be deregistered by another handset still registered. This means it is not possible to complete the deregistration using the handset which is to be deregistered.
OK, 9 Open the main menu and press the button
1 9-1 or 2 9-2, OK Select the handset to be deregistered and confirm
- Multiple Handsets -
停,OK Enter the PIN code and confirm

The message NRCG appears in the display of the deregistered handset. The handset is thus deregistered and can no longer be used for external or internal calls.
9.1.5 Changing the PIN code
The registration and deregistration of handsets are protected against unauthorised use by a PIN code. The PIN code can contain up to eight digits. When delivered, the PIN code is "0000".
OK, 8 Open the main menu and press the button
PINP, OK
Enter the PIN code and confirm
NEUEPIN M, OK
Enter the new PIN and confirm
WIEJERH 🎩, OK
Enter the new PIN again and confirm

If you should forget your PIN code, please contact our Service Hotline (refer to Chapter 10).
9.2 Internal calls (intercom function)
As soon as two handsets are registered on a base station, they can be used for internal calls.
INT, 1 or 2
Dial the internal handset call number
Take the call
End the call

If an external call is received during an internal call, short acoustic signals are issued and the caller's number appears in the display, if available.
-, /R
End the internal call and take the external call
- Multiple Handsets -
9.3 Forwarding external calls
If you have taken an external call on a handset, the call can be transferred to another handset.
INT, 1 or 2
Dial the internal handset call number during a call
Take the call
Forward the call

If the handset called does not answer, take the external call back by pressing the INT button.
9.4 Consultation / Brokering
While a call is in progress, it is possible to dial another handset in order to consult with someone. The external caller is put on hold while you converse with the second, internal person called. You can switch between the callers as often as necessary.
INT, 1 or 2
Dial the internal handset call number during a call
Take the call
INT Change to other caller
9.5 Conference calls
An external call can be transferred to another internal handset for a conference call. This enables two handset users to confer with the external caller at the same time.
INT, 1 or 2
Dial the internal handset call number during a call
Take the call
2 sec INT Activate the conference call facility
- Troubleshooting -
10 Troubleshooting
Should problems arise with the telephone, refer to the following information. In the case of technical problems, contact our Hotline, tel. 0180 5 00 13 88 (Telekom costs at time of going to print: 14 ct/min). In the case of claims under the terms of guarantee, contact your sales outlet. There is a 2 year period of guarantee
| Faults | Corrective measures |
| - No connection to base station possible | - The handset is too far from the base station.- Check that you have used the correct PIN code for the registration. |
| - There is no dialling tone- The telephone does not signal calls | - The telephone line is not connected pro-perly or is defective. Only use the telephone connection cable supplied.- Test whether the telephone connection is in order by using another telephone.- The rechargeable standard batteries are empty or defective.- The handset is too far from the base station.- Check that the ringer is activated.- Dialling mode set incorrectly (refer to Chap-ter 8.5). |
| - Interruptions in the connection | - The handset is too far from the base station.- The base station is in an unsuitable loca-tion. |
| - The handset no lon-ger responds | - Reset all the functions to their default set-tings. Before doing so, disconnect the power adapter plug briefly from the power socket. For information on default settings, refer to Chapter 8.6. |
| - The BATTERIE- message appears after a short time | - Place the handset in the base station for 14 hours. If this does not help, replace the re-chargeable standard batteries. |
| - No caller phone number display (CLIP) | - The caller number display function is an op-tional service offered by telephone network providers. Contact your network provider for further information. |
- Important Information -
11 Important Information
11.1 Technical data
| Feature | Value |
| Standard DECT-GAP | |
| Power supply Input: 230 V, 50 Hz | Output: 6VDC 400mA |
| Range (outdoors/indoors) 300 m, 50 h | 50 m |
| Standby Up to 110 h | |
| Max. talk time Up to 8 h | |
| Rechargeable standard batteries 2 | x 1.2 V/650 mAh, size: AAA |
| Dialling method Tone dialling (DTMF) | Pulse dialling |
| Permissible ambient temperature 1 | 0°C to 30°C |
| Permissible relative humidity 20% to 75% | |
| Flash function 100 ms, 300 ms |
DECT: Digitally Enhanced Cordless Telephone = Standard for cordless telephones.
GAP: Generic Access Profile = Standard for the interoperation of handsets and base stations from other manufacturers.
11.2 Replacing the telephone connection cable
If the telephone connection cable needs to be replaced, refer to the diagram below for the cable required.
F-Code - IMPORT standard
