
RB3131W - Fridge GORENJE - Free user manual and instructions
Find the device manual for free RB3131W GORENJE in PDF.


User questions about RB3131W GORENJE
0 question about this device. Answer the ones you know or ask your own.
Ask a new question about this device
Download the instructions for your Fridge in PDF format for free! Find your manual RB3131W - GORENJE and take your electronic device back in hand. On this page are published all the documents necessary for the use of your device. RB3131W by GORENJE.
USER MANUAL RB3131W GORENJE
Refrigerator - Freezer
EN
Thank you for your trust and for buying this appliance. We hope it will successfully serve the purpose for many years.
Refrigerator with freezer is for domestic use only.
The lower part of the appliance is refrigerator and is used for storing fresh foods at the temperature of 0^ C and higher.
Before Putting Into Use......14
Instructions for Use
We Care for the Environment
Tips for Energy Savings
Important 15
Disposing of the Worn Out Appliance
Placing and Installation ....16
Choosing the Right Place
Connection to Power Supply
Description of the Appliance .....17
Operation Control ....18
Temperature Selection
Use....18
The upper part is freezer and is used for freezing fresh foods and storing frozen foods for longer periods of time (up to one year, depending on the kind of foods you store). The compartment is marked with four stars..
Storing Fresh Foods
Freezing Fresh Foods
Storing Frozen Foods
Defrosting Frozen Food
How to make ice cubes
Changing the Direction of Opening the
Door 20
Maintenance and Cleaning ......21
Automatic Defrosting of the Refrigerator
Manual Defrosting of the Frezing
Compartment
Cleaning the Appliance
Switch Off the Appliance When Not In Use
Trouble-Shooting Guide......22
Before Putting Into Use
- Before connecting the appliance to the mains supply, leave it stand for about 2 hours, which will reduce a possibility of malfunctions in the cooling system due to transport handling.
- Clean the appliance, and be thorough, especially in the interior (See Cleaning and Maintenance).
- In case the interior accessories are not correctly placed, rearrange them as described in chapter Description of the Appliance.
Instructions for Use
These instructions for use are intended for the user. They describe the appliance and its correct and safe use. They were prepared for various types of refrigerators therefore you might find in it some functions that do not apply to your appliance and description of the accessories that your appliance does not include.
We Care for the Environment
- Our appliances are distributed in packaging made of environmental friendly material which could safely be recycled, disposed off or destroyed, with no effects on the nature whatsoever.
- These instructions are printed either on recycled paper or chlorine free bleached paper.
- When your appliance finally wears out, please try not to burden the environment with it; call your nearest authorised service agent. (See Disposing of the Worn Out Appliance).
Tips for Energy Savings
- Try not to open the door too often, especially when the weather is wet and hot. Once you open the door, mind to close it as soon as
possible. This is especially important if you have an upright model.
- Every now and then check if the appliance is sufficiently ventilated (adequate air circulation behind the appliance).
- Use higher thermostat settings only when required or recommended.
- Before loading the appliance with packages of fresh foods, make sure they are cooled to ambient temperature.
-
Ice and frost layer increase energy consumption, so do clean the appliance as soon as the layer is 3-5 mm thick.
-
If the gasket is damaged or if it turns out that the sealing is poor, the energy consumption is substantially higher. To restore efficiency, replace the gasket.
- The condenser on the rear wall should be always clean, free of dust or any impurities.
- Always consider instructions stated in sections Positioning and Energy Saving Tips, otherwise the energy consumption is substantially higher.
⚠️ Important
- This appliance is manufactured in compliance with relevant safety standards. However, it is still advisable it is not used without due supervision by persons with diminished physical, motoric, or mental capabilities or persons with inadequate experience or knowledge. The same recommendation applies to minors using the appliance.
- If you have bought this appliance to replace an old one equipped with a lock that cannot be opened from inside (lock, bolt), make sure that the lock is broken. This will make it impossible for children to lock themselves inside the appliance and suffocate.
- The appliance must be correctly connected to the mains supply. (see: Connecting to the Mains Supply).
- Do not touch the cooled surfaces while the appliance operates, especially not with wet hands, because the skin may stick to the cold surfaces.
- Do not freeze bottles containing liquid, especially not soft drinks, such as mineral water, sparkling wine, beer, cola etc., because liquid expands during freezing and the glass bottle is very likely to blow up.
- Do not eat frozen food (bread, fruit, vegetables), because you can get frostbites.
- If the food has strange smell or color, throw it away, because it is very likely that it is spoiled and therefore dangerous to eat.
- Disconnect the appliance from the power supply before repairing it (only a qualified technician should repair it), before cleaning and before replacing the light bulb.
- Do not defrost the appliance with other electric devices (hair dryer etc.) and never
scrape the ice or frost layer with sharp tools. Use only enclosed tools or tools recommended by the manufacturer.
- For the sake of environment protection - be careful not to damage the rear wall of the appliance (the condenser unit or the tubes - for example when moving the appliance) or any part of the refrigerating system inside the appliance.
- The refrigerating system of the appliance is filled with refrigerant and oil, so when the appliance is damaged, handle it with care and dispose it of in compliance with environmental protecting precautions. (See We Care for the Environment).
- If the supply cord is damaged, it must be replaced by the manufacturer or his service agent or a qualified person in order to avoid hazard.
- The rating plate is inside the appliance or outside on the rear wall.
- Warning! Ventilation slots on the appliance or a built-in element must always be clean and unobstructed.
- Warning! Do not use mechanical devices or tools to defrost the refrigerator, nor any other methods except for those recommended by the manufacturer.
- Warning! When installing, cleaning, or removing the appliance, make sure the insulation on the refrigeration system parts is not damaged. Thus you will also prevent damage to the environment.
- Warning! Do not use electric appliances in the refrigerator or freezer interior, except for those expressly allowed by the refrigerator-freezer manufacturer
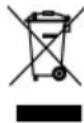
The symbol on the product or on its packaging indicates that this product may not be treated as household waste. Instead it shall be handed over to the applicable collection point for the recycling of electrical and electronic equipment. By ensuring this product is disposed of correctly, you will help prevent potential negative consequences for the environment and human health, which could otherwise be caused by inappropriate waste handling of thisproduct. For more detailed information about recycling of this product, please contact your local city office, your household waste disposal service or the shop where you purchased the product.
Disposing of the Worn Out Appliance
- When your appliance finally wears out, dispose it of. If the appliance has a lock, break it, in order to prevent eventual accidents (danger of children get locked inside the appliance).
- The refrigerating system of the appliance is filled with refrigerant and insulating substances which should be separately treated and processed. Call your nearest authorised service agent or specialised servicing centre. If you don't find one, contact your local authorities or your distributor. Be careful not to damage the tubes on the rear wall of the appliance (danger of pollution).
Placing and Installation
Choosing the Right Place
Place the appliance in a dry and regularly ventilated room. Allowed ambient temperature depends on the model (class) of the appliance and is stated on the rating plate of the appliance. Never place the appliance near heat emitting devices (e.g. cooker, radiator, water heater or similar devices) and do not expose it to direct sunlight. The appliance should be positioned at least 3 cm away from the electric or gas cooker and at least 30 cm away from the oil or coal stove. If this is not possible, use an appropriate insulation. Behind the appliance there should be free space at least 200 cm ^2 wide and above the appliance the high kitchen units should be at least 5 cm away from the appliance in order to assure adequate ventilation of the condenser unit.
| Class Ambient temperature | |
| SN (subnormal) from + | 10°C to + 32°C |
| N (normal) from + 16°C | to + 32°C |
| ST (sub-tropical) from + | 16°C to + 38°C |
| T (tropical) from + 16°C | to + 43°C |
Location
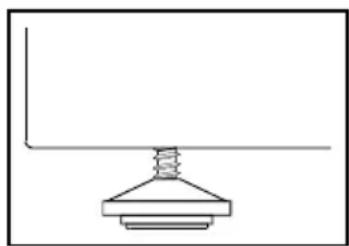
- Place the appliance horizontally and firmly on a solid base. Level the appliance with two adjustable feet located on the front of the appliance.
natural_image
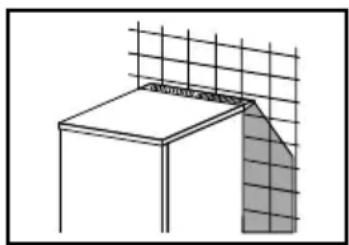
Simple line drawing of a mechanical component with a base and spring (no text or symbols)- The appliance with ventilation grid may be placed close to the wall. The grid enables sufficient air circulation, required for adequate ventilation of the rear wall.
natural_image
Simple line drawing of a window with grid lines and a shaded corner detail (no text or symbols)Connection to Power Supply
Connect the appliance with the cable and plug to the power supply socket outlet with a ground terminal (safety socket). Required nominal voltage and frequency are indicated on the rating plate. The connection to the mains supply and earthing have to be made according to current standards and regulations. The appliance resists temporary voltage tolerance up to -6 to +6 %
Description of the Appliance
text_image
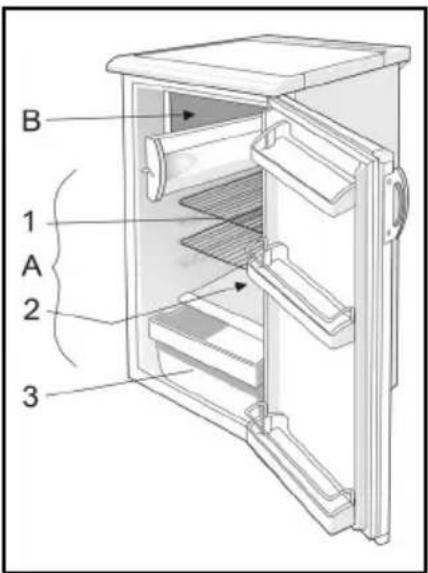
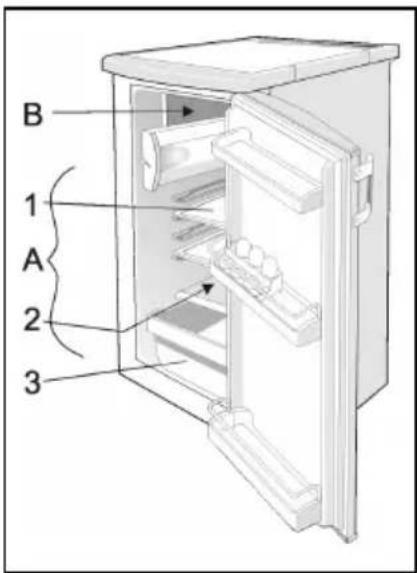
B 1 A 2 3Refrigerator (A)
Refrigerator is used for storing fresh foods for few days.
Freezer (B)
Freezer is used for freezing fresh foods and for storing already frozen foods.
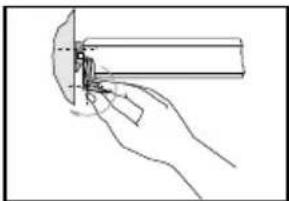
Opening the freezer door
natural_image
Line drawing of a hand holding a cylindrical object with a pointed tip, no text or symbols presentShelf (1)
(the number of shelves depend on model) Shelf can be optionally placed on the guides inside the appliance. It is protected against pulling out. If you want to remove it, slightly lift up the back part and pull it out. Glass shelves (some models only have them) are protected with plastic spacers. Before pulling the shelf out, spacers must be moved towards you. Spacers can be also removed, however, it is better to keep them for any later transport.
Quickly perishable food should be stored on the back i.e. the coldest part of the shelves. Line limiting the quantity of food is indicated on the bottom shelf of some models - do not place food in front of it.
text_image
B 1 A 2 3Defrost Water Outlet (2)
Regularly check the defrost water outlet and the channel, because they should never be clogged (as for example with food rests). If clogged, use a plastic straw and clean it.
Fruit and Vegetable Container (3)
The container is on the bottom under the glass shelf and is used mainly for storing fruits and vegetables. It provides adequate humidity which has favourable effect on food stored.
Door Liner
The door liner consists of various shelves or holders used for storing eggs, cheese, butter and yogurt as well as other smaller packages, tubes, cans etc.
The lower shelf is used for storing bottles.
Illumination in the Interior of the Refrigerator
The light for illuminating the interior of the appliance is on, when the door is opened. The operation of the light does not depend on the position of the thermostat knob.
NOTE:
- The appliance can be equipped with various accessories, depending on the model of the appliance.
- Various accessories (spice container, tube holder or additional shelves) can be bought in authorized centres.
Operation Control
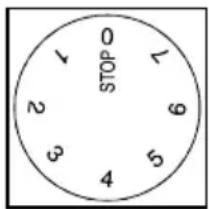
The appliance is controlled with thermostat knob, situated in the right upper part inside the appliance. Turn the knob from STOP (0) position towards 7 and backwards.
Temperature Selection
- Higher settings on the knob (towards 7) mean lower temperatures (colder) in all three compartments of the appliance. Temperature in the interior of the appliance may even drop below 0°C. Higher settings should be used only in case higher temperature is recommended or required. When the ambient temperature is normal, we recommend medium setting.
- Changes of the ambient temperature affect temperature in the interior of the appliance (choose correct setting of the thermostat knob).
- In STOP (0) position the appliance does not operate (the cooling system is switched off), yet power supply is not interrupted (the light is on, when you open the refrigerator door).
- Temperature in the refrigerator also depends on how often the door is opened.
text_image
STOP 0 1 2 3 4 5 6 7 8 9Use
Storing Fresh Foods
Proper use of the appliance, adequately packed food, correct temperature and taking into account hygienic precautions will substantially influence the quality of the food stored.
- Foods to be stored in the refrigerator should be properly packed as to prevent mixing various moisture degrees and odors (in polyethylene bags or sheet, aluminium foil, wax paper, or stored in covered containers or bottles).
- Before storing food in the refrigerator, remove the excessive packaging (like yoghurt in multi-package).
- Pack systematically and make sure that foodstuffs do not touch each other (various odours may mix). Assure adequate air circulation around packages.
- Never store inflammable, volatile or explosive substances.
- Beverages with high alcohol percentage shall be stored in tightly sealed bottles in vertical position.
- Food should not touch the rear wall of the refrigerator!
-
Foods should be cooled down before storing.
-
Crispy and delicate foods should be stored in the coldest parts of the refrigerator.
• Try not to open the door too often. - Set the thermostat to the setting where lowest temperatures are reached. Set the thermostat gradually as to avoid freezing of the foods.
Use a thermometer and measure the temperature in the individual compartments. Place the thermostat in a glass vessel filled with water. Temperature readings are most reliable few hour after steady state is reached.
- Some organic solutions like volatile oils in lemon and orange peel, acid in butter etc. can cause damages when in contact with plastic surfaces or gaskets for longer period of time.
- Unpleasant odor inside the refrigerator is a sign that something is wrong with foods or that your refrigerator needs cleaning. Unpleasant odor can be eliminated or reduced by washing the interior of the refrigerator with a mild solution of water and vinegar. We also recommend using activated carbon filters to clean the air or to neutralize odors.
- If you plan a longer journey, make sure to remove quickly perishable articles of food out of the appliance before you leave
Fresh Food Storage Time in the Refrigerator
| Article of food | Storage time (days) | ||||||||||||||
| 1 2 | 3 4 | 5 6 | 7 8 | 9 | 10 11 | 12 13 | 14 | ||||||||
| Butter + + + + + + + = | = = = | = | |||||||||||||
| Eggs + + + + + + + + | + + = | = = | |||||||||||||
| Meat: fresh uncut + + chopped + =smoked + + + + | = | ||||||||||||||
| + + + | + + + | = = = | |||||||||||||
| Fish + = | |||||||||||||||
| Marinade + + + + + + | + + + | = = = | = | ||||||||||||
| Root + + + + + + + + = = = = | = = = | ||||||||||||||
| Cheese | + + | + + = | = = = = | = = = = | = = = = | = = = = | = = = = | = = = = | = = = = | = = = = | = = = = | = = = = | = = = = | = = = = | = = = = |
| Sweets | + + | = = = = | = | ||||||||||||
| Fruit | + + | = = = = | = = = = = | = = = = = | = = = = = | = = = = = | = = = = = | = = = = = | = = = = = | = = = = = | = = = = = | = = = = = | = = = = = | = = = = = | = = = = = |
| Prepared dishes | + + | = = | |||||||||||||
Legend:
+ recommended storage time
= possible storage time
Freezing Fresh Foods
-
Carefully select food you intend to freeze; it should be of adequate quality and suitable for freezing.
• Use correct packaging and wrap it right. -
The packaging should be air tight and shouldn't leak since this could cause substantial vitamin loss and dehydration of foods.
-
Foils and bags should be soft enough to tightly wrap around the foods.
-
Mark packages with following data: kind and amount of foods and the date of loading.
- It is most important that the food is frozen as quickly as possible. Therefore we recommend the size of the package not to be too large and to be cooled before loading into the freezer.
- The amount of fresh foods that can be loaded in the freezer within 24 hours is indicated on the rating plate (freezing capacity). If the loaded amount is too large, the quality of freezing is reduced which affects the quality of frozen foods.
Freezing Procedure
- 24 hours before loading the freezer with fresh foods to be frozen, set the thermostat to position 3-5. Put packages on the shelf and let them freeze. Some 24 hours after loading the packages of fresh foods, reset the thermostat, if
necessary, to operating temperature. (See Temperature Selection) and reload the frozen packages to the bottom shelf.
- The next time you want to freeze fresh foods, repeat the freezing procedure and be careful that packages with fresh foods do not touch frozen packages.
- For freezing smaller amount of foods (up to 1 kg) there is no need to change the thermostat setting (see Temperature Selection).
Storing Frozen Foods
Frozen foods can be stored on the bottom of the appliance or on the shelf.
Commercially Frozen Foods
The storage time and the recommended temperature for storing commercially frozen foods are indicated on the packaging. For storing and using consider the manufacturer's instruction. When shopping, be careful and choose only adequately packed foods provided with complete data and stored in freezers where the temperature is not higher than -18°C. Do not buy packages of food covered with frost layer. This indicates that the package was thawed before at least once. Be careful that packages don't start to thaw, as the temperature raise reduces the quality of foods.
Approximate Storage Time of Frozen Foods
| Food Storage time (in months) | ||||||||||||
| 1 | 2 | 3 | 4 | 5 | 6 | 7 | 8 | 9 | 1 | 0 | 1 | |
| Vegetable + + + | ||||||||||||
| Fruit + + + | ||||||||||||
| Bread, pastries + | ||||||||||||
| Milk + | ||||||||||||
| Ready-made meals + | ||||||||||||
| Meat: Beef + + + | ||||||||||||
| Veal + + + | ||||||||||||
| Pork + + + | ||||||||||||
| Poultry + + + | ||||||||||||
| Game | + + + | |||||||||||
| Minced meat | + | |||||||||||
| Smoked sausages | + | |||||||||||
| Fish: lean fat | + | |||||||||||
| + | ||||||||||||
| Offal | + | |||||||||||
Defrosting Frozen Food
Partially thawed or defrosted foods should be used as soon as possible. Cold air preserves the food but it does not destroy microorganisms which rapidly activate after defrosting and make foods perishable. Partial defrosting reduces the nutritional value of foods, especially of fruits, vegetables and ready-made meals.
How to make ice cubes
(certain models only)
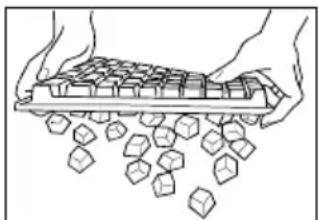
Recommended thermostat position for ice making is on the middle setting. Fill two thirds of the ice tray with cold water or any other liquid convenient for freezing. Insert the ice tray
into the guides or on the cooling plate. Time required for the ice to form, largely depends on ambient temperature, thermostat setting and on how often you open the door. It usually takes 2-6 hours (depends on which model of refrigerator you have). With smaller refrigerators we recommend you make a stock of ice cubes (store them in a separate plastic box). The easiest way to empty the ice tray is to turn the tray around, pour it with cold water and slightly twist it (bend it).
natural_image
Illustration of hands holding a tray with scattered cubes (no text or symbols)Changing the Direction of Opening the Door
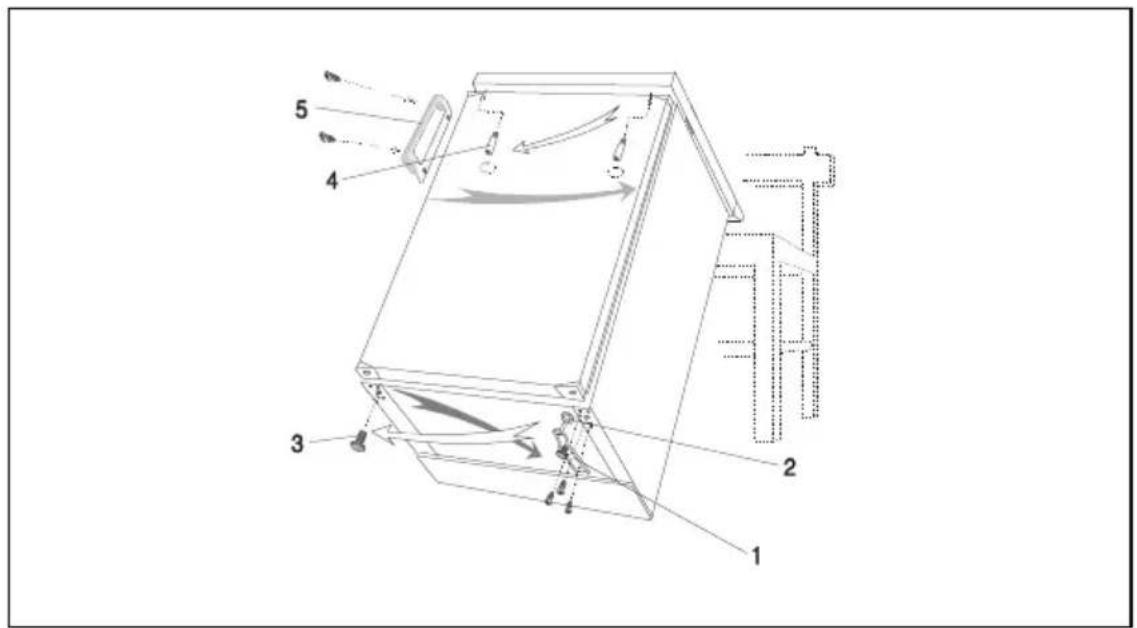
If you find the direction of opening the door on your appliance inconvenient, you can change it. Holes on the opposite side have already been prepared in the factory and are now plugged.
- Unscrew the lower hinge with foot and remove the door of the appliance.
- Unscrew the other foot and fix it on the place where previously was the hinge with the foot.
-
Rotate the fastener having the function of the upper hinge counter clockwise, take it off and replace it on the opposite side of the door.
-
Put the door on the fastener having the function of the upper hinge.
- Put the fastener with foot of the lower hinge (with a washer) into the plastic corner with a hole and fix the lower hinge.
- Unscrew the handle and replace it on the opposite side (not for handles mounted horizontally). Some screws are covered with caps. Take them off before undoing the screws.
- Plug the remaining holes with decorative caps.
- Check the gasket, it shouldn't be creased and it should seal well.
Changing the Direction of Opening the Door on the Freezing Compartment
- Unscrew the blocking element and the hinge of the freezing compartment and take off the door.
- Plug the holes with plastic caps provided.
- Turn the door for 180° and replace it on the opposite side of the freezing compartment. Fix the hinge and the blocking element of the door (position of holes already provided).
text_image
Technical diagram of a mechanical device with numbered components and directional arrows indicating motion or flow.1 Lower hinge with foot
2 Lower hinge washer
3 Foot
4 Fastener
5 Handle

text_image
7 8 66 Freezing compartment
7 Blocking element
8 Door hinge
Maintenance and Cleaning
Automatic Defrosting of the Refrigerator
There is no need to defrost the refrigerator, because ice depositing on the inner back wall is defrosted automatically. Ice is depositing on the inner back wall during the compressor operation; later on, when the compressor is not operating ice is defrosting and water drops collect and drain through the outlet in the inner
back wall into the drain pan situated above the compressor, from where it evaporates.
Manual Defrosting of the Frezing Compartment
When the frost and ice layer in the freezing compartment is 3-5 mm thick, you should clean the freezer.
- Turn the thermostat knob to STOP (0) position, and disconnect the power supply.
Empty the compartment and take care that the packages remain frozen.
- Put a suitable vessel under the freezing compartment to collect the defrost water. Leave the door of the compartment open to accelerate defrosting.
- Avoid using defrosting sprays, as they may cause damage to the plastic parts and may be hazardous to health.
Cleaning the Appliance
Disconnect the power supply before cleaning the appliance.
Do not use coarse or aggressive cleaning agents as you can damage the surface. Be careful to remove any cleanser agent remaining after cleaning.
- Clean the exterior with water and detergent.
- Varnished surfaces are cleaned with soft cloth and an alcohol based cleaning agent (for example glass cleaners). You may also use alcohol (ethanol or isophylic alcohol).
- The application of abrasive and specially aggressive cleaners, such as the stainless steel cleaners, is not appropriate for the cleaning of plastic and coated parts.
- Remove the detachable accessories in the interior of the appliance and clean it with water and liquid detergent. Plastic parts cannot be washed in washing machine.
- Wash the interior of the appliance with lukewarm water, in which you added one or two spoonfuls of vinegar.
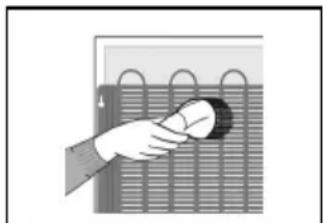
- Every now and then wipe the condenser on the rear wall. Use soft non-metal brush or vacuum cleaner.
natural_image
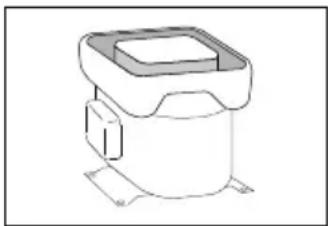
Illustration of a hand holding a baby near a coiled bed (no text or symbols)- Do not forget to clean also the defrost water receptacle above the refrigerator compressor (do not remove the receptacle).
natural_image
Technical line drawing of a mechanical component with a square top and mounting base (no text or symbols)After cleaning, connect the appliance to power supply and reload it.
Switch Off the Appliance When Not In Use
If you do not intend to use the appliance for a longer period, set the thermostat knob to the STOP (0) position, disconnect the power supply, take out the foods and defrost and clean the appliance. Leave the door slightly open.

Trouble-Shooting Guide
During the service, you can come across some troubles that in most cases result from improper handling of the appliance and can easy be eliminated.
The Appliance Fails to Operate After Connecting to the Mains Supply
- Check the supply in the outlet socket and make sure the appliance is switched on (thermostat knob in operating position).
Continuous Operation of the Refrigerating System
- the door was frequently opened or it was left opened for too long;
- the door is not properly closed (the door may sag, the gasket may be polluted or damaged);
- perhaps you have overloaded the appliance with fresh foods;
- The reason may be inadequate ventilation of the compressor and condenser (assure adequate air circulation and wipe off the condenser);
Ice Formation on the Inner Rear Wall
As long as the defrost water runs to the channel and through the outlet to the drain pan on the compressor, automatic defrosting of the appliance is assured. In case the ice formation on the inner back wall is increased (3-5 mm), ice should be manually defrosted.
Set the thermostat knob to STOP (0) position and leave the door open. Never use electric devices for defrosting and do not scrape the ice or frost layer with sharp objects.
After completed defrosting, turn the knob to desired position and close the refrigerator door.
The cause of increased ice formation may be one of the following:
- the door does not seal well (clean the gasket if it is contaminated, or replace it if it is damaged);
– the door was frequently opened or it was left opened for too long;
– the food stored in the refrigerator was warm;
– the food or dish is touching the inner back wall.
Water is Leaking From the Refrigerator
In case the discharge water outlet is clogged, or the defrost water drips over the channel, water leaks from the refrigerator.
- Clean the clogged opening, for example with a plastic straw.
- Manually defrost the increased ice layer. See Ice Formation on the Inner Back Wal.
Noise
Cooling in refrigerating-freezing appliances is enabled by the cooling system with compressor, which produces noise. How noisy the appliance is depends on where it is placed, how it is used and how old the appliance is.
- During the operation of the compressor the noise of liquid is heard and when the
- compressor is not operating, the refrigerant flow is heard. This is a normal condition and it has no influence whatsoever on the lifetime of the appliance.
- After starting the appliance, the operation of the compressor and the refrigerant flow may be louder, which does not mean that something is wrong with the appliance and it has no influence on the lifetime of the appliance. Gradually the noise is reduced.
- Sometimes unusual and stronger noise is heard, which is rather unusual for the appliance. This noise is often a consequence of inadequate placing.
- The appliance shall be placed and levelled firmly on solid base.
- It should not touch the wall or kitchen units standing next to it.
- Check the accessories in the interior of the appliance, they should be placed correctly in their positions; also check the bottles, tins and other vessels that might touch each other and rattle.
Bulb Replacement
Before replacing the light bulb, disconnect the appliance form the power supply.
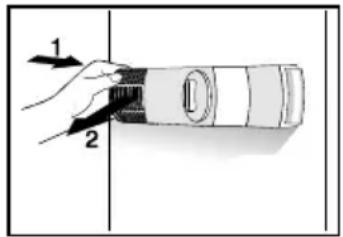
Press the cover at the rear side (in the arrow 1 direction) and remove the plastic cover (in the arrow 2 direction). Replace the bulb with a new one (E14, max. 15 W).
Don't forget: the old bulb does not belong to organic waste.
Light bulb is consuming good therefore our in-guarantee service does not relate to it.
Bulb lamps used in this appliance are special purpose lamps selected for household appliances use only. They are not suitable for household room illumination.
text_image
Diagram showing a hand holding a device with labeled parts 1 and 2, likely illustrating a mechanical or electrical component.WE RESERVE THE RIGHT TO ALTER THE SPECIFICATIONS WITH NO INFLUENCE ON THE OPERATION OF THE APPLIANCE.