EZ-NAS Gigabit NAS - Print Server Inter-Tech - Free user manual and instructions
Find the device manual for free EZ-NAS Gigabit NAS Inter-Tech in PDF.


User questions about EZ-NAS Gigabit NAS Inter-Tech
0 question about this device. Answer the ones you know or ask your own.
Ask a new question about this device
Download the instructions for your Print Server in PDF format for free! Find your manual EZ-NAS Gigabit NAS - Inter-Tech and take your electronic device back in hand. On this page are published all the documents necessary for the use of your device. EZ-NAS Gigabit NAS by Inter-Tech.
USER MANUAL EZ-NAS Gigabit NAS Inter-Tech
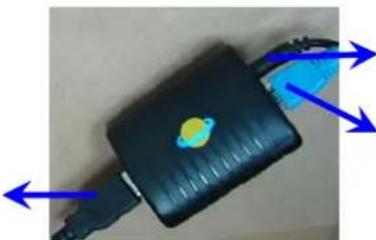
Connect to usb device, something like usb enclosure, printer, usb raid box, xbox,
natural_image
Close-up of a black electronic device with blue arrows indicating direction, no visible text or symbolsDC 5V / 2A adapter
Connect to router or Ethernet hub
1.1 Search Storage
1.1.1 Search Disk
Note: If your PC doesn't install Java Runtime Environment, please download from http://www.java.com/
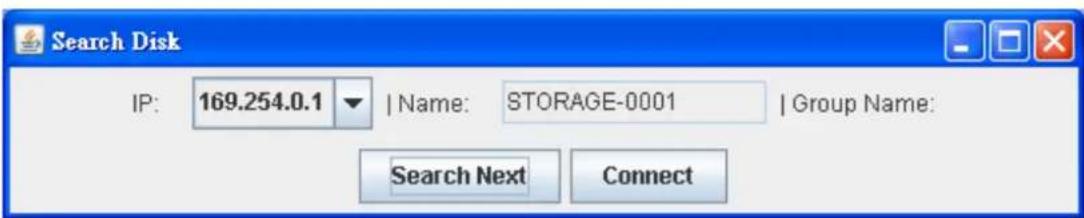
A. Execute "Search Disk" Utility from PC & click in "Search Next"
text_image
Search Disk IP: 169.254.0.1 | Name: STORAGE-0001 | Group Name: Search Next ConnectB. Configure PC be AUTO IP
If your network environment have DHCP server: Storage will get the IP from DHCP server. Storage role in the DHCP client in this condition
If your network environment have no DHCP server: Storage automatically
become DHCP server itself. Storage role in the DHCP server in this condition. Storage default IP is 169.254.0.1 and your PC will connect Storage from browser
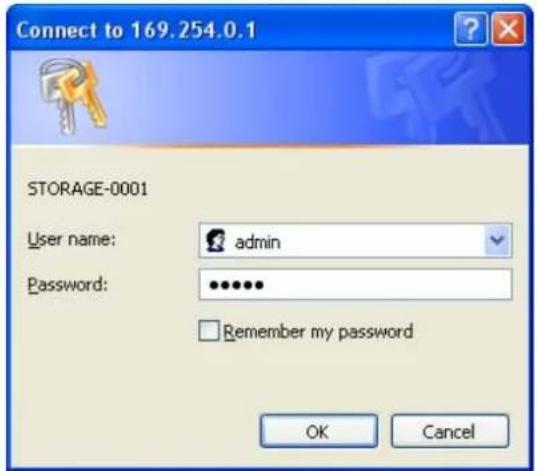
Click in "Connect" button and pop authentication dialog
text_image
Connect to 169.254.0.1 STORAGE-0001 User name: admin Password: •••••• Remember my password OK CancelDefault user name and password "admin/admin"
2.WEB Control Page
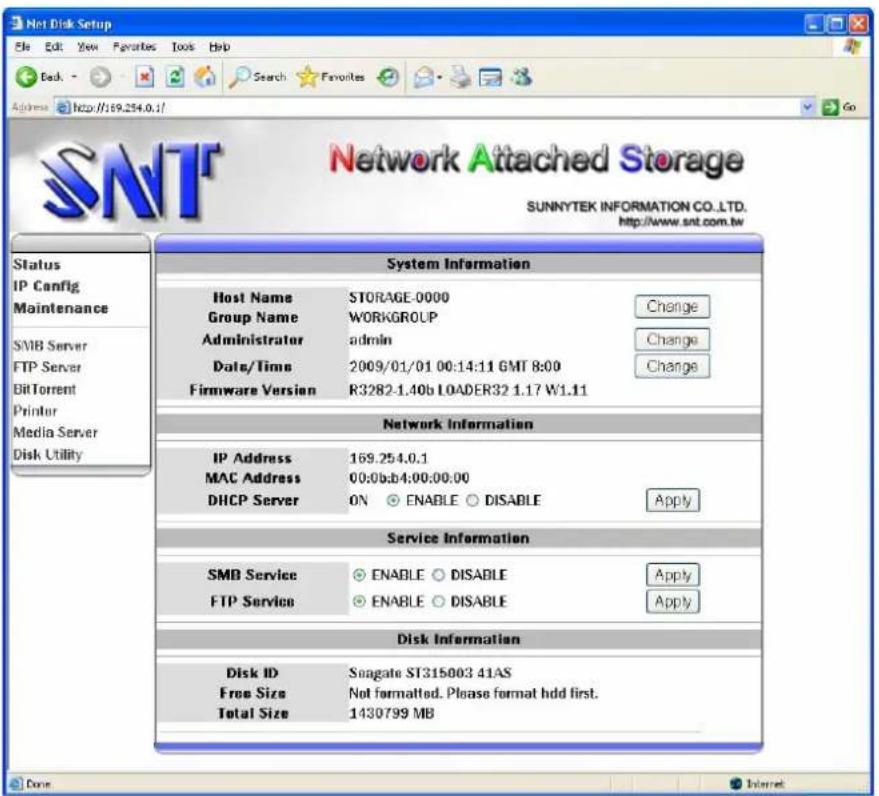
2.2 Status
text_image
Net Disk Setup File Edit View Favorites Tools Help Desk Search Favorites Address http://69.254.0.1/ SNT Network Attached Storage SUNNYTEK INFORMATION CO.,LTD. http://www.snt.com.tw Status IP Config Maintenance SMB Server FTP Server BitTorrent Printer Media Server Disk Utility System Information Host Name STORAGE-0000 Group Name WORKGROUP Administrator admin Change Date/Time 2009/01/01 00:14:11 GMT 8:00 Change Firmware Version R3282-1.40b LOADER32 1.17 W1.11 Network Information IP Address 169.254.0.1 MAC Address 00:0b:b4:00:00:00 DHCP Server ON ENABLE DISABLE Apply Service Information SMB Service ENABLE DISABLE Apply FTP Service ENABLE DISABLE Apply Disk Information Disk ID Seagate ST315003 41AS Free Size Not formatted. Please format hdd first. Total Size 1430799 MBDisplay storage current status
2.1.1 System Information
2.1.1.1 Host Name / Group Name
Click "Status" -> "Change" button (beside host and group name) to get into Identification page
Host Name: default value is STORAGE-XXXX. The last 4 digital xxxx depend on storage MAC address。
Storage on a network need unique names so they can identify and communicate with each other. It's best to keep host names short (fifteen characters or less) and easily recognizable.
We recommend that you use only Internet-standard characters in the computer name. The standard characters are the numbers 0 through 9, uppercase and lowercase letters from A through Z, and the hyphen (-) character. Computer names cannot consist entirely of numbers, nor can they contain spaces. The name also cannot contain special characters, such as the following:
$$ < >; \because^ {\prime \prime} * + = \backslash |?, $$
Group Name: default value is WORKGROUP
A group of computers that are connected on a network and share resources, such as printers and files. When you set up a network, Windows automatically creates a workgroup and gives it a name.
2.1.1.2 Administration
Click "Status" -> "Change" button (beside administrator) to get into administration page
Administrator: default is "admin", and this field can't change by user
Password: default is "admin", this field will change logon WEB password by user
Verify password: confirm password
After input password and click "ok" button, browser will re-login, and pop login dialog
2.1.1.3 Date/Time
Click "status" -> "Change" button (beside Date/Time) to get into Date and Time page
Date: set manual Date (yyyy/mm/dd)
Time: set manual Time (hh:mm:ss)
SNTP: enable/disable SNTP client
Time server: locate time server
Time Zone: click your current time zone in the list, and then click OK.
Daylight saving time : If your time zone observes daylight saving time and you want your storage clock to be adjusted automatically when daylight saving time changes, make sure the Automatically adjust clock for Daylight Saving Time check box is selected
2.1.1.4 Firmware version
Display firmware and loader current version
2.1.2 Network Information
2.1.2.1 IP Address
Display storage IP address
2.1.2.2 MAC Address
Display storage MAC address
2.1.2.3 DHCP Server
Enable / Disable DHCP server.
Enable DHCP server, Storage default IP is 169.254.0.1
Disable DHCP server with no DHCP server environment, the storage IP is 169.254.X.X
Disable DHCP server with DHCP server environment, the storage get the IP from DHCP server
2.1.3 Service Information
SAMBA Service : Disable / Enable SAMBA server FTP Service : Disable / Enable FTP server
2.1.4 Disk Information
Display Hard Disk model / Free Size / Total Size information
2.2 IP config
2.2.1 Auto IP
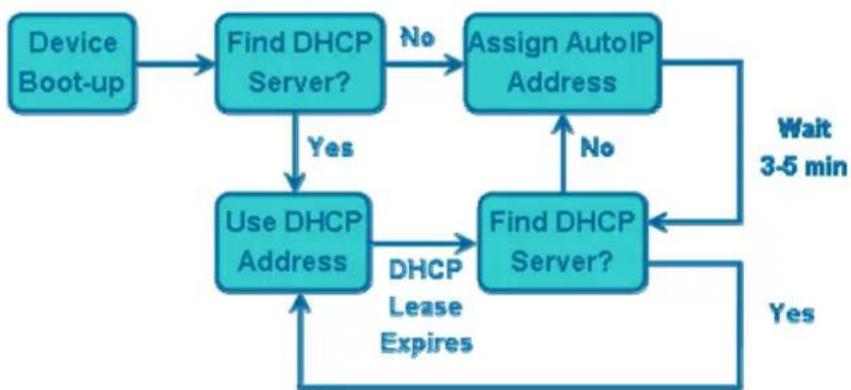
flowchart
graph TD
    A["Device Boot-up"] --> B["Find DHCP Server?"]
    B -->|No| C["Assign AutoIP Address"]
    B -->|Yes| D["Use DHCP Address"]
    C --> E["Find DHCP Server?"]
    D -->|No| E
    E --> F["Wait 3-5 min"]
    E --> G["Yes"]
    D --> H["DHCP Lease Expires"]
Upon boot-up the device must check for DHCP servers on the network
If a DHCP server is active/available, then the device must assign itself a DHCP address according to the instructions provided by the DHCP server
If no DHCP servers are active/available, the device must assign itself an Auto IP address and role play as DHCP server (169.254.0.1 / 255.255.255.0 / no gateway)
2.2.2 Static IP
IP address: this is the IP address assigned by your Router for your
Storage.You shall specify the IP address of the storage here. e.g.
192.168.1.123
Subnet Mask: an address code that determines the size of the network; this is the subnet mask of the storage, when seen by external users on the Internet (including your ISP). The subnet mask is provided by your ISP.
e.g.255.255.255.0
Gateway IP Address: an IP address forwards Internet traffic from your local area network (LAN) . e.g. 192.168.1.1
DNS Server IP address: you must specify DNS server IP address here if your ISP has the said address.
2.3 Maintenance
2.3.1 Firmware Upload
You can select new firmware to upload. Please don't turn off the power and close the web browser when the firmware is uploading
2.3.2 System Reboot
Click the Reboot button to have the device perform a software restart. The SYSTEM LED will blinks as the device restarts and then remain on if the restarts is successful.
Please wait about a minute before refreshing your browser before logging in again
2.3.3 Factory Default
Turn off the power at first. Click and hold "Factory default setting" button then reboot system (release it after power on 2 seconds) to clear all
configuration and restore to default settings.
2.4 SMB server
Samba is software that can be run on a platform other than Microsoft Windows, for example, UNIX, Linux, IBM System 390, OpenVMS, and other operating systems. Samba uses the TCP/IP protocol that is installed on the host server. When correctly configured, it allows that host to interact with a Microsoft Windows client or server as if it is a Windows file and print server.
- Share one or more directory trees
- Share one or more Distributed filesystem (Dfs) trees
- Assist clients with network browsing
- Provide or assist with Windows Internet Name Service (WINS) name-server resolution
- Share printers installed on the server among Windows clients on the network (not support)
● Authenticate clients logging onto a Windows domain (not support)
2.4.1 Configure SMB Server
Connect to storage SMB page ,the page as bellow:
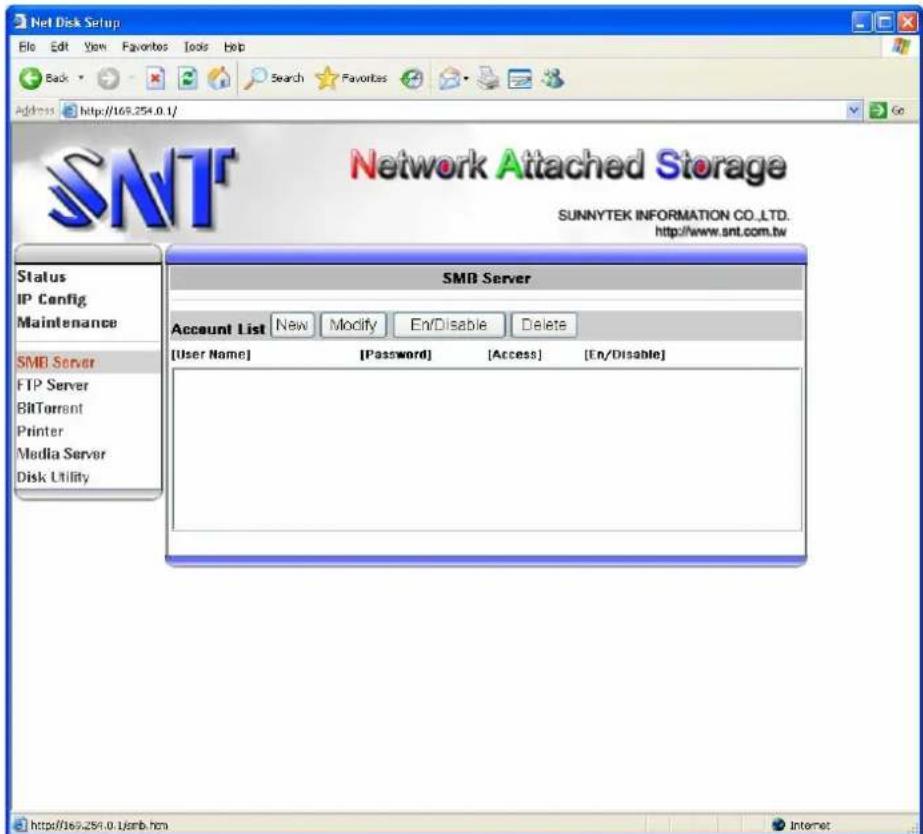
text_image
Net Disk Setup File Edit View Favorites Tools Help Back Search Favorites Go Address http://169.254.0.1/ SNT Network Attached Storage SUNNYTEK INFORMATION CO.,LTD. http://www.snt.com.tw Status IP Config Maintenance SMB Server FTP Server BITTorrent Printer Media Server Disk Utility SMB Server Account List New Modify En/Disable Delete [User Name] [Password] [Access] [En/Disable] http://169.254.0.1/jmb.htm Internet- NEW: create SMB share account (folder) and password, default
account :guest password: null
- Modify:
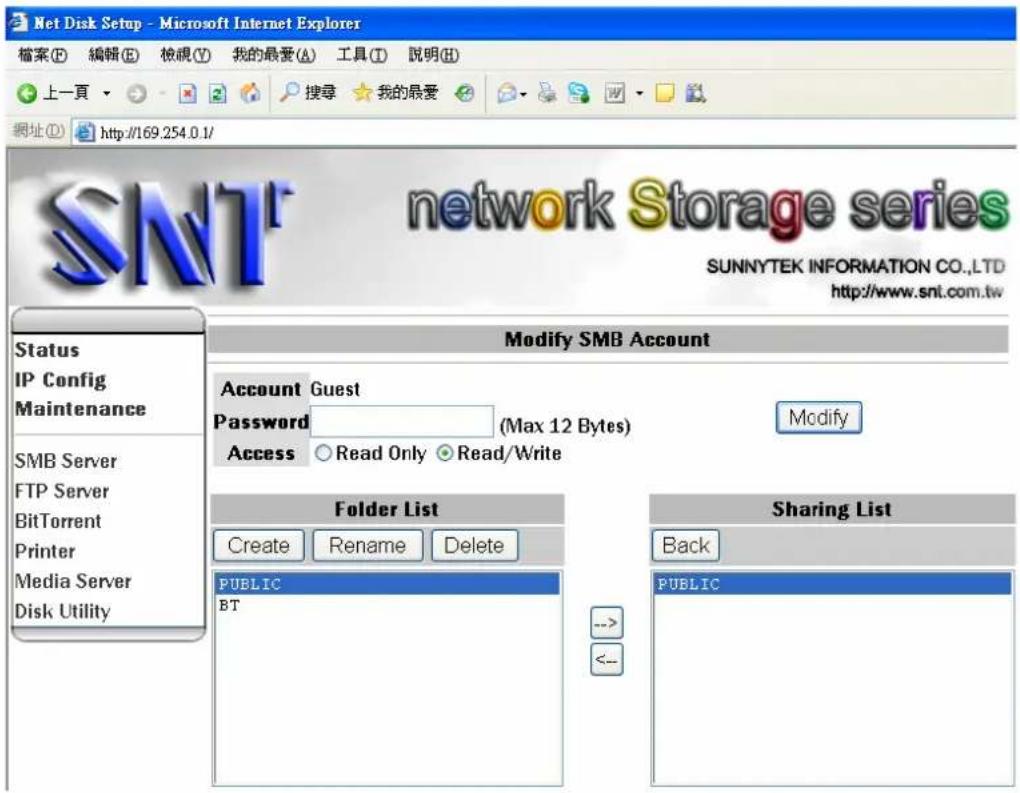
text_image
Net Disk Setup - Microsoft Internet Explorer 檔案(F) 編輯(E) 檢視(V) 我的最愛(A) 工具(T) 說明(H) 上一頁 搜尋 我的最愛 網址(D) http://169.254.0.1/ SNT network Storage series SUNNYTEK INFORMATION CO.,LTD http://www.snt.com.tw Modify SMB Account Account Guest Password (Max 12 Bytes) Access ○ Read Only ○ Read/Write Modify Folder List Create Rename Delete PUBLIC BT Sharing List Back PUBLIC <this page can modify as bellow
password: password of SMB account
access control : read only / read and write access control of SMB account folder sharing: Folder List is all of exist folder on storage, Sharing List is share folder of SMB account. If you want to share some folder, select this folder from Folder List and add to Sharing List.
folder manage :create / rename /delete folder
- Enable/ Disable :this button can enable/disable SMB account
- Delete: delete SMB account
2.4.2 Setting Up Windows 95/98/Me Computers
The Windows 95/98/Me operating systems are very similar to each other, it is possible to treat them with a common set of directions
- Add "File and printer sharing for Microsoft Networks,"
Samba uses TCP/IP to communicate with clients on the network, so you will
need to make sure there is support for TCP/IP on each Windows client. Unlike Unix operating systems, Windows does not necessarily have support for TCP/IP installed. However, when Windows is installed on a computer with a network card or a network card is added to a system already running Windows, TCP/IP support is installed by default, along with the Client for Microsoft Networks, which supports SMB file sharing
To make sure both services are installed on your Windows system, double-click the Network icon in the Control Panel to open the Network dialog box, as shown in bellow:

text_image
Network Configuration | Identification | Access Control | The following network components are installed: Client for Microsoft Networks AMD PCNET Family PCI Ethernet Adapter TCP/IP File and printer sharing for Microsoft Networks Add... Remove... Properties Primary Network Logon: Client for Microsoft Networks File and Print Sharing... Description OK CancelYou might also see "File and printer sharing for Microsoft Networks," which is used to make the system into a server. In addition, you might see NetBEUI or Novell Networking.
- Adding TCP/IP
If you don't see TCP/IP listed, you'll need to install the protocol. You can add the protocol by inserting the Windows distribution CD-ROM in your CD-ROM drive and clicking the Add button below the component window. Indicate that you wish to add a protocol by selecting Protocol and clicking "Add..." on the following dialog box, which should look similar as bellow:
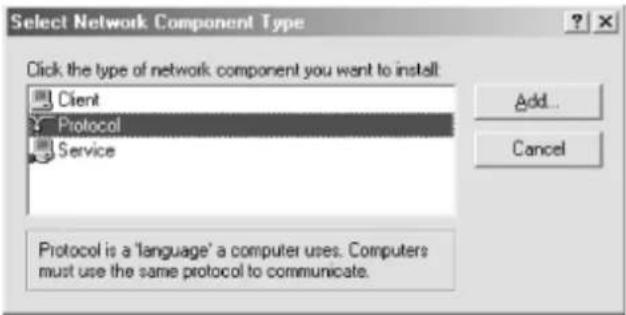
text_image
Select Network Component Type Click the type of network component you want to install Client Protocol Service Add... Cancel Protocol is a 'language' a computer uses. Computers must use the same protocol to communicate.After that, select manufacturer Microsoft, then protocol TCP/IP, then click OK. After doing so, you will be returned to the network dialog. Click OK to close the dialog box, and Windows will install the necessary components from the CD-ROM and request that the system be rebooted. Go ahead and reboot the system, and you're set.
- Configuring TCP/IP
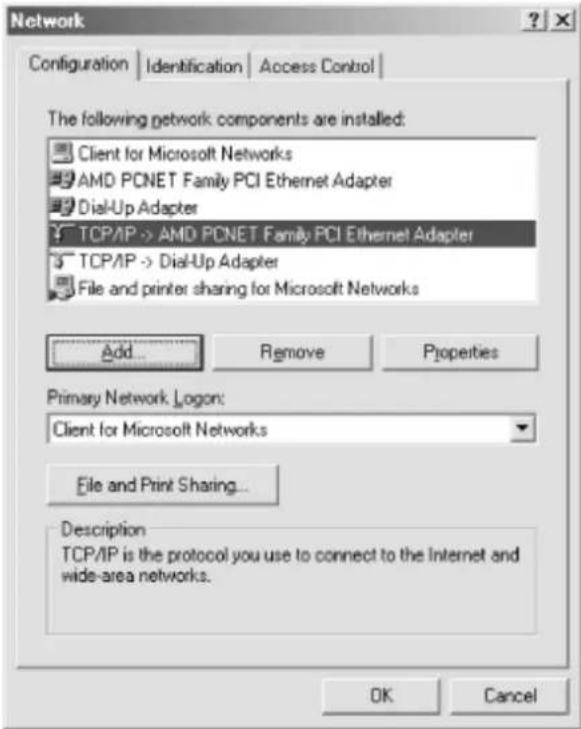
Select the TCP/IP protocol linked to the networking device that will be accessing the Samba network. If you have only one networking device, simply click the TCP/IP item. Now click the Properties button to open the TCP/IP Properties dialog. You should see something similar as bellow:
text_image
Network Configuration | Identification | Access Control | The following network components are installed: Client for Microsoft Networks AMD PCNET Family PCI Ethernet Adapter Dial-Up Adapter TCP/IP -> AMD PCNET Family PCI Ethernet Adapter TCP/IP -> Dial-Up Adapter File and printer sharing for Microsoft Networks Add... Remove Properties Primary Network Logon: Client for Microsoft Networks File and Print Sharing... Description TCP/IP is the protocol you use to connect to the Internet and wide-area networks. OK Cancel- IP Address tab
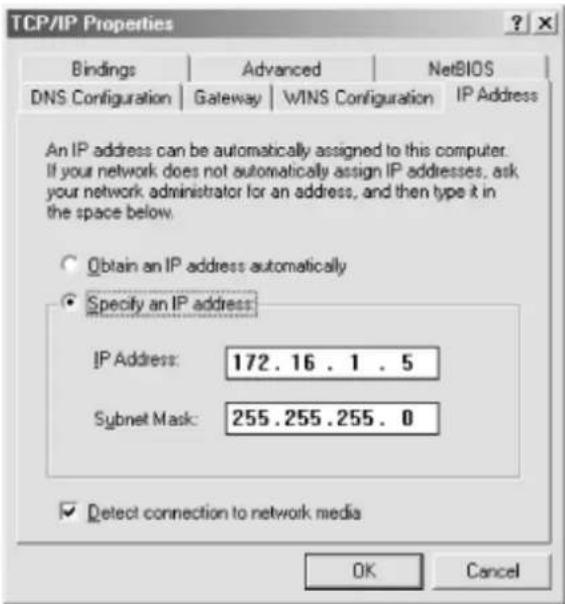
The IP Address tab is shown as bellow
text_image
TCP/IP Properties Bindings | Advanced | NetBIOS DNS Configuration | Gateway | WINS Configuration | IP Address An IP address can be automatically assigned to this computer. If your network does not automatically assign IP addresses, ask your network administrator for an address, and then type it in the space below. Obtain an IP address automatically Specify an IP address: IP Address: 172.16.1.5 Subnet Mask: 255.255.255.0 Detect connection to network media OK CancelIf you use DHCP on your network to provide IP addresses automatically to Windows systems, select the "Obtain an IP address automatically" radio button. Otherwise, click the "Specify an IP address" radio button and enter the client's address and subnet mask in the space provided. You or your network manager should have selected an address for the client on the same subnet (LAN) as the Samba server.
- Setting the Computer Name and Workgroup
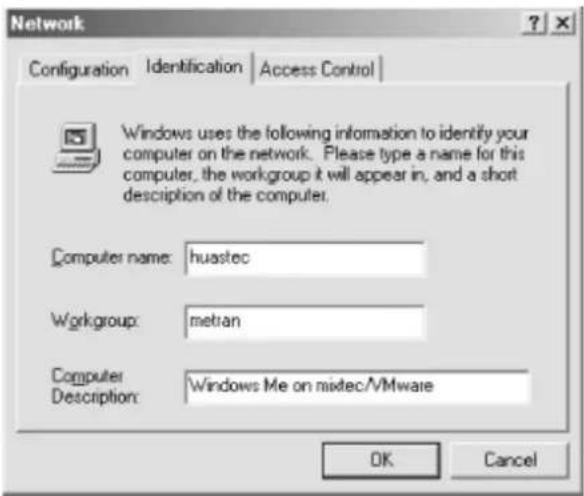
Finally, click the OK button in the TCP/IP configuration dialog, and you'll be taken back to the Network Configuration dialog. Then select the Identification tab, which will take you to the dialog box shown as bellow:
text_image
Network Configuration Identification Access Control Windows uses the following information to identify your computer on the network. Please type a name for this computer, the workgroup it will appear in, and a short description of the computer. Computer name: huastec Workgroup: metran Computer Description: Windows Me on mixtec/VMware OK CancelFinally, click the OK button and follow whatever instructions Windows provides. (You might have to insert your Windows distribution CD-ROM and/or reboot.)
- Accessing the Samba Server from Windows 95/98
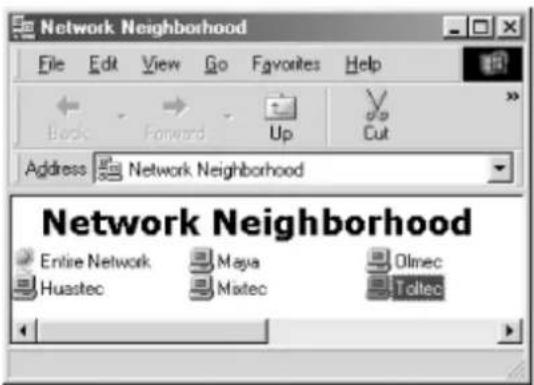
Double-click the Network Neighborhood icon on the desktop. You should see your Samba server listed as a member of the workgroup, as shown bellow:
text_image
Network Neighborhood File Edit View Go Favorites Help Back Forward Up Cut Address Network Neighborhood Network Neighborhood Entire Network Maya Olmec Huastec Mistec ToltecDouble-clicking the server name will show the resources that the server is offering to the network, as shown below
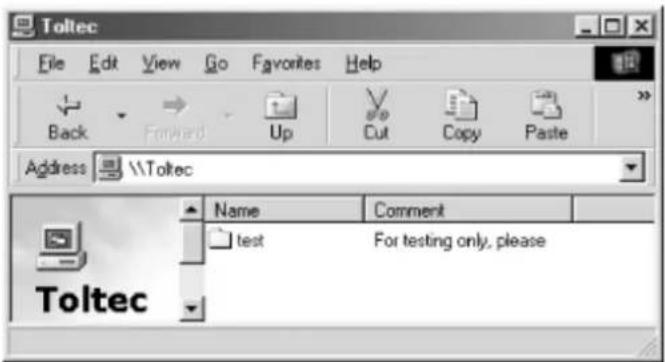
text_image
Toltec File Edit View Go Favorites Help Back Forward Up Cut Copy Paste Address \\Toltec Name Comment test For testing only, please Toltec- Accessing the Samba Server from Windows Me
Double-click the My Network Places icon on the desktop. You should see the test shared directory as shown in bellow
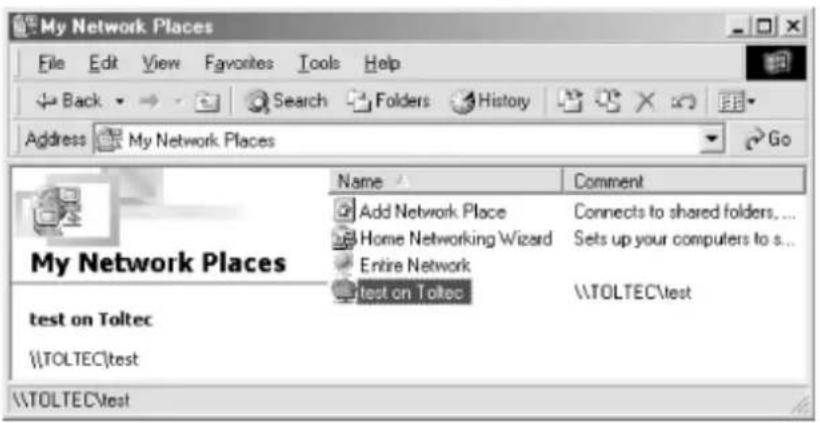
text_image
My Network Places File Edit View Favorites Tools Help Back Search Folders History Address My Network Places Go Name Comment Add Network Place Connects to shared folders... Home Networking Wizard Sets up your computers to s... Entire Network test on Toltec \\TOLTEC\test test on Toltec \\TOLTEC\test \\TOLTEC\testDouble-click the Entire Network icon, and you should see an icon for your workgroup, as shown in bellow
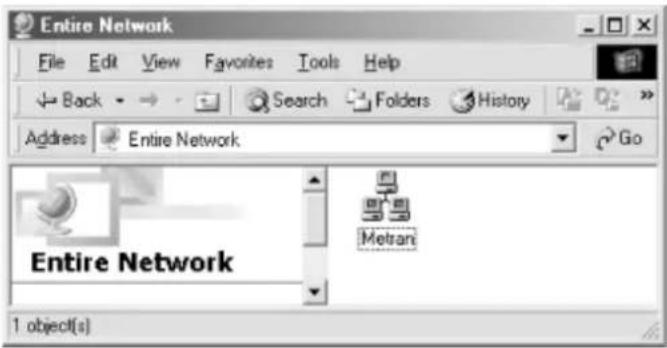
text_image
Entire Network File Edit View Favorites Tools Help Back Search Folders History Address Entire Network Go Entire Network Metran 1 object(s)NOTE:
If you don't see the server listed, it might be that browsing is not working correctly or maybe the server is just taking a few minutes to show up in the browse list. In either case, you can click the Start button, then select "Run...". This will give you a dialog box into which you can type the name of your server and the share name test in the Windows UNC format \server\test. This should open a window on the desktop showing the contents of the folder. If this does not work, there is likely a problem with name resolution, and you can try using the server's IP address instead of its computer name, like this:
\192.168.1.12\test
If it works, congratulations! Try copying files to and from the server using the Windows drag-and-drop functionality. You might be pleasantly surprised how seamlessly everything works
2.4.3 Setting Up Windows XP Computers
Although Windows XP is very similar to Windows 2000, it has a very different user interface, and there are a number of subtle differences. For example, getting to the Control Panel is different than in any previous version of Windows—one must click the Control Panel item from the Start menu (there is no Settings item in the Start menu in XP). By default, XP will display the Control Panel in Category View mode. If you see this, click the Switch to Classic View item in the upper-left corner of the window. All of our directions are for using the Control Panel in Classic View mode.
You should perform the following steps as the Administrator or another user in the Administrators group.
● Networking Components
Go to the Control Panel and double-click the Network and Dial-up Connections icon. You should see at least one Local Area Connection icon. If there is more than one, identify the one that corresponds to the network adapter that is connected to your Samba network. Right-click the Local Area Connection icon and click the Properties button. (Or double-click the Local Area Connection icon and then click the Properties button in the dialog box that comes up.) You should now be looking at the Local Area Connection Properties dialog box, as shown in bellow
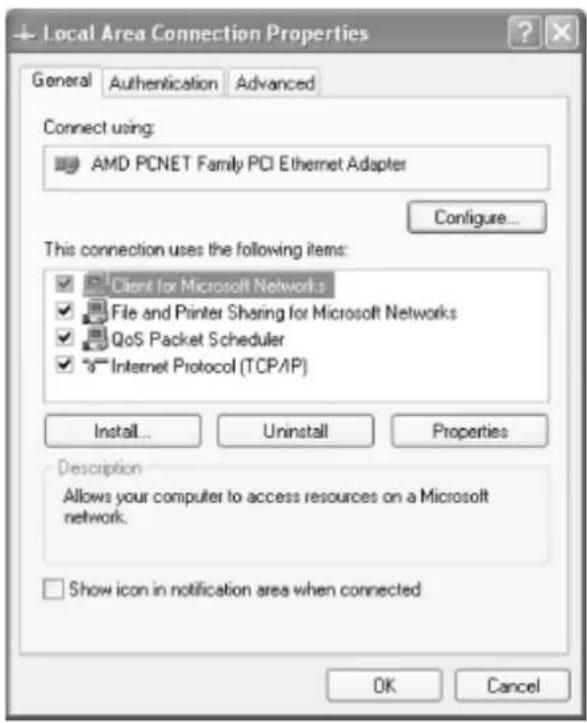
text_image
Local Area Connection Properties General Authentication Advanced Connect using: AMD PCNET Family PCI Ethernet Adapter Configure... This connection uses the following items: Client for Microsoft Networks File and Printer Sharing for Microsoft Networks QoS Packet Scheduler Internet Protocol (TCP/IP) Install... Uninstall Properties Description Allows your computer to access resources on a Microsoft network. Show icon in notification area when connected OK CancelYou should see at least the following two components:
- Client for Microsoft Networks
- Internet Protocol (TCP/IP)
If you do not see either Client for Microsoft Networks or Internet Protocol (TCP/IP) in your list, you will need to add them. For either, the method is to click the Install... button, click the type of component (Client or Protocol), and then click the Add... button. Next, click the component you want to add, and click the OK button. You should see the component added to the list with the others.
- Configuring TCP/IP
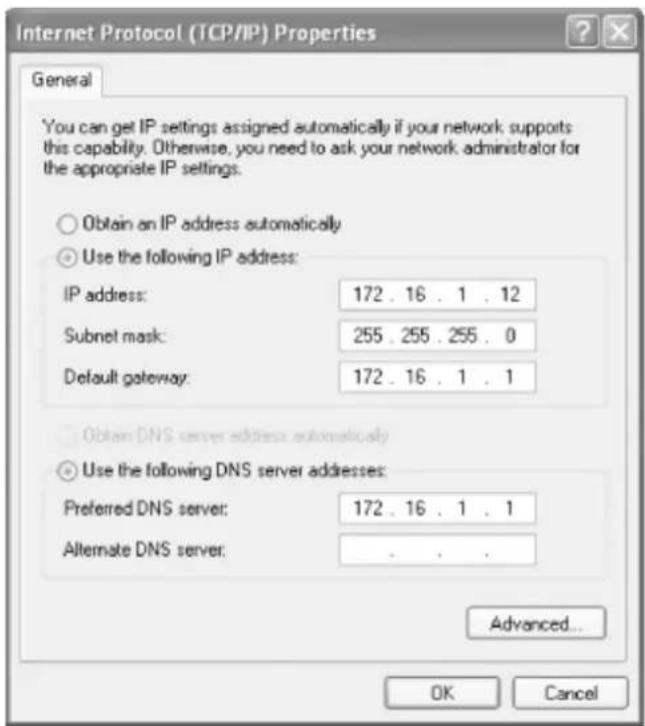
Now click Internet Protocol (TCP/IP) and then click Properties to open the Internet Protocol (TCP/IP) Properties dialog box, shown in bellow
text_image
Internet Protocol (TCP/IP) Properties General You can get IP settings assigned automatically if your network supports this capability. Otherwise, you need to ask your network administrator for the appropriate IP settings. Obtain an IP address automatically Use the following IP address: IP address: 172 . 16 . 1 . 12 Subnet mask: 255 . 255 . 255 . 0 Default gateway: 172 . 16 . 1 . 1 Obtain DNS server address automatically Use the following DNS server addresses: Preferred DNS server: 172 . 16 . 1 . 1 Alternate DNS server: . Advanced... OK CancelIf you are using DHCP on your network to assign IP addresses dynamically, select the "Obtain IP address automatically" radio button. Otherwise, select the "Use the following address:" radio button, and fill in the computer's IP address and netmask in the spaces provided. You or your network manager should have selected an address for the client on the same subnet (LAN) as the Samba server. For example, if the server's address is 192.168.1.1 and its network mask is 255.255.255.0, you might use the address 192.168.1.12 (if it is available) along with the same netmask. You can also fill in the IP address of the default gateway.
● Computer and Workgroup Names
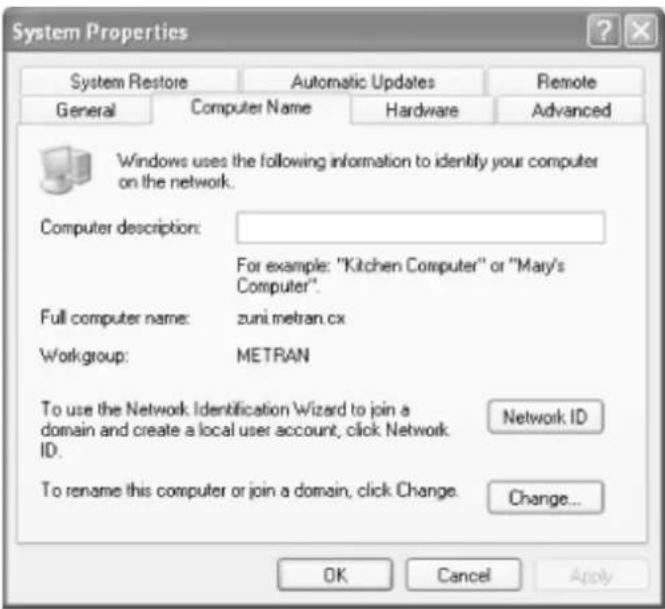
From the Control Panel, double-click the System icon to open the System Properties dialog box. Click the Computer Name tab, and your System Properties dialog box will look similar to:
text_image
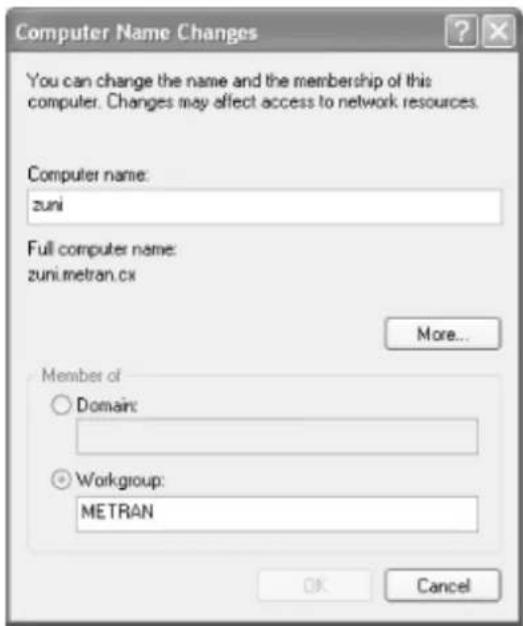
System Properties System Restore Automatic Updates Remote General Computer Name Hardware Advanced Windows uses the following information to identify your computer on the network. Computer description: For example: "Kitchen Computer" or "Mary's Computer". Full computer name: zuni.metran.cx Workgroup: METRAN To use the Network Identification Wizard to join a domain and create a local user account, click Network ID. Network ID To rename this computer or join a domain, click Change. Change... OK Cancel ApplyTo give your system computer a name and a workgroup, click the Change... button, which will bring up the Computer Name Changes dialog box, as in bellow
text_image
Computer Name Changes You can change the name and the membership of this computer. Changes may affect access to network resources. Computer name: zuni Full computer name: zuni.metran.cx More... Member of ○ Domain: ○ Workgroup: METRAN OK CancelYou need to identify your computer with a name and change the workgroup to the one you specified in the web page of your Samba server. Don't worry that Windows forces the workgroup to be all capital letters; it's smart enough to figure out what you mean when it connects to the network.
- Connecting to the Samba Server
Now for the big moment. Your Samba server is running, and you have set up
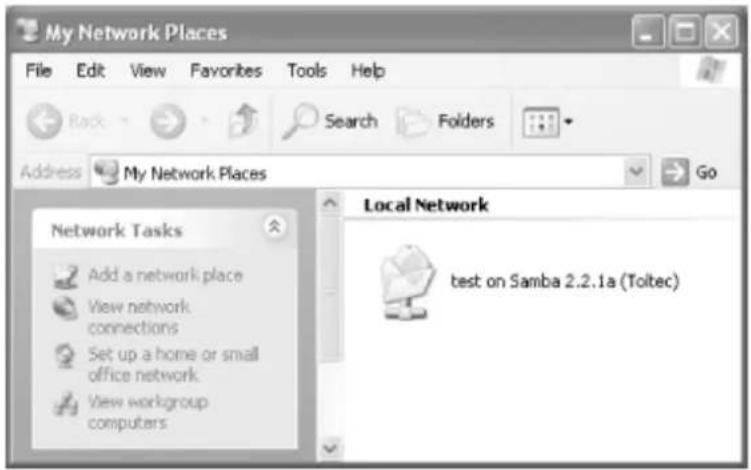
your Windows XP client to communicate with it. In the Start menu, select My Computer to open the My Computer window. Click My Network Places, in the Other Places box in the left part of the window. You should see a folder icon for the test directory, as shown in bellow
text_image
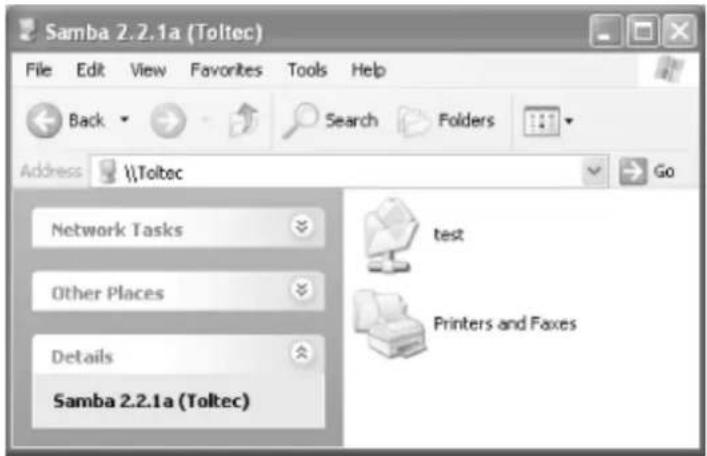
My Network Places File Edit View Favorites Tools Help Back Search Folders Address My Network Places Go Network Tasks Add a network place View network connections Set up a home or small office network. View workgroup computers Local Network test on Samba 2.2.1a (Toltec)Now click View workgroup computers in the Network Tasks box at the left of the window. You should see your Samba server listed as a member of the workgroup. Double-click its icon, and you will see a window that looks like
text_image
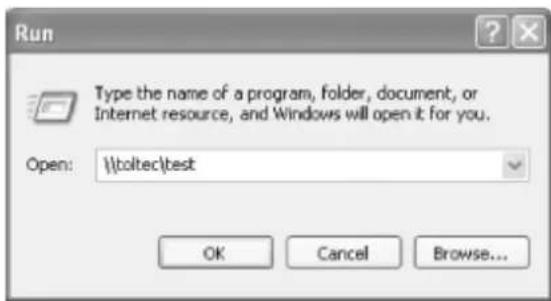
Samba 2.2.1a (Toltec) File Edit View Favorites Tools Help Back Search Folders Address \Toltec Go Network Tasks Other Places Details Samba 2.2.1a (Toltec) test Printers and FaxesIf you don't see the server listed in the workgroup, don't panic. Select Run... from the Start menu. A dialog box appears that allows you to type the name of your server and its share directory in Windows format. For example, you would enter \toltec\test, as shown in bellow, and use your server's hostname instead of "Toltec".
text_image
Run Type the name of a program, folder, document, or Internet resource, and Windows will open it for you. Open: \toltec\test OK Cancel Browse...If it works, congratulations! Try copying files to and from the server by dragging their icons to and from the Samba server's test folder. You might be pleasantly surprised how seamlessly everything works.
2.5 FTP server
File Transfer Protocol (FTP) is a network protocol used to transfer data from one computer to another through a network, such as over the Internet.
FTP is a file transfer protocol for exchanging files over any TCP/IP based network to manipulate files on another computer on that network regardless of which operating systems are involved (if the computers permit FTP access).
The objectives of FTP, as outlined by its RFC, are:
- To promote sharing of files (computer programs and/or data).
- To encourage indirect or implicit use of remote computers.
- To shield a user from variations in file storage systems among different hosts.
- To transfer data reliably, and efficiently
2.5.1 Configure FTP server
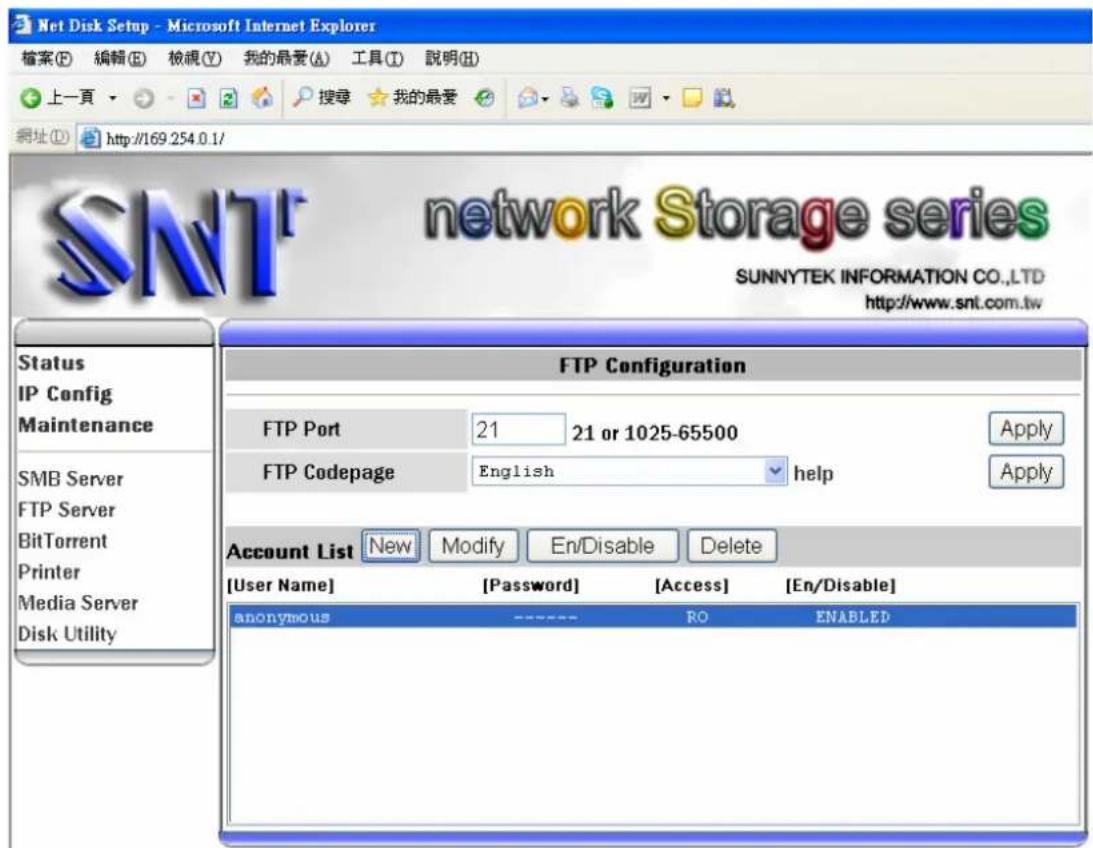
Connect to storage SMB page, the page as bellow:
text_image
Net Disk Setup - Microsoft Internet Explorer 檔案(F) 編輯(E) 檢視(V) 我的最愛(A) 工具(T) 說明(H) 上一頁 搜尋 我的最愛 網址(D) http://169.254.0.1/ SNT network Storage series SUNNYTEK INFORMATION CO.,LTD http://www.snt.com.tw Status IP Config Maintenance SMB Server FTP Server BitTorrent Printer Media Server Disk Utility FTP Configuration FTP Port 21 21 or 1025-65500 FTP Codepage English help Apply Apply Account List New Modify En/Disable Delete [User Name] [Password] [Access] [En/Disable] anonymous ---- RO ENABLED- FTP port: configure port number, port range is 1025 to 65500 and default port is 21. If you behind firewall ,remember to open port number mapping FTP port
- FTP code page: configure FTP server code page
Code page as bellow:
Central Europe (CP1250)
Croat, Czech, Hungarian, Polish, Romanian, Slovak, Slovene and Sorbian.
Cyrillic (CP1251)
Bulgarian, Belorussian, Macedonian, Moldavian, Russian, Serbian and Ukrainian.
Latin I (CP1252)
Albanian, Danish, Dutch, Faroese, Finnish, French, German,
Icelandic, Irish, Italian, Norwegian, Portuguese, Spanish and Swedish.
Baltic (CP1257)
Estonian, Latvian, Lithuanian.
- NEW: create FTP share account and password, default account is "guest"
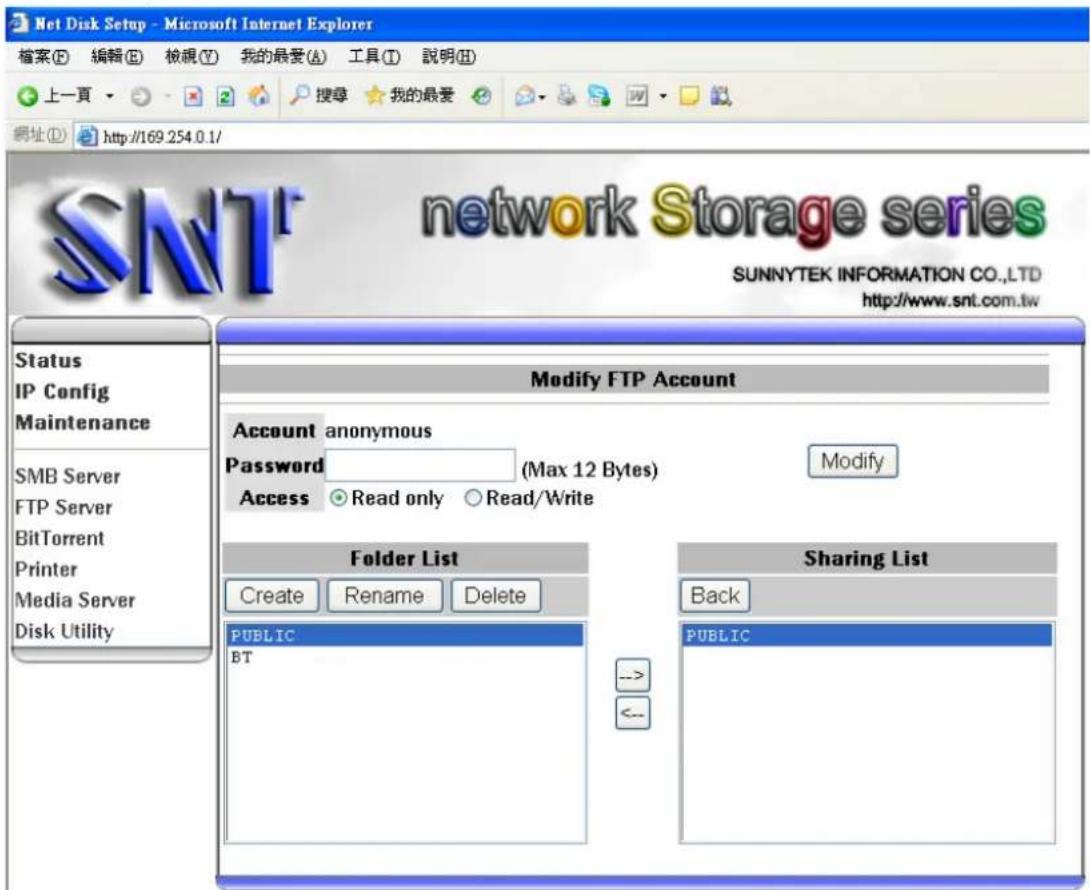
Modify:
text_image
Net Disk Setup - Microsoft Internet Explorer 檔案(E) 編輯(E) 楫視(V) 我的最愛(A) 工具(T) 說明(H) 上一頁 搜尋 我的最愛 網址(D) http://169.254.0.1/ SNT network Storage series SUNNYTEK INFORMATION CO.,LTD http://www.snt.com.tw Status IP Config Maintenance SMB Server FTP Server BitTorrent Printer Media Server Disk Utility Modify FTP Account Account anonymous Password (Max 12 Bytes) Access ● Read only ○ Read/Write Modify Folder List Create Rename Delete PUBLIC BT Sharing List Back PUBLIC <-->this page can modify as bellow
password: password of FTP account
access control : read only / read and write access control of FTP account folder sharing: Folder List is all of exist folder on storage, Sharing List is share folder of FTP account. If you want to share some folder, select this folder from Folder List and add to Sharing List.
folder manage :create / rename /delete folder
- Enable/ Disable :this button can enable/disable FTP account
- Delete: delete FTP account
2.5.2 Using FTP Within Microsoft Internet Explorer 7
1.Open Internet Explorer 7
2.In the address bar, type the following command:
ftp:// IP address ex: ftp://10.130.xxx.xxx
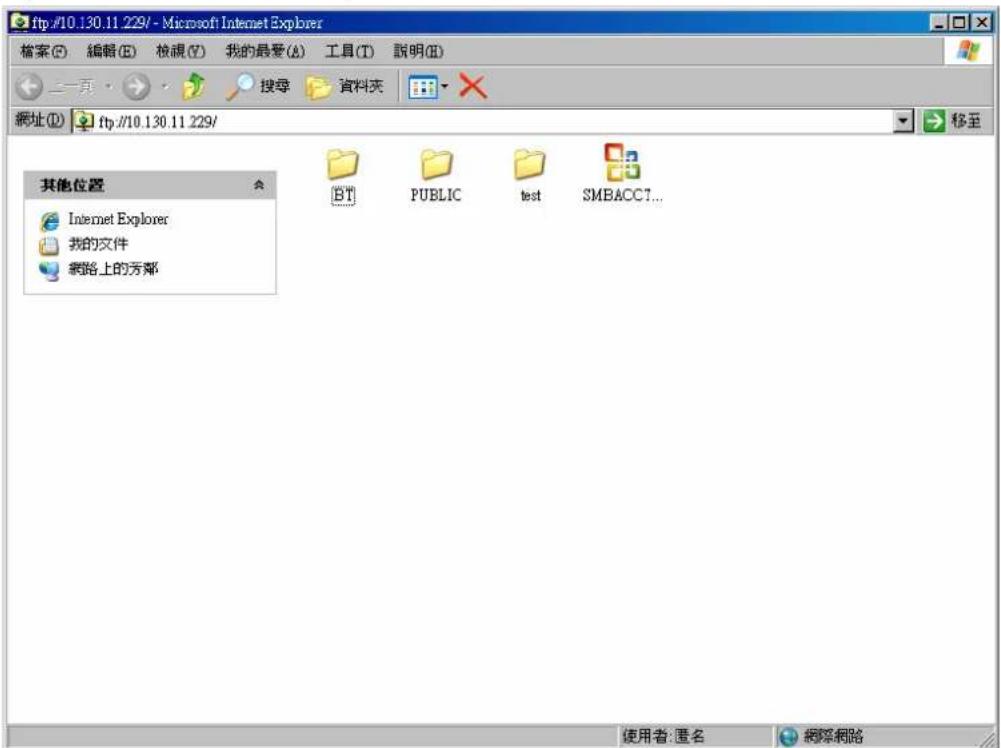
3.IE 7 will display a list of files and folders from the FTP domain
4.To quickly save a file locally, right-click the file and select "Save Target As..."
5. To manage the remote and locals files more completely, click the 'Page' menu button on the right-hand side of the IE 7 browser window and select the option, "Open FTP Site in Windows Explorer"
5. you can now drag-n-drop the files from remote FTP server to local file system easily
2.6 BitTorrent
2.6.1 What is BitTorrent
BitTorrent is a peer-to-peer file sharing (P2P) communications protocol. BitTorrent is a method of distributing large amounts of data widely without the original distributor incurring the entire costs of hardware, hosting, and bandwidth resources. Instead, when data is distributed using the BitTorrent protocol, each recipient supplies pieces of the data to newer recipients, reducing the cost and burden on any given individual source, providing redundancy against system problems, and reducing dependence on the original distributor.
2.6.2 Where can I get the torrent file
Simple Chinese site:
http://bt.ktxp.com/
http://bt.greedland.net/
http://bt.gamesir.com/
Traditional Chinese site:
http://forum.fdzone.org
http://www.mcy.hk/forum/
http://www.plusbb.com/
2.6.3 Using Bit Torrent client
- login BT forum and download torrent file to PC
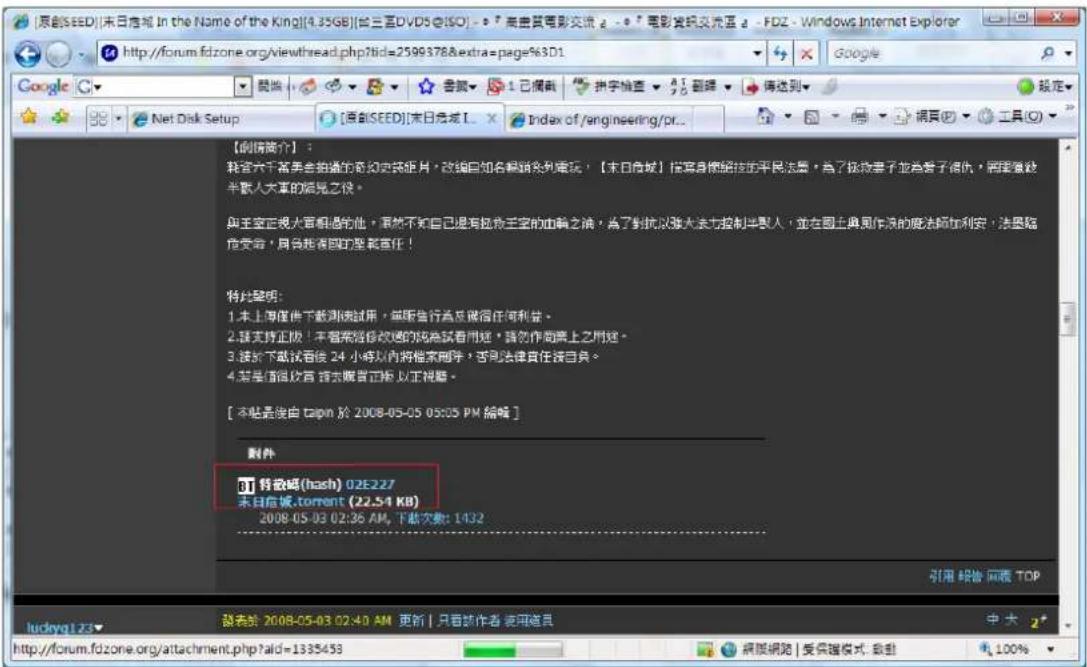
2 Double click BitTorrent page
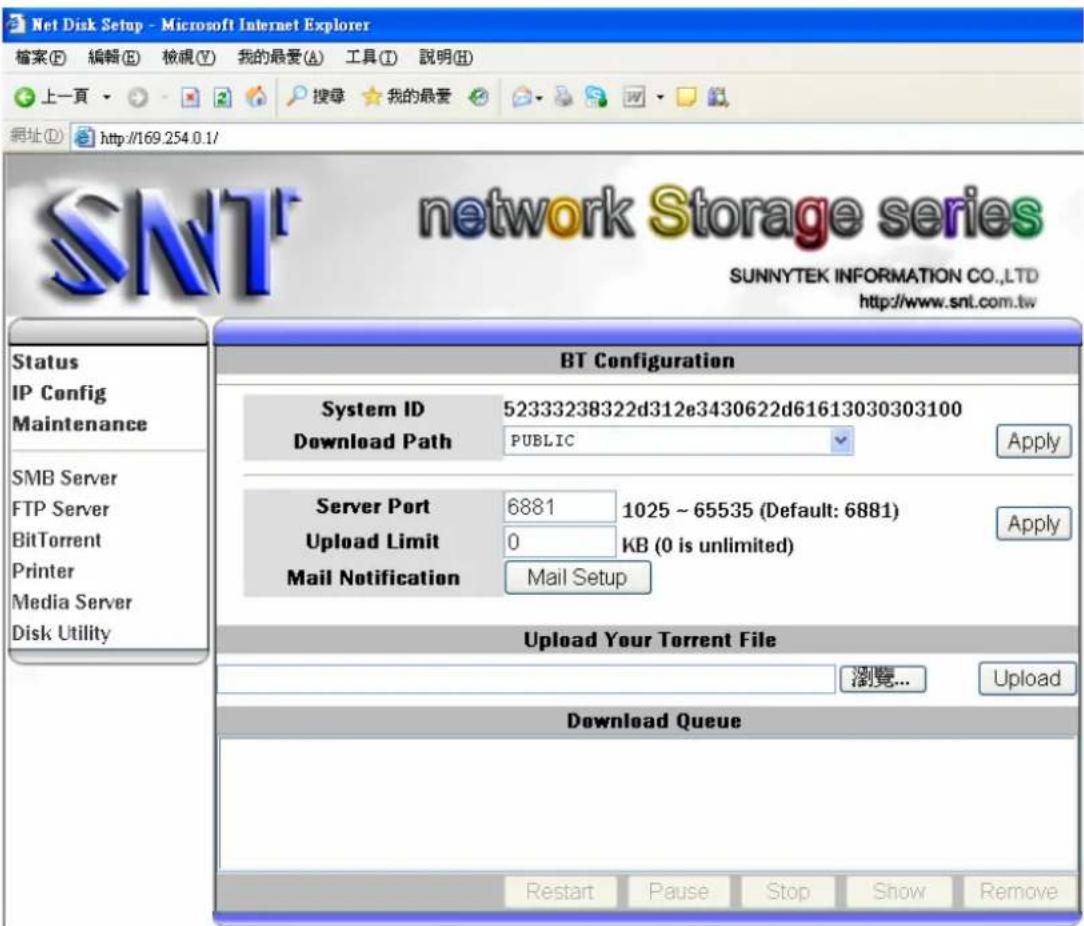
3. Browse and select torrent file to upload Download Queue
text_image
Net Disk Setup - Microsoft Internet Explorer 檔案(E) 編輯(E) 檢視(V) 我的最愛(A) 工具(T) 說明(H) 上一頁 搜尋 我的最愛 網址(D) http://169.254.0.1/ SNT network Storage series SUNNYTEK INFORMATION CO.,LTD http://www.snt.com.tw Status IP Config Maintenance SMB Server FTP Server BitTorrent Printer Media Server Disk Utility BT Configuration System ID 52333238322d312e3430622d61613030303100 Download Path PUBLIC Apply Server Port 6881 1025 ~ 65535 (Default: 6881) Upload Limit 0 KB (0 is unlimited) Mail Notification Mail Setup Upload Your Torrent File 瀏覽... Upload Download Queue Restart Pause Stop Show Remove- After few minutes, BT client will connect to the other BT client in internet and start to download data
- When torrent download percentage show 100%, the data will store in download path
- You can access file from SMB client or FTP client on the PC
- Information and configuration :
System ID: torrent ID
Number of the Downloads: number of torrent active
Server Port: BT server upload port
Upload Limit: BT server upload throughput control
- Mail Notification : when user stop or remove torrent ,storage will send the mail alarm to administrator email box
text_image
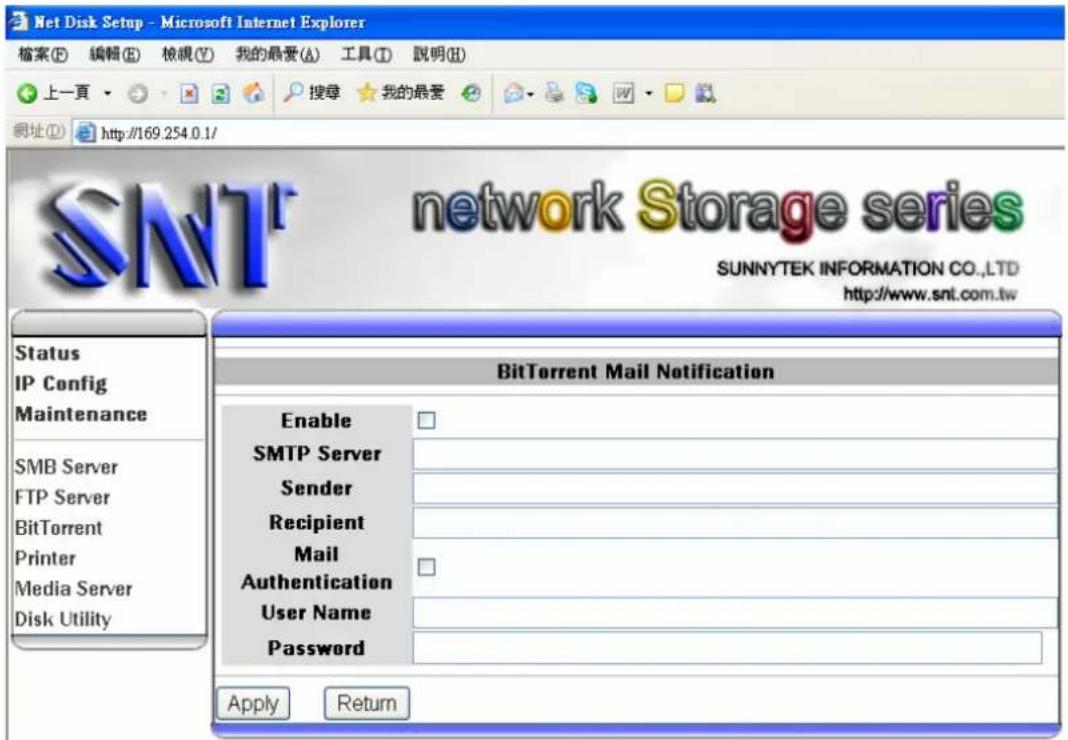
Net Disk Setup - Microsoft Internet Explorer 檔案(F) 編輯(E) 檢視(V) 我的最愛(A) 工具(T) 說明(H) 上一頁 搜索 我的最愛 網址(D) http://169.254.0.1/ SNT network Storage series SUNNYTEK INFORMATION CO.,LTD http://www.snt.com.tw Status IP Config Maintenance SMB Server FTP Server BitTorrent Printer Media Server Disk Utility BitTorrent Mail Notification Enable SMTP Server Sender Recipient Mail Authentication User Name Password Apply ReturnEnable: enable or disable mail alarm
SMTP Server: SMTP server address or IP (ex: ms48.url.com.tw)
Sender: email of sender (ex: sender@ ms48.url.com.tw)
Recipient: email of recipient (ex: recipient@ms44.url.com.tw)
Mail Authentication: enable or disable Mail Authentication, if you need.
User Name: user name of Email account (SMTP/POP3 user name)
Password: password of Email account (SMTP/POP3 password)
9. Button of torrent queue
Path: open file manager by Samba (Network Neighborhood)
FTP: open file by default FTP client of PC (default path is public)
Restart: you can select a torrent to restart from download queue
Pause: pause you can select a torrent to pause from download queue
Show: show all BT information
Remove: you can select a torrent to pause from download queue
2.6.4 Mail Notification
Enable: enable /disable mail notification check box
SMTP server: SMTP server address
Sender: the address which send from.
Recipient: the address which send to.
Mail Authentication: enable /disable mail authentication check box
User name :mail authentication user name
Password: mail authentication password
2.7 Disk Utility
- Format Disk: the format utility, it will erase all data on Hard Driver
- Sleep Time: configure the time Hard Driver get into sleep mode
- Scan Disk :the scan disk utility , it will check error data in Hard Driver
2.8 Print server
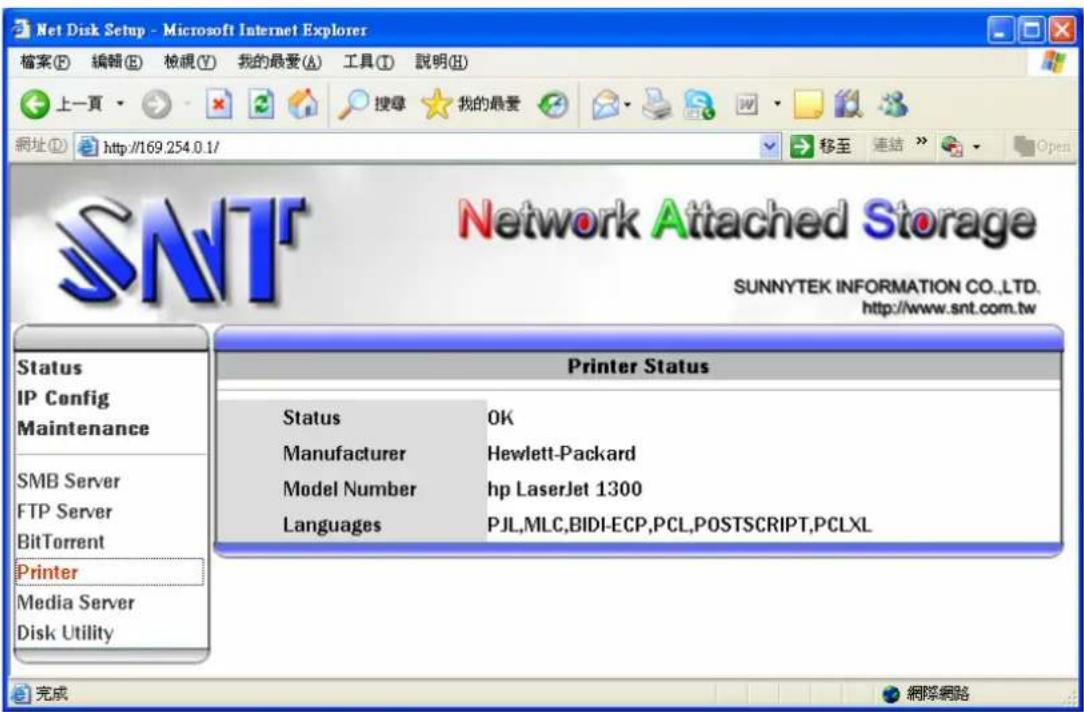
- Plug printer to USB host first
- Ensure that Add Print Services is installed from WEB page
Note: The network printer or device will need a static IP address to be seen on your network by the computer
text_image
Net Disk Setup - Microsoft Internet Explorer 檔案(E) 編輯(E) 檢視(V) 我的最愛(A) 工具(T) 說明(H) 上一頁 搜尋 我的最愛 網址(D) http://169.254.0.1/ 移至 連結 » Open SNT Network Attached Storage SUNNYTEK INFORMATION CO.,LTD. http://www.snt.com.tw Status IP Config Maintenance SMB Server FTP Server BitTorrent Printer Media Server Disk Utility Printer Status Status OK Manufacturer Hewlett-Packard Model Number hp LaserJet 1300 Languages PJL,MLC,BIDI-ECP,PCL,POSTSCRIPT,PCLXL 完成 網路網路- Click Start and select Printers and Faxes.
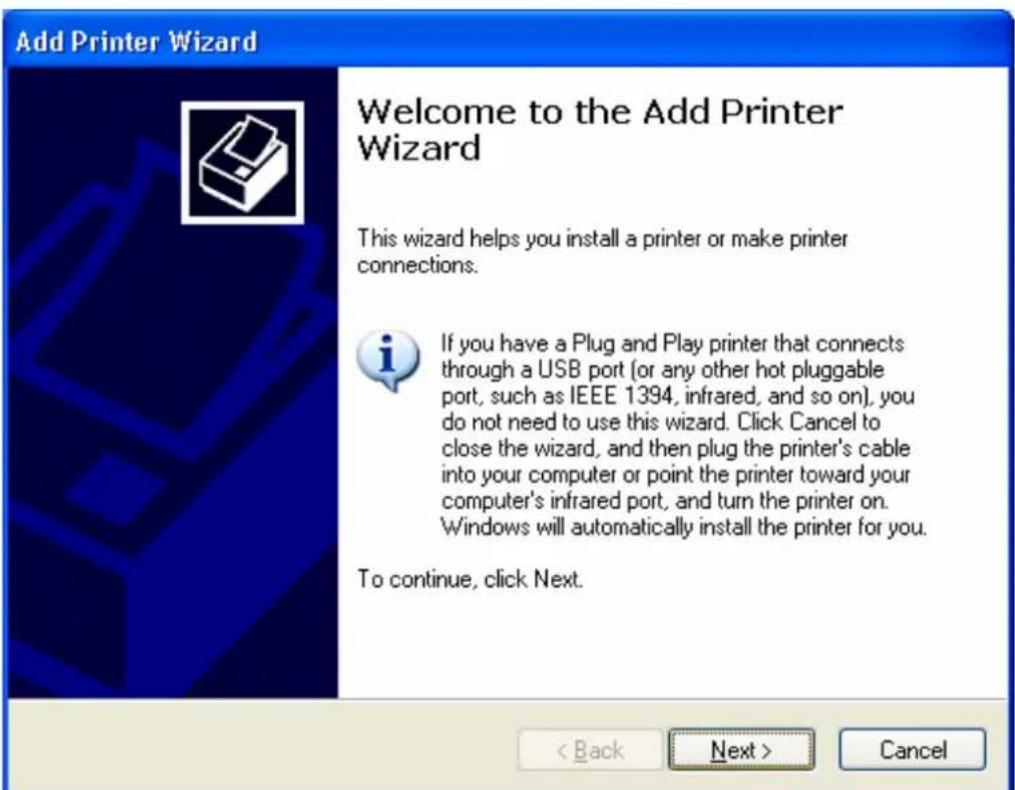
- Under Printer Tasks, click Add a Printer. Click Next.
text_image
Add Printer Wizard Welcome to the Add Printer Wizard This wizard helps you install a printer or make printer connections. If you have a Plug and Play printer that connects through a USB port (or any other hot pluggable port, such as IEEE 1394, infrared, and so on), you do not need to use this wizard. Click Cancel to close the wizard, and then plug the printer's cable into your computer or point the printer toward your computer's infrared port, and turn the printer on. Windows will automatically install the printer for you. To continue, click Next. < Back Next > Cancel-
Select the Local Printer attached to this computer radio button.
-
Uncheck the automatically detect and install my Plug and Play printer check box.
- Click Next.
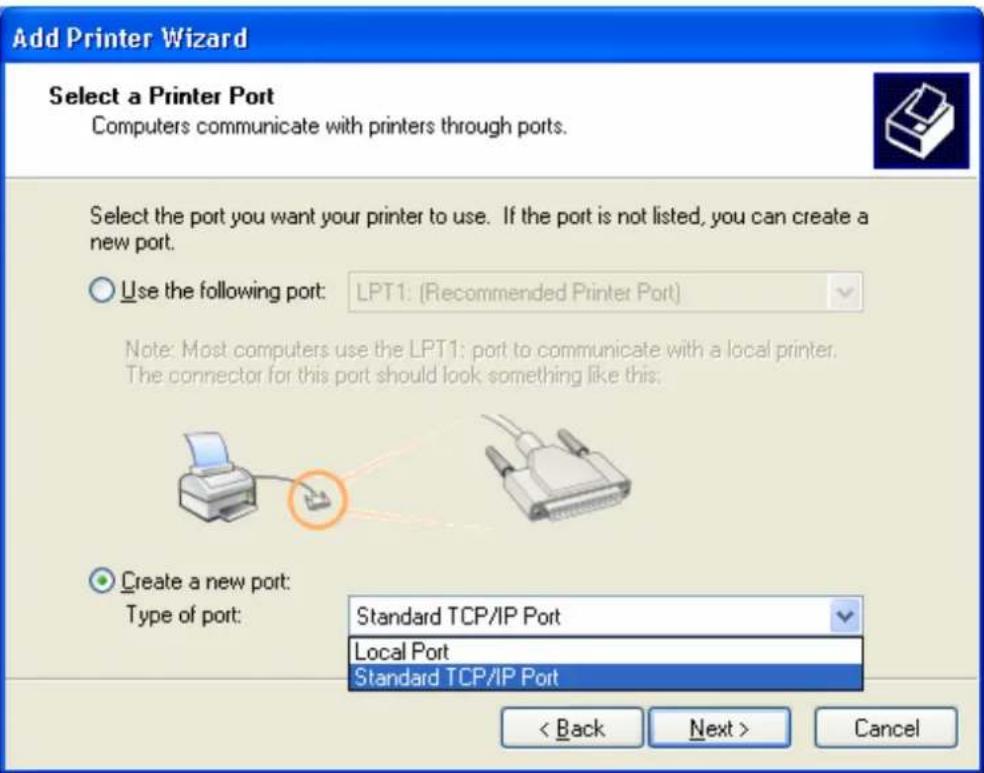
- Select the Create New Port radio button.
- From the Type of port: drop down list choose Standard TCP/IP Port. Click Next.
text_image
Add Printer Wizard Select a Printer Port Computers communicate with printers through ports. Select the port you want your printer to use. If the port is not listed, you can create a new port. Use the following port: LPT1: (Recommended Printer Port) Note: Most computers use the LPT1: port to communicate with a local printer. The connector for this port should look something like this. Create a new port: Type of port: Standard TCP/IP Port Local Port Standard TCP/IP Port < Back Next > CancelNote: You will now be prompted for 2 items: the Name or address of server providing lpd and the Name of printer or print queue on that server. The 1st item is the Static IP address that has been assigned to the device. The 2nd item is the Queue Name that you found in the device's documentation.
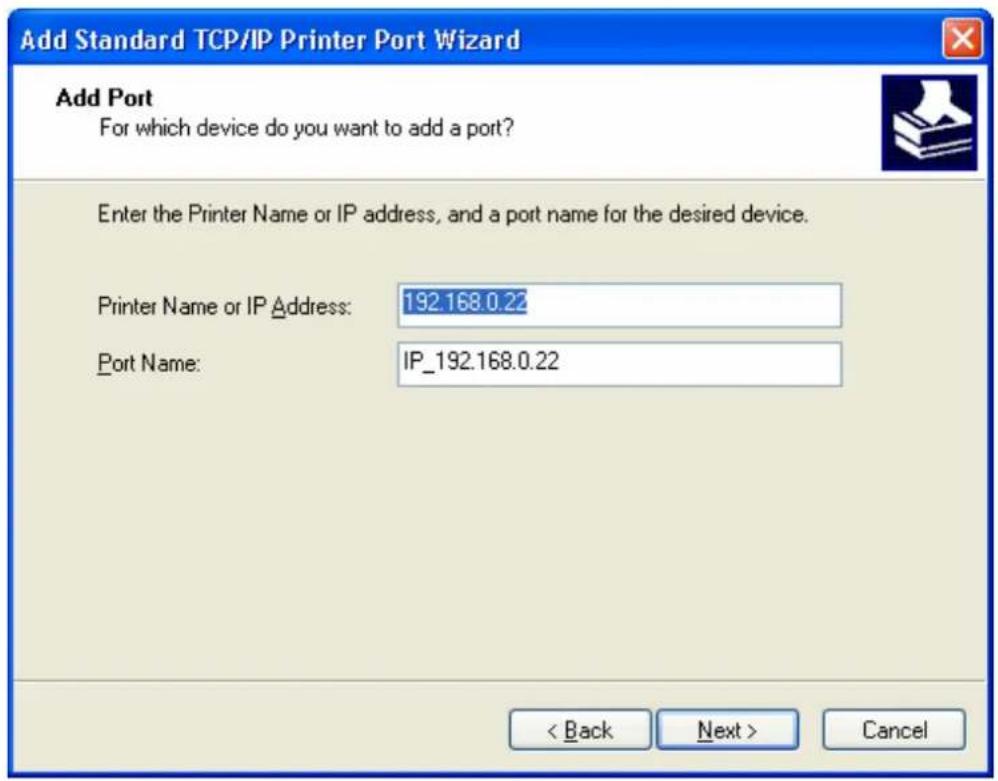
- In the Name or address of server providing lpd box, enter the IP Address of the device.
text_image
Add Standard TCP/IP Printer Port Wizard Add Port For which device do you want to add a port? Enter the Printer Name or IP address, and a port name for the desired device. Printer Name or IP Address: 192.168.0.22 Port Name: IP_192.168.0.22 < Back Next > Cancel11. Select configuration
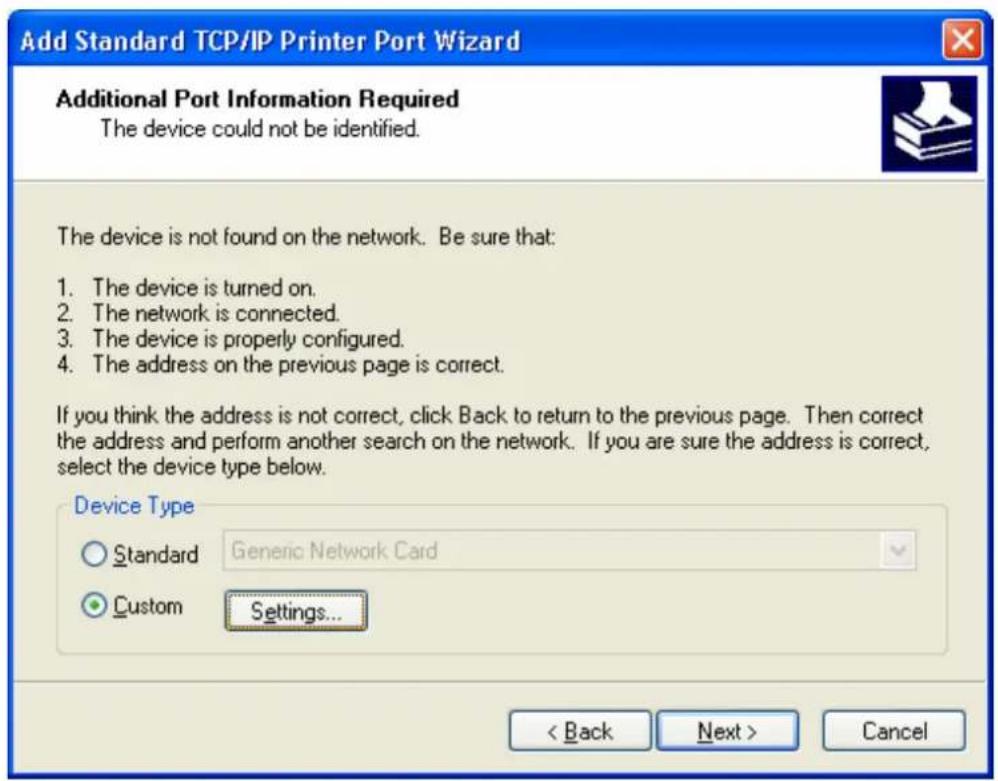
text_image
Add Standard TCP/IP Printer Port Wizard Additional Port Information Required The device could not be identified. The device is not found on the network. Be sure that: 1. The device is turned on. 2. The network is connected. 3. The device is properly configured. 4. The address on the previous page is correct. If you think the address is not correct, click Back to return to the previous page. Then correct the address and perform another search on the network. If you are sure the address is correct, select the device type below. Device Type Standard Generic Network Card Custom Settings... < Back Next > Cancel12. setup protocol LPR and queue name
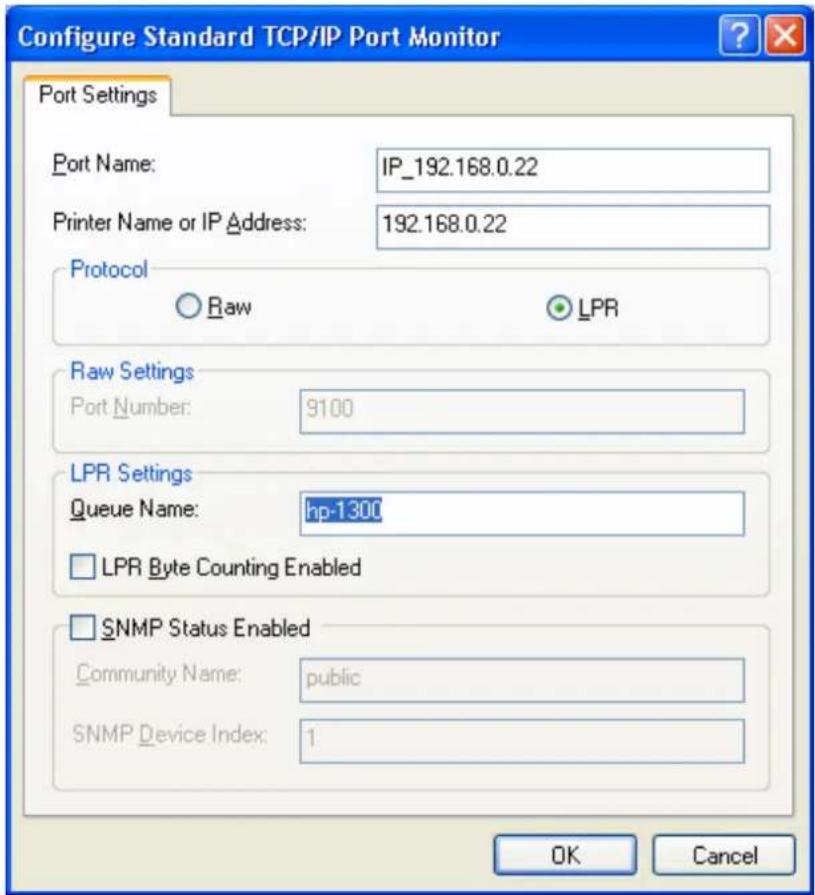
text_image
Configure Standard TCP/IP Port Monitor Port Settings Port Name: IP_192.168.0.22 Printer Name or IP Address: 192.168.0.22 Protocol Raw LPR Raw Settings Port Number: 9100 LPR Settings Queue Name: hp-1300 LPR Byte Counting Enabled SNMP Status Enabled Community Name: public SNMP Device Index: 1 OK CancelNote: If you receive an error message saying that the "LPD server did not respond as expected ...", click Cancel. Attempt to reenter the IP Address or Print Queue name. Click OK again. If this process fails, the device may not support LPR printing. You should stop now and contact the manufacturer for further assistance.
- If Step 10 completed successfully, you are now ready to install the driver. Click Have Disk. Click Browse.
- Locate and select the .INF file for the device. You may need to browse to the CD or to the folder on your computer where you have the device driver downloaded.
- When ready, click Next.
Note: If you are prompted to replace or keep existing driver, click on Keep Existing Driver. Click Next.
- When asked to print a test page, click No. Click Next. Click Finish.
Note: At this point, you should have the device listed in the Printers and Faxes folder. You can attempt to use it as a printer.
2.9 Media Server
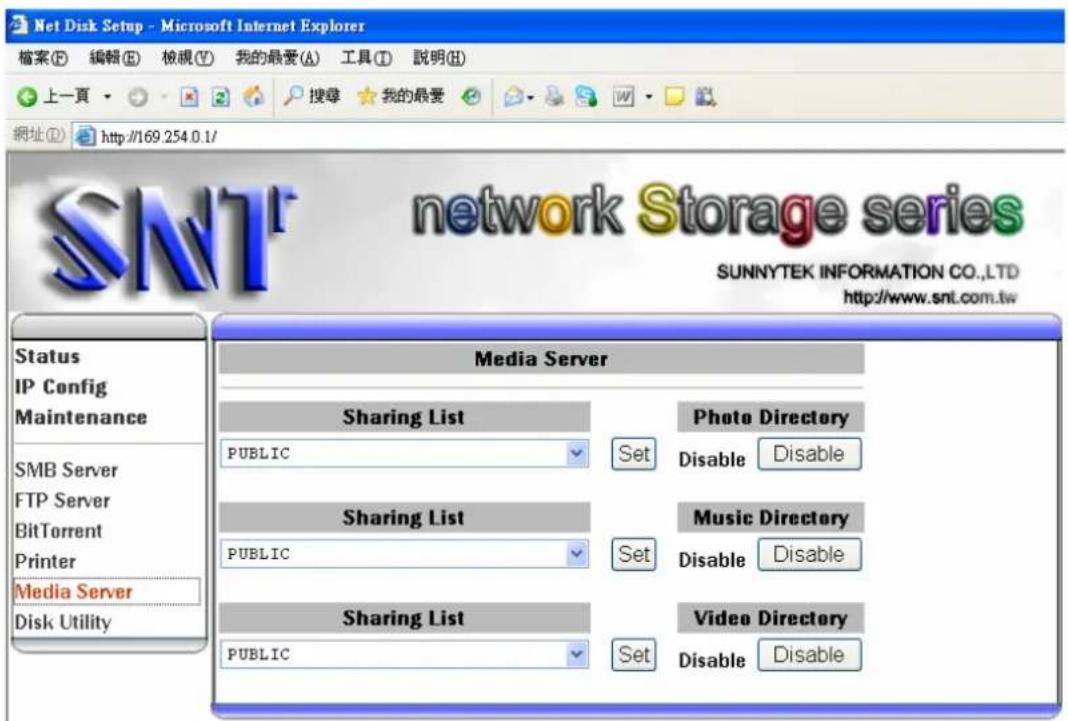
text_image
Net Disk Setup - Microsoft Internet Explorer 檔案(F) 編輯(E) 檢視(V) 我的最愛(A) 工具(T) 說明(H) 上一頁 搜索 我的最愛 網址(D) http://169.254.0.1/ SNT® network Storage series SUNNYTEK INFORMATION CO.,LTD http://www.snt.com.tw Status IP Config Maintenance SMB Server FTP Server BitTorrent Printer Media Server Disk Utility Media Server Sharing List PUBLIC Set Photo Directory Disable Disable Sharing List PUBLIC Set Music Directory Disable Disable Sharing List PUBLIC Set Video Directory Disable Disable-
- Select Media Server sharing folder
-
- Double click set button
- Make sure media server (storage) is same subnet with media player (X box 360 PS3 and iTunes)
4.Browse content from iTunes (music only), Xbox 360 and PS3 (music, photo video)
Share Media from Storage(Media server) with Xbox 360(Media player)
To access media files—including audio, video and pictures—from storage, you need to connect an Ethernet cable from the Ethernet port on the back of your Xbox 360 console to your Storage.
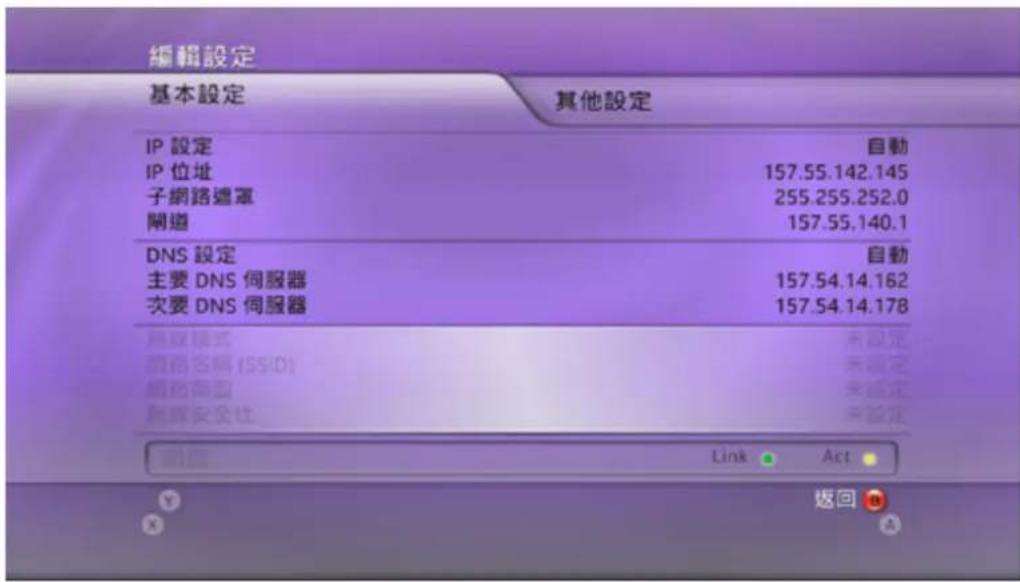
- Connect your console to your storage as described above.
- Click Media Server page of storage, and set up sharing list (photo, music, and video)
- When setup is complete, Media Server of storage should automatically start.
- XBOX360 will search for devices on your network.
- On your Xbox 360 console, in the Media area of the Xbox Dashboard, select Music, Pictures, or Video.
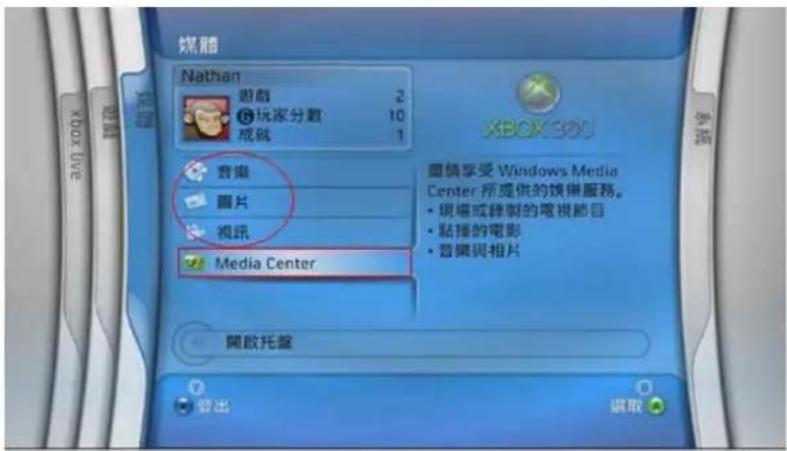
- Select STORAGE.
- Find the media content that you want to play, and then select Play.
Share Media from Storage(Media server) with PS3(Media player)
On your Storage:
Click Media Server page of storage, and set up sharing list (photo, music, and video)
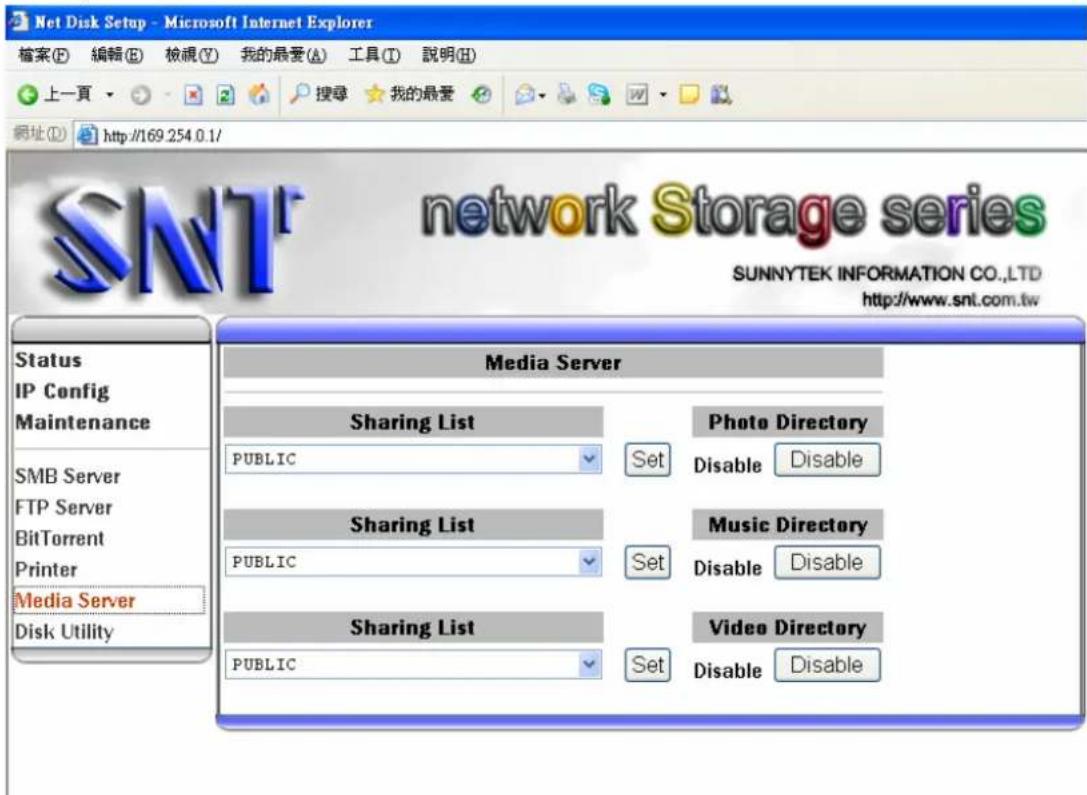
text_image
Net Disk Setup - Microsoft Internet Explorer 檔案(F) 編輯(E) 檢視(V) 我的最愛(A) 工具(T) 說明(H) 上一頁 搜尋 我的最愛 網址(D) http://169.254.0.1/ SNT network Storage series SUNNYTEK INFORMATION CO.,LTD http://www.snl.com.tw Status IP Config Maintenance SMB Server FTP Server BitTorrent Printer Media Server Disk Utility Media Server Sharing List PUBLIC Set Photo Directory Disable Disable Sharing List PUBLIC Set Music Directory Disable Disable Sharing List PUBLIC Set Video Directory Disable DisableOn your PS3:
- Go into the PS3's Settings menu and navigate to Network Settings - Media Server Connection, and select Enabled. This allows the PS3 to detect networked device running Universal Plug and Play (UPnP) server software.
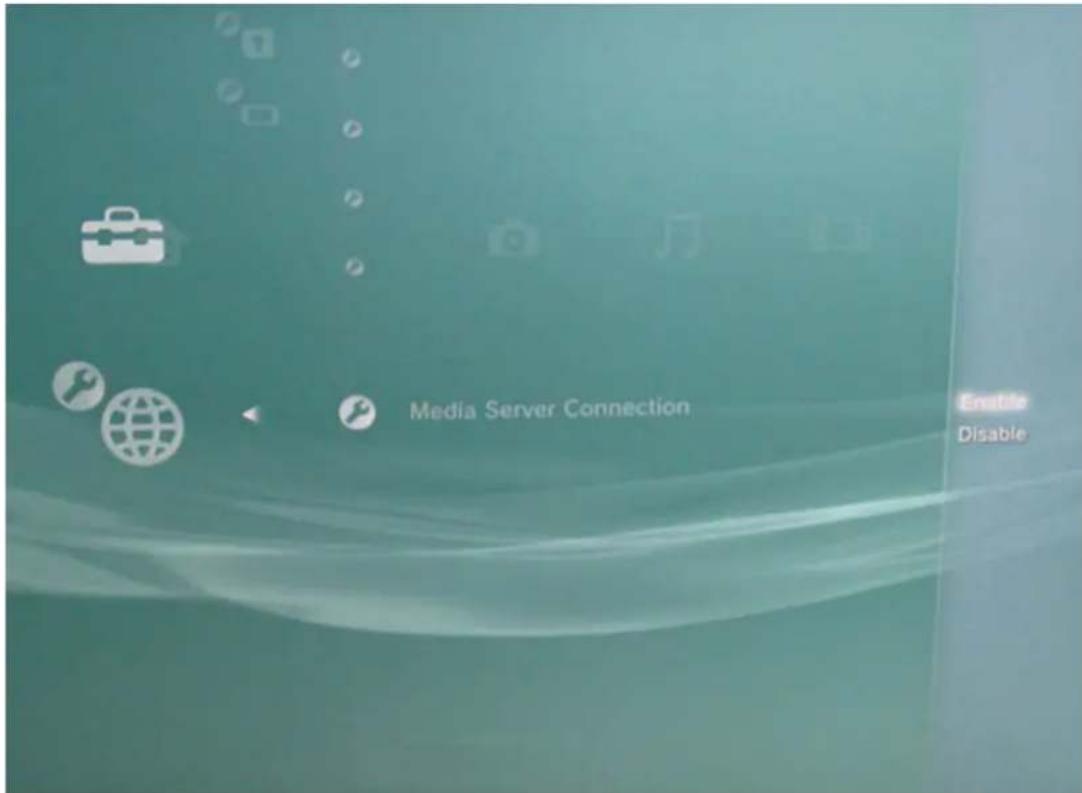
text_image
Media Server Connection Enable Disable-
When you turn on the PS3™ system, Media Servers on the same network are automatically detected and icons for the detected servers are displayed under 📷(Photo), 📌(Music), and 📋(Video).
-
Select the icon of the DLNA Media Server that you want to connect to under 📄(Photo), 🎶(Music), or 📋(Video) in the home menu. All available folders and files that can be played by the PS3™ system will be displayed.
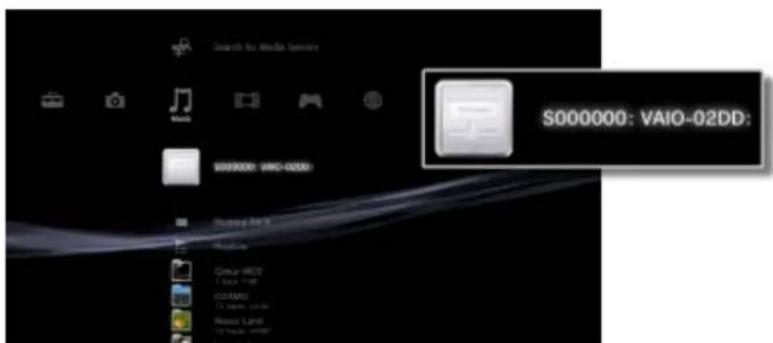
text_image
Search for media server S000000: VAIO-02DD: S000000: VAIO-02DD:- Select the file that you want to play.
Hints for PS3
- The PS3™ system must be connected to a network. For details on network settings, see 📄(Settings) > 🌐(Network Settings) > [Internet Connection Settings] in this guide.
- When the method of allocating IP addresses has been changed from AutoIP to DHCP under the settings for the network environment, perform another search for servers under (Search for Media Servers).
- The DLNA Media Server icon is only displayed when [Media Server Connection] is enabled under 📄(Settings) > ⚙(Network Settings).
- The folder names that are displayed vary depending on the DLNA Media Server.
- Depending on the DLNA Media Server, some files may not be playable or operations that can be performed during playback may be restricted.
- You cannot play copyright-protected content.
- File names for data that is stored on servers that are not compliant with DLNA may have an asterisk appended to the file name. In some cases, these files cannot be played on the PS3 ^TM system. Also, even if the files can be played on the PS3 ^TM system, it might not be possible to play the files on other devices.
Share Media from Storage(Media server) with iTuner(Media player)
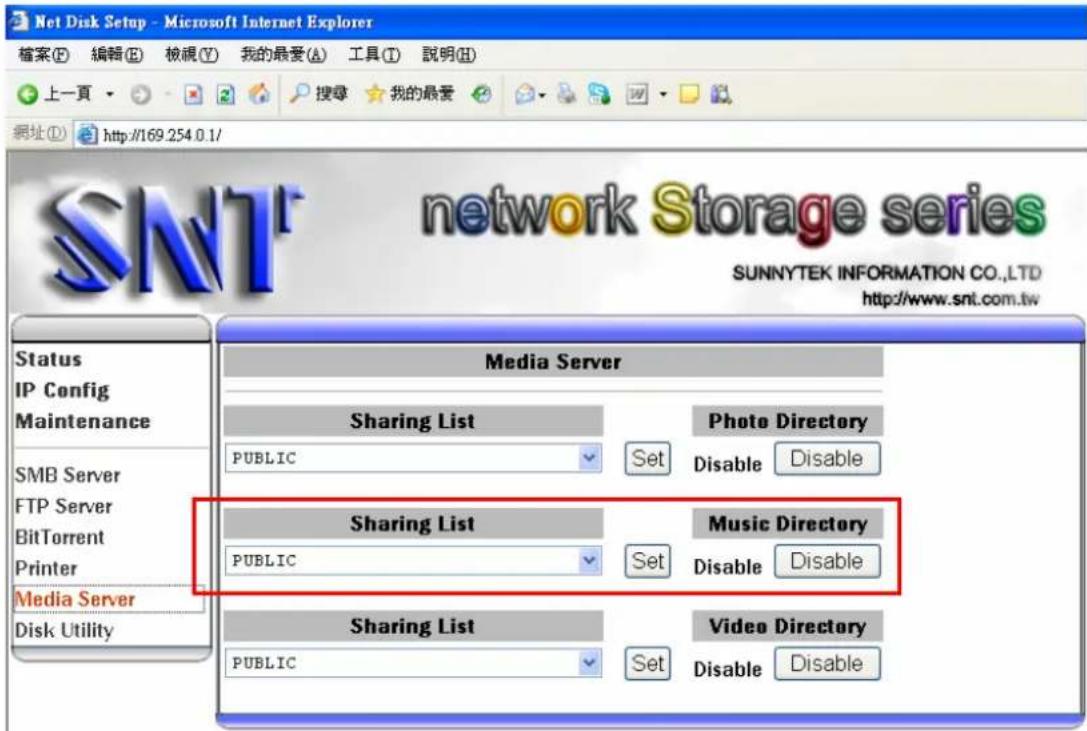
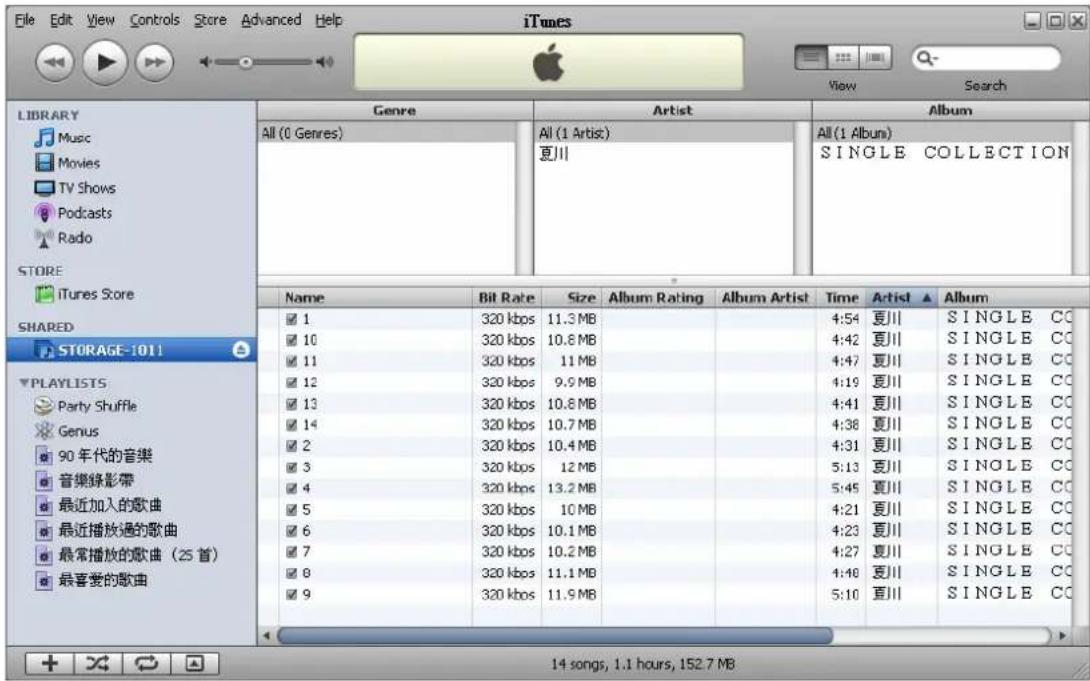
- You need to connect an Ethernet cable from the Ethernet port on the back of your iTunes to your storage
- Make sure storage media server enable (music)
text_image
Net Disk Setup - Microsoft Internet Explorer 檔案(F) 編輯(E) 檢視(V) 我的最愛(A) 工具(T) 說明(H) 上一頁 搜索 我的最愛 網址(D) http://169.254.0.1/ SNT network Storage series SUNNYTEK INFORMATION CO.,LTD http://www.snt.com.tw Status IP Config Maintenance SMB Server FTP Server BitTorrent Printer Media Server Disk Utility Media Server Sharing List PUBLIC Set Photo Directory Disable Disable Sharing List PUBLIC Set Music Directory Disable Disable Sharing List PUBLIC Set Video Directory Disable Disable3. select storage on shared class
text_image
File Edit View Controls Store Advanced Help iTunes View Search LIBRARY Music Movies TV Shows Podcasts Radio STORE iTunes Store SHARED STORAGE-1011 PLAYLISTS Party Shuffle Genus 90 年代的音樂 音樂綠影帶 最近加入的歌曲 最近播放過的歌曲 最常播放的歌曲 (25 首) 最喜愛的歌曲 Genre Artist Album All(1 Genres) All (1 Artist) 夏川 All(1 Album) SINGLE COLLECTION Name Bit Rate Size Album Rating Album Artist Time Artist Album 1 320 kbps 11.3 MB 4:54 夏川 SINGLE CO 10 320 kbps 10.8 MB 4:42 夏川 SINGLE CO 11 320 kbps 11 MB 4:47 夏川 SINGLE CO 12 320 kbps 9.9 MB 4:19 夏川 SINGLE CO 13 320 kbps 10.8 MB 4:41 夏川 SINGLE CO 14 320 kbps 10.7 MB 4:38 夏川 SINGLE CO 2 320 kbps 10.4 MB 4:31 夏川 SINGLE CO 3 320 kbps 12 MB 5:13 夏川 SINGLE CO 4 320 kbps 13.2 MB 5:45 夏川 SINGLE CO 5 320 kbps 10 MB 4:21 夏川 SINGLE CO 6 320 kbps 10.1 MB 4:23 夏川 SINGLE CO 7 320 kbps 10.2 MB 4:27 夏川 SINGLE CO 8 320 kbps 11.1 MB 4:40 夏川 SINGLE CO 9 320 kbps 11.9 MB 5:10 夏川 SINGLE CO 14 songs, 1.1 hours, 152.7 MB- Find the music that you want to play.