iDock130 - Computer Accessories Microlab - Free user manual and instructions
Find the device manual for free iDock130 Microlab in PDF.


User questions about iDock130 Microlab
0 question about this device. Answer the ones you know or ask your own.
Ask a new question about this device
Download the instructions for your Computer Accessories in PDF format for free! Find your manual iDock130 - Microlab and take your electronic device back in hand. On this page are published all the documents necessary for the use of your device. iDock130 by Microlab.
USER MANUAL iDock130 Microlab
natural_image
Two electronic devices: a mobile phone case with a small display and a handheld device (no visible text or symbols)iDock100
User's Manual
Microlab Technology Company Limited
Made in China
Docking Station for iPod
All other brand and product names are trademarks of their respective holders. Actual contents may differ slightly from those shown in print. All specifications and designs are subjected to changes without any prior notice.
Prior to first use, please read the manual carefully
Important Safety Instructions

Caution:
TO reduce the risk of electric shock, do not dismantle the product and do not expose the product to rain or moisture. No user-serviceable parts inside. Refer servicing to qualified personnel only.
Explanation of Graphical Symbols:
The lightning flash within an equilateral triangle is intended to alert you to the presence of uninsulated "dangerous voltage" within the product's enclosure that may be of sufficient magnitude to constitute an electric shock to person or persons.

The exclamation point within an equilateral triangle is intended to alert you to the presence of important operating and maintenance (servicing) instructions in the literature accompanying the product.
WARNINGS:
- Read Instructions: All the safety and operating instructions must be read before the product is operated.
- Retain Instructions: The safety and operating instructions should be kept for future reference.
- Heed warnings: All warnings on the product and in the operating instructions should be adhered to.
- Follow instructions: All operating and usage instructions should be followed,
- Installation: Install the product in accordance with the manufacturers' instructions.
-
Power sources: This product should be operated only from the type of power source printed on the label marking found on the product. If you are not sure of the type of power supply in your name, consult your product dealer or local power company.
-
Grounding or polarization: the product is not required to be grounded. Ensure the plug is fully inserted into the wall outlet or extension cord receptacle to prevent blade or pin exposure. Some versions of the product are equipped with a power cord fitted with a polarized alternating line plug (a plug having one blade wider than the other). This plug will fit onto the power outlet in only one direction. This is a safety feature. If you are unable to insert the plug fully into the outlet, try reversing the plug. If the plug should still fail to fit, contact your electrician to replace your obsolete outlet. Do not defeat the safety purpose of the polarized plug. When using an extension power-supply cord or a power-supply cord other than that supplied with the appliance, it should be fitted with the appropriate molded plugs and carry the safety approval allowed in your country.
-
Power cord protection: Power-supply cords should be routed so that they are not likely to be walked on, kinked or pinched by items placed on or against them, paying particular attention to cords from the plugs, multiple sockets and the point where they exit from the appliance.
-
Overloading: Do not overload wall outlets, extension cords or multiple sockets, as this can result in a risk of fire or electric shock.
-
Ventilation: The product must be properly ventilated. Do not place the product on a bed, sofa, or other similar surface which will buildup the temperature. Do not cover the product with any items such as tablecloths, newspapers, etc.
-
Heat: The product should be situated away from heat sources such as radiators, heat registers, stoves, or other products) including amplifier which produce a lot of heat. No naked flame sources, such as lighted candles, should be placed on the apparatus.
-
Wall or ceiling mounting: The product should be mounted to a wall or ceiling only as recommended by the manufacturer.
-
Water and moisture: To reduce the risk of fire or electric shock, do not expose the product to train, dripping, splashing or excessive moisture such as in a sauna or bathroom. Do not use this product near water: for example, near a bathtub, washbowl, kitchen sink, laundry tub, in a wet basement, or near a swimming pool, etc.
-
Object and Liquid entry: Never push objects of any kind into this product through openings, as they may contact dangerous voltage points or short-circuit parts that could result in a fire or electric shock. Never spill liquid of any kind on the product. Do not place any object containing liquid on top of the product.
-
Cleaning: Unplug the product from the wall outlet before cleaning. The cabinet of subwoofer may be cleaned by dusting with a dry cloth. If you wish to use an aerosol cleaning spray, do not spray directly on the cabinet; spray onto the cloth. Be careful not to contact the drive units.
-
Attachments: Do not use attachments not recommended by the product manufactures, as they may cause hazards.
-
Accessories: Do not place this product on an unstable cart, stand, tripod, bracket or table. The product might fall and cause serious injury to a child or adult, and damage the product. Use only with a cart, stand, tripod, bracket or table recommended by the manufacturer or sold with the product. Any mounting of the product should follow the manufacturer's instructions and should use a mounting accessory recommended by the manufacturer.
-
Moving the product: A product and cart combination should be moved with care. Quick stops, excessive force and uneven surfaces may cause the product and cart to overturn.
-
Unused periods: The power cord of the appliance should be unplugged from the outlet during lightning storms or when
Troubleshooting
| Frequently Asked Questions(FAQ) | Solutions |
| Your iPod does not dock properly | • Ensure the dock insert is correct for the iPod type• Remove the iPod and check for obstructions and foreign objects on the interfaces. |
| No Sound | • Ensure the system is plugged in and your iPod is turned ON, and a music track is selected and played.• Depress the Play/Pause button on the remote control.• Increase the volume level• Remove your iPod from the iDock, and wait briefly before reinserting again. You might need to do this for several times.• Ensure your iPod is running with compatible software. |
| No sound and your iPod is not charging | • Ensure the power cable is correctly plugged into the wall's AC socket.• Ensure the iPod is firmly seated on the iDock |
| No sound after quickly undocking or docking your iPod | • Remove your iPod from the iDock and wait for 5 seconds. Next reinsert the iPod to the iDock.• Unplug the power cable for 1 minute and the reinsert it again. This will reset the system. |
| Your iPod does not respond to the iDock remote control buttons shown: | • Remove your iPod from the iDock and pause briefly before reinserting. You might need to repeat this several times.• Try using the remote control from different locations. If it works somewhere else, then strong lighting or other room ambience might be affecting the Infrared signal.• Ensure no obstructions are in between the Infrared sensor and the remote control. Wipe off any dirt or oil stains on the lens of the remote control.• Check the remote control batteries and ensure the cell positive side is facing up in the compartment tray.• Try replacing with fresh batteries.• Upgrade the software inside the iPod. For more details, please refer to page 7 - To check for iPod Compatibility. |
| If the problem still exists, please contact the distributor or seek professional advice. | |
All specification and information are subject to changes without further notice

Technical Information
Specification
Product:
Frequency response:
20Hz-20kHz
Distortion:
<0.05%(1V RMS 1kHz)
Separation:
70 dB
DC IN:
DC 9V 800mA
Audio inputs:
iPod 30 pins, 3.5mm stereo plug
iPod interface:
Most iPods types except for iPod shuffle, iPhone
Audio interface:
Support any audio playback devices with 3.5mm stereo plug
Line out:
2 x RCA interfaces
Video out:
S-VIDEO, Composite RCA
Volume:
Rotary dial
Power LED:
Blue LED
AC Power
100 - 240V
Product size(WxHxD):
151 x 35 x 97mm
Product weight:
0.68kg
Made for iPod:
iPod (20GB, 30GB, 40GB, 60GB only), iPod (photo) 40GB, 60GB only.
iPod (color) 30GB, 60GB only, iPod (video) 30GB, 60GB, 80GB only,
iPod mini (4GB, 6GB only), iPod nano (1GB, 2GB, 4GB, 8GB only)
the product is left unused for a long period of time.
- Servicing: Do not attempt to service this product yourself, as opening or removing covers may expose you to dangerous voltage or other hazards. Refer all servicing to qualified service personnel.
- Replacement parts: When replacement parts are required, ensure the service technician had used replacement parts specified by the manufacturer or have the same characteristics as the original part. Unauthorized substitutions may result in fire, electric shock or other hazards.
- Mains fuses: For continued protection against fire hazard, use fuses of the correct type and rating. The correct fuse specification for each voltage range is marked on the product.
- Do not turn up the volume while listening to a section with very low level inputs or no audio signals. If you do, the speaker may be damaged when a peak level section is suddenly played.
- The only means of completely disconnecting the product from the power supply is by removing the power cord from the wall outlet or the product. Both the wall outlet or the product's power cord must remain freely accessible at all times while the product is in use.
- The AC power socket shall be installed near the equipment and shall be easily accessible.


Introduction
Congratulations on your choice of the iPod iDocking System from Microlab. It is specially designed for iPod or iPhone use. With high quality acoustic speaker system design, this product will bring your music out of private entertainment in your iPod to your living room.
Features:
- Besides standard iPod input, one set of auxiliary audio input is provided to be connected to the other digital audio playback devices.
• Automatically charge the iPod battery when docked - Comes with composite video and S-VIDEO output interfaces to output the iPod videos to bigger screen
- Full function infrared remote control
• External AC power adaptor available for global voltage requirement
Please ensure package contents are correct;
• iPod iDocking System 1pc
Poweltopd
• 3.5mm-3.5mm signal cable 1pc
• 2RCA 2RGadio signal cable 1pc
• RCA-RCA video signal cable 1pc
• Infrared remote control 1pc
• Type AAA batteries 2pcs
• User's manual 1pc
Note: Place the system on a firm and level surface. The speaker drivers are magnetically shielded for placement near TV LCD monitors without any video interferences.
All specification and information are subject to changes without further notice
All specification and information are subject to changes without further notice
Product connection and operation
text_image
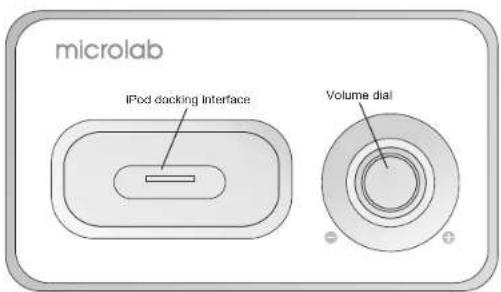
microlab IPod docking interface Volume dialiDock top panel
text_image
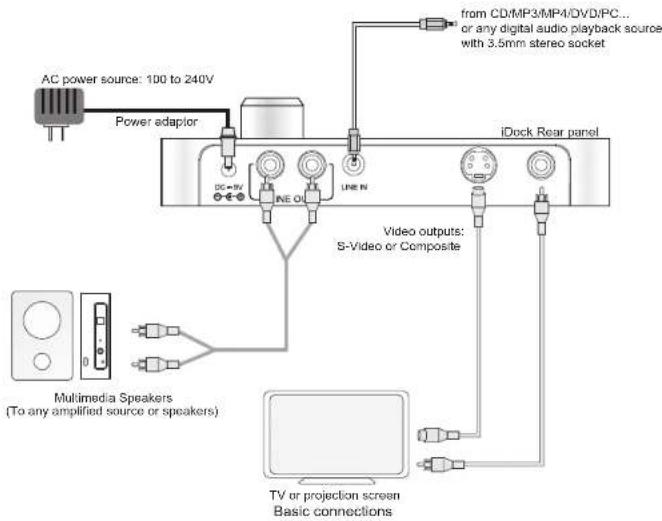
AC power source: 100 to 240V Power adaptor DC=3V NE O LINE N from CD/MP3/MP4/DVD/PC... or any digital audio playback source with 3.5mm stereo socket iDock Rear panel Video outputs: S-Video or Composite Multimedia Speakers (To any amplified source or speakers) TV or projection screen Basic connectionsAll specification and information are subject to changes without further notice
Product connection and operation
1.Product connection
a. Connect the LINE OUT of iDock with the audio signal input port of the amplifier.
b. Connect the LINE IN of iDock with the audio output port of the audio players, e.g., DVD player or PC, etc..
c. Connect the S-VIDEO OUT/Composite OUT of the iDock with the TV or LCD respective video input ports.
d. Connect the power adaptor's DC plug into the iDock DC 9V socket, and the other end into the wall or AC power supply.
2.Operation
a. Turn on the AC power supply. The Volume dial LED remains off and ensure the Volume dial remains at the lowest point to prevent speaker damage from sudden volume spike.
b. Turn the volume dial or press the "U" (ST-BY) on the remote control to turn on the product. The blue luminous ring LED is lighted.
3.Input selection
With the iPod docked, the audio output is from the iPod interface. When there is no iPod player connected, the LINE IN becomes the default input selection. Any digital audio playback devices can be connected via this 3.5mm stereo interface.
Note: When using iPod, please install the base adaptor of your respective iPod player version into the common base of the system.
Remote control illustration
text_image
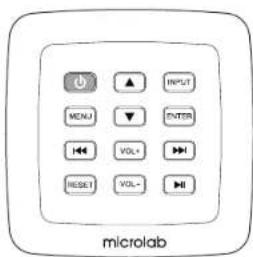
microlabRemote control
Functions:
: Power ON / Off button, product goes to
standby in Off mode
INPUT: Depress to select between line input or
iPod interface
MENU: Revert to iPod's previous menu
▲ ; Previous menu
▼ : Next menu
ENTER: Confirm selected menu
: Previous song
: Next song
VOL+/-: Volume adjustment level
▶II : Play or Pause the playback
RESET: Depress to revert volume to factory
default settings.
All specification and information are subject to changes without further notice