RRMP-670 USB - CD Player JGC - Free user manual and instructions
Find the device manual for free RRMP-670 USB JGC in PDF.


| Product Type | CD Player with USB Port |
| Brand | JGC |
| Model | RRMP-670 USB |
| Disc Compatibility | CD, CD-R, CD-RW, MP3 CD |
| USB Playback | MP3, WMA files via USB flash drive |
| Dimensions (W x D x H) | Approx. 430 x 250 x 100 mm |
| Weight | Approx. 2.5 kg |
| Power Supply | AC 100-240V, 50/60 Hz |
| Power Consumption | 12 W (max) |
| Audio Output | RCA stereo (2 x 2.5 W RMS) |
| Headphone Jack | 3.5 mm stereo |
| Remote Control | Yes, included |
| Playback Modes | Play/Pause, Stop, Skip, Repeat (1/All), Shuffle, Program |
| Display | LED display with track/time info |
| Languages Supported | English, French, Spanish (manual) |
| Cleaning | Wipe with soft dry cloth; avoid liquids |
| Safety | Class 1 laser product; do not open |
| Repairability | User replaceable fuse; service by qualified personnel |
| Accessories Included | Remote control, RCA cable, user manual |
Frequently Asked Questions - RRMP-670 USB JGC
User questions about RRMP-670 USB JGC
0 question about this device. Answer the ones you know or ask your own.
Ask a new question about this device
Download the instructions for your CD Player in PDF format for free! Find your manual RRMP-670 USB - JGC and take your electronic device back in hand. On this page are published all the documents necessary for the use of your device. RRMP-670 USB by JGC.
USER MANUAL RRMP-670 USB JGC
natural_image
Black and silver portable electronic device with analog dials and a digital display showing 01 (no visible text or symbols on the device body)text_image
29303132 OPEN OPEN AC IN ~text_image
OPEN OPEN ACIN-Netzbetrieb
natural_image
Line drawing of a cassette tape device with a vertical line and arrow indicating motion (no text or symbols)TABLE OF CONTENTS....22
IMPORTANT SAFETY INSTRUCTIONS 23-25
CONTROL ELEMENTS....26-27
PREPARATION....28
BASIC FUNCTIONS 29
CONNECTIONS 30
CLEANING AND CARE....36
TROUBLESHOOTING....37-38
TECHNICAL DATA....39
WARRANTY 40-41
Disposal
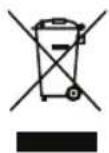
Proper disposal of this product.
This label indicates that, in the EU, electronic devices cannot be disposed of with regular household waste.
Please use the return or collections systems of your municipality or contact the seller where you purchased this product.
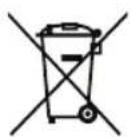
Please dispose of batteries environmentally friendly. Do not dispose of batteries with regular household waste. Please use the return or collections systems of your municipality or contact the seller where you purchased this product.
IMPORTANT SAFETY INSTRUCTIONS
Symbol legend
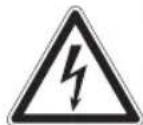
CAUTION
Danger of electric shock. Do not open!

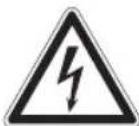
The lightening symbol in the triangle indicates to the user that there is uninsulated and therefore "dangerous voltage" in this device that could be strong enough to cause a serious electric shock.
Warning: In order to prevent the danger of electric shock, do not remove the outer casing. There are no useful parts for the user inside the device.
Leave repairs for qualified service personnel only.
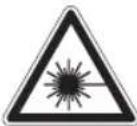
This device uses a Class 1 laser.
General
- Read this manual before first use thoroughly. It contains important information for your safety as well as for the use and maintenance of the equipment. Keep these instructions for future reference and pass it on with the device.
- Pay particular attention to the warnings on the device and in this instruction manual.
- Use the device only for its intended purpose. Improper use may lead to hazards.
- This device is designed for household use only. It is not suitable for commercial use.
- Do not open the device. Do not insert objects into the openings.
- This device is not intended to be used by persons (including children) with reduced physical, sensory or mental abilities or lack of experience and / or lack of knowledge unless they are supervised by a person responsible for their safety or have received instructions on how to use the device.
- Children should be supervised to ensure that they do not play with the device.
- The use of accessories and components not expressly recommended by the manufacturer may result in injuries or damages and voids the warranty.
- Warning: Extreme volume and high noise leads to permanent hearing loss.
- In the event of a malfunction by an electrostatic discharge: Unplug the device from the mains using the power cord. Wait a bit and plug the power cord back into the outlet. Turn on the device again to resume normal operation.
- Never immerse electrical parts of the device in water during cleaning or operation. Never hold the device under running water.
- Do not place heavy objects on top of the device.
- Do not under any circumstances attempt to repair the device yourself. For servicing and repairs, please consult an authorised dealer or qualified customer service centre.
IMPORTANT SAFETY INSTRUCTIONS
Installation location
- Use this device in dry indoor areas only and never outdoors.
- Warning: Do not use this device near water or heavy moisture; e.g. in a damp basement or beside a swimming pool or bathtub.
- Use this device in well-ventilated areas. Do not block off the air openings. Put the device in a place only in accordance with the manufacturer's instructions. Keep a minimum free distance of 10 cm around the device in order to allow for sufficient cooling. Do not cover the device with newspapers or other textiles such as drapes, blankets and clothing.
- Keep this device away from all heat sources like for example, ovens, hot plates and other heat-producing devices/objects.
- In order to reduce the risk of fire and electric shock, do not expose the device to fire (fireplace, grill, candles, cigarettes and so on) or water (water drops, water splashes, vases, tubs, ponds and so on).
- Only use this device in temperate latitudes; avoid using it in tropical and in especially damp climates.
- Do not use this device in a very dry environment. This can result in electrostatic discharges.
- Protect this device from extreme heat (over 35^ C) and cold (under 5^ C) as well as from direct sunlight and dust.
- Do not place this device near objects which create a strong magnetic field (e.g. motors, loudspeakers, transformers).
Power supply
- The mains voltage must match the information on the rating label of the device.
- The power plug is used as the disconnect device. Please be sure that the power plug is in operable condition.
- Only removing the power plug can separate the device completely from the mains supply.
- The power switch does not separate the device from the mains. In order to separate the device from the power supply, unplug the power cord.
- Avoid damages to the power cord that may be caused by kinks or contact with sharp corners.
- Make sure, the device, including power cord and power plug are not exposed to hot surfaces.
- Only unplug from the power outlet by the plug itself. Do not pull on the cord.
- Disconnect the power plug when the device is not in use, in case of malfunctions and prior to each cleaning.
- Unplug the power cord during lightning storms and prolonged absence in order to protect the electronics against overvoltage and damage.
- If the power cord or the casing of the device is damaged or if the device is dropped, the device may not be used before it is examined by a professional electrician.
- A damaged power cord may only be replaced by the manufacturer or a workshop commissioned by the manufacturer or by a similarly qualified person in order to avoid hazards.
- Protect the power cord and the housing from damage.
IMPORTANT SAFETY INSTRUCTIONS
ENSOLID
Condensation
- Should this device be cold and be brought into a warm and possibly damp environment, condensation can build up inside it. Condensation can hinder the proper functioning of the device. In extreme cases, condensation can also result in damages caused by a short circuit. Leave the device in a warm, dry environment for about 1-2 hours in order to dry up or release any possible condensation before you use it again.
Batteries
- Caution: There is danger of explosion from improper replacement of the batteries. Replace batteries only with the same or equivalent type of battery.
- Always change the entire battery pack. Do not mix old and new batteries, or batteries with different charge state.
- Make sure the batteries are correctly inserted. Observe the polarity (+) plus / (-) negative on the battery and the housing. Improperly inserted batteries can lead to leakage or, in extreme cases, a fire or an explosion.
- Never expose batteries to excessive heat (e.g. bright sun, fire), and never throw them into fire. The batteries could explode.
- The connections must not be short-circuited.
- Remove used batteries. Remove the batteries if you know that the device will not be used for a longer period of time. Otherwise, the batteries could leak and cause damage.
- Keep batteries out of reach of small children. If batteries have been swallowed, seek immediate medical attention.
• Non-rechargeable batteries must not be recharged. - Rechargeable batteries are to be removed from the device before being charged.
- Only use top-quality batteries. Cheap batteries could leak and result in damages.
- If the batteries leak, remove them with a cloth and dispose of them accordingly. Prevent battery acid from coming into contact with skin and eyes. If you do get battery acid in your eyes, flush them thoroughly with lots of water and consult a physician immediately. If battery acid comes into contact with your skin, wash the affected area with lots of water and soap.
text_image
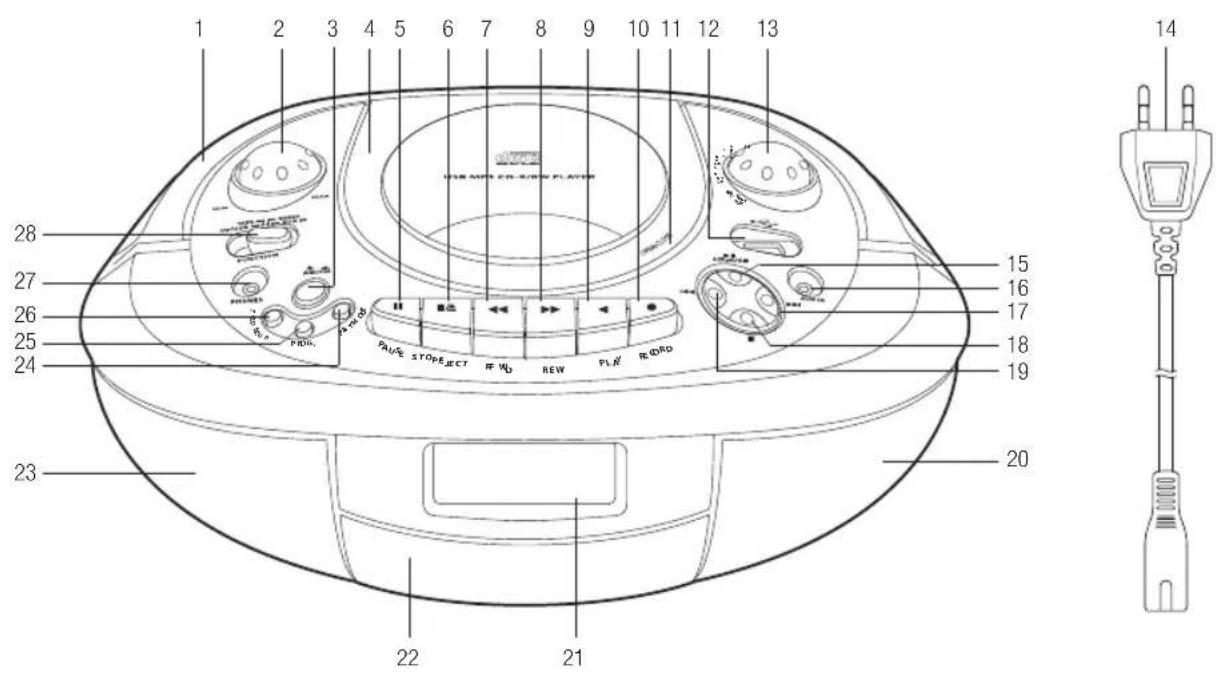
1 2 3 4 5 6 7 8 9 10 11 12 13 14 28 27 26 25 24 23 22 21 BLUE STOPJECT IF VLD REW PLR RECORD 15 16 17 18 19 20No. Part / Button Function No. Part / Button Function
| 1 Handle - 15 | ▶/II CD USB button | Playback/pause | ||
| 2 Volume control VOLUME | Increase/reduce volume 16 | AUX IN jack Connection for an external device | ||
| 3 AM/FM button | Switch frequency (AM/FM) 17 | ▶▶ button | Fast forward; next track | |
| 4 CD tray | - 18 | ■ button | End playback | |
| 5 | PAUSE ▪ button | Pause (cassette) | 19 ◀◀ button | Rewind; previous track |
| 6 | STOP/EJECT ▪ ▲ button | Stop / eject (cassette) | 20 Speaker (right) | Sound playback |
| 7 | F.FWD ◀◀ button | Fast forward (cassette) | 21 LCD Display | Display |
| 8 | REW ▶▶ button | Rewind (cassette) | 22 Cassette compartment | - |
| 9 | PLAY ◀ button | Play (cassette) | 23 Speaker (left) Sound playback | |
| 10 | RECORD ● button | Record (cassette) | 24 PLAY MODE button | Repeat function/ random playback |
| 11 | OPEN/CLOSE | Open / close CD tray | 25 PROG. button | Program tracks |
| 12 | USB slot | 26 FOLDER UP button | Skip track; select folder | |
| 13 | TUNING control | Set radio station | 27 PHONES 3.5 mm headphone jack | To connect headphones or earphones |
| 14 | Power cord with plug | - 28 FUNCTION switch Select operating mode | ||
CONTROL ELEMENTS
ENSOLID
text_image
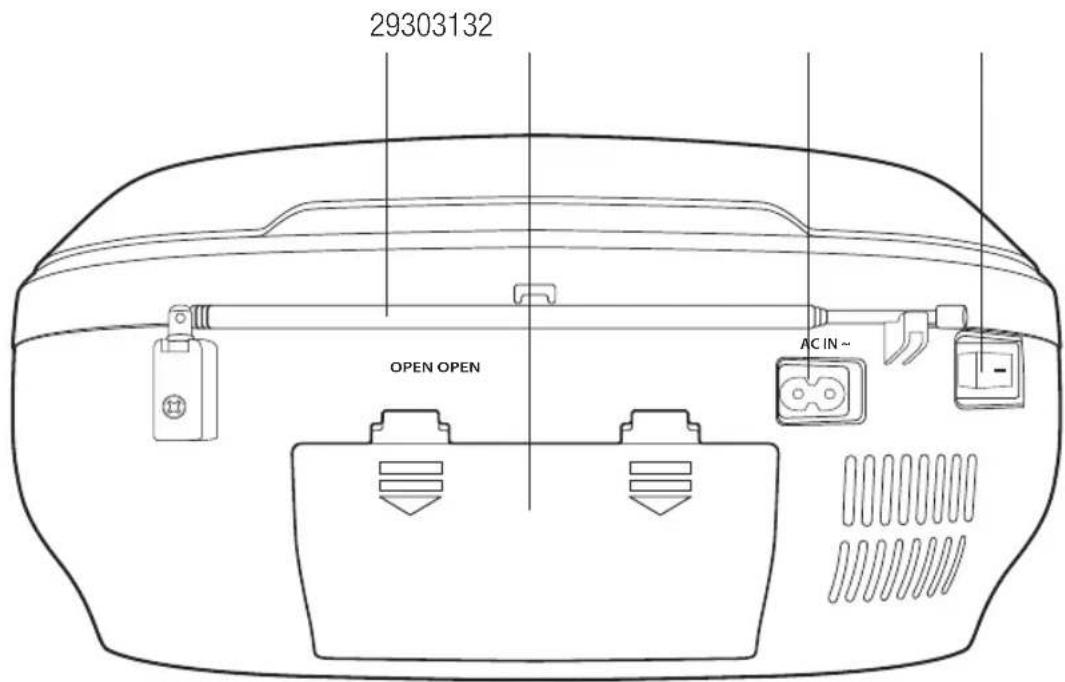
29303132 OPEN OPEN AC IN ~No. Part / Button Function
29 Telescopic antenna (FM) Antenna for FM radio operation
30 Battery compartment -
31 AC IN \~ Power cord connection
32 Power switch Switch device off / on
Delivery contents
- 1 x CD Radio recorder
- 2 x user manual
- 1 x power cord with power plug
Unpacking and checking
- Carefully take the device and its accessories out of the packaging. Retain the packaging in case you would like to store the device away or transport it at a later date. If you choose to dispose of the packaging, then please do so according to the applicable legal regulations.
- Check the packaging contents for completeness and damages. Should the contents in the packaging not be complete or be damaged, do not use the device. Return it to your retail outlet immediately.
- Open the CD tray (4) and remove the transport protection.
Setting up device
- Put the device on an even, stable and dry surface.
- Ensure sufficient ventilation. Keep a minimum distance of 10 cm around the device in order to ensure sufficient cooling.
Battery operation
- To operate device with batteries, you need 8 x 1.5V batteries, type C/UM-2/LR14.
- Only use same or equivalent type batteries.
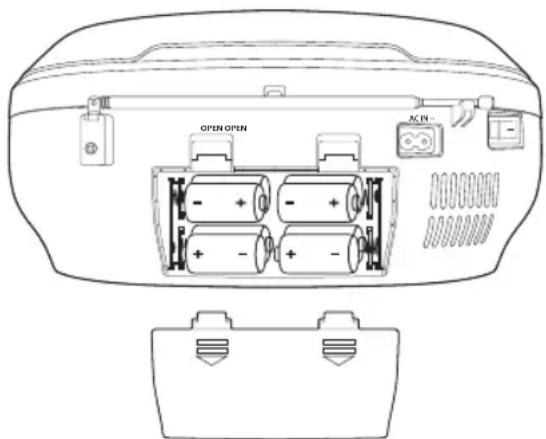
- Open the battery compartment (30) at the rear of the device and insert the batteries.
- Pay attention to the correct polarity (+/-) according to the imprint.
- Close the battery compartment after inserting the batteries. Make sure that the cover locks in properly.
- Remove all batteries when operating this device with a mains plug.
- In order to avoid damages, remove all batteries if you will not be using this device for a longer period of time.
- Read the safety instructions for handling batteries also. (See chapter IMPORTANT SAFETY INSTRUCTIONS).
text_image
OPEN OPEN AC IN-Mains operation
• Make sure that the FUNCTION switch (28) is on TAPE position.
- Connect the power cord to the AC IN\~ connection (31) at the back of the device. When delivered, the power cord may be found in the battery compartment (30).
- Make sure that the voltage corresponds to the specifications on the nameplate of the device. Insert the plug in the appropriate power outlet.
- Pull the plug from the power outlet in order to separate the device completely from the mains.
- Do not use this device simultaneously on mains and battery operation.
Switching device on and off
- Switch the device on using the power switch (32) at the back of the device.
- Switch the device off again after operation using the power switch.
- To completely disconnect the device from the mains, pull the plug from the power outlet.
Selecting operating mode
- Select the operating mode using the FUNCTION switch (28). The LCD display (21) is active during operating mode CD/USB only.
| Operating mode Explanation | |
| CD/USB Plays back | audio files from CD (e.g. audio-CD, MP3/WMA-CD.)Plays back audio files from a USB storage device. |
| TAPE Plays cassettes; switches off device. | |
| RADIO Radio operation | |
| AUX IN Plays back | audio files from an external device. |
Setting volume
- Set the desired volume by turning the volume control (2) on the device.
- To decrease the volume, turn the volume control toward MIN.
• To increase the volume, turn the volume control toward MAX. - Warning: Extreme volume leads to permanent hearing damage from high sound pressure.
Connecting an external device
- An external playback device (e.g. MP3 player) can be connected to this device using the AUX IN jack (16) and music can be played back via the speakers.
- Attention: Before connecting your external playback device, please also read the operating instructions for information regarding safety instructions and usage with other devices.
- Turn off the playback device and the external playback device.
- Connect the external playback device using a stereo cable (∅3.5 mm). The cable is not included in the scope of delivery.
- Connect the stereo cable with the AUX IN jack (16) on top of the device and insert the other end into the headphone jack or the LINE-OUT jack of the playback device. If the external device has a smaller or larger jack, then use a suitable adaptor (not included in the scope of delivery).
- First turn on the external device and set the volume to zero. Then turn this device on and set the volume to zero as well.
- Switch the FUNCTION switch (28) to the operating mode AUX IN.
- Set the volume of both devices. If the external device is connected to this device via the LINE-OUT jack, control the volume with this device.
- Set the playback functions on the external device.
- Note that if you switch off this device only, the external device will continue playing.
Headphones
- This device has a 3.5 mm headphone jack (27), to which you can connect most headphones or earphones (not included in scope of delivery).
- If the headphone or earphone is connected to the headphone jack, the built-in loudspeaker is automatically deactivated.
- As soon as the headphones or earphones are separated from the headphone jack, the loudspeaker is activated.
USB device
- Connect the USB device to the USB slot (12) at the top of the device.
- This device is equipped with a telescopic antenna (29) for FM range. Pull the telescopic antenna out completely and turn it in the direction in which you achieve the best reception.
- A ferrite antenna has been built in for AM range. Align the device so that you receive the station in the best possible sound quality.
Radio operation
- Slide the FUNCTION switch (28) on the device to RADIO. This device is now in radio operation.
- In order to select a frequency band press the AM/FM button (3). If the AM/FM button is located in the lower position, FM has been selected. If the AM/FM button is located in the upper position, AM has been selected.
- Set the TUNING control (13) to the desired radio station.
Disc formats
- This device supports CD formats audio-CD, writable CD-R and CD-RW with MP3/WMA files. Other discs or computer CDs cannot be read by this device. Do not insert such formats. The playback quality and performance are not guaranteed if non-standardised format definitions / production of MP3, WMA and CD-R/RW discs are used. This is not a defect of this device.
- The playback quality of the writable CDs depends on the recording and the quality of the CD blank.
- Do not insert any unwritten CD-R/RW discs in this device.
- Do not affix any stickers, labels, etc to either side of the CD-R/RW disc since this can lead to malfunctions.
Inserting and removing CD
- Slide FUNCTION switch (28) on the device to CD/USB.
- Open the CD tray (4) by pressing OPEN/CLOSE (11) on the CD tray lock. The CD tray opens upwards. OP is shown on the display (21).
- Remove the transport protection when you open the CD tray for the first time.
- Never open the CD tray forcefully. Open and close the CD tray cover without using pressure.
- Insert a CD in the CD tray so that the printed side is facing upwards. Press on a point in the middle of the CD until it locks into the axle.
- Press the CD tray cover downwards in order to close the CD tray. The CD can now be read.
- If the CD cannot be read or if no CD has been inserted, NO will be shown in the display.
- Before opening the CD tray again, always make sure that the CD is not revolving any longer. Press the button (18) first to end the CD revolutions.
- To remove the CD, position it with one finger in the middle of the CD (middle of the spindle) and with the other finger on the outside of the CD. Pull out the CD carefully.
Please note
- Only remove the CD once the CD tray has been completely opened.
- Never put more than one CD in the CD tray at a time.
- Do not put any objects other than CDs in the CD tray.
- Never touch the clear laser lens inside the CD tray.
- Bumping into the device could cause the tracks to skip.
• Very high volumes can cause vibrations which could also cause the tracks to skip. - Keep the CD tray closed except when you are changing the CD.
- Never open the CD tray when a CD is playing or if a CD is still spinning.
Playing audio-CD
- Switch the device into the CD playback mode and insert the audio CD as already described.
- The total number of tracks on the CD is shown on the display (21).
- Play/Pause: Press the ▶/II CD USB button (15) to start and interrupt the playback. If the playback is paused, the symbol ▶blinks in the display.
- Stop: To stop the playback, press the ■ button (18). The display shows the total number of tracks on the CD.
- Previous and next track: With the buttons ◀◀ (19) and ▶▶ (17), you can skip tracks to the next or previous track. By pressing the ◀◀ button (19) once, the track being played will be played back again from the start. By pressing twice, the previous title will be played again. By pressing the ▶ button (17), the next track will be played.
- Fast forwarding and rewinding: By holding down the buttons ◀◀ (19) and ▶▶ (17), you can fast forward or rewind the current track. Once the desired place has been found, let go of the button in order to proceed with the playback.
- By pressing the FOLDER UP button (26) 10 tracks are skipped.
Repeat and random play function
- You can set this function during playback of a track or in stop mode.
- Press the PLAY MODE button (24) once in order to play the track continually. REPEAT is shown in the display (21).
- Press the PLAY MODE button twice in order to play the entire CD continually. REPEAT ALL is shown on the display.
- Press the PLAY MODE button three times in order to activate the random playback. RANDOM is then shown on the display.
- Press the PLAY MODE button four times in order to switch off all functions.
Programming track playback
- You can program the CD player to play a sequence of up to 32 tracks. The playback list can only be programmed in stop mode. Press the ■button (18), before beginning programming.
- Press the PROG. button (25) once to switch to programming mode. The number of the storage space P01 and PROGRAM are shown blinking on the display.
- Select a CD track with the buttons ◀◀ (19) and ▶▶ (17). Store your selection with the PROG. button. The second storage space P02 is opened and can be occupied again as before.
• Proceed as described above to program further tracks. - You can occupy up to 32 storage spaces. If all storage spaces are occupied, the display shows FUL.
- Press the ▶/II CD USB button (15) to play the program. PROGRAM is then shown on the display.
- Once all programmed tracks have been played, the device stops automatically.
- Press the ■ button (18) to end the program playback. The playback list remains in the storage. In the display, the number of tracks and PROGRAM is shown. You can play the same playback list again by pressing the ▶USB button (15).
- By pressing the ■ button (18) twice the playback list is deleted. The program is also deleted if you: - open the CD tray (4),
- slide the FUNCTION switch (28) to another position,
- switch off the device with the power switch (32).
- Note: The repeat function can be combined with the playing of a program. For this, read the Repeat function section.
Playing MP3/WMA-CD
- This device can play back CDs (CD-R and CD-RW) with MP3-/WMA files as well as all recorded audio CDs (CD-DA). Other file extensions are not supported.
- WMA files which have DRM copy-protection cannot be played by this device. NO is shown on the display if you attempt to play DRM WMA files.
- The playback functions for MP3/WMA-CD are largely identical to the functions for audio CDs. Therefore, in the following section, only the differences when playing a MP3/WMA-CD and additional functions are described.
- Switch the device into CD playback mode and insert an MP3/WMA CD.
- Since the MP3/WMA-CDs can contain significantly more tracks, it can take longer for the CD player to read the entire contents directory.
- On the display (21) the total number of tracks and the control display MP3 or WMA will be shown.
- If the MP3/WMA-CD is in stop mode, keep the FOLDER UP button (26) pressed for approx. 2 seconds to the see total number of directories. On the display, the total number of directories (e.g. 012 for 12 directories), ALBUM, as well as a folder symbol will briefly be shown blinking.
- You can select a certain directory and start the playback of a track from this directory. CD in Stop Mode: Hold the FOLDER UP button (26) pressed for approx. 2 seconds until the total number of directories blinks in the display. Then briefly press the FOLDER UP button several times in order to select a directory. Finally press the ▶/II CD USB button (15) to start the playback of the first track in the selected directory.
CD PLAYER, USB DEVICE
- You can also select a directory while playing back CD tracks. Hold the FOLDER UP button (26) pressed for approx. 2 seconds until the entire number of the directories blinks on the display. Then press several times on the FOLDER UP button in order to select a directory. The playback of the current track is then interrupted. The CD player skips to the first track of the selected directory and starts the playback.
- If you press the FOLDER UP button (26) briefly, 10 tracks are skipped over.
Repeat function and random playback (MP3/WMA-CD)
- You can set this function during the playback of a track or in stop mode.
- Press the PLAY MODE button (24) once in order to play the track continually. REPEAT is shown in the display (21).
- Press the PLAY MODE button twice in order to repeat the entire CD continually. REPEAT ALL is then shown on the display.
- Press the PLAY MODE button three times, in order to repeat all tracks of a directory continually. The words REPEAT, ALBUM and a folder symbol are then shown on the display.
- Press PLAY MODE button four times to activate the random playback. RANDOM is shown on the display.
- Press the PLAY MODE button five times to switch off all functions.
Playing audio files from a USB device
- Before connecting a USB device, make sure that the FUNCTION switch (28) is on the TAPE position. Insert the USB device carefully into the USB slot (12).
- Slide the FUNCTION switch to the CD/USB position.
- The data is then read from the USB device. The entire number of tracks and the control display MP3 or WMA is then shown on the display (21).
- When play via USB, the control display USB appears.
- The playback function for audio CD and MP3/WMA-CD works for the USB device, too. Further information can be found in the chapter CD PLAYER.
- Never remove the USB device from the USB slot, if you are currently playing a track. Always stop the current track with the ■ button (18).
- Change the operating mode or switch off the device with the power switch (32) before carefully pulling out the USB device from the USB slot. This prevents damage to the USB device and files.
Notes
- USB devices must be FAT32 formatted. NTFS formatted devices are not recognised. NO will be shown on the display (21).
- The USB slot (12) can be used with the standards 1.1 and 2.0.
- The device supports USB devices with a capacity of up to 16 GB only.
- Due to changing technologies, it could happen that certain USB devices are not compatible with this device.
- Do not use any USB extension cords to connect your USB device with the USB slot. Disruptions could occur which can influence the music playback. In extreme cases the USB device could become damaged.
Inserting and removing cassette
- Set the FUNCTION switch to the TAPE position.
- Open the cassette compartment (22) by pressing the STOP/EJECT button (6).
- Tighten the band somewhat and insert the cassette with the band upwards. The empty spool should be located at the left. Close the cassette compartment until the cover audibly locks in.
- Play/Pause: Start play by pressing the PLAY ◀ button (9). Press the PAUSE ■ button (5), to interrupt play.
- Stop: End play by pressing the STOP/EJECT button.
- Fast forward and rewind: In order to fast forward or rewind the band, stop playback with the STOP/EJECT ▪/▲ button. Then press the F.FWD ◀◀ (7) or REW ▶▶ (8) button.
- Press the STOP/EJECT ▪/▲ button again to open the cassette compartment and remove the cassette.
- Cassettes can be used on both sides. If the cassette reaches the end of its play duration, remove the cassette and rotate it 180 degrees on its vertical axle. Insert the cassette again in order to play the other side.
- Auto-Stop function: If the cassette has reached the end of its play duration, the cassette playback switches off automatically. This is also the case for recording.
Recording onto cassette
- You can record from radio, CD or USB device. When recording and copying, you should observe copyright laws.
- Recording onto chrome (IEC II) and metal bands (IEC IV) is not possible. Use NORMAL (IECI) bands only.
- Insert a blank cassette into the cassette compartment (22).
- Press the PAUSE Button (5).
- Press the RECORD ● button (10). The PLAY ◀ button (9) will be activated simultaneously.
- Select the desired source with the FUNCTION switch (28).
- In order to record from the radio, set the FUNCTION switch to RADIO. Select the desired station with the TUNING control (13). To start recording, press the PAUSE button again.
- In order to record from CD or USB device, set the FUNCTION switch to CD/USB. Select a track and start the playback with the ▶/II CD USB button (15). To start recording, press the PAUSE ■ button.
- In order to interrupt recording, press the PAUSE button.
- Press the STOP/EJECT ■ button (6) to end recording.
- The recording is not influenced by the volume level.
Protection from deletions
- For every new recording, the old recording is deleted.
- You can protect the cassettes from accidental deletions or overwriting by breaking off the safety flap on the upper front side of the cassette.
- If you want to write over the cassette later, you can cover the hole with adhesive tape.

natural_image
Simple line drawing of a device with a vertical line and a downward arrow, no text or symbols present.CLEANING AND CARE
Cleaning the cassette drive
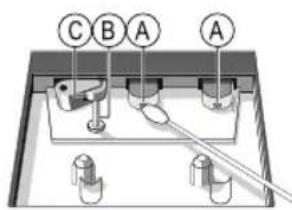
- To ensure the recording and playback quality, clean parts A, B and C in the cassette drive an average of once per month.
- Press on the STOP/EJECT ■(6) button to open the cassette compartment.
- Press the PLAY button (9) and clean the rubber pinch control C.
- Press the PAUSE ■ button (5) and clean the magnet heads A and the shaft B. Use a clean cloth or cotton swab which is moistened with pure alcohol (Isopropyl alcohol).
text_image
C B A A- After cleaning, press the STOP/EJECT ▪ button (6) and close the cassette compartment.
- Wait until the cleaned areas are completely dry before you insert a cassette again.
- Note: A special cleaning cassette can be used for the tape heads.
Handling cassettes
- Keep a large distance between cassettes and magnets or electromagnets. These can be located in motors as well as speakers, televisions, amplifiers, power devices and transformers in general.
- Do not expose the cassettes to high heat, extreme cold or humidity.
- Keep the cassettes protected from dust in their case.
- The longer the playing time of the cassette (60, 90, 120 minutes) the thinner the band and therefore the more sensitive it is to mechanical stress.
Compact Disc
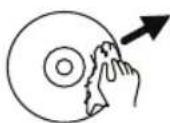
- Wipe off fingerprints and dust thoroughly with a soft cloth. Wipe from the centre to the edge (not circular).
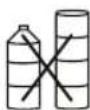
- Clean the disc periodically with a soft, lint-free cloth. Do not use solvents or abrasives.
- Do not write on CDs. Do not put any stickers on it.
- Protect your CDs against dust and scratches. Always keep it, therefore, in its case when not in use.
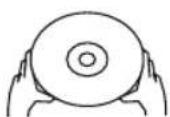
- Remove the CD from its case by pressing on the middle of the holder and then touching the edges only of the CD.
Cleaning the housing
- Pull the plug out of the wall outlet before every cleaning.
- Remove dust with a soft dusting cloth.
- Do not use a wet sponge, wax, spray polishes, or abrasives.
- Caution: No water must reach the housing. If so, unplug the power cord and let the device dry thoroughly before operating it again. Please do not dry the device in an oven or microwave oven.
TROUBLESHOOTING
If an error occurs, check the table below first, before you contact your dealer or send in the device. The address and hotline number can be found on the warranty card. Do not open the device and do not try to repair it yourself. You will lose the warranty claim and it is dangerous! Refer to the warranty conditions on the following pages.
| Problem Possible cause | Solution | |
| General | ||
| No sound. The volume is set | too low. Set the volume higher. | |
| The plug is not plugged in correctly. Plug in. | ||
| The display is blank; no reaction to pressing buttons. | Electrostatic discharge. Switch off device and pull the plug. Wait briefly and plug in again. | |
| Radio operation | ||
| No radio signal. The device | is not in radio mode. Set the radio mode with the FUNCTION switch (28). | |
| Disturbances when playing FM or AM radio. | The station is not properly tuned. Tune the station again. | |
| FM: Telescopic antenna is not pulled out. | Pull the antenna fully out. | |
| AM: The device is positioned in a location with poor reception. | Find the optimum position for the device. | |
| AUX IN connection | ||
| No sound. The volume is not set properly. Depending on the device, the volume must be set on the externally connected device as well as on this device.If the external device has a LINE-OUT jack, then set the volume on this device. | ||
| There is no playback. The connection is faulty. Check the connection to the playback device.Use a suitable stereo cable. | ||
| CD player | ||
| The CD player doesn’t work. | The device is not in CD playback mode. | Select the CD playback mode with the FUNCTION switch (28). |
| The CD is not inserted properly or there is no CD. | Insert a CD. Make sure that the CD label is facing upwards and that the CD is lying on the holder properly. | |
| The CD is not compatible with this device. The audio format cannot be played with this device. | Insert a suitable CD with a compatible audio format. | |
| The CD is dirty or scratched. Clean the CD or play another CD. | ||
| Laser lens dirty or scuffed. Clean the lens. Leave the device in a dry surrounding for 1-2 hours where the condensation can dry. | ||
| The CD is skipping tracks. | The CD is dirty or scratched. Clean the CD or play another CD. | |
| A program is being played. End program playback. | ||
| The random function is switched on. | Stop the random playback of tracks with the button PLAY MODE (24). | |
| Cassette recorder | ||
| Playback is irregular and of bad quality. | The tape head is dirty. Clean tape head. | |
| The cassette is defective. Use another cassette. | ||
| Wrong cassette type used. Use only type IEC I type cassettes (NORMAL). | ||
| Recording does not work. | The security flap of the cassette has been removed. | Change the cassette or cover the hole with adhesive tape. Check whether or not you really want to write over this cassette. |
| USB device | ||
| USB device is not recognised. | USB device is not connected correctly to the device. | Check the connection between the USB device and the device. Separate the USB device and connect it to the device again. |
| Files are not read. Unrecognised file format. The device can only play back the audio CD (CD-DA), MP3 and WMA formats. | ||
Power supply AC 230V\~, 50Hz
Battery operation DC 12V 8 x 1,5 V batteries (C/U4/2/LR14)
Power consumption 17 W
Laser type Class 1
Loudspeaker 2 x 2 W
Dimensions 250 x 360 x 155 mm (L x W x H)
Radio
FM range 87,5 - 108 MHz
AM range 522 - 1620 kHz
Disc drive for 8cm und 12cm diameter; only circular form, no other forms
Audio file format CD-DA, MP3, WMA
CD format CD Audio, CD-R, CD-RW
Memory format USB type 1.1, type 2.0
Supported memory size Max. 16 GB
Manufactured for
JGC-Company GmbH
Heckhofweg 146
50739 Köln
Customer service
Monday-Friday,10:00 - 18:00
(€ 0.14/min. from German landline;
max. € 0.42/min. from German mobile networks)
Please enter the serial number of your device here:
Customer Info Manufacturer's Warranty
JGC
Thank you for your purchase of one of our products. We hope you will enjoy using our high-quality product. Our strict production control ensures the high quality of our devices. However, in the event that you wish to submit a qualified claim, we grant a
3 years
warranty as of the date of purchase, subject to the following conditions:
This warranty does not affect your statutory warranty claims as consumer toward the seller of the device. These rights are not affected by our manufacturer's warranty. The warranty granted by us is valid only for domestic use of the device and is limited to the area of the Federal Republic of Germany.
The warranty term is 3 years as of the date of purchase.
It is within JGC's discretion to fulfil the warranty by repair or replacement of the device or defect component. Other claims are excluded. In case of questions regarding JGC products you no longer need to take the time to go to the seller but may call our service hotline or service center directly. A team of highly qualified product consultants and technicians is available from Monday through Friday from 10:00 a.m. to 6:00 p.m.
Service Hotline: 01805 / 22 17 84
(€ 0.14/min. from German landline; max. € 0.42/min. from German mobile networks)
When mailing your device, please also include a short description of the problem as this will facilitate handling. Please mail your device, without exception, only to our authorised service partner and use only the enclosed return coupon. If the return coupon is missing please contact the above service hotline.
ATTENTION: Mailings that are not pre-paid will not be accepted!
Customer Info Manufacturer's Warranty
JGC
Our service partner requires proof of purchase, either as original receipt or cash receipt printed by the seller to perform warranty repairs. The serial number on the device must also be readable. We are unable to perform warranty services free of charge without proof of purchase. We recommend keeping the original packaging in order to ensure safe transport of the device in case of a warranty claim.
Warranty repairs may be performed exclusively by E2 Servicecenter GmbH or contractual partners authorised by it. Repairs performed by the customer or other shops void the warranty; a claim for cost reimbursement does not exist.
The warranty is void or does not cover:
⇒ in case of improper use
⇒ in case of mechanical damages to the device from outside forces
⇒ in case of transportation damages
⇒ for wear parts
⇒ in case of operating errors and misuse
⇒ when placing the device in wet rooms or outdoors
→ in case of damages resulting from force, war, water, lightning, excess voltage, and other reasons not within the scope of JGC's responsibility.
⇒ in case of excessive use, in particular in case of non-domestic use
⇒ in case of disregard of the user instructions and installation errors
⇒ if the device does not have a technical defect
⇒ for transport and travel costs as well as costs incurred by installing and uninstalling the device
The warranty does not include any subsequent liability on our part, in particular no liability for damages to the device itself or incurred by the loss of the device until the time of repair (e.g. travel costs, handling costs, etc.). However, this does not limit or exclude our statutory warranty, in particular pursuant to the Product Liability Act. Also JGC is not liable for indirect or subsequent loss of sound recordings (CD / DVD etc.) or similar material, and ancillary equipment of any kind (power supplies, speakers, etc.).
Any warranty services provided by us do not extend the warranty term of 3 years as of the date of purchase, also not in terms of possibly exchanged components.
We wish you much joy with your new device and hope that your next one will be another JGC product.