LED32CHRDWHBD - TV Tecovision - Free user manual and instructions
Find the device manual for free LED32CHRDWHBD Tecovision in PDF.


User questions about LED32CHRDWHBD Tecovision
0 question about this device. Answer the ones you know or ask your own.
Ask a new question about this device
Download the instructions for your TV in PDF format for free! Find your manual LED32CHRDWHBD - Tecovision and take your electronic device back in hand. On this page are published all the documents necessary for the use of your device. LED32CHRDWHBD by Tecovision.
USER MANUAL LED32CHRDWHBD Tecovision
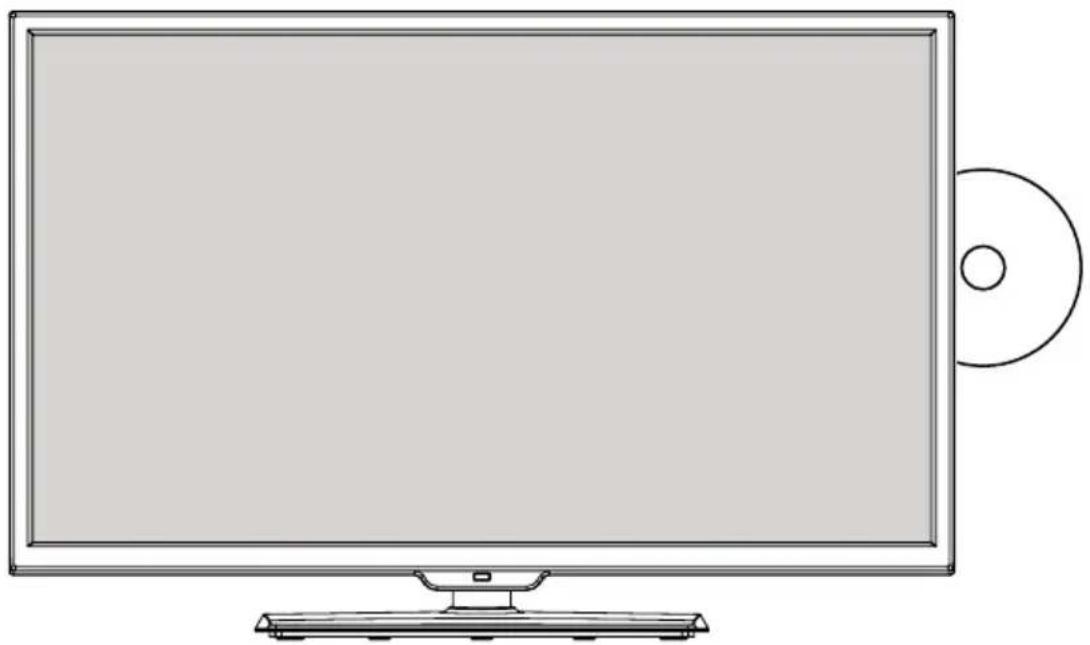
DIGITAL LED/LCD TELEVISION WITH DIRECT LED LIGHTING
natural_image
Line drawing of a flat-screen computer monitor with a CD on the side (no text or symbols)MODEL: LED32CHRDWHBD
Contents
Safety Information
- About this manual / Safety Information .... 1
- Product disposal....1
- Safety precautions .... 1
- Handling the LED/LCD screen .... 5
User Guidance Information
- Device Overview ....7
- Desktop Mounting / Wall Mounting....9
- Connecting an Antenna .... 10
- Remote Control 11
Operation
- First Installation.... 13
- Picture Menu 15
- Sound Menu....17
- Channel Menu.... 19
- Feature Menu....24
- Setup Menu 33
- Personal Video Recorder Mode (PVR) 36
• Media Player Mode 37
• Media Player Format 40 - DVD Operation 41
- Disc Care 49
Maintenance and Service
- Troubleshooting....50
- Specifications 51
Preface
About this manual
Thank you for purchasing tecovision LED/LCD Color Television (LED stands for Light-Emitting Diode, LCD stands for Liquid Crystal Display). We are pleased to present a product that has been designed with excellent quality, reliability and performance to make your viewing experience more satisfying than ever before. This manual provides detailed descriptions on how to use this product and making adjustments according to your personal preferences.
Please read the Safety Precautions and the instructions in this manual carefully, and keep them handy, for your future reference.
Safety Information
text_image
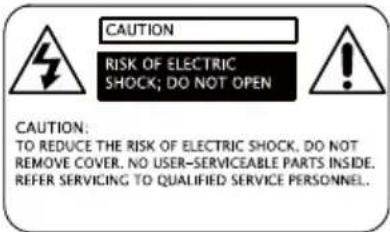
CAUTION RISK OF ELECTRIC SHOCK; DO NOT OPEN CAUTION: TO REDUCE THE RISK OF ELECTRIC SHOCK. DO NOT REMOVE COVER. NO USER-SERVICEABLE PARTS INSIDE. REFER SERVICING TO QUALIFIED SERVICE PERSONNEL.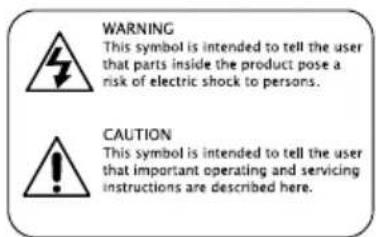
text_image
WARNING This symbol is intended to tell the user that parts inside the product pose a risk of electric shock to persons. CAUTION This symbol is intended to tell the user that important operating and servicing instructions are described here.Product disposal
Do not dispose of the LED/LCD television with general household waste. The LED/LCD screen contains a small amount of liquid crystal and mercury. For disposal or recycling information, please contact your local authorities.
Safety precautions
Please read all of these instructions before you operate your television and save these instructions for later use. This unit has been engineered and manufactured to ensure your personal safety, however, improper use can result in electric shock or fire hazard. In order not to defeat the safeguards incorporated in this equipment, please observe the following basic rules for its installation, use and servicing.

Safety Information
• Always, unplug this LED/LCD television from the wall outlet before cleaning.
- Do not use liquid cleaners or aerosol cleaners. Use a soft cloth moistened with water for cleaning.
- Use only the attachments recommended by the television equipment manufacturer.
- Do not use this LED/LCD television near water, for example, near a bath tub, washbowl, kitchen sink or laundry tub, in a wet basement, or near a swimming pool
- Do not place this LED/LCD television on an unstable surface, stand, or cart. The LED/LCD television may fall, causing serious injury to a child or an adult, and seriously damage the equipment.
- When moving the LED/LCD television, hold it under the main unit. Do not grab the base when moving. The base could come off, causing you to drop the LED/LCD television, possibly resulting in damage to the LED/LCD television or causing injury.
- The LED/LCD television should be moved with care. Quick stops, and uneven surfaces when transporting may lead to damage the LED/LCD television.
- Slots and openings in the back or bottom of the cabinet are provided for ventilation. To ensure reliable operation of the LED/LCD television and to protect it from overheating, these openings must not be blocked or covered. This LED/LCD television should not be placed in an enclosed installation such as a bookcase unless proper ventilation is provided.
- The openings should never be covered with a cloth or other material, and the bottom openings should not be blocked.
- This LED/LCD television should be operated only from a power source indicated on the marking label.
- Do not allow anything to rest on the power cord. Do not locate the LED/LCD television where the cord may be damaged due to lightning and power-line surges.
- Follow all warnings and instructions marked on the LED/LCD television.
- If an outdoor antenna is connected to the LED/LCD television, be sure the antenna system is earthed so as to provide some protection against voltage surges and static charges.
- For added protection for this LED/LCD television during a lightning storm, or when it is left unattended and unused for long period of time, unplug it from the wall outlet and disconnect the antenna. This will prevent damage to the equipment due to lightning and power-line surges.
Safety Information
- An outdoor antenna system should not be located in the vicinity of over head power lines or other electric light or power circuits, or where it can fall into such power lines or circuits. When installing an outdoor antenna system, extreme care should be taken to keep from touching such power lines or circuits as contacting with them could be fatal.
- Do not overload wall outlets and extension cords as this can result in fire or electric shock.
- Never push any kind of objects into this LED/LCD television through cabinet slots as they may touch dangerous voltage points or result in short-circuits of internal parts. This could result in a fire or electric shock. Never spill any kind of liquid on the LED/LCD television.
- Do not attempt to service the LED/LCD television by yourself because opening or removing covers may expose you to dangerous voltage or other hazard. Refer all servicing to qualified service personnel.
- Unplug this LED/LCD television from the wall outlet and refer servicing to qualified service personnel under the following conditions:
— When the power cord or plug is damaged or frayed.
— If liquid has been spilled into the LED/LCD television.
— If the LED/LCD television does not operate according to the operating instructions, please adjust those items that are covered by the operating instruction because improper adjustment of other controls may result in damage and will often require extensive work by a qualified technician to restore the LED/LCD television to normal state.
— If the LED/LCD television has been dropped or damaged.
— When the television comes about a distinct change in performance —this maybe indicates the need of servicing.
- After the servicing of the LED/LCD television, please ask the survice technician to perform routine safety checks to determine that the television is in safe operating condition.
- If needing to replace parts, please make sure that the replaced parts that the service technician adapts are specified by the manufacturer and have the same characteristics as the original parts. Unauthorized substitutions may result in fire, electric shock, or other hazards.
- Note to CATV system installer: the note reminds the CATV system installers that the cable earth should be connected to the earthing system of the building as close to the point of cable entry practical as possible.
- Wall mounting should follow the manufacturer instructions, and should use a mounting kit approved by the manufacturer

Safety Information
- The LED/LCD television should not be exposed to dripping or splashing and no objects filled with liquids, such as vases, shall be placed on the LED/LCD television.
- A warning that excessive sound pressure from earphone and headphones can cause hearing loss.
CAUTION: If the set is not going to be used for a long period, such as during a vacation, remove the plug from the wall outlet to economise power. (If the TV set is plugged in, a slight current still flows, even if the power button is in the OFF position).
Handling the LED/LCD screen
- Direct sunlight on the LED/LCD screen can cause damage to the screen. Take care when you are placing the television near a window.
- Do not push or scratch the LED/LCD screen. Do not place heavy objects on the LED/LCD screen. This may cause the screen to lose conformity or cause LED/LCD panel to malfunction.
- If the TV is used in a cold place, fuzzy image may appear on the screen. This is not a malfunction. The screen will be normal as its temperature rises to the normal operating level.
- If a still picture is displayed for a long period of time on the television screen, ghosting may occur for a while. The ghosting will eventually disappear.
- Displaying a static image for a long period of time on the television screen may cause burn in.
- If the LED/LCD panel becomes warm during operation, this is normal and not a malfunction.
Handling of broken glass and liquid crystal leakage
If the LED/LCD panel is damaged, crystalline liquid leakage may occur, or scattered broken glass may result. Do not touch broken glass or crystalline liquid (which is toxic) with bare hands that have cuts or skin irritation as poisoning may result. If any crystalline liquid gets into mouth or eyes, rinse thoroughly with clean water and consult your doctor.

Important Information
If a television is not positioned in a sufficiently stable location, it can be potentially hazardous due to falling. Many injuries, particularly to children, can be avoided by taking simple precautions such as:
• Using cabinets or stands recommended by the manufacturer of the television.
• Only using furniture that can safely support the television.
• Ensuring the television is not overhanging the edge of the supporting furniture.
- Not placing the television on tall furniture (for example, cupboards or bookcases) without anchoring both the furniture and the television to a suitable support.
- Not standing the televisions on cloth or other materials placed between the television and supporting furniture.
• Educating children about the dangers of climbing on furniture to reach the television or its controls.

Device Overview
text_image
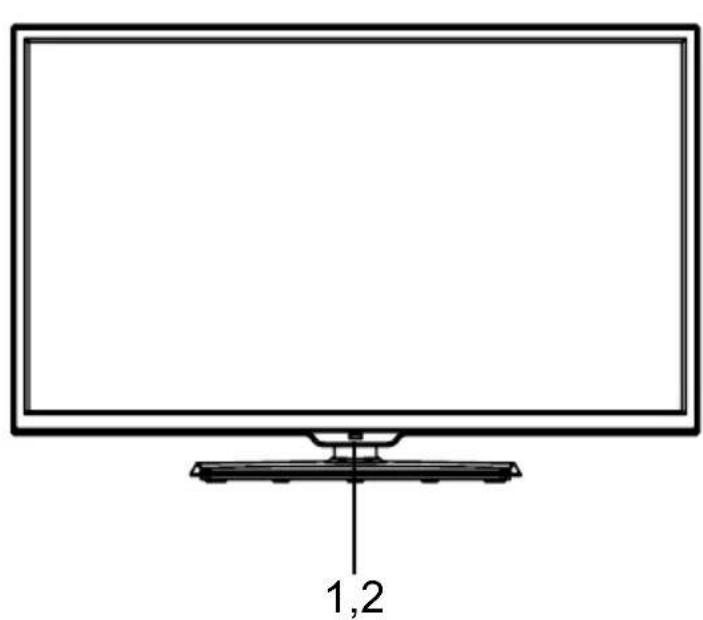
1,2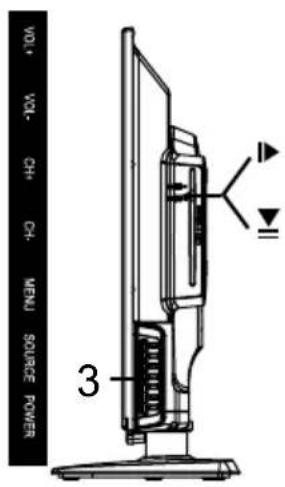
text_image
VOL VOL- CH- CH- MENU SOURCE POWER 3- Remote Sensor
Do not block this sensor or the remote control will not work.
- Standby Indicator
Indicates whether the unit is ON or in STANDBY (OFF) mode.
- The functions of the buttons are described as bellows:
POWER: Press to turn the unit on or off.
SOURCE: Press to select the input source of the TV.
MENU: Press to display the OSD menu, press again to exit the menu.
CH+/-: Press to scan through channels.
VOL+/-: Press to adjust the volume.
▶II: Play/Pause the disc playing.
▲: Eject the disc.

Device Overview
text_image
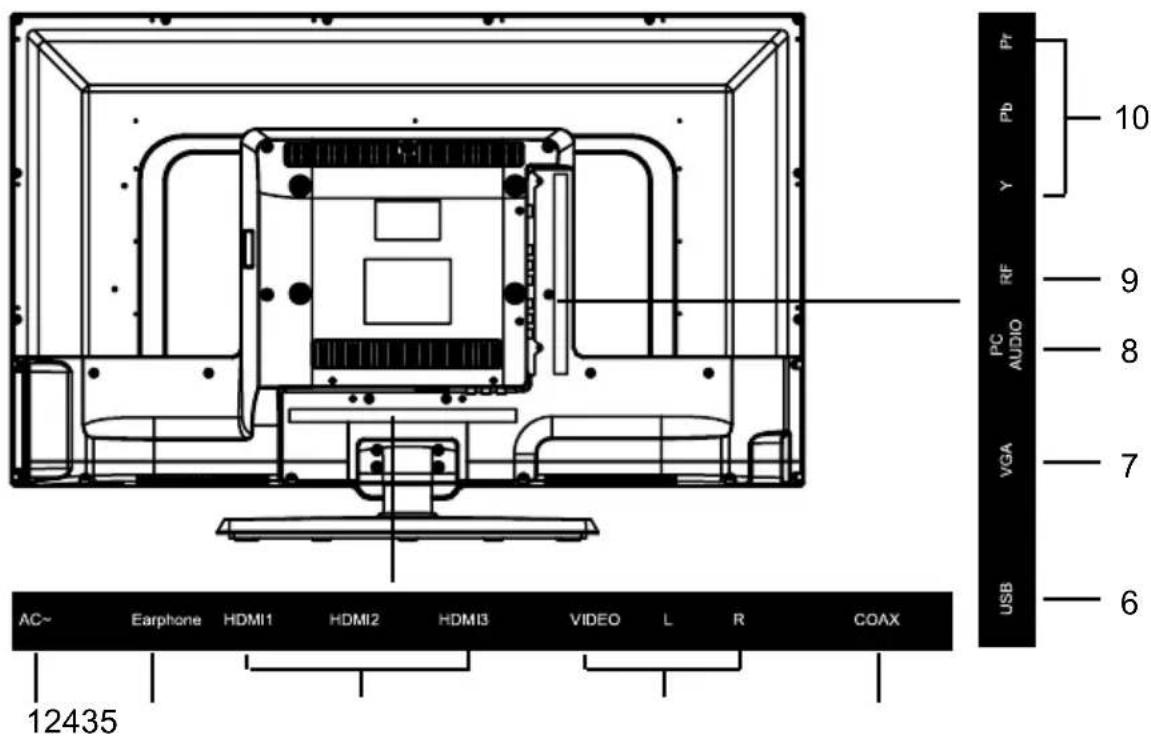
AC~ 12435 Earphone HDMI1 HDMI2 HDMI3 VIDEO L R COAX PC AUDIO VGA USB 10 9 8 7 6- Power Cord
- Headphone Jack
-
HDMI Input Jack
Connecting of HDMI signal -
AV (Video), R/L (Audio) Input Jack
Connecting for composite signal input in AV mode.
-
Coaxial Output Jack
-
USB
Connecting for USB device.
- VGA Input Jack
Connecting to the PC output jack a personal computer.
- PC Audio Input Jack
Connected to the audio output jack on a personal computer.
- Antenna Input Jack
Connecting to extern antenna to receive the TV.
- YPbPr Input Jack
Connecting for component signal input in YPbPr mode.

Desktop Mounting
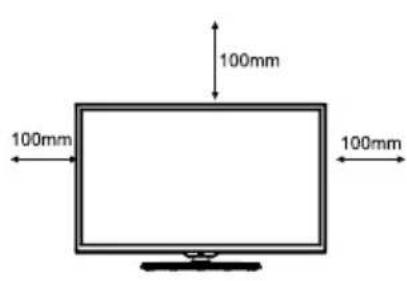
When mounting unit on a desktop or entertainment unit, first assemble the pedestal base as per the included instructions.
Ensure that there is ample clearance around the TV between walls and other objects to provide adequate ventilation and prevent overheating.
text_image
100mm 100mm 100mm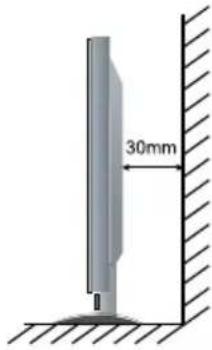
text_image
30mm
Wall Mounting
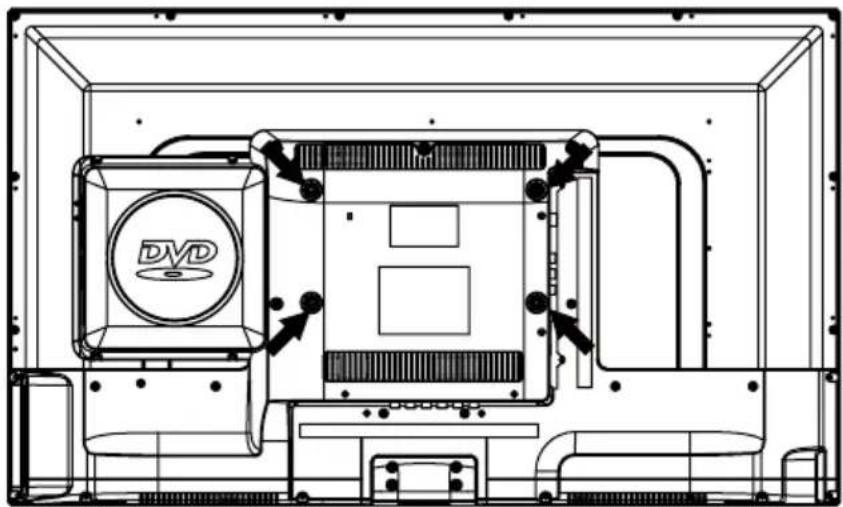
When wall mounting TV use only a wall bracket approved by the manufacturer. This device is compatible with standard 200mm x 100mm mounting bracket using the 4 points on the back of the unit as marked in the image below.
natural_image
Technical line drawing of a DVD drive assembly (no text or symbols)
Connecting an Antenna
flowchart
graph TD
    A["External Antenna"] --> B["Coaxial (Round) Antenna Cable"]
    C["Wall plate with antenna connector"] --> B
    D["RF IN"] --> E["ANT75Ω"]
    E --> F["Analog+Digital 75Ω"]
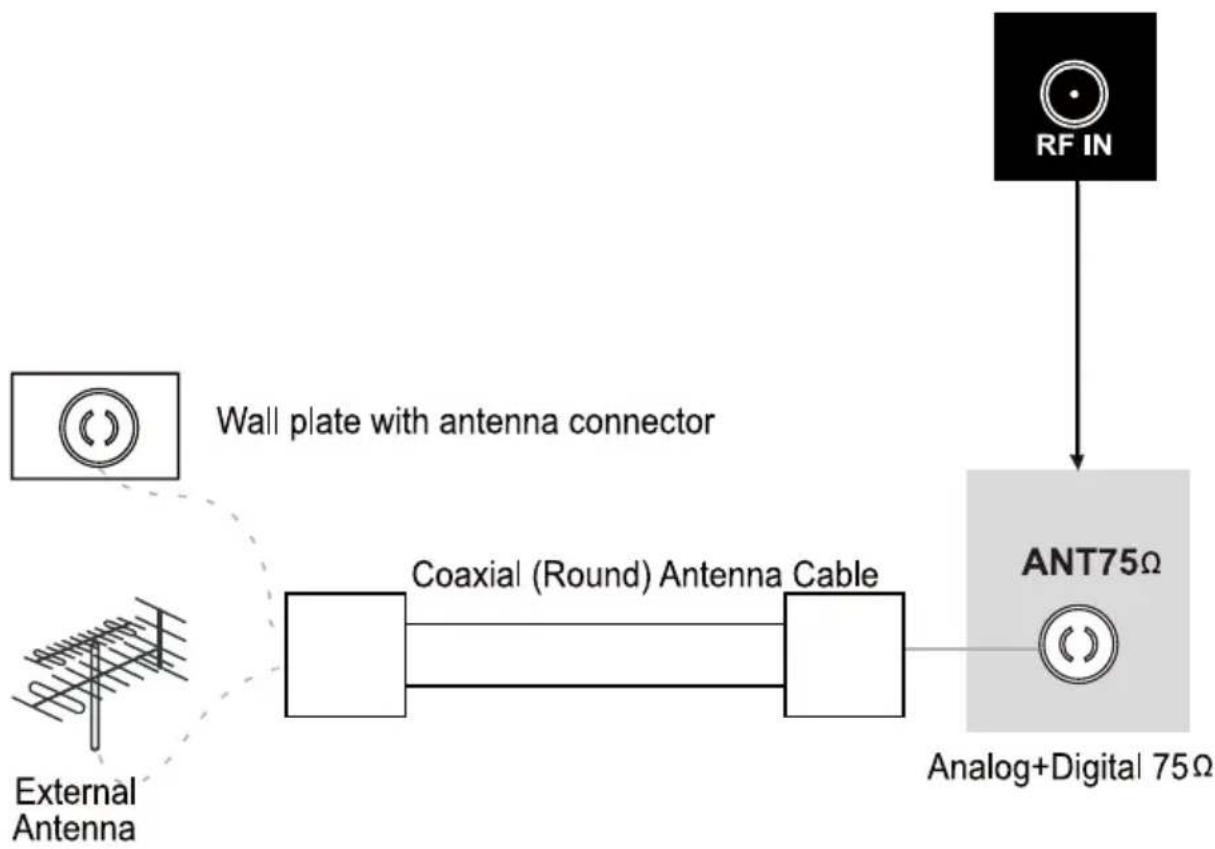
Press INPUT button on the remote control to display the input source menu, press ▲/▼ button to select ATV (Analog) or DTV (Digital) then press OK button to confirm.
NOTES: After installing your digital equipment and ascertained you cannot receive a picture, please check your cables and ensure they are in good condition and connected properly. If you still cannot receive a picture you should contact an experienced antenna installer to check whether digital signals are available in your location.
Digital services may not be available; however, the Government is working on a number of solutions to deliver digital television signals to all households in the country, by the time analog signals are switched off.

Remote control
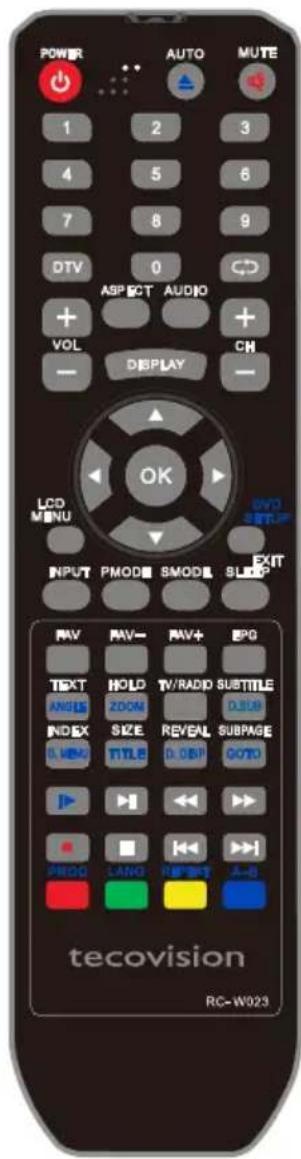
POWER
Turn on/off TV from standby.
▲ / AUTO
Eject the disc in DVD mode.
Auto adjust in PC mode.
0-9
Choose channel directly.
DTV
Switch to DTV source.
ASPECT
Change the picture size.
AUDIO
Change audio language in TV mode.
VOL+/-
Adjust volume.
DISPLAY
Show info bar.
LCD MENU
Open the TV OSD menu.
INPUT
Open the input source menu.
PMODE
Change the picture mode.
SMODE
Change the sound mode. mode.
SLEEP
Set sleep timer to turn off TV.
text_image
POWER AUTO MUTE 1 2 3 4 5 6 7 8 9 DTV 0 ASPECT AUDIO + VOL CH DISPLAY - LCD MENU DVD SETUP INPUT PMODE SMOOL EXIT SLEEP OK TEXT HOLD TV/RADIO SUBTITLE ANGIS ZOOM D308 INDEX SIZE REVEAL SUBPAGE O.WEN TITLE O.DSP GOTO PROG LANG RAPPT A-B TECOVISION RC-W023
Mute/Unmute the volume.

Recall previous channel in TV mode.
CH+/-
Adjust channel.

Navigation buttons/Confirm selection button.
DVD SETUP / EXIT
Open the DVD Setup menu. Exit from current menu.
FAV
Open the FAV channel list in TV mode.
FAV-/+
Select the channel in FAV channel list.
EPG
Open the electronic program guide.
ANGLE / TEXT
Switch angles in DVD mode.
Open the teletext in TV mode.
ZOOM / HOLD
Zoom function in DVD mode.
Hold function in teletext mode.

Remote control
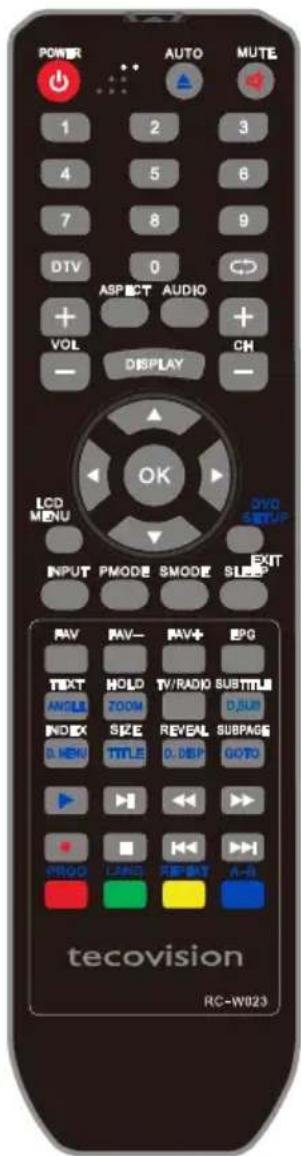
TV/RADIO
Switch the TV or RADIO mode.
D.SUB / SUBTITLE
Change subtitles in TV and DVD mode.
D.MENU / INDEX
Skip to Root menu in DVD mode.
Index function in teletext mode.
TITLE / SIZE
Skip to title in DVD mode. Size function in teletext mode.
D.DISP / REVEAL
Change language / audio tracks in DVD and TV modes.
Reveal function in teletext mode.
GOTO / SUBPAGE
Open goto function in DVD mode.
Subpage function in teletext mode.

Step playback mode in DVD and Media modes.

Play/Pause in DVD and media playback.

Fast reverse in playback.

Fast forward in playback.
text_image
POWER AUTO MUTE 1 2 3 4 5 6 7 8 9 DTV 0 ASPECT AUDIO + VOL CH DISPLAY - LCD MENU OK DVD SETUP INPUT PMODE SMODE EXIT SLEEP NAV NAV- NAV+ EPC TEXT HOLD TV/RADIO SUBTITLE ANGLE ZOOM D.SUB INDEX SIZE REVEAL SUBPAGE D MEN TITLE D.DSP GOTO PROD LANS REPAY A-B TECOVISION RC-W023
Start recording to PVR in DTV mode.

Stop in playback modes.

Previous file in media playback.

Next file in media playback.
PROG / RED
Open the program playback function in DVD mode.
Red button function in on screen menus.
LANG / GREEN
Change the language or audio track in DVD mode.
Green button function in on screen menus.
REPEAT / YELLOW
Repeat function in DVD and Media modes.
Yellow button function in on screen menus.
A-B / BLUE
A to B repeat function in DVD mode.
Blue button function in on screen menus.

First Installation
If this is the first time you are turning on the TV and there are no programs in the TV memory, the "Auto Installation" menu will appear on the screen.
These are 5 setups as follow:
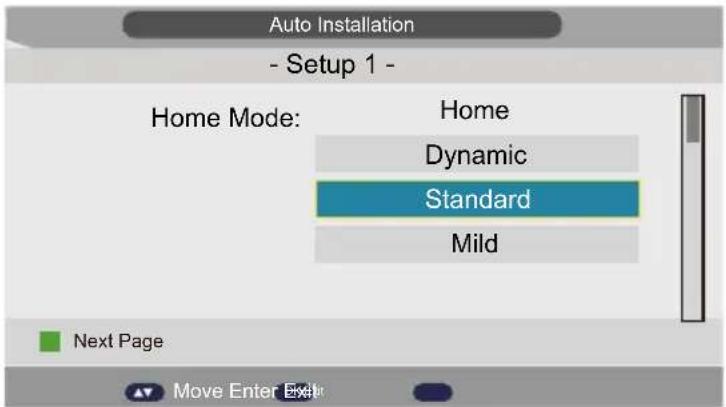
Setup 1
Press ▼/▲ button to select initial brightness setting.
Press OK button or GREEN button to enter Setup 2 menu.
Press EXIT button to exit Auto Installation menu.
text_image
Auto Installation - Setup 1 - Home Mode: Home Dynamic Standard Mild Next Page Move Enter ExitSetup 2
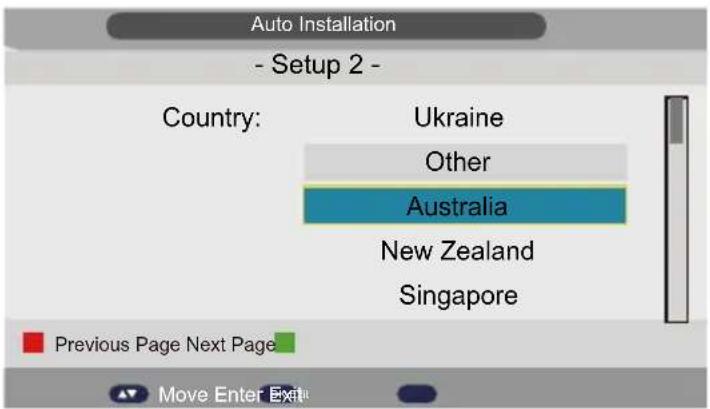
Pres ▼/▲ button to select country.
Press RED button to return to previous menu.
Press OK button or GREEN button to enter Setup 3 menu.
Press EXIT button to exit Auto Installation menu.
text_image
Auto Installation - Setup 2 - Country: Ukraine Other Australia New Zealand Singapore Previous Page Next Page Move Enter ExitSetup 3
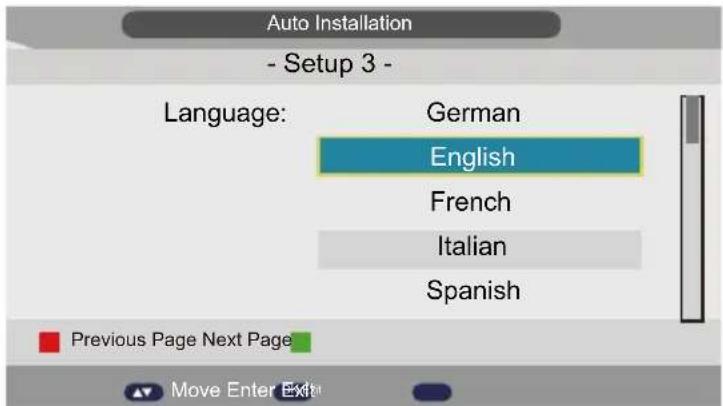
Press ▼/▲ button to select Language.
Press RED button to return to previous menu.
Press OK button or GREEN button to enter Setup 4 menu.
Press EXIT button to exit Auto Installation menu.

First Installation
text_image
Auto Installation - Setup 3 - Language: German English French Italian Spanish Previous Page Next Page Move Enter ExitSetup 4
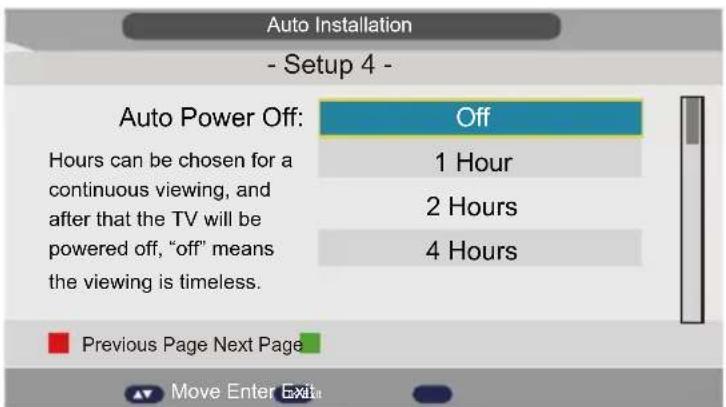
Press ▼/▲ button to select preferred Auto Power Off time.
Press RED button to return to previous menu.
Press OK button or GREEN button to enter Setup 5 menu.
Press EXIT button to exit Auto Installation menu.
text_image
Auto Installation - Setup 4 - Auto Power Off: Off Hours can be chosen for a continuous viewing, and after that the TV will be powered off, "off" means the viewing is timeless. 1 Hour 2 Hours 4 Hours Previous Page Next Page Move Enter ExitSetup 5
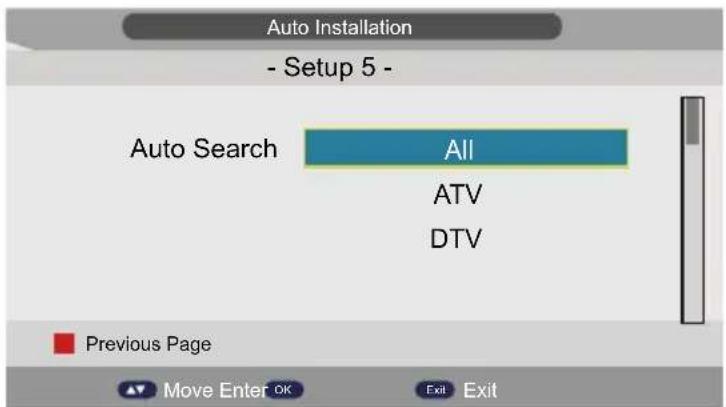
Press ▼/▲ button to select Auto Search type.
Press RED button to return to previous menu.
Press OK button to Start Search.
Press EXIT button to exit Auto Installation menu.
text_image
Auto Installation - Setup 5 - Auto Search All ATV DTV Previous Page Move Enter OK Exit Exit
Picture Menu
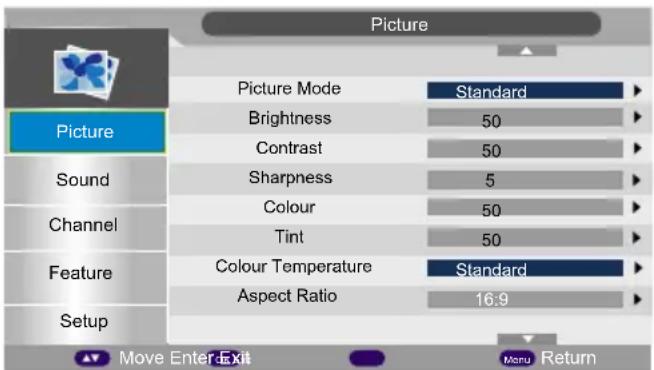
Press MENU button on the TV or on the remote control to display the main menu.
- Press ▲/▼ button to select PICTURE in the main menu.
- Press ▶ or OK button and then press ▲/▼ button to select the option that you want to adjust in the PICTURE menu.
- Press ▶ or OK button to enter sub-menu and then press ▲/▼ or ◀/▶ button to adjust.
- After finishing your adjustment, press the MENU button to return to the previous menu or press the EXIT button to exit the main menu.
text_image
Picture Picture Mode Standard Brightness 50 Contrast 50 Sharpness 5 Colour 50 Tint 50 Colour Temperature Standard Aspect Ratio 16:9 Sound Channel Feature Setup Move Enter Exit Menu ReturnPicture Mode
Press ▲/▼ button to select (Dynamic, Standard, Mild, User).
You can adjust the value of Brightness, Contrast, Colour when the Picture Mode is User.
Tips: You can press PMODE button on the remote control to change the Picture Mode directly.
Brightness
Press ◀/▶ to adjust the brightness of the picture.
Contrast
Press ◀/▶ button to adjust the contrast of the picture.

text_image
Contrast + 50
Picture Menu
Sharpness
Press ◀/▶ button to adjust the sharpness of your TV.
The suitable sharpness can make the picture look more clearer.
Colour
Press ◀/▶ button to adjust the colour saturation.
NOTE: This option is invalid in PC mode, and it will be shown in gray.
Tint
Press ◀/▶ button to adjust the tone of colour when system is in NTSC.
Colour temperature
Press ▼/▲ button to adjust the optimum colour temperature mode, according to your preference (Standard, Cool, Warm).
Aspect Ratio
Press ▼/▲ button to select Aspect Ratio (4:3, 16:9, Full, Zoom1, Zoom2, Cinema, Just Scan).
Noise Reduction
Press ▼/▲button to select Noise Reduction (Off, Low, Middle, High).
Operation

Sound Menu
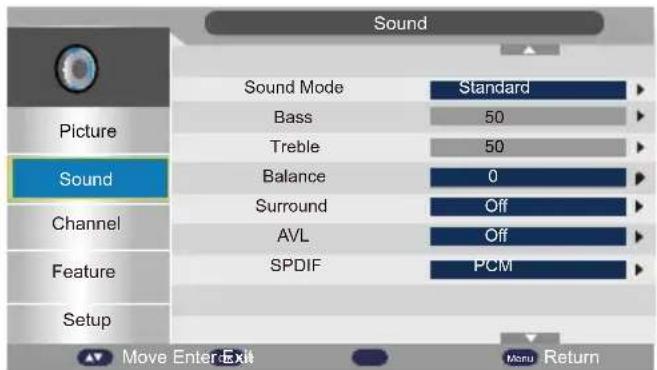
Press MENU button on the TV or on the remote control to display the main menu.
- Press ▲/▼ button to select SOUND in the main menu.
- Press ▶ or OK button and then press ▲/▼ button to select the option that you want to adjust in the SOUND menu.
- Press ▶ or OK button to enter sub-menu and then press ▲/▼ or ◀/▶ button to adjust.
- After finishing your adjustment, press the MENU button to return to the previous menu or press the EXIT button to exit the main menu.
text_image
Sound Sound Mode Standard Bass 50 Treble 50 Balance 0 Surround Off AVL Off SPDIF PCM Move Enter Exit Menu Return Picture Sound Channel Feature SetupSound mode
Press ▲/▼ button to select Sound Mode (Available sound mode: Standard, Movie, Music, Speech, User).
You can adjust the value of Bass and Treble when the Sound Mode is User.
TIPS: You can press SMODE button on the remote control to change the Sound Mode directly.
Bass
Press ◀/▶ button to increase or decrease the level of the lower-pitched sounds.
Treble
Press ◀/▶ button to increase or decrease the level of the higher-pitched sounds.
Balance
Press ◀/▶ button to adjust the audio output between left and right speakers.

Sound Menu
Surround
Press ▲/▼ button to turn On or Off the surround.
AVL
Press ▲/▼ button to turn On or Off the AVL (Audio Volume Leveler).
SPDIF
Press ▲/▼ button to select (Off, PCM, Auto).
Operation

Channel Menu
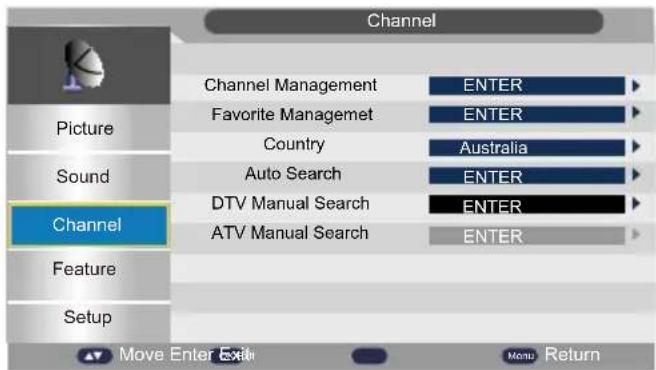
Press MENU button on the TV or on the remote control to display the main menu.
- Press ▲/▼ button to select CHANNEL in the main menu.
- Press ▶ or OK button and then press ▲/▼ button to select the option that you want to adjust in the CHANNEL menu.
- Press ▶ or OK button to enter sub-menu.
- After finishing your adjustment, press the MENU button to return to the previous menu or press the EXIT button to exit the main menu.
text_image
Channel Picture Sound Channel Feature Setup Channel Management Favorite Managemet Country Auto Search DTV Manual Search ATV Manual Search ENTER ENTER Australia ENTER ENTER ENTER ENTER Move Enter Exit Menu ReturnChannel Management
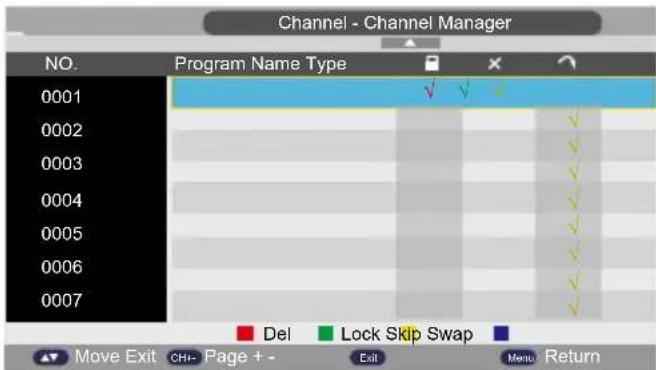
Press ▲/▼/◄/► button to select Program.
text_image
Channel - Channel Manager NO. Program Name Type 0001 0002 0003 0004 0005 0006 0007 Del Lock Skip Swap Move Exit CHi- Page + - Exit Menu ReturnPress RED button to Delete the channel. Press RED button again will cancel delete.
Press GREEN button to lock the channel. Press GREEN button again to unlock.
Press YELLOW button to skip the channel. Press YELLOW button again wil cancel skip.
Press BLUE button to swap the channel position.
Following message will appear before exit Channel Manager menu when there is channel selected for deletion.

Channel Menu
Message
Do you want to delete the selected items?

Cancel
Press ◀/▶ button to choose OK or Cancel. Press OK button to confirm.
TV
Successfully updated...
Favorite Manager
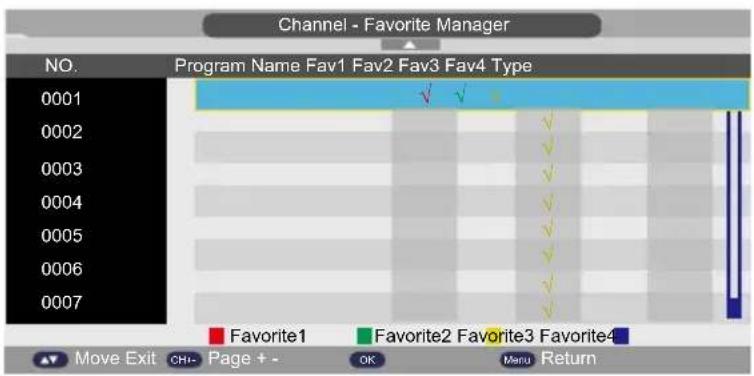
Press ▲/▼/◄/► button to select Program.
text_image
Channel - Favorite Manager NO. Program Name Fav1 Fav2 Fav3 Fav4 Type 0001 0002 0003 0004 0005 0006 0007 Favorite1 Favorite2 Favorite3 Favorite4 Move Exit CH+ Page + - OK Manu ReturnPress RED button to set to Fav1 list.
Press GREEN button to set to Fav2 list.
Press YELLOW button to set to Fav3 list.
Press BLUE button to set Fav4 list.
Press the RED / GREEN / YELLOW / BLUE button again unselect the program.
Press MENU or EXIT button, the successfully updated message will appear.
Operation

Channel Menu
Country
Press ▲/▼ button to select appropriate country, and press OK or ◀/▶ button to confirm.
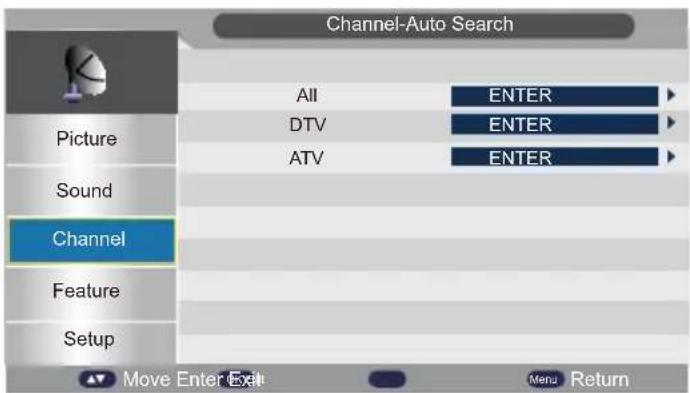
Auto Search
text_image
Channel-Auto Search All ENTER DTV ENTER ATV ENTER Picture Sound Channel Feature Setup Move Enter Exit Menu ReturnPress ▲/▼ button to select Search All, DTV, ATV, then press OK button or ▶ button to enter.
text_image
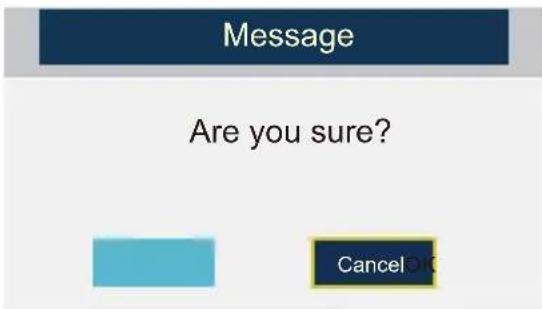
Message Are you sure? Cancel OKMessage will appear for confirmation. Press ◀/▶ button to choose OK or Cancel. Press OK button to Confirm. Channel Tuning menu will appear as follow:
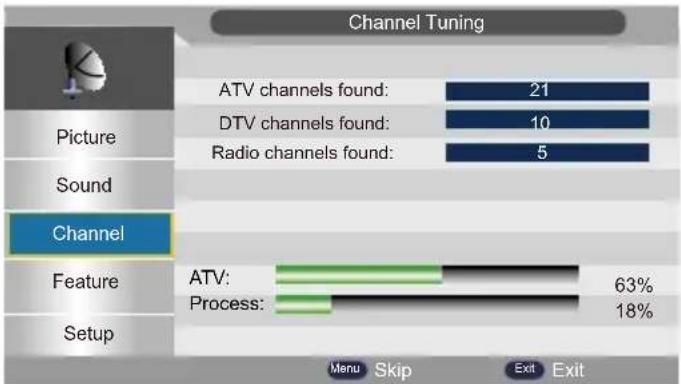
bar
Channel Tuning | Category | Value | |---|---| | TV channels found: | 21 | | DTV channels found: | 10 | | Radio channels found: | 5 | | Feature | Value (%) | | :--- | :--- | | ATV: | 63 | | Process: | 18 | Menu Skip Exit Exit
Channel Menu
When auto search finish, the save successful menu will appear for few seconds.
DTV Manual Search
Press OK button or ▶ button to enter.
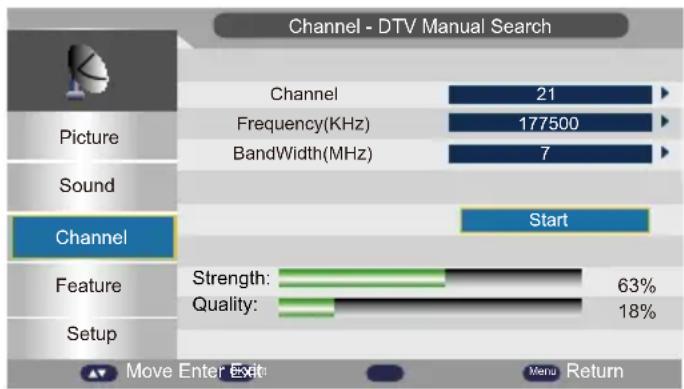
Channel
Press ▲/▼ button to select Channel, then press OK button or ▶ button to enter and press ▲/▼ button to select channel, then press OK button or ◀/▶ button to confirm.
Start
Press ▲/▼ button to select Start, then press OK button or ▶ button to start scan, the channel tuning menu will appear for few seconds.
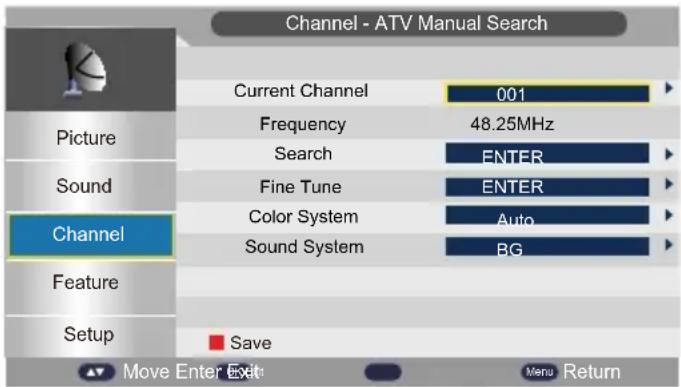
ATV Manual Search
Press OK button or ▶ button to enter.
text_image
Channel - ATV Manual Search Current Channel 001 Frequency 48.25MHz Search ENTER Fine Tune ENTER Color System Auto Sound System BG Save Move Enter Exit Menu Return Picture Sound Channel Feature SetupCurrent Channel
Press OK button or ▶ button to enter.
Press ▲/▼ button to select Current Channel, then press OK button or ▶ button to enter. Press ▲/▼ button to select channel, then press OK button or ◀/▶ button to select.

Channel Menu
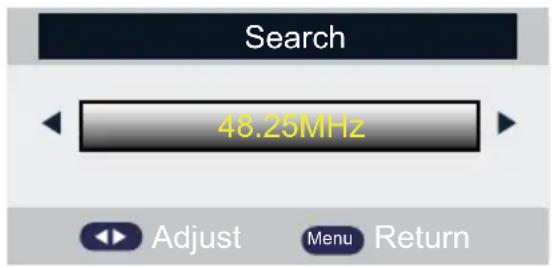
Search
Press ▲/▼ button to select Search, then press OK button or ▶ button to enter, and then press ◀/▶ to scan the channel.
text_image
Search 48.25MHz Adjust Menu ReturnFine Tune
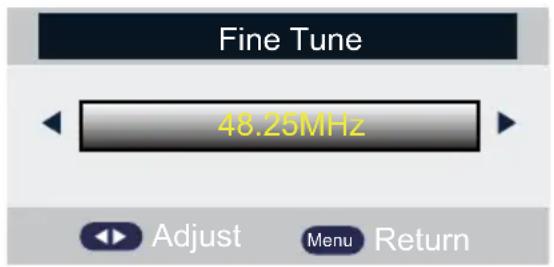
Press ▲/▼ button to select Fine Tune, then press OK button or ▶ button to enter.
text_image
Fine Tune 48.25MHz Adjust Menu ReturnPress ◀/▶ button to adjust programe frequency, press MENU button to return to the previous menu.
Color System
Press ▲/▼ button to select Auto / PAL / SECAM, then press OK button or ◀/▶ button to confirm.
Sound System
Press ▲/▼ button to select BG, DK, I, L, L'. then press OK or ◀/▶ button to confirm.
Note: Press RED button to save the result of the adjustment.
Operation

Feature Menu
Press MENU button on the TV or on the remote control to display the main menu.
- Press ▲/▼ button to select FEATURE in the main menu.
- Press ▶ or OK button and then press ▲/▼ button to select the option that you want to adjust in the FEATURE menu.
- Press ▶ or OK button to enter sub-menu.
- After finishing your adjustment, press the MENU button to return to the previous menu or press the EXIT button to exit the main menu.
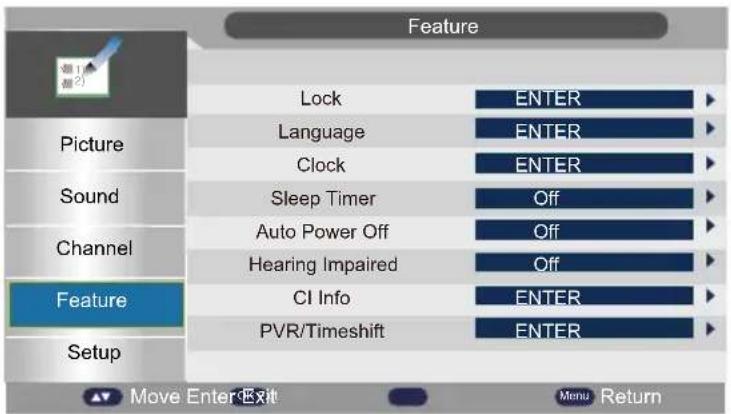
text_image
Feature Lock ENTER Language ENTER Clock ENTER Sleep Timer Off Auto Power Off Off Hearing Impaired Off CI Info ENTER PVR/Timeshift ENTER Picture Sound Channel Feature Setup Move Enter Exit Menu ReturnLock
Press OK button or ▶ button to enter the sub menu (the default password is 0000).
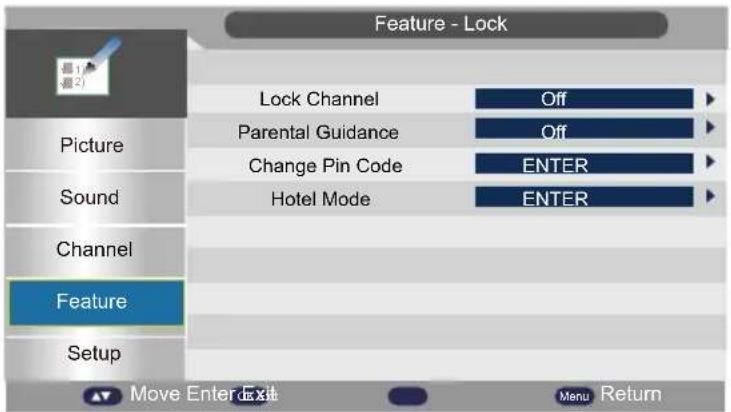
Lock Channel
Press OK button or ▶ button to enter.
Press ▲/▼ button to select Off or On, then press OK or ▶ button to confirm.
text_image
Feature - Lock Lock Channel Off Parental Guidance Off Change Pin Code ENTER Hotel Mode ENTER Picture Sound Channel Feature Setup Move Enter Exit Menu ReturnParental Guidance and Change Pin Code will be available once Lock Channel is On.

Feature Menu
Parental Guidance
Press OK or ▶ button to enter the sub menu.
Then press ▲/▼ button to select Rate (No Block, Block R and above, Block AV and above, Block MA and above, Block M and above, Block PG and above, Block G and above, Block All).
Then press OK or ▶ button to confirm.
Change Pin Code
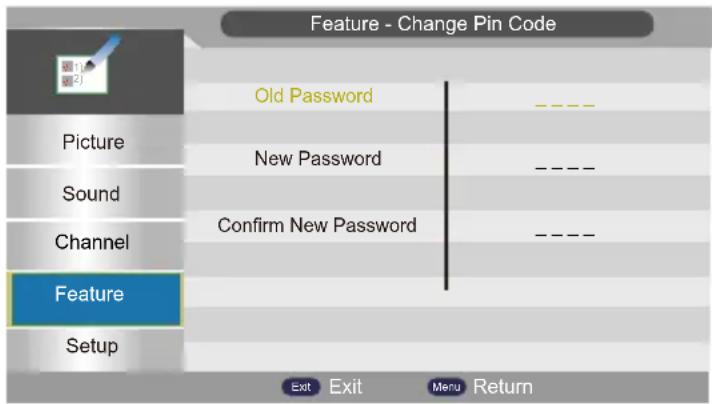
Press OK button or ▶ button to enter, and Change Pin Code menu will appear.
text_image
Feature - Change Pin Code Old Password Picture New Password Sound Confirm New Password Channel Feature Setup Exit Exit Menu ReturnInput old password at "Old Password", (if the old password is incorrect, the password will not be allowed to modify).
Input new password at "New Password".
Input new password again at "Confirm New Password", if new password and confirm new password consistent.
The successfully updated message will appear for few seconds, otherwise, the password mismatch message will appear.
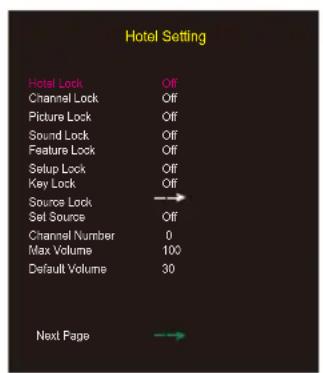
Hotel Mode
Press OK or ▶ button to enter.
text_image
Hotel Setting Hotel Lock Off Channel Lock Off Picture Lock Off Sound Lock Off Feature Lock Off Setup Lock Off Key Lock Off Source Lock →→ Set Source Off Channel Number 0 Max Volume 100 Default Volume 30 Next Page →→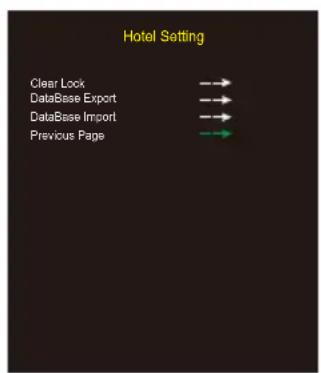
text_image
Hotel Setting Clear Lock → DataBase Export → DataBase Import → Previous Page →
Feature Menu
Hotel Lock
Press ▲/▼ button to select Hotel Lock, then press ◀/▶ button to select On or Off.
Channel Lock
Press ▲/▼ button to select Channel Lock, then press ◀/▶ button to select On or Off.
Picture Lock
Press ▲/▼ button to select Picture Lock, then press ◀/▶ button to select On or Off.
Sound Lock
Press ▲/▼ button to select Sound Lock, then press ◀/▶ button to select On or Off.
Feature Lock
Press ▲/▼ button to select Feature Lock, then press ◀/▶ button to select On or Off.
Setup Lock
Press ▲/▼ button to select Setup Lock, then press ◀/▶ button to select On or Off.
Key Lock
Press ▲/▼ button to select Key Lock, then press ◀/▶ button to select On or Off. When key lock option is on, you can't use the key panel button.
Source Lock
Press ▲/▼ button to select Source Lock, then press OK button to enter sub-menu. ON is locked, Off is unlocked.
Set Source
Press ▲/▼ button to select Set Source, then press ◀/▶ button to select On or Off.
Channel Number
Press ▲/▼ button to select Channel number, then press ◀/▶ button to select.

Feature Menu
Max Volume
Press ▲/▼ button to select Max Volume, then press ◀/▶ button to adjust the value. After set the Max Volume, the volume can't be adjusted above the max volume.
Default Volume
Press ▲/▼ button to select Default Volume, then press ◀/▶ button to adjust the value.
Clear Lock
Press ▲/▼ button to select Clear Lock, then press OK button to reset all settings of hotel menu to default settings.
DataBase Export
Press ▲/▼ button to select DateBase Export, then press OK button to export hotel settings of this TV to USB disk.
DataBase Import
Press ▲/▼ button to select DateBase Import, then press OK button to import hotel settings from USB disk.
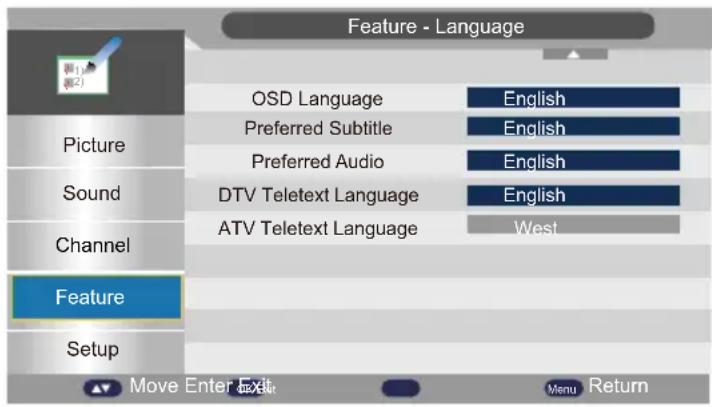
Language
Press OK button or ▶ button to enter the sub menu.
text_image
Feature - Language OSD Language English Preferred Subtitle English Preferred Audio English DTV Teletext Language English ATV Teletext Language West Picture Sound Channel Feature Setup Move Enter Exit Menu ReturnOSD Language
Press ▲/▼ button to select OSD Language, press OK button or ▶ button to enter the sub-menu.
then press ▲/▼ button to select, then press OK button or ▶ button to confirm.

Feature Menu
Preferred Subtitle
Press ▲/▼ button to select Preferred Subtitle, press OK button or ▶ button to enter the sub-menu.
Then press ▲/▼ button to select, then press OK button or ▶ button to confirm.
Preferred Audio
Press ▲/▼ button to select Preferred Audio, press OK button or ▶ button to enter the sub-menu.
then press ▲/▼ button to select, then press OK button or ▶ button to confirm.
DTV Teletext Language
Press ▲/▼ button to select DTV Teletext language, press OK button or ▶ button to enter the sub-menu.
Then press ▲/▼ button to select, then press OK button or ▶ button to confirm.
ATV Teletext Language
Press ▲/▼ button to select ATV Teletext language, press OK button or ▶ button to enter the sub-menu.
Then press ▲/▼ button to select, then press OK button or ▶ button to confirm.
Clock
Press OK button or ▶ button to enter the sub-menu.
Press ▲/▼/◄/► button to select.
Sleep Timer
Press OK button or ▶ button to enter the sub menu.
Press ▲/▼ button to select (Available options are: Off, 10 mins, 20 mins, 30 mins, 60 mins, 90 mins, 120 mins, 180 mins, 240 mins).
Auto Power Off
Press OK button or ▶ button to enter the sub menu.
Press ▲/▼ button to select (Available options are: 1 Hour, 2 Hours, 4 Hours).
Hearing Impaired
Press OK button or ▶ button to enter the sub menu.
Press ▲/▼ button to select On or Off, then press OK button or ◀/▶ button to confirm.

Feature Menu
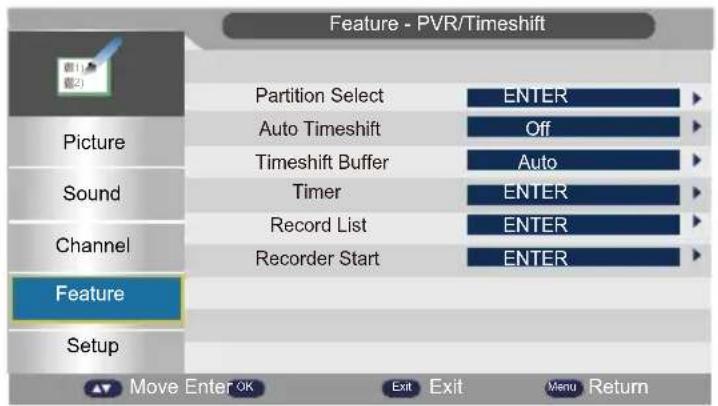
PVR/Timeshift
Press OK button or ▶ button to enter.
text_image
Feature - PVR/Timeshift Picture Sound Channel Feature Setup Partition Select Auto Timeshift Timeshift Buffer Timer Record List Recorder Start ENTER Off Auto ENTER ENTER ENTER ENTER ENTER Move Enter OK Exit Exit Menu ReturnPartition Select
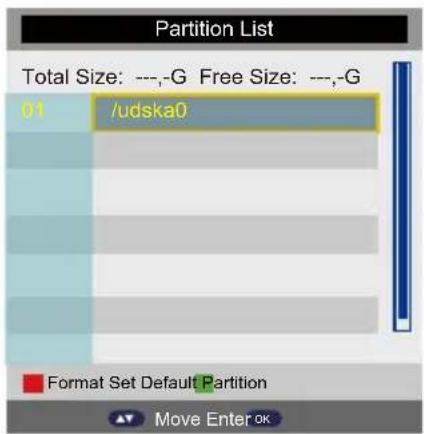
Press ▲/▼ button to select Partition Select, then press OK button or ▶ button to enter.
Press RED button to Format Partition.
Press GREEN button to Set Default Partition.
text_image
Partition List Total Size: ---,-G Free Size: ---,-G 01 /udska0 Format Set Default Partition Move Enter OKAuto Timeshift
Press ▲/▼ button to select Auto Timeshift, press OK button or ▶ button to enter the sub menu.
then press ▲/▼ button to select the 'Off' or 'Auto', then press OK button or ▶ button to confirm.
Timeshift Buffer
Press ▲/▼ button to select Timeshift Buffer, press OK button or ▶ button to enter the sub menu.
then press ▲/▼ button to select (Auto, 30 Mins, lhr, or 2hr), then press OK button or ▶ button to confirm.

Feature Menu
Timer
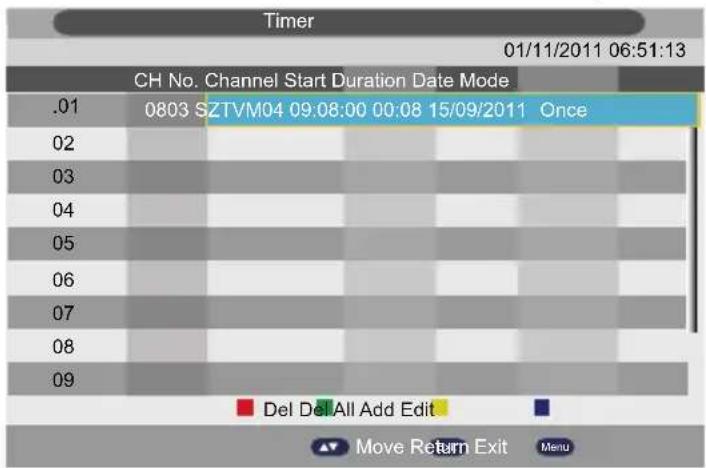
Press ▲/▼ button to select Timer, then press OK button or ▶ button to enter.
text_image
Timer 01/11/2011 06:51:13 CH No. Channel Start Duration Date Mode .01 0803 SZTVM04 09:08:00 00:08 15/09/2011 Once 02 03 04 05 06 07 08 09 Del Del All Add Edit Move Return Exit MenuPress ▲/▼ button to select channel.
Press RED button to delete selected channel. Message will appear for confirmation.
Press ◀/▶ button to select OK or Cancel. Press OK button to confirm.
Press GREEN button to delete all timers. Message will appear for confirmation.
Press ◀/▶ button to select OK or Cancel. Press OK button to confirm.

text_image
Message Delete all timers? Cancel OKPress YELLOW button to add channel to the timer list, the sub-menu (Timer Edit) will appear as show below.
Press ▲/▼ button to select channel that you want to edit.

text_image
Timer Edit 13/01/2008 18:02:25 Recorder Off Type DTV Channel 0001 YLETV1 Start Time 09:36 Duration 10:15 Date 13/01/2008 Mode Once
Feature Menu
Recorder (When the PVR format support)
Press OK button or ▶ button to enter and press ▲/▼ button to select On or Off.
Press MENU button to save the settings, press EXIT button to exit.
Type
Press ▲/▼ button to select Type, then press OK button or ▶ button to enter and press ▲/▼ button to select DTV or Radio.
Channel
Press ▲/▼ button to select Channel, then press OK button or ▶ button to enter and press ▲/▼ button to select channel which you want to add to the timer list.
Start Time
Press ▲/▼ button to select Start Time, then press OK button or ▶ button to enter and press 0-9 button to input time.
Duration
Press ▲/▼ button to select Duration then press OK button or ▶ button to enter and press 0-9 button to input duration.
Date
Press ▲/▼ button to select Date, then press OK button or ▶ button to enter and press 0-9 button to input date.
Mode
Press ▲/▼ button to select Mode, then press OK button or ▶ button to enter and press ▲/▼ to select Once, Daily, Weekly, Monthly.
Press BLUE button to edit selected channel sub-menu (Timer Edit) will appear as show above.
Record List
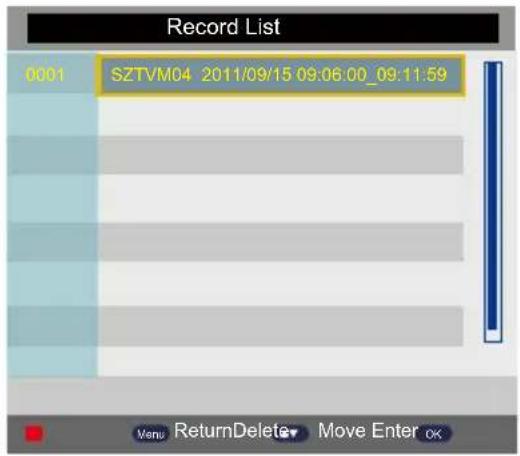
Press ▲/▼ button to select Record List, then press OK button or ▶ button to enter. Then sub-menu will appear as follow:

Feature Menu
text_image
Record List 0001 SZTVM04 2011/09/15 09:06:00_09:11:59 Menu ReturnDelete Move Enter OKPress ▲/▼ button to select recorded program from the list.
Press RED button to Delete selected program. Message will appear for confirmation.
Press ◀/▶ button to select OK or Cancel. Press OK button to confirm.
Press OK button to playback selected program.
Record Start
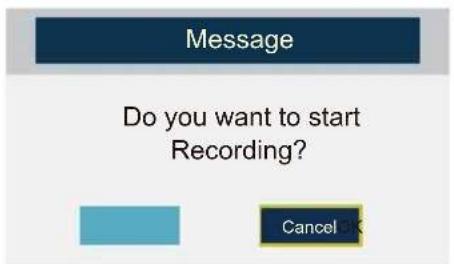
Press ▲/▼ button to select Record Start, press OK button or ▶ button to enter. Message will appear for confirmation.
text_image
Message Do you want to start Recording? Cancel OKPress ◀/▶ button to select OK or Cancel. Press OK button to confirm.

Setup Menu
Press MENU button on the TV or on the remote control to display the main menu.
- Press ▲/▼ button to select SETUP in the main menu.
- Press ▶ or OK button and then press ▲/▼ button to select the option that you want to adjust in the SETUP menu.
- Press ▶ or OK button to enter sub-menu.
- After finishing your adjustment, press the MENU button to return to the previous menu or press the EXIT button to exit the main menu.
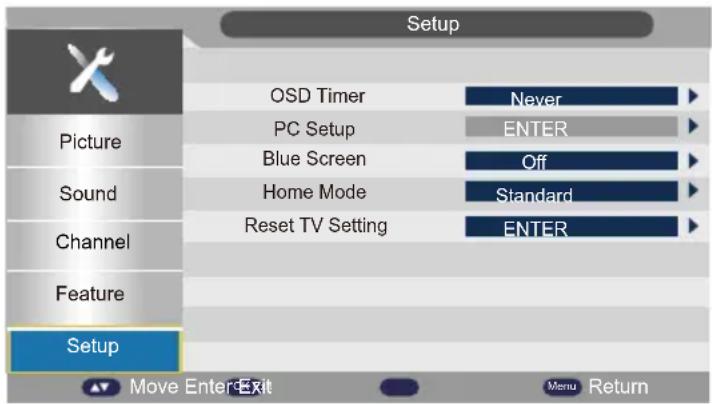
text_image
Setup OSD Timer Never PC Setup ENTER Blue Screen Off Home Mode Standard Reset TV Setting ENTER Picture Sound Channel Feature Setup Move Enter Exit Menu ReturnOSD Timer
Press OK button or ▶ button to enter the sub-menu.
Then press ▲/▼ button to select, then press OK button or ◀/▶ button to confirm.
PC Setup
Press OK button or ▶ button to enter the sub-menu.
Then press ▶ button to enter, then press OK button or ◀/▶ button to confirm (when the PC Signal is connected).
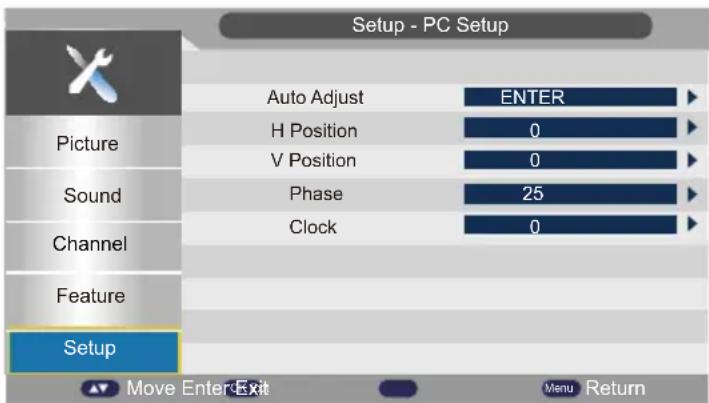
text_image
Setup - PC Setup Auto Adjust ENTER H Position 0 V Position 0 Sound Phase 25 Clock 0 Channel Feature Setup Move Enter Exit Menu Return
Setup Menu
AUTO Adjust
Press ▲/▼ button to select the AUTO Adjust, press OK button to Auto Adjust. This option can set the above setting well automatically.
H Position
Press ▲/▼ button to select the H Position, you can adjust the horizon position of the picture by pressing ◀/▶ button.
V Position
Press ▲/▼ button to select the V Position, you can adjust the vertical position of the picture by pressing ◀/▶ button.
PHASE
Press ▲/▼ button to select the PHASE, press ◀/▶ button to adjust the picture. (The picture will shake if the PHASE sets unsuitable).
CLOCK
Press ▲/▼ button to select the CLOCK, press ◀/▶ button to adjust the signal's transfer speed to make the picture looks well.
Blue Screen
Press OK button or ▶ button to enter the sub-menu.
Then press ▲/▼ button to select On or Off, then press OK button or ◀/▶ button to confirm.
Home Mode
Press ▶ button to select Home Mode (Home, Dynamic, Standard, Mild).
Reset TV Setting
Press OK button or ▶ button to enter.
The password menu will appear (when the Lock is on).
Operation

Setup Menu
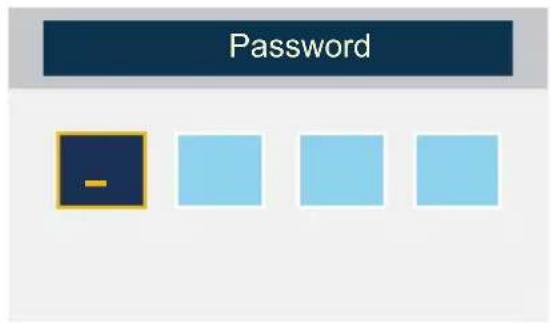
text_image
Password -Else confirmation message will appear:
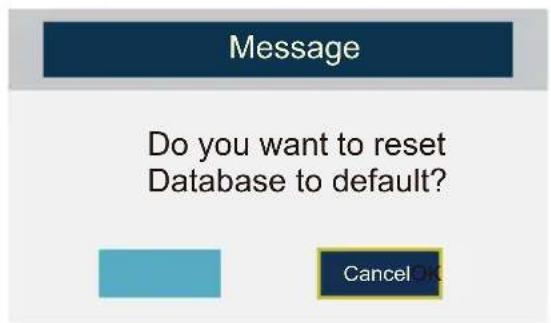
text_image
Message Do you want to reset Database to default? Cancel OKPress ◀/▶ button to choose OK or Cancel. Press OK button to confirm. Resetting message and OK message will appear once reset.

Personal Video Recorder Mode (PVR)
Note: You should insert the portable hard drive or USB before you start to record.
Recorder
When watching DTV programme, you can press ● button on the remote control to record the current program.
An confirmation menu will appear for your confirmation.
Press ◀/▶ button to select Yes or No. Press OK button to confirm.

RECORNDING
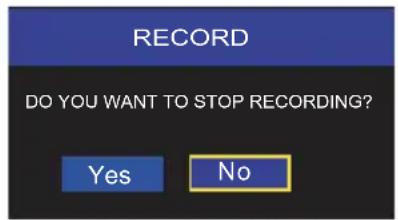
If you want to stop RECORDING, press ■ button on you remote control.
Then an confirmation menu will appear for your confirmation.
Press ◀/▶ button to select Yes or No. Press OK button to confirm.
text_image
RECORD DO YOU WANT TO STOP RECORDING? Yes No
Media Player Mode
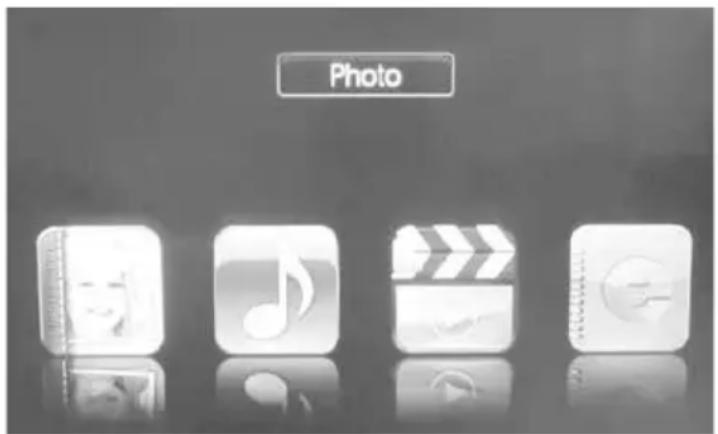
Press INPUT button and ▲/▼/OK button to select the MEDIA in the Source menu.
text_image
PhotoPress ◀/▶ buttons to select media type you want to play, then press OK to confirm your selected.
Media types: Photo, Music, Movie, e-Book.
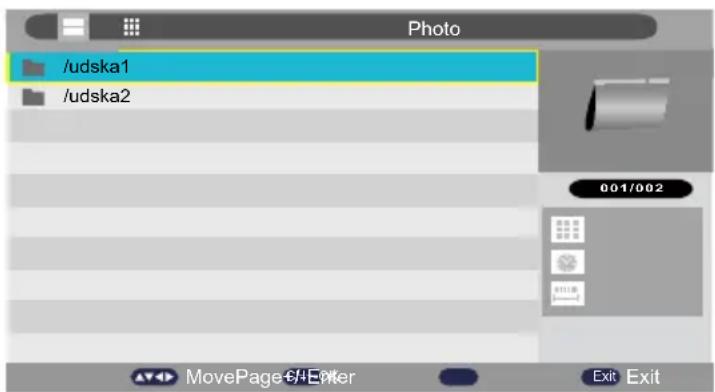
Press ▲/▼ button to select device. Then press OK button or ▶ button to enter.
Photo player
text_image
/udska1 /udska2 001/002 MovePage-6/Enter Exit ExitThe user can play Photo files via the Photo Player. In left interface you can press ▲/▼ and OK button to select your desired photo. Press ▶ II button to play selected photo(s) or press GREEN button to select all photos. Press again to unselect.
While the Photos is displaying, you can press OK button to bring up the on screen control menu. Press ◀/▶ button to select function, then press OK button to excute.
Tips: You can also use the ▶/◀/▶/■ button on the remote control.

Media Player Mode
Music player
text_image
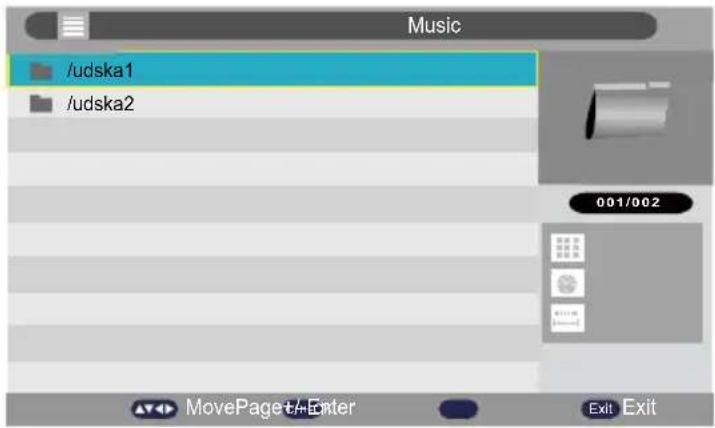
Music /udska1 /udska2 001/002 MovePage t-Enter Exit ExitThe user can play MUSIC files via the Music player In left interface you can press ▲/▼ and OK button to select your desired music file or press GREEN button to select all music files and press ▶II to play.
While the Music is displaying, you can press ◀/▶ button to select function icon in control menu on the screen, then press OK button to excute.
Press EXIT button to return to previous menu.
Tips: You can also use the ▶II / ◀◀ / ▶◀/ ▶/ ■ button on the remote control.
Movie player
text_image
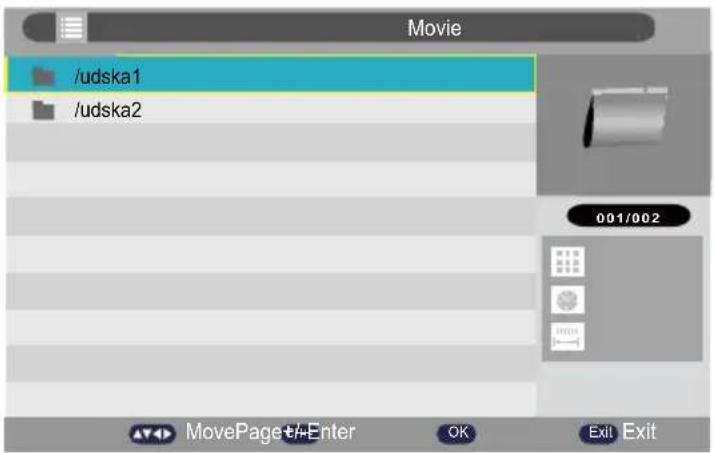
/udska1 /udska2 Movie 001/002 MovePage4-Enter OK Exit ExitThe user can play MOVIE files via the Movie Player. In left interface you can press ▲/▼ to select your desired file and press ▶II to play.
Operation

Media Player Mode
While the Movie is displaying, you can press OK button to bring up the on screen control menu. Press ◀/▶ button to select function, then press OK button to execute. Press EXIT button to return to previous menu.
Tips: You can also use the ▶II / ◀◀/▶▶ /◀ /▶▶ / ■ button on the remote control.
e-Book player
text_image
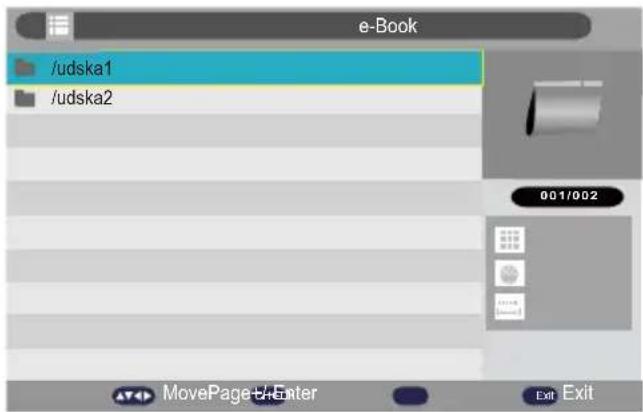
/udska1 /udska2 e-Book 001/002 MovePage4-Enter Exit ExitThe user can play electronic book files via the E-Book. In left interface you can press ▲/▼ to select your desired file and press ▶II to play.

Media Player Format
| TypeContainer | VideoDecoder | MaxResolution | |
| MOVIE | AVI | MPEG-4 ASP;H.264;DivX;XvidWMV9/VC-1 | 1920x1080 |
| MPEG-4SP | CIF(352x288)QCIF(176x144) | ||
| 027x0821GEPJM | |||
| MPEG1/2 | MPEG-1VideoMPEG-2Video | 1920x1080 | |
| MPEG4 | MPEG-2Video;MPEG-4ASP;H.264;Xvid;MJPEG;H.264 | 1920x1080 | |
| WMVWMV9/VC | C-1 | 1920x1080 | |
| RealMediaRV3 | 0/RV401920x1080 | ||
| FlashSorenson | H.263;H.2641920x1080 | ||
| QuickTime | MPEG-4 ASP;H.264;MJPEG | 1920x1080 | |
| ASF | WMV3 / WVC1; MP4S / M4S2 | ||
| Matroska Video | MPEG-2 Video; MPEG-4 ASP;H.264;Xvid; DivX;DivX Plus HD;RV30/RV40;WMV9/VC-1; | 1920x1080 | |
| DivX | MPEG-4 ASP; DivX; Xvid; | 1920x1080 | |
| TSStream | MPEG-2Video;H.264;WMV9/VC-1; | 1920x1080 |
| Type | Container | MaxResolution |
| PHOTO | JPEG | 165370 |
| Progressive JPEG | 61648 | |
| BMP | 101439 | |
| PNG | 101439 | |
| GIF | ||
| TIFF | ||
| MUSIC | WAVE | LPCM; ADPCM |
| WMA | WMA STD; WMA Prof | |
| AAC | AAC-LC / HE-AAC | |
| AC3 | AC3; E-AC3 | |
| MPEG | MP1;MP2;MP3;AAC-LC;HE-AAC; | |
| Read Audio | AAC / HE AAC; Cook | |
| Ogg | Vorbis | |
| FLAC | FLAC | |
| e-Book | TEXT | |

DVD Operation
BASIC OPERATIONS
TURN ON AND OFF THE DVD FUNCTION
Turn on the LCD TV and then press the INPUT button repeatedly to select DVD mode.
INSERT DISC TO DVD
Insert the disc to the disc slot, the player will load the disc automatically. There will have an on screen indication "CLOSE" then "READ".
After loading the disc content, it will switch to play mode automatically. If the disc is already placed inside, the disc will be read automatically.
NOTE: For some discs, after loading the content of the disc, need to press the ▶ II or select from the disc menu to start.
Please make sure when inserting the Disc, the mirror side of the disc has to face yourself.
When inserting the Disc incorrectly, you may damage the DVD mechanism.
PAUSING/PLAYING PLAYBACK
Press the ▶|| button to switch between pausing and playing.
STOPPING PLAYBACK
Press the ■ button at the location where you want to interrupt playback.
To resume playback at the position where the disc was stopped, press the ▶|| button. If you press the ■ button twice, the unit's memory will be cleared and pressing the ▶|| button will reset the disc to the beginning.
SKIP (PREVIOUS/NEXT)
Press the ◀ PREV button to go back to previous chapters/tracks.
Press the ▶ NEXT button to advance chapters/tracks.
For an Audio CD, use the number buttons (remote control only) to jump directly to that track number.
VOLUME
Press the VOL-/VOL+ buttons to adjust the output volume.
NOTE: Playback DVD discs in original code, is not adjustable.
MUTE
Press the MUTE button to mute the audio output. There will have an on screen symbol indicate "MUTE".
Press again to cancel, or press the VOL+ button to cancel and adjust the volume.
In case there is no audio output, try to press the MUTE button to cancel mute.

DVD Operation
ZOOM
Press the ZOOM button to zoom in the picture.
There are 6 zoom modes, press the ZOOM button to toggle between
different zoom modes in sequent. (zoom2 - zoom3 - zoom4)
In zoom2-4, you may use the ▲/▼/◄/► buttons to pan the picture for your favorite portion.
SUBTITLE SELECTION ( DVD)
- While a DVD is playing, press the SUBTITLE button to display the current the language setting, as shown in the example.
- Press the SUBTITLE button repeatedly to select the desired subtitle language.
NOTE
. If only one language is recorded, the language does not change.
. About two seconds later, playback continues with the new subtitle you selected.
. If no button is pressed within a few seconds, playback continues without changing the current subtitle.
. The number of languages recorded differs depending on the disc.
. This function can only be used for discs on which subtitles have been recorded in multiple languages.
AUDIO SELECTION ( DVD)
On some discs, the sound is recorded in two or more formats. Follow the directions below to select the preferred language and sound system.
-
While a disc is playing, press the AUDIO button to show the current audio format number.
-
Press the AUDIO button repeatedly to select the desired audio format. NOTE
. If only one audio format is recorded, the number does not change.
. About two seconds later, playback continues in the new audio format.
ANGLE SELECTION ( DVD )
Some DVDs contain scenes which have been shot from a number of different angles. For these discs, the same scene can be viewed from each of these different angles.
-
While you are playing a DVD with different angles recorded, press the ANGLE button to view the number of the current angle available.
-
Press the ANGLE button repeatedly to change the scene to the next angle in those recorded.

DVD Operation
. About two seconds later, playback continues from the new angle you selected.
. If no button is pressed within 10 seconds, playback continues without changing the current angle.
NOTE
This function can only be used for discs on which scenes shot from multiple angles have been recorded.
MP3/JPEG PLAYBACK
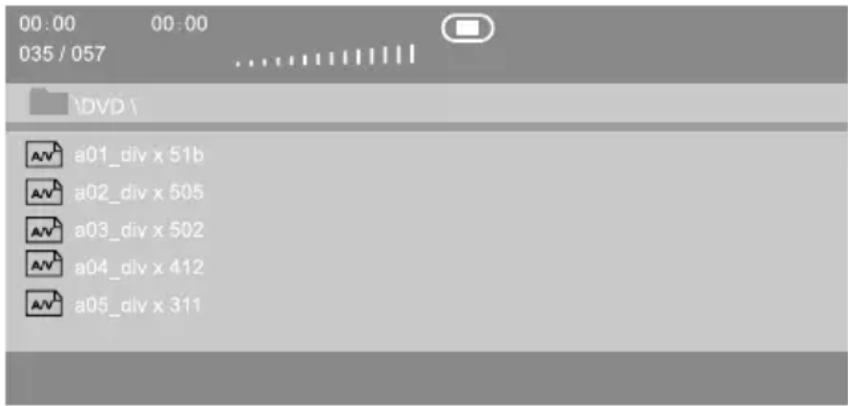
After loading the MP3/JPEG disc, it will start to scan for the stored MP3/JPEG folders.
Then will firstly display the MP3 contents automatically and start to play the first file (highlighted file)
Screen as follow:
text_image
00:00 035 / 057 DVD \ a01_div x 51b a02_div x 505 a03_div x 502 a04_div x 412 a05_div x 311Use the ▲/▼ buttons to select the folder you want to play.
NOTE:
When playback MP3 files, there is no picture display, only audio output.
Playing the JPEG discs, press the PROGRAM button to select slide effects.)
When play or pause with picture playback, you may use the navigation buttons to flip ] rotate the picture.
▲ button to flip horizontally.
▼ button to flip vertically.
◀ button to rotate left 90°.
▶ button to rotate right 90°.
Press the |◀ /▶▶| buttons to select next / previous page or press numeric buttons to view the corresponding pictures.

DVD Operation
FAST FORWARD /FAST REVERSE
- Press the ◀◀ or ▶▶ button when a disc is playing.
Each time the ◀◀ or ▶▶ button is pressed, the speed of fast scan changes in the following sequence.
FORWARD X 2 ---> FORWARD X 4 ---> FORWARD X 8
----> FORWARD X 16----> FORWARD X 32 ----> PLAY
BACKWARD X 2---> BACKWARD X 4---> BACKWARD X 8
---> BACKWARDX 16---> BACKWARD X 32 ---> PLAY
- Press the ▶II button to play when you reach the desired point to resume playback at normal speed.
SUBTITLE SELECTION ( DVD)
-
While a DVD is playing, press the SUBTITLE button to display the current the language setting, as shown in the example.
-
Press the SUBTITLE button repeatedly to select the desired subtitle language. NOTE
. If only one language is recorded, the language does not change.
. About two seconds later, playback continues with the new subtitle you selected.
. If no button is pressed within a few seconds, playback continues without changing the current subtitle.
. The number of languages recorded differs depending on the disc.
. This function can only be used for discs on which subtitles have been recorded in multiple languages.
AUDIO SELECTION ( DVD)
On some discs, the sound is recorded in two or more formats. Follow the directions below to select the preferred language and sound system.
-
While a disc is playing, press the AUDIO button to show the current audio format number.
-
Press the AUDIO button repeatedly to select the desired audio format.
NOTE
. If only one audio format is recorded, the number does not change.
. About two seconds later, playback continues in the new audio format.
ANGLE SELECTION ( DVD )
Some DVDs contain scenes which have been shot from a number of different angles.
For these discs, the same scene can be viewed from each of these different angles.
-
While you are playing a DVD with different angles recorded, press the ANGLE button to view the number of the current angle available.
-
Press the ANGLE button repeatedly to change the scene to the next angle in those recorded.
NOTE
This function can only be used for discs on which scenes shot from multiple angles have been recorded.

DVD Operation
Customizing the GENERAL SETUP Settings
Press the SETUP button to enter setup menu.
- Use the ◀/▶ button select GENERAL SETUP option.
- Use the ▲/▼ button to highlight and individual GENERAL SETUP option.

text_image
-- General Setup Page -- TV Display 16:9 4:3 Pan Scan OSD Lang Eng 4:3 Letter Box Screen Saver On Wide Last Memory Off Set TV Display mode| TV Display | Cycles among TV Type modes:4:3 pan scan, 4:3 letter box, 16:9. |
| OSD Lang | You can choose the OSD Language . |
| Screen Saver | This function is used to turn the screen saver On or Off. |
| Last Memory | This function to set the Last Memory to On or Off. |

DVD Operation
Customizing the AUDIO SETUP Settings
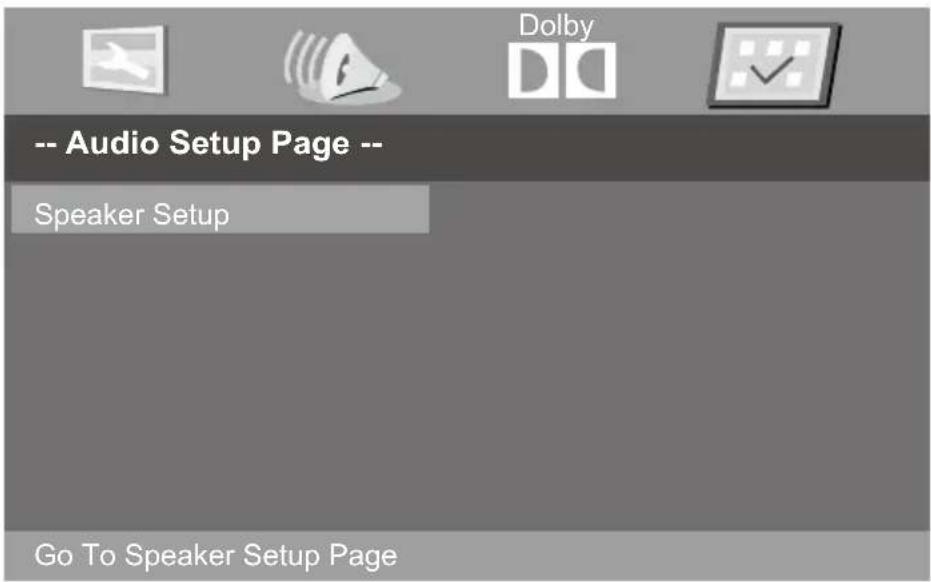
Press the SETUP button to enter setup menu.
- Use the ◀/▶ button select AUDIO SETUP option.
- Use the ▲/▼ button to highlight and individual AUDIO SETUP option.
text_image
-- Audio Setup Page -- Speaker Setup Go To Speaker Setup PageSpeaker Setup A disc recorded multi channel soundtrack, the output signal will be incorporated to left and right or stereo channel.

DVD Operation
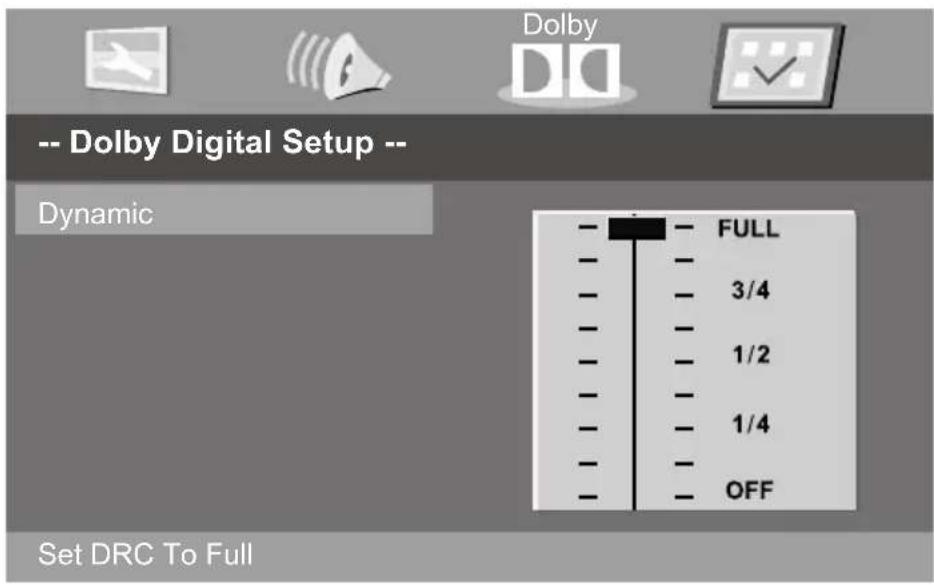
Customizing the Dolby Digital SETUP Settings
Press the SETUP button to enter setup menu.
- Use the ◀/▶ button select Dolby Digital SETUP option.
- Use the ▲/▼ button to highlight and individual Dolby Digital SETUP option.
text_image
-- Dolby Digital Setup -- Dynamic - - FULL - - 3/4 - - 1/2 - - 1/4 - - OFF Set DRC To FullDynamic This option is used to set the compression ratio in order to control the sound (Volume) contrast.

DVD Operation
Customizing the PREFERENCE SETUP Settings
Press the SETUP button to enter setup menu.
- Use the ◀/▶ button select PREFERENCE SETUP option.
- Use the ▲/▼ button to highlight and individual PREFERENCE SETUP option.

Dolby


-- Prerence Page --
| TV Type | PAL | PAL |
| Audio | Eng | Multi |
| Subtitle | Eng | NTSC |
| Disc Menu | Eng | |
| Parental | ||
| Password | ||
| Default | ||
| Set TV Standard | ||
| TV Type | Cycles among TV Type modes: PAL, Multi, NTSC. |
| Audio | You can choose the Audio Language. |
| Subtitle | You can choose the Subtitle Language. |
| Disc Menu | You can choose the Disc Menu Language. |
| Parental | When playing disc with parental lock function, you may select an Age Control Grade according to grade of disc and your own preference. For example, if PG is selected, DVD Video disc rated higher than the PG grade can not be played. |
| Password | User can change the password that is required when the user wants to change the Age ControlGrade in the Parental Lock function. (Default password is 123456) |
| Default | Setting the ‘Default’ function will reset all options and your personal settings to the factory default and all your personal settings will be erased. |

DVD Operation
Disc Care
About Disc Terms
Title
Generally, pictures or music compressed on a DVD are divided into several sections "title".
Chapter
The smaller section unit of picture or music in a DVD under the title, usually one title is comprised of one or more chapters and each of them is numbered for easy searching, but some discs may not have a recording chapter.
Track
A segment of picture or music on a CD. Each track is numbered for searching.
Care of Disc
Video disc contains high-density compressed data that needs proper handling.
- Hold the disc with fingers by outer edge and/or the centre spindle hole. Do not touch the discs surface.
- Do not bend or press the disc.
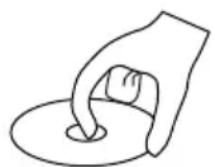


- Do not expose the disc to direct sunlight or heating sources. Store discs in cabinet vertically, and in dry condition.
Prevent exposure to:
- Direct sunlight
- Heat or exhaust from a heating device
- Extreme humidity
Clean the disc surface with a soft, dry cleaning cloth. Wipe the disc surface gently and radically from centre toward the outer edge.
Do not apply thinner, alcohol, chemical solvent, or sprays when cleaning. Such cleaning fluids will permanently damage the disc surface.

Troubleshooting
- Do not use other functions that are not mentioned in this user's manual.
- In case a problem occurs with your TV, please take the following steps first.
- If you still have the problem, turn the power off and contact TECO service on 1300 660 037.
| Issue | Action |
| No power | * Check the indicator light. (Red is STANDBY. Green or Blue is ON). If light is OFF, switch ON the power from the outlet and/or the power switch at the back of the TV.* Make sure the TV and the power cord are connected correctly.* Plug in another device to the outlet and make sure there is power coming from the outlet.* Press POWER on the remote control or on the side panel. |
| Power cut off automatically | * Check if the TIMER or SLEEP TIMER is set ON.* TV temperature may increased. Remove any objexts/dust blocking the vents. |
| Remote Control does not operate | * Check if Main Power is On.* Change the batteries and make sure batteries are inserted correctly.* Make sure that you do not use the remote control under strong lighting.* Make sure the remote control aim to the remote control sensor directly within 7 meter from the TV. |
| No signal | * Check the cables and connections. Make sure they are connected correctly and securely fastened.* Turn ON the device (e.g. DVD player) that you are trying to view, and, if needed, start play.* Press SOURCE on the remote control or on the side panel, and select the correct input source.* Test the input port with other device and connect the device on other input port. |
| Poor picture quality | * Check the cables and connections. Make sure they are connected correctly and securely fastened.* Check the condition and length of the cables. Cables that have been bent or pinched may also cause picture quality problems. Replace the cable or try a different cable type.* Press the CH button to display a different channel. Picture quality problems on a single channel or on all channels may be caused by the TV station signal (antenna) or the cable signal source. Rescan the channel. Contact experienced antenna installer to check the antenna if needed.* Adjust the Picture setting (Picture Mode, Contrast, Brightness, Colour etc.) in the Menu.* Check the vedio setting on the external device. |
| No sound | * Check if the Mute function is ON. Press Mute, or the Vol+ to turn off mute.* Is the volume too low? Press the Vol+ button.* Check the cables and connections. Make sure they are connected correctly and securely fastened.* Check the audio setting on the external device. |

Specifications
| Model | 32" LEDTV | |
| LED Edge Backlight LCD Panel | Panel Size | 31.5" |
| Brightness | 250 | |
| Contrast Ratio | 1200:1 | |
| Max. Resolution | 1366 x 768 | |
| Input Connector | VIDEO | 1 |
| YPbPr | 1 | |
| AUDIO(L/R) | 1 | |
| PC /AUDIO | 1 | |
| HDMI | 3 | |
| RF | 1 | |
| USB | 1 | |
| Output Connector | HEADPHONE | 1 |
| COAX | 1 | |
| Power Source | AC~ 230V | |
| Power Consumption | 55W | |
| Mounting Bracket (VESA) | 200mm x 100mm | |
| Screw size | M4 | |
Note: This manual is for your reference only. Design and specifications subject to change without prior notice for future product improvements.
tecovision
www.teco.com.au