M-Book 6000 G2 - Laptop MAXDATA - Free user manual and instructions
Find the device manual for free M-Book 6000 G2 MAXDATA in PDF.


| Product Type | Laptop |
| Brand | MAXDATA |
| Model | M-Book 6000 G2 |
| Display Size | 15.4 inches (approx.) |
| Processor | Intel Core 2 Duo (typical) |
| RAM | Up to 4 GB DDR2 |
| Storage | Hard drive up to 250 GB (typical) |
| Dimensions (W x D x H) | Approx. 360 x 265 x 35 mm |
| Weight | Approx. 2.7 kg |
| Power Supply | AC adapter, 19V DC, 65W |
| Battery Type | Lithium-ion, 6-cell |
| Operating System | Windows XP or Windows Vista (typical) |
| Connectivity | Wi-Fi 802.11a/b/g, Ethernet, USB 2.0 (4x), VGA, audio jacks |
| Main Functions | Office productivity, web browsing, multimedia, connectivity |
| Maintenance & Cleaning | Use soft dry cloth; avoid liquids; periodic dust removal from vents |
| Safety Precautions | Do not block vents, avoid extreme temperatures, use only supplied charger |
| Spare Parts & Repairability | Keyboard, battery, hard drive, RAM modules replaceable; support by authorized service |
| General Information | Designed for mobile professional use; released mid-2000s |
Frequently Asked Questions - M-Book 6000 G2 MAXDATA
User questions about M-Book 6000 G2 MAXDATA
0 question about this device. Answer the ones you know or ask your own.
Ask a new question about this device
Download the instructions for your Laptop in PDF format for free! Find your manual M-Book 6000 G2 - MAXDATA and take your electronic device back in hand. On this page are published all the documents necessary for the use of your device. M-Book 6000 G2 by MAXDATA.
USER MANUAL M-Book 6000 G2 MAXDATA
natural_image
Laptop computer with visible keyboard and screen (no text or symbols)Notice
The company reserves the right to revise this publication or to change its contents without notice. Information contained herein is for reference only and does not constitute a commitment on the part of the manufacturer or any subsequent vendor. They assume no responsibility or liability for any errors or inaccuracies that may appear in this publication nor are they in anyway responsible for any loss or damage resulting from the use (or misuse) of this publication.
This publication and any accompanying software may not, in whole or in part, be reproduced, translated, transmitted or reduced to any machine readable form without prior consent from the vendor, manufacturer or creators of this publication, except for copies kept by the user for backup purposes.
Brand and product names mentioned in this publication may or may not be copyrights and/or registered trademarks of their respective companies. They are mentioned for identification purposes only and are not intended as an endorsement of that product or its manufacturer.
©August 2011
Trademarks
Intel, Celeron and Intel Core are trademarks/registered trademarks of Intel Corporation.
Preface
R&TTE Directive
This device is in compliance with the essential requirements and other relevant provisions of the R&TTE Directive 1999/5/EC.
This device will be sold in the following EEA countries: Austria, Italy, Belgium, Liechtenstein, Denmark, Luxembourg, Finland, Netherlands, France, Norway, Germany, Portugal, Greece, Spain, Iceland, Sweden, Ireland, United Kingdom, Cyprus, Czech Republic, Estonia, Hungary, Latvia, Lithuania, Malta, Slovakia, Poland, Slovenia.
CE Marking
This device has been tested to and conforms to the regulatory requirements of the European Union and has attained CE Marking. The CE Mark is a conformity marking consisting of the letters “CE”. The CE Mark applies to products regulated by certain European health, safety and environmental protection legislation. The CE Mark is obligatory for products it applies to: the manufacturer affixes the marking in order to be allowed to sell his product in the European market.
This product conforms to the essential requirements of the R&TTE directive 1999/5/EC in order to attain CE Marking. A notified body has determined that this device has properly demonstrated that the requirements of the directive have been met and has issued a favorable certificate of expert opinion. As such the device will bear the notified body number 0560 after the CE mark.
The CE Marking is not a quality mark. Foremost, it refers to the safety rather than to the quality of a product. Secondly, CE Marking is mandatory for the product it applies to, whereas most quality markings are voluntary.
FCC Statement
(Federal Communications Commission)
You are cautioned that changes or modifications not expressly approved by the party responsible for compliance could void the user's authority to operate the equipment.
This equipment has been tested and found to comply with the limits for a Class B digital device, pursuant to Part 15 of the FCC Rules. These limits are designed to provide reasonable protection against harmful interference in a residential installation. This equipment generates, uses and can radiate radio frequency energy and, if not installed and used in accordance with the instructions, may cause harmful interference to radio communications. However, there is no guarantee that interference will not occur in a particular installation. If this equipment does cause harmful interference to radio or television reception, which can be determined by turning the equipment off and on, the user is encouraged to try to correct the interference by one or more of the following measures:
- Re orient or relocate the receiving antenna.
- Increase the separation between the equipment and receiver.
- Connect the equipment into an outlet on a circuit different from that to which the receiver is connected.
- Consult the service representative or an experienced radio/TV technician for help.
Operation is subject to the following two conditions:
- This device may not cause interference.
And - This device must accept any interference, including interference that may cause undesired operation of the device.
Preface
FCC RF Radiation Exposure Statement:
- This Transmitter must not be co-located or operating in conjunction with any other antenna or transmitter.
- This equipment complies with FCC RF radiation exposure limits set forth for an uncontrolled environment. This equipment should be installed and operated with a minimum distance of 20 centimeters between the radiator and your body.

Warning
Use only shielded cables to connect I/O devices to this equipment. You are cautioned that changes or modifications not expressly approved by the manufacturer for compliance with the above standards could void your authority to operate the equipment.
If your purchase option includes both Wireless LAN and 3.75G modules, then the appropriate antennas will be installed. Note that In order to comply with FCC RF exposure compliance requirements, the antenna must not be co-located or operate in conjunction with any other antenna or transmitter.
Important Notice - 3.75G/HSPA & Bluetooth/Wireless LAN Modules
In order to comply with FCC regulations you should NOT operate the 3.75G/HSPA module and the Bluetooth/Wireless LAN modules at the same time as this may disrupt radio frequency, and cause interference. When the 3.75G/HSPA module is powered on, make sure that the Bluetooth/Wireless LAN modules are powered off.
IMPORTANT SAFETY INSTRUCTIONS
Follow basic safety precautions, including those listed below, to reduce the risk of fire, electric shock, and injury to persons when using any electrical equipment:
- Do not use this product near water, for example near a bath tub, wash bowl, kitchen sink or laundry tub, in a wet basement or near a swimming pool.
- Avoid using this equipment with a telephone line (other than a cordless type) during an electrical storm. There may be a remote risk of electrical shock from lightning.
- Do not use the telephone to report a gas leak in the vicinity of the leak.
- Use only the power cord and batteries indicated in this manual. Do not dispose of batteries in a fire. They may explode. Check with local codes for possible special disposal instructions.
- This product is intended to be supplied by a Listed Power Unit with an AC Input of 100 - 240V, 50 - 60Hz, DC Output of 19V, 3.42A (65 Watts) minimum AC/DC Adapter.
This Computer's Optical Device is a Laser Class 1 Product
EuP Off Mode Power Consumption Statement:
The figures below note the power consumption of this computer in compliance with European Commission (EC) regulations on power consumption in off mode:
- Off Mode < 1W
Preface
Instructions for Care and Operation
The notebook computer is quite rugged, but it can be damaged. To prevent this, follow these suggestions:
- Don't drop it, or expose it to shock. If the computer falls, the case and the components could be damaged.
| Do not expose the computer to any shock or vibration. | Do not place it on an unstable surface. | Do not place anything heavy on the computer. |
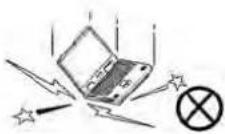 | 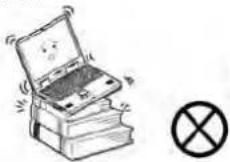 |  |
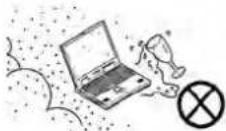
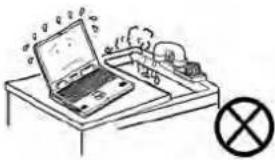
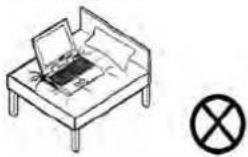
- Keep it dry, and don't overheat it. Keep the computer and power supply away from any kind of heating element. This is an electrical appliance. If water or any other liquid gets into it, the computer could be badly damaged.
| Do not expose it to excessive heat or direct sunlight. | Do not leave it in a place where foreign matter or moisture may affect the system. | Don’t use or store the computer in a humid environment. | Do not place the computer on any surface that will block the Vents/Fan Intakes. |
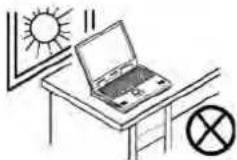 |  |  |  |
Preface
- Avoid interference. Keep the computer away from high capacity transformers, electric motors, and other strong magnetic fields. These can hinder proper performance and damage your data.
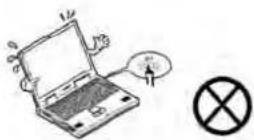
- Follow the proper working procedures for the computer. Shut the computer down properly and don't forget to save your work. Remember to periodically save your data as data may be lost if the battery is depleted.
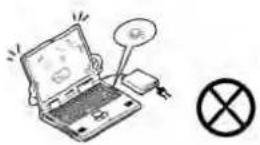
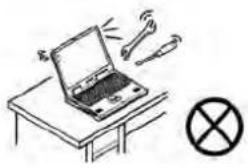
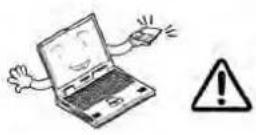
| Do not turn off the power until you properly shut down all programs. | Do not turn off any peripheral devices when the computer is on. | Do not disassemble the computer by yourself. | Perform routine maintenance on your computer. |
 |  |  |  |
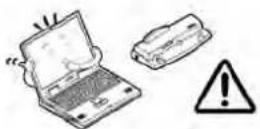
- Take care when using peripheral devices.
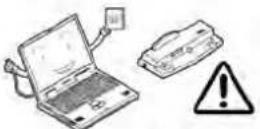
| Use only approved brands of peripherals. | Unplug the power cord before attaching peripheral devices. |
 |  |
Preface
Power Safety
The computer has specific power requirements:

Power Safety Warning
Before you undertake any upgrade procedures, make sure that you have turned off the power, and disconnected all peripherals and cables (including telephone lines). It is advisable to also remove your battery in order to prevent accidentally turning the machine on.
- Only use a power adapter approved for use with this computer.
- Your AC/DC adapter may be designed for international travel but it still requires a steady, uninterrupted power supply. If you are unsure of your local power specifications, consult your service representative or local power company.
- The power adapter may have either a 2-prong or a 3-prong grounded plug. The third prong is an important safety feature; do not defeat its purpose. If you do not have access to a compatible outlet, have a qualified electrician install one.
- When you want to unplug the power cord, be sure to disconnect it by the plug head, not by its wire.
- Make sure the socket and any extension cord(s) you use can support the total current load of all the connected devices.
- Before cleaning the computer, make sure it is disconnected from any external power supplies (i.e. AC/DC adapter or car adapter).
| Do not plug in the power cord if you are wet. | Do not use the power cord if it is broken. | Do not place heavy objects on the power cord. |
Preface
Polymer Battery Precautions
Note the following information which is specific to polymer batteries only, and where applicable, this overrides the general battery precaution information overleaf.
- Polymer batteries may experience a slight expansion or swelling, however this is part of the battery's safety mechanism and is not a cause for concern.
- Use proper handling procedures when using polymer batteries. Do not use polymer batteries in high ambient temperature environments, and do not store unused batteries for extended periods.
See also the general battery precautionary information overleaf for further information.
Preface
Battery Precautions
- Only use batteries designed for this computer. The wrong battery type may explode, leak or damage the computer.
- Do not remove any batteries from the computer while it is powered on.
- Do not continue to use a battery that has been dropped, or that appears damaged (e.g. bent or twisted) in any way. Even if the computer continues to work with a damaged battery in place, it may cause circuit damage, which may possibly result in fire.
- If you do not use the battery for an extended period, then remove the battery from the computer for storage.
- Recharge the batteries using the notebook's system. Incorrect recharging may make the battery explode.
- Do not try to repair a battery pack. Refer any battery pack repair or replacement to your service representative or qualified service personnel.
- Keep children away from, and promptly dispose of a damaged battery. Always dispose of batteries carefully. Batteries may explode or leak if exposed to fire, or improperly handled or discarded.
- Keep the battery away from metal appliances.
- Affix tape to the battery contacts before disposing of the battery.
- Do not touch the battery contacts with your hands or metal objects.

Battery Disposal & Caution
The product that you have purchased contains a rechargeable battery. The battery is recyclable. At the end of its useful life, under various state and local laws, it may be illegal to dispose of this battery into the municipal waste stream. Check with your local solid waste officials for details in your area for recycling options or proper disposal.
Danger of explosion if battery is incorrectly replaced. Replace only with the same or equivalent type recommended by the manufacturer. Discard used battery according to the manufacturer's instructions.
Cleaning
Do not apply cleaner directly to the computer; use a soft clean cloth.
Do not use volatile (petroleum distillates) or abrasive cleaners on any part of the computer.
Servicing
Do not attempt to service the computer yourself. Doing so may violate your warranty and expose you and the computer to electric shock. Refer all servicing to authorized service personnel. Unplug the computer from the power supply. Then refer servicing to qualified service personnel under any of the following conditions:
- When the power cord or AC/DC adapter is damaged or frayed.
- If the computer has been exposed to rain or other liquids.
- If the computer does not work normally when you follow the operating instructions.
- If the computer has been dropped or damaged (do not touch the poisonous liquid if the LCD panel breaks).
- If there is an unusual odor, heat or smoke coming from your computer.

Removal Warning
When removing any cover(s) and screw(s) for the purposes of device upgrade, remember to replace the cover(s) and screw(s) before turning the computer on.
Preface
Travel Considerations
Packing
As you get ready for your trip, run through this list to make sure the system is ready to go:
- Check that the battery pack and any spares are fully charged.
- Power off the computer and peripherals.
- Close the display panel and make sure it's latched.
- Disconnect the AC/DC adapter and cables. Stow them in the carrying bag.
- The AC/DC adapter uses voltages from 100 to 240 volts so you won't need a second voltage adapter. However, check with your travel agent to see if you need any socket adapters.
- Put the notebook in its carrying bag and secure it with the bag's straps.
- If you're taking any peripherals (e.g. a printer, mouse or digital camera), pack them and those devices' adapters and/or cables.
- Anticipate customs - Some jurisdictions may have import restrictions or require proof of ownership for both hardware and software. Make sure your documents are prepared.

Power Off Before Traveling
Make sure that your notebook is completely powered off before putting it into a travel bag (or any such container). Putting a notebook which is powered on in a travel bag may cause the vent(s)/fan intake(s)/outlet(s) to be blocked. To prevent your computer from overheating make sure nothing blocks the vent(s)/fan intake(s)/outlet(s) while the computer is in use.
Preface
On the Road
In addition to the general safety and maintenance suggestions in this preface, and Chapter 8: Troubleshooting, keep these points in mind:
Hand-carry the notebook - For security, don't let it out of your sight. In some areas, computer theft is very common. Don't check it with normal luggage. Baggage handlers may not be sufficiently careful. Avoid knocking the computer against hard objects.
Beware of Electromagnetic fields - Devices such as metal detectors & X-ray machines can damage the computer, hard disk, floppy disks, and other media. They may also destroy any stored data - Pass your computer and disks around the devices. Ask security officials to hand-inspect them (you may be asked to turn it on). Note: Some airports also scan luggage with these devices.
Fly safely - Most airlines have regulations about the use of computers and other electronic devices in flight. These restrictions are for your safety, follow them. If you stow the notebook in an overhead compartment, make sure it's secure. Contents may shift and/or fall out when the compartment is opened.
Get power where you can - If an electrical outlet is available, use the AC/DC adapter and keep your battery(ies) charged.
Keep it dry - If you move quickly from a cold to a warm location, water vapor can condense inside the computer. Wait a few minutes before turning it on so that any moisture can evaporate.
Preface
Developing Good Work Habits
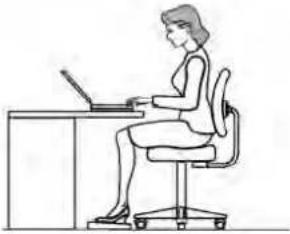
Developing good work habits is important if you need to work in front of the computer for long periods of time. Improper work habits can result in discomfort or serious injury from repetitive strain to your hands, wrists or other joints. The following are some tips to reduce the strain:
natural_image
Line drawing of a woman sitting at a desk using a laptop (no text or symbols)- Adjust the height of the chair and/or desk so that the keyboard is at or slightly below the level of your elbow. Keep your forearms, wrists, and hands in a relaxed position.
- Your knees should be slightly higher than your hips. Place your feet flat on the floor or on a footrest if necessary.
- Use a chair with a back and adjust it to support your lower back comfortably.
- Sit straight so that your knees, hips and elbows form approximately 90-degree angles when you are working.
• Take periodic breaks if you are using the computer for long periods of time.
Remember to:

• Alter your posture frequently.
- Stretch and exercise your body several times a day.
• Take periodic breaks when you work at the computer for long periods of time. Frequent and short breaks are better than fewer and longer breaks.
Preface
Lighting
Proper lighting and comfortable display viewing angle can reduce eye strain and muscle fatigue in your neck and shoulders.
- Position the display to avoid glare or reflections from overhead lighting or outside sources of light.
- Keep the display screen clean and set the brightness and contrast to levels that allow you to see the screen clearly.
- Position the display directly in front of you at a comfortable viewing distance.
- Adjust the display-viewing angle to find the best position.
LCD Screen Care
To prevent image persistence on LCD monitors (caused by the continuous display of graphics on the screen for an extended period of time) take the following precautions:
- Set the Windows Power Plans to turn the screen off after a few minutes of screen idle time.
- Use a rotating, moving or blank screen saver (this prevents an image from being displayed too long).
- Rotate desktop background images every few days.
- Turn the monitor off when the system is not in use.
LCD Electro-Plated Logos
Note that in computers featuring a raised LCD electro-plated logo, the logo is covered by a protective adhesive. Due to general wear and tear, this adhesive may deteriorate over time and the exposed logo may develop sharp edges. Be careful when handling the computer in this case, and avoid touching the raised LCD electro-plated logo. Avoid placing any other items in the carrying bag which may rub against the top of the computer during transport. If any such wear and tear develops contact your service center.
Preface
XVI
Preface
Contents
Notice ....I
FCC Statement ...... III
FCC RF Radiation Exposure Statement: IV
EuP Off Mode Power Consumption Statement: ...... V
Instructions for Care and Operation ......VI
Power Safety VIII
Polymer Battery Precautions ......IX
Battery Precautions ...... X
Cleaning....XI
Servicing .....XI
Travel Considerations .....XII
Quick Start Guide
Overview 1-1
Advanced Users 1-2
Beginners and Not-So-Advanced Users ....1-2
Warning Boxes 1-2
Not Included 1-3
System Startup 1-4
Model Differences 1-5
System Software 1-5
System Map: LCD Panel Open 1-6
LED Indicators 1-7
Hot Key Buttons & Keyboard 1-8
Keyboard 1-9
Function/Hot Key Indicators 1-10
System Map: Front & Left Views ......1-11
System Map: Right & Rear Views ......1-12
System Map: Bottom View ......1-14
3.75G/HSPA Module USIM Card Installation .....1-15
Docking Port 1-16
Windows 7 Start Menu & Control Panel ....1-17
Video Features ....1-18
Power Options 1-20
Features & Components
Overview 2-1
Hard Disk Drive 2-2
Optical (CD/DVD) Device 2-3
Loading Discs 2-3
Handling CDs or DVDs 2-4
DVD Regional Codes 2-5
Multi-in-1 Card Reader 2-6
ExpressCard Slot 2-7
Inserting and Removing ExpressCards ....2-7
Touchpad and Buttons/Mouse 2-7
Preface
Gestures and Device Settings 2-8
Audio Features 2-12
Optimizing Audio Recording 2-13
Adding a Printer 2-14
USB Printer 2-14
Parallel Printer 2-14
Power Management
Overview 3-1
The Power Sources 3-2
AC/DC Adapter 3-2
Battery 3-2
Turning On the Computer 3-3
Power Plans 3-4
Power-Saving States 3-6
Sleep 3-6
Hibernate 3-7
Shut down 3-7
Configuring the Power Buttons 3-8
Resuming Operation 3-9
Energy Star Power Saving 3-10
Battery Information 3-11
Battery Power 3-11
Conserving Battery Power 3-12
Battery Life 3-13
New Battery 3-13
Recharging the Battery with the AC/DC Adapter .....3-13
Proper handling of the Battery Pack ....3-14
Battery FAQ ....3-15
Drivers & Utilities
What to Install ....4-1
Module Driver Installation ....4-1
Driver Installation 4-2
Updating/Reinstalling Individual Drivers 4-4
User Account Control 4-4
Windows Security Message 4-4
New Hardware Found 4-5
Driver Installation Procedure 4-5
Chipset 4-5
Video 4-5
LAN 4-6
CardReader 4-6
TouchPad 4-6
Modem (Optional) 4-6
Hot Key 4-7
USB 3.0 4-7
MEI 4-7
Audio 4-7
Windows Experience Index 4-8
Preface
Optional Drivers 4-9
PC Camera Module 4-9
Wireless LAN Module 4-9
Fingerprint Reader Module 4-9
3.75G/HSPA Module 4-9
TPM Driver 4-9
IRST Driver 4-9
BIOS Utilities
Overview 5-1
The Setup Utility 5-2
Failing the POST 5-3
Fatal Errors 5-3
Non-Fatal Errors 5-3
Setup Screens 5-4
Intel® vPro™ technology 5-5
Accessing the Intel Management Engine ....5-5
Main Menu 5-8
System Time & Date (Main Menu) 5-8
SATA Port # (Main Menu) 5-9
System/Extended Memory: (Main Menu) 5-9
MB Series / BIOS Revision / KBC/
EC firmware Revision 5-9
Advanced Menu 5-10
Advanced Chipset Control (Advanced Menu) .....5-10
Bluetooth Power Setting (Advanced Menu >
Advanced Chipset Control) 5-11
SATA Mode (Advanced Menu) 5-11
Legacy USB Support (Advanced Menu) 5-11
Boot Logo (Advanced Menu) 5-12
Power On Boot Beep (Advanced Menu) 5-12
Battery Low Alarm Beep (Advanced Menu) 5-12
Security Menu 5-13
Set Supervisor Password (Security Menu) 5-13
Set User Password (Security Menu) 5-14
Password on boot (Security Menu) 5-14
TPM Configuration (Security Menu) 5-15
TPM State (Security Menu > TPM Support Enabled) .5-16
Pending TPM operation (Security Menu >
TPM Support & TPM State Enabled) 5-17
Boot Menu 5-18
Boot Sequence (Boot Menu) 5-19
Exit Menu 5-20
Upgrading The Computer
Overview 6-1
When Not to Upgrade 6-2
Removing the Battery 6-3
Upgrading the Hard Disk Drive ....6-4
Upgrading the Optical (CD/DVD) Device 6-6
Preface
Upgrading the System Memory (RAM) 6-8
Modules & Options
Overview 7-1
PC Camera Module 7-2
PC Camera Driver Installation 7-3
Wireless LAN Module 7-10
3rd Party WLAN Driver Installation 7-11
Intel® WLAN Driver Installation 7-11
Connecting to a Wireless Network in Windows 7 .....7-12
Intel® My WiFi Configuration 7-15
Windows Mobility Center 7-27
Security Modules (Fingerprint & TPM) 7-28
Fingerprint Reader Module 7-29
Fingerprint Reader Driver Installation 7-29
User Enrollment 7-30
Fingerprint Control Center Features 7-33
Bluetooth Module 7-34
Intel Bluetooth Combo Driver Installation ....7-35
Standard Bluetooth Configuration in Windows 7 .....7-36
3rd Party Bluetooth Combo Driver Installation .....7-40
3rd Party Bluetooth & WLAN Combo Settings .....7-41
Bluetooth Networking Setup 7-44
Bluetooth & WLAN Combo Module Configuration ...7-45
3.75G/HSPA Module 7-48
Wireless Manager 7-51
Wireless Manager Installation 7-51
Wireless Manager Application 7-52
Profiles 7-55
Settings 7-59
Text Messaging Service (SMS) 7-62
SMS Utility 7-62
Sending a Text Message 7-64
Phonebook 7-67
SMS Settings 7-70
Trusted Platform Module 7-73
Enabling & Activating TPM 7-74
Trusted Platform Module (TPM) Driver Installation ..7-76
Initializing TPM 7-77
Infineon Security Platform Settings Tool 7-79
IRST Driver 7-87
Intel® Management and Security Status ....7-88
Troubleshooting
Overview 8-1
Basic Hints and Tips 8-2
Backup and General Maintenance 8-3
Viruses 8-4
Upgrading and Adding New Hardware/Software .....8-5
Problems and Possible Solutions ....8-7
Preface
Bluetooth Connection Problems 8-13
Intel® Centrino Advanced WLAN &
Bluetooth V3.0+HS Combo Modules 8-17
Interface (Ports & Jacks)
Overview ......A-1
Intel Video Driver Controls
Intel Video Driver Installation ......B-1
Dynamic Video Memory Technology ...... B-1
Intel® Graphics & Media Control Panel ......B-2
Display Devices & Options ...... B-4
Attaching Other Displays B-5
Configuring an External Display in Windows 7 ......B-8
HDMI Audio Configuration ......B-11
Specifications
Processors For All Models ......C-2
Processor For Model A Only ......C-2
Processor For Model A Only ......C-2
Core Logic C-2
Display C-2
Memory C-2
Video Adapter C-2
BIOS C-3
Storage C-3
Audio ......C-3
Keyboard & Pointing Device ......C-3
Card Reader C-3
Interface C-3
Slots C-3
Communication ......C-4
Power Management C-4
Power ......C-4
Indicators C-4
Security C-4
Operating System ......C-4
Environmental Spec ....C-4
Dimensions & Weight ......C-4
Preface
XXII
Chapter 1: Quick Start Guide
Overview
This Quick Start Guide is a brief introduction to the basic features of your computer, to navigating around the computer and to getting your system started. The remainder of the manual covers the following:
• Chapter 2 A guide to using some of the main features of the computer e.g. the storage devices (hard disk, optical device, Card Reader, ExpressCard/34/54), Touchpad & Mouse, Audio & Printer.
- Chapter 3 The computer's power saving options.
- Chapter 4 The installation of the drivers and utilities essential to the operation or improvement of some of the computer's subsystems.
- Chapter 5 An outline of the computer's built-in software or BIOS (Basic Input Output System).
• Chapter 6 Instructions for upgrading your computer.
- Chapter 7 A quick guide to the computer's Wireless LAN, PC Camera, 3.75G/HSPA, Security and Bluetooth modules (some of which may be optional depending on your purchase configuration).
• Chapter 8 A troubleshooting guide.
- Appendix A Definitions of the interface, ports/jacks which allow your computer to communicate with external devices.
- Appendix B Information on the Intel Video driver controls.
- Appendix C The computer's specification.

Quick Start Guide
Advanced Users
If you are an advanced user you may skip over most of this Quick Start Guide. However you may find it useful to refer to “What to Install” on page 4 - 1, “BIOS Utilities” on page 5 - 1 and “Upgrading The Computer” on page 6 - 1 in the reminder of the User’s Manual. You may also find the notes marked with a of interest to you.
Beginners and Not-So-Advanced Users

Notes
Check the light colored boxes with the mark above to find detailed information about the computer's features.
If you are new to computers (or do not have an advanced knowledge of them) then the information contained in the Quick Start Guide should be enough to get you up and running. Eventually you should try to look through all the documentation (more detailed descriptions of the functions, setup and system controls are covered in the remainder of the User's Manual), but do not worry if you do not understand everything the first time. Keep this manual nearby and refer to it to learn as you go. You may find it useful to refer to the notes marked with a as indicated in the margin. For a more detailed description of any of the interface ports and jacks see “Interface (Ports & Jacks)” on page A - 1.
Warning Boxes
No matter what your level please pay careful attention to the warning and safety information indicated by the symbol. Also please note the safety and handling instructions as indicated in the Preface.
1 - 2 Overview
Not Included
Operating Systems (e.g. Windows 7) and applications (e.g. word processing, spreadsheet and database programs) have their own manuals, so please consult the appropriate manuals.

Drivers
If you are installing new system software, or are re-configuring your computer for a different system, you will need to install the drivers listed in "Drivers & Utilities" on page 4 - 1. Drivers are programs which act as an interface between the computer and a hardware component e.g. a wireless network module. It is very important that you install the drivers in the order listed. You will be unable to use most advanced controls until the necessary drivers and utilities are properly installed. If your system hasn't been properly configured (your service representative may have already done that for you); refer to Chapter 4 for installation instructions.
Ports and Jacks
See Appendix A for a description of the interface (ports & jacks) which allow your computer to communicate with external devices, connect to the internet etc.

Quick Start Guide
System Startup
- Remove all packing materials.
- Place the computer on a stable surface.
- Securely attach any peripherals you want to use with the notebook (e.g. keyboard and mouse) to their ports.
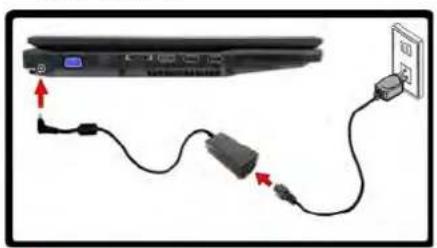
- Attach the AC/DC adapter to the DC-In jack on the left of the computer, then plug the AC power cord into an outlet, and connect the AC power cord to the AC/DC adapter.
- Use one hand to raise the lid/LCD to a comfortable viewing angle (do not exceed 120 degrees); use the other hand (as illustrated in Figure 1 - 1 below) to support the base of the computer (Note: Never lift the computer by the lid/LCD).
natural_image
Diagram showing cable connection between a device and a power outlet (no text or symbols present)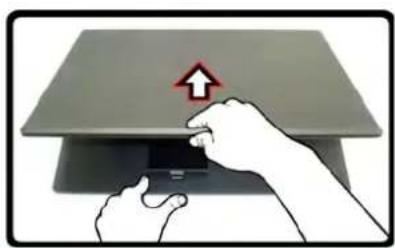
natural_image
Illustration of hands pressing a component on a device (no text or symbols visible)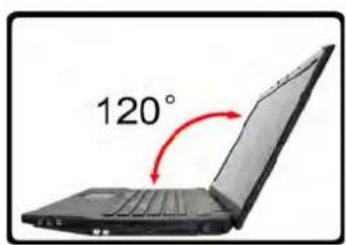
text_image
120°Shutdown
Note that you should always shut your computer down by choosing the Shut Down command from the Start menu in Windows. This will help prevent hard disk or system problems.
Figure 1 - 1 - Computer with AC/DC Adapter Plugged-In/Opening the Lid/LCD/
1 - 4 Overview
Model Differences
This notebook series includes two different model types that vary slightly in design style, color and general appearance. Note that your model may appear slightly different from those pictured in this manual. See “Specifications” on page C - 1 for a full information on the chipsets, CPUs and modules supported by each model.
System Software
Your computer may already come with system software pre-installed. Where this is not the case, or where you are re-configuring your computer for a different system, you will find that this manual refers to the Windows 7 operating system.
Windows OS
In order to run Windows 7 without limitations or decreased performance, your computer requires a minimum 1GB of system memory (RAM), however if you are running Windows 7 64 bit your computer requires a minimum 2GB of system memory (RAM).
Quick Start Guide
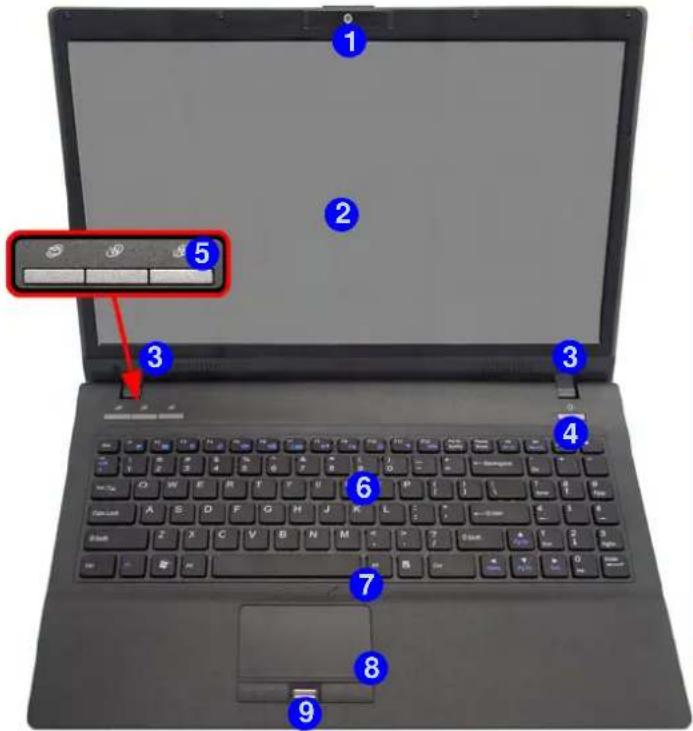
Figure 1 - 2 LCD Panel Open
- Built-In PC Camera
- LCD
- Speakers
- Power Button
- Hot Key Buttons
- Keyboard
- Built-In Microphone
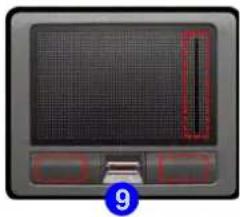
- Touchpad & Buttons
- Fingerprint Module
natural_image
Front view of a computer monitor with a grid screen and red-outlined UI element, labeled with number 9 (no readable text or symbols beyond the label)Note that the valid operational area for the Touchpad's scroll bar and Buttons is that indicated within the red dotted lines above.
System Map: LCD Panel Open
text_image
Laptop keyboard diagram with numbered annotations pointing to key keys and a red arrow indicating a button or scroll.
Wireless Device Operation Aboard Aircraft
The use of any portable electronic transmission devices aboard aircraft is usually prohibited. Make sure the module(s) are OFF if you are using the computer aboard aircraft.
Use the key combinations to toggle power to the 3.75G/HSPA/WLAN/
Bluetooth modules, and check the LED indicator icon to see if the modules are powered on or not (see Table 1 - 3, on page 1 - 10 Table 1 - 1, on page 1 - 7).
1 - 6 System Map: LCD Panel Open
LED Indicators
The LED indicators display helpful information about the current status of the computer.
| Icon | Color | Description | Icon | Color | Description |
| D-/↓ | Orange DC Power is Plugged In Green |  | The (optional) Wireless LAN Module is Powered On | ||
| Blinking Orange The Powered USB Port is On* Orange | The (optional) Bluetooth Module is Powered On | ||||
Green The Computer is On Green Hard Disk Activit  | |||||
Blinking Green The Computer is in Sleep Mode Green N  er Lock Activated er Lock Activated | |||||
| III | Orange | The Battery is Charging |  | Green | Caps Lock Activated |
| Green | The Battery is Fully Charged |  | Green | Scroll Lock Activated (to activate press Fn & Scr Lk) | |
| Blinking Orange | The Battery Has Reached Critically Low Power Status | Table 1 - 1 - LED Indicators | |||
*Note: The powered USB 2.0 port (see Figure 1 - 5 on page 1 - 12) may be toggled on /off by means of the Fn + Power Button key combination. When the powered USB port is on it will supply power when the system is off but still powered by the AC/DC adapter plugged into a working outlet, or powered by the battery with a capacity level above 20% (this may not work with certain devices - see page 8 - 11).

Quick Start Guide

Other Keyboards
If your keyboard is damaged or you just want to make a change, you can use any standard USB keyboard. The system will detect and enable it automatically. However special functions/hot-keys unique to the system's regular keyboard may not work.
NumLk & ScrLk
Hold down the Fn Key and either NumLk or ScrLk to enable number or scroll lock, and check the LED indicator for status.
Hot Key Buttons & Keyboard
These buttons give instant access to the default Internet browser and e-mail program, and allow you to toggle the Silent Mode on/off with one quick button press.
| Hot Key Function | |
 | Activate the Default E-Mail Browser (Note that inWindows 7this button will only function after Outlook or Outlook Express are installed) |
 | Activate the Default Internet Program |
 | Toggle *Silent Mode (for power saving) |
Table 1 - 2 - Hot Key Buttons
*When enabled, Silent Mode will reduce fan noise and save power consumption. Note this may reduce computer performance.

Special Characters
Some software applications allow the number-keys to be used with Alt to produce special characters. These special characters can only be produced by using the numeric keypad. Regular number keys (in the upper row of the keyboard) will not work. Make sure that NumLk is on.
1 - 8 Hot Key Buttons & Keyboard
Quick Start Guide
Keyboard
The keyboard has a numerical keypad on the right for easy numeric data input, and features function keys to allow you to change operational features instantly. See Table 1 - 3, on page 1 - 10 for full function key combination details.

text_image
Esc F1 F2 F3 F4 F5 F6 F7 F8 F9 F10 F11 F12 Prt Sc Pause Ins Del / * ! @ # $ Function Keys - ( ) - + NumLk & 1 2 3 4 5 6 7 8 9 0 = - Backs ScrLk Keys Play/Pause Key W E R T Y U I O P { } 7 8 9 Tab → W E R T Y U I O P { } ; Home ↑ PgUp Caps Lock A S D F G H J K L : " ← Enter 4 5 6 Shift Z X C V B N M < Power Numerical Keypad Ctrl Fa Alt Alt Ctrl Home PgOn End Ins EnterFigure 1 - 3 - Keyboard
Keyboard 1 - 9

Quick Start Guide
Function/Hot Key Indicators
The function keys (F1 - F12 etc.) will act as hot keys when pressed while the Fn key is held down. In addition to the basic function key combinations; visual indicators are available when the hot key utility is installed.
| Keys Function Keys Function | |||
| Fn + ~ Play/Pause (in Audio/Video Programs) Fn + F7 Display Toggle | |||
| Fn + [IMAGE] | 3.5G Module Power Toggle   | Fn + F8/F9 | Brightness Decrease/Increase  |
| Fn + F1 | TouchPad Toggle   | Fn + F10 | PC Camera Power Toggle   |
| Fn + F2 | Turn LCD Backlight Off(Press a key to or use TouchPad to turn on) | Fn + F11 | WLAN Module Power Toggle [IMAGE] [OFF] |
| Fn + F3 | Mute Toggle   | Fn + F12 | Bluetooth Module Power Toggle   |
| Fn + F4 Sleep Toggle |  | *Silent Mode Toggle (see page 3 - 7)  | |
| Fn + F5/F6 | Volume Decrease/Increase  | ||
Table 1 - 3 - Function & Hot Key Indicators
1 - 10 Function/Hot Key Indicators
Quick Start Guide
System Map: Front & Left Views
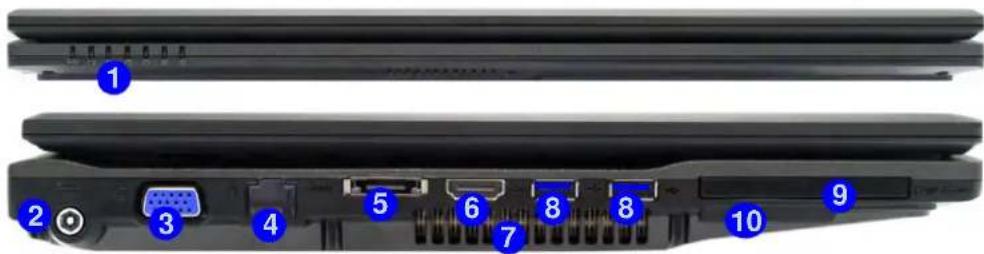
text_image
Labeled diagram of a laptop chassis showing internal components and portsMulti-In-1 Card Reader
The card reader allows you to use the most popular digital storage card formats:
MMC (MultiMedia Card) / RS MMC
SD (Secure Digital) / Mini SD / SDHC / SDXC
MS (Memory Stick) / MS Pro / MS Duo
USB 3.0 Ports
USB 3.0 ports are denoted by their blue color; USB 2.0 ports are colored black. Note that the USB 3.0 port requires a driver installation (see "USB 3.0" on page 4 - 7), does not support wake on USB and is not operational under DOS.
Figure 1 - 4 Front & Left Views
- LED Indicators
- DC-In Jack
- External Monitor Port
- RJ-45 LAN Jack
- e-SATA Port/USB 2.0 Combo Port
- HDMI-Out Port
- Vent/Fan Intake/Outlet
- 2 * USB 3.0 Ports
- ExpressCard Slot (see page 2 - 7)
- Multi-In-1 Card Reader

Quick Start Guide
Figure 1 - 5 Right & Rear Views
- S/PDIF-Out Jack
- Microphone-In Jack
- Headphone-Out Jack
- 1 * Powered USB 2.0 Port
- Optical Device Drive Bay (for CD/DVD Device - see page 2 - 3)
- Security Lock Slot
- Battery
System Map: Right & Rear Views
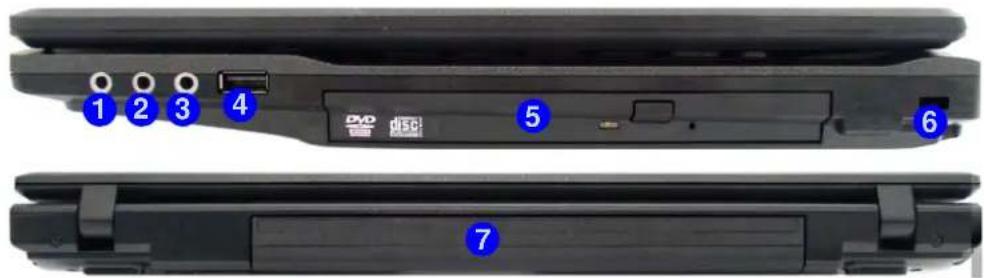
text_image
1 2 3 4 DVD disc 5 6 7Powered USB 2.0 Port
The powered USB 2.0 port 4 an supply power when the system is off but still powered by the AC/DC adapter plugged into a working outlet, or powered by the battery with a capacity level above 20% (this may not work with certain devices - see page 8 - 11). Toggle power to this port by using Fn + power button.
1 - 12 System Map: Right & Rear Views

CD/DVD Emergency Eject
If you need to manually eject a CD/DVD (e.g. due to an unexpected power interruption) you may push the end of a straightened paper clip into the emergency eject hole. Do not use a sharpened pencil or any object that may break and become lodged in the hole. Don't try to remove a floppy disk/CD/DVD while the system is accessing it. This may cause the system to "crash".
Disk Eject Warning
Don't try to eject a CD/DVD while the system is accessing it. This may cause the system to "crash". Stop the disk first then eject it, or press the stop button twice.

Changing DVD Regional Codes
Go to the Control Panel and double-click Device Manager (Hardware and Sound), then click the + next to DVD/CD-ROM drives. Double-click on the DVD-ROM device to bring up the Properties dialog box, and select the DVD Region (tab) to bring up the control panel to allow you to adjust the regional code.
DVD region detection is device dependent, not OS-dependent. You can select your module's region code 5 times. The fifth selection is permanent. This cannot be altered even if you change your operating system or you use the module in another computer.

Quick Start Guide
Figure 1 - 6 Bottom View
- Battery
- Docking Port
- RAM & CPU Bay Cover
- Vent/Fan Intake/Outlet
- Hard Disk Bay Cover
Note: the 3.75G/HSPA USIM Card is located under the RAM & CPU Bay Cover.
System Map: Bottom View

Battery Information
Always completely discharge, then fully charge, a new battery before using it. Completely discharge and charge the battery at least once every 30 days or after about 20 partial discharges. See "Battery Information" on page 3 - 11 for full instructions.
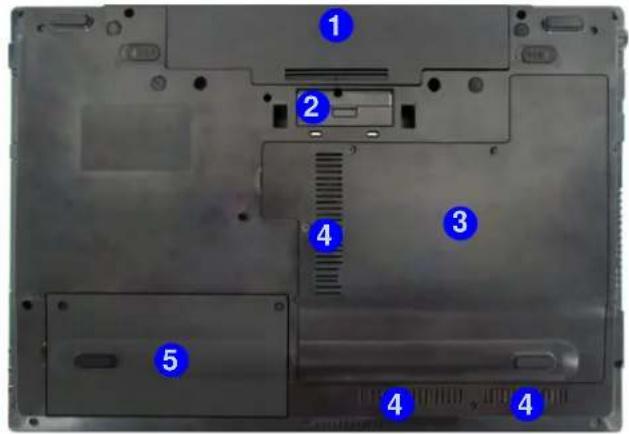
text_image
Laptop front panel with numbered annotations pointing to different components
CPU
The CPU is not a user serviceable part.
Overheating
To prevent your computer from overheating make sure nothing blocks the Vent/Fan Intake while the computer is in use.
1 - 14 System Map: Bottom View
3.75G/HSPA Module USIM Card Installation
If you have included an optional 3.75G/HSPA module in your purchase option, follow the instructions below to install the USIM card (which will be provided by your service provider), and then run the Mobile Partner application. See “Wireless Manager” on page 7 - 51 for instructions on installing the program etc.
- Turn off the computer, and turn it over and then remove the battery (slide the latches in the direction indicated below and slide the battery out).
- Insert the USIM card into the slot at the rear of the battery compartment, as illustrated below, until it clicks fully into position, and replace the battery.
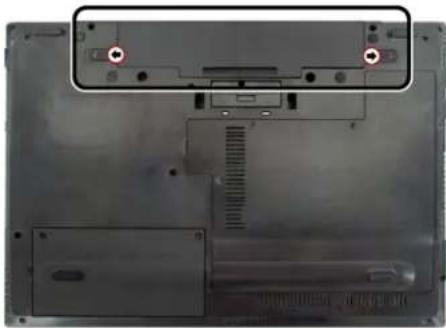
natural_image
Back view of a laptop chassis showing front panel, rear panel, and internal components (no text or symbols visible)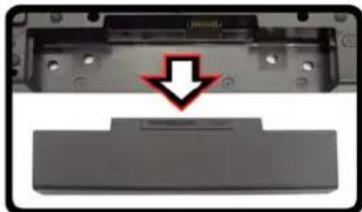
natural_image
Close-up of a black electronic device casing with a red arrow pointing to a component, no visible text or symbols.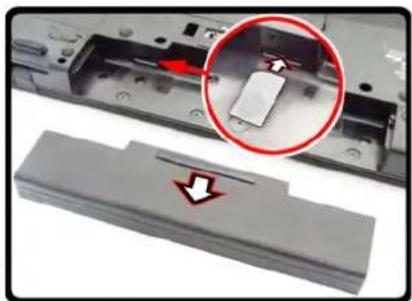
natural_image
Close-up of a mechanical component with a magnified inset showing a small electronic component (no visible text or symbols)
USIM Card Orientation
Note that the USIM card's readable side (with the gold-colored contacts) should face upwards as illustrated.
Figure 1 - 7 - Battery Removal & USIM Card Insertion

Quick Start Guide
Docking Port
Follow the instructions below before connecting the computer to the docking station, if included in your purchase configuration (Factory Option for Model A computers). Failure to open the cover of the docking port before connecting the computer to the docking station may result in irreparable damage to the connector on the docking station.
- Turn the computer over.
- Slide the docking port cover latch in the direction of the arrow at point to open the cover.
- After disconnecting the computer from the docking station, slide the docking port cover latch in the direction of the arrow at point ②
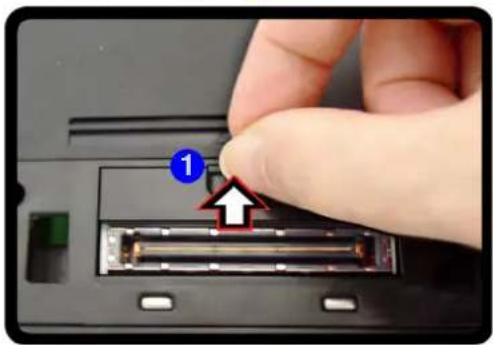
natural_image
Close-up of a hand inserting a physical component into a device (no visible text or symbols)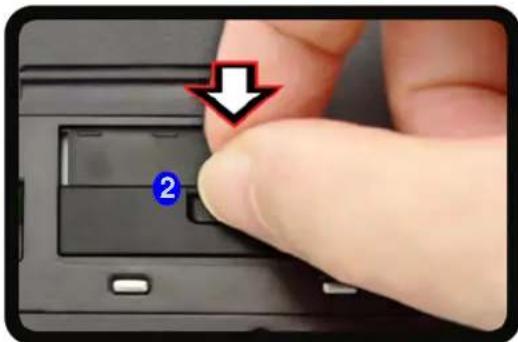
text_image
2Figure 1 - 8 - Opening and Closing the Docking Port

Docking Port Cover
Make sure you keep the cover closed when the computer is not docked in the station. This will help prevent foreign objects and/or dust getting in to the contact area.
1 - 16 Docking Port
Windows 7 Start Menu & Control Panel
Most of the control panels, utilities and programs within Windows 7 (and most other Windows versions) are accessed from the Start menu. When you install programs and utilities they will be installed on your hard disk drive, and a shortcut will usually be placed in the Start menu and/or the desktop. Right-click the Start menu icon 📋, and then select Properties if you want to customize the appearance of the Start menu.
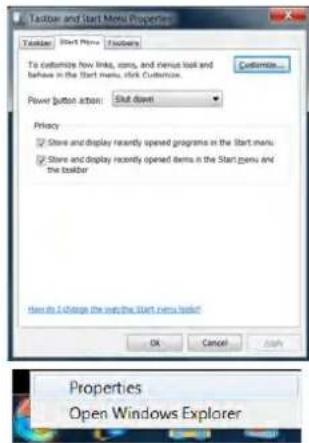
text_image
Taktor and Start Menu Properties Tasks Start Menu Features Customize... To customize how links, axes, and menus look and behave in the Start menu, click Customize. Power button action: Shift down Privacy ✓ Store and display recently opened programs in the Start menu; ✓ Store and display recently opened items in the Start menu and the toolbar then do I change the view the Start menu toolbar OK Cancel Apply Properties Open Windows Explorer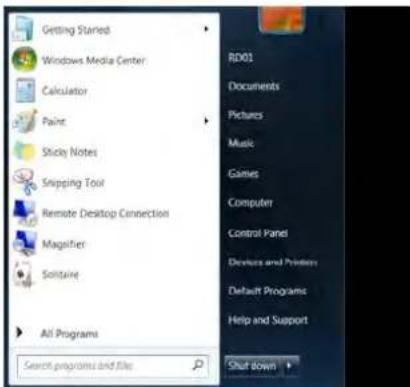
text_image
Getting Started Windows Media Center Calculator Paint Sticky Notes Snipping Tool Remote Desktop Connection Magifier Soilaine All Programs Search programs and file RD01 Documents Pictures Music Games Computer Control Panel Desktops and Printers Default Programs Help and Support Shut down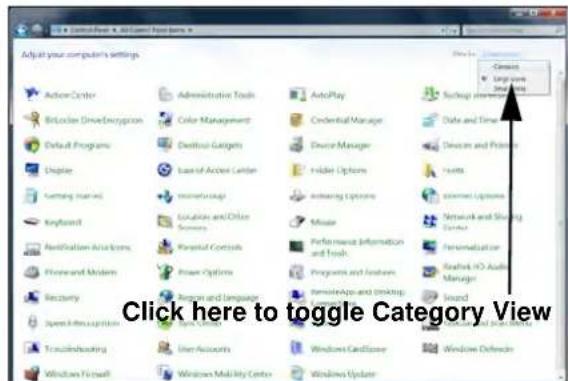
text_image
ControlBox 4. Active Web Tools Adjust your computer settings Action Center Edit Course Drive/Inception Default Programs Delete Surgery training Keyboard Application Audio Items Phone and Modem Recovery Open Information To Install/Boosting Windows Firewall Administrative Tools Color Management Dental Gadget Ease of Access Center Wormware Location and Office Services Personal Controls Power Options Access and Language User Accounts Windows Security Windows Update AutoPlay Credential Manager Device Manager Hidden Options Enhancing Options Miscar Performance Information and Touch Programs and Features Personal Apps and Linkups Windows CardSpace Windows Update Cancel Large screen Small screen Supply Chain Data and Time Devices and Process Tools Internet Options Network and Shipping Center Personalization Starlink HD Audio Manager Isand Send to Open ServiceFigure 1 - 9 - Start Menu & Control Panel
In many instances throughout this manual you will see an instruction to open the Control Panel. The Control Panel is accessed from the Start menu, and it allows you to configure the settings for most of the key features in Windows (e.g. power, video, network, audio etc.). Windows 7 provides basic controls for many of the features, however many new controls are added (or existing ones are enhanced) when you install the drivers. To see all controls it may be necessary to toggle off Category View to view the control panel icons.

Quick Start Guide
Video Features
You can configure display options from the Display (Control Panel) and Screen Resolution in Windows. For more detailed video information see "Intel Video Driver Controls" on page B - 1.
To access Display (Control Panel) and Screen Resolution in Windows:
- Click Start and click Control Panel.
- Click Display (icon) - In the Appearance and Personalization category.
- Click Adjust Screen Resolution/Adjust resolution.
OR
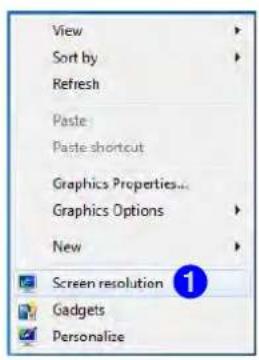
- Alternatively you can right-click the desktop and select Screen resolution ① (Figure 1 - 10).
- Use the dropbox to select the screen Resolution ② (Figure 1 - 10).
- Click Advanced settings ③ (Figure 1 - 10) to bring up the Advanced properties tabs.
text_image
View Sort by Refresh Paste Paste shortcut Graphics Properties... Graphics Options New Screen resolution Gadgets Personalize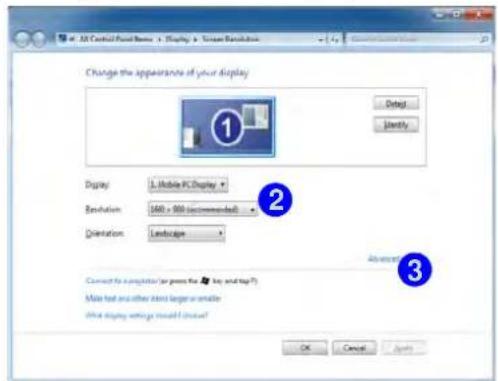
text_image
All Control Panel Name - Display - Screen Resolution Change the appearance of your display Display: 1. Mobile PC Display Resolution: 140 x 500 (Recommended) Orientation: Landscape Connect to a computer (or press the key and top?) Make text and other text larger or smaller What display settings should be found? OK Cancel ApplyFigure 1 - 10 - Screen Resolution
1 - 18 Video Features
Quick Start Guide
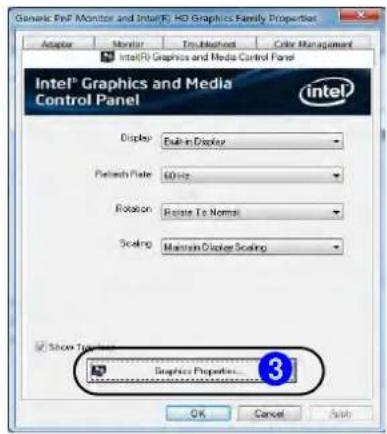
To access the Intel(R) Graphics and Media Control Panel:
- Click Advanced settings ② (Figure 1 - 10 on page 1 - 18) in the Display Settings control panel in Windows.
- Click Graphics Properties (button) ③ (Figure 1 - 11) in the Intel Graphics & Media Control Panel tab.
OR
- Right-click the desktop and select Graphics Properties from the menu.
OR - Click the icon 4 (Figure 1 - 11) in the taskbar and select Graphics Properties from the menu.
OR - Access the Intel(R) Graphics and Media Control Panel from the Windows control panel in Classic View.
text_image
Generic PDF Monitor and Intel® HD Graphics Family Properties Adapter Monitor Trip-Method Color Management Intel® Graphics and Media Control Panel Intel® Graphics and Media Control Panel Display Built-in Display Patch/Plate 60 Hz Rotation Relate To Normal Scaling Maintain Display Scaling Show Options Graphics Properties... OK Cancel Apply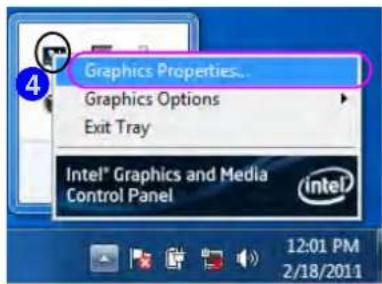
text_image
Graphics Properties... Graphics Options Exit Tray Intel® Graphics and Media Control Panel 12:01 PM 2/18/2011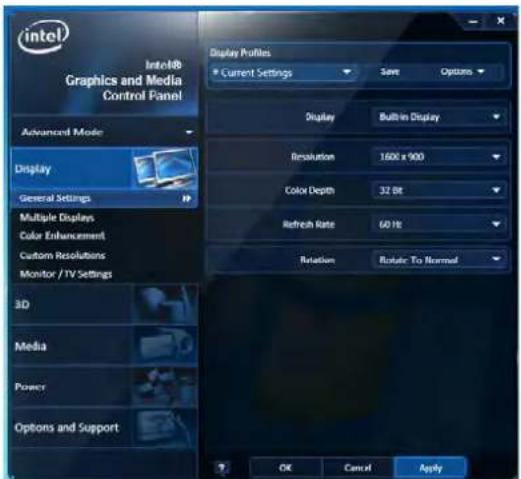
text_image
Intel i36B Graphics and Media Control Panel Advanced Mode Display General Settings Multiple Displays Color Enhancement Custom Resolutions Monitor / TV Settings 3D Media Power Options and Support Display Profiles Current Settings Save Options Display Built-in Display Resolution 1600 x 900 Color Depth 32 Bit Refresh Rate 60 Hz Rotation Rotate To Normal OK Cancel ApplyFigure 1 - 11 - Intel Graphics and Media Control Panel

Quick Start Guide
Power Options
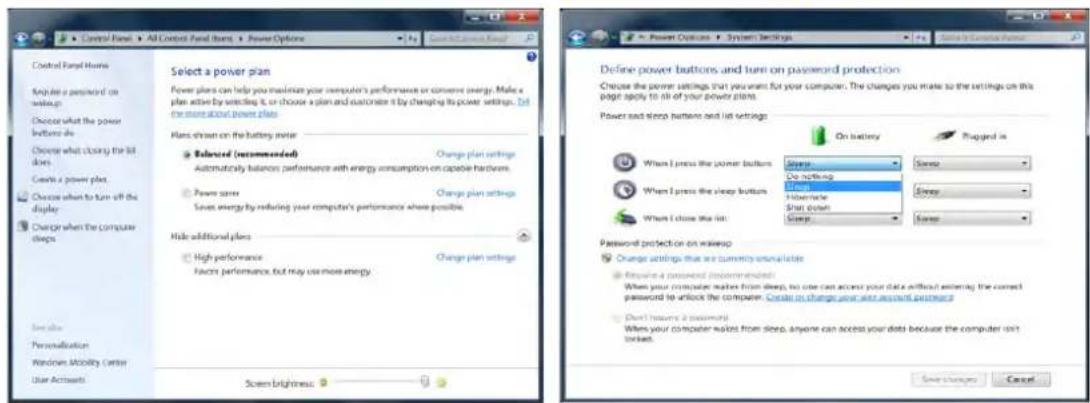
The Power Options (Hardware and Sound menu) control panel icon in Windows (see page 1 - 14) allows you to configure power management features for your computer. You can conserve power by means of power plans and configure the options for the power button, sleep button, computer lid (when closed), display and sleep mode from the left menu. Note that the Power saver plan may have an affect on computer performance.
Click to select one of the existing plans, or click Create a power plan in the left menu and select the options to create a new plan. Click Change plan settings and click Change advanced power settings to access further configuration options.
Pay attention to the instructions on battery care in "Battery Information" on page 3 - 11.
text_image
Control Panel Home Include a password on watches Choose what the power buttons do Choose what closing the list does Create a power plan. Choose when to turn off the display Change when the computer sleeps Save the Personalization Remote Security Center User Accounts Select a power plan Power plans can help you maximize your computer's performance or consume energy. Make a plan active by watching it, or choose a plan and customize it by changing its power settings. Do re more about power plans Plans drawn on the battery meter Balanced (recommended) Automatically balances performance with energy consumption on capable hardware. Power save Save energy by reducing your computer's performance where possible. Make additional plans High performance Focus performance, but may use more energy. Change plan settings Change plan settings Change plan settings Change plan settings Define power buttons and turn on password protection Choose the power settings that you want for your computer. The changes you make so the settings on this page apply to all of your power plans. Power and sleep buttons and list settings On battery Locked in When I press the power button Sleep Do nothing Sleep When I press the sleep button Sleep When I chose the list: Sleep Password protection on wireless Change settings that are currently unavailable Require a password recommended When your computer wakes from sleep, no one can access your data without entering the correct password to unlock the computer. Create an account your own account password. Don't have a permission! When your computer wakes from sleep, anyone can access your data because the computer isn't locked. Save Changes... Cancel...Figure 1 - 12 - Power Options
1 - 20 Power Options
Chapter 2: Features & Components
Overview
Read this chapter to learn more about the following main features and components of the computer:
- Hard Disk Drive
• Optical (CD/DVD) Device - Multi-in-1 Card Reader
- ExpressCard Slot
- Touchpad and Buttons/Mouse
- Audio Features
- Adding a Printer
Features & Components

Power Safety
Before attempting to access any of the internal components of your computer please ensure that the machine is not connected to the AC power, and that the machine is turned off. Also ensure that all peripheral cables, including phone lines, are disconnected from the computer.
Figure 2 - 1
Hard Disk Location
Hard Disk Drive
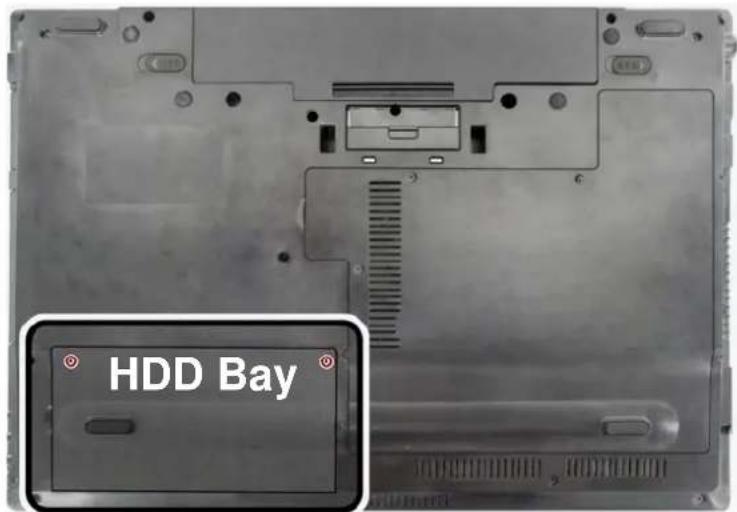
The hard disk drive is used to store your data in the computer. The hard disk can be taken out to accommodate other 2.5" serial (SATA) hard disk drives with a height of 9.5 mm.
The hard disk is accessible from the bottom of your computer as seen below. For further details see “Upgrading the Hard Disk Drive” on page 6 - 4.
text_image
HDD Bay2 - 2 Hard Disk Drive
Optical (CD/DVD) Device
There is a bay for a 5.25" optical (CD/DVD) device (12.7mm height). The actual device will depend on the module you purchased (see "Storage" on page C - 3). The optical device is usually labeled "Drive D:" and may be used as a boot device if properly set in the BIOS (see "Boot Menu" on page 5 - 18).
Loading Discs
To insert a CD/DVD, press the open button ①nd carefully place a CD/DVD onto the disc tray with label-side facing up (use just enough force for the disc to click onto the tray's spindle). Gently push the CD/DVD tray in until its lock "clicks" and you are ready to start. The busy indicator ②vill light up while data is being accessed, or while an audio/video CD, or DVD, is playing. If power is unexpectedly interrupted, insert an object such as a straightened paper clip into the emergency eject hole ③ to open the tray.

text_image
DVD disc 2 1 3
Sound Volume Adjustment
How high the sound volume can be set depends on the setting of the volume control within Windows. Click the Volume icon on the taskbar to check the setting (see "Audio Features" on page 2 - 12).
Figure 2 - 2 Optical Device
Features & Components

CD Emergency Eject
If you need to manually eject a CD (e.g. due to an unexpected power interruption) you may push the end of a straightened paper clip into the emergency eject hole. However please do NOT use a sharpened pencil or similar object that may break and become lodged in the hole.
Disk Eject Warning
Don't try to remove a CD/DVD while the system is accessing it. This may cause the system to "crash".
Handling CDs or DVDs
Proper handling of your CDs/DVDs will prevent them from being damaged. Please follow the advice below to make sure that the data stored on your CDs/DVDs can be accessed.
Note the following:
- Hold the CD or DVD by the edges; do not touch the surface of the disc.
- Use a clean, soft, dry cloth to remove dust or fingerprints.
- Do not write on the surface with a pen.
- Do not attach paper or other materials to the surface of the disc.
- Do not store or place the CD or DVD in high-temperature areas.
- Do not use benzene, thinner, or other cleaners to clean the CD or DVD.
- Do not bend the CD or DVD.
- Do not drop or subject the CD or DVD to shock.
DVD Regional Codes
To change the DVD regional codes see “Changing DVD Regional Codes” on page 1 - 13.
| DVD Regional Coding | ||
| Region | Geographical Location | 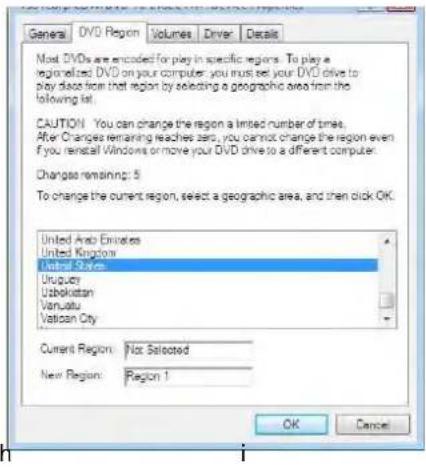 |
| 1 USA | Canada | |
| 2 | Western Europe, Japan, South Africa, Middle East & Egypt | |
| 3 | South-East Asia, Taiwan, South Korea, The Philippines, Indonesia, Hong Kong | |
| 4 | South & Central America, Mexico, Australia, New Zealand | |
| 5 | N Korea, Russia, Eastern Europe, India & Most of Africa | |
| 6 | C | |
Table 2 - 1 DVD Regional Coding
n
a
Features & Components
2
Card Reader Cover
Make sure you keep the rubber cover provided in the card reader when not in use. This will help prevent foreign objects and/or dust getting in to the card reader.
Figure 2 - 3 Left View
- Card Reader
Multi-in-1 Card Reader
The card reader allows you to use some of the latest digital storage cards. Push the card into the slot and it will appear as a removable device, and can be accessed in the same way as your hard disk (s). Make sure you install the card reader driver (see "CardReader" on page 4 - 6).
• MMC (MultiMedia Card) / RS MMC
• SD (Secure Digital) / Mini SD / SDHC / SDXC
• MS (Memory Stick) / MS Pro / MS Duo
*Note: The PC adapters are usually supplied with these cards.

natural_image
Back view of a laptop computer showing port labels and connectors (no readable text or symbols)Features & Components
ExpressCard Slot
The computer is equipped with an ExpressCard/34/54 slot that reads Express Card/34 and ExpressCard/54 formats. ExpressCards are the successors to PCMCIA (PC Cards). Make sure you install the Card Reader driver (see "CardReader" on page 4 - 6).
ExpressCard/54 is used for applications which require a larger interface slot, e.g. CompactFlash card reader. The number denotes the card width; 54mm for the Express Card/54 and 34mm for the ExpressCard/34.

natural_image
Back view of a black laptop computer showing port, ventilation slots, and a blue circular marker labeled '1' (no text or symbols on the device itself)Inserting and Removing ExpressCards
- Align the ExpressCard with the slot and push it in until it locks into place (as pictured in the generic figure below).
- To remove an ExpressCard, simply press the card to eject it.

ExpressCard Slot Cover
Make sure you keep the rubber cover provided in the ExpressCard slot when not in use. This will help prevent foreign objects and/or dust getting in to the ExpressCard Slot.
Figure 2 - 4 Left View
- ExpressCard Slot
Features & Components
2

Touchpad Scrolling
This computer model series may feature different Touchpad versions.
These Touchpads may differ in their vertical scrolling function in most scrollable windows.
Some Touchpads require sliding the finger up and down on the right of the Touchpad to scroll the window. Other versions require tapping/holding down the finger at the top right or bottom right of the Touchpad to scroll the window.
Figure 2 - 5 Mouse Properties
Touchpad and Buttons/Mouse
The Touchpad is an alternative to the mouse; however, you can also add a mouse to your computer through one of the USB ports. The Touchpad buttons function in much the same way as a two-button mouse.
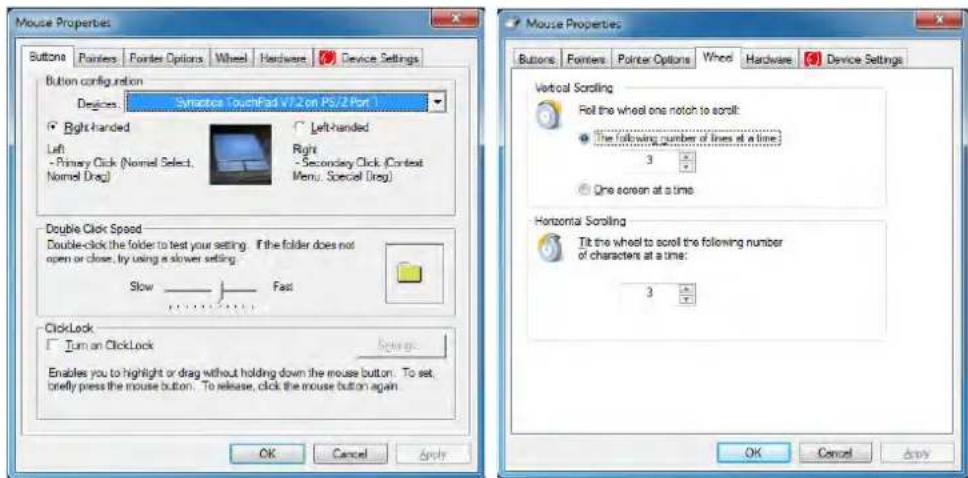
Once you have installed the Touchpad driver (see "TouchPad" on page 4 - 6) you can configure the functions by double-clicking the Touchpad driver icon in the notification area. You may then configure the Touchpad tapping, buttons, scrolling (see sidebar), pointer motion and sensitivity options to your preferences.
text_image
Mouse Properties Buttons Pointers Pointer Options Wheel Hardware Device Settings Button configuration Devices: Synatica TouchPad V12 on PS/2 Port Right handed Left - Primary Click (Normal Select, Normal Drag) Left-handed Right - Secondary Click (Context Menu, Special Drag) Double Click Speed Double-click the folder to test your setting. If the folder does not open or close, try using a slower setting. Slow Fast ClickLock Turn on ClickLock Enable you to highlight or drag without holding down the mouse button. To set, briefly press the mouse button. To release, click the mouse button again OK Cancel Apply Mouse Properties Buttons Pointers Pointer Options Wheel Hardware Device Settings Vertical Scrolling Fell the wheel one notch to scroll: The following number of lines at a time: 3 One screen at a time Horizontal Scrolling Tilt the wheel to scroll the following number of characters at a time: 3 OK Cancel Apply2 - 8 Touchpad and Buttons/Mouse
Features & Components
Gestures and Device Settings
The Synaptics Gestures Suite application allows you to use a specific gesture (action) on the surface of the Touchpad to perform specific actions to manipulate documents, objects and applications.
You can configure the settings from the Device Settings tab in Mouse Properties:
- Click Start, and click Control Panel (or point to Settings and click Control Panel).
- Click Mouse (Hardware and Sound).
- Click Device Settings (tab) and click Settings.
- Use the menu tree on the left to access the user configurable settings.
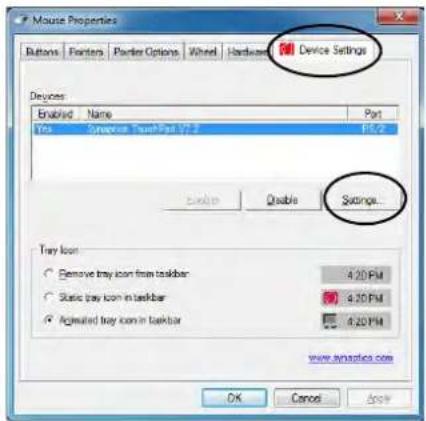
text_image
Mouse Properties Buttons Fonters Folder Options Wheel Hardware Device Settings Devices Enabled Name Port Yes Syniverse TrayIcon V7.3 FPC2 Enable Enable Settings... Tray Icon Remove tray icon from taskbar 4:20PM Static tray icon in taskbar 4:20PM Automated tray icon in taskbar 4:20PM www.synastics.com OK Cancel Apply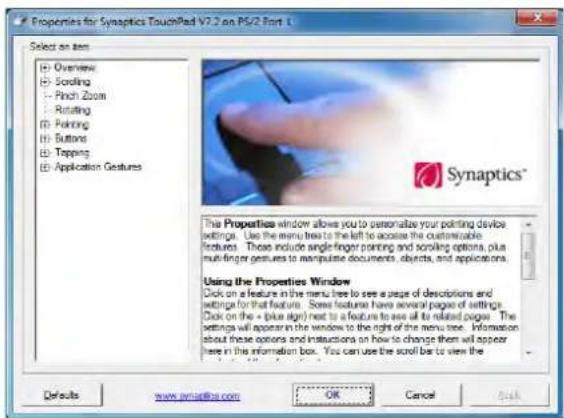
text_image
Properties for Synaptics TouchPad V7.2 on PS/2 Part 1 Select on item • Overview • Scrolling • Pinch Zoom • Rotating • Polkring • Buttons • Topping • Application Features Synaptics® The Properties window allows you to personalize your printing device settings. Use the menu tree to the left to access the customizable features. These include single finger printing and scrolling options, plus multi-finger gestures to manipulate documents, objects, and applications. Using the Properties Window Click on a feature in the menu tree to see a page of descriptions and settings for that feature. Some features have several pages of settings. Click on the + (blue align) next to a feature to see all its related pages. The settings will appear in the window to the right of the menu tree. Information about these options and instructions on how to change them will appear here in this information box. You can use the scroll bar to view the Defaults www.pntia@cs.com OR Cancel Help
Show Video
You can get a clearer view of the gestures involved by clicking the Show Video option for each gesture item.
Select the gesture (Pinch Zoom, Rotating, Three Fingers Down and Three Finger Flick) in the Device Settings > Settings left tree menu and click the Show Video button to see the demonstration video.
For more details on any of the gestures see the help in the lower part of the right menu window.
Figure 2 - 6
Mouse Properties - Device Settings
Features & Components
2
Figure 2 - 7
Scrolling Gesture

Mouse Driver
If you are using an external mouse your operating system may be able to auto-configure your mouse during its installation or only enable its basic functions. Be sure to check the device's user documentation for details.
Figure 2 - 8 Zooming Gesture
Scrolling
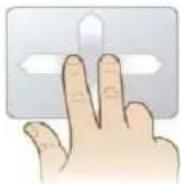
The Two-Finger scrolling feature works in most scrollable windows and allows you to scroll horizontally and vertically. Place two fingers, slightly separated, on the Touchpad surface and slide both fingers in the direction required (in a straight continuous motion).
Zooming
The Pinch Zoom gesture can be used to perform the same function as a scroll wheel in Windows applications that support CTRL + scroll wheel zoom functionality. Place two fingers on the Touchpad (for best results use the tips of the fingers) and slide them apart to zoom in, or closer together to zoom out.

2 - 10 Touchpad and Buttons/Mouse
Features & Components
Rotating
Use the Pivot Rotate gesture to rotate objects (e.g. photos) in 90 degree increments. Place a finger down on the left “target” zone and keep it stationary. Place another finger near the middle of the Touchpad and slide it in a circular motion around the stationary finger (clockwise or counterclockwise) to rotate the object.
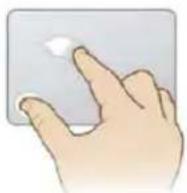
Figure 2 - 9
Rotating Gesture
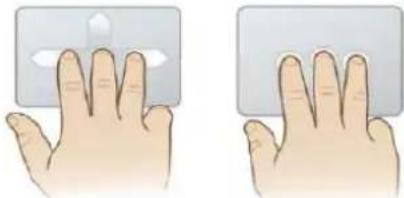
Three Finger-Flick/Three Fingers Down (Press)
The Three Finger-Flick gesture may be used to enhance navigation with a variety of applications such as browsing the Internet or scrolling through a photo viewer. The Three Fingers Down gesture may be used to launch user-selectable applications.
natural_image
Illustration of two hands holding a rectangular object with a dot on top (no text or symbols)Figure 2 - 10 Flick/Press Gesture
Touchpad and Buttons/Mouse 2 - 11
Features & Components
2

Sound Volume Adjustment
The sound volume level is set using the volume control within Windows (and the volume function keys on the computer). Click the volume icon in the taskbar to check the setting.
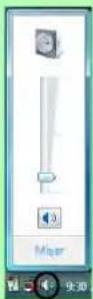
Figure 2 - 11
Realtek Audio
Manager
Audio Features
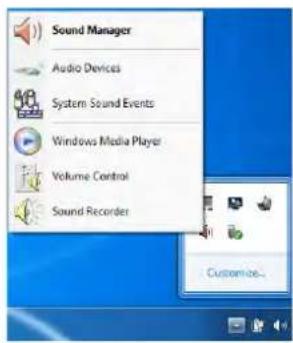
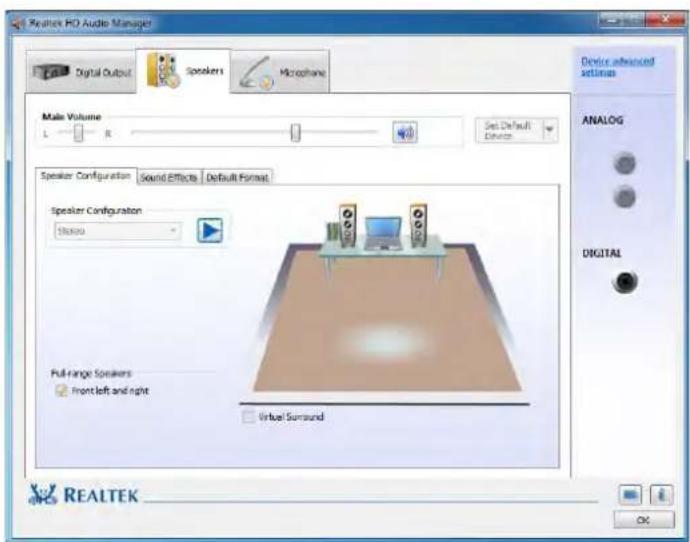
You can configure the audio options on your computer from the Sound control panel in Windows, or from the Realtek HD Audio Manager icon in the taskbar/control panel (right-click the taskbar icon to bring up an audio menu). The volume may also be adjusted by means of the Fn + F5/F6 key combination.
text_image
Sound Manager Audio Devices System Sound Events Windows Media Player Volume Control Sound Recorder Customize...Right-click the icon to access the menu above.
text_image
REALTEK HD Audio Manager Digital Output Speakers Microphone Make Volume L R Set Default Device Speaker Configuration Sound Effects Default Format Speaker Configuration Status Full-range Speakers Front left and right Virtual Surround Analog DIGITAL REALTEK2 - 12 Audio Features
Features & Components
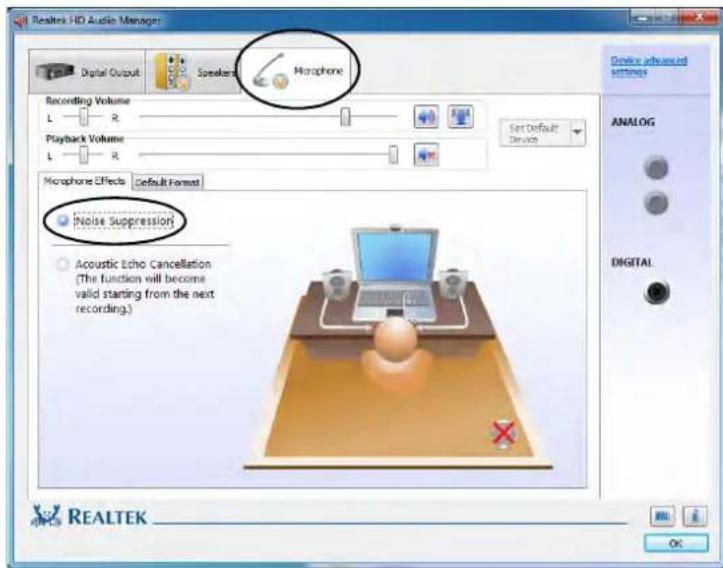
Optimizing Audio Recording
Follow these instructions to optimize your audio recording.
- Double-click the taskbar icon to bring up the Realtek HD Audio Manager.
- Click the Microphone tab.
- Click the Noise Suppression button to prevent any background noise or feedback.
- Click OK to close the Realtek HD Audio Manager.
text_image
Realtek HD Audio Manager Digital Output Speaker Microphone Recording Volume L R Playback Volume L R Set Default Device Microphone Effects Default Format [Noise Suppression] Acoustic Echo Cancellation (The function will become valid starting from the next recording.) DIGITAL REALTEK OKFigure 2 - 12 Optimizing Audio Recording
Audio Features 2 - 13
Features & Components
2

Parallel Printer
After setting up the printer attach the parallel cable to the printer.
Connect the printer's parallel cable to the Parallel to USB converter, and then plug the converter into the USB port.
Turn ON the printer, then turn ON the computer.
Windows will identify the printer and either load one of its own drivers or ask you to supply one. Follow the on-screen instructions.
Adding a Printer
The most commonly used peripheral is a printer. The following conventions will help you to add a printer; however it is always best to refer to the printer manual for specific instructions and configuration options.
USB Printer
Most current printers have a USB interface connection. You may use any one of the ports to connect the printer.
Install Instructions:
- Set up the printer according to its instructions (unpacking, paper tray, toner/ink cartridge etc.).
- Turn ON the computer.
- Turn ON the printer.
- Connect the printer's USB cable to one of the USB ports on the computer.
- Windows will identify the printer and either load one of its own drivers or ask you to supply one. Follow the on-screen instructions.
Parallel Printer
This is still a very common type of printer. The install instructions are in the sidebar, however you will need to purchase a parallel to USB converter.
2 - 14 Adding a Printer
Power Management
Chapter 3: Power Management
Overview
To conserve power, especially when using the battery, your computer power management conserves power by controlling individual components of the computer (the monitor and hard disk drive) or the whole system. This chapter covers:
• The Power Sources
• Turning On the Computer
- Power Plans
• Power-Saving States
- Configuring the Power Buttons
• Energy Star Power Saving
- Battery Information

OS Note
Power management functions will vary slightly depending on your operating system. For more information it is best to refer to the user's manual of your operating system.
The computer uses enhanced power saving techniques to give the operating system (OS) direct control over the power and thermal states of devices and processors. For example, this enables the OS to set devices into low-power states based on user settings and information from applications.
Power Management


Silent Mode
Use the Key to toggle Silent Mode to reduce fan noise and save power consumption. Note this may reduce computer performance.
The Power Sources
The computer can be powered by either an AC/DC adapter or a battery pack.
AC/DC Adapter
Use only the AC/DC adapter that comes with your computer. The wrong type of AC/DC adapter will damage the computer and its components.
- Attach the AC/DC adapter to the DC-in jack on the left of the computer.
- Plug the AC power cord into an outlet, and then connect the AC power cord to the AC/DC adapter.
- Raise the lid/LCD to a comfortable viewing angle.
- Press the power button to turn "On".
Battery
The battery allows you to use your computer while you are on the road or when an electrical outlet is unavailable. Battery life varies depending on the applications and the configuration you're using. To increase battery life, let the battery discharge completely before recharging (see "How do I completely discharge the battery?" on page 3 - 15).
We recommend that you do not remove the battery. For more information on the battery, please refer to "Energy Star Power Saving" on page 3 - 10.
3 - 2 The Power Sources
Power Management
Turning On the Computer
Now you are ready to begin using your computer. To turn it on simply press the power button on the front panel.
When the computer is on, you can use the power button as a Stand by/Hibernate/Shutdown hot-key button when it is pressed for less than 4 seconds (pressing and holding the power button for longer than this will shut the computer down). Use Power Options in the Windows control panel to configure this feature.

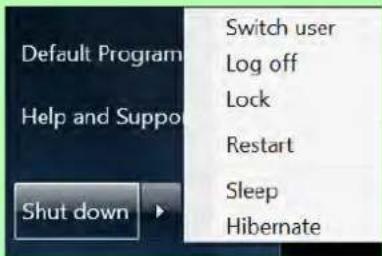
Shut Down
Note that you should always shut your computer down by choosing the Shut Down command from the bottom right of the Start menu in Windows. This will help prevent hard disk or system problems.
text_image
Default Program Help and Suppo Shut down Switch user Log off Lock Restart Sleep Hibernate
Forced Off
If the system "hangs", and the Ctrl + Alt + Del key combination doesn't work, press the power button for 4 seconds, or longer, to force the system to turn itself off.
Power Button as Stand by or Hibernate Button
You can use the OS's "Power Options" control panel to set the power button to send the system into Stand by or Hibernate mode (see your OS's documentation, or "Configuring the Power Buttons" on page 3 - 8 for details).
Power Management

Resuming Operation
See Table 3 - 1, on page 3 - 9 for information on how to resume from a power-saving state.
Password
It is recommended that you enable a password on system resume in order to protect your data.
Figure 3 - 1 Power Plan Advanced Settings
Power Plans
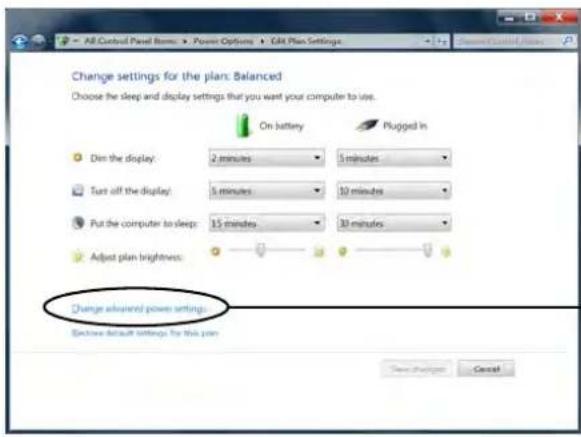
The computer can be configured to conserve power by means of power plans. You can use (or modify) an existing power plan, or create a new one.
The settings may be adjusted to set the display to turn off after a specified time, and to send the computer into Sleep after a period of inactivity.
Click Change plan settings and then click Change advanced power settings to access further configuration options in Advanced Settings.
text_image
All Control Panel Items: > Power Options > Edit Plan Settings Change Settings for the plan: Balanced Choose the sleep and display settings that you want your computer to use. On battery Plugged in Dim the display: 2 minutes 5 minutes Turn off the display: 5 minutes 10 minutes Put the computer to sleep: 15 minutes 30 minutes Adjust plan brightness: Change advanced power settings: Exclude default settings for this plan Save Utilities Cancel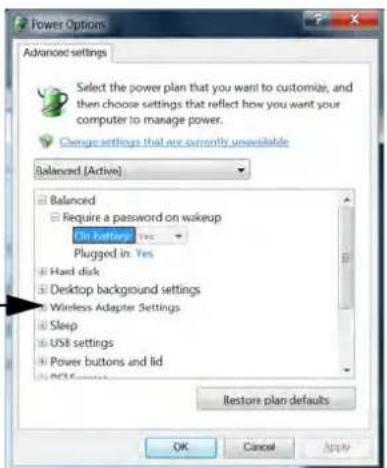
text_image
Power Options Advanced settings Select the power plan that you want to customize, and then choose settings that reflect how you want your computer to manage power. Change settings that are currently unavailable Balanced [Active] Balanced Require a password on wakeup Hot Settings: Yes Plugged in: Yes Hard disk Desktop background settings Wireless Adapter Settings Sleep USB settings Power buttons and lid Restore plan defaults OK Cancel Apply3 - 4 Power Plans
Power Management
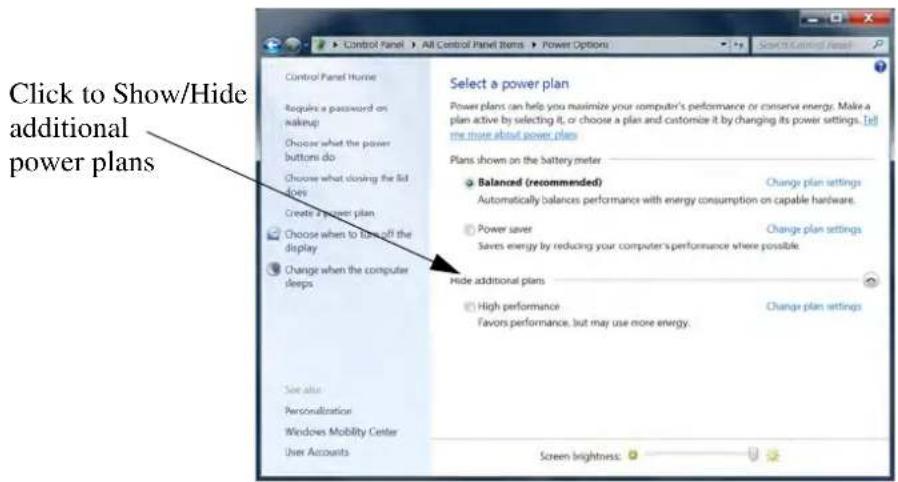
Each Windows power plan will also adjust the processor performance of your machine in order to save power. This is worth bearing in mind if you are experiencing any reduced performance (especially under DC/battery power).
Choose High performance (you may need to click Show additional plans to view the High performance plan) for maximum performance when the computer is powered from an AC power source. Choose the Power saver (bear in mind that this scheme may slow down the overall performance of the computer in order to save power) for maximum power saving when the computer is battery (DC power) powered.
text_image
Click to Show/Hide additional power plans Control Panel Hume Require a password on nakeup Choose what the power buttons do Choose what closing the lid does Create a power plan Choose when to enter off the display Change when the computer sleeps Save after Personalization Windows Mobility Center User Accounts Select a power plan Power plans can help you maximize your computer's performance or conserve energy. Make a plan active by selecting it, or choose a plan and customize it by changing its power settings. Tell me more about power plans Plans shown on the battery meter Balanced (recommended) Automatically balances performance with energy consumption on capable hardware. Power saver Saves energy by reducing your computer's performance where possible Hide additional plans High performance Favors performance, but may use more energy. Change plan settings Screen brightness.Figure 3 - 2 Power Plans
Power Management
Power-Saving States
You can use power-saving states to stop the computer's operation and restart where you left off. Win 7 uses the Sleep, Hibernate and Shut Down power-saving states.
Sleep
In Sleep all of your work, settings and preferences are saved to memory before the system sleeps. When you are not using your computer for a certain length of time, which you specify in the operating system, it will enter Sleep to save power.
The PC wakes from Sleep within seconds and will return you to where you last left off (what was on your desktop) without reopening the application(s) and file(s) you last used.
If your mobile PC in Sleep is running on battery power the system will use only a minimum amount of power. After an extended period the system will save all the information to the hard disk and shut the computer down before the battery becomes depleted.
Power Management
Hibernate
Hibernate uses the least amount of power of all the power-saving states and saves all of your information on a part of the hard disk before it turns the system off. If a power failure occurs the system can restore your work from the hard disk; if a power failure occurs when work is saved only to memory, then the work will be lost. Hibernate will also return you to where you last left off within seconds. You should put your mobile PC into Hibernate if you will not use the computer for a period of time, and will not have the chance to charge the battery.
Shut down
You should Shut down the computer if you plan to install new hardware (don't forget to remove the battery and follow all the safety instructions in Chapter 6), plan to be away from the computer for several days, or you do not need it to wake up and run a scheduled task. Returning to full operation from Shut down takes longer than from Sleep or Hibernate.

text_image
Default Program Help and Suppo Shut down Switch user Log off Lock Restart Sleep Hibernate
Silent Mode
You can use Silent Mode to reduce power consumption and fan noise.
Use the Silent Mode hot key Mto toggle this mode on/off.
On screen visual indicators will display the Silent Mode status (see Table 1 - 3, on page 1 - 10).
Note Silent Mode may reduce computer performance.
Figure 3 - 3
Lock Button menu
Power Management

Password Protection
It is recommended that you enable a password on wake up in order to protect your data.
However you can disable this setting from the Power Options menu by clicking Require a password on wakeup in the left menu, and selecting the options (click Change settings that are currently unavailable).
Figure 3 - 4 Power Options Define Power Buttons
Configuring the Power Buttons
The power/sleep button (Fn + F4 key combo) and closed lid may be set to send the computer in to a power-saving state. Click Choose what the power buttons do on the left menu in Power Options to bring up the menu.
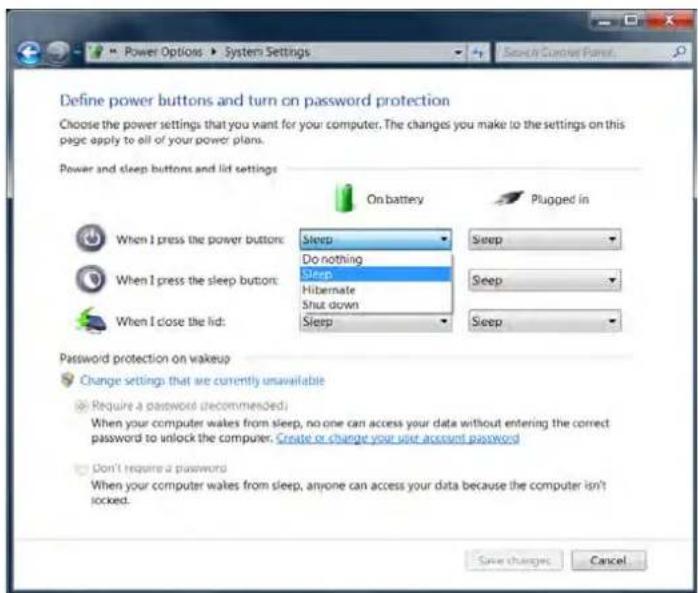
text_image
Define power buttons and turn on password protection Choose the power settings that you want for your computer. The changes you make to the settings on this page apply to all of your power plans. Power and sleep buttons and list settings On battery Plugged in When I press the power button: Sleep Do nothing Sleep Hibernate Shut down Sleep Sleep When I press the sleep button: Sleep Sleep When I close the lid: Sleep Sleep Password protection on wakeup Change settings that are currently unavailable Require a password (recommended): When your computer wakes from sleep, no one can access your data without entering the correct password to unlock the computer. Create or change your user account password Don't require a password When your computer wakes from sleep, anyone can access your data because the computer isn't locked. Save changes Cancel3 - 8 Configuring the Power Buttons
Power Management
Resuming Operation
You can resume operation from power-saving states by pressing the power button, or in some cases pressing the sleep button (Fn + F4 key combo).
| Power Status | Icon D/U | Color | To Resume |
| Power Off Off Press the Power Button | |||
| Sleep Blinking | Green | Press the Power ButtonPress the Sleep Button (Fn + F4 Key Combo) | |
| Hibernate | Off (battery)Orange (AC/DC adapter) | Press the Power Button | |
| Display Turned Off | Green Press a Key or Move | the Mouse/Touchpad | |
| Power ButtonWhen the computer is on, you can use the power button as a Sleep/Hibernate/Shut Down hot key button when it is pressed for less than 4 seconds (pressing and holding the power button for longer than this will force the computer to shut down). | |||

Closing the Lid
If you have chosen to send the computer to Sleep when the lid is closed, raising the lid will wake the system up.
Table 3 - 1
Resuming Operation

3.75G/HSPA Modules & System Wake Up
Note that the 3.75G modules DO NOT support system wake up on 3.75G/HSPA modem activity.
Power Management
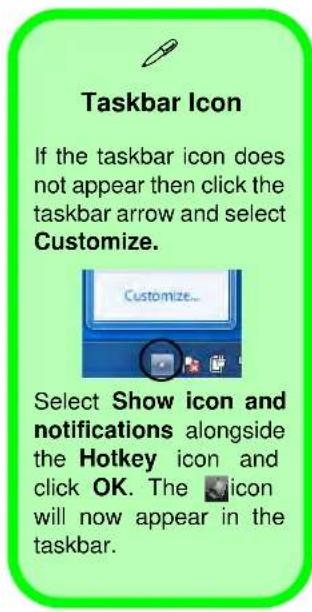
text_image
Taskbar Icon If the taskbar icon does not appear then click the taskbar arrow and select Customize. Customize... Select Show icon and notifications alongside the Hotkey icon and click OK. The 🔊icon will now appear in the taskbar.Figure 3 - 5 Energy Star Menu
Energy Star Power Saving
This system supports Energy Star power management features that place computers (CPU, hard drive, etc.) into a low-power sleep modes after a designated period of inactivity. If you want to enable Energy Star power saving then follow these instructions:
- Right-click the taskbar icon (see sidebar).
- Select Power Conservation Modes.
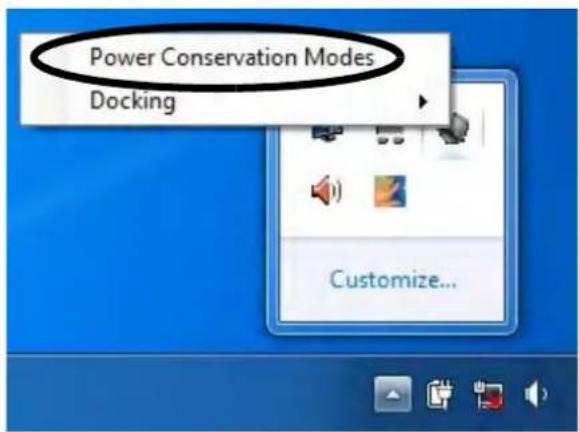
text_image
Power Conservation Modes Docking Customize...
text_image
Docking The Docking menu item will appear when you right-click the taskbar icon however this item can only be used when the computer is docked with the docking station.3 - 10 Configuring the Power Buttons
Battery Information
Follow these simple guidelines to get the best use out of your battery.
Battery Power
Your computer's battery power is dependent upon many factors, including the programs you are running, and peripheral devices attached. You can set actions to be taken (e.g. Shut down, Hibernate etc.), and set critical and low battery levels from power plan Change plan settings > Change advanced power settings (see Figure 3 - 2 on page 3 - 5).
Click the battery icon 📄 the taskbar to see the current battery level and charge status.
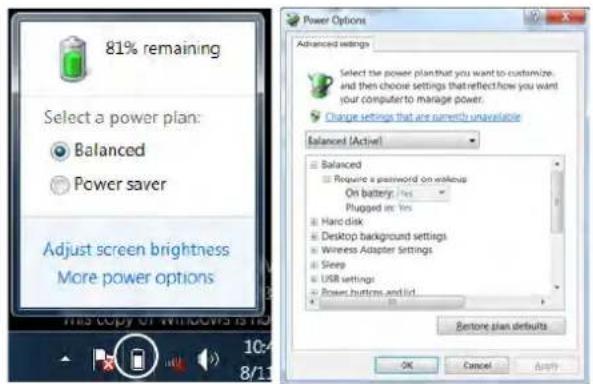
text_image
81% remaining Select a power plan: Balanced Power saver Adjust screen brightness More power options This copy of Windows is 10 10-4 8/13 Power Options Advanced settings Select the power plan that you want to customize, and then choose settings that reflect how you want your computer to manage power. Change settings that are currently unavailable Balanced (Active) Balanced Require a password on lockups On battery: Yes Plugged on Yes Hard disk Desktop background settings Wireless Adapter Settings Sleep USB settings Power buttons and list Restore plan defaults OK Cancel Apply
Low Battery Warning
When the battery is critically low, immediately connect the AC/DC adapter to the computer or save your work, otherwise, the unsaved data will be lost when the power is depleted.
Figure 3 - 6
Battery Icon (Taskbar) & Battery Advanced Settings
Power Management

Windows Mobility Center
The Windows Mobility Center control panel provides an easy point of access for information on battery status, power plans used and wireless device status etc.
Conserving Battery Power
- Use a power plan that conserves power (e.g Power saver), however note that this may have an affect on computer performance.
- Lower the brightness level of the LCD display. The system will decrease LCD brightness slightly to save power when it is not powered by the AC/DC adapter.
- Reduce the amount of time before the display is turned off.
- Close wireless, Bluetooth, modem or communication applications when they are not being used.
- Disconnect/remove any unnecessary external devices e.g. USB devices, ExpressCards etc.
Figure 3 - 7
Windows Mobility
Center
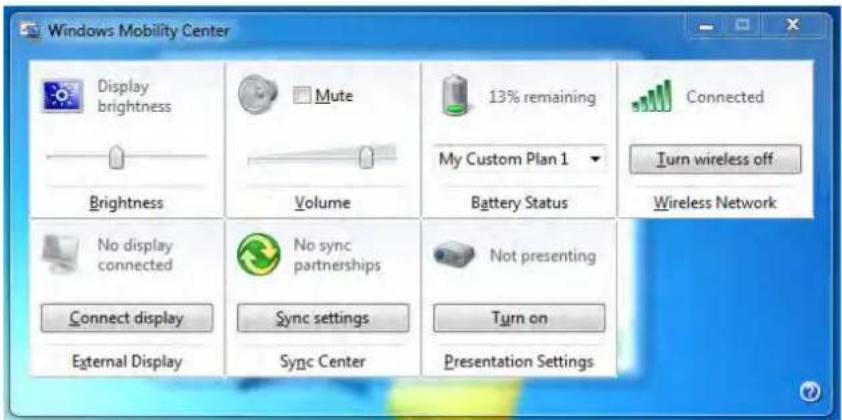
text_image
Windows Mobility Center Display brightness Brightness Mute Volume 13% remaining My Custom Plan 1 Battery Status Connected Turn wireless off Wireless Network No display connected Connect display External Display No sync partnerships Sync settings Sync Center Not presenting Turn on Presentation Settings3 - 12 Battery Information
Battery Life
Battery life may be shortened through improper maintenance. To optimize the life and improve its performance, fully discharge and recharge the battery at least once every 30 days.
We recommend that you do not remove the battery yourself. If you do need to remove the battery for any reason (e.g. long term storage) see “Removing the Battery” on page 6 - 3.
New Battery
Always completely discharge, then fully charge, a new battery (see “Battery FAQ” on page 3 - 15 for instructions on how to do this).
Recharging the Battery with the AC/DC Adapter
The battery pack automatically recharges when the AC/DC adapter is attached and plugged into an electrical outlet. If the computer is powered on, and in use, it will take several hours to fully recharge the battery. When the computer is turned off but plugged into an electrical outlet, battery charge time is less. (Refer to “LED Indicators” on page 1 - 7 for information on the battery charge status, and to “Energy Star Power Saving” on page 3 - 10 for more information on how to maintain and properly recharge the battery pack.)
Power Management

Caution
Danger of explosion if battery is incorrectly replaced.
Replace only with the same or equivalent type recommended by the manufacturer. Discard used battery according to the manufacturer's instructions.
Proper handling of the Battery Pack
- DO NOT disassemble the battery pack under any circumstances
- DO NOT expose the battery to fire or high temperatures, it may explode
- DO NOT connect the metal terminals (+, -) to each other

Damaged Battery Warning
Should you notice any physical defects (e.g. the battery is bent out of shape after being dropped), or any unusual smells emanating from the notebook battery, shut your computer down immediately and contact your service center. If the battery has been dropped we do not recommend using it any further, as even if the computer continues to work with a damaged battery in place, it may cause circuit damage, which may possibly result in fire. It is recommended that you replace your computer battery every two years.
Battery FAQ
How do I completely discharge the battery?
Use the computer with battery power until it shuts down due to a low battery. Don't turn off the computer even if a message indicates the battery is critically low, just let the computer use up all of the battery power and shut down on its own.
- Save and close all files and applications.
- Create a power plan for discharging the battery and set all the options to Never.
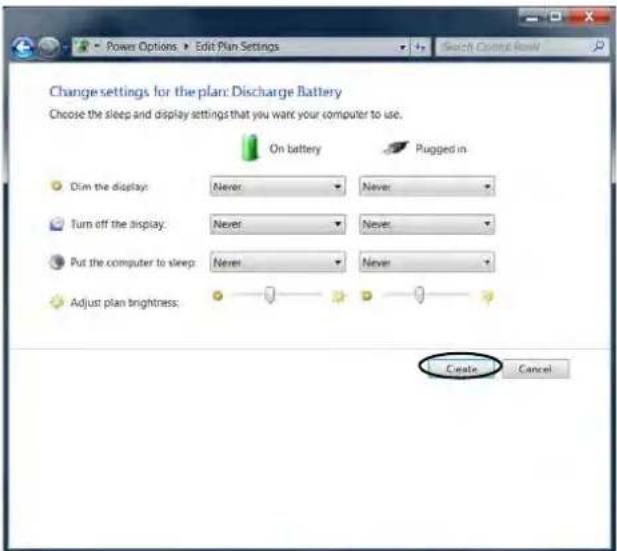
text_image
Change settings for the plan: Discharge Battery Choose the sleep and display settings that you want your computer to use. On battery Pugged in Dim the display: Never Never Turn off the display: Never Never Put the computer to sleep: Never Never Adjust plan brightness: Create CancelFigure 3 - 8 Power Plan Create
Power Management
- Click Change plan settings (after creating it) and click Change plan settings > Change advanced power settings.

Figure 3 - 9
Change Plan
Settings / Change
Advanced Power
Settings
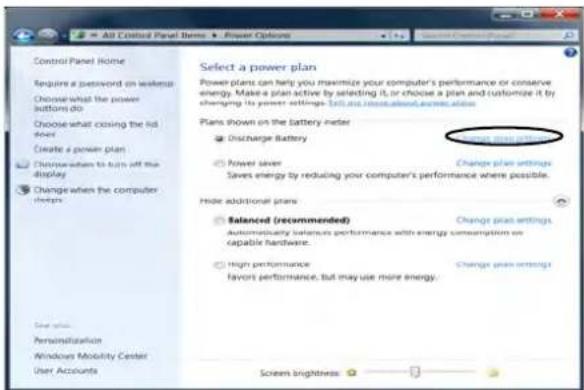
text_image
All Control Panel Items ▼ Power Options Control Panel Home Require a password on weakness Choose what the power buttons do Choose what closing the lid soes Create a power plan Choose when to turn off the display Change when the computer helps Select a power plan Power plans can help you maximize your computer's performance or conserve energy. Make a plan active by selecting it, or choose a plan and customize it by changing its power settings. Tell us more about power actions. Plans shown on the battery meter ○ Discharge Battery ○ Power saver ○ Change plan settings Saves energy by reducing your computer's performance where possible. Hide additional plans ○ Balanced (recommended) Automatically balances performance with energy consumption or capable hardware. ○ High performance favors performance, but may use more energy. ○ Change plan settings Screen brightness ▼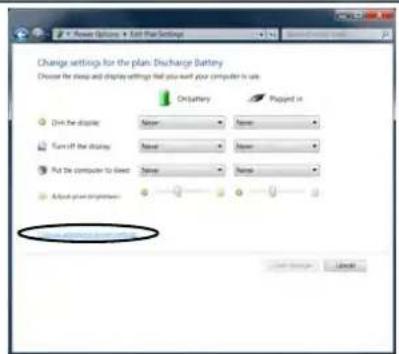
text_image
Change settings for the plan: Discharge Battery Choose for steps and display settings that you want your computer to use. On/OFFBRY Pushed in Drink the display None Turn-off the display None Put the computer to direct None Apply your computer OK3 - 16 Battery Information
Power Management
- Scroll down to Battery and click + to expand the battery options.
- Choose the options below (click Yes if a warning appears):
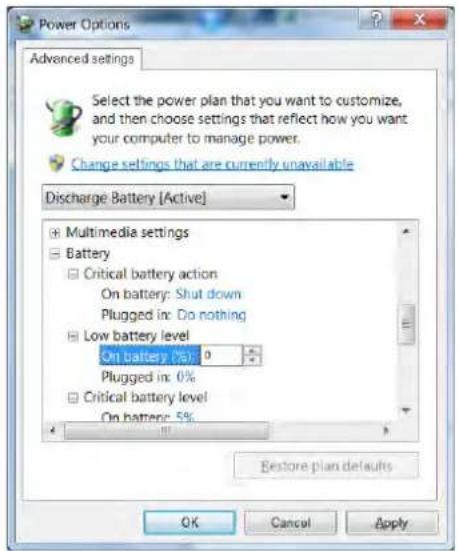
text_image
Power Options Advanced settings Select the power plan that you want to customize, and then choose settings that reflect how you want your computer to manage power. Change settings that are currently unavailable Discharge Battery [Active] Multimedia settings Battery Critical battery action On battery: Shut down Plugged in: Do nothing Low battery level On battery: 0% Plugged in: 0% Critical battery level On battery: 5% Restore plan defaults OK Cancel Apply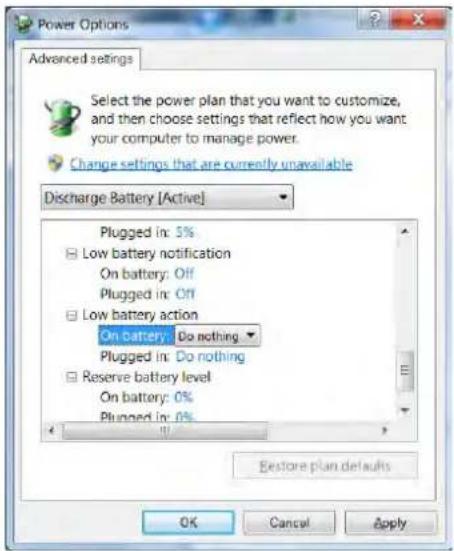
text_image
Power Options Advanced settings Select the power plan that you want to customize, and then choose settings that reflect how you want your computer to manage power. Change settings that are currently unavailable Discharge Battery [Active] Plugged in: 5% Low battery notification On battery: Off Plugged in: Off Low battery action On battery: Do nothing Plugged in: Do nothing Reserve battery level On battery: 0% Plugged in: 0% Restore plan defaults OK Cancel ApplyFigure 3 - 10 Power Options Advanced Settings - Battery
- Low battery levels = 0%
• Critical battery Levels = 1% - Low battery action = Do Nothing
• Critical battery action (On battery) = Shut Down
• Critical battery action (Plugged in) = Do Nothing
Power Management
How do I fully charge the battery?
When charging the battery, don't stop until the LED charging indicator light changes from orange to green.
How do I maintain the battery?
Completely discharge and charge the battery at least once every 30 days or after about 20 partial discharges.
Chapter 4: Drivers & Utilities
This chapter deals with installing the drivers and utilities essential to the operation or improvement of some of the computer's subsystems. The system takes advantage of some newer hardware components for which the latest versions of most available operating systems haven't built in drivers and utilities. Thus, some of the system components won't be auto-configured with an appropriate driver or utility during operating system installation. Instead, you need to manually install some system-required drivers and utilities.
What to Install
The Device Drivers & Utilities + User's Manual disc contains the drivers and utilities necessary for the proper operation of the computer.
Module Driver Installation
The procedures for installing drivers for the Wireless LAN, PC Camera, 3.75G/HSPA, Fingerprint, TPM and Combo Bluetooth & WLAN modules are provided in “Modules & Options” on page 7 - 1.
Make sure any modules (e.g. WLAN, 3.75G/HSPA, PC Camera or Bluetooth) are ON before installing the appropriate driver.
Drivers & Utilities
Driver Installation
Insert the Device Drivers & Utilities + User's Manual disc and click Install Drivers/Option Drivers (button).
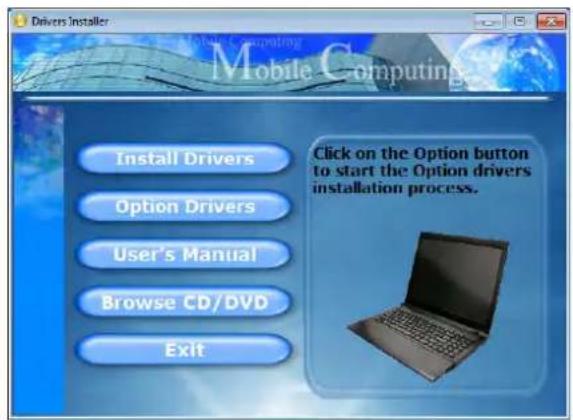
text_image
Drivers Installer Mobile Computing Mobile Computing Install Drivers Option Drivers User's Manual Browse CD/DVD Exit Click on the Option button to start the Option drivers installation process.
text_image
Drivers Installer Please follow steps from top to bottom in order to install drivers. 1. Install Chipset Driver 2. Install VGA Driver 3. Install LAN Driver 4. Install Cardreader Driver 5. Install Touchpad Driver 6. Install Modem Driver 7. Install Hotkey AP 8. Install USB3.0 Driver 9. Install MET Driver 10. Install Audio Driver Back ExitFigure 4 - 1 - Drivers Installer Screens
- Check the driver installation order from Table, on page 4 - 3 (the drivers must be installed in this order) which is the same as that listed in the Drivers Installer menu.
- Click to select the driver you wish to install, (you should note down the drivers as you install them).
- Follow the instructions for each individual driver installation procedure as listed on the following pages.
4 - 2 Driver Installation
Drivers & Utilities
| Driver for Windows 7 with Service | Page | Driver for Windows 7 with Service | Page |
| Chipset Page 4 - 5 PC Camera Module Page 7 - 2 | |||
| Video Page 4 - 5 Wireless LAN Module Page 7 - 10 | |||
| LAN Page 4 - 6 Fingerprint Reader Module Page 7 - 29 | |||
| CardReader Page 4 - 6 Bluetooth Module Page 7 - 34 | |||
| TouchPad Page 4 - 6 3.75G/HSPA Module Page 7 - 48 | |||
| Modem (Optional) | Page 4 - 6 Trusted Platform Module Page 7 - 73 | ||
| Hot Key | Page 4 - 7 IRST Driver Page 7 - 87 | ||
| USB 3.0 | Page 4 - 7 | *Note all drivers provided are for Windows 7 with Service Pack 1. | |
| MEI | Page 4 - 7 | ||
| Audio | Page 4 - 7 | ||
Table 4 - 1- Driver Installation
Manual Driver Installation
Click Browse CD/DVD (button) in the Drivers Installer application and browse to the executable file in the appropriate driver folder.
Windows Update
After installing all the drivers make sure you enable Windows Update in order to get all the latest security updates etc. (all updates will include the latest hotfixes from Microsoft). See “Windows Update” on page 4 - 8 for instructions.

Drivers & Utilities
Updating/Reinstalling Individual Drivers
If you wish to update/reinstall individual drivers it may be necessary to uninstall the original driver. To do this go to the Control Panel in the Windows OS and double-click the Programs and Features icon (Programs > Uninstall a program). Click to select the driver (if it is not listed see below) and click Uninstall, and then follow the on screen prompts (it may be necessary to restart the computer). Reinstall the driver as outlined in this chapter.
If the driver is not listed in the Programs and Features menu:
- Click Start, and click Control Panel (or point to Settings and click Control Panel).
- Double-click Device Manager (Hardware and Sound > Device Manager).
- Double-click the device you wish to update/reinstall the driver for (you may need to click "+" to expand the selection).
- Click Driver (tab) and click the Update Driver or Uninstall button and follow the on screen prompts.
User Account Control
If a User Account Control prompt appears as part of the driver installation procedure, click Continue or Allow, and follow the installation procedure as directed.
Windows Security Message
If you receive a Windows security message as part of the driver installation process. Just click “Install this driver software anyway” or “Install” to continue the installation procedure.
You will receive this message in cases where the driver has been released after the version of Windows you are currently using. All the drivers provided will have already received certification for Windows.
4 - 4 Driver Installation
New Hardware Found
If you see the message “New Hardware Found” during the installation procedure (other than when outlined in the driver install procedure), click Cancel to close the window, and follow the installation procedure.
Driver Installation General Guidelines
The driver installation procedure outlined in this Chapter (and in Chapter 7 Options & Modules), are accurate at the time of going to press.
Drivers are always subject to upgrade and revision so the exact procedure for certain drivers may differ slightly. As a general guide follow the default on screen instructions for each driver (e.g. Next > Next > Finish) unless you are an advanced user. In many cases a restart is required to install the driver.
Make sure any modules (e.g. PC Camera, WLAN or 3.75G/HSPA) are ON before installing the appropriate driver.
Driver Installation Procedure
Insert the Device Drivers & Utilities + User's Manual disc and click Install Drivers (button).
Chipset
- Click 1. Install Chipset Driver > Yes.
- Click Next > Yes > Next > Next.
- Click Finish to restart the computer.
Video
- Click 2. Install VGA Driver > Yes.
- Click Next > Yes > Next > Next.
- Click Finish to restart the computer.

Drivers & Utilities
LAN
- Click 3. Install LAN Driver > Yes.
- Click Install Drivers and Software > Next.
- Click the button to accept the license and click Next.
- Click Next > Install.
- Click Finish.
- The network settings can now be configured.
CardReader
- Click 4. Install Cardreader Driver > Yes.
- Click Install.
- Click Finish.
TouchPad
- Click 5. Install Touchpad Driver > Yes.
- Click Next.
- Click the button to accept the license, and then click Next.
- Click Finish > Restart Now to restart the computer.
Modem (Optional)
If your model configuration includes a modem, there are two different modem modules available with this computer model series. Install using the instructions below, as appropriate for your module.
-
Click 6. Install Modem Driver > Yes.
-
Click OK > OK.
OR
-
Click OK.
-
The modem is ready for dial-up configuration.

Modem Country Selection
Go to the Phone and Modem control panel and make sure the modem country selection is appropriate for you.
4 - 6 Driver Installation
Drivers & Utilities
Hot Key
- Click 7. Install Hotkey AP Driver > Yes.
- Click Next > Next.
- Click Finish > Finish to restart the computer.
USB 3.0
- Click 8. Install USB 3.0 Driver > Yes.
- Click Next.
- Click the button to accept the license agreement and click Next.
- Click Install.
- Click Finish.
- Click Finish.
OR
- Choose the language you prefer and click OK.
- Click Next.
- Click the button to accept the license agreement and click Next.
- Click Finish.
MEI
- Click 9. Install MEI Driver > Yes.
- Click Next (for Model B computers you may click in the checkbox to select "Install Intel® Control Center" - see "Intel® Management and Security Status" on page 7 - 88).*
- Click Yes > Next > Next.
- Click Finish.
Audio
- Click 10. Install Audio Driver > Yes.
- Click Next.
- Click Finish to restart the computer.
Note that after installing the audio driver the system will not return to the Drivers Installer screen. To install any of the optional drivers listed overleaf, eject the Device Drivers & Utilities + User's Manual disc and then reinsert it (or double-click the disc icon in My Computer), and click Option Drivers (button) to access the optional driver menu.
Drivers & Utilities
Windows Experience Index
After the drivers are installed follow this procedure to ensure an accurate rating from the Windows Experience Index (make sure the AC/DC adapter is plugged in):
- Click Start, and click Control Panel.
- Click Performance Information and Tools (System and Security > System > Check the Windows Experience Index).
- Click "Rate this computer".
- The computer will take a few minutes to assess the system performance.
- Close the control panel.

Windows Update
After installing all the drivers make sure you enable Windows Update in order to get all the latest security updates etc. (all updates will include the latest hotfixes from Microsoft).
To enable Windows Update make sure you are connected to the internet:
- Click Start, and click Control Panel (or point to Settings and click Control Panel).
- Click Check for updates (Security), or double-click Security Center and click Windows Update.
- Double-click Check for updates (button).
- The computer will now check for updates (you need to be connected to the internet).
- Click Install now (button) to install the updates.
4 - 8 Driver Installation

Optional Drivers
See the pages indicated for the driver installation procedures for any modules included in your purchase option.
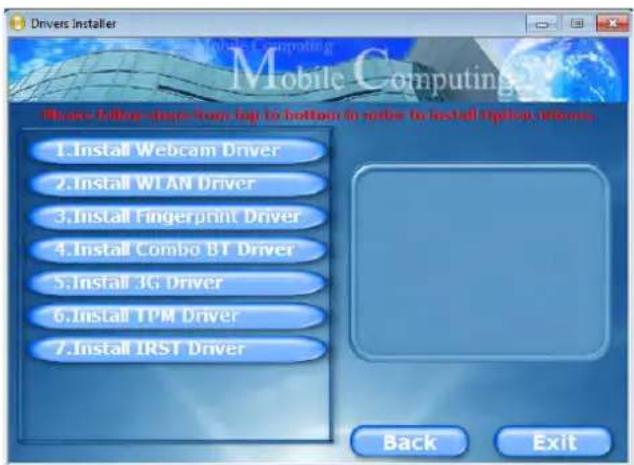
text_image
Drivers Installer 1. Install Webcam Driver 2. Install WLAN Driver 3. Install Fingerprint Driver 4. Install Combo BT Driver 5. Install 3G Driver 6. Install TPM Driver 7. Install IRST Driver Back ExitFigure 4 - 2 - Drivers Installer - Option Drivers Menu
Note that you need to install both the WLAN & Bluetooth drivers for Intel and 3rd party WLAN & Bluetooth Combo modules.
PC Camera Module
See "PC Camera Module" on page 7 - 2.
Wireless LAN Module
See "Wireless LAN Module" on page 7 - 10.
Fingerprint Reader Module
See "Fingerprint Reader Module" on page 7 - 29.
Bluetooth Module
See "Bluetooth Module" on page 7 - 34.
3.75G/HSPA Module
See "PC Camera Module" on page 7 - 2.
TPM Driver
See "Trusted Platform Module" on page 7 - 73.
IRST Driver
See "IRST Driver" on page 7 - 87.
Drivers & Utilities
4
Chapter 5: BIOS Utilities
Overview
This chapter gives a brief introduction to the computer's built-in software:
If your computer has never been set up, or you are making important changes to the system (e.g. hard disk setup), then you should review this chapter first and note the original settings found in Setup. Even if you are a beginner, keep a record of the settings you find and any changes you make. This information could be useful if your system ever needs servicing.
There is one general rule: Don't make any changes unless you are sure of what you are doing. Many of the settings are required by the system, and changing them could cause it to become unstable or worse. If you have any doubts, consult your service representative.

BIOS Screens
Note that the BIOS screens pictured on these pages are intended for guidance in setting up your system's BIOS.
BIOS versions are subject to constant change and revision, therefore your computer's actual screens may appear slightly different from those pictured on these pages.
BIOS Utilities

BIOS Settings Warning
Incorrect settings can cause your system to malfunction. To correct mistakes, return to Setup and restore the Previous Values with
The Setup Utility
Each time you turn on the computer the system takes a few seconds to conduct a POST, including a quick test of the on-board RAM (memory).
As the POST proceeds, the computer will tell you if there is anything wrong. If there is a problem that prevents the system from booting, it will display a system summary and prompt you to run Setup.
If there are no problems, the Setup prompt will disappear and the system will load the operating system. Once that starts, you can't get into Setup without rebooting.
The Aptio Setup Utility tells the system how to configure itself and manage basic features and subsystems (e.g. port configuration).
To enter Setup, turn on the computer and press F2 (give the system a few seconds to enter Setup). If the Boot Logo is enabled the F2 on screen will be highlighted to illustrate that the system is processing the request during the POST (or press F7 for boot options). If you get a “Keyboard Error”, (usually because you pressed F2 too quickly) just press F2 again.
If the computer is already on, reboot using the Ctrl + Alt + Delete combination and then hold down F2 when prompted. The Setup main menu will appear.
To see the boot options press F7 and choose your preferred boot device.
5 - 2 The Setup Utility
Failing the POST
Errors can be detected during the POST. There are two categories, “fatal” and “non-fatal”.
Fatal Errors
These stop the boot process and usually indicate there is something seriously wrong with your system. Take the computer to your service representative or authorized service center as soon as possible.
Non-Fatal Errors
This kind of error still allows you to boot. You will get a message identifying the problem (make a note of this message!) and you can then press F7 (the F7 on screen will be highlighted to illustrate that the system is processing the request) for boot options.
Press F2 (give the system a few seconds to enter Setup; the F2 on screen will be highlighted to illustrate that the system is processing the request) to run the Setup program and try to correct the problem. If you still get an error message after you change the setting, or if the “cure” seems even worse, call for help.
BIOS Utilities

Setup Menus
The Setup menus shown in this section are for reference only. Your computer's menus will indicate the configuration appropriate for your model and options.
Figure 5 - 1 Navigation Menu
Setup Screens
The following pages contain additional advice on portions of the Setup. Along the top of the screen is a menu bar with menu headings. When you select a heading, a new screen appears. Scroll through the features listed on each screen to make changes to Setup.
Instructions on how to navigate each screen are in the box at the bottom right side of the screen.
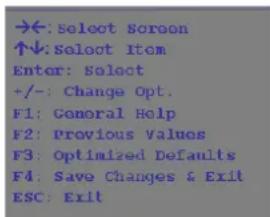
text_image
→←: Select Screen ↑↓: Select Item Enter: Select +/-: Change Opt. F1: General Help F2: Previous Values F3: Optimized Defaults F4: Save Changes & Exit ESC: ExitIf these tools are confusing, press F1 to call up a General Help screen, and then use the arrow keys to scroll up or down the page.
The Item Specific Help on the upper right side of each screen explains the highlighted item and has useful messages about its options.
If you see an arrow ▶ next to an item, press Enter to go to a sub-menu on that subject. The sub-menu screen that appears has a similar layout, but the Enter key may execute a command.
5 - 4 The Setup Utility
Intel® vPro™ technology
Intel® vPro™ technology is supported by Model A computers only. This set of technology features, built into the computer's motherboard, allows Information Technology departments remote access to the computer. This allows the IT department to monitor, maintain and manage computers regardless of the state of the operating system or the computer's power state. This can be done over a wired or corporate wireless network, or even outside the corporate firewall through a wired LAN connection.
Accessing the Intel Management Engine
To access the Intel Management Engine press Ctrl + P at startup. Your system administrator will need to assist you in managing the information as applicable to your enterprise. Note the following password information for the Intel Management Engine:
- The default password is “admin” (without quotes).
If you get an "Error - Intel(R) ME password change rejected" message when creating a new password, then note the following parameters for creating a password:
• between 8 and 32 characters long
- Contain both upper and lower case Latin characters
- Have at least one numeric character
- Have at least one ASCII non-alphanumeric character (!, @, #, \$, %, ^, &, *)
BIOS Utilities
Figure 5 - 2
Intel(R) Management
Engine
(Password Creation)
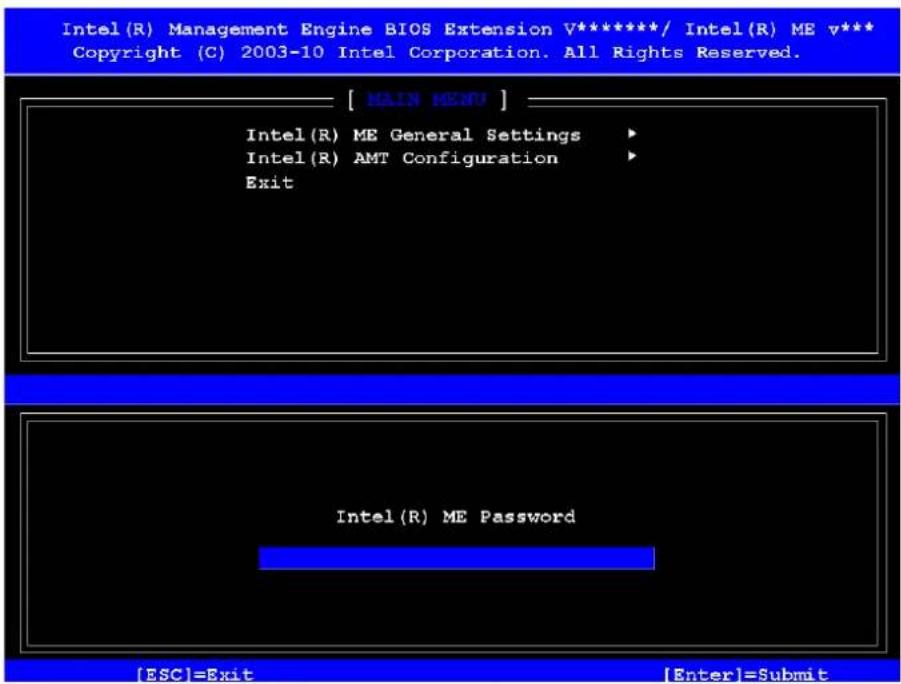
text_image
Intel(R) Management Engine BIOS Extension V*********/ Intel(R) ME v*** Copyright (C) 2003-10 Intel Corporation. All Rights Reserved. [ MAIN MENU ] Intel(R) ME General Settings Intel(R) AMT Configuration Exit Intel(R) ME Password [ESC]=Exit [Enter]=SubmitOnce you have entered the password you will then be taken to the platform configuration screen.
5 - 6 Intel® vPro™ technology
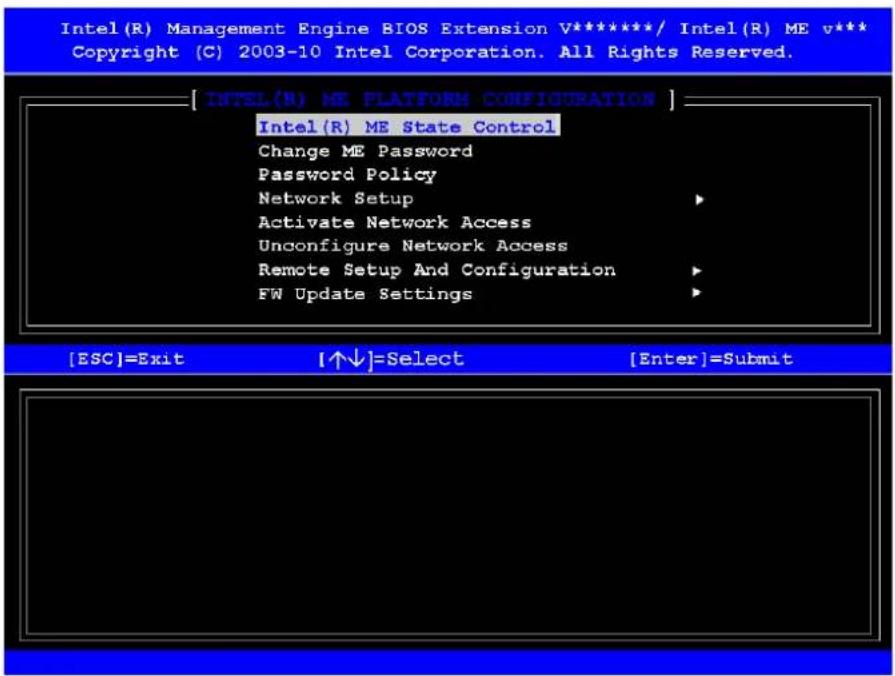
text_image
Intel(R) Management Engine BIOS Extension V*********/ Intel(R) ME v*** Copyright (C) 2003-10 Intel Corporation. All Rights Reserved. [ INTEL(R) ME PLATFORM CONFIGURATION ] Intel(R) ME State Control Change ME Password Password Policy Network Setup Activate Network Access Unconfigure Network Access Remote Setup And Configuration FW Update Settings [ESC]=Exit [↑↓]=Select [Enter]=SubmitFigure 5 - 3 Intel(R) Management Engine (Platform Configuration)
The platform configuration screen allows you to setup Intel ME as per your requirements (consult your IT administrator for the actual settings required). See "MEI" on page 4 - 7 and "Intel® Management and Security Status" on page 7 - 88.
BIOS Utilities
Figure 5 - 4 Main Menu
Main Menu
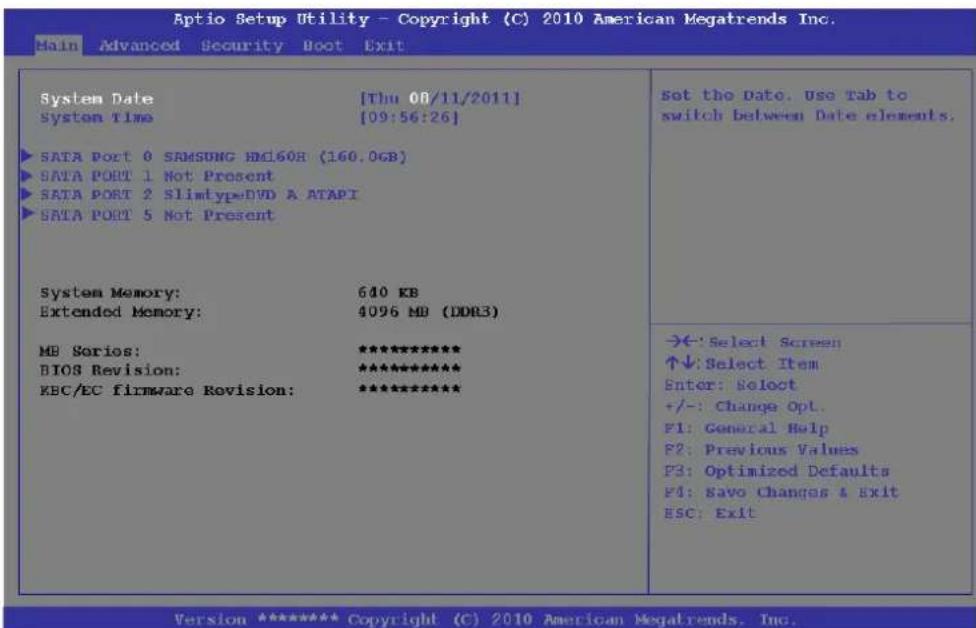
text_image
System Date [Thu 08/11/2011] system time [09:56:26] SATA Port 0 SAMSUNG HD160R (160.0GB) SATA PORT 1 Not Present SATA PORT 2 SlimtypeDVD & ATAPI SATA PORT 5 Not Present System Memory: 640 KB Extended Memory: 4096 MB (DDR3) MB Series: ********** BIOS Revision: ********** KBC/EC firmware Revision: ********* Set the Date. Use Tab to switch between Date elements. →←: Select Screen ↑↓: Select Item Enter: Select +/-: Change Opt. P1: General Help P2: Previous Values P3: Optimized Defaults P4: Save Changes & Exit ESC: Exit Version ***** Copyright (C) 2010 American Megatrends, Inc.System Time & Date (Main Menu)
The hour setting uses the 24-hour system (i.e., = midnight; 13 = 1 pm). If you can change the date and time settings in your operating system, you will also change these settings. Some applications may also alter data files to reflect these changes.
BIOS Utilities
SATA Port # (Main Menu)
Pressing Enter opens the sub-menu to show the configuration of a optical Device/HDD on the computer's SATA Ports.
System/Extended Memory: (Main Menu)
This item contains information on the system memory, and is not user configurable.
The system will auto detect the amount of memory installed.
MB Series / BIOS Revision / KBC/EC firmware Revision
This item contains information on the BIOS version etc., and is not user configurable.
BIOS Utilities
Figure 5 - 5 Advanced Menu
Advanced Menu
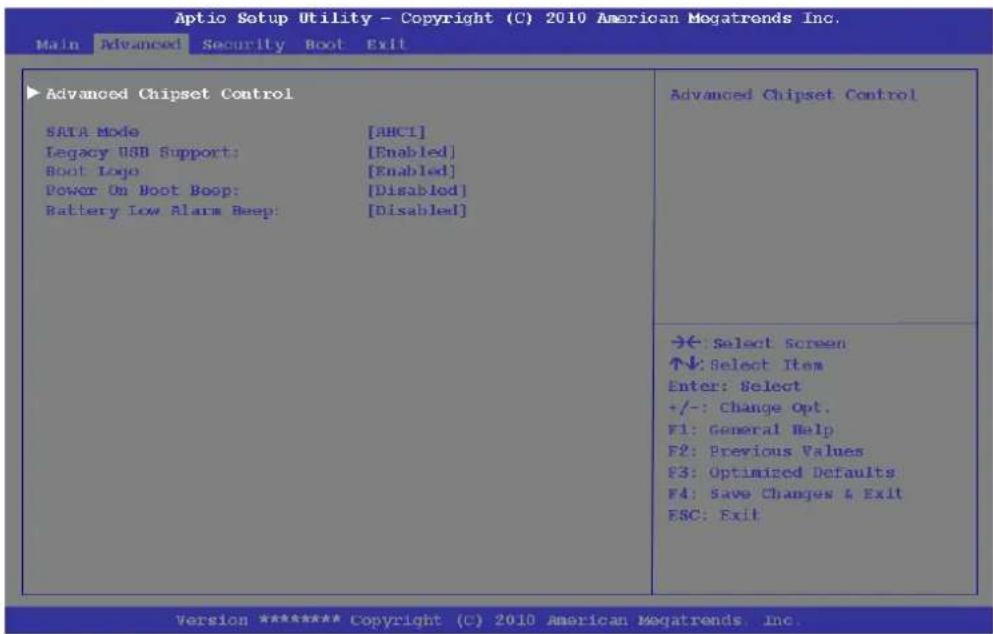
text_image
Aptio Setup Utility - Copyright (C) 2010 American Megatrends Inc. Main Advanced Security Boot Exit ▶ Advanced Chipset Control SATA Mode [AHCI] Legacy USB Support: [Enabled] Boot Logo [Enabled] Power On Boot Boop: [Disabled] Battery Low Alarm Beep: [Disabled] Advanced Chipset Control →← Select Screen ↑↓: Select Item Enter: Select +/-: Change Opt. F1: General Help F2: Previous Values F3: Optimized Defaults F4: Save Changes & Exit ESC: Exit Version ***** Copyright (C) 2010 American Megatrends, Inc.Advanced Chipset Control (Advanced Menu)
The sub-menu here allows you to adjust the Bluetooth Power Setting.
5 - 10 Advanced Menu
BIOS Utilities
Bluetooth Power Setting (Advanced Menu > Advanced Chipset Control)
You can adjust the Bluetooth module power setting to your preference. The default setting (Disabled) will see the Bluetooth module powered off when the system is started up or restarted. Enabling the power setting will have the module retain the last power status (on or off) before any restart or shut down.
SATA Mode (Advanced Menu)
You can configure SATA (Serial ATA) control to operate in IDE (native/compatible), AHCI (Advanced Host Controller Interface) modes from this menu. The SATA Mode should be set BEFORE installing an operating system, and after you have backed up all necessary files and data (see sidebar). Make sure you install the Intel Rapid Storage Technology application if you have set the SATA Mode to AHCI (see “MEI Driver for Intel® vPro™ Technology” on page 7 - 79).
Legacy USB Support (Advanced Menu)
Choose “Enabled” if you intend to use USB devices in systems which do not normally support USB functionality (e.g. DOS). The default setting is “Enabled” and does not need to be changed if you intend to use your USB devices in Windows.

SATA Mode Selection
If you have installed the Windows 7 operating system with either IDE or AHCI mode enabled, DO NOT disable the set mode (if you wish to disable the set mode you will need to reinstall the Windows 7 OS).
BIOS Utilities
Boot Logo (Advanced Menu)
Use this menu item to enable/disable the Boot Logo screen at system startup.
Power On Boot Beep (Advanced Menu)
Use this menu item to enable/disable the beep as the computer starts up.
Battery Low Alarm Beep (Advanced Menu)
Use this menu item to enable/disable the battery low alarm beep.
BIOS Utilities
Security Menu
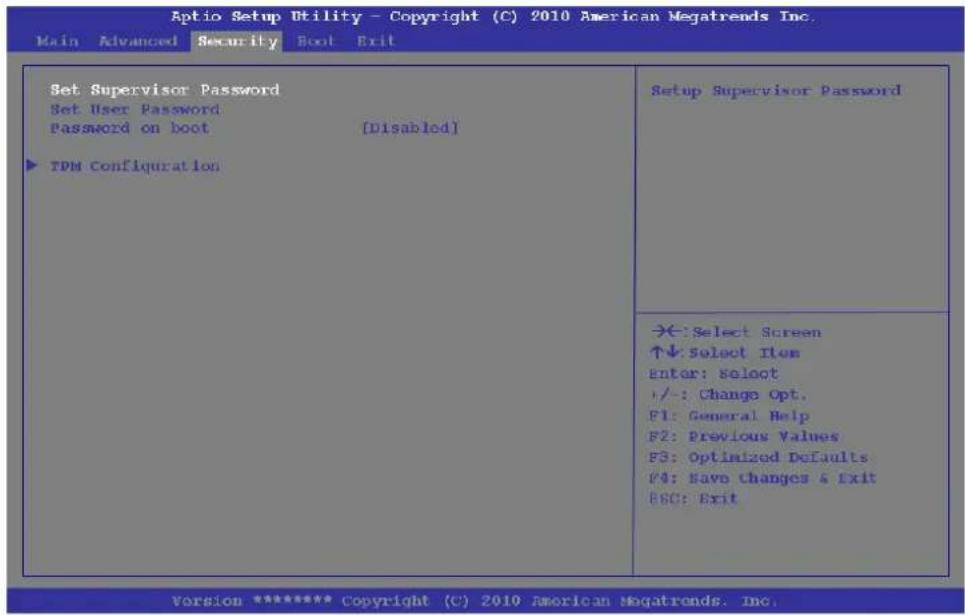
text_image
Aptio Setup Utility - Copyright (C) 2010 American Megatrends Inc. Main Advanced Security Boot Exit Set Supervisor Password Set User Password Password on boot [Disabled] ▶ TPM Configuration Setup Supervisor Password →:Select Screen ↑↓:Select Item Enter: Select +/-: Change Opt. F1: General Help F2: Previous Values F3: Optimized Defaults F4: Save changes & Exit BSC: Exit Version ***** Copyright (C) 2010 American Megatrends, Inc.
Security Menu
The changes you make here affect the access to the Setup utility itself, and also access to your machine as it boots up after you turn it on. These settings do not affect your machine or network passwords which will be set in your software OS.
Figure 5 - 6 Security Menu
Set Supervisor Password (Security Menu)
You can set a password for access to the Aptio Setup Utility. This will not affect access to the computer OS (only the Aptio Setup Utility). If you set a supervisor password you can then add a user password and password on boot.
BIOS Utilities

Password Warning
If you set a boot password (Password on boot is "Enabled"), NEVER forget your password.
The consequences of this could be serious. If you cannot remember your boot password you must contact your vendor and you may lose all of the information on your hard disk.
Set User Password (Security Menu)
You can set a password for user mode access to the Aptio Setup Utility. This will not affect access to the computer OS, (only the Setup utility) unless you choose to set a Password on Boot (see below). Many menu items in the Aptio Setup Utility cannot be modified in user mode. You can only set the user password after you have set the supervisor password.
Password on boot (Security Menu)
Specify whether or not a password should be entered to boot the computer (you may only set a password on boot if a supervisor password is enabled). If “Enabled” is selected, only users who enter a correct password can boot the system (see the warning in the sidebar). The default setting is “Disabled”.
Note: To clear existing passwords press Enter and type the existing password, then press Enter for the new password (without typing any password entry) and Enter again to confirm the password clearance.
TPM Configuration (Security Menu)
This sub-menu will allow you to enable/disable Trusted Platform Module (TPM) support, and to configure the TPM State. Select TPM Configuration and press Enter to access the sub-menu. Press Enter to access the TPM Support menu and select Enable to display the full TPM configuration menu (see "Trusted Platform Module" on page 7 - 96 for details).
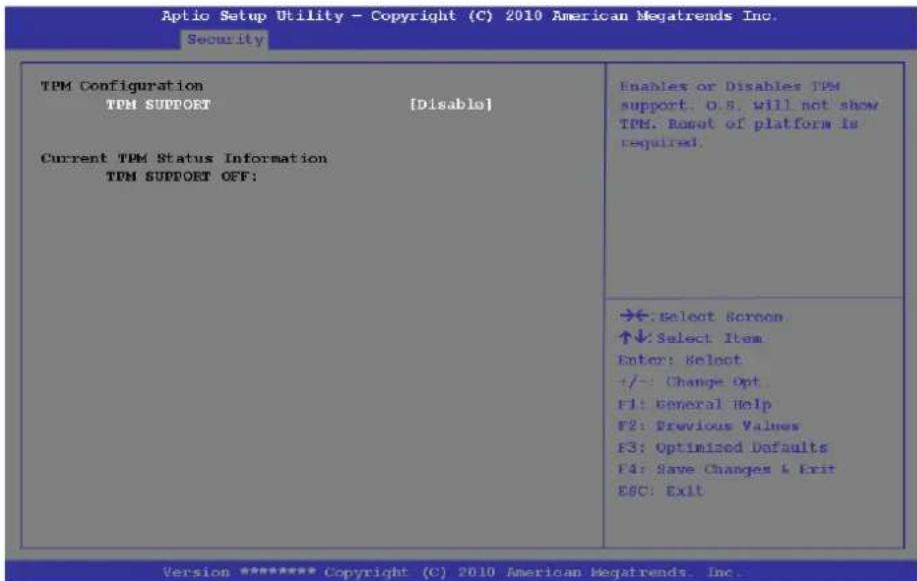
text_image
Aptic Setup Utility - Copyright (C) 2010 American Megatrends Inc. Security TPM Configuration TPM SUPPORT [Disable] Current TPM Status Information TPM SUPPORT OFF: Enables or Disables TPM support. O.S. will not show TPM. Romet of platform is required. →:Select Screen ↑↓:Select Item Enter: Select +/-: Change Opt. F1: General Help F2: Previous Values F3: Optimized Defaults F4: Save Changes & Exit ESC: Exit Version ***** Copyright (C) 2010 American Megatrends. Inc.Figure 5 - 7 TPM Support
BIOS Utilities
TPM State (Security Menu > TPM Support Enabled)
Select TPM State, press Enter and select Enable to change the TPM state to enabled. You will then need to press F4 to save the changes and restart the computer.
Figure 5 - 8
TPM State (Enabled)
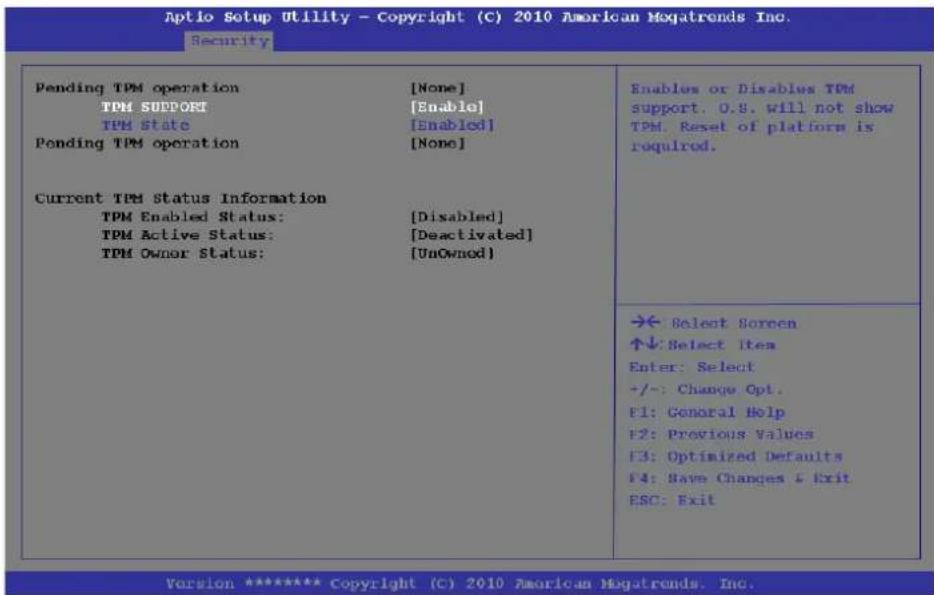
text_image
Aptio Setup Utility - Copyright (C) 2010 American Megatrends Inc. Security Pending TPM operation [None] TPM SUPPORT [Enable] TPM State [Enabled] Ponding TPM operation [None] Current TPM Status Information TPM Enabled Status: [Disabled] TPM Active Status: [Deactivated] TPM Owner Status: [UnOwned] Enables or Disables TPM support. O.S. will not show TPM. Reset of platform is required. → Select Screen ↑↓: Select Item Enter: Select +/-: Change Opt. F1: General Help F2: Previous Values F3: Optimized Defaults F4: Save Changes & Exit ESC: Exit Version ***** Copyright (C) 2010 American Megatrends, Inc.As the computer restarts press F2 to enter the BIOS again and go to the TPM Configuration menu.
5 - 16 Security Menu
Pending TPM operation (Security Menu > TPM Support & TPM State Enabled) Select Pending TPM operation, press Enter and select the option you require (if you are initializing TPM you should select Enable Take Ownership). You will then need to press F4 to save the changes and restart the computer.
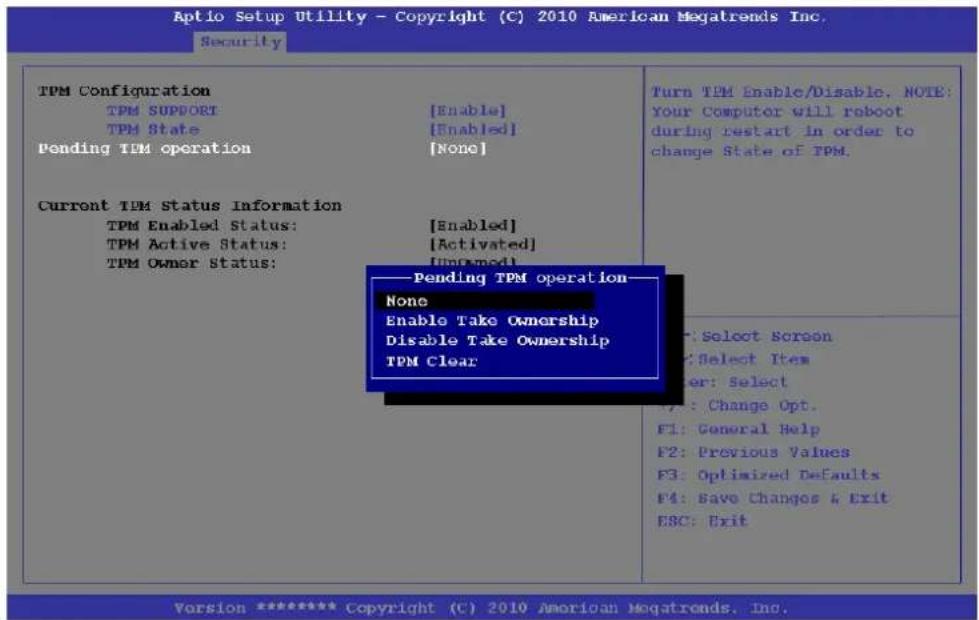
text_image
Aptio Setup Utility - Copyright (C) 2010 American Megatrends Inc. Security TPM Configuration TPM SUPPORT [Enable] TPM State [Enabled] Pending TPM operation [None] Current TPM Status Information TPM Enabled Status: [Enabled] TPM Active Status: [Activated] TPM Owner Status: [Unapproved] ----Pending TPM operation---- None Enable Take Ownership Disable Take Ownership TPM Clear Turn TPM Enable/Disable, NOTE: Your Computer will reboot during restart in order to change State of TPM. * : Select Screen * : Select Item user : Select F1: Change Opt. F2: General Help F3: Previous Values F4: Optimized Defaults F5: Save Changes & Exit ESC: Exit Version ***** Copyright (C) 2010 American Megatrends, Inc.Figure 5 - 9 Pending TPM operation (Enable Take Ownership)
BIOS Utilities
Figure 5 - 10 Boot Menu

BIOS Screens
Note that the BIOS screens pictured on these pages are intended for guidance in setting up your system's BIOS.
BIOS versions are subject to constant change and revision, therefore your computer's actual screens may appear slightly different from those pictured on these pages.
Boot Menu
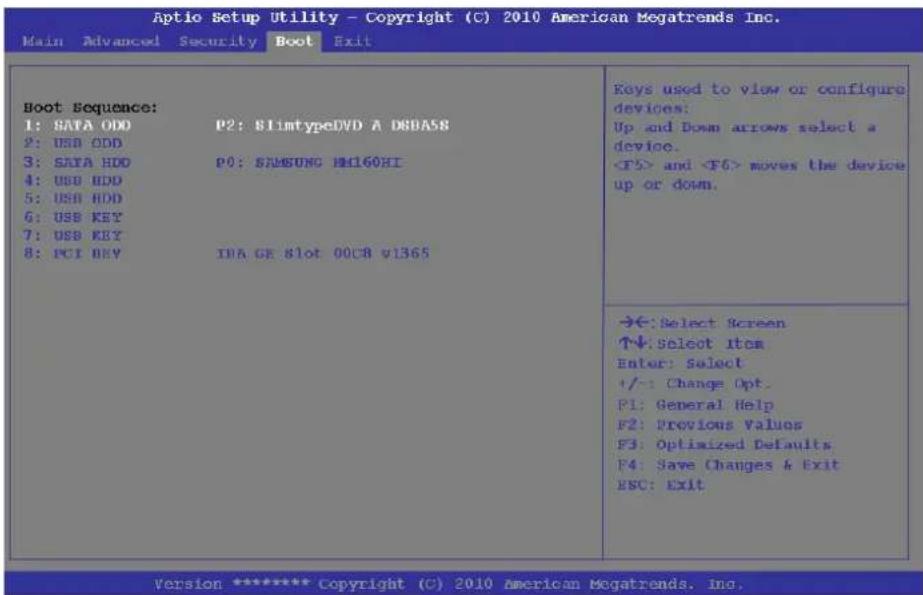
text_image
Aptio Setup Utility - Copyright (C) 2010 American Megatrends Inc. Main Advanced Security Boot Exit Boot Sequence: 1: SATA ODD P2: SlimtypeDVD A DBBASS 2: USB CDD 3: SATA HDD P0: SAMSUNG HM160HI 4: USB HDD 5: USB HDD 6: USB KEY 7: USB KEY 8: PCI KEY IDA GE Slot 00CB v1365 →←: Select Screen ↑↓: Select Item Enter: Select +/-: Change Opt. F1: General Help F2: Previous Values F3: Optimized Defaults F4: Save Changes & Exit ESC: Exit Version ***** Copyright (C) 2010 American Megatrends, inc.When you turn the computer on it will look for an operating system (e.g. Windows 7) from the devices listed in this menu, and in this priority order. If it cannot find the operating system on that device, it will try to load it from the next device in the order specified in the Boot Sequence. Item specific help on the right is available to help you move devices up and down the order.
BIOS Utilities
Boot Sequence (Boot Menu)
Use the arrow keys to move up and down the menu and use the F5 and F6 keys to move the device's boot priority up and down the list (the selected device will be highlighted in white).
Boot Menu 5 - 19
BIOS Utilities
Figure 5 - 11 Exit Menu
Exit Menu
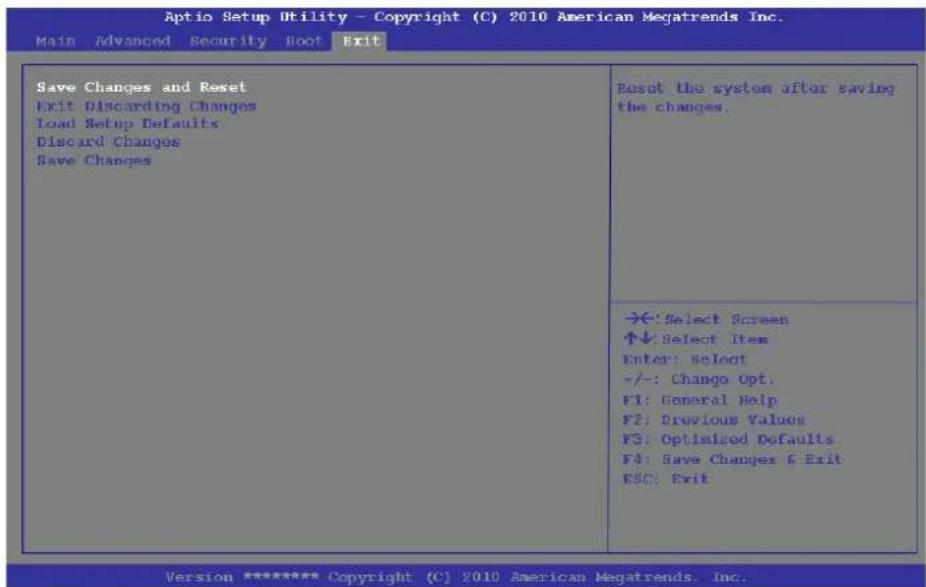
text_image
Aptio Setup Utility - Copyright (C) 2010 American Megatrends Inc. Main Advanced Security Boot Exit Save Changes and Reset Exit Discarding Changes Load Setup Defaults Discard Changes Save Changes Reset the system after saving the changes. →: Select Screen ↑↓ Select Item Enter: Select -/-: Change Opt. F1: General Help F2: Previous Values F3: Optimized Defaults F4: Save Changes & Exit ESC: Exit Version **** Copyright (C) 2010 American Megatrends, Inc.Click Save Changes and Reset to save all changes made. Choosing to Discard Changes, or Exit Discarding Changes, will wipe out any changes you have made to the Setup. You can also choose to restore the original Setup defaults that will return the Setup to its original state, and erase any previous changes you have made in a previous session.
5 - 20 Exit Menu
Chapter 6: Upgrading The Computer
Overview
This chapter contains information on upgrading the computer. Follow the steps outlined to make the desired upgrades. If you have any trouble or problems you can contact your service representative for further help. Before you begin you will need:
• A small crosshead or Phillips screwdriver
- A small regular slotted (flathead) screwdriver
- An antistatic wrist strap
Before working with the internal components you will need to wear an antistatic wrist strap to ground yourself because static electricity may damage the components.
The chapter includes:
- Removing the Battery
- Upgrading the Hard Disk Drive
- Upgrading the Optical (CD/DVD) Device
- Upgrading the System Memory (RAM)
Please make sure that you review each procedure before you perform it.

Warranty Warning
Please check with your service representative before undertaking any upgrade procedures to find out if this will VOID your warranty.
Upgrading The Computer

Power Safety Warning
Before you undertake any upgrade procedures, make sure that you have turned off the power, and disconnected all peripherals and cables (including telephone lines). It is advisable to also remove your battery in order to prevent accidentally turning the machine on.
When Not to Upgrade
These procedures involve opening the system's case, adding and sometimes replacing parts.
You should not perform any of these upgrades if:
- Your system is still under warranty or a service contract
- You don't have all the necessary equipment
- You're not in the correct environment
- You doubt your abilities
Under any of these conditions, contact your service representative to purchase or replace the component(s).

Removal Warning
When removing any cover(s) and screw(s) for the purposes of device upgrade, remember to replace the cover(s) and screw(s) before turning the computer on.
Upgrading the Processor
If you want to upgrade your computer by replacing the existing processor with a faster/new one you will need to contact your customer service representative. We recommend that you do not do this yourself, since if it is done incorrectly you may damage the processor or mainboard.
Upgrading The Computer
Removing the Battery
If you are confident in undertaking upgrade procedures yourself, for safety reasons it is best to remove the battery.
- Turn the computer off, and turn it over.
- Slide the latch in the direction of the arrow.
- Slide the latch in 2 he direction of the arrow, and hold it in place.
- Slide the battery out in the direction of the arrow . ③
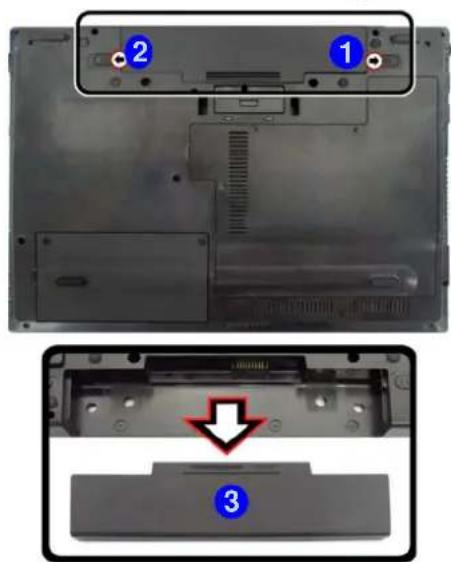
text_image
Laptop rear panel with labeled components and a close-up view showing internal structure and mounting features
Warranty Warning
Please check with your service representative before undertaking any upgrade procedures to find out if this will VOID your warranty.
Figure 6 - 1
Battery Removal
Upgrading The Computer

HDD System Warning
New HDD's are blank. Before you begin make sure: You have backed up any data you want to keep from your old HDD.
You have all the CD-ROMs and FDDs required to install your operating system and programs.
If you have access to the internet, download the latest application and hardware driver updates for the operating system you plan to install. Copy these to a removable medium.
Figure 6 - 2
Hard Disk Bay
Cover Removal
Upgrading the Hard Disk Drive
The hard disk drive can be taken out to accommodate other 2.5" serial (SATA) hard disk drives with a height of 9.5mm (h) (see "Storage" on page C - 3). Follow your operating system's installation instructions, and install all necessary drivers and utilities (see "Driver Installation" on page 4 - 2), when setting up a new hard disk.
- Turn off the computer, and turn it over and remove the battery.
- Locate the hard disk bay cover and loosen screws 81 2
- Remove the hard disk bay cover . ③
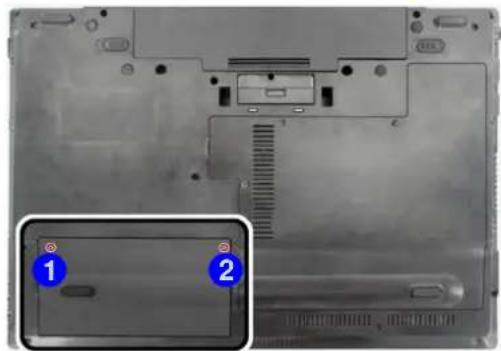
natural_image
Laptop back panel with two highlighted components (labeled 1 and 2), showing internal circuitry and mounting hardware (no text or symbols beyond labels)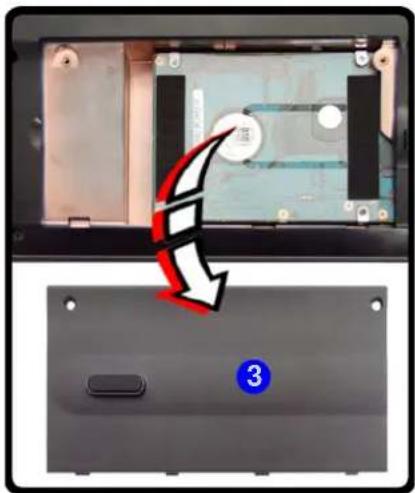
text_image
Diagram showing a device with a red arrow pointing to a component, labeled with number 3 and a blue button.6 - 4 Upgrading the Hard Disk Drive
Upgrading The Computer
-
Grip the tab and slide the hard disk in the direction of arrow . ④
-
Lift the hard disk out of the bay . ⑤
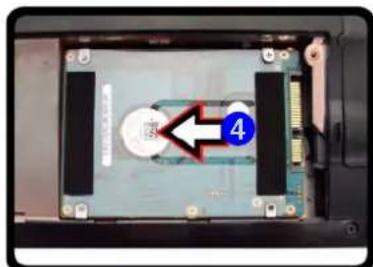
text_image
Labeled diagram of a computer rear panel showing a component with a numbered arrow and number 4 indicating a specific area.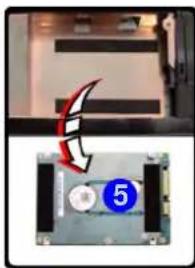
text_image
Diagram showing a device with a red arrow and numbered component labeled '5', likely indicating a process or state.-
Remove the screw(s) a 6 l the adhesive cover . 7
-
Reverse the process to install a new hard disk drive (do not forget to replace all the screws and covers).
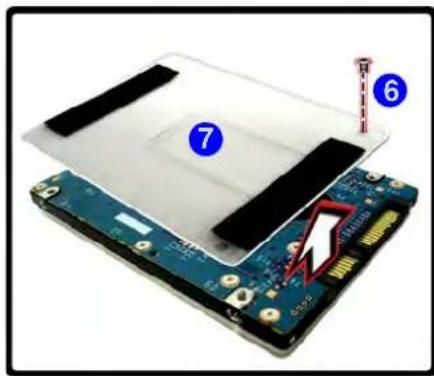
text_image
Labeled diagram of an electronic circuit board with components numbered 6, 7, and a highlighted section marked with a red arrow.
Hard Disk Screws & Cover
The hard disks and covers pictured here may appear slightly different from your model design (these designs are subject to change and upgrade without notice). Pay careful attention to the screws (if included) and cover orientation.
Figure 6 - 3 HDD Assembly Removal
Figure 6 - 4 HDD Cover Removal
Upgrading The Computer
Upgrading the Optical (CD/DVD) Device
- Turn off the computer, and turn it over and remove the battery.
- Locate the hard disk bay cover and loosen screws &1 2
- Remove the hard disk bay cover . ③
Figure 6 - 5
Removing the HDD
Cover
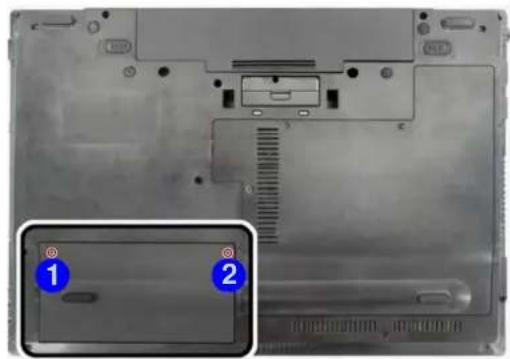
natural_image
Laptop back panel with two highlighted areas (1 and 2) showing internal components and mounting points (no text or symbols)
text_image
Diagram showing a device with a red arrow pointing to a component, labeled with number 3 and a blue circular indicator.6 - 6 Upgrading the Optical (CD/DVD) Device
Upgrading The Computer
-
Remove the screw at point, ④d use a screwdriver to carefully push out the optical device at point ⑤
-
Reverse the process to install the new device.
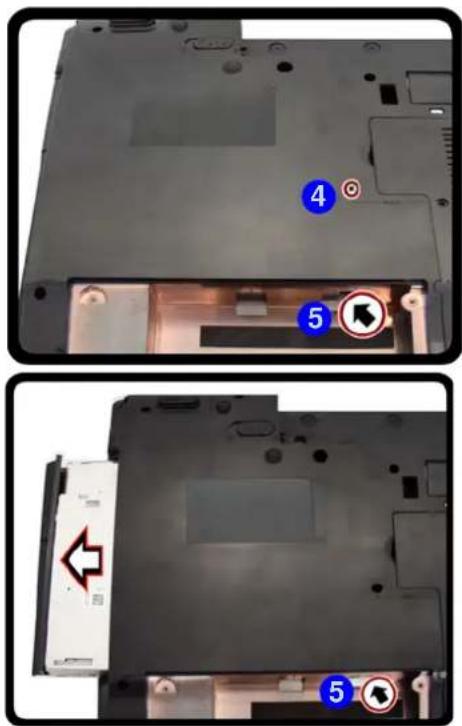
text_image
Laptop interior view with numbered components and directional arrows indicating movement or changeFigure 6 - 6 Removing the Optical Device
Upgrading the Optical (CD/DVD) Device 6 - 7
Upgrading The Computer
Upgrading the System Memory (RAM)
The computer has two memory sockets for 204 pin Small Outline Dual In-line (SO-DIMM) DDRIII (DDR3) type memory modules (see "Memory" on page C - 2 for details of supported module types).
- Turn off the computer, and turn it over and remove the battery.
- Locate the RAM & CPU bay cover and remove screws 1 - 4

Figure 6 - 7
CPU/RAM Bay
Cover Screws
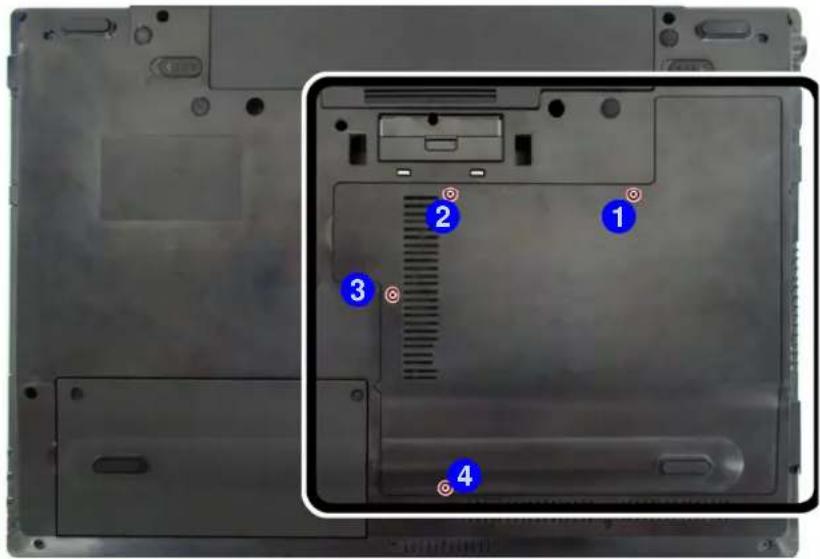
text_image
Laptop back panel with numbered annotations pointing to internal components6 - 8 Upgrading the System Memory (RAM)
Upgrading The Computer
- Carefully (a fan and cable are attached to the under side of the cover) lift up the bay cover.
- Carefully disconnect the fan cable, 4d remove the cover 5.
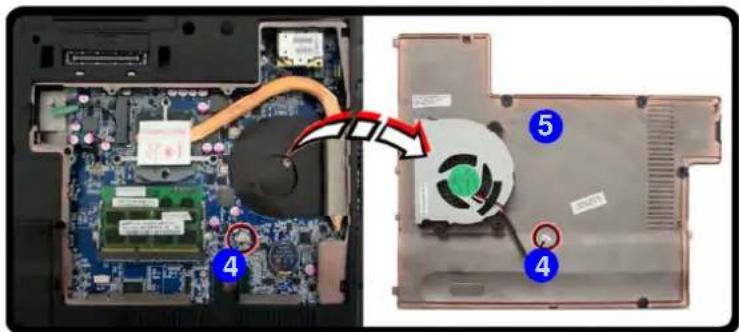
text_image
Laptop interior view showing a circuit board with labeled components and a highlighted fan assembly- Gently pull the two release latches on the sides of the memory socket in the direction indicated by the arrows (6 7) in Figure 6 - 10.
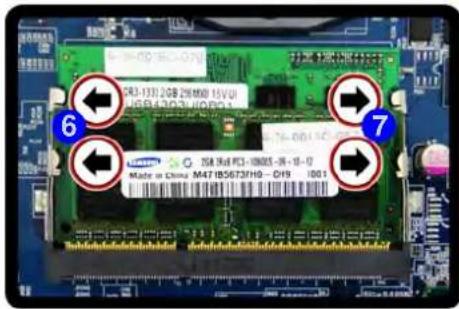
text_image
6 7 S8 16d FC-10005-3R-1-0 Made in China M47185673F10-DH9 I001
text_image
Contact Warning Be careful not to touch the metal pins on the RAM module's connecting edge. Even the cleanest hands have oils which can attract particles, and degrade the module's performance.
text_image
Fan Cable & Cover Make sure you reconnect the fan cable 4 before screwing down the bay cover. Note the information on replacing the RAM & CPU bay cover in "Cover Pins" on page 6 - 11.Figure 6 - 8
CPU/RAM Bay
Cover Removed
Figure 6 - 9
RAM Module
Release
Upgrading The Computer
- The RAM module will p8-up, and you can remove it.
- Pull the latches to release the second module if necessary.
- Insert a new module holding it at about a 30^ angle and fit the connectors firmly into the memory slot.
Figure 6 - 10
RAM Module
Removal

Single Memory Module Installation
If your computer has a single memory module, then insert the module into the Channel 0 (JDIMM1) socket. In this case this is the lower memory socket (the socket closest to the mainboard).
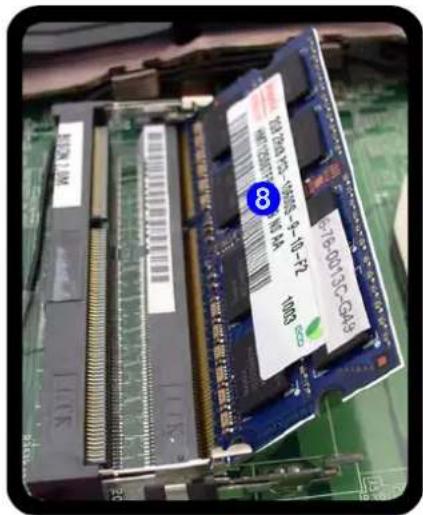
text_image
8 LED盘驱动器,电源中串芯片 LED盘驱动器,电源中串芯片 LED盘驱动器,电源中串芯片 LED盘驱动器,电源中串芯片 LED盘驱动器,电源中串芯片 LED盘驱动器,电源中串芯片 LED盘驱动器,电源中串芯片 LED盘驱动器,电源中串芯片 LED盘驱动器,电源中串芯片 LED盘驱动器,电源中串芯片 LED盘驱动器,电源中串芯 LED盘驱动器,电源中串芯 LED盘驱动器,电源中串芯 LED盘驱动器,电源中串芯 LED盘驱动器,电源中串芯 LED盘驱动器,电源中串芯 LED盘驱动器,电源中串芯 LED盘驱动器,电源中串芯 LED盘驱动器,电源中串芯 LED盘驱动器,电源中串芯 LED盘驱动器,电源中串芯片 LED盘驱动器,电源中串芯片 LED盘驱动器,电源中串芯片 LED盘驱动器,电源中串芯片 LED盘驱动器,电源中串芯片 LED盘驱动器,电源中串芯片 LED盘驱动器,电源中串芯片 LED盘驱动器,电源中串芯片 LED盘驱动器,电源中串芯片 LED盘驱动器,电源中串/芯片 LED盘驱动器,电源中串/芯片 LED盘驱动器,电源中串/芯片 LED盘驱动器,电源中串/芯片 LED盘驱动器,电源中串/芯片 LED盘驱动器,电源中串/芯片 LED盘驱动器,电源中串/芯片 LED盘驱动器,电源中串/芯片 LED盘驱动器,电源中串/芯片 LED盘驱动器,电源中串/芯 LED盘驱动器,电源中串/芯 LED盘驱动器,电源中串/芯 LED盘驱动器,电源中串/芯 LED盘驱动器,电源中串/芯 LED盘驱动器,电源中串/芯 LED盘驱动器,电源中串/芯 LED盘驱动器,电源中串/芯 LED盘驱动器,电源中串/芯 LED盘驱动器,电源中串/芯- The module's pin alignment will allow it to only fit one way. Make sure the module is seated as far into the slot as it will go. DO NOT FORCE the module; it should fit without much pressure.
- Press the module in and down towards the mainboard until the slot levers click into place to secure the module.
6 - 10 Upgrading the System Memory (RAM)
Upgrading The Computer
- Replace the bay cover and screws (make sure you reconnect the fan cable before screwing down the bay cover).
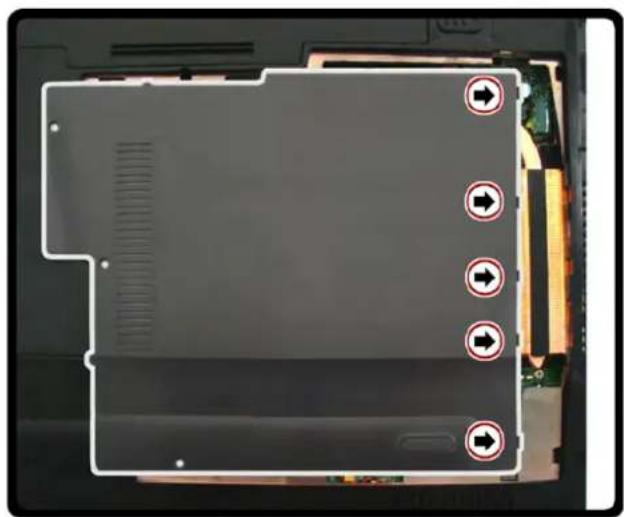
natural_image
Internal view of a computer drive chassis showing battery pack and cable (no text or symbols visible)- Restart the computer to allow the BIOS to register the new memory configuration as it starts up.

Cover Pins
Note that there are cover pins need to be aligned with slots in the case to insure a proper cover fit, before screwing down the bay cover (see Figure 6 - 11).
Figure 6 - 11 Cover Pin Alignment
Upgrading The Computer
Chapter 7: Modules & Options
Overview
This chapter contains information on the following modules, which may come with your computer, depending on the configuration purchased. If you are unsure please contact your service representative.
• PC Camera Module
- Wireless LAN Module
• Security Modules (Fingerprint & TPM)
• Fingerprint Reader Module
- Bluetooth Module
• 3.75G/HSPA Module
- Trusted Platform Module
• I R S T D r i v e r
- Intel® Management and Security Status

Important Notice
3.75G/HSPA & Bluetooth/Wireless LAN Modules
If your purchase option includes both Wireless LAN and 3.75G modules, then the appropriate antennas will be installed. Note that In order to comply with FCC RF exposure compliance requirements, the antenna must not be co-located or operate in conjunction with any other antenna or transmitter.
In order to comply with FCC regulations you should NOT operate the 3.75G/HSPA module and the Bluetooth/Wireless LAN modules at the same time as this may disrupt radio frequency, and cause interference.
When the 3.75G/HSPA module is powered on, make sure that the Bluetooth/Wireless LAN modules are powered off.

Wireless Device Operation Aboard Aircraft
The use of any portable electronic transmission devices aboard aircraft is usually prohibited. Make sure the module(s) are OFF if you are using the computer aboard aircraft.
Modules & Options

Latest PC Camera Driver Information
Check the Device Drivers & Utilities + User's Manual disc, and any accompanying insert pages, for the latest updated information on the PC Camera driver, which may override the information provided here.
PC Camera Driver Uninstallation
If you need to uninstall the driver, then uninstall the WebCam Installer item from the Programs and Features control panel in Windows.
PC Camera Module
Make sure that the PC Camera module is therefore installing the driver and use the Fn + F10 key combination (see "Function/Hot Key Indicators" on page 1 - 10) to toggle power to the PC Camera module. When the PC Camera module is powered on, the on-screen indicator will briefly be displayed. Make sure you install the drivers in the order indicated in Table , on page 4 - 3. When the PC Camera module is powered on, the indicator will briefly be displayed.
There are a number of different camera modules available with this computer model series. You will have the appropriate application installed for your camera (note that some versions of the camera application do not support the zoom function). Make sure you access the application via the desktop shortcut.
Modules & Options
PC Camera Driver Installation
- Make sure the module is powered on, and then insert the Device Drivers & Utilities + User's Manual disc into the CD/DVD drive.
- Click Option Drivers (button).
- Click 1. Install Webcam Driver > Yes.
- Click Next > Finish to restart the computer. OR
- Click Next >Install >Finish >Finish to restart the computer.
- Run the camera application program from the desktop shortcut (if the hardware is turned off use the Fn + F10 key combination to turn it on again).

PC Camera Screen Refresh
The PC Camera module supports a frame rate of 12 fps. If you find that the screen refresh rate is subject to lag or stuttering, then reduce the window size, or adjust the Output Size and/or Color Space Compression.
To reduce Output Size and/or Color Space Compression run the camera application, click Options and select Video Capture Pin. Adjust the settings from the appropriate pull-down menu.
Modules & Options
PC Camera Audio Setup
If you wish to capture video & audio with your camera, it is necessary to setup the audio recording options in Windows.
- Click Start, and click Control Panel (or point to Settings and click Control Panel).
- Click Sound (Hardware and Sound).
- Click Recording (tab).
- Right-click Microphone (Realtek High Definition Audio) and make sure the item is not disabled.
- Double-click Microphone (or select Properties from the right-click menu).
- Click Levels (tab), and adjust the Microphone and Microphone Boost sliders to the level required.
- Click OK and close the control panels.
- Run the camera application program from the desktop shortcut.
- Go to the Devices menu heading and select Microphone (Realtek High Defini....) (it should have a tick alongside it).
- Go to the Capture menu heading and select Capture Audio (it should have a tick alongside it).
Modules & Options
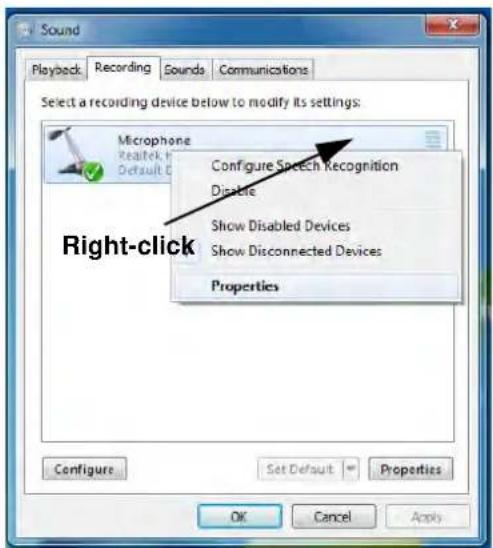
text_image
Sound Playback: Recording Sounds Communications Select a recording device below to modify its settings: Microphone Configure Speech Recognition Disable Show Disabled Devices Show Disconnected Devices Properties Right-click Configure Set Default Properties OK Cancel Apply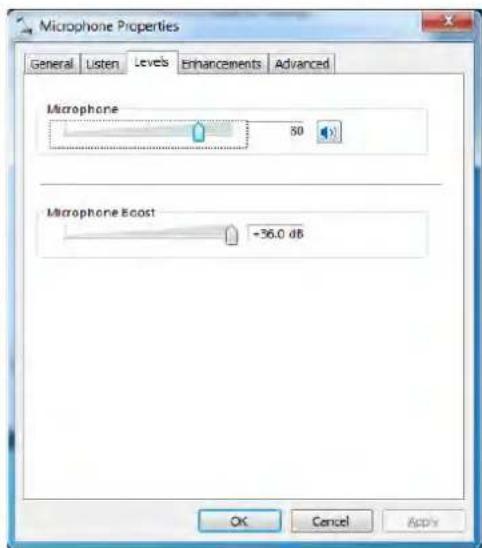
text_image
Microphone Properties General Listen Levels Enhancements Advanced Macrophone 50 Macrophone Boost -36.0 dB OK Cancel ApplyFigure 7 - 1 Audio Setup for PC Camera
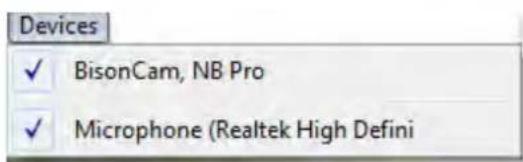
text_image
Devices ✓ BisonCam, NB Pro ✓ Microphone (Realtek High Defini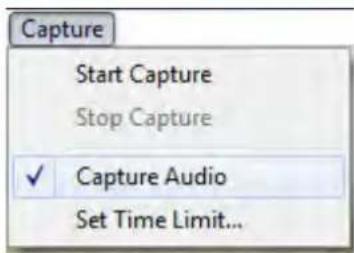
text_image
Capture Start Capture Stop Capture ✓ Capture Audio Set Time Limit...PC Camera Module 7 - 5
Modules & Options

Pre-Allocating File Size/Space
You may pre-allocate the file size (File > Allocate File Size/Space) for the capture file in the camera program (you may need to set a folder location first).
Pre-allocating space on the hard disk can improve the capture quality (particularly of large capture files), by reducing the amount of work the hard disk has to do in finding space for the video data as it is being captured.
See also "Reducing Video File Size" on page 7-7.
Camera Application
The camera application is a video viewer for general purpose video viewing and testing, and for capturing video files to .avi format.
- Run the camera application from the desktop shortcut (it is recommended that you set the capture file before the capture process - see "Set Capture File" on page 7 - 6).
- Go to the Capture menu heading (if you wish to capture audio check "PC Camera Audio Setup" on page 7 - 4) and select Start Capture.
- Click OK/Yes (the file location will be displayed in the pop-up box) to start capturing the video, and press Esc to stop the capture (you can view the file using the Windows Media Player).
Set Capture File
Prior to capturing video files you may select the Set Capture File... option in the File menu, and set the file name and location before capture (this will help avoid accidentally overwriting files). Set the name and location then click Open, then set the "Capture file size:" and click OK. You can then start the capture process as on the previous page.
Note the important information in reducing video file size below in order to save file space, and help prevent system problems.
Modules & Options
Reducing Video File Size
Note that capturing high resolution video files requires a substantial amount of disk space for each file. After recording video, check the video file size (right-click the file and select Properties) and the remaining free space on your hard disk (go to My Computer, right-click the hard disk, and select Properties). If necessary you can remove the recorded video file to a removable medium e.g. CD, DVD or USB Flash drive.
Note that the Windows 7 system requires a minimum of 15GB of free space on the C: drive system partition. In order to prevent system problems it is recommended that you save the captured video file to a location other than the C: drive (see set capture file above), limit the file size of the captured video (see “Pre-Allocating File Size/Space” on page 7 - 6) or reduce video resolution (see below).
To Reduce Video Resolution Output Size:
- Run the camera application program from the desktop shortcut.
- Go to Options and scroll down to select Video Capture Pin....
- Click the Output Size drop box and select a lower resolution size in order to reduce the captured file size.
- Click OK.
PC Camera Module 7 - 7
Modules & Options

Latest PC Camera Driver Information
Check the Device Drivers & Utilities + User's Manual disc, and any accompanying insert pages, for the latest updated information on the PC Camera driver, which may override the information provided here, including the figures pictured here.
Figure 7 - 2 Video Capture Filter
Eliminating Screen Flicker
If you find that the video screen in the camera program is flickering, you can try to adjust the setting in the Video Capture Filter options.
- Run the camera application from the desktop shortcut.
- Go to Options and scroll down to select Video Capture Filter....
- Click either 50Hz or 60Hz under Frequency (Anti Flicker).
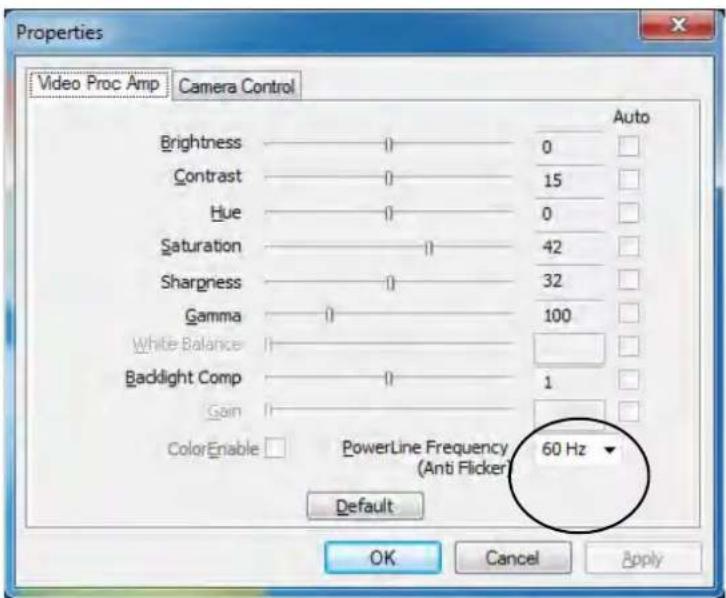
text_image
Properties Video Proc Amp Camera Control Brightness 0 0 Contrast 0 15 Hue 0 0 Saturation 1 42 Sharpness 0 32 Gamma 0 100 White Balance Backlight Comp 0 1 Gain ColorEnable PowerLine Frequency 60 Hz (Anti Flicker) Default OK Cancel Apply7 - 8 PC Camera Module
Modules & Options
Taking Still Pictures
The camera application allows you to take still pictures.
- Run the camera application from the desktop shortcut.
- Go to Options and select Take Picture.
- The picture (in JPEG format) will be placed in the Snapshot folder on the desktop.


Snapshot Folder
The Snapshot folder's default location is on the desktop. Do not move this folder or an error may appear when you try to take a still picture.
If you accidentally delete or move the folder, you can create a new Snapshot folder on the desktop in order to capture the files.
Modules & Options

Wireless Device Operation Aboard Aircraft
The use of any portable electronic transmission devices aboard aircraft is usually prohibited. Make sure the module(s) are OFF if you are using the computer aboard aircraft.
Use the Fn + F11 key combination to toggle power to the WLAN module, and check the indicator to see if the module is powered on or not (see Table 1 - 3, on page 1 - 10 Table 1 - 1, on page 1 - 7).
Wireless LAN Module
If you have included an Intel® or 3rd Party Wireless LAN (or WLAN & Bluetooth combo) module in your purchase option, make sure that the WLAN module is on before installing the driver.
Use the Fn + F11 key combination (see "Function/Hot Key Indicators" on page 1 - 10) to toggle power to the Wireless LAN module. When the WLAN module is powered on, the LED will be green and the on-screen indicator will briefly be displayed. Make sure you install the drivers in the order indicated in Table, on page 4 - 3.
Note that you need to install both the WLAN & Bluetooth drivers for Intel and 3rd party WLAN & Bluetooth Combo modules.
3rd Party WLAN Driver Installation
If you see the message "Found New Hardware" click Cancel to close the window.
- Make sure the module is powered on, and then insert the Device Drivers & Utilities + User's Manual disc into the CD/DVD drive.
- Click Option Drivers (button).
- Click 2. Install WLAN Driver > Yes.
- Choose the language you prefer and click Next.
- Click Next.
- Click Finish to restart the computer.
Intel® WLAN Driver Installation
If you see the message "Found New Hardware" click Cancel to close the window.
- Make sure the module is powered on, and then insert the Device Drivers & Utilities + User's Manual disc into the CD/DVD drive.
- Click Option Drivers (button).
- Click 2. Install WLAN Driver > Yes.
- Click Next > Next.
- Click the button to accept the license and click Next.
- Click Next > Next > Finish.
Note: The operating system is the default setting for Wireless LAN control in Windows (see overleaf).
Modules & Options

Network and Sharing Center
You can also use the Network and Sharing Center control panel in Windows (Network and Internet) to connect to any available wireless networks.
Figure 7 - 3 Click Taskbar Icon Menu & Network and Sharing Center
Connecting to a Wireless Network in Windows 7
Make sure the Wireless LAN module is turned on.
- Click the taskbar wireless icon, and then double-click an access point to connect to or click to Open Network and Sharing Center if you do not see a network you want to connect to in the taskbar menu (a list of options will appear allowing setting changes, and creating a new network).
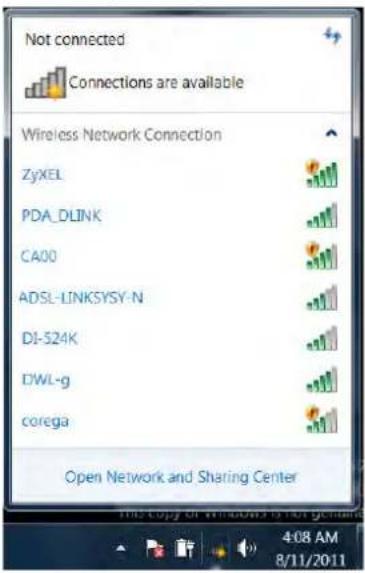
text_image
Not connected Connections are available Wireless Network Connection ZyXEL PDA_DLINK CA00 ADSL-LINKSYSY-N D1-524K DJWL-g corega Open Network and Sharing Center 4:08 AM 8/11/2011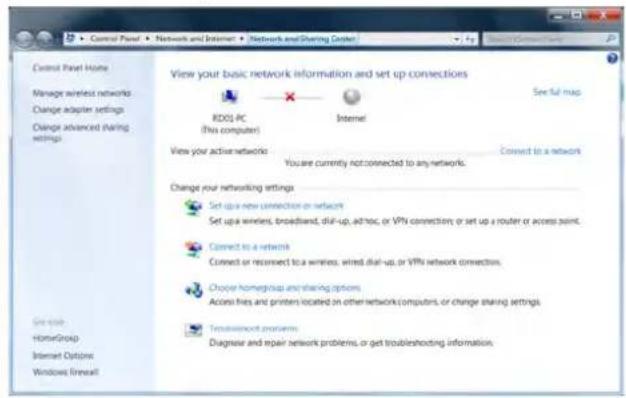
text_image
Control Panel Home Manage wireless networks Change adapter settings Change advanced sharing settings View your basic network information and set up connections RDOS PC (This computer) Internet View your active network: You are currently not connected to any networks. Connect to a network Change your networking settings Set up a new connection or network Set up a wireless, broadband, dial-up, ad-hoc, or VPN connection; or set up a router or access point. Connect to a network Connect or reconnect to a wireless, wired dial-up, or VPN network connections. Choose homegroup and sharing options Access files and printers located on other network computers, or change sharing settings. Troubleshoot problems Diagnose and repair network problems, or get troubleshooting information.7 - 12 Wireless LAN Module
Modules & Options
- You may need to enter a security key for any access point to which you are trying to connect.
- Click to select a network location (e.g. Home, Work or Public).
- Click "View or change settings in Network and Sharing Center" to access further options for the connection.
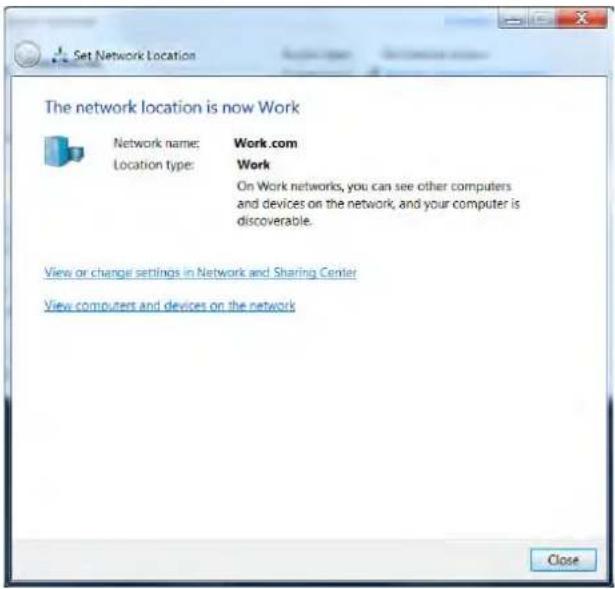
text_image
Set Network Location The network location is now Work Network name: Work.com Location type: Work On Work networks, you can see other computers and devices on the network, and your computer is discoverable. View or change settings in Network and Sharing Center View computers and devices on the network CloseFigure 7 - 4 Network Location Set
Modules & Options

Security Enabled Networks
You should try to make sure that any network you are connecting to is a secure network.
Connecting to unsecure networks may allow unauthorized access to your computer, documents, websites and files etc.
Figure 7 - 5
Click Taskbar Icon Menu - Disconnect
- Click the taskbar icon 📁 to see any currently connected networks.
- To disconnect from the wireless network you can click the taskbar wireless icon, click the active connection and then click Disconnect (button).
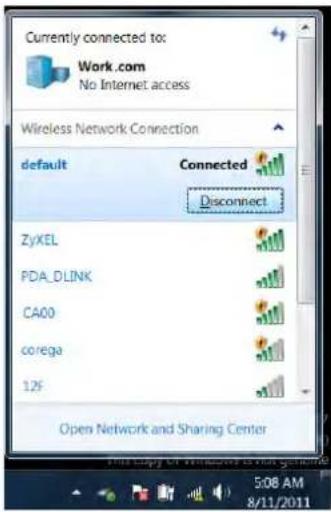
text_image
Currently connected to: Work.com No Internet access Wireless Network Connection default Connected Disconnect ZyXEL PDA_DLINK CA00 corega 125 Open Network and Sharing Center 5:08 AM 8/11/2011Modules & Options
Intel® My WiFi Configuration
Intel® My WiFi Technology uses your WLAN (for Intel WLAN modules only) module to allow you to connect up to eight other WiFi enabled devices (e.g. digital cameras, other computers, cell phones, handheld devices etc.) to your computer (similar to Bluetooth), while still connecting to the Internet through your WiFi wireless connection. Intel® My WiFi Technology offers greater range and speed than other personal area networks, and does not require an access point.

Intel® My WiFi Help
To get help on Intel® My WiFi configuration and settings, access the Intel® My WiFi Utility from the Start menu (Start > Programs/All Programs > Intel PRO-Set Wireless > Intel My WiFi Technology), or by clicking the taskbar icon. Click the Help icon and select a help topic from the Contents menu.
Modules & Options
Intel® My WiFi Configuration
You can configure the My WiFi settings as follows.
- Access the Intel® My WiFi Utility from the Start menu (Start > Programs/All Programs > Intel PROSet Wireless > Intel My WiFi Technology), or by double-clicking the taskbar icon
- Click Enable Enable (on the first run of the program there will be no connected devices listed).
Figure 7 - 6
Intel® My WiFi
Utility
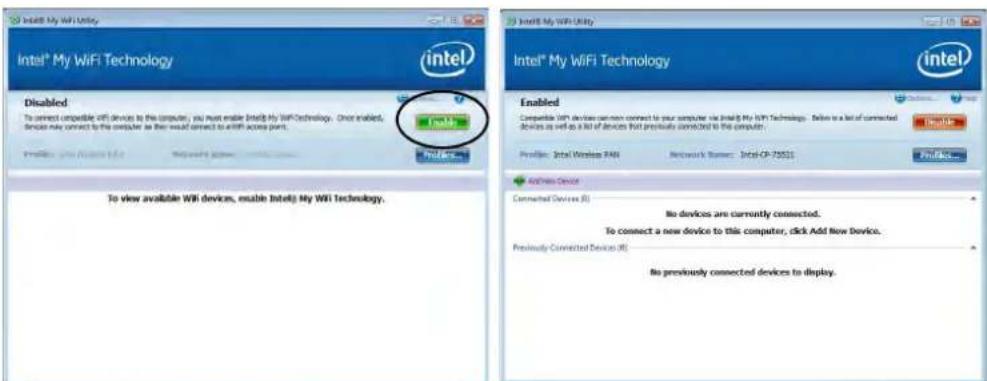
text_image
Intel® My WiFi Technology Intel® My WiFi Technology Enabled Compatible WiFi devices can own connect to your computer via Intel® My WiFi Technologies. Below is a list of connected devices as well as a list of devices that previously connected to the computer. Profile: Intel Wireless FAM Network Name: Intel CP-73521 Profile... Access Devices Connected Devices (S) No devices are currently connected. To connect a new device to this computer, click Add New Device. Previously Connected Devices (E) No previously connected devices to display.7 - 16 Wireless LAN Module
Modules & Options
- Click Start and click Control Panel.
- Click Network and Sharing Center (Network and Internet).
- Click Change adapter settings.
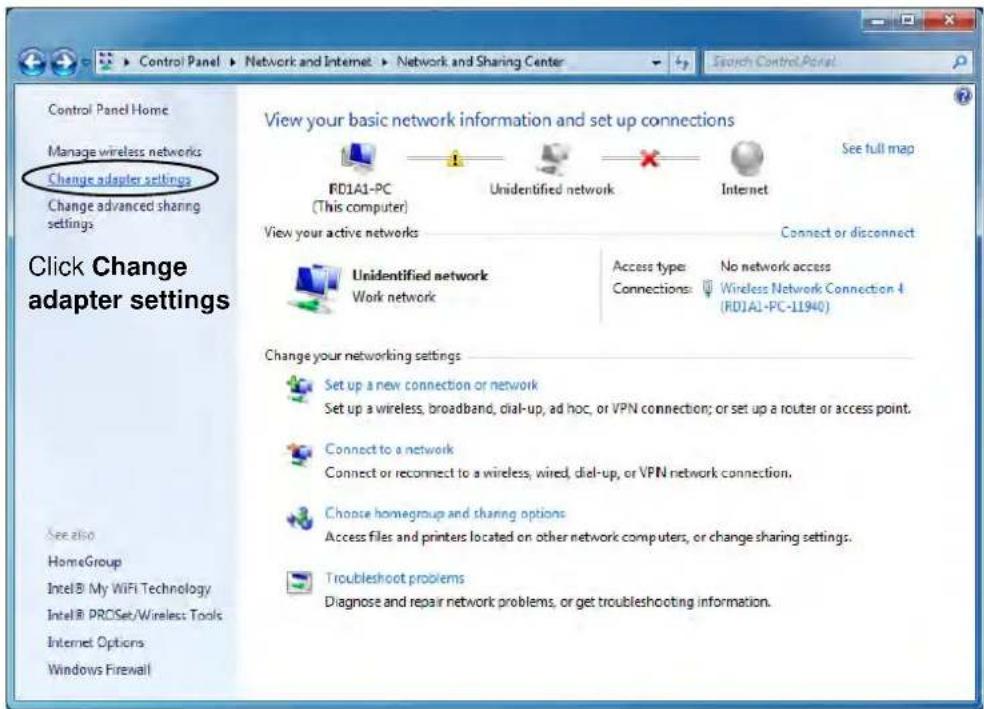
text_image
Control Panel Home Manage wireless networks Change adapter settings Change advanced sharing settings Click Change adapter settings See also HomeGroup Intel® My WiFi Technology Intel® PROSet/Wireless Tools Internet Options Windows Firewall View your basic network information and set up connections RD1A1-PC (This computer) Unidentified network Internet View your active networks Connect or disconnect Unidentified network Work network Access type: No network access Connections: Wireless Network Connection 4 (RD1A1-PC-11940) Change your networking settings Set up a new connection or network Set up a wireless, broadband, dial-up, ad hoc, or VPN connection; or set up a router or access point. Connect to a network Connect or reconnect to a wireless, wired, dial-up, or VPN network connection. Choose homegroup and sharing options Access files and printers located on other network computers, or change sharing settings. Troubleshoot problems Diagnose and repair network problems, or get troubleshooting information.Figure 7 - 7 Network and Sharing Center
Modules & Options
Figure 7 - 8 Network Connections
- Right-click Wireless Network Connection and select Properties.
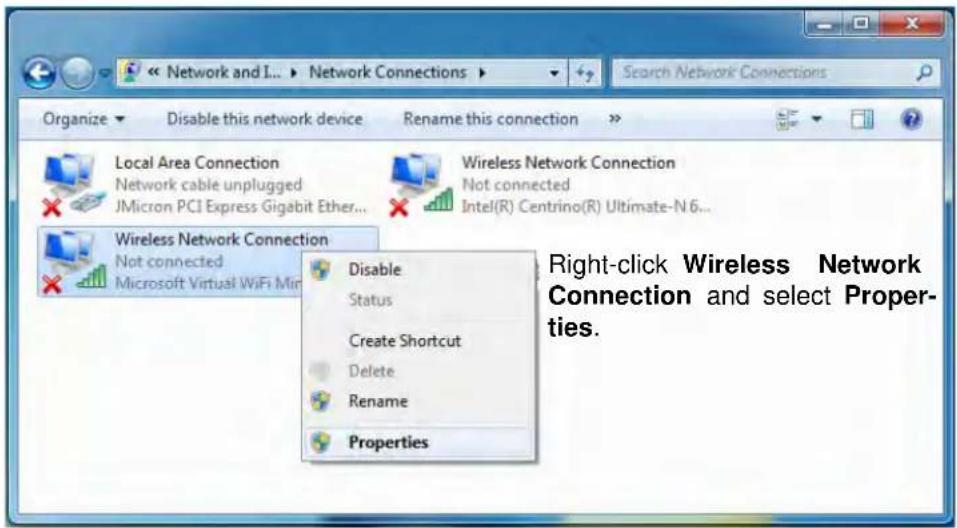
text_image
Right-click Wireless Network Connection and select Properties.7 - 18 Wireless LAN Module
Modules & Options
- Click Sharing (tab) and select "Allow other network users to connect through this computer's Internet connection".
- Select Wireless Network Connection under Home networking connection.
- Click OK.
Click "Allow other network users to connect through this computer's Internet connection".
Select Wireless Network Connection.
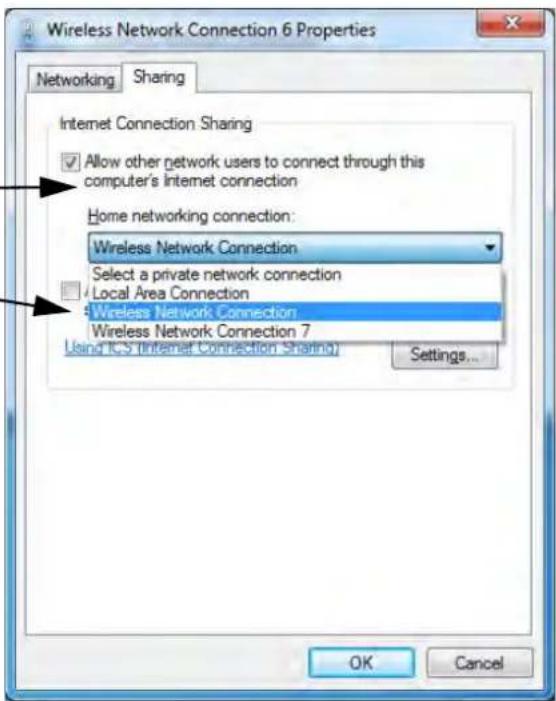
text_image
Wireless Network Connection 6 Properties Networking Sharing Internet Connection Sharing Allow other network users to connect through this computer's Internet connection Home networking connection: Wireless Network Connection Select a private network connection Local Area Connection Wireless Network Connection Wireless Network Connection 7 Using ICS (Internet Connection Sharing) Settings... OK CancelFigure 7 - 9 Wireless Network Connection Properties - Sharing
Modules & Options
-
Access the Intel® My WiFi Utility from the Start menu (Start > Programs/All Programs > Intel PROSet Wireless > Intel My WiFi Technology), or by double-clicking the taskbar icon
-
Click Profiles
Profiles...

Figure 7 - 10
Intel® My WiFi
Utility - Profiles
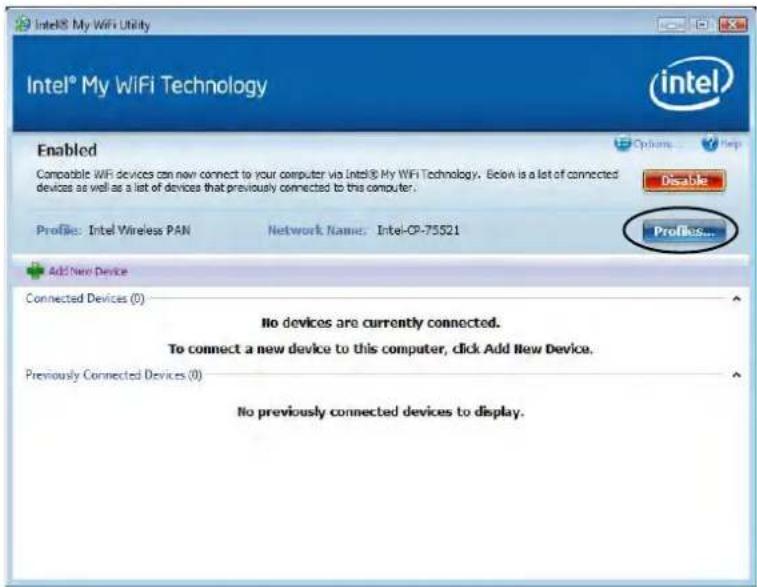
text_image
Intel® My WiFi Utility Intel® My WiFi Technology Enabled Compatible WiFi devices can now connect to your computer via Intel® My WiFi Technology. Below is a list of connected devices as well as a list of devices that previously connected to this computer. Profiles: Intel Wireless PAN Network Name: Intel-CP-75521 Add New Device Connected Devices (0) No devices are currently connected. To connect a new device to this computer, click Add New Device. Previously Connected Devices (0) No previously connected devices to display.7 - 20 Wireless LAN Module

Modules & Options
- Click Profiles, click Intel Wireless PAN and click Edit or New (Note that all preset settings may not be editable - see sidebar).
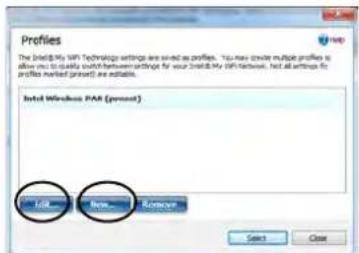
text_image
Profiles The Install My WiFi Technology settings are saved as profiles. You must create multiple profiles as allow you to qualify search between versions for your Install My WiFi network. Next all settings for profiles marked (except) are available. Install Wireless PAR (present) Add New Remove Select Cancel- You can change the Profile Name and Network Name to your personal preferences in General (tab).

Profile and Network Names
The Profile Name is the name as displayed on your computer in the Network Connections control panel (see Figure 7 - 13 on page 7 - 22).
The Network Name (SSID) is the name the devices see when they try to connect to your computer.
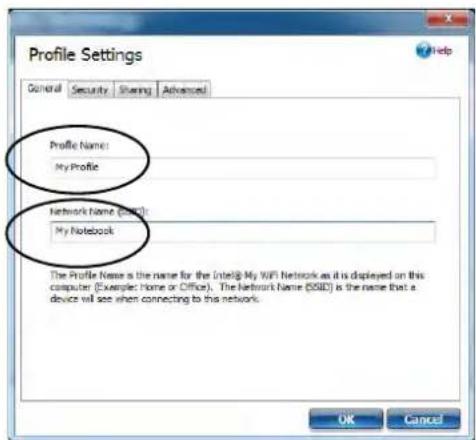
text_image
Profile Settings General Security Sharing Advanced Profile Name: My Profile Network Name (COS) My Notebook The Profile Name is the name for the Intel® My WiFi Network as it is displayed on this computer (Example: Home or Office). The Network Name (SSIE) is the name that a device will see when connecting to this network. OK CancelFigure 7 - 11
Profiles

Profile Settings
Profiles that are preset may not be fully editable. To edit all the profile settings, click New to create a new profile and adjust the settings to your preferences.
Figure 7 - 12
Intel® My WiFi
Profile Settings - General
Modules & Options
- Click Security (tab).
- Change the Security Type to WEP and the Encryption Type to 64bit.
- Enter a password (8 characters long) in the Password box.
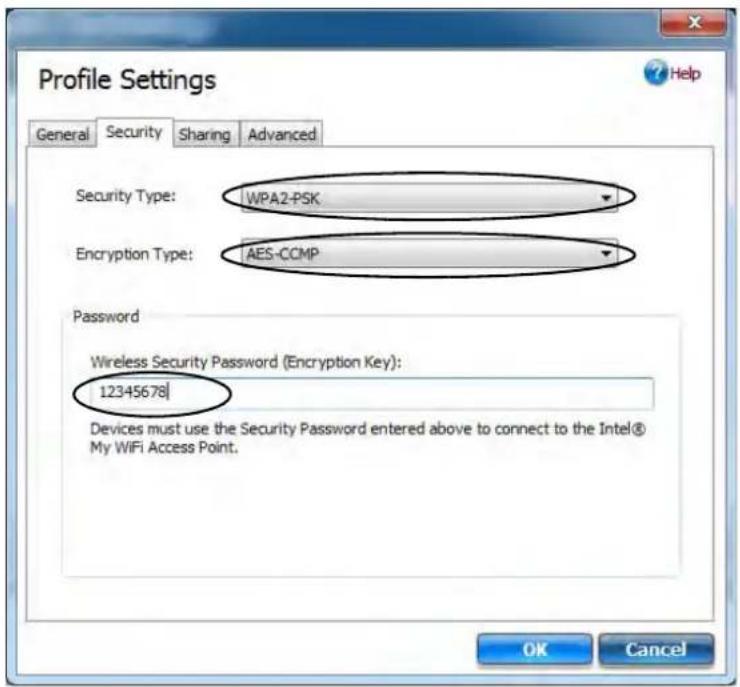
text_image
Profile Settings General Security Sharing Advanced Security Type: WPA2-PSK Encryption Type: AES-CCMP Password Wireless Security Password (Encryption Key): 12345678 Devices must use the Security Password entered above to connect to the Intel® My WiFi Access Point. OK CancelFigure 7 - 13 Intel® My WiFi Profile Settings - Security
7 - 22 Wireless LAN Module

Modules & Options
- Click Sharing (tab).
- It is recommended that the Filter Network Traffic and DHCP and DNS Server are Disabled.
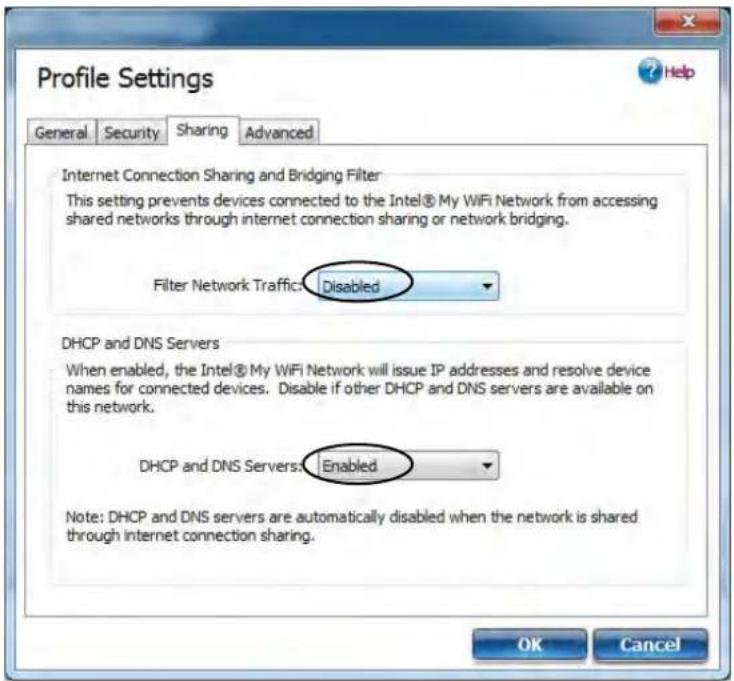
text_image
Profile Settings General Security Sharing Advanced Internet Connection Sharing and Bridging Filter This setting prevents devices connected to the Intel® My WiFi Network from accessing shared networks through internet connection sharing or network bridging. Filter Network Traffic: Disabled DHCP and DNS Servers When enabled, the Intel® My WiFi Network will issue IP addresses and resolve device names for connected devices. Disable if other DHCP and DNS servers are available on this network. DHCP and DNS Servers: Enabled Note: DHCP and DNS servers are automatically disabled when the network is shared through internet connection sharing. OK CancelFigure 7 - 14 Intel® My WiFi Profile Settings - Sharing
Modules & Options
- Click Advanced (tab).
- It is recommended that the Default Channel is set to Channel 1, 6 or 11.
- Click OK to save the settings.
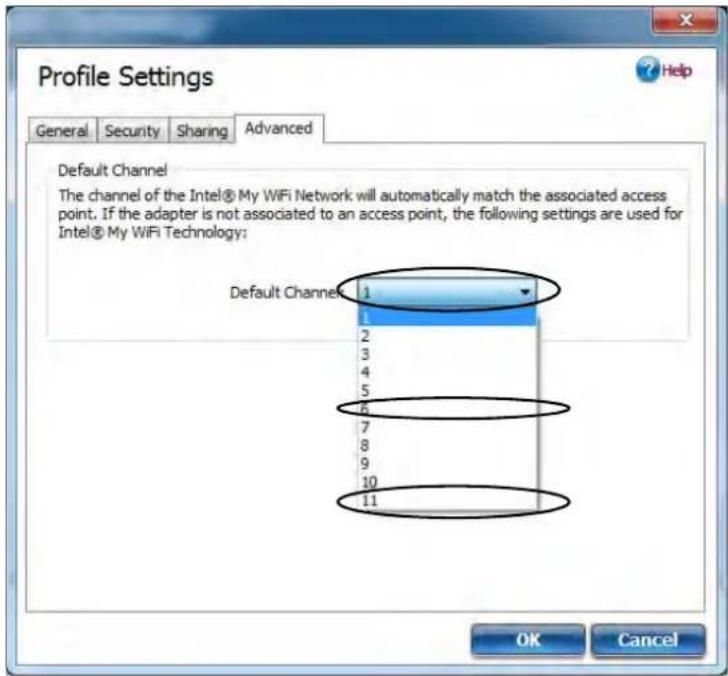
text_image
Profile Settings General Security Sharing Advanced Default Channel The channel of the Intel® My WiFi Network will automatically match the associated access point. If the adapter is not associated to an access point, the following settings are used for Intel® My WiFi Technology: Default Channels 1 2 3 4 5 6 7 8 9 10 11 OK CancelFigure 7 - 15 Intel® My WiFi Profile Settings - Advanced
7 - 24 Wireless LAN Module
Modules & Options
- Double-click Wireless Network Connection in Network Connections.
- Click Details to display the Network Connection Details.
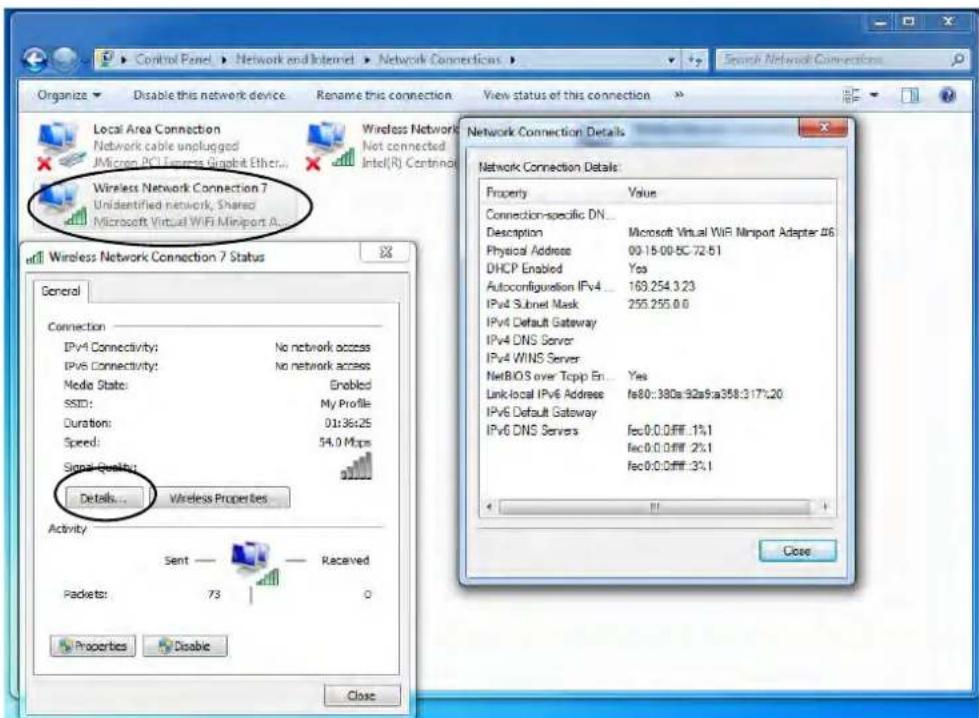
text_image
Control Panel > Network and Internet > Network Connections > Organize Disable this network device Rename this connection View status of this connection Local Area Connection Network cable unplugged JMizqrc PCI Express Gipbbit Ether... Wireless Network Not connected Intel(R) Conting Wireless Network Connection 7 Unidentified network, Shared Microsoft Virtual WiFi Miniport 0... Wireless Network Connection 7 Status General Connection IPv4 Connectivity: No network access IPv6 Connectivity: No network access Media State: Enabled SSID: My Profile Duration: 01:36:25 Speed: 54.0 Mbps Signal Quality: Details... Wireless Properties Activity Sent Received Packets: 73 0 Properties Disable Close Network Connection Details Property Value Connection-specific DN... Description Microsoft Virtual WiFi Minport Adapter #6 Physical Address 09:15:00 8C-72-51 DHCP Enabled Yes Autoconfiguration IPv4 ... 169.254.3.23 IPv4 Subnet Mask 255.255.0.6 IPv4 Default Gateway IPv4 DNS Server IPv4 WINS Server NetBIOS over TcpB En... Yes Link-local IPv6 Address N80::380a:92a5:a358:317:20 IPv6 Default Gateway IPv6 DNS Servers fec0:0.0:fff_1%1 fec0:0.0:fff_2%1 fec0:0.0:fff_3%1 CloseFigure 7 - 16 Wireless Network Connection Details
Modules & Options
- Access the Intel® My WiFi Utility from the Start menu (Start > Programs/All Programs > Intel PROSet Wireless > Intel My WiFi Technology), or by clicking the taskbar icon
- To add a new device follow the instructions in the devices' user guide for connecting to a WiFi network.
- Click Add New Device in Intel® My WiFi Utility to confirm the security settings detail.
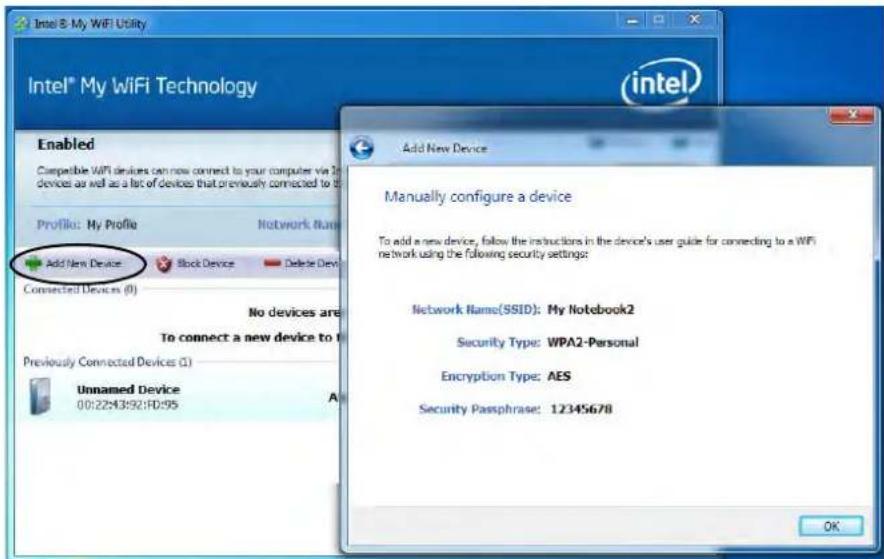
text_image
Intel® My WiFi Utility Intel® My WiFi Technology Enabled Compatible WiFi devices can now connect to your computer via 2G devices as well as a lot of devices that previously connected to the Profile: My Profile Network Name Add New Device Block Device Delete Devi Connected Devices (0) No devices are To connect a new device to Previously Connected Devices (1) Unnamed Device 00:22:43:92:FD:95 Add New Device Manually configure a device To add a new device, follow the instructions in the device's user guide for connecting to a WiFi network using the following security settings: Network Name(SSID): My Notebook2 Security Type: WPA2-Personal Encryption Type: AES Security Passphrase: 12345678 OKFigure 7 - 17 Intel® My WiFi Utility (Add New Device)
7 - 26 Wireless LAN Module
Windows Mobility Center
The Windows Mobility Center control panel provides an easy point of access for information on battery status, power plans used and wireless device status etc.
To access the Windows Mobility Center:
- Click Start, and click Control Panel (or point to Settings and click Control Panel).
- Double-click Windows Mobility Center (Mobile PC).
- Click the button to Turn wireless off/on, or click the icon 📄 to access the network menu.
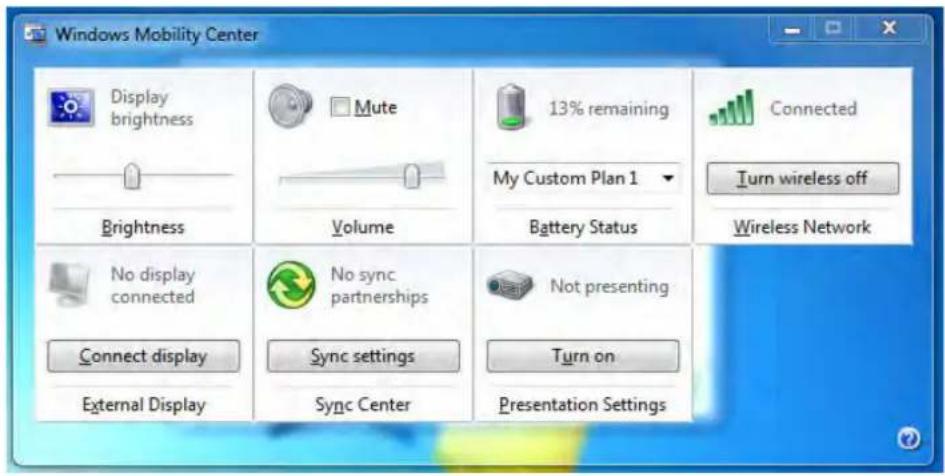
text_image
Windows Mobility Center Display brightness Brightness Mute Volume 13% remaining My Custom Plan 1 Battery Status Connected Turn wireless off Wireless Network No display connected Connect display External Display No sync partnerships Sync settings Sync Center Not presenting Turn on Presentation SettingsFigure 7 - 18 Windows Mobility Center
Modules & Options

Password Warning
If you set passwords for any of the security modules, NEVER forget your password.
The consequences of this could be serious. If you cannot remember your boot password you must contact your vendor and you may lose all of the information on your hard disk.
Security Modules (Fingerprint & TPM)
The encrypted channel between the Trusted Platform Module security chip (see “Trusted Platform Module” on page 7 - 73) and the fingerprint reader with AuthenTec TrueSuite software (see “Fingerprint Reader Module” on page 7 - 29) provides a high level of security for your computer. A further level of security and control is provided in the BIOS (see “Security Menu” on page 5 - 13).
The fingerprint reader with the AuthenTec TrueSuite software allows you to:
- Access or Lock your computer
- Protect sensitive files
- Access frequently used websites using your fingerprint
- Fill in frequently log on information
Fingerprint Reader Module
The fingerprint reader module provides a high level of security for your computer. Make sure you have administrator's rights to your computer, and have a Windows password enabled for full security protection.
Fingerprint Reader Driver Installation
- Insert the Device Drivers & Utilities + User's Manual disc into the CD/DVD drive.
- Click Option Drivers.
- Click 3. Install Fingerprint Driver > Yes.
- Click Next > Next > Next.
- Click Finish > Yes to restart the computer.
- Click the tray icon, scan a finger or click Start > Programs/All Programs > Protector Suite > Control Center and then begin the enrollment process (see over).
Modules & Options

Fingerprint Enrollment
Note that it is strongly recommended that you enroll more than one finger in case of injury etc.
User Enrollment
- Click Start > Programs/All Programs > Protector Suite > Control Center, or double click the notification area icon (click Initialize).
- On the first run of the program you will be asked to click the Accept button to accept the license.
- If you have not set a Windows password you will be prompted to do so (note: If you have not set a password Protector Suite cannot secure access to your computer).
- Click Submit when you have entered password.
- You will then be prompted to enroll your fingerprints (you can click Tutorial to get help with fingerprint enrollment at any time).
Figure 7 - 19 Fingerprint Enrollment
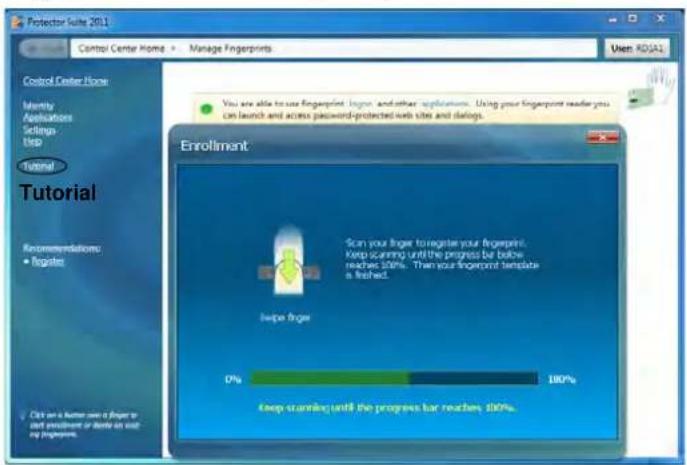
text_image
Protector Suite 2011 Control Center Home Manage Fingerprints User ADUAL Control Center Home Identity Applications Settings Help Tutorial Tutorial Recommendations • Register You are able to use fingerprint login and other applications. Using your fingerprint reader you can launch and access password-protected web sites and dialogs. Enrollment: Scan your finger to register your fingerprint. Keep scanning until the progress bar before reaches 50%. Then your fingerprint template is dashed. Keep fringe 0% 100% Keep scanning until the progress bar reaches 100%.7 - 30 Fingerprint Reader Module
Modules & Options
- Click the button above any of the fingers to begin the enrollment process for that finger.
- Swipe the finger until the progress bar reaches 100% to enroll that finger.
- Repeat the process for all the fingers you wish to enroll (see sidebar), and then click Save and Continue.
- Enter a backup password and click Apply.
- Close the fingerprint status window.
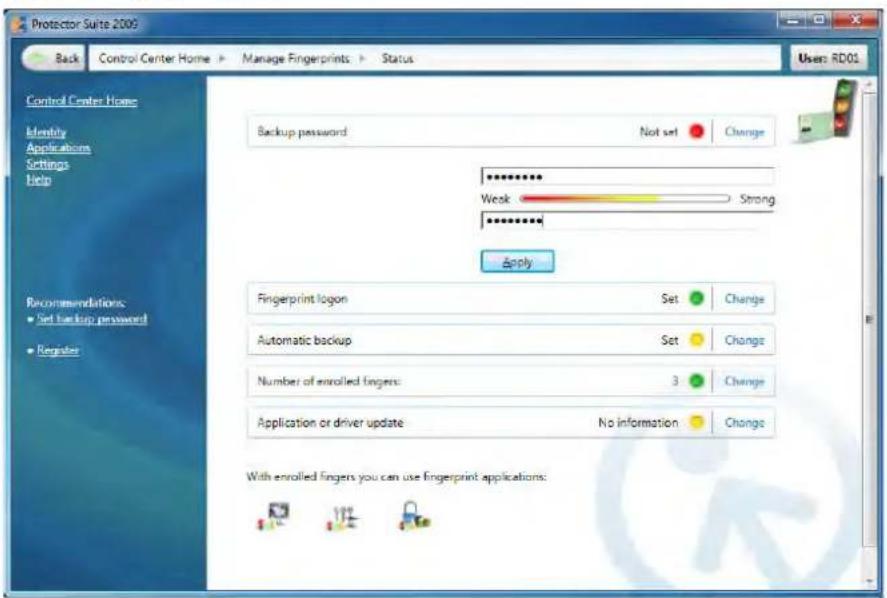
text_image
Protector Suite 2005 Back Control Center Home Manage Fingerprints Status User: RD01 Control Center Home Identity Applications Settings Help Backup password Not set Change ********** Weak Strong ********** Apply Fingerprint logon Set Change Automatic backup Set Change Number of enrolled fingers 3 Change Application or driver update No information Change With enrolled fingers you can use fingerprint applications:
Fingerprint Enrollment
Note that it is strongly recommended that you enroll more than one finger in case of injury etc.
Figure 7 - 20
Fingerprint Status
Modules & Options
Figure 7 - 21 Control Center & Biomenu
- Right-click the taskbar icon and select Start Control Center (and then swipe a finger) to allow you to Edit Fingerprints, register Applications, edit Settings and access the Help menu etc. You can also run the Control Center etc. from the Protector Suite item in the Programs/All Programs menu
- Click "Help" in Control Center Home to get more information on any topic.
- You can also run the Tutorial, or Product Tour video to get more information.
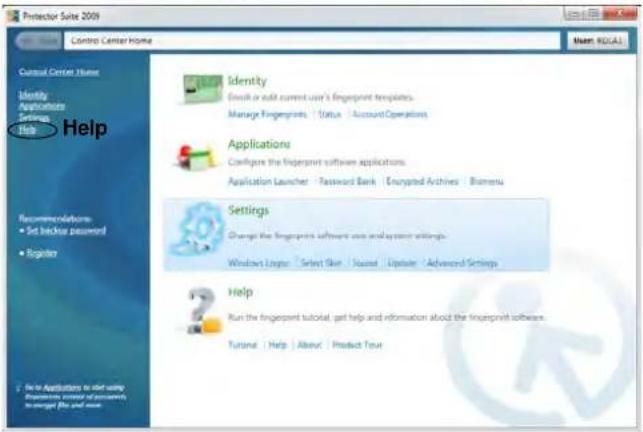
text_image
Protector Suite 2009 Control Center Home Name: RCLALL Control Center Home Identity Applications Settings Help Recommendations: • Set back/stop password • Register Identity Email or add current user's fingerprint templates. Manage Fingerprints | Status | Account Operations Applications Configure the fingerprint software applications. Application Launcher | Password Bank | Encrypted Archives | Bumenu Settings Change the fingerprints software use and system settings. Windows LAYER | Select Skirt | Sound | Lipalool | Advanced Settings Help Run the fingerprint tutorial, get help and information about the fingerprint software. Tutorial | Help | About | Product Tour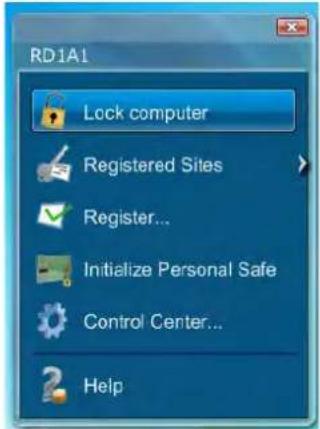
text_image
RD1A1 Lock computer Registered Sites Register... Initialize Personal Safe Control Center... Help- See "Help" on page 7 - 78 for further details.
- If you swipe your finger over the reader at any time you can access the Biomenu to lock the computer, register websites, access the Personal Safe, open the Control Center and access the Help menu.
7 - 32 Fingerprint Reader Module
Modules & Options
Fingerprint Control Center Features
Application Launcher
The Application Launcher allows you to register applications to be launched when assigned to a particular finger. Simply copy the application icon on to one of the registered fingers and ten click OK to close the application window. Once registered the application will launch when you swipe the appropriate finger across the sensor.
Password Bank
The Password Bank stores registrations of user names, passwords and other settings for web sites etc.
Personal Safe
The Personal Safe is an encrypted area assigned on your hard drive that allows you to store files and folders to be protected by fingerprint protection.

Help
For more information on these and other features simply access "Help" in the Fingerprint Control Center and select the item from the menu on the left.
Modules & Options

Wireless Device Operation Aboard Aircraft
The use of any portable electronic transmission devices aboard aircraft is usually prohibited. Make sure the module(s) are OFF if you are using the computer aboard aircraft.
Use the Fn + F12 key combination to toggle power to the Bluetooth module, and check the LED indicator to see if the module is powered on or not (see Table 1 -3, on page 1 - 10 Table 1 - 1, on page 1 - 7).
Bluetooth Module
If your purchase option includes the Combination Wireless LAN & V3.0 Bluetooth module (either Intel® or 3rd Party) then install the driver as instructed over-leaf.
Use the Fn + F12 key combination to toggle power to the Bluetooth module (see "Function/Hot Key Indicators" on page 1 - 10). When the Bluetooth module is powered on, the PED will be orange and the on-screen indicator will briefly be displayed.

Bluetooth Data Transfer
Note that the transfer of data between the computer and a Bluetooth enabled device is supported in one direction only (simultaneous data transfer is not supported). Therefore if you are copying a file from your computer to a Bluetooth enabled device, you will not be able to copy a file from the Bluetooth enabled device to your computer until the file transfer process from the computer has been completed.
- For Intel Bluetooth combo modules see the installation procedure see “Intel Bluetooth Combo Driver Installation” on page 7 - 35 and “Standard Bluetooth Configuration in Windows 7” on page 7 - 36.
- For 3rd party Bluetooth combo modules see the installation procedure see "3rd Party Bluetooth Combo Driver Installation" on page 7 - 40 and "3rd Party Bluetooth & WLAN Combo Settings" on page 7 - 41.
Modules & Options
Intel Bluetooth Combo Driver Installation
Note this driver is required only for the Intel combo Bluetooth and WLAN module only.
- Before installing the driver make sure the Bluetooth module is powered on (use Fn + F12 key combination), then insert the Device Drivers & Utilities + User's Manual disc into the CD/DVD drive. If a Found New Hardware window appears, click Cancel in all windows that appear, and then proceed to install the driver as below.
- Click Option Drivers (button).
- Click 4. Install Combo BT Driver > Yes.
- Click Next > Next.
- Click the button to accept the license and click Next.
- Click Next > Finish.
- See over for configuration instructions.
Note that, at the time of going to press, Intel® Centrino® Wireless-N 1030 and Advanced-N 6230 WLAN & Bluetooth V3.0+HS combo modules use the standard Bluetooth configuration in Windows 7 (see "Standard Bluetooth Configuration in Windows 7" on page 7 - 36). Do not use the Bluetooth & WLAN Combo settings information outlined from page 7 - 41 to page 7 - 47. See also "Intel® Centrino Advanced WLAN & Bluetooth V3.0+HS Combo Modules" on page 8 - 16.

High Speed Bluetooth Data Transfer
The Combination Wireless LAN & V3.0 Bluetooth module supports high speed (V3.0) data transfer. However to achieve such transfer speeds, both devices must support high speed data transfer.
To obtain high speed (V3.0) data transfer make sure that both the WLAN and Bluetooth modules are powered on.
Check your Bluetooth compatible device's documentation to confirm it supports high speed data transfer.
Modules & Options

Add a Device
Click Start, and click Control Panel and then click Devices and Printers (Hardware and Sound). Click Add a device to search for any available Bluetooth devices.
Bluetooth Module & Resuming From Sleep Mode
The Bluetooth module's default state will be off after resuming from the Sleep power-saving state. Use the key combination (Fn + F12) to power on the Bluetooth module after the computer resumes from Sleep.
Figure 7 - 22 Bluetooth Devices & Click Icon Menu
Standard Bluetooth Configuration in Windows 7
Setup your Bluetooth Device so the Computer Can Find it
- Turn your Bluetooth device (e.g. PDA, mobile phone etc.) on.
- Make the device discoverable (to do this check your device documentation).
To Turn the Bluetooth Module On
- Press the Fn + F12 key combination to power on the Bluetooth module.
- A Bluetooth icon will appear in the taskbar.
- You can then do any of the following to access the Bluetooth Devices control panel.
- Double-click the taskbar icon 📋 to access the Bluetooth Devices control panel.
- Click/Right-click the taskbar icon and choose an option from the menu.
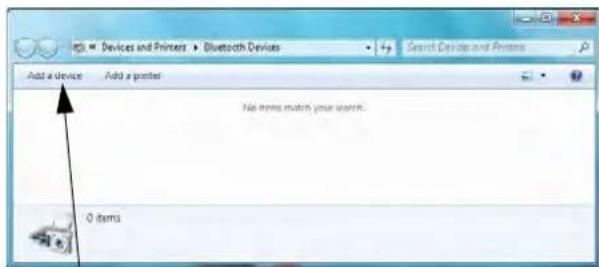
text_image
Add a device Add a printer No items match your users. 0 itemsAdd a device
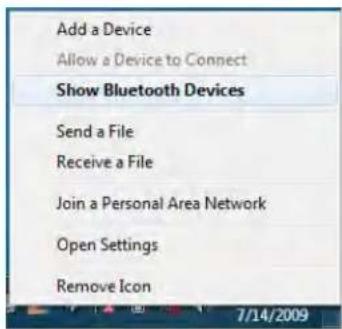
text_image
Add a Device Allow a Device to Connect Show Bluetooth Devices Send a File Receive a File Join a Personal Area Network Open Settings Remove IconRight-Click Taskbar Icon
7 - 36 Bluetooth Module
Modules & Options
To Add a Bluetooth Device
- Access the Bluetooth Devices control panel and click Add a device.
- Double-click the device you want to pair with the computer.
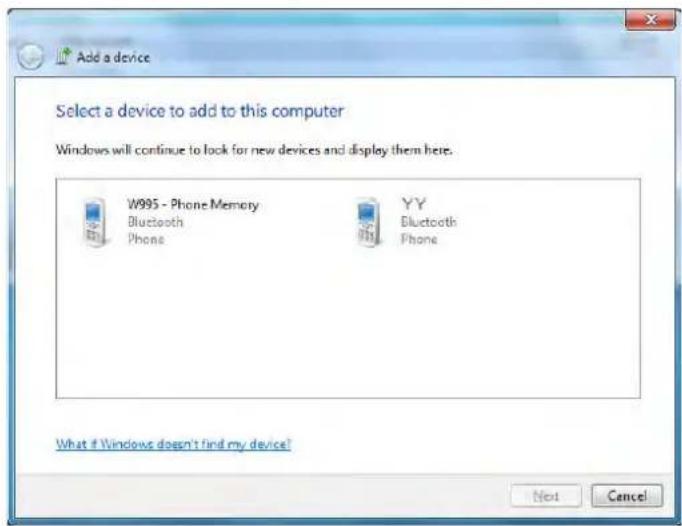
text_image
Add a device Select a device to add to this computer Windows will continue to look for new devices and display them here. W995 - Phone Memory Bluetooth Phone YY Bluetooth Phone What if Windows doesn't find my device? Next Cancel- On first connection the computer will provide you with a pairing code to be entered onto the device.

Pairing Options
If a device has been previously connected then the pairing option menu will appear when you attempt subsequent connections. You can choose to have the computer create a pairing code for you, use the device's existing pairing code or you can pair certain devices without using a code.
Figure 7 - 23 Add a Device
Modules & Options
Figure 7 - 24 Pairing Code Example
- Enter the code into your Bluetooth enabled device and follow any on-screen instructions to complete the pairing.
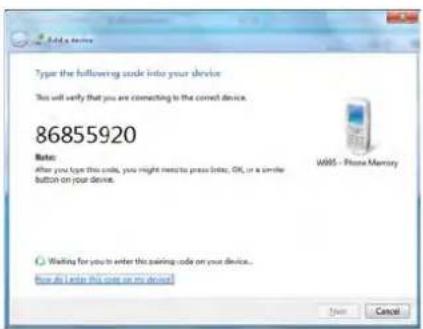
text_image
Type the following code into your device This will verify that you are connecting to the correct device. 86855920 Note: After you type this code, you might miss to press before, OK, or a similar button on your device. W995 - Phone Memory Waiting for you to enter this pairing code on your device... How do I enter this code on my device! Next Cancel
Pairing Codes
The example outlined here shows a connection to a mobile device. Other devices e.g. computers, may have a slightly different connection procedure, and may require you to confirm a pairing code is correct on both devices. Follow the on-screen instructions to complete the pairing.
- Windows will check to see if any drivers are required to complete the pairing.
- Follow any on-screen instructions on the computer if device drivers are required to be installed.
- Click Close.
Figure 7 - 25
Pairing Complete & Bluetooth Device Enabled
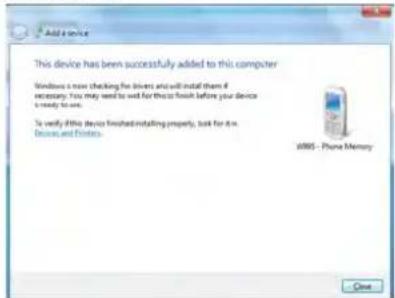
text_image
Add a device This device has been successfully added to this computer. Windows is now checking for drivers and will install them if necessary. This may need to sell for these finish before your device is ready to use. To verify this device finished installing property, but for it in Devices and Divers. i995 - Phone Memory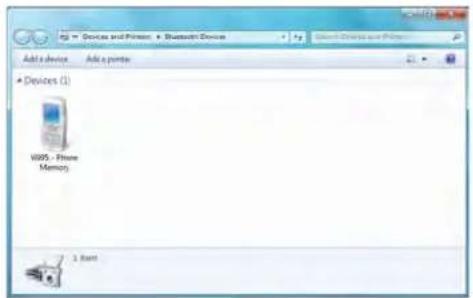
text_image
Add a device Add a portes + Devices (1) WINS - Prime Memory 3. Root7 - 38 Bluetooth Module
Modules & Options
To Change Settings for the Bluetooth Device
- Click the taskbar icon and select Show Bluetooth Devices.
- Right-click on the device you want to change and click Properties to:
- Change the name of the device (click Bluetooth, type a new name and click OK).
- Enable/Disable a service (click Services, clear/tick the check box next to the service and click OK).
To Make your Computer Discoverable to Bluetooth Devices
- Click the taskbar icon and select Open Settings.
- Click Options, and make sure that Allow Bluetooth devices to find this computer check box (Discovery) has a tick inside it.
- Make sure that the Alert me when a new Bluetooth device wants to connect check box (Connections) has a tick inside it, if you want to be notified when a Bluetooth device wants to connect.
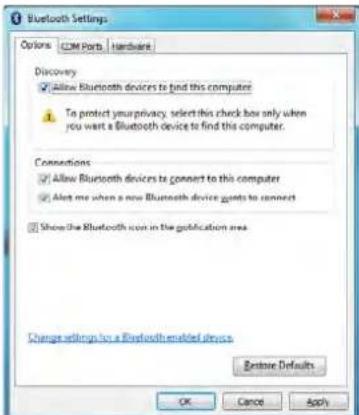
text_image
Bluetooth Settings Options COM Ports hardware Discovery ✓ Allow Bluetooth devices to find this computer To protect your privacy. Select this check box only when you want a Bluetooth device to find this computer. Connections ✓ Allow Bluetooth devices to connect to this computer ✓ Alert me when a new Bluetooth device goets to connect ✓ Show the Bluetooth icon in the publication area Change settings to a Bluetooth enabled device Entire Defaults OK Cancel Apply
Bluetooth Help
To get help on Bluetooth configuration and settings, select Help and Support from the Start menu. Type Bluetooth in the Search Help box, and select an item from the returned search results to get more information.
Figure 7 - 26 Bluetooth Settings - Options
Modules & Options

High Speed Bluetooth Data Transfer
The Combination Wireless LAN & V3.0 Bluetooth module supports high speed (V3.0) data transfer. However to achieve such transfer speeds, both devices must support high speed data transfer.
To obtain high speed (V3.0) data transfer make sure that both the WLAN and Bluetooth modules are powered on.
Check your Bluetooth compatible device's documentation to confirm it supports high speed data transfer, and for configuration information..
3rd Party Bluetooth Combo Driver Installation
Note this driver is required only for the combo Bluetooth and WLAN module only.
- Before installing the driver make sure the Bluetooth module is powered on (use Fn + F12 key combinations), then insert the Device Drivers & Utilities + User's Manual disc into the CD/DVD drive. If a Found New Hardware window appears, click Cancel in all windows that appear, and then proceed to install the driver as below.
- Click Option Drivers (button).
- Click 4. Install Combo BT Driver > Yes.
- Choose the language you prefer and click OK.
- Click Next.
- Click the button to accept the license and click Next.
- Click Next > (select if you want to create an icon to appear on the desktop) Next > Install.
- Click Finish.
- The My Bluetooth icon 📋 will appear on the desktop and the Bluetooth item will be installed in the Programs/All Programs menu.
- See "Bluetooth Networking Setup" on page 7 - 44 for information on Bluetooth networking.
Note to achieve high speed data transfer both the Bluetooth and WLAN modules must be powered ON (see sidebar).
Modules & Options
3rd Party Bluetooth & WLAN Combo Settings
This information applies to the combo Bluetooth and WLAN module only.
- Make sure the Bluetooth module is powered on.
- Double-click the My Bluetooth application on the desktop (or access it from the Programs/All Programs menu).
- Click My Bluetooth Settings (menu heading).
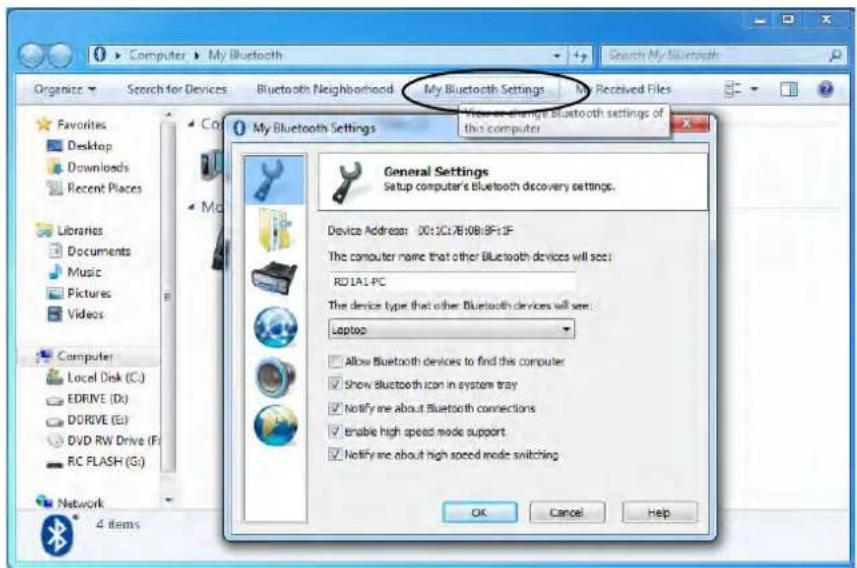
text_image
Computer > My Bluetooth Organize Search for Devices Bluetooth Neighborhood My Bluetooth Settings My Received Files Favorites Desktop Downloads Recent Places Libraries Documents Music Pictures Videos Computer Local Disk (C) EDRIVE (D) DORIVE (E) DVD RW Drive (F) RC FLASH (G) Network 4 items My Bluetooth Settings General Settings Setup computer's Bluetooth discovery settings. Device Address: 00:10178108:8F:13F The computer name that other Bluetooth devices will see: RD1A1-PC The device type that other Bluetooth devices will see: Laptop Allow Bluetooth devices to find the computer Show Bluetooth icon in system tray Notify me about Bluetooth connections Enable high speed mode support Notify me about high speed mode switching OK Cancel Help
Bluetooth Module & Resuming From Sleep Mode
The Bluetooth module's default state will be off after resuming from the Sleep power-saving state. Use the key combination (Fn + F12) to power on the Bluetooth module after the computer resumes from Sleep.
Figure 7 - 27 My Bluetooth Settings
Modules & Options
- Click General Settings 📋 to change the computer name that other Bluetooth devices will see, and click the tickbox to Allow Bluetooth devices to find this computer
- Click OK to confirm the settings.
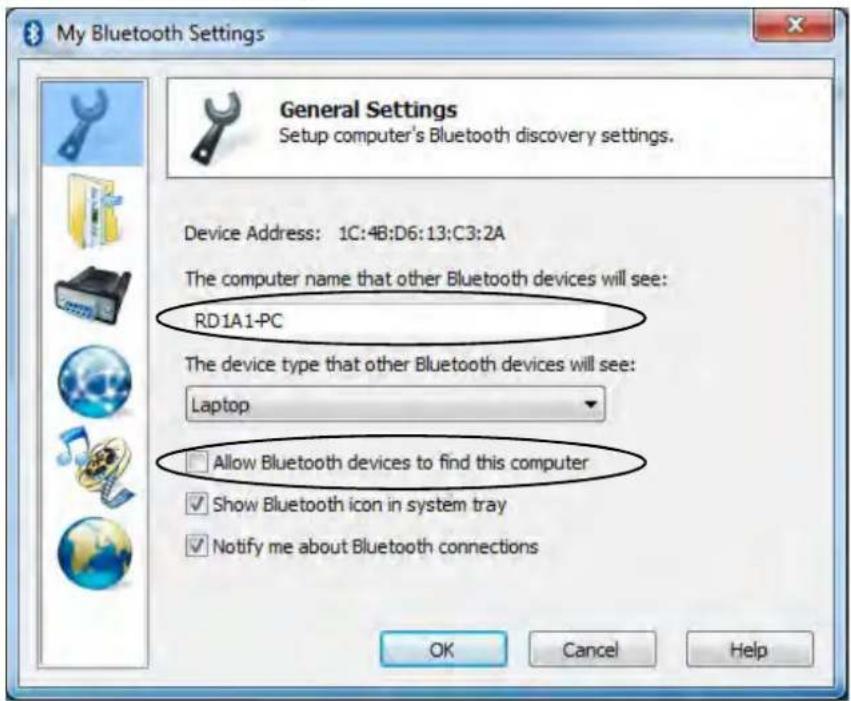
text_image
My Bluetooth Settings General Settings Setup computer's Bluetooth discovery settings. Device Address: 1C:4B:D6:13:C3:2A The computer name that other Bluetooth devices will see: RD1A1-PC The device type that other Bluetooth devices will see: Laptop Allow Bluetooth devices to find this computer Show Bluetooth icon in system tray Notify me about Bluetooth connections OK Cancel HelpFigure 7 - 28 General Settings
7 - 42 Bluetooth Module

Modules & Options
- Click File Transfer Settings 📄 to Enable sharing of my files with other Bluetooth devices.
- Click OK to confirm the settings.
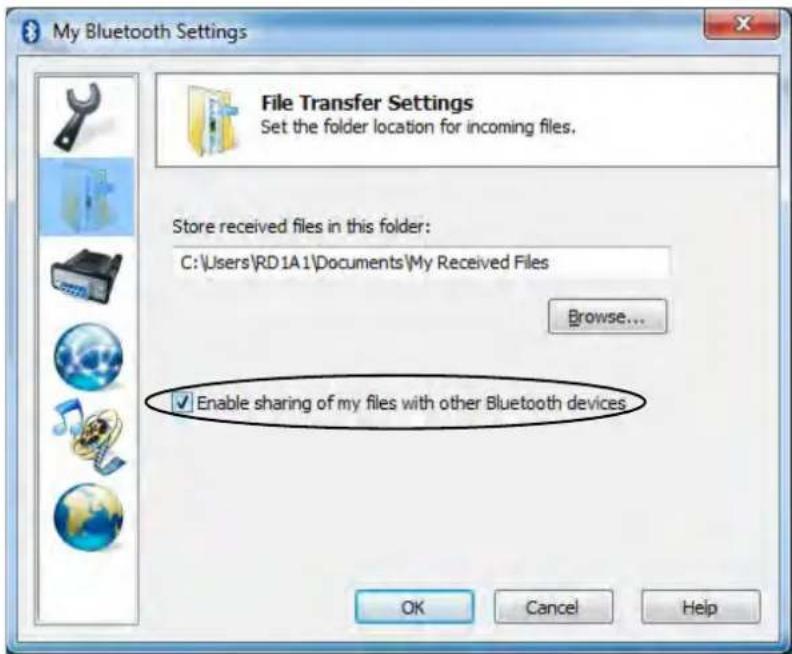
text_image
My Bluetooth Settings File Transfer Settings Set the folder location for incoming files. Store received files in this folder: C:\Users\RD1A1\Documents\My Received Files Browse... Enable sharing of my files with other Bluetooth devices OK Cancel HelpFigure 7 - 29 File Transfer Settings
Modules & Options
Bluetooth Networking Setup
This information applies to the combo Bluetooth and WLAN module only.
- Make sure the Bluetooth module is powered on.
- Double-click the My Bluetooth application on the desktop (or access it from the Programs/All Programs menu).
- Click My Bluetooth Settings (see Figure 7 - 27 on page 7 - 41).
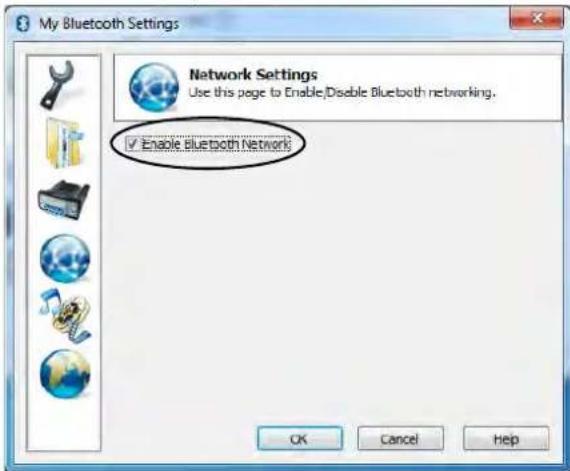
text_image
My Bluetooth Settings Network Settings Use this page to Enable,Disable Bluetooth networking. ✓ Enable bluetooth Network OK Cancel HelpFigure 7 - 30 Network Settings
- Click Network Settings (make sure the Bluetooth module is powered on.
- Click Enable Bluetooth Network and click OK.
- A message will appear in the taskbar to confirm that the network driver has been installed.
7 - 44 Bluetooth Module
Modules & Options
Bluetooth & WLAN Combo Module Configuration
Setup your Bluetooth Device so the Computer Can Find it
- Turn your Bluetooth device (e.g. PDA, mobile phone etc.) on.
- Make the device discoverable (to do this check your device documentation).
To Turn the Bluetooth Module On
- Press the Fn + F12 key combination to power on the Bluetooth module.
To Add a Bluetooth Device
- Double-click the My Bluetooth application on the desktop (or access it from the Programs/All Programs menu).
- Double-click the device you want to pair with the computer (if no devices appear press F5 or click the Refresh button to search for devices).
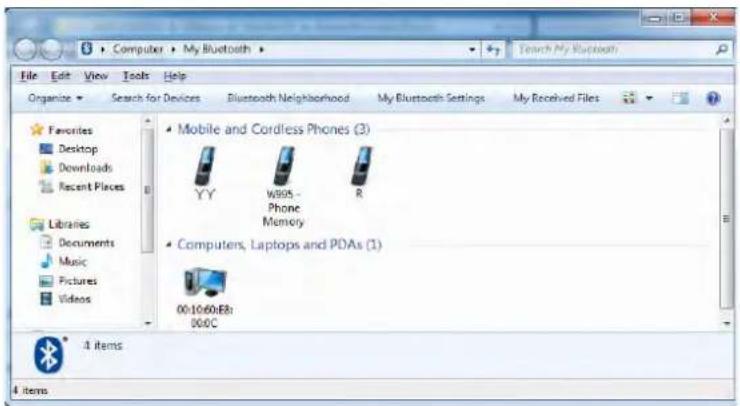
text_image
Computer - My Bluetooth File Edit View Tools Help Organize Search for Devices Bluetooth Neighborhood My Bluetooth Settings My Received Files Favorites Desktop Downloads Recent Places Libraries Documents Music Pictures Videos Mobile and Cordless Phones (3) YY W995 - Phone Memory Computers, Laptops and PDAs (1) 00:10:60:E8: 00:0C 4 items 4 items
Bluetooth Module & Resuming From Sleep Mode
The Bluetooth module's default state will be off after resuming from the Sleep power-saving state. Use the key combination (Fn + F12) to power on the Bluetooth module after the computer resumes from Sleep.
Figure 7 - 31 My Bluetooth Devices
Modules & Options
- You will then be presented with a menu of options to select from.
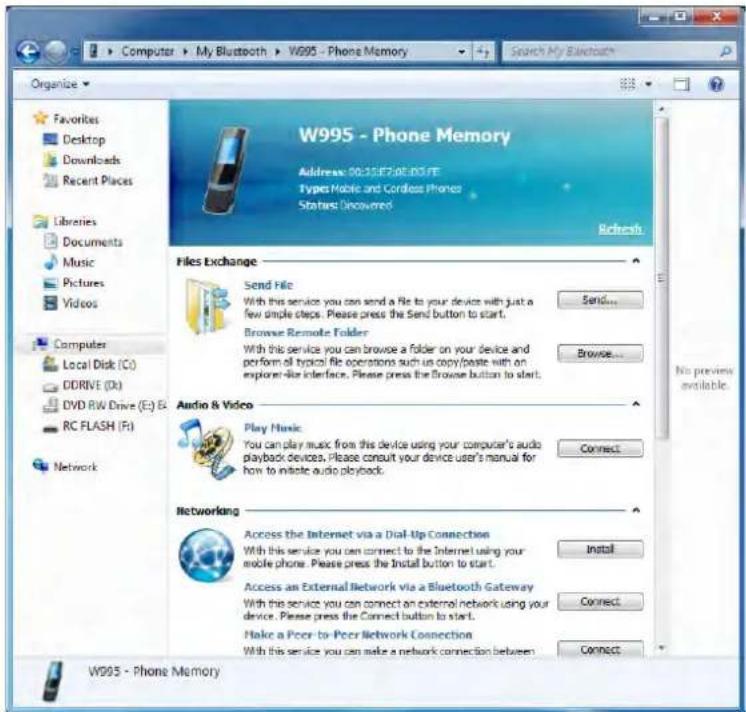
text_image
W995 - Phone Memory Address: 00.35E2/08.03.FE Types Mobile and Cordless Phones Status Discovered Favors Desktop Downloads Recent Places Libraries Documents Music Pictures Videos Computer Local Disk (C:) DDRIVE (D:) DVD RW Drive (E:) & RC FLASH (F:) Network W995 - Phone Memory Files Exchange Send File With this service you can send a file to your device with just a few simple steps. Please press the Send button to start. Browse Remote Folder With this service you can browse a folder on your device and perform all typical file operations such as copy/paste with an explorer-like interface. Please press the Browse button to start. Audio & Video Play Music You can play music from this device using your computer's audio playback devices. Please consult your device user's manual for how to initiate audio playback. Connect. Networking Access the Internet via a Dial-Up Connection With this service you can connect to the Internet using your mobile phone. Please press the Install button to start. Access an External Network via a Bluetooth Gateway With this service you can connect an external network using your device. Please press the Connect button to start. Make a Peer-to-Peer Network Connection With this service you can make a network connection between Connect.Figure 7 - 32 Bluetooth Device Options
- Click the appropriate button to connect to the device.
7 - 46 Bluetooth Module

Modules & Options
- You may need to allow the connection from your device, and you will then need to provide a passcode from the device.
- You can then enter the passcode on the computer and click OK to establish the connection.
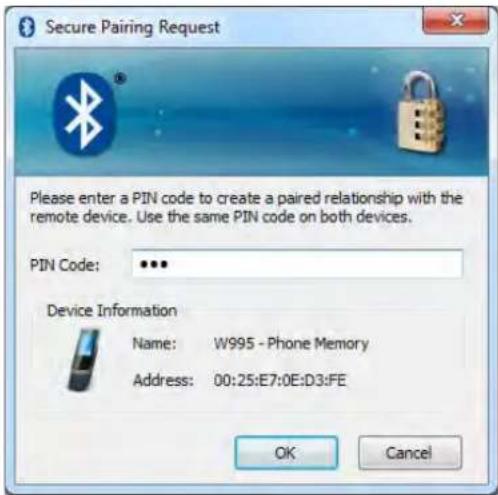
text_image
Secure Pairing Request Please enter a PIN code to create a paired relationship with the remote device. Use the same PIN code on both devices. PIN Code: ••• Device Information Name: W995 - Phone Memory Address: 00:25:E7:0E:D3:FE OK Cancel
text_image
Connection established Connected to "OBEX File Transfer Client" service of "W995 - Phone Memory" device.Figure 7 - 33 Bluetooth Pairing Code & Connection Established
Modules & Options
3.75G/HSPA Module
If you have included an optional 3.75G/HSPA (High Speed Packet Access) module (see “Communication” on page C - 4 for specification details) in your purchase option, you will have the appropriate application provided for your particular module. Follow the instructions on page 7 - 50 to install the USIM card (supplied by your service provider), and then install the application (see over for further details).

Important Notice - 3.75G/HSPA & Bluetooth/Wireless LAN Modules
In order to comply with FCC regulations you should NOT operate the 3.75G/HSPA module and the Bluetooth/Wireless LAN modules at the same time as this may disrupt radio frequency, and cause interference. When the 3.75G/HSPA module is powered on, make sure that the Bluetooth/Wireless LAN modules are powered off.
Modules & Options
Before installing the application, make sure that the 3.75G/HSPA module is ON (installing the driver with the module off will not allow the software to detect the module hardware correctly). Use the Fn + ☐ key combination (see "Function/Hot Key Indicators" on page 1 - 10) to toggle power to the 3.75G/HSPA module. When the 3.75G/HSPA module is powered on, the on-screen indicator will briefly be displayed. Make sure you install the drivers in the order indicated in Table , on page 4 - 3 . Note that exiting the application does NOT turn off the 3.75G/HSPA module.
- Wireless Manager - See “Wireless Manager Installation” on page 7 - 51 for driver installation information and “Wireless Manager Application” on page 7 - 52 for instructions on using Wireless Manager.

3.75G/HSPA Modules & System Wake Up
Note that the 3.75G modules DO NOT support system wake up on 3.75G/HSPA modem activity.
Modules & Options

Power Safety Warning
Before you undertake any installation procedures, make sure that you have turned off the power, and disconnected all peripherals and cables (including telephone lines).
USIM Card Orientation
Note that the USIM card's readable side (with the gold-colored contacts) should face upwards as illustrated.
Figure 7 - 34
Battery Removal & USIM Card Insertion
3.75G/HSPA Module USIM Card Installation
Follow the instructions below to install the USIM card (which will be provided by your service provider).
- Turn off the computer, and turn it over.
- Slide the latch in the direction of the arrow.
- Slide the latch in 2 he direction of the arrow, and hold it in place.
- Remove the battery.
- Insert the USIM card as illustrated below until it clicks fully into position, and replace the battery.
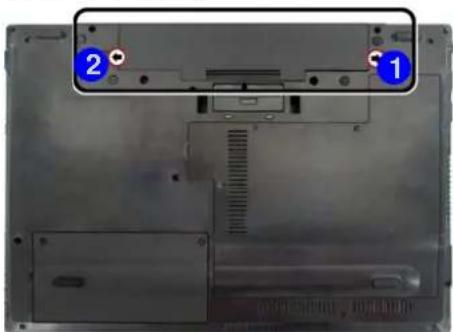
natural_image
Back view of a laptop computer showing internal components and ventilation slots (no text or symbols visible)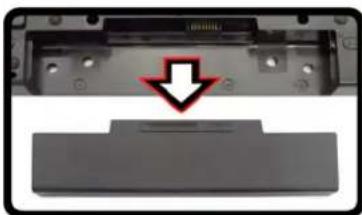
natural_image
Close-up of a device's front panel showing a black plastic component with a red arrow pointing to it, and a separate black base (no text or symbols visible)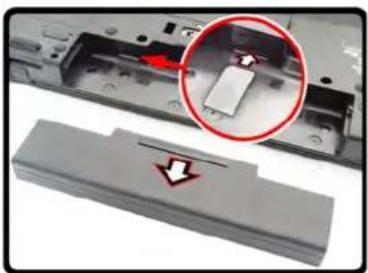
natural_image
Close-up of a computer chassis showing a component being inserted, with a magnified inset highlighting the internal structure (no text or symbols visible)Modules & Options
Wireless Manager
With the 3.75G/HSPA module and USIM card (supplied by your service provider) installed you may then install the Wireless Manager application. The Wireless Manager application allows you to directly access your HSPA internet service from the computer.
Wireless Manager Installation
- Enable power to the module by pressing the Fn + □ key combination (give the module about 10 seconds to power on - the on screen icon will indicate the module's power status).
- If a Found New Hardware window appears, click Cancel (click Cancel for all Found New Hardware windows that appear).
- Insert the Device Drivers & Utilities + User's Manual disc into your external optical device drive.
- Click Option Drivers (button).
- Click 3. Install 3G Driver > Yes.
- Click Next > Next > Install.
- Click Finish.
- Access the Wireless Manager application from the Start menu or the desktop shortcut


Wireless Device Operation Aboard Aircraft
The use of any portable electronic transmission devices aboard aircraft is usually prohibited. Make sure the module(s) are OFF if you are using the computer aboard aircraft.
Use the Fn + key combination to toggle power to the 3.75G/HSPA module, and check the indicator to see if the module is powered on or not (see Table 1 - 3, on page 1 - 10/ Table 1 - 1, on page 1 - 7).
Modules & Options

PIN Number
The PIN number for your USIM card will be supplied by your service provider. You usually have a limited number of attempts to enter the correct PIN number.
If you fail to enter the PIN number correctly you will be blocked from accessing the USIM card and you will need a PUK (Personal Unblocking Key), supplied by your service provider, to unlock it.
Figure 7 - 35 Wireless Manager (Not connected)
Wireless Manager Application
The connection information is stored on the USIM card supplied by the service provider (where this is not the case you may need to create a profile - see “Creating a Profile” on page 7 - 58).
- Power on the 3.75G/HSPA module using the Fn + 🔒 key combination.
- Access the Wireless Manager application from the Start menu (Start > All Programs > Wireless Manager > Wireless Manager) or the desktop shortcut
- You may be required to enter you PIN number and click OK.
- Click the Connect Connect button (a Profile needs to be selected, and in most cases this will be pre-configured).
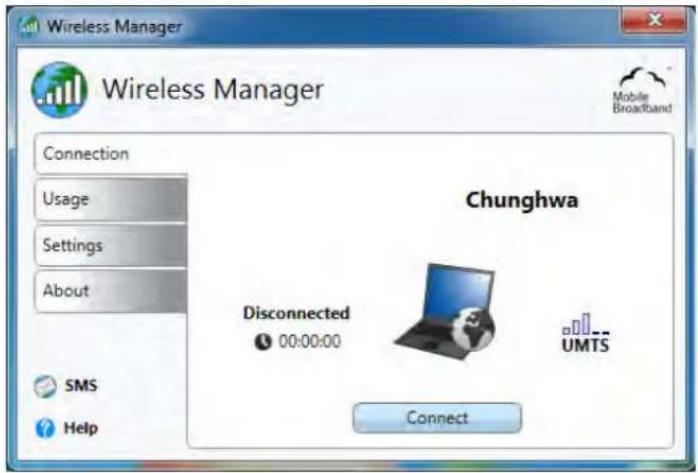
text_image
Wireless Manager Wireless Manager Connection Usage Settings About Chunghwa Disconnected 00:00:00 UMTS SMS Help ConnectModules & Options
- The system will connect to your network.
- Connected will appear above the timer icon (the timer will indicate your connected time for the current session) Connected 0000-33
- You can then access the internet, download e-mail etc. as per any internet connection.
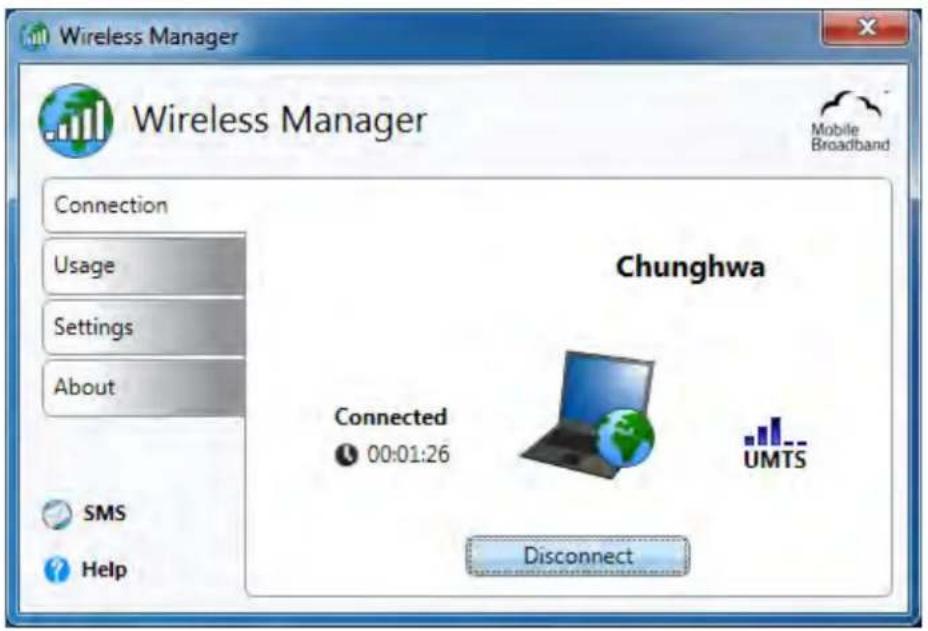
text_image
Wireless Manager Wireless Manager Mobile Broadband Connection Usage Settings About Chunghwa Connected 00:01:26 UMTS SMS Help Disconnect
text_image
Wireless Manager Help To get help on Wireless Manager configuration and settings, click the Help icon or press F1. ? HelpFigure 7 - 36 Wireless Manager (Connected)
Modules & Options
Figure 7 - 37
Notification Area
Icons (Connected)


Notification Area Icon
Right-click the notification area icon to bring up the menu to Open/Exit Wireless Manager, Disconnect or Turn radio off.
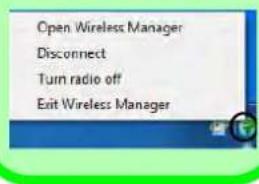
text_image
Open Wireless Manager Disconnect Turn radio off Exit Wireless Manager- Click the Wireless Manager notification area icon to view the connection status, or wireless icon to view the Mobile Broadband Connection status
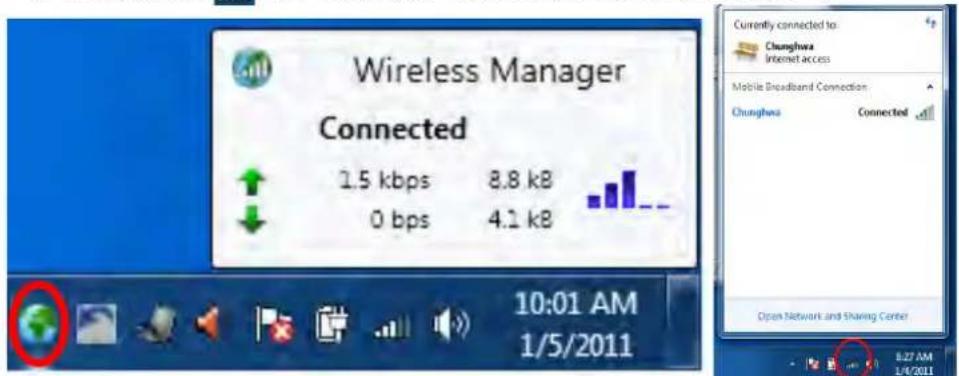
text_image
Wireless Manager Connected 1.5 kbps 8.8 kB 0 bps 4.1 kB 10:01 AM 1/5/2011 Currently connected to: Chunghwa Internet access Mobile Broadband Connection Chunghwa Connected Open Network and Sharing Center 8:27 AM 1/4/2011-
The indicator will display the signal strength and radio access technology. UMTS
-
To disconnect from the service provider, click the Disconnect Disconnect button (note that if you click the close icon at the top right of the screen the application will minimize to the system tray, however the application will still be running; to exit the application right-click the notification area icon and click Disconnect or Exit Wireless Manager).
- The program will disconnect from the service provider.
- The module will still be on, and you will need to press the Fn + □ key combination to turn it off.
- If you are unsuccessful in connecting this way you may need to add a profile with information provided by your service provider (see the following pages).
Modules & Options
Profiles
- Access the Wireless Manager application from the Start menu (Start > All Programs > Wireless Manager > Wireless Manager) or the desktop shortcut
- Click the Settings > Advanced.
- Click the Profiles (tab).
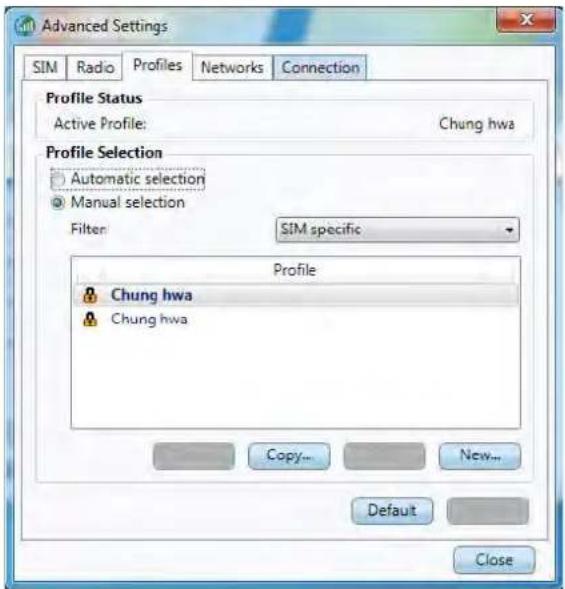
text_image
Advanced Settings SIM Radio Profiles Networks Connection Profile Status Active Profile: Chung hwa Profile Selection Automatic selection Manual selection Filter: SIM specific Profile Chung hwa Chung hwa Copy... New... Default CloseFigure 7 - 38 Advanced Settings - Profiles
Modules & Options
Figure 7 - 39 Multiple Profiles Found
- Multiple profiles may be available from the USIM card and the first time the application starts it may require you to select a profile (Set Profile) to use for your connection.
Multiple Profiles Found
Multiple profiles were found for this SIM card. From the list below, please select which profile to use for connection.

natural_image
Blank white image with a thin gray border (no text, symbols, or markings)Set Profile
Automatic Profile Selection
If Automatic selection is chosen, then the application will search the operator profile database for a profile that matches the details on your USIM card. If a correct profile is found it will be automatically selected as your profile.
Manual Profile Selection
If Manual selection is chosen, then you can select a profile from the applications's operator profile database, or you can create a new profile.
Modules & Options
Selecting a Profile
- Click Manual selection (button).
- Click the Filter to view the drop-down list.
- Select the Profile you wish to use and click Apply to confirm the selection.
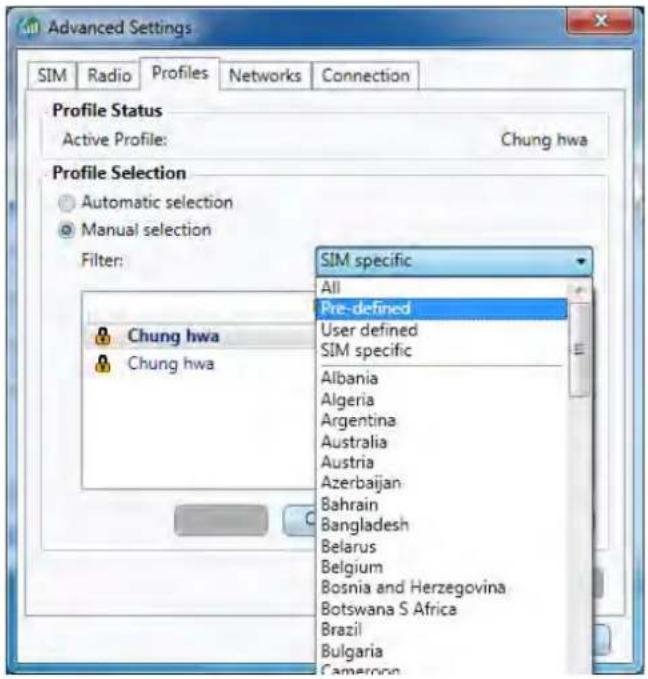
text_image
Advanced Settings SIM Radio Profiles Networks Connection Profile Status Active Profile: Chung hwa Profile Selection Automatic selection Manual selection Filter: Chung hwa Chung hwa SIM specific All Pre-defined User defined SIM specific Albania Algeria Argentina Australia Austria Azerbaijan Bahrain Bangladesh Belarus Belgium Bosnia and Herzegovina Botswana S Africa Brazil Bulgaria CameroonFigure 7 - 40 Profile - Manual Selection (Filter)
3.75G/HSPA Module 7 - 57
Modules & Options

Deleting a Profile
To delete a profile click to select Manual selection and select the profile and click Delete.
Modifying a Profile
To modify a profile click to select Manual selection and select the profile and click Edit. Change the settings as required and then click Save (note that only user defined profiles may be edited).
Figure 7 - 41 New Profile IP, DNS & Protocols
Creating a Profile
- Click Manual selection (button).
- Click the New.
- Enter a name you prefer for the profile.
- Enter the Access Point Name (APN).
- Enter the User Name and Password if required (some service providers may not require this information and the fields may then be left blank).
- If your service provider requires IP address, DNS and Protocols to be entered, click the appropriate tab and enter the supplied information (otherwise leave blank).
- Click Save to save the profile information.
- The profile will be stored under User defined in the Filter drop-down list.
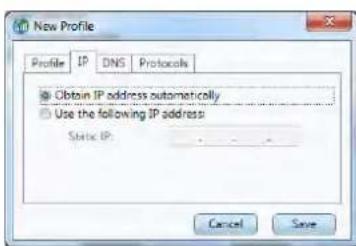
text_image
New Profile Profile IP DNS Protocols Obtain IP address automatically Use the following IP address: Static IP: Cancel Save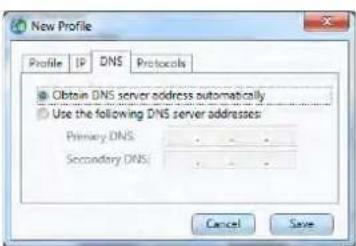
text_image
New Profile Profile IP DNS Protocols Obtain DNS server address automatically Use the following DNS server addresses: Primary DNS: . . . . Secondary DNS: . . . . Cancel Save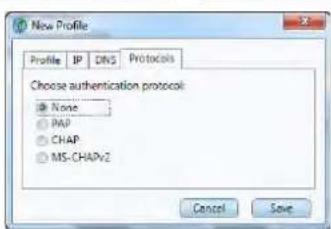
text_image
New Profile Profile IP DNS Protocols Choose authentication protocol: None PAP CHAP MS-CHAPv2 Cancel SaveSettings
The Settings tab allows you at adjust the application features. Click to put a tick in Launch Wireless Manager at Windows startup to launch the application at Windows Startup.
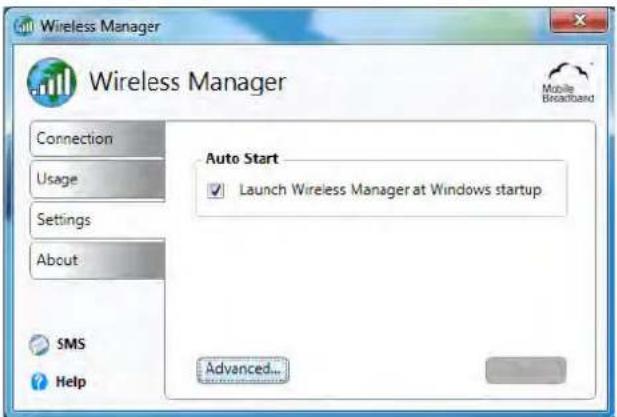
text_image
Wireless Manager Wireless Manager Connection Usage Settings About Auto Start Launch Wireless Manager at Windows startup SMS Help Advanced...Figure 7 - 42 Settings
The Advanced settings allows more detailed configuration. To access the Advanced settings:
- Access the Wireless Manager program from the Start menu (Start > All Programs > Wireless Manager > Wireless Manager) or the desktop shortcut
- Click the Settings > Advanced.
- Click the tab to edit any particular setting.
Modules & Options

PIN Notes
You will have to enter your current PIN to change the PIN settings.
Request PIN at startup will apply only after you have shut the computer down and restarted it (not just restarted).
Radio & Power Saving States
You can choose to have the radio turned on or off during Hibernate or Sleep power saving states.
Figure 7 - 43 Advanced Settings SIM & Radio
SIM
Most USIM cards are protected by a Personal Identity Number (PIN). You may turn on or off the Request PIN at startup (click Apply to save any changes). You can also Change PIN (you will need to enter the new PIN in the two fields provided and click Apply to save any changes).
Radio
Radio needs to be turned on before you can make any connection (note this is not the same as powering the module off/on using the Fn + ☐ key combination), but you may turn it off when required. Automatic mode is the recommended setting for most 3G networks as it will use 3G where available. All Frequency bands are selected as default (click Apply to save any changes).
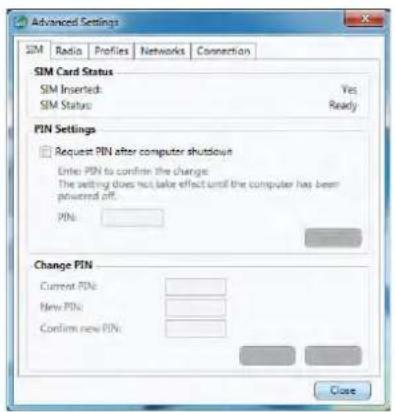
text_image
Advanced Settings SIM Radio Profiles Networks Connection SIM Card Status SIM Inserted: Yes SIM Status: Ready PIN Settings □ Request PIN after computer shutdowns Enter PIN to confirm the charge: The setting does not take effect until the computer has been powered off. PIN: Change PIN Current PIN: New PIN: Confirm new PIN: Close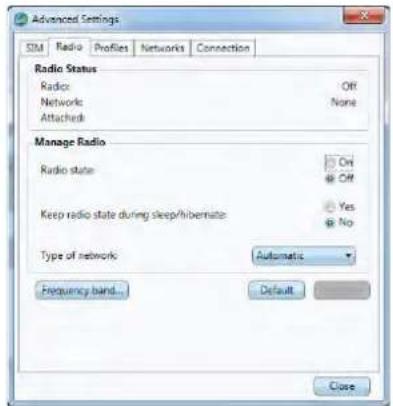
text_image
Advanced Settings SIM Radio Profiles Networks Connection Radio Status Radio: Off Networks None Attached Manage Radio Radio state: On Off Keep radio state during sleep/hibernate: Yes No Type of network: Automatic Frequency band... Default CloseModules & Options
Networks
The mobile network list lists available networks at your location, and allows you to select a network which to connect. You must disconnect before being able to select a network.
Connection
You can set the Wireless Manager to automatically connect at Windows startup (however the module must be powered on, and radio must be turned on). You can also automatically connect when resuming from a power-saving state (click Apply to save any changes). Click Default to return to the original default settings.
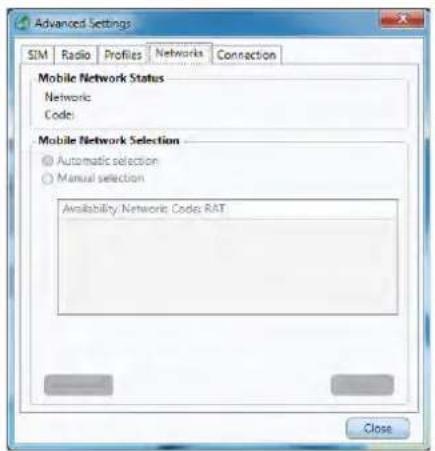
text_image
Advanced Settings SIM Radio Profiles Networks Connection Mobile Network Status Network: Code: Mobile Network Selection Automatic selection Manual selection Availability Network Code RAT Close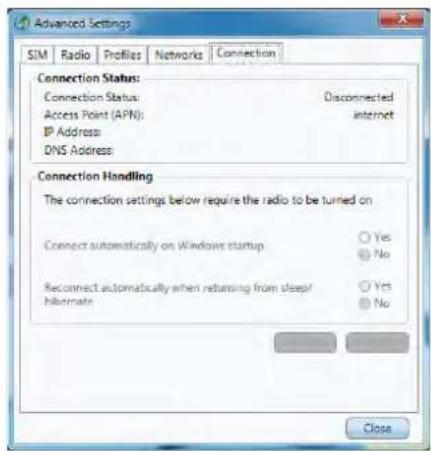
text_image
Advanced Settings SIM Radio Profiles Networks Connection Connection Status: Connection Status: Disconnected Access Point (APN): internet IP Address: DNS Address: Connection Handling The connection settings below require the radio to be turned on Connect automatically on Windows startup Yes Reconnect automatically when returning from sleep/ histrain Yes No Close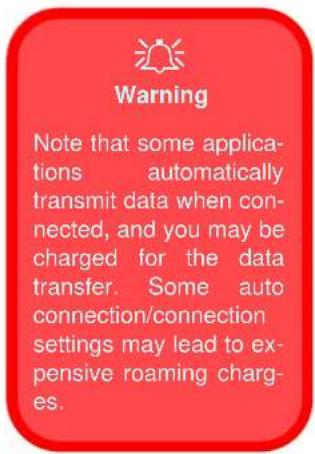
text_image
Warning Note that some applications automatically transmit data when connected, and you may be charged for the data transfer. Some auto connection/connection settings may lead to expensive roaming charges.Figure 7 - 44 Advanced Settings Networks & Connection
Modules & Options
Text Messaging Service (SMS)
In addition to standard internet services you may also send and receive SMS text messages using the Wireless Manager, if your service supports SMS.
SMS Utility
- Access the Wireless Manager application from the Start menu (Start > All Programs > Wireless Manager > Wireless Manager) or the desktop shortcut
- Click SMS and the SMS Utility will then start.
- The indicator in the upper right corner will display if radio is currently on or off (radio must be on in order to send/receive messages).
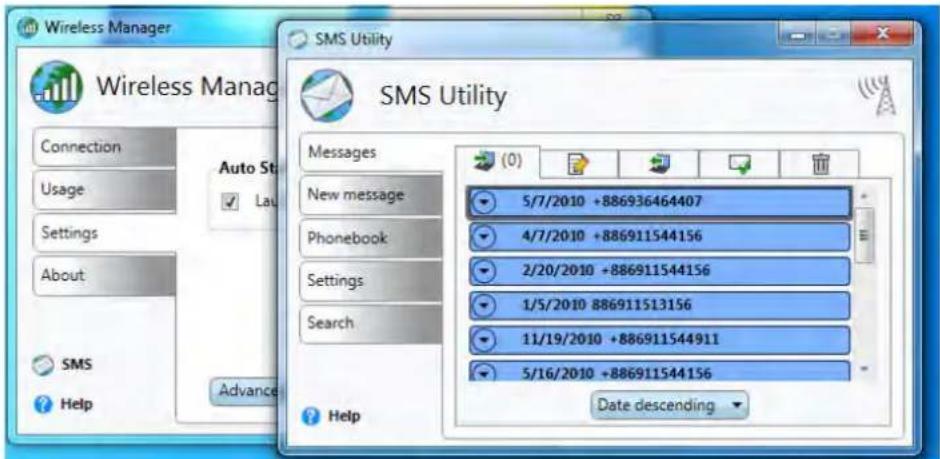
text_image
Wireless Manager Wireless Manag Connection Usage Settings About SMS Help Auto St Advance SMS Utility Messages New message Phonebook Settings Search Help (0) 5/7/2010 +886936464407 4/7/2010 +886911544156 2/20/2010 +886911544156 1/5/2010 886911513156 11/19/2010 +886911544911 5/16/2010 +886911544156 Date descendingFigure 7 - 45 SMS Utility Open
7 - 62 3.75G/HSPA Module
Modules & Options
Messages
Click the Messages tab to access the tabs displaying text messages. The tabs at the top of the menu display the Inbox, Drafts, Outbox, Sent and Trash menus.
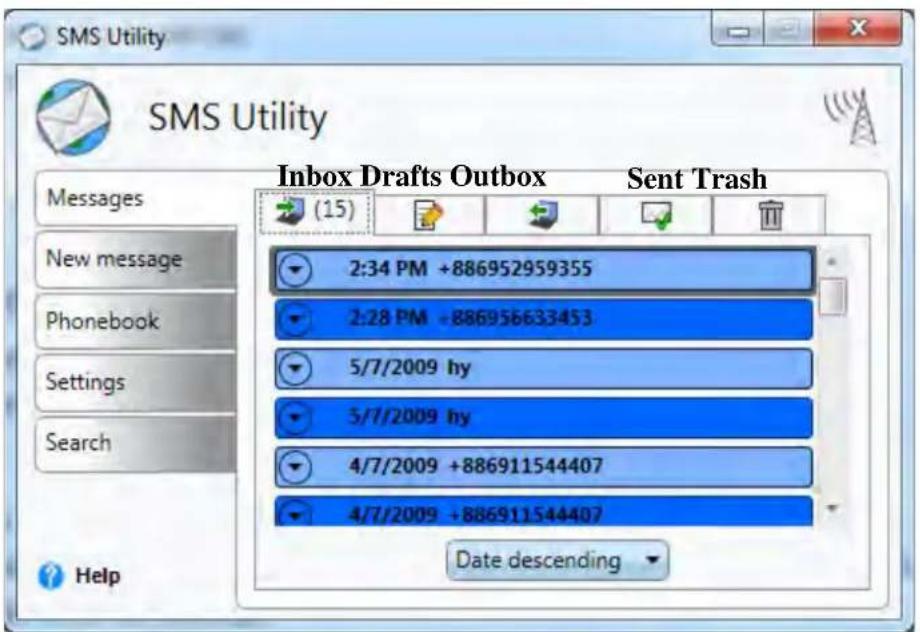
text_image
SMS Utility Inbox Drafts Outbox Sent Trash Messages New message Phonebook Settings Search Help (15) 2:34 PM +886952959355 2:28 PM -886956633453 5/7/2009 hy 5/7/2009 hy 4/7/2009 +886911544407 4/7/2009 +886911544407 Date descendingText messages are automatically saved to your computer and may be sorted in ascending or descending order by name or date.
Figure 7 - 46 SMS Utility Messages
Modules & Options
Sending a Text Message
- Access the Wireless Manager application from the Start menu (Start > All Programs > Wireless Manager > Wireless Manager) or the desktop shortcut
- Click SMS and the SMS Utility will then start.
- Click the New Message tab.
- Enter the phone number in the To field (multiple numbers may be entered separated by a semicolon (;), or click the phonebook icon 📋 to select a name from the phonebook.
- Select any contact's phone number and click OK (you can click a check box to select multiple contacts or more than one phone number for each contact).
- Type the message body in the Message field (to a maximum of 160 characters).
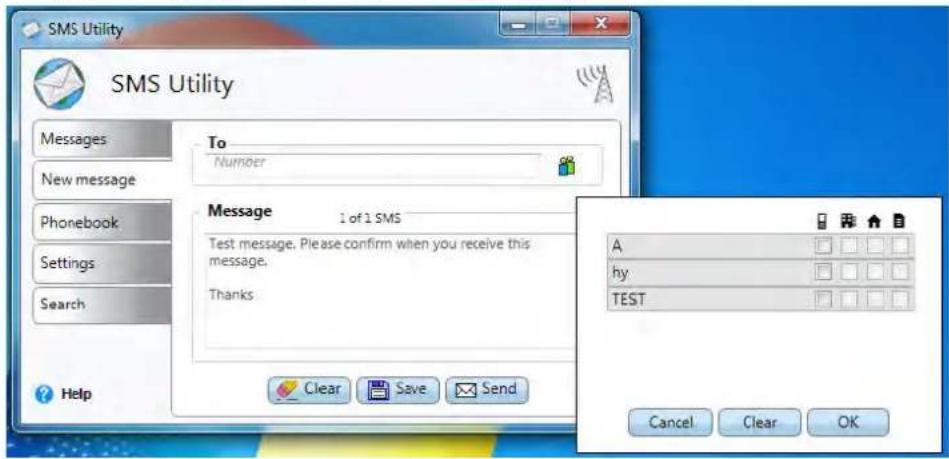
text_image
SMS Utility Messages New message Phonebook Settings Search Help To Number Message 1 of 1 SMS Test message. Please confirm when you receive this message. Thanks Clear Save Send A hy TEST Cancel Clear OKFigure 7 - 47 SMS Utility - New Message
7 - 64 3.75G/HSPA Module
Modules & Options
- Click Send 📧 Send to send the message or Save Save to save the message in the Drafts folder
- Clicking the Clear icon Clear clears both the Message and To fields.
- If radio is on then the message will be sent, however if the radio is off the message will be stored in the Outbox.
Note that you do not have to connect to the network to Send/Receive SMS messages.
Inbox
Any received text messages will be displayed in the Inbox. The number of unread messages will be displayed in parenthesis in the inbox tab. Unread messages will be displayed in a darker color then the read messages, and incoming messages will be displayed briefly in the Notification Area.
text_image
SMS Utility Messages New message Phonebook Settings Search Help (15) 2:34 PM - 886952959355 2:28 PM - 886936632453 5/7/2009 hy 5/7/2009 hy 4/7/2009 +886911544407 4/7/2009 +886911544407 Data descending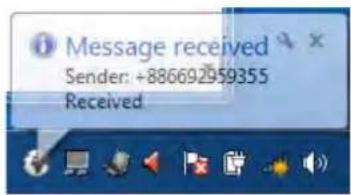
text_image
Message received Sender: +886692959355 ReceivedFigure 7 - 48 SMS Utility - Inbox & New Message Received Notification
Modules & Options
Figure 7 - 49 Close Message
Messages
- Opening a text message: Double-click the message and the message will open in a new window (to close it click the close icon in the top right of the message).

text_image
SMS Utility SMS Utility 1/5/0011 2:34:22 PM From ->500112703337 - 27964 Click to close the message- Previewing a text message: Click the preview icon 🔍 and the message preview will open. Click the icon again to close the preview.
- Replying to a text message: Double-click the message and click Reply. Type the reply in the message field and click Send to send the message (or Save to save it in Drafts.
- Forwarding a text message: Double-click the message and click Forward. Type the recipients name in the To field or click the icon 📋 to select recipients from the phonebook.
- Deleting a text message: Right-click the message select Delete selected. To delete all messages in the folder right-click any message and select Delete All. Holding down the Ctrl key and selecting messages allows you to multiple select messages for deletion (choose Delete selected). Deleted message will be sent to the Trash folder. To permanently delete messages right-click and select Delete selected or Delete All (or you may choose to Recover/Recover All) and click Yes to confirm.
Phonebook
The Phonebook allows you to view and edit all your frequently used contacts, and is divided into Contacts and Groups. To access the Phonebook:
- Access the Wireless Manager application from the Start menu (Start > All Programs > Wireless Manager > Wireless Manager) or the desktop shortcut
- Click SMS and the SMS Utility will then start.
- Click the Phonebook tab.
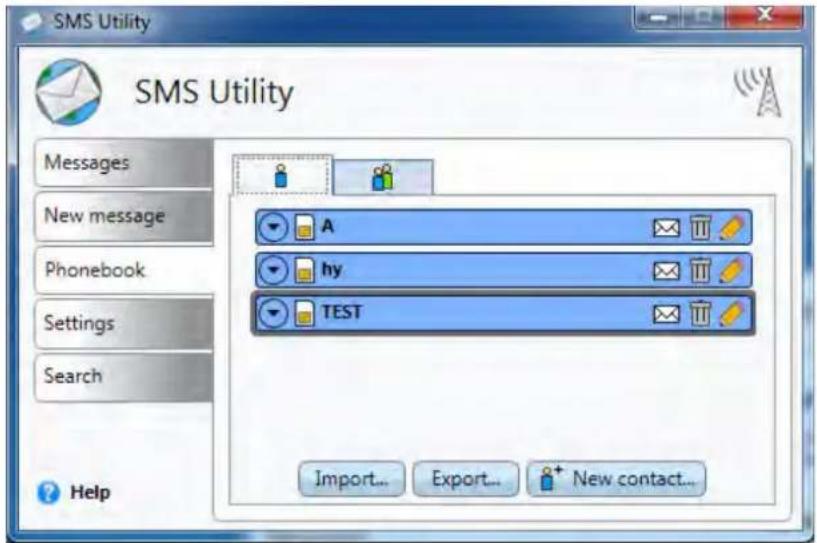
text_image
SMS Utility Messages New message Phonebook Settings Search Help A hy TEST Import... Export... + New contact...Figure 7 - 50 SMS Utility - Phonebook (Contacts)
Modules & Options

Import/Export Contacts
Import/Export Contacts: Click the Import/Export Import... Export... buttons to import or export the list of contacts.
Figure 7 - 51 SMS Utility New Contact
Contacts
- New Contact: Click the New contact button 📋 + New contact... to create a contact. Add the name and at least one phone number (Mobile, Work, Home and Other fields are available) for the contact. Click theicon to expand the number details. Select Synchronize with SIM to synchronize the contact information with your USIM card. Click the Save icon 📋 to save the information.
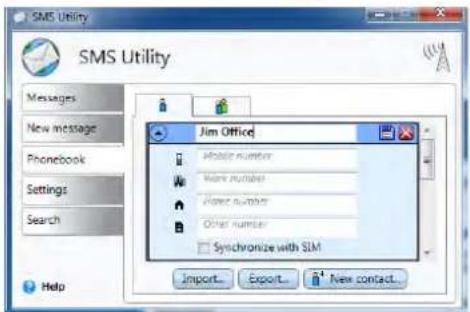
text_image
SMS Utility Messages New message Phonebook Settings Search Help Jim Office Mobile number Work number Power number Other number Synchronize with SIM Import... Export... New contact...- Edit Contact: Click the edit icon 📋 to make changes to a contact detail, and click save 📋 to confirm the changes.
- Delete Contact: Click the delete icon ☐ to delete a contact from the phone-book.
- Send a message to a Contact: Click the message icon ✉ to send a text message to any contact.
Groups
You can organize existing contacts into groups from the Groups tab.
- New Group: Click the New group button 📋 New group... to create a group. Click the icon to expand the group details, and click a check box to add at least one phone number from the contacts for the group. Click the Save icon 📋 to save the information.
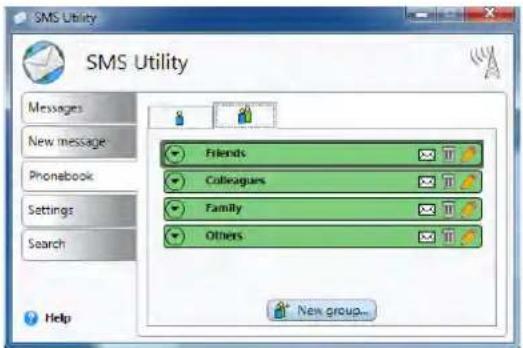
text_image
SMS Utility Messages New message Phonebook Settings Search Help Friends Colleagues Family Others New group...Figure 7 - 52 SMS Utility Groups
- Edit Group: Click the edit icon to make changes to a contact detail, and click save to confirm the changes, or close to exit without making changes.
- Delete Group: Click the delete icon ☐ to delete a group from the phonebook.
- Send a message to a Group: Click the message icon 📧 to send a text message to any group.
Modules & Options
Figure 7 - 53
SMS Utility Settings

SMS Settings
Message Length: You can set the number of blocks that can be sent (up to a length of 10 blocks).
Message validity period: This sets the period after which the message will be deleted from the SMS center and therefore not forwarded to the recipient(s) when they come online.
Display information messages: You can choose whether to allow information messages to automatically appear on screen or not.
SMS Settings
The SMS Utility Settings tab allows you at adjust the SMS features.
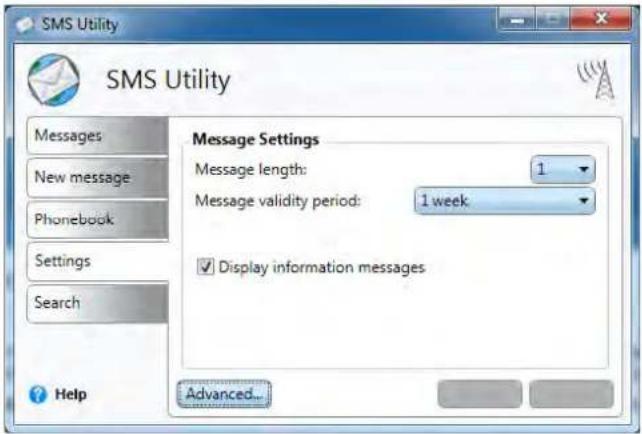
text_image
SMS Utility Messages New message Phonebook Settings Search Message Settings Message length: 1 Message validity period: 1 week ✓ Display information messages Help Advanced...The Advanced settings allows more detailed configuration. To access the Advanced settings:
- Access the Wireless Manager application from the Start menu (Start > All Programs > Wireless Manager > Wireless Manager) or the desktop shortcut
- Click SMS and the SMS Utility will then start.
- Click the Settings > Advanced.
- Click the tab to edit any particular setting.
Modules & Options
Send
Click Delivery Report to automatically request a reply from a recipient. If you click to Send messages in Outbox automatically upon connection then messages written when the radio is off, will then be sent automatically the next time radio is turned on. You can also choose to Include original message in reply.
Notification
This menu allows you to enable/disable Show animation on new message to get an animated notification of newly received messages. Enabling Play sound on new message will play an audio notification upon receipt of new messages.
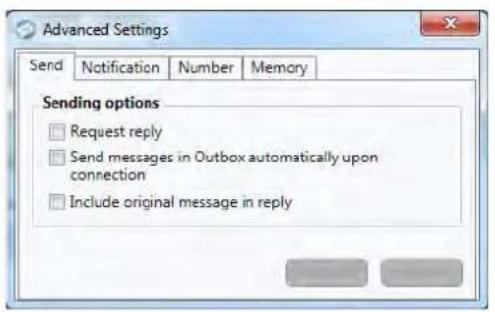
text_image
Advanced Settings Send Notification Number Memory Sending options Request reply Send messages in Outbox automatically upon connection Include original message in reply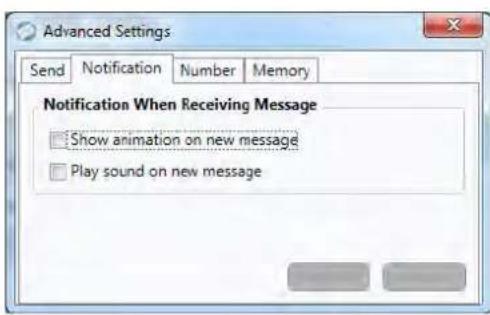
text_image
Advanced Settings Send Notification Number Memory Notification When Receiving Message Show animation on new message Play sound on new messageFigure 7 - 54 SMS Utility - Advanced Settings Send & Notification
Modules & Options
Number
You can choose to Use default service center number or you can uncheck the box and add your number manually if your service provider supplies a different number (click Apply to save the change or Default to return to the default number).
Memory
Phonebook memory status displays the number of contacts displayed on the USIM card.
Figure 7 - 55
SMS Utility -
Advanced Settings
Number & Memory
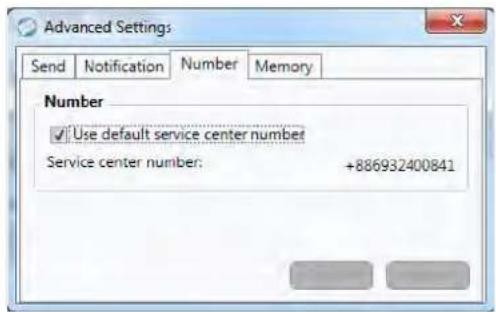
text_image
Advanced Settings Send Notification Number Memory Number ✓ Use default service center number Service center number: +886932400841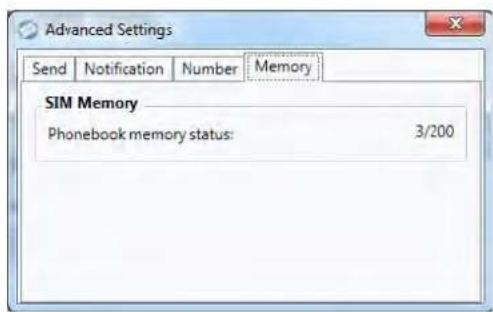
text_image
Advanced Settings Send Notification Number Memory SIM Memory Phonebook memory status: 3/200Trusted Platform Module
The TPM security chip allows you to create and manage digital certificates for user and platform authentication. This type of security is usually administered within large enterprises and organizations, and therefore requires implementation by a system administrator before users can access security features.
Individual users can use the TPM as an authentication with the fingerprint reader.
Make sure you have administrator's rights to your computer, and have a Windows password enabled for full security protection. In addition Make sure you prepare a removable media (e.g. a USB flash drive) to store passwords etc. before beginning the TPM initialization process.
Before setting up the TPM functions you must initialize the security platform.
Modules & Options
Enabling & Activating TPM
- Restart the computer.
- Enter the Aptio Setup Utility pressing F2 during the POST/startup.
- Use the arrow keys to select the Security menu
- Select TPM Configuration and press Enter.
- Select TPM Support and press Enter, select Enable and press Enter.
- Select TPM State, press Enter and select Enabled to change the TPM state to enabled. You will then need to press F4 to save the changes and restart the computer.
Figure 7 - 56
TPM State
(Enabled)
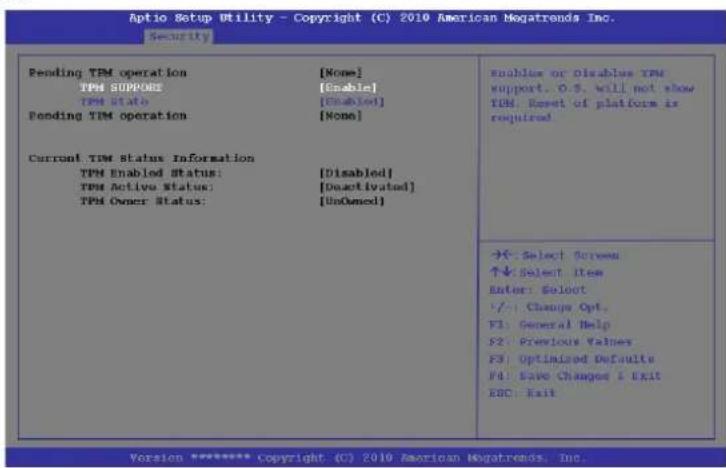
text_image
Aptio Setup Utility - Copyright (C) 2010 American Megatrends Inc. Security Pending TPM operation [None] TPM SUPPONE [Enable] TPM State [Enabled] Pending TPM operation [None] Current TPM Status Information TPM Enabled Status: [Disabled] TPM Active Status: [Unactivated] TPM Owner Status: [UnOwned] Enable or disables TPM support. 0.5. will not show TPM. Reset of platform is required Select Screen Select Item Enter: Select ✓: Change Opt. F1: General Help F2: Previous Values F3: Optimized Defaults F4: Save Changed i Exit EPC: Exit Version ***** copyright. (C) 2010 American Megatrends, Inc.- As the computer restarts press F2 to enter the BIOS again and go to the TPM Configuration menu.
Modules & Options
- Select Pending TPM operation, press Enter and select the option you require (if you are initializing TPM you should select Enable Take Ownership) and press Enter. You will then need to press F4 to save the changes and restart the computer.
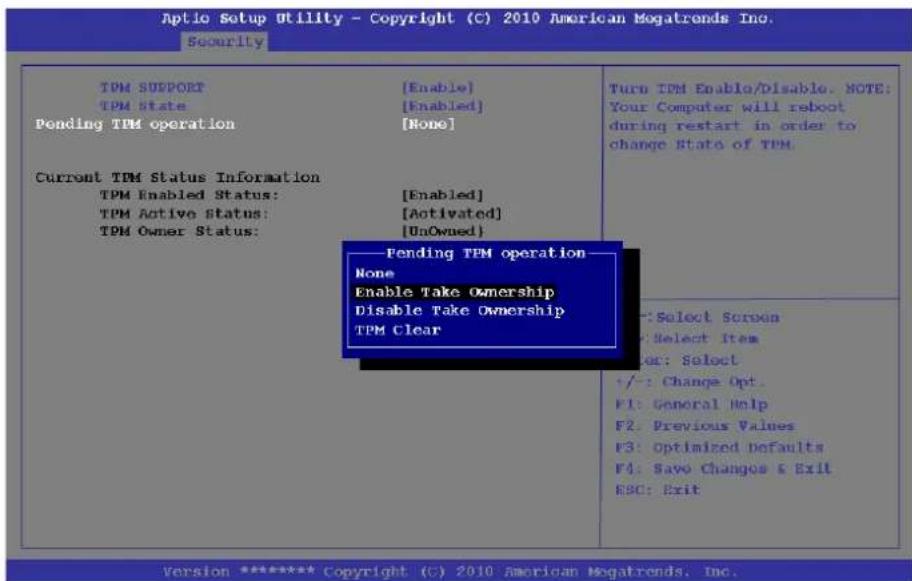
text_image
Aptio Setup Utility - Copyright (C) 2010 American Mogatrends Inc. Security TPM SUPPORT [Enable] TPM State [Enabled] Pending TPM operation [None] Current TPM Status Information TPM Enabled Status: [Enabled] TPM Active Status: [Activated] TPM Owner Status: [UnOwned] Fending TPM operation—— None Enable Take Ownership Disable Take Ownership TPM Clear Turn TPM Enable/Disable. NOTE: Your Computer will reboot during restart in order to change State of TPM. +: Select Screen +: Select Item Enter: Select +/-: Change Opt. F1: General Help F2: Previous Values F3: Optimized Defaults F4: Save Changes & Exit ESC: Exit Version ***** Copyright (C) 2010 American Mogatrends, Inc.Figure 7 - 57
Pending TPM
operation
(Enable Take
Ownership)
- You can now install the TPM driver (see "Trusted Platform Module (TPM) Driver Installation" on page 7 - 76) and then initialize the TPM.
Modules & Options
Trusted Platform Module (TPM) Driver Installation
- Make sure you have enabled and activated the TPM in the BIOS before installing the driver (if you do not do see the note below).
- Insert the Device Drivers & Utilities + User's Manual disc into the CD/DVD drive.
- Click Option Drivers (button).
- Click 6. Install TPM Driver > Yes.
- Click Install > Next.
- Click the button to accept the license and click Next.
- Click Next > Next > Install.
- Click Finish > Yes to restart the computer.
If you have installed the driver without enabling and activating the TPM first, a confirmation message will appear on restart.
Figure 7 - 58 TPM Confirmation Message
(if the driver is installed without TPM being enabled and activated in the BIOS)
A configuration change was requested to enable, activate, and allow the creation of an operator authentication value that permits temporary deactivation of the TPM
Press [F10] to enable, activate, and allow the creation of an operator authentication value that permits temporary deactivation of the TPM Press ESC to reject this change request and continue
Press F10 to enable and activate the TPM and you can then configure as overleaf. However it is recommended that you enter the BIOS and take ownership (see page 7 - 75) of the TPM before configuration in Windows. Alternatively press Esc to continue without making changes the TPM.
Initializing TPM
- Run the application from the Infineon Security Platform Solution > Manage Security Platform item in the Start > Programs menu.
- Click User Settings (tab) and click Yes, or right-click the icon in the notification area of the taskbar, and select Security Platform Initialization (or click the Security Platform State taskbar bubble).
- The Quick Initialization method will automatically be selected for you (if you need to use advanced settings provided by your network administrator then select Advanced Initialization).
- You will need to use a removable media (e.g. a USB Flash Drive) to store passwords and data (keep the media in a safe place until required).
- Select the drive you want to use from the drop-down menu and click Next.
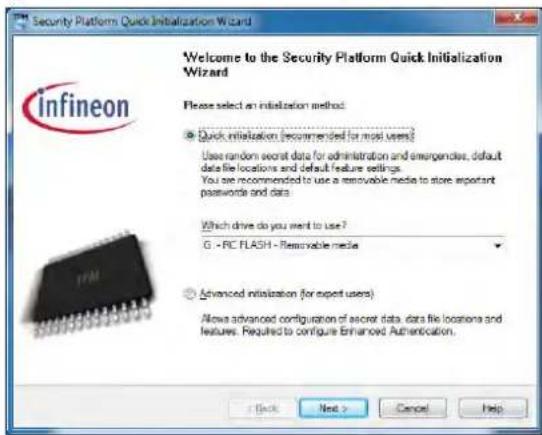
text_image
Security Platform Quick Initialization Wizard Welcome to the Security Platform Quick Initialization Wizard Please select an initialization method: ● Quick initialization (recommended for most users) Uses random secret data for administration and emergencies, default data file locations and default feature settings. You are recommended to use a removable media to store important passwords and data Which drive do you want to use? G - FC FLASH - Removable media ● Advanced initialization (for expert users) Allows advanced configuration of secret data, data file locations and features. Required to configure Enhanced Authentication.Figure 7 - 59 Security Platform Quick Initialization Wizard
Modules & Options
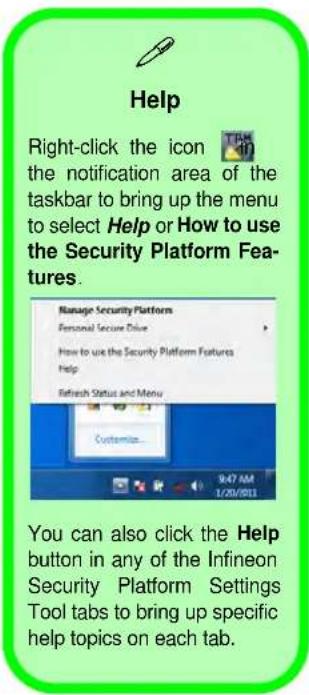
text_image
Help Right-click the icon the notification area of the taskbar to bring up the menu to select Help or How to use the Security Platform Fea- tures. Manage Security Platform Personal Secure Drive How to use the Security Platform Features Help Refresh Status and Menu Customize... 9:47 AM 1/20/2011 You can also click the Help button in any of the Infineon Security Platform Settings Tool tabs to bring up specific help topics on each tab.Figure 7 - 60 Settings
- Choose the Security Platform Features you want to use by clicking the appropriate tickbox.
- Enter a Basic User Password (and re-type to confirm it) and click Next.
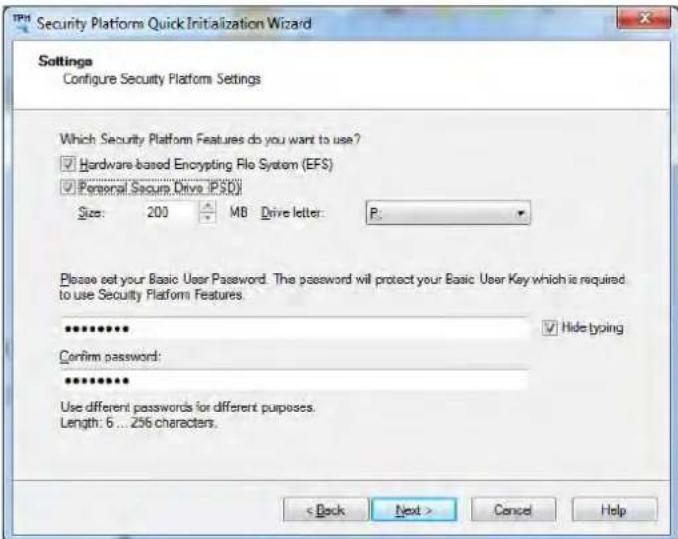
text_image
Security Platform Quick Initialization Wizard Settings Configure Security Platform Settings Which Security Platform Features do you want to use? Hardware-based Encrypting File System (EFS) Personal Security Drive (PSD) Size: 200 MB Drive letter: P. Please set your Basic User Password. The password will protect your Basic User Key which is required to use Security Platform Features. ************ Confirm password: ************ Use different passwords for different purposes. Length: 6 ... 256 characters. < Back Next > Cancel Help- Click Next to confirm the settings.
-
The computer will then initialize the settings.
-
Click Finish.
-
Click the tabs and control panels to adjust the settings.
- Double-click the taskbar icon to access the Infineon Security Platform Settings Tool, or right-click the taskbar icon and select a menu item.
Modules & Options
Infineon Security Platform Settings Tool
The Infineon Security Platform Settings Tool allows you to manage and check the TPM state, manage your password information, and to backup and restore the TPM data. As TPM is usually administered within large enterprises and organizations, your system administrator will need to assist you in managing the information here.
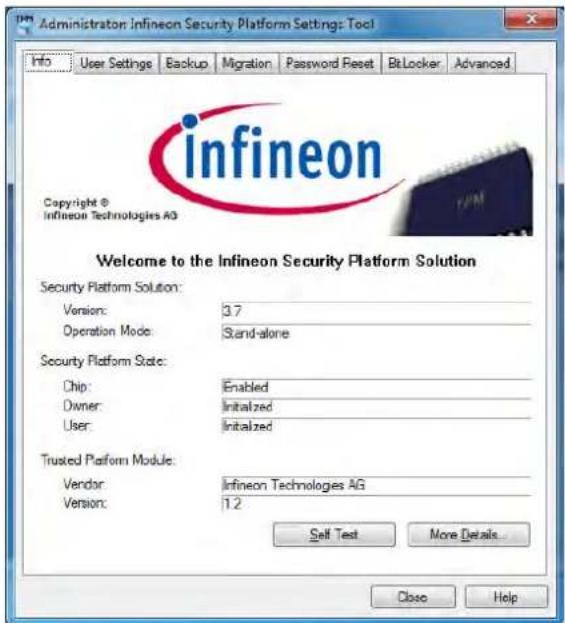
text_image
Administrator Infineon Security Platform Settings: Tool Info User Settings Backup Migration Password Reset BitLocker Advanced Copyright © Infineon Technologies AG infineon Welcome to the Infineon Security Platform Solution Security Platform Solution: Version: 3.7 Operation Mode: Stand-alone Security Platform State: Chip: Enabled Owner: Initialized User: Initialized Trusted Platform Module: Vendor: Infineon Technologies AG Version: 1.2 Self Test More Details... Close Help
Menus
Note that not all the menus pictured here will be available for access. The menu items that appear will be dependent on your configuration settings etc. (see the Help file for full details).
Figure 7 - 61 Infineon Security Platform Settings Tool
Modules & Options
User Settings
This page allows the settings to be configured for the currently logged in Infineon Security Platform user including the ability to change the password, configure secure e-mail, file and folder encryption and Enhanced Authentication. You can also import or delete certificates protected by the security platform.
Figure 7 - 62
Infineon Security
Platform Settings
Tool (User Settings)

text_image
Administrator Infineon Security Platform Settings Tool Info User Settings Backup Migration Password Reset BitLocker Advanced Basic User Password Change... Change your Basic User Password. This password is required to access Security Platform keys and certificates. Security Platform Features Configure... Configure secure e-mail, file and folder encryption. Security Platform Certificates Manage... View, import or delete Security Platform certificates. Close Help7 - 80 Trusted Platform Module
Modules & Options
Backup
Here you can configure backup and restore operations. Backup files contain the computer identification and user identification information which is used to match the machine name and user name with the current machine and user during restoration.
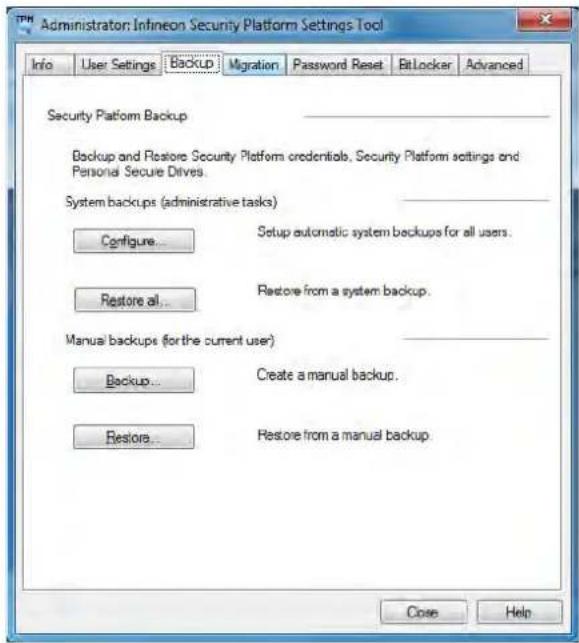
text_image
Administrator: Infineon Security Platform Settings Tool Info User Settings Backup Migration Password Reset BitLocker Advanced Security Platform Backup Backup and Restore Security Platform credentials, Security Platform settings and Personal Secure Drives. System backups (administrative tasks) Configure... Setup automatic system backups for all users. Restore all... Restore from a system backup. Manual backups (for the current user) Backup... Create a manual backup. Restore... Restore from a manual backup Close HelpFigure 7 - 63 Infineon Security Platform Settings Tool (Backup)
Trusted Platform Module 7 - 81
Modules & Options
Migration
The Migration tab is used to help securely transfer keys and certificates from one platform to another.
Figure 7 - 64
Infineon Security Platform Settings Tool (Migration)
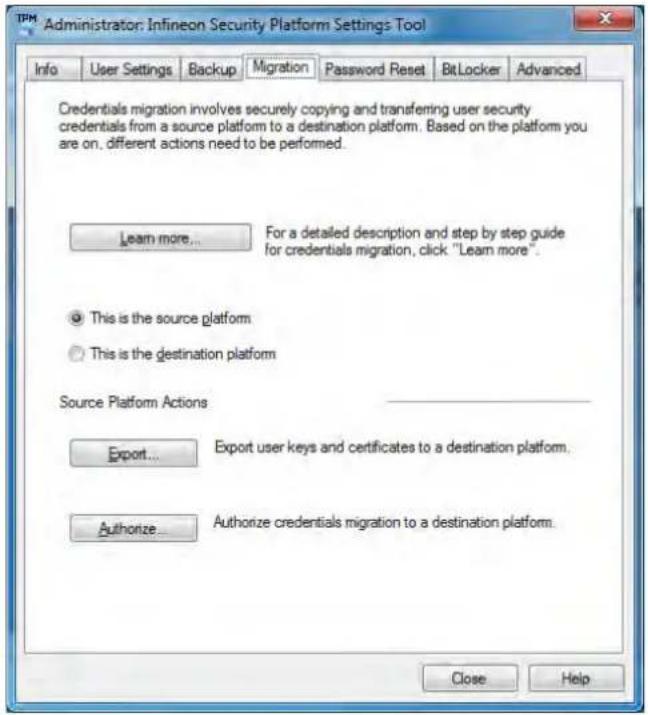
text_image
Administrator: Infineon Security Platform Settings Tool Info User Settings Backup Migration Password Reset BitLocker Advanced Credentials migration involves securely copying and transferring user security credentials from a source platform to a destination platform. Based on the platform you are on, different actions need to be performed. Learn more... For a detailed description and step by step guide for credentials migration, click "Learn more". This is the source platform This is the destination platform Source Platform Actions Export... Export user keys and certificates to a destination platform. Authorize... Authorize credentials migration to a destination platform. Close Help7 - 82 Trusted Platform Module
Modules & Options
Password Reset
Use Password Reset to reset basic user passwords when required.
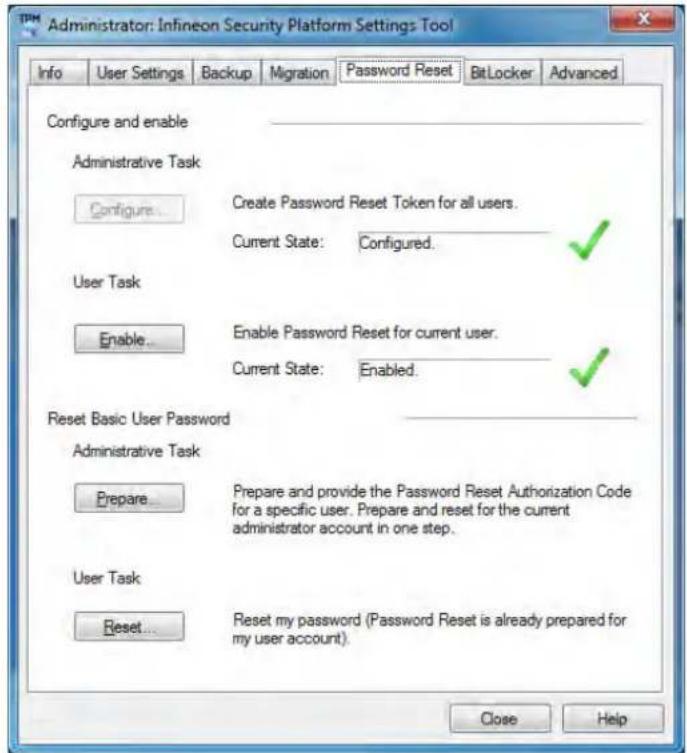
text_image
Administrator: Infineon Security Platform Settings Tool Info User Settings Backup Migration Password Reset BitLocker Advanced Configure and enable Administrative Task Configure... Create Password Reset Token for all users. Current State: Configured. User Task Enable... Enable Password Reset for current user. Current State: Enabled. Reset Basic User Password Administrative Task Prepare... Prepare and provide the Password Reset Authorization Code for a specific user. Prepare and reset for the current administrator account in one step. User Task Reset... Reset my password (Password Reset is already prepared for my user account). Close HelpFigure 7 - 65
Infineon Security
Platform Settings
Tool
(Password Reset)
Trusted Platform Module 7 - 83
Modules & Options
BitLocker
BitLocker Drive Encryption can be used in conjunction with the TPM to encrypt data on the disk and is done via the Microsoft BitLocker Control Panel Applet. Click Configure and select a drive to be encrypted and then follow the Wizard to begin the encryption process.
Figure 7 - 66
Infineon Security
Platform Settings
Tool
(BitLocker)
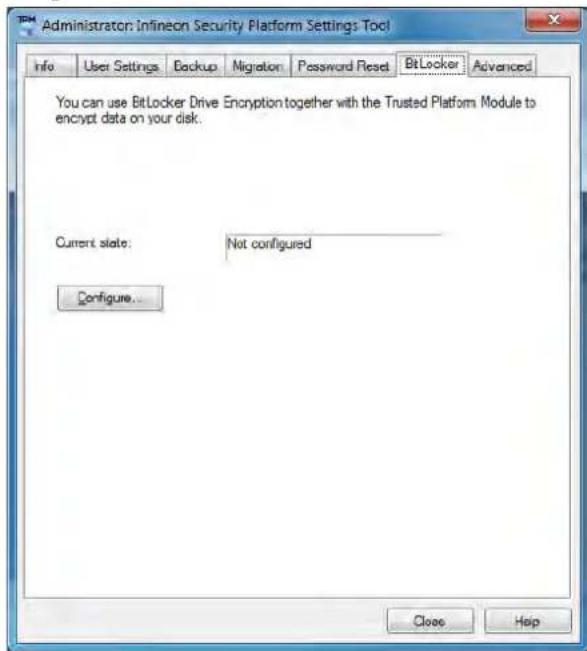
text_image
Administrator: Infineon Security Platform Settings Tool Info User Settings Backup Migration Password Reset BitLocker Advanced You can use BitLocker Drive Encryption together with the Trusted Platform Module to encrypt data on your disk. Current state: Not configured Configure... Close Help7 - 84 Trusted Platform Module
Modules & Options
Access the Microsoft BitLocker Drive Encryption control panel applet from the Windows control panel (System and Security).
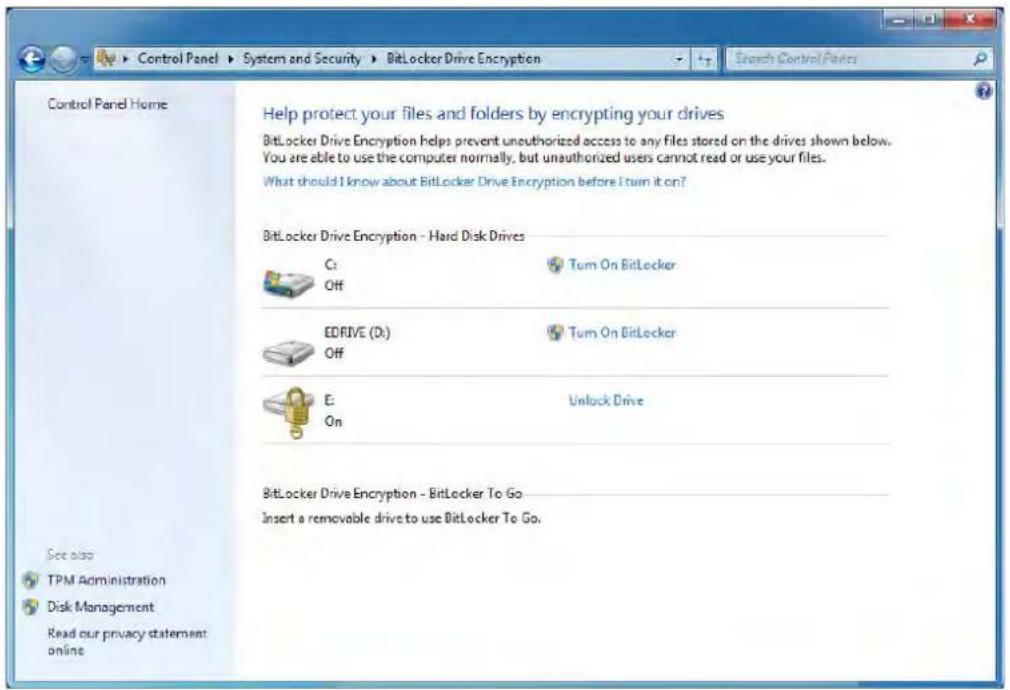
text_image
Control Panel Home Help protect your files and folders by encrypting your drives BitLocker Drive Encryption helps prevent unauthorized access to any files stored on the drives shown below. You are able to use the computer normally, but unauthorized users cannot read or use your files. What should I know about BitLocker Drive Encryption before I turn it on? BitLocker Drive Encryption - Hard Disk Drives C: Tum On BitLocker Off EDRIVE (D:) Tum On BitLocker Off E: Unlock Drive On BitLocker Drive Encryption - BitLocker To Go Insert a removable drive to use BitLocker To Go. See also TPM Administration Disk Management Read our privacy statement onlineFigure 7 - 67
BitLocker Drive
Encryption
Modules & Options
Advanced
Configure all the Security Platform owner and policy settings from the Advanced tab. The settings that can be changed are for the local computer only.
Figure 7 - 68
Infineon Security
Platform Settings
Tool
(Advanced)
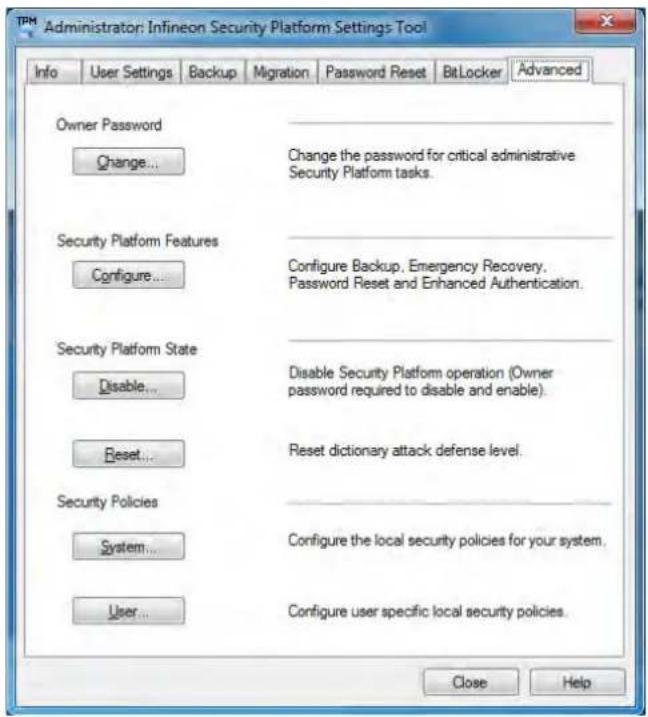
text_image
Administrator: Infineon Security Platform Settings Tool Info User Settings Backup Migration Password Reset BitLocker Advanced Owner Password Change... Change the password for critical administrative Security Platform tasks. Security Platform Features Configure... Configure Backup, Emergency Recovery, Password Reset and Enhanced Authentication. Security Platform State Disable... Disable Security Platform operation (Owner password required to disable and enable). Reset... Reset dictionary attack defense level. Security Policies System... Configure the local security policies for your system. User... Configure user specific local security policies. Close Help7 - 86 Trusted Platform Module
IRST Driver
Install the Intel Rapid Storage Technology to support your SATA drive if set up in AHCI mode in the BIOS (see “SATA Mode (Advanced Menu)” on page 5 - 11).
- Insert the Device Drivers & Utilities + User's Manual disc into the CD/DVD drive.
- Click Option Drivers (button).
- Click 7. Install IRST Driver > Yes.
- Click Next.
- Click Yes > Next > Next.
- Click Finish to restart the computer.
Modules & Options
Intel® Management and Security Status
(Model B Only)
Access the Intel® Management and Security Status control panels from the Start menu in Windows. These features allow users and IT Administrators to enhance and protect computing assets. Your system administrator will need to assist you in managing some of the information here.

User Guide
You can access the user guide provided to get help on any aspect of the Intel® Management and Security Status control panel.
Click on Learn More at the bottom left of the control panel and then click "For more information, refer to the user guide" (link).
You will need to have the Adobe Acrobat Reader program installed (this is provided on the Device Drivers & Utilities + User's Manual disc.
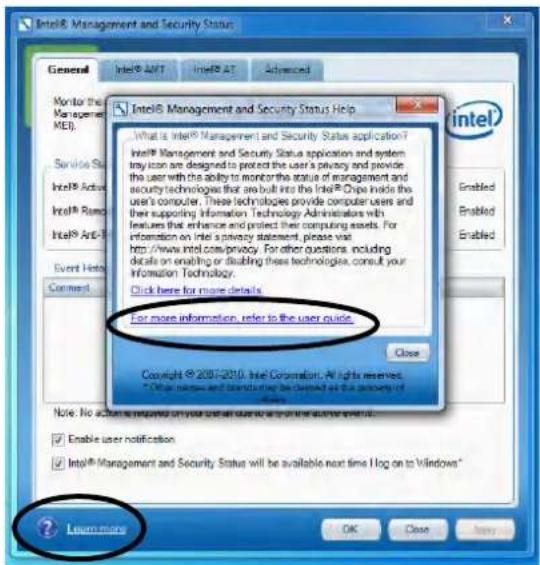
text_image
Intel® Management and Security Status General Intel® AMT Intel® AT Advanced Monitor the Management MEL Service Sta Intel® Active Intel® Rem Intel® Arcl Event History Connect Intel® Management and Security Status Help What is Intel® Management and Security Status application? Intel® Management and Security Status application and system try icon are designed to protect the user's privacy and provide the user with the ability to monitor the status of management and security technologies that are built into the Intel® Cyte inside the user computer. These technologies provide computer users and ther supporting information. Technology Administrators will features that enhance and protect their computing assets. For information on Intel's privacy statement, please visit http://www.intel.com/privacy. For other questions, including details on enabling or disabling these technologies, consult your information Technology. Click here for more details. For more information, refer to the user guide. Copyright © 2007-2010, Intel Corporation. All rights reserved. * Other updates and benefits may be carried out at this technology of Note: No action is required only for use as an error to do if the active event is. Enable user notification Intel® Management and Security Status will be available next time I log on to Windows * OK Close Apply Innemore
Figure 7 - 69
Intel Management & Security Status Help
7 - 88 Intel® Management and Security Status
Modules & Options
General
The General tab provides basic information on Intel® AMT, Intel® Standard Manageability, Level 3 Manageability Upgrade, Intel® Anti-Theft and Intel® RPAT status and events.
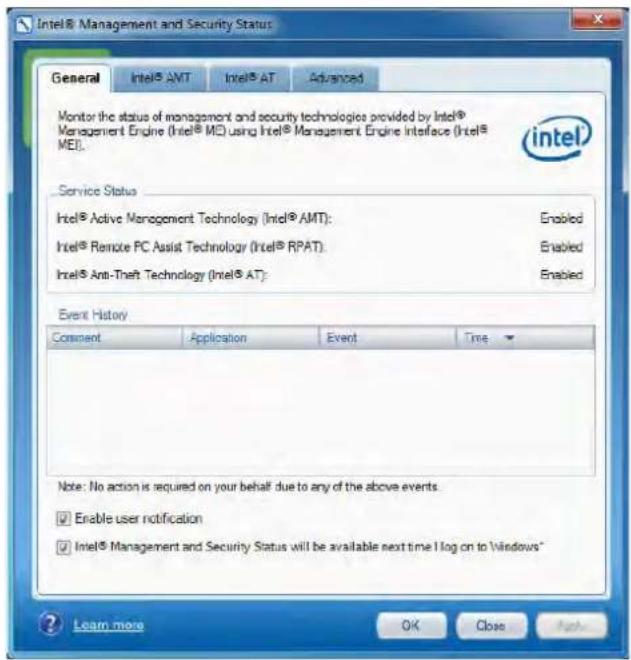
text_image
Intel® Management and Security Status General Intel® AMT Intel® AT Advanced Monitor the status of management and security technologies provided by Intel® Management Engine (Intel® ME) using Intel® Management Engine Interface (Intel® ME). Service Status Intel® Active Management Technology (Intel® AMT): Enabled Intel® Remote PC Assist Technology (Intel® RPAT): Enabled Intel® Anti-Thrift Technology (Intel® AT): Enabled Event History Comment Application Event Time Note: No action is required on your behalf due to any of the above events. ✓ Enable user notification ✓ Intel® Management and Security Status will be available next time I log on to Windows* ? Learn more OK Close ApplyFigure 7 - 70 Intel Management & Security Status General
Modules & Options
Intel® Active Management Technology
The Intel® AMT tab will be shown if you system is configured to support it. This allows your network's IT professionals to remotely discover, heal and protect your computer.
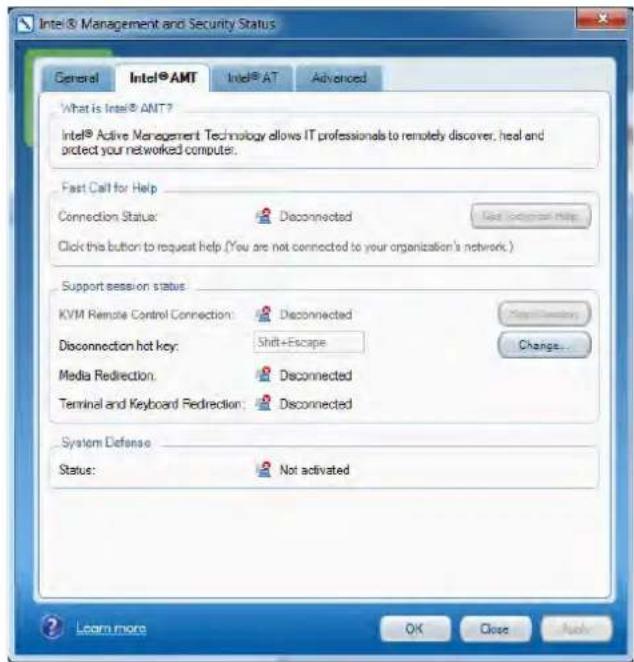
text_image
Intel® Management and Security Status General Intel® AMT Intel® AT Advanced What is Intel® AMT ? Intel® Active Management Technology allows IT professionals to remotely discover, heal and protect your networked computer. Fast Call for Help Connection Status: Disconnected Click this button to request help (You are not connected to your organization's network.) Support session status KVM Remote Control Connection: Disconnected Disconnection hot key: Shift+Escape Media Redirection: Disconnected Terminal and Keyboard Redirection: Disconnected System Defense Status: Not activated Learn more OK Close ApplyFigure 7 - 71 Intel Management & Security Status Intel® AMT
7 - 90 Intel® Management and Security Status
Modules & Options
Intel® Anti-Theft
This tab displays information on Intel® Anti-Theft information. Click on the link to connect to an Intel site to get more information on Intel® Anti-Theft technology.
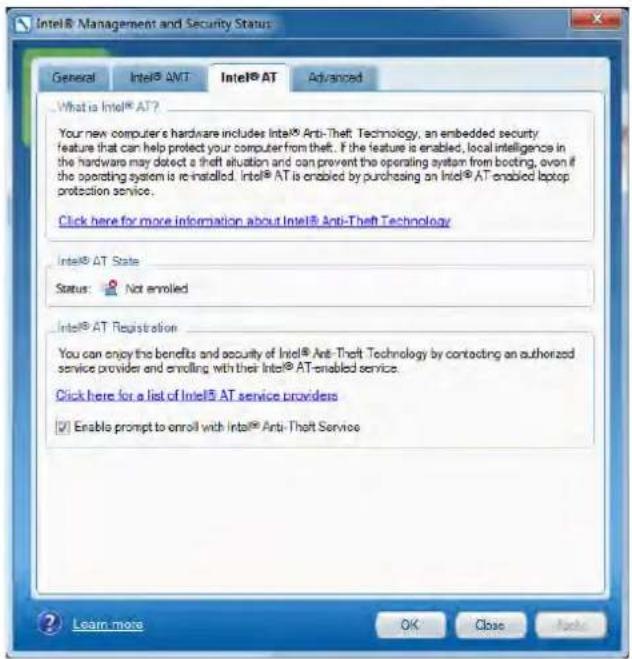
text_image
Intel® Management and Security Status General Intel® AMT Intel® AT Advanced What is Intel® AT? Your new computer's hardware includes Intel® Anti-Theft Technology, an embedded security feature that can help protect your computer from theft. If the feature is enabled, local intelligence in the hardware may detect a theft situation and can prevent the operating system from booting, even if the operating system is re-installed. Intel® AT is enabled by purchasing an Intel® AT enabled laptop protection service. Click here for more information about Intel® Anti-Theft Technology Intel® AT State Status: Not enrolled Intel® AT Registration You can enjoy the benefits and security of Intel® Anti-Theft Technology by contacting an authorized service provider and enrolling with their Intel® AT-enabled service. Click here for a list of Intel® AT service providers ✓ Enable prompt to enroll with Intel® Anti-Theft Service Learn more OK Close ApplyFigure 7 - 72 Intel Management & Security Status Intel® Anti-Theft
Modules & Options
Advanced
The Advanced tab provides additional information on the system.
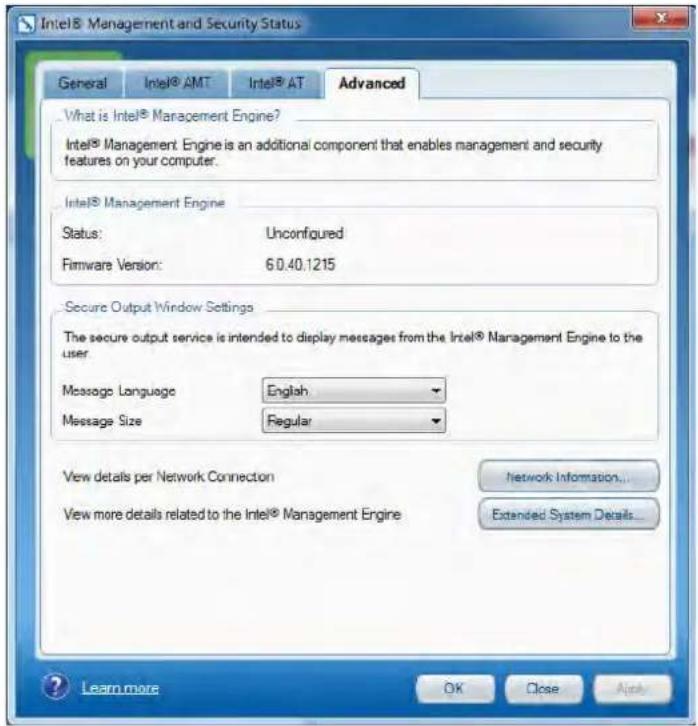
text_image
Intel® Management and Security Status General Intel® AMT Intel® AT Advanced What is Intel® Management Engine? Intel® Management Engine is an additional component that enables management and security features on your computer. Intel® Management Engine Status: Unconfigured Firmware Version: 6.0.40.1215 Secure Output Window Settings The secure output service is intended to display messages from the Intel® Management Engine to the user. Message Language English Message Size Regular View details per Network Connection View more details related to the Intel® Management Engine Network Information... Extended System Details... Learn more OK Close HelpFigure 7 - 73 Intel Management & Security Status Advanced
7 - 92 Intel® Management and Security Status
Chapter 8: Troubleshooting
Overview
Should you have any problems with your computer, before consulting your service representative, you may want to try to solve the problem yourself. This chapter lists some common problems and their possible solutions. This can't anticipate every problem, but you should check here before you panic. If you don't find the answer in these pages, make sure you have followed the instructions carefully and observed the safety precautions in the preface. If all else fails, talk to your service representative. You should also make a record of what happened and what remedies you tried.
Of course, if something goes wrong, it will happen at the most inconvenient time possible, so you should preview this section just in case. If, after you've tried everything, and the system still won't cooperate, try turning it off for a few minutes and then rebooting. You will lose any unsaved data, but it may start working again. Then call your service representative.
Troubleshooting
Basic Hints and Tips
Many of the following may seem obvious but they are often the solution to a problem when your computer appears not to be working.
- Power - Is the computer actually plugged into a working electrical outlet? If plugged into a power strip, make sure it is actually working. Check the LED Power & Communication Indicators (see “LED Indicators” on page 1 - 7) to see the computer’s power status.
- Connections - Check all the cables to make sure that there are no loose connections anywhere.
- Power Savings - Make sure that the system is not in Hibernate or Sleep mode by pressing the keys configured in your Power Options (see “Power-Saving States” on page 3 - 6), the Fn + F4 key combination, or power button to wake-up the system.
- Brightness - Check the brightness of the screen by pressing the Fn + F8 and F9 keys to adjust the brightness.
- Display Choice - Press Fn + F7 to make sure the system is not set to “external only” display.
- Boot Drive - Make sure there are no optical media and/or USB storage devices in any connected drive (this is a common cause of the message “Invalid system disk - Replace the disk, and then press any key” / “Remove disks or other media. Press any key to restart”).
8 - 2 Basic Hints and Tips
Troubleshooting
Backup and General Maintenance
- Always backup your important data, and keep copies of your OS and programs safe, but close to hand. Don't forget to note the serial numbers if you are storing them out of their original cases, e.g. in a CD wallet.
- Run maintenance programs on your hard disk and OS as often as you can. You may schedule these programs to run at times when you are not using your computer. You can use those that are provided free with your OS, or buy the more powerful dedicated programs to do so.
- Write down your passwords and keep them safe (away from your computer). This is especially important if you choose to use a Supervisor password for the BIOS (see “Security Menu” on page 5 - 13).
- Keep copies of vital settings files such as network, dialup settings, mail settings etc.(even if just brief notes).

Warranty
The CPU is not a user serviceable part. Opening this compartment, or accessing the CPU in any way, may violate your warranty.
Troubleshooting
Viruses
- Install an Anti-Virus program and keep the definitions file (the file which tells your program which viruses to look for) up to date. New computer viruses are discovered daily, and some of them may seriously harm your computer and cause you to lose data. Anti-Virus programs are commercially available and the definitions file updates are usually downloadable directly from the internet.
- Be careful when opening e-mail from sources you don't know. Viruses are often triggered from within e-mail attachments so take care when opening any attached file. You can configure most Anti-Virus programs to check all e-mail attachments. Note: You should also beware of files from people you know as the virus may have infected an address book and been automatically forwarded without the person's knowledge.
- Keep a “Bootable CD-ROM/DVD-ROM/USB storage device” (this CD/DVD/USB device provides basic information which allows you to startup your computer) handy. You may refer to your OS’s documentation for instructions on how to make one, and many Anti-Virus programs will also provide such a disk (or at least instructions on how to make one).
Troubleshooting
Upgrading and Adding New Hardware/Software
- Do not be tempted to make changes to your Windows Registry unless you are very sure of what you are doing, otherwise you will risk severely damaging your system.
- Don't open your computer or undertake any repair or upgrade work if you are not comfortable with what you are doing.
- Read the documentation. We can assume, since you are reading this that you are looking at the computer's manual, but what about any new peripheral devices you have just purchased? Many problems are caused by the installation of new hardware and/or software. Always refer to the documentation of any new hardware and/or software, and pay particular attention to files entitled “READ ME” or “READ ME FIRST”.
- When installing a new device always make sure the device is powered on, and in many cases you will need to restart the computer. Always check that all the cables are correctly connected.
- Make sure you have installed the drivers for any new hardware you have installed (latest driver files are usually available to download from vendor's websites).
Troubleshooting
- Thoroughly check any recent changes you made to your system as these changes may affect one or more system components, or software programs. If possible, go back and undo the change you just made and see if the problem still occurs.
- Don't over complicate things. The less you have to deal with then the easier the source of the problem may be found; Example - if your computer has many devices plugged into its ports, and a number of programs running, then it will be difficult to determine the cause of a problem. Try disconnecting all of the devices and restarting the computer with all the peripheral devices unplugged. A process of elimination (adding and removing devices and restarting where necessary) will often find the source of a problem, although this may be time consuming.
Problems and Possible Solutions
| Problem Possible Cause - Solution | |
| You turned on the power but it doesn't work. | Battery missing / incorrectly installed. Check the battery bay, make sure the battery is present and seated properly (the design of the battery only allows it to go in one way). Make sure there's nothing interfering with the battery contacts. |
| The battery LED power indicator , blinking orange. | Lisw Battery. Plug in the power source. If the computer doesn't start up immediately, turn it off then on again. |
| You are losing battery power too quickly. | The system is using too much power. If your OS has a Power Plans scheme (see “Power Plans” on page 3 - 4) check its settings. You may also be using a USB device/external device that is drawing a lot of power. |
| Actual battery operating time is shorter than expected. | The battery has not been fully discharged before being recharged. Make sure the battery is fully discharged and recharge it completely before reusing (see “Battery” on page 3 - 2).Power Options have been disabled. Go to the Control Panel in Windows and re-enable the options.A peripheral device/USB device/ExpressCard is consuming a lot of power. Turn off/remove the unused device to save power. |
Troubleshooting
| Problem Possible Cause - Solution | |
| The computer feels too hot. | Make sure the computer is properly ventilated and the Vent/Fan intakes are not blocked. If this doesn’t cool it down, put the system intoHibernatemode or turn it off for an hour. Make sure the computer isn’t sitting on a thermal surface (see “Overheating” on page 1 - 14). Make sure you’re using the correct adapter.Make sure that your notebook is completely powered off before putting it into a travel bag (or any such container). Putting a notebook which is powered on in a travel bag may cause the Vent/Fan intakes to be blocked. |
| Nothing appears on screen. | The system is in a power saving mode. Toggle the sleep/resume key combination, Fn + F4 (see “Configuring the Power Buttons” on page 3 - 8).The screen controls need to be adjusted. Toggle the screen control key combinations Fn + F8/F9. If you’re connected to an external monitor, make sure it’s plugged in and turned on. You should also check the monitor’s own brightness and contrast controls.The computer is set for a different display. Toggle the screen display key combination, Fn + F7. If an external monitor is connected, turn it on.The screen saveris activated. Press any key or touch the TouchPad. |
| No image appears on the external monitor I have plugged in and powered on. | You haven’t installed the video driver and configured it appropriately from the Control Panel. SeeAppendix Bfor instructions on installing and configuring the video driver. |
8 - 8 Problems and Possible Solutions
Troubleshooting
| Problem Possible Cause - Solution | |
| You forget theboot password. | If you forget the password, you may have to discharge the battery of the CMOS. Contact your service representative for help. |
 Password WarningIf you choose to set a boot password,NEVERforget your password. The consequences of this could be serious. If you cannot remember your boot password you must contact your vendor and you may lose all of the information on your hard disk. Password WarningIf you choose to set a boot password,NEVERforget your password. The consequences of this could be serious. If you cannot remember your boot password you must contact your vendor and you may lose all of the information on your hard disk. | |
| The sound cannot be heard or thevolumeis very low. | The volume might be set too low. Check the volume control in theVolume Control Panelin the Windows taskbar, or use the key combinationFn + F5and F6(see“Function/Hot Key Indicators”on page 1 - 10)to adjust. |
| The CD/DVDCannot be read. | The CD/DVD is dirty. Clean it with a CD/DVD cleaner kit. |
| The CD/DVDtray will not openwhen there is a disc in the tray. | The CD/DVD is not correctly placed in the tray. Gently try to remove the disc using the eject hole (see“Loading Discs”on page 2 - 3). |
| TheDVD regional codescan no longerbe changed. | The code has been changed the maximum 5 times. See“DVD Regional Codes”on page 2 - 5. |
| Unwelcomenumbersappear whentyping. | If the LEDis lit, then Num Lock is turnedON.(see“LED Indicators”onpage 1 - 7). |
Troubleshooting
| Problem Possible Cause - Solution | |
| Other KeyboardsIf your keyboard is damaged or you just want to make a change, you can use any standard USB keyboard. The system will detect and enable it automatically. However special functions/hot keys unique to the system's regular keyboard may not work. | |
| The system freezes or the screen goes dark. | The system's power saving features have timed-out. Use the AC/DC adapter, press the sleep (Fn + F4) key combination, or press the power button if no LEDs are lit. |
| The system never goes into a power saving mode. | Power Options features are not enabled. Go to the Windows Power Options menu and enable the features you prefer (see “Power-Saving States” on page 3 - 6). Make sure you have enabled Hibernate mode from the control panel. |
| The Wireless LAN/Bluetooth/3.75G modules cannot be detected. | The modules are off. Check the LED indicator (1) and/or function key indicator to see if the WLAN/Bluetooth/3.75G/HSPA module is on or off (see “LED Indicators” on page 1 - 7). If the LED indicator is off, then press the Fn + F11 (WLAN), Fn + F12 (Bluetooth) or Fn + (3.75G) key combination(s) in order to enable the modules (see “Function/Hot Key Indicators” on page 1 - 10). |
8 - 10 Problems and Possible Solutions
Troubleshooting
| Problem Possible Cause - Solution | |
| The PC Camera module cannot be detected. | The module is off. Press the Fn + F10 key combination in order to enable the module (see “Function/Hot Key Indicators” on page 1 - 10). Run the BisonCap program to view the camera picture. |
| The Wireless LAN/Bluetooth/ PC Camera/3.75G/HSPA modules cannot be configured. | The driver(s) for the module(s) have not been installed. Make sure you have installed the driver for the appropriate module (see the instructions for the appropriate module in “Modules & Options” on page 7 - 1). |
| A file cannot be copied to/from a connected Bluetooth device. | The transfer of data between the computer and a Bluetooth enabled device is supported in one direction only (simultaneous data transfer is not supported). If you are copying a file from your computer to a Bluetooth enabled device, you will not be able to copy a file from the Bluetooth enabled device to your computer until the file transfer process from the computer has been completed |
| The Bluetooth module is off after resuming from Sleep. | The Bluetooth module’s default state will be off after resuming from the Sleep power-saving state. Use the key combination (Fn + F12) to power on the Bluetooth module after the computer resumes from Sleep. |
| The computer is off (or in Sleep Mode) but powered by the AC/DC adapter plugged into a working outlet, or by battery with a capacity above 20%. I have plugged a device into the powered USB port in order to charge it, but the device is not charging. | The port is not powered on. Toggle power to the port using the Fn + power button combination.This function may not work with certain external USB compliant devices (check your device’s documentation). If this is the case, power the computer on and connect the external USB device in order to charge it. |
Troubleshooting
| Problem Possible Cause - Solution | |
| A yellow exclamation mark appears alongside PCI Simple Communications Controller (Other Devices) in Device Manager. | The IRST driver will fix this known issue. Install the IRST driver (see “IRST Driver” on page 7 - 87). |
| I cannot obtain high speed Bluetooth data transfer. | To obtain high speed Bluetooth data transfer take into account the following:Only the combination Wireless LAN & V3.0 Bluetooth module supports high speed (V3.0) data transfer.To achieve high speed transfer speeds, both devices must support high speed data transfer (i.e both the computer and the Bluetooth compatible device you are connecting to).To obtain high speed (V3.0) data transfer make sure that both the computer’s WLAN and Bluetooth modules are powered on (use the Fn + F11 to toggle power to the WLAN module and Fn + F12 to toggle power to the Bluetooth module).Check your Bluetooth compatible device’s documentation to confirm it supports high speed data transfer, and for configuration information.Make sure that Enable high speed mode support in General Settings in My Bluetooth Settings is enabled if you wish to use high speed data transfer (see Figure 7 - 28 on page 7 - 42). |
8 - 12 Problems and Possible Solutions
Bluetooth Connection Problems
If you are experiencing problems connecting to some Bluetooth devices (in particular certain mobile phones and headsets) it may be necessary to download and install the Windows Mobile Device Center software (for Windows Vista and Windows 7). Go to the Microsoft website and search for the Microsoft Windows Device Center Driver for Windows Vista (64-bit or 32-bit) and Windows 7 (64-bit or 32-bit), and then download the driver.
- Install the Microsoft Windows Device Center Driver as appropriate for your operating system.
- Windows 7 requires further configuration.
- Make sure the Bluetooth device is powered on.
- Go the Windows 7 control panel and double-click Device Manager (Hardware and Sound > Devices and Printers).
- Bluetooth Peripheral Device(s) will be listed under Other Devices (note this will only be listed if you have connected, or tried to connect to, a Bluetooth device previously).
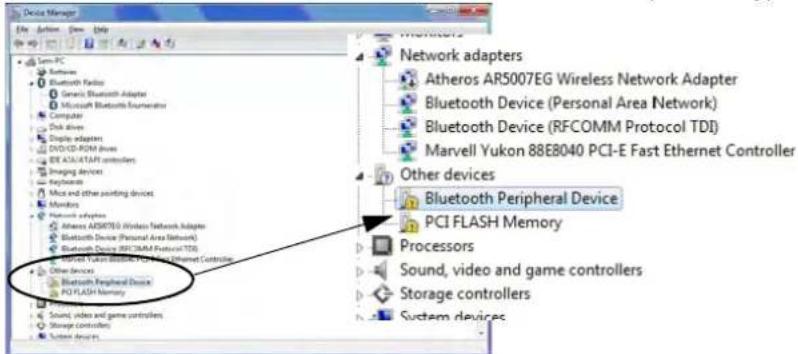
text_image
Device Manager File Edit View Help Lamp-FC Bluetooth Generic Bluetooth Adapter Microsoft Bluetooth fumeater Disk drives Double adapters DVD/CD-ROM drives BE ATATAP controllers Imaging devices Keyframes Mix end other pointing devices Monitors Network adapters Atheros AR5007EG Wireless Network Adapter Bluetooth Device (Personal Area Network) Bluetooth Device (RFCOMM Protocol TDI) Marvell Yukon 88E8040 PCI-E Fast Ethernet Controller Other devices Bluetooth Peripheral Device PCI FLASH Memory Processors Sound, video and game controllers Storage controllers System devicesBluetooth Peripheral Devices
You will need to repeat the procedure listed here for all Bluetooth Peripheral Devices listed under Other Devices i.e. until there are no more Bluetooth Peripheral Devices listed under this menu heading.
Figure 8 - 1 - Device Manager
Troubleshooting
- Right-click Bluetooth Peripheral Device and click on Update Driver Software.
- Click Browse my computer for driver software.
- Click Let Me pick from a list of device drivers on my computer.
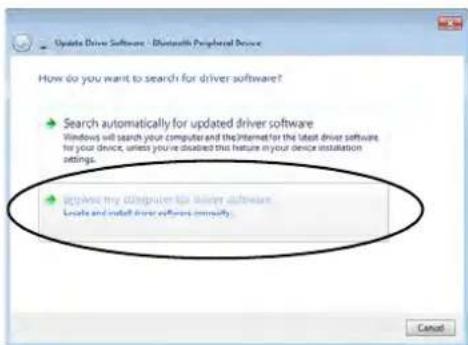
text_image
Update Driver Software - Bluetooth Peripheral Device How do you want to search for driver software? Search automatically for updated driver software Windows will search your computer and the Internet for the latest driver software for your device, unless you're disabled this feature in your device installation settings. Browse the computer for driver software Locate and install driver software currently. Cancel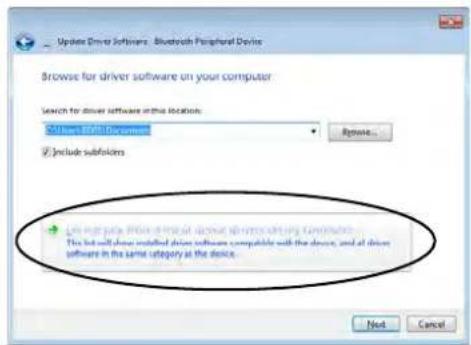
text_image
Update Driver Software: Bluetooth Peripheral Device Browse for driver software on your computer Search for driver software in this location: SQL Server SQL Server Include subfolders This will also show installed driver software compatible with the device, and at driver software in the same category at the device. Next CancelFigure 8 - 2 - Browse my computer.../Let me pick from...
- Select Bluetooth Radios from the list.
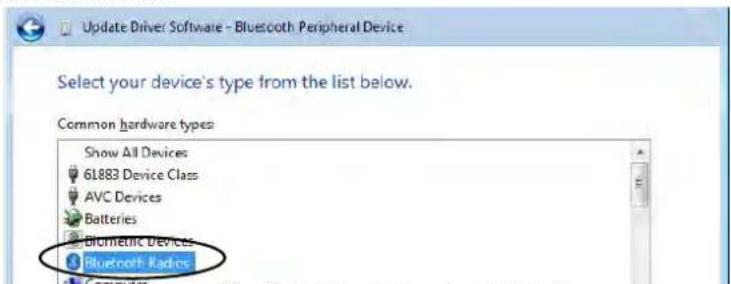
text_image
Update Driver Software - Bluetooth Peripheral Device Select your device's type from the list below. Common hardware types Show All Devices 61883 Device Class AVC Devices Batteries Biometric Devices Bluetooth Radics ComputerFigure 8 - 3 - Select Bluetooth Radios
8 - 14 Bluetooth Connection Problems
Troubleshooting
- A list of drivers will appear with Manufacturer on one side and Model in the other.
- Choose Microsoft Corporation (make sure you choose the full name Microsoft Corporation and do not choose Microsoft - Note that you must have installed the Microsoft Windows Device Center Driver for Microsoft Corporation to appear in the list).
- Select Windows Mobile-based device support from the Model list.
Make sure you select Microsoft Corporation
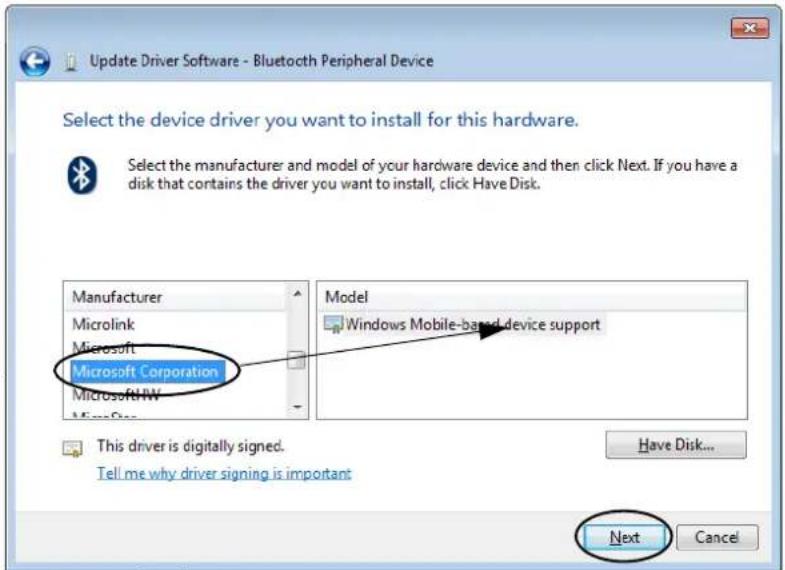
text_image
Update Driver Software - Bluetooth Peripheral Device Select the device driver you want to install for this hardware. Select the manufacturer and model of your hardware device and then click Next. If you have a disk that contains the driver you want to install, click Have Disk. Manufacturer Microlink Microsoft Microsoft Corporation Microsoft RW Microsoft Model Windows Mobile-based device support This driver is digitally signed. Tell me why driver signing is important Have Disk... Next CancelFigure 8 - 4 - Select Device Driver
- Click Next > Yes and the driver will install.
- Click Close to complete the installation.
Troubleshooting
- The Device Manager should now display the Windows Mobile-based device support under Bluetooth Radios.
- You will need to repeat the process for any other Bluetooth Peripheral Devices listed under Other Devices.
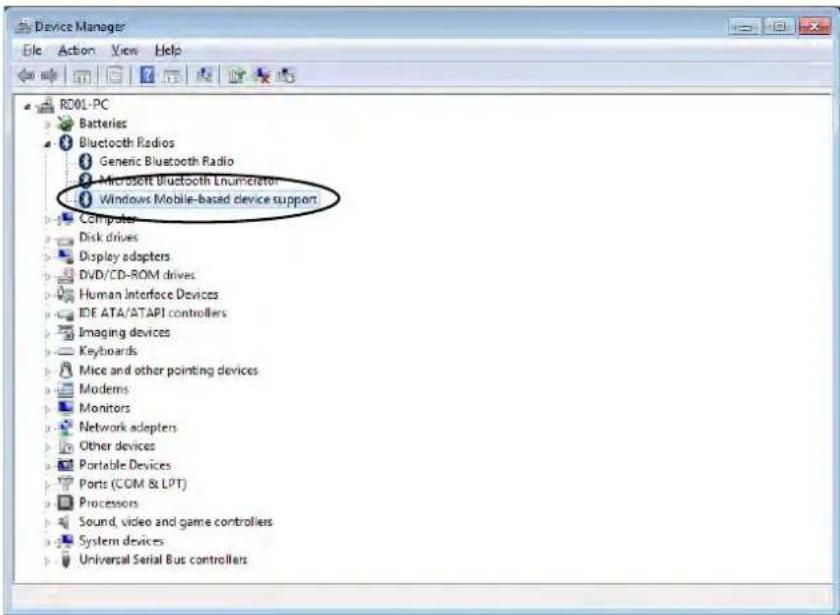
text_image
Device Manager File Action View Help RDOL-PC Batteries Bluetooth Radios Generic Bluetooth Radio Microsoft Bluetooth Lnucleator Windows Mobile-based device support Computers Disk drives Display adapters DVD/CD-ROM drives Human Interface Devices IDE ATA/ATAPI controllers Imaging devices Keyboards Mice and other pointing devices Moderns Monitors Network adapters Other devices Portable Devices Ports (COM & LPT) Processors Sound, video and game controllers System devices Universal Serial Bus controllersFigure 8 - 5 - Device Manager - Bluetooth Radio
8 - 16 Bluetooth Connection Problems
Troubleshooting
Intel® Centrino Advanced WLAN & Bluetooth V3.0+HS Combo Modules
Note that, at the time of going to press, Intel® Centrino® Advanced-N 6230 or Intel® Wireless-N 1030 WLAN & Bluetooth V3.0+HS combo modules use the standard Bluetooth configuration in Windows 7 (see "Standard Bluetooth Configuration in Windows 7" on page 7 - 38). Do not use the Bluetooth & WLAN Combo settings information outlined from page 7 - 30 to page 7 - 36.
Driver Release Update
Note also that, at the time of going to press, this module does not support high speed Bluetooth (V3.0) data transfer. Intel have scheduled a driver release to allow this module to support high speed data transfer, so please check with Intel or your service center for details.
Troubleshooting
Appendix A: Interface (Ports & Jacks)
Overview
The following chapter will give a quick description of the interface (ports & jacks) which allow your computer to communicate with external devices, connect to the internet etc.
| Item Description | |
| Card Reader PortMMC / SD / MS | The card reader allows you to use some of the latest digital storage cards. Push the card into the slot and it will appear as a removable device. |
| DC-In Jack Plug the——— | supplied AC/DC adapter into this jack to power your computer. |
External Monitor (VGA)Port | This port allows you to connect an external monitor, or Flat Panel Display, to get dual video or simultaneous display on the LCD and external monitor/FPD. |
| e-SATA/USB Porte-SATA | This is a combined e-SATA (external Serial Advanced Technology Attachment)/ USB 2.0 compatible port.Plug external Serial ATA hard drives into this e-SATA (external Serial Advanced Technology Attachment) port. See “USB 2.0/1.1 Ports” on page A - 3 for USB port information. |

Interface (Ports & Jacks)
| Item Description | |
| HDMI-Out Port HDMI | The HDMI-Out (High-Definition Multimedia Interface) is an audio/video connector interface for transmitting uncompressed digital streams. This allows you to connect an external monitor, TV or Flat Panel Display etc. as a display device by means of a HDMI cable. Note that HDMI carries both audio and video signals. |
Headphone-Out Jack  | Headphones or speakers may be connected through this jack. Note: Set your system's volume to a reduced level before connecting to this jack. |
Microphone-In Jack Plug  | an external microphone in to this jack to record on your computer. |
RJ-45 LAN Jack This port supports LAN (Network) functions. | Note: Broadband (e.g. ADSL) modems usually connect to the LAN port. |
Security Lock Slot  | To prevent possible theft, a Kensington-type lock can be attached to this slot. Locks can be purchased at any computer store. |
S/PDIF-Out Jack  | This S/PDIF (Sony/Philips Digital Interface Format) Out Jack allows you to connect your DVD-capable PC to a Dolby AC-3 compatible receiver for “5.1” or ‘dts’ surround sound. |
A - 2 Interface (Ports & Jacks)

Interface (Ports & Jacks)
| Item Description | |
USB 2.0/1.1 Ports USB 3.0 Port USB 3.0 Port | These USB 2.0 compatible ports (USB 2.0 is fully USB 1.1 compliant) are for low-speed peripherals such as keyboards, mice or scanners, and for high-speed peripherals such as external HDDs, digital video cameras or high-speed scanners etc. Devices can be plugged into the computer, and unplugged from the computer, without the need to turn the system off (if the power rating of your USB device is 500mA or above, make sure you use the power supply which comes with the device).The USB 3.0 ports are denoted by their blue color; USB 2.0 ports are colored black. USB 3.0 will transfer data much faster than USB 2.0, and is backwards-compatible with USB 2.0.Note that the USB 3.0 port requires a driver installation (see “USB 3.0” on page 4 - 7), does not support wake on USB and is not operational under DOS.*Note: The powered USB 2.0 port (see “System Map: Right & Rear Views” on page 1 - 12) may be toggled on /off by means of the Fn + Power Button key combination. When the powered USB port is on it will supply power when the system is off but still powered by the AC/DC adapter plugged into a working outlet, or powered by the battery with a capacity level above 20% (this may not work with certain devices - see page 8 - 11). |

Interface (Ports & Jacks)

A - 4
Appendix B: Intel Video Driver Controls
The basic settings for configuring video are outlined in "Video Features" on page 1 - 18.
Intel Video Driver Installation
Make sure you install all the drivers in the order indicated in Table, on page 4 - 3.
- Insert the Device Drivers & Utilities + User's Manual disc into the CD/DVD drive.
- Click 2. Install VGA Driver > Yes.
- Click Next > Yes > Next > Next.
- Click Finish to restart the computer.
DVMT Notes
DVMT is not local video memory.
DVMT is not user-configurable.
DVMT will not function in MS-DOS. DOS uses the legacy memory indicated.
Dynamic Video Memory Technology
Intel ^® DVMT automatically and dynamically allocates as much (up to 1.7GB) system memory (RAM) as needed to the video system (the video driver must be installed). DVMT returns whatever memory is no longer needed to the operating system.
Intel Video Driver Controls

Application Mode
Note that all figures pictured, and instructions outlined here are based on the Advanced Application Mode.
Figure B - 1
Intel® G&M
Control Panel
Intel® Graphics & Media Control Panel
Advanced video configuration options are provided by the Intel® Graphics and Media Control Panel. To access the control panel:
- Click Advanced settings in the Screen Resolution control panel in Windows.
- Click the Intel(R)... tab and click Graphics Properties (button).
OR - Right-click the desktop and select Graphics Properties from the menu.
OR - Double-click the Intel(R) G&M control panel in Windows.
- Choose the application mode ( Basic, Advanced or Wizard) required (see sidebar).

text_image
Generic PoP Monitor and Intel® HD Graphics Family Properties Adapter Monitor Troubleshoot Color Management Intel® Graphics and Media Control Panel Intel® Graphics and Media Control Panel Display Epsilon Display Refresh Rate 80 Hz Rotation Rotate To Normal Scaling Maintain Display Scaling Show Options Graphics Properties... OK Cancel Apply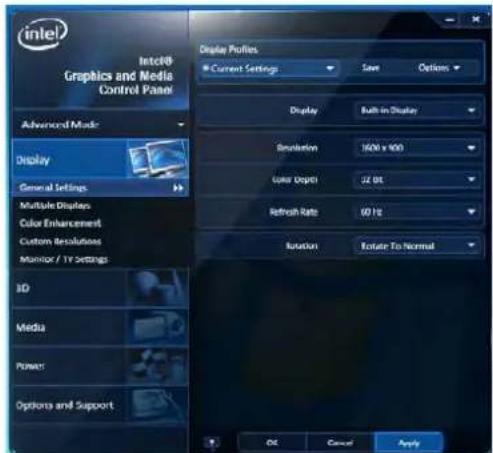
text_image
Intel® Graphics and Media Control Panel Advanced Mask Display General Settings Multiple Displays Color Enhancement Custom Resolutions Monitor / TV Settings 3D Media Power1 Options and Support Display Profiles Current Settings Save Options Display Built-in Display Resolution 1500 x 400 Color (Opacity) 72 dB Refresh Rate 60 Hz Rotation Rotate To Normal OK Cancel ApplyB - 2 Intel® Graphics & Media Control Panel

Intel Video Driver Controls
You may make changes to any of the graphics properties by clicking the appropriate menu tab on the left of the menu and adjusting the settings on the right.
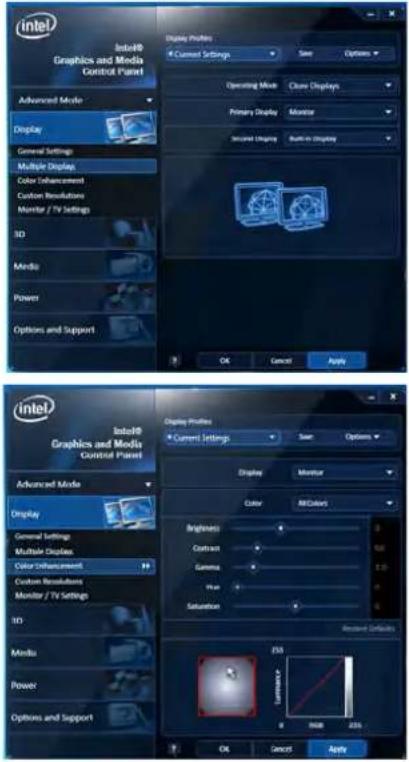
text_image
intel Intel® Graphics and Media Control Panel Advanced Mode Display General Settings Multiple Displays Color Enhancement Custom Resolutions Monitor / TV Settings 3D Media Power Options and Support Display Modems Current Settings Save Options Operating Mode Close Displays Primary Display Monitor Secure Display Built-in Display OK Cancel Apply intel Intel® Graphics and Media Control Panel Advanced Mode Display General Settings Multiple Displays Color Enhancement Custom Resolutions Monitor / TV Settings 3D Media Power Options and Support Display Modems Current Settings Save Options Display Monitor Color All Colors Brightness Contrast Gamma True Saturation Reset-up Defaulty 253 Sigma: OK Cancel Apply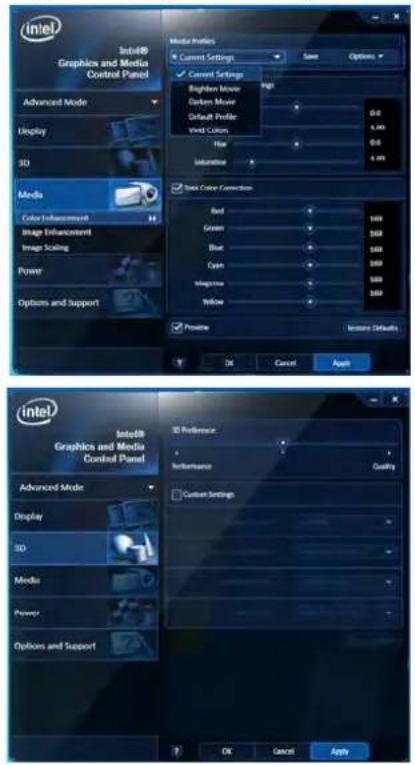
text_image
Intel® Graphics and Media Control Panel Advanced Mode Display 3D Media Color Enhancement Image Enhancement Image Scaling Power Options and Support Media Profiles Current Settings Save Options ✓ Current Settings Brighter Movie Custom Movie Default Profile Word Color Blue Information ✓ Text Color Correction Red Green Blue Cyan Magazine Yellow ✓ Positive Import Default OK Cancel Apply Intel® Graphics and Media Control Panel Advanced Mode Display 3D Media Power Options and Support ID Preference Performance ✓ Custom Settings OK Cancel Apply
Options & Support
Click Options & Support and select an item from the sub-menu to bring up the help and support topics.
You will need to be connected to the Internet to access the key resource links.
Multiple Display
At least one other display must be attached in order to view multiple display selection options.
Figure B - 2
Intel® G&M
Control Panel Tabs

Intel Video Driver Controls

Function Key Combination
You can use the Fn + F7 key combination to toggle through the display options:
- Notebook Only
- External Display Only
- Notebook + External Display
Make sure you give the displays enough time to refresh.
Note that HDMI supports video and audio signals.
Table B - 1 Display Modes
Display Devices & Options
Besides the built-in LCD you can also use an external monitor/flat panel display/TV connected to the external monitor port or to the HDMI-Out port (High-Definition Multimedia Interface) as your display device. The table below outlines the display options.

Attaching Displays
When you first attach an external display you may find that the desktop does not occupy the full screen area. Use either the display's auto adjust/configure controls, or the Intel(R) G&M control panel to configure the full screen display.
| Intel Display Mode Description | |
| Single Display One of the connected displays is used as the display device | |
| Clone Displays | Both connected displays output the same view and may be configured independently |
| Extended Desktop | Both connected displays are treated as separate devices, and act as a virtual desktop |
B - 4 Intel® Graphics & Media Control Panel

Intel Video Driver Controls
Attaching Other Displays
If you prefer to use a monitor or flat panel display, connect it to the external monitor port or HDMI-Out port on the left of the computer.
To Clone Displays:
- Attach your display to the external monitor port or HDMI-Out port, and turn it on.
- Go to the Intel(R) G&M control panel and click Display > Multiple Displays.
- Click Operating Mode and select Clone Displays from the menu.
- Click Apply, and OK to confirm the settings change.
- You can switch the Primary/Secondary Display from the menu.
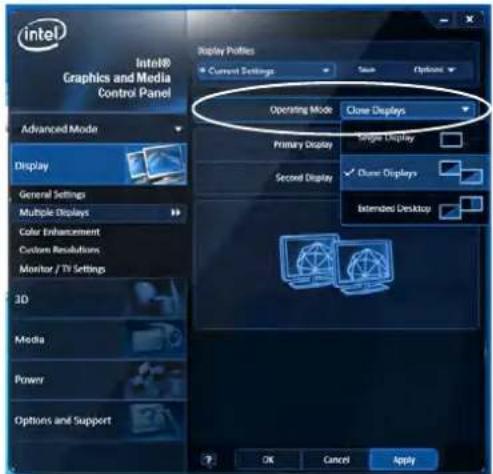
text_image
Intel® Graphics and Media Control Panel Advanced Mode Display General Settings Multiple Displays Color Enhancement Custom Resolutions Monitor / TV Settings 3D Media Power Options and Support Display Portles Current Settings Save Options Operating Mode Close Displays Primary Display Single Display Second Display Chase Displays Extended Desktop OK Cancel Apply
Multiple Display
At least one other display must be attached in order to view Multiple Display selection options.
General Settings
Click General Settings to access settings the options for any attached display.
Figure B - 3
Display > Multiple
Displays (Clone)

Intel Video Driver Controls

Display Settings Extended Desktop
You can have different Colors, Screen Area and Monitor Refresh Rates for each display device provided your monitor can support them.
You can drag the monitor icons to match the physical layout of your displays. Icons and programs may also be dragged between the displays.
Figure B - 4
Display > Multiple Displays (Extended)
To Enable Extended Desktop:
- Attach your display to the external monitor port or HDMI-Out port, and turn it on.
- Go to the Intel(R) G&M control panel and click Display > Multiple Displays.
- Click Operating Mode and select Extended Desktop from the menu.
- Click Apply, and OK to confirm the settings change.
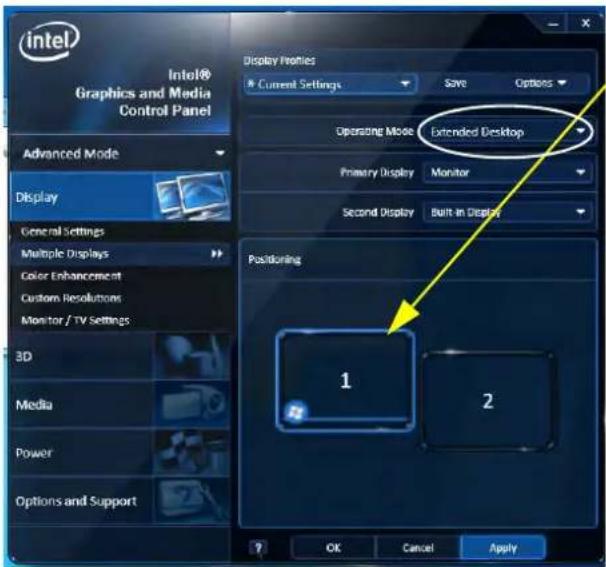
text_image
Intel® Graphics and Media Control Panel Advanced Mode Display General Settings Multiple Displays Color Enhancement Custom Resolutions Monitor / TV Settings 3D Media Power Options and Support Display Fronties * Current Settings Save Options Operating Mode Extended Desktop Primary Display Monitor Second Display Built-in Display Positioning 1 2 OK Cancel ApplyClick the appropriate monitor icon and drag it to match the physical arrangement you wish to use (e.g. the secondary display may be extended left/right/above/below the primary display).
Click General Settings to make any adjustments required.
B - 6 Attaching Other Displays

Intel Video Driver Controls
Display Profiles
You can save display settings to be loaded at any time.
- Go to the Intel(R) G&M control panel and click Display.
- Configure the General Settings, Multiple Displays, Color Enhancement, Custom Resolution & Monitor/TV Settings to your preferences.
- Click Apply, and OK to confirm the settings change.
- Click the Save button at the top of the General Settings, Multiple Displays or Color Enhancement menus (under Display Profiles).
- Type a name for the Profile and click OK.
- The Profile will be listed under Display Profiles.
- Select the profile from the pull-down menu and click Apply, and OK to confirm the settings change.
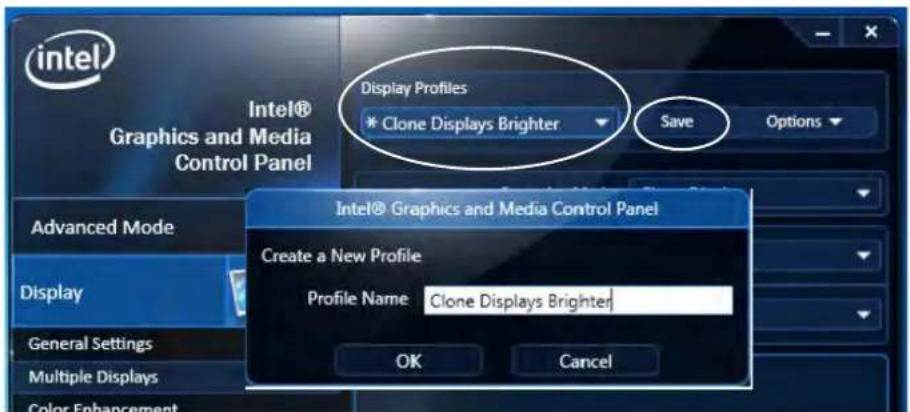
text_image
Intel® Graphics and Media Control Panel Display Profiles * Clone Displays Brighter Save Options Advanced Mode Display General Settings Multiple Displays Color Enhancement Intel® Graphics and Media Control Panel Create a New Profile Profile Name: Clone Displays Brighter OK CancelFigure B - 5 Intel® G&M Profiles
Attaching Other Displays B - 7

Intel Video Driver Controls

Function Key Combination
You can use the Fn + F7 key combination to toggle through the display options:
- Notebook Only
- External Display Only
- Notebook + External Display
Make sure you give the displays enough time to refresh.
Note that HDMI supports video and audio signals.
Figure B - 6
Screen Resolution Multiple Displays (Win 7)
Configuring an External Display in Windows 7
You can also use the Screen Resolution control panel in Windows 7 to configure an external display.
- Attach your display to the external monitor port or HDMI-Out port, and turn it on.
- Go to the Screen resolution control panel (see "Video Features" on page 1 - 14).
- Click the Detect button.
- The computer will then detect any attached displays.
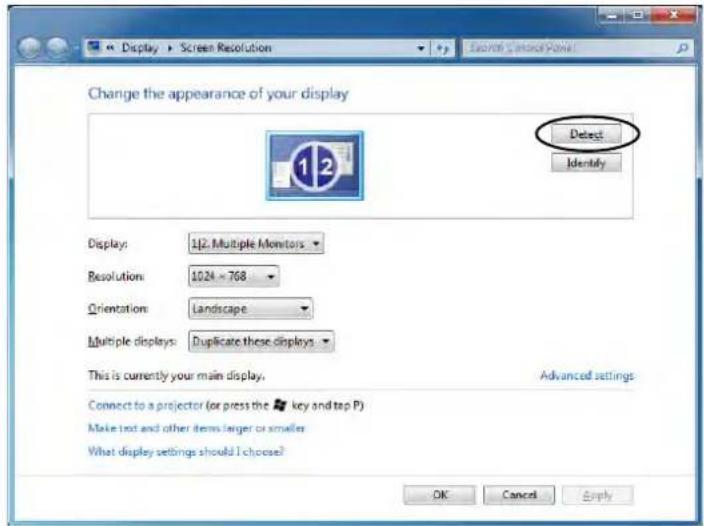
text_image
Change the appearance of your display Display: 112. Multiple Monitors Resolution: 1024 × 768 Orientation: Landscape Multiple displays: Duplicate these displays This is currently your main display. Connect to a projector (or press the key and tap P) Make text and other items larger or smaller What display settings should I choose? Detect Identify Advanced settings OK Cancel ApplyB - 8 Configuring an External Display in Windows 7

Intel Video Driver Controls
- You can configure the displays from the Multiple Displays menu.
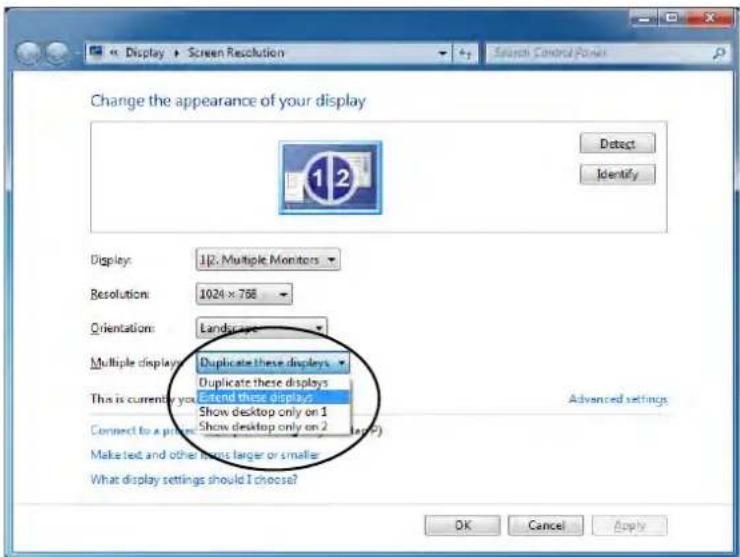
text_image
Change the appearance of your display Display: 102. Multiple Monitors Resolution: 1024 x 768 Orientation: Landar view Multiple displays: Duplicate these displays This is currently you: Duplicate these displays Extend these displays Show desktop only on 1 Show desktop only on 2 Connect to a plot (e.g. Image) Make text and other items larger or smaller What display settings should I choose? Advanced settings OK Cancel ApplyFigure B - 7 Screen Resolution Multiple Display Options (Win 7)
- Duplicate these displays - Shows an exact copy of the main display desktop on the other display(s)
- Extend these displays - Treats both connected displays as separate devices
• Show desktop only on 1/2 - Only one of your displays is used.
Intel Video Driver Controls
Using the Windows Logo Key P Key Combination to Switch Displays
You can also use the z + P key combination to quickly change display configuration and modes (this is particularly useful when attaching a projector) in Windows 7.
- Attach your display to the external monitor port or HDMI-Out port, and turn it on.
- Press the + P key combination.
- An on-screen menu will pop up.
- Use the cursor keys (or +P ) to select the appropriate configuration from the menu, and press Enter to confirm the selection.
Figure B - 8
+ P Display
Configuration
Selection
(Win 7)
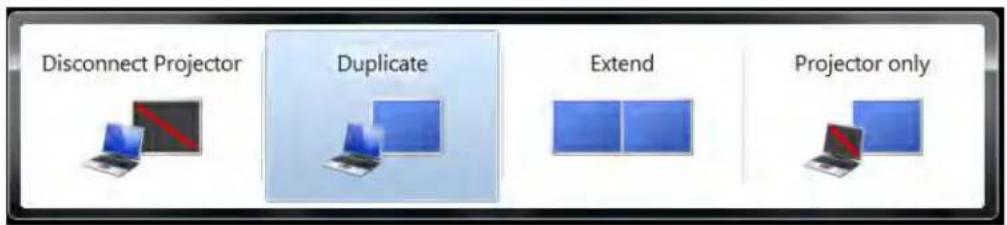
text_image
Disconnect Projector Duplicate Extend Projector only
B - 10 Configuring an External Display in Windows 7
HDMI Audio Configuration
HDMI (High-Definition Multimedia Interface) carries both audio and video signals. In some cases it will be necessary to go to the Sound control panel and manually configure the HDMI audio output as per the instructions below.
- Click Start, and click Control Panel (or point to Settings and click Control Panel).
- Click Sound (Hardware and Sound) and click Playback (tab)
- Depending on your display, the playback device may be selected, however in some cases you may need to select the audio device and click Set Default (button). If the display does not appear, select Realtek Digital Output and click Set Default (button).
- Double-click the device to access the control panel tabs illustrated overleaf.
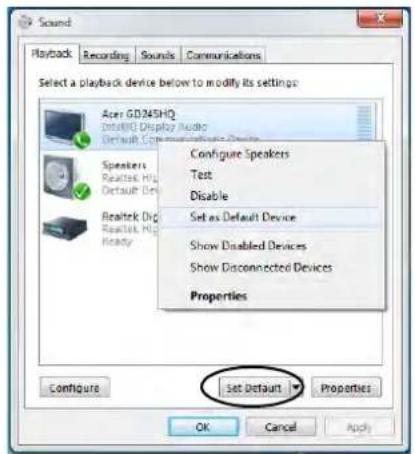
text_image
Sound Playback Recording Sounces Communications Select a playback device below to modify its settings: Acer GD245HQ DitaBQ Display Audio Default Display Audio Speakers Realtek Hig Default Dev Realtek Dig Realtek Hig Ready Configure Speakers Test Disable Set as Default Device Show Disabled Devices Show Disconnected Devices Properties Configure Set Default Properties OK Cancel Apply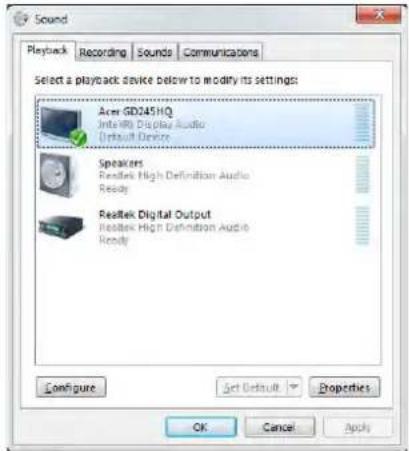
text_image
Sound Playback Recording Sounds Communications Select a playback device below to modify its settings: Acet GD245HQ InteRik Display Audio Default Devices Speakers Realtek High Definition Audio Ready Realtek Digital Output Realtek High Definition Audio Ready Configure Set Default Properties OK Cancel ApplyFigure B - 9 Sound - HDMI Device (Set Default)
Intel Video Driver Controls
- Double-click the connected HDMI device (or right-click and select Properties) to adjust the HDMI settings from the control panel tabs.
- Click OK to close the control panel (see notes overleaf).
Figure B - 10
HDMI Device
Properties
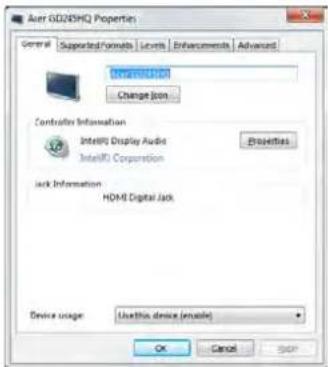
text_image
Azure 6D26HQ Properties General Supported formats Levels Enhancements Advantage Enteriffusion Change Icon Controller Information Intel® Display Audio Intel® Corporation Jack Information HDMI Digital Jack Device usage Use this device (optional) OK Cancel SO
text_image
Ransk Digital Output Properties General Supported Formats Levels Enhancements Advanced Excluded Formats Which of the following formats is your Digital Receiver able to decode? UTS Audio Dolby Digital Microsoft INM4 Pro Audio Sample Format Which of the following sample rates are supported by your Digital Receiver? 44.1 kHz 192.0 kHz 46.0 kHz 96.0 kHz OK Cancel Help
text_image
Radtek Digital Output Properties General | Supported Formats | Levels | Enhancements | Advanced Select the sound effects to apply for your current listening configuration. Changes may not take effect until the next time you start playback. ■ Create all sound effects ■ Immediate mode ■ End-of-peak ■ Voice Cancellation ■ High-Shift ■ Baulizer Sound Effect Properties Provider: Radtek Description: Simulates multiple playback environments. Setting: None OK Cancel Apply
text_image
Realtek Digital Output Properties General | Supported formats | Lattice | Diverspanisms | Advanced Default format select the sample rate and bit depth to be used when running in shared mode. 2 channels, 36 bit, 40000 Hz (USB) Quality 2 channels, 16 bit, 44100 Hz (I/O) Quality 2 channels, 16 bit, 44100 Hz (USB) Quality 2 channels, 16 bit, 60000 Hz (Studio Quality) 2 channels, 16 bit, 90000 Hz (Studio Quality) 2 channels, 24 bit, 44100 Hz (Studio Quality) 2 channels, 24 bit, 40000 Hz (Studio Quality) 2 channels, 24 bit, 60000 Hz (Studio Quality) 2 channels, 24 bit, 90000 Hz (Studio Quality) This device Remove currently OK Cancel Apply
B - 12 HDMI Audio Configuration
Intel Video Driver Controls
HHDMI Notes
- Connect a device with HDMI support to the HDMI-Out port BEFORE attempting to play audio/video sources through the device.
- To play audio sources through your external display's (TV or LCD) speakers you will need to go to the audio configuration control panel on the display and configure the audio input accordingly (see your display device manual).
HDMI Video Configuration
- Connect an HDMI cable from the HDMI-Out port to your external display.
- Configure your external display as per the instructions in "Attaching Other Displays" on page B - 5.
- Set up your external display (TV or LCD) for HDMI input (see your display device manual).
- You can now play video/audio sources through your external display.

Other Applications
If you are using a third party application to play DVDs etc. from any attached DVD device, you will need to consult the application's documentation to see the appropriate audio configuration (the application must support digital to analog translation).
Intel Video Driver Controls

B - 14
Appendix C: Specifications

Latest Specification Information
The specifications listed in this Appendix are correct at the time of going to press. Certain items (particularly processor types/speeds and CD/DVD device types) may be changed, updated or delayed due to the manufacturer's release schedule. Check with your service center for details.

Specifications
Processors For All Models
Note all processor packages are rPGA
Intel® Core i7-2620M (2.7GHz)
4M L3 Cache, 32nm (32 Nanometer), DDR3-1333MHz, TDP 35W
Intel® Core i5-2540M (2.6GHz)
3M L3 Cache, 32nm (32 Nanometer), DDR3-1333MHz, TDP 35W
Intel® Core i5-2520M (2.5GHz)
3M L3 Cache, 32nm (32 Nanometer), DDR3-1333MHz, TDP 35W
Processor For Model A Only
Intel® Core i5-2410M (2.3GHz)
3M L3 Cache, 32nm (32 Nanometer), DDR3-1333MHz, TDP 35W
Intel® Core i3-2330M (2.2GHz)
3M L3 Cache, 32nm (32 Nanometer), DDR3-1333MHz, TDP 35W
Intel® Core i3-2310M (2.1GHz)
3M L3 Cache, 32nm (32 Nanometer), DDR3-1333MHz, TDP 35W
Processor For Model A Only
Intel® Pentium® B950 (2.10GHz)
2M L3 Cache, 32nm (32 Nanometer), DDR3-1333MHz, TDP 35W
Intel® Pentium® B940 (2.00GHz)
2M L3 Cache, 32nm (32 Nanometer), DDR3-1333MHz, TDP 35W
Core Logic
Model A:
Intel® HM65 Chipset
Model B:
Intel® QM57 Chipset
Display
15.6" (39.62 cm) HD (1366 * 768) / HD+ (1600 * 900) 16:9 TFT LCD
Memory
Dual Channel DDRIII (DDR3)
Two 204 Pin SO-DIMM Sockets
Supporting DDRIII (DDR3) 1333MHz (the operational frequency is dependent on processor FSB)
Memory Expandable up to 8GB
(1GB / 2GB / 4GB DDRIII (DDR3)
Modules Supported)
Video Adapter
Intel® Integrated GPU
Intel® HD Graphics 3000 Video:
Dynamic Frequency
Intel Dynamic Video Memory Technology with Shared Memory Architecture of up to 1748MB
Microsoft DirectX10® Compatible

C - 2 Specifications
Specifications
BIOS
AMIBIOS
Model A:
One 32Mb SPI Flash ROMs
Model B:
Two 32Mb SPI Flash ROMs
Storage
One Changeable 12.7mm(h) Optical Device (CD/DVD) Type Drive (Super Multi)
Easy Changeable 2.5" 9.5 mm (h) SATA (Serial) HDD
Audio
High Definition Audio Interface Built-In Microphone Two Built-In Speakers
Keyboard & Pointing Device
Isolated Full Size WinKey Keyboard with Independent Numeric Keys Built-in TouchPad (integrated scrolling key functionality) with Multi Gesture Function Three Instant Keys (WWW, E-Mail, Silent Mode)
Card Reader
Embedded Multi-in-1 Card Reader (Supporting Push-Push Function)
- MMC/ RS MMC - SD/ Mini SD / SDHC/ SDXC - MS/ MS Pro/ MS Duo
Note: Some of these cards require PC adapters that are usually supplied with the cards.
Interface
One Powered USB 2.0 Port
One eSATA / USB 2.0 Combo Port
Two USB 3.0 Ports
One External Monitor Port
One HDMI 1.4a Out Port
One Headphone-Out Jack
One Microphone-In Jack
One S/PDIF-Out Jack
One RJ-45 LAN Jack
One DC-In Jack
One Docking Port
Slots
One ExpressCard/34/54 Slot
Two Mini-Card Slots (USB/PCIe):
Slot 1 for WLAN Module with Half Mini-Card Slot and PCIe & USB Interface
Slot 2 for 3.75G Mini-Card Slot with USB Interface (Factory Option)
Specifications
| Communication | Power Management | Security |
| 10/100/1000 MB Base-TX Ethernet LANIntel® Centrino® Advanced-N 6230 (2*2802.11 a/g/n) Half Mini-Card PCIe WLAN & Bluetooth 3.0 Combo Module (Factory Option)1.3M or 2.0M Pixel USB PC Camera Module (Factory Option)UMTS/HSPDA-based 3.75G Module with USB Mini-Card Interface (Factory Option)Quad-band GSM/GPRS (850 MHz, 900 MHz, 1800 MHz, 1900 MHz)UMTS WCDMA FDD (2100 MHz)Note that UMTS modes CAN NOT be used in North America.For Model A Only:Combo WLAN (802.11b/g/n) andBluetooth v3.0+HS Half Mini-Card Module with PCIe Interface (Factory Option)Intel® Centrino® Wireless-N 1030 (1*2802.11 b/g/n) Half Mini-Card PCIe WLAN & Bluetooth 3.0 Combo Module (Factory Option) | Supports Wake on LANSupports Wake on USBPowerFull Range AC/DC AdapterAC input 100 - 240V, 50 - 60HzDC Output 19V, 3.42A (65 Watts)6 Cell Smart Lithium-Ion Battery Pack, 48.84WHIndicatorsLED Indicators - Power/Suspend,Battery, HDD/ODD, Bluetooth/Wireless LAN, Num Lock, Caps Lock, Scroll Lock | Security (Kensington® Type) Lock SlotBIOS PasswordFingerprint Reader Module with Trusted Platform Module SupportFor Model B Only:Intel® vPro SupportOperating SystemWindows® 7 with Service Pack 1Environmental SpecTemperatureOperating: °C - 35°C Non-Operating: -20°C - 60°CRelative HumidityOperating: 20% -Non-Operating: 10% - 90%Dimensions & Weight374mm (w) * 256mm (d) * 37.9mm (h)2.5 kg With 6 Cell Battery & ODD |

C - 4 Specifications
80%