
Santo 80408 KGL8 - Refrigerator AEG-ELECTROLUX - Free user manual and instructions
Find the device manual for free Santo 80408 KGL8 AEG-ELECTROLUX in PDF.


| Product Type | Fridge-freezer |
| Brand | AEG-Electrolux |
| Model | Santo 80408 KGL8 |
| Power Supply | AC 230-240 V, 50 Hz, 10 A fuse |
| Fridge Temperature Range | +3°C to +8°C (Holiday +14°C) |
| Freezer Temperature Range | -15°C to -24°C |
| Fridge Defrost | Automatic (frost-free) |
| Freezer Defrost | Manual (scraper provided) |
| Refrigerant | Isobutane (R600a), flammable |
| Control Panel | Electronic with temperature display and mode buttons |
| Cooling Functions | COOLMATIC, FROSTMATIC, SHOPPING, HOLIDAY |
| Interior Lighting | Replaceable bulb (220-240 V) |
| Door Handles | Included, adjustable |
| Interior Accessories | Adjustable shelves, door racks, humidity-controlled drawer, bottle rack |
| Ice Pack | 2 ice packs included |
| Freezer Calendar | Storage time symbols on drawers |
| Rear Spacers | Included for ventilation |
| Installation Clearances | 3 cm from electric cooker, 30 cm from oil/coal, 5 cm from other fridge |
| Safety Compliance | EU Low Voltage and EMC directives |
| Customer Service | Contact dealer or AEG-Electrolux service |
Frequently Asked Questions - Santo 80408 KGL8 AEG-ELECTROLUX
User questions about Santo 80408 KGL8 AEG-ELECTROLUX
0 question about this device. Answer the ones you know or ask your own.
Ask a new question about this device
Download the instructions for your Refrigerator in PDF format for free! Find your manual Santo 80408 KGL8 - AEG-ELECTROLUX and take your electronic device back in hand. On this page are published all the documents necessary for the use of your device. Santo 80408 KGL8 by AEG-ELECTROLUX.
USER MANUAL Santo 80408 KGL8 AEG-ELECTROLUX
Muur-afstandhouders
natural_image
Illustration of a hand using a tool to install or install a wall-mounted panel, with no visible text or symbols.Deurgrepen monteren
A Toets AAN/UIT
natural_image
Line drawing of a hand using a tool to lift or install a shelf panel (no text or symbols)natural_image
Line drawing of a mechanical component with coiled springs and a handle, no text or symbols present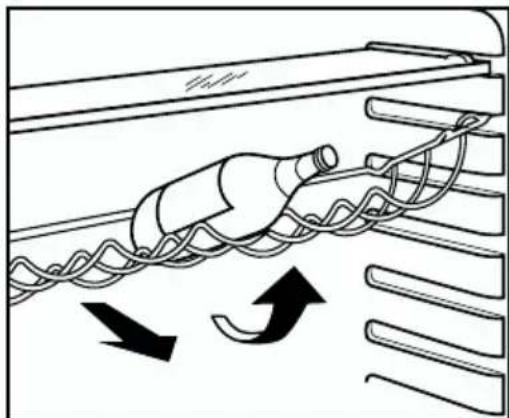
natural_image
Diagram of a mechanical device with rotating components and directional arrows indicating motion (no text or symbols)natural_image
Technical line drawing of a mechanical device with internal components and a curved arrow indicating motion (no text or symbols)natural_image
Technical diagram of a mechanical assembly with a central component and two parallel plates (no text or symbols)natural_image
Illustration of a hand holding scissors inside a circular component, with arrows indicating rotation (no text or symbols)
Tips om energie te besparen
natural_image
Technical line drawing of a mechanical component with an inset showing a close-up view of a component (no text or symbols present)Before placing your new refrigerator/freezer into operation please read these operating instructions carefully. They contain important information for safe use, for installation and for care of the appliance.
Please keep these operating instructions for future reference. Pass them on to possible new owners of the appliance.
Notes which are important for your safety or for the proper functioning of the appliance are stressed with a warning triangle and/or with signal words (Warning!, Caution!, Attention!). Please observe the following carefully.

Supplementary information regarding operation and practical applications of the appliance appear after this symbol.

Tips and notes concerning economical and environmentally sound use of the appliance are marked with the flower.
The operating instructions contain instructions for the correction of possible malfunctions by the user in the section "What to do if ...". If these instructions should not be sufficient, our customer service department is always available to you.
Contents
Safety 35
Disposal ....36
Appliance Packaging Information 36
Disposal of old Appliances 37
Remove transport safeguard ....37
Installation....38
Installation Location ....38
Your appliance needs air ....39
Rear spacer....39
Fitting the Door Handles ....39
Electrical connection .....40
Prior to Initial Start-up ....40
Control panel 41
Temperature adjustment ....45
Switching the Appliance Off ....48
Interior Accessories ....51
Storage shelves ....51
Door rack ....51
Humidity control ....51
Drawer 52
Bottle rack ....52
Fresh food refrigeration ....53
Freezing and storing frozen food ....54
Preparation of Ice Cubes .....55
Freezing calender....55
Ice pack ....55
Defrosting ....56
Cleaning and Care ....57
Energy Saving Tips ....58
What to do if ....59
Correcting Malfunctions 59
Changing the light bulb 60
Customer Service 61
Regulations, Standards, Guidelines .....61
⚠️ Safety
The safety aspects of our refrigerators/freezers comply with accepted technical standards and the German Appliance Safety Law. Nevertheless, we consider it our obligation to make you aware of the following safety information:
Intended use
- The refrigerator is intended for use in the home. It is suitable for the cooling, freezing and storing of frozen food, as well as for making ice. If the appliance is used for purposes other than those intended or used incorrectly, no liability can be accepted by the manufacturer for any damage that may be caused.
• Alterations or changes to the freezer are not permitted for reasons of safety. - If you use the refrigerator in a commercial application or forpurposes other than the cooling, freezing or frozen storage of foods, please observe all valid legal regulations for your application.
Prior to initial start-up
- Check the refrigerator for transport damage. Under no circumstance should a damaged appliance be plugged in! In the event of damage, please contact the vendor.
Refrigerant
The refrigerant isobutane (R600a) is contained within the refrigerant circuit of the appliance, a natural gas with a high level of environmental compatibility, which is nevertheless flammable.
- During transportation and installation of the appliance, be certain that none of the components of the refrigerant circuit become damaged.
- If the refrigerant circuit should become damaged:
- avoid open flames and sources of ignition;
– thoroughly ventilate the room in which the appliance is situated.
Safety of children
- Packaging (e.g. wraps, polystyrene) can be dangerous for children. There is a risk of suffocation! Keep packaging material away from children!
- Please make old appliances unusable prior to disposal. Pull out the mains plug, cut off the mains cable, break or remove spring or boltcatches, if fitted. By doing this you ensure that children cannot lock themselves in the fridge when playing (there is risk of suffocation!)or get themselves into other dangerous situations.
- This appliance is not intended for use by persons (including children) with reduced physical, sensory or mental capabilities, or lack of experience and knowledge, unless they have been given supervision or instruction con-
cerning use of the appliance by a person responsible for their safety.
Children should be supervised to ensure that they do not play with the appliance. !
Daily Operation
- Containers with flammable gases or liquids can leak at low temperatures. There is a risk of an explosion! Do not store any containers with flammable materials such as, for example, spray cans, fire extinguisher refill cartridges etc in the refrigerator/freezer.
- Bottles and cans must not be placed in the freezer compartment. They can burst when the contents freeze, high carbonate content drinks can even explode! Never store lemonade, juices, beer, wine, sparkling wine etc. in the freezer compartment. Exception: high alcohol content spirits can be stored in the freezer compartment.
- Do not put ice creams or ice cubes in the mouth immediately after removal from the freezer compartment. Very cold ice can freeze to the lips or tongue and cause injury.
- Do not touch frozen food with wet hands. Your hands could freeze to the food.
- Do not operate any electrical appliances in the refrigerator/freezer (e.g. electric ice cream makers, mixers etc.).
- Before cleaning the appliance, always switch off the appliance and unplug it, or pull the house fuse or switch off the circuit breaker.
- When unplugging always pull the plug from the mains socket, do not pull on the cable.
In case of malfunction
- If the a malfunction occurs on the appliance, please look first in the "What to do if ..." section of these instructions. If the information given there does not help, please do not perform any further repairs yourself.
- Refrigerators/freezers may only be repaired by qualified service engineers. Improper repairs can give rise to significant hazards. If your appliance needs repairing, please contact your specialist dealer or our Customer Service.
Disposal
Appliance Packaging Information
All materials are environmentally sound! They can be dumped or burned at an incinerating plant without danger!
About the materials: The plastics can be recycled and are identified as follows:
PE< for polyethylene, e.g. the outer covering and the bags in the interior.
PS< for polystyrene foam, e.g. the pads, which are all free of chlorofluorocarbon.
The carton parts are made from recycled paper and should be disposed of at a waste-paper recycling collection location.
Disposal of old Appliances
For environmental reasons, refrigeration appliances must be disposed of properly. This applies to your old appliance, and - at the end of its service life - for your new appliance as well.
Warning! Before disposing of old appliances make them inoperable. Remove plug from mains, sever the power cable, remove or destroy any snap or latch closures. This eliminates the danger that playing children lock themselves into the appliance (danger of suffocation!) or place themselves into other life-endangering situations.
Disposal:
- The appliance may not be disposed of with domestic waste or bulky refuse.
- The refrigerant circuit, especially the heat exchanger at the back of the appliance, may not be damaged.
- The symbol on the product or on its packaging indicates that this product may not be treated as household waste. Instead it shall be handed over to the applicable collection point for the recycling of electrical and electronic equipment. By ensuring this product is disposed of correctly, you will help prevent potential negative consequences for the environment and human health, which could otherwise be caused by inappropriate waste handling of this product. For more detailed information about recycling of this product, please contact your local city office, your household waste disposal service or the shop where you purchased the product.
Remove transport safeguard
The appliance and the interior fittings are protected for transport.
- Remove all adhesive tape and packing pieces from the interior of the appliance.
Installation
Installation Location
The appliance should be set up in a well ventilated, dry room.
Energy use is affected by the ambient temperature. The appliance should therefore
- not be exposed to direct sunlight;
- not be installed next to radiators, cookers or other sources of heat;
- only be installed at a location whose ambient temperature corresponds to the climate classification, for which the appliance is designed.
The climate classification can be found on the serial plate, which is located at the left on the inside of the appliance.
The following table shows which ambient temperature is correct for each climate classification: each climate classification:
If installation next to a source of heat is unavoidable, the following minimum clearances must be maintained at the sides of the appliance:
- for electric cookers 3 cm;
- for oil and coal fired ranges 30 cm.
If these clearances cannot be maintained a heat insulating pad is required between the cooker and the refrigeration appliance.
If the refrigeration appliance is installed next to another refrigerator or freezer a clearance of 5 cm at the sides is required, in order to prevent the formation of condensation on the outside of the appliance.
Your appliance needs air
For safety reasons, minimum ventilation must be as shown Fig.
Attention: keep ventilation openings clear of obstruction;

Rear spacers
Fit the rear spacers contained inside the appliance to ensure even dissipation of heat generated during operation.
Proceed in the sequence illustrated by the figures.
natural_image
Diagram showing a hand adjusting a door lock mechanism with a magnified inset (no text or symbols)Fitting the Door Handles
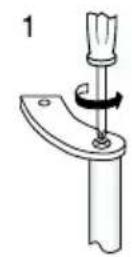
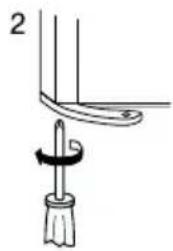
- Screw the top handle bracket to the handle rod (1). Fit the bottom handle bracket on the lower left-hand side of the door (2).
- Fit the top handle bracket on the top left-hand side of the door (3) and screw the handle rod to the bottom handle bracket (4).
Attention!
Do not overtighten the screws (max. 2 Nm) as you may damage the door handles.
natural_image
Simple line drawing of a tool with a handle and base, no text or symbols present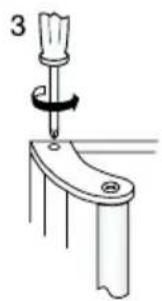
natural_image
Diagram of a screwdriver inserted into a mechanical component (no text or symbols)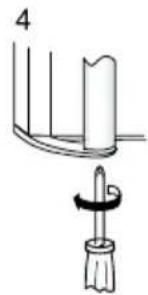
natural_image
Technical illustration of a mechanical component with a curved base and a separate view showing a lever mechanism (no text or symbols)Electrical connection
Before initial start-up, refer to the appliance rating plate to ascertain if supply voltage and current values correspond with those of the mains at the installation location.
e.g.: AC 230 ... 240 V 50 Hz or
230 ... 240 V\~ 50 Hz
(i.e. 230 to 240 volts alternating current, 50 Hertz)
The rating plate is inside the appliance on the left.
A correctly installed, earthed socket is required for the electrical supply. The supply must have a fuse rating of at least 10 Amps.
If the socket is not accessible once the appliance is built in, the electrical installation must include suitable means of isolating the appliance from the mains (e.g. fuse, cut-out, current trip or similar with a minimum contact separation of 3 mm).
Attention: The mains connection cable may only be replaced by a skilled electrician. Please contact your dealer or our customer service department for repairs.
Prior to Initial Start-Up
- Please clean the appliance interior and all accessories prior to initial start-up (see section: "Cleaning and Care").
Control panel

A ON/OFF button
B Fridge section indicator
C Temperature indicator for fridge section
D Buttons for setting temperature for fridge section
E Thermometer indicator for fridge section (with COOLMATIC)
F MODE button for setting the operating mode
G Text display
H RESET button
I Freezer section indicator
L Temperature indicator for freezer section
M Buttons for setting temperature for freezer section
N Thermometer indicator for freezer section (with FROSTMATIC)
Temperature setting buttons
The temperature is adjusted using the „+“ (WARMER) and „-“ (COLDER) buttons.
These buttons are connected to the temperature display.
- The temperature display is switched over from the display of the ACTUAL temperature (Temperature display is illuminated) to the display of the DESI-RED temperature (Temperature display flashes) by pressing one of the two buttons, „+“ (WARMER) or „-“ (COLDER).
• Each time one of the two buttons is pressed again the DESIRED temperature is adjusted by 1 °C.
- If neither button is pressed, the temperature display automatically switches back after a short period (approx. 4 sec.) to the display of the ACTUAL
temperature.
DESIRED temperature means:
The temperature that has been selected for inside the fridge or the freezer compartment. The DESIRED temperature is indicated by flashing numbers.
ACTUAL temperature means:
The temperature display indicates the current temperature inside the fridge or the freezer compartment. The ACTUAL temperature is indicated with illuminated numbers.
Temperature Displays
The temperature displays shows several types of information.
- In normal operation the average temperature in the fridge section is displayed (ACTUAL temperature). The variations in temperature in the whole fridge section are small.
- In the freezer section the warmest temperature is displayed (ACTUAL temperature). When fully filled, the warmest zone is normally located at the top in the front area of the freezer section. Depending upon how the section is filled, the temperatures are lower in other areas of the freezer section.
- When the temperature is being adjusted a flashing display indicates the fridge or the freezer compartment temperature currently set (DESIRED temperature).
Tip: When changing the temperature setting wait about 24 hours until the temperature display has stabilised.
- When there is a temperature warning for the freezer compartment, if the RESET button is activated, the temperature display will show for 5 seconds the warmest temperature the frozen food has reached.
- If there is a fault in the appliance the temperature display shows:
- a square or a letter in the temperature display of the fridge for a fault in the fridge,
- a square or a letter in the temperature display of the freezer for a fault in the freezer.
MODE button
Different operating modes can be set using the MODE button.
The following operating modes can be selected:
- SHOPPING: Fridge temperature value 3^ for 6 hours, cooling for freezer section runs for 1 hour in continuous operation.
- FROSTMATIC: Cooling for the freezer section runs for 52 hours in continuous operation.
- COOLMATIC: Fridge temperature value 3 °C for 6 hours.
- FROSTMATIC and COOLMATIC:
Cooling for freezer section runs for 52 hours in continuous operation, fridge temperature value 3 °C for 6 hours.
- HOLIDAY: Fridge temperature value 14 °C.
- : Normal operation according to the required temperatures set.
- Press MODE button once. In the display the operating mode SHOPPING will flash.
- After approx. 4 seconds the display stops flashing, the operating mode SHOPPING is set.
- If another operating mode is to be set, before 4 seconds have elapsed, press the MODE button repeatedly until the desired mode is shown in the display. After approx. 4 seconds have elapsed, the display stops flashing, the operating mode is set. If the MODE button is pressed again, the next operating mode appears in the display.
To return to normal operation, press the MODE button repeatedly until no words appear in the display ("").
Text display
The names of the various operating modes that can be set with the MODE button and the words indicating an alarm, power cut or electrical fault appear in the text display.
- Operating modes: SHOPPING, FROSTMATIC, COOLMATIC, FROSTMATIC and COOLMATIC, HOLIDAY, empty field when operating normally.
- Alarm: TEMPERATURE when there is a temperature warning
• After power cut: POWER displayed
• Electrical fault: SERVICE displayed
RESET button
With the RESET button, the acoustic warning signal can be switched off, e.g. the "Open Door" warning when sorting in or out, the food to be chilled or frozen.
When there is a temperature warning for the freezer compartment, if the RESET button is activated, the temperature display will show for 5 seconds the warmest temperature the frozen food has reached.
Prior to Initial Start-Up
Before connecting the appliance to the mains and putting it into operation for the first time, leave the appliance to stand for 30 minutes if was transported upright. After transport on its side, the appliance must be left to stand for 2 hours before putting it into operation. This is necessary to allow the oil to flow back into the compressor. Otherwise the compressor may be damaged.
- Please clean the appliance interior and all accessories prior to initial start-up (see section: "Maintenance and Cleaning").
- The appliance must be correctly installed in accordance with the chapter "Installation" before it is put into operation for the first time. Care should be especially taken that the mains voltage and frequency available correspond with the appliance's rating plate.
- Remove the cold accumulation block from the appliance.
- Place the cold accumulation block into a drawer only after the optimal storage temperature of -18 ^ has been reached, and allow to freeze.
- After 24 hours place the cold accumulation block at the front of the upper drawer.
- Re-freeze the thawed cold accumulation block in the same fashion, e.g. after cleaning the appliance.
Initial Start-Up
- Insert plug into mains socket.
- Press and hold down the ON/OFF button. The temperature indicator and the back lighting light up, the appliance starts up. An alarm sounds, TEMPERATURE appears in the display and the back lighting flashes in red.
- Switch off alarm and red back lighting using RESET button. The TEMPERATURE indicator goes out, if the temperature in the appliance has gone below the warning temperature.
3 Temperature settings set in the factory: +5 °C for the fridge section, -18 °C for the freezer section. -
Set the refrigerator to the desired temperature (see section: "Temperature Adjustment").
Goods to be refrigerated can be loaded shortly after switching on, because the storage temperature in the refrigerator is quickly reached. -
Set the freezer temperature to -18^ or colder (see section: "Temperature Adjustment").
Do not load freezer with goods until a temperature of -18^ has been reached, or until the red warning indicator light has gone out..
Temperature Adjustment
With the individual temperature setting buttons the desired temperatures in the refrigerator and in the freezer compartment can be adjusted independently of one another.
- Press either the „+“ (WARMER) or „-“ (COLDER) button for the refrigerator or freezer compartment.
The temperature display switches over and the DESIRED temperature currently set flashes on the temperature display.
- To adjust to a warmer temperature, press the „+“ (WARMER) button. To adjust to a colder temperature, press the „-“ (COLDER) button. The changed setting is immediately displayed on the temperature display.
Each time the button is pressed the temperature is adjusted by 1^ C.
Adjustable temperature range for the freezer compartment:
-15 °C to -24 °C.
Adjustable temperature range for the refrigerator compartment:
+3 °C to +8 °C, (HOLIDAY: +14 °C)
Note: +5 °C for the refrigerator compartment and -18 °C for the freezer compartment should be considered cold enough as a storage temperature.
- When the buttons are not further pressed after an adjustment has been made, after a short period (approx. 5 sec.) the temperature display switches over and again displays the ACTUAL temperature in the refrigerator compartment. The display changes from flashing to illuminated numbers.
When the setting is changed, the compressor does not start immediately if automatic defrosting is currently taking place.
The display lighting switches itself on when any button is touched. If no button is pressed, the display lighting switches itself off after approx. 1 minute.
Important! Please check regularly on the warning display and on the temperature display that the storage temperature is being maintained.
Tip:
The appliance setting cannot be changed when the mains plug is pulled out or there is no power supply.
When reconnected to the mains supply, the appliance takes on the state it had at the time of the interruption to the power supply.
Operating modes
Using the MODE button different operating modes can be selected. The operating modes are automatically switched off after a corresponding period, but can also be manualled ended each time. To do this, press the MODE button repeatedly until there are no longer any words appearing in the display. After the operating modes have been completed, the appliance continues to run with the previously set desired temperatures.
As long as the figures in the temperature display are still flashing after the desired temperature has been set, no operating mode can be set with the MODE button.
SHOPPING
The SHOPPING function is suitable for quickly cooling larger quantities of refrigerated foods in the fridge section, as well as for smaller amounts of frozen foods in the freezer section, e. g. after a big shop.
This automatically sets a desired temperature of +3 °C for the fridge section for 6 hours. Cooling for the freezer section runs for 1 hour in continuous operation.
- Press the MODE button repeatedly until SHOPPING is flashing in the display.
After approx. 4 seconds the operating mode SHOPPING is activated, the SHOPPING indicator lights up. Both thermometer indicators in the display show a falling temperature column.
The SHOPPING function is automatically switched off after 6 hours.
The SHOPPING indicator will go out.
The display lighting switches itself on when any button is touched. If no button is pressed, the display lighting switches itself off after approx. 1 minute.
FROSTMATIC
The FROSTMATIC function provides for quick freezing of fresh food products, and at the same time protects previously stored goods against undesired warming in the freezer compartment.
The cooling of the freezer section runs for about 52 hours in continuous operation.
- Press the MODE button repeatedly until FROSTMATIC is flashing in the display.
After approx. 4 seconds the operating mode FROSTMATIC is activated, the FROSTMATIC indicator lights up. The thermometer indicator in the display for the freezer section shows a falling temperature column.
The operating mode FROSTMATIC is automatically switched off depending on how the appliance is filled at the latest after approx. 52 hours. The FRO-STMATIC indicator will go out.
COOLMATIC
The COOLMATIC operating mode is suitable for quickly cooling larger quantities of refrigerated foods in the fridge section, e. g. drinks, salads for a party or wedding.
- Press the MODE button repeatedly until COOLMATIC is flashing in the display.
After approx. 4 seconds the operating mode COOLMATIC is activated, the COOLMATIC indicator lights up. The thermometer indicator in the display for the fridge section shows a falling temperature column.
The COOLMATIC function now provides for intensive cooling. A DESIRED temperature of +3 °C is automatically selected. The COOLMATIC function is ended automatically after a period of 6 hours. The originally selected DESI-RED temperature is again valid. The temperature display shows the ACTUAL refrigerator temperature.
FROSTMATIC and COOLMATIC
When the FROSTMATIC and COOLMATIC functions are combined, a desired temperature of +3^ is automatically set for the fridge section for 6 hours. Cooling for the freezer section runs for 52 hours in continuous operation.
- Press the MODE button repeatedly until FROSTMATIC and COOLMATIC are flashing in the display at the same time.
After approx. 4 seconds the operating mode FROSTMATIC and COOLMATIC is activated, the FROSTMATIC und COOLMATIC indicators light up. Both thermometer indicators in the display show a falling temperature column.
The function FROSTMATIC and COOLMATIC is automatically switched off: COOLMATIC after 6 hours, FROSTMATIC after 52 hours at the latest.
The indicators go out accordingly.
HOLIDAY
In the operating mode HOLIDAY (holiday setting) the desired temperature value for the fridge section is +14 °C. In the holiday mode it is therefore possible to leave the door of the empty refrigerator closed during periods of extended absence. Advantage: Unintentional closing of the door, or accidental closing of the door by persons who have access to your home during your absence, is no longer possible. Without the holiday mode leaving the door closed would lead to the accumulation of odours and mould.
After emptying and cleaning the appliance, proceed as follows:
- To switch on the holiday setting, press the MODE button repeatedly until HOLIDAY is flashing in the display.
After approx. 4 seconds the operating mode HOLIDAY is activated, HOLIDAY lights up.
Important! Do not store any goods in the refrigerator when the holiday mode is in operation. The temperature is regulated at about +14 °C when the holiday mode is in operation. This is too warm for food products.
If, while you are away, the room temperature could fall below 15 °C for a long period, the fridge should not be operated in the operating mode HOLIDAY, but switched off and the door opened.
To return to normal operation, press the MODE button repeatedly until there are no longer any words appearing in the display.
Switching the Appliance Off
Refrigerator and freezer compartments can be switched off independently of one another.
- To switch the entire appliance off, press and hold down the ON/OFF button. In both temperature displays there is a countdown from "3" to "1". After "1" is reached, OF is displayed briefly, then the fridge section and the freezer section are switched off. The temperature displays go out.
Before the countdown has been completed, the switch-off procedure can be cancelled by releasing the ON/OFF button.
Switching off fridge section when freezer section is switched on:
Press and hold the "+" and "-" buttons for the fridge section at the same time. There is a "countdown" from "3" to "1", then "OF" appears in the temperature display. The fridge section switches itself off.
To switch the fridge section on again, press "+" or "-" button.
Switching off fridge section when freezer section is switched off:
- Press and hold the "+" and "-" buttons for the fridge section at the same time. There is a "countdown" from "3" to "1", then "OF" appears in the temperature display. The fridge section or the whole appliance switches itself off.
Before the countdown has been completed, the switch-off procedure can be cancelled by releasing the "+" and "-" buttons.
When the fridge section is switched off, the only operating mode that can be activated while the freezer section is operating is FROSTMATIC.
Switching off freezer section when fridge switched on:
- Press and hold down the "+" and the "-" buttons for the freezer section at the same time. In the temperature display for the freezer section there is a countdown from "3" to "1". Then "OF" appears in the temperature display. The freezer section switches itself off.
To switch the freezer section on again, press "+" or "-" button.
Switching off freezer section when fridge switched off:
- Press and hold down the "+"and the "-" buttons for the freezer section at the same time. There is a countdown from "3" to "1", then "OF" appears in the temperature display. The freezer section or the whole appliance switches itself off.
Note: The appliance cannot be switched on or off if unplugged, or if there is no power being supplied to it. Following connection to the mains power supply, the appliance returns to the same operating state as before the interruption of main power.
If the appliance is not to be used for an extended period:
-
Switch appliance off by pressing and holding the ON/OFF button (see above).
-
Remove the mains plug or switch off.
-
Defrost freezer compartment and clean thoroughly (see section: "Maintenance and Cleaning").
-
Leave the doors open after defrosting to avoid accumulation of odours.
Control and Information Systems
The control and information systems consist of a temperature display, an optical warning indicator light and an acoustic warning.
The system warns:
- when there is a power cut;
- when the appliance doors are open
- when the temperature in the refrigerator or freezer compartment is too high;
- if there are functional disturbances at the appliance.
Power cut warning
After an interruption to the power supply, POWER is displayed in the display and the current Actual temperature is displayed again. The appliance continues to run with the previously selected settings. The POWER indicator goes out, as soon as any button is pressed.
Temperature warning
For the fridge section:
An alarm sounds and the TEMPERATURE indicator and a red back light flash, as soon as the temperature in the fridge section rises above 12 °C.
In addition the temperature display for the fridge section flashes. If the temperature in the fridge section falls below 12 °C, the alarm automatically switches itself off. The TEMPERATURE indicator and the red back lighting continue to flash.
- You can turn off the alarm and warning light using the RESET button.
For 5 seconds the temperature display for the fridge section shows the warmest temperature that was reached in the fridge section during the temperature warning. After that the temperature display stops flashing and switches back to the current temperature in the fridge section. The TEMPERATURE indicator continue to flash as long as there is a temperature warning.
For the freezer section:
An alarm sounds and the TEMPERATURE indicator and red back light flash, as soon as the temperature in the freezer section rises above -11 ^ . In addition the temperature display for the freezer section flashes.
If the temperature in the freezer section falls back below -11 °C, the alarm automatically switches itself off. The TEMPERATURE indicator and the red back lighting continue to flash.
- You can turn off the alarm and the red back lighting using the RESET button.
For 5 seconds the temperature display for the freezer section shows the warmest temperature that was reached in the freezer section during the temperature warning. After that the temperature display stops flashing and switches back to the current temperature in the freezer section. The TEMPERATURE indicator continues to flash, as long as there is a temperature warning.
If there is an interruption to the power supply during an alarm, when the appliance is reconnected to the supply, it starts with an acoustic and visual alarm.
If the possibility of partial or complete thawing exists, you should check the quality of the foods.
A rise in temperature may be caused by:
- frequent door opening for long periods of time;
- loading with large quantities of warm foods;
- high ambient temperature;
- an error with the appliance.
Function Errors
If the appliance's electronics recognise a technical problem that has to be remedied by the Customer Service Department, an alarm sounds and the SERVICE indicator appears back lit with a flashing red light.
The temperature display indicates:
- a square or a letter in the temperature display of the fridge for a fault in the fridge,
-
a square or a letter in the temperature display of the freezer for a fault in the freezer.
-
Using the RESET button you can switch off the alarm and the flashing red light. The SERVICE indicator continues to be lit as long as there is an electrical malfunction.
Interior Accessories
Storage shelves
- You should always slide one of the full size glass storage shelf into the lowest set of guides, above the fruit and the vegetable containers, and
keep it in this position.
- The height of the storage shelves can be adjusted:
- To do this pull the storage shelf forward until it can be swivelle-dupwards or downwards and removed.
- Please do the same in reverse to insert the shelf at a different height.
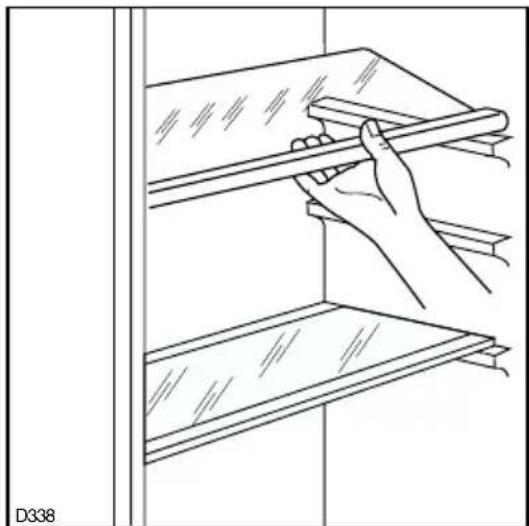
Adjusting the upper door rack
natural_image
Line drawing of a hand holding a metal rod above a shelf, no text or symbols present- Depending on the food stored, the upper door racks can be changed to other holders or removed. Take out the refrigerators food, press the door racks digonally upwards at their edges, reposition them, and press them back into place.
Humidity control
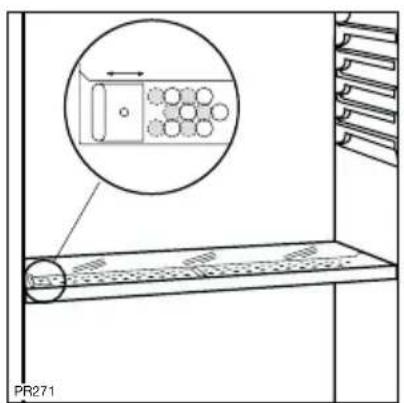
The glass shelf incorporates a device with slits (adjustable by means of a sliding lever), which makes it possible to regulate the temperature in the vegetable drawer(s). Close the slots to obtain a warmer temperature and greater humidity. Open the slots to obtain a cooler temperature and less humidity.
Drawer
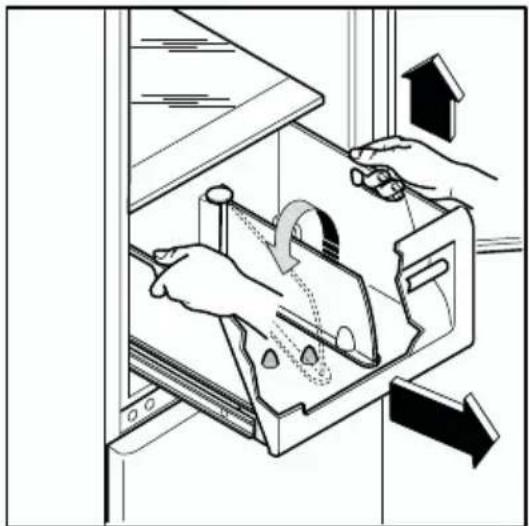
The drawer is suitable for storing fruit and vegetables. There is a separator inside the drawer that can be placed in different positions to allow for the subdivision best suited to personal needs.
There is a grille on the bottom of the drawer to separate the fruit and vegetables from any humidity that may form on the bottom surface.
natural_image
Illustration of hands operating a mechanical device with arrows indicating motion (no text or symbols)To remove the drawer, use the side handles (as shown in the drawing). All parts inside the drawer can be removed for cleaning purposes.
Bottle rack
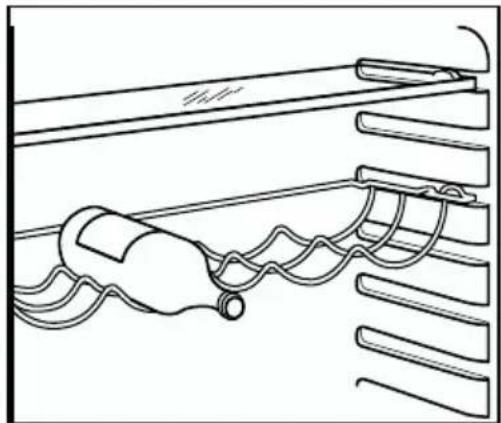
Place bottles in the rack with the bottleneck to the front.
Important: Only store unopened bottles horizontally.
The bottle rack can be tilted for storing opened bottles.
To do this pull the bottle rack forward until it can be tilted upwards, then slide the front support into the next level up.
natural_image
Line drawing of a mechanical or electrical component with coiled wires and a handle, no text or symbols present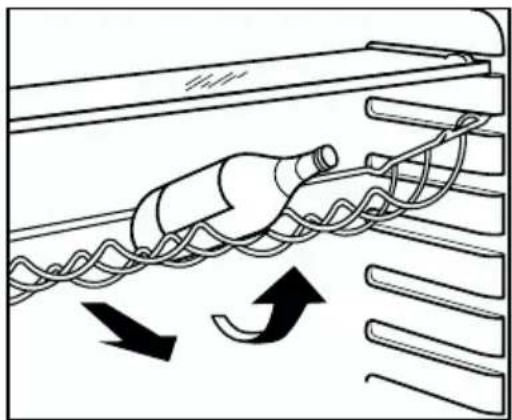
natural_image
Diagram of a mechanical device with rotating components and directional arrows indicating motion (no text or symbols)Fresh food refrigeration
To obtain the best performance:
- do not store warm food or evaporating liquide in the refrigerator
- do cover or wrap the food, particularly if it has a strong flavour.
- Position food so that air can circulate freely round it.
Useful hints:
Meat (all types): wrap in polythene bags and place on the glass shelf above the vegetable drawer(s)For safety, store in this way only one or two days at the most.
Cooked foods, cold dishes, etc: these should be covered and may be placed on any shelf.
Fruit and vegetables: these should be thoroughly cleaned and placed in the special drawer(s) provided.
Butter and cheese: these should be placed in special airtight containers or wapped in aluminium foil or polythene bags to exclude as much air as possible.
Milk bootles: these should have a cap and should be stored in the bottle rack on the door.
Bananas, potatoes, onions and garlic, if not packed, must not be kept in the refrigerator.
Freezing and storing frozen food
You can use your freezer for freezing fresh food yourself.
Important!
- The temperature in the freezer compartment must be -18^ or colder before freezing food.
- Please observe the freezing capacity given on the rating plate. The freezing capacity is the maximum quantity of fresh food that can be frozen within a period of 24 hours. If you wish to freeze food several days in a row, please observe a maximum capacity of only 2/3 to 3/4 of that on the rating plate. The quality of the food is best preserved when it is frozen right through to the core as quickly as possible.
- Allow warm food to cool down before freezing. The warmth will cause increased ice formation and increase the power consumption.
- Please note the maximum storage times specified by the manufacturer.
- Thawed foods which have not been processed further (cooked into meals) may not under any circumstances be frozen a second time.
- Containers with flammable gases or liquids can leak at low temperatures. There is a risk of an explosion! Do not store any containers with flammable materials such as, for example, spray cans, fire extinguisher refill cartridges etc in the refrigerator/freezer.
- Bottles and cans must not be placed in the freezer. They can burst when the contents freeze, high carbonate content drinks can even explode! Never store lemonade, juices, beer, wine, sparkling wine etc. in the freezer. Exception: high alcohol content spirits can be stored in the freezer.
- All foods must be packed air tight prior to freezing, so that they do not dry out or lose their flavour, and so that no flavour contamination of other frozen goods occurs.
Caution! Do not touch frozen food with wet hands. Your hands could freeze to the food.
- To achieve faster freezing of food or to freeze the maximum allowed quantity, depress the ambient switch 12 hours before loading the food without modifying the thermostat setting.
- Place the food to be frozen in the top drawer.
- Not open the door frequently or leave it open longer than absolutely necessary.
Preparation of Ice Cubes
-
Fill the ice cube tray 3/4 full with cold water, place it in the freezer compartment and leave to freeze.
-
To loosen the frozen cubes, either bend the ice cube tray or hold it under running water for a few seconds.
Important! Never try to free an ice tray that is frozen to the freezer compartment using pointed or sharp edged objects. Use the ice scraper supplied.
Freezing Calendar
• The symbols on the drawers show different types of frozen goods.
- The numbers indicate storage times in months for the appropriate types of frozen goods. Whether the upper or lower value of the indicated storage time is valid depends on the quality of the foods and pre-treating before freezing. The lower value applies to foods with high fat content.

Ice pack
There are two ice packs in one drawer of the freezer.
In the event of a power failure or malfunction, the ice packs will lengthen the amount of time it takes for the frozen food to become too warm by several hours. The ice packs can only fulfil this task optimally if it is placed in the uppermost drawer, at the front, above the frozen food. You can use the ice packs for cooling cold bags.
Defrosting
Refrigerator
Frost is automatically eliminated from the evaporator of the refrigerator compartment every time the motor compressor stops, during normal use. The defrost water drains out through a trough into a special container at the back of the appliance, over the motor compressor, where it evaporates.
Freezer
The freezer compartment, however, will become progressively covered with frost. This should be removed with the special plastic scraper provided, whenever the tickness of the frost exceeds 4 mm. During this operation it is not necessary to switch off the power supply or to remove the foodstuffs.
However when the ice becomes very thick on the inner liner, complete defrosting should be carried out as follows:
- Remove the frozen food from the freezer, wrap it in several layers of newspaper and put it in a very cool place.
- Switch off the appliance and pull out the plug, or remove or unscrew the safety fuses.
- Leave the freezer compartment door open.
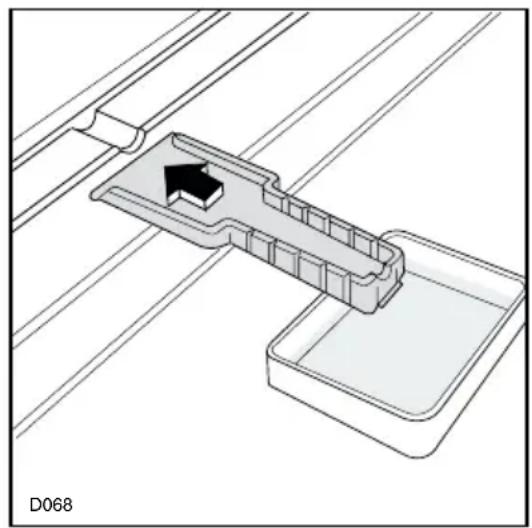
- Insert the plastic scraper into the recess provided under the defrost water channel and place a collecting basin under it.
natural_image
Technical line drawing of a mechanical component with an arrow indicating direction, no text or symbols present-
Once defrosting is completed keep the scraper for future use;
-
Turn the thermostat knob to the required setting or replace the plug in the power socket.

Warning!
Never use metal tools to scrape off the frost
Do not use a mechanical device or any artificial means to speed up the thawing process other than those recommended by the manufacturer.
A temperature rise of the frozen food packs, during defrosting, may shorten their safe storage life.
Cleaning and Care

For hygienic reasons the appliance interior, including interior accessories, should be cleaned regularly.
Warning!
- The appliance may not be connected to the mains during cleaning. Danger of electrical shock! Before cleaning switch the appliance off and remove the plug from the mains, or switch off or turn out the circuit breaker or fuse.
- Never clean the appliance with a steam cleaner. Moisture could accumulate in electrical components, danger of electrical shock! Hot vapours can lead to the damage of plastic parts.
- The appliance must be dry before it is placed back into service.
Attention!
- Ethereal oils and organic solvents can attack plastic parts, e.g.
– lemon juice or the juice from orange peals;
- butyric acid;
- cleansers which contain acetic acid.
Do not allow such substances to come into contact with appliance parts.
- Do not use any abrasive cleansers.
- Remove frozen food and the food from the refrigerator. Wrap frozen food in several layers of newspaper. Store it in a cool place, well covered.
- Defrost the freezer compartment prior to cleaning (see "Defrosting" section).
-
Switch the appliance off and remove the plug from the mains, or switch off or turn out the circuit breaker or fuse.
-
Clean the appliance and the interior accessories with a cloth and lukewarm water. Commercially available dish washing detergents may also be used.
- After cleaning wipe with fresh water and rub dry.

Accumulation of dust at the condenser increases energy consumption. For this reason carefully clean the condenser at the back of the appliance once a year with a soft brush or a vacuum cleaner.
-
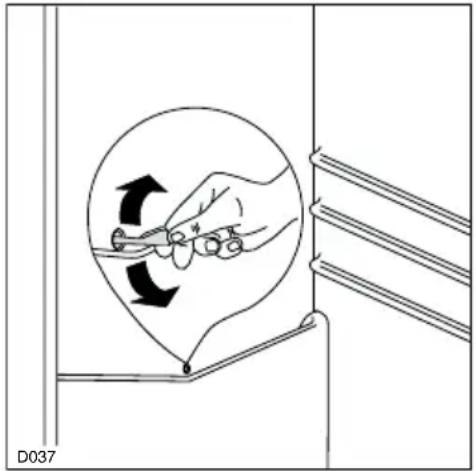
Check the water drain hole on the rear wall of the fridge. Clear a blocked drain hole with the aid of the green peg in the pack of accessories included with the appliance.
-
After everything is dry place appliance back into service.
natural_image
Diagram showing a hand holding a tool inside a circular component, with arrows indicating rotation or movement (no text or symbols)
Energy Saving Tips
- Do not install the appliance near cookers, radiators or other sources of warmth. High ambient temperatures cause longer, more frequent operation of the compressor.
- Ensure sufficient air circulation and exhaust at the appliance base and at the back wall of the appliance. Never cover air vent openings.
- Do not place warm foods into the appliance. Allow warm foods to cool first.
- Only leave door open as long as necessary.
- Do not set temperature any colder than necessary.
- Put frozen food in the fridge to defrost. The cold in the frozen food will then be used to cool the fridge.
- Keep the heat emitting condenser, the metall grille on the rear wall of your appliance, always clean.
What to do if ...
Correcting Malfunctions
A malfunction may be caused by only a minor fault that you can rectify yourself using the following instructions. Do not perform any other work on the appliance if the following information does not provide assistance in your specific case.
Warning! Repairs to refrigerators/freezers may only be performed by qualified service engineers. Improper repairs can give rise to significant hazards for the user. If your appliance needs repairing, please contact your specialist dealer or our Customer Service.
| Malfunction Possible | Cause Remedy | |
| Appliance does not work. | Appliance is not switched on | Switch on the appliance. |
| Mains plug is not plugged in or is loose. | Insert mains plug. | |
| Fuse has blown or is defective. | Check fuse, replace if necessary. | |
| Socket is defective. | Mains malfunctions are to be corrected by an electrician. | |
| Appliance cools too much. Temperature is set too cold. | Turn the temperature regulator to a warmer setting temporarily. | |
| The food is too warm. | Temperature is not properly adjusted. | Please look in the "Initial Start Up" section. |
| Door was open for an extended period. | Open the door only as long as necessary. | |
| A large quantity of warm food was placed in the appliance within the last 24 hours. | Turn the temperature regulator to a colder setting temporarily. | |
| The appliance is near a heat source. | Please look in the "Installation location" section. | |
| Interior lighting does not work. | Light bulb is defective. | Please look in the "Changing the Light Bulb" section. |
| Heavy build up of frost, possibly also on the door seal. | Door seal is not air tight (possibly after changing over the hinges). | Carefully warm the leaking sections of the door seal with a hair dryer (not hotter than approx. 50 °C). At the same time shape the warmed door seal by hand such that it sits correctly. |
| Unusual noises. | Appliance is not level. | Readjust the feet. |
| The appliance is touching the wall or other objects. | Move the appliance slightly. | |
| A component, e.g. a pipe, on the rear of the appliance is touching another part of the appliance or the wall. | If necessary, carefully bend the component out of the way. | |
| The compressor does not start immediately after changing the temperature setting. | This is normal, no error has occurred. | The compressor starts after a period of time. |
| Water on the floor or on storage shelves. | Water drain hole is blocked. | See the "Cleaning and Care" section. |
Changing the light bulb

Warning! There is a risk of electric shocks! Before changing the light bulb, switch off the appliance and unplug it, or pull the fuse or the circuit breaker.
Light bulb data: 220-240 V
-
To switch off the appliance, press the ON/OFF button.
-
Unplug the mains plug.
-
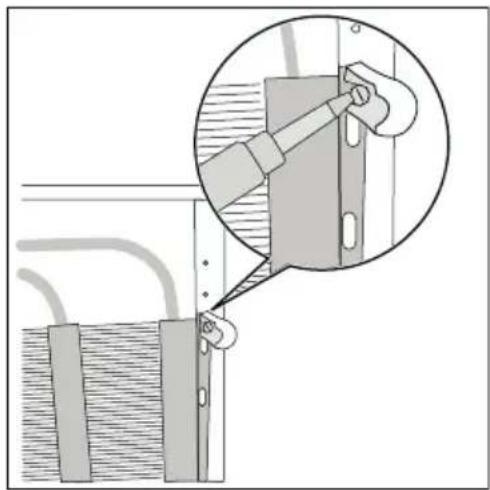
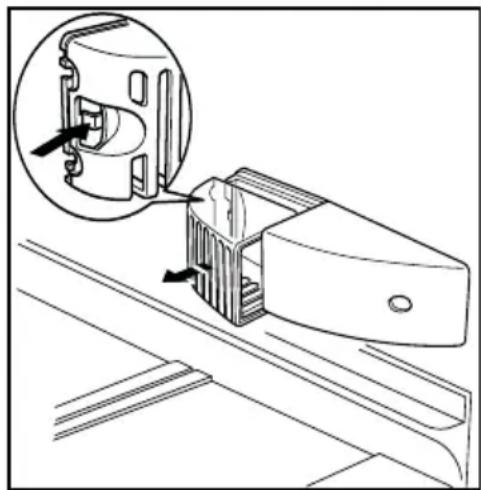
To change the light bulb press on the rear hook and at the same time slide the cover in the direction indicated by the arrow.
-
Change the defective light bulb with one of the some power (the maximum power is shown on the light diffuser).
-
Refit the light bulb cover.
-
Put the refrigerator back into operation.
natural_image
Technical line drawing of a mechanical component with an inset showing a close-up view of a component (no text or symbols present)Customer Service
If you cannot find the remedy for a malfunction in these operating instructions, please contact your dealer or our customer service department. Addresses and telephone numbers are listed in the accompanying booklet "Guarantee Conditions/Customer Service Locations".
Selective ordering of replacement parts can save unnecessary travel and costs. For this reason always provide the following appliance information: This information can be found on the serial plate in the interior at the left of the appliance.
- Model Name
- Model Number (PNC)
- Serial Number (S-No.)

natural_image
Pure grid pattern with no text, numbers, or symbolsWe recommend that you enter this information here, so that it is handy if needed.
Note: The customer bears the costs of unjustified customer service calls even during the guarantee period.
Regulations, Standards, Guidelines
This appliance was designed for household use and was manufactured in accordance with the appropriate standards. The necessary measures in accordance with appliance safety legislation regulations (GSG), accident prevention regulations for refrigeration appliances (VBG 20) and the regulations of the German Society of Electrical Engineers (VDE) were observed in the manufacture of this appliance.
The refrigerant circuit has been checked for leaks.
This appliance is in accordance with the following EU guidelines:
- 73/23/EWG dated 19 February 1973 - low voltage guidelines.
- 89/336/EWG dated 3 May 1989
(including guideline change notice 92/31/EWG) - EMV guideline
AEG Hausgeräte GmbH
Postfach 1036
D-90327 Nürnberg
02/08 Subject to change without notice
- Muur-afstandhouders
- Deurgrepen monteren
- Tips om energie te besparen
- Contents
- ⚠️ Safety
- Intended use
- Prior to initial start-up
- Refrigerant
- Safety of children
- Daily Operation
- In case of malfunction
- Disposal
- Appliance Packaging Information
- Disposal of old Appliances
- Disposal:
- Remove transport safeguard
- Installation
- Installation Location
- Your appliance needs air
- Rear spacers
- Fitting the Door Handles
- Attention!
- Electrical connection
- Control panel
- Temperature setting buttons
- Temperature Displays
- MODE button
- - FROSTMATIC and COOLMATIC:
- Text display
- RESET button
- Initial Start-Up
- Temperature Adjustment
- Tip:
- Operating modes
- SHOPPING
- FROSTMATIC
- COOLMATIC
- FROSTMATIC and COOLMATIC
- HOLIDAY
- Switching the Appliance Off
- Switching off freezer section when fridge switched on:
- Switching off freezer section when fridge switched off:
- Control and Information Systems
- Power cut warning
- Temperature warning
- For the fridge section:
- For the freezer section:
- Function Errors
- Interior Accessories
- Storage shelves
- Adjusting the upper door rack
- Humidity control
- Drawer
- Bottle rack
- Fresh food refrigeration
- Freezing and storing frozen food
- Important!
- Preparation of Ice Cubes
- Freezing Calendar
- Ice pack
- Defrosting
- Refrigerator
- Freezer
- Warning!
- Cleaning and Care
- Energy Saving Tips
- What to do if ...
- Correcting Malfunctions
- Changing the light bulb
- Customer Service
- Regulations, Standards, Guidelines
Brand : AEG-ELECTROLUX
Model : Santo 80408 KGL8
Category : Refrigerator