
LC2000 - TV MARANTZ - Free user manual and instructions
Find the device manual for free LC2000 MARANTZ in PDF.


| Brand | Marantz |
| Model | LC2000 |
| Product Type | LCD TV |
| Screen Size | Available in 15", 17", and 20" variants (see manual for specific model) |
| Power Supply | DC 15V via external power adapter; mains connection |
| Power Consumption | Not specified; typical for LCD TVs of this era |
| TV System | Multi-standard (PAL/SECAM/NTSC) with W/E European or French (SECAM L/L') support |
| Channel Capacity | 100 channels (0–99) |
| Inputs | SCART (EXT1 RGB), Y/C S-Video (EXT2), CVBS (EXT3), PC VGA (monitor option), audio L/R, mini jack PC audio |
| Outputs | Audio L/R, headphone (mini-jack) |
| Remote Control | Infrared with numeric keys, teletext, picture/sound effects, sleep timer, and shortcut keys |
| Local Keyboard | On-set controls for power, volume, channel, source, and menu |
| On-Screen Display (OSD) | Multi-language; accessible via remote or local keyboard |
| Picture Adjustments | Brightness, Contrast, Saturation, Hue, Sharpness, Noise Reduction, Picture Effect, Movie Expand |
| Sound Adjustments | Volume, Balance, Bass, Treble, Audio mode, Dynamic Bass, Virtual Surround, Sound Effect (Pers/Music/Theatre/Voice) |
| Teletext | Yes, with TOP and FLOF support; transparent mode available |
| Monitor Mode (PC) | Optional; VGA input with auto-detection; resolutions up to 1024x768 (15"), 1280x768 (17"), 640x480 (20") |
| Wall Mount | VESA compatible; use 10 mm M4 screws |
| Safety | Breakable glass; keep away from heat, moisture, and ensure ventilation |
| Cleaning | Unplug before cleaning; use only damp cloth; no liquid/ aerosol cleaners |
| Accessories Included | Power cable, remote control with batteries, power adapter, RF cable, warranty card, user manual |
Frequently Asked Questions - LC2000 MARANTZ
User questions about LC2000 MARANTZ
0 question about this device. Answer the ones you know or ask your own.
Ask a new question about this device
Download the instructions for your TV in PDF format for free! Find your manual LC2000 - MARANTZ and take your electronic device back in hand. On this page are published all the documents necessary for the use of your device. LC2000 by MARANTZ.
USER MANUAL LC2000 MARANTZ
Congratulations on purchasing your new LCD TV which we are sure will provide you with many years of trouble-free enjoyment. This User Manual is provided to help you to start using your new set as quickly as possible and to explain all the functions available to you.
Before setting up and using your new LCD TV, however, we recommend that you carefully read the section 'Important safety precautions'.
Note:
The set is also optionally available with a Monitor mode feature allowing you to use it as a computer monitor. Some of the features and instructions given in this Quick Setup Guide therefore relate to the Monitor mode feature and will not apply to the standard TV set.
Operational safety
Regulatory information 5 Important safety precautions 5
Accessories supplied
Power cable 6
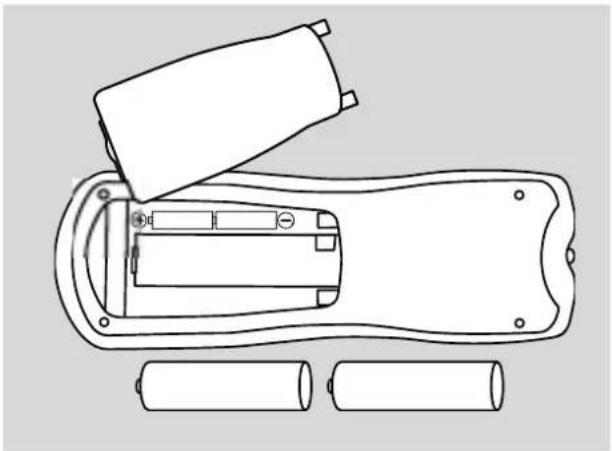
Remote control and batteries 6
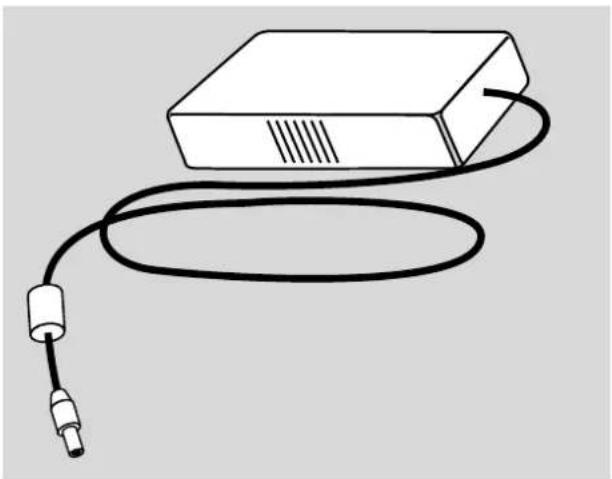
Power adapter 6
User Manual 6
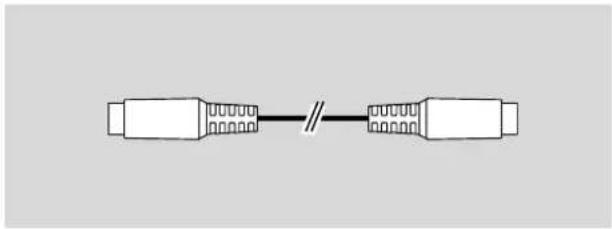
RF cable 6
Warranty card 6
Installing batteries in the remote control 6
Getting acquainted with your LCD TV
Front view 7
Rear view 7
Remote control 8
Local keyboard 9
Connecting up
Right side or top side ____ 10 VESA Wall Mounting ____ 10 Mains supply connection ____ 10 Aerial connection ____ 10 Scart (Euro) connection ____ 10 Y/C video connection (EXT 3, Option only) ____ 11 CVBS connection (EXT 3, Option only) ____ 11 Left/right audio input connections ____ 11 PC video input (Monitor option only) ____ 11 Mini jack PC audio input (Monitor option only) ____ 12 Headphone connection ____ 12
First installation
OSD language selection ____ 13 Country Selection ____ 13 Using Auto Search to select your programmes ____ 13 Manual Sort ____ 14 Deleting a programme ____ 14 Moving a programme ____ 14 Editing a channel ____ 14 Inserting a channel ____ 15 Selecting Monitor mode (Monitor option only) ____ 15
Basic channel selection
Channel selection using the numerical keypad on the remote control ____ 16 Channel selection using Page+/Page- on the remote control ____ 16
Operating with the On Screen Display (OSD)
Main Menu selection 17
Adjusting TV picture settings 17
Adjusting sound settings 17
Changing the OSD language 18
Automatic programme search 18
Using Manual sort to assign TV channels to programmes of your choice 19
Using the Remote Control Shortcut keys
Movie Expand 19
Picture Effect 19
Sound Effect 19
Sleep Timer 19
Using the Local Menu
Teletext
Using Teletext 20
Using your LCD TV in Monitor mode
Selecting Monitor mode ____ 21 Adjusting picture settings in Monitor mode ____ 21
Product Specification
Regulatory information

This equipment complies with the requirements of Directive 89/336/EEC and 73/23/EEC as amended by 93/68/EEC
Important safety precautions
Breakage
The screen of your LCD TV is made of glass and can break if the product is dropped or knocked. If this should happen, take care to avoid injury caused by broken glass pieces or sharp edges.
Cleaning
Before cleaning your LCD TV, unplug the power cord from the mains supply. Clean with a damp cloth and do not use liquid or aerosol cleaners.
Moving
Exercise utmost care when moving your LCD TV.
Placement
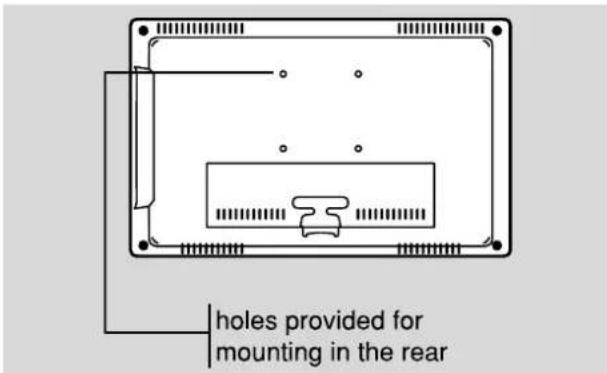
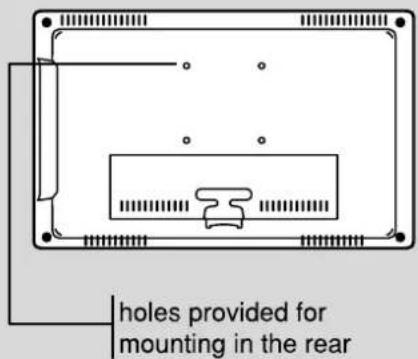
Ensure that your LCD TV is always placed on a stable surface. Do not place it on an unstable trolley, stand, tripod or table where it could fall and sustain damage as well as cause serious personal injury. If wall mounted, ensure that the set is mounted only using the holes provided for mounting in the rear.
Power supply
Use only the power supply delivered with your LCD TV or one recommended by the manufacturer. Use the power supply only for its intended purpose.
Important note:
When the TV is switched off it still consumes a small amount of power. It is therefore recommended that the power supply is unplugged from the mains supply when the TV set is switched off for an extended period.
Sources of heat
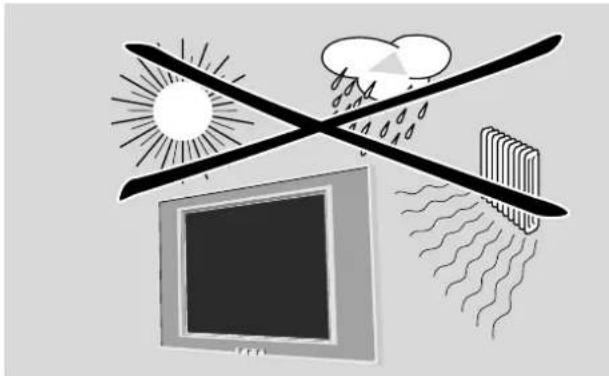
Keep your LCD TV away from heat sources such as radiators, heaters, stoves and amplifiers.
Water and moisture
Do not use your LCD TV in a damp environment, for example near a bathtub, washbasin, kitchen sink or swimming pool.
Do not place it in an area when liquid may drip or splash on it and ensure that no liquid filled containers such as vases are placed on top of it.
natural_image
Illustration of a TV set with sun, cloud, and rain symbols crossing over a screen (no text or labels)Ventilation
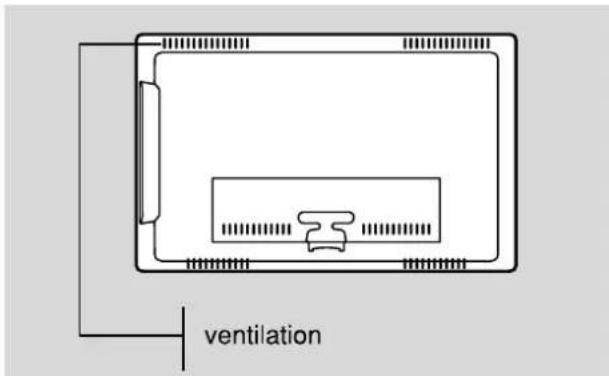
The cabinet of your LCD TV has openings for ventilation. Do not cover or block these openings since insufficient ventilation can cause overheating and shorten the life of your TV. Do not operate the set on soft surfaces such as a bed, sofa or rug since this may block the ventilation openings. Likewise, do not place the TV in an enclosed place such as a bookcase or rack, unless proper ventilation is provided.
Accessories supplied
On unpacking your LCD TV, ensure that the following accessories are included.
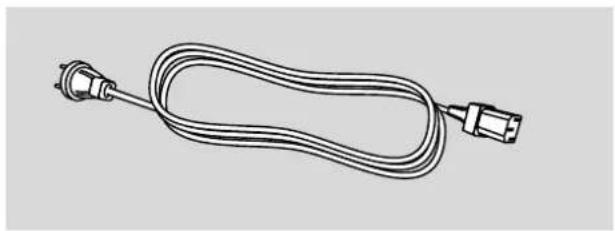
Power cable
natural_image
Line drawing of a coiled electrical plug with two connectors (no text or symbols)Remote control and batteries
natural_image
Technical line drawing of a handheld device with battery and cylindrical components (no text or symbols)Power adapter
natural_image
Line drawing of a rectangular device connected to a cable with a connector (no text or symbols)User Manual
RF cable
natural_image
Pure electrical connector diagram showing two connected components with no text or symbolsWarranty card
Installing batteries in the remote control
Before switching on your LCD TV set for the first time, install the two type AA batteries supplied in the remote control. These should be replaced periodically when their power is depleted and the remote control fails to operate.
Open the battery cover on the rear of the remote control and insert the two batteries taking care that the positive and negative ends of the batteries correspond with the positive and negative markings on compartment.
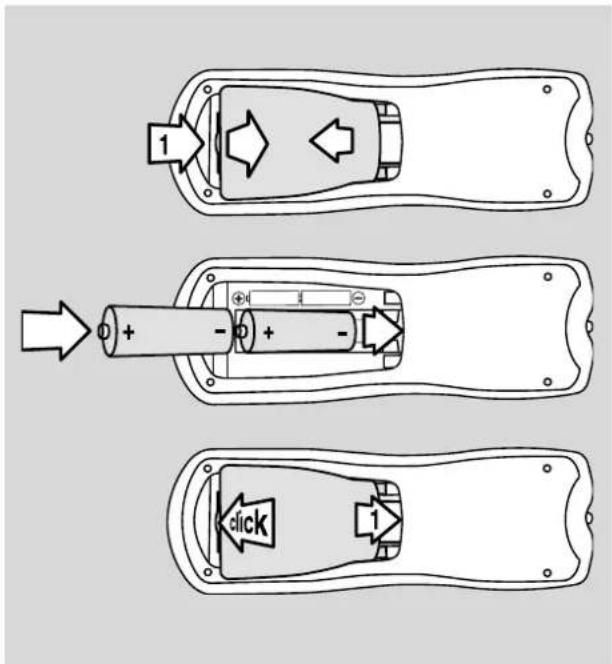
Caution: do not mix old and new batteries, and never mix different types of battery (standard, alkaline etc.).
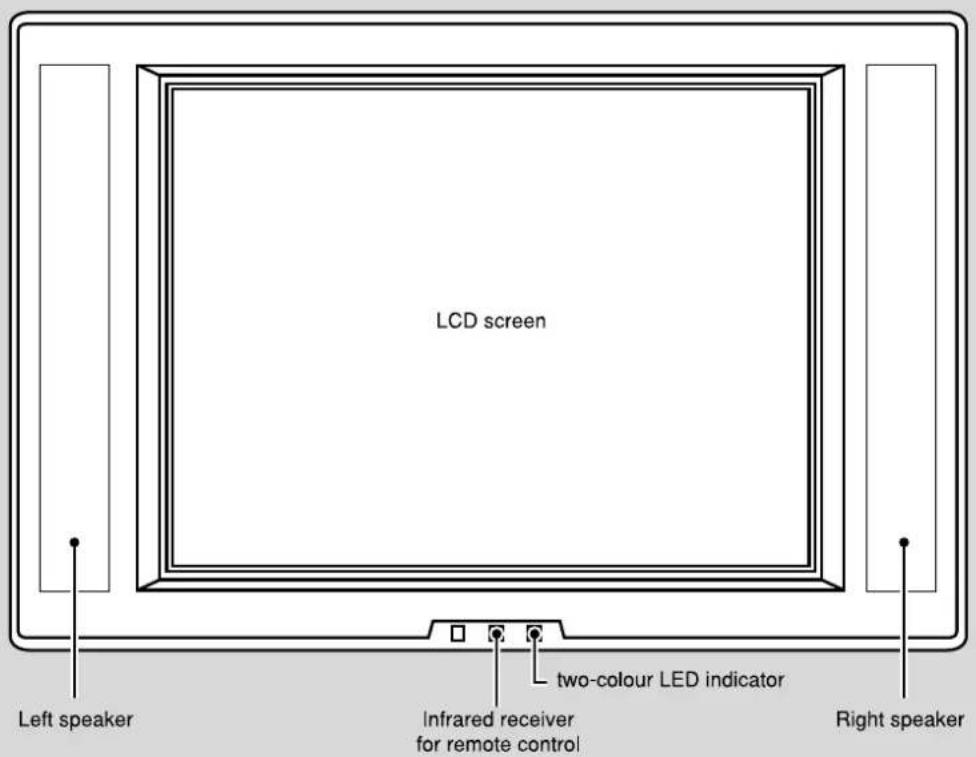
Front view
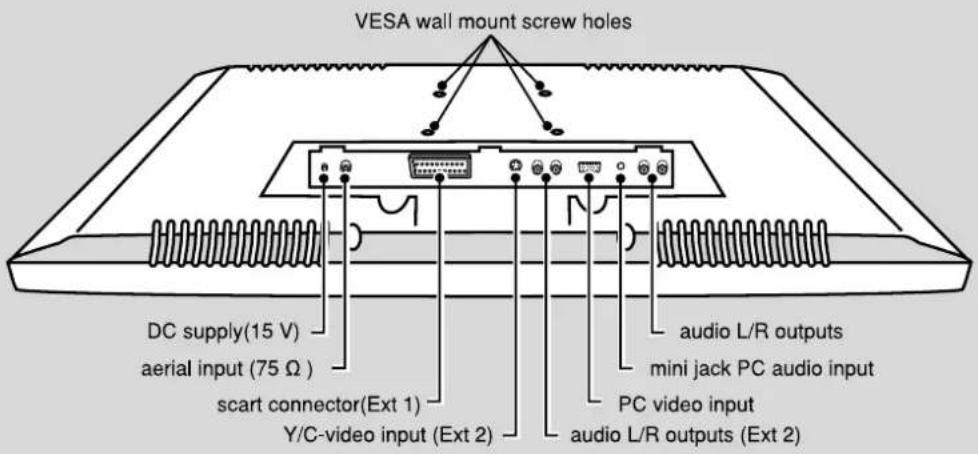
Rear view
Remote Control
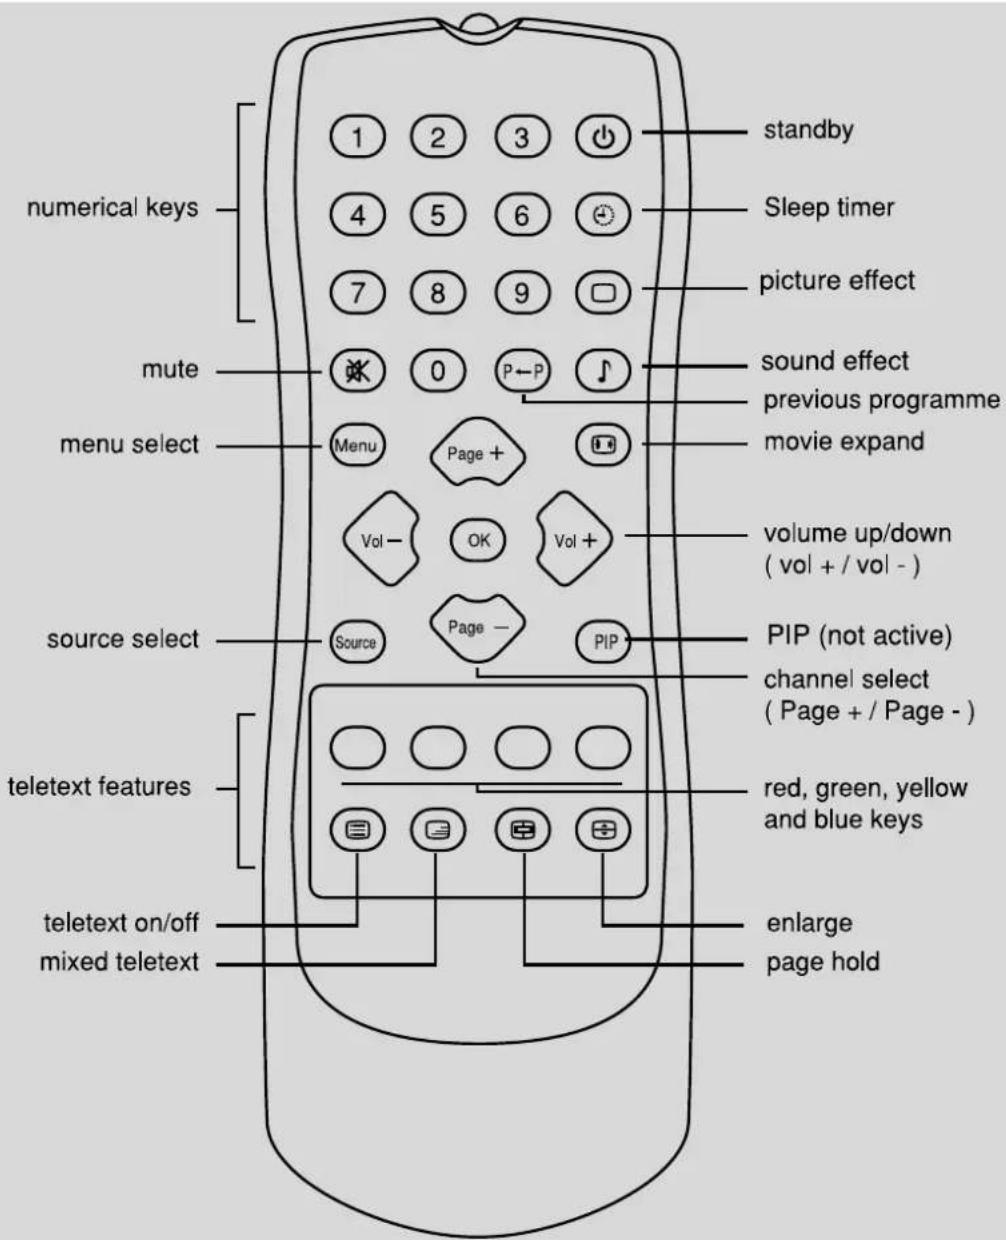
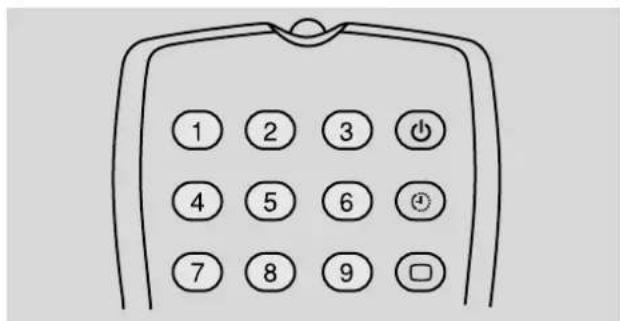
Numerical keys 0 → 9
- For keying numerical information e.g. channel numbers and teletext pages.
Standby
● Switches the set into standby mode. In this mode the set still consumes a small amount of power and can be woken up, for example by selecting a channel using the numerical keys.
Sleep timer
● Switches the set into standby after a preselected time.
Picture effect
- Provides a choice between pre-selected picture settings.
Sound effect
- Provides a choice between pre-selected audio settings and allows you to switch the audio output mode between stereo and mono. When there is a dual-language transmission, you can also use the sound effect key to select language-1 or language-2.
Mute
● Switches the sound from the loudspeakers off/on.
Previous programme
● Returns the set to the previously selected programme.
Menu select
- Opens/closes the Main Menu on the On Screen Display.
Movie expand
- Provides a choice between pre-selected movie settings.
- In TV-mode: selection between normal / expand / movie / movie+.
- In monitor mode: selection between normal / expand.
Volume up/down
● Increases/decreases the sound level.
When pressed, a slider appears on the screen allowing you to set the sound level between 0 and 100%.
Source select
- Selects signal source: EXT 1, EXT 2, EXT 3, PC video input (if featured) and previous channel.
Channel select
- Steps up or down through the channels and external sources.
Teletext on/off
● Switches the teletext screen on and off.
Mixed teletext
- Allows you to continue viewing the programme whilst using teletext by switching to a transparent teletext screen.
Enlarge
● Enlarges the teletext image on the screen.
Page hold
- Stops a teletext page search and remains on the currently-selected page.
Red, green, yellow and blue keys
- For certain teletext providers, these keys provide a shortcut to selected teletext pages. Will be used for TOP and FLOF teletext featuring.
Local Keyboard
Your LCD TV is equipped with a local keyboard featuring the set's on/off button plus buttons for channel and source selection, volume control and for bringing up the On-Screen Display (OSD) menu.
Depending on model, the local keyboard may be located on the right side of the set (as illustrated in the side panel view) or on the top of the set.
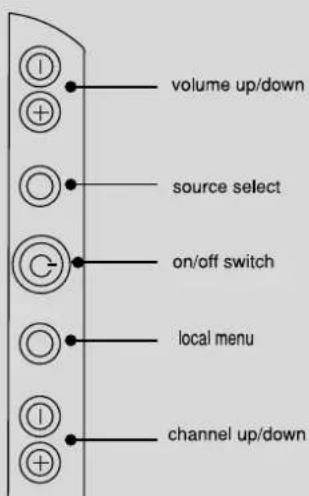
Volume up/down
●Increases/decreases the sound level.
Source select
● Selects signal source: EXT 1, EXT 2, EXT 3, PC video input (if featured) and previous channel.
On/off
●Switches the set on or off. See also 'safety precautions' power supply.
Menu
- When pushed for less than 2 seconds: opens the Local Menu which is displayed on the OSD. This menu allows you to make simple adjustments to the set's picture and sound. (See 'Using the Local Menu').
- When pushed for more than 2 seconds: opens the Main Menu.
Channel up/down (p + /p -)
●Steps up or down through the channels.
Right side (optional)
VESA Wall mounting
If the set is to be mounted on a wall, use only the mounting screw holes provided in the rear and fix securely to the wall using 10 mm M4 screws.
Mains supply connection
●Ensure that the on/off switch on the TV is set to the off position.
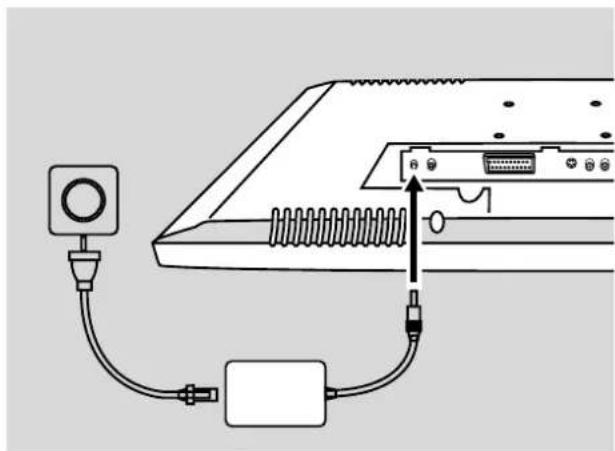
- Connect the power adapter cable to the DC supply socket (15 V) on the rear of the set. Using the power cable supplied with the set, connect the power adapter to the mains supply. Your set is then ready to be switched on.
natural_image
Diagram of a cable connection setup showing a sensor connected to an audio device via a resistor, with no visible text or symbols.Aerial connection
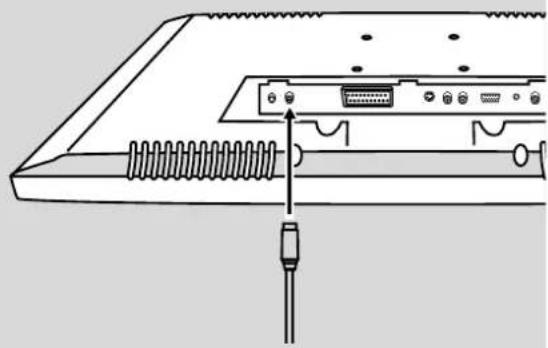
Your LCD TV set is equipped with an input socket for connection to an external (75 aerial via a coaxial cable. For best picture quality, we recommend that you use an outdoor aerial.
natural_image
Diagram of a computer monitor rear panel showing internal components and cable insertion (no text or labels)Scart (Euro) connection
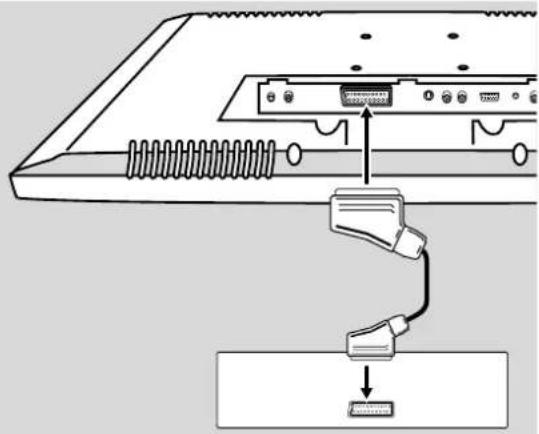
- For users in Europe, a version of the set featuring a Scart connector is supplied for connection to a VCR, DVD player or a video games station. This signal source is selected by selecting EXT 1 on the TV set using the source select button on the local keyboard or the channel select buttons on the remote control.
- If the Scart connection is used, the set will automatically switch over from the currently selected channel to the EXT 1 source when the VCR, DVD player or video games station is started.
natural_image
Diagram showing a cable connector inserted into a device panel, with an arrow indicating the cable's direction (no text or symbols present)- Scart connection (Ext-1 / RGB) gives the best picture quality of all external sources.
Y/C video connection
(EXT 2, Option only)
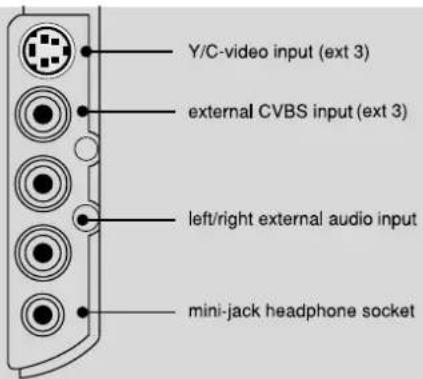
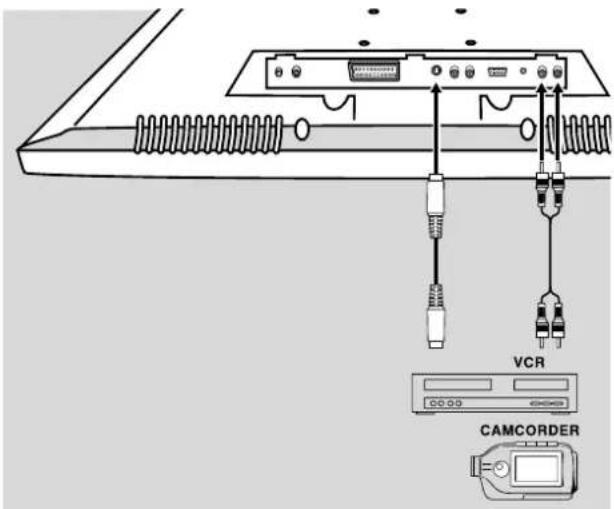
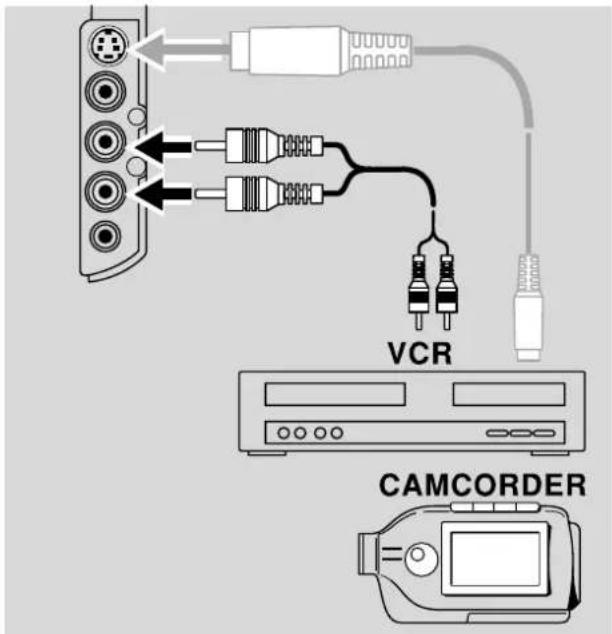
●The Y/C video co ections on the rear and right side of your TV set are for connection to an S-VHS signal source such as S-VHS camcorder or VCR. Select this signal source by selecting EXT 2 for the rear connection or EXT 3 for the side connection using the source select button on the local keyboard or the channel select buttons on the remote control.
CVBS connection
(EXT 3, Option only)
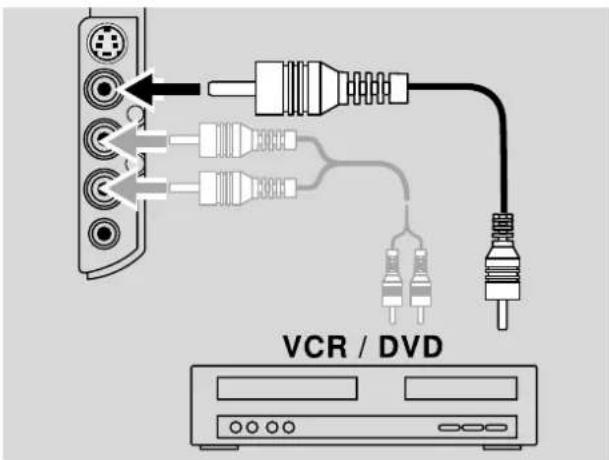
- If you have a VCR or DVD player with a CVBS video output, you can connect it to your LCD TV set through the CVBS video input on the right side of the set. Select this signal source by selecting EXT 3.
Left/right audio input connections
●Connect the left and right audio cables from your S-VHS camcorder or VCR to the left/right audio input sockets on the back (EXT 2) or side (EXT 3) of your LCD TV set, taking care that the colour of the plugs and sockets match (left: white, right: red).
PC video input
(Monitor option only)
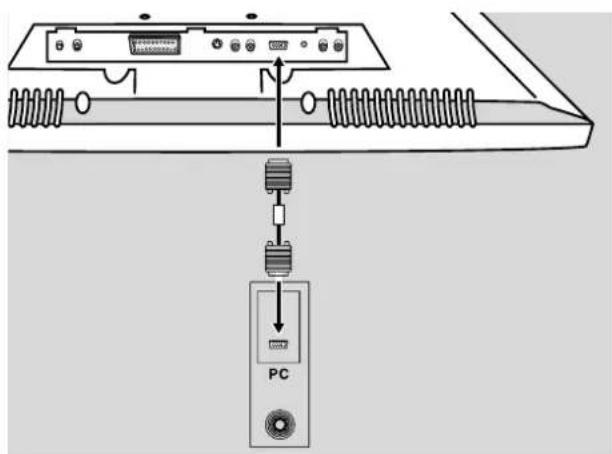
- If you use your LCD TV as a computer monitor, connect the cable from the output of your computer's video graphics adapter card to the set's PC video input. When the set and computer are switched on, the set will automatically detect and adapt to the resolution of the graphics adapter. See also 'Initial installation'.
Mini jack PC audio input
(Monitor option only)
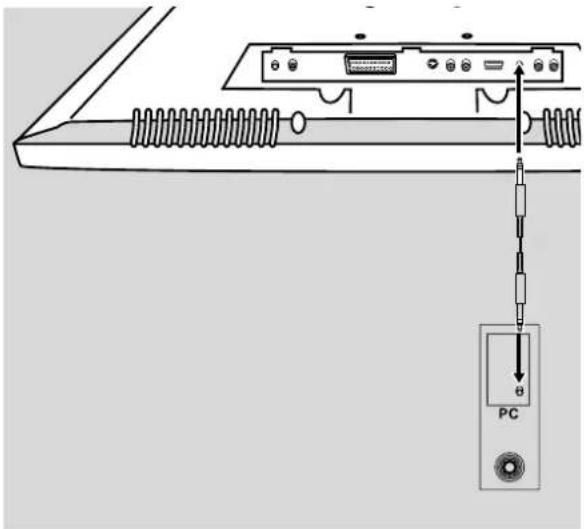
●The speakers on your LCD TV can also provide the audio output for your computer's sound card. Connect the audio cable from the sound card of your computer to the mini jack PC audio input on the back of the set.
Headphone connection (optional)
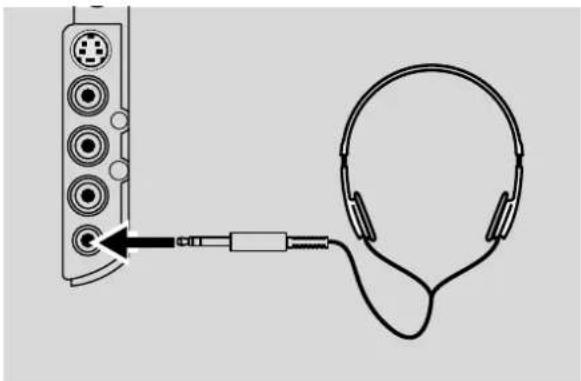
- Connect headphones to the minijack stereo headphone socket on the right side of the set. This will mute the set's loudspeakers.
natural_image
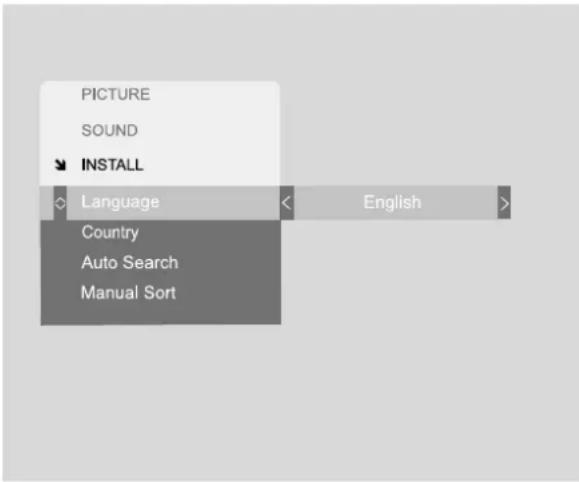
Diagram showing audio headset connected to a speaker with an audio jack (no text or symbols present)When you switch on your set for the first time, the following screen is displayed. This gives you the opportunity to:
●select your On Screen Display language
●select your country
●automatically or manually search for available programmes and
●manually sort the detected programmes into the order of your choice
OSD language selection
1 Press > on the remote control to select your desired language from a list of available languages.
2 Press < /> to page through the list until you reach the language you want.
Note:
You can always change the OSD language later by selecting 'Language' on the Setup Menu (see 'Changing the OSD language').
Country selection
Choose your country of residence before running the Auto Search procedure.
1 Press ∨ on the remote control to select Country
2 Press < / > to page through a list of countries until you reach your country of residence.
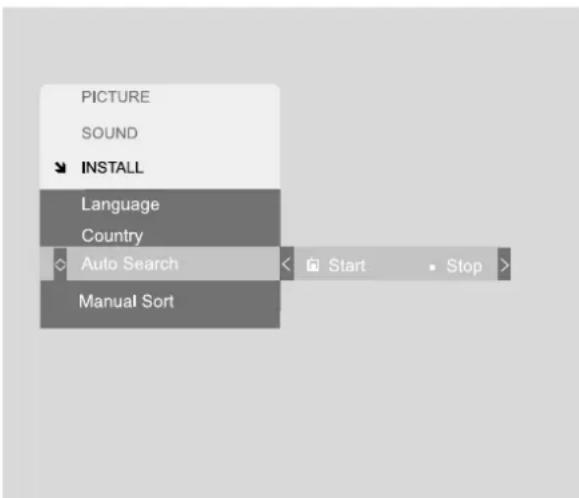
Using Auto Search to select your programmes
1 Press to select Auto Search
2 Press > to select 'Start'
The Auto Search procedure then starts.
As the procedure progresses, an indicator with the number of channels detected appears on the screen.
At the end of the Auto Search procedure, the screen automatically switches to the Manual Sort submenu to allow you to arrange the programmes into the order of your choice.
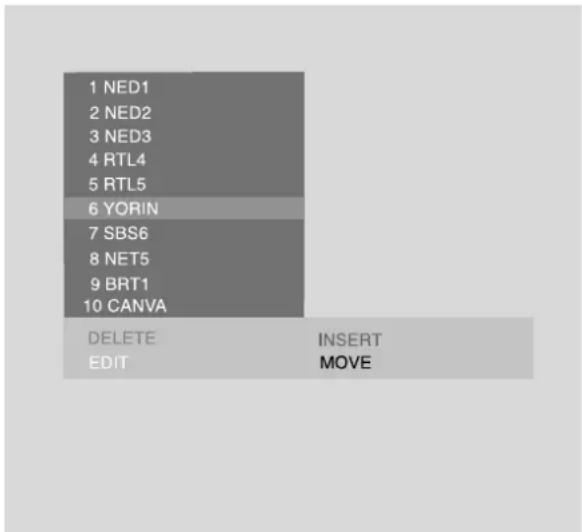
The submenu shows only 10 programmes at a time but you can scroll up and down through the complete list using the Y and / keys. As you scroll through the list, the currently highlighted programme is displayed on the TV screen.
If your TV signal provider (e.g. cable or satellite TV company) operates an ATS (Automatic Tuning System), the names of the programme providers will be displayed and these will be assigned to the TV channels selected by your signal provider.
If a channel does not have a programme assigned to it, "—" will be displayed. If the name of the programme is not known, it will be displayed as "CH[programme number]". You can give the channel a name using the EDIT function on the submenu.
If you are satisfied with the programme order, simply press the OK button on the remote control. The installation routine in then complete and you can start to use your TV set.
If you wish to change the order of programmes or edit the programme list, continue with the Manual Sort procedure.
Manual Sort
The Manual Sort submenu allows you to delete, insert, move or edit programme items in your programme list.
Deleting a programme
1 Using the ∧ / ∨ keys on the remote control, select the programme you wish to delete.
2 Press the red key on the remote control to delete the programme.
The programme will disappear from the list and all programmes below it will move up one position.
Moving a programme
1 Using the ∧ / ∨ keys on the remote control, select the programme you wish to move.
2 Press the > and the Blue keys simultaneously on the remote control.
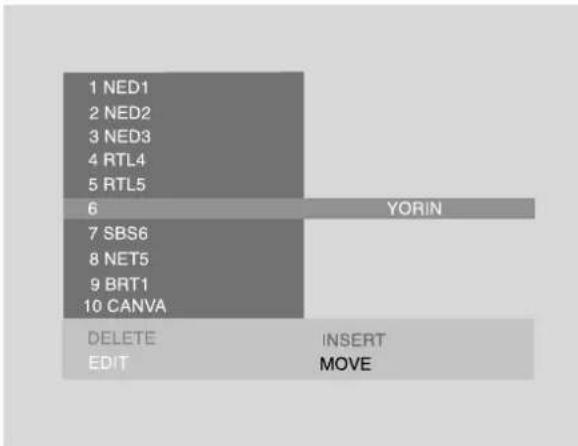
The selected programme moves out of the list to the right.
3 Using the ∧ / ∨ keys move the programme to your preferred channel position.
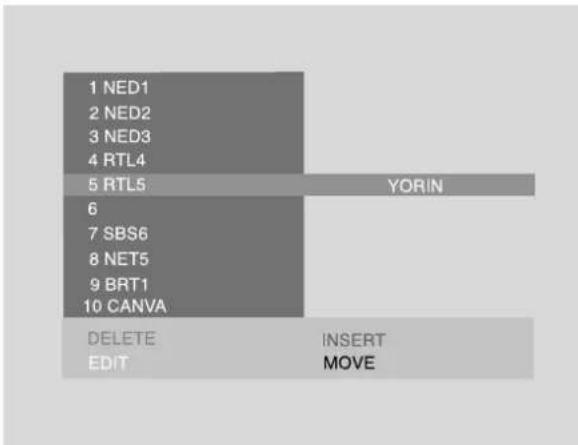
During this time, the programme you are moving will be displayed on the TV screen.
4 Press the < and the Blue keys simultaneously on the remote control to insert the programme in the new channel position.
The programme originally in the channel position and the programmes below it will automatically move one position down until the gap in the original channel position is filled.
Editing a channel
The EDIT/INSERT submenu allows you to edit a channel's properties.
EDIT PROGRAM NR. "...."
FREQUENCY "xxx.xx" MHz SYSTEM "W/E EUROPE/FRANCE PROGRAM NAME "......" A/...../9
1 Using the ∧ / ∨ keys on the remote control, select the channel you wish to edit.
2 Press the Yellow key on the remote control.
The Manual Sort menu is replaced on the screen by the EDIT/INSERT submenu.
To edit the channel frequency
1 Press < or > to tune to the previous or next programme
As the previous or next programme is tuned in, it appears on the screen. The frequency in MHz of the currently tuned programme appears on the right of the menu.
2 Repeat this procedure until the programme of your choice is selected
Your LCD TV is a multi-standard set that operates with W/E European or French (SECAM L/L¢) video systems. This is usually automatically detected, but the menu item System allows you also to manually set it for individual programmes.
To edit the video system
1 Using the ∨key, select System
2 Using the < or > keys select either W/E Europe or France
The menu item Programme Name allows you to give the programme a name of your choice
To edit the programme name
1 Using the ∨ key, select Programme Name
The current name of the programme is displayed to the right of the menu item
2 Press >
The menu enters the editing mode and a cursor is displayed over the first character of the programme name
3 Press < / > to select the character you wish to edit and the / keys to change it
4 When you have edited the programme name, press OK to leave the EDIT/INSERT submenu.
Inserting a channel
The EDIT/INSERT submenu also allows you to insert a new programme between any two programmes
1 Using the ∧ / ∨ keys on the remote control, select the position in the programme list where you wish to insert a new programme.
2 Press the Green key on the remote control
The Manual Sort menu is replaced on the screen by the EDIT/INSERT submenu.
You can then edit the frequency, system and programme name as described in the previous section.
3 When you have finished editing the programme, press OK to leave the EDIT/INSERT submenu.
The new programme will then be placed at the selected position in the programme list.
When you have completed the Manual Sort procedure, press OK on the remote control. The installation routine in then complete and you can start to use your TV set.
Note:
You can later run the Auto Tune or Manual Sort procedures at any time by selecting "Install" from the Main Menu.
Selecting Monitor mode
(Monitor option only)
On first switching on the set and before performing the first installation, you can switch to Monitor mode.
1 Press Source on the remote control or local keyboard.
PC VGA
"PC VGA" will be displayed in the top right corner of the screen.
Subsequently, whenever the set is switched on it will automatically be in Monitor mode.
2 To switch back to TV mode, press Source on the remote control or local keyboard again.
Note:
If there is no video signal from the computer when the set is in Monitor mode, the screen will display the words "No sync" for 10 seconds. The set will then automatically switch into Standby.
If you switch back to TV mode, the first installation routine must be performed before the set can be used as a TV. After the first installation has been completed, you can switch the set to Monitor mode by pressing Source on the remote control or local keyboard and selecting 'PC video' or by using the channel up/channel down buttons (see 'Basic channel selection').
Switching off only the TV-set and not the computer (when connected via the VGA cable) can in some cases result in not switching off the backlight. Please switch off both TV-set and computer after using the TV-set as monitor.
Your LCD TV set allows you to select up to 100 channels (0 → 99)
Channel selection using the numerical keypad on the remote control
To select a single-digit channel number:
1 Hold down the channel number on the numerical keypad.
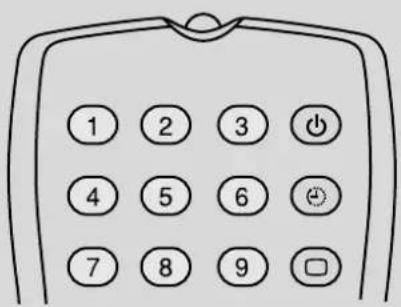
The set immediately tunes to the channel of your choice.
To select a double-digit channel number:
1 Briefly (< 1 second) press the first digit of the channel number on the numerical keypad.
2 Release the first digit and quickly (within 2 seconds) press the second digit of the channel number.
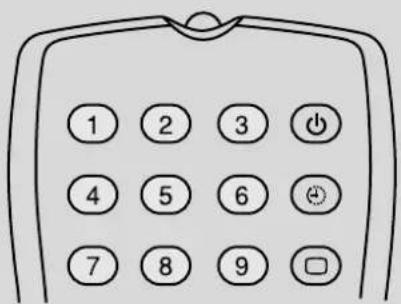
The set immediately tunes to the channel of your choice.
Note:
If the channel you have chosen does not exist, the set will remain tuned to the current channel.
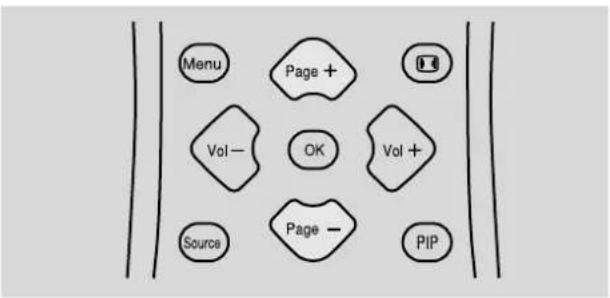
Channel selection using Page+/Page- on the remote control
1 Press the Page+ or Page- keys on the remote control.
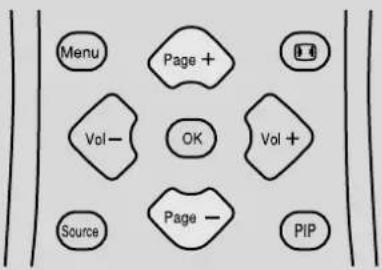
flowchart
graph TD
    A["Menu"] --> B["Page +"]
    C["Vol -"] --> D["OK"]
    E["Source"] --> F["Page -"]
    G["PIP"] --> H["Vol +"]
The set immediately tunes to the next or previous channel in the channel list.
When the highest channel in the list has been selected, the next Page+ keys pressed select EXT 1, EXT 2, EXT 3 and PC video (if featured) in order, after which channel selection returns to the lowest channel in the list.
In the same way, when the lowest channel in the list has been selected, the next Page- keys pressed select PC video (if featured) EXT 3, EXT 2 and EXT 1 in order, after which channel selection returns to the highest channel in the list.
Note:
You can also follow the above procedure for channel selection using the Channel up/Channel down keys on the local keyboard.
EXT 1, EXT 2, EXT 3 and PC video (if featured) sources can also be selected directly with the Source key on the remote control and local keyboard.
Operating with the On Screen Display (OSD)
The OSD on your LCD TV set has been designed to make initial setting-up and adjustment as easy as possible.
Main Menu selection
1 Press Menu on the remote control.
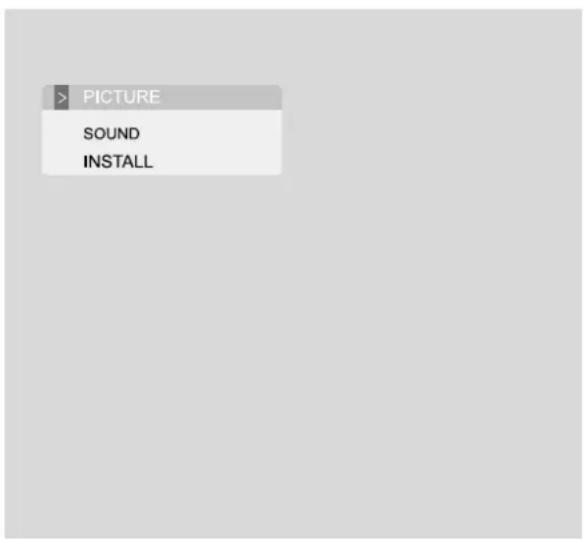
The Main Menu appears on the OSD.
2 Press ∧ and ∨ on the remote control to select the item you wish to adjust.
Note:
The Menu key is a toggle button so pressing it again when in the Main Menu removes the OSD from the screen.
Adjusting TV picture settings
1 Select PICTURE from the Main Menu.
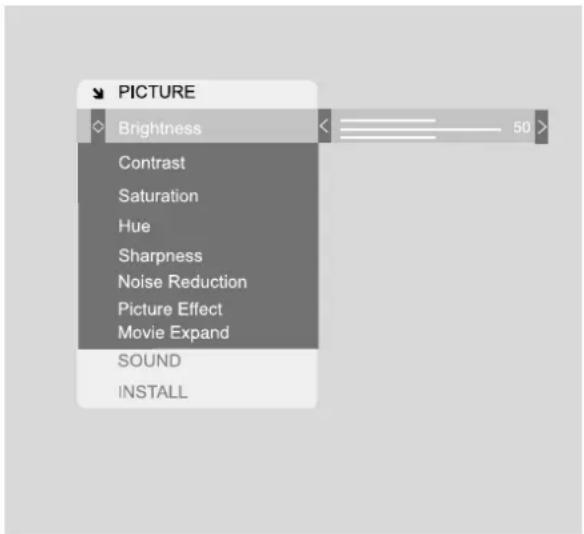
2 Press > to open the PICTURE Menu.
3 Press ∧ and ∨ to select the picture item you wish to adjust
4 Press > and < to adjust the picture item to your requirements.
5 When you have made your selection press ∧ or ∨ to leave the picture item or press Menu to remove the OSD from the screen.
Note:
These items are adjusted by the slider on the right of the menu item
The items: Brightness, Contrast, Sharpness and Noise Reduction are adjusted by the slider on the right of the menu item.
The item Picture Effect can be set to Normal, Emphasis or Movie
The item Movie Expand can be set to Normal, Expand, Movie or Movie+
Moving the noise reduction slider above 30 can cause blurry pictures with fast moving pictures.
The item 'Hue' is adjustable only for NTSC systems (only available via EXT 1, EXT 2 or EXT 3 input). For PAL and SECAM systems it is greyed out and cannot be selected.
Adjusting sound settings
11 Select SOUND from the Main Menu.
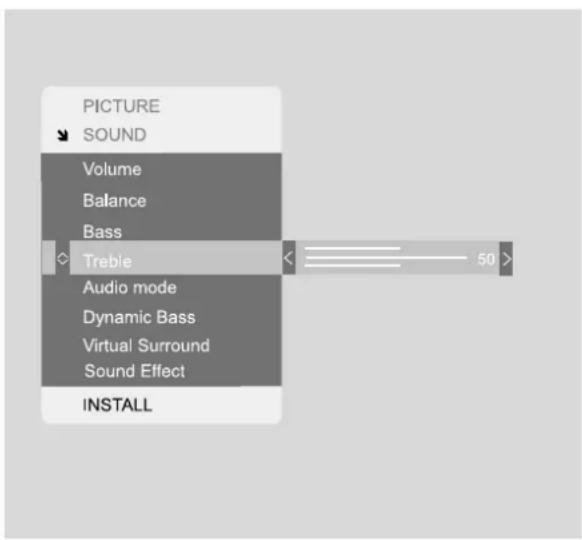
2 Press > to open the SOUND Menu.
3 Press ∧ and ∨ to select the sound item you wish to adjust.
4 Press > and < to adjust the sound item to your requirements.
5 When you have made your selection press ∧ or ∨ to leave the sound item or press Menu to remove the OSD from the screen.
Note:
The items: Bass, Treble, Balance and Dynamic Bass are adjusted by the slider on the right of the menu item.
The item Virtual Surround can be switched on or off.
The item Sound Effect can be set to Pers, Music, Theatre, or Voice.
The items bass and treble are only available when 'personal' is selected in the sound effect menu.
Changing the OSD language
The OSD language was chosen during the initial installation. You can, however, change this language at any time to another language of your choice.
1 Select SETUP from the Main Menu.
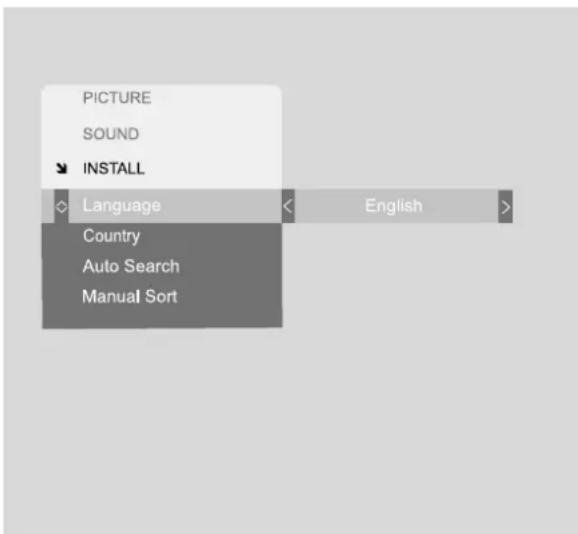
Language is the only selection available to you in the Setup Menu.
2 Select Language.
3 Press > to select your desired language from a list.
4 Press < / > to page through the list until you reach the language you require.
5 When you have made your selection press ∧ or ∨ to leave the Language Menu or press Menu to remove the OSD from the screen.
Note:
Your language selection will not take effect until you leave the Language Menu.
Automatic programme search
When your LCD TV was switched on for the first time, it was installed by starting the Auto Search routine to detect available programmes and assign them to channel numbers on your set. You can repeat this procedure at any time to retune your set, for example, to include new television stations that were not available when you first installed your set.
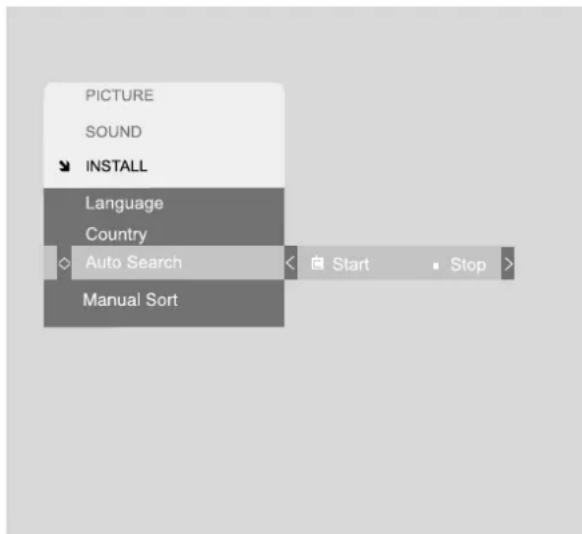
1 Select INSTALL from the Main Menu.
2 Press > to open the INSTALL Menu.
3 Press ∨ to select Auto Search.
4 Press > to select 'Start'.
5 Press > to start Auto Search.
All previously-selected programmes are removed and the Auto Search procedure starts.
At the end of the Auto Search procedure, the screen automatically switches to the Manual Sort submenu to allow you to arrange the programmes into the order of your choice.
Using Manual Sort to assign TV channels to programmes of your choice
You can sort the programmes into the order of your choice using Manual Sort.
This automatically opens after you have run the Auto Search procedure but you can also open it manually to make changes to your programme list by selecting Manual Sort from the INSTALL menu.
The Manual Sort procedure is described in detail in the section ‘First Installation’.
The remote control has 4 shortcut keys to the right of the numerical keys allowing you to make quick adjustments to your set. When one of these keys is pressed, a small OSD appears at the bottom centre of the screen.
Movie Expand
Allows you to adjust the height and width of your picture to match the programme source.
Using the < / > keys on the remote control, Movie Expand can be set to:
Normal, Expand, Movie or Movie+ in TV mode
Normal or Expand
in Monitor mode (only for wide screens)
Picture Effect
Allows you to make adjustments to the television picture. Using the < / > keys on the remote control, Picture Effect can be set to Normal, Emphasis or Movie
Sound Effect
Allows you to adjust the sound equalization to match the programme material. Using the < / > keys on the remote control, Sound Effect can be set to Pers, Music Theatre or Voice
Sleep Timer
Allows you to switch the set into standby after a preselected time. By pressing the key repeatedly, you can choose between:
Off/15min/30min/60min/90min
Within a few seconds of selecting the timer setting, the display disappears from the screen and the sleep timer starts counting. If you press the sleep timer key again, the screen will display:
Sleep Timer. [.] . . . 10min
showing the time remaining before the set switches into standby.
After several seconds, the display disappears from the screen and the timer continues running.
If you press the Sleep Timer key again while the display is still on the screen, the timer stops and resets itself to the time closest to the time remaining.
By pressing the key repeatedly, you can reset the timer or switch it off.
Using the Local Menu Teletext
Besides the Main Menu opened with the remote control, your LCD TV also features a Local Menu that you can open with the Menu button on the set's local keyboard (on the right side or top of the set). This menu allows you to put the set in standby and to make simple adjustments to the set's picture and sound.
1 Press the Menu button for less than 2 seconds on the local keyboard to open the Local Menu.
2 Press the Menu button on the local keyboard or ∧ and ∨ on the remote control to step through the items to the one you wish to adjust.
flowchart
graph TD
    A["Menu"] --> B["Page +"]
    C["Vol -"] --> D["OK"]
    E["Source"] --> F["Page -"]
    G["Pip"] --> H["Vol +"]
The items appear individually on the screen and you can step through them in the order:
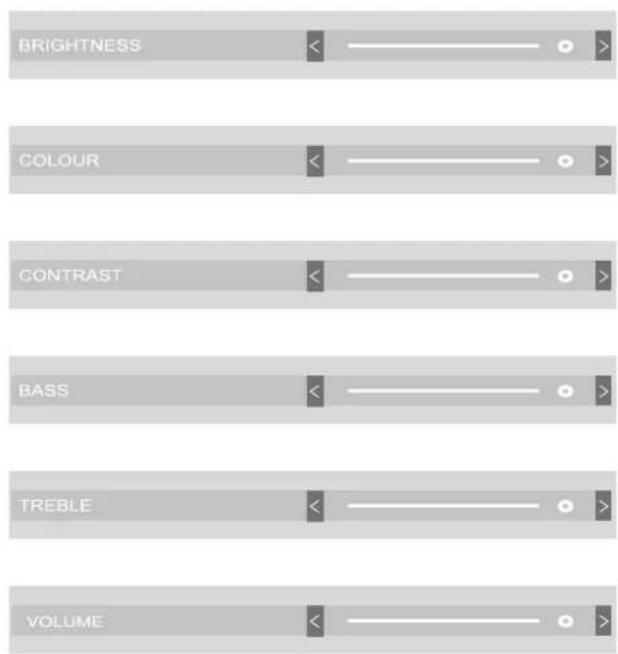
3 Press > and < to adjust the item to your requirements.
4 When you have made your selection press the Menu button on the local keyboard or ∧ or ∨ on the remote control to leave the item, or press Menu on the remote control to remove the OSD from the screen.
Teletext is the information service provided by most TV stations in addition to their regular programme material. Your LCD TV is equipped to receive teletext signals and to display them graphically on your screen.
Using teletext
1 Select a channel on your set
2 Press the teletext button on the remote control.
The opening teletext screen for your selected channel appears.
3 Select your desired teletext page by typing in the page number using the numerical keys. These numbers are given in the opening screen.
4 If you wish to stop the page search, press (freeze page) on the remote control.
5 To turn off teletext mode, press the teletext button
again.
Note:
If you wish to continue viewing the programme whilst using teletext, press (transparent teletext screen) on the remote control.
Some teletext providers support what is known as TOP Teletext. These display colour-coded shortcuts which allow you to use the four coloured buttons on your remote control to select pages without the need to type in page numbers.
If your LCD TV includes the optional Monitor feature, you can also use it as a computer monitor. The resolution provided depends upon the video graphics adapter used but the maximum resolution that can be attained is:
15" screen → 1024 by 768 pixels
17" screen → 1280 by 768 pixels
20" screen →640 by 480 pixels
Selecting Monitor mode
1 Press Source repeatedly on the remote control or the local keyboard until PC VGA appears in the top right corner of the screen.
PC VGA
You are now in Monitor mode. The resolution of your video graphics adapter is automatically detected by the set.
Note:
If there is no video signal from the computer when the set is in Monitor mode, the screen will display the words
“No sync” for 10 seconds. The set will then automatically switch into Standby.
There are a number of picture settings you can adjust to optimize the performance of your set in Monitor mode.
Adjusting picture settings in Monitor mode
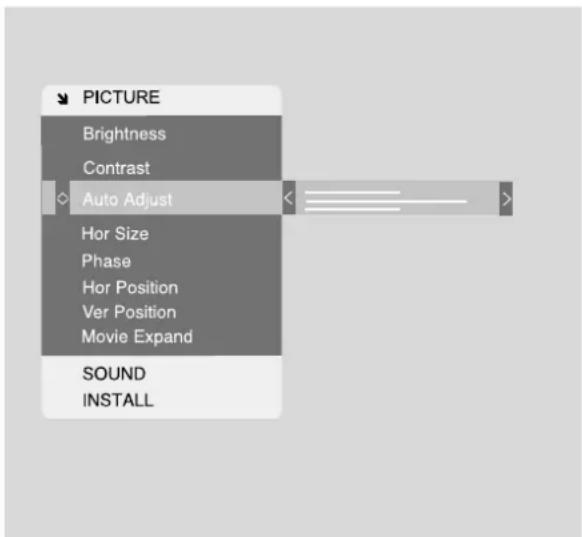
1 Select PICTURE from the Main Menu.
2 Press > to open the PICTURE Menu
3 Press ∧ and ∨ to select the picture item you wish to adjust.
4 Press > and < to adjust the picture item to your requirements.
5 Press ∧ or ∨ to store the settings and leave the picture item or press MENU to store the settings and remove the OSD from the screen.
Note:
The items BRIGHTNESS and CONTRAST are adjusted by the slider on the right of the menu item.
Auto adjust
Automatically centralize the picture on the screen. Can be set to ONNOFF. If the result after automatic adjustment is not satisfying, manual correction is possible with Hor size, Hor position or Ver position.
Hor Size
Manually adjust the picture width on the screen in horizontal direction. After this operation, the picture can be centralised using the horizontal position function as explained below.
Phase
This must be adjusted after the frequency has been set to optimize picture quality.
Hor position
Adjusts the horizontal position of the image on the screen. Each video standard will require a different value for this setting.
Ver position
Adjusts the vertical position of the image on the screen. Each video standard will require a different value for this setting.
Movie Expand (only for wide screen)
Allows you to adjust the height and width of your picture to match the programme source. Can be set to Normal or Expand.
Note:
The items Brightness, Contrast, Horizontal Size, Phase, Horizontal Position and Vertical Position are adjusted by a slider on the right of the menu item.
- Note:
- Operational safety
- Accessories supplied
- Getting acquainted with your LCD TV
- Connecting up
- First installation
- Basic channel selection
- Operating with the On Screen Display (OSD)
- Using the Remote Control Shortcut keys
- Using the Local Menu
- Teletext
- Using your LCD TV in Monitor mode
- Product Specification
- Regulatory information
- Important safety precautions
- Breakage
- Cleaning
- Moving
- Placement
- Power supply
- Sources of heat
- Water and moisture
- Ventilation
- Installing batteries in the remote control
- Front view
- Rear view
- Remote Control
- Numerical keys 0 → 9
- Standby
- Sleep timer
- Picture effect
- Sound effect
- Mute
- Previous programme
- Menu select
- Movie expand
- Volume up/down
- Source select
- Channel select
- Teletext on/off
- Mixed teletext
- Enlarge
- Page hold
- Red, green, yellow and blue keys
- Local Keyboard
- On/off
- Menu
- Channel up/down (p + /p -)
- Right side (optional)
- VESA Wall mounting
- Mains supply connection
- Aerial connection
- Scart (Euro) connection
- Y/C video connection
- CVBS connection
- Left/right audio input connections
- PC video input
- Mini jack PC audio input
- Headphone connection (optional)
- OSD language selection
- Country selection
- Using Auto Search to select your programmes
- Manual Sort
- Deleting a programme
- Moving a programme
- Editing a channel
- To edit the channel frequency
- To edit the video system
- To edit the programme name
- Inserting a channel
- Selecting Monitor mode
- Channel selection using the numerical keypad on the remote control
- Channel selection using Page+/Page- on the remote control
- Main Menu selection
- Adjusting TV picture settings
- Adjusting sound settings
- Changing the OSD language
- Automatic programme search
- Using Manual Sort to assign TV channels to programmes of your choice
- Using the Local Menu Teletext
- Using teletext
- Adjusting picture settings in Monitor mode
- Auto adjust
- Hor Size
- Phase
- Hor position
- Ver position
- Movie Expand (only for wide screen)
Brand : MARANTZ
Model : LC2000
Category : TV