
Santo 1450-6TKCL - Fridge AEG - Free user manual and instructions
Find the device manual for free Santo 1450-6TKCL AEG in PDF.


User questions about Santo 1450-6TKCL AEG
0 question about this device. Answer the ones you know or ask your own.
Ask a new question about this device
Download the instructions for your Fridge in PDF format for free! Find your manual Santo 1450-6TKCL - AEG and take your electronic device back in hand. On this page are published all the documents necessary for the use of your device. Santo 1450-6TKCL by AEG.
USER MANUAL Santo 1450-6TKCL AEG
Operating Instructions
Dear customer,
Before placing your new refrigerator/freezer into operation please read these operating instructions carefully. They contain important information for safe use, for installation and for care of the appliance. Please keep these operating instructions for future reference. Pass them on to possible new owners of the appliance.
These operating instructions are for use with several technically comparable models with varying accessories. Please observe the notes which apply to your model.

Notes which are important for your safety or for the proper functioning of the appliance are stressed with a warning triangle and/or with signal words (Warning!, Caution!, Important!). Please observe the following carefully.

This symbol guides you step by step in the operation of the appliance.

Supplementary information regarding operation and practical applications of the appliance appear after this symbol.

Tips and notes concerning economical and environmentally sound use of the appliance are marked with the cloverleaf.
The operating instructions contain instructions for the correction of possible malfunctions by the user in the section "What to do if ...". If these instructions should not be sufficient, contact your local Service Force Centre.
Printed on paper manufactured with environmentally sound processes he who thinks ecologically acts accordingly...
Contents
Important Safety Instruction ....4
Disposal 6
Appliance Packaging Information 6
Disposal of old Appliances 6
Remove transport packaging 6
Installation 7
Installation Location 7
Your refrigerator needs air 7
Detaching the worktop 8
Mounting under a continuous worktop ....8
Reversing the door....9
Changing over the freezer compartment door 10
Prior to Initial Start-Up ....10
Electrical Connection 11
Plug socket 12
Description of the appliance ....12
View of the appliance 12
Starting up and temperature regulation .....13
Interior Accessories 14
Storage shelves/wire trays 14
VARIO glass storage shelf 14
Correct storage 15
Freezing and storing frozen food 15
Preparation of Ice Cubes 16
Defrosting 17
The fridge defrosts automatically .....17
Defrosting the freezer compartment .....17
Switching off the appliance 18
Cleaning and Care 18
Energy Saving Tips 19
What to do if ....20
Correcting Malfunctions 20
Changing the light bulb 22
Service & Spare Parts 22
Help us to Help You ....23
Customer Care 23
AEG Service Force 24
Noises during Operation 26
Regulations, Standards, Guidelines .....26
Technical terminology .....27
⚠️ Important Safety Instructions
These warnings are provided in the interests of your safety. Ensure you fully understand them before installing or using the appliance. Your safety is of paramount importance. If you are unsure about the meaning of these warnings contact the Customer Care Department for assistance.
Intended use
- The refrigerator is intended for use in the home. It is suitable for the cooling, freezing and storing of frozen food, as well as for making ice. If the appliance is used for purposes other than those intended or used incorrectly, no liability can be accepted by the manufacturer for any damage that may be caused.
- Alterations or changes to the refrigerator are not permitted for reasons of safety.
- If you use the refrigerator in a commercial application or for purposes other than the cooling, freezing or frozen storage of foods, the manufacturer accepts no liability for any damages which may occur.
Prior to initial start-up
- Ensure that the appliance does not stand on the electrical supply cable. Important: if the supply cable is damaged, it must be replaced by authorised service or qualified personnel using a special cable of the same type.
- Check the appliance for transport damage. Under no circumstance should a damaged appliance be plugged in! In the event of damage, please contact your supplier.
Refrigerant
The refrigerant isobutane (R600a) is contained within the refrigerant circuit of the appliance, a natural gas with a high level of environmental compatibility, which is nevertheless flammable.
- During transportation and installation of the appliance, be certain that none of the components of the refrigerant circuit become damaged.
- If the refrigerant circuit should become damaged:
- avoid open flames and sources of ignition;
- thoroughly ventilate the room in which the appliance is situated.
Safety of children
- Packaging (e.g. wraps, polystyrene) can be dangerous for children. There is a risk of suffocation! Keep packaging material away from children!
- Please make old appliances unusable prior to disposal. Pull out the mains plug, cut off the mains cable, break or remove spring or bolt catches, if fitted. By doing this you ensure that children cannot lock themselves in the appliance when playing (there is risk of suffocation!) or get themselves into other dangerous situations.
- Often children cannot recognise the hazards present in household appliances. It is therefore important that you ensure adequate supervision and never let children play with the appliance!
Daily Operation
- Containers with flammable gases or liquids can leak at low temperatures. There is a risk of an explosion! Do not store any containers with flammable materials such as spray cans, fire extinguisher refill cartridges etc in the refrigerator and/or freezer.
- Bottles and cans must not be placed in the freezer compartment. They can burst when the contents freeze, high carbonate content drinks can even explode! Never store lemonade, juices, beer, wine, sparkling wine etc. in the freezer compartment.
- Do not put ice cream or ice cubes in the mouth immediately after removal from the freezer compartment. Very cold ice can freeze to the lips or tongue and cause injury.
- Do not touch frozen food with wet hands. Your hands could freeze to the food.
- Do not operate any electrical appliances in the refrigerator and/or freezer (e.g. electric ice cream makers, mixers etc.).
- Before cleaning the appliance, always switch off the appliance and unplug it, or pull the house fuse or switch off the circuit breaker.
- When unplugging always pull the plug from the mains socket, do not pull on the cable.
In case of malfunction
- If a malfunction occurs on the appliance, please look first in the "What to do if ..." section of these instructions. If the information given there does not help, please do not perform any further repairs yourself.
- Under no circumstance should you attempt to repir the appliance yourself. Repairs carried out by unexperienced persons may cause injury or serious malfunctioning. Contact your local AEG Service Force Centre.
Disposal
Appliance Packaging Information
All materials are environmentally sound! They can be disposed of or burned at an incinerating plant without danger.
About the materials: The plastics can be recycled and are identified as follows:
PE< for polyethylene, e.g. the outer covering and the bags in the interior.
PS< for polystyrene foam, e.g. the pads, which are all free of chloro-fluorocarbon.
The carton parts are made from recycled paper and should be disposed of at a waste-paper recycling collection location.
Disposal of old Appliances
For environmental reasons, refrigeration appliances must be disposed of properly. This applies to your old appliance, and - at the end of its service life - for your new appliance as well.

Warning! Before disposing of old appliances make them inoperable. Remove plug from mains, sever the power cable, remove or destroy any snap or latch closures. This ensures that playing children do not lock themselves inside the appliance (danger of suffocation!) or place themselves into other life-endangering situations.
Disposal:
- The appliance may not be disposed of with domestic waste or bulky refuse.
- The refrigerant circuit, especially the heat exchanger at the back of the appliance, must not be damaged.
• Information concerning collection schedules or locations can be obtained from your local Council or Environmental Health Office.
Remove transport packaging
The appliance and the interior fittings are protected for transport. Pull off the adhesive tape on the left and right side of the door.
You can remove any remnants of adhesive using white spirit.
Remove all adhesive tape and packing pieces from the interior of the appliance.
Installation
Installation Location
The appliance should be set up in a well ventilated, dry room.
Energy use and efficient performance of the appliance is affected by the ambient temperature.
The appliance should therefore
- not be exposed to direct sunlight;
- not be installed next to radiators, cookers or other sources of heat;
- only be installed at a location whose ambient temperature corresponds to the climate classification, for which the appliance is designed.
The climate classification can be found on the serial plate, which is located at the left on the inside of the appliance.
The following table shows which ambient temperature is correct for each climate classification:
| Climate classification for an ambient temperature of | |
| SN +10 to +32 °C | |
| N +16 to +32 °C | |
| ST +18 to +38 °C | |
| T +18 to +43 °C | |
If the refrigeration appliance is installed next to another refrigerator or freezer a clearance of 5 cm at the sides is required, in order to prevent the formation of condensation on the outside of the appliance.
Your refrigerator needs air
For correct operation this appliance must be located in a dry atmosphere, away from heat sources, e.g. cookers, radiators, boilers and direct sunlight.
You should also ensure that air can circulate freely around the back and the top of the cabinet. There should be 100mm (4") between the top of the cabinet and any overhanging kitchen furniture.
Alternatively allow 50mm (2") between the top of the cabinet and any overhanging kitchen furniture and a gap of 25mm (1") on either side of the appliance.
If your refrigerator is installed under a continuous worktop, an air outlet opening of at least 200 cm ^2 and a ventilation grille (A/B) matching the worktop design should be provided at the rear of the worktop.
The cut surfaces of the worktop (C) should be varnished to avoid swelling due to penetration of moisture.
The appliance wall distance must be at least 30 mm and should be checked before the ventilation grille is inserted.
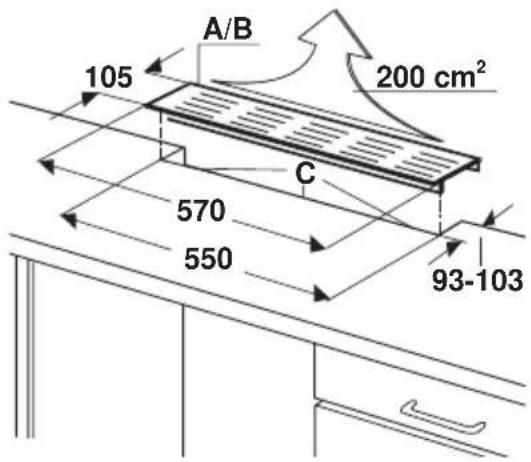
text_image
A/B 105 200 cm² C 570 550 93-103Special accessories:
A Ventilation grille, brown
B Ventilation grille, white
Detaching the worktop
After the worktop has been removed the appliance can be installed
underneath a continuous worktop.
The procedure is as follows:

Unscrew the Philips screws (F) on the right and the left.

Lift the worktop slightly, push it about 20 mm towards the rear, and lift it off upwards (G).
Unscrew the holding bracket (H) and keep it in a safe place.
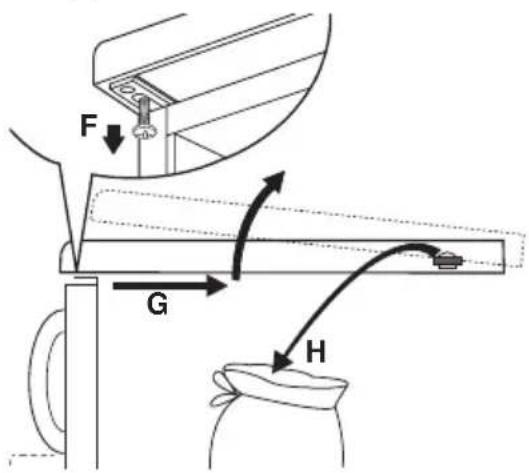
text_image
F G HMounting under a continuous worktop
If installed under a continuous worktop, the appliance is fastened with a mounting screw (A) under the panel.
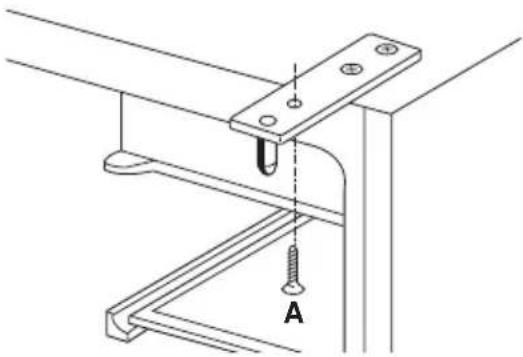
natural_image
Technical line drawing of a mechanical bracket with screw fasteners and mounting holes (no text or symbols)Reversing the door
The side at which the door opens can be changed from the right side (as supplied) to the left side, if the installation site requires.

Warning! When changing the side at which the door opens, the appliance must not be connected to the mains. Remove plug from the mains beforehand.

Tilt the appliance slightly towards the rear and prop it securely.

Unscrew the door hinge screws (K) and remove the hinge pin bracket (1).

Open the door a little way and take it out downwards.
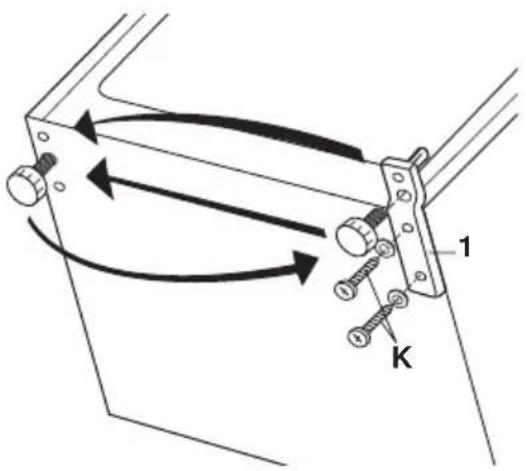
text_image
Diagram showing mechanical assembly with labeled components and directional arrows indicating motion or force
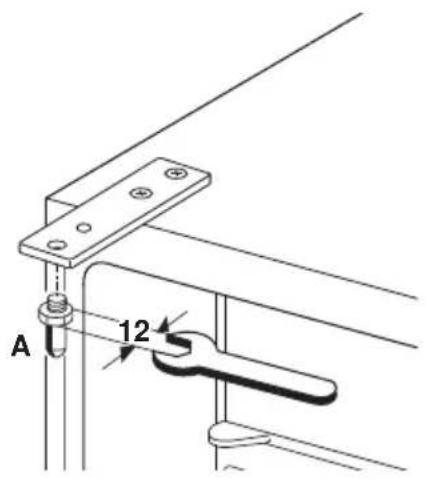
Unscrew the upper pin (A) and screw it into place on the opposite side.

Fit the door into the upper pin (A) and close it.

Screw the hinge pin bracket (1) securely into place on the opposite side using the screws (K).
text_image
A 12
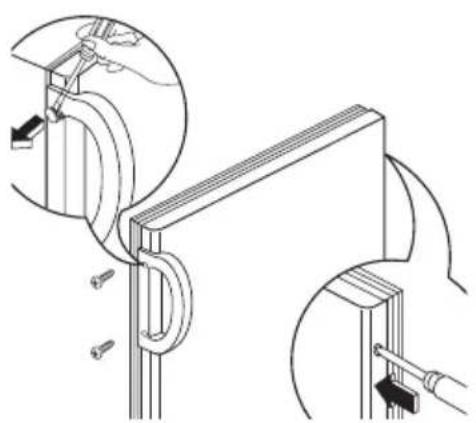
Unscrew the handle. Refit it on the opposite side after having pushed in the plugs with a punch. Cover the holes left open with the plugs contained in the documentation pack.
natural_image
Technical line drawing of a mechanical assembly with two views (top and side), no visible text or symbolsChanging over the freezer compartment door
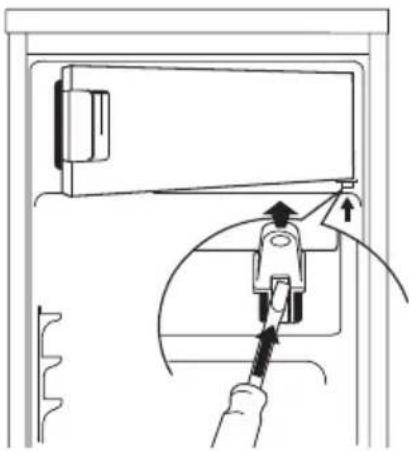
Open the freezer compartment door a little way.
Using a small screwdriver, press the spring in the opening of the lower door bearing slightly upwards and take the door bearing out complete with the door.
natural_image
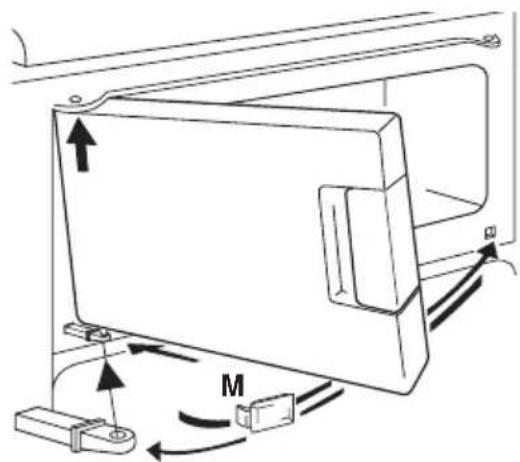
Diagram of a device being inserted into a door panel, showing tool placement and cable insertion (no text or symbols)Position the covering cap (M) on the opposite side.
Turn the freezer compartment door through 180° and fit the lower door bearing into the lower bearing cavity of the freezer compartment door.
Lift the freezer compartment door a little way upwards, fit it into the upper door bearing, and at the
text_image
Diagram of a mechanical device with labeled components and directional arrows indicating motion or forcesame time insert the lower door bearing into the square hole.
Small upwards and downwards adjustments of the freezer compartment door will make fitting easier.
Prior to Initial Start-Up
Please clean the appliance interior and all accessories prior to initial start-up (see section: "Cleaning and Care").
Electrical Connection
Any electrical work required to install this appliance should be carried out by a qualified electrician or competent person.

WARNING - THIS APPLIANCE MUST BE EARTHED
The manufacturer declines any liability should these safety measures not be observed.
Before switching on, make sure the electricity supply voltage is the same as that indicated on the appliance rating plate. The rating plate is inside, on the left.
The appliance is supplied with a 13 amp plug fitted. In the event of having to change the fuse in the plug supplied, a 13 amp ASTA
approved (BS 1362) fuse must be used.
Important
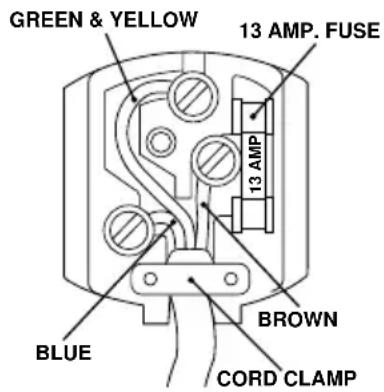
The wires in the mains lead are coloured in accordance with the following code:
Green and Yellow: Earth
Blue: Neutral
Brown: Live
As the colours of the wires in the mains lead of this appliance may not correspond with
text_image
GREEN & YELLOW 13 AMP. FUSE 13 AMP BROWN BLUE CORD CLAMPthe coloured markings identifying the terminals in your plug, proceed as follows:
- The wire coloured green and yellow must be connected to the terminal marked with the letter "E" or by the earth symbol or coloured green and yellow.
- The wire coloured blue must be connected to the terminal "N" or coloured black.
- The wire coloured brown must be connected to the terminal marked "L" or coloured red.
- Upon completion there must be no cut, or stray strands of wire present and the cord clamp must be secure over the outer sheath.

Warning! A cut-off plug inserted into a 13 amp socket is a serious safety (shock) hazard. Ensure that the cut-off plug is disposed of safely.
Plug socket
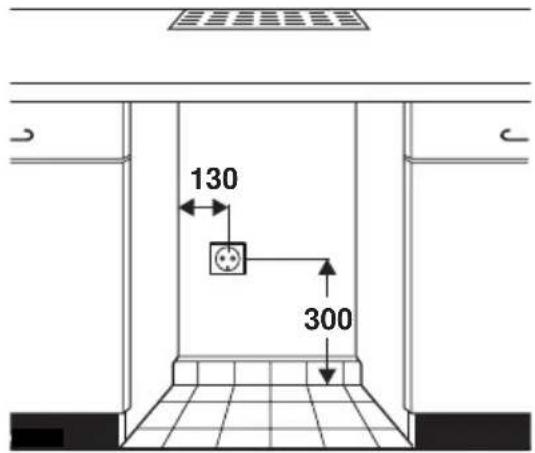
The plug socket necessary for connection of your appliance to the electricity supply should be positioned so that it is possible to pull out the appliance plug.
If your appliance is installed under a continuous worktop, the plug socket should be provided as shown.
Alternatively a concealed spur socket fitted with a 13 A fuse may be fitted. If the socket is not accessible once the appliance is built in, the electrical installation must include suitable means of isolating the appliance from the mains (e.g. fuse, cut-out, current trip or similar with a minimum contact separation of 3 mm).
text_image
130 300Description of the appliance
View of the appliance
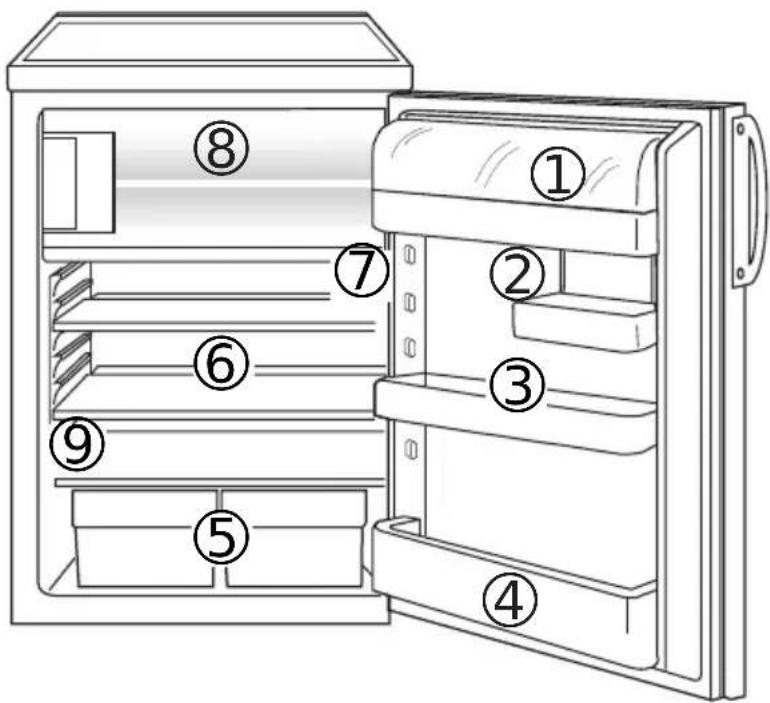
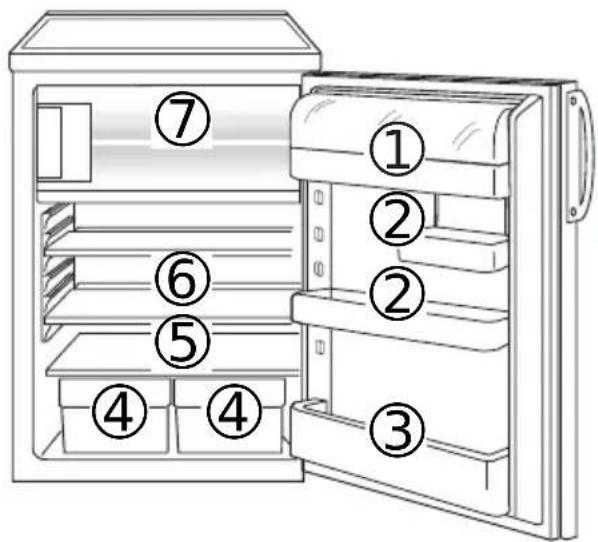
① Butter/cheese compartments with flap and egg storage insert
② Door storage compartment with retaining rail (not for all models)
③ Door storage compartment
④ Bottle shelf
⑤ Vegetable drawers
⑥ Storage shelves
⑦ Temperature regulator and light switch
⑧ Freezer compartment
⑨ Rating plate
text_image
Diagram of a refrigerator with numbered compartments for identificationStarting up and temperature regulation

Insert the plug of the connection lead into the plug socket with protective earth contact. When the refrigerator compartment door is opened, the internal lighting is switched on.
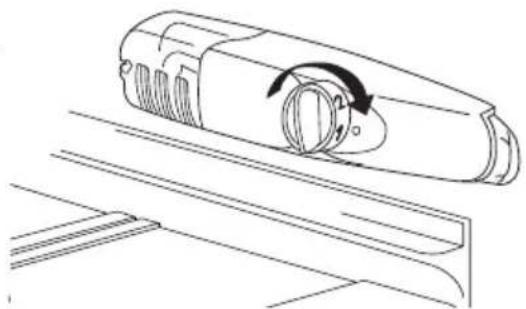
The temperature selector knob is located on the RH side of the refrigerator compartment.
Setting "0" means: Off.
Turning clockwise in direction "1": Refrigerating unit on, the latter then operating automatically.
Setting "1" means:
Hightest temperature, warmest setting.
Setting "6" (end-stop) means:
Lowest temperature, coldest setting.
natural_image
Technical line drawing of a mechanical component with rotational arrow indicating motion (no text or symbols)The temperatures in the refrigerator compartment and freezer compartment cannot be independently regulated.
At a low ambient temperature of around 16^ C, setting "1" should be selected. At ambient temperatures of around 25^ C, select setting "2". If you require a lower temperature, select setting "3" or "4". On this setting, you can be sure the fresh food will be reliably frozen and that a storage temperature of -18^ C will be maintained in the freezer compartment.
If you want the freeze fresh food rapidly, select setting "6", ensuring that the temperature in the refrigerator compartment does not drop below 0°C. You should also promptly reset the temperature regulator to setting "3" or "4".
Important!
High ambient temperatures (e.g. on hot summer days) and a cold setting on the temperature regulator (position "5" to "6") can cause the compressor to run continuously.
Reason: when the ambient temperature is high, the compressor must run continuously to maintain the low temperature in the appliance. The fridge will not be able to defrost since automatic defrosting of the fridge is only possible when the compressor is not running (see also "Defrosting" section). The result is the build up of a thick layer of frost on the fridge rear wall.
If this happens, turn the temperature regulator back to a warmer setting (position "3" to "4"). At this setting the compressor will be switched on and off as usual and automatic defrosting recommenced.
Interior Accessories
Storage shelves/wire trays
Various glass or plastic storage shelves and wire trays are included with your appliance - different models have different combinations.

You should always slide one of the full size glass storage shelves into the lowest set of guides, above the fruit and vegetable containers, and keep it in this position.
The height of the storage shelves can be adjusted:

To do this pull the storage shelf forward until it can be swivelled upwards or downwards and removed.

Please do the same in reverse to insert the shelf at a different height.
VARIO glass storage shelf
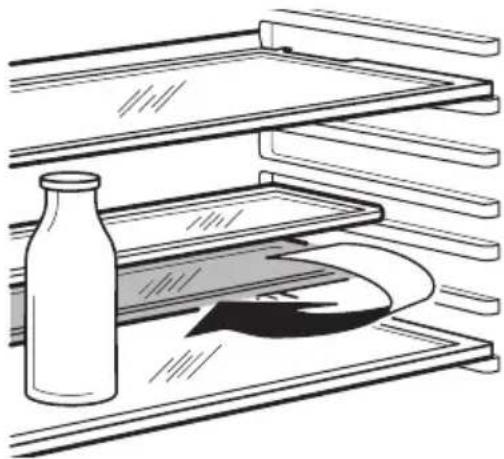
Your appliance is equipped with two half-size glass storage shelves.
Storing tall items:

Slide the front half of the Vario storage shelf in another level to the rear. By this means you will gain space to place tall items on the storage shelf below.
natural_image
Illustration of a shelf with a bottle and a tray, no text or symbols presentCorrect storage
① Butter and cheese
② Eggs and preserves
③ Drinks
④ Cheese storage, fruit, and vegetables
⑤ Meat, salami, cold cuts, dairy produce
⑥ Ready meals, pastries, preserves
⑦ Frozen food storage/freezing food, icemaking.
text_image
Diagram of an open refrigerator with numbered compartments for identification* * * * This symbol means that deep-frozen food can be kept for some months in this compartment.
The length of storage time depends on the type of food - see manufacturer's instructions.
However, small quantities of fresh foods can be frozen (see: "Freezing and storage").
Tip: Food in the fridge should always be covered or packaged, to prevent drying and tainting of other food.
The following are suited for packaging:
- Polyethylene airtight bags and wraps;
- Plastic containers with lids;
- Special plastic covers with elastic;
- aluminium foil.
Freezing and storing frozen food
The freezer compartment is for freezing and storing food.
Important!
- The temperature in the freezer compartment must be -18^ or colder before freezing food or storing food already frozen.
- Do not freeze too large a quantity at any one time (max. 2 kg per 24 hrs). The quality of the food is best preserved when it is frozen right through to the core as quickly as possible.
-
Allow warm food to cool down before freezing. The warmth will cause increased ice formation and increase the power consumption.
-
Please note the maximum storage times specified by the manufacturer.
- Thawed foods which have not been processed further (cooked into meals) may not under any circumstances be frozen a second time.
- Containers with flammable gases or liquids can leak at low temperatures. There is a risk of an explosion! Do not store any containers with flammable materials such as spray cans, fire extinguisher refill cartridges etc in the freezer compartment.
- Bottles and cans must not be placed in the freezer. They can burst when the contents freeze, high carbonate content drinks can even explode! Never store lemonade, juices, beer, wine, sparkling wine etc. in the freezer compartment.
All foods must be packed air tight prior to freezing, so that they do not dry out or lose their flavour, and so that no flavour contamination of other frozen goods occurs.
Caution! Do not touch frozen food with wet hands. Your hands could stick to the food and cause skin abrasions.
Lay the packaged food on the floor of the freezer compartment. Unfrozen food must not touch items already frozen, otherwise the frozen food could begin to defrost.
Tips:
- The following are suited for the packaging of frozen goods:
- freezer bags and polyethylene wraps;
- special cans for frozen goods;
- extra-thick aluminium foil.
- The following are suitable for sealing bags and wrap: plastic clips, rubber bands or tape.
- Smooth the air out of the bag before sealing; air makes it easier for the frozen food to dry out.
- Make flat packages, because these freeze more quickly.
- Do not fill cans for frozen goods to the brim with liquid or paste-like goods, because liquids expand during freezing.
Preparation of Ice Cubes
Fill the ice cube tray 3/4 full with cold water, place it in the freezer compartment and leave to freeze.
To loosen the frozen cubes, either bend the ice cube tray or hold it under running water for a few seconds.
Important! Never try to free an ice tray that is frozen to the freezer compartment using pointed or sharp edged objects, since you may damage the refrigerating circuit. Use the plastic scraper.
Defrosting
The fridge defrosts automatically
The rear wall of the fridge covers with frost when the compressor is running, and defrosts when the compressor is off. The water from the thawing frost evaporates by itself.
Defrosting the freezer compartment
During use and when the freezer compartment door is opened, moisture is deposited in the freezer compartment as frost. Remove this frost from time to time with the soft plastic scraper. Under no circumstances use hard or pointed objects to remove frost.
The freezer compartment should always be defrosted when the layer of frost has reached a thickness of approx. 4 millimetres; however at least once a year. A good time for defrosting is when the appliance is empty or contains only little food.

Warning!
- Do not use electrical heating appliances or any other mechanical or artificial devices to speed up the defrosting process, with the exception of those recommended in these operating instructions.
- Do not use defrosting sprays, they can be hazardous to your health and/or contain substances that damage plastics.
Caution! Do not touch frozen food with wet hands. Your hands could stick to the food and cause skin abrasions.

Remove frozen food, wrap it in several layers of newspaper and store it, covered, in a cool place.

Switch off the appliance and unplug it, or pull the fuse or switch off the circuit breaker.

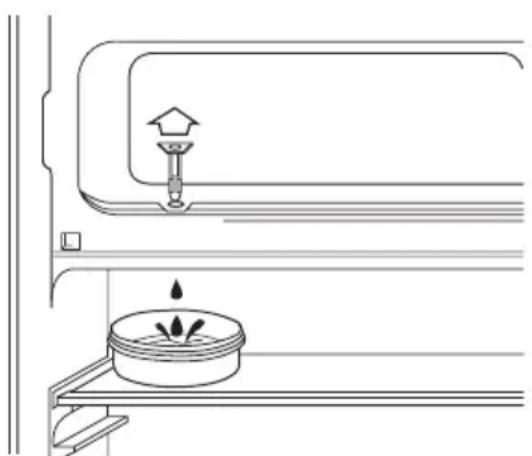
Remove the stopper from the meltwater outlet and place a bowl underneath it to catch the meltwater.
Tip: You can speed up the defrosting process by placing a pan with warm water in the freezer compartment and closing the doors. Remove pieces of ice that have fallen before they completely defrost.

After defrosting, thoroughly clean the freezer compartment (see "Cleaning and Care" section).
natural_image
Diagram of a kitchen appliance with a drain, leaf drop, and a container (no text or symbols)Switching off the appliance
To switch off the appliance, turn the temperature regulator to position "0".
If the appliance is not going to be used for an extended period:
Remove all refrigerated packages.
Switch off the appliance by turning the temperature regulator to position "0".
Remove the mains plug or switch off or turn out the circuit breaker or fuse.
Clean thoroughly (see section: "Cleaning and Care").
Leave the door open to avoid the build up of odours.
Cleaning and Care
For hygienic reasons the appliance interior, including interior accessories, should be cleaned regularly.
Warning! • The app
- The appliance may not be connected to the mains during cleaning. Danger of electrical shock! Before cleaning switch the appliance off and remove the plug from the mains, or switch off or turn out the circuit breaker or fuse.
- Never clean the appliance with a steam cleaner. Moisture could accumulate in electrical components, danger of electrical shock! Hot vapours can lead to the damage of plastic parts.
- The appliance must be dry before it is placed back into service.
Important!
- Ethereal oils and organic solvents can attack plastic parts, e.g.
- lemon juice or the juice from orange peel;
- butyric acid;
- cleansers which contain acetic acid.
Do not allow such substances to come into contact with appliance parts. - Do not use any abrasive cleansers.
Remove frozen food and the food from the refrigerator. Wrap frozen food in several layers of newspaper. Store it in a cool place, well covered.
Defrost the freezer compartment prior to cleaning (see "Defrosting" section).
Switch the appliance off and remove the plug from the mains, or switch off or turn out the circuit breaker or fuse.
Clean the appliance and the interior accessories with a cloth and lukewarm water. Commercially available dish washing detergents may also be used.
After cleaning wipe with fresh water and rub dry.
Accumulation of dust at the condenser increases energy consumption. For this reason carefully clean the condenser at the back of the appliance once a year with a soft brush or a vacuum cleaner.
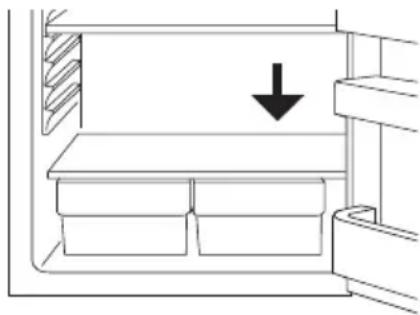
Check the water drain hole on the rear wall of the fridge.
Clear a blocked drain hole with the aid of the green peg in the pack of accessories included with the appliance.
After everything is dry place appliance back into service.
natural_image
Diagram of a refrigerator interior showing a double door with an arrow pointing to the front panel (no text or symbols present)Energy Saving Tips
- Do not install the appliance near cookers, radiators or other sources of warmth. High ambient temperatures cause longer, more frequent operation of the compressor.
- Ensure sufficient air circulation and exhaust at the appliance base and at the back wall of the appliance. Never cover air vent openings.
- Do not place warm foods into the appliance. Allow warm foods to cool first.
- Only leave door open as long as necessary.
- Do not set temperature any colder than necessary.
- Put frozen food in the fridge to defrost. The cold in the frozen food will then be used to cool the fridge.
- Always keep the heat emitting condenser, the metal grille on the rear wall of your appliance clean.
What to do if ...
Correcting Malfunctions
Spare parts:
The following spare parts can be ordered from your local AEG Service Force Centre. You can fit these yourself without any special skill or training, e.g.:
- butter/cheese compartment,
- egg holders,
- door racks,
- fruit and vegetable drawers,
- storage racks
A malfunction may be caused by only a minor fault that you can rectify yourself using the following instructions. Do not perform any other work on the appliance if the following information does not provide assistance in your specific case.

Important! Repairs to refrigerators/freezers may only be performed by competent service engineers. Improper repairs can give rise to significant hazards for the user. If your appliance needs repairing, please contact your specialist dealer or your local Service Force Centre.
| Symptom Possible Cause Remedy | ||
| Appliance does not work. | Appliance is not switched on. | Switch on the appliance. |
| Mains plug is not plugged in or is loose. | Insert mains plug. | |
| Fuse has blown or is defective | Check fuse, replace if necessary. | |
| Socket is defective. | Mains malfunctions are to be corrected by an electrician. | |
| Appliance cools too much. | Temperature is set too cold. | Turn the temperature regulator to a warmer setting temporarily. |
| Symptom Possible Cause | Remedy | |
| The food is too warm. | Temperature is not properly adjusted. | Please look in the "Initial Start Up" section. |
| Door was open for an extended period. | Open the door only as long as necessary. | |
| A large quantity of warm food was placed in the appliance within the last 24 hours. | Turn the temperature regulation to a colder setting temporarily. | |
| The appliance is near a heat source. | Please look in the "Installation location" section. | |
| Interior lighting does not work. | Light bulb is defective. | Please look in the "Changing the Light Bulb" sections. |
| Heavy build up of frost, possibly also on the door seal. | Door seal is not air tight (possibly after reversing the door). | Carefully warm the leaking sections of the door seal with a hair dryer (on a cool setting). At the same time shape the warmed door seal by hand such that it sits correctly. |
| Unusual noises. | Appliance is not level. | Readjust the feet. |
| The appliance is touching the wall or other objects. | Move the appliance slightly. | |
| A component, e.g. a pipe, on the rear of the appliance is touching another part of the appliance or the wall. | If necessary, carefully bend the component out of the way. | |
| The compressor does not start immediately after changing the temperature setting. | This normal, no error has occurred. | The compressor starts after a period of time. |
| Water on the floor or on storage shelves. | Water drain hole is blocked. | See the "Cleaning and Care" section. |
Changing the light bulb

Warning! There is a risk of electric shocks! Before changing the light bulb, switch off the appliance and unplug it, or pull the fuse or the circuit breaker.
Light bulb data: 220-240 V, max. 15 W

To switch off the appliance, turn the temperature regulator to position "0".

Unplug the mains plug.

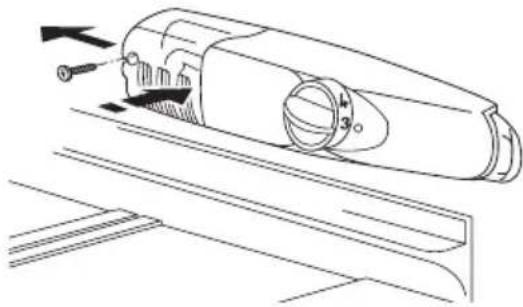
To change the light bulb, undo the screw.

Press the light bulb cover as shown and slide it backwards.

Change the defective light bulb.

Refit the light bulb cover and the screw.

Put the refrigerator back into operation.
natural_image
Technical line drawing of a mechanical component with no visible text or symbolsService & Spare Parts
In the event of your appliance requiring service, or if you wish to purchase spare parts, contact your local AEG Service Force Centre by telephoning:
08705 929 929
Your call will be automatically routed to the Service Centre covering your post code area.
In guarantee customers should ensure that the above checks have been made as the engineer will make a charge if the fault is not a mechanical or electrical breakdown.
Please not that proof of purchase is required for in-guarantee service calls.
Help us to Help You
Please determine your type of enquiry before writing or telephoning. When you contact us we need to know:
- Your name, address and post code.
- Your telephone number.
- Clear and concise details of the fault.
- The model number and serial number (see rating plate).
- Date of purchase.
Customer Care
For general enquiries concerning your AEG appliance and for further information on AEG products, contact our Customer Care Department by letter or telephone, as follows:
Customer Care Department
AEG Domestic Appliance Limited
55-77 High Street
Slough
Berkshire
SL1 1DZ
Tel: 08705 350350 (*)
(*) calls to this number may be recorded for training purposes.
To contact your local AEG Service Force Centre telephone 08705 929 929
| CHANNEL ISLANDS | ORKNEY(M65) | Corsie Domestics7 King StreetKirkwallOrkney KW15 | NORTH EAST | ||
| GUERNSEY | Guernsey ElectricityPO Box 4Vale, GuernseyChannel Islands | GATESHEAD(M39) | Unit 356aDukesway CourtDukeswayTeam ValleyGateshead NE11 0BH | ||
| PERTH | Hydro ElectricalInveralmond HouseRuthervenfield RoadPerth PH1 3AQ | ||||
| JERSEY | Jersey Electricity CompanyPO Box 45Queens RoadSt HellerJerseyChannel Islands JE4 8NY | GRIMSBY(M42) | 15 Hainton AvenueGrimsbySouth HumbersideDN32 9AS | ||
| PERTH(OWN SALES) | Graham BeggUnit 4Airport Ind EstateWick KW1 4QS | ||||
| SCOTLAND | SHETLAND(OWN SALES) | Tait Electronic Systems LtdHolmsgarth RoadLerwickShetland ZE1 0PW | Unit 1Boulevard Industrial EstateHullHU3 4AY | ||
| ABERDEEN(M05) | 54 Claremont StreetAberdeen AB10 6RA | LEEDS(M37) | 64-66 Cross Gates RoadLeedsLS15 7NN | ||
| AUCHTERMUCHY(M03) | 33a BurnsideAuchtermuchyFife KY14 7AJ | SHETLAND(OWN SALES) | Bolts Shetland Ltd.26 North RoadLerwickShetland ZE1 0PE | Unit 16Gurney WayAycliffe Industrial EstateNewton AycliffeDL5 6UJ | |
| BLANTYRE(M07) | Unit 5Block 2Auchenraith Ind. EstateRosendale WayBlantyre G72 0NJ | WHALSAY(OWN SALES) | Leask ElectricalHarisdaleSymbister, WhalsayShetland ZE2 9AA | SHEFFIELD(M38)Pennine HouseRoman Ridge Ind.Roman Ridge RoadSheffield S9 1GB | |
| DUMFRIES(M01) | 93 Irish StreetDumfriesScotland DG1 2 PQ | NORTHERN IRELAND | |||
| DUNOON(M67) | Brair Hill7 Hill StreetDunoonArgyll PA23 7AL | BELFAST(M27) | Owenmore HouseKilwee Business ParkUpper Dunmury LaneBelfastBT17 0HD | NORTH WEST | |
| GLASGOW(M04) | 20 Cunningham RoadClyde EstateRutherglenGlasgow G73 1PP | CARDIFF(M28) | WALESGuardian Industrial EstateClydesmuir RoadTremorfaCardiffCF2 2QS | BIRKENHEAD(M11) | 1 Kelvin ParkDock RoadBirkenheadL41 1LT |
| INVERNESS(M06) | Unit 3BSmithton Ind. EstateSmithtonInverness IV1 AJ | CARLISLE(M10) | Unit 7James Street WorkshopsJames StreetCarlisleCumbria CA2 5AH | ||
| ISLE OF ARRAN(OWN SALES) | Arran DomesticsUnit 4 The Douglas CentreBrodickIsle of Arran KA27 8AJ | CLYWD(M14) | Unit 6-7 Coed - ParcAbergele RoadRhuddlanClwydWalesLL18 5UG | ISLE OF MAN(M64) | South Quay Ind. EstateDouglasIsle of ManIM1 5AT |
| ISLE OF BARRA(OWN SALES) | J Zerfah244 BruernishIsle of BarraWestern Islands HS9 5QY | DYFED(M77) | Maes Y CoedHigh MeadLlanybydderCarmarthenshireSA40 9UL | LIVERPOOL(M15) | Unit 1Honeys Green PrecinctHoneys Green LaneLiverpoolL12 9JH |
| ISLES OF BUTE | Walker EngineeringGlenmhorUpper Serpentine RoadRothesayIsle of Bute PA20 9EH | HAVERFORDWEST(M75) | Cromlech LodgeAmblestonHaverfordwestPembrokeshireSA62 5DS | MANCHESTER(M09) | Unit BCentral Industrial EstateSt Marks StreetBoltonBL3 6NR |
| ISLE OF LEWIS | ND Macleod16 James StreetStornowayIsle of Lewis PA87 2QW | OSWESTRY(M17) | Plas FfynnonWarehouseMiddleton RoadOswestrySY11 2PP | PRESTON(M13) | Unit 250Dawson PlaceWalton SummitBamber BridgePrestonLancashire PR5 8AL |
| KELSO(M08) | 2-8 Wood MarketKelsoBorders TD5 7AX | STOCKPORT(M16) | Unit 20 Haigh ParkHaigh AvenueStockportSK4 1QR | ||
To contact your local AEG Service Force Centre telephone 08705 929 929
| MIDLANDS | LONDON & EAST ANGLIA | SUNBURY(M63) | Unit 1aThe SummitHanworth RoadHanworth Ind. EstateSunbury on ThamesTW16 5D | ||
| BIRMINGHAM(M18) | 66 Birch Road EastWyrley Road Ind. EstateWittonBirminghamB6 6DB | BECKENHAM(M79) | 11a Gardener Ind. EstateKent House LaneBeckenhamKent BR3 1QZ | ||
| BOURNE(M44) | Manning Road Ind. EstatePinfold RoadBournePE10 9HT | CHELMSFORD(M47) | Hanbury RoadWidford Ind. EstateChelmsfordEssexCM12 3AE | SOUTH EASTASHFORD(M58) | Unit 2Bridge Road Business Est.Bridge RoadAshfordKent TN2 1BB |
| BRIDGNORTH(M72) | 68 St. Mary's StreetBridgnorthShropshireWV16 4DR | COLINDALE(M53) | Unit 14Capitol ParkCapitol WayColindaleLondon NW9 0EQ | ||
| GLOUCESTER(M23) | 101 Rycroft StreetGloucesterGL1 4NB | ELTHAM(M78) | 194 Court RoadMottinghamElthamLondon SE9 4EW | Unit 1Redsfield Ind. EstateChurch CrookhamFleetHampshire GU13 0RD | |
| HEREFORD(M31) | Unit 3Bank BuildingsCattle marketHarefordHE4 9HX | ENFIELD(M49) | 284 Alma RoadEnfieldLondonEN3 7BB | HAYWARDSHEATH(M55) | 21-25 Bridge RoadHaywards HeathSussex RH16 1UA |
| HIGHAM FERRERS(M51) | 30 High StreetHigham FerrersNorthantsNN10 8BB | GRAVESEND(M57) | Unit B4Imperial Business EstateGravesendKentDA11 0DL | SOUTH WESTBARNSTAPLE(M30) | Main RoadFremingtonBarnstapleNorth Devon EX31 2NT |
| ILKESTON(M43) | Unit 2Furnace RoadIlkeston DE7 5EP | HARPENDEN(M46) | Unit 4Riverside EstateColdharbour LaneHarpendenAL5 4UN | BOURNEMOUTH(M26) | 63-65 Curzon RoadBournemouthDorsetBH1 4PW |
| LEICESTER(M22) | Unit 7Oaks Ind. EstateCoventry RoadNarboroughLeicestershireLE0 5GF | LETCHWORTH(M50) | 16-17 Woodside Ind. EstateWorks RoadLetchworthHertsSG6 1LA | BRIDGEWATER(M35) | 6 Hamp Ind. EstateBridgewaterSomerset TA6 3NT |
| LINCOLN(M40) | Unit 8Stonefield ParkClifton StreetLincolnLN5 8AA | LONDON(M76) | 2/4 Royal LaneYiewsleyWest DraytonMiddlesexUB7 8DL | BRISTOL(M25) | 11 Eldon WayEldonwall TradingBristolAvon BS4 3QQ |
| NEWCASTLEUNDER LYME(M12) | 18-21 Croft RoadBrampton Ind. EstateNewcastle under LymeStaffordshireST5 0TW | MAIDENHEAD(M60) | Reform RoadMaidenheadBerkshireSL6 8BY | EMSWORTH(M33) | 266 Main RoadSouthbourneEmsworthPO10 8JL |
| REDDITCH(M20) | 13 Thornhill RoadNorth Moons MoatRedditchWorcestershireB98 9ND | MOLESEY(M61) | 10 Island Farm AvenueWest MoleseySurreyKT8 2UZ | ISLE OF WIGHT(M34) | Unit 8Enterprise CourtRyde Business ParkRydeIsle of Wight PO33 1DB |
| TAMWORTH(M19) | Unit 3Sterling ParkClaymoreTamworthB77 5DO | NEWBURY(M24) | 9 Pipers CourtBerkshire DriveThatchamBerkshireRG19 4ER | NEWTON ABBOT(M29) | Unit 2Zealley Ind. EstateKingsteigntonNewton AbbotS. DevonTQ12 3TD |
| WORCESTER(M73) | Units 1 & 2Northbrook CloseGregorys Mill Ind. EstateWorcesterWR3 8BP | IPSWICH(M48) | Unit 6CELton Park Business CentreHadleigh RoadipswichIP2 0DD | Unit 7DPool Ind. EstateWilson WayRedruthCornwall TR15 3QW | |
| NORWICH(M52) | 2b Trafalgar StreetNorwichNR1 3HN | ||||
Noises during Operation
The following noises are characteristic of refrigeration appliances:
- Clicks Whenever the compressor switches on or off, a click can be heard.
- Humming As soon as the compressor is in operation, you can hear it humming.
- Bubbling/ When refrigerant flows into thin tubes, you can hear Splashing bubbling or splashing noises. Even after the compressor has been switched off, this noise can be heard for a short time.
Regulations, Standards, Guidelines
This appliance was designed for household use and was manufactured in accordance with the appropriate standards. The necessary measures in accordance with appliance safety legislation regulations (GSG), accident prevention regulations for refrigeration appliances (VBG 20) and the regulations of the German Society of Electrical Engineers (VDE) were observed in the manufacture of this appliance.
The refrigerant circuit has been checked for leaks.
CE This appliance is in accordance with the following EU guidelines:
- 73/23/EWG dated 19 February 1973 - low voltage guidelines.
- 89/336/EWG dated 3 May 1989
(including guideline change notice 92/31/EWG) - EMV guideline
Technical terminology
- Refrigerant
Liquids that can be used to a generate a cooling effect are known as refrigerants. They have a relatively low boiling-point, indeed so low, that the warmth from the food stored in the fridge or freezer can cause the refrigerant to boil and vaporise.
• Refrigerant Circuit
Closed circulation system that contains the refrigerant. The refrigerant circuit comprises primarily of an evaporator, a compressor, a condenser and pipe work. - Evaporator
The refrigerant is evaporated in the evaporator. Similar to all other liquids, refrigerant requires heat to evaporate. This heat is removed from the interior of the appliance, as a result the interior is cooled. The evaporator is therefore located inside the appliance or placed in foam immediately behind the inner wall and thus not visible. - Compressor
The compressor looks like a small drum. It is driven by a built-in electric motor and is mounted on the base of the appliance at the rear. The task of the compressor is to draw in vaporised refrigerant from the evaporator, to compress it, and to pass it on to the condenser. - Condenser
The condenser normally has the form of a grid. The refrigerant compressed in the compressor is liquefied in the condenser. During this process, heat is released to the surrounding air at the surface of the condenser. The condenser is mounted on the base of the appliance.
AEG Hausgeräte GmbH
Postfach 1036
D-90327 Nürnberg