
ZE-080DVD - DVD player ZENEC - Free user manual and instructions
Find the device manual for free ZE-080DVD ZENEC in PDF.


| Product Type | Car DVD Player |
| Brand | Zenec |
| Model | ZE-080DVD |
| Dimensions (W x H x D) | 178 x 100 x 160 mm (Single DIN) |
| Weight | 1.2 kg |
| Power Supply | 12V DC (negative ground) |
| Playback Formats | DVD, DVD±R/RW, CD, CD-R/RW, MP3, JPEG |
| Display | 8-inch TFT LCD touchscreen |
| Output Power | 4 x 50W max |
| Video Output | Composite video, optional rear camera input |
| Audio Output | Front & rear RCA pre-outs |
| Connectivity | USB, SD card, Bluetooth, AM/FM tuner |
| Remote Control | Included |
| Cleaning Instructions | Wipe with a soft, dry cloth. Do not use solvents. |
| Safety Precautions | Use only in vehicles with 12V negative ground systems. Avoid excessive volume to prevent hearing damage. |
| Spare Parts Availability | Contact Zenec service center for remote control or mounting accessories. |
| General Information | Designed for in-car entertainment with advanced playback options and touchscreen control. |
Frequently Asked Questions - ZE-080DVD ZENEC
User questions about ZE-080DVD ZENEC
0 question about this device. Answer the ones you know or ask your own.
Ask a new question about this device
Download the instructions for your DVD player in PDF format for free! Find your manual ZE-080DVD - ZENEC and take your electronic device back in hand. On this page are published all the documents necessary for the use of your device. ZE-080DVD by ZENEC.
USER MANUAL ZE-080DVD ZENEC
MODEL NO:
ZE-080DVD
INSTRUCTION MANUAL
natural_image
Black and white checkerboard pattern with no text or symbolsZENEC ZE-080DVD
12 DIN DVD & MP3/WMA STAND ALONE PLAYER
© 1992 – 1997 Dolby Laboratories, Inc.
natural_image
Simple line drawing of a hand holding a circular object with a pointer (no text or symbols)
natural_image
Abstract black-and-white line drawing with intersecting strokes and small dots (no text or symbols)
natural_image
Simple line drawing of a stylized animal face with no text or symbols
natural_image
Illustration of two hands holding a circular object with a pointed tip, no text or symbols presentGRUNDGERÄT
BEDIENTEIL

① POWER - Taste
natural_image
Line drawing of a rectangular electronic device with internal components and mounting holes (no text or symbols)
natural_image
Technical line drawing of a rectangular electronic device with side and top views (no text or symbols)
natural_image
Diagram showing two steps of a device being inserted into a package, with no visible text or symbols.BENUTZEN DER FERNBEDIENUNG:
| VCD | 00:00:35 | 00:03:53 |
| Track 5/12 |

VIDEOEINSTELLUNGEN (VIDEO SETUP)
BILDFORMAT (TV DISPLAY)

RATINGEINSTELLUNGEN
PASSWORT

ZUSÄTZLICHE INFORMATIONEN
| Supply Voltage: 12 VDC (10.8V ~ 16V), test voltage 13.2V, negative ground | |
| Environment Temperature: 0°C ~ 45°C | |
| Chassis Dimensions: 183.4 x | 178 x 50 (mm) |
| Current Consumption: Less than 2AQuiescent < 5mA | |
| Video System: NTSC/PAL/AUTO | |
| Discs Played: (1) DVD-VIDEO | Disc5” (12cm) single-sided, single-layer5” (12cm) single-sided, double-layer(2) Compact Disc (CD-DA, VIDEO CD)5” (12cm) Disc |
| Audio Output Level: 2ch 2.0 | -0/-1Vrms (10K Ω) |
| Video Output Level: 1± 0.2V (75 Ω) | |
| Characteristics: (1) Frequency | Response 20Hz~20KHz ( ±2dB)(2) S/N Ratio 85dB (JIS) (1KHz) |

Congratulations to your purchase of this DVD player. This product has been designed and built to deliver the highest quality video reproduction with CD sound.
We are sure you'll enjoy watching your favorite movies with this player as a part of your multimedia system. For best results, please consult a professional mobile electronics installer for application advice or troubleshooting.
To guarantee top performance, we recommend to using quality installation accessories such as RCA interconnects, power cables, and speaker wire. Thank you for choosing a ZENEC product for your mobile entertainment system.
FEATURES
Compatible with PAL-DVD (Video CD) and NTSC DVD (Video CD).
This player can play discs recorded in either PAL or NTSC format.
● A single LSI chip now integrates all major DVD playback circuit functions including MPEG2 decoder, video D/A converter and audio decoders.
● L/R stereo analog audio outputs for connection to existing head unit aux inputs.
Video output is composite video.
● Supplied remote handles multi-function software (multi-language audio-track/subtitle, multi-angle, multi-story, etc), plus all basic functions.
USE THIS PRODUCT SAFELY
When Driving
Keep the volume level low enough to be aware of road and traffic conditions.
When Washing Car
Do not expose the product to water or excessive moisture. This could cause electrical shorts, fire or other damage.
When Parked
Parking in direct sunlight can produce very high temperatures inside your vehicle. Give the interior a chance to cool down before starting playback.
Use the proper Power Supply
This product is designed to operate with 12 volt DC and negative chassis ground.
Protect the Disc Mechanism
Avoid inserting any foreign objects into the slot of this player.
Failure to observe this may cause malfunction due to the precise mechanism of this unit.
Use Authorized Service Centres
Do not attempt to disassemble or adjust this precision product, please refer to the service centre near by for service assistance.
CONTENTS
SAFETY INFORMATION 24
DISC NOTES....25
INSTALLATION....26/27
REMOTE CONTROL....28
PREPARING THE REMOTE CONTROL 29
LOADING A DVD/VCD/CD DISC 29
EJECTING A DISC....30/31
ON-SCREEN DISPLAY FUNCTION 32
MULTI-AUDIO LANGUAGE FUNCTION 33/34
INITIAL SETUP....35
LANGUAGE SETUP 36
VIDEO SETUP....37
RATING SETUP 38
ADDITIONAL INFORMATION....39
ACCESSORIES AND HARDWARE 40
TECHNICAL SPECIFICATIONS 41
WARRANTY 42/43
SAFETY INFORMATION
Caution:
This DVD player is a class A laser product. However this mobile DVD player uses a visible/invisible laser beam which could cause hazardous radiation exposure if directed into the eyes. Be sure to operate the mobile DVD player correctly as instructed. Use of controls or adjustments or performance of procedures other than those specified herein may result in hazardous radiation exposure. Do not open covers and do not repair by yourself, refer servicing to qualified person.
Warning:
To reduce the risk of fire, electric shock, do not expose this equipment to rain or moisture. To reduce the risk of fire of electric shock, and annoying interference, use only the recommended accessories. This device is intended for continuous operation.
This product incorporates copyright protection technology that is protected by method claims of certain US patents and other intellectual property rights owned by Macrovision Corporation, and is intended for home and other limited viewing uses only unless otherwise authorized by Macrovision Corporation. Reverse engineering or disassembly is prohibited.
Region Management Information:
This mobile DVD player is designed and manufactured to respond to the region management information that is recorded on a DVD disc. If the region number described on the DVD disc does not correspond to the region number of this mobile DVD player, it cannot play this disc.
Disc formats supported by this player (12 cm disc)
CD: CD, CD-R, CD-RW, CD-ROM, MP3 VCD: VCD, SVCD, DVCD DVD: DVD5, DVD9, DVD10
Discs which cannot be played with this player
DVD-ROM DVD-RAM CDV CD-G
Handing and cleaning
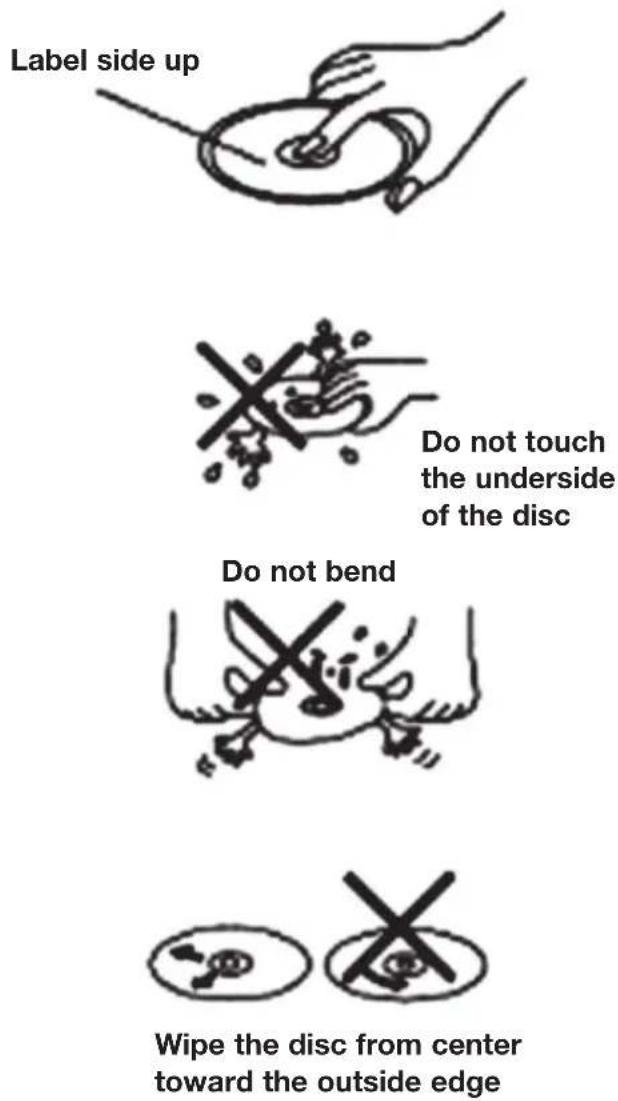
Dirt, dust, scratches and warping disc will cause misoperation. Do not place stickers or make scratches on discs. Do not warp discs. A disc should be kept in its case when not in use to prevent damage.
Do not place discs in following place:
- Direct sunlight
- Dirty, dusty and damp areas
- Near car heaters
- On the seats or dashboard

Manufactured under license from Dolby Laboratories.
"Dolby" and the double-D symbol are trademarks of Dolby Laboratories.
DISC CLEANING
Use a dry soft cloth to wipe the surface. If the disc is quite dirty, use a soft cloth slightly moistured with isopropyl (rubbing) alcohol.
Never use solvents such as benzine, thinner or conventional record cleaners as they may mar the surface of the disc.
Note:
A disc may become somewhat scratched (although not enough to make it unplayable) depending on how it is handled and the conditions of exposure. Note these scratches are not an indication of any problem with the player.
Preparing New Discs with Rough Spots
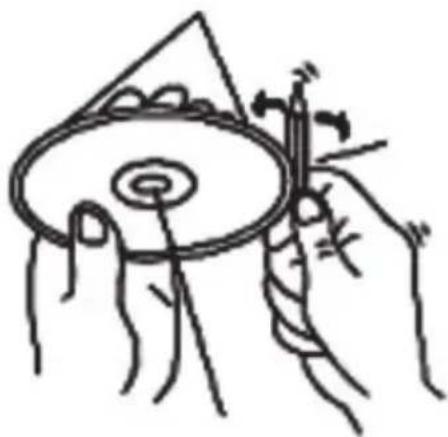
A new disc may have rough edges on its inside and outside edges. If a disc with rough edges is used, the proper setting will not be performed and the player will not play the disc. Therefore, remove the rough edges in advance by using a ball point pen or pencil as shown on the right.
To remove the rough edges, press the side of the pen or pencil against the inside and outside edges of the disc.
Rough spots on
outside edge
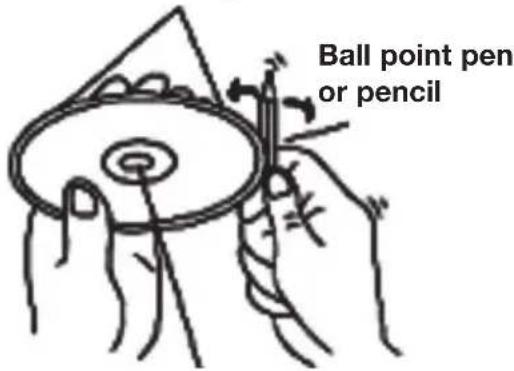
Rough spots on inside edge
INSTALLATION
Front panel

① POWER Turn the power on/off
② PLAY/PAUSE Begin disc play/Pause disc play ( :To staNote playback DVD discs,press the PLAY button of the Remote Controller)
③ STOP Stop disc play
④ SKIP Use to skip a scene or music
⑤ EJECT A disc is ejected by this button
⑥ Remote Sensor Receives a light signal from the remote controller
⑦ Disc in A disc is inserted here
⑧ Reset Resetting the processor
Rear panel electrical connection

General
Avoid installing and operating the unit in direct sunlight or near hot air vents. If the internal temperature of the vehicle is extremely high, a short cooling down period is necessary before operating the unit.

natural_image
Line drawing of a rectangular electronic device with internal components and mounting holes (no text or symbols)
natural_image
Technical line drawing of a rectangular electronic device with side and top views (no text or symbols)Notes:
■ Use only the supplied mounting material. Failure to follow the instructions will invalidate your warranty.
- Do not install and operate the unit in any way other than described in this manual. Failure to follow the instructions will invalidate your warranty.
REMOTE CONTROL

- Change the Video/Audio to mode IN
- Press POWER to turn the unit ON or OFF
- Display the root menu that is stored on the DVD disc selects between PBC ON a PBC OFF on a VCD
- in MENU mode, these buttons move the cursor to the up or down in MENU mode, these buttons move the cursor to the left or right
- Confirm the Track/Chapter selected with the number key or selected with the cursor
- Increase or decrease the volume
- Numeric buttons
- Press to increase 10
-
Display the TITLE menu that is stored in DVD disc
-
Changes the AUDIO soundtrack on multiaudio soundtrack DVD disc. Changing of the sound mode of the VCD/CD disc
-
Switch the Repeat mode of DVD/VCD/CD/MP3 disc
-
Changes the SUBTITLE language on multi-subtitle language DVD disc
-
Display statistical disc information during Playback
-
Eject button
-
Display or Exit the SETUP menu
-
Press to pause playback or continue playing
-
Press to stop playback
-
Press to skip to the next track
-
Press to skip back one track
-
Press to start forward rapidly
-
Press to reverse rapidly
-
Mute the volume
-
Disc search button, cooperatively used with numeric button
-
Zoom in the capture
-
Select playing discs recorded in either PAL or NTSC format in the stop mode.
-
Changes the view angle on multi-angle DVD disc
-
Selects forward slow motion Playback
PREPARING THE REMOTE CONTROL
Inserting the Battery
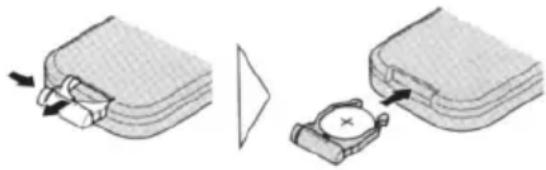
- Open the battery compartment cover.
-
Insert the new battery (3V Cr2025). Make sure that the positive and negative terminals of the battery are oriented as indicated.
-
Close the cover
natural_image
Diagram showing two steps of a device being placed, one with a lock and arrow, the other with a watch and magnifying glass (no text or symbols)Using the Remote Control
Point the remote control toward the front of the player (at the remote receiver “eye”) Operation angle: About ± 30 degree in each the direction of the front of the IR mark.
LOADING A DVD/VCD/CD DISC
- Turn the ignition to the Accessory (ACC) position.
- Press the ⏻ POWER button.
- Insert the disc into the disc slot with the label side of the disc facing up.
- The player starts playback automatically.
EJECTING A DISC
Press ▲ (EJECT) button to eject the disc.
Stopping play
- Press the ■ (Stop) button to stop playback.
Press the ▶ (play) button for playback.
- Press the ■ (Stop) button twice. It will stop the playback and go back to initial Track/Chapter.
Rapid Forward/Reverse
Press FF ▶ & REW ◀ during play. Each time the button is pressed the speed changes (depending on the disc format) as follows: DVD/VCD/CD/MP3:
→ Nomal playback → 2x → 4x → 8x → 20x →
Skipping Track
Press ◄/▶ on the remote handset or on the front panel during playback. Press ▶ to skip to next track, and ◄ to jump back one track.
Slow Motion Playback
Press the slow button during playback. Each time the button is pressed the changes (depending on the disc format) as follows:
DVD VCD:
→ 1/2x → 1/4x → 1/6x → 1/7x →
Pause (still picture)
Pressing PAUSE button during playback, it will stop play temporarily.
Press the PAUSE button for the second time to resume playback.
Repeat
Press the REPEAT button to select repeat mode as follows:
DVD:
Press the REPEAT button to select repeat mode as follows.
→ RepeatChapter → Repeat Title → OFF →
SVCD/VCD/CD/MP3:
Press the REPEAT button to select repeat mode as follows.
→ Repeat Single → Repeat ALL → OFF →
-
Repeat Single mode continuously repeat the current track/song.
-
in Repeat ALL mode, all tracks /songs on the disc are repeated.
ZOOM
If button ZOOM is pressed, picture will enlarge time to time. But some DVD discs pictures can not be zoomed.
TITLE
Press TITLE button when DVD is playback, it will come back to TITLE to play.
GOTO
Press GOTO button for the first time, it will appear the searching time function and searching title/chapter function.
Press GOTO button for the second time, it will give the bookmark when the disc is playing, on the other hand, the function is escaped.
You need to press the GOTO button the third time when the disc is playing to escape the function.
Mute Function
Press MUTE button on the card remote Control to cut down the sound output.
Press it again or vol ⊕⊖ to resume to previous volume level.
VOL ⊕ ⊖
Volume Control:
Press VOL ⊕ on the card remote control to increase the sound level and press VOL ⊖ to decrease the sound level.
Remote Sensor (IR)
Point the remote handset to the remote sensor.
Receive the signal from remote handset.
Turning the player on/off
Press the POWER button on front of panel or press POWER button on remote control to turn the player on or off.
Mode
Whenever you press AUX button, input condition is to be changed as follows.
→ DVD → AUX1 → DVD →
AUDIO/VIDEO IN
The unit can accept an auxiliary(AUX) signal from external equipment.
- Connect the equipment and the unit with A/V cables, the AUDIO OUT of the external equipment is connected to the AUDIO IN jack on the front panel of the unit, the VIDEO OUT of the external equipment is connected to the VIDEO IN jack of the unit.
- Turn on the external equipment and the unit.
- Select input function by pressing the AUX button on the remote control. Select the AUX1 input from external AV signal.
- The signals are routed through the Video output jack and the Audio output jack of the DVD unit.
ON-SCREEN DISPLAY FUNCTION
Press the DISPLAY button during playback to display the contents of the current disc on the screen.
Example:
(1) Press DISPLAY for the first time:
SVCD VCD CD:
| VCD | 00:00:35 | 00:03:53 |
| Track 5/12 |
Disc type, elapsed time, remain time Track Number, Total Track Number of the disc currently being played will shown on the screen.
DVD:
| DVD | 00:00:35 | 00:03:53 | |
| Title 1/1 | Chapter 1/8 | Angle | 1/1 |
| Audio | 1/2 | 6Ch | ENG |
| Subtitle | 1/2 | CHI | |
| Bitrate | 8.448 | Mbps |
Disc type, elapsed time, remain time, Title number, Chapter number, view angle, audio channel, audio type, language, Subtitle number of the track currently played back will be shown on the screen.
When the message on the screen, use the ◀ button to move the cursor to select mode, and input the number to change the title or chapter, or press ENTER button to change other mode. Press the other button, the temporal message will be shown on the right up of the disc message.
(2) Press DISPLAY for the second time:
The message on the screen will be cleared.
MP3:
The elapsed time on the screen will be shown or cleared by pressing display button.
MULTI-AUDIO LANGUAGE FUNCTION
DVD:
Press AUDIO during playback.
Each time the button is pressed, number of the audio soundtrack language changes in sequential order.
Notes:
The language number is different according to the disc.
Some discs only contain one language sound-track. When no different language soundtrack is available will be displayed in the top left corner of the screen.
VCD CD:
Press AUDIO during playback.
It is possible to switch the sound between monaural and stereo sound.
→ Stereo → Left → Right →
MENU Function
DVD:
Press MENU button while the disc is playing and the disc menu will be displayed. You can navigate with the remote control navigation keys and select a feature with the ENTER key. Press MENU twice, it will go back to the primary place.
VCD:
Press MENU button while the disc is playing, you can switch between PBC ON and PBC OFF mode.
TITLE Menu Function
(For DVD only)
If the DVD has multiple titles recorded on the disc. It can select preferred title from the title menu to start playback.
- Press TITLE during playback. The title menu is displayed.
- Press the cursor button show in TV screen, select preferred title by the cursor button and confirmed by ENTER key.
Multi-Subtitle Language Function (For DVD only)
Press SUBTITLE during playback.
Each time the button is pressed, number of the subtitle language changes in sequential order.
Notes:
The language number is different according to the disc.
Some discs only contain one language sound-track.
When no different language soundtracks are recorded, will be displayed at screen left top corner.
Multi-angle Function (For DVD only)
Press ANGLE during playback.
Each time the button is pressed, number of the angle changes in sequential order.
Notes:
The angle number is different according to the disc.
The function only work for discs having scenes recorded at different angles.
When no different angles are available, ∅ will display in the top left corner of the screen.
MP3 /MPEG/JPG DISC PLAY
MP3 disc is playing as the format of FOLDER.
For example:

Use ▲▼◀▶ to select the item or folder, then press ENTER button.
Pressing REPEAT button repeatedly can select three kinds of repeat play mode.
In the playback, use ◀◀/▶◀ to skip an item ahead or back.
When the STOP, use ▲▼◄►. Move the cursor to MODE, press ENTER button to change the mode.
Use SUBTITLE button to return the upper window.
Note: Press TITLE button to enter the preview mode when playing JPG.
INITIAL SETUP
SETUP MENU - MAIN PAGE
- Press SETUP in the stop mode.
- The initial SETUP menu is displayed.
- Select the preferred item by using the ◀ / ▶ buttons.
- Press ENTER buttons.
- Press SETUP again to exit setup menu.
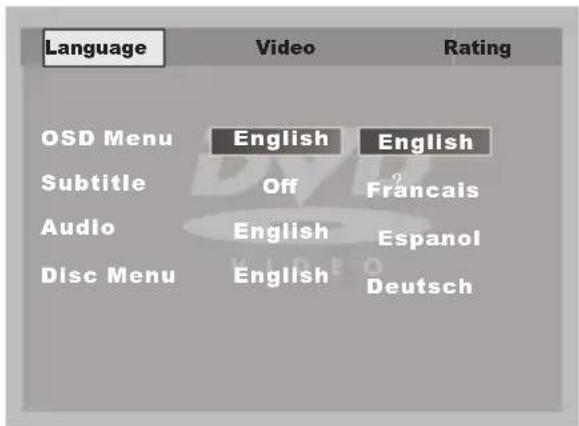
a. Language
This setup page includes all the item of Language display feature. The detail please refer to LANGUAGE SETUP MENU.
b. Video
This setup page include all the item for TV display feature. Please refer to VIDEO SETUP MENU.
c. Rating
This setup page includes rating feature. The detail please refer to RATING SETUP MENU.
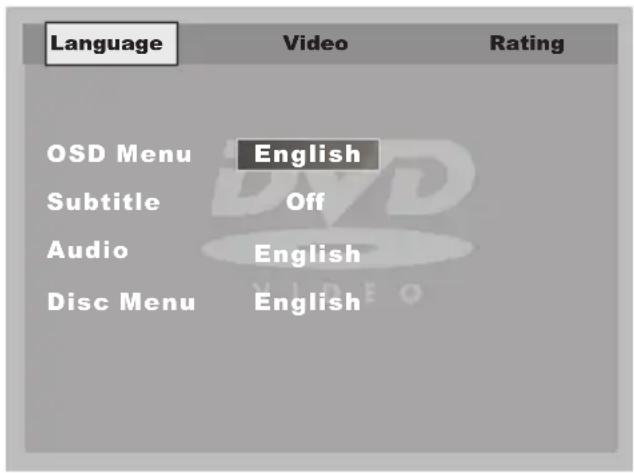
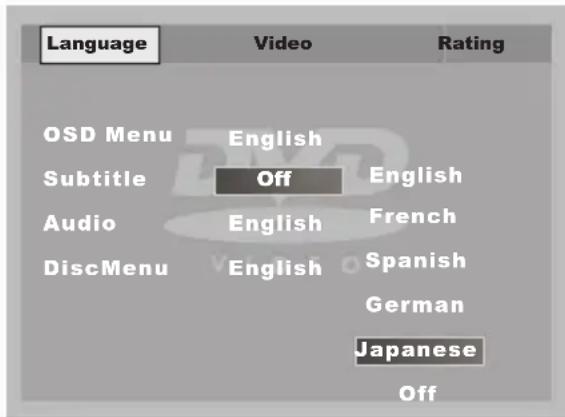
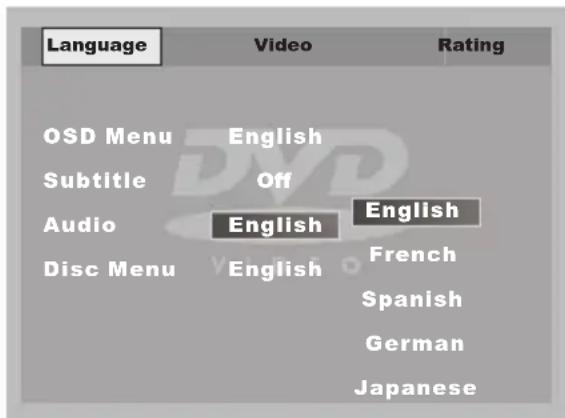
LANGUAGE SETUP
Subtitle
Select the preferred SUBTITLE language by using the cursor buttons and confirm by pressing ENTER.
Disc Menu
Select the preferred DISC MENU language by using the cursor buttons and confirm by pressing ENTER.


VIDEO SETUP
TV Display
This is to select the appropriate TV aspect (4:3 or 16:9) according to the connected TV set.
Normal/PS (For 4:3 TV)
Played back in the PAN & SCAN style. (If connected to wide-screen TV, the left and right edges are cut off.)
Normal/LB (For 4:3 TV)
Played back in letterbox style. (If connected to wide-screen TV, black bands appear at top and bottom of the screen.)
Wide (For 16:9 TV)
Select when a wide-screen TV set is connected.
TV Type
This player can play discs recorded in either PAL or NTSC format in this setting.
Select NTSC format, when you connect the player to NTSC TV.
Select PAL format, when you connect the player to PAL TV.
Select AUTO format, the player TV output format will output a video signal according to the DVD disc format.


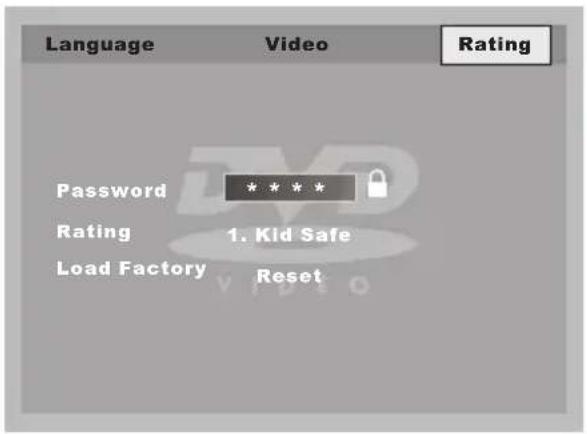
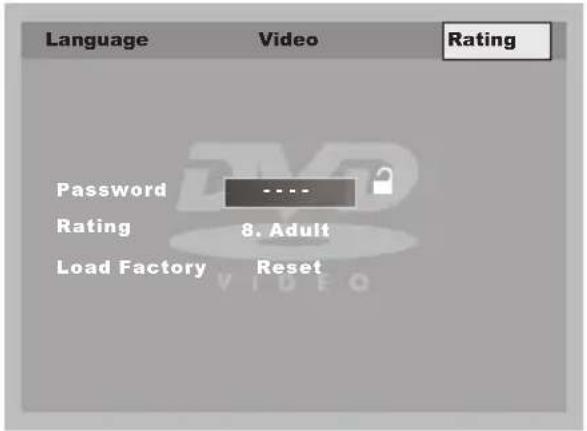
RATING SETUP
Password
Type the old password (The initial factory code is null) and key in a new four character password of your choice to confirm.
Rating
Pressing ENTER to change the preferred rating level between the following 8 level:
-
adult → 1. kid safe → 2.G → 3. PG →
-
PG_13 → 5. PG_R → 6.R → 7.NC_17
Selected the RESET and pressing ENTER to return the default-values.
ADDITIONAL INFORMATION
Notes:
To avoid shorts in the electrical system, be sure to disconnect the power cable before beginning installation.
Refer to the owner's manual for details on connecting the power amp and other units, then make connections correctly.
Never feed power to other equipment by cutting the insulation of the power supply lead of the unit and tapping into the lead. The current capacity of the lead will be exceeded, causing overheating.
When replacing fuse, be sure to use only fuse of the same rating on this unit.
With DVD-R/DVD-RW discs, only recordings made in the video format (Video mode) can be played back. DVD - RW discs recorded in the Video Recording format (VR mode) cannot be played back.
Even with DVD-R/DVD-RW discs featuring recordings made in the Video format (Video mode), playback may not be possible with this unit due to disc characteristics or scratches or dirt on the disc. Dirt or condensation on the lens inside this unit may also prevent playback.
Playback of discs recorded with a PC using the correct format is possible but depending on the application software, environmental settings and other factors playback may not be possible (For details, inquire at the store or dealer where you purchased the application software.)
CD - Extra discs can be played back as music CD's.
Normal playable discs are CD-R/CD-RW other than those recorded with a music CD recorder.
Playback of music CD-R/CD-RW discs even those recorded with a music CD recorder, may not be possible with this unit due to disc characteristics or dirt on the disc. Dirt or condensation on the lens inside this unit may also prevent playback.
Titles and other text informations recorded on a CD-R/CD-RW discs can not be displayed by this unit.
If you insert a CD-RW disc into this unit to playback, it will take a bit longer time than when you do with a conventional CD or CD-R disc.
Read the precautions with the CD-R/CD-RW discs before using.
ACCESSORIES AND HARDWARE
| No. | Item | Diagram | Quantity |
| 1 | User Manual |  | 1 |
| 2 | Remote Control |  | 1 |
| 3 | A/V Connections | 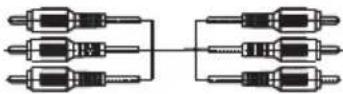 | 1 |
| 4 | Power Supply Connections |  | 1 |
| 5 | External Remote Sensor |  | 1 |
| Rubber Foot 46 |  | ||
| 7 | Mounting Material | 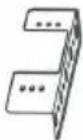  | 1 Set |

The use of any accessories except for those provided might result in damage to the unit. Make sure only to use the accessories shipped with the unit, as shown above.
TECHNICAL SPECIFICATIONS
| Supply Voltage: 12 VDC (10.8V ~ 16V), test voltage 13.2V, negative ground | |
| Environment Temperature: 0°C ~ 45°C | |
| Chassis Dimensions: 183.4 x | 178 x 50 (mm) |
| Current Consumption: Less than 2AQuiescent < 5mA | |
| Video System: NTSC/PAL/AUTO | |
| Discs Played: (1) DVD-VIDEO | Disc5” (12cm) single-sided, single-layer5” (12cm) single-sided, double-layer(2) Compact Disc (CD-DA, VIDEO CD)5” (12cm) Disc |
| Audio Output Level: 2ch 2.0 +0/-1Vrms (10K Ω) | |
| Video Output Level: 1± 0.2V (75 Ω) | |
| Characteristics: (1) Frequency | Response 20Hz~20KHz ( ±2dB)(2) S/N Ratio 85dB (JIS) (1KHz) |
Note:
Specifications and design are subject to modification, without notice, due to improvements in technology.
2 YEARS LIMITED WARRANTY
Dear customer
Thank you for purchasing this ZENEC product. It is advisable to keep the original packing material for any future transporting of the product.
Should your ZENEC product require warranty service, please return it to the retailer from whom it was purchased or the distributor in your country.
This ZENEC product is warranted against defective materials or workmanship for a period of TWO years from date of purchase at retail.
Warranty Limitations
This warranty does not cover any damage due to:
- Improper installation, incorrect audio or mains connection(s).
- Exposure to excessive humidity, fluids, heat sun rays or excessive dirt or dust.
- Accidents or abuse, unauthorized repair attempts and modifications not explicitly authorized by the manufacturer.
This warranty is limited to the repair or the replacement of the defective product at the manufacturer's option and does not include any other form of damage, whether incidental, consequential or otherwise. The warranty does not cover any transport costs or damages caused by transport or shipment of the product. Warranty work will not be carried out unless this warranty certificate is presented fully completed with model, serial number, purchaser's address, purchasing date and dealer stamp together with the original sales slip!
2 JAHRE GARANTIE
State: ZIP or Postal Code
Country:
Dealer's address & stamp

- ZENEC ZE-080DVD
- DIN DVD & MP3/WMA STAND ALONE PLAYER
- GRUNDGERÄT
- BEDIENTEIL
- ① POWER - Taste
- BENUTZEN DER FERNBEDIENUNG:
- VIDEOEINSTELLUNGEN (VIDEO SETUP)
- BILDFORMAT (TV DISPLAY)
- RATINGEINSTELLUNGEN
- PASSWORT
- ZUSÄTZLICHE INFORMATIONEN
- FEATURES
- USE THIS PRODUCT SAFELY
- When Driving
- When Washing Car
- When Parked
- Use the proper Power Supply
- Protect the Disc Mechanism
- Use Authorized Service Centres
- CONTENTS
- SAFETY INFORMATION
- Caution:
- Warning:
- Region Management Information:
- Disc formats supported by this player (12 cm disc)
- Discs which cannot be played with this player
- Handing and cleaning
- DISC CLEANING
- Note:
- Preparing New Discs with Rough Spots
- INSTALLATION
- Front panel
- Rear panel electrical connection
- General
- Notes:
- REMOTE CONTROL
- PREPARING THE REMOTE CONTROL
- Inserting the Battery
- Using the Remote Control
- LOADING A DVD/VCD/CD DISC
- EJECTING A DISC
- Stopping play
- Rapid Forward/Reverse
- Skipping Track
- Slow Motion Playback
- Pause (still picture)
- Repeat
- ZOOM
- TITLE
- GOTO
- Mute Function
- Remote Sensor (IR)
- Turning the player on/off
- Mode
- AUDIO/VIDEO IN
- ON-SCREEN DISPLAY FUNCTION
- Example:
- Press DISPLAY for the first time:
- Press DISPLAY for the second time:
- MP3:
- MULTI-AUDIO LANGUAGE FUNCTION
- DVD:
- VCD CD:
- MENU Function
- VCD:
- TITLE Menu Function
- (For DVD only)
- Multi-Subtitle Language Function (For DVD only)
- Multi-angle Function (For DVD only)
- MP3 /MPEG/JPG DISC PLAY
- INITIAL SETUP
- SETUP MENU - MAIN PAGE
- a. Language
- b. Video
- c. Rating
- LANGUAGE SETUP
- Subtitle
- Disc Menu
- VIDEO SETUP
- TV Display
- Normal/PS (For 4:3 TV)
- Normal/LB (For 4:3 TV)
- Wide (For 16:9 TV)
- TV Type
- RATING SETUP
- Password
- Rating
- ADDITIONAL INFORMATION
- ACCESSORIES AND HARDWARE
- YEARS LIMITED WARRANTY
- Warranty Limitations
- JAHRE GARANTIE
Brand : ZENEC
Model : ZE-080DVD
Category : DVD player