Tel 382 Combo Big - Phone AUDIOLINE - Free user manual and instructions
Find the device manual for free Tel 382 Combo Big AUDIOLINE in PDF.


User questions about Tel 382 Combo Big AUDIOLINE
0 question about this device. Answer the ones you know or ask your own.
Ask a new question about this device
Download the instructions for your Phone in PDF format for free! Find your manual Tel 382 Combo Big - AUDIOLINE and take your electronic device back in hand. On this page are published all the documents necessary for the use of your device. Tel 382 Combo Big by AUDIOLINE.
USER MANUAL Tel 382 Combo Big AUDIOLINE
natural_image
Technical line drawing of a mechanical component with no visible text or symbolsAkkus aufladen
text_image
1 2 3 4 5 6 7 8 9 10 11 A B C D E F G H I J K L M N O P Q R S T U V W X Y Z A B C D E F G H I J K L M N O P Q R S T U V W X Y Z A1 Display
600 mAh = ca. 100 h / ca. 10 h
1 Safety Information ....1
2 Preparing the Telephone ....3
3 Operating Elements 5
4 Icons in the display 8
5 Telephoning 9
6 Other features ....13
7 Call list / Redial .....14
8 Phone book ....15
9 Setting the telephone .....16
10 Answering machine ....20
11 Registering/de-registering handsets ....25
12 PBX / Supplementary Services .....26
13 Appendix ......27
1 Safety Information
Please read this operating instruction manual thoroughly.
Intended use
The telephone is suitable for telephoning within a public telephone network system. Any other use is considered unintended use. Unauthorised modification or reconstruction is not permitted. Under no circumstances open the device or complete any repair work yourself.
Installation location
Prevent excessive exposure to smoke, dust, vibration, chemicals, moisture, heat and direct sunlight. Do not use the telephone in potentially explosive areas.
Power adapter plug
Attention: Only use the power adapter plug supplied because other power supplies could damage the telephone. Ensure access to the power adapter plug is not obstructed by furniture or such.
Rechargeable batteries
Attention: Never throw batteries into a fire. Only use batteries of the same type. Pay attention to the correct polarity. Incorrect polarity of the batteries represents a risk of explosion during charging.
GB
Safety Information
Power failure
In case of a power failure you can only use the desktop telephone to make calls. The display will not work. You cannot dial telephone numbers from the phonebook, the caller list or the redial list.
Lift the handset, wait for the dialling tone and enter the telephone number.
Medical equipment
⚠ Attention: Never use the telephone in the vicinity of medical equipment. Effects on such equipment cannot be fully ruled out.
DECT ^1 telephones can cause an unpleasant humming sound in hearing aids.
Disposal
In order to dispose of your device, take it to a collection point provided by your local public waste authorities (e.g. recycling centre). According to laws on the disposal of electronic and electrical devices, owners are obliged to dispose of old electronic and electrical devices in a separate waste container.
The adjacent symbol indicates that the device must not be disposed of in normal domestic waste!
Batteries represent a hazard to both health and the environment! Never open, damage or swallow batteries, nor allow them to get into the environment.
They may contain toxic and ecologically hazardous heavy metals. You are legally obliged to dispose of batteries at the point of sale or at appropriate collection points provided by your local public waste authorities. Disposal is free of charge. The adjacent symbols indicate that batteries must not be disposed of in normal domestic waste and but at authorised collection points.
Packaging materials must be disposed of according to local regulations.



Low-radiation operation
This device reduces emissions by up to 75 % in talk mode (depending on the distance of the handset to the base station) compared to a standard DECT cordless telephone.

The power adapter plugs supplied fulfils the eco-design directive of the European Council (Directive 2005/32/EC).
This means that power consumption is considerably lower than power adapter plugs of an earlier design both in operating and idling modes.
^1 DECT: Digital Enhanced Cordless Telecommunication = Standard for cordless telephones.
2 Preparing the Telephone
Safety information
⚠ Attention: It is essential to read the Safety Information in Chapter 1 before starting up.
Checking the package contents
The package contains:
Content BigTel Combo model
380 382* 383* 384*
Desktop telephone (base station) 1 1 1 1
Power adapter plug S005CV0600060 (for desktop telephone) 1 1 1 1
Telephone connection cable 1 1 1 1
Handset 1 2 3 4
Rechargeable batteries 2 4 6 8
Charging station 1 2 3 4
Power adapter plug S002CV0600030 (for charging station) 1 2 3 4
Operating instructions 1 1 1 1
^1 Visit www.audioline.de to find out whether this telephone is available.
Connecting the desktop telephone
⚠ Attention: Position the desktop telephone at least 1 m away from other electronic devices, otherwise there is a risk of mutual disturbance.
Connect the base station as illustrated in the diagram. For reasons of safety, only use the power adapter plug and telephone connection line supplied.
Connect the handset with the desktop telephone using the coiled cord. Put the short straight end to the handset and the long straight end through the guide into the respective jack on the desktop telephone.
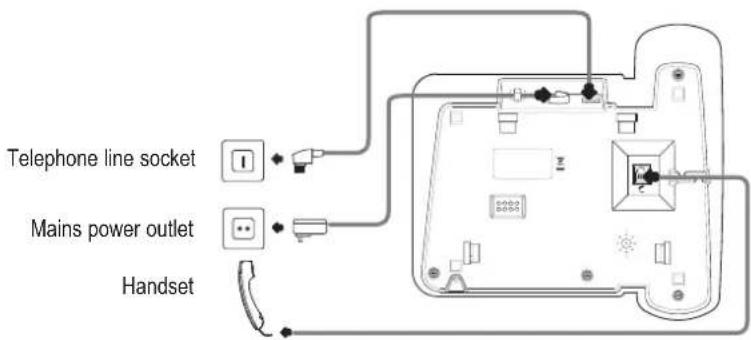
text_image
Telephone line socket Mains power outlet Handset⚠ Attention: Use only the power adapter plug supplied with the telephone!
Connecting the charging station
Connect the charging station as illustrated in the diagram. For safety reasons, only use the power adapter plug supplied.
Mains power outlet
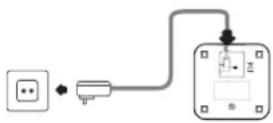
⚠ Attention: Use only the power adapter plug supplied with the charging station!!
Inserting the batteries
Open the battery compartment cover. Put in the batteries. Close the battery compartment cover.
⚠ Attention: Use only type AAA, NiMH, 600 mAh rechargeable batteries. Never use normal batteries / primary cell batteries. Observe the correct polarity!
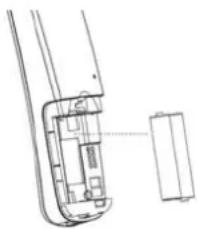
natural_image
Technical line drawing of a mechanical component with internal structure and a separate rectangular block (no text or symbols)Charging the batteries
Before the handset is used for the first time, insert it in the charging station for at least 14 hours.
The handset warms up during the charging process. This is normal and does not represent a risk. Use only the adapter plug unit provided for the charging station. The battery status is shown on the display. When the battery capacity is nearly exhausted, the battery symbol (☐) will flash in the display and you will hear the battery warning sound (if the option is switched on) / menu item "HS SETTINGS / TONE SETUP / BATTERY LOW"). You still have up to ten minutes of talk time.
Setting the time and date
At initial operation the telephone does not have the correct time (e.g. for entries in the call list / answering machine). Date and time are set through the menu item "SETTINGS / DATE & TIME" (desktop telephone) or "HS SETTINGS / DATE & TIME" (handset). You only have to do this setting on one of the devices; the other one will take date and time from that one.
Setting the display language
The display language is available in 3 languages. The default setting is “German (DEUTSCH)”. Set the language using the menu item “EINSTELL. / SPRACHE” (desktop telephone) or “MT EINSTELL. / SPRACHE” (handset).
Auto Answer
If this function is activated, an incoming call is taken when the cordless handset is removed from the charging station. The automatic answering function is activated and deactivated using the menu item "HS SETTINGS / AUTO ANSWER".
3 Operating Elements
Desktop telephone

text_image
1 2 3 4 5 6 AVIO/LOURS EIGTEN 7 8 9 10 11 12 13 14 15 16 171 Display
2 Menu / OK / Mute In idle state: Press to open the menu In menus: Press to onfirm the operation In talk mode: Press to mute the microphone
3 Phonebook / Back In idle state: Press to open the phonebook In menus: Press to exit present menu In predial mode: Press to delete a digit
4 Answering machine-button In idle state: Press to playback outgoing message (OGM) Press and hold to record an OGM In playback mode: Press to go back to previous message
5 Navigation key
In idle state: Press to open the caller list In menus/lists: Press to scroll up During a call or in playback mode: Press to increase the volume In editing mode: Press to move the cursor one character to the left
In idle state: Press to open the redial list In menus/lists: Press to scroll down During a call or in playback mode: Press to decrease the volume In editing mode: Press to move the cursor one character to the right
C In editing mode: Short press to backspace one digit, long press to clear whole strings In lists (e.g. phonebook): Press to delete an entry In answering machine playback mode: Press to delete a message
INT In idle state: Press to make an internal call
6 Answering machine-button In idle state: Press and hold to record a memo In playback mode: Press to skip to next message
Operating Elements
7 Answering machine-button In idle state: Press to playback messages
In playback mode: Press to pause current message playback
8 Answering machine-button In idle state: Press and hold to switch the answering
machine On/Off
In idle state / answering machine on: Press to select OGM 1 or OGM 2
In playback / record mode: Press to stop message playback / record
9 Delete In editing mode: Short press to backspace one digit, long
press to clear whole string
In lists (e. g. phonebook): Press to delete an entry
In playback mode: Press to delete a message
10 Answering machine-button In idle state: Press and hold to switch the answering
machine On/Off
In idle state / answering machine on: Press to select OGM 1 or OGM 2
In playback / record mode: Press to stop message playback / record
11 Intercom In idle state: Press to make an internal call
12 R-key (Flash) In predial mode or during a call: Press to insert a flash
13 Volume keys During a call or message playback: Press - to decrease and + to increase
the volume
14 Handsfree Press to make a call with speakerphone
15 Microphone
16 Digit keypad Press to enter a digit or character
0 key: Press to enter a pause
17 One touch memory keys
Handset
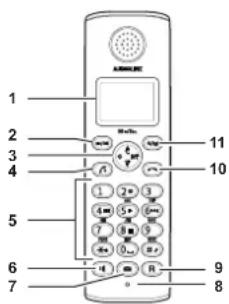
text_image
1 2 3 4 5 6 7 8 9 10 11 A B C D E F G H I J K L M N O P Q R S T U V W X Y Z A B C D E F G H I J K L M N O P Q R S T U V W X Y Z A B C D E F G H I J K L M N O P Q R S T U V W Y Z1 Display
2 Menu / OK / mute
In idle state:
In menus:
In talk mode:
Press to open the menu
Press to onfirm the operation
Press to mute the microphone
Operating Elements
3 Navigation key ▲ In idle state: Press to open the caller list
In menus/lists: Press to scroll up
During a call or in playback mode: Press to increase the volume
In editing mode: Press to move the cursor one character to the left
In idle state: Press to open the redial list
In menus/lists: Press to scroll down
During a call or in playback mode: Press to decrease the volume
In editing mode: Press to move the cursor one character to
the right
C In editing mode: Short press to backspace one digit, long
press to clear whole string
In lists (e. g. phonebook): Press to delete an entry
In answering machine playback mode: Press to delete a message
INT In idle state: Press to make an internal call
4 Off Hook button ... this is like lifting the handset on a desktop phone
5 Digit keypad Press to enter a digit or character
0 key: Press to enter a pause
* key: Press and hold to activate/deactivate the keylock
# key: Press and hold to deactivate/activate the handset ringer
In playback mode (answering machine):
2 key: Press to delete the message
4 key: Press to begin relevant message again
Press two times close on one another to skip
back to previous message
5 key: Press to playback / pause messages
6 key: Press to skip to next message
8 key: Press to stop playback
6 Handsfree Press to make a call with speakerphone
7 Answering machine-button In idle state: Press to playback messages
8 Microphone
9 R-key (Flash) In predial mode or during a call: Press to insert a flash
10 On Hook button ... this is like replacing the handset on a desktop telephone
In idle state: Press and hold to switch off the handset Handset is switched off: Press to switch on the handset In menus / lists: Press to get back to idle state
11 Phonebook / Back
In idle state:
In menus:
In predial mode:
Press to open the phonebook
Press to exit present menu
Press to delete a digit
4 Icons in the display
Desktop telephone and handset
| Icon | Description | |
| Desktop | ||
| telephone / handset | ||
| A call is in progress. | ||
| Handsfree is being used. | ||
| Ringer is switched off. | ||
| New entry in the caller list or new message on the answering machine. | ||
| Phonebook menu. | ||
| There's a message in your voice mailbox (depending on your telephone network provider). | ||
| More than one call from the same caller number. | ||
| Is being displayed together with the sequential number of the entry in the caller list, the redial list or the message on the answering machine. | ||
Handset (additional)
| Icon | Description |
| Y | On: The connection to the base station is good. |
| Flashing: The connection to the base station is lost. | |
| III | On: Indicates the battery charge status. |
| Scrolling while handset in base: Batteries are being charged. | |
| C | Some segments not displayed: Batteries need charging. |
| Flashing: Batteries should be charged immediately. | |
| A | On: The alarm function is activated. |
| Flashing: The alarm is ringing. | |
| S | The key lock is activated. |
5 Telephoning
Taking a call

Your phone is ringing.
On the desktop telephone

Lift the handset or press the handsfree button.
On the handset
If the handset is not in the charging station:

Press the Off Hook button or the handsfree button.
If the handset is in the charging station and AUTO ANSWER is not activated:

Remove the handset from the charging station and press the Off Hook button or the handsfree button.
If the handset is in the charging station and AUTO ANSWER is activated:
Remove the handset from the charging station - the call will be taken automatically.
Making a call
On the desktop telephone
M

Enter the telephone number.
Delete wrong characters pressing C.
Lift the handset or press the handsfree button.
On the handset
/

Enter the telephone number.
Delete wrong characters pressing C.
Press the Off Hook button or the handsfree button.
You can also lift off the desktop telephone's handset, or press the Off Hook button on the cordless handset and you will hear the dialling tone. The entered number will be dialled immediately. It is not possible to correct wrong digits individually using this dialling procedure.
Ending a call
On the desktop telephone

Replace the handset.
On the handset

Press the On Hook button or replace the handset in the charging station.
Redial
Both the desktop telephone and the handset saves the last10 dialled telephone numbers. If a caller is stored in your phone book, the name will be displayed as well.

Open the redial list.

Select an entry.
On the desktop telephone


Lift the handset or press the handsfree button.
On the handset


Press the Off Hook button or the handsfree button.
Making a call from the call list
Your handset saves the numbers of the last 20 incoming calls in the call list centralized in the desktop telephone. It is separated for "MISSED" and "RECEIVED". If a caller is stored in your phone book, the name will be displayed as well. Saving can only take place if the function "Phone number transmission (CLIP)" is available at your connection and caller ID is not suppressed by the caller or was not transmitted for any other reason.

Open the call list ("MISSED").


Select an entry.
On the desktop telephone


Lift the handset or press the handsfree button.
On the handset


Press the Off Hook button or the handsfree button.
If you want to open the call list "RECEIVED":( /OK) / ▲ / ▼ CALL LIST/ /OK) / ▲ / ▼ RECEIVED/ /OK)
Making a call from the phone book
You can store up to 150 entries in the phone book. The desktop telephone's and handset's phone books are seperated. For creating entries see section "8 Phone book".

Open the phone book.


Select an entry.
On the desktop telephone


Lift the handset or press the handsfree button.
On the handset


Press the Off Hook button or the handsfree button.
Making a call using the one touch memory keys (desktop telephone only)
For storing telephone numbers please refer to chapter "6 Other features".
M1 ... M5 Press the desired one touch memory key. The stored number will be displayed and dialed in handsfree mode.
Call timer
Your telephone automatically times the duration of every call in hours, minutes and seconds.
Setting the earpiece/loudspeaker volume
During a call you can adjust the volume in 5 levels if telephoning "normally" (earpiece volume) or 6 levels with hands-free (loudspeaker volume). These separate settings will remain at the last selected level when you end the call.
On the desktop telephone additionally
Set the volume using the + / - keys.
Muting the microphone
During a call you can switch your handset's microphone off. The display shows MUTE. To unmute press the key again.
Internal calls
Making an internal call
INT Press the INT key. If there is only one handset registered to the base (desktop phone) the other device will ring at once. In case of some more registered handsets you will have to enter the respective internal telephone number (1...X). For an internal call to the desktop telephone dial "0".
Transferring an external call
During an external call . . . Press the INT key. If there is only one handset registered to the base (desktop phone) the other device will ring at once. In case of some more registered handsets you will have to enter the respective internal telephone number (1...X). For an internal call to the desktop telephone dial "0". The external call is put on hold. When the called device answers you can announce the call transfer. Replace the handset or press the On Hook button. The call will be transferred. IF the desired device does not answer press the INT key to get back to the external call (call on hold).
GB
Telephoning
Broker's call
| During an external call . . . | |
| INT | Press the INT key. |
| If there is only one handset registered to the base (desktop phone) the other device will ring at once. In case of some more registered handsets you will have to enter the respective internal telephone number (1...X). For an internal call to the desktop telephone dial "0". The external call is put on hold. | |
| INT | Use the INT key to switch between the calls. |
3-Party Conference
| During an external call . . . | |
| INT | Press the INT key. |
| If there is only one handset registered to the base (desktop phone) the other device will ring at once. In case of some more registered handsets you will have to enter the respective internal telephone number (1...X). For an internal call to the desktop telephone dial "0". The external call is put on hold. | |
| When the called device answers you can announce the conference. | |
| * | Press the star-key - the conference is established. |
| INT | Press the INT key, to return to broker's call (described above). |
Any device hangs up during a conference call will leave the other device still in connection with the external call.
6 Other features
Key lock (handset only)
The key lock prevents functions assigned to buttons being activated inadvertently. Incoming calls can still be taken in the normal way even when the key lock function is activated.

Press and hold down the star-key until the key lock icon appears in the display For unlocking the keypad again press and hold down the star-key until the icon disappears.

Switching the ringer on/off (handset only)
You can turn off the ringer via the menu item "HS SETTINGS / RING SETUP / INT RING or EXT RING / VOLUME" as well.

Press and hold down the #-key until the icon appears in the display This setting is only valid for external calls.

For turning the ringer on again press and hold down the #-key until the icon disappears.
Switching off the handset (handset only)
You can switch off the handset for saving battery capacity.

Press and hold down the On Hook-button. After a few seconds the handset will be switched off. The display illumination goes down.

For switching the handset on again press and hold down the On Hook-button until the display is illuminated.
Storing telephone numbers to the one touch memory keys (desktop phone only)

The desktop telephone is in idle state.
Enter the telephone number you want to store.
M1 ... M5
Press and hold down the respective one touch memory key for approx. 2 s. When the telephone number is stored you will hear a short beep.
7 Call list / Redial
Editing the call list
| A | Open the call list (MISSED). |
| A | Select an entry. |
| The respective call's date and time is shown. | |
| -OK | Press the menu key. |
| A | Select one of the following options and confirm with OK: |
| ADD TO PB | The telephone number will be stored in the telephone book. Enter a name, confirm or edit the telephone number and select a ringtone melody for the entry. |
| DELETE? | The entry will be deleted after a confirmation query. |
| DELETE ALL? | The complete list will be deleted after a confirmation query. |

text_image
You can access the call list via the menu as well:( /OK / CALL LOG/ /OK / / MISSED oder RECEIVED / OK .Editing the redial list
| Open the redial list. | |
| Select an entry. | |
| Press the menu key. | |
| Select one of the following options and confirm with OK: | |
| ADD TO PB | The telephone number will be stored in the telephone book. Enter a name, confirm or edit the telephone number and select a ringtone melody for the entry. |
| DELETE? | The entry will be deleted after a confirmation query. |
| DELETE ALL? | The complete list will be deleted after a confirmation query. |

text_image
You can access the redial list via the menu as well:(-/OK/ / CALL LOG/-/OK/ / /DIALED/ -/OK .8 Phone book
Your phone can store up to 150 private phonebook entries with names and numbers. You can also select different ringtones for your phonebook entries. Always enter the phone numbers with the area code; this enables a correct display of the respective caller for whom there is an existing entry and whose phone number transmission to your connection is available. The desktop telephone's and handset's phone books are seperated.
Creating a new entry
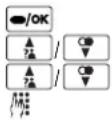
Press the menu key. Select PHONEBOOK and press OK. Select NEW ENTRY if necessary and press OK. Enter the name (max. 12 digits). Letters are also imprinted on the digit keys. Letters, digits and special characters are entered by pressing the relevant key the respective number of times. After a short time the cursor skips one position forwards. Having entered the name press 📄/OK Enter the phone number (max. 20 digits). If your telephone is connected to a PBX start the telephone number with the access code. If a dialling pause is needed, press after the access code the 0 key for approx. 3 sec. A P appears in the display. Having entered the number press 📄/OK melody for the entry. Confirm with OK.


Select a melody for the entry.
Confirm with OK.
Editing phone book entries
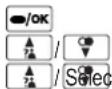
Press the menu key. Select PHONEBOOK and press OK. e of the following options and confirm with OK
LIST All entries are shown. Scroll to the desired entry. NEW ENTRY You can create a new entry. EDIT RECORD All entries are shown. Scroll to the desired entry. Press OK to edit the selected entry. Use the C key to delete characters and numbers then add new characters and numbers as required. Please refer to "Creating a new entry". DEL RECORD All entries are shown. Scroll to the desired entry. Press OK to delete the entry after a confirmation query. DELETE ALL Press OK to delete all entries after a confirmation query. MEM STATUS The current allocation will be displayed (e.g. 7/150 Used: 7 of 150 possible entries are present).
9 Setting the telephone
Date/Time

Press the menu key.
SETTINGS (on the desktop telephone) or HS SETTINGS (on the handset) and OK.
| Select | DATE & TIME and press OK. |
| Select the year and confirm with | OK. |
| Select the month and confirm with | OK. |
| Select the day and confirm with | OK. |
| Select the hour and confirm with | OK. |
| Select the minute and confirm with | OK. |
You only have to do this setting on one of the devices; the other one will take date and time from that one.
In case of mains failure at the desktop telephone this setting will be deleted when simultaneously the handset is switched off or the batteries are empty.
Alarm (handset only)
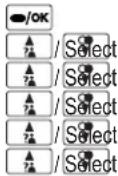
Press the menu key.
HS SETTINGS and press OK.
ALARM and press OK.
ON and press OK.
e hours and minutes and confirm each by pressing OK.
SNOOZE ON or SNOOZE OFF and press OK. If "Snooze" is turned on it
means that the alarm signal is being repeated after 5 minutes.
If "Snooze" is turned off the alarm signal is given once at the specified time. To confirm the alarm signal, press any key.
Setting the ringer

Press the menu key.
SETTINGS (on the desktop telephone) or HS SETTINGS (on the handset) and OK.
| / Select | RING SETUP and press OK. |
| / Select one of the following options and confirm with | OK: |
INT RING MELODY Select a melody for internal calls and press OK. VOLUME Select the volume and press OK.
EXT RING MELODY Select a melody for external calls and press OK. VOLUME Select the volume and press OK.
If you select "VOLUME OFF" the respective icon appears in the display.
Setting the alert tones (handset only)


Select

Select

Select
Press the menu key.
HS SETTINGS and press OK.
TONE SETUP and press OK.
e of the following options and confirm with
OK:
KEY TONE
Switch the keytone on or off.
BATTERY LOW Switch the alert tone on or off. The tone sounds if "Low battery" is detected.
RANGE ALARM Switch the alert tone on or off. The tone sounds if "Out of range" is detected.
Setting the display language


Select
Press the menu key.
SETTINGS (on the desktop telephone) or HS SETTINGS (on the handset) and
press OK.

Select
LANGUAGE and press OK.

Select
anguage and press
OK.
Setting the handset name (handset only)


Select
Press the menu key.
HS SETTINGS and press OK.
HS NAME and press OK.
Delete the old name with C, enter a new name using the digit keys and confirm with
OK.
Setting Auto Answer (handset only)


Select
Press the menu key.
HS SETTINGS and press OK.
AUTO ANSWER and press OK.

Select
ether the automatic answer function will be on or off and confirm with
OK.
If Auto Answer is on an incoming call will immediately be taken when the handset is taken from the charging station.
Setting the telephone
Setting Call Barring (handset only)
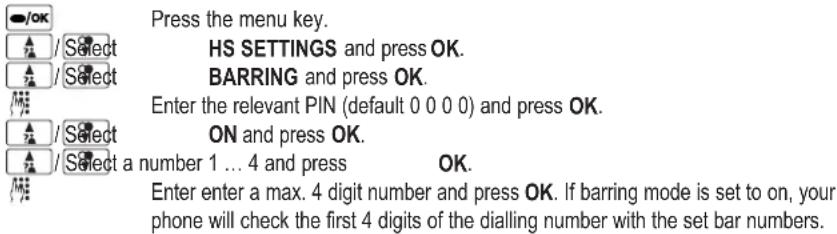
text_image
/OK Press the menu key. /Select HS SETTINGS and press OK. /Select BARRING and press OK. Enter the relevant PIN (default 0 0 0 0) and press OK. /Select ON and press OK. /Select a number 1 ... 4 and press OK. Enter enter a max. 4 digit number and press OK. If barring mode is set to on, your phone will check the first 4 digits of the dialling number with the set bar numbers.If barring mode is set to on and the dialling number matched with any one of the set bar numbers, the dialling procedure will be aborted with "CALLS BARRED" shown in the display.
Select a base station (handset only)

text_image
Press the menu key. Select HS SETTINGS and press OK. Select SELECT BASE and press OK. You see a list of base stations. The relevant base is marked with a "+". Select a base and press OK.You can only select a base station your handset is already registered to.
Setting the dial mode

text_image
/OK /Select /Select /Select Press the menu key. SETTINGS (on the desktop telephone) or BS SETTINGS (on the handset) and press OK. DIAL MODE and press OK. TONE or PULSE and press OK.In most situations the TONE option should be selected.
Setting the Flash Time

text_image
/OK Press the menu key. SETTINGS (on the desktop telephone) or BS SETTINGS (on the handset) and press OK. /Select FLASH TIME and press OK. /Select 100 (ms), 250 (ms), 600 (ms) or 1000 (ms) and confirm with OK.Setting the telephone
Editing the PIN

Press the menu key.
SETTINGS (on the desktop telephone) or BS SETTINGS (on the handset) and press OK.
MODIFY PIN and press OK.
Enter the relevant PIN (default 0 0 0 0) and press OK.
Enter a new PIN and press OK.
Enter the new PIN again and press OK.
The four digit PIN protects some settings against unauthorized changes. If you have forgotten your PIN please call our service hotline.
Resetting the handset (handset only)
Press the menu key.
HS SETTINGS and press OK.
HS DEFAULT and press OK.
Enter the relevant PIN (default 0 0 0 0) and press OK.
The entries in phonebook or TAM messages and personal OGMs will not be deleted.
Resetting the desktop telephone (desktop telephone only)
Press the menu key.
SETTINGS and press OK.
BS DEFAULT and press OK.
Enter the relevant PIN (default 0 0 0 0) and press OK.
The entries in phonebook or TAM messages and personal OGMs will not be deleted. The registration of handsets will not be changed.
10 Answering machine
The integrated digital answering machine offers a total recording time of up to 14 minutes for outgoing and incoming messages or memos. Each message/memo can be up to 2 minutes long. Self recorded memos are treated like messages.
You can access the answering machine from the base station as well as with limited functions from the handset. Using a telephone with tone dialling (DTMF) you have also a PIN protected remote access.
You can select between two modes:
- Answer and record
- Answer only.
A standard announcement (in german language) is already saved for every operating type at the delivery stage. Therefore the answering machine is immediately operational. At "Answer and record" and reaching of the maximum recording capacity the device will automatically switch to the operating type "Answer only".
If the answering machine is turned off the announcement for the operating type "Answer only" will be played after approx. 10 rings.
If the answering machine is switched off, "TAM OFF" appears in the displays of desktop telephone and handset. If the answering machine is switched on, the number of old and new (not heard) messages will be shown. On the handset's display this is alternating with the handset's name.
When listening messages date and time of the respective message will be shown. For this reason date and time have to be set correctly (menu: SETTINGS or HS SETTINGS / DATE & TIME).
The display "02/04 MSGS" means f. ex. 2 new messages, 4 messages total.
Turning the answering machine on/off / Selecting the answering mode
Press the menu key.
TAM and press OK.
TAM SETTINGS and press OK.
TAM ON/OFF and press OK.
ON or OFF and confirm with OK.

If you have selected ON:
OGM 1 for the "answer and record mode" or OGM 2 for the "answer-only mode" and press OK.
On the desktop telephone additionally

Press the TAM on/off key for approx. 2 seconds.
The answering machine will be switched on or off. When it is switched on the mode will be displayed and voice prompted.

If you want to change the mode press the TAM on/off key briefly, provided the TAM is already switched on.
Recording outgoing message
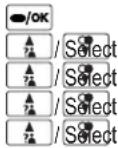
Press the menu key.
TAM and press OK.
TAM SETTINGS and press OK.
SET OGM and press OK.
OGM 1 for the "answer and record mode" or OGM 2 for the "answer-only and press OK.
RECORD and press OK. You will be prompted to speak your message.
Speak your message to the microphone and press OK at the end of the recording. Playback of your outgoing message will start.
On the desktop telephone additionally

You can easily record an outgoing message for the active answer mode:
Press the I<< key for approx. 2 seconds. The answering mode is displayed and you are prompted to speak your outgoing message.

Press the Stop key to stop recording.
Playback outgoing message
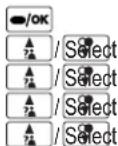
Press the menu key.
TAM and press OK.
TAM SETTINGS and press OK.
SET OGM and press OK.
OGM 1 for the "answer and record mode" or OGM 2 for the "answer-only mode" and press OK.
PLAY and press OK.
Playback of the outgoing message will start.

Answering Machine
On the desktop telephone additionally

Press the I<< key briefly to listen to the current OGM.
Deleting the personal outgoing message
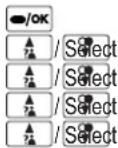
Press the menu key.
TAM and press OK.
TAM SETTINGS and press OK.
SET OGM and press OK.
OGM 1 for the "answer and record mode" or OGM 2 for the "answer-only
mode" and press OK.
DEFAULT and press OK.
Confirm the confirmation query with OK.
Listen new messages / deleting single messages
On the desktop telephone only

Press to start playback ...
The loudspeaker will be switched on and the playback will start.
or
On the desktop telephone or on the handset
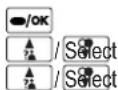
Press the menu key.
TAM and press OK.
MESSAGE and press OK.
The loudspeaker will be switched on and the playback will start.
During playback you have the following options:

You can set the playback volume (on the desktop telephone you can use +/- as well).
On the desktop telephone

Delete the relevant message
To begin the relevant message again or to go back to the previous message (press 2 times)

Pause / play
Skip to the next message
Stop playback
On the handset

Delete the relevant message
To begin the relevant message again or to go back to the previous message (press 2 times)

Pause / play
Skip to the next message
Stop playback
Deleting all old messages
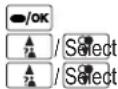
Press the menu key.
TAM and press OK.
DELETE ALL and press OK.
All old (already heard) messages will be deleted after a confirmation query.
On the desktop telephone additionally

Press the delete key for approx. 2 seconds. All old (already heard) messages will be deleted.
Recording a memo
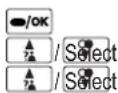
Press the menu key.
TAM and press OK.
MEMO and press OK.
Speak your memo to the microphone and press OK.
On the desktop telephone additionally

Press the >>I key for approx. 2 seconds. "MEMO" appears in the display and you are prompted to speak your memo.

Press the Stop key to stop recording.
Taking a call from the answering machine
It is possible to intercept a call even if the answering machine has already begun to take it. So you can talk with the person who called.
On the desktop telephone

Lift the handset or press the handsfree button.
On the handset

Press the Off Hook button or the handsfree button.
Setting the answering machine
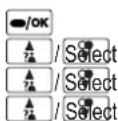
Press the menu key.
TAM and press OK.
TAM SETTINGS and press OK.
e of the following options and confirm with OK:
TAM ON/OFF Switching the answering machine on or off.
SET OGM Select/record/playback OGMs
TAM ALERT If this feature is activated you will hear an audible warning tone every 60 seconds if you have new messages.
SET RING Select the delay for answering a call:
- x RINGS (2 ... 9 calls): Call will be answered after x rings.
- TOLL SAVER: If new messages are available, the answering machine will answer
GB
Answering Machine
after two rings. If no new messages are available the call will be answered after six rings. Therefore you can check remotely whether or not new messages are available without having to make a connection.
TAM PIN Enter the remote access PIN (default 0 0 0 0). This PIN is needed for remote accessing the answering machine from a tone-dialling (DTMF) telephone.
TAM DEFAULT Resetting the answering machine to delivery state.
Remote access
You can ring your phone from another tone-dialing phone.
• Dial your own telephone number.
- If the answering machine is set to off, it will answer after 10 rings.
If the answering machine is set to on it will answer after the preset delay.
If the TAM memory is full it will answer after 10 rings announcing OGM 2 and the hint that the memory is full.
- Press the star key whilst hearing the OGM then enter the TAM PIN.
- You will hear a voice prompt telling you whether you have any new messages.
• If yes, it will start playing them.
- If not you will get to the main menu by pressing 1.
In the main menu you have the following options:
Key Function
1 Play the main menu.
5 Play messages.
7 Switch the TAM on.
9 Switch the TAM off.
During playback of messages you have the following options
Key Function
2 Delete current message.
4 Repeat the current message.
44 Skip backwards to the previous message.
5 Start / stop playback (pause).
6 Skip forward to next message.
8 Stop playback (back to main menu).
The connection will be cut off if a wrong remote PIN is entered three times.
11 Registering/de-registering handsets
Four handsets can be registered to a base station (desktop telephone). The handsets delivered with your telephone are already registered. To register a "foreign" handset please refer to it's user manual.
Registering a handset of the same type
On the handset

text_image
/OK Select Select a base station and press Press the menu key. REGISTRATION and press OK. OK. The relevant base is marked with a "+". Enter the relevant PIN for the base, the new handset should be registered on, and press OK.On the desktop telephone

After a few seconds the handset is registered.
Deleting a handset
text_image
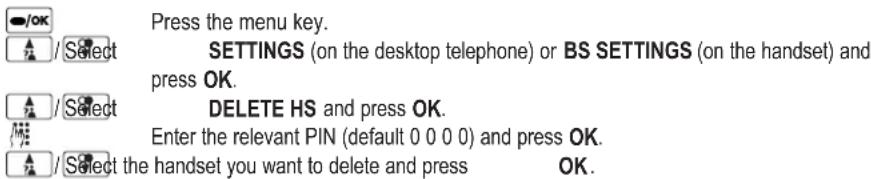
/OK Press the menu key. SETTINGS (on the desktop telephone) or BS SETTINGS (on the handset) and press OK. DELETE HS and press OK. Enter the relevant PIN (default 0 0 0 0) and press OK. Select the handset you want to delete and press OK.Warning: Only delete a handset if you no longer want it to work on your DECT system.
12 PBX / Supplementary Services
PBX
If the telephone is connected to a private branch exchange, functions such as transferring calls and automatic call back can be used via the R button.
Refer to the operating manual provided with your private branch exchange as to which Flash time must be set in order to use these functions. The sales outlet where you purchased the exchange can provide information as to whether the telephone will work properly with the exchange.
Please remember to enter the access code and a neccessary dialling pause (a long press "0") when creating phone book entries.
Supplementary services
Your telephone supports supplementary services provided by your telephone network provider, such as brokering, call waiting and conference facilities. These supplementary services can be used via the R-button.
Please contact your telephone network provider regarding which Flash time must be set to use the supplementary services. Contact your telephone
network provider with regard to enabling supplementary services.
13 Appendix
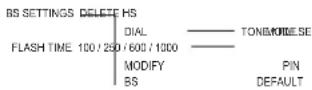
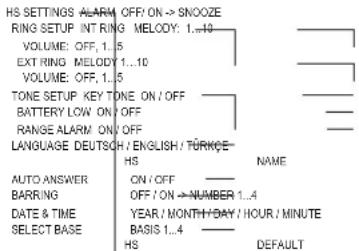
Menu structure handset
PHONE BOOK LIST/NEW ENTRY / EDIT RECORD / DEL RECORD / DELETE ALL / MEM STATUS
CALL LOG MISSED / RECEIVED / DIALED
text_image
HS SETTINGS INT RING OFF: ON -> SNOOZE RING SETUP IN RING MELODY: 1...10 VOLUME: OFF, 1..5 EXT RING MELODY 1...10 VOLUME: OFF, 1..5 TONE SETUP KEY TONE ON / OFF BATTERY LOW ON / OFF RANGE ALARM ON / OFF LANGUAGE DEUTSCH / ENGLISH / TÜRKÖE- HS NAME AUTO ANSWER ON / OFF BARRING OFF / ON → NUMBER 1..4 DATE & TIME YEAR / MONTH/BAY / HOUR / MINUTE SELECT BASE BASIS 1..4 HS DEFAULTREGISTRATION — BASE 1..4
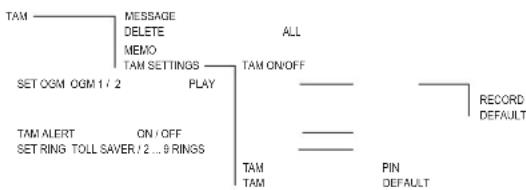
flowchart
graph TD
    A["TAM"] --> B["MESSAGE DELETE MEMO"]
    B --> C["TAM SETTINGS"]
    C --> D["ALL"]
    D --> E["TAM ON/OFF"]
    E --> F["SET OGM CGM 1 / 2 PLAY"]
    F --> G["TAM ALERT ON/OFF SET RING TOLL SAVER / 2 ... 9 RINGS"]
    G --> H["TAM TAM PIN DEFAULT"]
    H --> I["RECORD DEFAULT"]
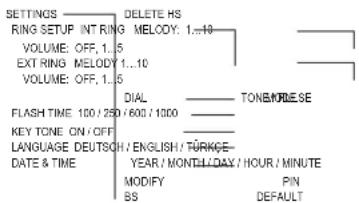
Menu structure desktop telephone
PHONE BOOK LIST/NEW ENTRY / EDIT RECORD / DEL RECORD / DELETE ALL / MEM STATUS
CALL LOG MISSED / RECEIVED / DIALED
text_image
SETTINGS RING SETUP INT RING MELODY: 1..10 VOLUME: OFF, 1..5 EXTRING MELODY: 1..10 VOLUME: OFF, 1..5 FLASH TIME: 100 / 250 / 600 / 1000 KEY TONE: ON / OFF LANGUAGE DEUTSCH / ENGLISH / TÜRKCE- DATE & TIME YEAR / MONTILLDAY / HOUR / MINUTE MODIFY PIN SS DEFAULTREGISTRATION
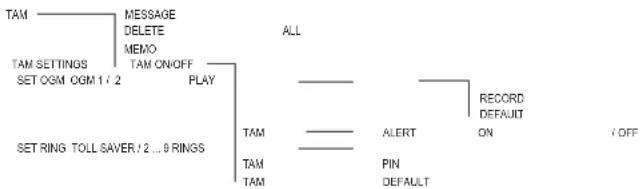
flowchart
graph TD
    A["TAM"] --> B["MESSAGE DELETE MEMO"]
    B --> C["TAM ON/OFF PLAY"]
    C --> D["ALL"]
    D --> E["RECORD DEFAULT ON"]
    E --> F["/ OFF"]
    G["TAM SET RING TOLL SAVER / 2 ... 9 RINGS"] --> H["TAM"]
    H --> I["TAM"]
    I --> J["TAM"]
    J --> K["TAM"]
    K --> L["TAM"]
    L --> M["TAM"]
    M --> N["TAM"]
    N --> O["TAM"]
    O --> P["TAM"]
    P --> Q["TAM"]
    Q --> R["TAM"]
    R --> S["TAM"]
    S --> T["TAM"]
    T --> U["TAM"]
    U --> V["TAM"]
    V --> W["TAM"]
    W --> X["TAM"]
    X --> Y["TAM"]
Service-Hotline Germany: Tel. 0180 5 001388 (Costs for call from german landline at time of print: 14 ct/min, max. 42 ct/min from mobile phone providers.)
GB
Character set
| 0 | SP | 0 | - | + | = | - | ( | ) | " | ' | ` | [ | ] | { | } | < | > | / | \ | ^ | - | | |
| 1 | . | , | : | ; | ! | i | ? | 4 | * | # | & | % | $ | € | £ | ¥ | @ | ° | § | |||
| 2 | A | B | C | 2 | À | À | À | Ä | Ä | Ä | A | AE | Ç | C | C | |||||||
| 3 | D | E | F | 3 | Ö | È | É | É | È | E | È | È | ||||||||||
| 4 | G | H | I | 4 | G | I | í | I | I | I | I | I | ||||||||||
| 5 | J | K | L | 5 | Ł | L | L | |||||||||||||||
| 6 | M | N | O | 6 | Ñ | Ñ | Ñ | Ò | Ó | Ó | O | O | Ö | Ø | ||||||||
| 7 | P | Q | R | S | 7 | R | R | S | S | S | S | ß | ||||||||||
| 8 | T | U | V | 8 | † | Ù | Ù | Ù | Ù | Ù | Ù | |||||||||||
| 9 | W | X | Y Z | 9 Ŵ | ||||||||||||||||||
In Case of Problems
Should problems arise with the telephone, please refer to the following information first. In the case of technical problems, you can contact our hotline service, tel. 0180 5 001388 (Costs for call from German Telekom landline at time of print: 14 ct/min). In the case of claims under the terms of guarantee, contact your sales outlet. There is a 2 year period of guarantee.
- After pressing the on hook button or lifting the handset from the desktop telephone, no ring tone is audible, the line is not engaged.
- Check the telephone connector on the desktop telephone and on the wall socket.
- Check power connector on the desktop telephone and on 230 V.
- Make sure the delivered telephone connection cable is used.
- The line is being occupied by another handset. Wait until the connection is terminated.
- Display: "BASE X" flashing.
- Check power connector on the desktop telephone and on 230 V.
- Reduce range.
- Register handset.
- No display on the handset.
- Handset turned off -> turn on.
- Battery empty -> recharge.
Default settings
Desktop telephone Handset
| Call list No entry No entry | ||
| Phone book No entry No entry | ||
| Alarm – Off | ||
| Ringer Internal call: Melody 2 Internal call: Melody 2 | ||
| External call: Melody 1 External call: Melody 1 | ||
| Volume: 5 Volume: 5 | ||
| Tone setup Key tone: On Key tone: On | ||
| – Battery tone: On | ||
| – Out of range: On | ||
| Language German German | ||
| Handset name – BIGTEL 380 | ||
| Auto answer – On | ||
| Dial mode | tone (DTMF) | s. desktop telephone |
| Flash time | 100 ms | s. desktop telephone |
| PIN | 0 0 0 0 | s. desktop telephone |
| TAM | On | s. desktop telephone |
| Answer delay | 6 rings | s. desktop telephone |
| Answer mode | OGM 1 (answer & record) | s. desktop telephone |
| TAM PIN 0 0 0 0 | s. desktop telephone | |
Technical data
Standard: DECT / GAP
Number of channels: 120 duplex channels
Frequencies: 1880 MHz to 1900 MHz
Duplex mode: Time division multiplex, 10ms frame length
Channel spacing: 1728 kHz
Bit rate: 1152 kBit / s
Modulation: GFSK
Voice encoding: 32 kBit / s
Transmitter power: 10 mW (average power per channel)
Range: up to 250 m outside, up to 50 m inside buildings
Electricity supply desktop telephone: 100\~240 V AC (adapter plug S005CV0600060) / 6 V, 600 mA DC
Electricity supply charger: 100\~240 V AC (adapter plug S002CV0600030) / 6 V, 300 mA DC
Handset: Operating time: Stand-by time / Talk time 600 mAh = up to 100 h / up to 10 h
Charging time: approx. 14 hours
Operating temperature for handset operation: 5°C to 40°C; 20% to 75% rel. humidity
Operating temperature for desktop telephone operation: 5°C to 40°C; 20% to 75% rel. humidity
Storage temperature: -10^ to +60^
Appendix
Dial mode: Tone / Pulse
R-key : Flash time (100 ms / 250 ms / 600 ms / 1000 ms)
Desktop telephone dimensions (mm): L / W / H = approx. 210 x 195 x 85
Handset dimensions (mm): L / W / H = approx. 157 x 44 x 26
Telephone line cord:
TSV on Pin 3 and 4 according to CTR 37 (Euro)
Adapter plug: European-type mains connector
Declaration of Conformity
This device fulfils the requirements stipulated in the EU directives:
- 1999/5/EU directive on radio equipment and telecommunications terminal equipment and the mutual recognition of their conformity.
- 2005/32/EU directive "Energy-using products".
Conformity with the above mentioned directives is confirmed by the CE symbol on the device.
To view the complete Declaration of Conformity, please refer to the free download available on our web site www.audioline.de.
Maintenance
Clean the housing surfaces with a soft, fluff-free cloth.
Do not use any cleaning agents or solvents.
Guarantee
AUDIOLINE equipment is produced and tested according to the latest production methods. The implementation of carefully chosen materials and highly developed technologies ensure trouble-free functioning and a long service life. The terms of guarantee do not apply where the cause of equipment malfunction is the fault of the telephone network operator or any interposed private branch extension system. The terms of guarantee do not apply to the batteries or power packs used in the products. The period of guarantee is 24 months from the date of purchase.
All deficiencies related to material or manufacturing errors within the period of guarantee will be redressed free of charge. Rights to claims under the terms of guarantee are annulled following tampering by the purchaser or third parties. Damage caused as the result of improper handling or operation, normal wear and tear, incorrect positioning or storage, improper connection or installation or Acts of God and other external influences are excluded from the terms of guarantee. In the case of complaints, we reserve the right to repair defect parts, replace them or replace the entire device.
Replaced parts or devices become our property. Rights to compensation in the case of damage are excluded where there is no evidence of intent or gross negligence by the manufacturer.
If your device shows signs of defect during the period of guarantee, please return it to the sales outlet in which you purchased the AUDIOLINE device together with the purchase receipt. All claims under the terms of guarantee in accordance with this agreement can only be asserted at the sales outlet.
No claims under the terms of guarantee can be asserted after a period of two years from the date of purchase and hand-over of the product.
Appendix
Index
A
Alarm 16
Alert tones 17
Answering mode .....21
Auto Answer 4,17
B
Broker's call 12
C
Call list 10
Call timer 11
Character set 28
Charging station 4
Charging the batteries ....4
Conference 12
Connecting the desktop telephone ....3
D
Date/Time 16
Declaration of Conformity ....30
Default settings .....29
Deleting all old messages .....23
Deleting single messages .....22
Deleting the personal outgoing message .....22
Dial mode 18
Display language 4
Disposal 2
E
Earpiece/loudspeaker volume .....11
Editing the call list ....14
Editing the redial list....14
Ending a call....9
F
Flash Time 18
G
Guarantee 30
H
Handset name 17
|
In Case of Problems .....28
Inserting the batteries ....4
Installation location ....1
Intended use ....1
Internal calls 11
K
Key lock 13
L
Language 17
Listen new messages .....22
M
Maintenance....30
Making a call 9
Medical equipment 2
Menu structure .....27
Muting the microphone .....11
P
Package contents ....3
PBX 26
Phone book 10,15
PIN 19
Playback outgoing message .....21
Power adapter plug ....1
Power failure 2
R
Rechargeable batteries ....1
Recording a memo .....23
Recording outgoing message .....21
Redial 10
Registering/de-registering handsets .....25
Ringer....16
Ringer on/off 13
S
Safety Information ....1
Select a base station .....18
Setting the answering machine .....23
Setting the time and date ....4
Supplementary services .....26
Switching off the handset .....13
T
Taking a call 9,23
Technical data 29
Transferring an external call....11
Turning the answering machine on/off .....21
Appendix
Service-Hotline Deutschland: Tel. 0180 5 001388