DECT 4800B - Phone AUDIOLINE - Free user manual and instructions
Find the device manual for free DECT 4800B AUDIOLINE in PDF.


User questions about DECT 4800B AUDIOLINE
0 question about this device. Answer the ones you know or ask your own.
Ask a new question about this device
Download the instructions for your Phone in PDF format for free! Find your manual DECT 4800B - AUDIOLINE and take your electronic device back in hand. On this page are published all the documents necessary for the use of your device. DECT 4800B by AUDIOLINE.
USER MANUAL DECT 4800B AUDIOLINE
natural_image
Three vintage mobile phones on stands, one with a digital display and the other with a screen (no visible text or symbols)User Instructions 61
text_image
= Laut = Mittel = Leise
- Bedienung -
4.8 Freisprechen
text_image
01-04NACHRI. 1 2Name: MANFRED ZINNOW
3.2 Check contents of pack....67
3.3 Connecting the base station....67
3.4 Connecting the chargers 67
3.5 Fitting standard batteries.... 68
3.6 Charging the standard batteries 68
4 Operation.... 69
4.1 The display....69
4.2 Receiving calls 69
4.3 Making calls 70
4.4 Making an internal call.... 70
4.5 Connecting external calls to another handset 71
4.6 Holding conference calls 71
4.7 Adjusting the receiver volume 71
4.8 Handsfree facility....72
4.9 Room monitoring.... 72
4.10 Redial facility 72
4.10.1 Storing individual redial numbers in the phone book 73
4.10.2 Deleting individual redial numbers....73
4.11 Switching the handset on and off 74
4.12 Mute button 74
4.13 Keypad lock....74
4.14 Baby call....75
4.15 Temporary tone dialling.... 75
4.16 Switching off the ring tone 76
4.17 Range information.... 76
4.18 Paging from the base station to the handset 76
5 The phone book.... 77
5.1 Entering numbers and names in the phone book....77
5.2 Dialling stored numbers from the phone book....78
5.3 Changing a phone book entry 78
5.4 Direct dial buttons 78
5.4.1 Allocating direct dial buttons....79
5.4.2 Using the direct dial buttons....79
5.5 Deleting stored numbers from the phone book 80
- Contents -
5.6 Checking phone book entries 80
5.7 Assigning special ring tones to phone book entries (VIP ring tone) 81
5.8 Setting up the special phone book....82
5.8.1 Dialling stored numbers from the special phone book 82
6 Caller display (CLID)......83
6.1 The caller list 84
6.1.1 Storing individual numbers on the caller list in the phone book 84
6.2 Deleting individual telephone numbers from the caller list....85
7 Private exchanges/T-NET 86
7.1 "R" Button on private exchanges....86
7.2 "R" Button and the DEUTSCHE TELEKOM T-Net 86
7.3 Inserting an automatic pause 86
8 Special functions ....87
8.1 Changing display names 87
8.2 Setting ring tones and ringer volumes 88
8.3 Setting up dialling blocks 89
8.4 Automatic dialling code....90
8.5 Turning signal tones on or off....92
8.6 Accepting calls automatically....93
8.7 Setting the flash time....93
8.8 Touch-tone (TTD) or pulse (PD) dialling....94
8.9 Setting the display language 94
8.10 Changing the call duration display....95
8.11 Changing the PIN code on the base station 95
8.12 Deleting all lists 96
8.13 Factory settings....96
9 The answering machine .....97
9.1 Switching the answering machine on/off .....98
9.2 General settings 98
9.2.1 Maximum recording time.... 98
9.2.2 Delaying acceptance of calls.... 99
9.2.3 Warning signal for recorded messages....99
9.2.4 Listening-in to incoming messages 100
9.3 Recording, checking or deleting greeting messages .....100
9.3.1 Recording greeting messages.... 101
9.3.2 Checking the currently set greeting message.... 102
9.3.3 Deleting your own greeting and reverting to the standard greeting..... 102
- Contents -
9.4 Listening to recorded messages 103
9.4.1 Deleting all messages 104
9.5 Recording and listening to the memo 104
9.6 The remote access facility.... 105
9.6.1 The PIN code....105
9.6.2 Listening to messages using the remote access facility 106
9.6.3 Switching on the answering machine remotely.... 107
9.6.4 Toll-free remote pre-access facility.... 107
9.7 Forwarding calls directly to the answering machine 107
9.7.1 Blocking calls and forwarding calls directly to the answering machine 107
9.7.2 Forwarding anonymous calls directly to the answering machine ..... 109
9.7.3 Using and changing the SOS code 109
10 Multiple handsets .... 111
10.1 Logging on and logging off handsets 111
10.1.1 Logging on DECT4800/4801 handsets....111
10.1.2 Logging on other DECT-GAP telephones to the base station..... 111
10.1.3 Logging off handsets.... 112
10.2 Additional base stations 112
11 Troubleshooting 114
12 Important information.... 115
12.1 Technical data.... 115
12.2 Changing the telephone cable.... 115
12.3 Warranty.... 116
12.4 Declaration of conformity.... 117
- General information -
1 General Information
Please read these operating instructions carefully. If you should have any questions, please contact our Service Department on the Hotline number 0180 5 00 13 88. Under no circumstances open the unit yourself and do not try to carry out your own repairs. For any claims under the warranty, please refer to your dealer.
Intended use - This telephone has been designed for use on an analogue telephone line (PSTN) within Germany. However, no guarantee can be accepted for trouble-free operation on all telecommunications terminal equipment connections due to the differences between the different telecommunications network operators. The telephone requires a TAE socket with F/N coding in common with other plug-in units such as fax machines, answering machines or modems. Connect the telephone cable to the phone socket intended for the purpose only. Do not change the plug on the connecting cable.
Power failure - If the power should fail, it will not be possible to make calls using the telephone. Keep a cord-connected phone handy, which works without an external power supply, for possible emergencies.
Standard rechargeable batteries - do not use any other rechargeable batteries or battery packs. These could possibly cause a short circuit. When changing batteries, always use standard batteries, Type AAA 1.2V 650mA. Do not throw standard batteries into the fire or immerse in water. Do not dispose of old or defective standard batteries with the normal household waste.
The maximum standby and talk times quoted are applicable for the standard rechargeable batteries supplied under optimum conditions. Ambient temperature, charging cycle and other external factors, such as the radio loading in the area of use, can considerably reduce the operating times. Furthermore, the charging capacity is reduced for technical reasons during use or when stored at very high or low temperatures.
Charging the handset - It is normal for the handset to become warm when charging and is not dangerous. Do not use other manufacturer's charging equipment for charging the handset, as otherwise damage could occur.
Private exchanges - The telephone can also be connected to a private exchange. You can find out from the dealer from whom the equipment was purchased whether your telephone will work on your private exchange without any problems. Due to the large number of different private exchanges, it is not possible to guarantee this function.
Power supply - Use only the AUDIOLINE plug-in power supply provided, as other power supplies could damage the telephone. There is a risk to life if the power supply is opened and not disconnected from the mains.
- General information -
Position - There must be a 230 Volt mains socket near to where the telephone is positioned. Do not set up the base station in the immediate vicinity of other electrical equipment such as microwaves or hi-fi systems, as this may result in mutual interference. The location has a decisive influence on the trouble-free operation of the telephone.
Place the base station on a flat and non-slip surface. The feet of the base station do not normally leave any marks on the surface. However, due to the large number of varnishes and surfaces in use, it may not be possible to prevent marks occurring on the surface due to the feet of the unit.
Do not use the handset in areas where there is a risk of explosion.
Excessive exposure to smoke, dust, vibrations, chemicals, moisture, heat or the direct rays of the sun must be avoided.
Information regarding medical equipment - The telephone works with a very low transmission power. This low transmission power prevents any risk to health according to the current state of research and technology. However, it has been shown that portable telephones can interfere with medical equipment when switched on. Therefore, please maintain a distance of at least one metre from medical equipment.
Disposal - If the useful life of the standard batteries or the complete equipment has expired, please dispose of these carefully in accordance with the statutory requirements and in a manner friendly to the environment.
Temperature and Ambient Conditions - The telephone is designed for use in protected rooms with a temperature range of 10 °C to 30 °C. The base station must not be installed in damp rooms such as a bathroom or laundry room. Avoid proximity to sources of heat such as radiators and do not expose the unit to direct sunlight.
Cleaning and care - The surface of the case can be cleaned with a soft, dry, lint-free cloth. Never use cleaning agents, particularly aggressive solvents. No attention is necessary apart from cleaning the case occasionally. The rubber feet of the base station are not resistant to all cleaning agents. The manufacturer can therefore not accept any liability for possible damage to furniture or the like.
CE mark - The telephone complies with the basic requirements of the R&TTE Directive This is confirmed by the CE mark.
- User controls -
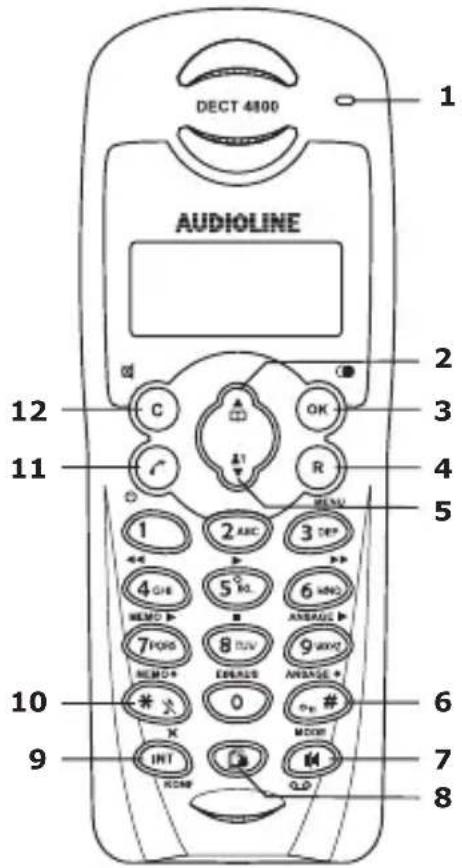
2 User controls
- Call indicator, flashes for newly recorded messages
- Phone book/Selection button
- Redial/OK button
- Menu/R signal button
- Caller list CLID/Selection button
- Keypad lock
- Handsfree/Answering machine
- Special phone book
- Internal calls/Conference
- Ringer On-Off
- Call button/On-Off button
- Mute button/Cancel
text_image
DECT 4800 AUDIOLINE 1 2 3 4 5 6 7 8 9 10 11 12 C OK R ABC THP 5th 6th 7th 8th 9th INT MODI OLDBase station
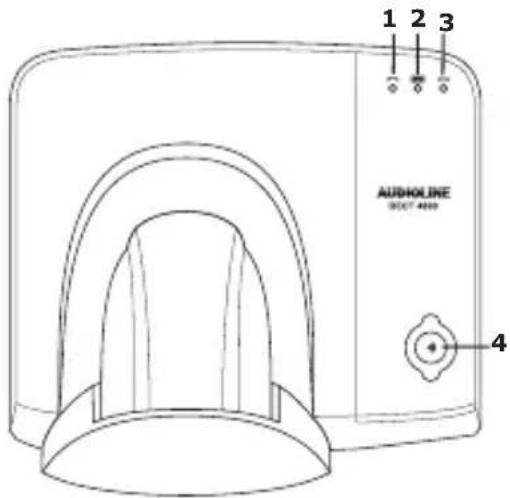
- Call indicator
- Answering machine on/Message indicator
- Charge monitoring lamp
- Paging button.
text_image
AUDHOLINE 3007 4499 1 2 3 4Charger
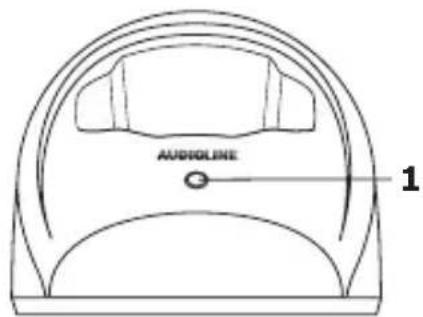
- Charge monitoring lamp
text_image
AUDIOLINE 1- Setting up -
3 Setting up
3.1 Safety Information
NOTE Before setting-up, it is essential that you read the General Information at the beginning of this manual.
3.2 Check contents of pack
The following items are supplied:
| one base station with main power supply o | her charger with mains power supply |
| three handsets with belt clips fourstandard | batteries |
| one telephone connecting cable one instru | ction manual |
3.3 Connecting the base station
Position the base station near to your telephone connection socket and to a mains socket. Your telephone works using Touch-Tone Dialling.
- Insert the plug of the power supply into the socket on the rear of the base station and plug the power supply into a properly installed 230 V mains socket. The plug-in power supply for the base station must always be connected. For safety reasons, use only the plug-in mains power supply provided.
- Connect the telephone cable supplied to the telephone socket and the telephone jack on the rear of the base station. Use only the new telephone cable provided.
- If required, clamp the two cables in the cable channel underneath the foot support and then run these through the two openings towards the rear.
Note: The two plugs must audibly click into place so that they do not fall out again.
3.4 Connecting the charger
Set up the charger in the desired place within reach of a electricity supply socket.
- Setting up -
3.5 Fitting standard batteries
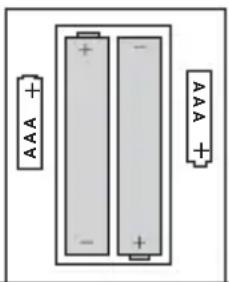
To fit the standard rechargeable batteries supplied into the handset, press on the upper edge of the battery compartment and slide it downwards. Now insert the batteries taking care to ensure that the polarity is correct. Close the battery compartment cover.
natural_image
Diagram of two batteries with positive and negative charge indicators, no text or symbols presentImportant note: Place the handset in the base station or one of the chargers with the display to the front for at least 16 hours. The telephone may malfunction if the batteries are not properly charged. The charging light on the base station will come on.
3.6 Charging the standard batteries
The standard rechargeable batteries for the handset have a stand-by time of max. 144 hours at room temperature and a maximum talk time of 12 hours. To charge the batteries, place the handset in the base station or one of the chargers with the display to the front.
The current battery capacity is shown in the display.

Full
Half full

charged.

Note: Exactly like your car battery, the standard rechargeable batteries are unavoidably subject to a certain ageing. However, you can have an influence on this ageing process by "training" the standard batteries to a certain extent. In regular use of the phone, if you cyclically charge and fully discharge the standard batteries by using the telephone until the symbol flashes in the display, a demand is placed on the batteries and they will repay you by giving maximum performance and a long life. Extended charging and extended discharging on the other hand will both degrade the capacity and shorten the life of the standard batteries.
- Operation -
4 Operation
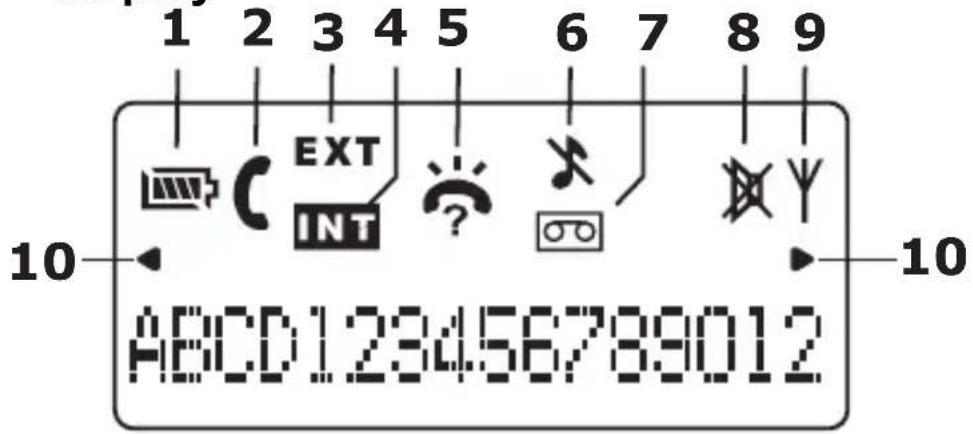
4.1 The display
text_image
1 2 3 4 5 6 7 8 9 EXT INT ? ABC D123456789012| 1 | Full => => Discharged. | |
| 2 |  | You are making a call. |
| 3 | EXT | Flashing: You are receiving an external call.Lit: You are making an external call. |
| 4 |  | Flashing: You are receiving an internal call.Lit: You are making an internal call.(with multiple handsets only) |
| 5 |  | A new phone number has been stored in the caller list CLID or you are currently in the caller list. |
| 6 |  | The ring tone is switched off. |
| 7 |  | The answering machine is switched on. |
| 8 |  | The microphone is switched off. |
| 9 |  | Appears when the handset is within range of the base station. |
| 10 |  | The phone number is not fully shown in the display. |
4.2 Receiving calls
When an external call arrives, the ringing tone sounds on the handset. The EXT symbol will flash in the display. Lift the handset from the base station or press the call button ⏻ on the handset and the connection will be made. To end the call, replace the handset in the base station or press the call button ⏻ on the handset.
- Operation -
4.3 Making calls
| 1. Enter the required telephone number with a maximum of 18 digits using the number pad. The numbers pressed are shown in the display. If more than 16 digits are pressed, the ◀ indicator on the left-hand edge of the display will appear and the last 16 digits will be shown. |
| 2. Press the call button and the required connection will be made.The call duration in minutes and seconds is shown in the display during a call.Ten seconds after dialling, the display will switch from showing the number dialled to showing the duration of the call. The call duration will still be retained in the display for a few seconds after the call has been ended. |
| 3. To end the call, press the call button or replace the handset on the base station. |
Note: If you have entered a number incorrectly, you can delete the number by repeatedly pressing the button. The number is completely deleted by pressing the button for a long time.
You can also get a dialling tone by first pressing the call button Ⓤ. On entering the digits of your required phone number, your telephone will dial the number directly. With this method of making a call, it is not possible to correct individual digits in the number in the manner described above.
Note: If another handset is already using the external line, the message EXT will appear on all handsets. In this case, it is not possible to make a further external call.
4.4 Making an internal call
When you have connected multiple handsets to a base station, you will be able to make internal calls. To do this, press the INT button and then the number of the required handset. The display shows the internal call number 1 or 2.
The call is accepted with the call button ⏻ on the handset called.
If an external call comes in while you are making an internal call, you will hear short signal tones and the message EXT will flash in the display. To take the external call, end the internal call by means of the call button ⏻ and accept the external call with the call button ⏻.
- Operation -
4.5 Connecting external calls to another handset
If you have accepted an external call on one handset, you can forward the external call to another handset. To do this, press the INT button and then the number of the required handset. After the internal call has been accepted at the other handset, you have the following options:
A. Consultation / Brokering: You can now speak to the internal subscriber and
return to the external caller by pressing the button. You can switch between the external and the internal call as many times as you like in this way.
B. Forward the call: The external call is forwarded to the handset called by pressing the call button ⏻ on the first handset.
4.6 Holding conference calls
An external call can be connected to a further internal subscriber as a conference call. In this way, two handsets can talk to the external caller simultaneously.
Establish the required connection with the external subscriber. Then press the button and the internal number of the second handset required. When the second internal subscriber has accepted the call, press and hold the button for 2 seconds and all three subscribers will be connected together on a conference call. The messages INT and EXT will appear in the display. The conference is ended by one of the internal participants hanging up.
4.7 Adjusting the receiver volume
There are three volume levels available to you if you should want to change the receiver volume on the handset.

Press the selection buttons during a call to change the receiver volume. The selected volume will be shown in the display.

= Loud = Medium


- Operation -
4.8 Handsfree facility
Press the handsfree button during a call. You will now hear the person you are speaking to over the loudspeaker in the handset.
Press the handsfree button 📋 again to switch off the handsfree facility.
4.9 Room monitoring
With the room monitoring feature, you place a handset in the required room and activate the monitor function. You can then call up this handset and listen-in to the room without the handset ringing. Also in the case of an external call, the handset concerned does not ring.
| Button Display | |
 | FEATURES |
 | MONITOR |
 | OFF or ON |
 | Select OFF or ON |
 | MONITOR |
 Hold Hold | The message MONITOR will flash in the display. |
Deactivating room monitoring
Press the R MENU button to enter the right menu level directly. Then press and select OFF. Confirm with OK and exit programming by holding the button pressed.
4.10 Redial facility
Use Redial if the person called is engaged or does not reply. Your telephone remembers the last ten numbers, each with a maximum of 18 digits. When the list is full, the oldest number is always deleted from the list.
 |  button and the last phone number dialled will be shown in the button and the last phone number dialled will be shown in the |
 | |
- Operation -
4.10.1 Storing individual redial numbers in the phone book
| Button | Display Comment | ||
 | Last number dialled | ||
 | Selected number Select required telephone number. | ||
 | SAVE | ||
 | NAME? Enter name | You will find further information on entering names in Chapter 5.1. | |
 | Selected number Number can be edited. | ||
 | SAVE Number is saved. | ||
| c | Hold button pressed to return to main display. | ||

4.10.2 Deleting individual redial numbers
| Button | Display Comment | |
 | Last number dialled | |
 | Selected number Select required telephone number. | |
 | SAVE | |
 | DELETE | |
 | DELETE? Safety prompt | |
 | Further redial number | Number is deleted. |
| c | Hold button pressed to return to main display. | |

- Operation -
4.11 Switching the handset on and off
Switching the handset off: Press and hold the ⏻ button for 2 seconds.
Switching the handset on again: Press and hold the ⏻ button for 2 seconds. The handset will switch itself on automatically as soon as you replace it on the base station.
4.12 Mute button
You can turn off the microphone in the handset by using the mute button. In this way, you will be able to speak without the other person hearing you.
Switching off the microphone: Press the Ⓞ button. The symbol will appear in the display.
Switching on the microphone again: Press the ⓒ button again. The symbol in the display will go off and you will be able to speak to the other person once more.
4.13 Keypad lock
With the keypad lock, you can prevent a button on the handset being pressed accidentally. Incoming calls can be received as normal even when the keypad lock is switched on.
Activating the keypad lock
Hold the button pressed until you hear a signal tone. The message ENABLE # will appear in the display.
Deactivating the keypad lock
Hold the button pressed again until you hear a signal tone. The message in the display will go off and you will be able to use the handset normally once more.
- Operation -
4.14 Baby call
Small children or even older people can easily dial a previously defined telephone number using the baby call feature. Press any button on the handset (with the exception of the
| Button Display | |
 | FEATURES |
 | MONITOR |
1 x  | DIR DIAL |
 | OFF |
1 x  | Select ON |
 | Enter the number. Existing numbers can be deletedindividually with thebutton. |
 | DIR DIAL |
 Hold Hold | DIR DIAL will flash in the display. |
Deactivating baby call
Press the R MENU button to enter the right menu level directly. Then press and choose the OFF setting by means of the selection buttons . Confirm with and exit programming by holding the C button pressed.
4.15 Temporary tone dialling
If you can only use your telephone in Pulse Dialling mode, you do not have to forego the facilities of Tone Dialling (e.g. interrogating an answering machine). You
can change temporarily to Tone Dialling during a call by means of the (press the button until you hear a beep) button.
PULSE dialling will be reselected at the end of the call.
- Operation -
4.16 Switching off the ring tone
If at any time you do not want to be disturbed, you can turn off the ring tone on the handset.
Switching off the ring tone
Press and hold the button for 2 seconds. The display. Incoming calls will now only be signalled at the base station and no longer at the handset.


Switching on the ring tone again
Press and hold the will go off.

button again for 2 seconds. The

symbol in the display
4.17 Range information
The range of the handset is ca. 50 metres in closed rooms and ca. 300 metres outdoors. When there is a good contact with the base station, the symbol will come on in the display. You hear warning tones, if you are too far away from the base station. Is the connection broken, the symbol will disappear and the message SEEK BS will appear.
4.18 Paging from the base station to the handset
If you cannot remember where you have left the handset, press the paging button

on the base station. You will now hear the handset audible signal for 30
seconds and thus be easily able to find it again. You can cancel the audible signal by pressing any button on the handset.
- The phone book -
5 The phone book
You can store 50 phone numbers, each with 18 digits, and an associated name, with up to 10 letters, in the phone book of your handset.
5.1 Entering numbers and names in the phone book
| Button | Display Comment | |
1 x  | ADD ENTRY | |
 | NAME? | Enter name. |
 | NUMBER? Enter number. | |
 | ADD ENTRY Number is saved. | |
 | Hold button pressed to return to main display. | |
Notes:
You can terminate the process at any time by pressing and holding the ⓒ button.
Individual numbers or letters can be deleted with the ⓒ button.
The special characters "* - _ : /" can be entered with the button.
When the phone book is full, an appropriate message will appear and a number must be deleted before you can continue entering new phone numbers.
If a call is received during the storing process, entry of the number is interrupted and will have to be repeated.
If a number that has already been stored is entered again, a long signal tone will sound and the number will not be stored.

- The phone book -
5.2 Dialling stored numbers from the phone book
| Button | Display Comment | |
1 x | ADD ENTRY | |
 | Selected phone book entry | Select required phone book entry. |
 | The phone number will be dialled. | |
Press the appropriate letter to directly choose an entry from the phone book alphabetically.
5.3 Changing a phone book entry
| Button Display Comment | ||
1 x ADD ENTRY | ||
 | Selected phone book entry | Select required phone book entry. |
 | EDIT ENTRY | |
 | Name | The name can be deleted with the @ button and then re-entered. |
 | Number | The number can be deleted with the @ button and then re-entered. |
 | EDIT ENTRY The phonebook entry has been re-saved. | |
 | Hold button pressed to return to main display. | |
5.4 Direct dial buttons
A phone number from the phone book can be allocated to each of the numbers 1 to 9. The stored number is then dialled directly by pressing one of these buttons.
- The phone book -
5.4.1 Allocating direct dial buttons
| Button | Display Comment | |
 | FEATURES | |
 | MONITOR | |
 | QUICK DIAL | |
 | KEY 1 Select the required button 1 to 9 using the selection buttons. | |
 | Key 1 to 9 | |
 | OFF | |
 | ON | |
 | Phone book The first entry in the phone book will be displayed. | |
 | Phone book Select the required phone book entry using the selection buttons. | |
 | Number The corresponding phone number will be displayed again. | |
 | QUICK DIAL | |
 | Hold button pressed to return to main display. |
5.4.2 Using the direct dial buttons
Hold the appropriate direct dial button 1 to 9 pressed for 2 seconds. The corresponding phone number will be shown in the display and the connection will be made.
- The phone book -
5.5 Deleting stored numbers from the phone book
| Button | Display Comment | |
1 x | ADD ENTRY | |
 | Selected phonebook entry | Select required phone book entry. |
 | EDIT ENTRY | |
 | DELETE | |
 | DELETE? Safety prompt | |
 | Phone book entry is deleted. | |
 | Hold button pressed to return to main display. |
5.6 Checking phone book entries
| Button | Display Comment | |
1 x | ADD ENTRY | |
 | Selected phone book entry | Select required phone book entry. |
 | Number will be displayed. | |
 | Selected phone book entry | Other phonebook entries can be selected using the selection buttons and checked with the button. |
 | Hold button pressed to return to main display. |
- The phone book -
5.7 Assigning special ring tones to phone book entries (VIP ring tone)
If your phone line has the caller display feature CLID, you can assign a special ring tone to each phone book entry. You will thus be able to tell who is calling you as soon as you hear the ring tone. You will find further general information on transmitting phone numbers in Chapter 6.
| Button | Display Comment | |
| 1 x ADD ENTRY | ||
 | ||
 | Selected phone book entry | Select required phone book entry. |
 | EDIT ENTRY | |
 | VIP MELODY | |
 | OFF The VIP ring tone | for this number is switched off. |
 | ON | |
 | MELODY 1 - 10 | |
 | MELODY 1 - 10 Select | the required tone. |
 | VIP MELODY The phonebook entry has been re-saved. | |
 | Hold button pressed to return to main display. | |
To switch off the VIP tone for a particular number, follow the entering procedure and select the OFF setting for the appropriate number.
- The phone book -
5.8 Setting up the special phone book
You can store a further 7 numbers in your telephone's special phone book. The special phone book can be used to store important numbers such as those of doctors, fire brigade or police. Phone numbers that are already stored in the normal phone book cannot be entered again into the special phone book.
| Button | Display Comment | |
 | ADD ENTRY | |
 | NAME? | Enter name. |
 | NUMBER? Enter number. | |
 | ADD ENTRY Number is saved. | |
 | Hold button pressed to return to main display. |
You will find further information on entering names in Chapter 5.1.
5.8.1 Dialling stored numbers from the special phone book
| Button | Display Comment | |
 | ADD ENTRY | |
 | Selected phone book entry | Select required phone book entry. |
 | The phone number will be dialled. | |
Press the appropriate letter to directly choose an entry from the phone book alphabetically.
If you want to change or delete an entry in the special phone book, select the entry and then follow the instructions in Chapter 5.3 (from the third step) and Chapter 5.5 (from the third step).
- Caller display (CLID) -
6 Caller display (CLID)
Using caller display, you can see with incoming calls who is calling you. If this function is available on your telephone, the display will show you the caller's telephone number when the telephone rings. If this number has already been saved in the phone book, the name of the caller will be displayed directly.
If the message PRIVATE appears instead of a phone number, the call is one where the caller has suppressed the transmission of the phone number. If the message XXXX appears, the phone number cannot be displayed for technical reasons.
All calls are stored in a caller list so that you will not miss any calls even in your absence. A total of 20 phone numbers can be stored in the list. When the list is full, the oldest number is always deleted from the list.
If new numbers are stored in the list during your absence, the display will show the

symbol.

NOTE
Caller display is an optional service from your telephone provider. Your telephone will show the number in the display if your telephone provider offers this service. The display of date and time is not transmitted by all telephone service providers. Please ask your telephone provider for further information. Furthermore, transmission of the phone number is not possible with many private exchanges.
- Caller display (CLID) -
6.1 The caller list
To view the phone numbers on the caller list, please proceed as follows:
| Button | Display Comment | |
1 x | Last call saved | |
 | Selected number You can now view the whole list using the selection buttons. | |
 | If you want to call back a number on the callerlist directly, simply press the call button ⏻ andthe number will be dialled immediately. | |
 | To exit the caller list. |
6.1.1 Storing individual numbers on the caller list in the phone book
| Button | Display Comment | |
1 x | Last call saved | |
 | Selected number Select required telephone number. | |
 | SAVE ENTRY | |
 | NAME? | Enter name. |
 | Selected number Number can be edited. | |
 | SAVE ENTRY Number is saved. | |
 | Hold button pressed to return to main display. |
If a number that has already been stored is entered again, a long signal tone will sound and the number will not be stored.
- Caller display (CLID) -
6.2 Deleting individual telephone numbers from the caller list
| Button | Display Comment | |
1 x | Last call saved | |
 | Selected number Select required telephone number. | |
 | SAVE ENTRY | |
 | DELETE | |
 | DELETE? | Safety prompt |
 | Further numbers on the caller list | Number is deleted. |
 | Hold button pressed to return to main display. | |
7 Private exchanges/T-NET
You can use the "R" signal button on your telephone on private exchanges and when using DEUTSCHE TELEKOM's T-Net functions.
7.1 "R" Button on private exchanges
If you have connected your telephone to a private exchange, you can use all the facilities such as call transfer, automatic recall, etc. The "R" signal button gives you access to these facilities. The FLASH time "100ms" will be required on a private exchange (Adjustment, see 8.7). You can find out from the dealer from whom the equipment was purchased whether your telephone will work on your private exchange without any problems.
7.2 "R" Button and the DEUTSCHE TELEKOM T-Net
Your telephone supports the most important DEUTSCHE TELEKOM added value functions (e.g. brokering, call waiting, three-way conference, etc.). The T-Net works using the "FLASH 300ms" setting. (Adjustment, see 8.7). Please contact DEUTSCHE TELEKOM to gain access to T-Net functions.
7.3 Inserting an automatic pause
With some private exchanges, it is necessary to dial a certain number (e.g. "9" or "0") in order, after a short pause, to obtain a dialling tone for an outside line on the extension.
An automatic dialling pause of ca. 3 seconds can be incorporated into the number.
When entering the number, hold the button pressed at the required point until the d indicator appears in the display. Then enter the remaining digits of the phone number. You can, of course, also store this pause with numbers in the phone book.
- Special functions -
8 Special functions
All further setting options are described in the following sections.
| Programming is started by means of the R MENU button. | |
| You can scroll through the menu using the selection buttons |  |
| Press the OK button to move to the next menu level. | |
| Press the C button to exit the current menu level and to move one step higher. | |
| You can exit programming by holding the C button pressed. | |
| In the following descriptions, each programming procedure is described in full so that you can program any feature without knowledge of the menu structure.Experienced users can move freely within the menu with the help of the menu tree. | |
8.1 Changing display names
In normal operation, the message "DECT4800 1" appears in the display. If you have logged on several handsets to one base station, it can be useful to give each handset its own name. The number after the name shows with which number the handset can be called internally.
| Button Display | |
 | FEATURES |
3 x  | DISPLAY |
 | LANGUAGE |
1 x  | LABEL |
 | DECT4800 |
| Delete existing letters withc and enter new name. | |
 | LABEL |
 | Press and hold button |
- Special functions -
8.2 Setting ring tones and ringer volumes
10 different tunes are available on the handset as ring tones for the handset and the base station. The ringer volume can be adjusted separately for the handset and the base station in 5 steps.
Handset ring tone for external calls Handset ring tone for internal calls
| Button Display | |
 FEATURES FEATURES | |
1 x  | SOUNDS |
 HS RINGER HS RINGER | |
 VOLUME VOLUME | |
1 x  | EXT MELODY |
 MELODY 1 to 10 MELODY 1 to 10 | |
 Select tune Select tune | |
 EXT MELODY EXT MELODY | |
 Press and hold button Press and hold button | |
| Button Display | |
 | FEATURES |
1 x  | SOUNDS |
 | HS RINGER |
 | VOLUME |
2 x  | INT MELODY |
 | MELODY 1 to 10 |
 | Select tune |
 | INT MELODY |
 | Press and hold button |
Handset ringer volume
| Button Display | |
 | FEATURES |
1 x  | SOUNDS |
 | HS RINGER |
 | VOLUME |
 | Volume 1 to 5 and Vol Off. |
 | Select volume level or OFF |
 | VOLUME |
 | Press and hold button |
Note: With the setting VOL OFF, incoming calls are no longer audibly signalled at the handset but only at the base station.
- Special functions -
Base station ring tone Base station ringer volume
| Button Display | |
 | FEATURES |
| 1 | SOUNDS |
 | HS RINGER |
| 1 | BS RINGER |
 | VOLUME |
| 1 | MELODY |
 | MELODY 1 to 10 |
| Select tune | |
 | MELODY |
| Press and hold button | |
| Button Display | ||
 | FEATURES | |
| 1 | SOUNDS | |
 | HS RINGER | |
| 1 | BS RINGER | |
 | VOLUME | |
| Volume 1 to 5 and Vol Off. | ||
 | Select volume level or OFF | |
 | VOLUME | |
| Press and hold button | ||
8.3 Setting up dialling blocks
You can block specific phone numbers by using the dialling blocks. The dialling blocks can be set up separately for each handset.
OFF All phone numbers are allowed
ALL All numbers are blocked except the emergency numbers 110 and 112.
EXEMPT All numbers are blocked except a freely programmable dialling code and the emergency numbers 110 and 112.
BAR Here, you can block a specific dialling code, e.g. 0190.
- Special functions -
| Button | Display Comment | |
 | FEATURES | |
 | MONITOR | |
 | CALL BAR | |
 | PIN? Enter the PIN Code for the base station (factory setting 0 0 0 0). | |
 | HANDSET 1 | |
 | HANDSET 1 to 5 | Select the required handset for which the dialling blocks are to be set up. |
 | Current setting | |
 | OFFALLEXEMPTBAR | Select the required option.With EXEMPT and BAR, confirm with OK and enter the required dialling code with max. 5 digits. Numbers already entered can be deleted individually with the @ button. |
 | CALL BAR | |
 | Hold button pressed to return to main display. | |
Note: If no numbers are entered when the options EXEMPT and BAR are chosen, the dialling block will be automatically switched off after confirming with OK.
8.4 Automatic dialling code
Your telephone has an automatic dialling code function. With this function, when dialling a particular phone number, a previously stored number is inserted in front of the actual phone number.
In this way, when dialling a particular dialling code for example, you can automatically insert a required call-by-call number in front of this phone number. Or, you can automatically add the required country code to an international number.
- Special functions -
Example: The number 0221 (in this case, an area dialling code) has the number 0xxxx assigned to it. Here, the call-by-call will automatically be placed in front of every number dialled that begins with 0221. If you have dialled the number 0221-987654321, the telephone will recognise the 0221 and will dial 0xxxx-0221-987654321.
Three phone numbers, each with 5 digits, can be stored and assigned. The prefixed numbers will not be shown in the display. The phone numbers in the phone books and the caller list are also monitored.
| Button Display | |
 | FEATURES |
 | MONITOR |
3 x  | PREFIX |
 | PIN? |
N | Enter the PIN Code for the base station (factory setting 0 0 0 0). |
 | PREFIX 1 |
 | Select dialling code 1 - 3 |
 | OFF or ON |
 | Select OFF or ON |
 | When ON is selected, confirm with OK and enter the required dialling code, which is to be automatically prefixed, with max. 5 digits (Example 0xxxx). Numbers already entered can be deleted individually with the C button. |
 | |
 | |
 | Confirm again with OK and then enter the number combination with which the number you entered first is to be automatically dialled (Example 0221) and confirm with OK. |
 | |
 | PREFIX |
 | Press and hold button |
- Special functions -
8.5 Turning signal tones on or off.
Your telephone has three signal tones that can be turned on or off.
Kev Beep: Each time a button on the handset is pressed, this is confirmed with a short signal tone.
Confirm: Signal tone when a setting has been successfully completed.
Charging: Signal tone when the handset is placed on the base station and the charging process starts.
| Button Display | |
 | FEATURES |
1 x  | SOUNDS |
 | HS RINGER |
2 x  | TONES |
 | KEY BEEP |
 | Select KEY BEEP, CONFIRM or CHARGING |
 | ON or OFF |
 | Select ON or OFF |
 | Select KEY BEEP, CONFIRM or CHARGING |
 | Press and hold button |
- Special functions -
8.6 Accepting calls automatically
Incoming calls are accepted automatically when you lift the receiver from the base
station. If you only want calls to be accepted by means of the ⏻ button, you can deactivate the automatic acceptance facility.
| Button Display | |
 | FEATURES |
2 x  | SETTINGS |
 | AUTO ANS. |
 | ON or OFF |
 | Select ON or OFF |
 | AUTO ANS. |
 | Press and hold button |
8.7 Setting the flash time
Two different flash times can be set by means of the R-signal button.
FLASH 1 = 100ms
FLASH 2 = 300ms
| Button Display | |
 | FEATURES |
2 x  | SETTINGS |
 | AUTO ANS. |
1 x  | FLASH TIME |
 | FLASH 1 or FLASH 2 |
 | Select FLASH 1 or FLASH 2 |
 | FLASH TIME |
 | Press and hold button |
- Special functions -
8.8 Touch-tone (TTD) or pulse (PD) dialling
This feature enables you to use your telephone both on analogue exchanges (PD) and on the new digital exchanges (TTD). The factory setting is TONE dialling.
| Button Display | |
 | FEATURES |
2 x  | SETTINGS |
 | AUTO ANS. |
2 x  | DIAL MODE |
 | TONE or PULSE |
 | Select TONE or PULSE |
 | DIAL MODE |
 | Press and hold button |
8.9 Setting the display language
The display messages can be set up in German and English.
| Button Display | |
 | FEATURES |
3 x  | DISPLAY |
 | LANGUAGE |
 | GERMAN or ENGLISH |
 | Select GERMAN or ENGLISH |
 | |
- Special functions -
8.10 Changing the call duration display
The actual duration of the call will appear in the display while a call is being made.
You can determine whether the duration of the call is displayed or not.
| Button Display | |
 FEATURES FEATURES | |
3 x  | DISPLAY |
 LANGUAGE LANGUAGE | |
2 x  | CALL TIMER |
 ON or OFF ON or OFF | |
 Select ON or OFF Select ON or OFF | |
 CALL TIMER CALL TIMER | |
 Press and hold button Press and hold button | |
8.11 Changing the PIN code on the base station
Some functions of the telephone system are protected against unauthorised use by a PIN code. The PIN code consists of up to eight numbers. As supplied, the PIN code is set to "0000".
| Button Display | |
 FEATURES FEATURES | |
4 x  | SYSTEM |
 REGISTER REGISTER | |
3 x  | CHANGE PIN |
 PIN? PIN? | |
Ni  | Enter old PIN code. |
 NEW PIN? NEW PIN? | |
Ni  | Enter new PIN code |
 REPEAT REPEAT | |
Ni  | Enter new PIN code again. |
 CHANGE PIN CHANGE PIN | |
 Press and hold button Press and hold button | |
- Special functions -
8.12 Deleting all lists
The contents of the phone book, the redial facility and the caller list can be deleted with one procedure.
| Button | Display | |
 | FEATURES | |
| 5 | RESET | |
 | RECORDS | |
 | RESET? | |
 | RECORDSThe reset is carried out. | |
 | Press and hold button | |
8.13 Factory settings
You can reset the handset to the factory settings once more by means of the Factory Settings function.
| Button | Display | |
 | FEATURES | |
| 5 |  | RESET |
 | RESET | |
| 1 |  | SETTINGS |
 | PIN? | |
| N |  | Enter the PIN code for the base station |
 | SETTINGS | |
 | The factory settings are reset. | |
| External ring melody tone 1 Receiver volume medium Button click on | ||
| Internal ring melody tone 2 Flash time 1 Automatic call accept on | ||
| Basis ring melody 1 Confirmation tone on Call duration on | ||
| Handset ringer volume 3 Tone dialling Charging monitor on | ||
| Base station ringer volume 3 Language: German Monitor off | ||
| Direct dialling off Baby call off Dialling blocks off | ||
| PIN 0 0 0 0 Answering machine on Listen-in on | ||
| Call accept 5 rings Standard greeting on Exception numbers off | ||
| Record calls | Recording time 2 min. | Blocks off |
| Message tone off | SOS Code 111 | PIN remote access 000 |
- The answering machine -
9 The answering machine
The integral answering machine can digitally store up to 25 incoming messages with a total length of up to 9 minutes. In addition, a memo can be left for other users. For your greeting message, you can use two pre-recorded standard messages or you can record two messages of your own. If you have not recorded your own greeting, the standard greeting will answer automatically.
Note: Even when the answering machine has already accepted the call, you can also accept the call by means of the call button ⏻. In this case, the recording of the message will be automatically terminated.
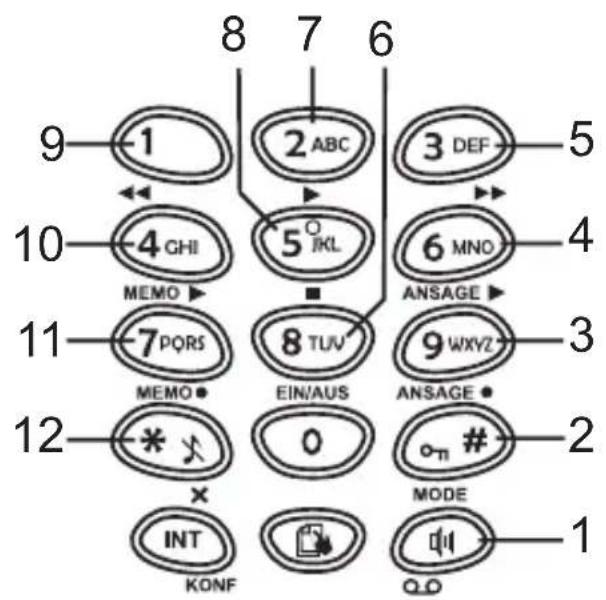
The answering machine is controlled by means of the handset. Press 1 to switch on the answering machine control.
text_image
8 7 6 9 -1 2 ABC 3 DEF 5 10 -4 GHI 5° IKL 6 MNO 4 MEMO ANSAGE 11 -7 PQRS 8 TUV 9 WXYZ 3 MEMO EIN/AUS ANSAGE 12 -* * 0 MODE 2 X MODE INT KONF QD 1- Start answering machine control
- Changeover greeting mode
- Record greeting
- Play back greeting
- Skip messages
-
Switch answering machine on/off
-
Play back messages
- Stop button
- Repeat messages
- Play back memo
- Record memo
- Delete messages
When the answering machine control is switched on, the display will change back to the normal display after ca. 30 seconds if no entries are made.
- The answering machine -
9.1 Switching the answering machine on/off
To switch the answering machine on, proceed as follows:
| Button | Display Comment | |
 | The messages ANS RECORD, ANS ONLY or AM OFF will appear in the display | |
 | ANS RECORD, ANS ONLY or AM OFF | Switching on or off takes ca. 2 seconds and is confirmed by a signal tone. |
 | Hold button pressed to return to main display. |
When the answering machine is switched on, the symbol 📞 appears in the display and the 📞 indicator light on the base station comes on.
9.2 General settings
9.2.1 Maximum recording time
The integral answering machine can digitally store up to 9 minutes of incoming messages. The maximum length of each incoming message is either 1 or 2 minutes. If the caller speaks for longer, a signal tone sounds and the call will be cut off. If there is a pause of more than 3 seconds during recording, the call will automatically be terminated with a signal tone. No more calls will be answered if the memory capacity for new messages is exhausted and the display will show the appropriate message.
| Button Display | |
 | FEATURES |
6 x  | ANSWER MAC |
 | RING DELAY |
2 x  | MSG LENGTH |
 | 1 MINUTE or 2 MINUTES |
 | Select the required length. |
 | MSG LENGTH |
 | Press and hold button |
- The answering machine -
9.2.2 Delaying acceptance of calls
Here, you can set up after how many rings incoming calls are to be accepted. This number can be set to between 2 and 7 rings. The TOLL SAVER setting for the toll-free remote pre-access facility is also available. For more information, see Chapter 9.6.4 Remote access.
| Button Display | |
 NU NU | FEATURES |
6 x  | ANSWER MAC |
 | RING DELAY |
 | TOLL SAVER or RINGS 2 to 7 |
 | Select the required number. |
 | RING DELAY |
 | Press and hold button |
9.2.3 Warning signal for recorded messages
Whenever a new message or memo has been recorded, you will hear a signal tone on the handset every minute. In this way, you can tell immediately whether new messages or a memo have been recorded in your absence. This warning signal can be switched on or off (factory setting: Off).
| Button Display | |
 | FEATURES |
6 x  | ANSWER MAC |
 | RING DELAY |
1  | ALERT TONE |
 | On or Off |
 | Select On or Off |
 | ALERT TONE |
 | Press and hold button |
- The answering machine -
9.2.4 Listening-in to incoming messages
It is also possible to listen to incoming calls automatically using handset 1 without accepting the call. If you do not want to listen-in to calls, you can switch this function off here.
| Button Display | |
 | FEATURES |
6 x  | ANSWER MAC |
 | RING DELAY |
3 x  | SPK FILTER |
 | On or Off |
 | Select On or Off. |
 | SPK FILTER |
 | Press and hold button |
9.3 Recording, checking or deleting greeting messages
With your answering machine you can choose between two different types of greeting message.
The caller will either hear the greeting and then, after this, be able to leave a message (factory setting) or an informative text only will be played and the caller will be unable to leave a message.
One pre-recorded greeting in each case is available for each type. Of course, you can also record your own greeting for each type.
- The answering machine -
9.3.1 Recording greeting messages
The length of your own greeting must be at least 3 seconds and may not exceed 40 seconds. The longer your greeting lasts, the less recording time will be available for incoming messages.
Type 1: Recording answers and message (Display indication: RECORD)
The caller will hear your greeting and will be able to leave a message for you.
Text of the pre-recorded standard greeting message: "Hello, unfortunately your call cannot be answered personally at the moment. Could you therefore please leave a message after the tone".
Type 2: Greeting only (Display indication: GREETING ONLY)
The caller will hear your greeting and will not be able to leave a message for you. Use this greeting when you only want to leave information for callers.
Text of the pre-recorded standard greeting message: "Hello, unfortunately your call cannot be taken at the moment. Please try again later. Thank you".
Recording your own greeting
| Button | Display Comment | |
 | The messages ANS RECORD, ANS ONLY or AM OFF will appear in the display | |
 | ANS RECORD or ANS ONLY | Choose which mode you want to record a greeting for by pressing repeatedly. If the answering machine is switched off, the display will change back to the AM OFF message after a short time. |
 | REC OGM1 or REC OGM2 | Dictate the text of your greeting into the handset after the tone. |
 | After you have finished | recording, your message will be played back once more. |
 | To return to main display. |
Note: Even when you have recorded your own greeting messages, you can re-activate the pre-recorded greetings at any time. For more information see Chapter 9.3.3.
- The answering machine -
9.3.2 Checking the currently set greeting message
| Button | Display Comment | |
 | The messages ANS RECORD, ANS ONLY or AM OFF will appear in the display | |
 | PLAY OGM1 or PLAY OGM2 | You will hear the currently selected greeting. |
 | To return to main display. |
9.3.3 Deleting your own greeting and reverting to the standard greeting
| Button | Display Comment | |
 | The messages ANS RECORD, ANS ONLY or AM OFF will appear in the display | |
 | ANS RECORD or ANS ONLY | Choose which mode you want to delete your own greeting for by pressing repeatedly. |
 | PLAY OGM1 or PLAY OGM2 | The greeting will be played back. When the greeting message has been played back, press the next button. |
 | DELETED Your own greeting has been deleted. | |
 | To return to main display. | |
- The answering machine -
9.4 Listening to recorded messages
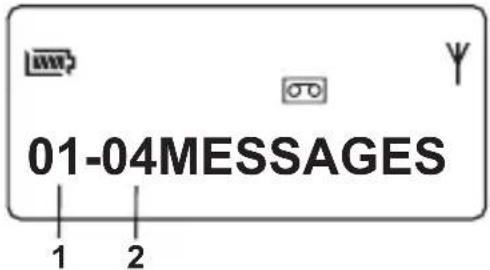
If messages have been left in your absence, the indicator lamp on the base station and the LED on the handset will flash and the display will show the number of new messages.
text_image
01-04MESSAGES 1 2- Number of newly recorded messages
- Total number of recorded messages
| Button | Display Comment | |
 | The messages ANS RECORD, ANS ONLY or AM OFF will appear in the display | |
 | 01 – 02 – 03 etc. | The newly recorded messages will now be played back first. If there are no new messages, then all the existing messages will be played back. |
| While the messages are being played back, you have the following options. | ||
 | Repeat current message. | |
 | Play back next message. | |
 | Play back previous message. If the message has already been running for 5 seconds, the current message will be repeated. | |
 | DELETED Delete current message. | |
 | STOP Stop playback | |
 | To return to main display. | |
The volume can be adjusted with the selection buttons
- The answering machine -
9.4.1 Deleting all messages
| Button | Display Comment | |
 | The messages ANS RECORD, ANS ONLY or AM OFF will appear in the display | |
 | DELETE? | Now confirm with OK or cancel the deletion by pressing C twice. |
 | DELETED |
9.5 Recording and listening to the memo
You can leave a memo on your answering machine for other people who use it, e.g. your family. The maximum length of the memo is 1 or 2 minutes (see Chapter 9.2.1). If a memo has been recorded, the display will show the message NEW MEMO.
Recording a memo
| Button | Display Comment | |
 | The messages ANS RECORD, ANS ONLY or AM OFF will appear in the display | |
 | REC MEMO Dictate your text into the handset after the tone. | |
 | After you have finished recording, your memo will be played back once more. | |
 | To return to main display. | |
Note: Before a new memo can be recorded, any existing memo must be deleted. Otherwise, it will not be possible to make a new recording.
Listening to and deleting the memo => The display shows NEW MEMO.
| Button | Display Comment | |
 | The messages ANS RECORD, ANS ONLY or AM OFF will appear in the display | |
 | PLAY MEMO A long memo can be stopped by means of the Stop button (5). To delete the memo, press the button while the memo is playing. | |
 | To return to main display. | |
- The answering machine -
9.6 The remote access facility
The remote access facility allows the answering machine to be called up from any telephone in order to listen to messages and to carry out other functions.
9.6.1 The PIN code
Your answering machine has personal access authorisation so that only you can listen to incoming messages using the remote access facility. This PIN code is set in the factory to "0 0 0".
If you should ever forget the PIN code, go to Chapter 8.13 and carry out a reset.
| Button Display | ||
 | FEATURES | |
| 6 x |  | ANSWER MAC |
 | RING DELAY | |
| 6 x |  | REMOTE PIN |
 | PIN?Enter the current PIN code (factory setting 0 0 0). | |
 | NEW PIN?Enter the required new three-digit PIN code. | |
 | REPEATRepeat the new PIN code. | |
 | REMOTE PIN | |
 | Press and hold button | |
- The answering machine -
9.6.2 Listening to messages using the remote access facility
- Call your number and wait until your call is answered.
- While you are listening to your greeting, press the ✠ button and then enter the three-digit PIN code. If the entry is incorrect, the greeting will be repeated. Press the ✠ button and re-enter the PIN code. If the entry is correct, you will hear two signal tones. If the PIN code is entered incorrectly three times, the connection will be cut off.
- The recorded messages will be played back immediately. After the messages have been played, you will hear two signal tones.
- After the messages have been played back, further functions can be carried out using the remote access facility within the next 8 seconds. For more information, see the following table.
- Replace the receiver when you have finished with the remote access facility.
Remote access functions
① = Repeat messages (rewind)
② = Play back all messages again
③ = Play back next message (forward wind)
④ = Play back a memo
⑤ = Stop button
⑥ = Play back current greeting
⑦ = Record a memo
⑧ = Turn the answering machine on or off
A short signal tone => Answering machine is switched off
Two signal tones => Answering machine is switched on.
⑨ = Record new greeting
★ = Delete message playing
★ and ⑩ = Delete all messages
<h1 id="change-mode">= Change mode</h1>
A short signal tone => Greeting only, no recording
Two signal tones => Answering machine will record calls
- The answering machine -
9.6.3 Switching on the answering machine remotely
Imagine that you have left your office or house and have forgotten to switch on your answering machine.
By means of the remote access facility, you have the option of switching on the answering machine from another telephone.
- Call your number. The call will be automatically accepted after 10 rings even if the answering machine is switched off and you will hear your greeting message
- Replace the receiver.
9.6.4 Toll-free remote pre-access facility
Using the toll-free remote pre-access facility, you can find out whether there are any messages on your answering machine without incurring any charges.
To do this, set the "Delaying acceptance of calls" function to the "ECO" setting. For more information see Chapter 9.2.2.
If you now call your answering machine when you are away, the answering machine will answer as follows:
A. If your call is answered after 2 rings, there will be messages on your answering machine.
B. If no messages have been recorded, your call will not be answered after 2 rings. Put the receiver down immediately as your call will now only be answered after the fourth ring. In this way, you can save call charges.
9.7 Forwarding calls directly to the answering machine
9.7.1 Blocking calls and forwarding calls directly to the answering machine
Incoming calls can also be forwarded directly to the answering machine. The answering machine must be switched on.
- The answering machine -
Note: Remember that the settings will only work if your telephone connection has caller display (CLID) and the caller transmits his phone number. You will find more information on caller display in Chapter 6.
OFF: All calls are received normally.
ALL: All calls are forwarded directly to the answering machine.
EXEMPT: Here, you can enter a complete telephone number with a maximum of 18 digits or even part of a telephone number, e.g. a dialling code. The telephone will only ring for calls with this telephone number. All other calls will ring once and will then be accepted directly by the answering machine.
SCREENING: Here, you can enter a complete telephone number with a maximum of 18 digits or even part of a telephone number, e.g. a dialling code. Only calls with this number will be forwarded to the answering machine after one ring. The telephone will ring normally for all other calls.
With the special SOS code however, callers have the option of deactivating this block so that the base station rings. See Chapter 9.7.3.
| Button | Display Comment | |
 | FEATURES | |
 | ANSWER MAC | |
 | RING DELAY | |
 | SCREENING | |
 | OFF, ALL, EXEMPT or SCREEN | |
 | OFF, ALL, EXEMPT or SCREEN | Select the required option. |
 | NUMBER? | For the EXEMPT and SCREENING options, the display shows the message NUMBER?. Enter the required telephone number here with a maximum of 18 digits. |
 | SCREENING | |
 | To return to main display. |
- The answering machine -
9.7.2 Forwarding anonymous calls directly to the answering machine
Incoming calls, which do not transmit their telephone number (display indication PRIVATE), can be forwarded directly to the answering machine without a ringing signal.
With the special SOS code however, callers have the option of deactivating this block so that the base station rings for 8 seconds. See Chapter 9.7.3.
Note: Remember that the forwarding function will only work if your telephone connection has caller display (CLID) and the callers transmit their telephone numbers or suppress them (private). You will find more information on caller display in Chapter 6.
| Button Display | |
 | FEATURES |
6 x  | ANSWER MAC |
 | RING DELAY |
5 x  | BLOCKER |
 | On or Off |
 | Select On or Off. |
 | BLOCKER |
 | Press and hold button |
9.7.3 Using and changing the SOS code
With the SOS code, callers can deactivate the blocks described under 9.7.1 and 9.7.2 so that the base station rings anyway. The SOS code is a three-digit number. The factory setting is 111.
Using the SOS code
The caller enters the star symbol * and the SOS code by means of the number pad on the telephone as soon as the answering machine greeting is played. The answering machine will stop and the base station will ring for 8 seconds with a continuous ring.
Example with factory setting: * 1 1 1
- The answering machine -
Changing the SOS code
Note: The SOS code and the PIN code for remote access must not be the same.
If you should ever forget the SOS code, go to Chapter 8.13 and carry out a reset.
| Button Display | |
 | FEATURES |
6 x  | ANSWER MAC |
 | RING DELAY |
7 x  | SOS CODE |
 | PIN?Enter the current SOS code (factory setting 1 1 1). |
 | NEW PIN?Enter the required new three-digit SOS code. |
 | REPEATRepeat the new SOS code. |
 | SOS CODE |
 Hold Hold | |
- Multiple handsets -
10 Multiple handsets
Up to three additional handsets can be logged on to your base station. You can obtain this additional handset from your AUDIOLINE dealer with the designation DECT 4801.
Note: Handsets from other manufacturers can also be integrated into the telephone system by means of the internationally adopted GAP standard. In the same way, you can use an AUDIOLINE handset on base stations from other manufacturers, as long as these units work using the GAP standard.
10.1 Logging on and logging off handsets
10.1.1 Logging on DECT4800/4801 handsets
| Button Display | |
 | FEATURES |
| 4 | SYSTEM |
 | REGISTER |
 | BS 1 2 3 4If the handset is already connected to a base station, the corresponding numbers will flash. |
| Number pad | Select the base station on the number pad. |
 | PIN? |
| Number pad | Enter the PIN Code (factory setting 0 0 0 0). |
 | Press the button on the base station for 2 seconds. |
 | SEARCH BS 1 |
| After a short time the handset will be logged on. The internal number of the new handset will appear in the display. | |
10.1.2 Logging on other DECT-GAP telephones to the base station
To log on a DECT-GAP handset, follow the instructions in the other manufacturer's operating manual and then press the ⏻ button on the base station for 2 seconds. Use the PIN code 0 0 0 0 for logging on.
- Multiple handsets -
10.1.3 Logging off handsets
A handset can only be logged off using another handset that is still logged-on. It is therefore not possible to carry out the logging-off procedure using the handset that is to be logged off.
| Button Display | |
 | FEATURES |
4 x  | SYSTEM |
 | REGISTER |
2 x  | DELETE HS |
 | HANDSET 1 |
 | Select the handset that you want to log off. |
 | PIN? |
| Number pad | Enter the PIN Code (factory setting 0 0 0 0). |
 | After a short time the handset will be logged off. |
10.2 Additional base stations
You can increase the range of the handsets by using multiple base stations. In order to use this effect, all base stations must be connected to one telephone line. Depending upon how you want to use the system, you can allocate the same phone number to each base station or you can give the base stations different numbers. Make sure that the range of each base station overlaps. Please check the range of the handsets each time before setting up a new base station.
If a handset is logged on to the base station and if automatic base station selection is switched on (further information in this chapter), the handset will always be forwarded to the nearest base station automatically. Current calls cannot be transferred from one base station to another.
- Multiple handsets -
| Button Display | |
 | FEATURES |
| 4 | SYSTEM |
 | REGISTER |
| 1 | SELECT BS |
 | AUTO or FIXED |
 | Select whether you want the handset to be automatically or permanently connected to a base station. When selecting FIXED, confirm with OK and then select the required base station by means of the number pad. If the handset is logged on to different base stations, the appropriate numbers will flash. |
 | |
- Troubleshooting -
11 Troubleshooting
If you have problems with your telephone, please check the following points first.
For technical problems, you can also contact our hotline on Tel. 0180 5 00 13 88.
For any claims under the warranty, please refer to your dealer. The warranty period is 2 years.
| No calls possible | ○ The telephone line is not correctly connected or is faulty.○ Use only the telephone cable provided.○ Test whether your telephone connection is in order by using another telephone.○ The power supply is not plugged in or there is a total power failure.○ The rechargeable batteries are flat or defective.○ You are too far away from the base station. |
| Connection is cut off or drops out | ○ You are too far away from the base station or the base station is wrongly positioned. |
| The charging symbol does not come on while the handset is on the base station. | ○ Place the handset properly on the base station, clean the contact surfaces on the handset and on the base station with a soft, dry cloth. |
| The standard batteries discharge very quickly. | ○ Charge the handset. If this does not help, replace the standard batteries. |
| Display dark | ○ Caused by direct sunlight, allow the handset to cool down. |
- Important information -
12 Important information
12.1 Technical data
| Standard | DECT-GAP |
| Power supply Base station 220/230V, 50 Hz | |
| Range Indoors up to 50 m | |
| Range Outdoors up to 300 m | |
| Standby up to 144 hours | |
| Max. call duration more than 12 hours | |
| Standard rechargeable batteries Type AAA 1.2V 650 mAh | |
| Dialling method Touch-Tone Dialling | |
| Permissible ambient temperature 10°C to 30°C | |
| Permissible relative humidity 20 to 75% | |
| Signal button function 100ms and 300ms | |
12.2 Changing the telephone cable
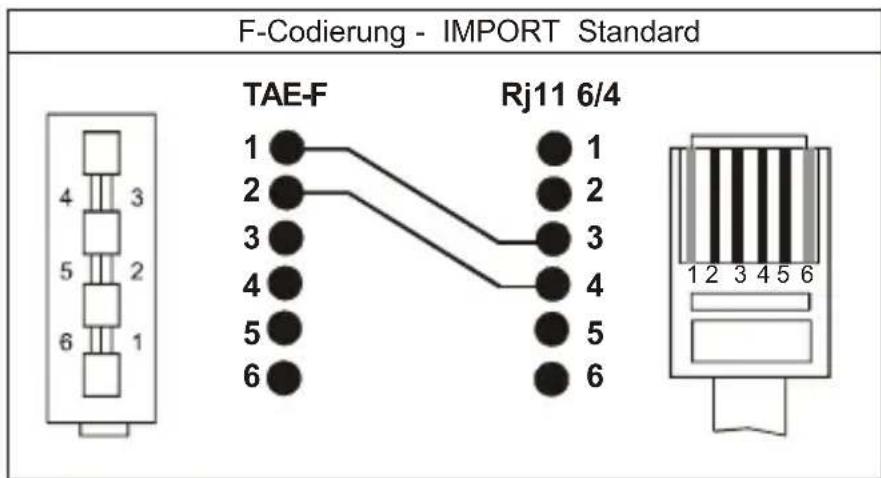
If you have to replace your telephone cable, you can locate the appropriate cable at your dealer's with the help of the following diagram.
text_image
F-Codierung - IMPORT Standard TAE-F Rj11 6/4- Important information -
12.3 Warranty
AUDIOLINE units are manufactured and tested in accordance with the most up-to-date manufacturing procedures. Selected materials and highly developed technologies ensure trouble-free operation and long life. If, however, your unit should develop a fault within the warranty period, please contact the shop where you bought your AUDIOLINE unit, taking with you your purchase receipt. The warranty period is 24 months calculated from the day of purchase. This warranty is not applicable to the batteries or battery packs used in the various products.
Warranty conditions:
All defects, which are the result of material or manufacturing faults, will be rectified free of charge within the warranty period. Claims under the warranty shall not be considered if the equipment has been tampered with by the purchaser or third parties. Damage, which results from improper handling or use, incorrect positioning or storage, inappropriate connection or Installation and through Act of God or other external influences are not covered by the warranty. In the case of complaints, we reserve the right to repair or to replace the defective parts or to exchange the unit. Parts or units that have been exchanged shall become our property. Claims for damages shall not be entertained unless they relate to intention or gross negligence on the part of the manufacturer. In accordance with these conditions, all claims under the warranty shall be made exclusively to your dealer. Rights under the warranty can no longer be enforced after the expiry of two years from the purchase and handing over of our products.
- Important information -
12.4 Declaration of conformity
WE AUDIOLINE GmbH
OF Hellersbergstr. 2a
D-41460 Neuss
DECLARE UNDER OUR SOLE RESPONSIBILITY AS EU DISTRIBUTOR THAT THE PRODUCT
MODEL: DECT4800B
DESCRIPTION: DECT standard cordless telephone
IS IN CONFORMITY WITH THE BASIC REQUIREMENTS OF DIRECTIVE: 1999/5/EC
AUTHORISED SIGNATORY:
Signature:
Name: MANFRED ZINNOW
Position in the company: MANAGING DIRECTOR:
Date of issue: 28.01.2004
A copy of this declaration will be retained for 10 years after cessation of production.

SUPPLIER: AUDIOLINE GmbH, Hellersbergstr. 2a,
D-41460
Neuss
PRODUCT:
DECT4800B
This product has been developed for use with an analogue telephone line (PSTN) within Germany. However, no guarantee can be accepted for trouble-free operation on all telecommunications terminal equipment connections due to the differences between the different telecommunications network operators and inserted PABX systems.