DECT 8600SIM - Phone AUDIOLINE - Free user manual and instructions
Find the device manual for free DECT 8600SIM AUDIOLINE in PDF.


User questions about DECT 8600SIM AUDIOLINE
0 question about this device. Answer the ones you know or ask your own.
Ask a new question about this device
Download the instructions for your Phone in PDF format for free! Find your manual DECT 8600SIM - AUDIOLINE and take your electronic device back in hand. On this page are published all the documents necessary for the use of your device. DECT 8600SIM by AUDIOLINE.
USER MANUAL DECT 8600SIM AUDIOLINE
natural_image
Black-and-white photo of a vintage mobile phone with a digital display and keypad (no visible text or symbols)Operating Instructions ____ 53
natural_image
Front view of a car with visible headlights and grille (no text or symbols)natural_image
Simple line drawing of a car with a handle and wheels (no text or symbols)
natural_image
Blurred grayscale image with indistinct shapes and no visible text or symbols- Inbetriebnahme -
natural_image
Two identical white rectangular objects with black markings, resembling pens or devices (no text or symbols visible)natural_image
Pure electrical circuit lines without any symbols- Bedienung -
4. Bedienung
Name: MANFRED ZINNOW
3.2. Check contents of pack.... 59
3.3. Connecting the base station 59
3.4. Fitting standard batteries.... 60
3.5. Fitting the belt clip 61
3.6. Setting the display language.... 61
3.7. Wall mounting 61
- Operation 62
4.1. Display messages.... 62
4.2. Receiving calls 63
4.3. Making calls 63
4.4. Handsfree facility.... 64
4.5. Setting the receiver and handsfree volume 64
4.6. Call duration display.... 64
4.7. Muting the microphone in the handset.... 64
4.8. Redial facility 65
4.9. Keypad lock.... 65
4.10. Paging from the base station to the handset 65
4.11. Headset connector.... 66
4.12. Temporary tone dialling.... 66
- The phone book 67
5.1. Dialling numbers from the phone book 67
5.2. Entering numbers in the phone book 67
5.3. How to enter names.... 68
5.4. Displaying stored numbers from the phone book 68
5.5. Changing numbers stored in the phone book 69
5.6. Deleting stored numbers from the phone book.... 69
5.7. Deleting the whole phone book.... 69
- Caller display (CLIP) 70
6.1. The caller list....71
6.2. Storing individual numbers on the caller list in the phone book 71
6.3. Deleting individual telephone numbers from the caller list...... 72
6.4. Deleting the entire Caller List.... 72
- Contents -
7. Sending and receiving text messages.... 73
7.1. General requirements and information 73
7.2. Choosing a provider.... 74
7.3. Information on memory capacity.... 75
7.4. Sending or saving a new SMS message 76
7.5. Reading, answering and deleting SMS messages received..... 77
7.6. Send SMS messages saved in the Drafts folder 78
7.7. Editing and deleting SMS messages already sent.... 79
7.8. Switching off the warning tone for new SMS messages ..... 79
7.9. Selecting the Send Service Centre 80
7.10. Setting up the SMS centre 81
8. Programming the SIM card 82
8.1. Inserting or removing the SIM card.... 82
8.2. Copying numbers from the SIM card to the phone book ..... 83
8.3. Copying numbers from the phone book to the SIM card ...... 84
9. Private exchanges/T-NET 85
9.1. "R" Button on private exchanges 85
9.2. "R" Button and the DEUTSCHE TELEKOM T-Net...... 85
9.3. Changing the Flash time 85
9.4. Using Pause.... 86
10. Special functions ...... 87
10.1. Setting the call tone on the handset.... 87
10.2. Switching the button click on or off 88
10.3. Accepting calls automatically 88
10.4. Changing display names.... 88
10.5. Setting the display contrast.... 89
10.6. Tone or pulse dialling.... 89
10.7. Setting up dialling blocks.... 89
10.8. Changing the SYS PIN code.... 90
10.9. Switching the hold music on and off 90
10.10. Restoring factory settings 91
- Contents -
11. Multiple handsets.... 92
11.1. Making an internal call 93
11.2. Connecting external calls to another handset.... 93
11.3. Copying the phone book 94
11.4. Ring priority 94
11.5. Logging off handsets.... 95
11.6. Logging on AUDIOLINE DECT8600SIM handsets 95
11.7. Logging on a third-party handset to the base station.... 96
11.8. Logging on a DECT8600SIM handset to other base stations... 96
11.9. Additional base stations 96
12. Troubleshooting.... 98
13. Important information.... 99
13.1. Important note 99
13.2. Technical data.... 99
13.3. Changing the telephone cable 99
13.4. Warranty.... 100
13.5. Declaration of conformity 101
1. General Information
Please read these operating instructions carefully. If you should have any questions, please contact our Service Department on the Hotline number 0180 5 00 13 88. Under no circumstances open the unit yourself and do not try to carry out your own repairs. For any claims under the warranty, please refer to your dealer.
Intended use - This telephone has been designed for use on an analogue telephone line (PSTN) within Germany. However, no guarantee can be accepted for trouble-free operation on all telecommunications terminal equipment connections due to the differences between the different telecommunications network operators. The telephone requires a TAE socket with F/N coding in common with other plug-in units such as fax machines, answering machines or modems. Connect the telephone cable to the phone socket intended for the purpose only. Do not change the plug on the connecting cable. Power failure - If the power should fail, it will not be possible to make calls using the telephone. Keep a cord-connected phone handy, which works without an external power supply, for possible emergencies.
Standard rechargeable batteries - do not use any other rechargeable batteries or battery packs. These could possibly cause a short circuit. When changing batteries, always use standard batteries, Type AAA 1.2V 550mA. Do not throw standard batteries into the fire or immerse in water. Do not dispose of old or defective standard batteries with the normal household waste.
The maximum standby and talk times quoted are applicable for the standard rechargeable batteries supplied under optimum conditions. Ambient temperature, charging cycle and other external factors, such as the radio loading in the area of use, can considerably reduce the operating times. Furthermore, the charging capacity is reduced for technical reasons during use or when stored at very high or low temperatures.
Charging the handset - It is normal for the handset to become warm when charging and is not dangerous. Do not use other manufacturer's charging equipment for charging the handset, as otherwise damage could occur.
Power supply - Use only the AUDIOLINE plug-in power supply provided, as other power supplies could damage the telephone. There is a risk to life if the power supply is opened and not disconnected from the mains.
Private exchanges - The telephone can also be connected to a private exchange. You can find out from the dealer from whom the equipment was purchased whether your telephone will work on your private exchange without any problems. Due to the large number of different private exchanges, it is not possible to guarantee this function.
- General information -
Position - There must be a 230 Volt mains socket near to where the telephone is positioned. Do not set up the base station in the immediate vicinity of other electrical equipment such as microwaves or hi-fi systems, as this may result in mutual interference. The location has a decisive influence on the trouble-free operation of the telephone.
Place the base station on a flat and non-slip surface. The feet of the base station do not normally leave any marks on the surface. However, due to the large number of varnishes and surfaces in use, it may not be possible to prevent marks occurring on the surface due to the feet of the unit.
Do not use the handset in areas where there is a risk of explosion.
Excessive exposure to smoke, dust, vibrations, chemicals, moisture, heat or the direct rays of the sun must be avoided.
Information regarding medical equipment - The telephone works with a very low transmission power. This low transmission power prevents any risk to health according to the current state of research and technology. However, it has been shown that portable telephones can interfere with medical equipment when switched on. Therefore, please maintain a distance of at least one metre from medical equipment.
Disposal - If the useful life of the standard batteries or the complete equipment has expired, please dispose of these carefully in accordance with the statutory requirements and in a manner friendly to the environment.
Temperature and Ambient Conditions - The telephone is designed for use in protected rooms with a temperature range of 10 °C to 30 °C. The base station must not be installed in damp rooms such as a bathroom or laundry room. Avoid proximity to sources of heat such as radiators and do not expose the unit to direct sunlight.
Cleaning and care - The surface of the case can be cleaned with a soft, dry, lint-free cloth. Never use cleaning agents, particularly aggressive solvents. No attention is necessary apart from cleaning the case occasionally. The rubber feet of the base station are not resistant to all cleaning agents. The manufacturer can therefore not accept any liability for possible damage to furniture or the like.
CE mark - The telephone complies with the basic requirements of the R&TTE Directive This is confirmed by the CE mark.
2. User controls
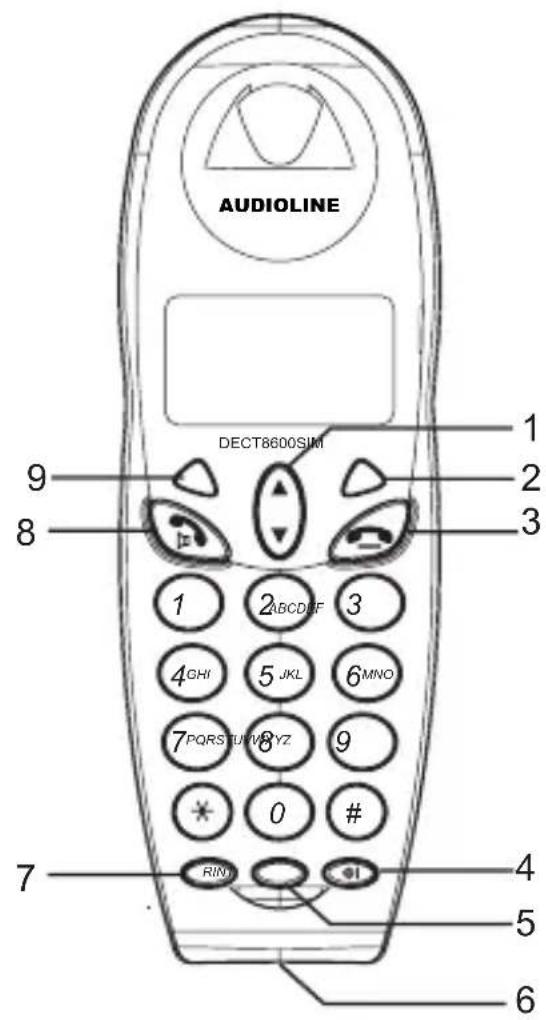
Handset
1 Selection buttons
2 Display button right
3 End call
4 Mute button
5 Internal calls
6 Headset connector
7 R signal button
8 Call button
9 Display button left
text_image
AUDIOLINE DECT8600SIM 1 2 3 9 8 1 2 ABCDIF 3 4 GHI 5 JKL 6 MNO 7 PQRS TU VBYZ 8 9 * 0 # 7 RIN 4 5 6Base station
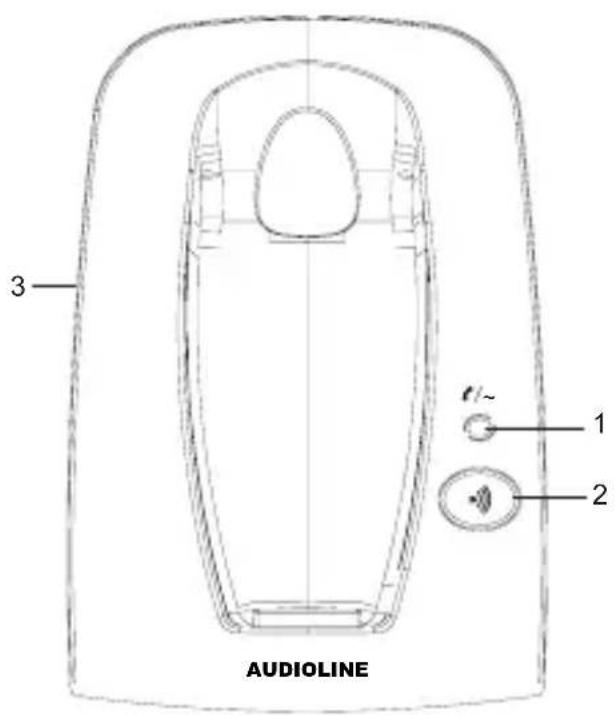
1 Call and mains indicator
2 PAGE button
3 SIM card slot
text_image
3 1 2 AUDIOLINE- Setting up -
3. Setting up
3.1. Safety Information
NOTE: Before setting up, it is essential that you read the General Information at the beginning of this manual.
3.2. Check contents of pack
The following items are supplied:
| one base station one mains power supply | |
| one handset with standard batteries one belt clip | |
| one telephone connecting cable one instruction manual | |
| two screws two wall plugs | |
| one headset |
3.3. Connecting the base station
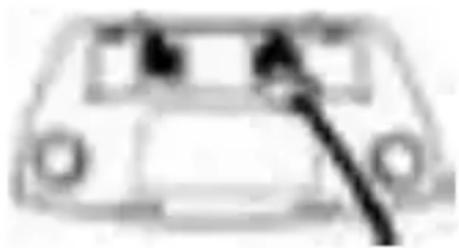
- Position the base station near to your telephone connection socket and to a mains socket. Insert the plug of the power supply into the socket on the underside of the base station and plug the power supply into a
natural_image
Front view of a car with visible headlights and grille (no text or symbols)properly installed 230 V mains socket. The plug-in power supply for the base station must always be connected. For safety reasons, use only the plug-in mains power supply provided.
-
Connect the telephone cable supplied to the telephone socket and the telephone jack on the underside of the base station. Use only the new telephone cable provided.
-
Run the two cables through the clamps and the two cable channels to the rear of the base station.

natural_image
Simple line drawing of a car front view with no text or symbols
natural_image
Blurred grayscale image with indistinct shapes and no visible text or symbols- Setting up -
3.4. Fitting standard batteries
The rechargeable batteries have a stand-by time of max. 120 hours and a maximum talk time of up to 10 hours.
To fit the standard rechargeable batteries supplied into the handset, press on the upper edge of the battery compartment and slide it downwards. Now insert the batteries taking care to ensure that the polarity is correct. Close the battery compartment cover.
Use only rechargeable batteries, type AAA 2 x 1.2V, 550mAh.
The current battery capacity is shown in the display.

Full Half Low


If the battery capacity is too low, the symbol will flash in the display and the handset will have to be charged.
To charge the batteries, place the handset in the base station with the display to the front.
Note: The batteries must be charged for at least 16 hours before being used for the first time. Exactly like your car battery, the rechargeable batteries are unavoidably subject to a certain ageing. However, you can have an influence on this ageing process by "training" the batteries to a certain extent. In regular use of the phone, if you cyclically charge and fully discharge the batteries by using the telephone until the battery indicator appears in the display, a demand is placed on the batteries and they will repay you by giving maximum performance and a long life. Extended charging and extended discharging on the other hand will both degrade the capacity and shorten the life of the batteries.
- Setting up -
3.5. Fitting the belt clip
With the belt clip supplied, you can always carry the handset with you.
To fit the belt clip, slot it into the handset in a horizontal position and then turn it to a vertical position.
3.6. Setting the display language
The display messages can be set up in German and English (factory setting - German).
Press the Menu display button.
Select Handset Settings with
▲ and ▼ and press OK.
Select Language with
▲ and ▼ and press OK.
Select a language using
▲ and ▼ and press Save.
The language will be changed over after a short time and the display will indicate that it is ready once more.
3.7. Wall mounting
Use the two screws and wall plugs for fixing to the wall. Drill two holes 75 mm apart and leave the screws protruding ca. 7.5 mm from the wall. Now place the telephone over the screws and push down slightly.

text_image
Port Stove Bus- Operation -
4. Operation
4.1. Display messages
The illuminated plain text display shows all the menu items in the German language. During normal operation, the display will show the name of the handset and the current battery capacity.
The following symbols may be shown in the top line of the display:
| 1 |  | Lit: You are making a call.Flashing: You are receiving an external call. |
| 2 |  | Lit: You are making an internal call.Flashing: You are receiving an internal call.(with multiple handsets only) |
| 3 |  | Lit: The handsfree facility is activated. |
| 4 |  | Lit: You are currently in the caller list or unread caller number records exist in caller list.Flashing: A new number has been stored in the caller list. |
| 5 | SMS | Lit: Unread SMS records exist in SMS log.Flashing: You have received a new text message. |
| 6 |  | Full => => => Discharged. |
For ease of operation and later programming, new inscriptions can always be applied to the two selection buttons on the right and left under the display. During normal operation, the right-hand selection button has the inscription Menu and the left-hand button the inscription Dir.
- Operation -
4.2. Receiving calls
When a call arrives, the ringing tone sounds on the handset. The display will be illuminated for a short time and the symbol will flash.
The caller's number may also be displayed. You will find further information on this topic in Chapter 6.
Press the green call button 📋 on the handset and the connection will be made. The call indicator on the base station will flash during the call. The message External call will appear in the display and, after a few seconds, the current call time.
To end the call, replace the handset in the base station or press the red button on the handset.
When the automatic call accept feature is selected, the call is automatically accepted as soon as you lift the handset from the base station. You can find out in Chapter 10.3 how to switch the automatic call accept feature on.
4.3. Making calls
Enter the required telephone number with a maximum of 24 digits using the number pad. The numbers pressed are shown in the display.
Note: If you have entered a number incorrectly, you can delete the number by repeatedly pressing the Clear button.
Press the green call button 🔊 and the required connection will be made.
Note: You can also get a dialling tone by first pressing the green call button. On entering the digits of your required phone number, your telephone will dial the number directly. With this method of making a call, it is not possible to correct individual digits in the number in the manner described above.
- Operation -
4.4. Handsfree facility
Press the green call button twice at the start of a call. You will now hear the dialling tone or the person you are speaking to over the loudspeaker in the handset.
By pressing the green call button repeatedly, you can change over between normal and handsfree mode during a call.
4.5. Setting the receiver and handsfree volume
If the receiver or the handsfree volume is too quiet or too loud for you, you can change this to suit your requirements.
You can adjust the volume during a call by means of the and buttons. The selected volume 1 to 4 will be shown in the display.
4.6. Call duration display
The call duration in minutes and seconds is shown in the display during a call. A few seconds after dialling, the display will switch from showing the number dialled to showing the duration of the call. The call duration will still be retained in the display for a few seconds after the call has been ended.
4.7. Muting the microphone in the handset
You can turn off the handset microphone during a call by using the button. It is thus possible to speak without the other person hearing you. The loudspeaker in the handset remains switched on and you can continue to hear the other person.
Press the Ⓧ button once during a call. The message Secrecy On will appear in the display.
To switch the microphone on again, press the button once more. The Secrecy On message will go off and you can continue the call as normal.
- Operation -
4.8. Redial facility
You can use the redial facility if the person called is engaged or does not reply. Your telephone remembers the last five numbers dialled.
Press the ▲ button. The display will show Redial and the last number dialled.
Further numbers can now be selected from the redial list by repeatedly pressing the button. The button is used to page back through the list.
Now press the call button and the telephone number displayed will be automatically dialled.
4.9. Keypad lock
If you want to protect the handset from accidental use, the keypad can be locked. When the keypad lock is switched on, it will only be possible to receive calls.
Activating the keypad lock
Press the Menu display button and then the * button
Deactivating the keypad lock
Press the Unlock display button and then the * button
4.10. Paging from the base station to the handset
If you cannot remember where you have left the handset, press the button on the base station. You will hear the handset audible signals for 30 seconds and thus be able to find it again easily. You can cancel the audible signals earlier by pressing the red phone button on the handset or the button on the base station.
- Operation -
4.11. Headset connector
The headset connection facility is located on the underside of the handset.
Calls are received as normal when the headset is connected to the handset. You will then hear the person you are talking to in the earpiece and your voice will be transmitted by means of the microphone in the headset.
It is also possible to switch to handsfree mode when using the headset.
4.12. Temporary tone dialling
If you can only use your telephone in Pulse Dialling mode, you do not have to forego the facilities of Tone Dialling (e.g. interrogating an answering machine).
You can change temporarily to Tone Dialling during a call by pressing of the Ⓞ button for two seconds. In the display appears T.
PULSE dialling will be reselected at the end of the call.
- Phone book -
5. The phone book
255 numbers including a name can be stored in the phone book. The maximum length for a number is 24 characters.
5.1. Dialling numbers from the phone book
Press the Dir display button
Select the required number with ▲ and
or
Enter the initial letter of the required subscriber and the first entry with the appropriate letter will be shown in the display. Further numbers can then be selected with ▲ and . ▼
Press the green button and the number will be dialled.
5.2. Entering numbers in the phone book
Press the Dir display button
Press the Option display button and the OK display button
Enter the name (16 characters) and confirm with Save.
Enter the number (24 digits) and confirm with Save.
Exit programming by pressing the Back display button twice.
Important Information: Always include the dialling code even when saving local numbers. If you should ever copy the phonebook to a SIM card, you will then be able to use these numbers directly on your mobile phone without further editing.
- Phone book -
5.3. How to enter names
The number keys are also printed with letters for entering names. By repeatedly pressing the appropriate button, upper case letters as well as numbers and special characters can be entered.
Example: You want to enter the name "Peter".
Press: 1 x button 7, 2 x button 3, 1 x button 8, 2 x button 3, 3 x button 7
To enter a space, press the 0 button and wait until the cursor automatically jumps to the next position
To enter the same letter twice, press the appropriate letter and then wait until the cursor automatically jumps to the next position.
Incorrect entries can be deleted with the Clear display button.
To change a particular letter, you can move the cursor to the required position using the ▲ and ▼ buttons in order to delete and then re-enter a letter.
Overview
| Button 1 , | . ' ? - ! 1 Button 7 P Q R S | p q r s 7 | |
| Button 2 A | B C a b c 2 ö ü ä ß Button 8 | T U V t u v | 8 |
| Button 3 D | E F d e f 3 Button 9 W X Y | Z w x y z 9 | |
| Button 4 G | H I g h i 4 Button 0 Space | 0 | |
| Button 5 J | K L j k l 5 * button * | ||
| Button 6 M | N O m n o 6 # button # |
5.4. Displaying stored numbers from the phone book
Press the Dir display button
Select the required number with and .
Cancel the display by pressing the Back display button.
- Phone book -
5.5. Changing numbers stored in the phone book
| Press the Dir display button |
| Select the required number with ▲ and ▼ and press the Option display button. |
| Select Edit Entry with ▲ and ▼ and press OK. |
| Delete the letters with Clear and enter the new name. You can also add letters in any position with ▲ and . ▼ |
| Confirm with Save. |
| Delete the number with Clear and re-enter. You can also add numbers in any position with ▲ and . ▼ |
| Confirm with Save. |
| Exit programming by pressing the Back display button twice. |
5.6. Deleting stored numbers from the phone book
| Press the Dir display button |
| Select the required number with ▲ and ▼ and press the Option display button. |
| Select Delete Entry with ▲ and ▼ and press OK. |
| Exit programming by pressing the Back display button. |
5.7. Deleting the whole phone book
| Press the Dir display button |
| Press the Option display button. |
| Select Delete all entries with ▲ and ▼ and press OK. |
| To delete, press OK once more. |
| Exit programming by pressing the Back display button. |
6. Caller display (CLIP)
In the case of incoming calls, you can see who is calling you by means of the caller display facility. If this function is available on your telephone, the display will show you the caller's telephone number when the telephone rings. If this number has already been saved in the phone book, the name of the caller will be displayed directly.
If no phone number appears, the call is one where the caller has suppressed the transmission of the phone number. If the message Call appears, the phone number cannot be displayed for technical reasons.
All calls are stored in a caller list so that you will not miss any calls even in your absence. A total of 50 phone numbers can be stored in the list. When the list is full, the oldest number is always deleted from the list.
If new numbers are stored in the list during your absence, the symbol will flash in the display.

Note: Caller display is an optional service from your telephone provider. Your telephone will show the number in the display if your telephone provider offers this service. The display of date and time is not transmitted by all telephone service providers. Please ask your telephone provider for further information. Furthermore, transmission of the phone number is not possible with many private exchanges.
- Caller display -
6.1. The caller list
To view the phone numbers on the caller list, please proceed as follows:
| Press the▼button. The display will showCalls Listand, after a few seconds, the last number received. |
| Further numbers can now be selected from the caller list by repeatedly pressing the button. Thebuttonis used to page back through the list. |
| If you want to call back a number on the caller list directly, simply press the call button and the number displayed will be dialled automatically. |
6.2. Storing individual numbers on the caller list in the phone book
| Press the▼button. The display will show Calls List and, after a few seconds, the last number received. |
| Select the required number with ▲and .▼ |
| If you want to store a number from the caller list in the phone book, press the Option display button |
| Select Copy To Directory with ▲and ▼and press OK. |
| Enter the name (16 characters) and confirm with Save. |
| The selected phone number will be shown again in the display. Press Save and the number will be stored in the phone book. |
| Exit programming by pressing the Back display button twice. |
- Caller display -
6.3. Deleting individual telephone numbers from the caller list
| Press the▼button. The display will show Calls List and, after a few seconds, the last number received. |
| Select the required number with▲and .▼ |
| Press the Option display button. |
| Select Delete Entry with▲and▼and press OK. |
| Exit programming by pressing the Back display button twice. |
6.4. Deleting the entire Caller List
| Press the▼button. The display will show Calls List and, after a few seconds, the last number received. |
| Press the Option display button. |
| Select Delete all entries with ▲ and ▼ and press OK. |
| Confirm the safety prompt with OK and the caller list will be deleted. |
| Exit programming by pressing the Back display button twice. |
- Sending and receiving text messages -
7. Sending and receiving text messages
The popular communication method of short messages (SMS) is now also possible with the conventional telephone network. You can send and receive text messages (SMS) using your telephone. In order for you to be able to send and receive SMS text messages, some prerequisites must be met.
Important notes: The SMS service is not supported by each telephone network provider. Due to continuous development, the information given here may already have changed. The latest information can be obtained from the appropriate websites or service numbers.
7.1. General requirements and information
- Your telephone connection must have access to the CLIP facility (Calling Line Identification Presentation). Check with your telephone network provider that these services have been enabled on your telephone line. This service is subject to charge and you may have to apply to your telephone network provider for this (e.g. Deutsche Telekom on 0800 33 01000).
- 0190 numbers must not be blocked on your conventional telephone network.
- The SMS service is supported only on telephone lines, which are operated on the local network by Deutsche Telekom AG. The sending of text messages is not currently possible with call-by-call connections.
- The sending of text messages is subject to charge.
- If the recipient does not use the SMS service on the conventional telephone network or if his telephone is generally unable to receive text messages, the text message will automatically be delivered as a speech message, i.e. by means of the telephone.
- The costs will be billed by Deutsche Telekom.
- Sending and receiving text messages -
7.2. Choosing a provider
All SMS messages are distributed by a so-called SMS centre. At present, this service is offered by "Deutsche Telekom" and "Anny Way". These SMS centres can be reached via a special telephone number, by means of which the SMS messages are sent and received. Your
AUDIOLINE telephone is set up for sending via Deutsche Telekom and for receiving from both providers.
SMS using Deutsche Telekom.
- The number for the Deutsche Telekom message centre is 0193010.
- When using Deutsche Telekom, a simple registration is required. To do this, send your first text message with the text ANMELD (register) to the number 8 8 8 8.
○ Text messages from the Vodafone, E-Plus or O2 networks cannot be received by Deutsche Telekom. In this case, the text message will be read out.
SMS using Anny Way
- The number for the Anny Way message centre is 019001504.
- When using Anny Way, a simple registration is required. Send a test message with any content (e.g. Test) to the number 2 5 4 7 and after a few minutes you will receive a confirmation as a text message.
○ Text messages from the D1 (T-Mobile) and E-Plus networks cannot be received by Anny Way. In this case, the text message will be read out.
- Sending and receiving text messages -
SMS using Deutsche Telekom and Anny Way.
You can also receive SMS messages with your telephone from both providers at the same time and have the choice of sending messages with one or other provider. But first you must register with both providers.
Sending via Deutsche Telekom and receiving from both providers.
○ Choose the setting Anny Way for the Sending Service Centre as described in Chapter 7.9.
- Send a test message with any content (e.g. Test) to the number 2 5 4 7 and wait for a confirmation, which you will receive as a text message. This can take a few minutes.
○ Choose the setting Dt. Telekom for the Sending Service Centre as described in Chapter 7.9.
- Now send a message with the text ANMELD (register) to the number 8 8 8 8 and after a few minutes you will receive a confirmation as a text message.
Sending via Anny Way and receiving from both providers.
- Send a message with the text ANMELD (register) to the number 8 8 8 8 and wait for a confirmation, which you will receive as a text message. This can take a few minutes.
○ Choose the setting Anny Way for the Sending Service Centre as described in Chapter 7.9. - Send a test message with any content (e.g. Test) to the number 2 5 4 7 and after a few minutes you will receive a confirmation as a text message.
7.3. Information on memory capacity
A total of up to 25 SMS messages, each with 160 characters, can be saved in the three folders Inbox, Outbox and Drafts. When the memory is full, an appropriate warning will appear and you must delete either individual or all SMS messages.
- Sending and receiving text messages -
7.4. Sending or saving a new SMS message
Press the MENU display button. The display will show SMS Text Messaging.
Confirm with OK. The display will show Write Message.
Confirm with OK.
Now enter the required text with a maximum of 160 characters. You will find information on entering text in Chapter 5.3.
To send the text, press the Option display button. The display will show Send To.
You can obtain further options with the selection buttons ▲ and ▼, which are described in the next section.
Confirm with the OK display button and enter the required phone number. You can select a number from the phone book by means of the Search display button and the selection buttons ▲ and ▼.
Now press the Send display button and the message will be sent directly.
Further options
Save: Here, the message that has been written can be saved in the Drafts folder.
Insert Symbol: Special characters, which are not available via the number pad, can also be entered when entering text. Press the Option display button and choose the Insert Symbol setting by means of the selection buttons. Confirm with OK and select the required symbol by means of the selection buttons. The symbol is inserted into the text by means of the Insert display button.
Delete: This will delete the whole of the message text and you will be able to start entering new text.
Sent SMS messages are stored in the Outbox folder and can be read again later or resent.
- Sending and receiving text messages -
7.5. Reading, answering and deleting SMS messages received
As soon as an SMS message is received, you will hear a signal tone and you will be informed of this by the flashing of the message SMS in the display. You can find out how to switch the warning tone for the receipt of new SMS messages on or off in Chapter 0. The incoming SMS messages are stored in the INBOX folder.
Press the MENU display button. The display will show SMS Text Messaging.
Confirm with OK. The display will show Write Message.
Select Inbox with ▲ and ▼ and confirm with OK. You will now see the last message received in the display together with the date and time and the phone number that has sent the message.
Select the required message with ▲ and ▼ and confirm with the Read display button. The first lines of the message will be shown in the display.
You can scroll the text in the display with ▲ and . After the text has been read, you have the following options:
Exit text messaging with the Back display button and you will be able to select a different message for reading.
You can choose from the options described in the next section with the Option display button.
Exit the menu by pressing the Back display button repeatedly.
Options:
Delete: The selected message will be deleted from the folder.
Reply: The text entry field for your reply will appear. After you have written the text, press Option and OK. The phone number will be displayed and you can send the reply with the Send display button.
Forward: Here, the text that has been received can be changed and forwarded by the usual procedure.
- Sending and receiving text messages -
Call Number: The phone number of the sender of the message will appear in the display. You can dial this number directly using the call
button
Save Number: Here, the phone number of the sender of the message can be transferred to the phone book. Enter the appropriate name and confirm with OK and Save.
Delete All: Here, the whole Inbox folder will be deleted. Confirm twice with OK.
7.6. Send SMS messages saved in the Drafts folder
Press the MENU display button. The display will show SMS Text Messaging.
Confirm with OK. The display will show Write Message.
Select Drafts with ▲ and ▼ and confirm with OK.
Select the required message with ▲ and ▼ and confirm with Read.
To send the text, press the Option display button. The display will show Send To.
Confirm with the OK display button and enter the required phone number. You can select a number from the phone book by means of the Search display button and the selection buttons ▲ and ▼.
Now press the Send display button and the message will be sent directly.
- Sending and receiving text messages -
7.7. Editing and deleting SMS messages already sent
Press the MENU display button. The display will show SMS Text Messaging.
Confirm with OK. The display will show Write Message.
Select Outbox with ▲ and ▼ and confirm with OK.
Select the required message with ▲ and ▼ and confirm with Read.
Press the Option display button. The display will show Send To.
You can also select the Save, Insert Symbol, Call Number, Delete, Delete All options with the selection buttons ▲ and ▼.
Confirm the required option with the OK display button and follow the further instructions in the display.
Exit the menu by pressing the button .
Options:
Send To: The phone number will be displayed and you can send the reply with the Send display button. Or delete the phone number with Delete and enter a new phone number.
Save: Here, the message that has been written can be saved in the Drafts folder.
Insert Symbol: Special characters, which are not available via the number pad, can also be entered when entering text. Select the required symbol by means of the selection buttons. The symbol is inserted into the text by means of the Insert display button.
Call Number: The phone number of the sender of the message will appear in the display. You can dial this number directly using the call
button ☐. Exit this menu by pressing the button ,
Delete: The selected message will be deleted from the folder.
Delete All: Here, the whole Outbox folder will be deleted. Confirm twice with OK.
- Sending and receiving text messages -
7.8. Switching off the warning tone for new SMS messages
As soon as you receive an SMS message, you will hear a signal tone and you will be informed via the display. If you do not want to be informed of newly received SMS messages by means of this signal tone, for example at night, this tone can be switched off.
| Press the MENU display button. The display will show SMS Text Messaging. |
| Confirm with OK. The display will show Write Message. |
| Select SMS Settings with ▲ and ▼ and confirm with OK. |
| Select New SMS Beep with ▲ and ▼ and confirm with OK. |
| Switch the warning tone on or off using ▲ and ▼ and confirm with OK. |
| Exit the menu by pressing the Back display button repeatedly. |
7.9. Selecting the Send Service Centre
The two possible phone numbers for sending SMS messages are already pre-programmed. SMS messages are normally always sent using the first phone number (factory setting: Deutsche Telekom). If you want to specify a different phone number as the Send Service Centre, proceed as follows:
| Press the MENU display button. The display will show SMS Text Messaging. |
| Confirm with OK. The display will show Write Message. |
| Select SMS Settings with ▲ and ▼ and confirm with OK. |
| Select Select Send Service Centre with ▲ and ▼ and confirm with OK. |
| Select the required Send Service Centre with ▲ and ▼ and confirm with OK. |
| Exit the menu by pressing the Back display button repeatedly. |
- Sending and receiving text messages -
7.10. Setting up the SMS centre
You can enter different numbers in your telephone for receiving and sending SMS messages. There are up to five memory locations available for receiving and two memory locations for sending. The phone numbers for the currently available providers "Deutsche Telekom" and "Anny Way" are already stored and you do not normally have to make any adjustments at this point. If the numbers should change or if new providers should become available, you can enter the new data as follows:
| Press the MENU display button. The display will show SMS Text Messaging. |
| Confirm with OK. The display will show Write Message. |
| Select SMS Settings with ▲ and ▼ and confirm with OK. |
| Select Receiving Service Centres or Sending Service Centres with ▲ and ▼ and confirm with OK. |
| Select one of the five memory locations with ▲ and ▼ and confirm with OK. |
| Now enter a name. Existing letters are deleted with Clear. Confirm with Save. |
| Now enter the required phone number. Existing letters are deleted with Clear. Confirm with Save. |
| Exit the menu by pressing the Back display button repeatedly. |
- Programming the SIM card -
8. Programming the SIM card
You can copy the phone numbers stored in the phone book of your GSM mobile and in your telephone's phone book from one to the other. Up to 255 numbers can be saved in this way.
The following copying functions are available:
- Copying of individual numbers from the SIM card to the phone book.
- Copying of all numbers from the SIM card to the phone book.
- Copying of individual numbers from the phone book to the SIM card.
- Copying of all numbers from the phone book to the SIM card.
Important information: Please handle SIM cards carefully and do not touch the contact surfaces.
8.1. Inserting or removing the SIM card
Remove the card holder from the base station. The card holder is located on the bottom left-hand side of the base station.
Now slide the SIM card with the contacts uppermost into the cardholder. The card is slightly chamfered at the top left to ensure that you cannot insert it the wrong way round.
Now slide the card holder back into the base station.
To remove the SIM card again, press down the small projection on the right-hand side of the card holder slightly and carefully slide the card out of the card holder.
- Programming the SIM card -
8.2. Copying numbers from the SIM card to the phone book
Press the Dir display button.
Press the Option display button.
Select SIM Copy with ▲ and ▼ and press OK.
Enter the PIN code with a max. of 8 digits for your SIM card and confirm with OK.
NOTE: Please note that you only have three attempts available. After this, the SIM card must be re-enabled with the "Master PIN" (PUK).
SIM To Phone will appear in the display. Confirm with OK. The SIM card's phone book will now be read and after a short time the first number on the SIM card will appear.
If you only want to copy a particular number from the SIM card, select the required number with ▲ and . If you want to copy the whole phone book, go directly to the next point.
Press the Option display button.
Select Copy Entry or Copy All with ▲ and ▼ and press OK. If you have selected Copy All, you must confirm the process with the OK display button.
NOTE: If you selected Copy All, the phonebook is completely overwritten and it is lost all already stored numbers.
When the copying process is complete, exit the menu by pressing the Back display button repeatedly.
- Programming the SIM card -
8.3. Copying numbers from the phone book to the SIM card
Press the Dir display button.
Press the Option display button.
Select SIM Copy with ▲ and ▼ and press OK.
Enter the PIN code with a max. of 8 digits for your SIM card and confirm with OK.
NOTE: Please note that you only have three attempts available. After this, the SIM card must be re-enabled with the "Master PIN" (PUK).
SIM To Phone will appear in the display. Confirm with OK.
Select Phone To SIM with ▲ and ▼ and press OK.
If you only want to copy a particular number to the SIM card, select the required number with ▲ and . If you want to copy the whole phone book, go directly to the next point.
Press the Option display button.
Select Copy Entry or Copy All with ▲ and ▼ and press OK. If you have selected Copy All, you must confirm the process with the OK display button.
NOTE: If you selected Copy All, the SIM directory is completely overwritten and it is lost all already stored numbers.
When the copying process is complete, exit the menu by pressing the Back display button repeatedly.
- Private exchanges -
9. Private exchanges/T-NET
You can use the "R" signal button ^R on your telephone on private exchanges and when using DEUTSCHE TELEKOM's T-Net functions.
9.1. "R" Button on private exchanges
If you have connected your telephone to a private exchange, you can use all the facilities such as call transfer, automatic recall, etc. The "R" signal button gives you access to these facilities. The FLASH time "90ms" will be required on a private exchange (Adjustment, see 9.3). You can find out from the dealer from whom the equipment was purchased whether your telephone will work on your private exchange without any problems.
9.2. "R" Button and the DEUTSCHE TELEKOM T-Net
Your telephone supports the most important DEUTSCHE TELEKOM added value functions (e.g. brokering, call waiting, three-way conference, etc.). The T-Net works using the "FLASH 270 ms" setting. (Adjustment, see 9.3). Please contact DEUTSCHE TELEKOM to gain access to T-Net functions.
9.3. Changing the Flash time
The two flash times 90ms und 270ms are available.
| Press the Menu display button |
| Select Base Settings with ▲ and ▼ and press OK. |
| Select Flash Time with ▲ and ▼ and press OK. |
| Select the required Flash time of 90 m or 270 ms with ▲ and ▲ and confirm with OK. |
| Exit the menu by pressing the Back display button repeatedly. |
- Private exchanges -
9.4. Using Pause
With a few, older private exchanges, it is necessary to dial a certain number (e.g. "9" or "0") in order, after a short pause, to obtain a dialling tone for an outside line on the extension.
Hold the button # for two seconds between the number for the outside line and the actual telephone number. In the display appears P. After connecting to an outside line your telephone will wait for 3 seconds before dialling the actual telephone number. The pause can also be saved with numbers in the phone book.
9.5. Outside line code and pause automatically insert
If you have entered an outside line code, the outside line code will be inserted automatically when the phone book entries are copied between the SIM card and the internal phonebook.
Special note: If you do not need an outside line code, do not make any settings in this area.
| Press the Menu display button. |
| Select Base Settings with ▲ and ▼ and press OK. |
| Select Access Code with ▲ and ▼ and press OK. |
| Enter SYS PIN (factory setting 0000) and press OK. |
| Now enter the required outside line access code with a maximum of 6 characters. The pause can be entered after the access code by holding the # for two seconds until the P displays. Incorrect entries can be deleted with the Clear display button. |
| Confirm your entry with Save. |
| Exit the menu by pressing the Back display button repeatedly. |
- Special functions -
10. Special functions
All further programming functions can be accessed by means of a very user-friendly menu.
| Programming is started by means of the Menu button on the left-hand side below the display. |
| You can find the required level using the ▲ and ▼ buttons. |
| This level is opened by means of the OK button on the right-hand side below the display. |
| You can then again find the required function using the ▲ and ▼ buttons and again confirm with the OK display button. |
| You can go back one level each time by pressing the Back display button. |
| You can exit the menu with the red ▲ button. |
| Each save procedure will be cancelled automatically if no input is made within 20 seconds. |
10.1. Setting the call tone on the handset
Your handset can respond with ten different ringing tones and with five different volumes when a call comes through. If you are using the telephone system with several handsets, you can set different ring tones for external and internal calls.
| Press the Menu display button |
| Select Handset Settings with ▲ and ▼ and press OK. |
| Select Ringer with ▲ and ▼ and press OK. |
| Select External or Internal with ▲ and ▼ and press OK. |
| Select Change Melody or Change Volume with ▲ and ▼ and press OK. |
| Set the melody/volume with ▲ and ▼ and press Save. |
- Special functions -
10.2. Switching the button click on or off
Each time a button is pressed, the handset confirms with a button click. The button click can be switched on or off.
Press the Menu display button
Select Handset Settings with ▲ and ▼ and press OK.
Select Key Beeps with ▲ and ▼ and press OK.
Set Beep On/Beep Off with ▲ and ▼ and press Save.
10.3. Accepting calls automatically
Incoming calls are accepted automatically when you lift the receiver from the base station. If you only want calls to be accepted by means of the 📞 button, you can deactivate the automatic acceptance facility.
Press the Menu display button
Select Handset Settings with ▲ and ▼ and press OK.
Select Auto Talk with ▲ and ▼ and press OK.
Set Autotalk On or Autotalk Off with ▲ and ▼ and press Save.
10.4. Changing display names
In normal operation, the message "Handset 1" appears in the display. If you have logged on several handsets to one base station, it can be useful to give each handset its own name.
Press the Menu display button.
Select Handset Settings with ▲ and ▼ and press OK.
Select Name Handset with ▲ and ▼ and press OK.
Delete the existing name with Clear.
Enter the new name and confirm with Save.
The internal phone number of each handset will be shown after the display name.
- Special functions -
10.5. Setting the display contrast
The display contrast can be adjusted in 10 steps.
| Press the Menu display button. |
| Select Handset Settings with ▲ and ▼ and press OK. |
| Select Contrast with ▲ and ▼ and press OK. |
| Set the contrast from 1 to 10 with ▲ and ▼ and confirm with Save. |
10.6. Tone or pulse dialling
This feature enables you to use your telephone both on the older (PULSE DIALLING) exchanges and on the new (TONE DIALLING) exchanges. The factory setting is TONE dialling.
| Press the Menu display button. |
| Select Base Settings with ▲ and ▼ and press OK. |
| Select Dial Mode with ▲ and ▼ and press OK. |
| Set Tone Dial or Pulse Dial with ▲ and ▼ and confirm with Save |
10.7. Setting up dialling blocks
You can set up to four dialling blocks on your telephone. You can use the dialling blocks to block particular dialling codes, international dialling codes and also dialling codes to chargeable phone numbers. The entry for a dialling block can be up to four digits long.
Example 1:
With the entry 02xx, all dialling codes beginning with 02 are blocked.
Example 2:
With the entry 00xx, all international connections are blocked.
- Special functions -
Press the Menu display button.
Select Base Settings with ▲ and ▼ and press OK.
Select Call Barring with ▲ and ▼ and press OK.
Enter SYS PIN (factory setting 0000) and press OK.
Select the required dialling block No. 1 to 4.
Press Option and choose one of the following options with ▲ and ▼ :
- Barring On = Activate call barring.
- Barring Off = Deactivate call barring.
- Edit = Enter new number or change number.
- Clear Prefix = Delete number entered.
10.8. Changing the SYS PIN code
Some functions of the telephone system are protected against unauthorised use by a PIN code. The PIN code consists of four numbers. As supplied, the PIN code is set to "0000".
Press the Menu display button
Select Base Settings with ▲ and ▼ and press OK.
Select System PIN with ▲ and ▼ and press OK.
Enter the old PIN code and confirm with OK.
Enter the new PIN code and confirm with OK.
Enter the new PIN code once more and again confirm with OK.
10.9. Switching the hold music on and off
When multiple handsets are used and an external call is transferred to another handset, a piece of hold music is played for the caller while the call is being connected.
Press the Menu display button
Select Base Settings with ▲ and ▼ and press OK.
Select Hold Music with ▲ and ▼ and press OK.
Switch the hold music on or off using ▲ and ▼ and confirm with Save.
- Special functions -
10.10. Restoring factory settings
The handset and the base station are reset to the factory settings using this function.
Factory settings - Handset:
| Language: German Handset name: Handset | |
| Button click: On Automatic call accept: On | |
| Call tone, external: 1 Call tone, internal: 1 | |
| Call tone volume, external: Loud Call tone volume, internal: Loud | |
| Phone book deleted | |
Press the button for 10 seconds until you hear a signal tone.
Press the Yes display button and the factory settings for the handset will be reinstated.
Factory settings - Base station:
| Dialling mode: Tone dialling Flash time 90ms | |
| System PIN 0 0 0 0 Hold music: On | |
| Call barring off Caller list deleted | |
| All SMS messages deleted Priorities off | |
| SMS Receive 1: 0193010Deutsche Telekom | SMS Receive 2: 019001504Anny Way |
| SMS Send 1: 0193010Deutsche Telekom | SMS Send 2: 019001504Anny Way |
Disconnect the power supply to the base station at the plug-in power supply or at the base station.
Hold the button on the base station pressed and re-connect the base station to the power supply.
Continue to hold the button pressed for ca. 10 seconds until the LED on the base station flashes.
- Multiple handsets -
11. Multiple handsets
Up to five additional handsets can be logged on to your base station.
Note: Handsets from other manufacturers can be integrated into the telephone system by means of the internationally adopted GAP standard. In the same way you can use an AUDIOLINE handset on base stations from other manufacturers, as long as these units work using the GAP standard..
When you use multiple handsets you will have the following options:
- Internal calls between handsets.
- External calls can be forwarded between handsets.
- Incoming external calls are signalled on all handsets.
If another handset is already using the external line, it will not be possible to make further external call.
- Multiple handsets -
11.1. Making an internal call
When you have connected multiple handsets to a base station, you will be able to make internal calls. To do this, press the INT button. If only one additional handset is connected, the second handset will be dialled directly.
If there are more than two handsets, the display will show the available handsets after you have pressed the INT button. Then select the required handset by pressing the appropriate number.
Note: The internal phone number of each handset is shown after the display name.
11.2. Connecting external calls to another handset
If you have accepted an external call on one handset, you can forward the external call to another handset. To do this, press the INT button. If there are only two handsets, the second handset will be dialled directly. If there are more than two handsets, press the number of the required handset after pressing the INT button. The external caller will now hear a piece of hold music.
After the internal call has been accepted at the other handset, you have the following options:
A. Consultation / Brokering: You can now speak to the internal subscriber and return to the external caller by pressing the INT button. You can switch between the external and the internal call as many times as you like in this way.
B. Forward the call: The external call is forwarded to the handset called by pressing the 📞 button on the first handset. You can also forward the external call to a handset directly without consultation by dialling the internal number using the INT button and then pressing the button.
- Multiple handsets -
11.3. Copying the phone book
If you have several Type DECT8600SIM handsets, you can copy individual phone numbers (Copy Entry) or the whole phone book (Copy All) from one handset to the other. When you copy the complete phone book, the whole phone book in the other handset will be replaced.
Press the Dir display button.
Select the required number with ▲ and ▼ and press the Option display button.
Select Copy Entry or Copy All with ▲ and ▼ and press OK.
The display will show the number of all available handsets. Press the desired internal number of the handset
The selected handset shows Accept? Choose with Yes or No whether you want to accept the phone numbers.
11.4. Ring priority
When multiple handsets are used, you can specify one handset to ring before the other handsets.
Press the Menu display button.
Select Base Settings with ▲ and ▼ and press OK.
Select Handset Priority with ▲ and ▼ and press OK.
Now select which handset is to ring first with ▲ and ▼. Confirm with OK or Save.
Priorities off = all handsets ring immediately Priorities 1 to 6 = choose required handset
Set the number of rings between 1 and 9 before the other handsets ring with ▲ and . ▼
Confirm the selection with Save.
- Multiple handsets -
11.5. Logging off handsets
Press the Menu display button.
Select Registration with ▲ and ▲ and press OK.
Select De-Register Handset with ▲ and ▼ and press OK.
Enter the SYS PIN for the base station and confirm with OK.
Select the handset to be logged-off with ▲ and ▼ and confirm with OK.
11.6. Logging on AUDIOLINE DECT8600SIM handsets
When you buy a new handset, this must be logged-on to the base station. When the batteries have been fitted in the new handset, the display shows Register?.
Note: If the handset is already logged-on to another base station, please go to Register in the menu. Here, select Register and then select the number of the nearest base station. Then continue with the entry of the PIN code.
Display shows Register?
Press the Yes display button
Now select which base station you want to log the handset on to. With one existing base station, press the number 1 and the OK display button.
Enter the SYS PIN (factory setting 0000) and confirm with OK.
Now press the button on the base station until the LED on the base station flashes.
The handset will search for the base station and after a few seconds the handset will be logged-on. The handset will automatically be allocated the next free internal phone number between 2 and 6.
- Multiple handsets -
11.7. Logging on a third-party handset to the base station
Handsets from other manufacturers can be integrated into the telephone system by means of the internationally adopted GAP standard.
Switch the handset to be logged on into the registration mode with reference to the associated operating instructions. Then hold the button on the base station pressed until you hear a signal tone. The handset will be logged on after a few seconds and will be allocated the next free internal number between 2 and 6.
11.8. Logging on a DECT8600SIM handset to other base stations
Press the Menu display button
Select Registration with ▲ and ▼ and press OK.
Select Register Handset with ▲ and ▼ and press OK.
Confirm the display message Register with OK. The display will show how many base stations the handset can still be logged-on to.
Now select which base station you want to log the handset on to and press the OK display button.
Enter the SYS PIN for the selected base station and confirm with OK.
Now switch the appropriate base station to registration mode. To do this, follow the instructions in the appropriate operating manual. The handset will search for the base station and after a few seconds the handset will be logged-on.
11.9. Additional base stations
You can increase the range of the handsets by using several base stations. In order to make use of this effect, all base stations must be connected to a telephone socket.
- Multiple handsets -
Depending upon the application, you can allocate the same telephone number to each base station or you can give the base stations different numbers. In this case, the handset will always be given a new phone number as soon as it is within range of a different base station.
Make sure that the ranges of all base stations overlap. Please test the range of the handsets before putting a new base station into operation.
If a handset is logged on to the base station and if the automatic base station selection is activated (further information in this chapter), the handset is always forwarded automatically to the nearest base station. Current calls cannot be transferred from one base station to another.
Selecting a base station
| Press the Menu display button. |
| Select Handset Settings with ▲ and ▼ and press OK. |
| Select Select Base with ▲ and ▼ and press OK. The display will show the currently selected base station. |
| Select the required base station 1 to 4 or Auto with ▲ and ▼ and confirm with OK. |
| Exit the menu by pressing the Back display button repeatedly. |
- Troubleshooting -
12. Troubleshooting
If you have problems with your telephone, please check the following information. For any claims under the warranty, please refer to your dealer. The warranty period is 2 years. For technical problems, you can also contact our Service Department on the hotline number 0180 5 00 13 88.
| No calls possible The teleph | one line is not correctly connected or is faulty. Use only the telephone cable provided. Test whether your telephone connection is in order by using another telephone. The power supply is not plugged in or there is a total power failure. The rechargeable batteries are flat or defective. You are too far away from the base station. |
| Connection is cut off or drops out | You are too far away from the base station. Incorrect position for the base station. |
| Dialling not possible Dialling | mode incorrectly set (see Chapter 10.6). |
| The system no longer responds or is in an undefined state. | Reset all functions to the factory settings. Before doing so, briefly remove the power supply from the socket. Factory settings see Chapter 10.10. |
| The battery symbol appears in the display after just a few hours. | Place the handset on the base station for 10 hours. If this does not help, replace the rechargeable batteries. |
| SMS messages cannot be sent or received. | Check the requirements in Chapter 7.1 in order to use SMS on a conventional telephone network. |
- Important Information -
13. Important information
13.1. Important note
"Walkie - Talkie" is only available in the menu when multiple handsets of Type DECT8600SIM are used.
13.2. Technical data
| Standard DECT-GAP | |
| Channel number 1880 to 1990 MHz | |
| Power supply Base station 220/230V, 50 Hz | |
| Range Indoors up to 50 m | |
| Range Outdoors up to 300 m | |
| Standby up to 120 hours | |
| Max. call duration up to 10 hours | |
| Rechargeable batteries 2 x 1.2V/550mAh, Type AAA | |
| Dialling method TD or PD | |
| Permissible ambient temperature | 10°C to 30°C |
| Permissible relative humidity 20 to 75% | |
| Signal button function 90ms or 270ms | |
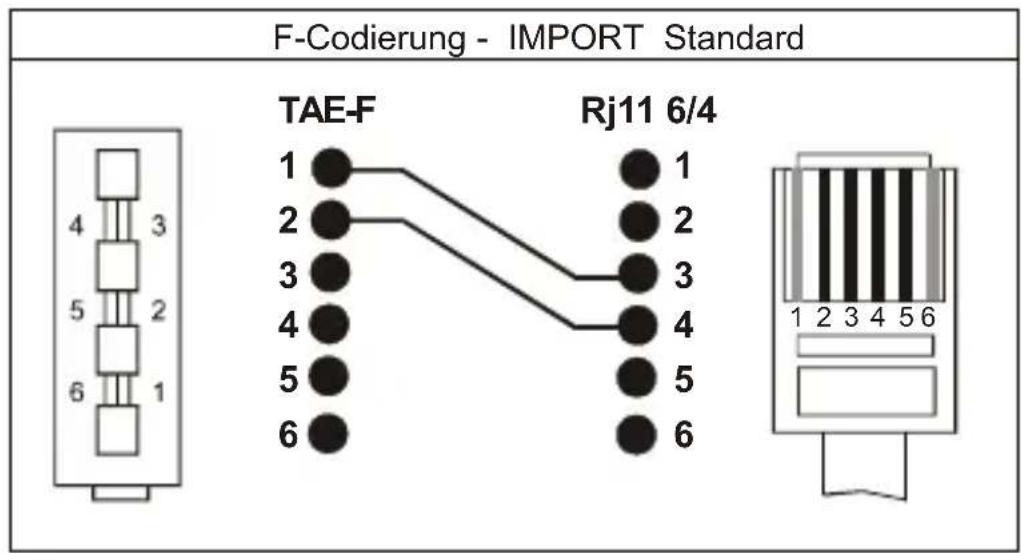
13.3. Changing the telephone cable
If you have to replace your telephone cable, you can locate the appropriate cable at your dealer's with the help of the following diagram.
text_image
F-Codierung - IMPORT Standard TAE-F Rj11 6/4- Important Information -
13.4. Warranty
AUDIOLINE units are manufactured and tested in accordance with the most up-to-date manufacturing procedures. Selected materials and highly developed technologies ensure trouble-free operation and long life. If, however, your unit should develop a fault within the warranty period, please contact the shop where you bought your AUDIOLINE unit, taking with you your purchase receipt. The warranty period is 24 months calculated from the day of purchase. This warranty is not applicable to the batteries or battery packs used in the various products.
Warranty conditions:
All defects, which are the result of material or manufacturing faults, will be rectified free of charge within the warranty period. Claims under the warranty shall not be considered if the equipment has been tampered with by the purchaser or third parties. Damage, which results from improper handling or use, incorrect positioning or storage, inappropriate connection or Installation and through Act of God or other external influences are not covered by the warranty. In the case of complaints, we reserve the right to repair or to replace the defective parts or to exchange the unit. Parts or units that have been exchanged shall become our property. Claims for damages shall not be entertained unless they relate to intention or gross negligence on the part of the manufacturer. In accordance with these conditions, all claims under the warranty shall be made exclusively to your dealer. Rights under the warranty can no longer be enforced after the expiry of two years from the purchase and handing over of our products.
- Important Information -
13.5. Declaration of conformity
WE AUDIOLINE GmbH
OF Hellersbergstr. 2a
D-41460 Neuss
DECLARE UNDER OUR SOLE RESPONSIBILITY AS EU DISTRIBUTOR THAT THE PRODUCT
MODEL: DECT8600SIM
DESCRIPTION: DECT standard cordless telephone
IS IN CONFORMITY WITH THE BASIC REQUIREMENTS OF
DIRECTIVE: 1999/5/EC
AUTHORISED SIGNATORY:
Signature:
Name: MANFRED Z NNOW
Position in the company: MANAGING DIRECTOR:
Date of issue: 12.08.2003

text_image
Liu Kui ING DIRECTOR:A copy of this declaration will be retained for 10 years after cessation of production.

SUPPLIER: AUDIOLINE GmbH, Hellersbergstr. 2a,
D-41460
Neuss
PRODUCT:
DECT8600SI
This product has been developed for use on an analogue telephone line (PSTN) within Germany. However, no guarantee can be accepted for trouble-free operation on all telecommunications terminal equipment connections due to the differences between the different telecommunications network operators and inserted PABX systems.