
NE-567 - Hi-Fi System Superior - Free user manual and instructions
Find the device manual for free NE-567 Superior in PDF.


User questions about NE-567 Superior
0 question about this device. Answer the ones you know or ask your own.
Ask a new question about this device
Download the instructions for your Hi-Fi System in PDF format for free! Find your manual NE-567 - Superior and take your electronic device back in hand. On this page are published all the documents necessary for the use of your device. NE-567 by Superior.
USER MANUAL NE-567 Superior
natural_image
Black-and-white photo of a CD-ROM/MS amplifier setup with external monitors and control panels, no visible text or symbols.natural_image
Technical line drawing of a speaker with two circular components and a labeled section (no text or symbols present)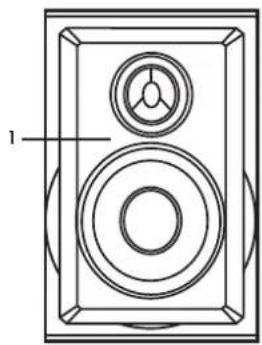
natural_image
Technical line drawing of a speaker with two circular components and a central knob (no text or symbols)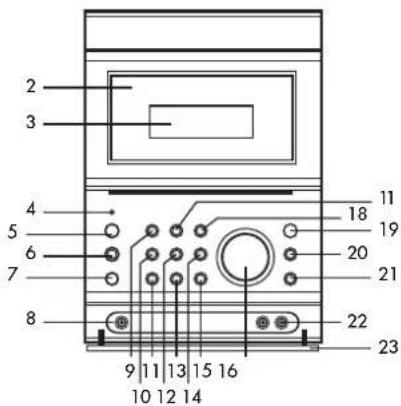
text_image
2 3 4 5 6 7 8 9 10 11 12 13 14 15 16 11 18 19 20 21 22 23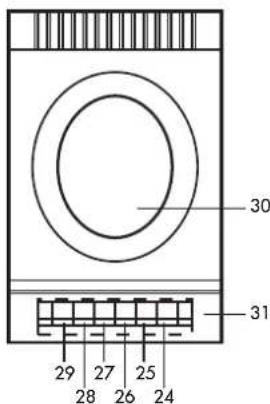
text_image
30 31 29 27 25 28 26 24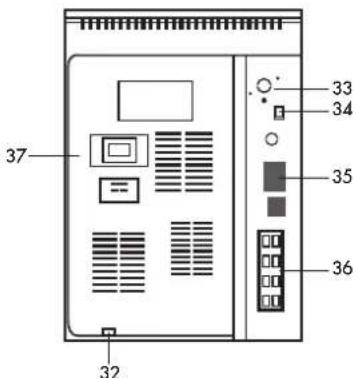
text_image
37 32 33 34 35 36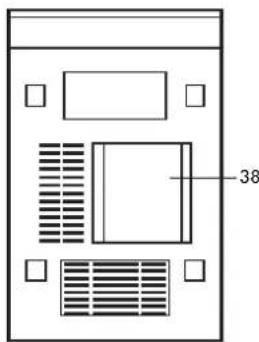
text_image
386
FERNBEDIENUNG
D
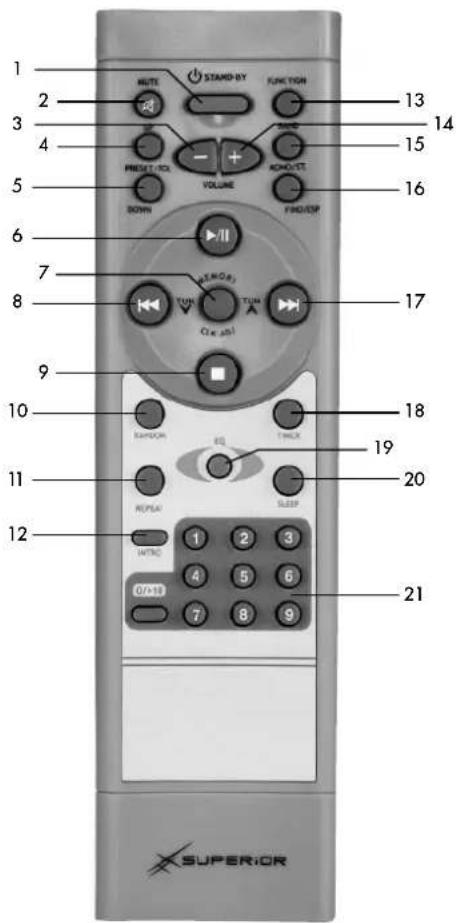
FERNBEDIENUNG
- POWER/ST ANDBY-TASTE
- MUTE-TASTE (STUMMSCHALTUNG)
- LAUTSTÄRKE-TASTE (LEISER)
- PRESET/FOLDER AUF-TASTE (VOREINSTELLUNG/ORDNER)
- PRESET/FOLDER AB-TASTE (VOREINSTELLUNG/ORDNER)
- CD WIEDERGABE/PAUSE-TASTE
- MEMORY/ Adjust-TASTE
- SKIP/SEARCH/TUNING AB-TASTE (SPRINGEN/SUCHEN/SENDERSUCHE)
- CD STOP-TASTE
- RANDOM-TASTE
- REPEAT-TASTE (WIEDERHOLUNG)
- INTROTASTE
- FUNKTIONSWAHLSCHALTER
- LAUTSTÄRKETASTE (LAUTER)
- BAND-TASTE
(BANDWAHLSCHALTER) - ST/MONO-TASTE
- SKIP/SEARCH/TUNING AUF-TASTE (SPRINGEN/SUCHEN/SENDERSUCHE)
- TIMER-TASTE
- EQ-TASTE (Equalizer)
- SLEEP-TASTE
- NUMMERNSUCH-TASTEN
text_image
1 2 3 4 5 6 7 8 9 10 11 12 MUTE STAND-BY FUNCTION 13 14 15 16 17 18 19 20 21 SUPEROInatural_image
Diagram of a battery holder assembly with two batteries and a black arrow indicating force or movement (no text or symbols)text_image
Diagram showing front view of a server rack with connected ports and cable connections, including a zoomed-in view of the internal structure.natural_image
Technical line drawing of a cassette tape with an inset close-up showing internal components (no text or symbols)text_image
OPEN VOLUME V LUMAbb.: 3 Abb.: 4
text_image
NO DISCtext_image
Cd 0100:08 VOLUMEAbb.: 7 Abb.: 8
text_image
02 Cd 00:00 VOLUME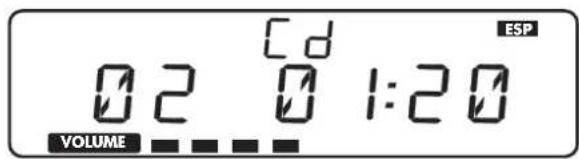
text_image
ESP 02 01:20 VOLUMEAbb.: 9
- MP3
text_image
001 R - NONE VOLUME ESPAbb.: 10 Abb.: 11
text_image
ALBUM 01 CDO VOLUME ESPANZEIGE DER MP3-INFO/ WIEDERHOLFUNKTIONEN (PER FERNBEDIENUNG)/ ZUFALLSWIEDERGABE (PER FERNBEDIENUNG)
D
text_image
01 REPEAT ALL ESP 002 00:03 VOLUMEAbb.: 12 Abb.: 13
text_image
0 1 ALBUM REPEAT ESP 0 2 0 1:07 VOLUMEZUFALLSWIEDERGABE (PER FERNBEDIENUNG)
text_image
RANDOM 03 00:13 VOLUME ESPAbb.: 14
INTROWIEDERGABE (PER FERNBEDIENUNG)/PROGRAMMODUS
D
INTROWIEDERGABE (PER FERNBEDIENUNG)
text_image
02 00:02 VOLUMEAbb.: 15
PROGRAMMODUS
text_image
MEMORY 01 P - 01 VOLUMEAbb.: 16 Abb.: 17
text_image
MEMORY 0 0 0 P - 0 1 VOLUME ESP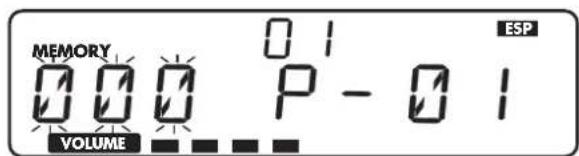
text_image
MEMORY VOLUME 01 P - 01 ESPAbb.: 18
text_image
8 1 06:08 VOLUMEAbb.: 19
natural_image
Illustration showing three hand positions: a mechanical press, a circular device with a ring, and a cross-shaped object (no text or symbols)3. Aufbewahrung
| Important Safety Instructions | 25 |
| Functions and Controls | 26 |
| Remote Control | 27 |
| Connecting the Speaker Cable to the Speaker Jacks | 28 |
| Using the Appliance | 28 |
| Setting the Clock | 28 |
| Power Standby | 29 |
| Setting the Timer | 29 |
| Equalizer (Only Via Remote Control) | 30 |
| AUX Playback | 30 |
| Setting the Automatic Power Off (Via Remote Control) | 30 |
| Radio Operation | 30 |
| Setting the Frequency | 30 |
| Selection Between Mono/Stereo | 31 |
| Automatic Station Search | 31 |
| Save a Station | 31 |
| Selecting a Saved Station | 31 |
| Note on AM/FM Frequencies (MW/UKW Wavelengths) | 32 |
| Cassette Operation | 32 |
| Displays on CD Display | 33 |
| CD/MP3 Operation | 34 |
| Playback of an Entire CD/MP3 | 34 |
| Playback of a Specific Track | 35 |
| Displaying the MP3 Information | 36 |
| Repeat Functions (via remote control) | 36 |
| Random Playback (via remote control) | 36 |
| Intro Playback (via remote control) | 37 |
| Program Mode | 37 |
| Beat Cut | 38 |
| Mute Function (via remote control) | 38 |
| Listening to Music on Headphones | 38 |
| Backup Batteries | 38 |
| Notes on Cleaning, Usage and Care | 39 |
| Technical Information | 41 |
| Disposal Instructions | 41 |
| Service / Guarantee | 42 |
IMPORTANT SAFETY INSTRUCTIONS
E
Basic safety instructions must be observed when using electric appliances.
In order to avoid the danger of burns, electrical shocks, fire and/or personal injury, please read this instruction manual thoroughly prior to using the appliance and follow all instructions while using this appliance.
Carefully store this instruction manual for later use.
If this appliance is given to another person, please provide this instruction manual as well.
IMPORTANT SAFETY INSTRUCTIONS
- Only plug this appliance into a standardly installed outlet. Do not use a power strip or an extension cable.
• The voltage given on the label of the appliance must match the voltage of your electrical grid.
- When positioning the electrical cable, be sure that it does not present a trip hazard during use of the appliance.
- Keep the appliance, the electrical cable and the plug away from hot surfaces, open flames and sharp edges.
- Never touch the appliance, the electrical cable or the plug with damp or wet hands.
- Never immerse the appliance, the electrical cable or the plug in water or other liquids. There is a serious risk of electrical shock!
- When you pull on the plug, always pull on the plug and never on the cable.
- Be sure that the electrical plug is always easily accessible.
- Do not use the appliance outside.
- Do not place the appliance in direct sunlight.
- Only use appropriate cable that is intended for this purpose to connect external devices. Always remove the plug from the outlet before connecting external cables.
- Only place the appliance on stable and level surfaces.
- Do not leave the appliance unattended during use.
• Children do not recognize the danger that can result from using electrical appliances. Keep children away from appliances. Please be especially careful when using appliances if children are present!
- Do not use the appliance if it shows signs of damage, if it has fallen or if it is not functioning properly.
- Regularly inspect the appliance, the electrical cord and the plug for visible damage. Do not ever use the appliance if you have detected damages. Do not attempt to repair the appliance yourself.
• Repair work may only be conducted by qualified professionals.
- Do not use the appliance as a storage shelf for decorative objects such as vases or similar objects which could tip over on the appliance.
- Be sure that a minimum distance of at least 10 cm exists on the sides in order to ensure sufficient air circulation.
- Remove the plug from the outlet if there is a storm or during a long period of absence (such as vacation). Also remove the batteries from the remote control during long periods of absence.
- This appliance is only appropriate for use in private households and is not intended for commercial use.
FUNCTIONS AND CONTROLS
E
FUNCTIONS AND CONTROLS
-
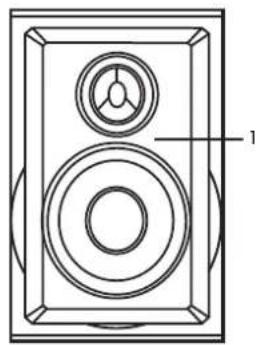
SPEAKERS
-
CASSETTE DECK DOOR
-
DISPLAY
-
INDICATOR LIGHTS
-
⏻ STANDBY BUTTON
-
MEMORY/ADJUSTMENT BUTTON
-
IR SENSOR
-
HEAD PHONE JACK
-
CD PLAY/PAUSE BUTTON
-
SKIP/SEARCH/TUNING REVERSE BUTTON
-
▼ PRESET/FOLDER REVERSE BUTTON
-
SKIP/SEARCH/TUNING FORWARD BUTTON
-
▲ PRESET/FOLDER FORWARD BUTTON
-
BAND SELECTION BUTTON
-
ST/MONO BUTTON
-
VOLUME ADJUSTER
-
CD STOP BUTTON
-
FIND/ESP BUTTON
-
▲ CD TRAY OPEN/CLOSE BUTTON
-
TIMER BUTTON
-
FUNCTION SELECTOR
-
AUX IN JACK
-
JACK COVER
-
CASSETTE RECORD BUTTON
-
CASSETTE PLAY BUTTON
-
CASSETTE REWIND BUTTON
-
CASSETTE FORWARD BUTTON
-
CASSETTE STOP/EJECT BUTTON
-
CASSETTE PAUSE BUTTON
-
CD TRAY
-
CASETTE BUTTON COVER
-
POWER CABLE
-
UKW ANTENNA
-
MW ANTENNA JACK
-
BEAT CUT BUTTON
-
SPEAKER JACKS
-
ON/OFF BUTTON
-
BATTERY TRAY (3 X TYPE: LR6; AA)
natural_image
Technical line drawing of a speaker with two circular components and a labeled section (1), no text or symbols present.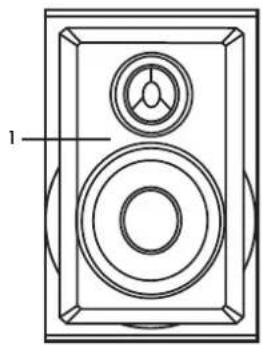
natural_image
Technical line drawing of a speaker with two circular components and a central knob (no text or symbols)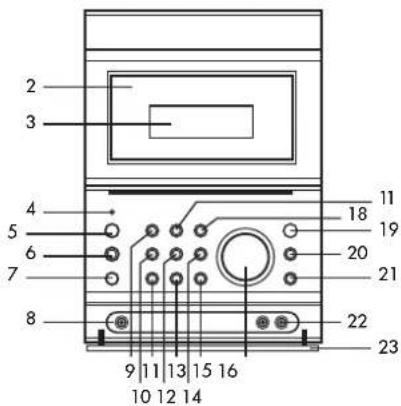
text_image
2 3 4 5 6 7 8 9 10 11 12 13 14 15 16 17 18 19 20 21 22 23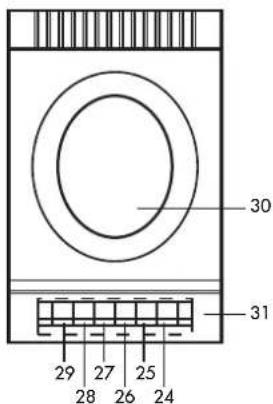
text_image
30 31 29 27 25 28 26 24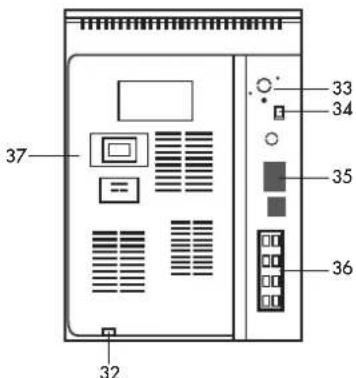
text_image
37 32 33 34 35 36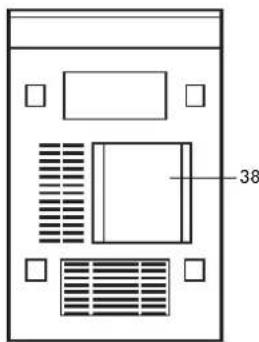
text_image
38REMOTE CONTROL
E
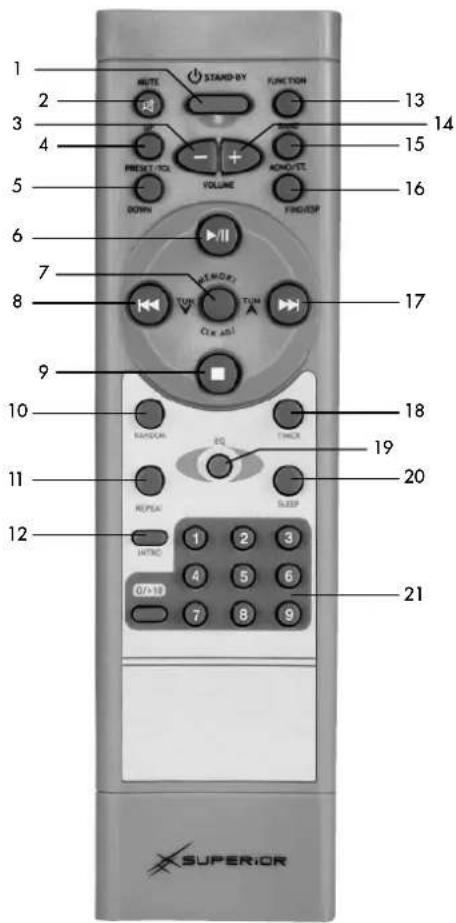
REMOTE CONTROL
- POWER/STANDBY BUTTON
- MUTE BUTTON
- VOLUME BUTTON (QUIETER)
- PRESET/FOLDER FORWARD BUTTON
- PRESET/FOLDER REVERSE BUTTON
- CD PLAY/PAUSE BUTTON
- MEMORY/ADJUSTMENT BUTTON
- SKIP/SEARCH/TUNING REVERSE BUTTON
- CD STOP BUTTON
- RANDOM BUTTON
- REPEAT BUTTON
- INTRO BUTTON
- FUNCTION SELECTOR
- VOLUME BUTTON (LOUDER)
- BAND SELECTION BUTTON
- ST/MONO BUTTON
- SKIP/SEARCH/TUNING FORWARD BUTTON
- TIMER BUTTON
- EQ BUTTON (Equalizer)
- SLEEP BUTTON
- NUMBER SEARCH BUTTONS
text_image
1 2 3 4 5 6 7 8 9 10 11 12 NOTE STAND-BY FUNCTION 13 14 15 16 17 18 19 20 21 SUPERIORInserting Batteries into the Remote Control
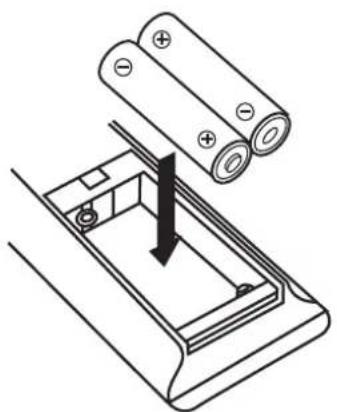
Press the battery tray lid down and away from the arrow mark and open the lid. Insert two 1.5 V, LR03, AAA batteries into the battery tray observing the indicators of the proper polarity ("+" and "-"). Then replace the lid of the battery tray and slide it upwards in the direction of the arrow.
NOTE:
Please consult the instructions given with the batteries as well.
natural_image
Diagram of a battery assembly with two batteries and a central component, showing no text or symbols.** Batteries Not Included **
CONNECTING THE SPEAKER CABLE TO THE SPEAKER JACKS/ USING THE APPLIANCE/ SETTING THE CLOCK
E
CONNECTING THE SPEAKER CABLE TO THE SPEAKER JACKS
- Speaker Connection:
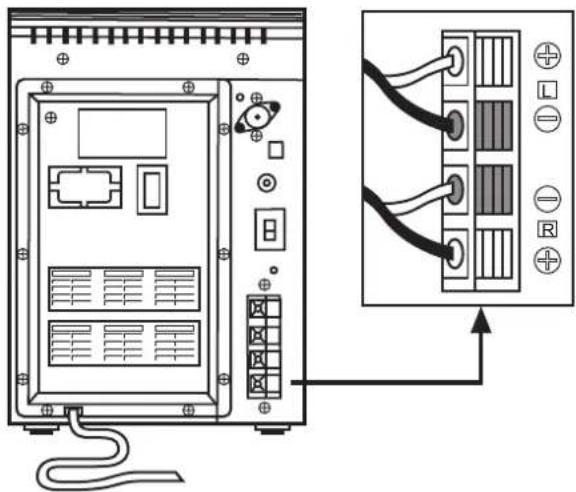
Remove the cable ties and fully unwind the SPEAKER CABLE. Connect this, as described in the following, to the SPEAKER JACKS (36) on the rear side of the appliance. To do so, place the end of the black cable in the black jack (-) and the end of the black cable with the white stripe in the red jack (+). At the same time, press on the cable clamps on the speaker jacks.
- Connecting the Power Cable:
Before the appliance can be used, you must plug the power cable (32) into a standardly installed electrical outlet.
text_image
Diagram showing front view of a server rack with connected cables and labeled ports, including a zoomed-in cable detail.USING THE APPLIANCE
After you having plugged the appliance into an outlet, press the ON/OFF button (37) on the rear side of the appliance. The appliance will enter standby mode. You can press the button POWER/STANDBY (5) on the appliance (or on the remote control) to turn the appliance on or off. To fully turn off the appliance, press the ON/OFF button again and remove the power cord from the outlet.
SETTING THE CLOCK
To set the clock, the appliance must be in standby mode.
- Press and hold the button MEMORY/ADJUST (6) until the 12 hour readout is blinking on the display.
- Then press the button TUNING/SKIP/SEARCH (FORWARD or REVERSE) (10/12), to change between the 12 and 24 hour readout modes.
- Press the button MEMORY/ADJUST (6) again until the HOUR readout on the display is blinking. Set the HOUR using the button TUNING/SKIP/SEARCH (FORWARD or REVERSE). Press the button MEMORY/ADJUST until the MINUTE readout blinks and set the MINUTES using the button SKIP/SEARCH/TUNING (FORWARD or REVERSE).
- Then press the button MEMORY/ADJUST again to confirm the time.
- Each setting will be automatically saved if a button is not pressed within 10 seconds.
POWER STANDBY/ SETTING THE TIMER
E
POWER STANDBY
- Press the button POWER/STANDBY (5) on the appliance or on the remote control (1), to turn on the appliance.
- Choose the music source (CD, cassette, aux or radio) by pressing the FUNCTION SELECTOR (21) multiple times until the desired function lights up on the display.
- Set the volume using the VOLUME ADJUSTER (16) (- or +).
- Set the preset equalizer (pass, classic, rock, pop or jazz) using the button EQ (19) on the remote control.
- Press the button POWER/STANDBY (5) again to turn the appliance on or off.
SETTING THE TIMER
By using the timer function, you can turn the appliance on or off at a time of your choosing.
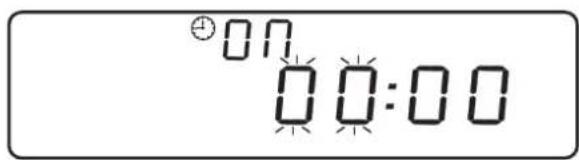
- After you have set the time, press the button TIMER (20) for several seconds. " ⊕ ON" and "00:00" will appear on the display and the numbers for setting the HOUR will blink (see graphic 1).
- To set the hour please use the buttons TUNING/SKIP/SEARCH (FORWARD or REVERSE) (10/12).
- Press the button TIMER (20) again and the numbers for setting the MINUTES will blink. To set the minutes please use the buttons TUNING/SKIP/SEARCH (FORWARD or REVERSE) (10/12).
- Press the button TIMER again to confirm the TURN ON TIME.
- After setting the turn on time "TIMER ON", " OFF" will appear on the display and the number for setting the HOUR will blink (see graphic 2).
- To set the time, please refer to steps 2 and 3. Press the button TIMER again to confirm the automatic turn off time TIMER OFF.
- After setting the turn on and turn off times, "TUNER" or "CD" will appear blinking on the display. Set the desired music source "TUNER" or "CD" using the button TUNING/SKIP/SEARCH (FORWARD or REVERSE).
- Press the button TIMER again and "VOL" will appear blinking on the display. Set the volume at which the music will automatically be turned on using the button TUNING/SKIP/SEARCH (FORWARD or REVERSE) (16). Confirm your entry by pressing the button TIMER.
- After completing steps 1 through 8, " ⏻" will appear on the display. The appliance will turn on automatically at the set time with the desired music source and turn off again at the set turn off time.
text_image
±00 00:00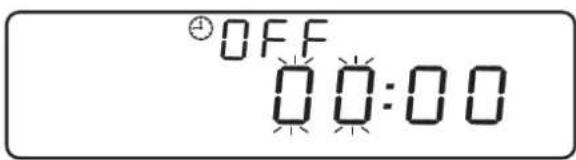
text_image
OFF 00:00Graphic 1 Graphic 2
Note: Each setting will be automatically saved if a button is not pressed within 10 seconds.
EQUALIZER (ONLY VIA REMOTE CONTROL)/ AUX PLAYBACK/ SETTING THE AUTOMATIC POWER OFF (VIA REMOTE CONTROL)/ RADIO OPERATION/ SETTING THE FREQUENCY
E
EQUALIZER (ONLY VIA REMOTE CONTROL)
EQ (19) shows the current equalizer setting. If you press the button EQ on the remote control, the equalizer setting will change as follows:

flowchart
graph LR
    A["PASS"] --> B["CLASS ROCK POP JAZZ"]
    B --> C[" "]
AUX PLAYBACK
Press the FUNCTION SELECTOR (21) until the readout "AUX" lights up on the display. An analog audio device can be connected to the appliance using the lower jacks on the rear side of the appliance. Use an RCA cable (not included) to connect the audio device. In doing so, also consult the manufacturer's instructions from the manufacturer of the audio device.
SETTING THE AUTOMATIC POWER OFF (VIA REMOTE CONTROL)
With the automatic power off, you can program the appliance to automatically turn off after a period of time specified by you.
- If you would like to fall asleep to music, press the button SLEEP on the remote control.
- You can set the radio or the CD player to play for 90, 80, 70 et cetera up to 10 minutes before the appliance automatically turns off.

flowchart
graph LR
    A["90"] --> B["80"]
    B --> C["70"]
    C --> D["60"]
    D --> E["50"]
    E --> F["40"]
    F --> G["30"]
    G --> H["20"]
    H --> I["16"]
    I --> J["1"]
    J --> K["1"]
    K --> L["NORMAL"]
RADIO OPERATION
Set the FUNCTION SELECTOR (21) on the appliance (or on the remote control) to TUNER.
- Press the button BAND (14) to select the frequency range, which appears on the display.
- Search within the selected frequency range with the button TUNING/SKIP/SEARCH (FORWARD or REVERSE) for the desired station.
- You can set the desired volume using the volume adjuster (16).
SETTING THE FREQUENCY
To manually search for stations with weak reception, press the button TUNING/SKIP/SEARCH (FORWARD or REVERSE) multiple times until you can read the proper frequency or until the station is clearly received.
SELECTION BETWEEN MONO/STEREO/ AUTOMATIC STATION SEARCH/ SAVE A STATION/ SELECTING A SAVED STATION
E
SELECTION BETWEEN MONO/STEREO
This function can only be used with UKW stations.
- If you would like to select a UKW station that is broadcast in stereo, press the button ST/MONO (15). If you can receive a UKW station in stereo, the symbol "CT." appears on the display.
- If you press the button ST/MONO, the symbol for UKW STEREO will disappear again and the appliance will be set to UKW MONO.
AUTOMATIC STATION SEARCH
- Press the button TUNING/SKIP/SEARCH (FORWARD or REVERSE) for somewhat longer than a second and then release the button. The tuner will automatically search for the first station with good reception.
- Repeat this step to select another station.
SAVE A STATION
You can save your favorite stations; up to 10 MW stations and up to 10 UKW stations. Use the following steps to save your selected station:
- Press the button BAND (14) on the appliance (or the remote control) to select between AM (MW) and FM (UKW).
- Select the desired station.
- The press MEMORY/ADJUST (6).
- Press the button PRESET/FOLDER (FORWARD or REVERSE) (11/13) to select the saved field number.
- Then press the button MEMORY/ADJUST again to confirm the selection.
- Repeat steps 2 through 5 to save additional stations.
- Repeat steps 2 through 5 to change saved stations.
Notes:
- By saving a new station in a save field already being use, the existing station will be deleted and overwritten by the new one.
- All saved fields will be deleted by removing the plug from the outlet or in the case of a power outage. In this case, you will have to save the stations again.
SELECTING A SAVED STATION
- Press the button BAND (14) to select the desired frequency range.
- Press the button PRESET/FOLDER (FORWARD or REVERSE) (11/13) to select a saved field number.
- This number will be shown with the corresponding frequency on the display.
- MW Antenna: The appliance is delivered with an MW antenna which you can plug into the rear side of the appliance (AM-ANT). You can receive AM frequencies on this wavelength. To do so, you should turn the antenna in the direction in which the best reception can be found.
- UKW Antenna: This appliance has a built-in dipole antenna for optimal UKW reception. You can receive FM frequencies on this wavelength. For the best possible reception, you should completely extend the antenna and point it in the appropriate direction.
CASSETTE OPERATION
Playing Back a Cassette
- To playback a cassette, open the CASSETTE DECK DOOR (2) using the button CASSETTE STOP/EJECT (28).
- Insert the cassette with the open side open and the full reel on the right hand side.
- Press the cassette down and close the cassette tray. Please do not touch the reel surface.
- Now set the FUNCTION SELECTOR (21) to "TAPE" and press the button PLAY (25).
- To stop playback, press the button CASSETTE STOP/EJECT (28) once. To open the cassette tray, press the button CASSETTE STOP/EJECT (28) again.
- To quickly fast forward the cassette, press the button CASSETTE F.FWD (27) and to quickly rewind, press the button CASSETTE REWIND (26).
Note: Before you insert the cassette, please make sure that the cassette does not have any loops. If it does, do not use the cassette again.
Recording from the Radio
- Set the FUNCTION SELECTOR (21) to RADIO, select the frequency range AM (MW) or FM (UKW) with the button TUNER/BAND and select the desired station (see section on radio operation).
- Insert a blank cassette in the cassette tray and press the buttons RECORD (24) and PLAY (25) at the same time.
- To stop recording, press the button CASSETTE STOP/EJECT (28) once.
- You can briefly interrupt the recording with the button CASSETTE PAUSE (29).
Recording from a CD
- Set the FUNCTION SELECTOR (21) to CD and select the track that you would like to record (see section on CD/MP3 operation).
- Place a blank cassette in the cassette tray and press the buttons RECORD (24) and PLAY (25) at the same time.
- To stop recording, press the button STOP/EJECT (28) once.
- You can briefly interrupt the recording with the button CASSETTE PAUSE (29).
Auto Stop
As soon as the cassette reaches the end of its reel during playback or recording, the built-in Auto Stop System releases the play and record buttons. The AUTO STOP System functions while recording from the built-in radio or from the CD player. Only the cassette functions can be automatically stopped. The radio or the CD player will continue to play.
CASSETTE OPERATION/ DISPLAYS ON CD DISPLAY
E
Type of Cassettes
Only use high quality cassettes (e.g. IEC TYPE 1) for your recordings. The use of C 120 cassettes in this appliance is NOT recommended.
Recording Protection
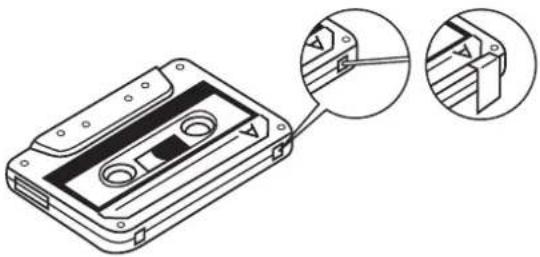
New recordings normally delete old recordings automatically. It is possible to protect recordings from accidental deletion by pressing in on the latch on the rear of the cassette.
natural_image
Technical line drawing of a cassette tape with an inset close-up showing internal components (no text or symbols)If the cassette is held with the recorded side facing up and the reel facing forward, the latch can be found on the left hand side of the rear of the cassette.
One can protect all recorded cassettes from accidental deletion in this manner. "Protected" cassettes prevent recording. If you attempt to begin recording and the button does not allow itself to press down, please never attempt to operate the mechanism using violence or it can become damaged. Check to see if a cassette has been inserted and whether the latch is still present. If you would like to record on a cassette whose latch has been removed, simply cover the resulting hole with tape.
DISPLAYS ON CD DISPLAY
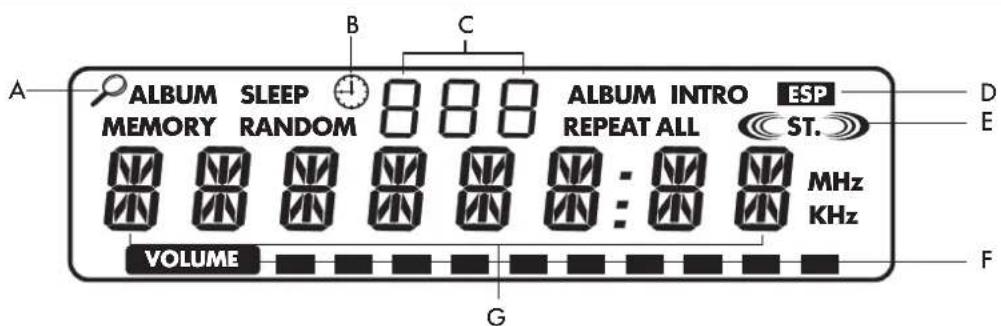
The symbols shown here will be more clearly explained in the following section.
text_image
A ALBUM SLEEP MEMORY RANDOM B C ALBUM INTRO ESP REPEAT ALL ST. MHz KHz VOLUME G F D EA. FIND DISPLAY E. STEREO DISPLAY
B. TIMER DISPLAY F. VOLUME DISPLAY HIGH/LOW
C. ALBUM NUMBER DISPLAY G. TITLE/NUMBER/TIME DISPLAY
D. ESP DISPLAY
CD/MP3 OPERATION / PLAYBACK OF AN ENTIRE CD/MP3
E
CD/MP3 OPERATION
- Press the FUNCTION SELECTOR (21) on the appliance and select the CD mode.
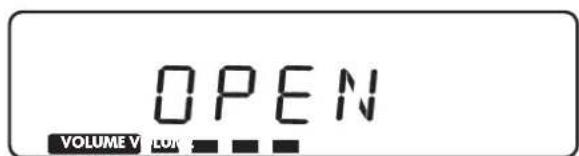
- To play a CD/MP3, first open the CD tray with the button OPEN/CLOSE (19). "OPEN" will appear on the display (3) (see graphic 3).
- Place the CD/MP3 disc, with the label facing up, in the CD tray, press the button OPEN/CLOSE again and the CD tray will close automatically.
- The appliance will begin to read automatically ("READ") and changes to CD/MP3 mode.
NOTE:
(1) This appliance can be used to play CD, CD-R, CD-RW and MP3 discs.
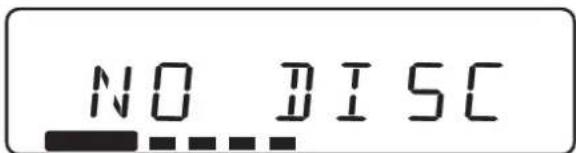
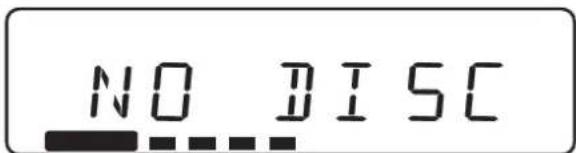
(2) If no disc has been inserted or the disc cannot be read, NO DISC will appear on the display (see graphic 4).
text_image
OPEN VOLUME V LUMGraphic 3 Graphic 4
text_image
NO DISCPLAYBACK OF AN ENTIRE CD/MP3
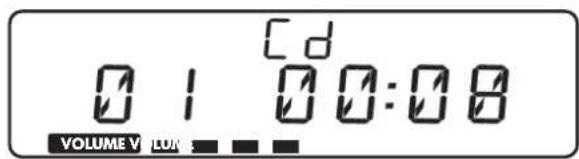
- Playback begins by pressing the button PLAY/PAUSE (9). Playback begins with the first track. The track number currently being played appears on the display along with the already elapsed playback time (see graphic 5).
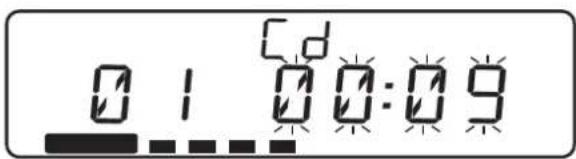
- To interrupt playback, press PLAY/PAUSE. The elapsed playback time will blink (see graphic 6).
- To resume playback, press PLAY/PAUSE again.
- To end playblack, press STOP (17).
text_image
Cd 01:00:08 VOLUME V LUMGraphic 5 Graphic 6
text_image
0 1 0 0:0 9PLAYBACK OF A SPECIFIC TRACK
E
PLAYBACK OF A SPECIFIC TRACK
- CD
- First complete steps 1-4 from the section CD/MP3 operation.
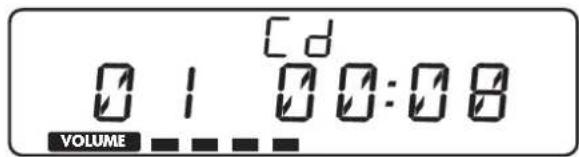
- Press the button SKIP/SEARCH/TUNING (FORWARD or REVERSE) (10/12) on the appliance (or the remote control) until the desired track number appears on the display (see graphic 7).
- Then press the PLAY/PAUSE button (9).
- If you press the button SKIP/SEARCH/TUNING (FORWARD or REVERSE) during playback, you can skip to the next track or return to the beginning of the track being played.
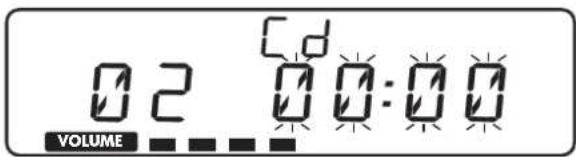
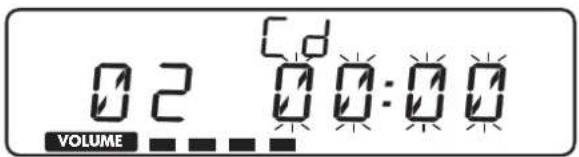
- Press the button SKIP/SEARCH/TUNING (FORWARD or REVERSE) while paused to skip to the next track (or return to the beginning of the current track). "00:00" will appear blinking on the display (see graphic 8).
- To start the playback, press the button PLAY/PAUSE (9).
Note: Press the button FIND/ESP (18) once and the indicator for the ESP function will appear on the display (see graphic 9).
Press the button FIND/ESP again and the indicator for the ESP function will disappear from the display.
text_image
Cd 01 00:08 VOLUMEGraphic 7 Graphic 8
text_image
02 VOLUME Cd 00:00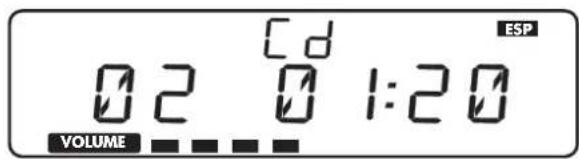
text_image
ESP 02 01:20 VOLUMEGraphic 9
- MP3
- First complete steps 1-4 from the section CD/MP3 operation.
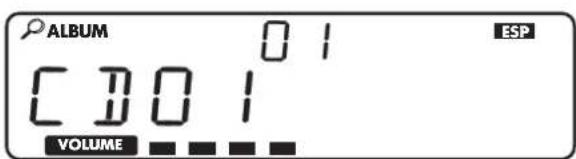
- Press the button PRESET/FOLDER (FORWARD or REVERSE) (11/13) and the album number will change. Press the button SKIP/SEARCH/TUNING (FORWARD or REVERSE) and the track number will change.
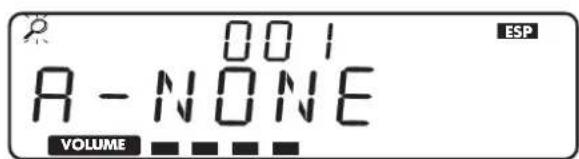
- Press the button FIND/ESP (18) once and the TITLE indicator will blink on the display. (If there is no disc name, NONE will be displayed (see graphic 10).
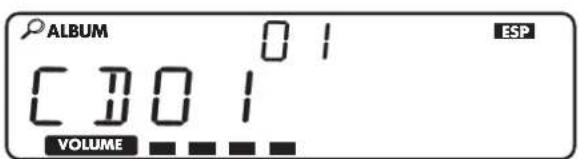
- Press the button FIND/ESP (18) twice and the ALBUM name will be displayed (if no name has been applied to the disc, UNKNOWN will be displayed) (see graphic 11).
- When the desired track is displayed, press the button PLAY/PAUSE (9) and the track will start.
text_image
001 A - NONE VOLUME ESPGraphic 10 Graphic 11
text_image
ALBUM 01 C 01 VOLUME ESPDISPLAYING THE MP3 INFORMATION/REPEAT FUNCTIONS (VIA REMOTE CONTROL)/RANDOM PLAYBACK (VIA REMOTE CONTROL)
E
DISPLAYING THE MP3 INFORMATION
- Press the button FIND/ESP (1) for one second and continuing holding it. The information saved on the MP3 disc will be displayed in the following order.

text_image
FILE NAME TITLE ARTIST-ALBUM →- Press the button FIND/ESP (1) for one second and continuing holding it. The track number currently playing and the already elapsed playback time will appear on the display.
REPEAT FUNCTIONS (VIA REMOTE CONTROL)
The following instructions can be used for CD and MP3 discs.
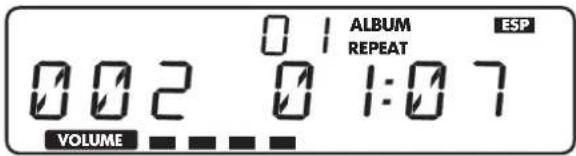
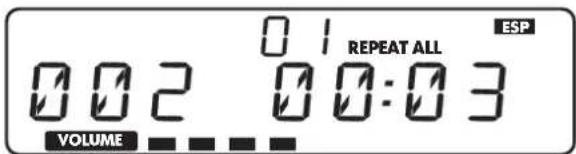
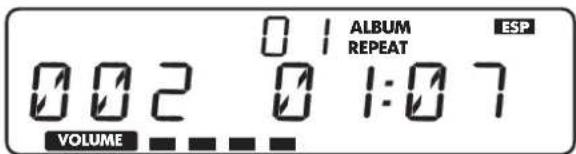
- Press the button REPEAT (11) on the remote control and REPEAT will appear on the display (3). The current track will now be repeatedly played (see graphic 12).
- Press the button REPEAT twice and REPEAT ALL will be displayed. The entire CD/MP3 will now be repeatedly played (see graphic 13).
- Press the button REPEAT three times and the repeat function will be turned off.
text_image
0 1 REPEAT ALL ESP 0 0 2 0 0:03 VOLUMEGraphic 12 Graphic 13
text_image
0 1 ALBUM REPEAT ESP 0 2 0 1:07 VOLUMERANDOM PLAYBACK (VIA REMOTE CONTROL)
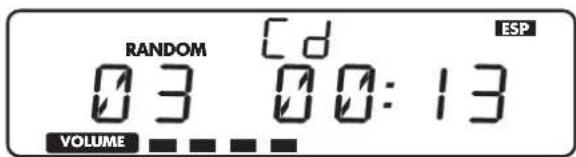
With the "RANDOM" function, you can allow a CD or MP3 to playback in a random order.
- Press the button RANDOM (10) on the remote control to start the random playback of the track (see graphic 14).
- Press the button RANDOM again to restore normal playback.
text_image
RANDOM 03 00:13 VOLUME ESPGraphic 14
INTRO PLAYBACK (VIA REMOTE CONTROL)/PROGRAM MODE
E
INTRO PLAYBACK (VIA REMOTE CONTROL)
- Press the button INTRO (12) on the remote control and INTRO will be displayed. Now the first 10 seconds of each track will be played (see graphic 15).
- Press the button INTRO again to restore normal playback.
INTRO
Abb.: 15
PROGRAM MODE
With the program mode, you can record up to 64 tracks in the program memory.
- SAVING TRACKS IN THE PROGRAM MEMORY
- CD
1) Press the button MEMORY/ADJUST (6) and select PROGRAM (see graphic 16).
2) You can select the track numbers with the buttons SKIP/SEARCH/TUNING (FORWARD or REVERSE) (10/12).
3) Then press the button MEMORY/ADJUST again to confirm the track number.
- MP3
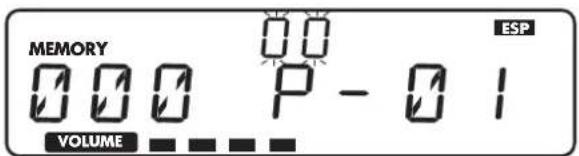
1) Press the button MEMORY/ADJUST (6) and select PROGRAM. The album number will blink (see graphic 17).
2) You can select the track numbers with the buttons SKIP/SEARCH/TUNING (FORWARD or REVERSE) (10/12).
3) Then press the button MEMORY/ADJUST again and the track number will blink (see graphic 18).
4) Press the button SKIP/SEARCH/TUNING (FORWARD or REVERSE) and the track number will change.
5) Then press the button MEMORY/ADJUST again to confirm the track number.
MEMORY
MEMORY
Abb.: 16 Abb.: 17
MEMORY
Abb.: 18
PROGRAM MODE/ MUTE FUNCTION (VIA REMOTE CONTROL)/ BEAT CUT/ MUTE FUNCTION (VIA REMOTE CONTROL)/ LISTENING TO MUSIC ON HEADPHONES/ BACKUP BATTERIES
E
- PROGRAMMED PLAYBACK
After saving the tracks, press the button PLAY/PAUSE (9) and the saved titles will be played in the desired order.
- DELETE PROGRAMMED TRACKS
While stopped, press the button MEMORY/ADJUST, then STOP/BAND or open the CD tray.
Note: As soon as you save a new program, the existing one will be overwritten.
BEAT CUT
This function allows you to reduce interference noises. To do so, press the switch BEAT CUT on the rear side of the appliance. (This function is only possibly for MW radio reception).
MUTE FUNCTION (VIA REMOTE CONTROL)
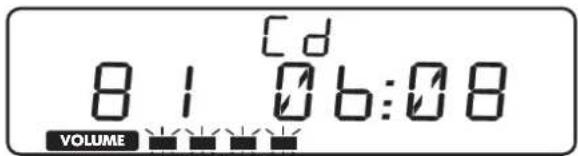
- If you press the button MUTE (2) on the remote control once, the volume display will blink and the sound will be interrupted (see graphic 19).
- Press the button MUTE again and the volume as well as the audio output will return to normal.
text_image
8 1 06:08 VOLUMEGraphic 19
This appliance has a jack (8) for connecting stereo headphones. To use headphones, insert the connector in the 3.5 mm jack PHONES on the rear of the appliance. The external speakers will be automatically turned off as soon as headphones are inserted into the jack.
BACKUP BATTERIES
Insert 3 1.5 v, type LR6 AA batteries in the battery trays as backup batteries. These will serve as memory backup of the appliances processor during power outages.
NOTES ON CLEANING, USAGE AND CARE
E
NOTES ON CLEANING, USAGE AND CARE
Warning:
Always remove the electrical cable from the outlet before cleaning!!
- The appliance, the electrical cable and the plug may not be immersed in water during cleaning. Clean these using a dry cloth.
- Do not use any harsh cleaning products, wire brushes, scouring powder or any other hard objects which could scratch the surface.
- Maintaining the Cassette Mechanism
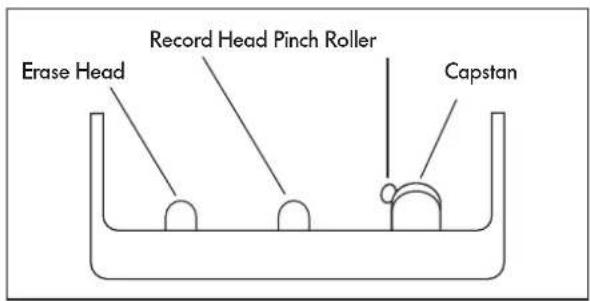
Clean the volume head and the pinch roller/capstan every 10 operating hours until all oxidation traces have been removed. There are a large number of special maintenance product available for this purpose, such as cleaning cassettes.
text_image
Erase Head Record Head Pinch Roller CapstanThe erase head and the record/playback head, as well as the surface of the pinch rollers, are sensitive and may not be touched with metal objects such as screw drivers. Do not ever attempt to oil any of these parts.
CD
- Always use CDs with the following mark:

- Note on the handling of CDs:
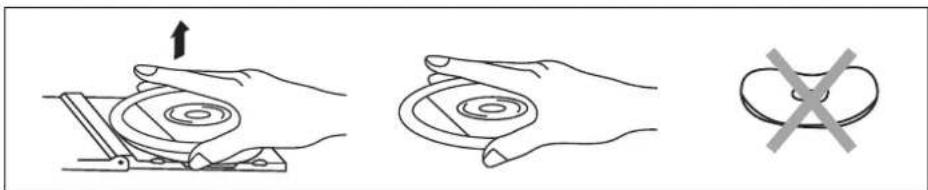
Take the CD out of a case and place it back into one.
• In doing so, do not touch the reflective recording surface.
- Do not glue on any labels and do not write on the surface.
- Do not bend the CD.
NOTES ON CLEANING, USAGE AND CARE
E
natural_image
Illustration showing three hand positions: a mechanical press, a circular component with a ring, and a cross-shaped object (no text or symbols)3. Storage
- Store CDs in their cases.
Do not expose them to direct sunlight, high temperatures, and large amounts of moisture or dusty places.
4. Cleaning a CD:
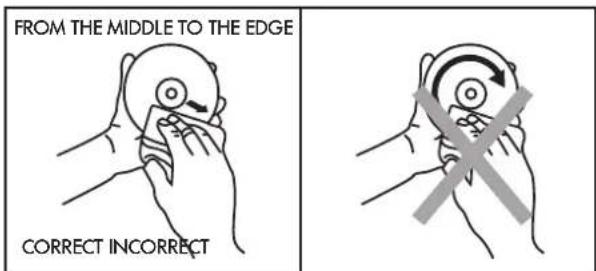
- If a CD has become soiled (with dust, dirt, fingerprints), you can wipe this away with a soft cloth.
- Clean the CD from middle all the way to the edges.
text_image
FROM THE MIDDLE TO THE EDGE CORRECT INCORRECT- Never use gasoline, paint thinner, cassette cleaning fluid or anti-static sprays.
• Always close the CD tray properly so that the lens does not become dusty. - Do not touch the lens.
NOTE REGARDING BATTERIES
- Only use the recommended batteries or those of the same type!
- Do not use dissimilar battery types or new and used batteries together!
- Check the proper polarity when inserting batteries!
- Please remove the batteries if the appliance will not be in use for a long period of time!
- Remove empty batteries from the appliance!
• Non-rechargeable batteries cannot be recharged! - Only charge batteries under the supervision of an adult!
- Do not short circuit connections!
- Do not throw batteries into fire!
TECHNICAL INFORMATION/ DISPOSAL INSTRUCTIONS
E
TECHNICAL INFORMATION
Power Supply: 230V
\~50Hz
Power Output: 4.5 Watt x 2
Appliance Dimensions: 226 (L) x 152 (W) x 218.5 (H) mm
Speaker Dimensions: 140 (L) x 185 (W) x 218.5 (H) mm
Net Weight: 5.49 kg
RADIO
Frequency Range: UKW 87.5 -108 MHz
MW 522 - 1620 KHz
CASSETTE DECK
Cassette Speed: 4.75 CM/Sec.
Frequency Range: 125 Hz-8 KHz
CD PLAYER
Optical Lens: 3-LASERBEAM
Frequency Range:
100 Hz 16 KHz
DISPOSAL INSTRUCTIONS
- Electrical appliances do not belong in the household trash. Legislation stipulates that old appliances must be disposed of via the community's public collection centers or collections of bulk refuse.
• This is the only manner in which old appliances can be properly disposed of and recycled.
SERVICE / GUARANTEE
E
SERVICE / GUARANTEE
The period of the guarantee is three years and begins upon the date of purchase. Please be sure to save the sales receipt for proof of the date of purchase.
The guarantee is valid for appliances that were purchased within Germany. It covers defects and malfunctions that occur within the period of the guarantee through normal use and that are caused by defects in materials or workmanship.
If your claim is covered by the guarantee, you will incur no costs for the repairs.
The guarantee expires in the cases of damage, alterations or improper use of the appliance insofar as this falls outside of the area of responsibility of the guarantor. This particularly applies to the following cases:
• Interference with the appliance by unauthorized persons.
- Alterations on or within the appliance, the removal of the serial number or the rendering illegible, removal or alteration of the appliance's label.
• Damages caused by impacts, fall or other external forces.
• Damages caused by improper usage or misuse.
- Damages caused by external factors, such as, for example: excess voltage, lightning.
• Commercial usage of the appliance.
Your legal rights in the case of a defect with the appliance (additional delivery, withdrawal, reduction, damage compensation, always in accordance with § 437 of the German Civil Code [BGB]) will not be limited by this guarantee.
Please save the original packaging for a possible return shipping for repairs.
Repaired or exchanged components generally underlie the remaining period of guarantee of the appliance.
If you have questions about this product or this instruction manual or have determined a defect with this product, please consult our service hotline directly in order to discuss further steps.
Hotline/EU: (0049) - (0)1805 64 66 66*
(*0.14 € /minute with the Deutsche Telekom network)
Important Notice:
Please do not send your appliance to us with being asked to do so Please be sure to contact our service hot line beforehand. The costs and risk of loss for unrequested sending are borne by the sender. We reserve the right to refuse unrequested shipments or return such products to the shipper at their own cost.
Product Number: 10000120
Manufactured for: