
MCD360 - Hi-Fi System Soundmaster - Free user manual and instructions
Find the device manual for free MCD360 Soundmaster in PDF.


| Product Type | Hi-Fi System |
| Brand | Soundmaster |
| Model | MCD360 |
| Main Unit Dimensions (W x D x H) | 192 mm x 140 mm x 142 mm |
| Weight | Approx. 2.5 kg |
| Power Supply | 100-240 V AC, 50/60 Hz |
| Amplifier Output Power | 2 x 2 W |
| Speaker Impedance | 6 ohms |
| FM Tuner Frequency Range | 87.5 to 108 MHz |
| CD Formats Supported | CD, CD-R, MP3 |
| USB Port | USB 2.0 (front socket) |
| CD Frequency Response | 20 Hz to 20 kHz |
| Amplifier Frequency Response | 20 Hz to 20 kHz |
| Playback Sources | CD, USB, FM Radio |
| Remote Control | Yes, with CR2025 battery included |
| Clock / Alarm Function | 24-hour clock, dual alarm, sleep timer |
| Number of FM Presets | 20 |
| Headphone Jack | Yes, 3.5 mm |
| Laser Class | Class 1 (CD player) |
| Safety Features | Auto power-off, overheat protection, child safety warnings |
| Cleaning Instructions | Use a soft dry cloth; no solvents |
| Standby Power Consumption | < 1 W (typical) |
| Box Contents | Main unit, speakers, remote control, FM antenna, user manual |
Frequently Asked Questions - MCD360 Soundmaster
User questions about MCD360 Soundmaster
0 question about this device. Answer the ones you know or ask your own.
Ask a new question about this device
Download the instructions for your Hi-Fi System in PDF format for free! Find your manual MCD360 - Soundmaster and take your electronic device back in hand. On this page are published all the documents necessary for the use of your device. MCD360 by Soundmaster.
USER MANUAL MCD360 Soundmaster
natural_image
Three modern audio speakers with control knobs and a remote control unit, displayed side by side (no visible text or symbols on devices)DEUTSCH
ENGLISH
FRANÇAIS
NEDERLANDS
ESPAÑOL
PORTUGUÊS
The apparatus shall not be exposed to dripping or splashing and that no objects filled with liquids, such as vases, shall be placed on the apparatus
The MAINS plug shall remain readily operable;
The switch shall remain readily operable;
Excessive sound pressure from earphones and headphones can cause hearing loss.
I. SAFETY PRECAUTIONS
1. INSTRUCTIONS BEFORE USE:
1) Power source: It is applicable to AC source of 100V-240V and 50Hz/60Hz.
2) Temperature: The ideal surrounding temperature is over 5^ C. Difficult operation may occur under 0^ C. Keep away from heat source.
3) Protection: Protect the cable plug, cable cord and socket against stepping, extruding and dragging.
4) In case of no use for a long time In case that you do not use for a long time by a trip or other, never fail to pull out the power plug out of the receptacles.
5) Insertion of foreign substance will be prohibited It might cause fire or hindrance if any subjects such as coin, needle which may conduct electricity will be put into the unit. Particularly you have to pay attention to the children's mischief.
6) Water and moisture The unit should not be used near water---for example, near bathtub, washbowl, kitchen sink, in a wet basement, or near a swimming pool, and the like
7) Ventilation: Good ventilation is required. Never put DISC or any fabric over the machine. Distance from wall shall be no less than 10cm for good ventilation.
8) Cleaning Always use a soft, dry cloth to clean the unit, Do not use such liquid as benzene or thinners, or chemically-treated cloths. Also, do not spray aerosol type insecticides near the unit.
9) To prevent electric shocks Never open the top cover, rear panel and touch internal parts. Doing so can result in malfunction. When moving the unit, always unplug the power cord and disconnect all connection cords to prevent short-circuits or damaged wires. If an object or water should enter the unit, unplug the unit immediately and contact your store of purchase or qualified service personnel.
WARNING:
This equipment is the Class-I laser unit with low-power laser head inside. To prevent your eyes from any injury caused by laser, please never open the casing or repair the equipment by yourself without any authorization. The equipment must be repaired by the professional personnel.
Note: to lessen the danger of electric shock, do not remove the enclosure (or back) of the unit, for there is no parts to be repaired inside the unit. Please send this unit to the professional
personnel for repair.

[The symbol of electricity with arrow inside the triangle aims at reminding the user that there is the dangerous voltage without insulation inside this unit, which is sufficient to cause the danger of electric shock to people.]
[The exclamation mark inside the triangle aims at reminding the user that there is the important operation and maintenance manual accompanying with this unit.]
The apparatus shall not be exposed to dripping or splashing and that no objects filled with
liquids, such as vases, shall be places on the apparatus.
The power switch of this apparatus is not all pole power switch, so when it is on off position, the apparatus inside maybe still exist electric shock.
Warning: to lessen the danger of fire or electric shock, prevent this unit from wetness or dampness.
Note:
To avoid any electric shock, do not use the excessively long electric wire, socket or other power inserts for this plug (with polarity) without any authorization. Insert all pins completely to the end without any metal part exposed.
2. PREPARATION BEFORE PLAY.
1
2.1 Accessory: (check if the following accessories are complete after unwrapping the box).
1 X REMOTE CONTROL
1 X MANUAL
2.2 Install the battery of the remote controller.
Press down on the compartment cover, and slide to remove the cover. Place the one batteries (CR2025) batteries in the remote control according to the polarity markings ("+" and "-") inside the compartment. Place the cover over the compartment, press down lightly, and push it upward until it snaps on.

II. BRIEFS OF CONTROL KEYS.
1. IDENTIFICATION OF CONTROLS
Front view
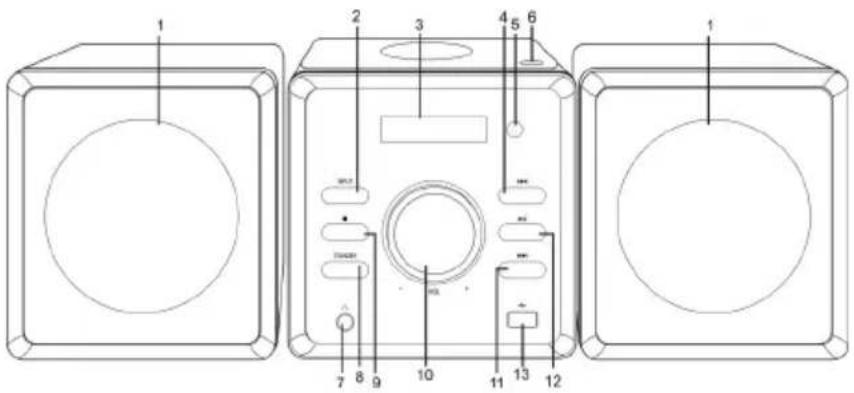
- Speaker
- INPUT button
- LCD display
- Previous track button
- Remote receiving window
- Open/Close button
-
Headphone socket
-
Standby button
- Stop button
- Volume -/+ control
- Next track button
- Play/Pause button
- USB socket
Rear view
- Speaker Connectors
- FM aerial terminal
- Main Lead
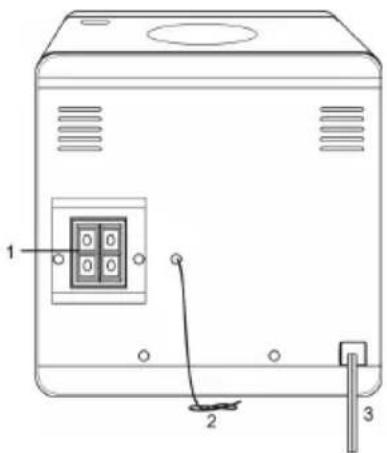
2. SYSTEM CONNECTION DIAGRAM

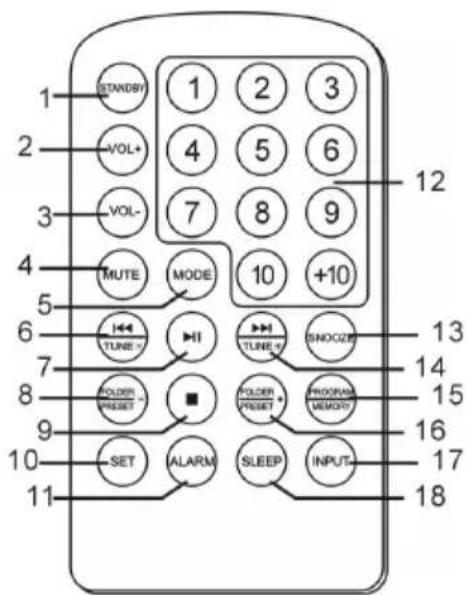
3. REMOTE CONTROL
- STANDBY BUTTON
- VOLUME + BUTTON
- VOLUME - BUTTON
- MUTE BUTTON
- MODE BUTTON
- PREVIOUS TRACK / TUNE - BUTTON
- PLAY/PAUSE BUTTON
- FOLDER - / PRESET - BUTTON
- STOP BUTTON
- SET BUTTON
- ALARM BUTTON
- NUMERICAL BUTTON
- SNOOZE BUTTON
- NEXT TRACK / TUNE + BUTTON
- PROGRAM / MEMORY BUTTON
- FOLDER + / PRESET + BUTTON
- INPUT BUTTON
- SLEEP BUTTON
III. BASIC OPERATION.
- POWER ON: Insert the plug into the wall socket and turn the socket on.
- STANDBY: Press the STANDBY button to resume the STANDBY and PLAY mode.
- SIGNAL SELECTION: Press "INPUT" button can be chose the CD / USB / RADIO format, each time press the button can be chose one format. (When the disc door open, the switch function will not be worked)
4. Adjusting the volume
To increase the volume:
1). Press the VOL control on the front panel, or press and hold the VOL+ button. On the remote control.
2). The LCD display will briefly show the selected setting.
To reduce the volume:
1). Press the VOL control on the front panel, or press and hold the VOL- button on the remote control.
2). The LCD display will briefly show the selected setting.
To mute the sound:
1). Press the MUTE button, the LCD displays 'Mute', press MUTE again to turn off, the LCD not displays Mute.
5. SETTING THE CLOCK:
The internal clock operates in 24-hour mode. Can set dual Alarm and Sleep function.
The clock may be set when the system is playing or when in standby mode.
Time Setting
1). Time and alarm setting
Press SET button to enter to the time setting, the setting order is: time setting, alarm 1 setting, alarm 2 setting, when there's "XX:XX" show on the display and flashes, you can adjust the time, press "◀◀" button can adjust the hour, press "▶◀" button can adjust the minute. (Alarm source setting: Enter the alarm setting press INPUT button than choose CD/USB/ FM/buzzer four alarm modes.)
Setting order as bellow:

flowchart
graph LR
    A["12:00 Time setting"] --> B["00:00 Alarm 1 setting"]
    B --> C["00:00 Alarm 2 setting"]
2). Alarm setting
Alarm can be set to alarm1 /alarm2/dual alarm/alarm off four modes, Press ALARM button on the remote control to switch to Alarm modes, the display would be showed the corresponding pattern ☺, there's no display when alarm off, when setting dual alarm, the early time will be worked. When the alarm rang, press SNOOZE or STANDBY button can be stop.
Setting the sleep function:
Setting the sleep time while playing, repeatedly press the SLEEP button on the remote control to cycle through the range:120>90>60>45>30>15 minutes, the LCD display then returns to the previously selected mode. It will go to the STANDBY mode in your setting time; press the SLEEP button can cancel the sleep function until there's no 'SLEEP' displayed.
6. USING THE FM RADIO
- Press "INPUT" Button to select FM. Frequency 87.5 to 108 MHz.
- Station search function (Pull out the antenna, the signal will be better received)
A. Whilst listening to a station press the buttons /TUNE- or /TUNE+ to tune up or down the current frequency in 0.05MHz steps, long press the above buttons can search the previous or next stations, the display will show the corresponding information, it won't stop until there's the station.
B. The channel of the tuner will switch automatically when the station is stereo and the signal is strong enough, it will play with stereo, the display will show ((ST)); otherwise it will play
with Mono, and the display will show nothing.
- Store and recall a preset station
FM 93.50 ^(ST) MHz
This unit has 20 presets for FM radio to facilitate the play of the station.
1) Preset stations
When playing the current station, press PROGRAM / MEMORY button, the number of the station flashing on the display. Press FOLDER-/PRESET- or FOLDER+/PRESET+ button can change the position of the current station, when the number stops flashing or press PROGRAM / MEMORY button, the station will store in the current position, there's the corresponding display on the LCD.
2) Scan function
In the current position, long press FOLDER-/PRESET- or FOLDER+/PRESET+ button, can scan the station forward or backward. It will stored when there's the radio signal, can save up to 20 stations, It will play from the first station when the preset full, there's the corresponding display on the LCD.
3) Play the preset station
When power on, press INPUT and to choose FM, long press FOLDER-/PRESET- or FOLDER+/PRESET+ button to scan the preset stations, after it, you can press the number keys to search the station, or press FOLDER-/PRESET- or FOLDER+/PRESET+ button search the preset station and play.
(NOTE: Power off, the preset stations will no longer be memorized)
Use of the number keys
Select each of the tracks you wish to play using the numeric buttons. If you require to programmer a track above 10, use the +10 button. Each press of this button will increase the selection by ten. For example:
To programmer track 12, press the 2 button and then press the +10 button once.
To programmer track 20, press the 10 button and then press the +10 button once.
7. USING THE CD/MP3, USB PLAYER ^5
WARNING! This product uses a class 1 laser. Avoid any direct exposure to the laser beam. Use of controls, adjustments or procedures not listed in this guide may result in hazardous exposure.

Handling Compact Discs
To remove a CD from its storage case, press down on the centre of the case and lift the disc out.
Hold the disc by the edges. Avoid touching the recorded side of the disc.
Compatible Compact Discs.
Only compact discs identified with the mark shown opposite can be used with your CD player.
For positions of the controls referred to in these instructions see the illustration on.



Removing CDs
- Press the ■button, the CD will stop playing. The LCD will display Stop and the number of tracks and play time of the CD.
- Wait until the CD stops spinning then press ▲ to open the CD drawer. Remove the disc then press ▲ to close the CD drawer.
This unit is the top loading CD player
- Put the disc: There's a ▲ mark on the unit cover, press it and the unit cover will automatically open up, put the disc in the CD drawer, and the middle hole align the drawer's central axis then press the disc down, so that the disc can fasten the mechanism, then close it, press INPUT button to choose CD item, the disc can be played, the LCD will show ▶' symbol and the format, position, played time of the current song.
$$ \boxed { \begin{array}{c} \text { CD MP3 } \ 0 0 1 - 0 1: 2 6 \end{array} } $$
- Take the disc: Press ■ button will stop playing, then open the unit cover, you can take the disc after the disc stopped, It won't play when the unit cover open.
CAUTION! Do not put anything other than a CD into the compartment.
Other objects may damage the CD mechanism. Do not force the lid to open further than the mechanism allows. Keep the lid closed when not in use to prevent dirt and dust from entering the mechanism. Never insert more than one CD at a time. If a CD is deeply scratched or too dirty, it may not play.

Play and Pause
Press INPUT button to choose CD mode, the system will search the disc, the format of the disc which can read will be shown on the LCD and then enter to the play mode, press ▶ button can pause playing. The LCD display shows the current track and the time played.
Press ▶ button again can resume playing.
Pause
- To stop a track temporarily, press the ▶ button on the remote control. The CD Disc(USB) will pause at the current play position. The LCD display shows the current track and the time played.
- To resume play, press the ▶ button on the remote control.
Skip forwards or backwards through tracks
- To select the next track, press the button. If you are on the last track of the CD Disc (USB), the player will return to track 1.
- To go back to the previous track press the k button. If you are on the track 1 of the CD, the player will go to the last track on the CD Disc (USB).
- To play a particular track press either on buttons until the track number required is shown on the LCD display.
- When the songs are stored in the multiple folders, press FOLDER-/PRESET- or FOLDER+/PRESET+ button can forward or backward switching between folders
Programmed track selection
You can set your CD Disc (USB) Player to play a preset selection of tracks.
- Press the ■ so the CD Disc (USB) is not playing then press the PROGRAM / MEMOR button. The LCD display will show 00-P-01 and PROG word. The first two digits 00 are where the selected track number is entered, P-00 is the program counter which will increment after a track is entered.
- Press either for buttons until the required track number is shown. The LCD displays the selected track and the program counter which has incremented to 001-P-01.
- Press the PROGRAM / MEMOR button again, the LCD will now display 000 P-01 and is ready for another track to be entered.
- Repeat steps 2 and 3 above until all the tracks are stored.
- To clear a program so the program counter is reset to 000-P-01 press the ■ button.
- To play the programmed tracks press the ▶button.
- When playing a program you can skip through the programmed selection using the lend buttons.
- After all the programmed tracks have been played, the CD Disc (USB) player stops automatically and your programmed selection is cleared.
Note: There can be up to a maximum of 20 tracks stored; the same track can be stored more than once.
Press ■ button can cancel the program playing, the word PROG on the LCD will disappear.
Use of the number keys
Select each of the tracks you wish to play using the numeric buttons. If you require to programmer a track above 10, use the +10 button. Each press of this button will increase the selection by ten. For example:
To programmer track 12, press the 2 button and then press the +10 button once.
To programmer track 24, press the 4 button and then press the +10 button twice.
Others function:
Press MODE button when playing, can switch the functions: Repeat one、Repeat folder、Repeat all、Random play、Intro play, press one can switch on function, there's the corresponding display on the LCD.

flowchart
graph TD
    A["CD MP3\n0 0 1—0 1:26\ne 1"] --> B["CD MP3\n0 0 1—0 1:26\nFOLDER e"]
    B --> C["CD MP3\n0 0 1—0 1:26\nALL"]
    D["CD MP3\n0 0 1—0 1:26\nINTRO"] <--_E["CD MP3\n0 0 1—0 1:26\nRANDOM"]
    E --> C
7
Repeat one: To repeat the current track during play mode.
Repeat folder: To repeat the tracks in the current folder.
Repeat all: To repeat all the tracks.
Random play: In this mode the CD player will play tracks in a random order.
Intro play: In this mode the CD player will play first 10 seconds of each track on the CD, then stop playing.
■ CARE AND MAINTENANCE
Cleaning CDs
Use a soft cloth to remove fingerprints and dust from the disc surface.
Wipe in a straight line from the centre to the outside of the disc.

- Never use chemicals such as record sprays, anti-static sprays, benzine or thinners to clean your CDs.
● To reduce the risk of scratches, always put CDs back in their cases after use. - Do not expose CDs to direct sunlight, high humidity or high temperatures for long periods.
- Do not stick paper or write on either side of the CD.
IV. TECHNICAL PARAMETERS
CD/ Radio System
Mains supply.... 100V-240V AC \~50/60Hz
FM Tuner frequency range.... 87.5 to 108MHz
CD Formats CD, CD-R, MP3
Front socket.... USB2.0
CD frequency response.... 20Hz to 20kHz
Amplifier frequency response.... 20Hz to 20kHz
Amplifier output power.... 2x2 W
Speaker impedance 6 ohms
Main unit size 192(W)×140(D)×142(H)mm
Note: we has a policy of continuous product development and reserves the right to change specification without prior notice

- SAFETY PRECAUTIONS
- INSTRUCTIONS BEFORE USE:
- WARNING:
- Note:
- PREPARATION BEFORE PLAY.
- BRIEFS OF CONTROL KEYS.
- IDENTIFICATION OF CONTROLS
- Rear view
- SYSTEM CONNECTION DIAGRAM
- REMOTE CONTROL
- BASIC OPERATION.
- Adjusting the volume
- SETTING THE CLOCK:
- Time Setting
- 1). Time and alarm setting
- 2). Alarm setting
- Setting the sleep function:
- USING THE FM RADIO
- USING THE CD/MP3, USB PLAYER 5
- Handling Compact Discs
- Removing CDs
- Play and Pause
- Pause
- Skip forwards or backwards through tracks
- Programmed track selection
- Use of the number keys
- Others function:
- ■ CARE AND MAINTENANCE
- Cleaning CDs
- TECHNICAL PARAMETERS
Brand : Soundmaster
Model : MCD360
Category : Hi-Fi System