
P-Touch 1700 - Label printer BROTHER - Free user manual and instructions
Find the device manual for free P-Touch 1700 BROTHER in PDF.


| Product Type | Label Printer |
| Brand | Brother |
| Model | P-Touch 1700 |
| Dimensions (W x D x H) | 6.85 x 7.87 x 2.36 in (174 x 200 x 50 mm) |
| Weight | 1.4 lb (0.65 kg) without batteries |
| Power Supply | 6 AA batteries (Alkaline recommended) or optional AC Adaptor AD-30 (7V, 1.2A) |
| Automatic Power Off | Yes, after 5 minutes of inactivity |
| Display | LCD, 7 x 5 dots, 1 line x 4 characters |
| Print Speed | 10 mm/sec |
| Compatible Tape Widths | 1/4" (6mm), 3/8" (9mm), 1/2" (12mm), 3/4" (18mm) - Brother TZ tapes only |
| Character Sizes | Standard, Double Width, Double Height, Double Width & Double Height, 4x Width & Double Height, BIG size (18mm tape only) |
| Print Styles | Normal, Italic, Outline, Bold, Shadow, Vertical, and combinations (e.g., Italic+Bold) |
| Underline / Frame | Yes, multiple box styles (Box 1-4) and underline |
| Mirror Printing | Yes, for transparent tape |
| Repeat Printing | Up to 9 copies |
| Numbering Function | Auto-increment numbers (1-9 range) |
| Tape Feed Settings | Automatic margins: 1/6" (4mm), 1/3" (8mm), 1/2" (12mm), 1" (24mm) or continuous without extra margins |
| Phrase Memory | 9 storage areas, total 300 characters (55 characters per area max) |
| Keyboard | 49 keys (39 character, 10 function) with SHIFT, CAPS, ALT, CODE keys |
| Internal Font | Helsinki |
| Cutter Type | Manual lever, replaceable cutter unit (approx. 2000 cuts lifetime) |
| Symbols | 57 additional symbols in 15 groups (accessed via CODE + SYMBOL) |
Frequently Asked Questions - P-Touch 1700 BROTHER
User questions about P-Touch 1700 BROTHER
0 question about this device. Answer the ones you know or ask your own.
Ask a new question about this device
Download the instructions for your Label printer in PDF format for free! Find your manual P-Touch 1700 - BROTHER and take your electronic device back in hand. On this page are published all the documents necessary for the use of your device. P-Touch 1700 by BROTHER.
USER MANUAL P-Touch 1700 BROTHER
natural_image
Line drawing of a portable electronic device with keypad and ports (no text or symbols)MODEL
PT-170 0
USER'S GUIDE
- Read this User's Guide before you start using your P-touch.
- Keep this User's Guide in a handy place for future reference.
INTRODUCTION
This machine will help you design and print labels for any application.
Extremely versatile, it can create characters of many sizes and styles. In addition, with the use of colorful tape cartridges, you can print labels with a variety of letter and background colors.
You no longer have to worry about rushing tasks that require professional-type printing. The quality and performance of this machine make it very versatile.
Although this machine is easy to use, we suggest that you read this manual carefully before starting. Please keep this manual in a handy place for future reference.
Good luck! We hope you enjoy making beautiful custom labels.
FCC NOTICE
This equipment has been tested and found to comply with the limits for a Class B digital device, pursuant to Part 15 of the FCC Rules. These limits are designed to provide reasonable protection against harmful interference in a residential installation. This equipment generates, uses, and can radiate radio frequency energy and, if not installed and used in accordance with the instructions, may cause harmful interference to radio communications. However, there is no guarantee that interference will not occur in a particular installation. If this equipment does cause harmful interference to radio or television reception, which can be determined by turning the equipment off and on, the user is encouraged to try to correct the interference by one or more of the following measures:
-Reorient or relocate the receiving antenna
-Increase the separation between the equipment and receiver.
-Connect the equipment into an outlet on a circuit different from that to which the receiver is connected.
-Consult the dealer or an experienced radio/television technician for help.
Patent numbers and patent publication numbers which are related to this product are as below:
USP4839742 USP4983058 USP5120147
USP4927278 USP5009530
USP4976558 USP5069557
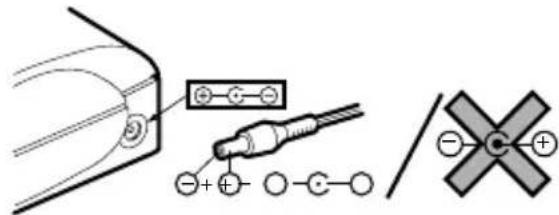
Use only the adaptor designed exclusively for this machine. See GENERAL PRECAUTIONS on page 5.
CONTENTS
CONTENTS 1
OVERVIEW 2
GENERAL PRECAUTIONS 5
BEFORE YOU START 6
INSERTING A TAPE CASSETTE....6
INSERTING BATTERIES 7
CHANGING THE CUTTER UNIT 8
STARTING....9
CREATING A MESSAGE.... 10
DISPLAY....10
MOVING THE CURSOR.... 10
CLEARING THE DISPLAY.... 11
KEY OPERATIONS 12
INPUT....13
SPACE KEY 14
SYMBOLS 15
EDITING A MESSAGE.... 18
DELETING 18
WORD OUT 20
OVER TYPING....21
INSERTING 22
SETTING THE FORMAT....24
SIZE 24
BIG SIZE FONT 27
STYLE 28
UNDERLINE/FRAME 30
PRINTING A LABEL 32
PRINTING.... 32
CUTTING 33
REPEAT PRINTING.... 34
NUMBERING 35
MIRROR PRINTING.... 38
TAPE FEED 39
PHRASE MEMORY OPERATION 42
PHRASE MEMORY 42
MEMORY SIZE 42
STORING THE MESSAGE.... 42
RECALLING FROM PHRASE MEMORY 44
DELETING THE PHRASE MEMORY 46
MESSAGE LIST 48
TROUBLESHOOTING 49
SPECIFICATIONS 50
ACCESSORIES....51
OVERVIEW
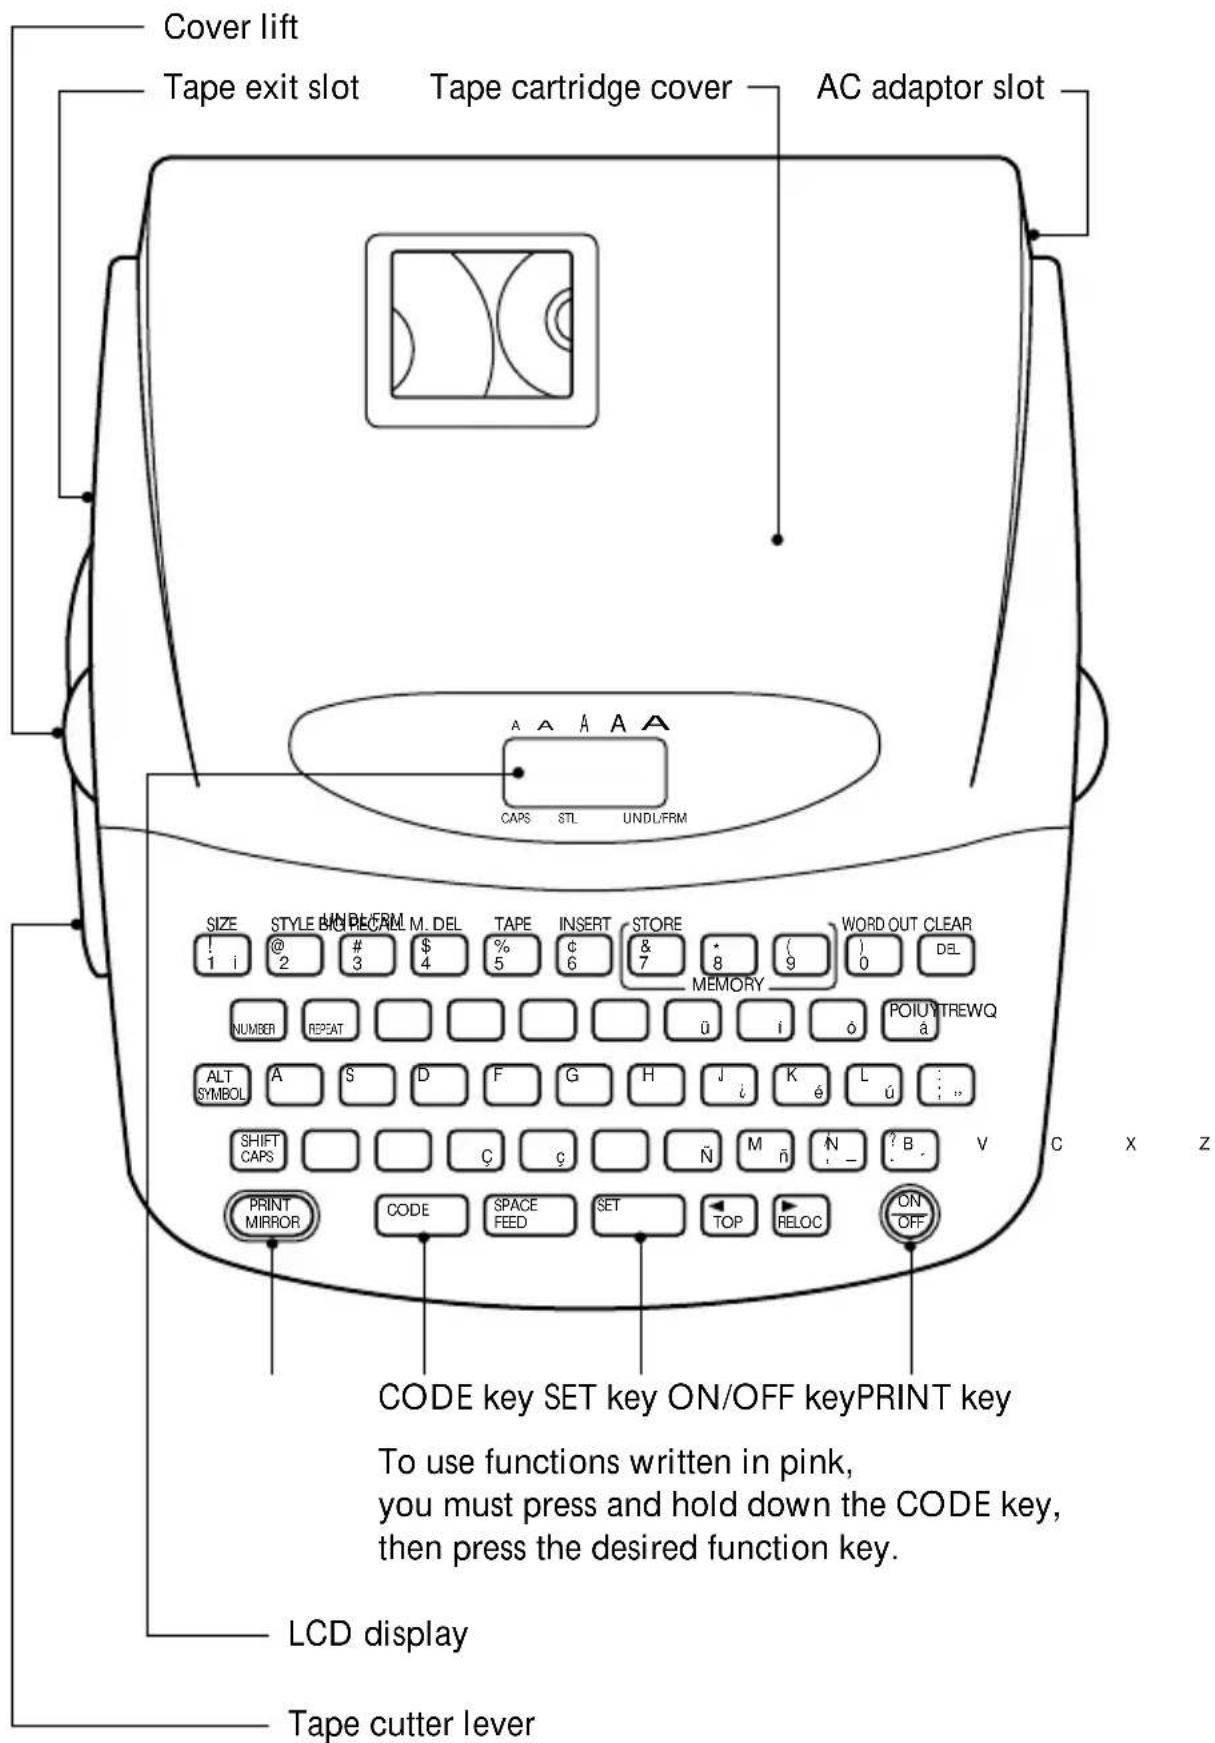
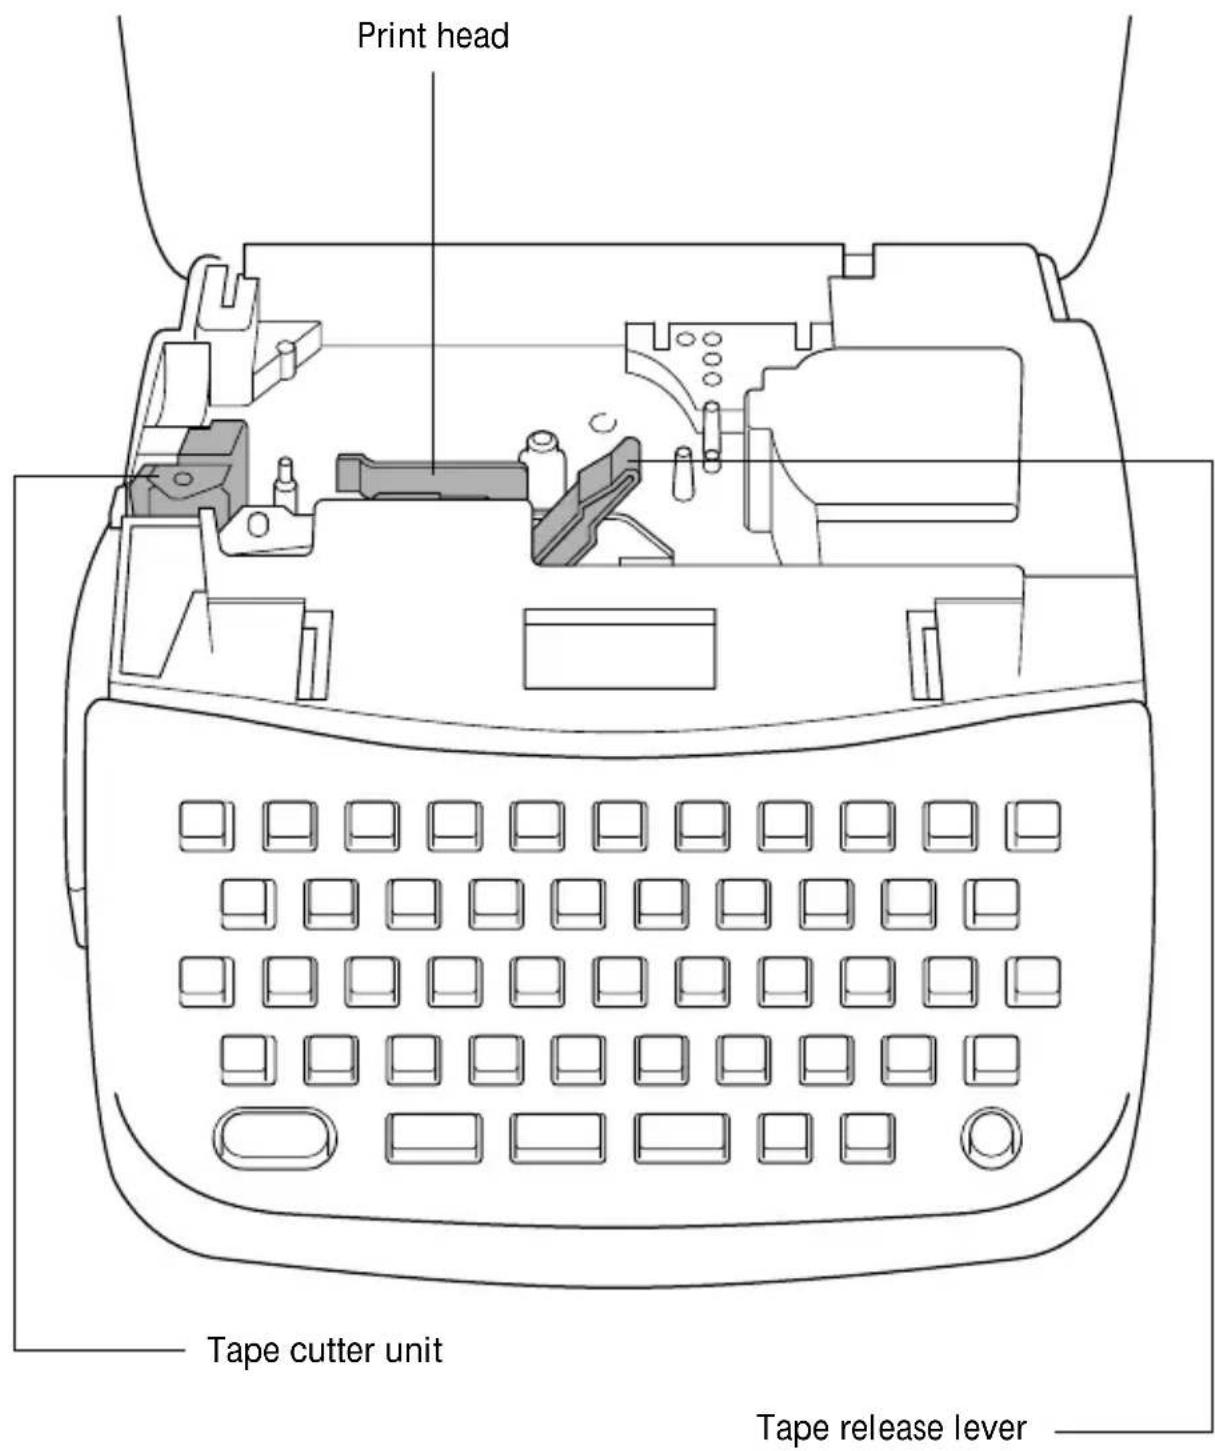
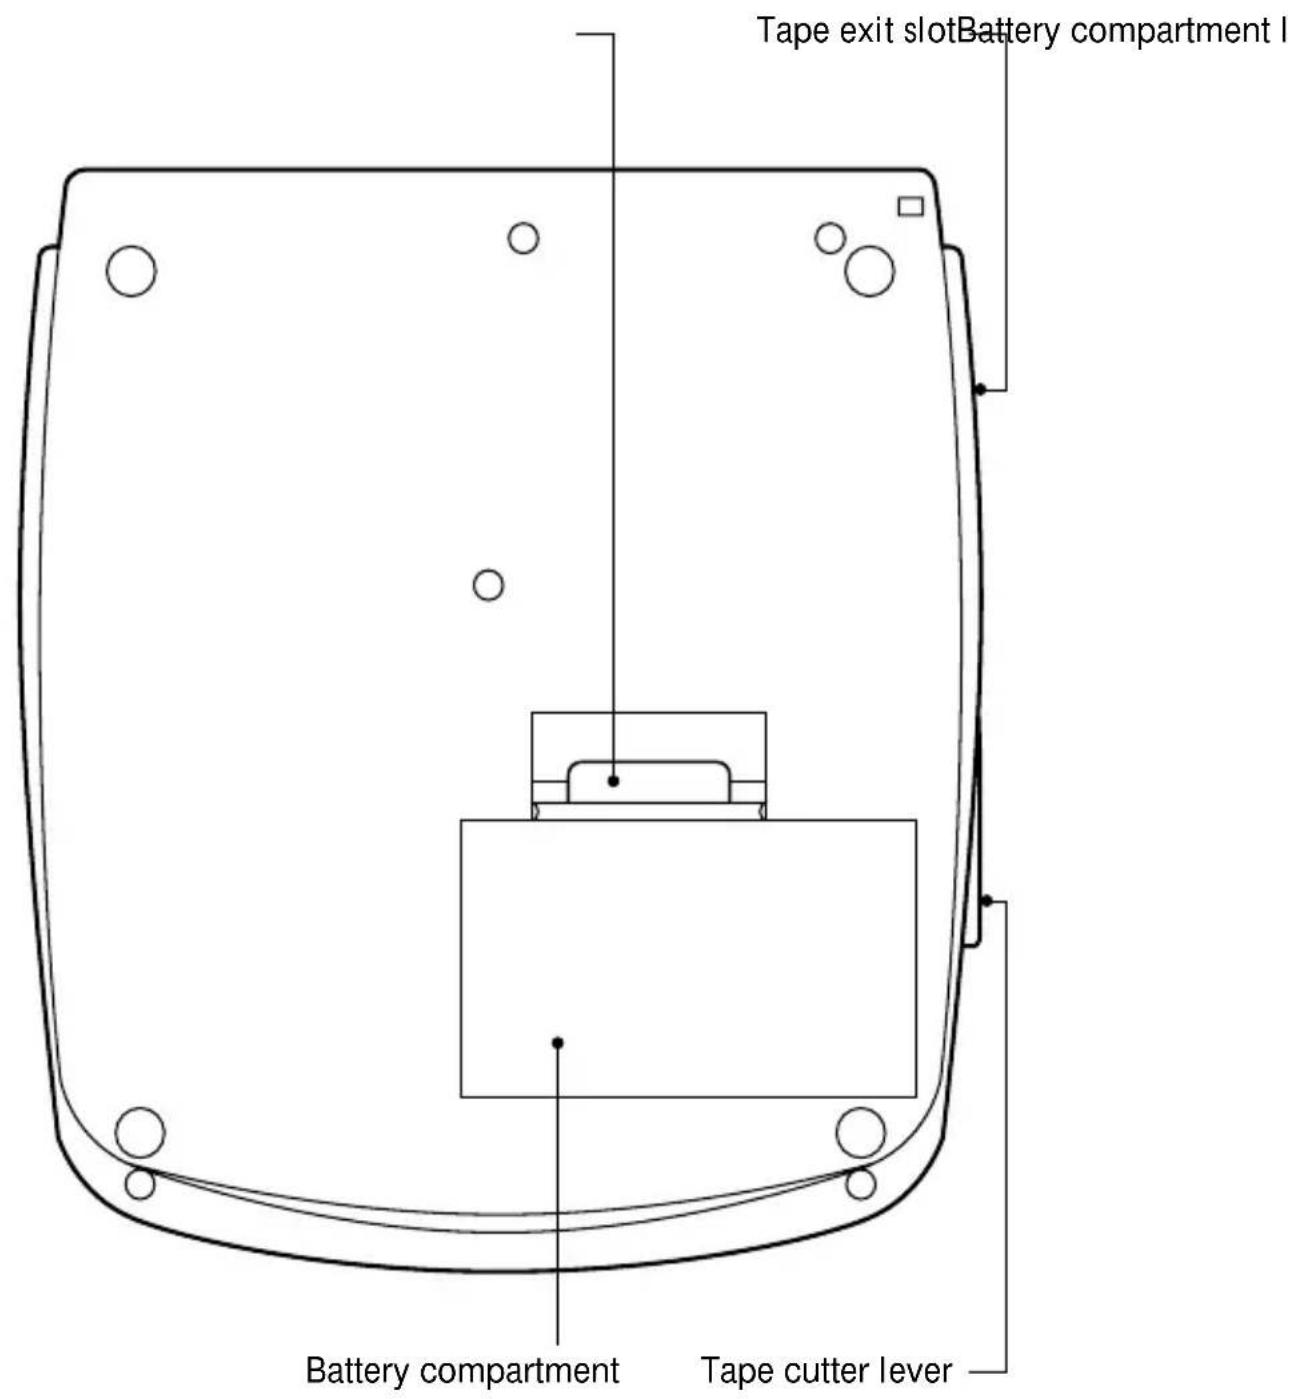
GENERAL PRECAUTIONS
- Use only Brother TZ tapes with this machine. Do not use tapes that do not have the mark.
- Four different tape widths are available: 1/4" (6mm), 3/8" (9mm), 1/2" (12mm) and 3/4" (18mm).
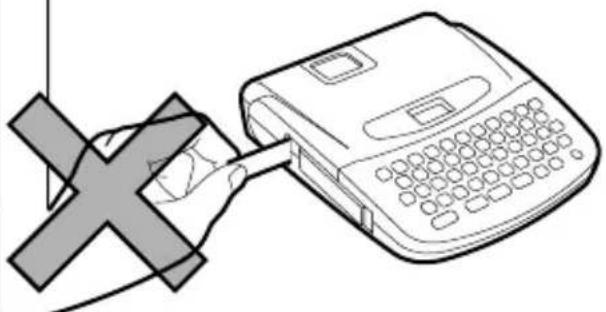
- Do not pull the tape. This may damage the tape cassettes.
- Do not clean the machine with alcohol or other organic solvents. Use only a soft, dry cloth.
- Remove the batteries and/or disconnect the AC Adaptor if you do not intend to use your machine for an extended period of time.
(Note: When power is disconnected, any messages in the working area or the Message Memory area will be lost.) - Do not put anything onto or into the machine.
- Do not expose the machine to high temperatures or high humidity. Never leave it on the dashboard or in the back of your car.
- Do not use the machine in dusty places. Keep it out of both direct sunlight and rain.
- Do not leave any rubber or vinyl on the machine for an extended period of time. Doing so may cause staining.
- After inserting a new tape cassette, advance the tape by holding down the CODE key and pressing the FEED key once.
- Do not touch the print head mechanism. If the head is touched, clean it immediately with a soft wipe (e.g.cotton swab) to avoid permanent damage.
- Use only the AC Adaptor, MODEL AD-30 designed exclusively for this machine. Use of any adaptor will void warranty.
BEFORE YOU START
INSERTING A TAPE CASSETTE
Brother TZ tapes are only available in the following widths for this machine: 1/4" (6mm), 3/8" (9mm), 1/2" (12mm) and 3/4" (18mm).
To insert a new tape cassette:
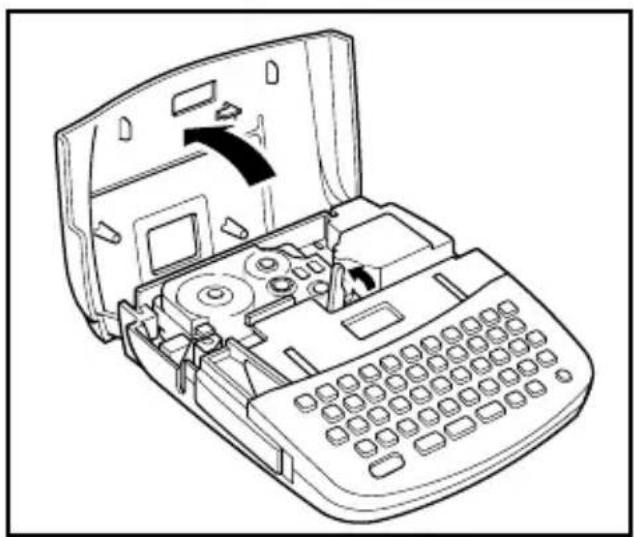
(1) Lift the cassette cover so that you can reach the tape cassette easily. This will also release the installed cassette.
(2) If there is a tape cassette already in the compartment, remove it by pulling it straight up.
(3) Remove the stopper from a new tape cassette and if the tape is loose, use your finger to wind it in the direction of the arrow on the tape cassette until it is taut. If you are using a previous tape, ensure the tape is taut prior to inserting it into the unit.
Note:
• Some tape cassettes are not provided with a stopper.
(4) Insert the tape cassette firmly into the compartment.
(5) Shut the compartment cover.
(6) Advance the tape by holding down the CODE key and pressing the FEED key once, then cut the tape.
Note:
- When inserting a tape cassette, make sure that the inner ribbon does not get caught on the corner of the metal securing stand.
- The white lever (release lever) automatically locks when the cover is closed. If the white lever is manually operated, the cover can not be closed.
natural_image
Line drawing of an open laptop with internal components and a black arrow indicating a directional flow (no text or symbols)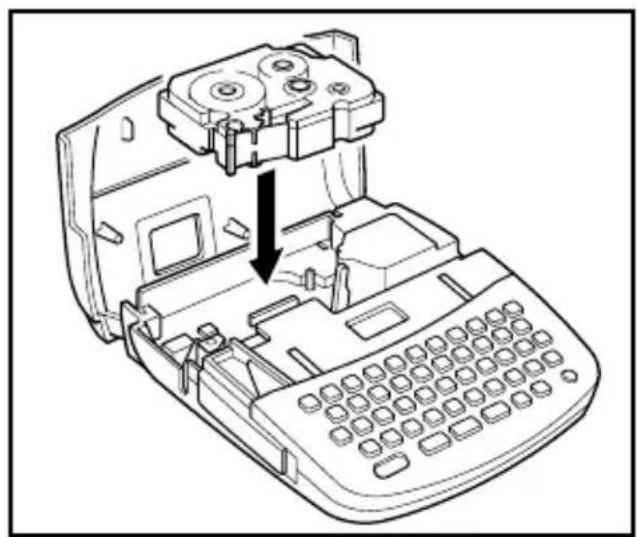
natural_image
Line drawing of a vintage typewriter with an open case and internal components, showing no text or symbols.INSERTING BATTERIES
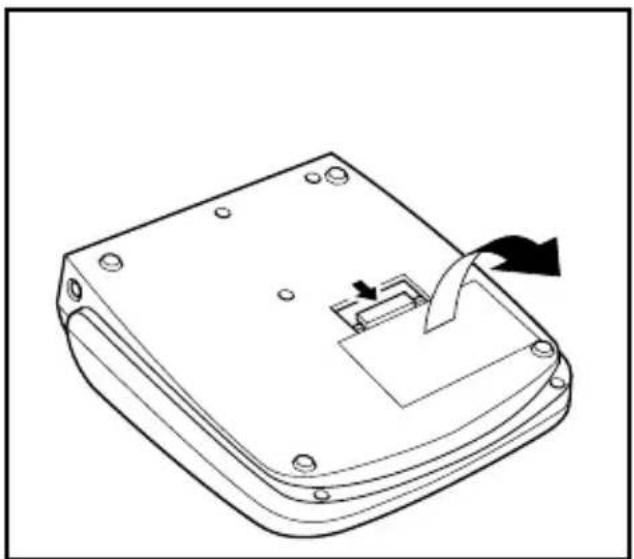
The machine uses six "AA" size (AM3, LR6, SUM-3, R6) batteries.
To insert batteries:
(1) Turn the machine over. Remove the battery compartment cover by pinching the latch and lifting.
(2) Follow the diagrams on the back of the compartment to insert the batteries in the proper direction.
(3) After inserting the batteries, re-fit the battery compartment cover.
When "BATT" (Batteries Weak) is displayed, replace the six batteries.
- Alkaline batteries are recommended.
- An optional AC Adaptor is available. (Model AD-30:7V, 1.2A)
natural_image
Technical line drawing of a mechanical device with a curved arrow indicating rotation or movement (no text or symbols)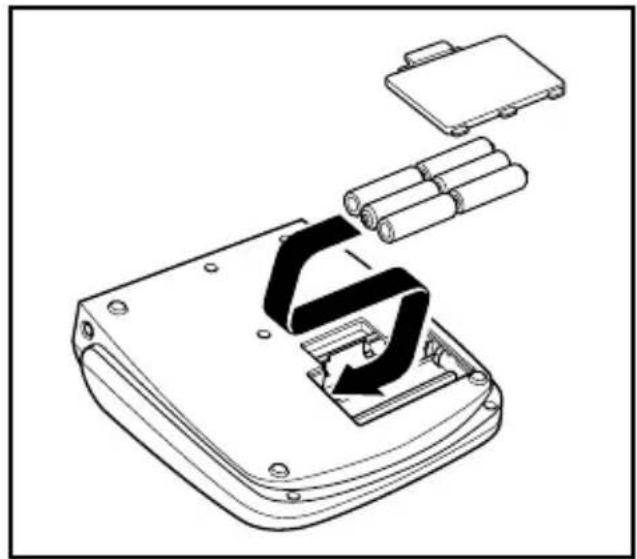
natural_image
Technical line drawing of a device with internal components and arrows indicating motion (no text or symbols)Note:
- When replacing batteries, do so in three minutes or less. Otherwise, unless an optional AC Adaptor is attached, any message in the working area or Phrase Memory will be lost.
- Note the following details when 1.2 V rechargeable NiCd batteries are used in this machine.
(1) "BATT" will not appear on the display when the rechargeable batteries are weak or empty. Instead, the power will turn off.
(2) Even after the batteries are recharged, the characters may not be printed clearly as a result of a low recharging efficiency or the operating conditions.
CHANGING THE CUTTER UNIT
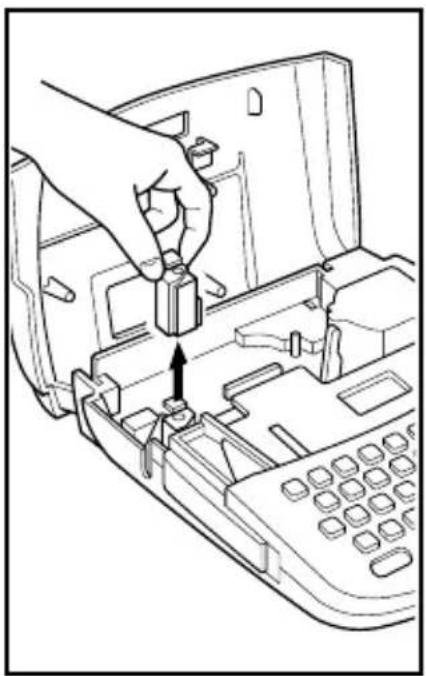
When the cutter is not cutting well, replace it with a new one.
To replace a cutter with a dull or broken blade:
(1) Open the tape cassette compartment cover and carefully remove the tape cassette if it is installed.
(2) Grasp the cutter with your fingers and pull it out.
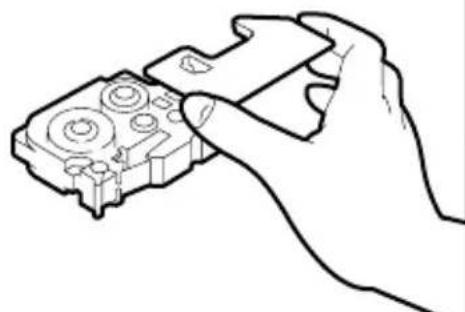
(3) Grasp the new cutter with the tab on the protective film and insert the cutter into the machine.
(4) Remove the cutter's protective film.
(5) Insert the tape cassette, then close the tape cassette compartment cover.
WARNING: Be very careful not to cut yourself when replacing the cutter.
Note:
The expected life of the unit's cutter is approximately 2000 cuts.
natural_image
Line drawing of a hand inserting a small component into an open device (no text or symbols visible)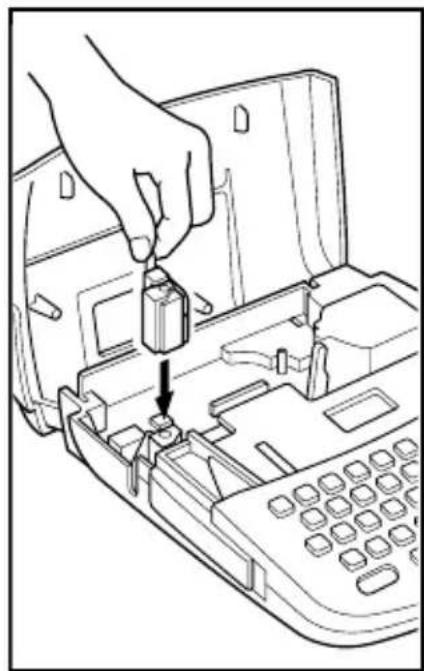
natural_image
Line drawing of a hand inserting a small component into a printer case (no text or symbols)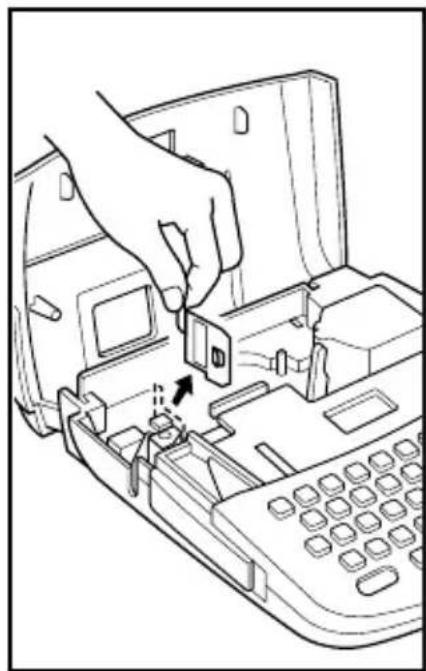
natural_image
Line drawing of a hand inserting a small electronic component into a computer keyboard (no text or symbols)
CAUTION
- When changing the cutter unit, be sure not to touch the cutter blade.
- Make sure that small children do not try to put the cutter unit in their mouths.
STARTING
To start the machine:
Press the ON/OFF key.
The machine's internal memory retains the last message created, and displays it when you turn on the machine. This feature allows you to stop work on a message, turn off the machine, and return to it later without having to re-enter the message.
The machine has an automatic power down feature. If the machine is on, but is not used for five minutes, it will automatically shut off. The message will be retained in memory until the machine is turned on again.
CREATING A MESSAGE
DISPLAY
You are now ready to create a message on the machine.
The machine's LCD display is four characters wide. Actually though, you can create messages up to 55 characters in length. The four-character display is like a window which moves across your message.

MOVING THE CURSOR
You can review and edit different parts of your message by moving the cursor backward and forward.
To move the cursor through your message:
Press the ◀ and keys to move the cursor one space at a time.
Note:
- Hold down the CODE key and press the TOP key to return the cursor to the beginning of the message.
- Hold down the CODE key and press the RELOC key to advance the cursor to the end of a message.
©
KEY OPERATIONS
CODE KEY
By holding down the CODE key and pushing the appropriate key, you can use the functions written in pink characters.
SHIFT KEY
By using the SHIFT key you can type capital letters, and symbols located on the upper part of keys. To type a capital “A”, hold the SHIFT key down and push the “A” key. To type a “percent” sign “%” (located above the “5”), hold the SHIFT key down and push the “5” key.
CAPS KEY
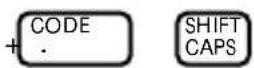
By holding down the CODE key and pressing the CAPS key, you set the machine into CAPS mode. When this mode is entered, the CAPS indicator on the display turns on. In CAPS mode, capital letters can be typed simply by pressing the character keys. If number keys are pressed, numbers -- not the symbols above them -- result. For this reason, CAPS mode is particularly useful for creating messages containing many numerals and capital letters. To exit CAPS mode, hold down the CODE key and press the CAPS key.
ALT KEY
By using the ALT key you can type various symbols marked on the keys in green. To type a symbol located on the right side of a key, hold down the ALT key and press the key on which the desired symbol is marked.
INPUT
You can now use the keys to enter a message.
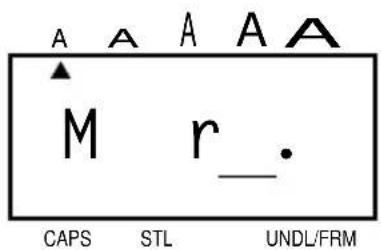
Example To input "Mr.":
- Press + SHIFT. to input a capital M.
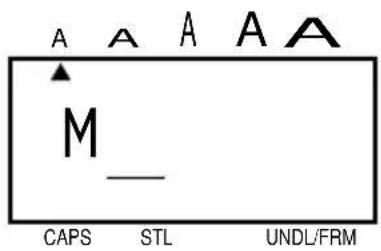
- Complete "Mr." by pressing then . ? /
SPACE KEY
As on a typewriter, this machine's SPACE key lets you add a blank space into your message.
Note:
The SPACE key and the ▶key have different functions. The key moves the cursor forward without adding blank spaces.
Example To complete the message "Mr. J Smith":
Enter the initial "J":
- Press + SHIFT. a to input a capital J.
- Add a blank space by pressing ONCED SPACE
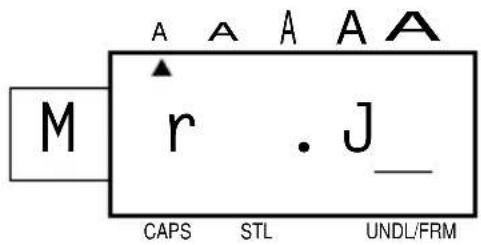
- Complete the message by entering "Smith".
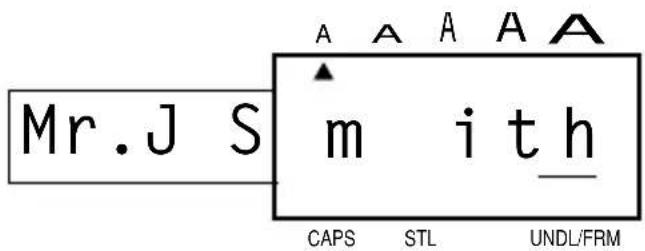
- If you make any mistakes during this input do not worry.
Simply press DEL to remove the last character, and input correctly.
SYMBOLS
In addition to the letters, symbols, and numerals on the key tops, there are 57 symbols available in Symbol Mode. These 57 additional symbols are arranged into 15 groups, corresponding to the numbers A to O on the keyboard.
| Group No. | SYMBOLS Group No. | SYMBOLS | |
| A | Ü AE æ § | I | |
| B+ | | =J | ||
| C | • | | | | K | |
| D | [ ] | L | |
| E° | 12 2 3 | M | |
| F | a o ♥ ★ | N | |
| G | 2 3 4 | O | |
| H |
To input a symbol that is not on the key top:
(1) Hold down the CODE key and press the SYMBOL key to enter Symbol Mode.
(2) The display will read: "A-O?".
(3) Press the key of the number from A to O whose group contains the symbol you want. That letter's group of symbols will be displayed.
(4) Move the cursor to the symbol you want.
(5) Press the SET key.
Note:
- Press the DEL key to exit Symbol Mode.
Example First, make sure that the cursor is located at the place where you want to add a symbol. To add a telephone symbol (to the message, changing the message to "Mr. J Smith
- Enter Symbol Mode by pressing + CODE ALT . SYMBOL
- The following message will be displayed:
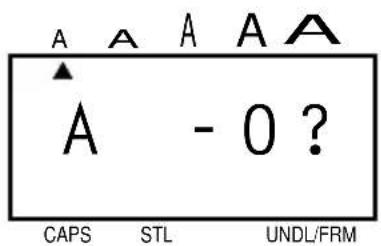
- Press the G key, as its group includes the telephone symbol.
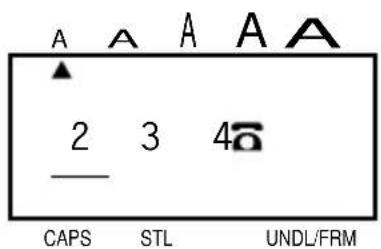
- The cursor is displayed highlighting the .
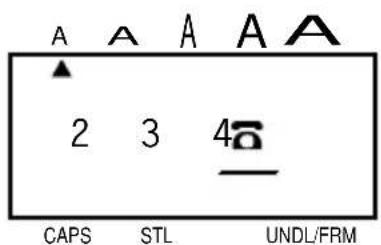

The message should now look like this:
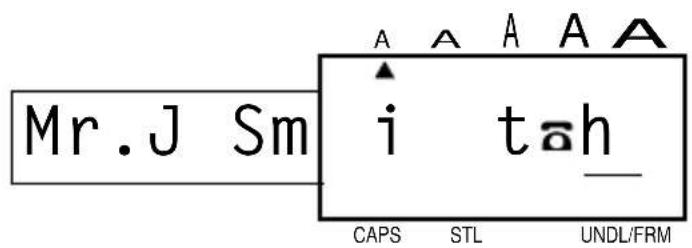
After a non-keyboard symbol has been entered, the machine automatically exits from Symbol Mode. If you wish to enter another symbol, you must re-enter Symbol Mode by holding down the CODE key and pressing the SYMBOL key.
EDITING A MESSAGE
DELETING
The DELETE key allows you to remove characters from your message.
To delete a character:
(1) Using the and keys, position the cursor one space to the right of the character you want to delete.
(2) Press the DELETE key.
Example To delete the from the message:
- Make sure the cursor is positioned to the right of the telephone symbol.
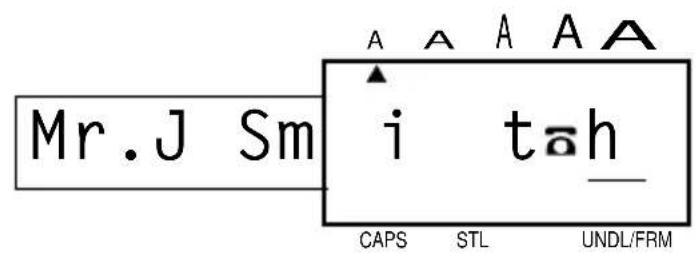
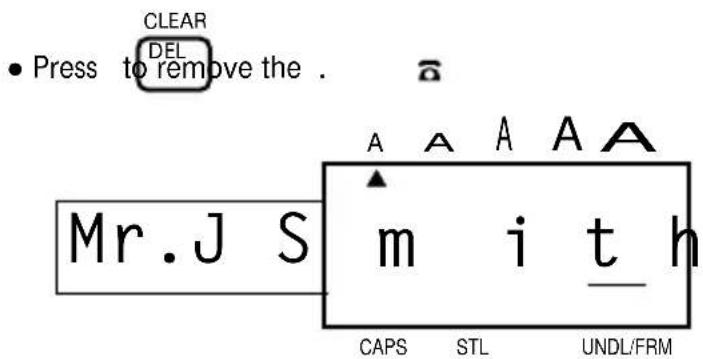
Now we will delete the blank space between the "J" and "S":
- Press under the cursor is positioned to the right of the blank space (under the "S").
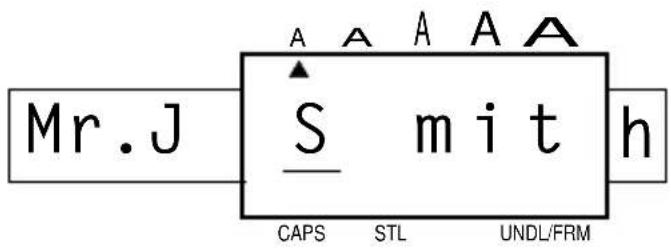
- Press to remove the blank space.
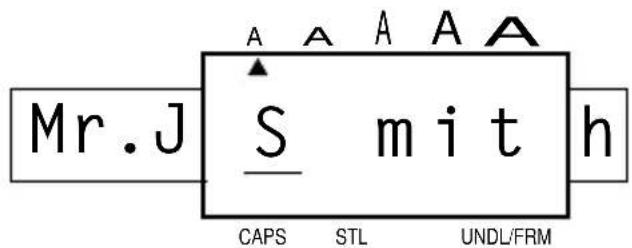
- Press to adjust the display in order to check that the blank space has been deleted.
WORD OUT
This function allows you to erase one word at a time, simplifying the editing of long messages.
To use the WORD OUT function:
(1) Position the cursor to the right of the word you want to delete.
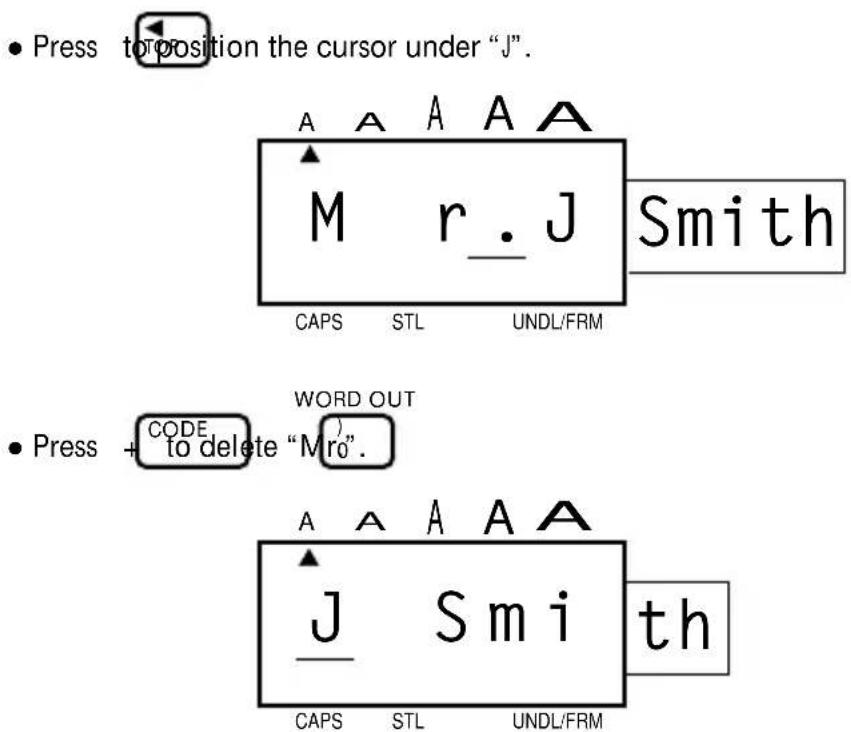
(2) Hold down the CODE key and press the WORD OUT key.
A number or word located before the cursor and after the nearest preceding space will be deleted.
Example To delete the word "Mr." from the message:
OVER TYPING
The machine normally operates in Overtype Mode. In Overtype Mode, you can change a character simply by typing a new one in its place.
To type over a character:
(1) Move the cursor to the character you want to change.
(2) Press the character or symbol you want.
The new character replaces the old one in the message.
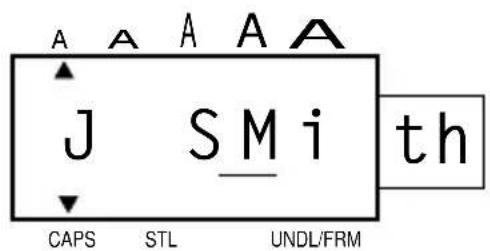
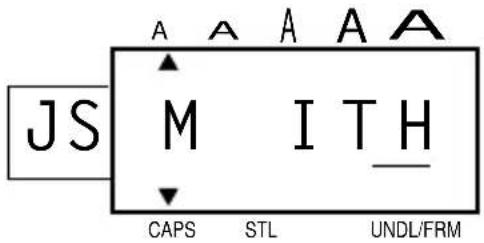
Example To replace the lower-case letters "mith" with capital letters:
- Position the cursor under the "m".
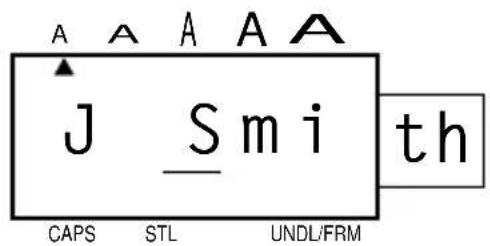
- Switch to CAPS Mode by pressing The CAPS indicator will light.
- Press the M key.
- Complete the process by typing the letters "ITH".
INSERTING
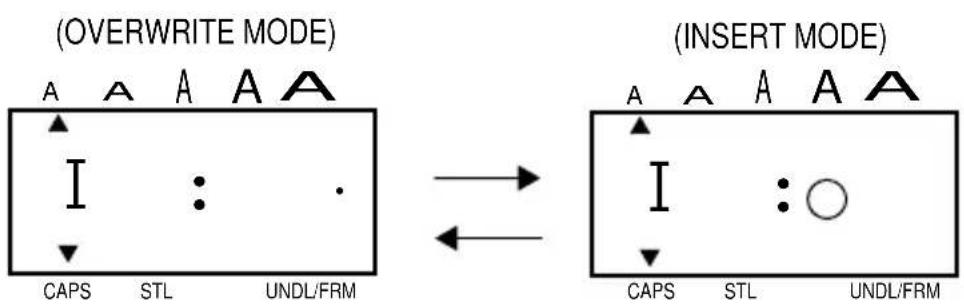
Sometimes you may want to insert a character into the middle of your message. To do so, you must change from Overtype Mode to Insert Mode.
To insert characters:
(1) Hold down the CODE key and press the INSERT key until display shows "I: ○"
(2) Move the cursor to the position where you want to insert.
(3) Press the keyboard character or symbol you want to add (see SYMBOLS).
All characters following the insertion will move one space to the right.
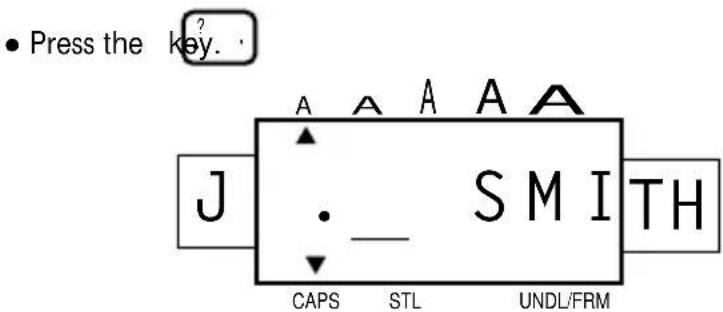
Example To insert a period into the message, changing it to "J. SMITH":
- Position the cursor under the "S".
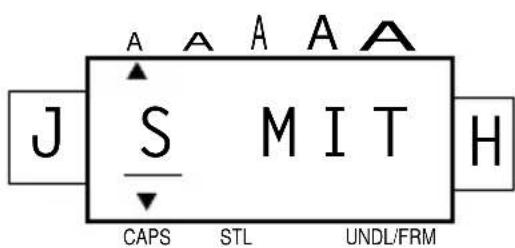
- Enter Insert Mode by pressing + CODE . \$ 6
• The following display appears.
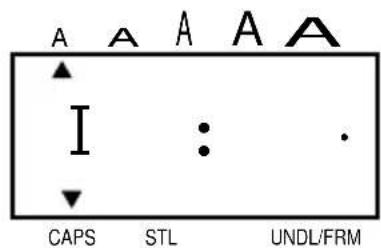
- Pressing the key while holding down the key toggles INSERT CODE between insert and overwrite mode.
flowchart
graph LR
    subgraph (OVERWRITE MODE)
        A1["A"] --> I["I"]
        A2["A"] --> I
        A3["A"] --> I
        A4["A"] --> I
        A5["A"] --> I
        A6["A"] --> I
        A7["A"] --> I
        A8["A"] --> I
        A9["A"] --> I
        A10["A"] --> I
        A11["A"] --> I
        A12["A"] --> I
        A13["A"] --> I
        A14["A"] --> I
        A15["A"] --> I
        A16["A"] --> I
        A17["A"] --> I
        A18["A"] --> I
        A19["A"] --> I
        A20["A"] --> I
        A21["A"] --> I
        A22["A"] --> I
        A23["A"] --> I
        A24["A"] --> I
        A25["A"] --> I
        A26["A"] --> I
        A27["A"] --> I
        A28["A"] --> I
        A29["A"] --> I
        A30["A"] --> I
        A31["A"] --> I
        A32["A"] --> I
        A33["A"] --> I
        A34["A"] --> I
        A35["A"] --> I
        A36["A"] --> I
        A37["A"] --> I
        A38["A"] --> I
        A39["A"] --> I
        A40["A"] --> I
        A41["A"] --> I
        A42["A"] --> I
        A43["A"] --> I
        A44["A"] --> I
        A45["A"] --> I
        A46["A"] --> I
        A47["A"] --> I
        A48["A"] --> I
        A49["A"] --> I
        A50["A"] --> I
        A51["A"] --> I
        A52["A"] --> I
        A53["A"] --> I
        A54["A"] --> I
        A55["A"] --> I
        A56["A"] --> I
        A57["A"] --> I
        A58["A"] --> I
        A59["A"] --> I
        A60["A"] --> I
    end

    subgraph INSERT MODE
        C1["CAPS"] --> C2["STL"]
        C3["STL"] --> C4["UNDL/FRM"]
    end

    style (OVERWRITE MODE) fill:#f9f,stroke:#333
    style (INSERT MODE) fill:#bbf,stroke:#333
- Release the key when the display shows "I:".
To leave INSERT Mode:
Holding down the CODE key press the INSERT key again.
SETTING THE FORMAT
You can print your completed message using a variety of different character sizes, styles, fonts, underline/frames and tape feed settings.
Choose character size, style, underline/box and tape feed before printing the label.
Note:
The type of character you choose will be used for all the characters in your message. It is not possible to have two different character sizes or styles within one message.
SIZE
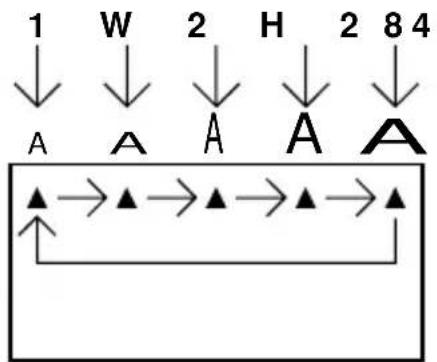
There are five different character sizes you can select for your label:
1 - Standard Size
J.SMITH
W2 - Double Width
J.SMITH
H2 - Double Height
J.SMITH
4 - Double Width & Double Height
J.SMITH
8 - 4 x Width & Double Height
J.SMITH
To choose a character size:
(1) Holding down the CODE key, press the SIZE key to change the character size. The size indicator on the display advances in the order shown.
flowchart
graph TD
    A["1"] --> B["A"]
    C["W"] --> D["A"]
    E["2"] --> F["A"]
    G["H"] --> H["A"]
    I["2"] --> J["A"]
    K["8"] --> L["A"]
    M["4"] --> N["▲"]
    O["▲"] --> P["▲"]
    Q["▲"] --> R["▲"]
    S["▲"] --> T["▲"]
CAPS STL UNDL/FRM
(2) Stop pressing the SIZE key when your desired character size is indicated.
Example To use Double Width and Double Height (4) characters:
- Hold down CODE and press until the 1size indicator is aligned with the A.
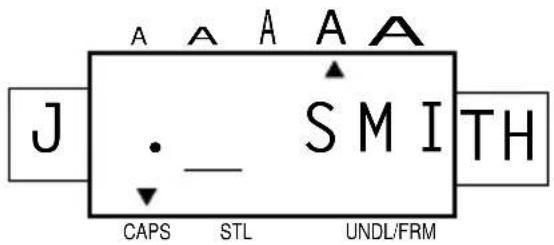
Note: When the BIG font is selected, the size is fixed to the BIG size whatever the SIZE setting.
Note:
The size of the characters that can be printed are limited by the width of the tape.
| Tape width Possible character sizes | |
| 3/4”(18mm) 1, | W2, H2, 4, 8, BIG |
| 3/4”(12mm) 1, | W2, H2, 4, 8 |
| 3/8”(9mm) 1, | W2, H2, 4, 8 |
| 1/4”(6mm) 1, | W2 |
If a character size is set which is not shown in the above table for the tape width being used and the PRINT key is pressed, an error message will be displayed and the label can not be printed.
BIG SIZE FONT
This machine has a BIG size font in addition to the normal font. The normal size font can be set at the standard size, W2 (double width), H2 (double height), 4 (double width & double height) and 8 (4 · width & double height). If the BIG size font is chosen, all other settings are cancelled.
J.SMITH
To choose the BIG size font:
(1) Holding down the CODE key, press the BIG key. The display shows "NORM" or "BIG", whichever is the currently selected font size.
(2) Pressing the BIG key while holding down the CODE key toggles the displays.
(3) Release the CODE key when a desirable font size is selected on the display. It will change as follows:
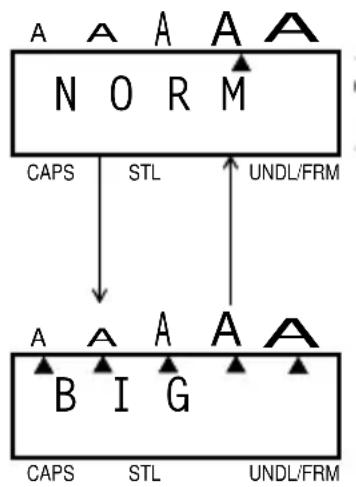
flowchart
graph TD
    A["A"] --> CAPS["CAPS"]
    B["A"] --> CAPS
    C["A"] --> CAPS
    D["A"] --> CAPS
    E["A"] --> CAPS
    F["A"] --> CAPS
    G["A"] --> CAPS
    H["A"] --> CAPS
    I["B"] --> CAPS
    J["I"] --> CAPS
    K["G"] --> CAPS
    L["M"] --> CAPS
    M["UNDL/FRM"] --> CAPS
    N["NORM"] --> CAPS
    O["STL"] --> CAPS
    P["UNDL/FRM"] --> CAPS
Note:
- When the BIG size font is selected, all lower case characters are printed in upper case, and the settings for SIZE, STYLE and UNDL/BOX are ignored.
- The BIG size font can only be set when tape with a 3/4" (18 mm) width is used.
STYLE
There are also nine different print styles:
Normal (NORM) Italic (ITAL)
J.SMITH
J.SMITH
Outline (OUTL) Italic + Outline (IT+O)
J.SMITH
J.SMITH
Bold (BOLD) Italic + Bold (IT+B)
J.SMITH
J.SMITH
Shadow (SHAD) Italic + Shadow (IT+S)
J.SMITH
J.SMITH
Vertical (VERT)
つ・のΣートエ
To choose a print style for your label:
(1) Holding down the CODE key, press the STYLE key once. The display will show the current print style.
(2) Still holding down the CODE key, press the STYLE key again. The available print styles will appear in order as you press the STYLE key.
(3) When the style you want is displayed, release the CODE key.
If you select a style other than Normal, the style indicator will be visible on the display.
Note:
- Only Normal style characters can be printed vertically.
- Vertical printing can not be used with some tape width and character size combinations.
Example To use Outline print:
- Hold down . CODE
- Press until the display reads "OUTL".
The style indicator turns on.
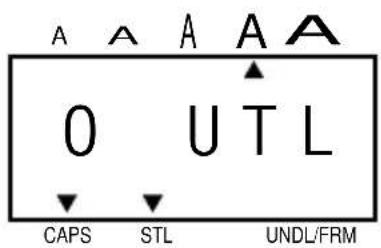
- Release
CODE
UNDERLINE/FRAME
You can add an underline or frame text when you wish to emphasize it.
To add Underline or Box around the text.
UNDL/FRM
(1) Holding down the CODE key, press UNDERLINE/FRAME () key.
(2) The current style will be shown on the display.
(3) Still holding down the CODE key, press UNDERLINE/FRAME key to change the style.
It will change as follows:
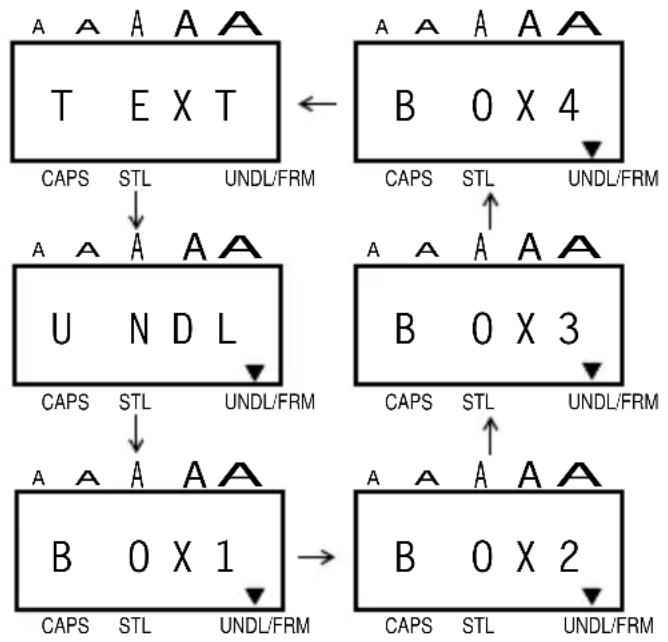
flowchart
graph TD
    A["T"] -->|CAPS| B["EXT"]
    B -->|STL| C["UNDL/FRM"]
    C --> D["A A A A A"]
    D --> E["U N D L"]
    E --> F["CAPS"]
    F --> G["STL"]
    G --> H["UNDL/FRM"]
    H --> I["A A A A A"]
    I --> J["B O X 1"]
    J --> K["CAPS"]
    K --> L["STL"]
    L --> M["UNDL/FRM"]
    M --> N["B O X 2"]
    N --> O["CAPS"]
    O --> P["STL"]
    P --> Q["UNDL/FRM"]
    Q --> R["A A A A A"]
    R --> S["B O X 3"]
    S --> T["CAPS"]
    T --> U["STL"]
    U --> V["UNDL/FRM"]
    V --> W["A A A A A"]
    W --> X["B O X 2"]
Note:
• Underline & Box are not available simultaneously.
- The underline or box will not be printed when the Vertical is used.
- Printing of the underline or frame are limited by the tape width and character size setting.
| Tape width Possible character sizes | |
| 3/4” (18 mm) 1, | W2, H2, 4, 8, BIG |
| 1/2” (12 mm) 1, | W2, H2, 4, 8 |
| 3/8” (9 mm) 1, | W2, H2, 4, 8 |
| 1/4” (6 mm) | X, W2 |
A triangle indicator on the display appears whether Underline or Frame is set on.
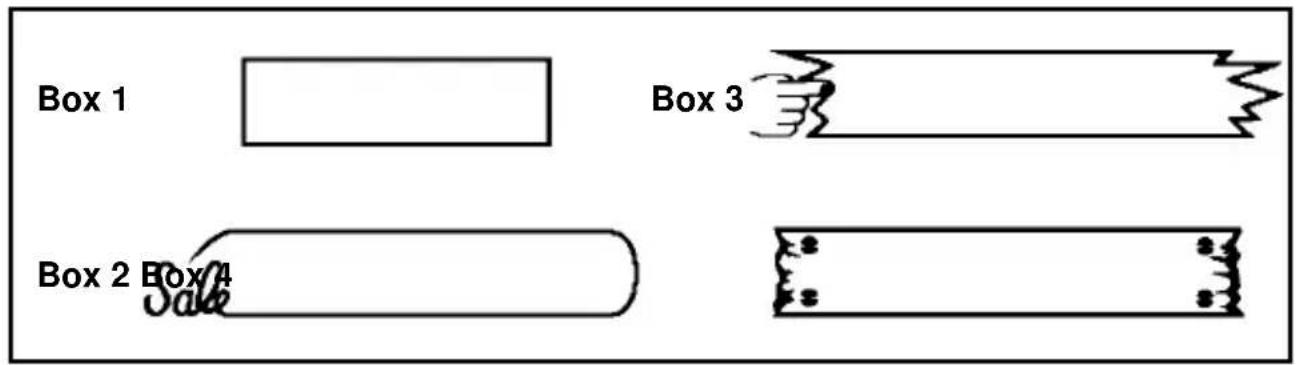
PRINTING A LABEL
PRINTING
After you have chosen the character size, print style and tape feed style, you are ready to print the label.
To print a label:
Press the PRINT key.
The printed label comes out of the tape exit slot on the side of the machine.
Press the CODE + FEED key before cutting the tape if TAPE FEED mode is set to “_”, “#”, “##” or “###”.
Example To print the message onto a label:
- Press
A label reading "J. SMITH" written in Double Width & Double Height Outline characters will be printed.
J.SMITH
Note:
- Do not pull on the tape. This may damage the tape cassette.
- Do not attempt to cut the tape during printing or feeding.
CUTTING
To cut the tape:
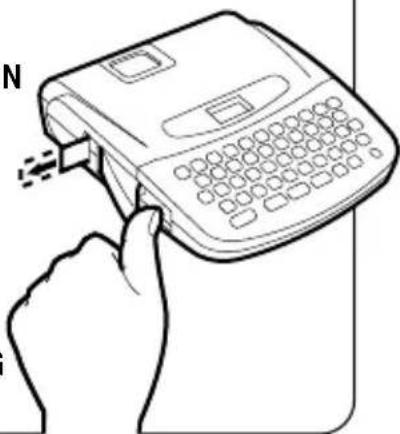
Pull out the tape cutter lever on the side of the machine.
Example To cut the label:
- Pull out the tape cutter lever.
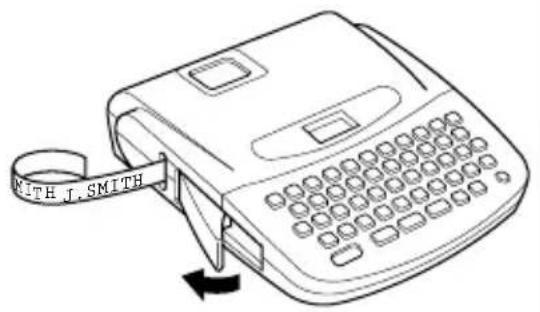
Note: If you pull out the tape cutter lever too far, it may break.
To attach the label:
Remove the label backing and attach the label at the desired position.
REPEAT PRINTING
The Repeat function allows you to repeatedly print the same label up to nine times.
To use the REPEAT PRINTING function:
It is recommended to set the TAPE FEED mode to “#”, “##” or “###”. (Please refer to page 39.)
(1) Hold down the CODE key and press the REPEAT ( ) key.
(2) The following message appears on the display:
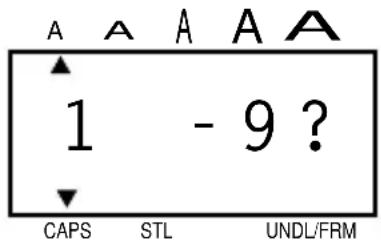
(3) Select the number of labels you want. For example, if you want nine labels to be printed, type 9.
(4) Press print.
Press the CODE + FEED keys before cutting the tape if the TAPE FEED mode is set to “-”, “#”, “##” or “###”.
Note:
CLEAR

before printing; the previous screen reappears.
• A maximum of nine copies can be printed.
• Cutting is not done automatically.
- Before starting a repeat print, check that there is sufficient tape in the cartridge.
- Never try to cut the tape during printing.
- Press the ON/OFF key immediately if the tape runs out before all the printing is finished. (striped tape will appear.)
NUMBERING
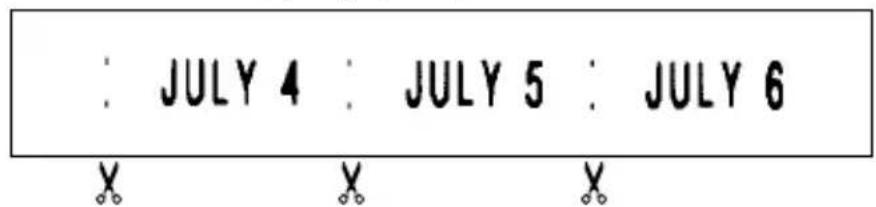
The NUMBERING function can be used to automatically increment numbers included in otherwise identical texts. For example, when printing text with a series of dates (“JULY 4, 1962”; “JULY 5, 1962”; and “JULY 6, 1962”), the auto count function will enable printing of all three texts in a single print operation.
To use the AUTO COUNT function when printing:
It is recommend to set the TAPE FEED mode to “#”, “##” or “###”. (Please refer to page 39.)
(1) Type in message to be printed.
(2) Position the cursor beneath the number in the text to be incremented. Then
hold down the CODE key and press the NUMBER KEY. The display changes as follows:
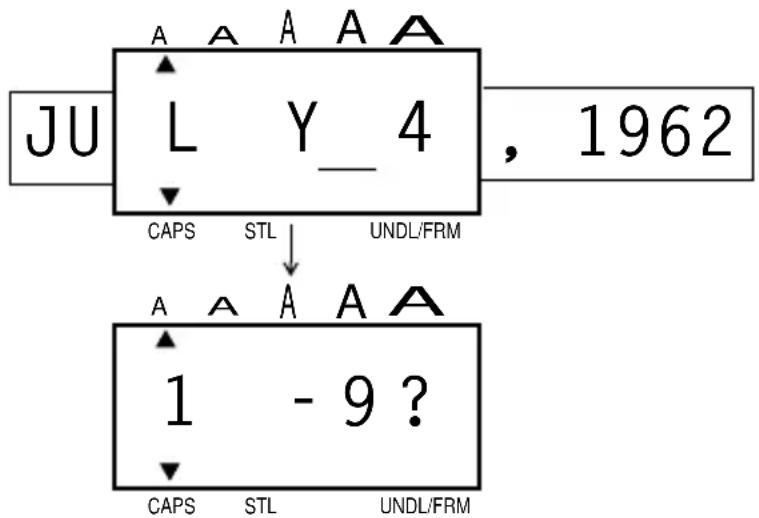
(3) The screen will prompt the selection of the last number to be printed. (In the example described above, the last number would be 6.)
(4) Press PRINT and the text will be printed out. Printing will be repeated, with the number specified incremented to the next number. This operation will continue until the last number is reached.
Press the CODE + FEED keys before cutting the tape if the TAPE FEED mode is set to “-”, “#”, “##” or “###”.
Note:
- Before printing, you can press the DELETE key to erase the number you have entered. Pressing DELETE again will exit the NUMBERING mode.
- The last number to be printed must be selected from within the range 1-9.
-
If you enter a number that is lower than the one originally entered in the text, printing will be disabled, and an "ERR" (ERROR) message will appear on the display if you press the PRINT key.
-
Numbers are always incremented one at a time.
- If the battery becomes weak during a NUMBERING operation, the operation will be interrupted.
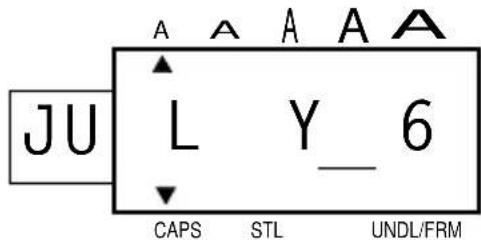
JULY 4, 1962
JULY 5, 1962
JULY 6, 1962
Example To use the NUMBERING function:
- Position the cursor beneath the number in the text to be incremented.
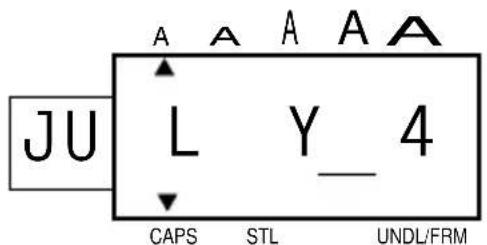
- Hold down the key and press the key. The display changes as follows:
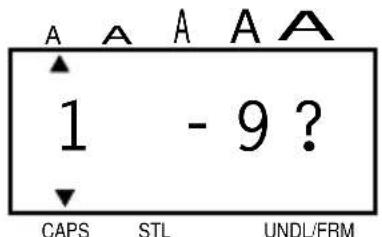
- Press numeric key "6".
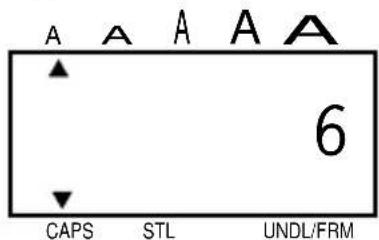
- Press . Your text will be printed out.
- The number will automatically be incremented by one, and the text will be printed out again.
- The printing operation will be repeated until the number you selected as the last number has been printed out. When printing has completed, the following display appears.
MIRROR PRINTING
For this application, tape with a clear adhesive must be used.
When the mirror Printing function is used, characters are printed so as to be legible from the adhesive side of the tape. If the labels are then attached to glass or some other transparent material, they can be read correctly from the opposite side. This type of label is particularly useful for attachment to the inside of shop windows or clear notebooks, so that it can be read from the outside. For this application, transparent tape must be used.
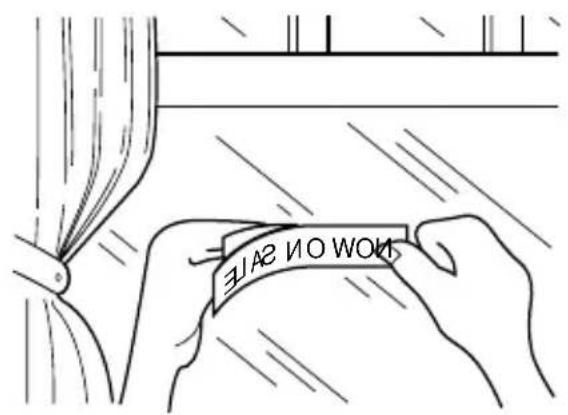
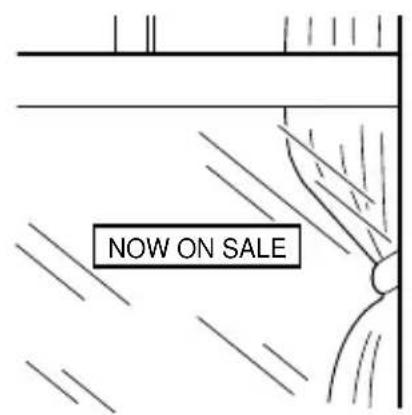
Mirror-printed labels attached inside the window can be read from the street.
To use Mirror Printing:
(1) Holding down the CODE key, press the MIRROR ( )
(2) The current print mode (M: or M: ·) appears on the display.
(3) Still holding down the CODE key, press the MIRROR key again. The display changes between the following two messages:
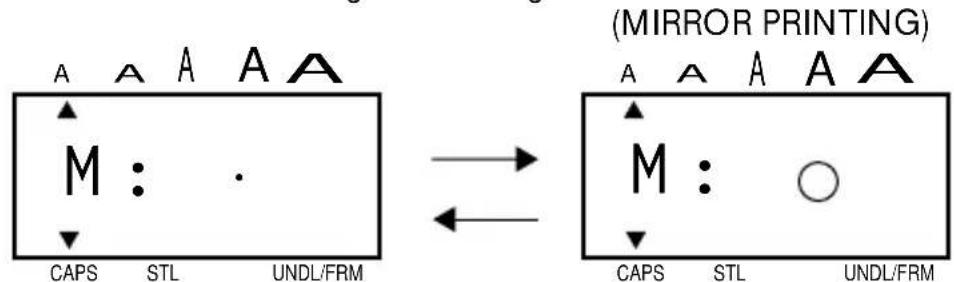
(4) If you want to use Mirror Printing, release the CODE key when "M: " is displayed. To use regular printing, release the CODE key when "M: · " is displayed.
Note:
The Mirror Printing function automatically turns off when the machine is turned off. If you want to use Mirror Printing again after the power has been turned off, you must turn on the Mirror printing function again.
TAPE FEED
The tape feed function can be used to leave equal margins on the left and right sides of the label. The margins can be set to any of the following four widths: 1/6"(4mm), 1/3"(8mm), 1/2"(12mm) or 1"(24mm). When continuously printing labels, the labels can be printed without extra margins. In addition, this function is very convenient when printing more than one label with multiple styles while changing the styles each time a label is printed.
To change the TAPE FEED Mode:
(1) Press and hold down the CODE key, then press the TAPE key.
(2) The current feed mode appears on the display.
(3) While still holding down the CODE key, press the TAPE key again. The display changes as shown below.
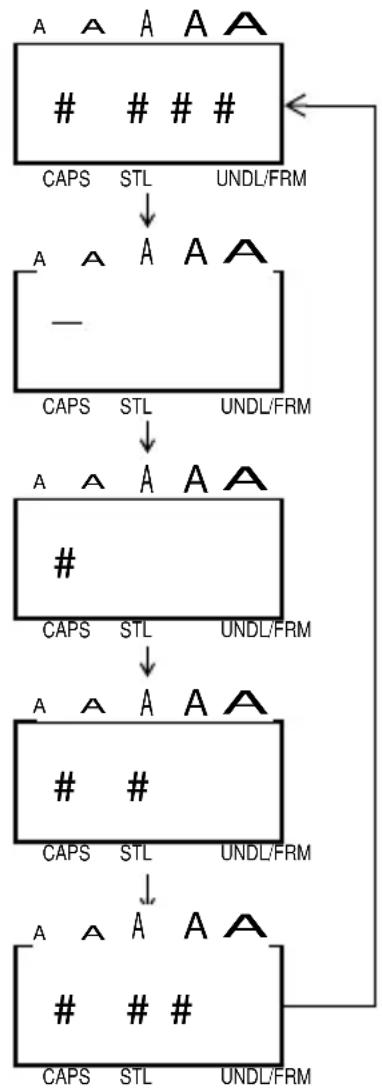
flowchart
graph TD
    A["CAPS"] --> B["STL"]
    B --> C["UNDL/FRM"]
    C --> D["#"]
    D --> E["CAPS"]
    E --> F["STL"]
    F --> G["UNDL/FRM"]
    G --> H["#"]
    H --> I["CAPS"]
    I --> J["STL"]
    J --> K["UNDL/FRM"]
    K --> L["#"]
    L --> M["CAPS"]
    M --> N["STL"]
    N --> O["UNDL/FRM"]
    O --> P["#"]
    P --> Q["CAPS"]
    Q --> R["STL"]
    R --> S["UNDL/FRM"]
Note:
When “-”, “#”, “##” or “###” is set, press
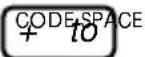
FEED
feed the tape after the label is printed and before the tape is cut. If the tape is not fed before being cut, some of the printed characters may be cut off. (See the illustrations below.)
Example
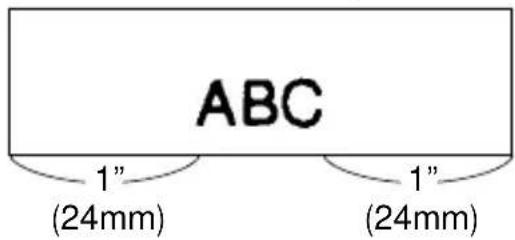
- When “####” is set, the tape is automatically fed 1"(24mm) after the label is printed. If the tape is cut without being fed, a label like that shown in the illustration below is produced.
- When “-” is set, the tape is not automatically fed after the label is printed. If CODE SPACE is pressed to feed the tape and the tape is cut, a label like that shown in the illustration below is produced.
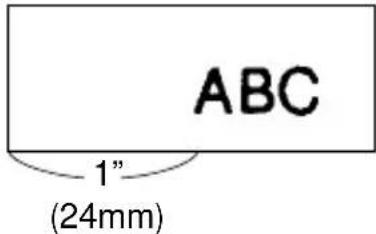
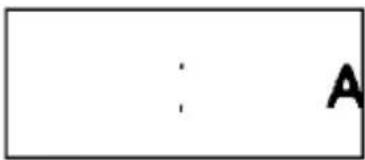
- When “#” is set, 4mm of the tape is automatically fed after the label is printed. If CODE SPACE + is pressed to feed the tape and the tape is cut, a label like that shown in the illustration below is produced. Please cut the tape on the “:” mark with scissors.
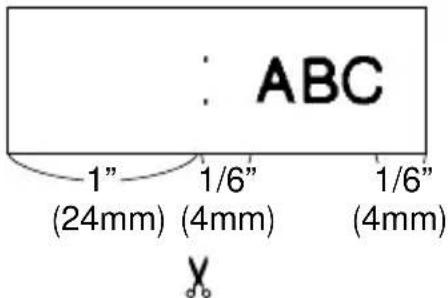
If the tape is cut at the outline, the text is centered in the middle of the label. The tape is automatically fed 1/3"(8mm) when “##” is set, and 1/2"(12mm) when “###” is set.
- Continuous printing
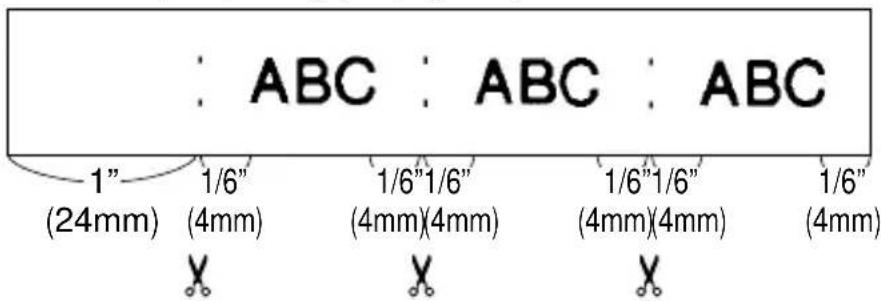
When “#” is set and three labels are printed continuously, the tape is fed and a label like that shown in the illustration below is produced. If “##” or “###” is set, the labels are printed with the appropriate margin widths. Please cut the tape on the “:” mark with scissors.
- Repeat printing (See page 34.)
- Numbering (See page 35.)
- Printing with different styles
When “-” is set, different styles can be used to print one label since the tape is not fed after a label is printed, different characters can be entered and the style can be changed. If the new label is printed, it will continue printing from the point where the first label stopped. After the whole label is printed, feed and cut the tape.
MR. J.SMITH MANAGER
PHRASE MEMORY OPERATION
PHRASE MEMORY
You can use the Phrase Memory function to store your most frequently used messages. Text stored in the Phrase Memory will not be deleted by the usual message clear operation (CODE + CLEAR).
You can easily recall your message from this Phrase Memory any time you want to work with it.
MEMORY SIZE
In the Message Phrase you can store up to a total of 300 characters. These 300 characters can be divided into as many as nine areas.
The maximum capacity for any single area is 55 characters.
Note:
When replacing batteries, do so in three minutes or less. Otherwise, unless an optional AC Adaptor is attached, any message in the working area or Phrase Memory will be lost.
STORING THE MESSAGE
To store the currently displayed message in the PHRASE MEMORY:
(1) Type message to be stored.
(2) Hold down the CODE key and press the STORE key.
(3) The display will read:
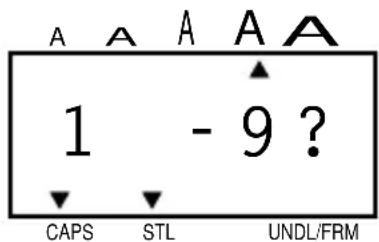
(4) Press a key from 1 to 9 to select a storage area.
(5) Your message is stored in the memory area you selected, and the display clears.
If the area you select is already being used, an error message will briefly appear, and then the display will again ask you to choose an area. In that event, please select a different number from 1 to 9.
If all nine areas are being used, you must clear one of them before you can store your current message.
Also, when 300 characters are already stored in the Phrase Memory and you try to store more, the message "FULL", will appear on the display. You must delete one of the memory areas before you can store your current message. See DELETING THE MESSAGE MEMORY.
Example To store the message "J. SMITH" in the Phrase Memory:
- Make sure the message is in the working area (on the display).
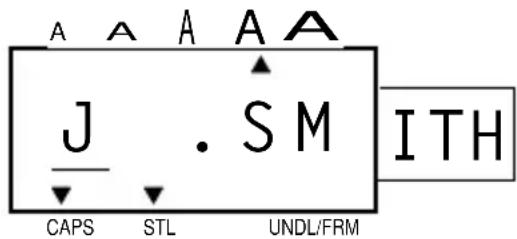
- Press + . The following guidance message appears on the display:
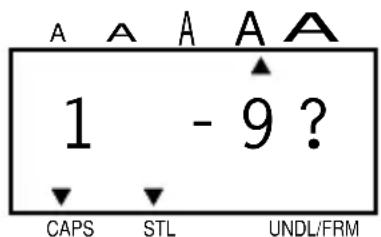
- Press a number key from 1 to 9. This time for example, press 1.
The message is stored, in the Phrase Memory.
Note: Before you enter an area number you can cancel storage by press-
RECALLING FROM PHRASE MEMORY
To recall a message stored in one of the nine PHRASE MEMORY areas:
(1) Holding down the CODE key, press the RECALL key.
(2) The display will read:
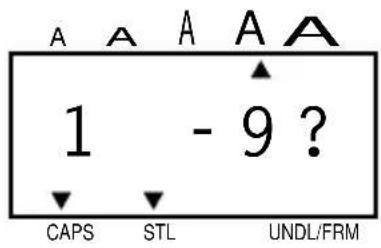
(3) Select the number of the area you want to recall, and press it.
(4) The key number and the beginning of the message appear on the display.
If you selected the wrong number, you can now press a new number key (1-9) to display the correct phrase.
(5) When your desired message is on the screen, press the SET key.
(6) The Phrase Memory you select is recalled into the working area for use.
Note:
- The character size, print style, and underline/box that are recalled are the same as those that were saved with the text.
- When a message is recalled from the PHRASE MEMORY, any message currently on the display is cleared.
Example To recall "J. SMITH" from the Phrase Memory:
- Press + . The following guidance message appears on the display:
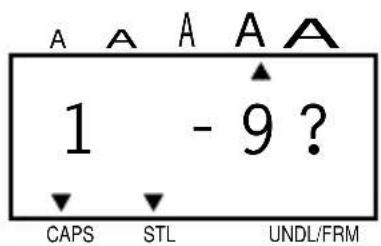
- Press 1, since you stored your message in area 1.
The stored message appears on the display, along with its area number.
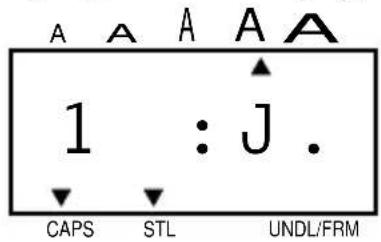
To alter recalled memory:
- Press . SET The message is moved to the working area and remains on the display.
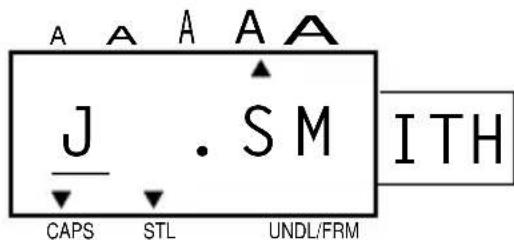
- You can see the current printing information on the display for STL, UNDL/FRM and the SIZE and BIG size settings.
- You can check the style (UNDL/FRM) by pressing the
(UNDL/FRM).
- Now you can print or edit the message.

DELETING THE PHRASE MEMORY
To delete an area of PHRASE MEMORY:
(1) Hold down the CODE key and press the M.DEL key. The following message appears on the display:
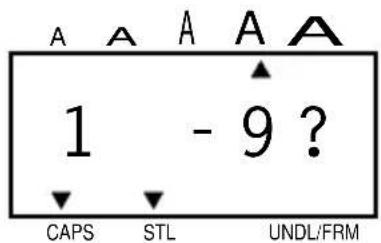
(2) Select the number key (1-9) of the memory area you want to delete, and press it.
The key number and the beginning of the message appear on the display.
If you accidentally selected the wrong number, you can press another number key (1-9) to display the correct phrase.
(3) When your desired message is on the screen, press the SET key.
(4) The Phrase Memory area is cleared and the message previously in the working area reappears on the display.
Example To delete "J. SMITH" from the Phrase Memory:
- Press - CODE . The following guidance appears on the display:
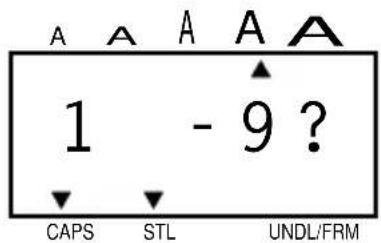
To delete Phrase Memory
- Press 1.
The stored message appears on the display.
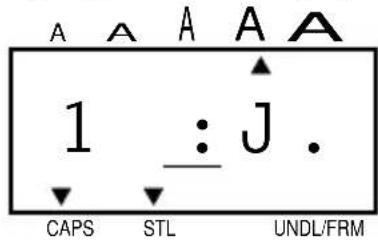
- Press . The message is deleted from the memory. The message previously in the working area (in this case, the same “J. SMITH”) appears on the display.
Note: Before you press SET you can cancel deletion by pressing CLEAR DEL.
Now you can use the cleared memory area "1" to store another message.
MESSAGE LIST
| ERR Input error. The selected tape type is incorrect. | |
| BATT The batteries are weak or empty. | |
| FULL | The working area is full (max: 55 characters) or the Phrase Memory is full (see page 42). |
| NORM | See page 28. |
| OUTL | |
| BOLD | |
| SHAD | |
| ITAL | |
| IT+O | |
| IT+B | |
| IT+S | |
| VERT | |
| A-O? See page 15. | |
| 1-9? See page 34, 35, 42, 44, 46. | |
| BIG The BIG size font is selected. | |
| ##### | See page 39. |
| - | |
| # | |
| ## | |
| ### | |
| M: Mirror printing. | |
| M: · Cancels mirror printing. | |
| TEXT Prints without underline/frame. | |
| UNDL Underlines characters. | |
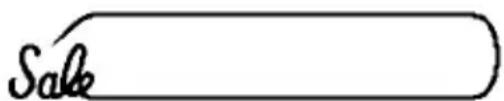
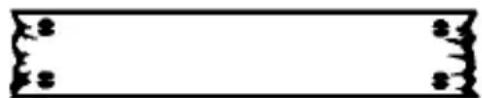
| BOX 1 | Frame characters. |
| BOX 2 | |
| BOX 3 | |
| BOX 4 | |
| I : Insert Mode is ON. | |
| I : · Insert Mode is OFF. | |
TROUBLESHOOTING
| Problem What to Do | |
| 1. The display stays blank after you have turned on the machine. | ·Check the polarity of the batteries.·If the batteries are low, replace them.·Check that the adaptor is working properly. |
| 2. The machine does not print, or the printed characters are blurred. | ·Check that the tape cassette has been inserted properly.·If the tape cassette is empty, replace it with a new one.·Check that the character size is appropriate for the width of the tape that is used. |
| 3. The printed characters are not formed properly. | ·The batteries are probably weak. Replace them. |
| 4. The tape cannot be cut. ·The cutting blade is probably dull. Replace the cutter unit. | |
| 5. Striped tape appears. ·You have reached the end of the tape. Replace it with a new tape. | |
| 6. The memory has cleared on its own. | ·The batteries are probably weak. Replace them. |
| 7. An unprinted line appears on a label. | ·There may be some dust on the print head. Wipe the print head gently with a dry cotton swab.·If dust still remains, dip the cotton swab in isopropyl (rubbing) alcohol and wipe the print head again. |
SPECIFICATIONS
Input Device: 49 keys (39 character keys and 10 function keys)
Print Speed: 10 mm/sec.
Character Size: Standard Size (1)
Double Width (W2)
Double Height (H2)
Double Width & Double Height (4)
4 x Width & Double Height (8)
BIG SIZE (ALL INDICATORS ON, STYLE FIXED, NO
UNDERLINE/FRAME)
Internal Character: Font: HELSINKI
Print Tape: Pressure-sensitive adhesive-based (TZ TAPE ONLY)
3/4"(18mm) (W) · 315"(8m) (L)
1/2"(12mm) (W) · 315"(8m) (L)
3/8" (9mm) (W) · 315" (8m) (L)
1/4" (6mm) (W) · 315"(8m) (L)
LCD: 7 x 5 dots 1 line x 4 columns
Power Supply: Batteries (AA/SUM-3/AM3/R6/LR6) or optional AC Adaptor. (AD-30:7V 1.2A)
Alkaline batteries are recommended.
The power automatically turns off when no key is pushed for five minutes.
Dimensions: 6.85"(174mm) (W) · 7.87"(200mm) (D) · 2.36"(50mm) (H)
Weight: 1.4lb(0.65kg) (without batteries)
Memory Buffer Size: 55 characters
Phrase Memory Size: 300 characters maximum 9 available storage areas
ACCESSORIES
- Supplies
Obtain tape cassettes, AC Adaptors and tape cutters from your nearest authorized dealer. Brother cannot be held responsible for trouble caused by the use of unauthorized supplies.
Use only Brother TZ tapes with this machine. Do not use tapes that do not have the mark.
| Stock No. | Description | QTY/ PACKAGE | PRICE |
| 3/4” (18mm)-wide laminated tapes | |||
| TZ-141 Black characters on clear tape 1 20.99 | |||
| TZ-145 White characters on clear tape 120.99 | |||
| TZ-241 Black characters on white tape 1 20.99 | |||
| TZ-242 Red characters on white tape 120.99 | |||
| TZ-243 Blue characters on white tape 1 20.99 | |||
| TZ-344 Gold characters on black tape 124.99 | |||
| TZ-345 White characters on black tape 1 23.99 | |||
| TZ-441 Black characters on red tape 120.99 | |||
| TZ-541 Black characters on blue tape 1 20.99 | |||
| TZ-545 White characters on blue tape 123.99 | |||
| TZ-641 Black characters on yellow tape 1 20.99 | |||
| TZ-741 Black characters on green tape 120.99 | |||
| TZ-B41 | Black characters on fluorescent orange tape | 1 24.99 | |
| TZ-M41 | Black characters on clear (matte) tape | 120.99 | |
| TZ-WB41 | Black characters on Bugs Bunny tape | 1 23.99 | |
| TZ-WT41 | Black characters on Taz tape | 123.99 | |
| TZ-WS41 | Black characters on Tweety & Sylvester tape | 1 23.99 | |
| 1/2” (12mm)-wide laminated tapes | |||
| TZ-131 Black characters on clear tape 116.99 | |||
| TZ-231 Black characters on white tape 1 17.99 | |||
| TZ-232 Red characters on white tape 117.99 | |||
| TZ-335 White characters on black tape 1 20.99 | |||
| 3/8" (9mm)-wide laminated tapes | |||
| TZ-121 Bl | ack characters on clear tape 114.99 | ||
| TZ-221 Bl | ack characters on white tape 1 16.99 | ||
| TZ-325 W | white characters on black tape 118.99 | ||
| TZ-421 Bl | ack characters on red tape 1 16.99 | ||
| 1/4" (6mm)-wide laminated tapes | |||
| TZ-111 Bl | ack characters on clear tape 112.99 | ||
| TZ-211 Bl | ack characters on white tape 1 14.99 | ||
| TZ-315 W | white characters on black tape 117.99 | ||
Special tapes
| Stock No. | Description | QTY/PACKAGE | PRICE |
| TZ-SE4 | Black characters on 3/4” (18-mm)-wide security tape | 1 29.99 | |
| TZ-FA3 | Blue characters on 1/2” (12-mm)-wide fabric tape | 124.99 |
Stamp kit
| Stock No. | Description | QTY/PACKAGE | PRICE |
| SK-MB | Stamp-making kit for Medium stamp with black ink | 1 37.99 | |
| SH-MB | Additional stamper for Medium stamp with black ink | 124.99 |
OPTIONS
| Stock No. | Description | QTY/PACKAGE | PRICE |
| AD-30 AC | ADAPTER 1 24.99 | ||
| TC-9 TAPE CUTTER 19.99 | |||
Most retailers and distributors carry a full line of tape cassettes. If you wish to order accessories for your P-Touch direct from Brother, please refer to the “Accessory Order Form” or visit us on-line at “http://www.brothermall.com”.
ACCESSORY ORDER FORM
This order form is provided for your convenience should your retailer not stock the item(s) needed or if you prefer to order by telephone. To order by phone, please call Brother International at 1-800-668-2768 and have your Visa or MasterCard available.
| Stock No. | Description Price Quantity | Total | ||
| TOTAL | ||||
Prices subject to change without notice.
Before calling:
- Review the reverse side of this form and select the desired items.
- Complete the order form, indicating the quantity of each item (for your records).
- Enter the total on the "Supply/Accessory Total" line below (for your records).
- Add appropriate sales tax and shipping/handling costs (for your records).
- Have your Visa or MasterCard number and expiration date available.
Supply/Accessory Total \$
All Residents of Canada: Please add
applicable sales taxes (G.S.T. & P.S.T.).
Shipping/Handling \$5.00
TOTAL DUE \$
G.S.T \$
P.S.T.\$
G.S.T. # R100663764
P.S.T. # 100100117TQ0001
* Prices subject to change without notice.
ACCESSORY ORDER FORM
This order form is provided for your convenience should your retailer not stock the item(s) needed or if you prefer to order by telephone. To order by phone, please call Brother International at 1-800-668-2768 and have your Visa or MasterCard available.
| Stock No. | Description Price Quantity | Total | ||
| TOTAL | ||||
Prices subject to change without notice.
Before calling:
- Review the reverse side of this form and select the desired items.
- Complete the order form, indicating the quantity of each item (for your records).
- Enter the total on the "Supply/Accessory Total" line below (for your records).
- Add appropriate sales tax and shipping/handling costs (for your records).
- Have your Visa or MasterCard number and expiration date available.
Supply/Accessory Total \$
All Residents of Canada: Please add applicable sales taxes (G.S.T. & P.S.T.).
Shipping/Handling \$5.00
TOTAL DUE \$
G.S.T \$
P.S.T.\$
G.S.T. # R100663764
P.S.T. # 100100117TQ0001
* Prices subject to change without notice.
GUIA DEL USUARIO
INTRODUCCION
natural_image
Line drawing of an open laptop with internal components and a hand pointing to the screen (no text or symbols)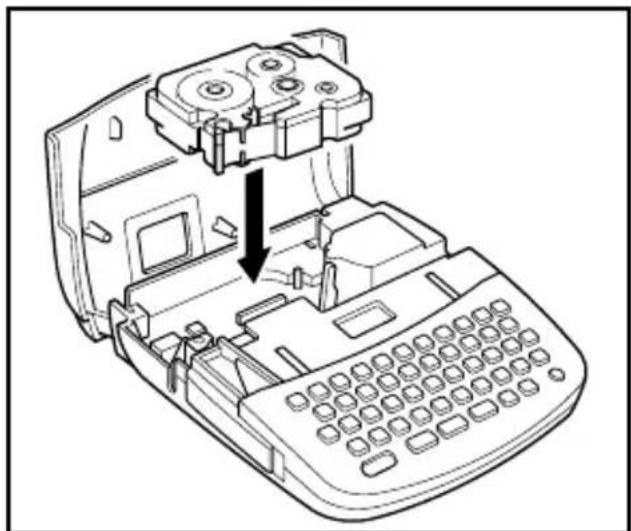
natural_image
Line drawing of a vintage typewriter with an open case and internal components, showing no text or symbols.INSERCION DE LAS BATERIAS
natural_image
Technical line drawing of a mechanical device with a component inserted, showing a curved arrow indicating rotation (no text or symbols present)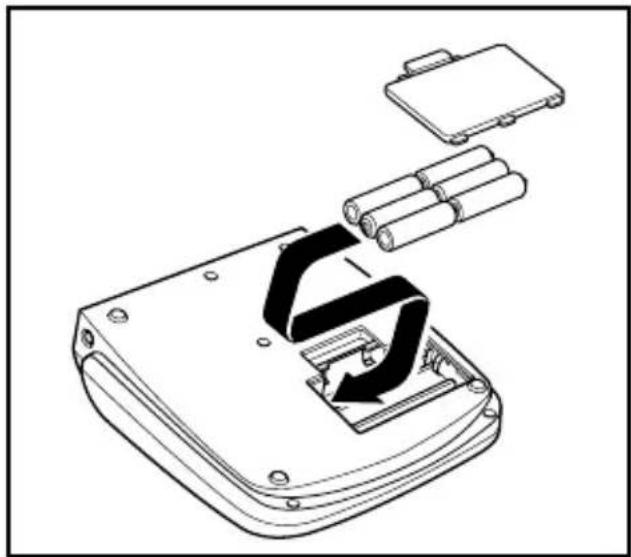
natural_image
Technical line drawing of a device with battery pack and internal components (no text or symbols)Nota:
natural_image
Line drawing of a hand inserting a small component into an open device (no text or symbols visible)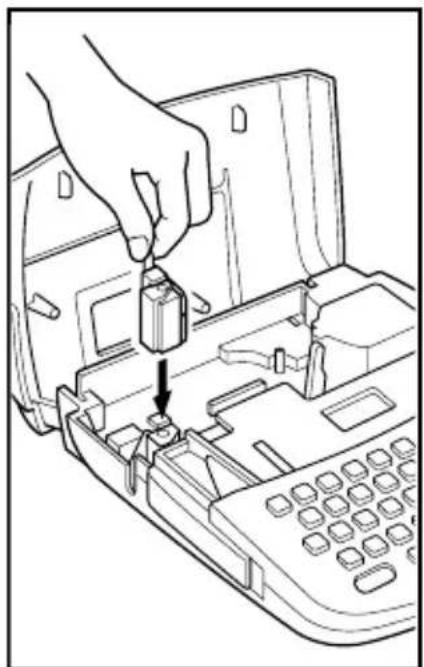
natural_image
Line drawing of a hand inserting a small component into a printer's internal circuit (no text or symbols)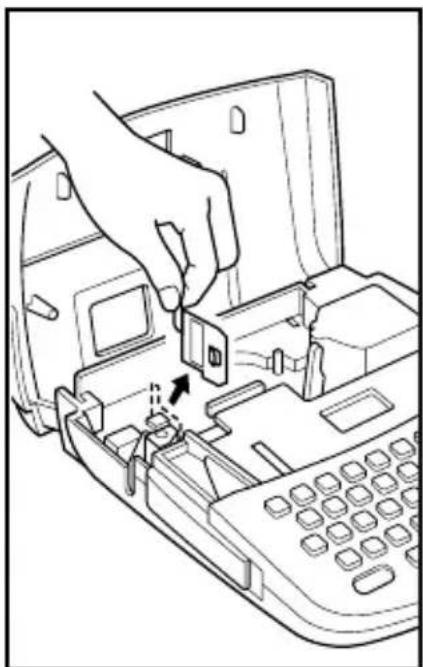
natural_image
Line drawing of a hand inserting a small electronic device into a computer keyboard (no text or symbols visible)
PRECAUCIÓN
4:Double Width & Double Height
J.SMITH
8:4 · Width & Double Height
J.SMITH
ESTILO
OUTLINE (OUTL) ITALIC+OUTLINE (IT + O)
J.SMITH
J.SMITH
BOLD (BOLD) ITALIC+BOLD (IT + B)
J.SMITH
J.SMITH
SHADOW (SHAD) ITALIC+SHADOW (IT + S)
J.SMITH
J.SMITH
VERTICAL (VERT)
·-工
SUBRAYADO/ENCUADRE
natural_image
Empty rectangular frame with black border (no text or symbols)BOX2:SALE
BOX3:POINTING

BOX4:NAME PLATE
natural_image
Decorative border with symmetrical floral and dot motifs (no text or symbols)IMPRESION Y CORTE
- Please read this notice carefully before starting.
To insert a new tape cartridge Cutting tape
- REMOVE THE STOPPER.
natural_image
Line drawing of a hand using a caliper to adjust or install a mechanical component (no text or symbols visible)- SOME TAPE CASSETTES ARE NOT PROVIDED WITH A STOPPER.
· USE YOUR FINGER TO TIGHTEN THE RIBBON.
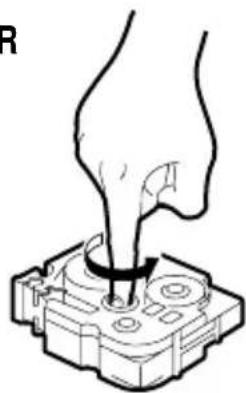
natural_image
Illustration of a hand pressing down on a mechanical component (no text or symbols visible)· INSTALL AND PRESS CODE+FEED.
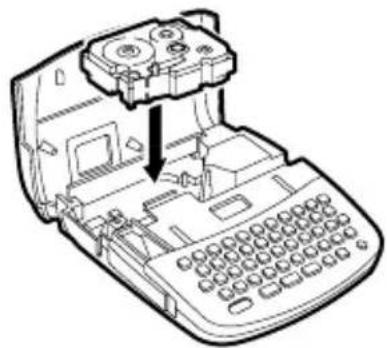
natural_image
Line drawing of a telephone handset with a device inserted, showing internal components and a downward arrow (no text or symbols)· DO NOT PULL TAPE TO ADVANCE IT.
natural_image
Illustration of a hand inserting a card into a digital timer (no text or symbols present)• TO CUT TAPE, USE THE BUILT-IN CUTTER LEVER. UNDER NO CIRCUM- STANCES AT- TEMPT TO CUT THE TAPE WHILE PRINTING OR FEEDING.
natural_image
Line drawing of a hand inserting a small electronic device into a keyboard (no text or symbols)AC adaptor connection
· USE THE AC ADAPTOR DESIGNED EXCLUSIVELY FOR THIS MACHINE.
- MODEL
- PT-170 0
- INTRODUCTION
- FCC NOTICE
- CONTENTS
- GENERAL PRECAUTIONS
- BEFORE YOU START
- INSERTING A TAPE CASSETTE
- To insert a new tape cassette:
- Note:
- INSERTING BATTERIES
- To insert batteries:
- CHANGING THE CUTTER UNIT
- To replace a cutter with a dull or broken blade:
- CAUTION
- STARTING
- CREATING A MESSAGE
- DISPLAY
- MOVING THE CURSOR
- To move the cursor through your message:
- KEY OPERATIONS
- CODE KEY
- SHIFT KEY
- CAPS KEY
- ALT KEY
- INPUT
- Example To input "Mr.":
- SPACE KEY
- SYMBOLS
- To input a symbol that is not on the key top:
- EDITING A MESSAGE
- DELETING
- To delete a character:
- Example To delete the from the message:
- WORD OUT
- To use the WORD OUT function:
- Example To delete the word "Mr." from the message:
- OVER TYPING
- To type over a character:
- Example To replace the lower-case letters "mith" with capital letters:
- INSERTING
- To insert characters:
- To leave INSERT Mode:
- SETTING THE FORMAT
- SIZE
- To choose a character size:
- Example To use Double Width and Double Height (4) characters:
- BIG SIZE FONT
- J.SMITH
- To choose the BIG size font:
- STYLE
- To choose a print style for your label:
- Example To use Outline print:
- UNDERLINE/FRAME
- To add Underline or Box around the text.
- PRINTING A LABEL
- PRINTING
- To print a label:
- Example To print the message onto a label:
- CUTTING
- To cut the tape:
- Example To cut the label:
- To attach the label:
- REPEAT PRINTING
- To use the REPEAT PRINTING function:
- NUMBERING
- To use the AUTO COUNT function when printing:
- Example To use the NUMBERING function:
- MIRROR PRINTING
- To use Mirror Printing:
- TAPE FEED
- To change the TAPE FEED Mode:
- Example
- PHRASE MEMORY OPERATION
- PHRASE MEMORY
- MEMORY SIZE
- STORING THE MESSAGE
- To store the currently displayed message in the PHRASE MEMORY:
- Example To store the message "J. SMITH" in the Phrase Memory:
- RECALLING FROM PHRASE MEMORY
- To recall a message stored in one of the nine PHRASE MEMORY areas:
- Example To recall "J. SMITH" from the Phrase Memory:
- DELETING THE PHRASE MEMORY
- To delete an area of PHRASE MEMORY:
- Example To delete "J. SMITH" from the Phrase Memory:
- To delete Phrase Memory
- SPECIFICATIONS
- ACCESSORIES
- - Supplies
- ACCESSORY ORDER FORM
- Before calling:
- GUIA DEL USUARIO
- INTRODUCCION
- INSERCION DE LAS BATERIAS
- Nota:
- PRECAUCIÓN
- ESTILO
- SUBRAYADO/ENCUADRE
- IMPRESION Y CORTE
Brand : BROTHER
Model : P-Touch 1700
Category : Label printer