ML 100 - Hi-Fi System DUAL - Free user manual and instructions
Find the device manual for free ML 100 DUAL in PDF.


| Product Type | Micro CD Music System with RDS |
| Brand | Dual |
| Model | ML 100 |
| Power Supply | 230V ~ 50Hz |
| Unit Dimensions (H x W x D) | 236 x 146 x 220 mm |
| Speaker Dimensions (H x W x D) | 236 x 146 x 160 mm |
| CD Compatible Formats | CD, CD-R, CD-RW |
| Radio Bands | FM (with RDS) and AM |
| Preset Stations | Up to 20 FM, up to 10 AM |
| Tape Deck | Cassette play and record |
| Remote Control | Yes, with 2 × AAA batteries |
| Speaker Connection | Red/black jacks; left and right |
| FM Antenna | Coiled wire, fully extendable |
| Equalizer Presets | CLASS, ROCK, POP, FLAT |
| Playback Modes | Repeat (all/track), Random, Intro, Program (up to 30 tracks) |
| RDS Features | PTY search, Radio Text, Clock Time |
| Timer / Sleep | Timer auto-on; Sleep 60/30 min or off |
| Headphone Jack | Yes (PHONE jack) |
| Recording Source | Radio or CD to tape (ALC) |
| Beat Cut Switch | For AM recording interference reduction |
| Display | LCD with clock, track info, timer |
| Cleaning | Exterior: soft cloth; CD lens: lens cleaner; tape head: alcohol |
Frequently Asked Questions - ML 100 DUAL
User questions about ML 100 DUAL
0 question about this device. Answer the ones you know or ask your own.
Ask a new question about this device
Download the instructions for your Hi-Fi System in PDF format for free! Find your manual ML 100 - DUAL and take your electronic device back in hand. On this page are published all the documents necessary for the use of your device. ML 100 by DUAL.
USER MANUAL ML 100 DUAL
Job : 7286-002 (ML 100) DUAL German Size : 125 (w) x 190 (h) mm Date : 30 Dec 2003
ML 100
MICRO CD MUSIK SYSTEM MIT RDS
Gebrauchsanweisung
natural_image
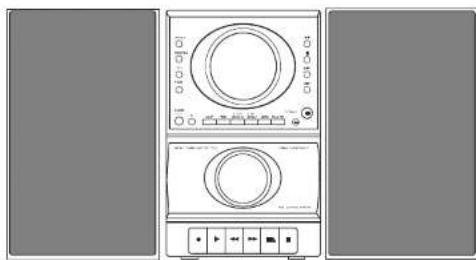
Front and back view diagram of a two-tier electronic device with control panel and speaker (no text or symbols)natural_image
Front view of a white electronic device with circular buttons and a play button, shown in two vertical panels (no text or symbols visible)Connecting the Speakers
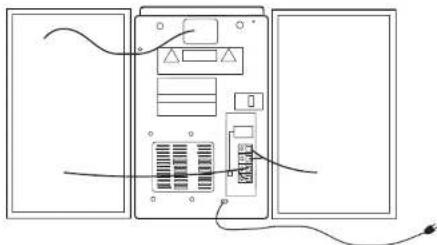
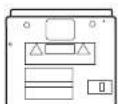
When connecting the speakers, match the red wires to the red jacks and the black wires to the black jack. Each speaker has a black and a red jack, one for positive and one for negative. The top two jacks are for the left speaker, while the bottom two jacks are for the right speaker.
natural_image
Diagram of a computer monitor internal structure with cables and connectors, no text or symbols presentSpeaker Wire Connection
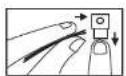
Push Speaker terminal tab down to insert wire.
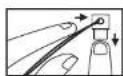
Release tab to lock wire in the terminal.
NOTE : Make sure the insulation is completely removed from the ends of the speaker wires at all connection points.
Using the Antenna
Before you use your audio system, you'll want to make sure the FM antenna is positioned properly. The FM antenna is the coiled wire connected to the back of the unit. Uncoll It, making sure it is fully extended (you may even want to tape it to the wall behind the unit, if possible. The higher, the better.)
For better AM reception, move or rotate the unit.
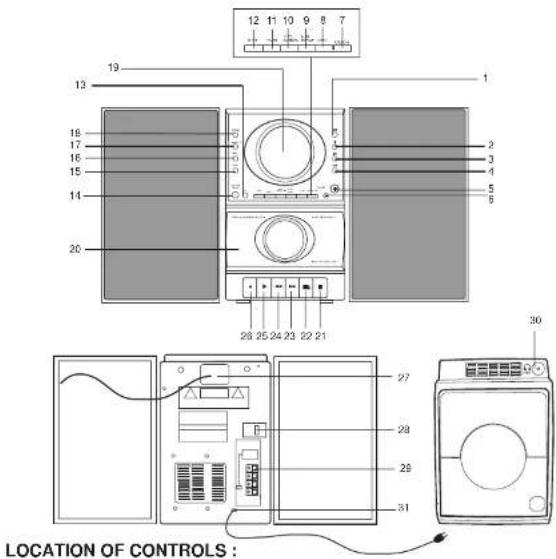
- CD Select and
CD Play / Pause Button (▶II)
-
CD Stop Button / RDS ( ■RDS)
-
CD Preview Button (
-
CD Next Button ( )
-
Volume Control Switch (VOLUME + )
-
Volume Control Switch (VOLUME -)
-
CD Random Button ( RANDOM )
-
CD Intro Button (INTRO
-
M-UP Repeat Button (M-UP REPEAT)
-
C-ADJ Memory Button
(C-ADJ MEMORY)
-
Timer Button ( TIMER )
-
Sleep Button (SLEEP)
-
Remote Receiver ( IR )
-
Power on / off Button
POWER/STAND BY)
-
Tuner Select Button (TUNER / BAND)
-
Tape Select Button (TAPE)
-
Preset and EQ Button (PRESET EQ)
-
Time Display Button (DISPLAY)
-
LCD Display
-
Cassette Door
-
Cassette Pause Button (Ⅲ)
-
Cassette Stop Button ( ■ ▲)
-
Cassette Forward Button ( ▶)
-
Cassette Rewind Button ( ◀️)
-
Cassette Play Button (▶)
-
Cassette Record Button ( ● )
-
FM Antenna Wire
-
Beat Cul 1 / FM ST.
Beat Cut 2 / FM MO
- Speaker output
red jacks & black jacks
-
Phone Jack (Q)
-
AC Power Cord
Remote Operation
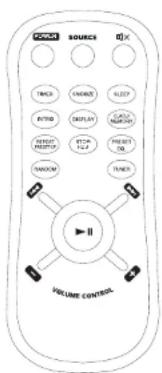
POWER - Turns the unit on/off.
SOURCE - Selects Tuner, Tape and CD mode.
MUTE ☐ x - Mutes volume.
TIMER - Enables or disables timer.
SNOOZE - Enters snooze mode when timer is on.
(only for remote)
SLEEP - Selects sleep time of 60 min, 30 min and off.
INTRO - Selects Intro play in CD mode.
DISPLAY - Shows clock time and timer on time.
C.ADJ/MEMORY - Enters program and clock setting mode;
confirms your settings.
REPEAT/PRESET UP - In CD mode - toggles repeat options.
(repeat disc / repeat track / repeat off)
In Tuner mode - selects preset station.
STOP/RDS - In CD mode - stops CD playback, In Radio mode
- shows RDS station information.
PRESET EQ - Selects among different sound effects. (classic)
flat / rock / pop)
RADOM Ⓐ - Plays tracks randomly in CD mode.
TUNER - In CD mode or Cassette mode - selects Tuner.
In Tuner mode - selects band.
SKIP BACKWARD - In CD mode - skips backwards to
the previous tracks.
In Tuner mode - searches down radio frequency.
SKIP FORWARD ➞ In CD mode - skips forward to the next track.
In Tuner mode - searches up radio frequency.
PLAY/PAUSE▶- Starts CD playback / short interruption of CD playback.
VOLUME CONTROL - - Lowers volume level.
VOLUME CONTROL + - Increases volume level.
Installing Batteries
The remote control must be inserted with 2 "AAA" or "UM-4" or "R03" batteries prior to use. Follow the steps below to ensure correct installation.
-
Remove the battery compartment door (located at the back of the remote control) pusing the tab in the direction of the arrow and then lifting the door out and off the cabinet.
-
Before inserting the batteries, observe the polarities (that is, + and -) of the battery, then relate the polarities to the engraved diagram inside the battery compartment. Now insert the batteries.
-
After installation of the batteries, replace and fit the lid to cover the batteries. Lightly push it close with a snap.
OPERATION INSTRUCTIONS
CD OPERATION
-
Press the ON/OFF button to switch on the unit.
-
Press the Play/Pause (▶) button to select CD Mode
-
The Multi-Function Display will indicate CD character.
-
Press CD door to open the CD compartment.
-
Insert the CD die with the label up
-
Insert the CD disc with the label up 6. Press the CD door to close the CD
-
Press the CD door to close the CD compartment. The CD player starts and scans the content list of the CD. After several seconds, the CD player will stop.
-
Press the Play/Pause button to start playback, display will
indicate track number and time indication.
-
Adjust the Volume Knob (+/-) to desired sound level for listening.
-
To interrupt playback, press the Play/Pause (▶) button. To resume playback, press the Play/Pause (▶) button again.
-
To stop playback, press the Stop (■) button.
-
Pressing and holding the (17) button longer than 0.5 second
the search function start the music at high speed
- Press the (▶/◀) button until the required track number is reached
Note
- If the disc compartment is empty, or the disc cannot be played,
the display alternately is flashing * NO DISC *
- Do not leave the CD door open, as dust is likely to dirty the laser beam optic.
- Do not store CDs in damp areas. Do not expose CDs to high temperatures.
RANDOM PLAYBACK
-
Press the RANDOM button to enter random mode, * lights up.
-
Press the PLAY/PAUSE button (▶) to start playback in random sequence of disc track.
-
To cancel RANDOM playback mode, press the RANDOM button once. Then, the Ⓞwill be
turned off and random mode will be cancelled.
INTRO PLAY
-
Press the "INTRO" button to enter intro mode, "INTRO" lights up.
-
Press the PLAY/PAUSE button (▶) to start playback, it will playback the first 10 seconds
of each track.
- To cancel "INTRO" mode, press the "INTRO" button again. Then, the "INTRO" will be
turned off and intro mode will be cancelled.
REPEAT PLAYBACK
- Press the M-UP REPEAT button once, the symbol "REPEAT ALL" will show on the display
and all tracks of the disc will repeatedly playback until pressing the Stop (■) button
- Press the M-UP REPEAT button twice, the symbol "REPEAT" will show on the display and
the current track will repeatedly playback until pressing the Stop ( ■ )button.
- Press the M-UP REPEAT button three times to cancel.
PROGRAMMING
- Press the C-ADJ MEMORY button on the stop mode, the symbol * P01 TR00 * will show on
the display
-
Press the (▶)br button to the selected track.
-
Press the C-ADJ MEMORY button again to confirm the selected track.
-
Repeat step 2 to 3 to program the play list (up to 30 tracks)
-
Press the PLAY / PAUSE button ( ▶I) to playback the programmed list.
Note
The programmed list will clear only when power is off.
DISPLAY
- Press the DISPLAY button once during play, the symbol REMAIN and the
remaining time of the track will show on the display
-
Press the DISPLAY button twice, the clock will show on the display.
-
Press the DISPLAY button three times, the time of the timer and the
flashing symbol "TIMER" will show on the display.
Note
CD/CD-R/CD-RW can be playable
RADIO OPERATION
-
Press the POWER STAND BY button to power on.
-
Press the TUNER button to select the RADIO mode
-
Press the TUNER button again to select band (FM/AM).
-
Tune in a station with the ( ▶ or ▶) button.
-
Adjust the VOLUME + or VOLUME - button to control the sound.
Note :
-
To improve reception the FM antenna wire should be extended in FM mode, or rotate the unit in AM mode.
-
In FM band, stereo [☐] lights when the system is receiving a FM station in stereo. Please make sure that the slide switch on the rear panel is set to Beat Cut 1 / FM ST for FM stereo reception.
-
Where stereo signals are weak and the reception noisy, it is better to receive the program in mono. Set the slide switch on the rear panel to Beat Cut 2 / FM MO.
Preset a Station
-
Press the TUNER button to select a waveband.
-
Press the ( ▶br ▶button to search a station.
-
Press the C-ADJ MEMORY button to enter program mode.
-
Press the M-UP REPEAT button to select memory location
(up to 20 FM stations,10 AM stations)
- Press the C-ADJ MEMORY button to confirm setting. Repeat
step 1 to 5 to preset other station
- Press the M-UP REPEAT button to call back the station memory.
Note: Five stations have been preset before you preset the station
Tuning to a RDS station (FM only)
- Press (▶or ◀ to select desired frequency or press M-UP REPEAT to access preset
stations
- If RDS station is found, RDS lights on the display with station name shown.
Displaying RDS Station Information
Press (■ / RDS ) repeatedly to display
- frequency
• radio text (RT)
- station type (PTY)
RDS NEWS (news), AFFAIRS (current affairs), INFO (weather, medical), SPORT (sports), EDUCATE (education), DRAMA (series and plays), CULTURE (religion), SCIENCE (science and technology), VARIED (miscellaneous), POP M (pop music), ROCK M (rock music), MOR M (middle-of-the-road music), LIGHTM (light music), CLASSICS (classical music), OTHERM (unclassified music), WEATHER (weather), FINANCE (financial information), CHILDREN (children's program), SOCIAL (social news), RELIGION (religious program), PHONE-IN (iphone-in program), TRAVEL (travel & leisure), HOBSY (hobby), JAZZ (Jazz music), COUNTRY (country music), NATIONAL (national), OLDIES (oldies), FOLK M (folk music), DOCUMENT (documentary), TEST (test) & ALARM (alarm).
PTY Search
-
Press ( ■' RDS ) until the display shows pty information.
-
Press and hold ( ■' RDS ) until the PTY indicator begins to flash.
-
Press (▶) or ▶ to select the type of station you want to find
-
Press (■ / RDS ) to confirm your selection and begin ply search.
- Clock time (CT)
When the display is showing CT information, press and hold (■ / RDS) to toggle CT ON and CT OFF.
Eng 5
-
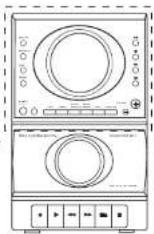
Press the TAPE button to select the TAPE mode.
-
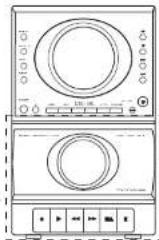
Press ( ■ ▲) to open the cassette door and then insert the cassette tape.
-
Press the PLAY ▶ button to playback the tape.
-
Press the REW ◀ button to quickly wind the tape backward.
-
Press the EEWD button to quickly wind the tune forward
-
STOP / EJECT ( ▲)
Press the STOP / EJECT button to stop the tape. When the cassette compartment is at stop mode, press the STOP / EJECT button to open the cassette door.
- PAUSE (
During play press the PAUSE button to temporarily stop the tape. Press the PAUSE button again to resume play.
- Adjust the VOLUME + or - button to control the sound.
RECORDING (●):
(A) Recording from the built-in radio
-
Open the cassette door and then insert the cassette tape
-
Press the TUNER / BAND button to select RADIO mode, tune in a station with
the (▶ or ▶) button.
-
Press the REC button to start recording
-
Press the STOP button once to stop recording.
Note : 1. Automatic Level Control ( ALC ) recording
The ALC circuit adjusts the recording input level automatically. No adjustment are required.
- Beat Cut Switch
If you hear an unusual sound while recording AM radio broadcasts, eliminate or suppress it by changing the position of the BEAT CUT switch on the rear panel.
(B) Recording from a compact disc
-
Open the cassette door and then insert the cassette tape.
-
Open the CD door and then put in the CD disc.
-
Press the REC button to start recording.
-
Press the PLAY:PAUSE button (▶) to start playing CD.
-
Press the STOP button once to stop recording
Note : If you press the REC button in play mode, it will go back to the beginning of the track and begin to record.
Warning :
Recording copyright material without permission of the copyright owners is usually an infringement. If you wish to re-record copyright material, permission from the copyright owner is necessary.
Eng 6
Listening through headphones
Insert the headphone plug into the PHONE jack and adjust the volume. The sound from the speakers will be cut off.
Sound Effect Setting
Press the PRESET EQ button to select CLASS, ROCK, POP, FLAT in turn.
Clock Setting
At stand by mode. "0 : 00" is shown on the display.
-
Press and hold the C-ADJ MEMORY button, the first "0" of "0:00" is flashing and then press the (▶ or ▶) button to adjust hour.
-
Press the C-ADJ MEMORY button again, when the next two "0" of "0:00"
are flashing then press the (▶ or ◀) to adjust minute.
- Press the C-ADJ MEMORY button again to confirm the clock setting.
Sleep Time Setting
Press the SLEEP button to select 60 minutes, 30 minutes and off.
Timer Setting
-
Press the DISPLAY button twice (in radio mode) or three times (in CD mode), the flashing symbol "TIMER" and *0:00* will show on the display.
-
Press and hold the C-ADJ MEMORY button, when the first "0" of "0:00" is
flashing press the (▶ or ▶) button to adjust hour.
-
Press the C-ADJ MEMORY button, when the two "0" of "0:00" are flashing press the (▶ or ▶) button to adjust minute.
-
Press the C-ADJ MEMORY button to confirm the setting.
-
Press the TIMER button, the unit will power on automatically on the time
you set.
- To cancel the timer, press the TIMER button again.
Note
The unit will playback automatically on the mode of what you set the timer on. (For example: If you set the timer on CD mode, the unit will playback the CD disc automatically on the time you set).
MAINTENANCE
Disconnect the audio system from the power source before performing any maintenance.
Cleaning
Clean the exterior of the system using a soft dust cloth.
CD Player
CAUTION! This system operates with a laser. It must be opened by only a qualified technician.
Tape Player
To prevent deterioration of sound quality, periodically open the door of each deck and clean the magnetic heads, pinch roller, and capstan with a cotton bud dipped in alcohol. Also, demagnetize the head by playing a demagnetizing cassette (available through an audio equipment store).
Eng 7 Eng 8
To protect recordings on one or both sides of a tape, remove the corresponding tab. If you later want to record on the tape, affix a piece of adhesive tape over the hole.
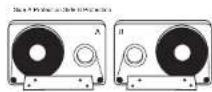
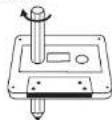
Quit Slacking – A little bit of slack in your tapes can cause scratches on the tape, or worse yet, the tape could break. If you notice some slack in the tape, use a pencil to tighten it up before you insert it.
Cleaning CDs
- Dirty CDs can cause poor sound quality. Always keep CDs clean by wiping them gently
with a soft cloth from the inner edge toward the outer perimeter.
- If a CD becomes dirty, wet a soft cloth in water, wring it out well, wipe the dirt away gently, and then remove any water drops with a dry cloth.
- Do not use record cleaning sprays or antistatic agents on CDs. Also, never clean CDs with benzine, thinner, or other volatile solvents which may cause damage to disc surface
CD lens Care
When your CD lens gets dirty it can also cause the system to output poor sound quality. To clean the lens you will need to purchase a CD lens cleaner which can maintain the output sound quality of your system. For instructions on cleaning the CD lens, refer to the ones accompanying the lens cleaner.
Safety Precautions
- Never open the cabinet under any circumstances. Any repairs or internal adjustments should be made only by a trained technician.
- Never operate this product with the cabinet removed.
• Do not use your system immediately after transporting it from a cold place to a warm place.
as condensation may cause the system to malfunction
- Keen your unit away from humid areas and abnormally hot places.
- Do not touch the player with wet hands. If any liquid enters the player cabinet, take the player to a trained technician for inspection.
- This compact disc player uses a laser to read the music on the disc. The laser mechanism corresponds to the cartridge and stylus of a record player. Although this product incorporates a laser pick-up lens, it is completely safe when operated according to directions.
- Discs rotate at high speed inside the player. Do not use damaged, warped, or cracked discs.
- Do not touch the pick-up lens which is located inside the disc compartment. To keep dust from collecting on the pick-up lens, do not leave the compartment door open for an extended period of time. If the lens becomes dirty, clean it with a soft brush, or use an air blower brush designed for camera lenses.
• The apparatus shall not be exposed to dripping and splashing.
Headset Safety
• Do not play your headset at high volume. Hearing experts warn against extended
high-volume play
- If you experience ringing in your ears, reduce volume or discontinue use.
- You should use with extreme caution or temporarily discontinue use in potentially hazardous situations.
Even if your headset is an open-air designed to let you to hear outside sounds, do not turn up the volume so high that you are unable to hear what is around you.
Important Battery Information
- Remove the batteries to avoid leakage if you do not use your remote control for more than one month.
- Discard leaky batteries immediately as leaking batteries may cause skin burns or other personal injuries. Dispose of batteries in the proper manner, according to provincial and local regulations.
-
Any battery may leak electrolyte under the following circumstances:
-
if mixed with a different battery type,
- if inserted incorrectly,
- if all batteries are not replaced at the same time,
- if disposed of in fire, or
- if an attempt is made to charge a battery not intended to be recharged
Technical specification
Power supply: 230V \~ 50Hz
Dimensions (H x W x D mm):
Unit size - 236 x 146 x 220
Speaker - 236 x 146 x 160
Rating Plate: Look for it at the back of the set.
- Connecting the Speakers
- Using the Antenna
- Remote Operation
- Installing Batteries
- OPERATION INSTRUCTIONS
- CD OPERATION
- Note
- RANDOM PLAYBACK
- INTRO PLAY
- REPEAT PLAYBACK
- PROGRAMMING
- DISPLAY
- RADIO OPERATION
- Note :
- Preset a Station
- Tuning to a RDS station (FM only)
- Displaying RDS Station Information
- PTY Search
- - Clock time (CT)
- RECORDING (●):
- Warning :
- Listening through headphones
- Sound Effect Setting
- Clock Setting
- Sleep Time Setting
- Timer Setting
- MAINTENANCE
- Cleaning
- CD Player
- Tape Player
- Cleaning CDs
- CD lens Care
- Safety Precautions
- Headset Safety
- Important Battery Information
- Technical specification
Brand : DUAL
Model : ML 100
Category : Hi-Fi System