
R-24W EWDSB - TV Alphatronics - Free user manual and instructions
Find the device manual for free R-24W EWDSB Alphatronics in PDF.


User questions about R-24W EWDSB Alphatronics
0 question about this device. Answer the ones you know or ask your own.
Ask a new question about this device
Download the instructions for your TV in PDF format for free! Find your manual R-24W EWDSB - Alphatronics and take your electronic device back in hand. On this page are published all the documents necessary for the use of your device. R-24W EWDSB by Alphatronics.
USER MANUAL R-24W EWDSB Alphatronics
natural_image
Three black-framed computer monitors on a white background, no visible text or symbolsS-17 eSHB | S-19 eSHB | S-22 eSHB
T-19eWSB | T-22eWSB
alphatronics
INHALT
text_image
Diagram showing connection between a monitor and a CD-ROM interface with labeled buttons 1 through 6text_image
① ② ③ ④ ⑤ ⑥ ⑦ DC PC IN SCART LINE IN RF IN DVB-T/C RF IN DVB-S/S2 COAXIALtext_image
① ② ③ ④ ⑤ ⑥ ⑦ ⑧ ⑨ ⑩ ⑪ YPBPR IN AV IN HDMI COAXIAL RF IN DVB-S/S2 RF IN DVB-T/C Int=USB→Ext. DCtext_image
9 10 11 12 13 DC COAXIAL RF IN DVB-S/S2 RF IN DVB-T/C DVDtext_image
1 2 3 4 5 6 7 8 9 DC COAXIAL RF IN DVB-S/S2 RF IN DVB-T/C YPBPR IN AV IN HDMInatural_image
Diagram of a cylindrical tank connected to two vertical pressure vessels with positive charges, no text or symbols present.natural_image
Line drawing of a computer monitor with an upward arrow pointing to it, no text or symbols present- Introduction and Tips for your Safety 24-26
- Location and Function of Controls.... 27
- Control buttons and terminals 28-29
- Remote Control 30-31
- Start Up 32
- Channel Menu 33
- Picture Menu....34
- Sound Menu 34
- Time Menu 35
- Lock Menu 35
- Option Menu 36
- Media Operation.... 36
- Dvd Operation (Only Valid For E-Line) 36
- Teletext Function 37
- Stand Installation.... 38-39
- Troubleshooting....40-41
Customer Service 42
1. INTRODUCTION AND TIPS FOR YOUR SAFETY
Thank you for buying our LCD/LED TV.
Safety Tips
For your safety and to avoid unnecessary damage to your TV set, please read and observe the following safety instructions:
Use and Environmental Conditions
This TV set is designed exclusively for reception and reproduction of video and audio signals. This equipment is designed for domestic and office environments and must not be used in rooms with high humidity (e.g. bathroom, sauna) or high concentrations of dust (e.g. workrooms).
The manufacturer's warranty is only valid for use in the specified permissible environment.
If the equipment is used in the open air, ensure that it is protected against moisture (rain, drips, splashes, sprayed water or dew).
High levels of moisture and concentrations of dust cause leakage currents in the equipment, which can lead to danger of electric shock or fire.
If you have moved the TV set out of the cold into a warm environment, leave it standing for about an hour since condensation may form.
Do not place any containers filled with liquids or lit candles on top of the TV.
Be careful when moving or turning the TV in order not to bruise fingers or objects in this area.
Batteries display a potential risk of suffocation when swallowed. Be aware not to let children open the battery compartment cover.
Transportation
Only transport the unit in an upright position. Hold the set by the top and bottom edges of the housing. The LCD/LED screen is made of glass and/or plastic and may break if not handled carefully. Should the LCD/LED screen become damaged or should the liquid crystal begin to leak, then it is imperative you wear rubber gloves when removing the set. Should the liquid come in contact with your skin, thoroughly rinse with water immediately.
Power Supply
This equipment must only be connected to a main power supply which has the same voltage and frequency as that specified on the rating plate; use the power cable provided.
Incorrect voltages can damage the equipment.
The main plug of the TV set must be easily accessible so that the set can be disconnected at any time.
When removing the main plug, pull the plug housing and not the cable.
The wires in the plug could be damaged and cause a short circuit the next time it is plugged in.
Lay the main cable in such a way that it will not be damaged. The power cable may not be kinked or laid over sharp edges, not stood on and not exposed to chemicals, the latter also applies to the device as a whole. A main cable with damaged insulation can lead to electric shocks and is a fire risk.
Air Circulation and High Temperatures
Like all electronic equipment, your TV needs air for cooling. Obstruction of the air circulation can cause fires. Therefore the air vents on the back must always be kept free. Please do not place newspapers or cloths on/over. If the TV is placed in a cabinet or on a shelf, leave at least 10 cm at the sides and 10 cm at the top to ensure sufficient air circulation.
Position the set so that it is not exposed to direct sunlight and additional heating from radiators.
Place the TV set on a level, firm base. The set should not protrude at the front when installing in cabinets or shelves.
Prevent any metal parts, needles, paper clips, liquids, wax or the like from getting into the TV set through the air venting slits in the rear panel. This can lead to short-circuits and possibly to fire.
If something should get into the inside of the TV set, pull out the plug immediately and notify customer service.
Repairs and Accessories
Never remove the back of the TV set yourself. Repair and servicing of your TV set should only be carried out by authorised TV technicians.
Cleaning
Use only a soft, clean, damp cloth to clean the TV set, the screen and remote control (do not use any caustic or abrasive cleaning agents).
LCD/LED-Display
The TV set with an LCD/LED screen you have purchased meets the highest quality requirements and has been tested for pixel errors. Despite the utmost caution in production of the displays, it cannot be totally ruled out that some of the pixels might be defective for technological reasons. Please understand that such effects cannot be considered a unit defect as defined by the warranty as long as they are within the limits specified by the standard.
Recycling
Attention: The EU directive 2002/96/EC regulates the proper way to recycle, handle and utilise used electronic devices.
Hence, all used electronic devices are to be disposed of separately. Please do not dispose of this set in the normal household rubbish.
You may return your used set free of charge at designated recycling centres or at your specialist dealer whenever you purchase a new, comparable set.
You can find out more about recycling (also for countries outside the EU) from your local government.
1.1 PACKAGE CONTENTS
• Power Cord • Operating Manual
- Remote Control • AC Adapter
- Cable
2. LOCATION AND FUNCTION OF CONTROLS
1. R-Line
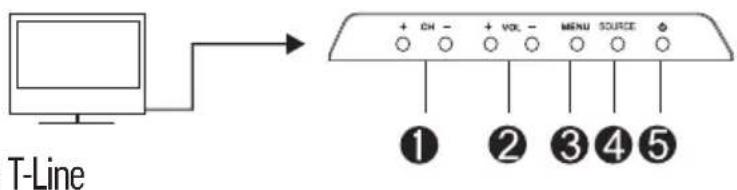
text_image
T-Line + CH - + VOL - MENU SOURCE + ① ② ③ ④ ⑤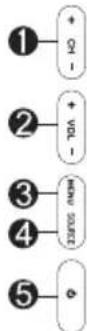
| Item Button Name Description | ||
| 1 | CH+/- | When you are watching the TV program, press these buttons to select channel in ascending or descending order. Select the upper or lower menu item in the OSD menu. |
| 2 | VOL+/- | Increase or decrease the volume.Adjust the values of the selected menu item in the OSD menu. |
| 3 MENU Enter | or exit from the menu | |
| 4 SOURCE Select an input signal. | ||
| 5 Switch on the | LFD TV when at standby mode or vice versa. | |
2. S-Line
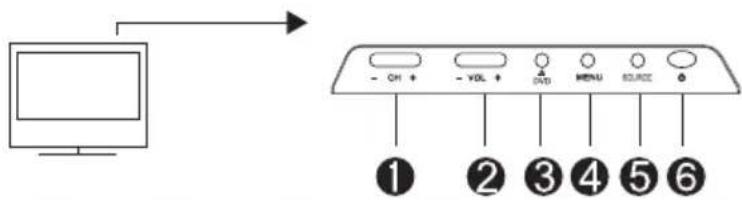
text_image
Diagram showing connection between a monitor and a control panel with labeled buttons 1 through 6| Position Tastenbeschriftung Funktion | ||
| 1 | CH+/- | When you are watching the TV program, press these buttons to select channel in ascending or descending order. Select the upper or lower menu item in the OSD menu |
| 2 | VOL+/- | Increase or decrease the volume.Adjust the values of the selected menu item in the OSD menu |
| 3 Open/Close. | Available in DVD mode. | |
| 4 MENU Enter | or exit from the menu | |
| 5 SOURCE Select an input signal. | ||
| 6 Switch on the | LED TV when at standby mode or vice versa. | |
ON/OFF switch is placed on the right side (R-Line) and on the bottom (S-Line).
Note:
Power indicator lights blue in standby and no light when TV is switched on.
3. CONTROL BUTTONS AND TERMINALS
1. R-Line/T-Line
Rear Panel
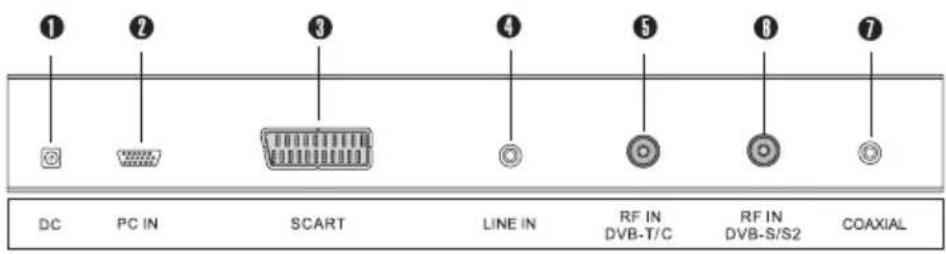
text_image
① ② ③ ④ ⑤ ⑥ ⑦ DC PC IN SCART LINE IN RF IN DVB-T/C RF IN DVB-S/S2 COAXIAL1 10.6V \~ 26V DC Terminal
2 PC IN Input Terminal
3 SCART Connector
4 LINE IN (VGA Audio) Terminal
5 ATV & DVB-T/C Input Terminal
6 DVB-S/S2 Input Terminal
7 COAXIAL Output Termina
Side panel
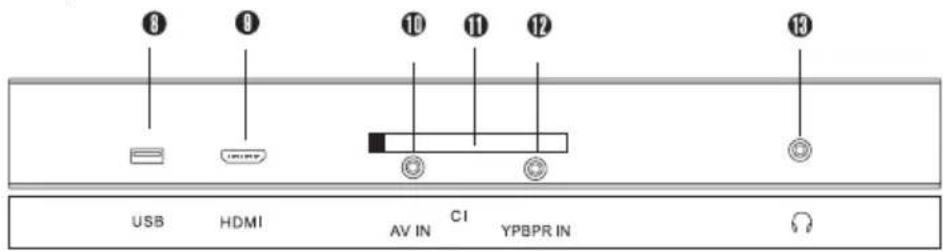
text_image
8 9 10 11 12 13 USB HDMI AV IN CI YPBPR IN8 USB Input Terminal
9 HDMI Input Connector
10 AV Input Terminal
11 CI (Front Face Up!)
12 YPbPr Input Terminal
13 Headphone Output Terminal
2. S-Line
S-17 eSHB - Left Side
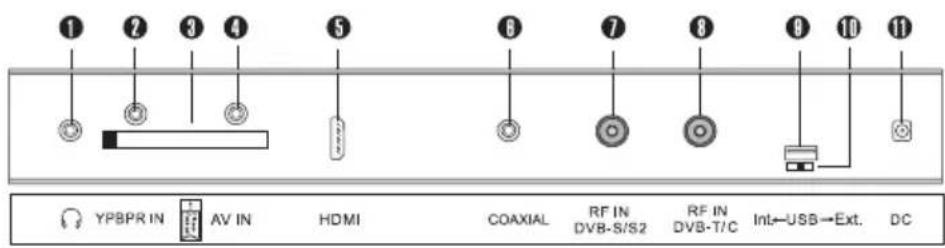
text_image
1 2 3 4 5 6 7 8 9 10 11 YPBPR IN AV IN HDMI COAXIAL RF IN DVB-S/S2 RF IN DVB-T/C Int←USB→Ext. DC1 Headphone Output Terminal
2 YPbPr Input Terminal
3 Cl (Back Face Up!)
4 AV Input Terminal
5 HDMI Input Terminal
S-17 eSHB - Right Side
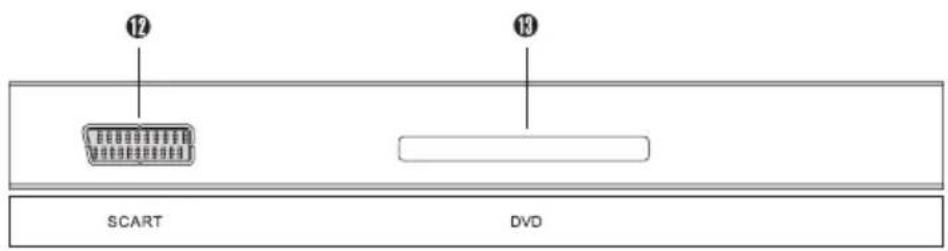
text_image
12 13 SCART DVD9 external USB slot
10 Switch for USB
(Int.:PVR,
Ext.: PVR/ Media Player)
11 10.6V \~ 26V DC TERMINAL
S-19 eSHB - Left Side Side
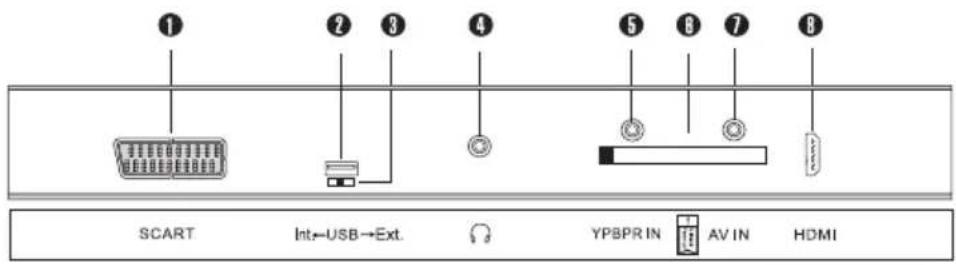
text_image
1 2 3 4 5 6 7 8 SCART Int←USB→Ext. YPBPR IN AV IN HDMI1 SCART TERMINAL
2 external USB slot
3 Switch for USB (Int.:PVR, Ext.: PVR/Media Player)
4 Headphone Output Terminal
5 YPbPr Input Terminal
6 CI (Back Face Up!)
7 AV Input Terminal
8 HDMI Input Terminal
S-19 eSHB - Right Side
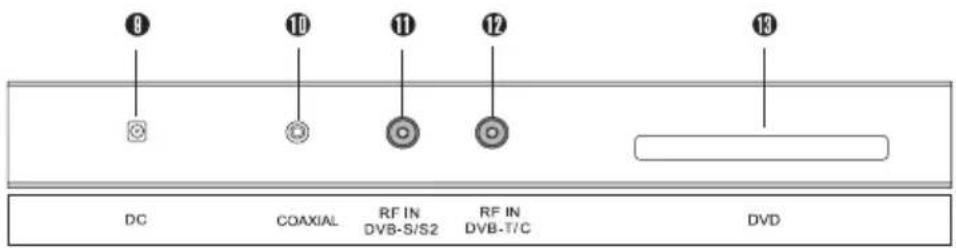
text_image
8 10 11 12 13 DC COAXIAL RF IN DVB-S/S2 RF IN DVB-T/C DVD9 ATV & DVB-T/C Input Terminal
10 DVD
11 10.6V \~ 26V DC TERMINAL
12 COAXIAL Output Terminal
13 DVB-S/S2 Input Terminal
S-22 eSHB - Right Side
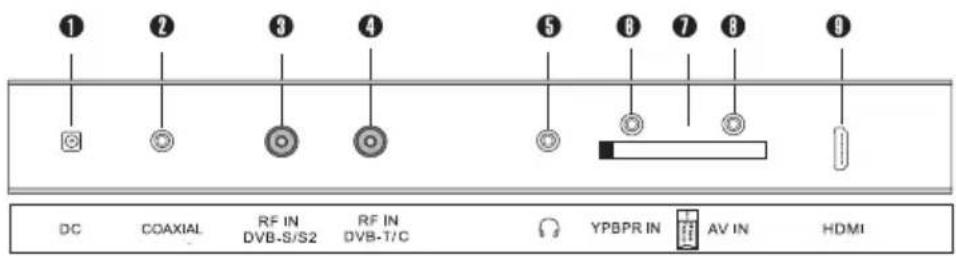
text_image
① ② ③ ④ ⑤ ⑥ ⑦ ⑧ ⑨ DC COAXIAL RF IN RF IN YPBPR IN AV IN HDMI DVB-S/S2 DVB-T/C AV IN HDMI1 10.6V \~ 26V DC TERMINAL
2 COAXIAL Output Terminal
3 DVB-S/S2 Input Terminal
4 ATV & DVB-T/C Input Terminal
5 Headphone Output Terminal
6 YPbPr Input Terminal
7 CI (Back Face Up!)
8 AV Input Terminal
9 HDMI Input Terminal
S-22 eSHB - Left Side
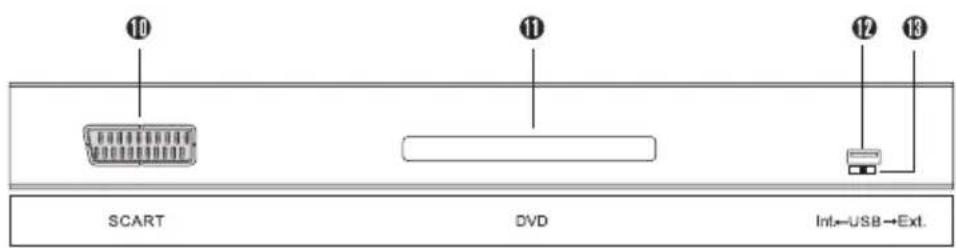
text_image
⑩ ⑪ ⑫ ⑬ ⑬ SCART DVD Int←USB→Ext.10 SCART TERMINAL
11 DVD
12 external USB slot
13 Switch for USB
(Int.:PVR, Ext.: PVR/Media Player)
4. REMOTE CONTROL
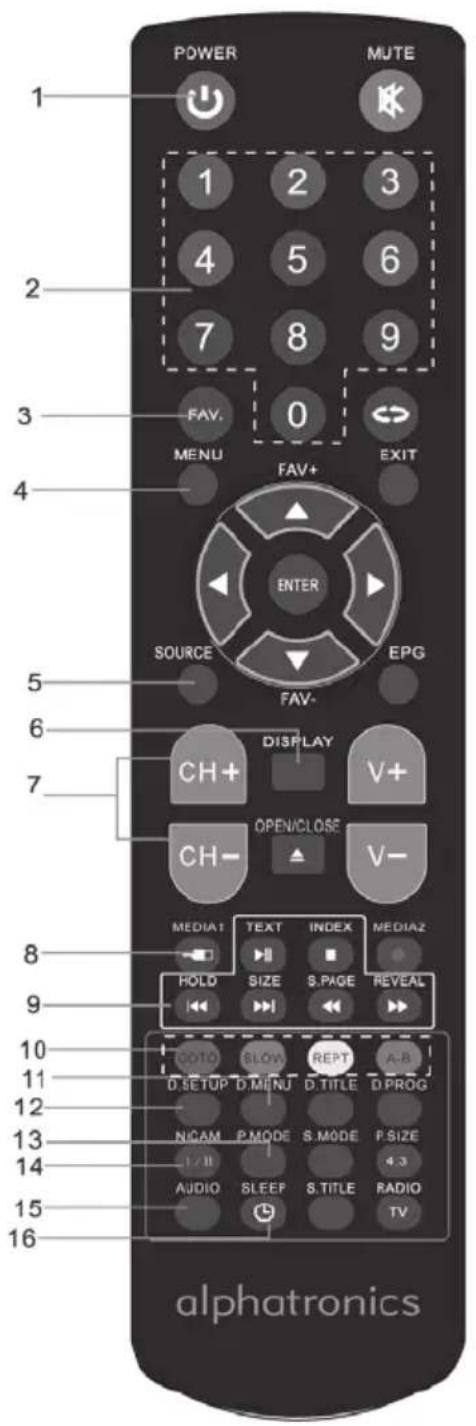
text_image
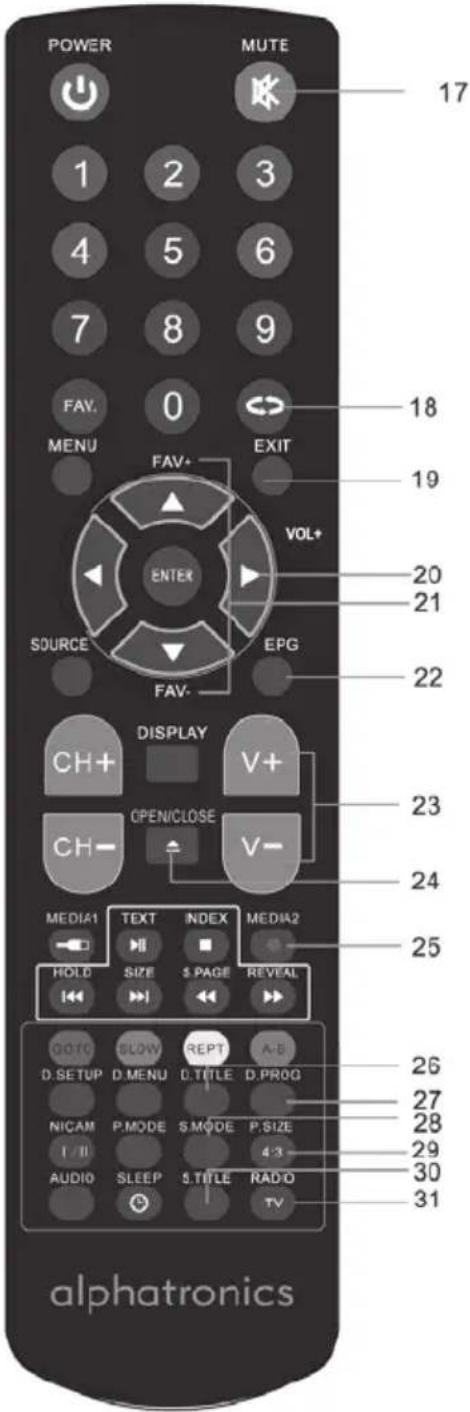
POWER MUTE 1 2 3 4 5 6 7 8 9 FAV. 0 FAV+ MENU EXIT SOURCE EPG FAV- DISPLAY CH+ V+ OPEN/CLOSE CH- V- MEDIA1 TEXT INDEX MEDIA2 HOLD SIZE S.PAGE REVEAL GOTO SLOW REPT A-B D SETUP D.MENU D.TITLE D.PROG NICAM P.MODE S.MODE P.SIZE AUDIO SLEEP S.TITLE RADIO TV alphatronics- POWER
- 0 - 9 Number Buttons
- FAV.
- MENU
- SOURCE (To select an input signal)*
- DISPLAY (To display the source and channel information)
- CH + / - (To select the channel forward or backward.)
- MEDIA1 (To enter the USB multi-media)
- TELETEXT Buttons (These Buttons are used for certain modes with teletext functions only. For further details, refer to the TELETEXT FUNCTION)
- RED/GREEN/YELLOW/CYAN (To use according to ON Screen Display Guide.)*
- D.MENU (During DVD playback, press to enter the program menu. During USB media playback, press to enter the setup menu.)
- D.SETUP (Press to activate the DVD SETUP menu.)
- P.MODE (To select picture mode.)
- NICAM (To switch among stereo, DUAL1, DUAL2 and Mono in ATV mode.)
- AUDIO (To select Stereo/MONO or change audio's language. In DTV, USB and DVD mode.)
- SLEEP (To select sleep time)
text_image
POWER MUTE 17 1 2 3 4 5 6 7 8 9 FAV. 0 MENU FAV+ EXIT 18 19 VOL+ 20 21 SOURCE EPG FAV- 22 DISPLAY CH+ V+ OPEN/CLOSE CH- V- MEDIA1 TEXT INDEX MEDIA2 HOLD SIZE $.PAGE REVEAL GOTO SLOW REPT A-B D. SETUP D. MENU D. TITLE D.PROG NICAM P.MODE S.MODE P.SIZE I / II 4:3 AUDIO SLEEP SProfile RADIO 30 31 alphatronics- MUTE (To switch the sound on or off.)
- RETURN (To return to the previously selected program number.)
- EXIT (To exit the menu.)
- ◀▶| ▲▼AND ENTER (Use to select on screen menu items and change menu values.)
- FAV+/FAV- (To select a favorite channel according to the service sequence in current favorite list.
- EPG (To start the EPG application.)
- VOL+/VOL- (To adjust the audio levels.)
- OPEN/CLOSE (Press to open or close the disctray.)
- MEDIA2 (Once button recording.)*
- D. TITLE (During DVD playback, press to display the DVD title menu.)**
- D.PROG (While watching the digital TV, press to start time shift. During DVD playback, press to display the program menu for edit.) enter the program*
- S.MODE (To select the sound mode.)
- P.SIZE (To select picture size.)
- S.TITLE (To enable/disable the subtitle in DTV, USB and DVD mode.)
- TV/Radio (To select TV and Radio in DTV mode.)
alphatronics
Note:
- Do not use rechargeable (Ni-Cd) batteries.
- Do not attempt to recharge, short circuit, disassemble, heat or throw the batteries into the fire.
- Do not splash the remote control with water or put it on a wet object to avoid possible damage.
- Do not drop, step on or cause any impact to the remote control unit. This may damage it, resulting malfunction.
- Do not mix old and new batteries.
- If the remote control unit is not going to be used for a long time, remove the batteries.
- Strong light such as direct sunlight impinging on the remote sensor can cause operational failure. Place the remote control to avoid direct contact with sunlight.
5. START UP
Before using your new LED TV you have to connect it to a suitable power source. For your comfort we installed already an extensive channel list for DVB-S/S2. You don't need to do a channel search.
For DVB-T/C we suggest, depending on location, to do an automatic channel search. Therefore, please enter main menu and follow the instruction.
If you need more information or a more detailed User manual, please go to our homepage: www.alphatronics.de
Choosing a TV Channel
- Press the CH+ or ▲ button to increase channel number.
- Press the CH- or button to decrease channel number.
You can select the channel number directly by pressing 0 to 9 buttons three times.
Note:
After selecting the digit button, the digit will be memorized. You can return to the previously selected programm by pressing
Selecting input source
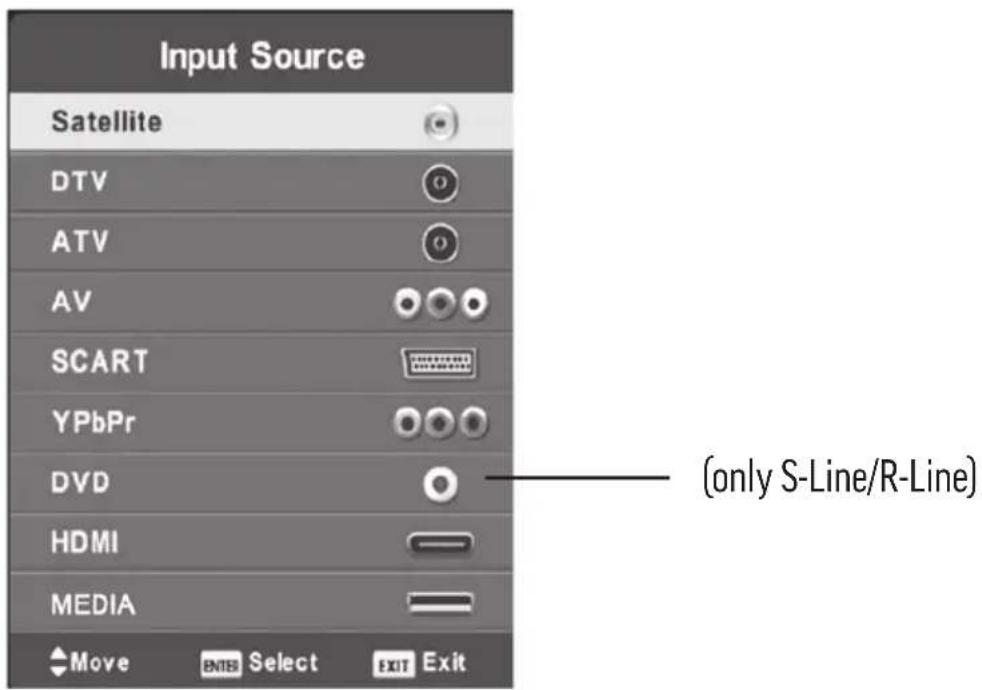
You can select the input source by pressing the SOURCE button on the top of the panel or press the SOURCE button on the remote control. Then press enter or the ▶to confirm.
text_image
Input Source Satellite DTV ATV AV SCART YPbPr DVD HDMI MEDIA Move Select Exit Exit (only S-Line/R-Line)6. CHANNEL MENU
Press the MENU button to display the main menu.
Press the ◀/▶ button to select CHANNEL in the main menu, it will highlight the first option.
- Press the ▲/▼ button to select the option that you want to adjust in the CHANNEL menu.
- Press OK button to adjust.
- After finishing your adjustment, press MENU button to save and return back to the previous menu.
Tuning Menu
Depending on the source you can do an automatic or manual search for DVBS/S2 or DVB-T / C. You can also edit the programs and timer list (only for devices with PVR). In DVB-S/S2 mode you can set the satellite configuration and add or delete satellites and transponders.
Tipps for DTV
1. EPG
Press EPG button on the remote controller to enter program guide menu, press EPG or Exit button to exit the menu.
TELETEXT
PIn DVBS/T/C mode push „Text“ to open or close Teletext.
7. PICTURE MENU
Press the MENU button to display the main menu.
Press the ◀/▶ button to select PICTURE in the main menu, it will highlight the first option.
- Press the ▲/▼ button to select the option that you want to adjust the PICTURE menu.
- Press OK button to adjust.
- After finishing your adjustment, press MENU button to save and return back to the previous menu.
Picture Mode
Press ▲ / ▼ button to select PICTURE MODE, then press OK button to enter sub-menu. Press ▲ / ▼ button to select. (Available Picture Mode: Personal, Dynamic, Standard, Mild). You can change the value of contrast, brightness, color and sharpness when the picture is in USER mode.
TIPS: You can press PMODE button on the remote control to change the Picture Mode directly.
8. SOUND MENU
Press the MENU button to display the main menu.
Press the ◀/▶ button to select SOUND in the main menu, it will highlight the first option.
- Press the ▲/▼ button to select the option that you want to adjust the SOUND menu.
- Press ◀/▶ button to adjust.
- After finishing your adjustment, press MENU button to save and return back to the previous menu.
Sound Mode
Press ▲ / ▼ button to select SOUND MODE, then press OK button to enter sub-menu. Press ▲ / ▼ button to select. (Available Sound mode: Personal, Standard, Music, Movie, Sports). You can change the value of Treble and Bass when the picture is in USER mode.
TIPS: You can press SMODE button on the remote control to change the Sound Mode directly.
7.1 Bluetooth:
If you have turned on the Bluetooth function, you enter the Bluetooth menu.
Now you can connect the TV with other Bluetooth-enabled devices. To do this, select „Search“ and wait until the TV has found the desired device in the list and inserted underneath. If the connection succeeded status appears „paired“. Now you can confirm this status by pressing „Enter“ and the status „connected“ appears. Now you can use the audio-device with your TV. If you want to disconnect, then confirm with „Enter“ on the displayed device and the status changes back from „connected“ to „paired“. The can also be deleted by pressing the „red“ button.
If you want to connect devices (up to 5 devices, the TV store), repeat, as described before.
Note:
- The TV will automatically reconnect with the last device, if available.
- When you hear the sound from Bluetooth, the main speakers are automatically muted. This you can change as needed in the Sound menu.
- Even if the TV can store up to 5 Bluetooth receivers, you can always just use one.
9. TIME MENU
Press the MENU button to display the main menu.
Press the ▲/▼ button to select TIME in the main menu, it will highlight the second option.
- Press the ▲ button to select the option that you want to adjust in the LOCK menu.
- Press ◀/▶ button to adjust.
- After finishing your adjustment, press MENU button to save and return back to the previous menu.
Sound Mode
Press ▲ / ▼ button to select SOUND MODE, then press OK button to enter sub-menu. Press ▲ / ▼ button to select. (Available Sound mode: Personal, Standard, Music, Movie, Sports). You can change the value of Treble and Bass when the picture is in USER mode.
TIPS: You can press SMODE button on the remote control to change the Sound Mode directly.
10. LOCK MENU
Press the MENU button to display the main menu.
Press the ▲ button to select LOCK in the main menu, it will highlight the first option.
- Press the ▲ button to select the option that you want to adjust in the LOCK menu.
- Press ◀/▶ button to adjust.
- After finishing your adjustment, press MENU button to save and return back to the previous menu.
Lock System
Press ▲ button to select LCOK SYSTEM, then press OK button to make the following options valid. (Default password is "0000")
11. OPTION MENU
Press the MENU button to display the main menu.
Press the ▲/▼ button to select OPTION in the main menu, it will highlight the first option.
- Press the ▲ / ▼ button to select the option that you want to adjust in the OPTION menu.
- Press ◀/▶ button to adjust.
- After finishing your adjustment, press MENU button to save and return back to the previous menu.
12. MEDIA OPERATION
Note: Before operating MEDIA menu, plug in USB device, then press INPUT button to set the Input Source to Media.
Press ◀/▶ button to select MEDIA in the Source menu, then press OK button to enter. Press ◀/▶ button to select the option that you want to adjust in the MAIN MEDIA menu, then press OK Button to enter. You can choose between Photo, Music, Movie and Text.
13. PVR RECORDING (STANDARD S-LINE, OPTIONAL R-LINE, T-LINE)
You can record both on the internal memory (S-line) as well as on an external memory. For this Please switch USB input (see page?) to the desired position. Internal (Int.) or external (Ext.).
Hint:
Keep in mind that not all USB sticks or external hard drives are compatible. Especially USB 3.0 storage devices can make problems. With the variety of models and memory sizes on the market, we can provide no guarantee of full functionality of all available USB memory. It is especially important that the speed is more than 5MB / s
The recording can be started in both ways, as a timer recording in the EPG menu, as well as an instant recording by pressing the button „Media2“. The recorded program is stored in the Media menu under „movie“. You get there via the source function on the remote control to access this menu.
Timeshift, press the „D.Prog“ button on the remote. Press the „Stop“ button to return to the live image. Timeshift is controlled by the function keys appearing on the display.
14. DVD OPERATION (S-LINE, R-LINE)
Basic operation
- Turn ON and OFF the DVD function.
- Turn on the LCD TV and then press SOURCE repeatedly to select DVD mode.
- Insert Disc to DVD
- Insert the Disc to the Disc slot (printed side of the disc has to face towards front of the unit), the player will load the disc automatically. There will have an on screen indication "CLOSE" then "READ". After loading the disc content, it will switch to play mode automatically. If the disc is already placed inside, the disc will be read automatically.
The DVD player will be controlled by the RC. Function of controls as shown an page 30 and 31.
15. STAND INSTALLATION - R-LINE/T-LINE
natural_image
Line drawing of a flat-screen monitor with a blank screen and stand (no text or symbols)

-
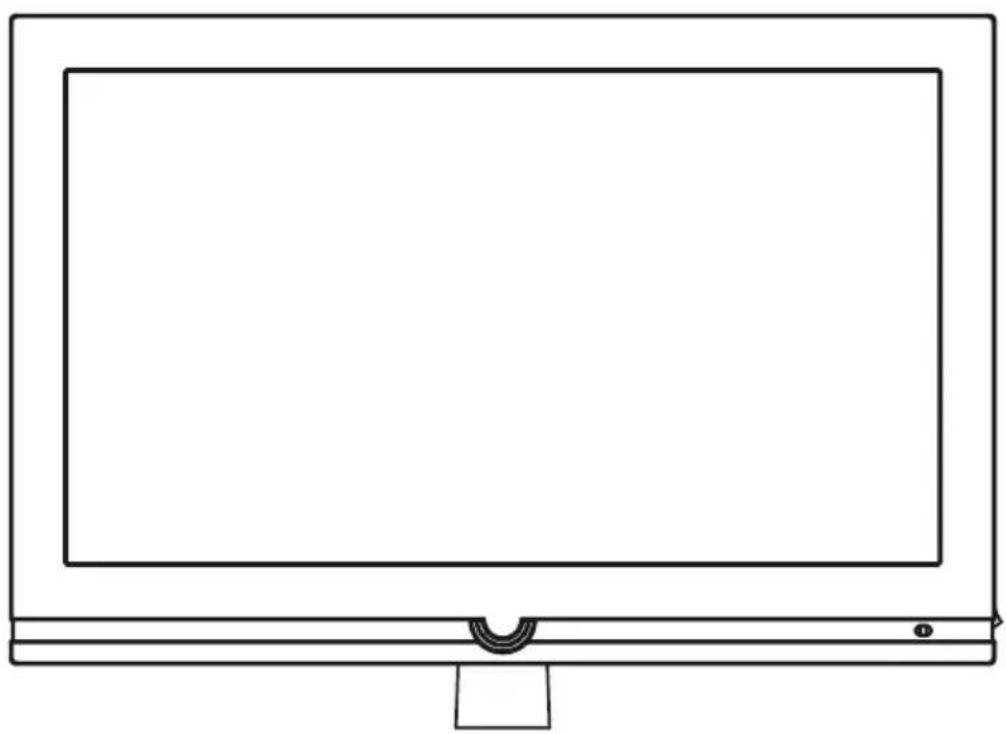
Put the ptastic stand to the stand pole. Do note the direction of the stand.
-
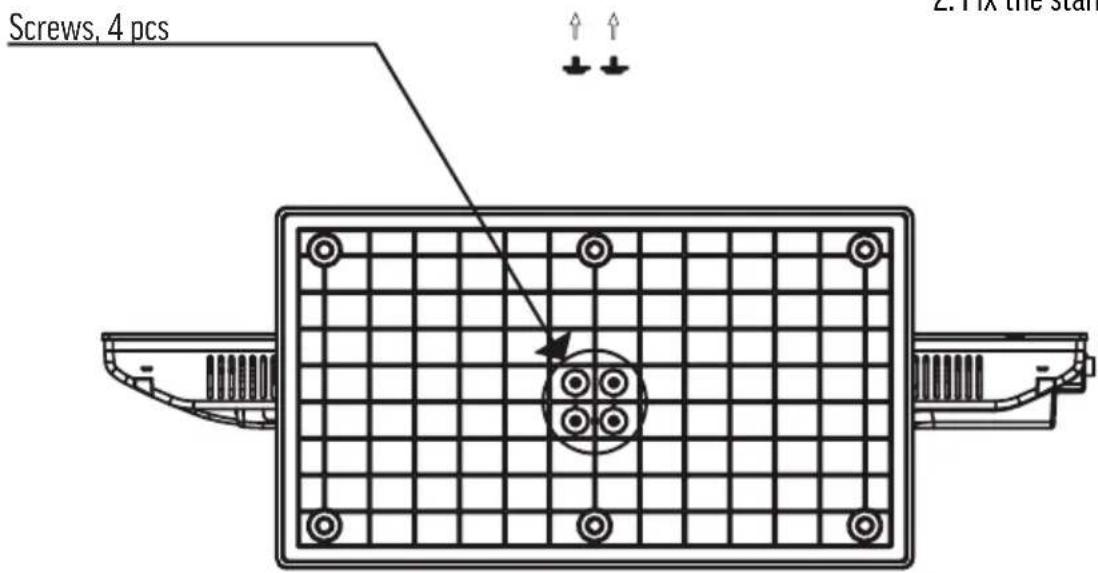
Fix the stand with the screws
text_image
Screws, 4 pcs E. Fix the startSTAND INSTALLATION -S-LINE
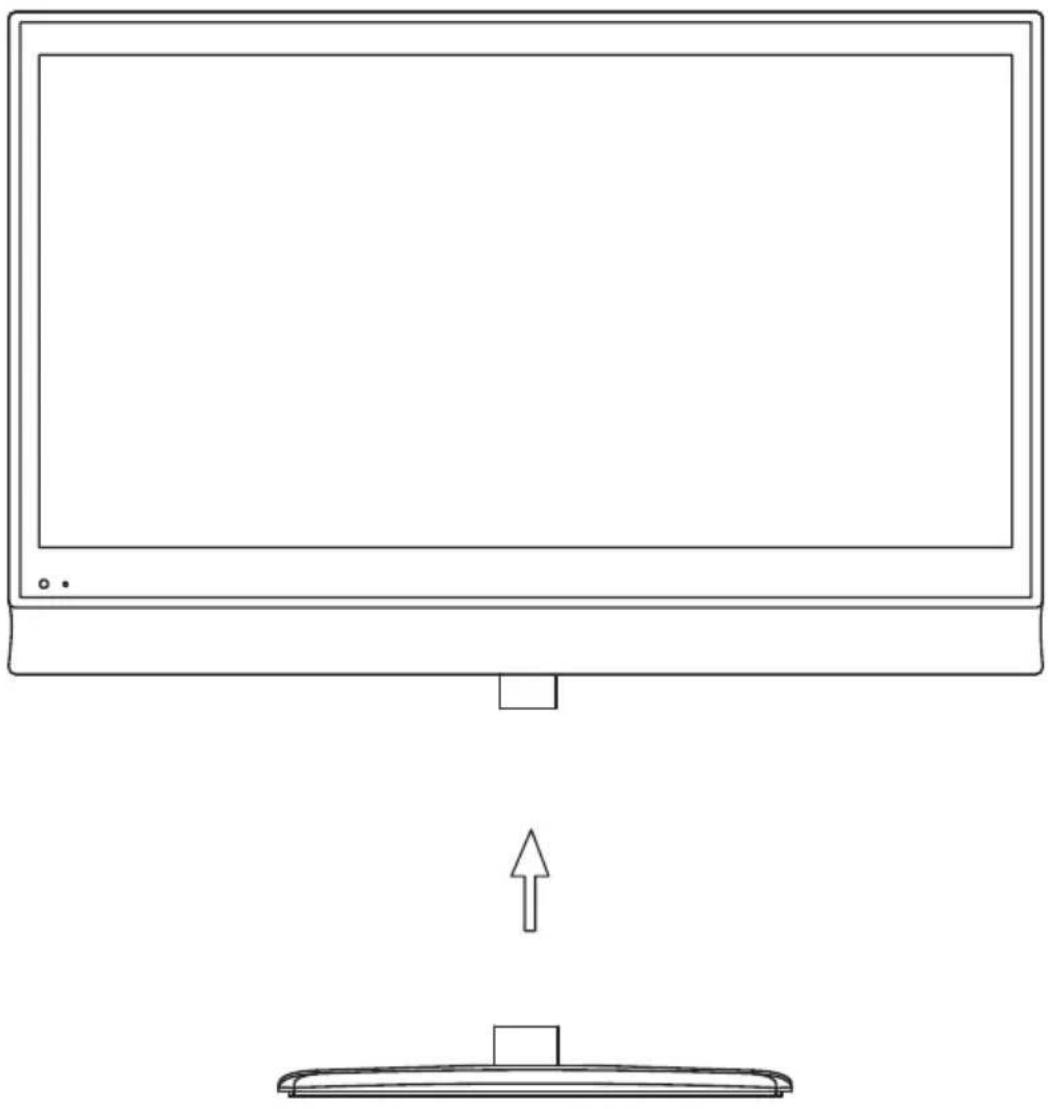
natural_image
Line drawing of a computer monitor with an upward arrow pointing to it, no text or symbols presentPush the stand into the stand pole.
16. TROUBLESHOOTING
Please use the following table to resolve the most common possible causes of the problem before calling service personnel. A minor adjustment may eliminate the problem and restore your TV reception.
| Problem Solutions | |
| No picture screen • Check that power is turned on. | Adjust brightness and contrast.Check input signal of TFT-LCD/LED.Check the power connection to the unit with screen.Check Main Display selection. |
| Picture is not clear • Check that Video cable is plugged in.Refer to the Picture Adjustments Menu in the OPERATING INSTRUCTIONS. | |
| Image is fuzzy • The power could be failing, try connecting the unit to another power outlet.Move unit a way from the magnetic equipment, such as Wireless Receiver, AC Transformer, etc.Refer to the Picture Adjustment Procedure Menu in the OPERATING INSTRUCTIONS. | |
| Colours are distorted Check that the Video cable is plugged in securely. | |
| Screen bounces or has wavy oscillations | Check Video input range (V-sync Max. 75Hz, H-sync Max.48.08KHz)Make sure Video cable connections are secure. |
| No sound • Check speaker line connections. | Sound might be muted, try adjusting the volume. |
| Only one speaker operates • Check audio wire connections with source device.Check the unit's speaker wires are securely connected. | |
| Remote Control inoperative • Check for light or obstacle interference with remote control signal and move unit to another location.• Batteries are dead; replace batteries with new ones. | |
| Poor Picture Reception and / or Poor Sound Quality | • From TV mode, select the appropriate setting and Rerun AUTO SEARCH channel. |
| When all else fails • Pull the AC plug off, | wait for 1 minute later and then plug the power again. |
If the unit does not operate normally after the operating instructions were followed and the troubleshooting section did not help, refer to dealer or qualified service staff.
Product Note:
Running Temperature -10- +45° Celsius
Storage Temperature -20- +60° Celsius
Customer Service
This product comes along with a 2-year warranty. If any problems occur, please contact your dealer.
Note
Designs, features and specifications are approximate and subject to change without notice. All pictures used in this manual are only for illustration purposes. Those pictures may differ from the original.
CE declaration
This is to declare the conformity of the product regarding protection of health and safety for the user and every other person and the electrical compatibility regarding the following standards:
EN 55022:2010
EN 55024:2010
EN 55013:2001 + A1:2003 + A2:2006
EN 55020:2007 + A11:2011
EN 61000-3-2:2006 + A1:2009 + A2:2009
EN 61000-3-3:2008
EN 60065:2002 + A1:2006 + Cor.:2007 + A11:2008 + A2:2010 + A12:2011
EN 300 328 V1.8.1
Furthermore this product corresponds to the following legal guidelines: