
PRS-950 - E-reader SONY - Free user manual and instructions
Find the device manual for free PRS-950 SONY in PDF.



| Product Type | E-reader (Digital Book Reader) |
| Model | PRS-950 (Reader Daily Edition™) |
| Dimensions (W/H/D) | Approx. 5 1/8 × 7 7/8 × 13/32 in (128 × 200 × 9.6 mm) |
| Weight | Approx. 9.6 oz (273 g) |
| Power Source | Built-in rechargeable battery: 3.7 V DC; AC adapter: 5.0 V DC, 1,500 mA |
| Battery Life | Approx. 20,000 continuous page turns (text-based ePub, fully charged) |
| Charging Time | ~2.5 hours with supplied AC adapter; ~5 hours via computer USB |
| Display | 7.1″ diagonal electrophoretic (e-paper), 600 × 1024 pixels, 16-level gray scale, capacitive touch screen |
| Connectivity | Mobile: HSPA/WCDMA 850/900/1900/2100, GPRS/EDGE; Wi-Fi: 802.11b/g; WPS support |
| Internal Memory | Approx. 1.4 GB user-available (after initial settings) |
| Expansion Slots | Memory Stick PRO Duo™ slot, SD card slot (supports up to 32 GB each) |
| Supported File Formats | ePub, PDF, TXT, RTF, BBeB (LRF/LRX), JPEG, PNG, BMP, MP3, AAC, WAV, and more |
| Operating Temperature | 41°F to 95°F (5°C to 35°C) |
| Key Features | Wireless download (3G/Wi-Fi), touch screen, font zoom, built-in dictionaries, Wikipedia, notes, highlights, bookmarks, collections, audio player, picture viewer, handwriting |
| Accessories Included | AC adapter (PRSA-AC1), USB cable, stylus |
| Repairability | Built-in battery not user-replaceable; reset hole, firmware updates via Wi-Fi or computer |
| Cleaning | Soft dry cloth; mild detergent if needed; avoid solvents, abrasives, and moisture |
Frequently Asked Questions - PRS-950 SONY
User questions about PRS-950 SONY
0 question about this device. Answer the ones you know or ask your own.
Ask a new question about this device
Download the instructions for your E-reader in PDF format for free! Find your manual PRS-950 - SONY and take your electronic device back in hand. On this page are published all the documents necessary for the use of your device. PRS-950 by SONY.
USER MANUAL PRS-950 SONY
Your Reader Daily Edition™ comes with these useful features:
Unplug and unwind – with mobile network or Wi-Fi® connection, you can download ebooks straight to your Reader™ without a computer and take your library on the go.
7" e-paper with clear touch screen – all you need is a soft touch to turn pages, tap to bookmark, take notes and highlight on a high quality screen.
Font Zoom – increase or decrease the text size to your preference, or zoom into images to take a closer look.
Dictionary and Wikipedia® – simply double-tap a word to read its definition or translate, learn more from Wikipedia's website.
Read on. There's so much more.
Personalize the standby screen with your favorite picture.
Use the “Collections” feature to keep your library organized and quickly find the next great book to read.
Support for the Reader™ device
First, check "Troubleshooting" (page 142) to resolve the issue.
Website and contact:
www.sony.com/readersupport
Phone number: 1-866-962-7669
Firmware Updates (System Software)
You may be notified (via an on-screen message) about firmware updates that are available for your Reader. We highly recommend that you install the latest firmware in order to take advantage of improvements and/or exciting new features for your Reader.
The firmware can be downloaded in one of two ways:
1) Directly to the Reader via a Wi-Fi connection. 2) Through a computer via a USB connection.
When you receive the message, select "Download Now" if the Reader is currently connected to a Wi-Fi network.
Otherwise, you can update the Reader firmware using a computer.
Please go to the Reader support website at http://www.sony.com/readersupport for instructions on how to update the Reader firmware.
Support for the Reader™ Store
Go to the Reader Store Help and Support page:
Tap [Store] at [Home] menu → press OPTIONS → tap [Help and Support].
For details about the Reader Store, see ▶ 35.
Jumping to a page (≥ 80)
Dictionary
- When reading a book (83) • Using Wikipedia (▶ 87)
- As an application (▶ 112)
- List of previously looked up words (➤ 86)
Reading Periodicals (➤ 88)
Browsing website (➤ 95)
Collection Management
- Creating (➤ 103)
- Adding contents (➤ 104)
- Deleting (➤ 105)
Other Applications
- Handwriting (➤ 113)
- Text Memo (➤ 116)
- Picture Viewer (➤ 118)
- Audio Player (➤ 120)
Supported File Formats (➤ 169)
Specifications (➤ 19)
©
Getting Content
Accessing the Reader™ Store Wirelessly ....35
Creating a Reader™ Store Account ....38
Making Purchases ....39
OPTIONS menu of the Reader Store ....40
Downloading Content 41
Accessing the Reader™ Store with your computer ...46
Step 1: Installing Reader™ Library ....48
Step 2: Sign in your account and purchasing eBooks ....51
Step 3: Transferring your eBooks to your Reader device ....52
Using Embedded Dictionaries ......
Listing previously looked up words ....8€
Using Wikipedia ....
Reading Newspapers / Magazines ......8
Reading from a Memory Stick™ or SD Card ......S
Network Menu
Network Menu ....
Google Books ......
Browsing Website ......
Adding a bookmark ....
OPTIONS menu of the [Browser] application ......101
Collections
Collections ....
Creating ....
Adding content ....
Deleting a collection ....
Removing content ....
Managing Content
Deleting Content ....
Protecting Content
Managing Periodicals
Chapter 1
Overview 14 - 20
Parts and Controls ....14
Specifications ....19
Overview
Parts and Controls
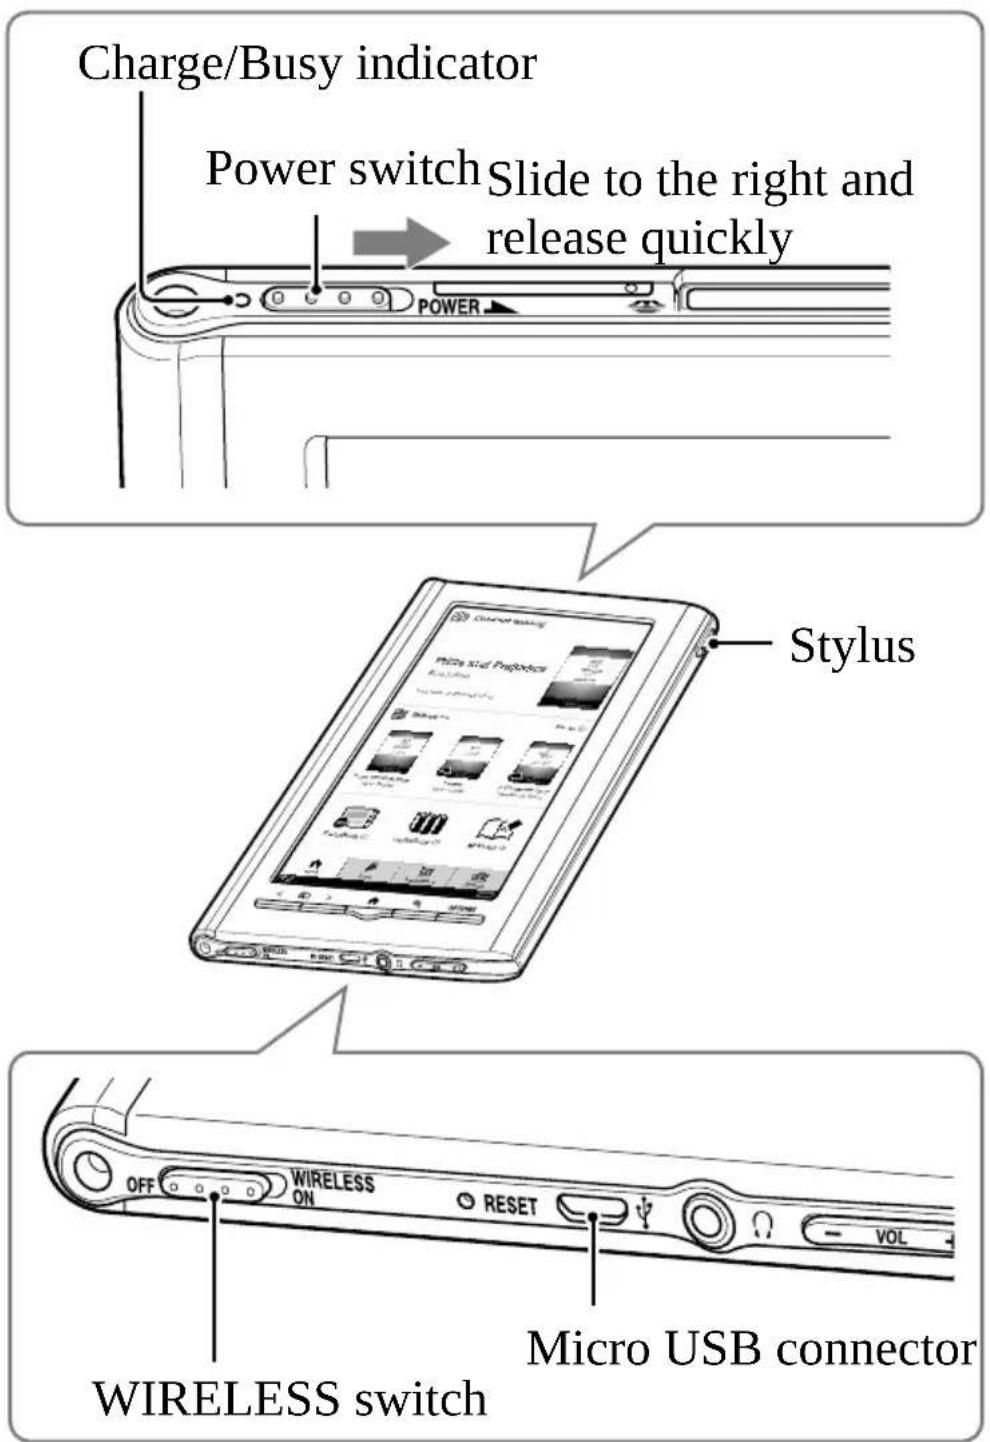


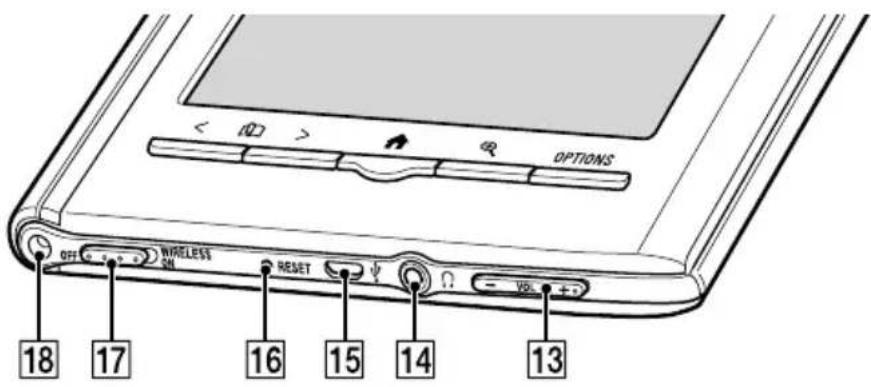
13 Volume button* (➤ 122)
Adjusts the volume when playing an audio file.
* A tactile dot on the + button helps with ease of operation.
14 Headphones jack
15 Micro USB connector (≥ 22, 48)
Used for transferring data and charging the Reader by the supplied USB cable.
16 RESET hole (≥ 142)
17 WIRELESS Switch (≥ 36, 37, 93)
Set to "ON" when using a mobile network or Wi-Fi network.
18 Holes for optional cover attachment
With the same hole in the left top corner of the Reader, an optional accessory cover can be attached.
Specifications
Model name
PRS-950
Power source
Built-in rechargeable battery: 3.7 V DC
AC adapter: 5.0 V DC, 1,500 mA
USB communication: Hi-Speed USB (USB 2.0 compliant)
Battery life (continuous playback)
Maximum Battery: Approx. 20,000 continuous page turns when reading only *
* Measured using a text based content in ePub format and a fully charged battery, consecutive page-turns at approximately one second per page under the recommended operating temperature. Actual battery life may vary based on usage patterns and individual device.
User available capacity
Approx. 1.4 GB after initial setting
Depending on size of pre-loaded excerpts, available memory capacity may vary.
Operating/charging temperature
41°F to 95°F (5°C to 35°C)
Dimensions (w/h/d)
Approx. 5 1/8 × 7 7/8 × 13/32 inches (128 × 200 × 9.6 mm)
Mass
Approx. 9 6/10 oz. (273 g)
Display:
7.1" (180.98 mm) diagonal electrophoretic display 600 × 1,024 pixel, 0.151 × 0.153 pixel/mm 16-level gray scale
Mobile network:
HSPA/WCDMA 850/900/1900/2100 MHz GPRS/EDGE 850/900/1800/1900 MHz
Wi-Fi:
802.11b/g compliant
Expansion slots
Memory Stick PRO Duo™ slot, SD card slot. See page 164 for memory card usage.
AC Adapter for Reader (PRSA-AC1)
• Output: 5.0 V DC, 1,500 mA - Input: 100 - 240 V AC, 50/60 Hz, 0.2 A - Operating/Charging temperature: 41°F to 95°F (5°C to 35°C) - Dimensions (w/h/d): Approx. 1 7/16 × 2 7/8 × 1 5/16 inches (Approx. 36 × 70 × 33 mm) • Mass: Approx. 1.76 oz. (50 g) - USB cable length: Approx. 58 1/8 inches (1.5 m)
Design and specifications are subject to change without notice.
Chapter 2
Getting Started ......22 - 26
Charging the Reader 22
Power Saving Tips ......24
Basic Operation ......27 - 34
Touch Screen 27
Home Menu ....32
Getting Content ......35 - 53
Accessing the Reader™ Store Wirelessly .....35
Creating a Reader™ Store Account ......38
Making Purchases ....39
OPTIONS menu of the Reader Store ....40
Downloading Content ......41
Accessing the Reader™ Store with your computer ....46
Getting Started
Charging the Reader
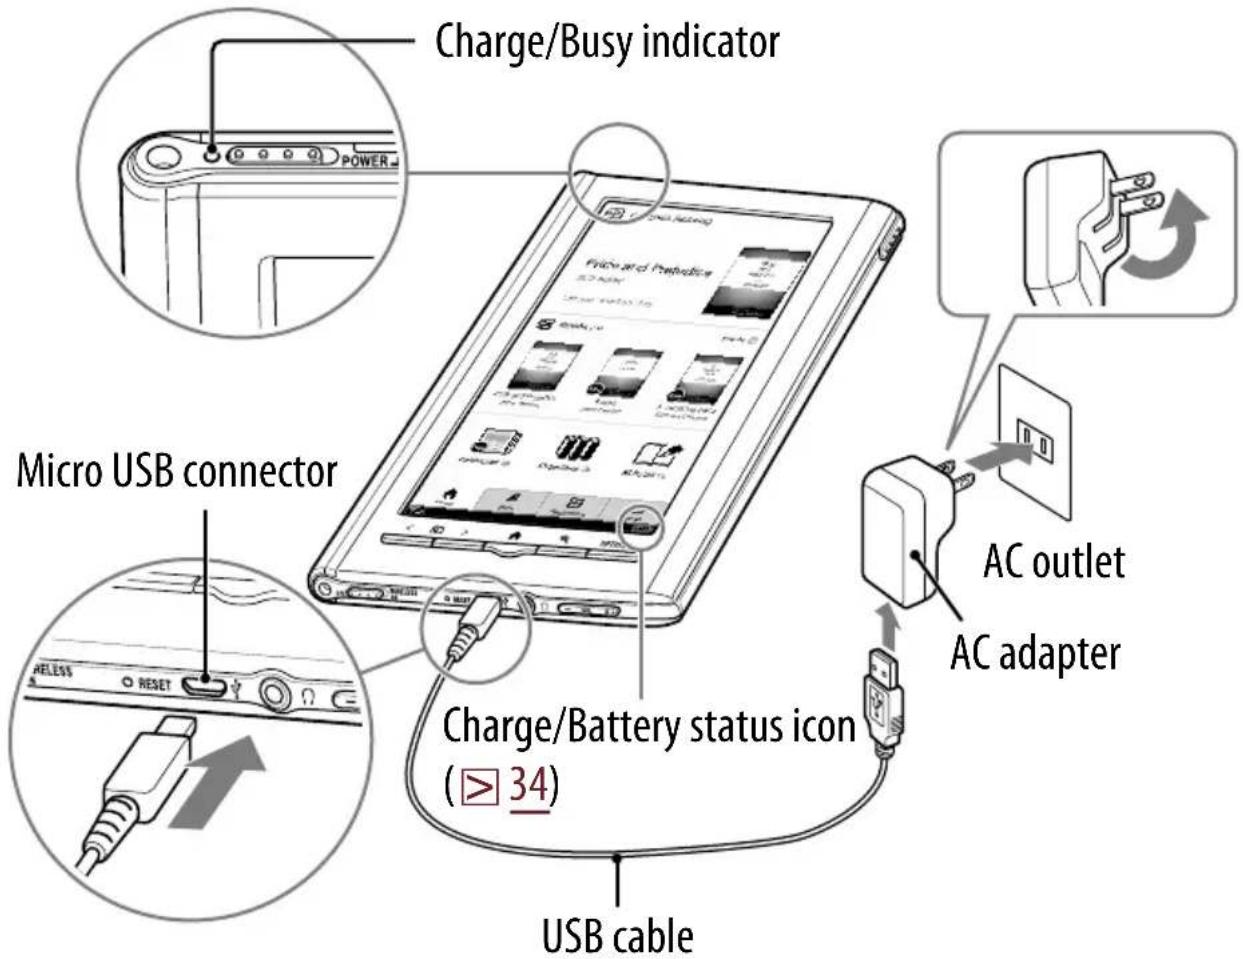
Charge your Reader by connecting to an AC outlet using the supplied AC adapter (PRSA-AC1). The time to completely charge a depleted battery is about 2.5 hours.
1 Connect one end of the supplied USB cable to the micro USB connector of the Reader, and the other end to the AC adapter.
2 Connect to an AC outlet.
appears in the status bar during the charge process. The indicator goes off and appears when fully charged.
Notes
Do not use the supplied USB cable or an AC adapter other than AC adapter (PRSA-AC1) with the Reader.
Connect the AC adapter to an easily accessible AC outlet. Should you notice an abnormality in the AC adapter, disconnect it from the AC outlet.
Tip
The Reader can also be charged by connecting it to your computer with the supplied USB cable (48). The time to completely charge a depleted battery is about 5 hours.
To check battery status in the status bar (33) during use
![graph LR A["Power Supply Battery"] --> B["Charging Cell"] B --> C["Charging Cell"] C --> D["Charging Cell"] D --> E["Charging Cell"] E --> F["Charging Cell"]](/content/2026/05/768969/images/f5c814228522f93ff6165fa02b0e8085a13636ffa9f5c73c61ec32cda3ec9824.jpg)
Charging battery recommended
Power Saving Tips
Charging Battery

To fully charge your Reader, continue charging until an icon shows completion of charge (▶ 22, 48).

Charging a completely depleted battery will take about 2.5 hours when connected to the supplied AC adapter.
Recommended Temperature
Please use your Reader within the recommended operating temperature range ( ▶ 19).
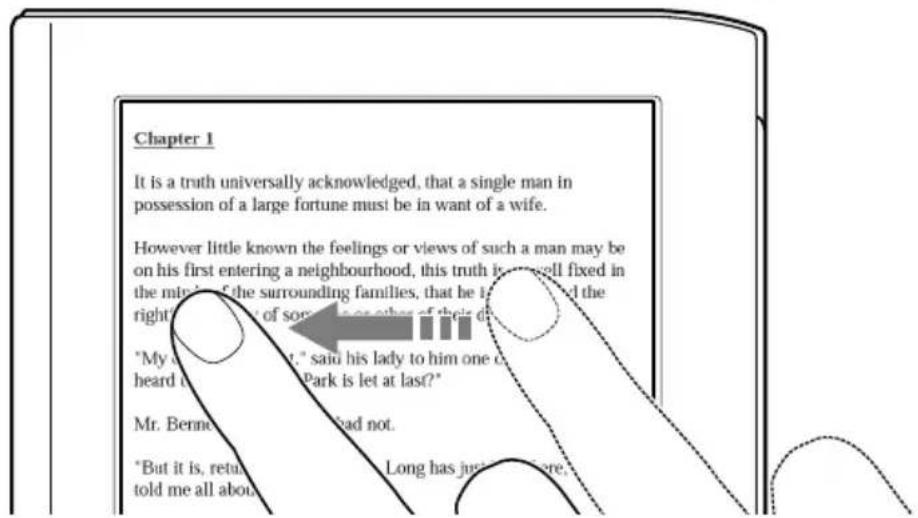
Swiping
In the page view, swiping the screen turns a page. To change page turn preference, see ▶ 126.
Swiping and holding
Swipe and hold the page to turn pages repeatedly.
On-screen keyboard
The on-screen keyboard is used for many functions.
Tip
The key array of the keyboard varies depending on the category of the input text (URL, etc.). Note that the input area may not appear on the keyboard.

To Perform at input area
Edit Tap to place the cursor.
Delete a character Tap to place the cursor and tap ← to delete a character before the cursor.
Finish inputting Tap [OK], [Search], [Done] or [Go].
Insert line feed Tap [Return].
Note
[Return] is only effective in the multiple line input.
| To Perform at input area | |
| Switch the keyboard type | Tap [123] to switch to the symbol keyboard. To return, tap [Abc]. |
| Switch the character type | Tap ↑ to switch to the upper-case keyboard. Tap %#$ to switch to additional characters at the symbol keyboard. |
| Input previously entered words | Tap one of previously entered words shown below the input area. |
| Notes● Keyboard history only records words of 4 to 15 letters. Numbers or other symbols are excluded.● Keyboard history is not displayed on the keyboard when using the [Browser] application. | |
| Move the cursor Tap | ◀ / ▶ to move the cursor in input area. |
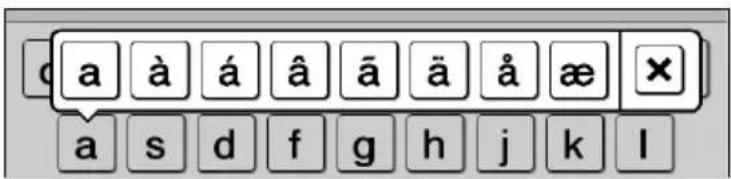
To input optional characters
Tapping and holding an applicable character key will pop up optional characters.
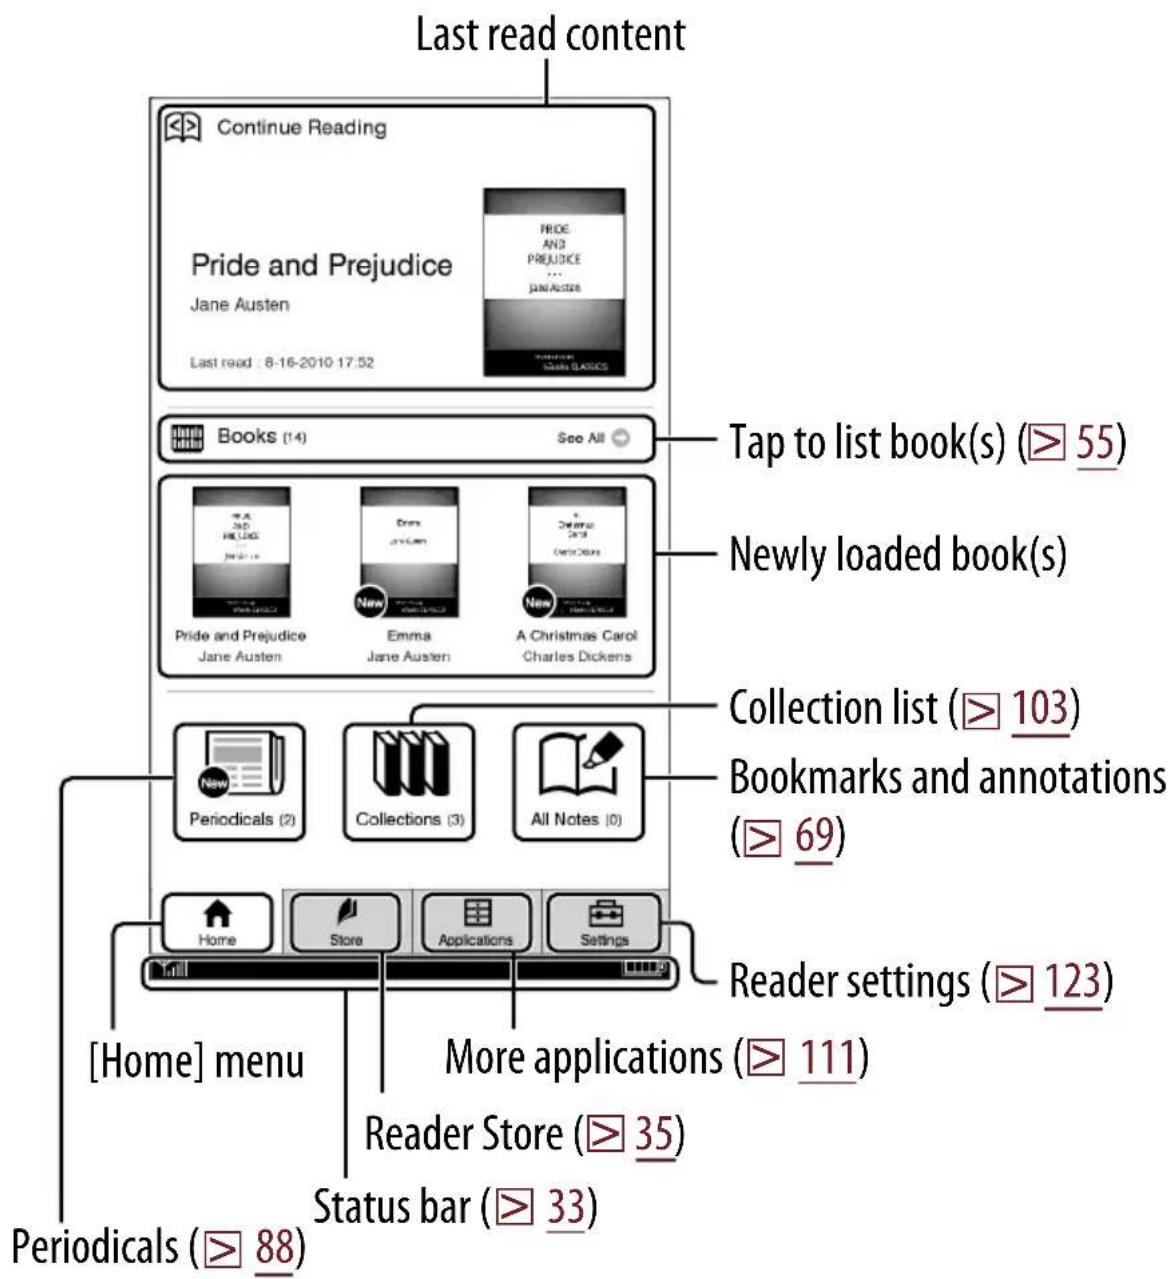
Home Menu
Press the (Home) button to display the [Home] menu.
Tip
Book and periodical recommendations, special promotions and exclusive offers will periodically appear on your Reader's [Home] menu (▶ 44).
About the status bar ( 32)
Icon Description
Current status indicator of mobile network and Wi-Fi network (36, 37).
Mobile network (3G) indicator. This appears when connected to a 3G network. The Reader is automatically connected to a 3G network when available.
/
appears when downloading content.
appears when connecting and downloading a page in the Reader Store or accessing the network menu.
/
appears when an SSL compatible site is displayed. The currently displayed site is encrypted using SSL.
may appear if a part of the displayed Web page is not SSL compatible.
Current text size (70).
Current page position in landscape mode (77).
Current page position indicator when in either 2 or 3 column split mode (71).
Page indicator. Tap this to jump to another page (80).
To check the network status
You can verify the wireless status by the wireless status icon that is displayed in the bottom left of the screen.
Mobile network status
For information on the network coverage area, please visit: http://www.sony.com/readersupport
Icon Status
The Reader is connected to the mobile network. The more bars, the stronger the signal.
The mobile network feature of the Reader is in standby mode (▶ 131).
The Reader cannot receive a mobile network signal. In this state, you cannot access the Reader Store.
The WIRELESS switch is set to "OFF" (≥ 18).
Tip
The displayed mobile network status icon varies according to the [Mobile Network] setting in the [Wireless Controls] setting (▶ 131).
Wi-Fi status
For details about the Wi-Fi settings, see ▶ 132.
Icon Status
| The Reader is connected to Wi-Fi. The more bars, the stronger the signal. | |
| The Wi-Fi network feature of the Reader is in standby mode ( ▶ 131). | |
| There is no Wi-Fi access point. In this state, you cannot access the Reader Store and the network menu. | |
| The WIRELESS switch is set to “OFF(18). |
Tip
The displayed Wi-Fi network status icon varies according to the [Wi-Fi] setting in the [Wireless Controls] setting (▶ 131).
Creating a Reader™ Store Account
In order to purchase and download eBooks or periodicals, you need to register an account at the Reader Store, or if you already have a Reader Store account or Sony Style account, sign in via your e-mail address and password.
![Reader Store. Reader™ Store. Welcome. Please make a selection below. I already have a Reader Store account. Sign In. I want to create a new account. Create Account. I want to import my Sony Style account to Reader Store. Import. Sign In / Register Later. Tap [Create Account].](/content/2026/05/768969/images/825ee1201f56d80ca3a50a293c59ed4e37f35dfee72bfb70b3eedc4bcfff1970.jpg)
Enter your e-mail address using the on-screen keyboard (30). The Reader will be associated with your account in the Reader Store.
Making Purchases
Browse the Reader™ Store to find your desired books and purchase them by following the store instructions.
Return to the top page of the Reader Store.
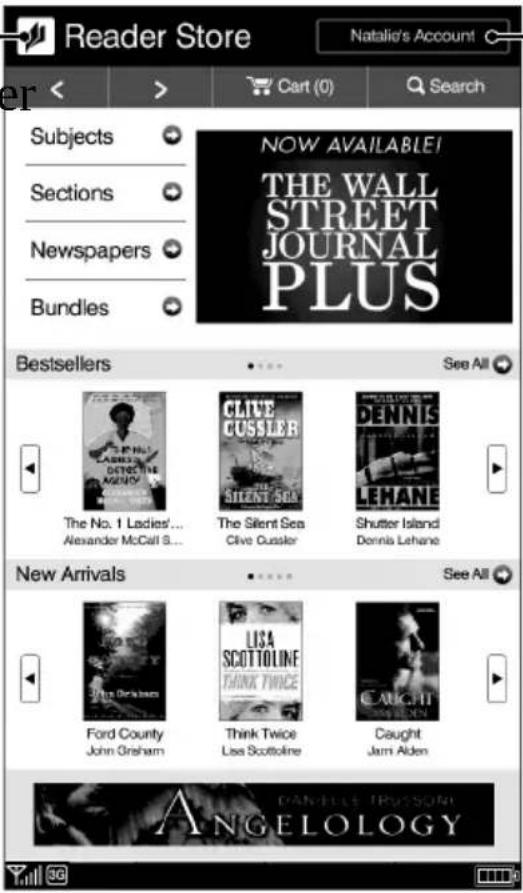
Displays purchase history and credit card information.
Tip
The purchased history can also be displayed by tapping ↓ [Purchased Content] under 📄 [Applications] at [Home] menu (➤ 93).
Reader Store notifications
You will automatically receive updates like book and periodical recommendations, special promotions and exclusive offers from the Reader Store on your [Home] menu.
To ensure this process, confirm the following:
- The WIRELESS switch is set to "ON" (➤ 18).
- A wireless network is available (▶ 36).
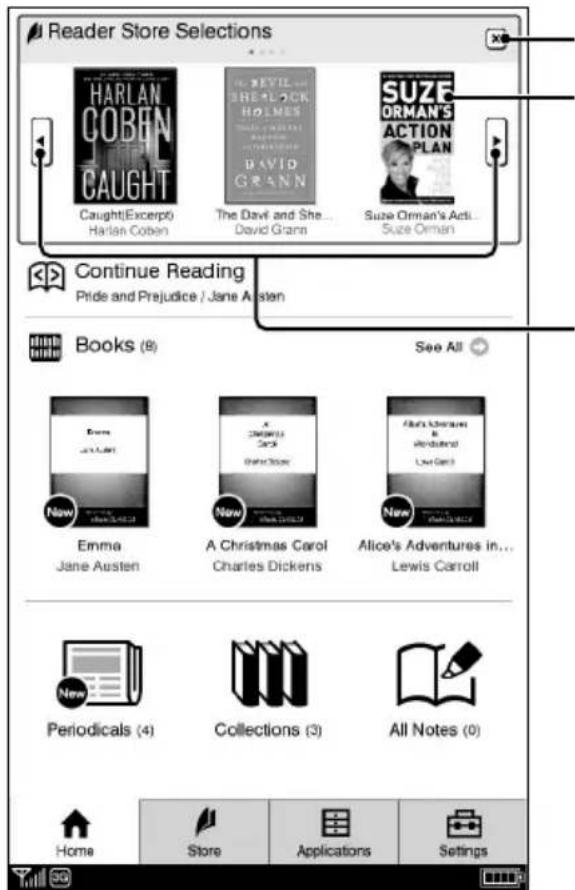
Close the Reader Store Notifications window Display the overview of the book in the Reader Store
Displays the previous or next three selections. You can get up to 12 selections.
To turn the [Reader Store Notifications] “On” or “Off”, go to [Settings] [General Settings] [Reader Store Notifications].
When you close the [Reader Store Notifications] window, your current recommendations will not be displayed the next time you go to the [Home] menu. However, the window will be displayed again when the Reader Store sends you new recommendations.
Step 1: Installing Reader™ Library
1. Connect your Reader device to your computer using the supplied USB cable.
Ensure that your Reader device is turned on, your computer is switched on, connected to the Internet, and you have Administrator access.
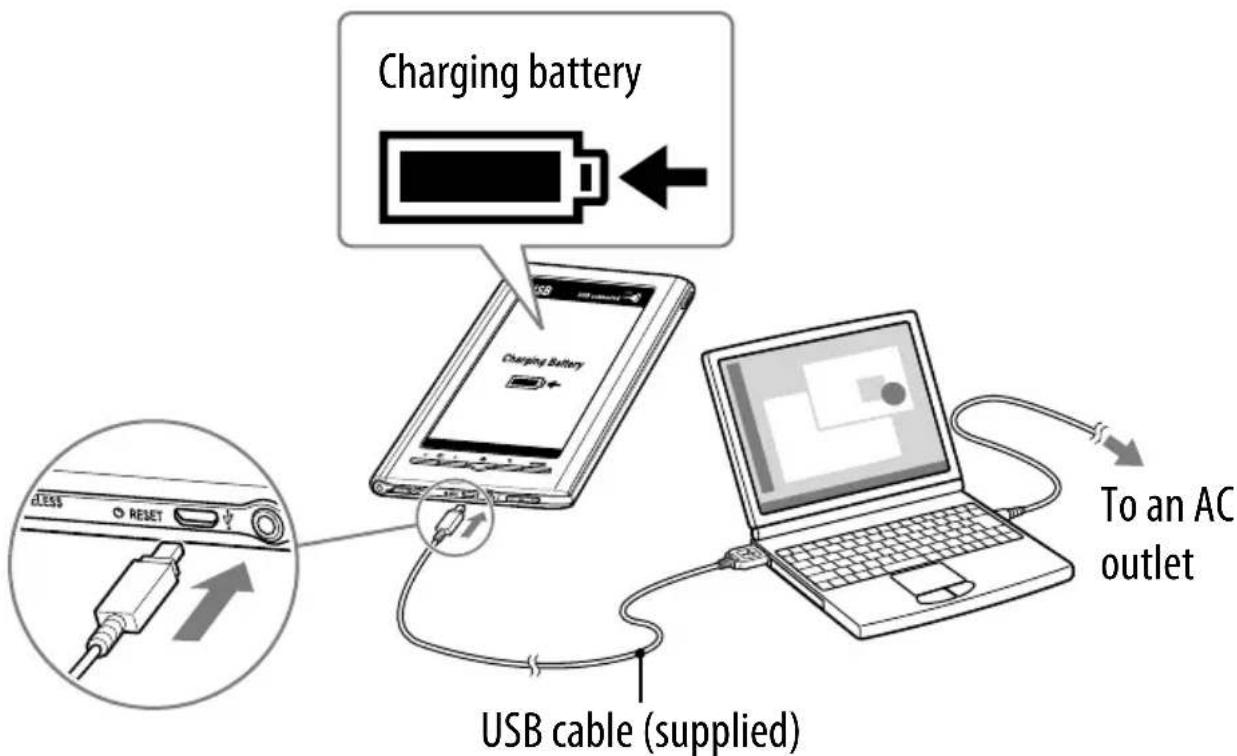
Status indicator while connecting your computer
| Icon and message Status | |
| [Charging battery] | Charging in progress. The battery icon does not indicate remaining battery power during charging. |
| [Charging complete] | Fully charged |
| [Charging stopped] | The Reader device is not charging its battery. Follow the on-screen instructions. |
3. Follow the on-screen instructions to complete the installation of Reader Library.
A shortcut to Reader Library will be added to your computer desktop (Windows only). Reader Library may start automatically depending on which option you choose just before finishing the installation. If Reader Library does not start automatically, double-click the shortcut to start Reader Library.
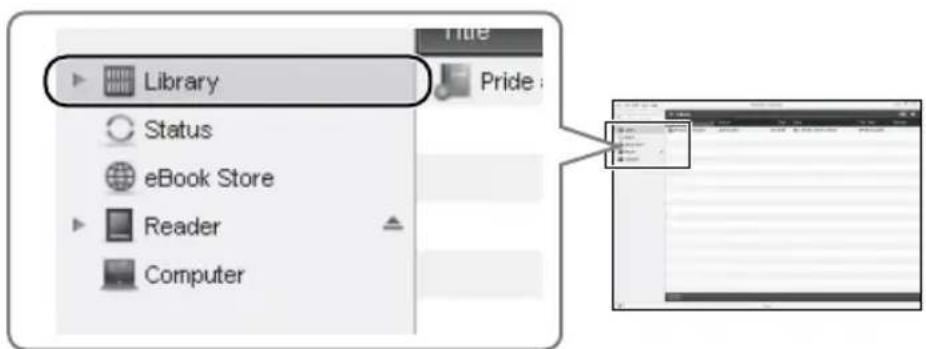
You can navigate around the different sections of Reader Library using the navigation menu on the left-hand side. When your Reader device is connected to your computer, you will see [Reader] appear in the list.
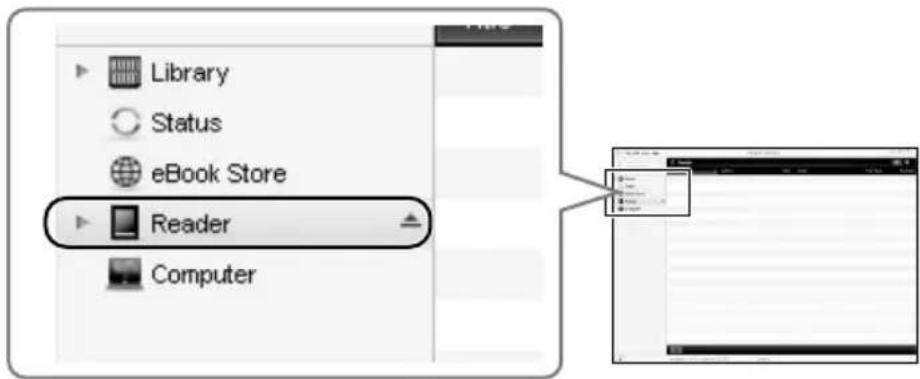
Step 2: Sign in your account and purchasing eBooks
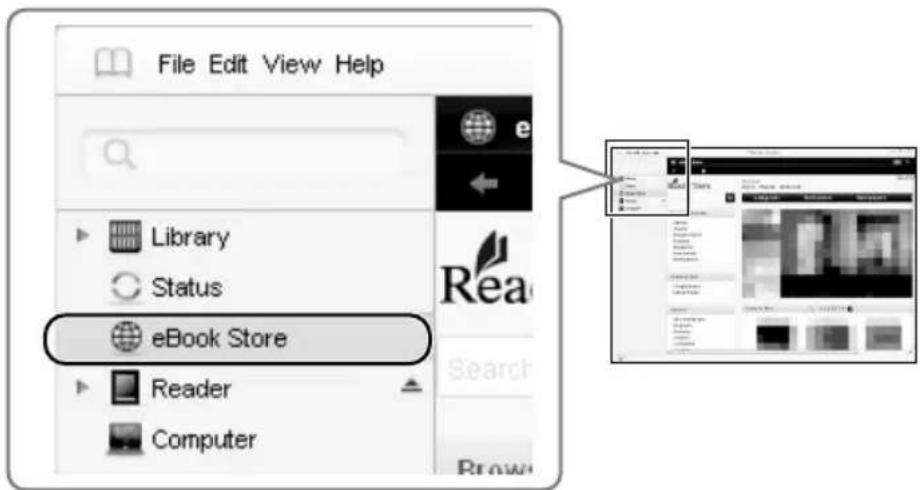
1. Visit Reader Store and sign in your account.
Click [eBook Store] in the left-hand menu within Reader Library.
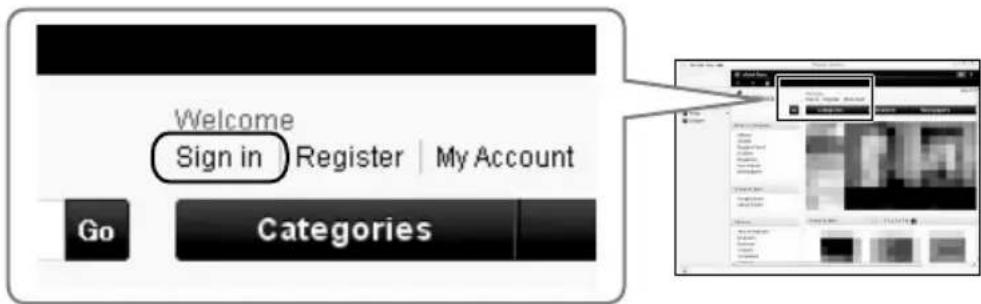
Sign in your account on the Reader Store.
Click the [Sign in] link. Follow the on-screen instructions to sign in your Reader Store account.
Note
If you do not have a Reader Store account, click [Register] to create an account.
2 Purchase and download eBooks.
Once you sign in to your account, you can purchase eBooks, subscribe to periodicals, and search over one million titles from Google Books. You can also borrow eBooks from your local public libraries. For details, refer to the home page of Reader Store. All purchased eBooks, subscribed periodicals, and free downloads can be found in the [Library] section in the left-hand menu within Reader Library.
Step 3: Transferring your eBooks to your Reader device
1 Click [Library] in the left-hand menu within Reader Library.
2 Click on the eBook that you wish to transfer and drag-and-drop it to [Reader] in the left-hand menu.
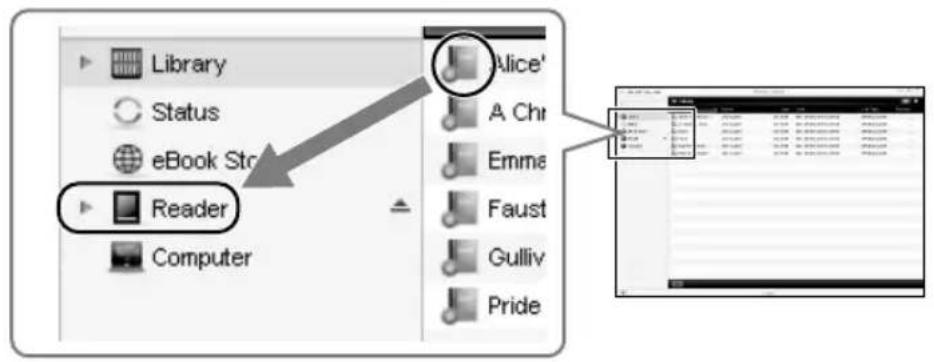
3 After a few moments, your eBook will be transferred.
If the Reader Library does not function as expected, refer to "Troubleshooting" in the Reader Library [Help] menu.
4 Close Reader Library and disconnect your Reader device from the computer.
Once Reader Library has closed, the on-screen message on your Reader device will change from [Do not disconnect] to [USB connected]. Once you see [USB connected], it is safe to disconnect your Reader device from your computer.
For more details about the Reader Library, refer to the Reader Library [Help] menu.
Reading Content
Reading Books
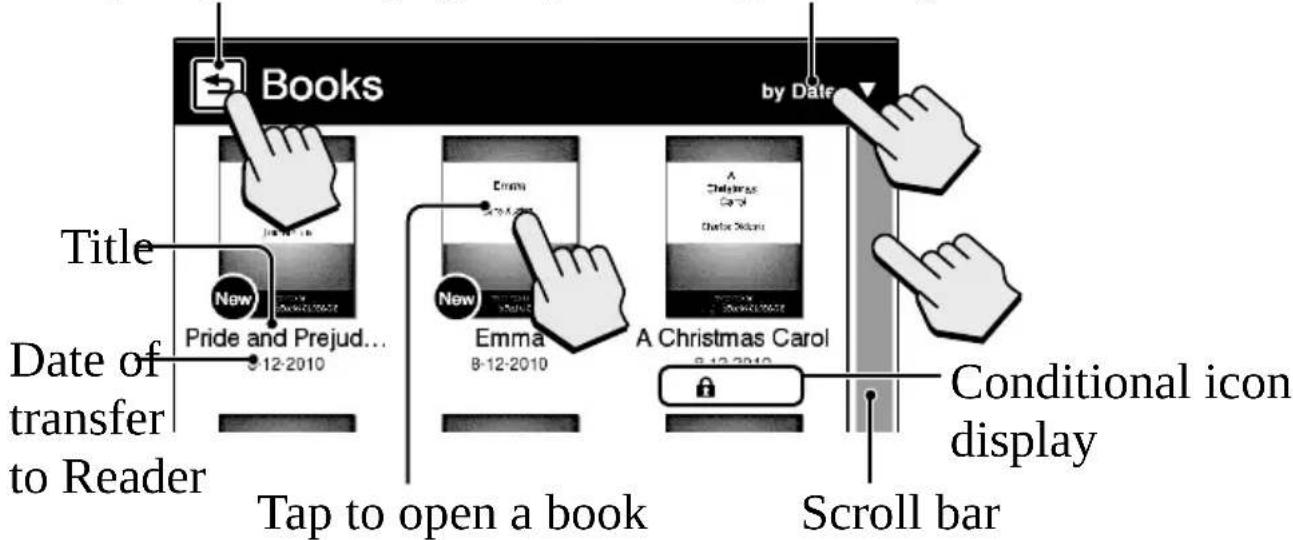
Tap [Books] at [Home] menu to view a book list. Tap a desired book to open.
Tap to go to the previous page. Tap to change the sorting order.
Tips
- Please see ▷ 57 regarding the OPTIONS menu.
- To transfer eBooks to the Reader, please see ➤ 52.
- The [Page Sync] function synchronizes bookmarks, typed notes, and the current page number across your compatible reading devices like handhelds (▶ 66).
Conditional icon
| Icon Condition | |
| New | Newly transferred or unread content. |
| Protected content (108). | |
| M.S./SD | Content on a memory card (91). |
| 23 | Days to the expiration date. [Expired] is displayed when a book has expired. |
Operation at page view
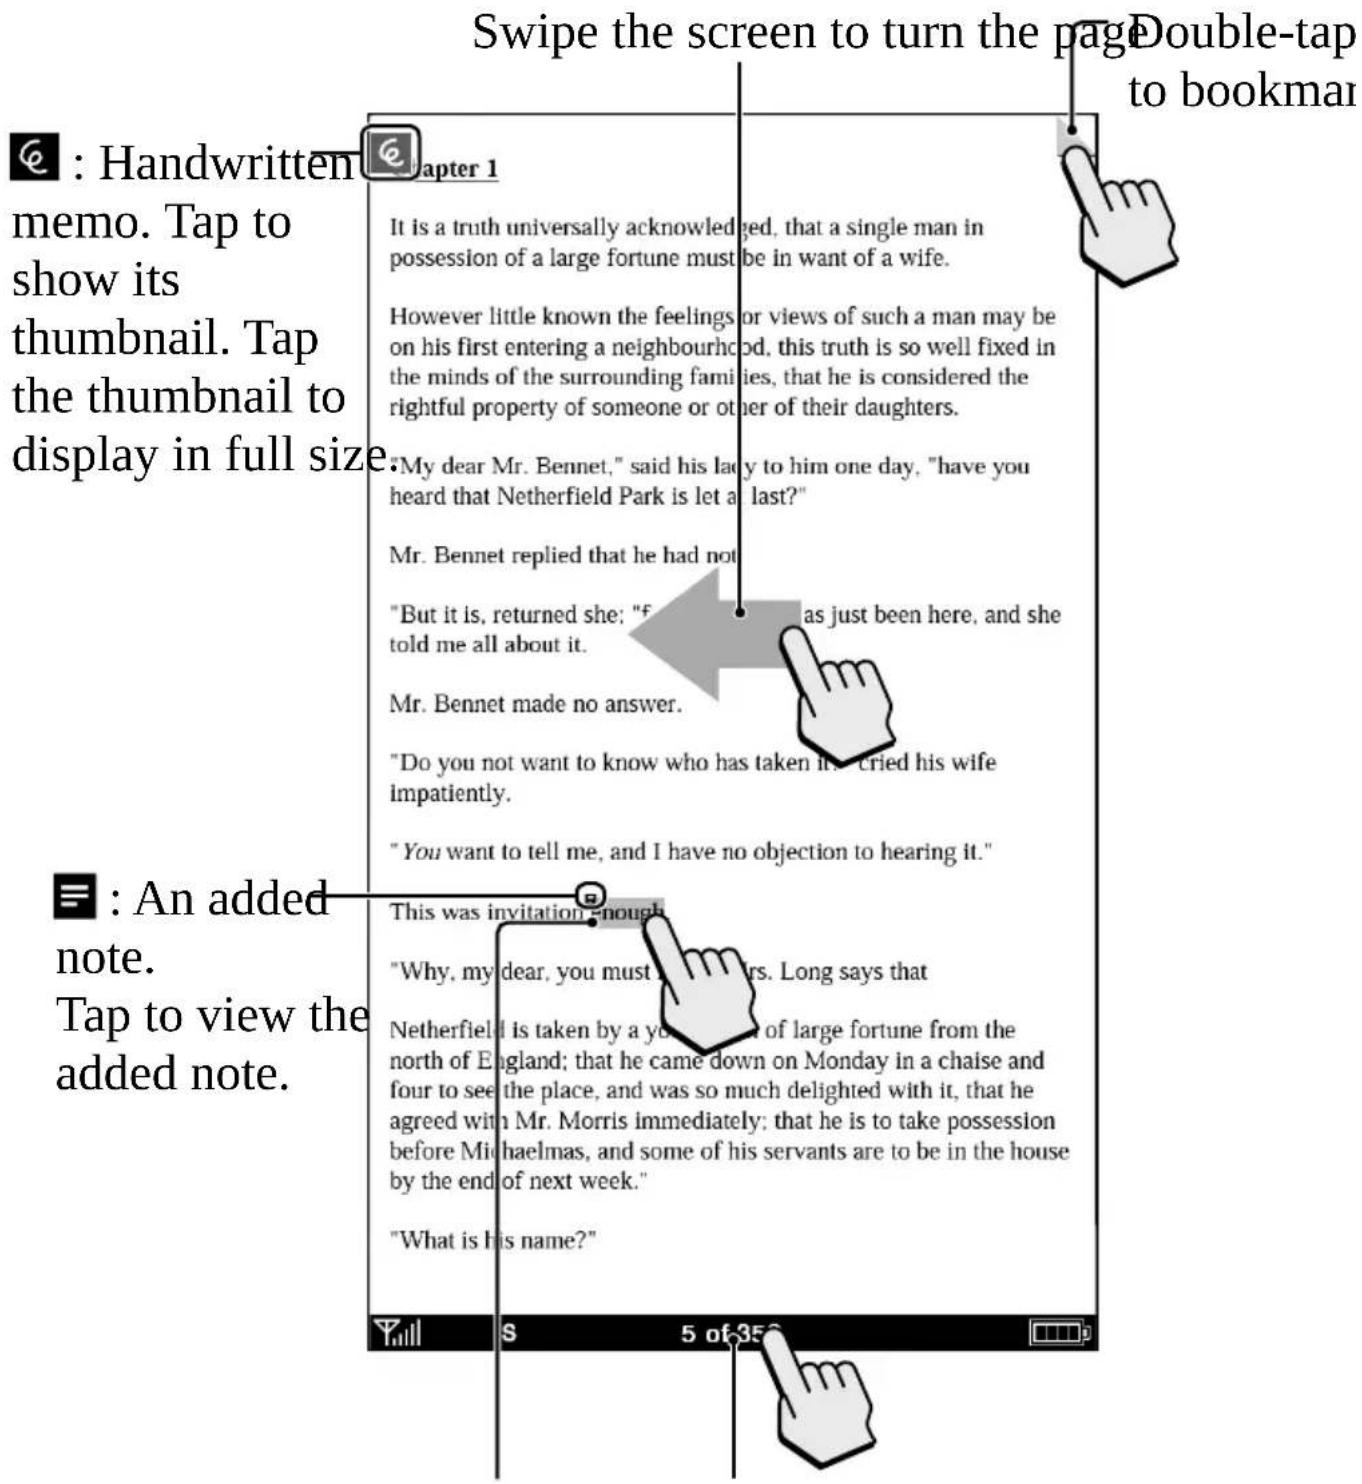
Double-tap to open. Tap to jump to dictionary/search/another page. Add highlight.
©
©
Item Description/Reference page
[Notes] [List]: Displays the [Notes] list in the content ( 67).
[Create/Edit]: Shows tools to bookmark, highlight, handwrite, and remove annotations ( ▶ 63).
[Hide]/[Show]: Toggles annotations displayed (▶ 82).
[Now Playing] Shows audio player (▶ 121).
[Orientation] Toggles the screen orientation either in portrait or landscape mode ( ▶ 77).
[Page Sync] Retrieves the latest reading-related information ( ▶ 66).
[Previous View] Returns to the previously viewed page.
[Protect Audio], Protects audio, books, drawings, [Protect Books], issues, text memos or pictures from [Protect Drawings], accidental deletion ( 108).
[Protect Issues], [Protect Memos], [Protect Pictures]
[Remove Bookmark] Deletes the bookmark on the page (▶ 61).
[Remove Content] Removes content from a collection ( ▶ 106).
[Rename Collection] Changes the collection name ( ▶ 104).
[Repeat] Sets repeat play of audio files ( ▶ 122).
[Resume Playing] Resumes audio playback (▶ 122).
[Return to List] Shows content list.
Item Description/Reference page
[Search] Searches for either content title or words in the contents with the keyword inputted by on-screen keyboard ( ▶ 79).
[Select Standby Screen] Selects pictures for the standby screen (▶ 119).
[Shuffle On]/ Plays all audio files in a random order [Shuffle Off] (▶ 122).
[Slideshow On]/ Starts/Stops a slideshow of pictures [Slideshow Off] (▶ 118).
[Sort:] Changes sort order of the list (▶ 55).
[View:] Changes the appearance of the list.
[Word Logs: Book], Either within a book or a periodical, [Word Logs: Periodical] shows a list of the last 100 words previously searched in the dictionary (86).
[Word Logs: Dictionary] Within a dictionary, shows a list of the last 100 words previously searched (▶ 86).
▲/▼ Displays the previous/next OPTIONS menu.
Tip
Pressing and holding the OPTIONS button for 2 seconds is the same as tapping or pressing OPTIONS ▶ tapping [Return to List].
©
Highlighting word(s)
Highlighting at page view:
- A word: Double-tap a word and tap 🔔 to highlight.
- Consecutive words: Double-tap and drag (➤ 29), and tap 🔔 to highlight.
- From the OPTIONS menu: [Notes] → [Create/Edit] (63).
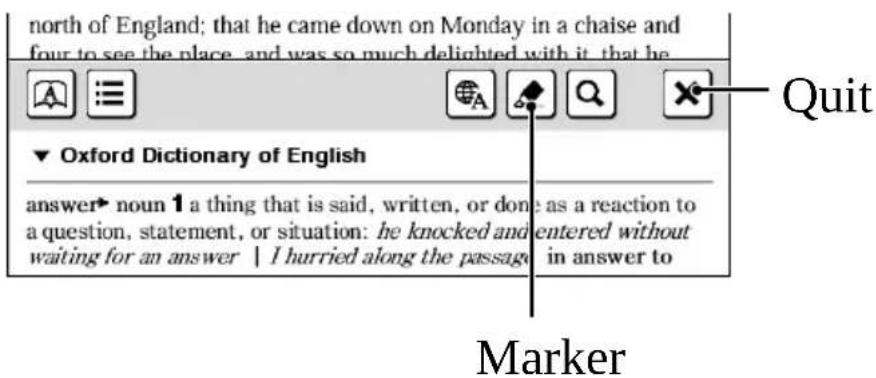
- Highlighting can be done in the OPTIONS menu: [Notes] → [Create/Edit] (▶ 63).
Deleting:
- From the OPTIONS menu: [Notes] → [Create/Edit] (▶ 63).
Tip
About other methods to delete all highlights, see ▶ 68.
Adding a note in a highlight: See ▶ 64.
Handwriting a note
Press OPTIONS → tap [Notes] → [Create/Edit] → 📄 → use a stylus or finger to draw a line.

Deleting a drawn line/highlight: Tap and stroke across the drawn line or highlight.
Tip
About other methods to delete all handwritten memos, see
68.
Notes
- While writing, make sure that you are not touching another area on the screen – this could affect the notes that you write with the stylus or your finger.
- To ensure your notes are correctly saved, do not handwrite notes too close to the edge of the screen.
- If you experience difficulties when handwriting or drawing on your Reader:
- avoid applying excessive pressure to the screen. – try not to handwrite or draw too quickly. – the notes functionality is not designed for very detailed drawings or for writing small characters.
Adding a note
1 Tap a bookmark or highlighted word → [by Drawing] or [by Keyboard].
To enter a handwritten note, tap [by Drawing].
Pen
Quit
Drawing area
Eraser
To enter a memo with typed in text (▶ 30), tap [by Keyboard].
When adding a note to the highlighted text in [Create/Edit], unselect any annotation tool icon and then tap the highlight.
2 Enter a note → tap [Done].
will be attached to the bookmark or highlight (▶ 56). To view the added note, tap the bookmark or highlight with the attached note.
Notes
- While writing, make sure that you are not touching another area on the screen – this could affect the notes that you write with the stylus or your finger.
- To ensure your notes are correctly saved, do not handwrite notes too close to the edge of the drawing area.
- If you experience difficulties when handwriting or drawing on your Reader:
- avoid applying excessive pressure to the screen. – try not to handwrite or draw too quickly. – the notes functionality is not designed for very detailed drawings or for writing small characters.
To edit a note
Tap a bookmark or highlight with ➕ [Edit] ➕ edit a note ➕ tap [Done].
To delete a note
Tap a bookmark or highlight with ☐ → [Delete] → [Yes].
Tip
About other methods to delete all notes, see ▶68.
Finding a Note
Searching for notes within a book
1 Press OPTIONS → tap [Notes] → [List].
A list of all the bookmarks, highlights, and handwritten notes in the current book appears.
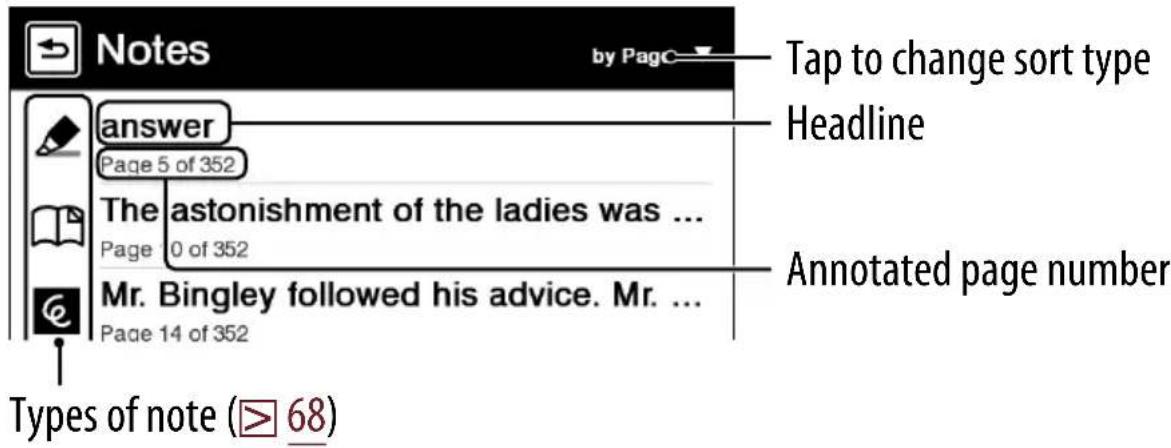
Tip
Please see ▶ 57 regarding OPTIONS menu.
2 Tap a note.
The page containing the selected note is displayed.
Icons and types of note in the [Notes] list
| Icon Types of note | |
| Bookmark | |
| Bookmark with a handwritten note | |
| Bookmark with a text note | |
| Highlight | |
| Highlight with a handwritten note | |
| Highlight with a text note | |
| Handwritten memo | |
Tip
You can set to merge the notes of the Reader and Reader Library when synchronizing. For further instructions, refer to Reader Library Help.
To delete notes
In the [Notes] list, press OPTIONS → tap [Delete Notes] → tap the check box of each note(s) to be deleted → [Done] → [Yes].
To delete all notes
In the [Notes] list, press OPTIONS → tap [Delete Notes] → press OPTIONS → tap [Select All] → [Done] → [Yes].
Finding the notes in all contents
1 Tap [All Notes] at [Home] menu.
A list of all the bookmarks, highlights, and handwritten notes in all contents appears.
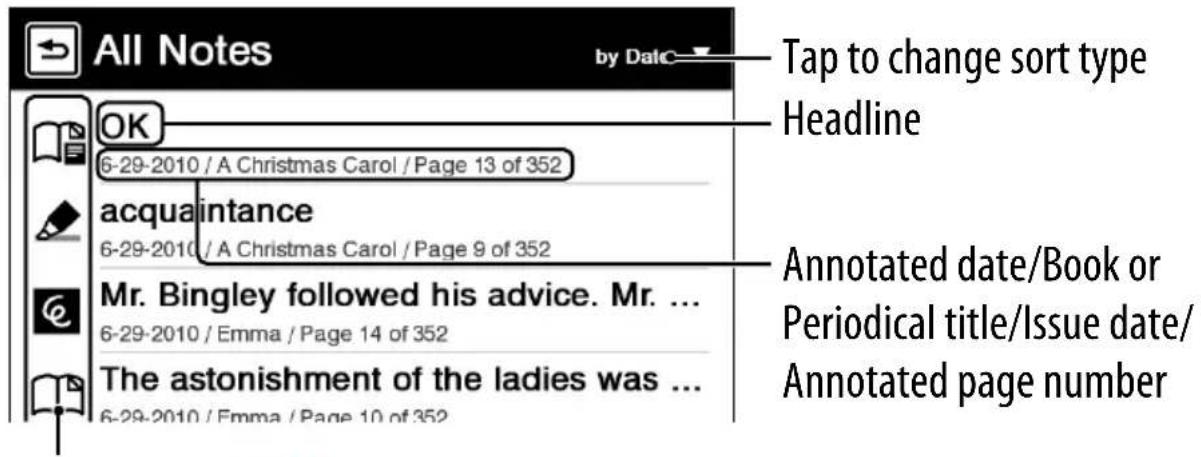
Types of note ( ▶ 68)
Tip
Please see ▶ 57 regarding OPTIONS menu.
2 Tap a note on the list.
The page containing the selected note is displayed.
To delete notes in all contents
In the [All Notes] list, press OPTIONS → tap [Delete Notes] → tap the check box of each note to be deleted → [Done] → [Yes].
To delete all notes in all contents
In the [All Notes] list, press OPTIONS → tap [Delete Notes] → press OPTIONS → tap [Select All] → [Done] → [Yes].
Resizing
Press Ⓗ (▶ 17) for re-sizing.
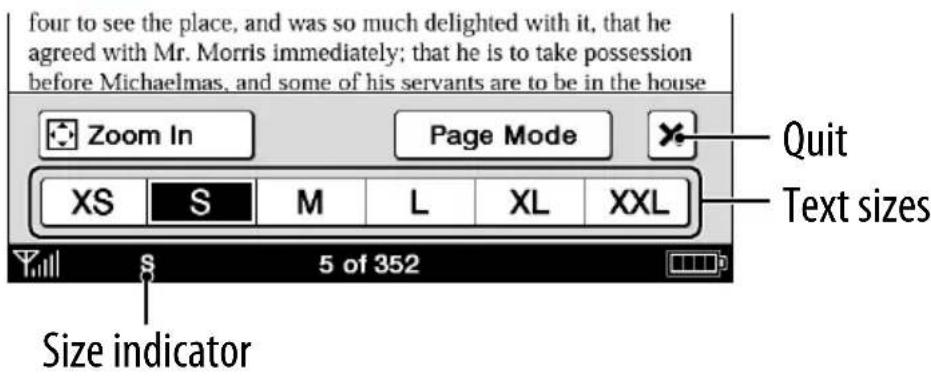
Adjusting the text size: Select desired text size then close window.
Notes
When you view PDF files in a size other than [S], the following may occur.
• [S] size is the default font size. If another size is selected, text size may not change correctly. - Functions such as highlighting, searching, or temporary word selection may not work correctly. - The table and graphics may not be correctly displayed. - A page containing only images cannot be resized.
Zooming in
The current page in view can be magnified. Also, the magnification can be locked so that the desired setting can be maintained. This feature is useful when reading a book containing scanned images.
1 Press → tap [ Zoom In].
Tip
Pressing and > simultaneously at the page view screen instantly magnifies the page by 10%.
2 Drag the zoom slider, or tap + or – of the zoom bar repeatedly until the page is zoomed to the desired scale.
Zoom in
Zoom slider
Zoom out to the original size
Custom setting mode
1 Tap 📋 → drag the slider, or tap 🖼 or 🏻 repeatedly until the page is adjusted to the desired brightness and contrast.
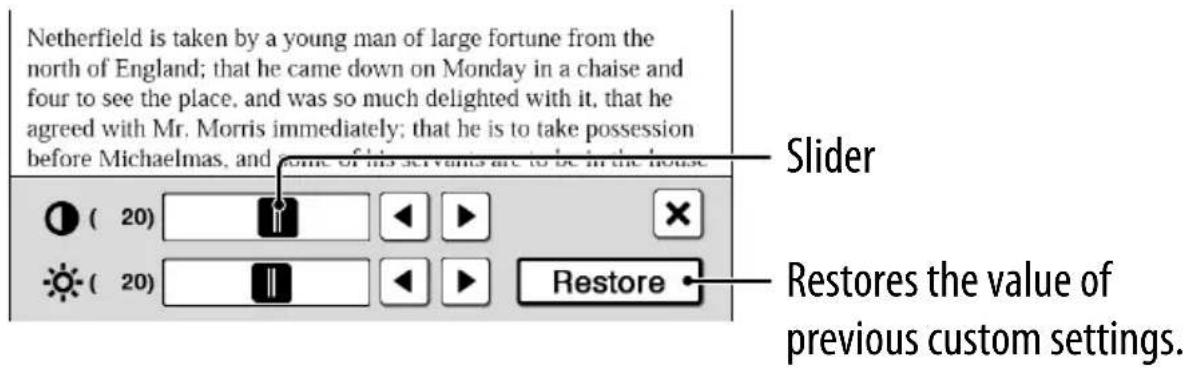
2 Tap to apply the setting and exit.
The change will only be stored in the content being adjusted. Select [Original] (▶ 75) when it is necessary to restore the default setting.
Screen Orientation
The screen orientation can be switched to either portrait (vertical) or landscape (horizontal) mode by selecting [Orientation] in any OPTIONS menu.
To change the direction of screen rotation, see [Screen Orientation] (▶ 126).
Portrait Landscape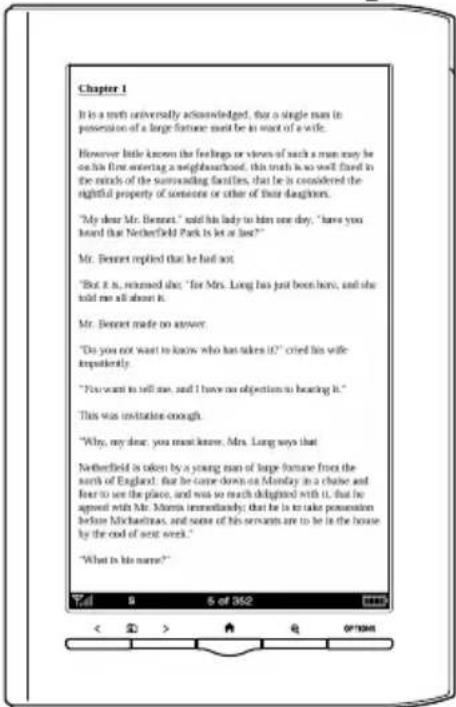
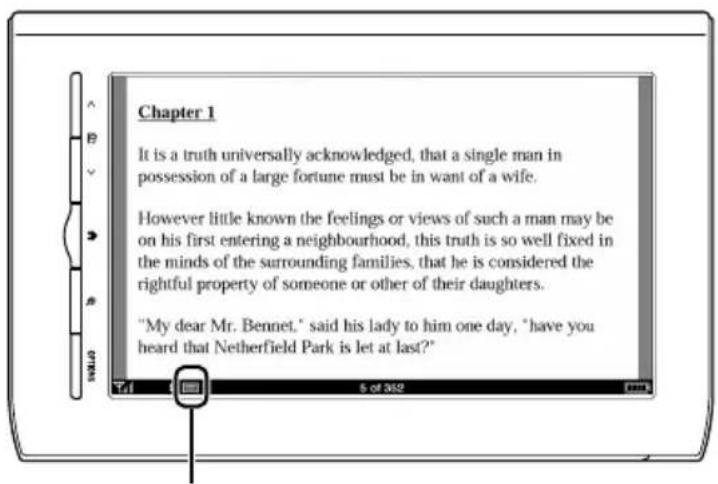
Position indicator
Searching
By selecting a word(s)
- To select a word, double-tap a desired word at page view.
- To select consecutive words, see "Double-tapping and dragging" (▶ 29).
The following screen will appear.
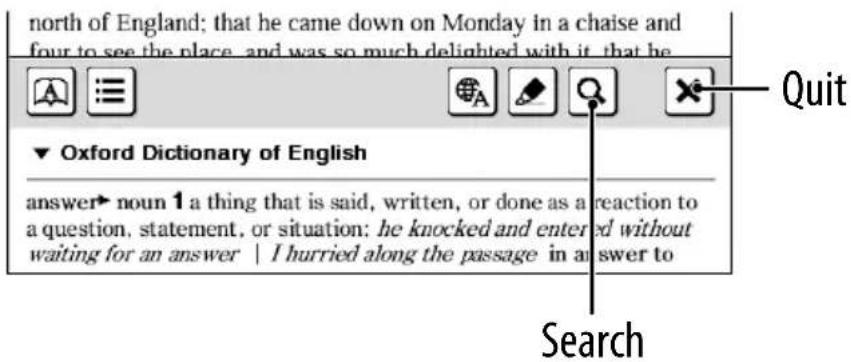
- To cancel, tap ✗ and tap anywhere on the page view. • To search the selected word(s), tap Q.
The search result screen will appear. The results are highlighted on the page.
- To cancel, tap × and quit.
- To navigate, tap ← or → to move to the previous/next result.
From the on-screen keyboard
1 Press OPTIONS → tap [Search] → input a word using the on-screen keyboard (▶ 30) → tap [Search].
The search result screen will appear. The results are highlighted on the page.
2 Tap ← or → to move to the previous/next result.
To cancel, tap × and quit.
Tip
Before searching, a selected word can be modified.
Double-tap a word → press OPTIONS → tap [Search] → modify the word in the input area of the on-screen keyboard → tap [Search].
Jumping to a Page
By using the slider
Tap the page number shown in the status bar → drag the slider, or tap a point on the page jump bar.
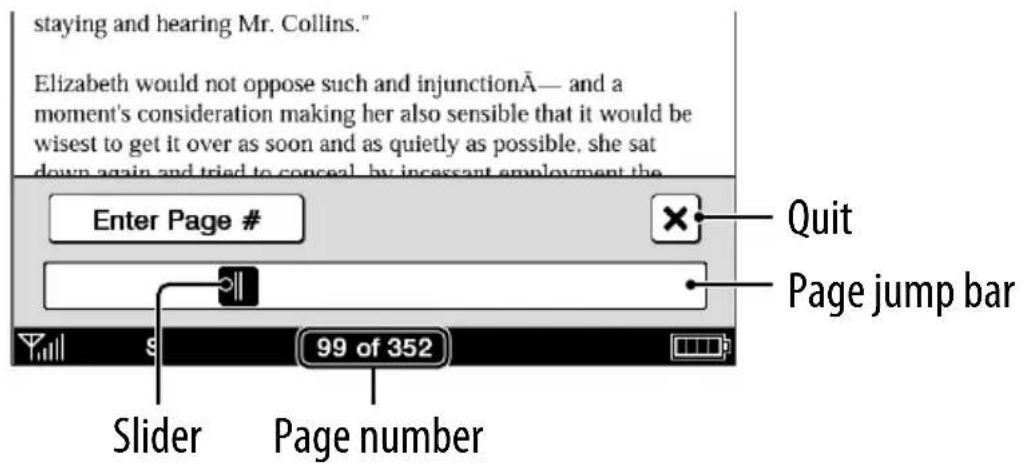
Tip
Jumping to a page can be done from the OPTIONS menu. Press OPTIONS → tap [Go to] → [Select Page].
By tapping a link
The link appears highlighted on the page view. Tap the link to jump to the linked page.
Links to websites are highlighted and can be accessed by tapping on the highlighted area. Note that you can connect to websites only when the Reader is connected to a wireless network. For details on browsing websites, see 95, 132.
Tip
When jumped with a hyperlink to Reader Store, the last read page of the content can be displayed as follows:
Press OPTIONS tap [Continue Reading].
Note
If a hyperlink is covered with highlighting, press OPTIONS tap [Notes] [Hide] to hide highlighting.
Returning to the previously displayed page
Press OPTIONS tap [Go to] [Previous View].
Jump to viewed pages
Press OPTIONS tap [Go to] [History]
(previous view) or (next view)
To list words with the same head letters as previously entered words
Tap or .
The list of candidate words changes dynamically whenever the word in the input area is modified.
Listed candidate words
Number of entries and page number/total pages
Scrolls the page
Input area

Using Wikipedia
A word or text can be searched for using Wikipedia (only when connected to a Wi-Fi network).
1 Double-tap a word.
The headline of the word definition is displayed.
Wikipedia
2 Tap .
The Wikipedia page is opened by using the [Browser] application. For details, see “Browsing Website” (95).
Tip
Wikipedia can be used only when connected to a Wi-Fi network.
Reading Newspapers / Magazines
You can read newspapers/magazines from [Periodicals] in the [Home] menu.
1 Tap [Periodicals] at [Home] menu.
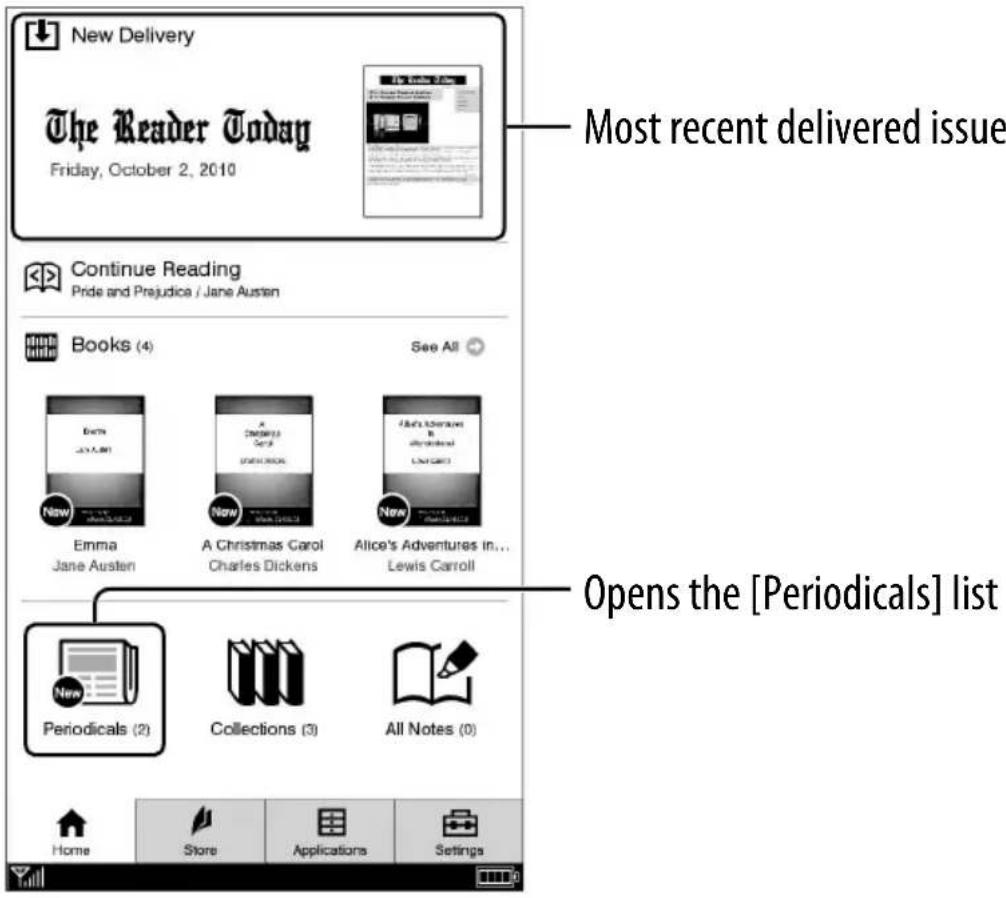
Tip
If you want to read the most recently delivered issue, tap [New Delivery] and read the issue.
2 Tap a desired periodical to go to issue list.
Network Menu
Network Menu
Tap [Applications] at [Home] menu.
Before accessing a website, confirm the following:
- The WIRELESS switch is set to "ON" (▶ 18).
- A wireless network is available (▶ 37).
Access and download public domain books from Google Books.
Browse websites optimized for Reader and sites of your choice.
View and download contents you've purchased from the Reader Store (▶ 39).
Google Books
You can choose from over one million free public domain titles from Google.
The Google Books site can be accessed from the Reader when connected to a Wi-Fi network (▶ 132).
Tap [Google Books] under [Applications] at [Home] menu.
Browse Google Books at the Reader Store.
Tip
You must be signed in to the Reader Store before you can access Google Books. See "Accessing the Reader Store wirelessly" (▶ 35).
Browsing Websites
Websites can be browsed only when connected to a Wi-Fi network (▶ 132).
Note
The Internet Browser is optimized to read text-based websites.
It does not support media plug-ins (e.g., Flash), file downloads, or zoom navigation.
The Internet Browser may not support all Wi-Fi access points or websites. Functionality and display capabilities may be limited. Sony makes no representations or warranties regarding the links to and/or the use of any websites or the availability of content at any such websites.
1 Tap [Browser] under [Applications] at [Home] menu. 2 Tap the link of the desired website in the browse home page using the supplied stylus.
OPTIONS menu of the [Browser] application
Pressing the OPTIONS button (▶ 17) will display the menu for related supplementary functions.
| Item Description/Reference page | |
| [Browse Home] | Returns to the browse home page (➤ 95). |
| [Add to Bookmarks] | Adds currently displayed website to the bookmark (➤ 99). |
| [View Bookmarks] | Displays the Web bookmarks (➤ 99). |
| [Input Address] | Input the URL by on-screen keyboard (➤ 98). |
| [Refresh Page] Refresh the display of currently displayed website. | |
| [Stop] Stops loading the Web page. | |
| [Capture Screenshot] | Captures a screenshot of the Website being displayed (➤ 97). |
| [Page Info] Displays the information of the currently displayed website. | |
| [Legal Information] | Displays the Legal Information page of the currently displayed website. |
| [Continue Reading] | Shows the last read page of the content and existing the Internet Browser. |
| [Edit Bookmarks] | Edits the contents of selected Web bookmarks (➤ 99). |
Table of Contents Index
From either the books or issues list
1 In the books or issues list, press OPTIONS and tap [Add to Collection]. 2 In the collection list, tap a collection you want to add the content. 3 Tap the thumbnail of the desired content and [Done].
You can check added content in the collection list.
Tip
To select all books or issues, press OPTIONS in the [Add Books] or [Add Issues] list and tap [Select All].
Deleting a collection
Even if you delete a collection, all content in the collection will remain undeleted on the Reader.
1 Tap [Collections] at [Home] menu. 2 Press OPTIONS and tap [Delete Collections]. 3 Tap the check box of each collection to be deleted, then [Done] and [Yes].
Tip
Also, you can delete a collection using Reader Library. For details, refer to the Reader Library Help.
Removing content
Even if you delete content in a collection, the remaining content will be left on the Reader.
1 Tap [Collections] at [Home] menu, then tap a collection. 2 Press OPTIONS and tap [Remove Content]. 3 Tap the thumbnail of each content to be deleted, then [Done] and [Yes].
Tips
- To select all content, press OPTIONS after step 2 above, then tap [Select All].
- When you delete content in [Books] or [Periodicals], corresponding content is also deleted from relevant collections.
Managing Content
Deleting Content
Example: [Books] list
1. Tap [Books], press OPTIONS, then tap [Delete Books].
To delete: tap a book thumbnail with the blank check box.
To delete all: press OPTIONS, then tap [Select All].
To undelete: tap a book thumbnail with a checked check box.
To unselect all: press OPTIONS, then tap [Unselect All].
2. Tap [Done], then [Yes].
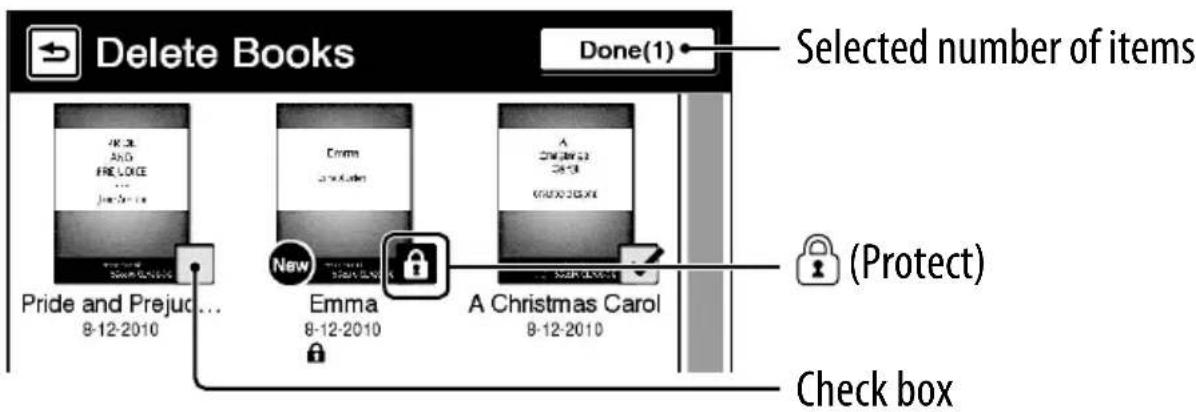
Tip
You can also delete the currently viewed book. Press OPTIONS in the page view, tap [Delete Book], then [Yes].
Protecting Content
Protecting content will keep you from unintentionally deleting content.
Example: [Books] list
1 Tap [Books] → press OPTIONS → tap [Protect Books].
To protect: tap a book thumbnail with .
To protect all: press OPTIONS ▶ tap [Protect All].
To unprotect: tap a book thumbnail with 🔒.
To unprotect all: press OPTIONS ▶ tap [Unprotect All].
2 Tap [Done].
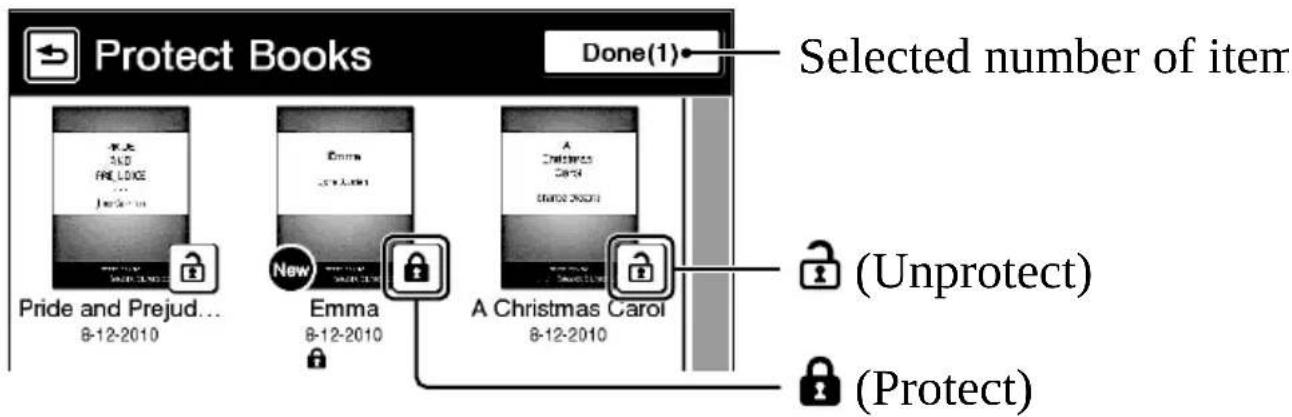
Note
This protection feature works only on the Reader. Protected content may still be deleted via your computer.
Managing Periodicals
In the issue list, you can keep only recent issues and delete previous issues automatically.
1 Tap [Periodicals] at [Home] menu tap a periodical.
2 Press OPTIONS tap [Manage Subscription].
The management dialog appears.
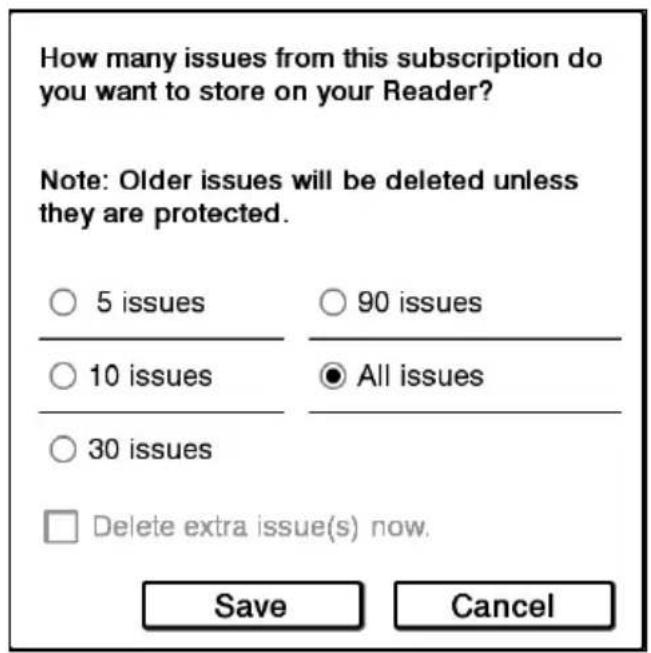
Tips
- If you tap [New], the current drawing is saved, and a new drawing editor opens.
- Newly created drawings will be saved only in the internal memory.
Notes
- While writing, make sure that you are not touching another area on the screen – this could affect the notes that you write with the stylus or your finger.
- To ensure your notes are correctly saved, do not handwrite notes too close to the edge of the drawing area.
- If you experience difficulties when handwriting or drawing on your Reader:
- avoid applying excessive pressure to the screen. – try not to handwrite or draw too quickly. – the notes functionality is not designed for very detailed drawings or for writing small characters.
Viewing/editing created drawings
After step 1 (▶ 113), tap a drawing thumbnail to view. Tap [Edit] and follow step 3 (▶ 113).
Tip
To delete the currently viewed drawing, press OPTIONS→ tap [Delete Drawing].
Capturing a screenshot
Your Reader allows you to capture a screenshot of the drawing you're viewing and store the image as a picture file.
To do this, view a drawing of your choice and then tap OPTIONS→ [Capture Screenshot].
You can view your captured screenshots by going to [Applications] → [Pictures].
To delete/protect a drawing(s)
Tap [Handwriting] under [Applications] at [Home] menu, press OPTIONS→ tap [Delete Drawings] or [Protect Drawings].
- To delete, follow the instruction after tapping [Delete Books] in “Deleting Content” (▶ 107).
- To protect, follow the instruction after tapping [Protect Books] in “Protecting Content” (▶ 108).
Creating text memos
1 Tap [Text Memo] under [Applications] at [Home] menu. 2 Tap [New Memo].
[New Memo]
Tip
Press OPTIONS → tap [New Memo] to create a text memo.
3 Enter text in the input area using the on-screen keyboard ( ▶ 30) → Tap [Done].
Tips
- If you tap [New], the current text memo is saved, and a new text memo editor opens.
- Newly created text memos will be saved only in the internal memory.
Viewing/editing text memos
After step 1 above, tap a memo to view. Tap [Edit] and follow step 3 above.
Tip
To delete the currently viewed memo, press OPTIONS → tap [Delete Memo].
To delete/protect a text memo in the list
Tap [Text Memo] under [Applications] at [Home] menu, press OPTIONS → tap [Delete Memos] or [Protect Memos].
- To delete, refer to the example instructions for deleting books in "Deleting Content" (▶ 107).
- To protect, refer to the example instructions for protecting books in "Protecting Content" (▶ 108).
To set as a standby screen
In the [Pictures] list, press OPTIONS → [Select Standby Screen] → tap the thumbnail of candidate picture → tap [Done].
The [Standby Screen] setting is configured from the [Settings] menu (▶ 129).
Tip
When two pictures or more have been selected, the displayed picture is rotated every time the Reader enters the sleep mode (➤ 15).
To zoom in a picture
Press Ⓗ ▷ 17) to switch to the zoom-in mode.
Tip
Double-tap where you wish to zoom in further. The double-tapped area will be shown centered automatically after zooming in.
Playing audio files
You can enjoy audio files with optional headphones.
1 Tap [Audio] under [Applications] at [Home] menu. 2 Tap a desired album to go to the audio list. 3 Tap a desired audio file, and play an audio file.
The playback screen appears (▷ 121).
Tips
- Please see ▶ 57 regarding OPTIONS menu.
- See "Supported File Formats" (▶ 169).
- To transfer audio files to the Reader using Reader Library, refer to Reader Library Help.
Note
An album or an audio file with cover art information can only display its thumbnail in the album list.
Playback screen operations
Cover art
Repeat icon
Shuffle icon
Play/pause
Playback progress bar
Playback icon appears
during playback
Volume indicator
Playback position
Skip to the beginning of the previous (or current if played more than 3 seconds from the beginning) audio file
Skip to the beginning of the next audio file
| To Do this | |
| Pause/stop a song Tap II. | |
| Resume playback Tap ▶. | |
| Skip to the previous/ next track | Swipe the playback screen. |
| Skip to the beginning of the previous (or current) audio file/beginning of the next audio file | Tap ◀◀◀/▶▶▶I.Note Skips to the beginning of the current audio file if played more than 3 seconds from the beginning. |
| Fast-reverse/ fast-forward an audio file | Drag the playback position indicator, or tap on the playback progress bar. |
| Control the volume Press the volume button. The volume indicator will appear in the status bar. | |
| Repeat songs | Press OPTIONS ➔ tap [Repeat] ➔ tap [Off], [One Song] or [All Songs].⇨1: Repeat one song⇨: Repeat all songs in the album |
| Shuffle songs | Press OPTIONS ➔ tap [Shuffle On] or [Shuffle Off].SHUF : Shuffle play in the album |
| Mute playback Press and hold the volume button. To resume, press the volume button again. | |
Settings
Changing Settings
Tap Settings] at [Home] menu.
[General Settings] (125)
[Date and Time]
[Time Zone]
[Date and Time Format]
[Page Turn Preference]
[Menu Language]
[Keyboard]
[Screen Orientation]
[Reader Store Notifications]
[Application Preferences] (127)
[Dictionary]
[Slideshow]
[Page Sync]
[System Management] (128)
[Power Management]
[Device Lock]
[Standby Screen]
[Check for Updates]
[Initialization] 130
[Restore Defaults]
[Clear Keyboard History]
[Format Memory]
Table of Content Index
©
[General Settings]
[Date and Time]
Tap a field to change.
Input a number by tapping the numeric key pad.
Tap [OK] to apply the change.
Tip
When you access the Reader Store or connect the Reader to your computer, the date and time of the Reader will be automatically synchronized with that of the Reader Store or your computer, based on the time zone setting of the Reader.
[Time Zone]
Sets the time zone and daylight saving time of the Reader. You need to configure this setting in initial settings, or after restoring the default settings using [Restore Defaults] (130).
Tip
If your region applies daylight saving time, check [Daylight Saving Time].
Note
If you have not set the appropriate time zone, periodicals may not be delivered at the expected time.
[Device Lock]
Locks the Reader by setting a pass code.
- Tap [On] to set a pass code. Input a 4-digit number by tapping the numeric key pad.
- Tap [OK] to lock the Reader.
- To unlock, input the pass code and tap [OK]. Then tap [Off] to unlock the Reader, and tap [OK].
Notes
• [0000] is the factory setting. - You are recommended to make a note of your password and keep it in a safe place separate from the Reader. - If you forget your password, contact your Sony Customer Support (▶ 3); however, note that in unlocking your device, all content on it will be erased. - When the [Device Lock] setting is activated, the Reader will not be recognized by your computer, please set to [Off] before connecting.
[Standby Screen]
Sets the standby screen during the sleep mode. [Off] displays nothing in the sleep mode.
- [Show picture]: Set [On] to show the selected pictures on the standby screen. For details on setting the pictures, see “To set as a standby screen” (▶ 119).
- [Show message]: Set [On] to show messages on the standby screen.
[Check for Update]
Manually performs a check of the latest firmware version available for your Reader.
Note
Your Reader will also automatically check for the latest firmware updates.
[Initialization]
[Restore Defaults]
Restores the Reader to its default settings.
You will need to perform the initial settings after restoring.
[Clear Keyboard History]
Deletes predictive words for the on-screen keyboard.
[Format Memory]
Formats the internal memory of the Reader or an inserted memory card. Formatting will erase all the contents in the selected storage.
Tip
Before formatting, make sure to backup data you wish to keep to your computer via Reader Library. Note that protected content will also be deleted by formatting.
Note
When any memory is formatted, audio file playback and content download stop, and the wireless network is shut down.
Table of Content Index
©
©
On the [Wi-Fi Network Settings] screen, configured access points and access points that are installed within the communication range of the Reader are displayed on a list.
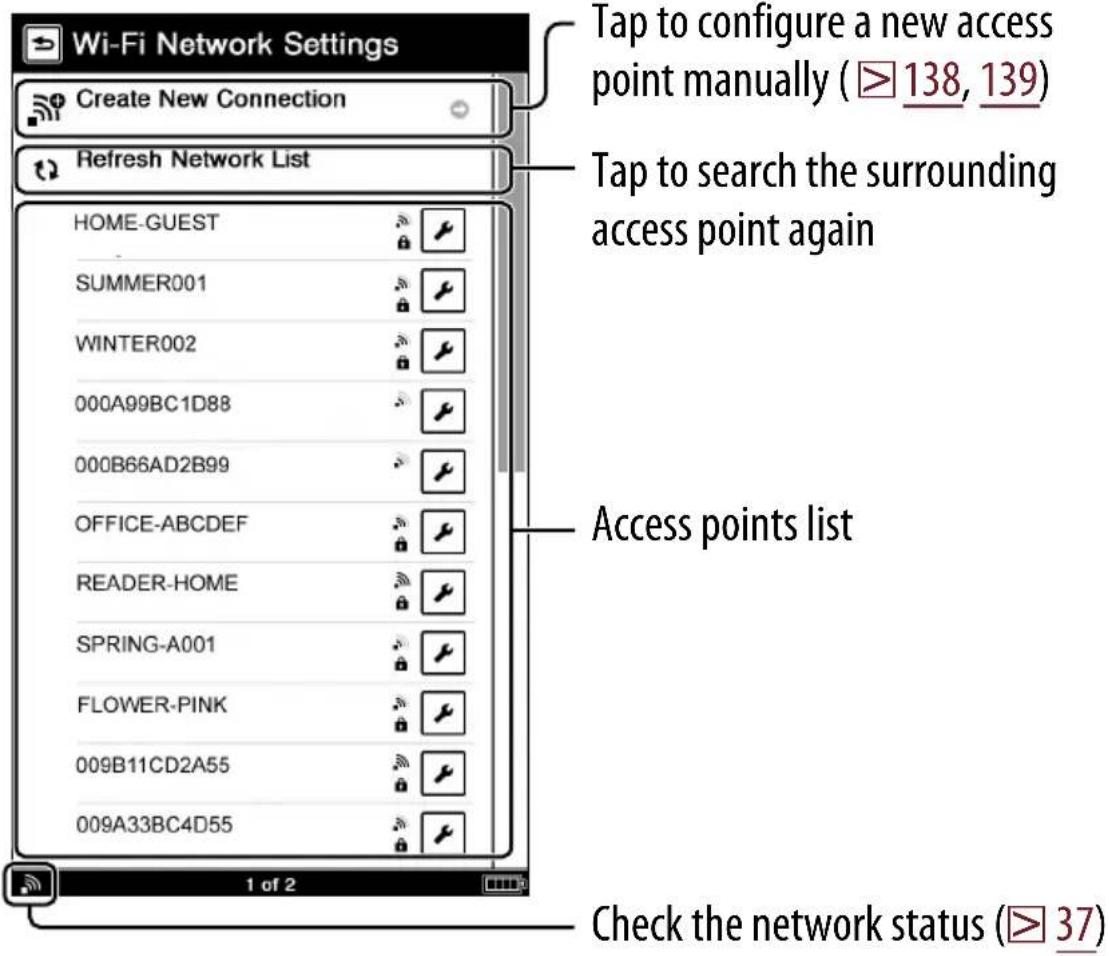
Icons in the access points list
IconDescription
 | Tap to edit the setting of the access point manually. |
 | The signal strength of the access point. |
 | The access point is set to use a security method. |
To connect a new access point from the access points list
If you connect to an access point where is not displayed, simply tap the access point in the list to connect to it.
To connect to an access point where is displayed
1 Tap a new access point from the access points list.
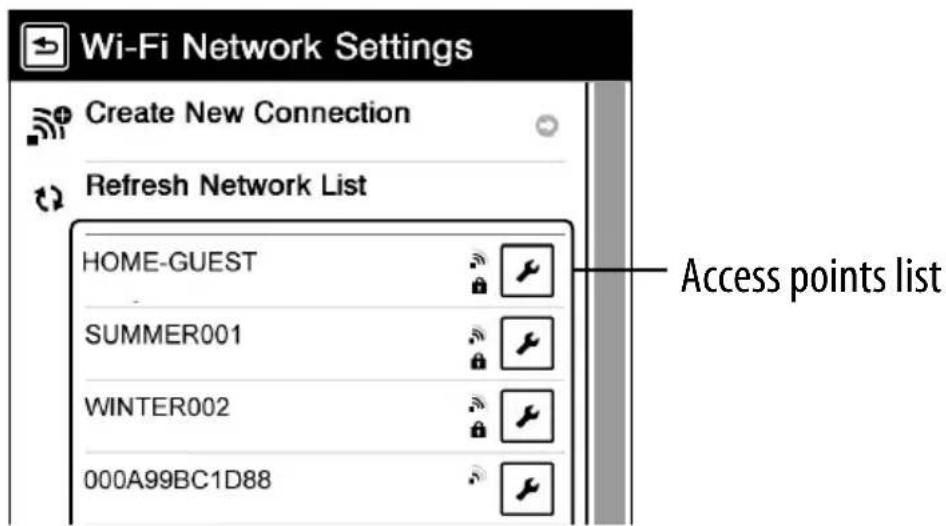
SSID and the security method are set automatically, simply by entering the encryption key.
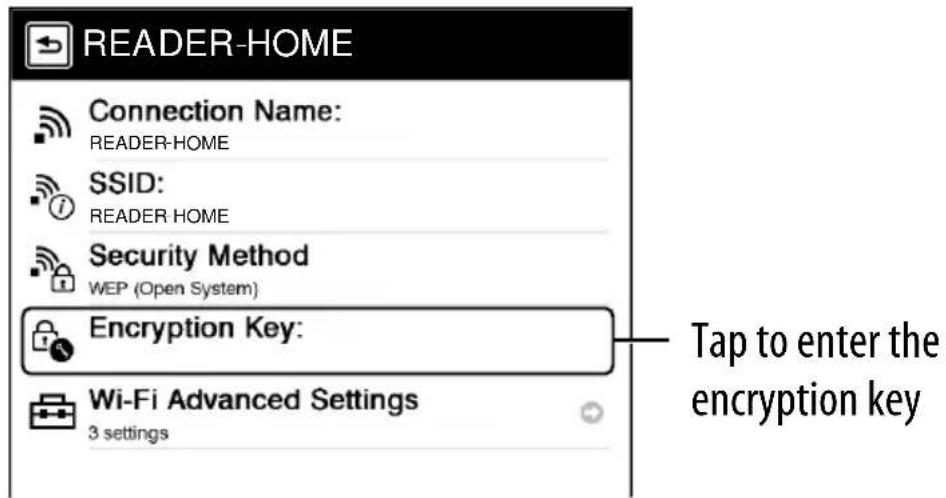
2 Tap [Encryption Key] enter the encryption key using the on-screen keyboard tap [OK].
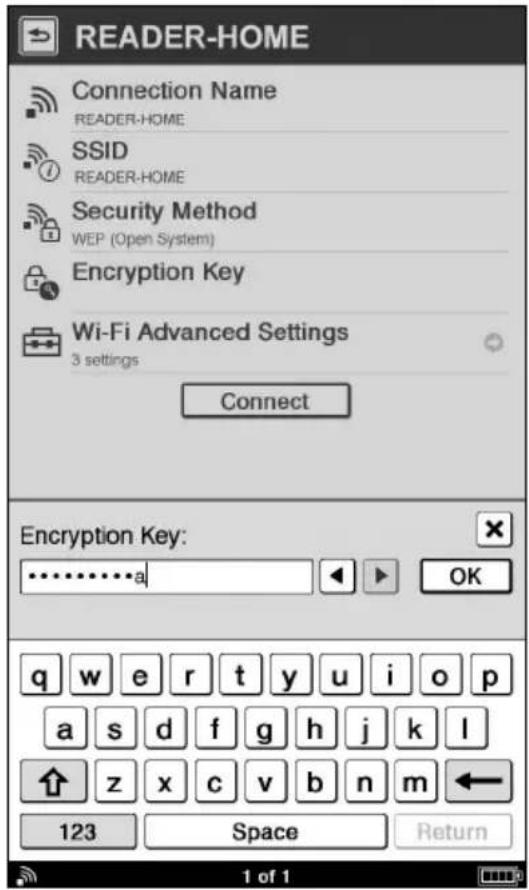
![SONY PRS-950 - Tap [Encryption Key] enter the encryption key using the on-screen keyboard tap [OK]. - 2](/content/2026/05/768969/images/0eb83a59510f2a4ca0cad23343b695c2f0dba6b689a629c246e9836f6da3e9a9.jpg)
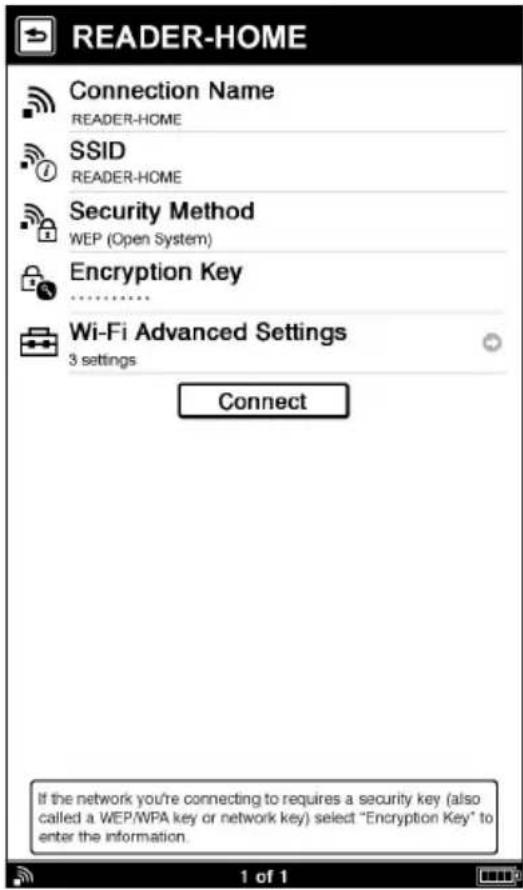
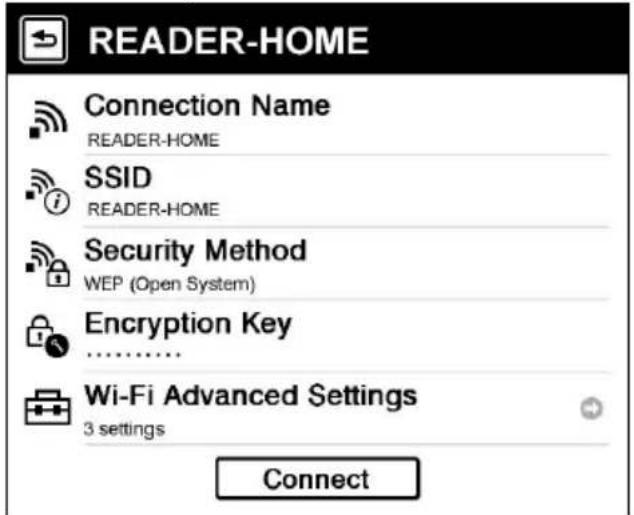
3 Tap [Connect] to return to the [Wi-Fi Network Settings] screen, and start connection to the access point.
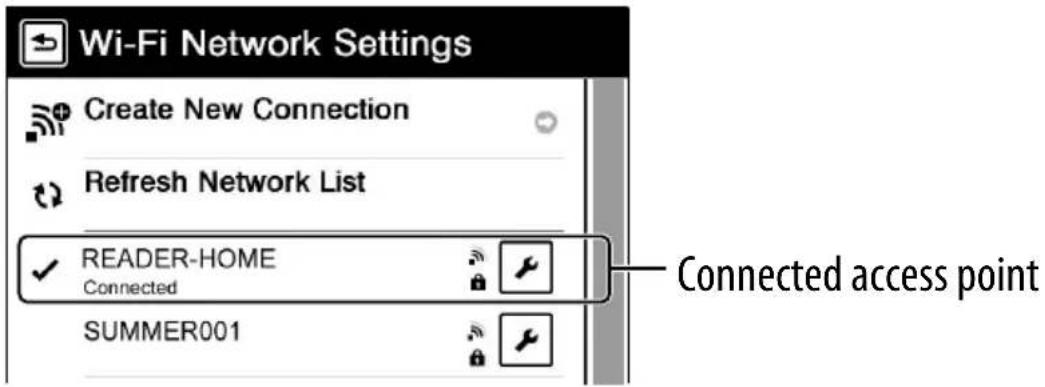
When √ and [Connected] appear, your Reader is now connected to a Wi-Fi Network.
Status of the access point in the access points list
MessagesStatus
| [Configured] Configured access point | |
| [Connected] | Currently connected access point. While connecting, [Connecting] appears. A check mark and [Connected] appear when the Reader connects to the access point. |
| [Invalid Configuration] | The access point configuration is invalid. Confirm the settings of the access point. Also, in the public Wi-Fi network, you need to log in by using [Browser] application. |
Tips
An access point, once configured, can be connected simply by tapping it on the list.
From the OPTIONS menu, you can change the order of the access points in the list, delete the configured access point, etc, (141).
To change the settings of the access point, or change the connection name, tap 📋 ( 139).
Notes
For the necessary settings to connect to a Wi-Fi, ask the administrator of the network (at school) or the public Internet access service provider.
If you do not know the encryption key (also called a WEP/WPA key or network key) for the access point, consult the administrator of the network or the public Internet access service provider.
You can configure up to 20 access points.
If the access point is set to use WEP (Shared Key) as the security method, tap [Security Method] [WEP (Shared Key)] [OK] [Connect], and connect to the access point again.
Do not change [Wi-Fi Advanced Settings] unless the administrator of the access point indicates otherwise, as the network may not operate correctly.
The reader does not support security systems customized in some access points. For details, refer to the operations guide for the access point.
Some public Wi-Fi services require log-in by using the [Browser] application.
To configure a new access point using the WPS (Wi-Fi Protected Setup) feature
The setting of the wireless LAN router supported WPS feature is easy to configure.
Tap [Create New Connection] and tap the desired setting method.
There are 2 ways to configure the access point. Follow the on-screen setup instructions.
[WPS Push-Button Configuration]: Connects the WPS-compliant access point by using the push-button method.
[WPS PIN Method]: Connects to the WPS-compliant access point using the PIN method.
If you begin a new configuration using the Push-Button or PIN method during connection to a Wi-Fi network, the connection will be terminated.
To configure a new access point manually
An access point not displayed in the access points list (such as an access point used with an unbroadcast SSID) can be configured manually.
Tap [Create New Connection] → [Manual Registration] → enter the SSID of the access point and setup other necessary settings.
Item Description
[Connection Name]
The connection name can be changed if necessary.
Enter the connection name using the on-screen keyboard, then tap [OK].
[SSID] Enter the SSID of the access point using the on-screen keyboard, then tap [OK].
[Security Method] Tap the security method type of the access point, then tap [OK].
[Encryption Key] Enter the encryption key (also called a WEP/WPA key or network key) using the on-screen keyboard, then tap [OK].
©


When you are out of the network coverage area for a while, slide the WIRELESS switch to “OFF” (18). Battery life can be extended by turning off the wireless feature.
Battery consumption may increase when using the [Browser] application. When the [Browser] application is not in use, close it by returning to the [Applications] or [Home] menu.
The Reader cannot turn on.
Moisture condensation may have occurred. Wait for a few hours and then turn on the Reader.
Battery power has been fully depleted. After charging the Reader by connecting to the supplied AC adapter and waiting for about one minute, slide the power switch to turn on the Reader.
Or after charging the Reader by connecting to your computer using the supplied USB cable for about 5 minutes, the Reader is turned on automatically (48).
Screen
Display takes a long time to appear.
In cold temperatures it may take time for the display to appear. This is due to the display characteristics and not a malfunction.
It may take a few moments for the Reader start-up screen to appear after a reset or shutdown.
The screen is frozen.
Reset the Reader by pressing the RESET hole. Then, after 5 seconds slide the power switch to turn on the Reader again (142).
Touch operation is not effective.
If condensation occurs in the touch screen, or dust attaches to the touch screen, it may cause a malfunction. For details, see “On Cleaning” (164).
If any objects are placed on the touch screen, it may cause a malfunction. When not in use, leave the Reader in sleep mode, or shut it down.
A page in the Reader Store is not displayed properly.
The wireless connection may have been interrupted. Make sure the WIRELESS switch is set to "ON" and a wireless network is available (36), then refresh the page using [Refresh Page] in the OPTIONS menu (40).
Wireless feature
You cannot access the Reader Store.
Check that the WIRELESS switch is set to "ON".
You are out of the network coverage area. To check the wireless status, see the wireless status icon in the status bar (36).
You cannot find a purchased book on the Reader.
The wireless connection may have been interrupted while you were downloading the book. Go to the [My Account] page in the Reader Store to re-download the book.
You have not received the latest periodical
The Reader may have been outside the network coverage area when the issue was delivered. Go to the [My Account] page in the Reader Store to re-download the past issue(s).
Tip
If you cannot find a solution from the above, go to [Help and Support] from the OPTIONS menu in the Reader Store (3).
Wi-Fi connection
The Reader will not connect to a Wi-Fi network.
→ Check that the WIRELESS switch is set to “ON” and [Wi-Fi] is set to [On] in the [Wireless Controls] setting (▶ 131). → Refresh to a Wi-Fi network manually (▶ 133). → Check if extra settings are required to connect to the Wi-Fi network, such as encryption key (WEP/WPA), fixed IP address, or proxy setting (▶ 139). → The access point uses 152-bit encryption key. WEP of the Reader does not support 152-bit encryption key. → WEP key automatic recognition may not be correct. Select the encryption method type of the access point manually (▶ 137). → The access point you want to use is set to make its SSID invisible to users. In this case, the access point may not be shown on the Wi-Fi network access point list. Enter the SSID manually (▶ 139). → When using the [Browser] application, some public Wi-Fi access points require you to enter a user ID and password by using the Internet browser. Check the public Wi-Fi service you intend to connect to. → The access point of the Wi-Fi network may be using a security protection system not supported by the Reader. Consult with the administrator of your network. → The access point may filter access by MAC address. Check the MAC address in the [About] screen of the [Settings] menu (▶ 124), then register the MAC address with the access point to connect to the Wi-Fi.
→ The authorization data may have been damaged as a result of shutting down while reading a content. De-authorize your computer and the Reader, then authorize again via Reader Library. Refer to Reader Library Help for further information. → The book may be protected by unsupported digital rights management. Check the book source for compatibility. → The book may contain an unsupported file format. Check the file format compatibility (▶ 169).
[Continue Reading] does not work, or bookmarks are missing.
→ If the file status has changed (such as in the following cases), data on [Continue Reading] or notes may be deleted.
- A Text/RTF/PDF file is edited.
- A book purchased with an authorized Reader is read on another de-authorized Reader by memory card transfer.
You cannot find a transferred book.
→ Protected content on the Reader can be deleted if it is deleted from your computer after being connected. It is recommended to manage content using Reader Library. → Books being transferred to the Reader by synchronization are deleted automatically if the same books are deleted in Reader Library before synchronization. For details, refer to Reader Library Help. → Do not delete folders or files from any of the “database” folders in the Reader. The content or notes may be deleted.
Playing audio files
An audio file cannot play back.
Audio files that are not supported by the Reader cannot be played. For details on supported audio files, see "Supported File Formats" (169).
Sound output is not audible.
Increase the volume if it is set too low ( 18).
If sound is not output through headphones, make sure the headphone plug is firmly inserted in the headphone jack (18).
Viewing pictures
A picture cannot be displayed.
Picture files that are not supported by the Reader cannot be viewed. For details on supported picture files, see "Supported File Formats" (169).
A large file size of a picture may not be displayable, and its file will not appear in the list. Delete the picture file using Reader Library.
Connection to the computer
The Reader cannot be operated.
The Reader cannot be operated when connected to a computer via USB.
The Reader cannot be charged using a computer
If [Charging stopped] is displayed on the screen, follow the on-screen instructions (48).
Make sure your computer is turned on and connected to the Reader with the supplied USB cable.
The Reader cannot be recognized by your computer.
→ A USB hub or USB extension cable is used for the connection. Connection via an extension cable or USB hub is not guaranteed. Connect the USB cable directly to the computer. → Disconnect the USB cable from the Reader, then reconnect it after a while. → If the Reader is locked, it will not be recognized by your computer, set [Device Lock] to [Off] (▶ 129). → While the Reader is connected to a computer, do not turn on, restart, wake up from sleep mode, or shut down the computer. Doing so may make the Reader unrecognizable by the computer. Disconnect the Reader from the computer before performing these operations. → Use the supplied USB cable. → There may be a malfunction with the USB port on your computer. Connect the supplied USB cable to another port on the computer. → It may take a while for the software to be recognized by the computer. Wait for a moment. → If none of the above solves the problem, press the RESET hole of the Reader (▶ 142), after 5 seconds turn on the Reader again, and then reconnect the supplied USB cable.
Content cannot be transferred to the Reader from your computer.
→ There is not enough free space on the Reader memory. Check [About] (▶ 124) for free space on internal memory, then delete unnecessary data. → The Reader is not authorized. Authorize the Reader using Reader Library. Refer to “Authorizing Your Computer and the Reader Device for eBook Stores” in Reader Library Help.
Reader Library does not recognize the Reader.
Disconnect the USB cable from the Reader, then reconnect it.
The Reader becomes unstable while connected to a computer.
A USB hub or USB extension cable is used for the connection. Connection via an extension cable or USB hub is not guaranteed. Connect the USB cable directly to the computer.
Memory Card
Content on a memory card cannot be read/played/viewed on the Reader.
Check that the memory card is inserted in the appropriate media slot in the correct direction (16).
Check to see that you are using a memory card that is supported by the Reader ( 164).
Clean the terminal area of the memory card gently with a soft cloth if it is dirty ( 164).
The Reader is not authorized, refer to “Authorizing Your Computer and the Reader Device for eBook Stores” in Reader Library Help.
When inserting the memory card into the Reader, it may take time for the Reader to recognize the content files in the memory card, especially if the number of files stored on the memory card is high.
Content cannot be transferred to a memory card.
Unlock the erasure prevention switch if it is locked.
There is not enough free space on the memory card.
Check [About] (124) for free space on the memory card, then delete unnecessary data (107).
→ The Reader cannot transfer content to memory cards directly. Use Reader Library to transfer content.
A memory card cannot be recognized on the Reader or Reader Library.
→ If a memory card is formatted by your computer, it may become unusable on the Reader and Reader Library. When formatting a memory card, format it using the Reader (▶ 130).
Content on a memory card cannot be deleted.
→ Unlock the erasure prevention switch if it is locked. → Uncheck the read-only attribute of content from your computer.
Appendix
Precautions
Reader Disposal Reference
The built-in rechargeable battery of the Reader is recyclable. Do not remove the battery yourself; consult Sony Support Center (3).
Disposal of Old Electrical & Electronic Equipment (Applicable in the European Union and other European countries with separate collection systems)
This symbol on the product or on its packaging indicates that this product shall not be treated as household waste. Instead it shall be handed over to the applicable collection point for the recycling of electrical and electronic equipment. By ensuring this product is disposed of correctly, you will help prevent potential negative consequences for the environment and human health, which could otherwise be caused by inappropriate waste handling of this product. The recycling of materials will help to conserve natural resources. For more detailed information about recycling of this product, please contact your local Civic Office, your household waste disposal service or the shop where you purchased the product. Applicable accessories: AC Adapter (PRSA-AC1)

On the wireless feature
- SONY provides wireless connectivity at no additional cost to you for certain activities in connection with the content service provided by SONY. You may be charged a fee for wireless connectivity for your use of other wireless services on your product, such as Wi-Fi access, international access or web browsing, should those services be available. You will be notified of the current fees for such services through the content service.
SONY reserves the right to discontinue wireless connectivity at any time or to otherwise change the terms of service for wireless connectivity at any time, including but not limited to the amount and terms applicable for wireless connectivity charges. SONY reserves the right to limit the number and size of data files that may be transferred using the wireless connectivity.
You agree that you will only use the wireless connectivity provided by SONY in connection with the content service that SONY provides for your product except as otherwise expressly permitted by Sony. You may not use the wireless connectivity for any other purpose.
Your use of the wireless connectivity may be limited if your product is located in any area without applicable wireless service coverage, and you may not be able to use some or all of the wireless services, including the content service. SONY is not responsible for the unavailability of wireless connectivity or any interruptions of wireless service.
- Wireless connectivity is only available in the service coverage area. Connectivity may vary.
- Turn off the wireless feature when you are in a location where radio communications are prohibited. When you are in such a location, you must obtain permission from the appropriate authorities before enabling the wireless feature of this device.
- Turn off the wireless feature in health care facilities where any regulations posted in such areas instruct you to do so. Hospitals or health care facilities may be using equipment that could be affected by radio frequency (RF) energy generated by wireless communication.
- Federal Aviation Administration (FAA) and Federal Communications Commission (FCC) regulations prohibit using the radio of wireless devices while in the air. Turn off the wireless feature before boarding an aircraft.
- Do not use your Reader near medical equipment without first obtaining permission to do so.
- If you use any personal medical device, consult the manufacturer of your device to determine whether it may be affected by RF energy.
- General notes on using the Wi-Fi (Wireless LAN) function. In some countries or regions, use of Wi-Fi products may be restricted by local regulations (e.g., limited number of channels).
On software
- Copyright laws prohibit reproducing the software or the manual accompanying it in whole or in part, or renting the software without the permission of the copyright holder.
- In no event will SONY be liable for any financial damage, or loss of profits, including claims made by third parties, arising out of the use of the software supplied with this Reader.
- The software provided with this Reader cannot be used with equipment other than that which is so designated.
- Please note that, due to continued efforts to improve quality, software specifications may be changed without notice.
- Operation of this Reader with software other than that provided is not covered by the warranty.
- Depending on the types of text and characters, the text shown on the Reader Library may not be displayed properly on the device. This is due to:
– The capacity of the Reader. – The Reader is not functioning normally. - Content information is written in a language or character set that is not supported by the Reader.
- The ability to display the languages on your Reader Library will depend on the OS installed on your computer. For better results, please ensure that the installed OS is compatible with the desired language you want to display.
- We do not guarantee that all languages will be displayed properly on your Reader Library.
- User-created characters and some special characters may not be displayed.
- Explanations in this manual assume that you are familiar with the basic operations of Windows or Mac OS. For details on the use of your computer and operating system, please refer to the respective manuals.
- By updating the Reader device software, you can ensure your Reader has the latest features. The latest software updates can be performed from the update menu on Reader Library Help – “Check for Updates”.
About Pre-loaded Contents
Sample content is pre-installed in the Reader so that you can try them out right away. The pre-installed sample content is for the purpose of trial reading, viewing and listening.
If you delete pre-installed sample content, you cannot restore it, and Sony will not supply any replacement content.
On cleaning
- Clean the Reader with a soft cloth, such as a cleaning cloth for eyeglasses.
- If the Reader becomes very dirty, clean it with a soft cloth slightly moistened with water or a mild detergent solution.
- Do not use any type of abrasive pad, scouring powder, or solvent, such as alcohol or benzene, as it may mar the finish of the case.
- Clean the headphone plug periodically.
- Tapping or dragging on the touch screen using a dirty stylus may damage the surface. Wipe the stylus with a dry cloth when it gets dirty.
- Do not get the Reader wet.
Notes on memory cards
Remove the memory slot protective card before inserting a memory card (optional). You can use the following memory cards with the Reader.
| Memory Stick DuoTM media Memory | Stick DuoTMMemory Stick PRO DuoTMMemory Stick PRO-HG DuoTMMemory Stick MicroTM |
| SD Card SD Card | SDHC Card |
About Memory Stick Duo™ media
Memory Stick Duo™ is a compact-size IC recording media with a large capacity. It has been designed not only for exchanging/sharing digital data among
Memory Stick Duo™ compliant products, but also for serving as a removable external storage media that can save data.
Notes
- Sony's Memory Stick Duo™ media of up to 32 GB has been tested to work with the Reader. But the proper operation on all types of the Memory Stick Duo™ media is not guaranteed.
- SD card of up to 32 GB has been tested to work with the Reader; however, not all SD cards are guaranteed to work.
- The M2™ Duo-size adapter must be attached to use Memory Stick Micro™ media in a slot for Memory Stick Duo™ media.
- The file system incorporated in the Memory Stick™ limits the capacity of a file to be transferred to less than 4GB. • Data over 123MB cannot be recorded in a single session.
- Standard-size Memory Stick™ media cannot be used on this product
- The maximum number of songs that can be recorded in the Memory Stick PRO™ media is 65535.
About SD card
SD card complies with compact memory card standard and is commonly used as a storage media for digital still cameras.
Copyright Notice
The contents of each book pre-loaded on this product are copyrighted works, edited with the cooperation of the publisher.
Copyright laws prohibit copying the data of this product or the contents of this manual (illustrations, related documents, etc.) in whole or in part without the permission of the copyright holder. Additionally, use of the data of this product or the contents of this manual is not allowed without Sony's permission except for personal use.
Besides personal use, it is against the copyright law to use any audio or picture you recorded without prior consent of the copyright holder. Accordingly, Memory Stick™ media with content protected image or data can be only used within the law.
Sony, the Sony logo, "BBeB", "Reader", "Reader Daily Edition" and their logos are either trademarks or registered trademarks of Sony Corporation.

MEMORY STICK™, "Memory Stick", "Memory Stick PRO Duo", "Memory Stick PRO-HG Duo", "Memory Stick Duo", "Memory Stick Micro", "M2", "MagicGate" and their logos are trademarks of Sony Corporation.
Bitstream is a registered trademark, and Dutch, Font Fusion, and Swiss are trademarks, of Bitstream Inc.
Microsoft, Windows, Windows Vista and Windows Media are trademarks or registered trademarks of Microsoft Corporation in the United States and / or other countries.
Macintosh and Mac OS are trademarks of Apple Inc., registered in the U.S. and other countries.
This PRS-950 contains Adobe® Reader® Mobile software under license from Adobe Systems Incorporated, Copyright © 1995-2009 Adobe Systems Incorporated. All rights reserved. Adobe and Reader are trademarks of Adobe Systems Incorporated. MPEG Layer-3 audio coding technology and patents licensed from Fraunhofer IIS and Thomson.
This product includes software developed by the OpenSSL Project for use in the OpenSSL Toolkit. (http://www.openssl.org/) Copyright© 1998-2008 The OpenSSL Project. All rights reserved. This product includes cryptographic software written by Eric Young (eay@cryptsoft.com). This product includes software written by Tim Hudson (tjh@cryptsoft.com). For details on OpenSSL License, refer to “END USER LICENSE AGREEMENT” in [About] at [Settings] menu on the Reader.
Wi-Fi, the Wi-Fi CERTIFIED logo, WPA, WPA2 and Wi-Fi Protected Setup are trademarks or registered trademarks of Wi-Fi Alliance.
- The Wireless LAN functionality, has passed Wi-Fi certification and complies with the interoperability specifications established by WFA (Wi-Fi Alliance).
CERTIFIED
All other system names and product names appearing in this document are the registered trademarks or trademarks of their respective owners. Further, the trademark TM and registered trademark ® symbols are not indicated throughout this document.
Program ©2010 Sony Corporation
Documentation ©2010 Sony Corporation
System Requirements
Reader Library will work with the following operating systems.
| OS Description | |
| Microsoft Windows 7 (32/64 bit) | Windows 7 StarterWindows 7 Home BasicWindows 7 Home PremiumWindows 7 ProfessionalWindows 7 Ultimate |
| Microsoft Windows Vista (32/64 bit) | Windows Vista Home Basic with Service Pack 2 or laterWindows Vista Home Premium with Service Pack 2 or laterWindows Vista Business with Service Pack 2 or laterWindows Vista Ultimate with Service Pack 2 or later |
| Microsoft Windows XP (32 bit only) | Microsoft Windows XP Home Edition with Service Pack 3 or laterWindows XP Professional with Service Pack 3 or laterWindows XP Media Center Edition 2004 & 2005 with Service Pack 3 or later |
| Apple Macintosh (32 bit only) | Mac OS X version 10.6.3 or laterMac OS X version 10.5.8 or laterMac OS X version 10.4.11 or later |
Handwriting ...63, 64, 111, 113 Finding a Note ....67 [Notes] ....59, 63, 67
Handwriting a note ......63
Headphones jack .....18
Highlighting word(s) ......62
Holes for optional cover attachment ....18
Home Menu ....32
[Help and Support] ...... 3, 40
[Hide]/[Show] .....59, 82
[History] ....58, 82
|
Icons and types of note in the [Notes] list ......68
Issues ......42, 89, 105, 109
[Info] 5
[Initialization] ......123, 130
[Input Address] ...... 98, 101
[IP Address] 139
J
Jumping to a Page .....80
Link 4,
[Go to] ....58, 80, 82
[Previous View] .....58, 82
[Select Page] .....58, 80
K
[Keyboard] ......123, 126
L
Link 4,
Listing previously looked up words ....
[Legal Information] ... 40, 101
[List]....59,
M
Magazines ......32, 42, 88
Making Purchases ......39
Managing Content ...... 107
Managing Periodicals ..... 109
Media slot ....1
Memory card ...... 16, 91, 164
Memory card access indicator ....1
Memory Stick PRO Duo™ ..... 16, 91, 10
Memory Stick PRO Duo™ slot ....
Micro USB connector 2 ....18, 22, 4
Mobile network ....35
Mobile network status .....36
[Manage Subscription] ...58, 109
[Manual Registration] ..... 139
[Margin Cut] ....71
[Menu Language] ....123, 126
[My Account] 40
N
Network Menu ......93
Newspapers ......32, 42, 88
Note ......61, 64, 67
Annotation ......61
Bookmarking ......61
Drawing ......63, 64
Finding a Note ......67
Handwriting a note .....63
Highlighting word(s) .....62
[Notes] ....59, 63, 67
[New Collection] ...... 58, 103
[New Drawing] ...... 58, 113
[New Memo] ...... 58, 116
[Notes] 59, 63, 67
[Create/Edit] .....59, 63
[Hide]/[Show] .....59, 82
[List] 59,67
[Now Playing] 59
O
On-screen keyboard ......30
[Clear Keyboard History] ....123, 130
[Keyboard] ......123, 126
Operation at page view ....56
OPTIONS Menu .....40, 57, 101, 141
OPTIONS menu of the [Browser] application .. 104
OPTIONS menu of the Reader Store ....40
OPTIONS menu of [Wi-Fi Network Settings] ...... 141
[Orientation] .....59, 77
[Original] 71, 75
P
Parts and Controls ......14
Periodicals ......32, 42, 88
Pictures ......111, 118
Slideshow .....60, 118, 127
Standby screen ......60, 119, 129
Supported File Formats 169
Zooming in ...... 72, 119
[Select Standby Screen] 60, 119
[Slideshow On]/ [Slideshow Off] .. 60, 118
[Slideshow] ......123, 127
[Standby Screen] 123, 129
Playing audio files ...... 120
Index
[Two Page View]....71
[WPS PIN Method] ...... 138
U
[WPS Push-Button
Configuration] ...... 138
Useful Features .... 5
Using Embedded
Z
Dictionaries ...... 83, 112
Zooming in ...... 72, 119
Using Wikipedia ......87
V
Viewing pictures ...... 118
Volume button ...... 18, 122
[View:] 60
[View Bookmarks] ..... 99, 101
W
Web bookmark .....99
Website 93, 95
Wi-Fi ......35, 87, 93, 131, 132
Wi-Fi status...... 37, 136
Wikipedia ....87
WIRELESS switch
......14, 18, 36, 37, 93
[Wi-Fi Advanced Settings]
.... 139
[Wi-Fi Network Settings]
.... 132
[Wireless Controls] ...... 131
[Word Logs: Book] .....60, 86
[Word Logs: Dictionary]
60, 86, 112
[Word Logs: Periodicals]....60
- SUPPORT FOR THE READER™ DEVICE
- WEBSITE AND CONTACT
- FIRMWARE UPDATES (SYSTEM SOFTWARE)
- SUPPORT FOR THE READER™ STORE
- JUMPING TO A PAGE (≥ 80)
- DICTIONARY
- READING PERIODICALS (➤ 88)
- BROWSING WEBSITE (➤ 95)
- COLLECTION MANAGEMENT
- OTHER APPLICATIONS
- SUPPORTED FILE FORMATS (➤ 169)
- SPECIFICATIONS (➤ 19)
- GETTING CONTENT
- NETWORK MENU
- COLLECTIONS
- MANAGING CONTENT
- CHAPTER
- OVERVIEW
- PARTS AND CONTROLS
- VOLUME BUTTON* (➤ 122)
- HEADPHONES JACK
- MICRO USB CONNECTOR (≥ 22, 48)
- RESET HOLE (≥ 142)
- WIRELESS SWITCH (≥ 36, 37, 93)
- HOLES FOR OPTIONAL COVER ATTACHMENT
- SPECIFICATIONS
- DISPLAY
- MOBILE NETWORK
- WI-FI
- EXPANSION SLOTS
- AC ADAPTER FOR READER (PRSA-AC1)
- GETTING STARTED
- BASIC OPERATION
- CHARGING THE READER
- NOTES
- TIP
- TO CHECK BATTERY STATUS IN THE STATUS BAR (33) DURING USE
- POWER SAVING TIPS
- CHARGING BATTERY
- RECOMMENDED TEMPERATURE
- SWIPING
- SWIPING AND HOLDING
- ON-SCREEN KEYBOARD
- TO PERFORM AT INPUT AREA
- NOTE
- TO INPUT OPTIONAL CHARACTERS
- HOME MENU
- ABOUT THE STATUS BAR ( 32)
- ICON DESCRIPTION
- TO CHECK THE NETWORK STATUS
- MOBILE NETWORK STATUS
- ICON STATUS
- WI-FI STATUS
- CREATING A READER™ STORE ACCOUNT
- MAKING PURCHASES
- READER STORE NOTIFICATIONS
- STEP 1: INSTALLING READER™ LIBRARY
- CONNECT YOUR READER DEVICE TO YOUR COMPUTER USING THE SUPPLIED USB CABLE
- STATUS INDICATOR WHILE CONNECTING YOUR COMPUTER
- FOLLOW THE ON-SCREEN INSTRUCTIONS TO COMPLETE THE INSTALLATION OF READER LIBRARY
- STEP 2: SIGN IN YOUR ACCOUNT AND PURCHASING EBOOKS
- VISIT READER STORE AND SIGN IN YOUR ACCOUNT
- SIGN IN YOUR ACCOUNT ON THE READER STORE
- PURCHASE AND DOWNLOAD EBOOKS
- STEP 3: TRANSFERRING YOUR EBOOKS TO YOUR READER DEVICE
- CLICK ON THE EBOOK THAT YOU WISH TO TRANSFER AND DRAG-AND-DROP IT TO [READER] IN THE LEFT-HAND MENU
- AFTER A FEW MOMENTS, YOUR EBOOK WILL BE TRANSFERRED
- CLOSE READER LIBRARY AND DISCONNECT YOUR READER DEVICE FROM THE COMPUTER
- READING CONTENT
- READING BOOKS
- TIPS
- OPERATION AT PAGE VIEW
- HIGHLIGHTING WORD(S)
- DELETING
- HANDWRITING A NOTE
- ADDING A NOTE
- TAP A BOOKMARK OR HIGHLIGHTED WORD → [BY DRAWING] OR [BY KEYBOARD]
- ENTER A NOTE → TAP [DONE]
- TO EDIT A NOTE
- TO DELETE A NOTE
- FINDING A NOTE
- SEARCHING FOR NOTES WITHIN A BOOK
- PRESS OPTIONS → TAP [NOTES] → [LIST]
- TAP A NOTE
- ICONS AND TYPES OF NOTE IN THE [NOTES] LIST
- TO DELETE NOTES
- TO DELETE ALL NOTES
- FINDING THE NOTES IN ALL CONTENTS
- TAP [ALL NOTES] AT [HOME] MENU
- TAP A NOTE ON THE LIST
- TO DELETE NOTES IN ALL CONTENTS
- TO DELETE ALL NOTES IN ALL CONTENTS
- RESIZING
- ZOOMING IN
- CUSTOM SETTING MODE
- TAP 📋 → DRAG THE SLIDER, OR TAP 🖼 OR 🏻 REPEATEDLY UNTIL THE PAGE IS ADJUSTED TO THE DESIRED BRIGHTNESS AND CONTRAST
- TAP TO APPLY THE SETTING AND EXIT
- SCREEN ORIENTATION
- SEARCHING
- BY SELECTING A WORD(S)
- FROM THE ON-SCREEN KEYBOARD
- JUMPING TO A PAGE
- BY USING THE SLIDER
- BY TAPPING A LINK
- RETURNING TO THE PREVIOUSLY DISPLAYED PAGE
- JUMP TO VIEWED PAGES
- TO LIST WORDS WITH THE SAME HEAD LETTERS AS PREVIOUSLY ENTERED WORDS
- USING WIKIPEDIA
- DOUBLE-TAP A WORD
- TAP
- READING NEWSPAPERS / MAGAZINES
- TAP [PERIODICALS] AT [HOME] MENU
- TAP A DESIRED PERIODICAL TO GO TO ISSUE LIST
- GOOGLE BOOKS
- TAP [GOOGLE BOOKS] UNDER [APPLICATIONS] AT [HOME] MENU
- BROWSING WEBSITES
- OPTIONS MENU OF THE [BROWSER] APPLICATION
- FROM EITHER THE BOOKS OR ISSUES LIST
- DELETING A COLLECTION
- REMOVING CONTENT
- DELETING CONTENT
- TAP [BOOKS], PRESS OPTIONS, THEN TAP [DELETE BOOKS]
- TAP [DONE], THEN [YES]
- PROTECTING CONTENT
- TAP [BOOKS] → PRESS OPTIONS → TAP [PROTECT BOOKS]
- TAP [DONE]
- MANAGING PERIODICALS
- VIEWING/EDITING CREATED DRAWINGS
- CAPTURING A SCREENSHOT
- TO DELETE/PROTECT A DRAWING(S)
- CREATING TEXT MEMOS
- TO DELETE/PROTECT A TEXT MEMO IN THE LIST
- PLAYING AUDIO FILES
- PLAYBACK SCREEN OPERATIONS
- SETTINGS
- CHANGING SETTINGS
- [GENERAL SETTINGS] (125)
- [APPLICATION PREFERENCES] (127)
- [SYSTEM MANAGEMENT] (128)
- [INITIALIZATION]
- [GENERAL SETTINGS]
- [DATE AND TIME]
- [TIME ZONE]
- [DEVICE LOCK]
- [STANDBY SCREEN]
- [CHECK FOR UPDATE]
- [RESTORE DEFAULTS]
- [CLEAR KEYBOARD HISTORY]
- [FORMAT MEMORY]
- ICONS IN THE ACCESS POINTS LIST
- TO CONNECT A NEW ACCESS POINT FROM THE ACCESS POINTS LIST
- TO CONNECT TO AN ACCESS POINT WHERE IS DISPLAYED
- TAP A NEW ACCESS POINT FROM THE ACCESS POINTS LIST
- TAP [ENCRYPTION KEY] ENTER THE ENCRYPTION KEY USING THE ON-SCREEN KEYBOARD TAP [OK]
- TAP [CONNECT] TO RETURN TO THE [WI-FI NETWORK SETTINGS] SCREEN, AND START CONNECTION TO THE ACCESS POINT
- STATUS OF THE ACCESS POINT IN THE ACCESS POINTS LIST
- TO CONFIGURE A NEW ACCESS POINT USING THE WPS (WI-FI PROTECTED SETUP) FEATURE
- TO CONFIGURE A NEW ACCESS POINT MANUALLY
- THE READER CANNOT TURN ON
- SCREEN
- DISPLAY TAKES A LONG TIME TO APPEAR
- THE SCREEN IS FROZEN
- WIRELESS FEATURE
- WI-FI CONNECTION
- [CONTINUE READING] DOES NOT WORK, OR BOOKMARKS ARE MISSING
- YOU CANNOT FIND A TRANSFERRED BOOK
- VIEWING PICTURES
- CONNECTION TO THE COMPUTER
- THE READER CANNOT BE RECOGNIZED BY YOUR COMPUTER
- CONTENT CANNOT BE TRANSFERRED TO THE READER FROM YOUR COMPUTER
- READER LIBRARY DOES NOT RECOGNIZE THE READER
- THE READER BECOMES UNSTABLE WHILE CONNECTED TO A COMPUTER
- MEMORY CARD
- CONTENT ON A MEMORY CARD CANNOT BE READ/PLAYED/VIEWED ON THE READER
- CONTENT CANNOT BE TRANSFERRED TO A MEMORY CARD
- A MEMORY CARD CANNOT BE RECOGNIZED ON THE READER OR READER LIBRARY
- CONTENT ON A MEMORY CARD CANNOT BE DELETED
- APPENDIX
- PRECAUTIONS
- READER DISPOSAL REFERENCE
- DISPOSAL OF OLD ELECTRICAL & ELECTRONIC EQUIPMENT (APPLICABLE IN THE EUROPEAN UNION AND OTHER EUROPEAN COUNTRIES WITH SEPARATE COLLECTION SYSTEMS)
- ON THE WIRELESS FEATURE
- ON SOFTWARE
- ABOUT PRE-LOADED CONTENTS
- ON CLEANING
- NOTES ON MEMORY CARDS
- ABOUT MEMORY STICK DUO™ MEDIA
- ABOUT SD CARD
- COPYRIGHT NOTICE
- CERTIFIED
- SYSTEM REQUIREMENTS
- J
- K
- L
- M
- N
- O
- P
- INDEX
Brand : SONY
Model : PRS-950
Category : E-reader