
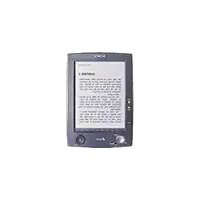
PRS-300SC - E-reader SONY - Free user manual and instructions
Find the device manual for free PRS-300SC SONY in PDF.
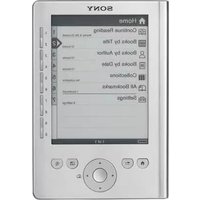


| Product Type | E-reader |
| Model | PRS-300SC |
| Brand | Sony |
| Dimensions (w/h/d) | Approx. 107.8 × 157.5 × 10.2 mm (4.25 × 6.2 × 0.4 in) |
| Weight | Approx. 220 g (7.76 oz) |
| Power Source | Built-in rechargeable battery (DC 3.7 V) or AC adapter (DC 5.2 V, optional AC-S5220E) |
| Battery Life (continuous page turns) | Approx. 7,500 pages (BBeB) / 6,800 pages (EPUB) |
| User Available Capacity | Approx. 440 MB |
| Operating Temperature | 5 to 35 °C (41 to 95 °F) |
| Supported File Formats | BBeB (.lrf, .lrx), PDF (.pdf), EPUB (.epub), Text (.txt), RTF (.rtf), Word (.doc, .docx) (converted) |
| Screen Orientation | Switchable vertical/horizontal |
| Text Size Adjustment | 3 levels (S, M, L) |
| Bookmark Function | Yes, with dedicated button |
| Page Jump | Direct page number input |
| Sleep Mode | Automatic after 60 min inactivity (configurable) |
| Charging Time (full charge) | Approx. 3.5 hours via USB, approx. 2 hours via AC adapter |
| USB Connection | USB 2.0 (High-Speed compatible) |
| Supplied Accessories | USB cable, sleeve, quick start guide |
| Optional Accessories | AC Adapter for Reader (AC-S5220E) |
| System Requirements | Windows Vista/XP or Mac OS X 10.4.11+; USB port; Internet connection for eBook Library |
| Pre-installed Content | Sample books for trial |
| Software | eBook Library for content management |
Frequently Asked Questions - PRS-300SC SONY
User questions about PRS-300SC SONY
0 question about this device. Answer the ones you know or ask your own.
Ask a new question about this device
Download the instructions for your E-reader in PDF format for free! Find your manual PRS-300SC - SONY and take your electronic device back in hand. On this page are published all the documents necessary for the use of your device. PRS-300SC by SONY.
USER MANUAL PRS-300SC SONY
Jump to the table of contents
User's Guide
PRS-300
Digital Book Reader
Table of Contents
Introduction
What You Can Do with the Reader 5
Getting Started
Parts and Controls 6
Turning on the Reader 9
About the sleep mode of the Reader 10
Charging the Reader 11
About charging 11
Charging the Reader via USB connection 11
Installing eBook Library 15
Basic Menu Operation 16
Importing and Transferring Content
Importing Content 20
Authorizing the Reader and your computer ....20
Downloading eBooks from eBook store....23
Importing content to eBook Library 25
Transferring Content.... 26
Transferring content to the Reader 26
Synchronizing content in Library with the Reader ....32
Reading Books
Reading Books 34
Selecting a book ....37
About the Options menu ....40
Operations on the book page 42
Using the Useful Features 44
Adjusting text size ....44
Creating a bookmark on a page 46
Switching screen orientation (vertical/horizontal) 49
Jumping to the specified number page directly .....50
Going back to previously displayed pages ....51
Deleting a book 52
Checking the book information ....53
Settings
Changing Settings 55
Settings menu items ....57
Advanced Settings menu items ......61
Troubleshooting
Troubleshooting 64
Restoring default settings ....72
Uninstalling eBook Library . 73
Other Information
Updating the Reader's Firmware 74
About Books Pre-installed on the Reader .. 75
Notes on the Reader Disposal .. 76
Precautions 77
On safety 82
Note on use 82
On heat build-up 83
On software 84
On Cleaning 85
On Copyrights 86
About GNU GENERAL PUBLIC LICENSE 87
Specifications 89
Index 91
What You Can Do with the Reader
First, read the Quick Start to prepare the Reader for use. Initially after purchase, you need to charge the Reader battery, and install the dedicated software “eBook Library” on your computer.
Once initial preparation is complete, you can transfer content from your computer to the Reader to take anywhere you wish.
Online eBook store *1

Downloaded eBooks from eBook store
eBooks stored on your computer
![graph LR A["Laptop with file grid and folder"] --> B["File with folder icon"] B --> C["Electronic device with screen and scroll"]](/content/2026/06/1145851/images/e5428813fb5934c65094f83365cb695b45e5949dea2b001643bd9627ae7774f7.jpg)
Transferring eBooks to the Reader
*1 The Internet connection is required.
Getting Started
Charge the Reader, then install eBook Library.
Importing
Downloaded eBooks from eBook store
Transferring
Transfer content from your computer to the Reader using eBook Library.

Reading
Enjoy content on the Reader.
Parts and Controls

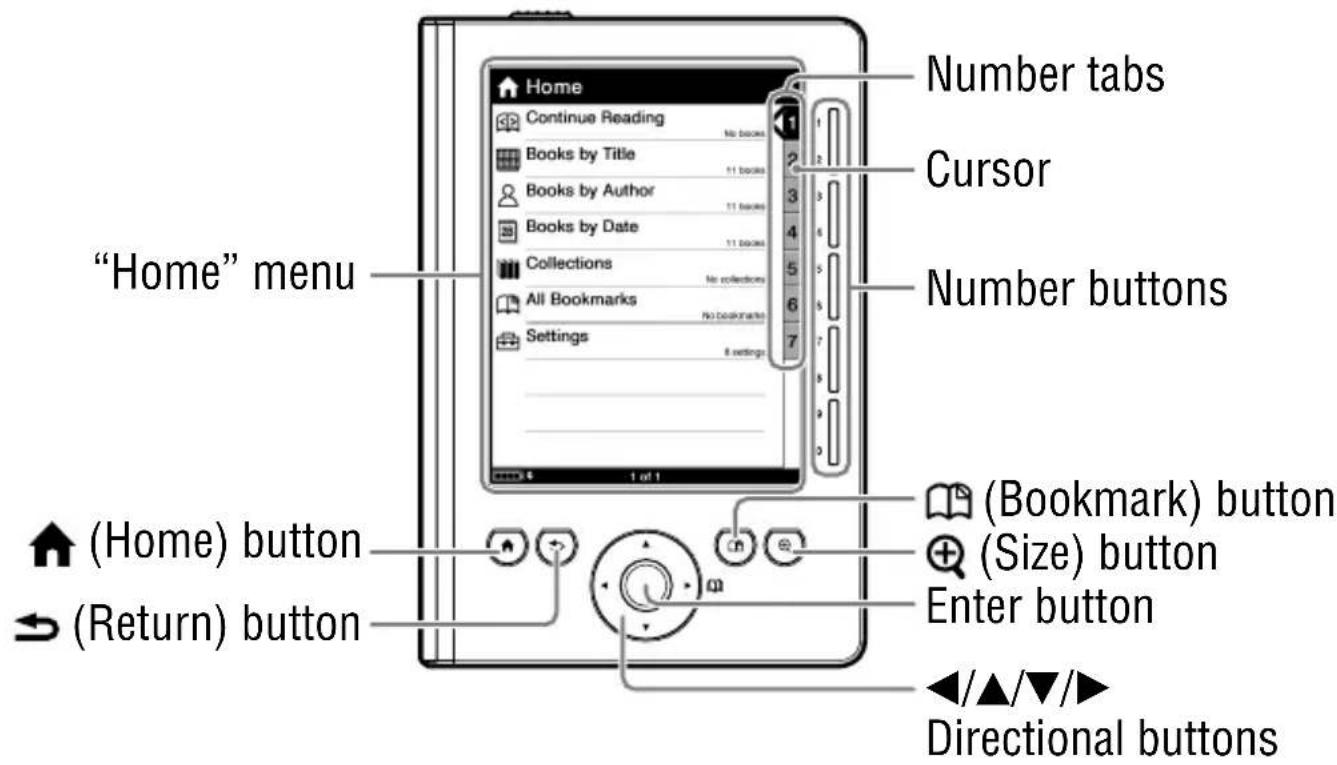
1 Enter button
Selects an item or applies a setting.

Enter button
2 ◀/▲/▼/► Directional buttons
- Moves the cursor on the number tab of the list screen. • Turns pages on the book page.
3 (Home) button
Displays the "Home" menu.
4 (Return) button
Goes to an upper menu or cancels the operation.
5 (Bookmark) button
Creates/Removes a bookmark. (▶ page 46)
6 (+Size) button
Adjusts the text size or switches the screen orientation. (> page 44, 49)
7 Number (1 - 9,0) buttons
- Selects the numbered items on the list screen.
- Inputs the page number that you want to jump to on the book page. (See page 50)
- Enters a numeric value on the “Settings” menu.
8 POWER switch
Switches the Reader on/off. (See page 9)
9 Charge indicator
Lights up in red while charging, and goes off when charging is complete. (See page 11)
Flashes in orange when your computer starts accessing the Reader via USB.
Also flashes in orange when switching the Reader on or off.
10 Holes for cover attachment
Used to attach the cover (optional).
11 Hole for hand strap
Used to attach the hand strap.
12 USB connector
Used to connect the USB cable (supplied). (See page 11)
13 DC IN jack
Used to connect the AC Adapter for Reader (AC-S5220E) (optional).
Hint
- The Reader can be charged by connecting to a computer using the supplied USB cable.
14 RESET button
Resets the Reader if no operation is possible. ( page 64)
About the serial number
The serial number provided for the Reader is required for customer registration. The number is on the label on the rear of the Reader. Do not remove the label.
Turning on the Reader
Slide the POWER switch to turn on the Reader. Make sure to turn on the Reader before connecting to your computer.

The Reader is turned on.
- When the Reader is turned on for the first time after purchase, the welcome screen appears. Press the Enter button to proceed to the next screen and set the “Menu Language” and “Date and Time Format” settings. For details about the settings, see “Settings menu items.” (page 59)
- It may take a few moments to turn on the Reader and the start-up screen to appear when used for the first time, after a reset or shutdown, or when the battery has been depleted.
The charge indicator lights up in orange when the Reader turns on.
Note
- If the Reader is not turned on, charging is required. For details, see "Charging the Reader." (▶ page 11)
To turn off the Reader
Slide the POWER switch again.
The Reader is turned off and enters sleep mode.
To stop consuming battery power, use "Device Shutdown" in the "Advanced Settings" menu. (▶ page 63)
About the sleep mode of the Reader
You can set the Reader to automatically enter sleep mode. When the sleep mode setting is activated, the Reader automatically enters sleep mode after 60 minutes of inactivity, at which point, the battery power is consumed slightly. The sleep mode setting is activated by default.
Hints
- If you turn on the Reader in sleep mode, the last displayed page appears (resume function).
- You can activate/deactivate sleep mode in the "Settings" menu. (▶ page 58)
- You can minimize battery consumption by using "Device Shutdown" in the "Advanced Settings" menu. (▶ page 63)
Note
- In the following states, the Reader will not automatically turn off, even if no operation is performed for 60 minutes.
- When connected to a computer using the supplied USB cable
- When connected to the AC Adapter for Reader (AC-S5220E) (optional) to charge
Charging the Reader
About charging
Charging the Reader is required when using it for the first time or when the remaining battery is low. Turn on the Reader, and then charge it in one of the following ways.
- Connect to a computer via USB. (Charging time: approx. 3.5 hours*)
- Connect to an AC outlet using the AC Adapter for Reader (AC-S5220E) (optional). (Charging time: approx. 2 hours*)
* Approximate time required to fully charge the battery.
Charging the Reader via USB connection
To charge the Reader via USB connection, follow the steps below.
Before connecting via USB, slide the POWER switch.
The Reader is turned on.
Note
- If the Reader does not turn on, the battery has been fully depleted. In this case, go to the next step. Although charging is in progress (charge indicator lights up in red), the Reader will not turn on until indicating connection via USB) appears on the screen (it takes at least 40 minutes).
2 Make sure your computer is connected to an AC outlet and turned on (not in sleep mode).
3 Connect the Reader to your computer using the supplied USB cable.
appears on the Reader and charging starts.
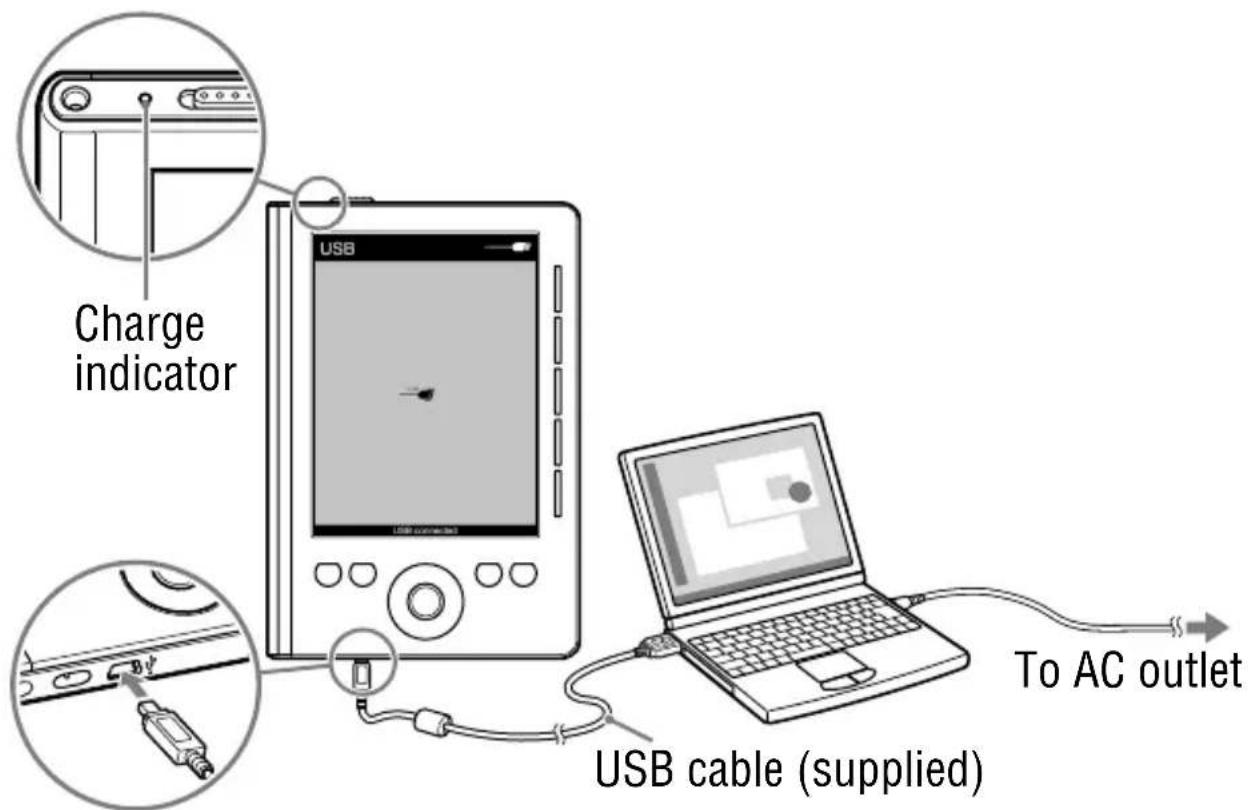
The displayed screen during the USB connection varies depending on the using environment.
Hints
- If eBook Library has not been installed on your computer, the AutoPlay window appears (Windows only). (▶ page 15)
- To check how much the Reader has been charged, disconnect the Reader from your computer, then check the battery icon. (▶ page 13)
- When the Reader is charged fully, the charge indicator (lights up in red while charging) goes off.
Notes
- While charging via USB, the Reader cannot be operated.
- Do not leave the Reader connected to a notebook computer which is not connected to an AC outlet for an extended period. It will consume the battery of the notebook computer.
- Connecting the Reader via a USB hub or extension cable may not work and is not supported. Connect the USB cable directly to the computer.
- If the Reader in the shutdown state is connected to your computer, although charging is in progress (charge indicator lights up in red), not appear on the Reader for at least 40 minutes. Be sure to turn on the Reader before the USB connection.
- At purchase, the Reader is in the shutdown state. Be sure to turn on the Reader before the USB connection.
- While the Reader is connected to your computer, do not turn on, restart, wake up from sleep mode, or shut down the computer. These operations may cause the Reader to malfunction. Disconnect the Reader from the computer before performing these operations.
To check the battery status
You can verify the remaining battery power by checking the battery indicator in the bottom left of the screen. Charge the battery when remaining power is low (the fewer black segments indicated, the lower the remaining power).
![graph LR A["Power Supply"] --> B["Battery"] B --> C["Battery with Battery"] C --> D["Battery with Battery"] D --> E["Battery with Battery"] E --> F["Battery"]](/content/2026/06/1145851/images/665de3e57d1406b47518bf4430ed150e4c6779ffa9d481e67eb7314603ffe0b7.jpg)
Note
- If the remaining battery power is low, the following warning appears. Charge the battery. (▶ page 11)

If you continue to use without charging, the following warning appears, and the Reader will turn off automatically.
Charge the Reader and turn it on again. (▶ page 11)

Installing eBook Library
eBook Library is the content management software you use with the Reader.
Notes
- The Internet connection is required to install eBook Library.
- Your computer needs to meet the minimum system requirements for eBook Library. For details, see “System Requirements.”
(> page 90)
1 Make sure the Reader and your computer are turned on, then connect them via USB. ( > page 11)
The “Installer for Reader” window appears.
Hint
- If you have disabled the AutoPlay feature of Windows, start the install launcher that is stored on the Reader manually. From the Start menu, click “My Computer” (“Computer” in the case of Vista) - “Installer for Reader” - “Windows” - “Setup eBook Library.”
2 Click “Installing eBook Library” in the “Installer for Reader” window, then follow the on-screen instructions.
To install eBook Library in Macintosh
When the Reader is connected to your computer, "LAUNCHER" appears on the desktop. Click it - "Mac" - "Setup eBook Library," and then follow the on-screen instructions.
Basic Menu Operation
You can operate the Reader by selecting item from the menu (list).
To select an item from the menu, press the number buttons as indicated on the number tabs.
Hint
- In addition to the number buttons, you can also select an item by using the ◀/▲/▼/►/Enter buttons.
In this manual, the operating instructions of the Reader are described as follows.
Example: Selecting a book from the Book list
From the “Home” menu, select “Books by title” desired book → “Begin.”
The actual operation for the example is shown as below:
2 Press the number 2 button, or press the ▲/▼ buttons to move the cursor onto “Books by Title” and then press the Enter button.
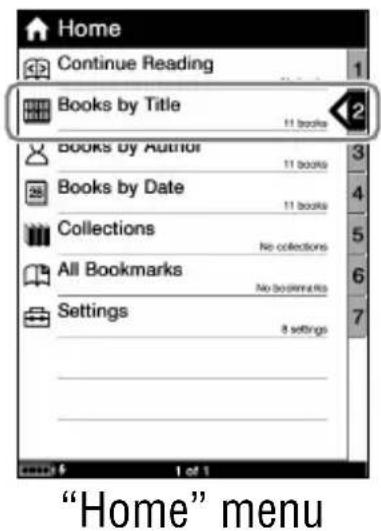
3 Press the number button of the desired book, or press the ▲/▼ buttons to move the cursor onto the desired book and then press the Enter button.
- If more than 30 books are stored, the Index menu appears. (▶ page 39)
- If the list is divided into the several pages, you can display the rest of the list by pressing the ▶ button.

Book list
4 Press the number 2 button, or press the ▲/▼ buttons to move the cursor onto “Begin” and then press the Enter button.
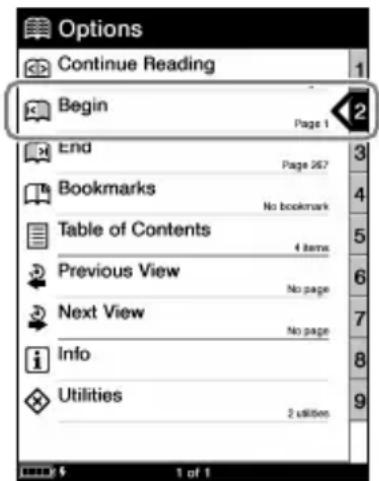
"Options" menu
To return to the "Home" menu
To return to the previous menu
Press the →(Return) button.
Hint
- If you open the book from “Continue Reading,” you can display the “Options” menu from the book page by pressing the ➕ (Return) button. (▶ page 41)
Importing Content
Authorizing the Reader and your computer
Before purchasing and downloading eBooks from the eBook store, the Reader and your computer need to be authorized.
Hint
- You can check whether the Reader is authorized from “About” in the “Settings” menu. (▶ page 60) If it has already been authorized, “Authorized for the eBook Store.” or “This device is authorized for Adobe DRM content.” is displayed.
Note
- The Internet connection is required to authorize the Reader and your computer.
1 Slide the POWER switch.
The Reader is turned on.
Note
- If the Reader does not turn on, the battery has been fully depleted. In this case, go to the next step. Although charging is in progress (charge indicator lights up in red), the Reader will not turn on until (indicating connection via USB) appears on the screen (it takes at least 40 minutes).
2 Connect the Reader to your computer using the supplied USB cable.
eBook Library starts automatically.

Notes
- If eBook Library does not start automatically, start it manually.
- If the Reader in the shutdown state is connected to your computer, the Reader will not be recognized by your computer. Make sure to turn on the Reader before the USB connection.
3 Click "eBook Store" in the Source view.
The View area is switched to the Store view.
Hint
- The available eBook store varies depending on the country.
4 Follow the store instructions.
To download Adobe DRM-protected files
When you download Adobe DRM-protected PDF or EPUB files for the first time, entering your Adobe ID will be required. Enter your Adobe ID by following the on-screen instructions. If you do not have an Adobe ID, create it by following the on-screen instructions, or refer to Sony support web sites.
Downloading eBooks from eBook store
You can download eBooks from an online eBook store to your computer.
Notes
- To download eBooks, an Internet connection is required on your computer.
- You need to authorize your computer to download eBooks from an eBook store. You also need to authorize the Reader to transfer and read downloaded eBooks on the Reader. For details, see “Authorizing the Reader and your computer” (▶ page 20) or refer to the eBook Library Help.
1 Start eBook Library. 2 Click “eBook Store” in the Source view.
The View area is switched to the Store view and the eBook store page appears.
3 Follow the page instructions to purchase (download).
Downloaded eBooks are automatically imported to "Library" in the Source view.
Hint
- Purchased eBooks are grouped under “Purchased” in the Library.
Hint
- eBooks can be read on eBook Library using your computer. For details on eBook Library operations, refer to the eBook Library Help.
Book types supported by the Reader
The following are the book types supported by the Reader and eBook Library
| File type (file extension) | Description |
| BBeB (.lrf, .lrx) | A file in BBeB format used in digital books and publications.The links embedded in eBooks (page jumps, etc.) can be used. (➤ page 43) |
| PDF file (.pdf) A file | in PDF format (Version 1.4 or before).Bookmarks and links on PDF files can be used. |
| EPUB file (.epub) A file in EPUB format used in digital books and publications that can adjust the layout automatically to fit the screen size. | |
| Text file (.txt) | |
| RTF file (.rtf) | |
| Word file*1 (.doc, .docx*2) | Supported only by eBook Library.Word files will be automatically converted into RTF files transferred to the Reader. |
*1 Only if Microsoft Word is installed on your computer. *2 On Macintosh, eBook Library does not support .docx files.
Importing content to eBook Library
You can import content files stored on your computer into Library of eBook Library.
You can import the following content files.
Book
PDF file, EPUB file, Text file, RTF file, Word file (unsecured)*, BBeB file
*1 Word files will be automatically converted into RTF files during transfer to the Reader only if Microsoft Word is installed on your computer.
Note
- Although you can import audio and photo files to eBook Library, you cannot transfer them to the Reader.
For details on content files you can import, refer to the eBook Library Help.
1 Start eBook Library. 2 Click "Import Files" on the "File" menu.
The "Import Files" dialog box appears.
3 Select the content file to be imported.
Hint
- You can import all the content files in a selected folder at the same time by selecting “Import Folder” on the “File” menu.
Transferring Content
Transferring content to the Reader
You can transfer (copy) the content in the Library to the Reader.
You can transfer the following content files.
Book
PDF file, EPUB file, Text file, RTF file, Word file (unsecured)*, BBeB file
*1 Word files will be automatically converted into RTF files during transfer to the Reader only if Microsoft Word is installed on your computer.
Notes
- If the Reader is locked, it will not be recognized on your computer and content cannot be transferred. Turn off the “Device Lock” setting before the USB connection. (▶ page 61)
- If the Reader has not been authorized, eBook Library will not transfer the DRM-protected files to the Reader. Make sure to authorize the Reader before the file transfer. (▶ page 22)
Hints
- The book content can be grouped in the Library as a collection, which can be transferred to the Reader. For details on how to create or transfer a collection, refer to the eBook Library Help.
- You can synchronize content in Library of eBook Library with the Reader. (▶ page 32)
1 Slide the POWER switch.
The Reader is turned on.
Note
- If the Reader does not turn on, the battery has been fully depleted. In this case, go to the next step. Although charging is in progress (charge indicator lights up in red), the Reader will not turn on until indicating connection via USB) appears on the screen (it takes at least 40 minutes).
2 Connect the Reader to your computer using the supplied USB cable. ( > page 11)
eBook Library starts automatically and “Reader” appears in the Source view of eBook Library.

Notes
- If eBook Library does not start automatically, start it manually.
- If “Reader” does not appear in the Source view after connecting the Reader to your computer, disconnect the USB cable from the Reader, then reconnect it after a while.
- If the Reader in the shutdown state is connected to your computer, the Reader will not be recognized by your computer. Make sure to turn on the Reader before the USB connection.
3 Click "Library" in the Source view, then click (List view).
The View area is switched to the List view and all the content in the Library is listed.
Hint
- When you click (Thumbnail View), content can be displayed as thumbnails.
4 Click "Books" in the Source view.
5 Select the content you want to transfer from the list.
6 Drag the content from the list to “Reader” in the Source view.
The content is transferred to the Reader.

Hint
- You can store computer data into the internal memory of the Reader by transferring the data from your computer using Windows Explorer.
Notes
- If there is not enough free space on the internal memory of the Reader, content may not be transferable. The internal memory of the Reader can be increased in the following 2 ways. — Transfer any unnecessary content back to eBook Library, then delete it to increase free space on the Reader.
- Delete any unnecessary book on the Reader. (▶ page 52)
- Do not delete files in the folder under “database,” and files in “database” on your computer. Perform data management using eBook Library. For details on the eBook Library operations, refer to the eBook Library Help.
- You can annotate books in eBook Library. However, the Reader can display only bookmarks and will not display other annotations such as highlights or comments.
- If bookmarks which include comments are transferred to the Reader, only the bookmarks will be displayed.
To transfer content back to eBook Library
1 Slide the POWER switch.
The Reader is turned on.
2 Connect the Reader to your computer using the supplied USB cable. ( > page 11)
eBook Library starts automatically and “Reader” appears in the Source view of eBook Library.
3 Click "Reader" in the Source view, then click (List view).
The View area is switched to the List view and all the content in Library is listed.
4 Click “Books” in the Source view. 5 Select the content you want to transfer back from the list. 6 Drag the content from the list to “Library” in the Source view.
The content is transferred back to eBook Library.
Note
- Bookmarks created on the Reader can be displayed on eBook Library 3.0 or later. Earlier versions of eBook Library will not display them.
Synchronizing content in Library with the Reader
You can synchronize content in the Library of eBook Library with the Reader by specifying a folder (such as “Library” or the sub-items under “Library”). The Reader can be automatically updated to match the content in the Library, when you connect it to your computer. For details, refer to the eBook Library Help.
Note
- To synchronize content in the Library of eBook Library with the Reader, you need to specify a folder (such as “Library” or the sub-items under “Library”). For details on how to specify a folder, refer to the eBook Library Help.
Hint
- When you want to synchronize content in the Library with the Reader right away, you can also synchronize them manually. For details on how to synchronize content manually, refer to the eBook Library Help.
1 Slide the POWER switch.
The Reader is turned on.
Note
- If the Reader does not turn on, the battery has been fully depleted. In this case, go to the next step. Although charging is in progress (charge indicator lights up in red), the Reader will not turn on until indicating connection via USB) appears on the screen (it takes at least 40 minutes).
2 Connect the Reader to your computer using the supplied USB cable. ( > page 11)
eBook Library starts and synchronizes content in the Library with the Reader automatically.
Notes
- If eBook Library does not start automatically, start it manually.
- If the Reader in the shutdown state is connected to your computer, the Reader will not be recognized by your computer. Make sure to turn on the Reader before the USB connection.
Hints
- eBook Library also starts synchronizing content in Library with the Reader automatically in the following situations:
- When you start eBook Library after connecting the Reader to your computer. — After a period of time when any changes have been made to the specified folder.
- You can also synchronize content in the computer drive with the Reader by specifying a folder as a favorite folder. For details, refer to the eBook Library Help.
Reading Books
Follow the steps below to read books transferred from your computer.
Note
- If an invalid operation is performed, ⊖ appears at the bottom of the screen.
1 From the “Home” menu, select “Books by Title.”

"Home" menu
- If more than 30 books are stored, the Index menu appears. Select the first character of the book title. For details, see “About the Index menu.” (see page 39)
- If the list is divided into several pages, you can display the rest of the list by pressing the ▶ button.
Hints
- If you want to continue reading from the last displayed page, select "Continue Reading" from the "Home" menu.
- From the “Home” menu, books can be selected from a variety of lists. For details, see “Selecting a Book.” (see page 37)
2 From the Book list, select the desired book.

Book list
(Expiration): Indicates days remaining until expiration. "Expired" is displayed when the book has expired.
3 From the “Options” menu, select “Begin.”

"Options" menu
Hint
- If you open the book from “Continue Reading,” you can display the “Options” menu from the book page by pressing the →(Return) button. (see page 41)
4 Press the ◀/▶ buttons to turn pages.
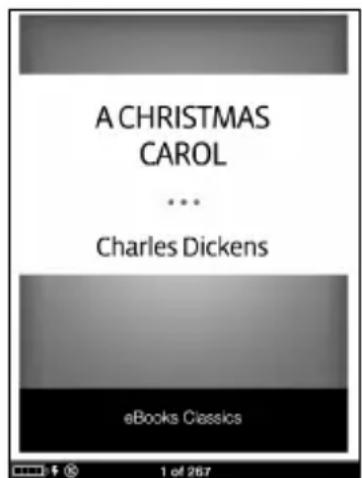
Book page
- For details on how to operate the book page, see "Operations on the book page." (see page 42)
Selecting a book
From the “Home” menu, you can select a book by the title, the author, or the transferred date, or from the “Collections” list.

"Home" menu
"Home" menu items to select a book
| Display item Description | |
| Books by Title Displays the Book list sorted by title. | |
| Books by Author Displays the Book list sorted by author. | |
| Books by Date Displays the Book list sorted by transferred date. | |
| Collections*1 | Displays the list of collections created on eBook Library. |
*1 Collections can only be created in eBook Library. For details on how to create or transfer a collection, refer to the eBook Library Help.
Hints
- If you want to continue reading from the last displayed page, select “Continue Reading” from the “Home” menu.
- You can select all bookmarked pages of all the books stored on the Reader from “All Bookmarks” in the “Home” menu. (▶ page 48)
Operations on a Book list
The following operations can be performed on a Book list (including the Book list in Collections).

Book list of "Books by Title"
| Button Operation | |
| ▲/▼ buttons | Press: Moves the cursor on the number tabs |
| ◀/▶ buttons | Press: Displays the previous/next page of the list. |
| Press and hold: Displays the first page/ last page of the list. | |
| Number buttons Press: Selects numbered item. | |
| ♠ (Home) button Press: Displays the “Home” menu. | |
| ⊕ (Size) button | Press and hold: Switches the screen orientation. (➤ page 49) |
| ⇨ (Return) button | Press: Goes to the upper menu. |
About the Index menu
In the Index menu, books are sorted into several categories. If more than 30 books are stored, the Index menu is displayed as the first page of the list. Select the category which the desired book belongs to.
- In the Index menu of “Books by Title” or “Books by Author,” books are sorted alphabetically.
- In the Index menu of “Books by Date,” books are sorted by transferred date.

Hint
- The Index menu is the first page of “Books by Title,” “Books by Author” and “Books by Date.” You can display the Index menu by pressing and holding the ◀ button in the Book list.
Note
- In the “Collections” list, the Index menu does not appear.
About the Options menu
The “Options” menu appears after you select a book from the list. You can choose the point to start the book or use the various features from the menu.

"Options" menu
"Options" menu items
| Display item Description | on/Reference page |
| Continue Reading Op | pens the last displayed page of the book. |
| Begin Opens the first | page of the book. |
| End Opens the final | page of the book. |
| Bookmarks*1 | Opens the bookmark list of the book. You can create bookmarks on the Reader. (> page 46) |
| Table of Contents*2 | Opens the table contents of the book. |
| Previous View | Opens the previously displayed pages. (> page 51) |
| Next View Returns to | pages viewed by “Previous View.” |
| Info | Displays the book Information. (▶ page 53) |
| Utilities | Deletes the book (▶ page 52), or removes all bookmarks (▶ page 48). |
*1 Bookmarks can also be created in eBook Library. For details, refer to the eBook Library Help.
*2 The table of contents can be displayed only if the book or the file has it.
To display the "Options" menu from the book page
The operations to display the “Options” menu from the book page vary depending on the item you have selected to open the book.
| Item you have selected Operation | |
| Continue Reading (in the “Home” and “Options” menu)BeginEnd | Press the ➔ (Return) button once. |
| Bookmarks Table of Contents | Press the ➔ (Return) button twice. |
| All Bookmarks | Press the ⚗Home) button to display the “Home” menu, select “Continue Reading,” then press the ➔ (Return) button once. |
Operations on the book page
On the Book page screen, the following operations can be performed.

Size indicator Current page number/ total page number
- When the text on an EPUB file is magnified, the page number of some divided sections may be displayed as “3-4,” for example, which implies that you are viewing a section between page 3 and 4.
| Button Operation | |
| ◀/▲/▼/►/buttons | Press: Turns pages. |
| Press and hold: Jumps 10 pages ahead/back from the current page. | |
| ▲/▼ buttons (When links are on the page) | Press: Moves the cursor onto the links. |
| Press and hold: Moves the cursor onto the uppermost/ lowest link on the page. | |
| Number buttons | Press: Jumps to the inputted page.(➤ page 50) |
| (Home) button Press: Displays the “Home” menu. | |
| (Size) button | Press: Adjusts the text sizes. (> page 44) |
| Press and hold: Switches the screen orientation. (> page 49) | |
| (Bookmark) button | Press: Creates/Removes a bookmark on the current page. (> page 46) |
| (Return) button | Press: Closes the page and goes up to the upper menu. |
To use the links of eBooks files on the Reader
You can use the links on a BBeB, PDF or EPUB file.
Move the cursor onto the desired link using the ▲/▼ buttons, then press the Enter button to jump to the linked page.
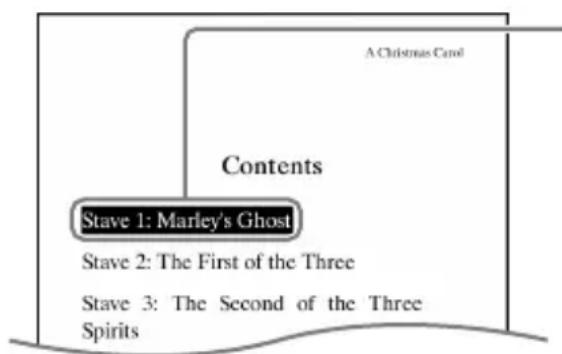
Link
Press the ▲/▼ buttons to move the cursor on the link.
Hints
- To go back to the previously displayed page after jumping using links or number buttons, select “Previous View” from the “Options” menu. (> page 51)
- By pressing and holding the ▲/▼ buttons, you can move the cursor to the uppermost/lowest link on the page.
- When links are on the page, pressing the ▲▼ buttons moves the cursor on the links first, and then turns pages after the cursor is moved to the uppermost or lowest link on the page.
Using the Useful Features
You can use the various features to enhance readability.
Adjusting text size
You can adjust the text size in 3 different sizes (S, M or L).
1 On the book page, press the ⊕(Size) button.
The text size is changed and the text and layout of the book page are adjusted automatically to fit the screen size.
The text size changes as shown below:
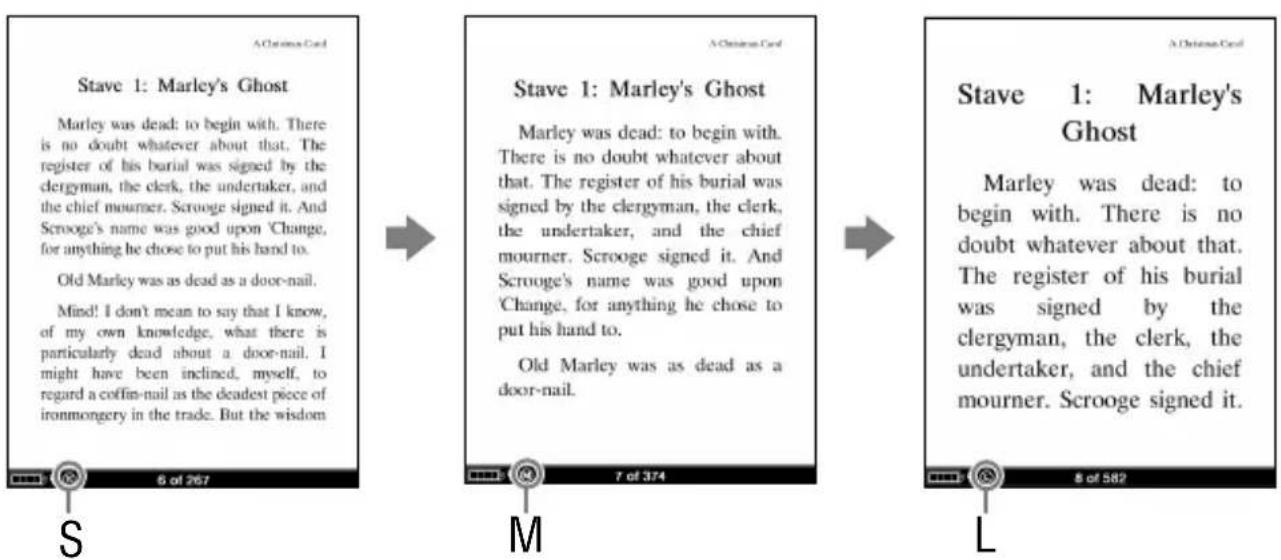
Hints
- When the texts on a PDF or EPUB file are magnified, the page is divided into multiple sections. To display the rest of the page, press the ◀/▲/▼/► buttons.
- When the text on an EPUB file is magnified, the page number of some divided sections may be displayed as “3-4,” for example, which implies that you are viewing a section between page 3 and 4.
Notes
- If you change the text size of a BBeB, Text or RTF file, the total page number displayed on the Reader increases with the number of divided sections.
- When you view PDF files in M or L size, the page layout is adjusted automatically to fit the screen size. In certain situations, only text may appear at these sizes as some tables and graphics may be reformatted and altered (the same applies to Adobe Reader's Reflow view). In these cases, viewing in S size will retain the original formatting.
- Due to the difference in screen size between the Reader and eBook Library, the total number of pages of BBeB, Text or RTF files may differ.
Creating a bookmark on a page
You can create a bookmark on a page you may wish to return to.
1 On the book page, press the 📄(Bookmark) button on the desired page.
The top right corner of the page is turned down.
A Christmas Carol
Bookmark
Stave 2: The First of the Three Spirits
When Scrooge awoke, it was so dark, that looking out of bed, he could scarcely distinguish the transparent window from the opaque walls of his chamber. He was endeavouring to pierce the darkness with his ferret eyes, when the chimes of a neighbouring church struck the four quarters. So he listened to
If you press the □(Bookmark) button again, the bookmark will be removed.
Hint
- Bookmarks can also be created in the eBook Library. If you transfer a book to eBook Library from the Reader, the bookmarks created on the Reader will be also transferred to eBook Library, and vice versa. However, if you transfer a book to a location where the same book exists, the bookmarks will not be overwritten.
Notes
- The bookmarks created on the Reader can be displayed on eBook Library 3.0 or later. Earlier versions of eBook Library will not display them.
- You can annotate books in eBook Library. However, the Reader can display only bookmarks and will not display other annotations such as highlights or comments.
- If the bookmarks which include comments are transferred to the Reader, only the bookmarks can be displayed.
- Highlights and highlights with comments are not converted into bookmarks after transferring the book to the Reader.
- By adjusting the text size, the displayed bookmark on the adjusted page may contain a variety of bookmark information. Note that all this bookmark information on the page will be deleted if the bookmark is removed.
To open a bookmarked page on the current book
On the book page, press the →(Return) button to display the “Options” menu, then select “Bookmarks” → the desired page.
Note
- If the book is opened from “All Bookmarks,” pressing the (Return) button will not display the “Options” menu. To display the “Options” menu, return to the “Home” menu, select “Continue Reading,” then press the (Return) button. ( > page 41)
To remove all bookmarks in the current book
1 On the book page, press the ←(Return) button to display the “Options” menu, then select “Utilities”→“Remove All Bookmarks.”
The confirmation screen appears.
Note
- If the book is opened from “All Bookmarks,” pressing the (Return) button will not display the “Options” menu. To display the “Options” menu, return to the “Home” menu, select “Continue Reading,” then press the (Return) button. ( > page 41)
2 On the confirmation screen, press the 📄 (Bookmark) button to remove all bookmarks.
All bookmarks in the current book are removed.
Hint
- To cancel the operation on the confirmation screen, press the → (Return) button.
To open a bookmarked page from all the bookmarks stored on the Reader
From the “Home” menu, select “All Bookmarks” the desired page.
Switching screen orientation (vertical/horizontal)
You can set the screen orientation to vertical or horizontal.
1 On the book page or list screen, press and hold the Ⓧ (Size) button.
The screen orientation is switched.
To switch back, press and hold the (+) (Size) button again.
Hint
- You can also change the screen orientation from the "Settings" menu. (▶ page 57)
About screen division when screen orientation is set to horizontal
When set to horizontal, the book page is divided into 2 parts (upper and lower).

Hint
- You can also display the rest of the page by pressing the ◀/▶ buttons. When links are on the page, pressing the ▲/▼ buttons moves the cursor on the links first, and then turns pages after the cursor is moved to the uppermost or lowest link on the page.
Jumping to the specified number page directly
You can jump directly to a page by inputting the page number with the number buttons.
1 On the book page, press the number buttons to input the page number.
The input page number appears in the center of the page.

To clear the input page number, press the ◀ button.
2 Press the Enter button.
The page of the input page number appears.
Hint
- By pressing the ←(Return) button, the screen to input number disappears. You can input the page number again.
Going back to previously displayed pages
After you have jumped to a page using the links or by inputting its page number, you can go back to the previously displayed pages from the “Options” menu.
1 On the book page, press the ←(Return) button to display the “Options” menu, then select “Previous View.”
The previously displayed page is displayed.
To go back to the page that is displayed by “Previous View,” select “Next View” from the “Options” menu.
Note
- If the book is opened from “All Bookmarks,” pressing the (Return) button will not display the “Options” menu. To display the “Options” menu, return to the “Home” menu, select “Continue Reading,” then press the (Return) button. ( > page 41)
Deleting a book
You can delete a book on the Reader from the “Options” menu.
1 On the book page, press the ←(Return) button to display the “Options” menu, then select “Utilities”→“Delete Book.”
The confirmation screen appears.
Note
- If the book is opened from "All Bookmarks," pressing the (Return) button will not display the "Options" menu. To display the "Options" menu, return to the "Home" menu, select "Continue Reading," then press the (Return) button. ( > page 41)
2 On the confirmation screen, press the 📄 (Bookmark) button to delete the displayed book on the screen.
The displayed book is deleted from the Reader.
Hint
- To cancel the operation on the confirmation screen, press the (Return) button.
Checking the book information
You can check the book information, such as the title, author, book cover thumbnail, etc., from the "Options" menu.
1 On the book page, press the ⇔ (Return) button to display the "Options" menu, then select "Info."
Note
- If the book is opened from "All Bookmarks," pressing the (Return) button will not display the "Options" menu. To display the "Options" menu, return to the "Home" menu, select "Continue Reading," then press the (Return) button. ( > page 41)
| Display item Description | |
| Book cover thumbnail | Displays the book cover thumbnail. (BBeB file only) |
| Title Displays | the title. |
| Author Displays the author. | |
| Publisher Displays the publisher. (BBeB file only) | |
| Category Displays the category. (BBeB file only) | |
| eBook ID Displays the Book ID. (BBeB file only) | |
| Kind Displays the file type. | |
| Date | Displays the latest update and creation date. |
| Size | Displays the file size. |
| File | Displays the file path location. |
| Digital Rights | Displays the following only if a book with DRM is selected. (BBeB, PDF and EPUB file only)Full viewable: The entire book can be read.Restricted: Some or all of the book cannot be read. |
| Expiration date | Displays the expiration date of the book if the book with DRM has an expiration date. (PDF and EPUB file only) |
Changing Settings
You can configure the various settings in the "Settings" menu.
From the "Home" menu, select "Settings."

"Home" menu
2 From the "Settings" menu, select the setting item you want to change.

"Settings" menu


Example: "Date and Time" setting screen
- For details about how to configure the settings, see "Settings menu items." (▶ page 57)
Settings menu items
In the "Settings" menu, you can configure the following settings.
| Setting item Description | |
| “Orientation” | Switches the screen orientation. Setting operation 1. On the “Settings” screen, press the number 1 button. |
“Date and Time”  | Sets date and time displayed on the Reader. Setting operation 1. Press the ◀/▲/▼/► buttons to move the cursor. 2. Press the number buttons to input the value. 3. Press the ◀/▲/▼/► buttons to move the cursor onto “OK,” then press the Enter button. Hint ·When you connect the Reader to your computer with eBook Library open, the date and time of the Reader is automatically synchronized with your computer’s clock. |
| Setting item Description | |
“Date and Time Format” | Sets the display format of date and time.“Date”: “Month-Day-Year,” “Day-Month-Year”“Time”: “12-hour,” “24-hour”Setting operation1. Press the ◀/▲/▼/► button to move the cursor.2. Press the Enter button to change the format type.3. Press the ◀/▲/▼/► buttons to move the cursor onto “OK,” then press the Enter button. |
“Sleep Mode” | Activates or deactivates sleep mode.“On” (default setting):• After 60 minutes of inactivity, the Reader enters sleep mode automatically while the battery power is consumed slightly.“Off”: The Reader does not activate sleep mode.For details, see “About the sleep mode of the Reader.”(> page 10)Setting operation1. Press the Enter button to select “On” or “Off.”2. Press the ◀/▲/▼/► buttons to move the cursor onto “OK,” then press the Enter button. |
| “Sleep Mode”(Continued) | NoteIn the following states, the Reader does not enter sleep mode after 60 minutes of inactivity even if “Sleep Mode” is set to “On.”- When connected to a computer using the supplied USB cable- When connected to the AC Adapter for Reader (AC-S5220E) (optional) to charge |
“Menu Language” | Sets the language of the displayed menu or messages.Available language: “English,” “Français, “Deutsch,” “Nederlands”Setting operationPress the ◀/▲/▼/► buttons to move the cursor onto the language, then press the Enter button.The cursor moves onto “OK” automatically.2. Press the Enter button again.HintsWhen the Reader is turned on for the first time, setting the language is required in the start-up setting. If you select other than “English,” the “Date and Time Format” setting is set automatically.Once the start-up setting is completed, setting the language will not set the “Date and Time Format” setting automatically. |
“Advanced Settings” | Refer to “Advanced Settings menu items.”(➤ page 61) |
| “About” | Displays the firmware version of the Reader, product name, license information, etc.Setting operation1. On the “Settings” screen, press the number 7 button.HintTo close the “About” page and return to the “Settings” menu, press the ➔ (Return) button. |
| “Restore Defaults” | Refer to “Restoring default settings.”(➤ page 72) |
To cancel the operation
Press the ← (Return) button.
Advanced Settings menu items
In the "Advanced Settings" menu, you can configure the following settings.
| Setting item Description | Locks the Reader by setting a password. “On”: The Reader is locked by the password. “Off” (default setting): The Reader is not locked. “Code”: Input 4-digit number for the password. Setting operation (to lock)1. Press the Enter button to select “On.”2. Press the ◀/▲/▼/► buttons to move the cursor, then press the number buttons to input the value.3. Press the ◀/▲/▼/► buttons to move the cursor onto “OK,” then press the Enter button.Once the password is set, next time you turn on the Reader, the screen asking for the password appears. To unlock it, input the password using the number buttons, then press Enter to confirm. |
| Setting item Description | |
| “Device Lock”(Continued) | NotesYou are recommended to make a note of your password and keep it in a safe place separate to the Reader. If you forget your password, contact your Sony Support Center (➤ page 65); however note that in unlocking your device, all content on it will be erased.When the “Device Lock” setting is activated, the Reader will not be recognized by your computer. Make sure to deactivate the “Device Lock” setting before the USB connection.Setting operations (to unlock)1. Press the ◀/▲/▼/► buttons to move the cursor, then press the number buttons to input the value.2. Press the ◀/▲/▼/► buttons to move the cursor onto “OK,” then press the Enter button.3. Press the Enter button to select “Off.”4. Press the ◀/▲/▼/► buttons to move the cursor onto “OK,” then press the Enter button. |
| Setting item Description | |
| “Format Internal Memory” | Formats the internal memory of the Reader. By formatting the memory, all the contents on the Reader will be erased. Setting operation On the confirmation screen, press the (Bookmark) button. Note Before formatting, make sure to transfer data that you do not want to lose to your computer or other device. |
| “Device Shutdown” | Shuts down the Reader to minimize battery consumption. Setting operation On the confirmation screen, press the (Bookmark) button. Notes After shutdown, the Reader may take a few moments to turn on. When you connect the Reader to your computer after shutdown, the Reader needs to be turned on again. |
To cancel the operation on the confirmation screen
Press the ← (Return) button.
Troubleshooting
If the Reader does not function as expected, try the following steps to resolve the issue.
1. Reset the Reader by pressing the RESET button with a small pin or clip, then slide the POWER switch to turn on the Reader.
The contents stored on the Reader are not affected by resetting.

Notes
- If you reset the Reader and connect it to your computer without turning it on, the Reader is not recognized by your computer and
does not appear on the Reader. Make sure to turn on the Reader before the connection.
- The bookmarks or the setting information may be deleted by resetting.
2 Check the symptoms in “Troubleshooting.” (> page 66)
3 Check for information about the issue in eBook Library Help.
4 Look for information about the issue on one of the support Web sites.
For customers in the USA:
http://www.sony.com/readersupport
Phone number: 1-866-962-7669
For customers in Canada:
http://www.sony.ca/ElectronicsSupport/
Phone number: 1-877-899-7669
For customers in Europe:
http://support.sony-europe.com/eBook/PRS
5 If the approaches listed above fail to resolve the issue, consult Sony Service Center.
Power
| Symptom Cause or corrective action | |
| Battery cannot be charged (The charge indicator does not light up). | → Charge the battery within the temperature range of 10 °C to 30 °C (50 °F to 86 °F). Otherwise, the charging may be insufficient or may not start. |
| Battery life seems short. | → The operating temperature is below 5 °C (41 °F). This is due to the battery characteristics and not a malfunction.→ You have not used the Reader for a prolonged period. Efficiency of the battery will be improved by repeatedly charging and discharging.→ The battery needs to be replaced. Consult your nearest Sony Service Center.→ The battery has not been given enough time to charge fully. Charge the battery until the charge indicator goes off. (The battery icon does not indicate remaining battery power while charging.) |
| The Reader cannot be turned on. | → Moisture condensation may have occurred. Wait for a few hours and then turn on the Reader. |
Symptom Cause or corrective action
The Reader cannot be turned on. (continued)
→ Battery power has been fully depleted. Charge the Reader via USB. (▶ page 11) The charge indicator lights up in red and charging starts. Wait for at least 40 minutes until the Reader turns on automatically and 📋 (indicating connection via USB) appears on the screen.
Screen
Symptom Cause or corrective action
It takes time for the display to appear.
→ In a cold place such as outdoors, it may take time for the display to appear. This is due to the display characteristics and not a malfunction.
Reading contents
Symptom Cause or corrective action
A book cannot be read.
→ A book with copyright protection cannot be read on any device other than the authorized one. (▶ page 20) → If the book has an expiration date, confirm whether the book has already expired. (▶ page 35)
→ If a Text/RTF/PDF file is edited, the data on “Continue Reading” or the bookmarks may be deleted.
"Continue Reading" does not work or the bookmarks are missing.
Connection to the computer
| Symptom Cause or corrective action | |
| The Reader cannot be operated during USB connection. | → Disconnect the USB connector from the Reader. |
| The Reader cannot be recognized. | → The Reader is turned off or the USB cable is not connected properly.Verify the above and try again.→ A USB hub or USB extension cable is used for the connection.Connecting the Reader via a USB hub or extension cable may not work and is not supported. Connect the USB cable directly to the computer.→ Verify that indicating connection via USB) is displayed at the top of the Reader's screen. If the Reader still cannot be recognized, disconnect the USB cable from the Reader, then reconnect it after a while.→ If “Device Lock” of the Reader is set to “On,” set it to “Off.” If the Reader is locked, it will not be recognized on your computer.→ While the Reader is connected to a computer, do not turn on, restart, wake up from sleep mode, or shut down the computer. These operations may render the Reader unrecognizable by the computer.Disconnect the Reader from the computer before performing these operations. |
Symptom Cause or corrective action
| The Reader cannot be recognized. (continued) | → Use the supplied USB cable.→ There may be a malfunction with the USB port on your computer. Connect the supplied USB cable to another port on the computer.→ It may take a while for the software to be recognized by the computer. Wait for a moment.→ If none of the above solves the problem, perform “Device Shutdown,” press the RESET button of the Reader, turn on the Reader again, and then reconnect the supplied USB cable. |
| (indicating connection via USB) does not appear when connected to your computer via USB. | → The Reader is in the shutdown state. Disconnect it from your computer, turn it on, then reconnect it.→ Battery power has been fully depleted. Charge the Reader via USB. (➤ page 11) The charge indicator lights up in red and charging starts. Wait for at least 40 minutes until the Reader turns on automatically and 🔴 appears on the screen. |
| Symptom Cause or corrective action | |
| Content cannot be transferred to the Reader from your computer. | → The USB cable is not connected properly. Disconnect the USB cable, then reconnect it.→ There is not enough free space on the Readers memory. Transfer any unnecessary content back to eBook Library, then delete it to increase free space on the Reader.→ The Reader is not authorized to the eBook store. |
| There is no response from eBook Library during communication with the Reader. | → Disconnect the USB cable from the Reader, then reconnect it. |
| The Reader becomes unstable while it is connected to the computer. | → A USB hub or USB extension cable is used for the connection. Connecting the Reader via a USB hub or extension cable may not work and is not supported. Connect the USB cable directly to the computer. |
| The Reader's battery cannot be charged. (The charge indicator does not light up.) | → The USB cable is not connected properly. Verify and try again.→ A USB hub or USB extension cable is used for the connection. Connecting the Reader via a USB hub or extension cable may not work and is not supported. Connect the USB cable directly to the computer. |
eBook
Symptom Cause or corrective action
An eBook cannot be read.
→ You may not have signed up or performed authorization for the service which is necessary for reading DRM-protected eBooks. Authorize your computer and the Reader. → You may have tried to read the content owned by another user. The content owned by another user cannot be read.
Restoring default settings
All default settings of the Reader can be restored.
Notes
The following occurs when you restore the default settings.
- The screen orientation setting will be vertical.
- The password will be erased and the device lock released.
From the “Home” menu, select “Settings”→“Restore Defaults.”
The Restore Defaults screen appears.
If "Device Lock" (▶ page 61) is set to "On," the screen asking for the password appears. Input the password, then select "OK."
2 Press the (Bookmark) button to restore default settings.
Hint
- To cancel the operation on the confirmation screen, press the (Return) button.
Uninstalling eBook Library
To uninstall the supplied software from your computer, follow the procedures below.
Note
- Before uninstalling, de-authorize your computer if it is authorized. For details on de-authorization, refer to the eBook Library Help.
Uninstalling from Windows
1 Click "Start" – "Control Panel." 2 Double-click "Add/Remove Programs." * 3 Click "eBook Library by Sony" in the "Currently Installed Programs" list, then click "Remove." 2*
Follow the on-screen instructions and restart your computer. The uninstallation is complete when the computer has restarted.
*1 "Uninstall a program" or "Programs and Features" in the case of Windows Vista. *2 "Uninstall" in the case of Windows Vista.
Note
- For details on how to uninstall eBook Library from Macintosh, refer to the eBook Library Help.
Updating the Reader's Firmware
By updating the Reader's firmware, you can ensure your Reader has the latest features. The latest firmware updates can be performed from the update menu on eBook Library from "Help" – "Check for Updates."
For details on updates, refer to the eBook Library Help or the following website.
For customers in the USA:
http://www.sony.com/readersupport
For customers in Canada:
http://www.sony.ca/ElectronicsSupport/
For customers in Europe:
http://support.sony-europe.com/eBook/PRS
About Books Pre-installed on the Reader
The Reader is pre-installed with sample content so that you can try it out right away. The pre-installed sample content is for the purpose of trial reading.
About sample content
The Reader is pre-installed with sample content.
If you delete the sample content, you cannot restore it, and Sony will not supply any replacement content.
Notes on the Reader Disposal
The built-in rechargeable battery of the Reader is recyclable. Do not remove the battery yourself, consult Sony Support Center.

Li-ion Mn
Precautions
Disposal of Old Electrical & Electronic Equipment (Applicable in the European Union and other European countries with separate collection systems)

This symbol on the product or on its packaging indicates that this product shall not be treated as household waste. Instead it shall be handed over to the applicable collection point for the recycling of electrical and electronic equipment. By ensuring this product is disposed of correctly, you will help prevent potential negative consequences for the environment and human health, which could otherwise be caused by inappropriate waste handling of this product. The recycling of materials will help to conserve natural resources. For more detailed information about recycling of this product, please contact your local Civic Office, your household waste disposal service or the shop where you purchased the product.
Disposal of waste batteries (applicable in the European Union and other European countries with separate collection systems)

This symbol on the battery or on the packaging indicates that the battery provided with this product shall not be treated as household waste.
On certain batteries this symbol might be used in combination with a chemical symbol. The chemical symbols for mercury (Hg) or lead (Pb) are added if the battery contains more than 0.0005% mercury or 0.004% lead.
By ensuring these batteries are disposed of correctly, you will help prevent potentially negative consequences for the environment and human health which could otherwise be caused by inappropriate waste handling of the battery. The recycling of the materials will help to conserve natural resources.
In case of products that for safety, performance or data integrity reasons require a permanent connection with an incorporated battery, this battery should be replaced by qualified service staff only.
To ensure that the battery will be treated properly, hand over the product at end-of-life to the applicable collection point for the recycling of electrical and electronic equipment.
For all other batteries, please view the section on how to remove the battery from the product safely. Hand the battery over to the applicable collection point for the recycling of waste batteries.
For more detailed information about recycling of this product or battery, please contact your local Civic Office, your household waste disposal service or the shop where you purchased the product.
Notice for customers: the following information is only applicable to equipment sold in countries applying EU directive
The manufacturer of this product is Sony Corporation, 1-7-1 Konan, Minato-ku, Tokyo, Japan. The Authorized Representative for EMC and product safety is Sony Deutschland GmbH, Hedelfinger Strasse 61, 70327 Stuttgart, Germany. For any service or guarantee matters please refer to the addresses given in separate service or guarantee documents.
Owner's Record
The model and serial numbers are located on the back of the unit. Record the serial number in the space provided below. Refer to these numbers whenever you call upon your Sony dealer regarding this product. Model No. ____ Serial No. ____
The following FCC statement applies only to the version of this model manufactured for sale in the USA.
Other versions may not comply with FCC technical regulations.
INFORMATION:
NOTE: This equipment has been tested and found to comply with the limits for a Class B digital device, pursuant to Part 15 of the FCC Rules. These limits are designed to provide reasonable protection against harmful interference in a residential installation. This equipment generates, uses, and can radiate radio frequency energy and, if not installed and used in accordance with the instructions, may cause harmful interference to radio communications.
However, there is no guarantee that interference will not occur in a particular installation. If this equipment does cause harmful interference to radio or television reception, which can be determined by turning the equipment off and on, the user is encouraged to try to correct the interference by one or more of the following measures:
- Reorient or relocate the receiving antenna.
- Increase the separation between the equipment and receiver.
- Connect the equipment into an outlet on a circuit different from that to which the receiver is connected.
- Consult the dealer or an experienced radio/TV technician for help.
You are cautioned that any changes or modifications not expressly approved in this manual could void your authority to operate this equipment.
If you have any questions about this product:
Visit:
www.sony.com/readersupport
Contact:
Sony “Digital Book Reader” Support Center at 1-(866)-962-7669
Write:
Sony Customer Information Service Center 12451 Gateway Blvd., Fort Myers, FL 33913
Declaration of Conformity
Trade Name: SONY
Model No.: PRS-300
Responsible Party: Sony Electronics Inc.
Address: 16530 Via Esprillo,
San Diego, CA 92127
U.S.A.
Telephone Number: 858-942-2230
This device complies with Part 15 of the FCC Rules. Operation is subject to the following two conditions: (1) this device may not cause harmful interference, and (2) this device must accept any interference received, including interference that may cause undesired operation.
For Customers in the USA and Canada RECYCLING LITHIUM-ION BATTERIES
Lithium-ion batteries are recyclable.
You can help preserve our environment by returning your used rechargeable batteries to the collection and recycling location nearest you.

For more information regarding recycling of rechargeable batteries, call toll free 1-800-822-8837, or visit http://www.rbrc.org/.
Caution: Do not handle damaged or leaking Lithium-ion batteries.
On safety
- Do not insert any foreign objects in the DC IN jack of the Reader.
- Be sure not to short-circuit the terminals of the Reader with metallic objects.
Note on use
- Never subject the Reader to extremes of light, temperature, moisture or vibration.
- Never wrap the Reader in anything when it is being used with the AC adapter. Heat build-up in the Reader may cause malfunction or damage.
- Do not put any heavy object on top of the Reader or apply a strong shock to the Reader. It may cause a malfunction or damage.
- Do not leave the Reader on an unstable surface
- Make sure not to sit down with the Reader in your back pocket.
- Do not expose the Reader to water. The Reader is not waterproof.
Remember to follow the precautions below.
- Be careful not to drop the Reader into a sink or other container filled with water.
- Do not use the Reader in humid locations or bad weather, such as in the rain or snow.
- Do not get the Reader wet.
If you touch the Reader with wet hands, or put the Reader in a damp article of clothing, the Reader may get wet and this may cause a malfunction of the Reader.
On heat build-up
Heat may build up in the Reader while charging, or if it is used for an extended period of time.
On software
- Copyright laws prohibit reproducing the software or the manual accompanying it in whole or in part, or renting the software without the permission of the copyright holder.
- In no event will SONY be liable for any financial damage, or loss of profits, including claims made by third parties, arising out of the use of the software supplied with this Reader.
- The software provided with this Reader cannot be used with equipment other than that which is so designated.
- Please note that, due to continued efforts to improve quality, software specifications may be changed without notice.
- Operation of this Reader with software other than that provided is not covered by the warranty.
- The ability to display the languages on your eBook Library will depend on the OS installed on your computer. For better results, please ensure that the installed OS is compatible with the desired language you want to display.
- We do not guarantee all the languages will be able to be displayed properly on your eBook Library.
- User-created characters and some special characters may not be displayed.
- Explanations in this manual assume that you are familiar with the basic operations of Windows or Mac OS. For details on the use of your computer and operating system, please refer to the respective manuals.
On Cleaning
- Clean the case of the Reader with a soft cloth, such as a cleaning cloth for eyeglasses.
- If the case of the Reader becomes very dirty, clean it with a soft cloth slightly moistened with water or a mild detergent solution.
- Do not use any type of abrasive pad, scouring powder, or solvent, such as alcohol or benzine, as it may mar the finish of the case.
- Be careful not to let water get into the Reader.
If you have any questions or problems concerning the Reader, consult your nearest Sony dealer.
Notes
- Recorded content is limited to private use only. Use of the content beyond this limit requires permission of the copyright holders.
- Sony is not responsible for incomplete recording/downloading or damaged data due to problems of the Reader or computer.
On Copyrights
The contents of each book pre-installed on this product are copyrighted works, edited with the cooperation of the publisher and editor hereto mentioned.
Copyright laws prohibit copying the data of this product or the contents of this manual (illustrations, related documents, etc.) in whole or in part without the permission of the copyright holder. Additionally, use of the data of this product or the contents of this manual is not allowed without Sony's permission except for personal use.
- SONY and the SONY logo are registered trademarks of Sony Corporation.
- BBeB, BBeB Book, and their logos are trademarks of Sony Corporation.
- Bitstream is a registered trademark, and Dutch, Font Fusion, and Swiss are trademarks, of Bitstream Inc.
- Microsoft, Windows, Windows Vista and Windows Media are trademarks or registered trademarks of Microsoft Corporation in the United States and/or other countries. Macintosh and Mac OS are trademarks of Apple Inc., registered in the U.S. and other countries.
- Adobe, the Adobe logo, Reader and PDF are either registered trademarks or trademarks of Adobe Systems Incorporated in the United States and/or other countries.
- This product includes software developed by the OpenSSL Project for use in the OpenSSL Toolkit. (http://www.openssl.org/) Copyright © 1998-2006 The OpenSSL Project. All rights reserved. This product includes cryptographic software written by Eric Young (eay@cryptsoft.com). This product includes software written by Tim Hudson (tjh@cryptsoft.com). For details on OpenSSL License, refer to “openssl.txt” on the Reader.
All other system names and product names appearing in this document are generally the registered trademarks or trademarks of their respective manufacturers. Further, the trademark ™ and registered trademark ® symbols are not indicated throughout this document.
Program ©2009 Sony Corporation
Documentation ©2009 Sony Corporation
About GNU GENERAL PUBLIC LICENSE
Dear customers
Thank you for purchasing this product.
Included with this product is the following software which applies to GPL/LGPL. You may obtain, modify and redistribute the source codes of the software.
bash
fileutils
findutils
gcc
glib
glibc
grep
hardhatutils
hostname
mkcramfs
mtd-utils
mtools
ncurses
pam
procps psmisc sed shellutils sysutils sysvinit tar textutils time util-linux
These source codes are available on the web site.
Access the following web site to download.
http://www.sony.net/Products/Linux/
Note that Sony accepts no inquiries concerning the contents of these source codes.
For details on GNU GENERAL PUBLIC LICENSE, refer to "GPL (English).rtf," "GPL (French).rtf," "LGPL (English).rtf" and "LGPL (French).rtf" on the Reader.
Specifications
Model name
PRS-300
Power source
Built-in rechargeable battery: DC 3.7 V
AC adapter: DC 5.2 V
Battery life (continuous playback)
Maximum Battery: Approx. 7,500 pages with BBeB Book contents *
Approx. 6,800 pages with EPUB contents*
* Measured using a fully charged battery and counting consecutive page-turns at approx 1 page per sec. Actual battery life may vary based on usage patterns and specific device.
User available capacity
Approx. 440MB
Available storage capacity of the Reader may vary.
Operating temperature
5 to 35 °C (41 to 95 °F)
Dimensions (w/h/d)
Approx. 4 1/4 × 6 1/4 × 13/32 inches (107.8 × 157.5 × 10.2 mm)
(maximum)
Mass
Approx. 7.76 oz (220 g)
Optional accessories
AC Adapter for Reader: AC-S5220E
Supplied accessories
USB cable (1)
Sleeve (1)
Quick Start (1)
Flyers
System requirements
The following are requirements to use eBook Library.
| OS | |
| Microsoft Windows Vista | Windows Vista Home Basic with Service Pack 1 or laterWindows Vista Home Premium with Service Pack 1 or laterWindows Vista Business with Service Pack 1 or laterWindows Vista Ultimate with Service Pack 1 or later |
| Microsoft Windows XP | Microsoft Windows XP Home Edition with Service Pack 2 or laterWindows XP Professional with Service Pack 2 or laterWindows XP Media Center Edition 2004 & 2005 with Service Pack 2 or later |
| Macintosh Ma | c OS X version 10.4.11 or laterMac OS X version 10.5.6 or later |
| CPU 80 | 0 MHz Celeron class processor or better for WindowsIntel, PowerPC G3, G4 or G5 processor for Mac |
| RAM 12 | 8 MB or more (minimum 512 MB for Windows Vista) |
| Free space on hard disc | 20 MB or moreDepending on the content amount, more space may be required. |
| Monitor High Color | Color or more, 1024 × 768 pixels or more (True Color, 1280 × 1024 pixels, or more recommended) |
| Other devices | USB port (High-Speed USB Compatible), pointing device such as mouse or track pad |
- Internet connection (broadband recommended, some fees may apply) is also required on your computer.
- This software is not supported by the following environments:
- An operating system other than those included above – Personally built computer or operating system
- Upgraded manufacturer-installed operating system
- Multi-boot environment
- Multi-monitor environment
Design and specifications are subject to change without notice.
Index
Symbols
(Bookmark) button .....7, 46
Home (Home) button 6
→ (Return) button ......7
⊕ (Size) botton .....7, 44, 49
◀/▲/▼/▶ Directional buttons......6
(Expiration) 35
A
Advanced Settings ....61
Device Lock....61
Device Shutdown ......63
Format Internal Memory .....63
B
Battery 13
Bookmark 46
Books by Author ....37
Books by Date ....37
Books by Title ......37
C
Charge indicator ....7
Charging 11
See also "Quick Start"
Collections ....37
D
DC IN jack 8
Default settings ....72
E
eBook Library 25
Install......See "Quick Start"
Uninstalling 73
Enter button 6
H
Hole for hand strap ....7
Holes for cover attachment .....7
Horizontal 49
I
Import 23
Content 25
Index menu 39
Information ....53
L
Link 43
N
Number buttons ....7
0
Options menu 40
Orientation ....49
P
POWER switch 7,9
R
Reading books ....34
Reset 64
RESET button ....8, 64
S
Settings ....57
About......60
Date and Time......57
Date and Time Format .....58
Menu Language .....59
Orientation ....57
Restore Defaults ....60
Sleep Mode ....10, 58
Synchronizing ....32
T
Transfer 26
Troubleshooting ....64
U
Updating ....74
USB 27
USB connector ....8
V
Vertical 49

- TABLE OF CONTENTS
- INTRODUCTION
- GETTING STARTED
- IMPORTING AND TRANSFERRING CONTENT
- READING BOOKS
- SETTINGS
- TROUBLESHOOTING
- OTHER INFORMATION
- WHAT YOU CAN DO WITH THE READER
- IMPORTING
- TRANSFERRING
- READING
- PARTS AND CONTROLS
- USB CONNECTOR
- DC IN JACK
- HINT
- RESET BUTTON
- ABOUT THE SERIAL NUMBER
- TURNING ON THE READER
- NOTE
- TO TURN OFF THE READER
- ABOUT THE SLEEP MODE OF THE READER
- HINTS
- CHARGING THE READER
- ABOUT CHARGING
- CHARGING THE READER VIA USB CONNECTION
- BEFORE CONNECTING VIA USB, SLIDE THE POWER SWITCH
- NOTES
- TO CHECK THE BATTERY STATUS
- INSTALLING EBOOK LIBRARY
- TO INSTALL EBOOK LIBRARY IN MACINTOSH
- BASIC MENU OPERATION
- EXAMPLE: SELECTING A BOOK FROM THE BOOK LIST
- TO RETURN TO THE "HOME" MENU
- TO RETURN TO THE PREVIOUS MENU
- IMPORTING CONTENT
- AUTHORIZING THE READER AND YOUR COMPUTER
- SLIDE THE POWER SWITCH
- CONNECT THE READER TO YOUR COMPUTER USING THE SUPPLIED USB CABLE
- CLICK "EBOOK STORE" IN THE SOURCE VIEW
- FOLLOW THE STORE INSTRUCTIONS
- TO DOWNLOAD ADOBE DRM-PROTECTED FILES
- DOWNLOADING EBOOKS FROM EBOOK STORE
- BOOK TYPES SUPPORTED BY THE READER
- IMPORTING CONTENT TO EBOOK LIBRARY
- TRANSFERRING CONTENT
- TRANSFERRING CONTENT TO THE READER
- CONNECT THE READER TO YOUR COMPUTER USING THE SUPPLIED USB CABLE. ( > PAGE 11)
- CLICK "LIBRARY" IN THE SOURCE VIEW, THEN CLICK (LIST VIEW)
- CLICK "BOOKS" IN THE SOURCE VIEW
- SELECT THE CONTENT YOU WANT TO TRANSFER FROM THE LIST
- DRAG THE CONTENT FROM THE LIST TO “READER” IN THE SOURCE VIEW
- TO TRANSFER CONTENT BACK TO EBOOK LIBRARY
- SYNCHRONIZING CONTENT IN LIBRARY WITH THE READER
- FROM THE “HOME” MENU, SELECT “BOOKS BY TITLE
- FROM THE BOOK LIST, SELECT THE DESIRED BOOK
- FROM THE “OPTIONS” MENU, SELECT “BEGIN
- PRESS THE ◀/▶ BUTTONS TO TURN PAGES
- SELECTING A BOOK
- HOME" MENU ITEMS TO SELECT A BOOK
- OPERATIONS ON A BOOK LIST
- ABOUT THE INDEX MENU
- ABOUT THE OPTIONS MENU
- TO DISPLAY THE "OPTIONS" MENU FROM THE BOOK PAGE
- OPERATIONS ON THE BOOK PAGE
- TO USE THE LINKS OF EBOOKS FILES ON THE READER
- USING THE USEFUL FEATURES
- ADJUSTING TEXT SIZE
- ON THE BOOK PAGE, PRESS THE ⊕(SIZE) BUTTON
- CREATING A BOOKMARK ON A PAGE
- ON THE BOOK PAGE, PRESS THE 📄(BOOKMARK) BUTTON ON THE DESIRED PAGE
- STAVE 2: THE FIRST OF THE THREE SPIRITS
- TO OPEN A BOOKMARKED PAGE ON THE CURRENT BOOK
- TO REMOVE ALL BOOKMARKS IN THE CURRENT BOOK
- TO OPEN A BOOKMARKED PAGE FROM ALL THE BOOKMARKS STORED ON THE READER
- SWITCHING SCREEN ORIENTATION (VERTICAL/HORIZONTAL)
- ON THE BOOK PAGE OR LIST SCREEN, PRESS AND HOLD THE Ⓧ (SIZE) BUTTON
- ABOUT SCREEN DIVISION WHEN SCREEN ORIENTATION IS SET TO HORIZONTAL
- JUMPING TO THE SPECIFIED NUMBER PAGE DIRECTLY
- ON THE BOOK PAGE, PRESS THE NUMBER BUTTONS TO INPUT THE PAGE NUMBER
- PRESS THE ENTER BUTTON
- GOING BACK TO PREVIOUSLY DISPLAYED PAGES
- ON THE BOOK PAGE, PRESS THE ←(RETURN) BUTTON TO DISPLAY THE “OPTIONS” MENU, THEN SELECT “PREVIOUS VIEW
- DELETING A BOOK
- CHECKING THE BOOK INFORMATION
- ON THE BOOK PAGE, PRESS THE ⇔ (RETURN) BUTTON TO DISPLAY THE "OPTIONS" MENU, THEN SELECT "INFO
- CHANGING SETTINGS
- FROM THE "HOME" MENU, SELECT "SETTINGS
- SETTINGS MENU ITEMS
- TO CANCEL THE OPERATION
- ADVANCED SETTINGS MENU ITEMS
- TO CANCEL THE OPERATION ON THE CONFIRMATION SCREEN
- RESET THE READER BY PRESSING THE RESET BUTTON WITH A SMALL PIN OR CLIP, THEN SLIDE THE POWER SWITCH TO TURN ON THE READER
- SYMPTOM CAUSE OR CORRECTIVE ACTION
- SCREEN
- READING CONTENTS
- EBOOK
- RESTORING DEFAULT SETTINGS
- UNINSTALLING EBOOK LIBRARY
- UNINSTALLING FROM WINDOWS
- UPDATING THE READER'S FIRMWARE
- ABOUT BOOKS PRE-INSTALLED ON THE READER
- ABOUT SAMPLE CONTENT
- NOTES ON THE READER DISPOSAL
- PRECAUTIONS
- DISPOSAL OF OLD ELECTRICAL & ELECTRONIC EQUIPMENT (APPLICABLE IN THE EUROPEAN UNION AND OTHER EUROPEAN COUNTRIES WITH SEPARATE COLLECTION SYSTEMS)
- DISPOSAL OF WASTE BATTERIES (APPLICABLE IN THE EUROPEAN UNION AND OTHER EUROPEAN COUNTRIES WITH SEPARATE COLLECTION SYSTEMS)
- NOTICE FOR CUSTOMERS: THE FOLLOWING INFORMATION IS ONLY APPLICABLE TO EQUIPMENT SOLD IN COUNTRIES APPLYING EU DIRECTIVE
- OWNER'S RECORD
- INFORMATION
- DECLARATION OF CONFORMITY
- FOR CUSTOMERS IN THE USA AND CANADA RECYCLING LITHIUM-ION BATTERIES
- ON SAFETY
- NOTE ON USE
- ON HEAT BUILD-UP
- ON SOFTWARE
- ON CLEANING
- ON COPYRIGHTS
- ABOUT GNU GENERAL PUBLIC LICENSE
- DEAR CUSTOMERS
- SPECIFICATIONS
- MODEL NAME
- POWER SOURCE
- BATTERY LIFE (CONTINUOUS PLAYBACK)
- USER AVAILABLE CAPACITY
- OPERATING TEMPERATURE
- DIMENSIONS (W/H/D)
- MASS
- OPTIONAL ACCESSORIES
- SUPPLIED ACCESSORIES
- SYSTEM REQUIREMENTS
- INDEX
- SYMBOLS
- A
- B
- C
- D
- E
- H
- I
- L
- N
- P
- R
- S
- T
- U
- V
Brand : SONY
Model : PRS-300SC
Category : E-reader