
SB 622 - Loudspeaker SCHAUB LORENZ - Free user manual and instructions
Find the device manual for free SB 622 SCHAUB LORENZ in PDF.


| Product Type | Soundbar with wireless subwoofer |
| Model Number | SB 622 |
| Brand | Schaub Lorenz |
| Soundbar Dimensions (W x D x H) | 1065 x 60 x 62 mm |
| Subwoofer Dimensions (W x D x H) | 465 x 255 x 82 mm |
| Soundbar Power Output (RMS) | 2 x 30 W |
| Subwoofer Power Output (RMS) | 60 W |
| Total Harmonic Distortion | 1% (1 kHz, 1 W) |
| Frequency Response (Soundbar) | 200 Hz - 20 kHz |
| Frequency Response (Subwoofer) | 40 Hz - 200 Hz |
| Impedance (Soundbar) | 8 Ω |
| Impedance (Subwoofer) | 4 Ω |
| Power Supply | AC 220-240 V ~ 50/60 Hz |
| Power Consumption (Soundbar, max.) | 55 W |
| Power Consumption (Subwoofer, max.) | 80 W |
| Audio Input Sensitivity | 700 mV |
| Connectivity | Bluetooth, Optical, AUX (RCA/L/R), MP3 Link (3.5 mm) |
| Bluetooth Version | Standard A2DP, AVRCP |
| Remote Control Range | 6 m |
| Remote Control Angle | 30° |
| Remote Control Battery | CR2025 (pre-installed) |
| Sound Modes | Movie, Music, Flat (EQ off) |
| Auto Standby | Approximately 15 minutes |
| Wall Mountable | Yes (Option B, brackets included) |
| Cleaning | Wipe with dry cloth; unplug before cleaning |
| Disposal | Do not dispose as household waste; recycle at collection point |
Frequently Asked Questions - SB 622 SCHAUB LORENZ
User questions about SB 622 SCHAUB LORENZ
0 question about this device. Answer the ones you know or ask your own.
Ask a new question about this device
Download the instructions for your Loudspeaker in PDF format for free! Find your manual SB 622 - SCHAUB LORENZ and take your electronic device back in hand. On this page are published all the documents necessary for the use of your device. SB 622 by SCHAUB LORENZ.
USER MANUAL SB 622 SCHAUB LORENZ
natural_image
Two black audio equipment units: a long rectangular TV and a smaller rectangular speaker (no visible text or symbols)Vorwort
Funk-Subwoofer
natural_image
Simple line drawing of a hand pressing down on a device component with an arrow indicating downward motion (no text or symbols)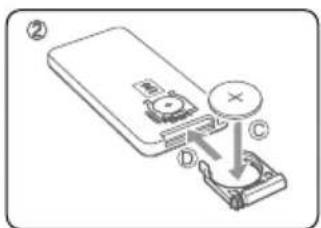
Hinweise:
natural_image
Illustration of a modern TV setup with a monitor, case, and stand (no text or symbols)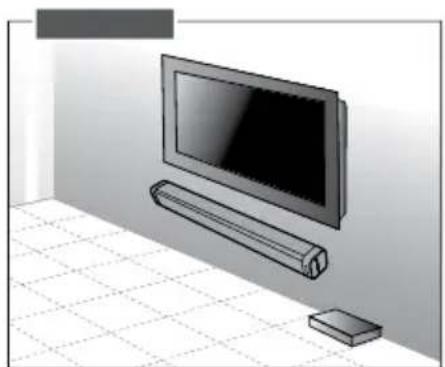
natural_image
Illustration of a modern TV mounted on a wall-mounted cable and a small rectangular device, with tiled floor background (no text or symbols)Wandmontage (Option B)
natural_image
Diagram of a mechanical device with a magnified inset showing internal components (no text or symbols)natural_image
Line drawing of a rectangular electronic device with two curved arrows indicating rotation or force direction (no text or symbols)
Anschlüsse
- Read Instructions - All the safety and operating instructions should be read before the appliance is operated.
- Retain Instructions - The safety and operating instructions should be retained for future reference.
- Heed Warnings - All warnings on the appliance and in the operating instructions should be adhered to.
- Water and Moisture – Do not use the apparatus near water (e.g. bath tub, sink, swimming pool) or in wet places or tropical climates. Do not place objects filled with liquids, such as vases, on top of the apparatus. Do not expose the apparatus to dripping or splashing.
- Setup – The apparatus should only be placed on a stable, flat surface. Do not let the apparatus fall down or expose it to shock.
- Wall or Ceiling Mounting - The appliance should be mounted to a wall or ceiling only as recommended by the manufacturer.
- Ventilation - The appliance should be situated so that its location or position does not interfere with its proper ventilation. For example, the appliance should not be situated on a bed, sofa, rug, or similar surface that may block the ventilation openings; or, placed in a built-in installation, such as a bookcase or cabinet that may impede the flow of air through the ventilation openings. Ensure a minimum distance of 5 cm around the apparatus for sufficient ventilation. Ensure that the ventilation is not impeded by covering the ventilation openings with items such as newspapers, table-cloths, curtains, etc.
- Heat - The appliance should be situated away from heat sources such as radiators, heat registers, stoves, or other appliances (including amplifiers) that produce heat.
- Power Sources - The appliance should be connected to a power supply only of the type described in the operating instructions or as marked on the appliance.
- Cables and Plugs – The mains plug shall remain readily operable. All cables should be routed so that they are not likely to be walked on or pinched by items placed upon or against them, paying particular attention to cords at plugs, convenience receptacles, and the point where they exit from the appliance.
- Cleaning - The appliance should be cleaned only as recommended by the manufacturer. Clean by wiping with a dry and clean cloth. Do not use chemical cleaners or detergents. Always pull the mains plug before cleaning the unit.
- Non-use Periods - The power cord of the appliance should be unplugged from the outlet when left unused for a long period of time.
- Object and Liquid Entry - Care should be taken so that objects do not fall and liquids are not spilled into the enclosure through openings.
- Damage Requiring Service - The appliance should be serviced by qualified service personnel when:
a) The power-supply cord or the plug has been damaged; or
b) Objects have fallen, or liquid has been spilled into the appliance; or
c) The appliance has been exposed to rain; or
d) The appliance does not appear to operate normally or exhibits a marked change in performance; or
e) The appliance has been dropped, or the enclosure damaged. - Servicing - The user should not attempt to service the appliance beyond that described in the operating instructions. All other servicing should be referred to qualified service personnel.
- Open Fire – Keep the apparatus away from open fires. Do not place naked flame sources, such as lighted candles on the apparatus.
- Thunderstorms – During a thunderstorm the mains plug should be unplugged.
- Safety Check – After servicing the technician should conduct a safety check in order to ensure that the apparatus is working properly and safely.
-
Batteries – Always place batteries in the correct polarization into electrical components. Danger of explosion if battery is incorrectly replaced. Replace only with the same or equivalent type. Do not mix old and new batteries. Take attention to the environmental aspects of battery disposal. Batteries shall not be exposed to excessive heat such as sunshine, fire or the like. Remove batteries before disposing of the product.
-
Volume Levels – To prevent possible hearing damage, do not listen at high volume levels for long periods.
- Headphones (if applicable) – Excessive sound pressure from earphones and headphones can cause hearing loss.

WARNING: To reduce the risk of fire or electric shock, do not expose this appliance to dripping or splashing.
WARNING: To reduce the risk of electric shock, do not remove cover (or back). No user serviceable parts inside. Refer servicing to qualified service personnel.

The lightning flash with arrowhead symbol within an equilateral triangle is intended to alert the user to the presence of uninsulated dangerous voltage within the product's enclosure that may be of sufficient magnitude to constitute a risk of electric shock to persons.

The exclamation point within an equilateral triangle is intended to alert the user to the presence of important operating and maintenance (servicing) instructions in the literature accompanying the appliance.

Batteries
Batteries may not be disposed of in regular house hold trash. Every consumer has the obligation to return batteries to special disposal locations.

Disposal of Used Electrical & Electronic Equipment
The meaning of the symbol on the product, its accessory or packaging indicates that this product shall not be treated as household waste. Please, dispose of this equipment at your applicable collection point for the recycling of electrical & electronic equipments waste. By ensuring the correct disposal of this product, you will help prevent potential hazards to the environment and to human health, which could otherwise be caused by unsuitable waste handling of this product. The recycling of materials will help conserve natural resources. For more detailed information about recycling of this product, please contact your local city office, your household waste disposal service or the shop where you purchased the product.
Controls and Connectors
Main Unit

1. Speakers
2. Remote Control Sensor
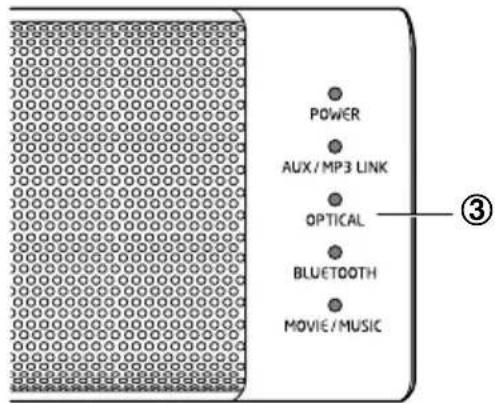
LED Indicators
POWER:
In STANDBY mode: Lit red.
AUX/MP3 LINK:
In AUX mode: Light turned on.
In MP3 LINK mode: Light flashes.
OPTICAL:
Sound output available: Light turned on.
Sound output unavailable: Light flashes.
BLUETOOTH®:
Bluetooth® playing mode: Light turned on.
Bluetooth® pairing mode: Light flashes.
MOVIE/MUSIC:
In MOVIE mode: Light turned on.
In MUSIC mode: Light flashes.
In FLAT mode: Light turned off.
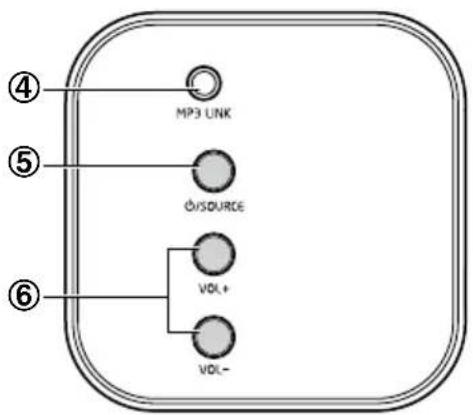
3. MP3 LINK Socket
To connect an external audio device.
4. / SOURCE
Press this button to turn ON or press and hold to switch to STANDBY mode.
To select the play function.
5. VOL+/VOL-
Increase/decrease the volume.
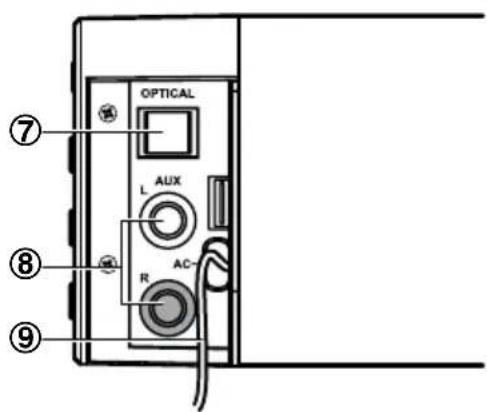
6. OPTICAL Socket
To connect an external audio device.
7. AUX (L/R) Socket
To connect an external audio device.
8. Power Cord
Front View
Side View
RearView
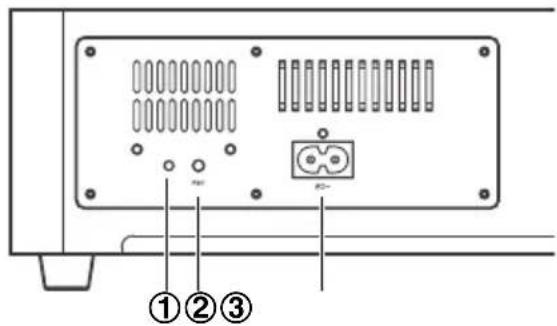
Wireless Subwoofer
EN
- PAIR Indicator Lights up solidly when pairing succeeded.
- PAIR button To connect to the main unit.
- AC\~ Socket Connect to power.
Remote Control
- ⏻ Switch the unit between ON and STANDBY mode.
- SOURCE To select the play function.
- VOL+/VOL- Increase/decrease the volume.
- / |◀◀ ▶▶ Skip to previous/next audio file in Bluetooth® mode.
- ▶Ⅱ Start or pause playback in Bluetooth® mode.
- BT PAIR Activate the pairing function in Bluetooth® mode and disconnect the existing paired Bluetooth® device.
- MUTE Mute or resume the sound.
- EQ Select a preset sound effect.

natural_image
Diagram of a hand pressing a button with a downward arrow (no text or symbols)First Time Use
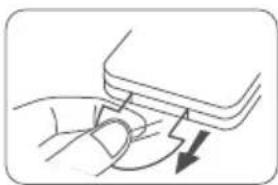
The unit has a pre-installed CR2025 battery. Remove the protective tab to activate the remote control battery.
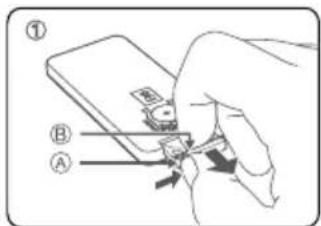
Replacing the Remote Control Battery
- Pull out the battery tray and remove the old battery.
- Place a new CR2025 battery into the battery tray with correct polarity (+/-) as indicated.
- Insert the battery tray back into the slot.

Notes:
• Even if the remote control is operated within the effective range (6m), remote control operation may be impossible if there are any obstacles between the unit and the remote control.
- If the remote control is operated near other products which generate infrared rays, or if other remote control devices using infrared rays are used near the unit, it may operate incorrectly. Conversely, the other products may operate incorrectly.
- When the remote control is not used for a longer period of time, remove the battery to prevent it from leaking.
- Mind the safety information for the use of batteries on page 16.
Placement and Mounting
Placement
A. If your TV is placed on a table, you can place the unit on the table directly in front of the TV stand, centered with the TV screen.
B. If your TV is attached to a wall, you can mount the unit on the wall directly below the TV screen.

natural_image
Illustration of a modern TV setup with a monitor, built-in box, and a small device (no text or symbols)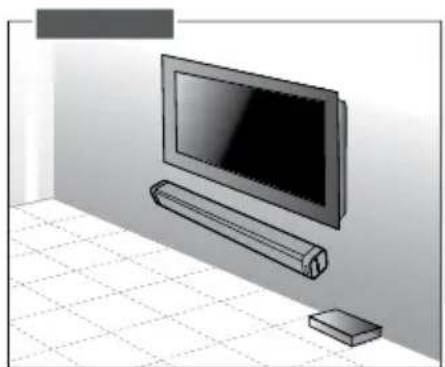
natural_image
Illustration of a modern TV mounted on a wall-mounted cable and a rectangular device, with tiled floor and grid pattern (no text or symbols)Wall Mounting (if using Option B)
- Installation must be carried out by qualified personnel only. Incorrect assembly can result in severe personal injury and property damage. Before mounting to a wall it must be checked confirmed that there are no installations such as electrical wiring and plumbing inside this wall. It is the installer's responsibility to verify that the wall will safely support the total load of the unit and wall brackets.
• Additional tools (not supplied) are required for the installation. - Do not overtighten screws.
- Keep this instruction manual for future reference.
- Use an electronic stud finder to check the wall type before drilling and mounting.
1
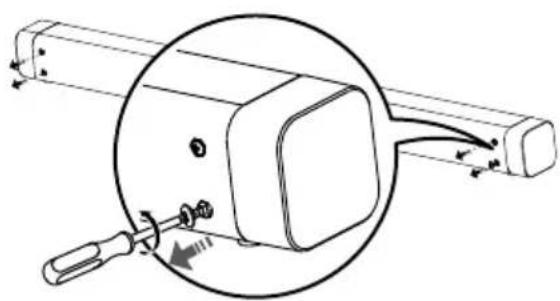
Remove the screws from the main unit.
natural_image
Diagram of a mechanical device with a magnified inset showing internal components (no text or symbols)2
Attach the wall brackets to the main unit with the screws removed from the main unit

3 Drill 2 parallel holes (∅ 3-8 mm each according to wall type) in the wall. The distance between the holes should be 979 mm.
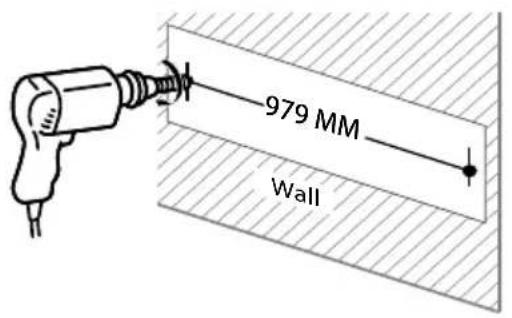
4 Firmly fix 1 dowel into each hole in the wall if necessary.

Leave a 5 mm gap between the wall and the screw's head. Lift the unit with the attached wall brackets over the heads of the screws and slot into place.

natural_image
Line drawing of a rectangular electronic device with two side connectors and directional arrows indicating rotation (no text or symbols)
Connections
OPTICAL Socket
- Remove the protective cap of the OPTICAL socket, then connect an OPTICAL cable (not included) to the TV's OPTICAL OUT socket and the OPTICAL socket on the unit.

flowchart
graph LR
    A["Optical cable"] --> B["TV"]
    C["Camera with I/O ports"] --> D["Optical cable"]
    D --> E["Monitor"]
Tip:
- If there is no sound coming out of the soundbar and the indicator light is flashing quickly, make sure the audio setting of your source player (e. g. DVD player, game console, TV) is set to PCM with optical input.
AUX Socket
A. Use an RCA to RCA audio cable (included) to connect the TV's audio output sockets to the AUX (R/L) socket on the unit.

B. Use an RCA to 3.5 mm audio cable (included) to connect the TV's headphone socket to the AUX (R/L) socket on the unit.

MP3 Link Socket
- Use a 3.5mm to 3.5mm audio cable (not included) to connect the external audio device headphone socket to the MP3 LINK socket on the unit.

POWER Connection
Risk of product damage!
- Ensure that the power supply voltage corresponds to the voltage printed on the back or the underside of the unit.
- Before connecting the AC power cord, ensure you have completed all other connections.
- Connect the mains plug of the main unit to a suitable mains socket.
- Connect the mains cable to the AC\~ socket of the subwoofer and then into a suitable mains socket.

Pairing the Wireless Subwoofer with the Main Unit
Automatic pairing
The subwoofer and soundbar will automatically pair when both units are plugged into the mains sockets and turned on. No cable is needed for connecting the two units.
When the subwoofer is pairing with the main unit, the PAIR indicator will flash.
- When the subwoofer is paired with the main unit, the PAIR indicator will light up.
Notes:
- Do not press the Pair button on the rear of the subwoofer, except for manual pairing.
- If the automatic pairing fails, pair the subwoofer with the main unit manually.
Manual pairing
- Ensure that all the cables are well connected and the main unit is in Standby mode.
- Press and hold the PAIR button on the rear of the subwoofer for a few seconds. The subwoofer will enter the pairing mode and the Pair Indicator will blink quickly.
- Press the ⏻ / SOURCE button on the main unit or the ⏻ button on the remote control to switch the main unit on.
- After the wireless connection succeeded, the PAIR indicator will light up.
- If the PAIR indicator blinks, the wireless connection has failed. Unplug the cable of the subwoofer and then reconnect the main cable after 3 minutes. Repeat steps 1 - 4.
Notes:
- If the wireless connection fails again, check if there is conflict or strong interference (for example, interference from an electronic device) around your location. Remove these conflicts or strong interferences and repeat the above procedures.
- The subwoofer should be within 6 m of the soundbar in an open area.
- If a TV or an external device is connected, the main unit and the subwoofer will switch on automatically when the TV or the external device is switched on.
- If the main unit is not connected with the subwoofer and it is in On mode, the POWER Indicator will flash. Follow steps 1 - 4 above to pair the subwoofer to the main unit.

Basic Operation
Standby/ON
When you first connect the main unit to the mains socket, the main unit will be in Standby mode. The POWER Indicator will light up red.
- Press the ⏻ / SOURCE button on the main unit or the ⏻ button on the remote control to switch the main unit on. The status indicator of the last used mode will light up.
- Press and hold the ⏻ / SOURCE button on the main unit or press the ⏻ button on the remote control to switch the main unit back to Standby mode. The POWER Indicator will light up red.
- Disconnect the mains plug from the mains socket if you want to switch the unit off completely.
- When the unit volume is close to mute or is idle for approximately 15 minutes, it will automatically switch to Standby mode.
Select Modes
Press the ⏻ / SOURCE button on the main unit or the SOURCE button on the remote control repeatedly to switch between AUX, MP3 LINK, OPTICAL and BLUETOOTH® modes.
- When AUX mode is selected, the AUX/MP3 LINK Indicator will light up steadily.
- When MP3 LINK mode is selected, the AUX/MP3 LINK Indicator will flash.
Adjusting the Volume
- Press the VOL +/- button to increase/decrease the volume.
- If you wish to turn the sound off, press the MUTE button on the remote control. Press the MUTE button again or press the VOL +/- button to resume normal listening.
- While adjusting the volume, the status indicator flashes quickly.
- While the volume level reaches its maximum level, if you press the VOL + button again, the status indicator flashes once. While the volume level reaches its minimum level, if you press the VOL - button again, the status indicator flashes once.
Select a Preset Sound Effect
While playing, press the EQ button on the remote control to select between preset equalizers: Movie (recommended for viewing movies), Music (recommended for listening to music) and default setting (EQ mode off).
- When Movie EQ is selected, the MOVIE/MUSIC Indicator will light up steadily.
- When Music EQ is selected, the MOVIE/MUSIC Indicator will flash.
- When EQ mode is off, the MOVIE/MUSIC Indicator will turn off.
AUX / MP3 Link / Optical Operation
- Ensure that the unit is connected to the TV or an audio device.
- While in ON mode, press the ⏻ / SOURCE button repeatedly on the main unit or the SOURCE button on the remote contro to select AUX or MP3 LINK or OPTICAL mode.
- Operate your audio device directly for playback features.
- Press the VOL +/- button to adjust the volume to your desired level. Additionally you can set the volume on the connected device.
Bluetooth® Wireless Playback
This unit can wirelessly stream audio from most Bluetooth ® devices within approximately 8 metres. Obstacles such as walls and other devices may limit this range.
Simply pair the device and enjoy wireless playback and control from your compatible Bluetooth ® device.
- Switch the unit on and select the Bluetooth mode by repeatedly pressing the ⏻ SOURCE button on the main unit or the SOURCE button on the remote control. The Bluetooth indicator will flash slowly.
- The system has entered the pairing mode.
Turn on the Bluetooth® function in your device. Please refer to your device's manual for further details. - Press the BT PAIR button on the remote control.
-
Go to your device's Bluetooth settings.
Add or search for devices.
When the model no. "SB 622" appears, select the device.
If asked for a pass code, enter "0000". -
Once a device is connected, the Bluetooth indicator will be lit solidly.
-
You can now play music on your device, it will be heard over the unit speakers.
-
To disconnect the Bluetooth ® function, switch to another function on the unit or disable the function from your Bluetooth ® device.
Notes:
- Only one device can be paired and played at a time.
- If there is an existing connection, press the BT PAIR button on the remote control to re-activate the pairing mode, the connection will be interrupted.
- If no other Bluetooth device pairs with this player within two minutes, the player will recover its previous connection.
- The player will also be disconnected when your device is moved beyond the operational range.
- If you want to reconnect your device to this player, place it within the operational range.
• If the device is moved beyond the operational range, when it is brought back, please check if the
device is still connected to the player.
• If the connection is lost, follow the instructions above to pair your device to the player again.
Listen to Music from Bluetooth® Device
- If the connected Bluetooth device supports Advanced Audio Distribution Profile (A2DP), you can listen to the music stored on the device through the player.
-
If the device also supports Audio Video Remote Control Profile (AVRCP), you can use the player's remote control to play music stored on the device:
-
Pair your device with the player as described above.
-
Play music via your device.
-
Use supplied remote control to control play:
- To pause/resume play, press the button.
- To skip to a track, press the ◀ buttons.
- Increase and decrease the volume using the VOL+ and VOL- buttons on the unit or remote control and using the volume controls on your device.
Note:
- If there is no playback, ensure that neither the unit nor your Bluetooth® device are set to zero volume and the right device for playback is paired.
Additional Guidelines for Bluetooth ® Devices
- The short wave radio signals of a Bluetooth device may impair the operation of other electronic and medical devices.
- Switch off the device where it is prohibited.
Compatibility Disclaimer
- Wireless performance is dependent on your device's Bluetooth ® wireless technology. Refer to your device's user manual.
- The manufacturer cannot be held liable for any loss or leakage of or damage to data.
Troubleshooting
If there should be any problem with this product, please try to solve it with the help of the following information before contacting service. Most problems can be solved easily.
No power
- Ensure that the AC cord of the apparatus is properly connected.
- Ensure that there is power at the AC outlet.
- Press / SOURCE button to turn the unit on.
Remote control does not work
- Reduce the distance between the remote control and the unit.
- Insert the battery with its polarities (+/-) aligned as indicated.
- Replace the battery.
- Aim the remote control directly at the sensor on the front of the unit.
No response from the unit
- Disconnect and reconnect the AC power plug, then turn the unit on again.
I can't find the Bluetooth® name of this unit on my Bluetooth® device for pairing
- Ensure the Bluetooth function is activated on your Bluetooth device.
- Ensure you have paired the unit with your Bluetooth device.
No connection between the main unit and the subwoofer
• Ensure that the mains cables of the main unit and the subwoofer are both connected securely to
a suitable mains power socket and that both components are switched on.
- Pair the main unit with the subwoofer manually. Please refer to “Pairing the Wireless Subwoofer with the Main Unit” above.
Technical Specifications
Soundbar
Power Supply: AC 220-240V\~50/60Hz
Output Power (RMS): 2x 30W
Power Consumption (max.):......55W
Total Harmonic Distortion: 1% (1kHz, 1W)
Audio Input Sensitivity: 700mV
Frequency Response: 200Hz - 20kHz
Impedance:....8Ω
Dimensions (WxDxH): 1.065 x 60 x 62 mm
Subwoofer
Power Supply: AC 220-240V\~50/60Hz
Output Power (RMS): 60W
Power Consumption (max.):......80W
Frequency Response: 40Hz - 200Hz
Impedance: 4Ω
Dimensions (WxDxH): 465 x 255 x 82 mm
Remote Control
Distance: 6 m
Angle: 30°
Technical specifications and design may change without notice.
CE
We, Karcher AG, herewith confirm that this product is in line with the basic requirements of regulation 1999/5/EG and further relevant regulations.
A copy of the declaration of conformity can be obtained at the following address:
Or online at the following link:
The Bluetooth ® word mark and logos are registered trademarks owned by Bluetooth SIG, Inc. and any use of such marks by Karcher is under license. Other trademarks and trade names are those of their respective owners.


- Vorwort
- Funk-Subwoofer
- Hinweise:
- Wandmontage (Option B)
- Anschlüsse
- Batteries
- Disposal of Used Electrical & Electronic Equipment
- Controls and Connectors
- Speakers
- Remote Control Sensor
- LED Indicators
- POWER:
- AUX/MP3 LINK:
- OPTICAL:
- BLUETOOTH®:
- MOVIE/MUSIC:
- MP3 LINK Socket
- / SOURCE
- VOL+/VOL-
- OPTICAL Socket
- AUX (L/R) Socket
- Power Cord
- Wireless Subwoofer
- Remote Control
- First Time Use
- Replacing the Remote Control Battery
- Notes:
- Placement and Mounting
- Placement
- Wall Mounting (if using Option B)
- Connections
- OPTICAL Socket
- Tip:
- AUX Socket
- MP3 Link Socket
- POWER Connection
- Risk of product damage!
- Automatic pairing
- Manual pairing
- Basic Operation
- Standby/ON
- Select Modes
- Adjusting the Volume
- Select a Preset Sound Effect
- AUX / MP3 Link / Optical Operation
- Bluetooth® Wireless Playback
- Listen to Music from Bluetooth® Device
- Note:
- Additional Guidelines for Bluetooth ® Devices
- Compatibility Disclaimer
- Troubleshooting
- No power
- Remote control does not work
- No response from the unit
- I can't find the Bluetooth® name of this unit on my Bluetooth® device for pairing
- No connection between the main unit and the subwoofer
- Technical Specifications
- Soundbar
- Subwoofer
- CE
Brand : SCHAUB LORENZ
Model : SB 622
Category : Loudspeaker