
ZE-5.1D - Car radio ZENEC - Free user manual and instructions
Find the device manual for free ZE-5.1D ZENEC in PDF.


| Product Type | 5.1-Channel Digital Amplifier with AV-Processor and OSD |
| Brand | ZENEC |
| Model | ZE-5.1D |
| Dimensions (W x H x D) | 270 x 45 x 160 mm |
| Net Weight | 2.2 kg |
| Power Supply | 12V DC (vehicle battery), remote turn-on (REM) |
| Amplifier Class | Class-D full-range |
| Channels | 5.1 (5 satellite + 1 subwoofer) |
| RMS Power Output (4 ohms, all channels driven, THD < 0.1%) | 5 x 50W + 1 x 50W |
| RMS Power Output (2 ohms subwoofer, THD < 1%) | 1 x 100W |
| Total Harmonic Distortion (Rated Power) | < 0.1% (satellite), < 1% (subwoofer at 2 ohms) |
| Signal-to-Noise Ratio (A-weighted) | > 90 dB |
| Input Sensitivity | 0.2V – 6V (adjustable in steps) |
| Damping Factor (4 ohms) | > 100 |
| Channel Separation | > 50 dB |
| Frequency Response (-3dB) | 10 Hz – 30 kHz |
| Crossover Slope | 24 dB/octave (high-pass and low-pass) |
| Crossover Frequency Range | 60 Hz – 220 Hz (adjustable in 10 Hz steps) |
| Decoding Formats | Dolby Digital 5.1, DTS 5.1 |
| Listening Modes | Surround 5.1, Phantom 4.1, 2-Channel Stereo |
| Inputs | 2x RCA line, 1x optical Toslink, 1x coaxial digital, 1x video (RCA), 1x IR remote input |
| Outputs | 6x speaker terminals (5 satellite + 1 sub), 1x subwoofer pre-out (RCA), 1x video out (RCA), 1x remote out |
| Protection Features | Short circuit, over current, under voltage (<9.5V), over temperature – auto shutdown with 'AMP PROTECT' display |
| Display | On-Screen Display (OSD) via video output (PAL) |
| Remote Control | Wired IR sensor and remote handset included |
| Warranty | 2 years limited |
Frequently Asked Questions - ZE-5.1D ZENEC
User questions about ZE-5.1D ZENEC
0 question about this device. Answer the ones you know or ask your own.
Ask a new question about this device
Download the instructions for your Car radio in PDF format for free! Find your manual ZE-5.1D - ZENEC and take your electronic device back in hand. On this page are published all the documents necessary for the use of your device. ZE-5.1D by ZENEC.
USER MANUAL ZE-5.1D ZENEC
5.1 DIGITAL AMPLIFIER WITH AV-PROCESSOR AND OSD

natural_image
Exterior view of a ZENEC 5.1 digital assembly module with ports and connectors (no readable text or symbols beyond branding)MODEL NO:
ZE-5.1D
OPERATION MANUAL
e13021914
3. DRC (Dynamic Range Compression) ON /OFF
and thank you for purchasing this 5.1 channel digital power amplifier from ZENEC
To maximize the performance of your complete car audio system, it is recommended that you acquaint yourself thoroughly with the capabilities and features of this amplifier. Therefore read this manual carefully, before attempting the installation of this multichannel amplifier. It is recommended to retain this manual and the purchasing/installation receipts for future reference
TECHNICAL FEATURES
5.1-CHANNEL MULTIMEDIA DIGITAL AMPLIFIEF
→ 50Wrms x 5 & 50Wrms x 1 @ 4 ohms (> 0.2% THD / 13.8V)
→ Max. output of subwoofer channel: 100Wrms @ 2 ohms (0.2% THD / 13.8V)
→ Satellite channels 4 ohms stable / subwoofer channel 2 ohms stable
→ Fullrange digital amplifi cation circuitry
→ Variable input sensitivity: 0.2 - 6V
→ Damping factor @ 4 ohms: < 100
→ Signal to noise ratio: < 90dB
→ Channel separation: < 50dB
→ Dimensions WxHxD: 270 x 45 x 160mm
KEY FEATURES
5.1 channel class-D fullrange amplifier with integrated AV-processor and OSI
Dolby Digital decoding format → DD 5.1
DTS decoding format → DTS 5.1
Listening mode selection (2-CH Stereo / Phantom Mode / Matrix Surround Mode
Integrated DSP based crossover with 24dB/oct slopes (60Hz \~ 220Hz adjustable in 10Hz steps)
Input sensitivity control (adjustment range 0.2/0.5/1.0/1.5/2.0/2.5/3.0/3.5/4.0/4.5/5.0/5.5/6.0 Vrms)
System setup by on-screen display
Optical & coaxial digital anlog RCA inputs
Test tone mode for speaker setup and calibrtior
Remote control for OSD adjustment
Remote output termina
INPUTS - OUTPUTS
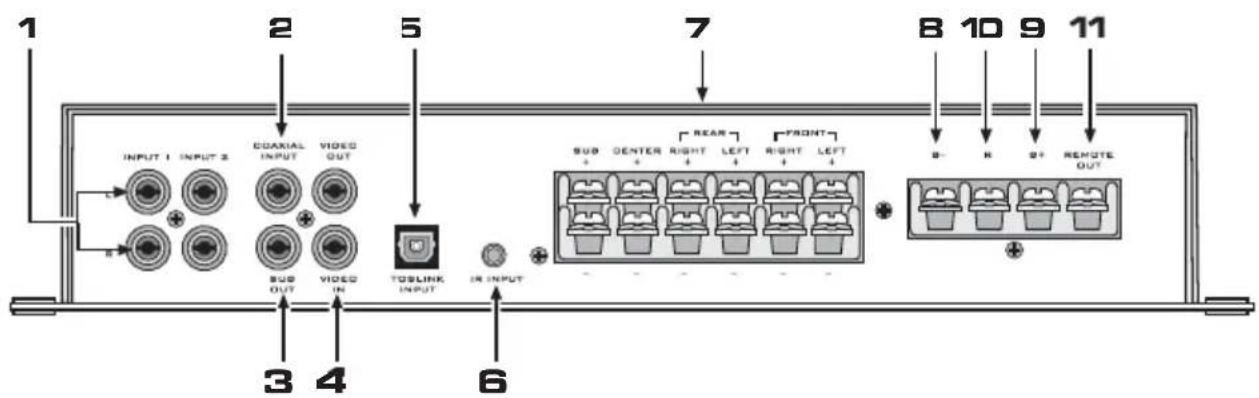
1) RCA inputs (Input 1/Input 2): Line inputs for connection with the RCA line-outs of the head-unit
2) Digital coaxial RCA input: For connection of the ZE-5.1D amplifier to the digital output (Bitstream, / PCM) of a DVD headunit
3) Subwoofer output: Sends a subwoofer pre-amp signal to a larger subwoofer amplifier if necessary
4) Video Input/Output: The ZE-5.1D provides function selection and display exclusively by OSD (On-Screen Display). For this purpose, the video output from a DVD or other video source is connected into the video input of the amplifier. The video output should then be connected to the input of the monitor, LCD, or TV. The ZE-5.1D supports only the PAL standard. When video input into the system is absent, the display color is blue and display position may be altered. This allows selection and display of functions even when no video sources are playing
5) Optical Toslink input: For connection of the ZE-5.1D amplifier to the optical digital output of a DVD headunit
6) IR input socket: IR remote input to control the system using the included remote control, you must first connect the wired IR sensor to the IR input of the system. To control the system, there should be no obstacle between the remote control and the IR sensor. For best results, the remote control should point directly at the front window of the wired IR sensor
7) Loudspeaker output terminals. Note, that the loudspeaker outputs may not be bridged
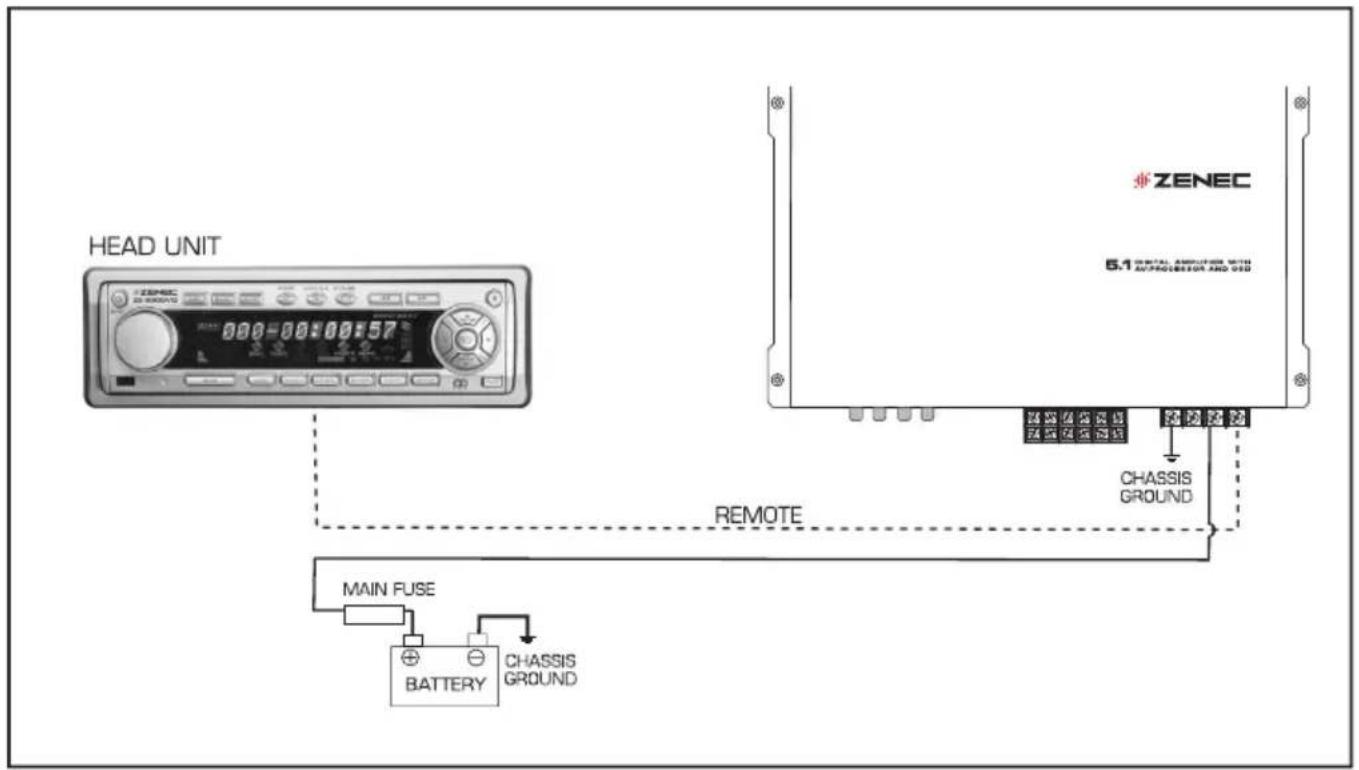
8) "GND" for connection to chassis ground or negative terminal of car battery
9) “+12V” for connection to the positive terminal of car battery
10) "REM" for the automatic (remote) turn-on / turn-off of the power amplifier from the head-unit's remote or antenna control leac
11) REM OUT This output must be connected to a separate bass amplifier (if required
When the amp powered on, the MUTE button on the remote control is used for instantaneous lowering of the volume level to zero. Eliminating MUTE can be done by pressing the MUTE button again, or else adjust volume up or down.
2. Input Selection
The INPUT SELECT button on the remote control provides manual switching of the input coming into the system. The first press of the INPUT button displays the current input source. The selection switches in order from -> Optical -> Coaxial-> Input1 -> Input2 and then back to Optical again. Input switching is possible while the source is displayed on the screen. If there is an error in optical or coaxial input, the display will blink continuously. In this circumstance, all controls are available while blinking. The ZE-5.1D has source memory: When you power the unit off and then on again, it will remember the last source selected, and return to that source automatically.
3. Test Tone
The ZE-5.1D amp features a test tone mode to check, if all speakers are connected properly. When this button is selected (on the remote control), white noise of a fairly low volume is forwarded to each of the 5 main speakers in order from -> Front Left -> Center -> Front Right -> Rear Right -> Rear Left, alternating every 2 seconds until the button is pressed once more.
Note: There is no test tone for the SUB output
4. Set-Up
This button causes the On Screen Display to open the menu for setting up the ZE-5.1D amplifier. In this menu window, the selection, function, and control of the selected function sections can be accomplished. The Set-Up menu allows control of
• Pro Logic Selection
• Dynamic Range Compression Selection for Dolby 5.1 material
• Crossover Filter selection for LPF and HPF used in Bass Management
- INPUT1 I eve
- INPUT2 Level
- Channel level (input gain) control
Pressing the Set-Up button on the remote while the menu is displayed on-screen, will cause the menu to hide. This button is also used to return to the main Set-Up menu from the channel level control menu.
5. Menu Up/Down
When the menu is displayed on the OSD (On-Screen Display), the function to be controlled can be selected by the Up/Down buttons. The buttons are set up in a circular pattern on the remote, for ease of use.
6. Selection Left/Right
After the selection of function using the Menu Up/Down button, function-dependant values can be changed using the LefVRight buttons on the Remote Control. As soon as the value is changed, the new value is displayed without requirement of confirmation. For value changes, the left button is used for decreasing values, and the right button is used for increasing values
7. Enter
This button is used to enter the channel level control in the Set-Up menu
8. Source Display
By pushing this button, you can display the decoding mode or Pro Logic mode on the monitor or TV. The following is an explanation of the modes
• Dolby Digital - Input source is Dolby Digital bitstream for all listening modes
- Pro Logic - Input source is PCM and Pro Logic is on for phantom or surround modes.
- Dolby Surround - Input source is Dolby Digital 2.0 Stereo and Pro Logic is on for phantom and surround modes.
- PCM - Input source is PCM and Pro Logic is off for all listening modes or input source is PCM and Pro Logic is on for stereo mode.
9. Volume Up/Dowr
These buttons control the master volume of the system. These buttons are only for master volume control. When channel level menu is invoked, these buttons cannot be used for control of channel levels. Channel levels can be changed using left or right button
SPEAKER CONNECTION SCHEMATIC

POWER INPUT SCHEMATIC
A/V CONNECTION SCHEMATIC

flowchart
graph TD
    A["ZENEC 5.1 DIGITAL AMPLIFIER WITH AV.PROGESSOR AND OBD"] --> B["Input 1"]
    A --> C["Input 2"]
    A --> D["Video In"]
    A --> E["Video Out"]
    A --> F["Tuner"]
    A --> G["MP3"]
    A --> H["LCD"]
    A --> I["IGBT Input"]
    A --> J["Video Out"]
OPERATION GUIDE
1. Input Source Selection
To select the input source for the system, the system should be turned on, then
1) Push „INPUT“ selection button on remote controller
2) Continuing to push the „INPUT“ selection button while the input is displayed on the monitor or TV makes a change in the input source as follows: OPTICAL -> COAXIAL -> INPUT1 -> INPUT2 -> OPTICAL (in circular order).
If there is an error in the data received via the optical or coaxial line the display will blink continuously. For more details, please see section 13. Digital Error Detect
2. Listening Mode Selection
The system provides three kinds of listening modes:
Surround Listening Mode
This mode is selected with a full set of 5.1 speakers connected. This mode is recommended for use, while Dolby Digital or Pro Logic is working.
Phantom 4.1 Listening Mode
This mode is selected when a center speaker is absent. This mode is recommended for use with Dolby Digital or Pro Logic when working without a center channel speaker
2-Channel Stereo Listening Mode
When this mode is selected, the rear channels are identical to the front channels. That is, the front left and right channels are copied to rear left and right channels respectively. In this mode, center signal is not produced, but SUB signal is produced. Pro Logic is automatically deactivated in this mode.
To select a listening mode described above, the system should be turned on and
1) Push „LISTEN MODE“ selection button on remote controller
2) Continuing to push „LISTEN SELECTION“ button while it is displayed in monitor or TV makes a change in the listening mode as follows: SURROUND -> PHANTOM 4.1 -> 2-STEREO (in circular order). While Pro Logic is off for a PCM source (CD or line input), if the listening mode is . SURROUND" or "PHANTOM 4.1 " there is no surround and center sound. For surround sound, Pro Logic should be set to ON in setup menu, or alternatively, "2-STEREO" listening mode can be selected.
3. DRC Dynamic Range Compression On/Off
This function currently supports only Dolby Digital 5.1 sources. For other programs and no surround listening modes, this function is not effective. When this function is on, a high level signal (e.g. explosions, bombing, jet passing by, etc) is compressed or attenuated, while having no influence on low level signal (like speech). When this function is off, the output is reproduced with full dynamic range as recorded on disc.
This function can be selected using DRC on/off switch in setup menu.
1) Push „SETUP“ button
2) Move blinking arrow to „DRC“ using „MENU UP“ or „MENU DOWN“ button
3) Select On or Off using „MENU LEFT“ or „MENU RIGHT“ button
4) After fi nished, push „SETUP“ button again to escape setup window
When DRC is ON, the high level peaks are reduced with no further effect on reproduction of low level sounds
For normal listening, set DRC to off
4. Pro Logic On/Of
This function makes stereo programs to be reproduced by multiple channels. When this function is not selected, the original stereo source is bypassed to the front speakers. This function is automatically bypassed for stereo listening mode, regardless of its selection in setup menu
To enable or disable Pro Logic, the system should be turned on and
1) Push „SETUP“ button
2) Move blinking arrow to „PRO LOGIC“ using „MENU UP“ or „MENU DOWN“ button
3) Select On or Off using „MENU LEFT“ or „MENU RIGHT“ button
4) After you are fi nished, push the „SETUP“ button again to escape setup window
5. Crossover Filter Selection
The SUB channel is low-pass filtered and other channels are high-pass filtered. The cutoff frequency of those low pass and high pass filters is changed simultaneously in this selection. This selection provides 60Hz to 220Hz of cutoff frequency in 10 Hz steps
To select suitable crossover fi iter to match one's own speaker system
1) Push „SETUP“ button
2) Using „MENU LEFT“ and „MENU RIGHT“ buttons on the remote control, select cutoff frequency in decreasing and increasing order respectively. One push of the left or right button makes one step movement in frequency. The frequency which is selected (displayed) is displayed promptly
3) After you are fi nished, push „SETUP“ button again to escape setup window
6. Channel Level Control
The menu system provides the ability to control each channel's input level from -10dB to +10 dB in 1 dB steps. This trim control can be used for matching levels of different types of speakers, or used when more power is required.
To enable channel level menu and to control values
1) Push „SETUP“ button.
2) Move blinking arrow to „CHANNEL LEVEL“ using „MENU UP“ or “MENU DOWN” button
3) Push the „Enter“ button on the remote controller. The window for channel level control will open.
4) Move the blinking arrow to the channel to be controlled using the „MENU UP“ or „MENU DOWN“ button
5) For level increasing, use the „MENU RIGHT“ button, and the „MENU LEFT“ button for level decreasing.
6) After fi nished, push the „SETUP“ button to escape channel window and push the „SETUP“ button again to completely escape setup menu.
7. Test Tone On/Of
To use the test tone function, the master volume should be increased to a relatively high playback level, because the output level of the test tone is relatively low
To enable or disable the test tone output.
1) Push the „TEST TONE“ button on the remote control. The test tone will be output to one channel at a time in the order of „FRONT LEFT → CENTER → FRONT RIGHT → REAR RIGHT → REAR LEFT“ continuously. While the test tone is playing, pressing any other function button does not work.
2) To output normal sound, push „TEST TONE“ button again. The test tone mode is then disabled to produce normal audio output.
Note: Test tone does not include a tone for the SUB channel. Checking the connechoon of SUB speaker is only possible with real audio sound through the SUB speaker.
8. Master Volume Up/Dowr
This controls the output level of all channels simultaneously It is designed to control in 1dB steps for high volume levels, or in 2dB steps for middle levels and in 3\~5dB for low levels. When volume level is lowered far enough, the output is muted. A short push of the „VOLUME UP“ or „VOLUME DOWN“ button will change the volume one step up or down, while pressing down the Volume button will result in multiple step changes.
9. Mute On/OFF
This function is to enable or disable muting of the decoder output. When mute is enabled, this is indicated on the screen until it is disabled. To disable mute, use the „MUTE“ button once more, or the master „VOLUME UP“, „VOLUME DOWN“ button respectively
10. Setup Menu Display
Controlling DRC, Pro Logic, crossover, line input levels and each channel level is only possible in the setup menu. For more information, refer to the previous explanations of this section. When the setup menu is invoked, the following display is shown
-> PRO LOGIC ON/OFF
-> DRC ON/OFF
-> CROSSOVER XXXHz
-> INPUT1 LEVEL X V**
-> INPUT2 LEVEL X V
-> CHANNEL LEVEL
* XXXHz of Crossover is 60Hz to 220Hz in 10Hz steps
** X V has the range of 0.2 - 6V
Movement of arrows in the left column is achieved by pressing the „MENU UP“ or „MENU DOWI button. When a function is selected, the arrow corresponding to the function is blinking. The On or Off status is controlled by „MENU RIGHT“ or „MENU LEFT“ button. In this case, both buttons act identically. The adjustment of the cutoff frequency for the crossover filter is also made by „MENU RIGHT“ or „MENU LEFT“ button. However, the left button is used for decreasing frequency and right button for increasing in this case. The „SETUP“ button is used to enable and disable setup menu
11. Channel Level Control Menu Display
As the sub-menu of setup menu, the following menu for channel level control is provided. To view this sub-menu, move to „CHANNEL LEVEL“ in setup menu using „MENU UP“ or „MENU DOWN button. Then, push the „ENTER“ button on the remote control unit
-> FRONT LEFT XX dB*
-> FRONT RIGHT XX dB
-> CENTER XX dB
-> RFAR I FFT XX dB
-> REAR RIGHT XX dB
-> WOOFER XX dB
* XX dB is -10 to +10dB in dB steps
The selection of channels is identical to the selection of functions in the setup menu. The level change is made by „MENU LEFT“ and „MENU RIGHT“ buttons. The left button is used for value decreasing and the right button for increasing, exactly indetical to the adjustment of the crossover filter frequency. To escape the channel sub-menu, press the button twice. The first push is to return to setup menu from this sub-menu, while the second push lets you leave the escape setup menu
12. Volume Fade in and Ou
Volume fading is involved in the following cases
1) Listening Mode Change
2) Input Source Change
3) Return From Test Tone
During fading of the volume, the display is blinking and the controller does not accept any command from the remote control. When the blinking stops, the user can control the system using remote control again
13. Digital Error Detection
The system provides two digital inputs; optical and coaxial. The coaxial input should be used with a true 75 ohm RCA interconnect cable. When one (or two) digital inputs are not connected, or connected inappropriately (for example the source unit is not powered on) the system can detect this situation. When pushing the input button on the remote control unit, the selected input source is displayed for about 7 sec. If digital data is properly received, the display will change from blinking to non-blinking after about 2 sec. due to the volume fading. If the digital data reception is not error-free, it remains blinking. When this situation occurs, connections or the digital output of the headunit should be checked. Note that the system does not provide error detection or zero-bit input detection on its analog input, such as line input1 and line input2
14. Amplifi er Shutdown and Message Display
The system can detect the following error modes of the amplifi er
1) Short Circuit and Over Current
2) Under Voltage
3) Over Temperature
When the system is in an under-voltage situation (2) (less than 9.5V) the overall system is shut down. The system will not give any message for under voltage situation. When the system is first put into protection for situations (1) or (3) it will self-test for 10 milliseconds. (While the system is self-testing, the sound may be discontinued.) If the same situation is detected after a certain time is elapsed, the system causes the amplifier to shut down by disconnecting the amplifier section from the power supply, and will display „AMP PROTECT“ on the OSD for about 110 sec (\~2 minutes). In this situation, no command can be executed. After the stated time has elapsed, the system automatically recovers to normal operation with the volume level two steps down from the level prior to shutoff
SPECIFICATIONS
| Rated Power Output (RMS)All channels driven simultaneously@ 13.8V into 4 Ohms (THD<0.1%) | 5 x 50 W & 1 x 50 W |
| Rated Power Output (RMS)All channels driven simultaneously@ 13.8V into 2 Ohms (THD<1%) | -/- x -/- W & 1 x 100 W |
| Damping Factor @ 4 Ohms LoadAll Channels | >100 |
| Signal-to-Noise Ratio (A-Filter Weighted) | >90 |
| All Channels @ full rated power output | >100dB(A) |
| Frequency Response (-3dB)Operation Mode set to FULL,All Channels driven simultaneously | 10Hz – 30kHz |
| Channel SeparationAll Channels | >50 dB |
| Input SensitivityAll channel Pairs | 0.2V - 6V |
| Integrated Cross-Over/FilteringSlope Rates | -highpass / Lowpass 24dB/Oct. |
| Highpass Cross-Over Frequency RangeLowpass Cross-Over Frequency Range | continuously variable 60 - 220 Hzcontinuously variable 60 - 220 Hz |
| Dimensions (W x H x D) | 270 x 45 x 160 mm |
| Net Weight: | 2.2kg |
2 YEARS LIMITED WARRANTY
Dear customer
Thank you for purchasing this ZENEC product. It is advisable to keep the original packing material for any future transporting of the product.
Should your ZENEC product require warranty service, please return it to the retailer from whom it was purchased or the distributor in your country.
This ZENEC product is warranted against defective materials or workmanship for a period of TWO years from date of purchase at retail.
Warranty Limitations
This warranty does not cover any damage due to:
- Improper installation, incorrect audio or mains connection(s).
- Exposure to excessive humidity, fluids, heat sun rays or excessive dirt or dust.
- Accidents or abuse, unauthorized repair attempts and modifications not explicitly authorized by the manufacturer.
This warranty is limited to the repair or the replacement of the defective product at the manufacturer's option and does not include any other form of damage, whether incidental, consequential or otherwise. The warranty does not cover any transport costs or damages caused by transport or shipment of the product. Warranty work will not be carried out unless this warranty certificate is presented fully completed with model, serial number, purchaser's address, purchasing date and dealer stamp together with the original sales slip!
2 JAHRE GARANTIE
Date of Purchase ....
Your name ....
Your address....
City: ....
State: ZIP or Postal Code
Country:
Your phone number ....
Dealer's address & stamp


- DIGITAL AMPLIFIER WITH AV-PROCESSOR AND OSD
- DRC (Dynamic Range Compression) ON /OFF
- TECHNICAL FEATURES
- 5.1-CHANNEL MULTIMEDIA DIGITAL AMPLIFIEF
- KEY FEATURES
- INPUTS - OUTPUTS
- Input Selection
- Test Tone
- Set-Up
- Menu Up/Down
- Selection Left/Right
- Enter
- Source Display
- Volume Up/Dowr
- OPERATION GUIDE
- Input Source Selection
- Listening Mode Selection
- Surround Listening Mode
- Phantom 4.1 Listening Mode
- 2-Channel Stereo Listening Mode
- DRC Dynamic Range Compression On/Off
- Pro Logic On/Of
- Crossover Filter Selection
- Channel Level Control
- Test Tone On/Of
- Master Volume Up/Dowr
- Mute On/OFF
- Setup Menu Display
- Channel Level Control Menu Display
- Volume Fade in and Ou
- Digital Error Detection
- Amplifi er Shutdown and Message Display
- YEARS LIMITED WARRANTY
- Warranty Limitations
- JAHRE GARANTIE
Brand : ZENEC
Model : ZE-5.1D
Category : Car radio