VC-PD510-1 - Vacuum Cleaner Hanseatic - Free user manual and instructions
Find the device manual for free VC-PD510-1 Hanseatic in PDF.


| Product Type | Cordless Stick Vacuum Cleaner |
| Brand | Hanseatic |
| Model | VC-PD510-1 |
| Rated Power | 120 W |
| Operating Voltage | 21.6 V |
| Battery Type | Lithium-Ion (T-DC38L) |
| Charger Model | ZD12D250060EU |
| Mains Connection | 100-240 V~, 50/60 Hz |
| Protection Class | II |
| Weight (assembled) | Approx. 2.47 kg |
| Suction Levels | 2 (I and II) |
| Charging Time (first) | 4–5 hours |
| Filter Types | Washable dust filter, hygiene filter, motor protection filter |
| Included Nozzles | Floor nozzle (turbo brush), crevice nozzle, furniture nozzle |
| Additional Accessories | Wall bracket, tube extension, battery, charger, screws, wall plugs |
| Storage | Wall-mounted bracket |
| Safety Features | Overheat protection, filter protection |
| Suitable For | Dry vacuuming only; not for liquids, ashes, sharp objects |
| Order Number | 2008 2614 |
Frequently Asked Questions - VC-PD510-1 Hanseatic
User questions about VC-PD510-1 Hanseatic
0 question about this device. Answer the ones you know or ask your own.
Ask a new question about this device
Download the instructions for your Vacuum Cleaner in PDF format for free! Find your manual VC-PD510-1 - Hanseatic and take your electronic device back in hand. On this page are published all the documents necessary for the use of your device. VC-PD510-1 by Hanseatic.
USER MANUAL VC-PD510-1 Hanseatic
natural_image
Line drawing of a single vacuum cleaner with long handle and clasp (no text or symbols)Gebrauchsanleitung
natural_image
Line drawing of a handheld device with internal components and handle (no text or symbols)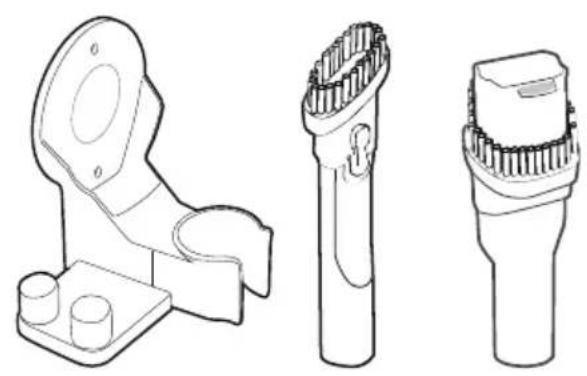
natural_image
Technical line drawings of three mechanical components: a bracket, a cylindrical component with grooves, and a multi-pronged cylindrical component (no text or symbols present)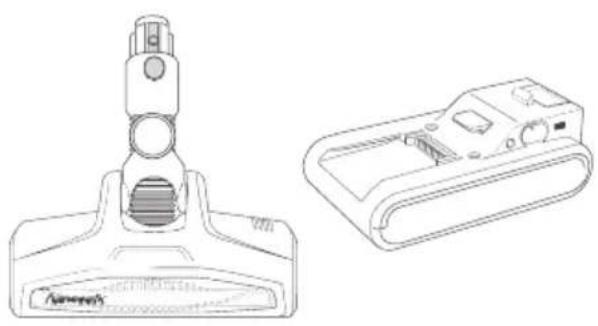
natural_image
Technical line drawing of a vacuum cleaner and its internal component (no text or symbols)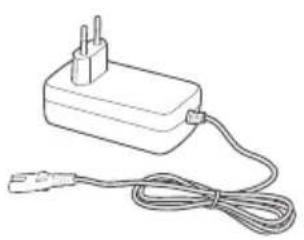
natural_image
Line drawing of a connected electrical plug with a cable (no text or symbols)
Lieferumfang
(4)(5)(6)(7)
natural_image
Simple line drawing of a plug connected to a cable, labeled (12), with no text or symbols beyond the label.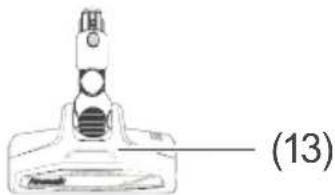
natural_image
Technical line drawing of a soldering iron component (no text or symbols)
natural_image
Technical line drawing of a mechanical bracket component (no text or symbols)natural_image
Technical line drawing of a mechanical component with no visible text or symbolsnatural_image
Technical line drawing of a mechanical tool or component with no visible text or symbolsnatural_image
Technical line drawing of a mechanical connector or connector with a labeled end (15), showing internal components without any text or symbols.natural_image
Top-down schematic of a circular component with two handles and a triangular connector at the bottom (no text or symbols)(22) (23)
natural_image
Circular diagram with a central circular element and three small circular elements, no text or symbols present.natural_image
Line drawing of a hand using a handheld device to measure a tool, labeled with number (2) and no text or symbols on the device itself.natural_image
Technical line drawing of a hair dryer with internal components and directional arrows (no text or symbols)natural_image
Line drawing of a single vacuum cleaner with long handle and clasp (no text or symbols)User manual
Manual/version: 1901-01943 EN 20210105 Article no.: 2008 2614 Reproduction, even of excerpts, is not permitted!
Battery-Operated Vacuum Cleaner
Table of contents
Delivery ...... EN-3
Package contents ..... EN-3
Check the delivery..... EN-3
Safety ...... EN-4
Intended use ..... EN-4
Explanation of terms ..... EN-4
Safety notices ..... EN-5
Appliance parts
and nozzles .....EN-11
Nozzles ..... EN-12
Start-up..... EN-13
Unpacking the appliance EN-13
Mounting the
wall bracket ..... EN-13
Charging the battery . . . EN-14
Preparing the appliance EN-14
Operation ..... EN-16
Vacuuming floors. ..... EN-16
Setting the suction force EN-17
Using the nozzles ..... EN-18
Finishing vacuuming . . . EN-18
Tidying away/storage . . EN-18
Care and maintenance... EN-19
Emptying the dust bin . . EN-19
Cleaning/changing
the dust filter ..... EN-20
Cleaning/replacing
the hygiene filter ..... EN-22
Cleaning the appliance . EN-23
Cleaning the
floor nozzle ..... EN-24
Troubleshooting table.... EN-26
Service ..... EN-28
Advice, order and
complaint..... EN-28
Spare parts ..... EN-28
Environmental protection . EN-29
Disposing of
old electrical devices
in an environmentally-
friendly manner ..... EN-29
Batteries and
rechargeable batteries . EN-29
Packaging ..... EN-30
Technical specifications .. EN-31
Delivery
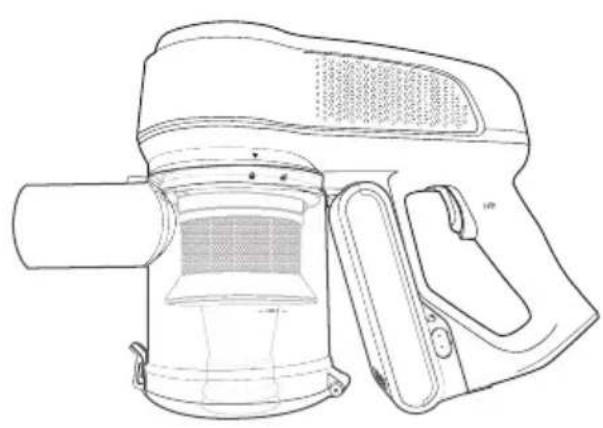
natural_image
Line drawing of a handheld device with internal components and ventilation slots (no text or symbols)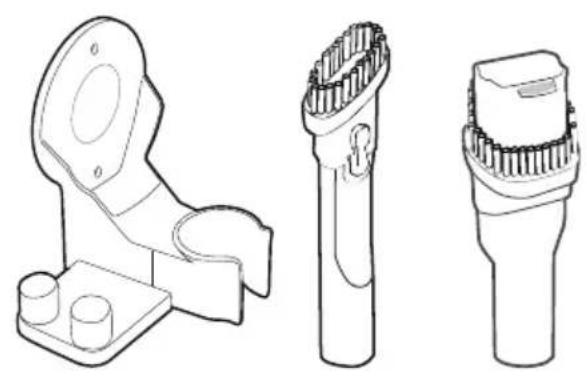
natural_image
Technical line drawings of three mechanical components: a bracket, a cylindrical component with teeth, and a multi-pronged cylindrical component (no text or symbols present)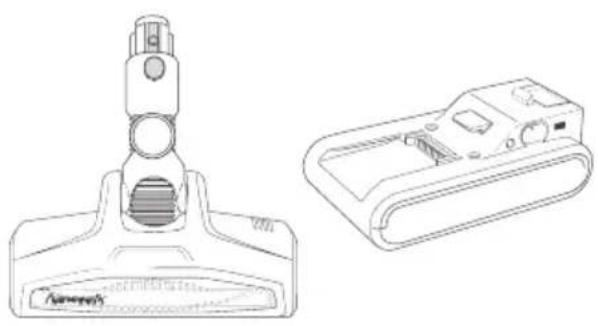
natural_image
Technical line drawings of a vacuum cleaner and its internal device (no text or symbols)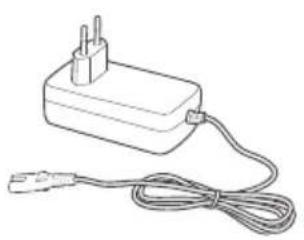
natural_image
Line drawing of a connected power strip with a terminal block and cable (no text or symbols)Package contents
- Vacuum cleaner
- Wall bracket
- Tube extension
– Floor nozzle (turbo brush) - Furniture nozzle
- Crevice nozzle
- Battery
- Battery charger
- 2× Screw
- 2× Wall plug
- User manual
Check the delivery
- Move the appliance to a suitable place and unpack it.
- Check that the delivery is complete.
- Check whether the appliance was damaged during transit.
- If the delivery is incomplete or the appliance has been damaged during transport, please contact our Service Centre (see „Service“ on page EN-28).
! WARNING!
Do not operate the appliance if it has visible damage.

Safety

Please read through the safety instructions and user manual carefully before using the appliance. This is the only way you can use all the functions reliably and reliably.
Be absolutely sure to also observe the national regulations in your country, which are also valid in addition to the regulations specified in this user manual.
Keep all safety notices and instructions for future reference. Pass all safety notices and instructions on to the subsequent user of the appliance.
Intended use
The appliance is intended for vacuuming up loose and dry dirt, such as dust, lint, crumbs on floors and cushions around the home and car. It is not suitable for vacuuming hazardous dusts or fluids.
The appliance is designed for use in private households only and is not designed for commercial use or multiple use (e.g.: use by several families in an apartment building).
Use the appliance exclusively as described in this user manual. Any other use is deemed improper and may result in damage to property or even personal injury. The manufacturer accepts no liability for damage caused by improper use.
Explanation of terms
The following symbols can be found in this user manual.

WARNING
This symbol indicates a hazard with a medium level of risk which, if not avoided, could result in death or serious injury.

CAUTION
This symbol indicates a hazard with a low level of risk which, if not avoided, could result in minor or moderate injury.

NOTICE
This symbol warns against possible damage to property.

This symbol refers to useful additional information.
Safety notices
In this chapter you will find general safety notices which you must always observe for your own protection and that of third parties. Please also observe the warning notices in the individual chapters on operation, cleaning, etc.
Risks in handling household electrical appliances

WARNING
Risk of electric shock! Touching live parts may result in severe injury or death.
■ Only use the appliance indoors. Do not use in wet rooms or in the rain.
■ Never expose the appliance to effects of the weather (rain, etc.).
■ Do not operate or continue to use the appliance, if it
■ shows visible signs of damage, e.g. the mains cord is defective.
■ starts smoking or there is a smell of burning.
■ makes unfamiliar noises.
In this case, you should pull the mains plug out of the socket and have the appliance repaired (see „Service“ on page EN-28).
■ Only connect the appliance to an easily accessible socket so that you can quickly disconnect it from the mains in the event of a fault.
- Keep the appliance, the mains plug and the mains cable away from open fl ames and hot surfaces.
■ Do not kink, pinch or run over the mains cord with the appliance. This can result in a break in the cable.
■ If the mains cord of the appliance is damaged, it must be replaced by the manufacturer, through customer service or by a qualified specialist.
■ Never leave the appliance unattended while the mains plug is connected to the socket.
■ Never pull the mains plug out of the socket by the mains cable, always hold the mains plug itself.
■ In the event of a fault, and before cleaning and maintenance (e.g. changing fi l-ter), always pull the mains plug out of the socket.
■ Never touch the mains plug with wet hands.
■ Ensure that no water seeps into the appliance. Never immerse the appliance in water.
■ Only insert the mains plug into the socket if all appliance components are completely dry.
■ Changes and repairs to the appliance may be carried out only by authorised specialists, such as our service team (see page EN-28). Unauthorised repairs to the appliance can cause property damage and personal injury, and invalidate liability and warranty claims. Never try to repair a defective or suspected defective appliance yourself.
■ This appliance contains electrical and mechanical parts which are essential for protection against potential sources of danger.
Only parts corresponding to the original appliance specifications may be used for repairs.
Risks to children
Risk of suffocation!
■ Do not allow children to play with the packaging fi Im. Children may get caught in it or suffocate.
■ Prevent children from pulling small parts off the appliance or putting them in their mouths.

CAUTION
Risks for certain groups of people
Dangers for children and people with limited physical, sensory or mental capacity!
■ This appliance may be used by children aged eight years and above, as well as persons with reduced physical, sensory or mental capacities or those lacking experience and/or knowledge, if they are supervised or have been
instructed in how to safely use the appliance and have understood the dangers associated with operating it.
■ Children should not be allowed to play with the appliance nor should they have access to the appliance when left unattended.
■ Do not leave the appliance unsupervised while in operation.
■ Cleaning and maintenance must not be carried out by children unless they are supervised.
Even with the fi Iters, the appliance exhaust air may still contain small quantities of dirt particles. If breathed in by small children, these can lead to allergic reactions.
■ Avoid vacuuming close to children, wherever possible.
Risks when handling the vacuum cleaner
Risk of injury!
Improper handling of the ap- pliance may result in injury.
■ Never touch moving parts of the appliance and accessories, for example, turbo brushes. There is a risk of fingers becoming trapped.
■ Always remove the turbo brush from the telescopic tube or suction hose before cleaning.
■ Lay the mains cord in such a way that no one trips over it.
Fire hazard!
Vacuuming glowing ash, burning cigarettes, etc. will set the fi Iter on fi re.
■ Do not vacuum glowing ash, burning cigarettes or matches.
Health hazard!
Improper handling of the appliance may result in health hazards.
■ Do not use the appliance if the hygiene or motor protection filter is missing or damaged. Otherwise, vacuumed dust can penetrate the appliance and escape into the ambient air.
Risks when handling the battery pack
Risk of injury!
Improper handling of the lithium-ion battery may lead to injuries.
If the battery pack is opened or dismantled, or if a damaged battery pack or a battery pack other than the one delivered is used, electrolyte may leak out. This can cause chemical burns and damage to the appliance and battery pack.
■ Use only the battery pack provided. Replace it only with an equivalent battery pack.
■ Operate the appliance only with the charging station provided.
■ To charge it, use only the mains adapter provided.
■ Never open or dismantle the battery pack.
■ Do not heat, short-circuit or expose the battery to direct sunlight, and do not dispose of it by burning it.
■ Remove any damaged battery packs or ones that have leaked from the appliance immediately. Do not allow electrolyte to come into contact with skin, eyes or mucus membranes.
■ If you come into contact with electrolyte, rinse the affected area immediately with plenty of clean water and contact a doctor if necessary.
■ If the battery pack is faulty, replace it with a new, original battery pack immediately.
■ If you wish to send the battery-operated vacuum cleaner back to us, you must do so with the battery pack inserted.
■ The battery pack must not be packed or sent separately.
■ There is a high risk of fire with old lithium batteries. Before disposing of these batteries, tape off the poles to prevent an external short circuit.
■ Before disposing of the appliance, remove and dispose of batteries and rechargeable batteries which are not permanently built into the appliance.
■ Only dispose of batteries and rechargeable batteries in a discharged state!
■ If possible, use rechargeable batteries instead of disposable batteries.
! NOTICE
Risk of damage!
Improper handling of the appliance can lead to property damage.
■ Do not use sharp objects to unpack the appliance.
■ Never sit or stand on the appliance.
■ Use the appliance only if the motor protection fi lter is in place. The motor protection fi lter must not be damaged.
■ Only the original supplied accessories and the speci-fi ed motor protection fi lter and hygiene fi lter may be used.
■ Never vacuum clay, plaster, cement, masonry dust or drilling dust. Vacuuming these materials blocks the filter.
■ Never vacuum water and other liquids.
■ Never vacuum sharp objects e.g. glass fragments.
■ On freshly shampooed carpets, always wait until the detergent is completely dry before vacuuming.
■ Never place the vacuum cleaner directly next to a heater or oven.
■ Never dry the hygiene fi Iter on a heater or with a hair-dryer or tumble dryer. The hygiene fi Iter will become porous and can be damaged.
■ Never wash the fi lter in a washing machine or dish-washer.
■ The fi Iter must be air-dried only.
■ Do not use any abrasive cleaners (scouring or thinning agents) to clean the appliance and accessories. They could damage the surface of the appliance.
Appliance parts and nozzles
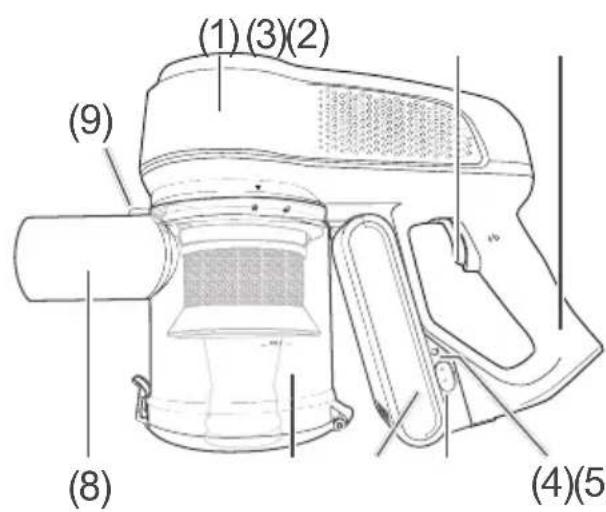
(4)(5)(6)(7)
(1) Motor housing
(2) On/Off switch
(3) Handle
(4) Operating display battery
(5) Charging port
(6) Battery
(7) Dust bin
(8) Suction tube
(9) Release button for dust bin

natural_image
Pure technical line drawing of a cylindrical mechanical component without any text, numbers, or symbols(10)(11)
natural_image
Simple line drawing of a plug connected to a cable, labeled (12), with no text or symbols beyond the label.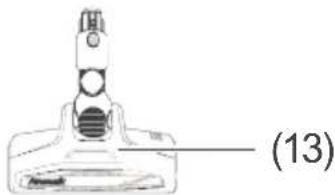
natural_image
Technical line drawing of a soldering iron component (no text or symbols)
natural_image
Technical line drawing of a mechanical bracket component (no text or symbols)(10) Release button for tube
(11) Tube extension
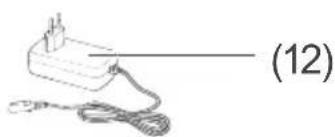
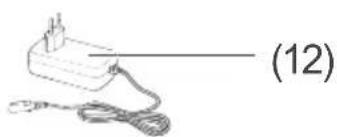
(12) Power adapter with mains cord
(13) Floor nozzle
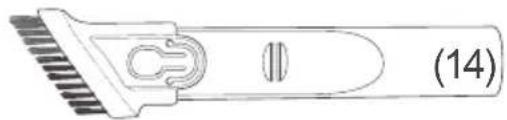
(14) Crevice nozzle
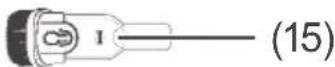
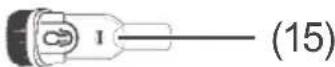
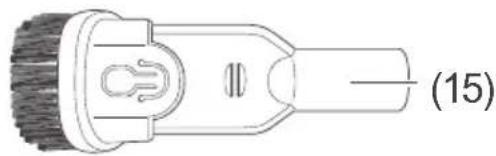
(15) Furniture nozzle
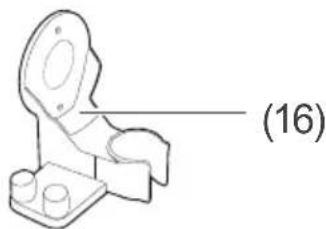
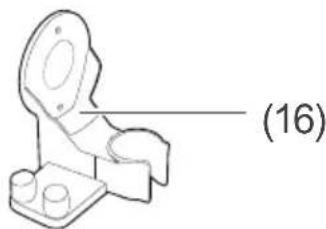
(16) Wall bracket
Nozzles
The vacuum cleaner comes with various nozzles designed for a range of uses. Where required, each nozzle can be attached to the suction tube (8) or the tube extension (11) before or during vacuuming.
Floor nozzle
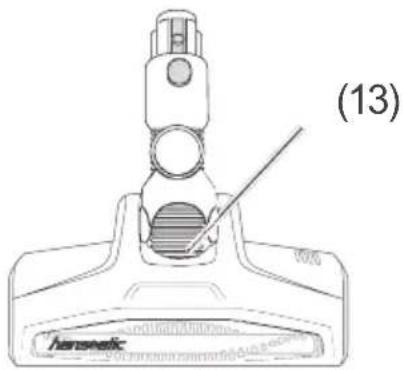
You will work with the floor nozzle (13) most of the time as it is designed for large, flat surfaces.
natural_image
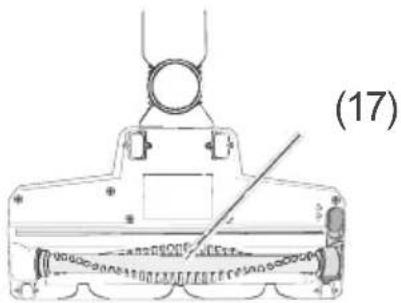
Technical line drawing of a mechanical component with no visible text or symbolsThe rotating brush (17) is propelled by the vacuum air flow. It is particularly suitable for vacuuming hair and thread from rugs and carpeted floors.
Crevice nozzle
natural_image
Technical line drawing of a mechanical tool or component with no visible text or symbolsThe crevice nozzle (14) is suitable for vacuuming material folds, joints, corners and niches that cannot be reached with the floor nozzle.
Furniture nozzle
natural_image
Technical line drawing of a mechanical component with textured ends and a central connector (no text or symbols)The furniture nozzle (15) can be used to remove dust from up-holstered furniture, mattresses, sofas and smaller surfaces.
Start-up
Unpacking the appliance

NOTICE
Risk of damage!
Improper handling of the appliance may result in damage.
■ Do not use sharp objects to unpack the appliance.
- Unpack the appliance.
- Carefully remove all parts of the packaging, plastic profiles, tape and foam padding.
Mounting the wall bracket
You should mount the wall bracket before setting up the appliance.

WARNING
Risk of injury!
Improper installation of the appliance can lead to injury.
■ Before drilling the holes, ensure that no wires or cables (power, gas, water etc.) will be damaged (check with a line locator).

NOTICE
Risk of damage!
Improper handling of the appliance may result in damage.
■ Check the condition of the wall before mounting the wall bracket.
Screws and wall plugs
You will need:
- 2 round-headed screws
- 2 suitable dowels
Tools and aids
You will need:
- screwdriver
- drill with drill bit suited to the nature of the wall
– measuring tape / ruler
-level - pencil

The upper drill hole must be at least 95 cm above the ground.
-
Start by drawing a vertical guide line on the wall using a pencil. It is best to use a spirit level for this.
-
Mark out the drill holes.
The upper drill hole must be at least 95 cm above the ground; the distance between the drill holes should be 10.5 cm. - Drill holes at the marked points, using a diameter that can accommodate the wall plugs.
- Place the wall plugs into the holes.
- Attach the wall bracket to the wall using the two screws.
Charging the battery
For the first time please fully charge the battery. The normal charging time of the battery is 4-5 hours.
To improve the service life of the battery, leave it fully discharged during operation, i.e. use the device until it comes to a standstill.
To prevent deep discharge, charge the battery every 3 months, even if you do not need the device during this time.
-
Insert the plug of the power adapter (12) into the charging port (5) for the charging cable on the battery.
-
Connect the mains plug to a properly installed socket contact.
The battery operating light (4) turns red.
- Once the battery is charged (when the operating light is green), remove the plug of the power adapter (12) from the charging port (5) for the charging cable.
Preparing the appliance
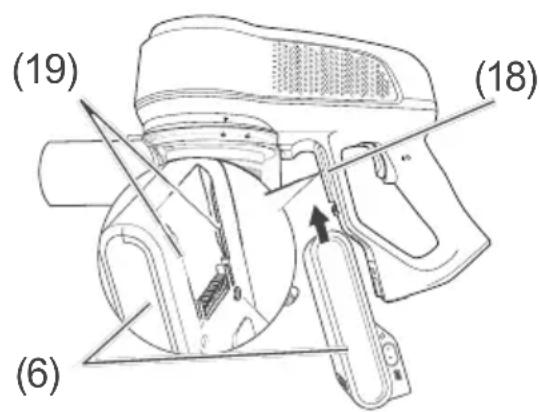
- Insert the battery (6) onto the handle of the appliance.
Make sure that the guide rails (18) on the appliance slide into the guide rails (19) on the battery (6).
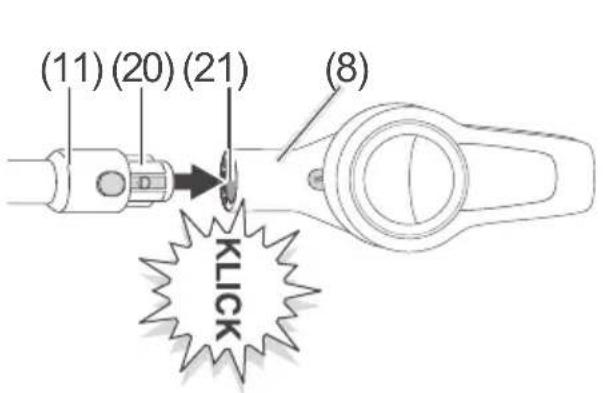
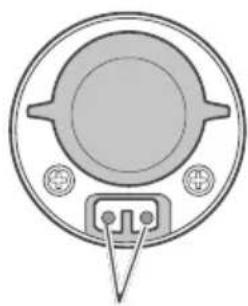
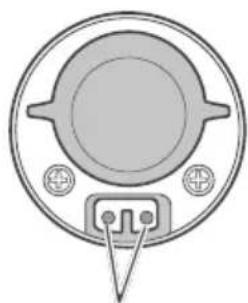
- Insert the connector (20) on the tube extension (11) into the opening (21) on the suction tube (8).
natural_image
Top-down schematic of a circular component with two handles and a triangular connector at the bottom (no text or symbols)(22) (23)
natural_image
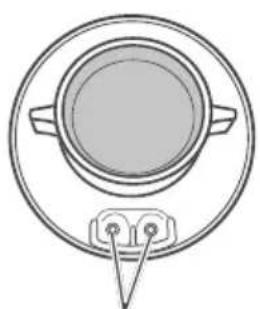
Circular diagram with a central circular component and three small circular elements, no text or symbols present.Make sure that the connector pins (22) slide into the openings (23).
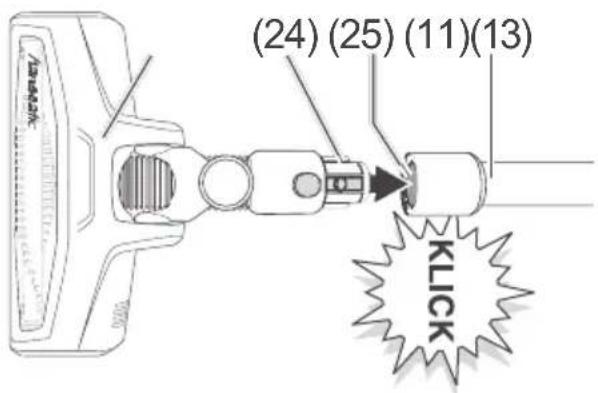
- Select a nozzle, e.g. the floor nozzle (13), and insert the connector (24) of the floor nozzle (13) into the opening (25) on the tube extension (11). Make sure that the connector pins (22) slide into the openings (23).

You can also attach all nozzles to the appliance directly.
All filters have already been inserted at the manufacturing plant. Your vacuum cleaner is now ready to use.
Operation
You can use the appliance if
- you have read the chapter "Safety", in particular the safety instructions (see page EN-4).
– the appliance has been set up as described in the chapter "Start-up" (see page EN-13).
Vacuuming floors

WARNING
Risk of electric shock! Improper use of the appli- ance may lead to serious injury or death.
■ Do not vacuum glowing ash, burning cigarettes or matches, sharp objects, glass fragments, water or other liquids. Glowing ash, burning cigarettes, etc. set the fi Iter on fi re; moisture can cause short circuits; sharp objects damage the fi Iter and can cause short circuits.

CAUTION
Health hazard!
Improper handling of the appliance may result in health hazards.
■ Do not use the appliance if the hygiene or motor protection filter is missing or damaged. Otherwise, vacuumed dust can penetrate the appliance and escape into the ambient air.

NOTICE
Risk of damage!
Vacuuming unsuitable materials blocks the fi Iter and can damage the appliance.
■ Never vacuum clay, plaster, cement, masonry dust or drilling dust.
natural_image
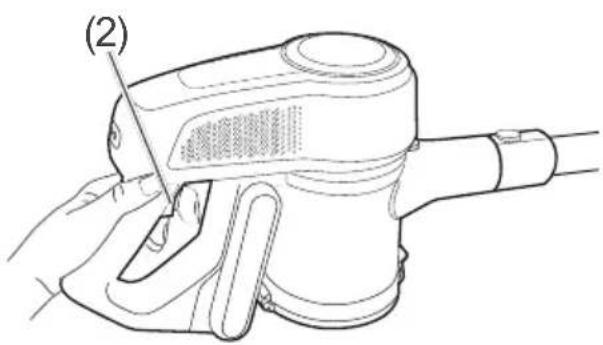
Line drawing of a hand using a handheld device to cut a tool, labeled with number (2) and no text or symbols on the device itself.- Press the On/Off switch (2) to turn the appliance on. The appliance will switch on at suction level I.
- To vacuum, push and pull the nozzle across the surface you are vacuuming. Rotate the tube extension (11) slightly to reach corners more effectively. This positions the nozzle diagonally.
In rare cases this can make a whistling noise initially. This is not a malfunction and stops after a while.
Setting the suction force
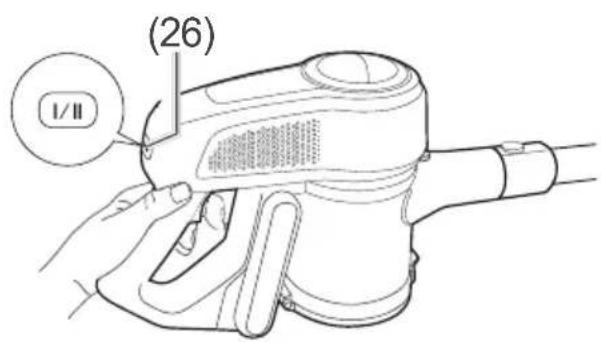
The appliance is equipped with two suction levels. Set the suction level using the suction level switch (26).
- Press the suction level switch (26) - once to switch from suction level I to suction level II; - once more to switch from suction level II back to suction level I.
Using the nozzles
The crevice nozzle and the furniture nozzle can also be used as brush nozzles.
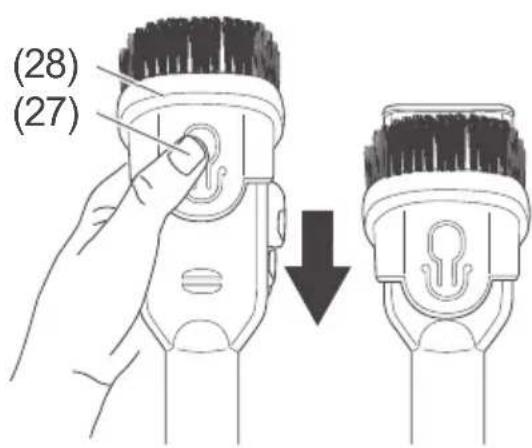
- To use the furniture nozzle (15) or the crevice nozzle (14) as a brush nozzle, press the locking mechanism (28) and slide the attachment (27) upwards.
- To use the furniture nozzle (15) or the crevice nozzle (14) for vacuuming, e.g. for upholstered furniture, press the locking mechanism (28) and slide the attachment (27) downwards.
Finishing vacuuming
natural_image
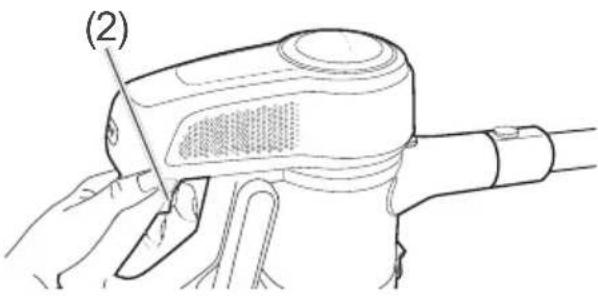
Line drawing of a handheld device with a hand operating it, labeled (2), showing no text or symbols on the device itself.- Press the On/Off switch (2) to turn the appliance off.
Tidying away/storage
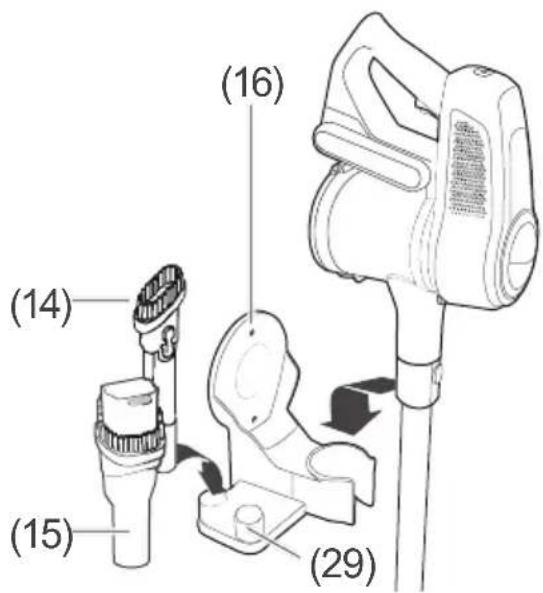
- To tidy away or store the appliance, hang it on the wall bracket (16) as illustrated. Attach the crevice nozzle (14) and the furniture nozzle (15) to the corresponding attachments (29).
Care and maintenance

CAUTION
Health hazard!
Improper handling of the appliance may result in health hazards.
■ Do not empty the dust bin in enclosed spaces. Empty the dust bin on a balcony, or outdoors directly into the waste bin.
Emptying the dust bin
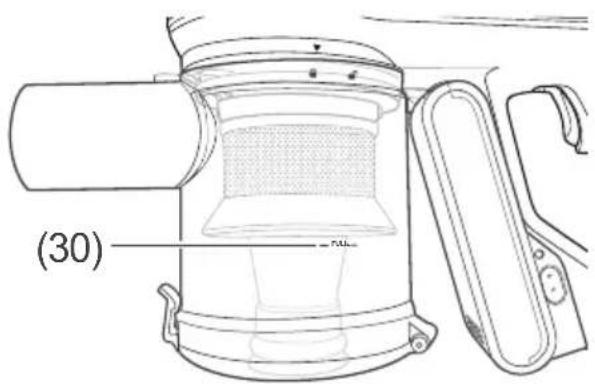
You should empty the dust bin at the latest when the dust in the dust bin reaches the "Full" mark (30).
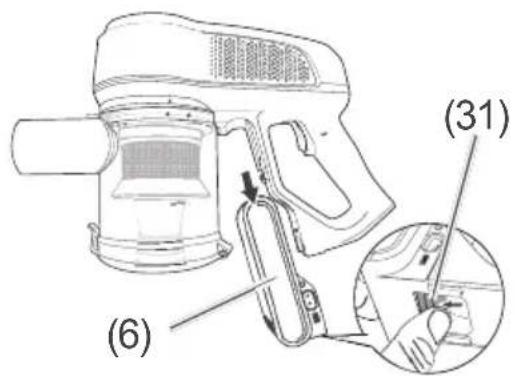
-
First remove the battery (6). To do this, press the locking mechanism (31) on the battery (6).
-
Hold the appliance and dust bin over a waste bin in such a way that the base of the dust bin is pointing towards the waste bin.
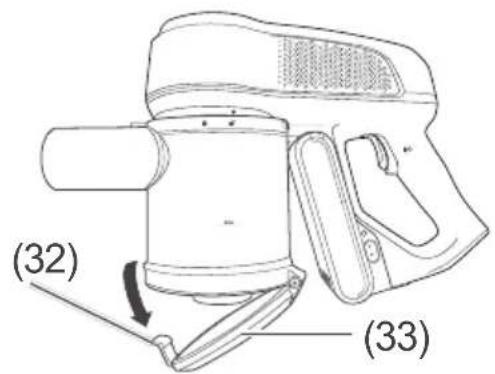
- Press the locking button (32) on the base of the dust bin (33).
The base of the dust bin (33) opens out downwards and the dust falls into the waste bin.
- Once the dust bin is empty, close the base of the dust bin (33).
You will hear the lock snap into place.
Cleaning/changing the dust filter

WARNING
Risk of electric shock! Improper use of the appli- ance may lead to serious injury or death.
■ Always pull the mains plug out of the socket prior to changing or cleaning the motor protection fi Iter.

NOTICE
Risk of damage! Improper handling of the appliance may result in dam- age.
■ Always use the correct filter for the appliance, otherwise the appliance may not function optimally.
■ Never vacuum without fi liters or with damaged fi liters. The vacuumed dust would penetrate the appliance and damage the motor.
■ Do not wash the filter in a washing machine or a dish-washer.
The dust filter should be cleaned regularly. Should the dust filter be damaged or no longer sufficiently cleanable, it must be replaced with a new one.
- First remove the battery (6).
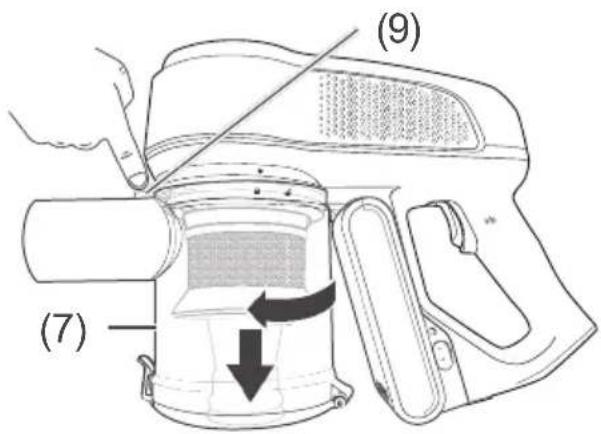
- Press the release button (9) for the dust bin (7).
- Turn the dust bin (7) clockwise until the symbol is underneath the wedge symbol and remove the dust bin (7).
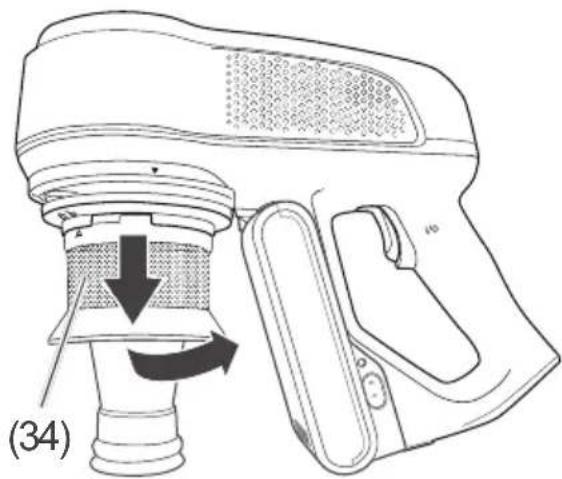
natural_image
Diagram of a hairdryer with labeled parts and directional arrows indicating movement (no text or symbols present)- Turn the dust bin (34) anti-clockwise until the 🔔 symbol is above the wedge symbol ▼ and remove the dust filter (34).
- Wash the dust filter under running water.
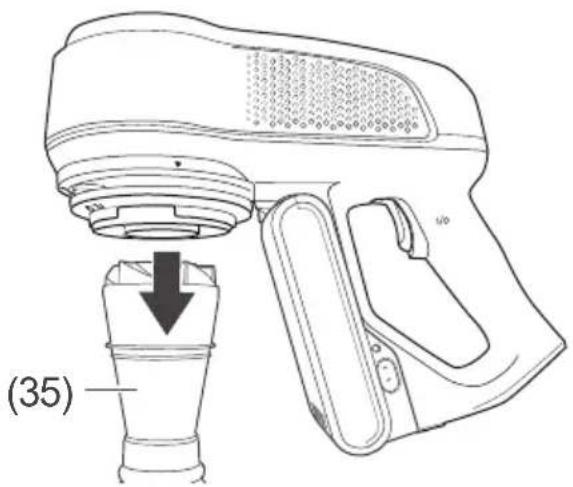
- Remove the suction piece (35) and wash it under running water.
- Allow the dust filter (34) and the suction piece (35) to dry out completely.
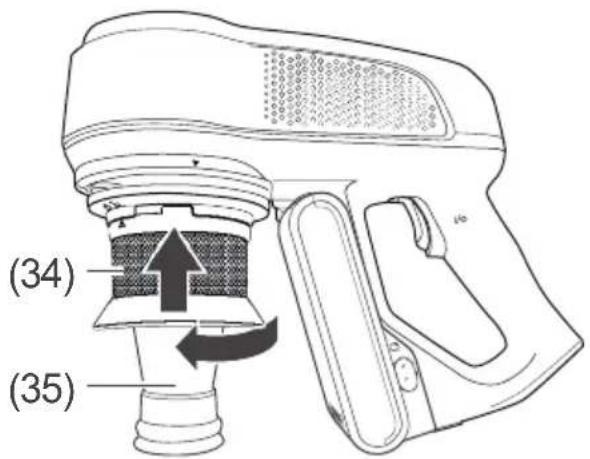
- Reinsert the suction piece (35) and dust filter (34) into the vacuum cleaner and turn the dust filter (34) clockwise until the symbol is above the wedge symbol ▼.
- Reattach the dust bin (7) and turn it anticlockwise until the symbol is underneath the wedge symbol ▼.
Cleaning/replacing the hygiene filter

WARNING
Risk of electric shock! Improper use of the appli- ance may lead to serious injury or death.
■ Before replacing or cleaning the hygiene fi lter, always pull the mains plug out of the socket.

NOTICE
Risk of damage! Improper handling of the appliance may result in dam- age.
■ Only use the appliance with the fi Iters installed.
■ Never dry hygiene fi Iters on a heater or with a hairdryer or tumble dryer, etc. It will become porous and can be damaged.
■ Never wash the hygiene filter in a washing machine.
■ Only let the hygiene fi Iter air-dry.
The hygiene filter should be cleaned regularly.
If odours cannot be removed by cleaning or the filter is too heavily soiled, it must be replaced.
- First remove the battery (6).
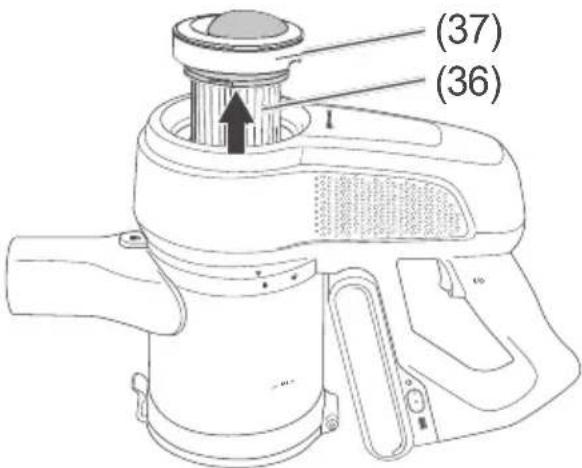
- Lift out the hygiene filter (36) on the filter cover (37).
-
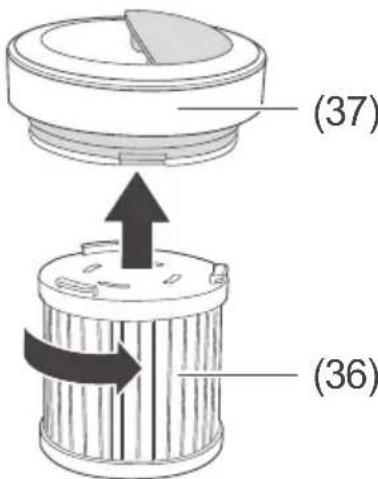
Turn the filter cover (37) anticlockwise and pull it off the hygiene filter (36).
-
Rinse the hygiene filter (36) and the filter cover (37) with clean water only, or shake it and/or clean it with compressed air. Never use detergent or washing-up liquid to clean the hygiene filter (36).
- Allow the hygiene filter (36) and the filter cover (37) to dry completely.
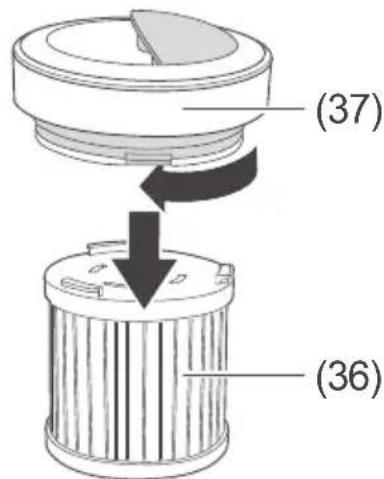
- Reattach the filter cover (37) to the hygiene filter (36) and turn it clockwise to tighten it.
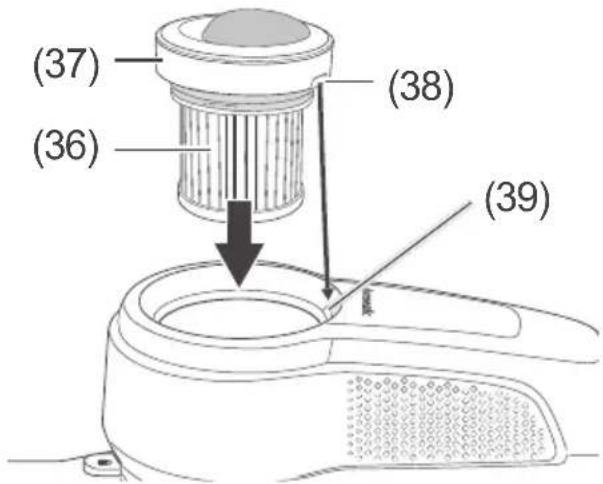
- Reinsert the hygiene filter (36) with the filter cover (37). In doing so, make sure that the recess (37) in the filter cover (38) hooks into the lug (39) on the appliance housing.
The article numbers for re-ordering dust and hygiene fi Iters are listed in chapter „Service“ on page EN-28.
Cleaning the appliance

WARNING
Risk of electric shock! Improper use of the appli- ance may lead to serious injury or death.
■ Always remove the battery before cleaning the appliance.
■ Ensure that no water seeps into the appliance.
■ Never immerse the appliance in water.
■ Reinsert the battery only once all parts of the appliance are completely dry.
! NOTICE
Risk of damage! Improper cleaning of the appliance can impair the surface.
■ Do not use any abrasive cleaners (scouring or thinning agents) to clean the appliance.
- Wipe
- the housing,
- the accessories
with a damp cloth as required.
Never allow liquid to penetrate
the vacuum cleaner.
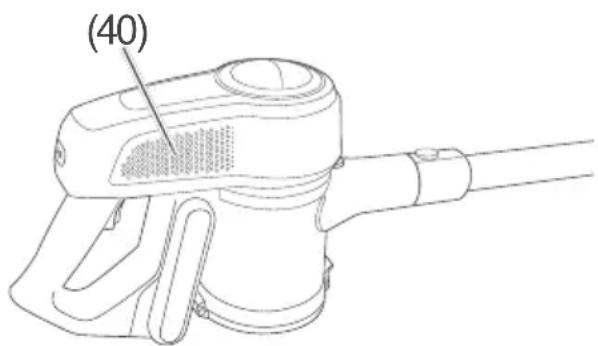
- Occasionally clean the air vent (40) on the right-hand side of the appliance with a soft brush.
Cleaning the floor nozzle
CAUTION
Risk of injury!
Improper handling of the appliance may result in injury.
■ Never touch moving parts of the appliance and accessories, e.g. the floor brush. There is a risk of fingers becoming trapped.
■ Always remove the floor brush from the telescopic tube or suction hose before cleaning.
- Occasionally vacuum the underside of the floor nozzle (13) with the crevice nozzle (14).
If the floor brush is no longer working properly:
- Remove the floor nozzle (13) from the tube extension (11) or from the suction tube (8).
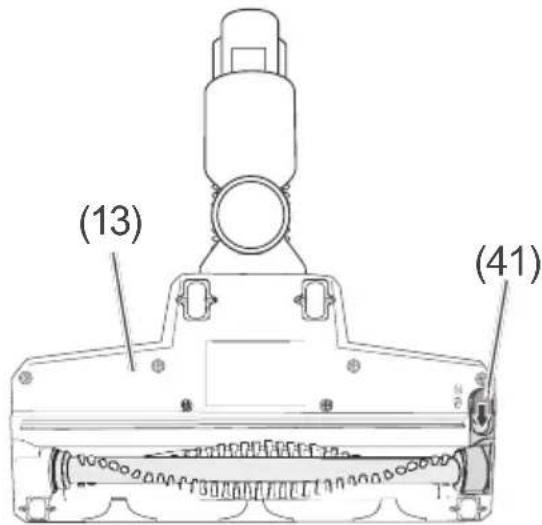
- Move the slider (41) on the underside of the floor nozzle (13) to the "Open" position (towards the 🔒 symbol).
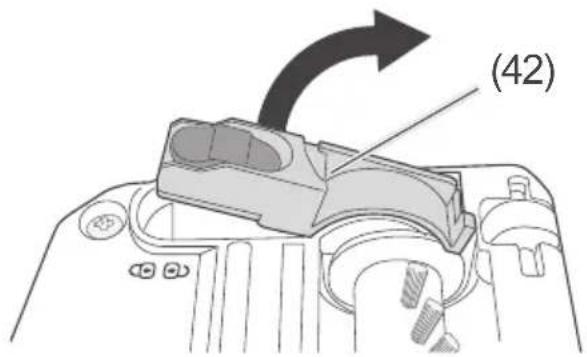
- Remove the locking latch (42).
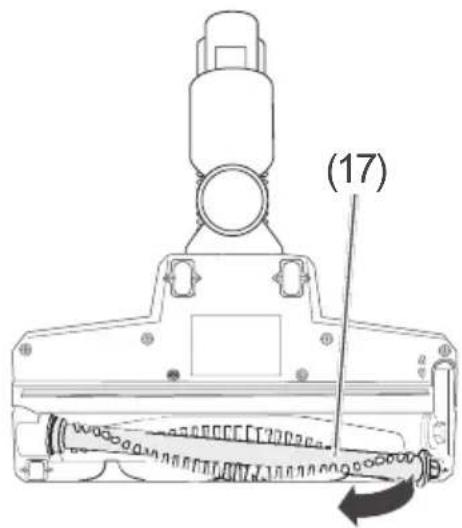
- Remove the brush (17).
- Remove any lint and hairs from the brush (17).
- Reinsert the brush (17) and the locking latch (42) and move the slider (41) to the "Closed" position (towards the symbol).
Troubleshooting table
Malfunctions can occur in all electrical appliances. This does not necessarily mean there is a defect in the appliance. For this reason, check the tables to see if you can correct the malfunction.

WARNING
Risk of electric shock in case of improper repair! Never try to repair a defective or suspected defective appliance yourself. You can put your own and future users' lives in danger. Only authorised specialists are allowed to carry out this repair work.
| Problem Possible cause Solutions, tips | |
| Appliance is not working. | Appliance is not switched on. |
| Appliance switches itself off. | Brush/nozzle blocked. |
| Dust filter is blocked. Over-heat protection has been activated. | |
| Tube extension is plugged. |
| Problem Possible cause Solutions, tips | ||
| Suction force is weak. | Nozzle is not positioned correctly. | Position the nozzle correctly. |
| Object is plugging the nozzle. | Switch the appliance off and check the tube extension for obstructions. Remove object. | |
| Filters are inserted incorrectly or are contaminated. | Insert filters correctly and/or clean. | |
| Dust is escaping from the appliance. | Filters are inserted incorrectly or are contaminated. | Insert filters correctly and/or clean. |

In rare cases this can make a whistling noise initially. This is not a malfunction and stops after a while.
Service
In order for us to help you quickly, please tell us:
| Name of appliance/accessories Order number | |
| Hanseatic Vacuum cleaner VC-PD510-1 2008 2614 | |
| 1× hygiene filter 2593 2449 | |
| 1× Batterie 5275 1953 | |
Advice, order and complaint
Please contact your mail order company's customer service centre if
– the delivery is incomplete,
– the appliance is damaged during transport,
– you have questions about your appliance,
- a malfunction cannot be rectified using the troubleshooting table,
– you would like to order further accessories.
Spare parts
Customers in Germany
– Please contact Hermes Fulfilment GmbH
Tel. +49 (0)57 32 99 66 00
Monday – Thursday, 8 am – 3 pm, Friday 8 am – 2 pm
Customers in Austria
- Please contact your mail order company's customer service centre or product advice centre.
Please note:
You are responsible for the condition of the appliance and its proper use in the household. Damage resulting from non-compliance with this manual unfortunately cannot be recognised.
Environmental protection
Disposing of old electrical devices in an environmentally-friendly manner
Electrical appliances contain harmful substances as well as valuable resources.
Every consumer is therefore required by law to dispose of old electrical appliances at an authorised collection or return point. They will thus be made available for environmentally-sound, resource-saving recycling.
You can dispose of old electrical appliances free of charge at your local recycling centre.
Contact your dealer directly for more information about this topic.
Batteries and rechargeable batteries
The symbol shown here means that batteries and rechargeable batteries must not be disposed of with other household waste.
Consumers are required by law to bring all batteries and rechargeable batteries, regardless of whether they contain harmful substances*) or not, to a collection point operated by their communal authority or borough or to a retailer, so that they can be disposed of in an environmentally friendly manner and so that valuable resources (e.g. cobalt, nickel or copper) can be recovered.
Batteries and rechargeable batteries can be returned free of charge.
Some of the possible contents (e.g. mercury, cadmium and lead) are toxic and, if improperly disposed of, can have adverse effects on the environment. Heavy metals, for instance, can have detrimental health effects on humans, animals and plants and accumulate in the environment and food chain, and then enter the body indirectly through the consumption of food.
There is a high risk of fire with old lithium batteries. Special care must therefore be taken to properly dispose of old lithium batteries and rechargeable batteries. Improper disposal can also lead to internal and external short circuits due to thermal effects (heat) or mechanical damage. A short circuit can lead to a fire or an explosion and have serious consequences for people and the environment. It is therefore important to tape off the poles of lithium batteries and rechargeable batteries before disposing of them to prevent an external short circuit.
Before disposing of the appli- ance, batteries and rechargeable batteries which are not perma- nently built into the appliance must be removed and disposed of separately.
Please only dispose of batteries and rechargeable batteries in a discharged state!
If possible, use rechargeable batteries in place of disposable batteries.
*) labelled with:
Cd = Cadmium
Hg = Mercury
Pb = Lead
Packaging

Our packaging is made from environmentally friendly, recyclable materials:
– Outer packaging made of cardboard
- Moulded parts made of foamed, CFC-free polystyrene (PS)
– Films and bags made of poly-ethylene (PE)
– Tension bands made of polypropylene (PP).
If you have sufficient space, we recommend keeping the packaging, at least during the warranty period. If the appliance has to be sent in for repair or brought to one of the repair service points, the appliance will only be adequately protected in the original packaging.
Dispose of the packaging responsibly.
Technical specifications
| Manufacturer | hanseatic |
| Name of appliance Vacuum cleaner | |
| Model VC-PD510-1 | |
| Rated power 120 W | |
| Mains connection 100-240 V~ / 50/60 Hz | |
| Operating voltage 21.6 V | |
| Battery type LI-Ion T-DC38L | |
| Charger ZD12D250060EU | |
| Protection class II | |
| Weight (assembled), ca. 2.47 kg | |
| Order number 2008 2614 |
Note: The vacuum cleaner was tested as a universal vacuum cleaner.
- Gebrauchsanleitung
- Lieferumfang
- Table of contents
- Delivery
- Package contents
- Check the delivery
- ! WARNING!
- Safety
- Intended use
- Explanation of terms
- WARNING
- CAUTION
- NOTICE
- Safety notices
- Risks to children
- Risks for certain groups of people
- Risks when handling the battery pack
- ! NOTICE
- Appliance parts and nozzles
- Nozzles
- Start-up
- Unpacking the appliance
- Mounting the wall bracket
- Screws and wall plugs
- Tools and aids
- Charging the battery
- Preparing the appliance
- Operation
- Vacuuming floors
- Setting the suction force
- Using the nozzles
- Finishing vacuuming
- Tidying away/storage
- Care and maintenance
- Cleaning/changing the dust filter
- Cleaning/replacing the hygiene filter
- Cleaning the appliance
- Cleaning the floor nozzle
- Troubleshooting table
- Service
- Advice, order and complaint
- Spare parts
- Customers in Austria
- Please note:
- Environmental protection
- Disposing of old electrical devices in an environmentally-friendly manner
- Batteries and rechargeable batteries
- Packaging
- Technical specifications
Brand : Hanseatic
Model : VC-PD510-1
Category : Vacuum Cleaner