
EWF 1053 MD - Washing machine ECG - Free user manual and instructions
Find the device manual for free EWF 1053 MD ECG in PDF.


| Product Type | Washing Machine |
| Brand | ECG |
| Model | EWF 1053 MD |
| Capacity (kg) | 10 |
| Maximum Spin Speed (rpm) | 1000 |
| Energy Efficiency Class | A+++ |
| Noise Level Wash (dB) | 55 |
| Noise Level Spin (dB) | 75 |
| Dimensions (H x W x D) mm | 850 x 600 x 600 |
| Weight (kg) | 75 |
| Power Supply | 220-240 V, 50 Hz, 10 A |
| Water Consumption per Cycle (L) | 50 |
| Annual Energy Consumption (kWh) | 200 |
| Number of Programs | 15 |
| Delay Start Timer (hours) | Up to 24 |
| Child Lock | Yes |
| Water Protection System | Partial (AquaStop) |
| Drum Material | Stainless Steel |
| Display Type | LED |
| Door Opening Angle | 180° |
| Filter Access | Front bottom |
| Drum Clean Program | Yes |
| Spare Parts Availability | Motor, pump, drum, belts, filters |
| Repairability Index | 7.5 / 10 |
Frequently Asked Questions - EWF 1053 MD ECG
User questions about EWF 1053 MD ECG
0 question about this device. Answer the ones you know or ask your own.
Ask a new question about this device
Download the instructions for your Washing machine in PDF format for free! Find your manual EWF 1053 MD - ECG and take your electronic device back in hand. On this page are published all the documents necessary for the use of your device. EWF 1053 MD by ECG.
USER MANUAL EWF 1053 MD ECG
Read carefully and save for future use!
Warning: The safety precautions and instructions in this manual do not cover all possible conditions and situations that may occur. The user must understand that common sense, caution and care are factors that cannot be incorporated into any of the products. These factors must therefore be provided by the user(s) using and operating this appliance. We are not liable for damages caused during shipping, by incorrect use, voltage fluctuation or the modification or adjustment of any part of the appliance.
Follow the instructions in this manual. Before using for the first time, read the entire written instructions carefully and keep them for future reference.
To protect against the risk of fire or electric shock, basic precautions must be taken while using electrical appliances, including the following:
- Make sure that the voltage in your outlet corresponds to the voltage indicated on the type plate of your appliance. To ensure your safety, insert the plug of the power cord into a properly grounded three-prong socket installed in accordance with the applicable Technical Standard in accordance with the manufacturer's instructions and local safety regulations.
- Do not operate the device if the cord is damaged. Entrust the connection of the appliance to the power supply and the water connection, any repairs or adjustments, including the replacement of the power cable, to an authorized service center! Do not remove the protective covers from the appliance; there is a risk of electric shock!
- Do not plug and unplug the power cord from the outlet using wet hands. You will avoid risk of electric shock.
- Do not touch the appliance with wet hands or feet.
- The power cord must remain accessible once the device is installed. Do not shorten the cable or use a power strip or extension cord.
Do not allow the cord to touch hot surfaces or place the cord over sharp edges.
- Do not turn the device on or off by plugging or unplugging the power cord. Do not remove the power cord from the outlet by yanking the cord. Unplug the power cord from the outlet by grasping the plug. After use, always switch off with the rotary selector to the OFF position, disconnect the appliance from the power supply and close the water supply.
- Do not place the machine on carpets or similar surface that could block the ventilation openings in the base.
- Do not insert any objects into the device or place any objects on the device (e.g. vases, cups, etc.).
- Do not place the drain hose of your machine in the sink, buckets or basins.
- Do not allow children to play with the appliance. Protect access to the machine from children and animals. Children under the age of 3 should be denied access unless they are under constant supervision.
- Keep away from children the small parts supplied in the bag with documentation.
- Do not expose the appliance to direct sunlight, do not use it outside, and do not expose it to rain.
- Do not keep flammable liquids close to the appliance.
- Do not wash items that have been cleaned, washed, soaked or stained with flammable or explosive substances (wax, oil, paint, petrol, degreasers, chemical solvents, kerosene, etc.) in the washing machine. The use of highly flammable and explosive or toxic solvents is prohibited. Do not use gasoline, alcohol, etc. as detergent. There might be a fire or explosion. Carpet washing is prohibited.
-
Do not touch the washing machine with wet hands when in operation. Never open the detergent drawer or the washing machine door during washing and spinning.
-
During discharge, do not touch the drain hose and the discharged water. Water may reach high temperatures during the operation of the washing machine.
- In case of malfunction first unplug it from power and then close the water tap. Do not try to repair the appliance by yourself, contact an authorized service center.
- Before using it for the first time, do not forget to REMOVE THE LOCKING SCREWS which are securing the washing machine drum during transportation. Damage cause by starting the washing machine with installed locking screws is not covered by the warranty.
- The appliance is intended exclusively for domestic use and for washing only textile materials. In the event of commercial use or use not in accordance with this manual, the warranty becomes void.
- This washing machine is intended for indoor use only.
- Do not install the appliance in wet or damp rooms, as well as in rooms where appear explosive or corrosive gases.
- This appliance is intended for use by children 8 years of age and older and persons with reduced physical or mental abilities or lack of experience and knowledge, provided they are under supervision or given instructions concerning use of the appliance in a safe manner and understand the potential hazards. Cleaning and maintenance by the user must not be done by children unless they are older than 8 years old and under supervision. Children under the age of 8 must keep away from the appliance and the power supply.
- Any intervention in the appliance by a person other than an authorized service provider results in loss of warranty.
- The warranty does not cover damage caused by outside effects (flood, chemicals, fire, etc.).
- The manufacturer is not liable for any damage caused by improper grounding/use. DANGEROUS VOLTAGE, RISK OF INJURY!
RECOMMENDATION
- Before using your new washing machine, ask for help with the installation and putting in operation a qualified plumber or an authorized service center.
- Install the washing machine in a well ventilated area with adequate air circulation. Place the appliance so that it can fully open the washing machine door. The washing machine is not intended as a built-in or for integration into furniture sets.
- The ideal ambient temperature for the washing machine operation is 15^ to 25^ .
- Frozen hoses can rot and break. In areas where the temperature drops below freezing, the temperature may jeopardize the safe operation of electronic circuits.
- We recommend that the first washing cycle be undergone without laundry for „90° white cotton“ so that you pour in the second compartment of the detergent drawer ½ measuring cup of detergent.
- Since long term contact with air can lead to deposition of detergent or fabric softener, pour the detergent and fabric softener into the compartment until just before the intended wash.
- We recommend using the prewash program only for heavily soiled laundry.
- The amount of laundry loaded into the washing machine must not exceed the maximum permitted amount. Otherwise, the washing machine will run in the safe mode.
- Use the washing machine only for laundry that is labelled by the manufacturer as suitable for machine washing.
- When using fabric softener and similar products in your machine, follow the manufacturer's recommendations for detergent/fabric softener.
• Make sure that there are no foreign objects in the pockets of the laundry pieces put in the washing machine (nails, needles, coins, lighters, matches, clips, etc). These foreign objects could damage the washing machine. - Washing very dusty clothing damages your washing machine. Shake heavily dusty clothing before placing it in the washing machine.
- Never open the detergent drawer while the machine is running.
- Never force open the door of the washing machine while it is running.
- Before opening the door, make sure that no water remains in the drum. Do not open the washing machine door if you see water.
- At the end of the program, wait at least 2 minutes and then open the door.
- Sulphur in decolourants may cause corrosion. Therefore never use decolourants in the washing machine. Never use substances containing solvents (e.g. benzine) in the washing machine.
- If you are not using the washing machine for longer time, unplug it, close the water supply and leave the door open. The interior of your machine will stay dry and free of odours.
- After testing at the end of the manufacturing process in the machine might remain a small amount of water, which does not constitute a risk of damage to your machine.
Danger of flooding
- Use a new set of hoses included with the appliance.
- Do not reuse the old hoses set.
• Always disconnect the appliance from the power supply and turn off the water supply after use. - Do not place the drain hose of your machine in the sink, buckets or basins.
Danger of fall or injury
- Do not step or sit on the washing machine. The top plate could break and you could injure yourself.
- Do not lean on the door. Do not force it closed. If it is difficult to close the door, make sure that there are not too many clothes in the washing machine or that they are well distributed.
- Arrange safely the hoses and power cable after installation. Trip and fall could cause injuries.
- Do not turn the washing machine upside down or on its side.
- Do not lift the washing machine by its protruding parts (detergent drawer, door). They could be damaged and cause injury.
- Handling the washing machine requires cooperation of at least two people.
Children's safety
• Children under the age of 3 should be denied access unless they are under constant supervision. Do not leave children without supervision close to the washing machine. Children could lock themselves inside the washing machine with fatal consequences.
- During the operation the glass door and the washing machine surfaces can be very hot. Protect small children and animals from contact with these surfaces.
- Keep the packaging materials away from the children. There is a risk of suffocation
- Swallowing detergents may cause poisoning and contact with skin or eyes may cause irritation. Keep detergents away from the children.
DESCRIPTION
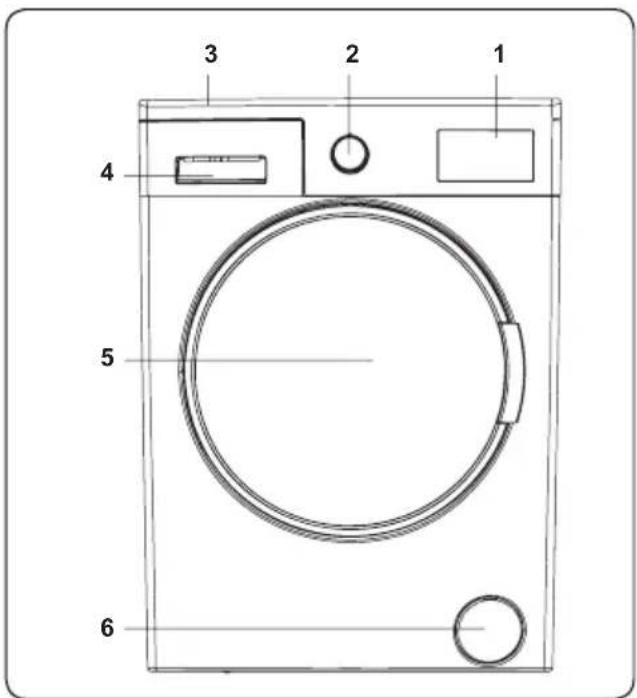
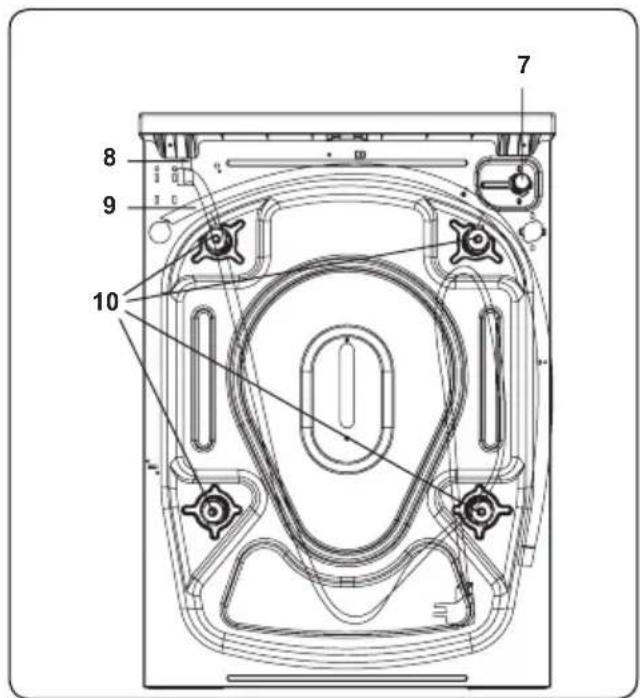
- Electronic display
- Program selector
- Top cover
- Detergent drawer
- Drum
- Pump filter cover
- Filling valve
- Power cord
- Drain hose
- Shipping screws
INSTALLATION
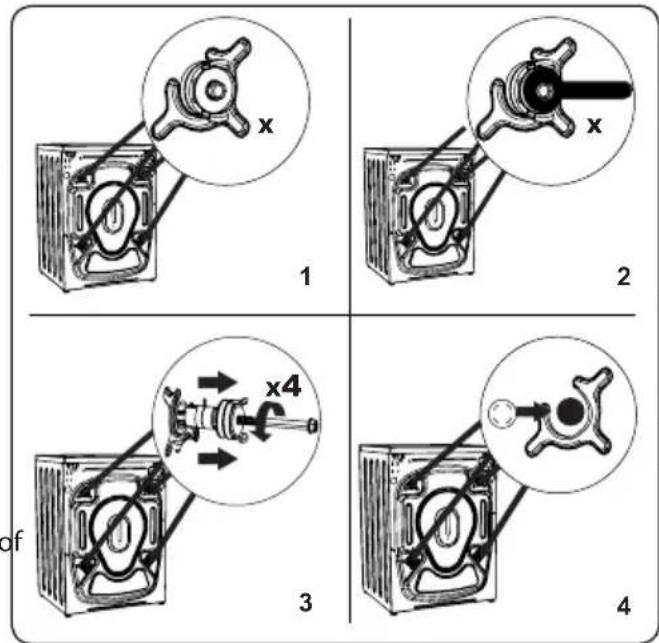
Shipping screws removal
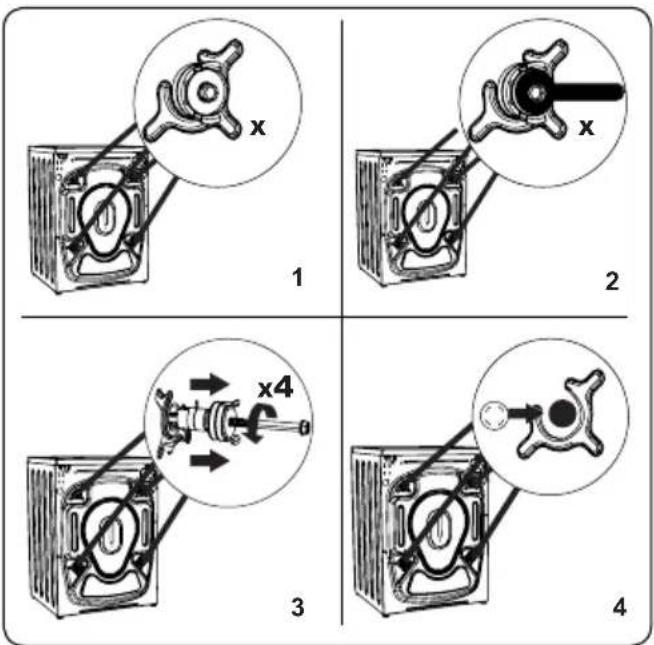
- Before starting the washing machine, remove the 4 shipping screws and rubber washers from the back of the washing machine. If the screws are not removed, they can cause strong vibrations, noise and malfunction of the washing machine and will void the warranty.
- Loosen the shipping screws by turning them counterclockwise with a suitable wrench.
- Remove the shipping screws by pulling them straight out.
- Insert the plastic plugs provided in the accessories bag into the holes left after removing the screws. Shipping screws should be stored for future use.
Note: Remove shipping screws before first use the washing machine. Malfunctions caused by operating the washing machine with the installed shipping screws are not covered by the warranty.
Adjusting the leveling feet / adjusting the adjustable stops
- Do not install the washing machine on a surface (e.g. carpet) that would prevent ventilation from below.
- To ensure quiet, vibration -free operation, install it on a solid surface.
- You can level the washing machine with the adjustable feet.
- Loosen the plastic lock nut.
- If you want to increase the height of the washing machine, turn the feet clockwise. If you want to lower the height of the washing machine, turn the
- Once the washing machine is levelled off, tighten the lock nuts by turning them clockwise.
- Never put underneath the washing machine cardboard, wood or any other similar materials.
- When sweeping and washing the floor on which the washing machine is placed, take care not to disturb the horizontal position of the washing machine.
Power connection
• The washing machine requires power supply of 220-240 V, 50 Hz.
- The power cable of your washing machine is equipped with a grounded plug. This plug should always be inserted into a 10 A grounded outlet.
- If you do not have a suitable outlet and a grounded fuse, consult a qualified electrician.
• We are not liable for damages resulting from connecting the appliance to an ungrounded outlet.
Note: Operating the washing machine at low voltage shortens the service life and reduces its efficiency.
Water supply hose
-
Depending on the specifications of the washing machine, your washing machine may be connected to a cold water supply or to a cold and hot water supply. A hose with a white cap should be connected to the cold water supply and a hose with a red cap to the hot water supply (if available).
-
To prevent water leakage into the joints, 1 or 2 nuts are supplied in the hose package (depending on the model of your washing machine). Attach these nuts to the end of the supply hose that connects to the water supply.
- Connect the new supply hoses to the 34 " threaded water tap.
- Connect the white end of the supply hose to the white supply valve on the back of the washing machine and the red end of the hose to the red supply valve (if used).
- Tighten the joints manually. If in doubt, contact a qualified plumber.
• Water flow with a pressure of 0.1 - 1, MPA will allow your washing machine to work with optimal efficiency (pressure 0.1, MPA means that more than 8 liters of water per minute flow through a fully open tap). - Once all connections have been made, turn on the water supply and check for leaks carefully.
- Make sure that new water supply hoses are not pinched, kinked, twisted, bent or crushed.
- If your washing machine is connected to a hot water supply, the hot water supply temperature should not be higher than 70°C.
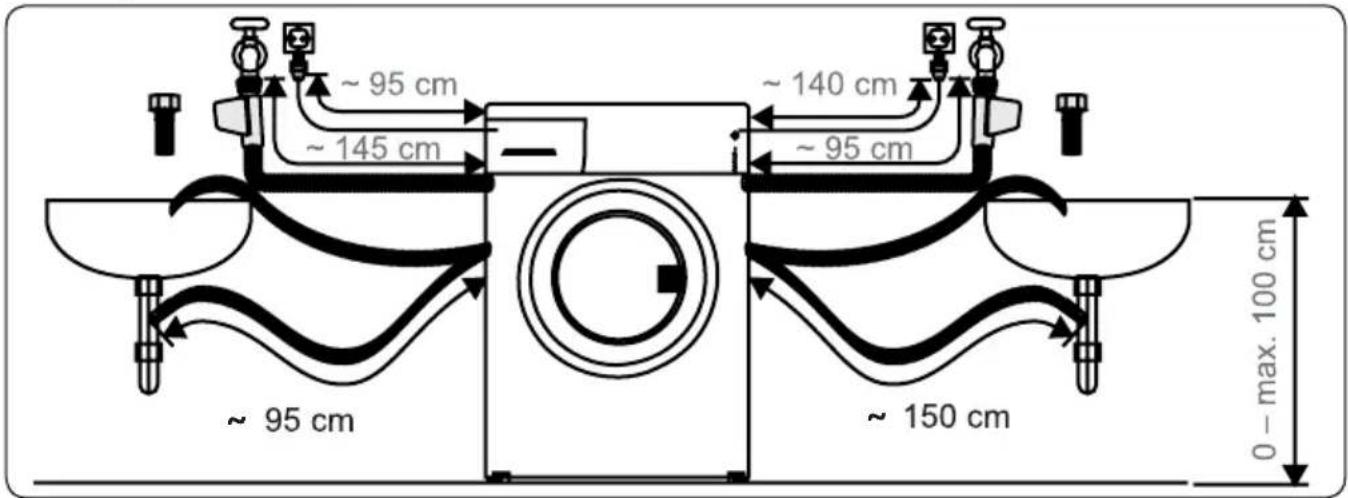
Note: The washing machine must be connected to the water supply only using the new supplied supply hose. Old hoses must not be reused.
Connecting water drain hose
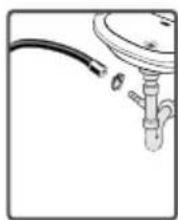
- Connect the drain hose to the stand or to the outlet elbow at the sink using additional equipment.
- Never try to extend the drain hose.
- Do not put the hose for draining water from the washing machine into a container, bucket or bathtub.
• Make sure that the drain hose is not bent, kinked, squashed or extended. - The drain hose must not be more than 100 cm from the ground.
natural_image
Simple line drawing of a mechanical component with a curved pipe and base (no text or symbols)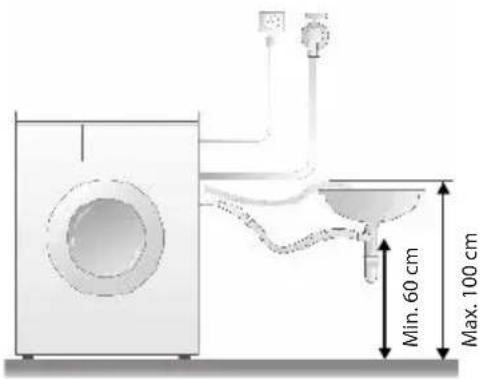
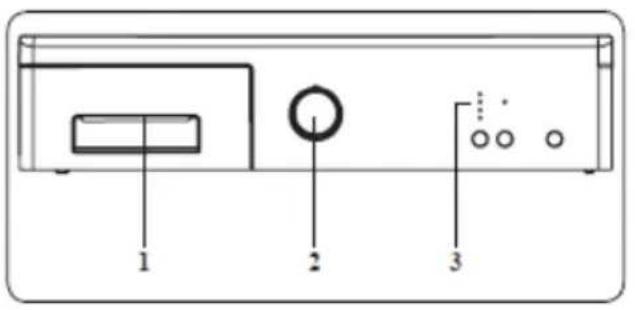
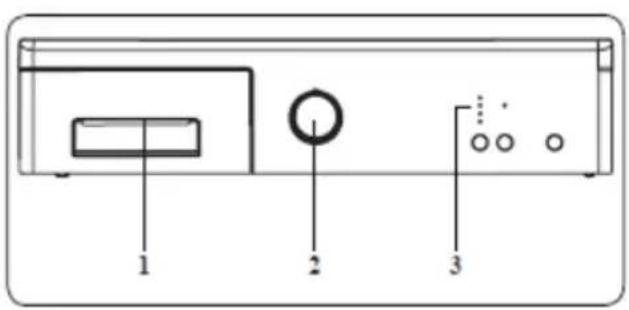
CONTROL PANEL OVERVIEW
- Detergent drawer
- Program selector
- Electronic display and additional functions
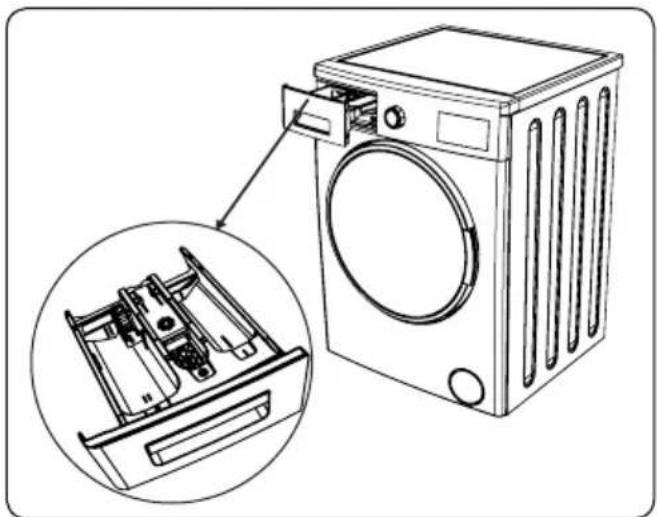
Detergent drawer
- The liquid detergent partition ensures its even dispensing during washing.
- Detergent dispenser
- Fabric softener dispenser
- Detergent dispenser for prewash
Sections
Detergent dispenser:
This section is for liquid or powder detergents or limescale removers.
Softener, starch, detergent:
This section is for emollients, fabric softeners or starch. Follow the instructions on the package. If fabric softeners leave marks on the laundry after use, try diluting them or using a liquid fabric softener.
Detergent dispenser for prewash:
You should only use this dispenser if you have selected the prewash function. We recommend using the prewash function only for very dirty laundry.
natural_image
Line drawing of a washing machine with an inset showing internal components (no text or symbols)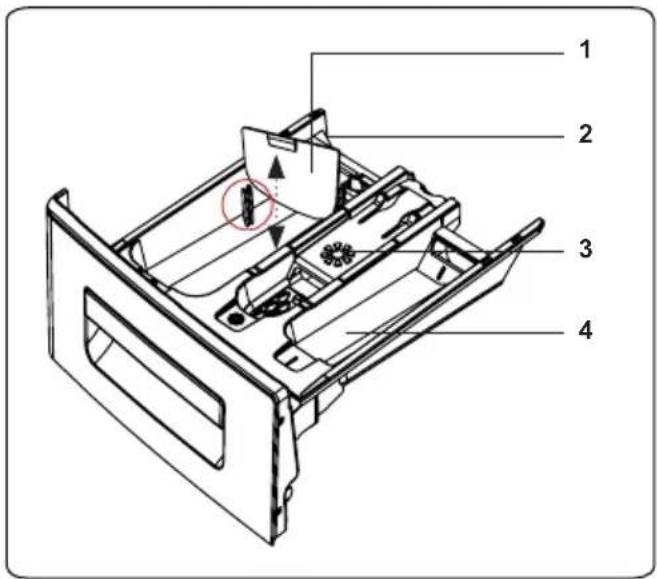
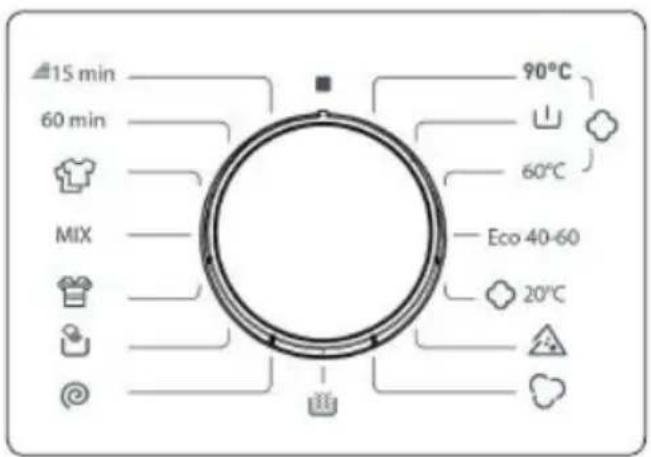
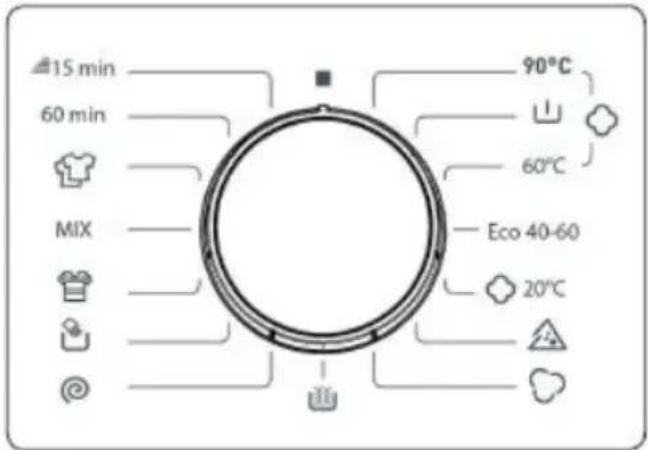
Program selector
• To select the desired program, turn the program selector clockwise or counterclockwise until the mark on the program selector points to the selected program.
• Make sure the program selector points exactly to the program you want to select.
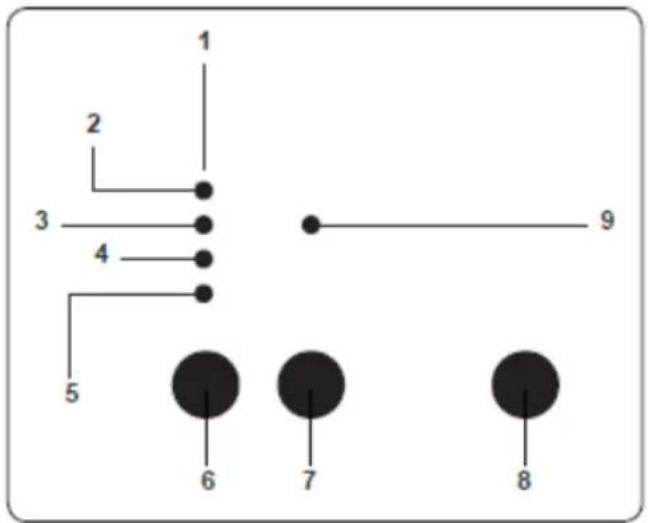
Electronic display
- Panel with display
- Operation indicator (washing)
- Rinse indicator
- Spin indicator
- Program completion indicator
- Delayed start additional function button
- Quick wash additional function button
- START/PAUZA button
- Additional function indicator – quick wash
The display shows the delayed start timer (if set), the temperature, all the additional functions you have selected and the current phase of the running program (prewash / wash - rinse - spin).
flowchart
graph TD
    1 --> 2
    2 --> 3
    3 --> 4
    4 --> 5
    5 --> 6
    6 --> 7
    7 --> 8
    9 --> 1
When the selected program is completed, END appears on the display. Display also shows whether the washing machine has malfunctioned.
USING THE WASHING MACHINE
Laundry preparation
- Follow the instructions of the labels on the garment.
- Divide the laundry according to type (cotton, synthetics, delicate, wool, etc.), washing temperature (cold, 30°, 40°, 60°, 90°) and degree of soiling (slightly soiled, soiled, heavily soiled).
- Never wash coloured and white laundry together.
- Dark fabrics may contain excess dye and should be washed separately several times.
- Make sure there are no metal objects on the laundry or in the pockets; if so, remove them.
ATTENTION: The warranty does not cover malfunctions that occur due to damage by foreign material.
- Close zippers, all hooks and eyelets.
- Remove the metal or plastic hooks of the curtains or put them in a washing net or bag.
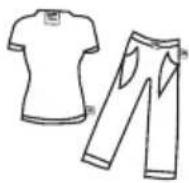
- Turn fabrics such as pants, knits, T-shirts and sweatshirts inside out.
- Wash socks, handkerchiefs and other small items in a protective net.
 | 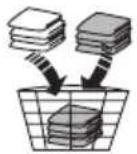 |
| 2 | |
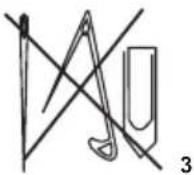 | 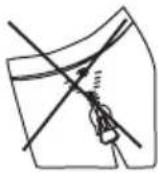 |
| 4 | |
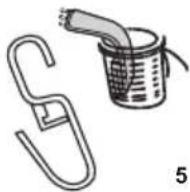 |  |
| 6 | |
 | |
| 7 |
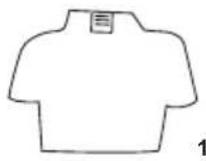
Clothing care symbols
  Normal wash Maximum washing temperature is 90 °C Normal wash Maximum washing temperature is 90 °C | 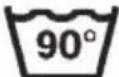  | 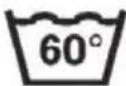  Maximum washing temperature is 60 °C Maximum washing temperature is 60 °C |
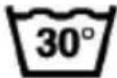  Maximum washing temperature is 30 °C Maximum washing temperature is 30 °C |  Manual washing Manual washing |  Washing prohibition Washing prohibition |
 Can be bleached Can be bleached |  No bleach No bleach |  Maximum ironing temperature 110 °C Maximum ironing temperature 110 °C |
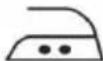 Maximum ironing temperature 150 °C Maximum ironing temperature 150 °C |  Maximum ironing temperature 200 °C Do not iron Maximum ironing temperature 200 °C Do not iron | 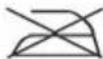 |
 Can be dry cleaned Can be dry cleaned |  Dry cleaning prohibition Dry cleaning prohibition |  Unfold flat Unfold flat |
 Hang when wet Hang when wet |  Hang to dry Do not tumble dry Hang to dry Do not tumble dry |  |
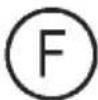 Can be cleaned with gasoline, alcohol, and trifluoro-trichloroethane Can be cleaned with gasoline, alcohol, and trifluoro-trichloroethane |  Can be cleaned with benzene, perchlorethylene Can be cleaned with benzene, perchlorethylene |  Can be cleaned with perchlorethylene, R11, R113 and gasoline Can be cleaned with perchlorethylene, R11, R113 and gasoline |
Putting laundry in the washing machine
- Open the washing machine door.
- Spread the laundry evenly in the washing machine.
NOTE: Be careful not to exceed the maximum load of the drum, as this would lead to poor washing results and wrinkling of the laundry. Information on the capacity of the washing machine can be found in the table of washing programs.
The following table shows the approximate weight of common types of laundry:
| TYPE OF LAUNDRY WEIGHT (g) | |
| Towel 200 | |
| Bed linen 500 | |
| Bathrobe 1,200 | |
| Blanket 700 | |
| Pillow case 200 | |
| Underwear 100 |
Tablecloth 250
- Load each piece of laundry separately.
- Make sure that no objects are caught between the rubber seal and the door.
- Gently push on the door until it clicks.
- Make sure that the door is completely closed, otherwise the program will not start.
Adding detergent to the washing machine
The amount of detergent used in the washing machine depends on the following criteria:
- If the laundry is only slightly soiled, do not prewash it. Put a small amount of detergent (according to the manufacturer's instructions) in compartment II of the detergent drawer.
- If the laundry is soiled too much, select the prewash program and place 14 of the detergent to be used in section I of the detergent drawer and the rest in section II.
- Use detergents designed for automatic washing machines in the washing machine. Follow the manufacturer's instructions regarding the amount of detergent to be used.
- More detergent is needed in areas with hard water.
- The amount of detergent required increases with larger loads of laundry.
- Put softener into the middle section of the detergent drawer. Do not exceed the MAX mark.
- Thick softeners may cause blockage of the drawer and should be diluted.
- Liquid detergents can be used in all programs without prewash. In this case, insert the liquid detergent level gauge into the sockets in section II of the detergent drawer. Use the lines on the gauge as a guide to fill the drawer to the desired level.
Washing machine operation
- Connect the washing machine to the power supply.
- Turn on the water supply.
- Open the washing machine door.
- Spread the laundry evenly in the washing machine.
• Gently push on the door until it clicks.
Program selection
Use the program table to select the most suitable program for your laundry.
Half load detection system
Your washing machine has a half load detection function.
If you put less than half the maximum amount of laundry in the washing machine, it will automatically set the half load function regardless of the selected program. This means that it takes less time to complete the selected program and uses less water and energy.
Delay start timer
- Press the Delay start button once.
- The "3h" indicator comes on.
- Press the Delayed Start button repeatedly until the indicator light with the desired delayed start setting (3, 6, 9 or 12 hours) comes on.
- If you have skipped the delayed start time you want to set, keep pressing the Delay start button until the desired time is displayed again.
- To activate the selected delay time, press any additional function button (except the Start / Pause button).
- Use the START / PAUSE button to start the delayed start countdown.
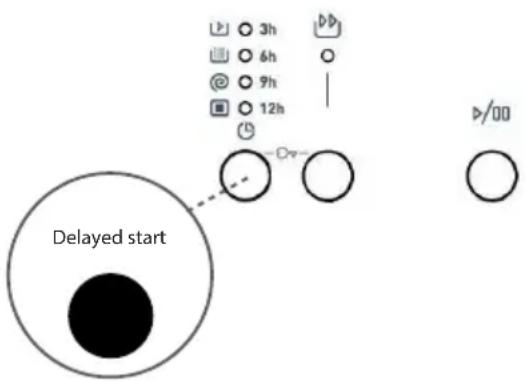
- To cancel the delayed start function after you have set it, press the Delay Start button once. The delayed start indicator goes out.
- To add / remove laundry when the delayed start function is active, you must press the Start / Pause button. After adding / removing laundry, you must press the Start / Pause button again to activate the delayed start function.
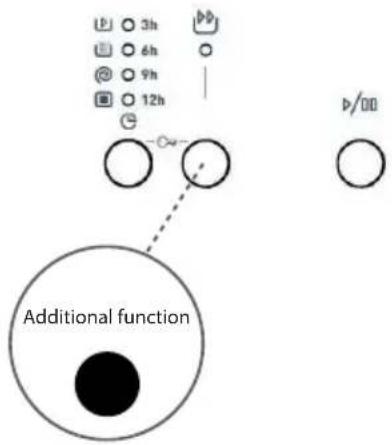
Quick wash: additional function

By using this function, you can wash the laundry in less time and use less energy and water.
We recommend using this option only if you wash less than half of the maximum load of dry laundry for the selected program.
Select this function by pressing the Quick Wash button. The quick wash light comes on.
NOTE: If you put less than half the maximum amount of laundry in the washing machine, the washing machine will automatically set the half load function, regardless of the selected program. This means that it takes less time to complete the selected program and uses less water and energy. If your washing machine detects half the load, the Quick Wash symbol will automatically appear on the display.
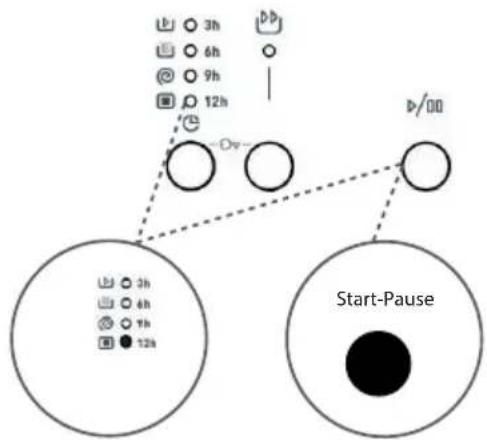
Start/Pause button
To start the selected program, press the Start / Pause button.
The operation (washing) indicator lights up.
flowchart
graph TD
    A["Start-Pause"] --> B["Time 3h"]
    A --> C["Time 6h"]
    A --> D["Time 9h"]
    A --> E["Time 12h"]
    B --> F["Control"]
    C --> G["Control"]
    D --> H["Control"]
    E --> I["Control"]
    F -.-> J["Duration: 3h"]
    G -.-> K["Duration: 6h"]
    H -.-> L["Duration: 9h"]
    I -.-> M["Duration: 12h"]
Child lock
The Child Lock function allows you to lock the buttons so that the selected wash cycle cannot be accidentally changed.
To activate the child lock, press and hold the additional function buttons at the same time, as shown, for at least 3 seconds. When the child lock is active, the additional function light on the panel will be on.
If you press any button or change the program selected with the program selector while the child lock is active, the additional function indicator light flashes on the display.
If the washing machine is already washing, while the child lock is active and you try to change the program by turning the program selector to the "0" position and then to the required
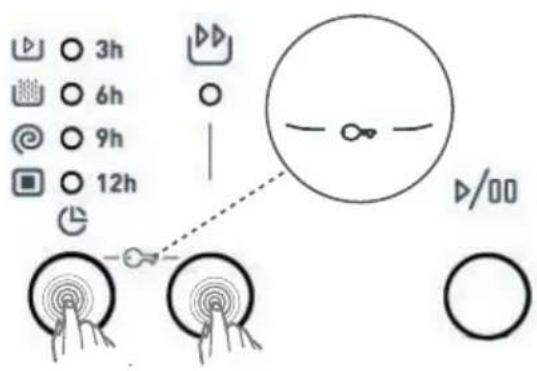
program, the washing machine will continue to wash without change.
To deactivate the child lock, press and hold the additional function buttons simultaneously for at least 3 seconds.
Cancelling program
The selected program can be canceled at any time:
- Switch the program selector to "0" position.
- The washing machine stops the wash cycle and the program is cancelled.
- Drain the water from the washing machine by turning the PROGRAM selector to any other program.
- Your washing machine will drain the water and cancel the program.
You can now select and start a new program.
End of program
Your washing machine will stop by itself when the selected program ends.
- The program end light is on the panel.
- You can open the washing machine door and remove the laundry.
- Leave the washing machine door open to allow the interior of the washing machine to dry.
- Switch the program selector to "0" position.
- Unplug the washing machine from the power supply.
- Close the water supply.
PROGRAMS TABLE
| Programme | Temperature (°C) | Maximum dry laundry capacity (kg) | Compartment | Length (minutes) | Laundry type/ Description |
| COTTON 90° 90 5.0 2 | 176 | Heavily soiled, cotton and linen laundry. (Underwear, bed linen, tablecloths, towels (maximum 2.5 kg), bed sheets, etc.) | |||
| Prewash – Cotton 60 | 5.0 1+2 156 | Soiled cotton and linen fabrics. (Underwear, bed linen, tablecloths, towels (maximum 2.5 kg), bed sheets, etc.) | |||
| COTTON 60 °C 60 5.0 | 2 190 | Soiled cotton and linen fabrics. (Underwear, bed linen, tablecloths, towels (maximum 2.5 kg), bed sheets, etc.) | |||
| ECO 40-60 40 5.0 2 180 | Soiled cotton and linen fabrics. (Underwear, bed linen, tablecloths, towels (maximum 2.5 kg), bed sheets, etc.) | ||||
| COTTON 20 °C 20 2.5 | 2 96 | Less soiled cotton and linen fabrics. (Underwear, bed linen, tablecloths, towels (max. 2 kg), bed sheets etc.) | |||
| Synthetics | 40 3.0 2 1 | 10 | Heavily soiled synthetic fabrics. (Nylon stockings, T -shirts, blouses, synthetic blends, etc.) | ||
| WOOL | 30 2.0 2 39 | Wool laundry with label making it machine washable. | |||
| RINSE | -- | 5.0 -- | 36 | Additional rinse of any type of laundry after washing. | |
| SPINNING | -- | 5.0 -- | 15 | Additional spin of any type of laundry after washing. | |
| DELICATE / HAND | 30 2.0 2 90 | Laundry for which hand washing or delicate laundry is recommended. | |||
| COLORED 40 °C | 40 3.0 2 1 | 80 | Less soiled cotton and linen fabrics. (Underwear, bed linen, tablecloths, towels (max. 2 kg), bed sheets etc.) | ||
| MIXED | 30 3.0 2 81 | You can wash together soiled cotton, synthetic, colored and linen fabrics. | |||
| BLOUSES / SHIRTS | 60 3.0 2 1 | 07 | You can wash together soiled cotton, synthetics and synthetic blends, T -shirts, blouses. | ||
| QUICK 60 min. | 60 2.0 2 60 | Soiled, cotton, colored and linen fabrics washed at 60°C for 60 minutes. | |||
| QUICK 15 min.* 30 2.0 2 15 | Slightly soiled cotton, linen and dyed fabrics. | ||||
* Due to the short washing time of this program, we recommend using less detergent. If the washing machine detects an uneven load, the program may last longer than 15 minutes. You can open the washing machine door 2 minutes after the end of the wash cycle. (This two-minute period is not included in the duration of the program).
NOTE: THE DURATION OF THE PROGRAM MAY CHANGE DEPENDING ON THE AMOUNT OF LAUNDRY, WATER TYPE, AMBIENT TEMPERATURE AND SELECTED ADDITIONAL FUNCTIONS.
- If you load 2 kg or less of laundry into the washing machine, the washing machine will start an automatic cycle lasting 30 minutes.
- Due to the short washing time of this program, we recommend using less detergent. If the washing machine detects an uneven load, the program may last longer than 15 minutes. You can open the washing machine door 2 minutes after the end of the wash cycle. (This two -minute period is not included in the duration of the program).
- According to regulations 1015/2010 and 1061/2010, program 3 with temperature options is the "Standard program for cotton at 60^" and the "Standard program for cotton at 40^" .
- The Eco 40-60 program can jointly clean normally soiled cottons with a recommended wash temperature of 40^ or 60^ in the same cycle and is used to assess compliance with EU ecodesign legislation.
- The most energy efficient programs are usually programs that wash for longer at lower temperatures.
- Filling the household washing machine to the capacity specified by the manufacturer for the relevant programs will contribute to energy and water savings.
- Program duration, energy consumption and water consumption values may vary depending on the weight and type of load, selected additional functions, type of water and ambient temperature.
- It is recommended to use liquid detergent for washing programs that wash at low temperatures. The amount of detergent depends on the amount of laundry and the degree of soiling. Follow the detergent manufacturer's recommendations for the amount used.
- The spin speed affects the noise and the residual moisture content. The higher the spin speed in the spin phase, the higher the noise and the lower the residual moisture content.
- You can access the product database, where model information is stored by reading the QR code on the energy label.
Important information
- Use only detergents, fabric softeners and accessories suitable for automatic washing machines. Excessive foam formed and the automatic foam absorption system was activated due to the use of too much detergent.
• We recommend regular cleaning of the washing machine every 2 months. Use the Drum Clean program for regular cleaning. If your washing machine does not have the Drum Clean program, use the Cotton 90 program. If necessary, use only suitable descaling agents developed specifically for washing machines. - Never open the door while the washing machine is in operation. You can open the washing machine door 2 minutes after the end of the wash cycle.
• Installation and repair work must always be performed by an authorized service representative to avoid possible risks. The manufacturer is not liable for damage that may occur during processes performed by unauthorized persons.
CLEANING AND MAINTENANCE
Warning
Before carrying out maintenance and cleaning, switch off the appliance and unplug the power cable. Before starting maintenance and cleaning of the washing machine, shut -off the water supply.
Do not use solvents, abrasive cleaners, glass cleaners or all -purpose cleaners to clean the washing machine. The chemicals they contain can damage the plastic surfaces of the appliance and other components.
Filters for water supply
Filters on the water supply prevent dirt and foreign materials from entering the washing machine.
We recommend cleaning these filters as soon as not enough water flows into the washing machine, although the water supply is switched on and the tap is open. We recommend cleaning these filters every 2 months.
- Unscrew the supply hose (s) from the washing machine.
- To remove the water supply filter from the filling valve, use long pliers and carefully remove the plastic rod on the filter.
- The second water supply filter is located at the end of the supply hose that goes into the tap. To remove the
second water supply filter, use long pliers and carefully remove the plastic rod on the filter.
- Thoroughly clean the filter with a soft brush, wash with soapy water and rinse thoroughly. Gently push the filter back into place.
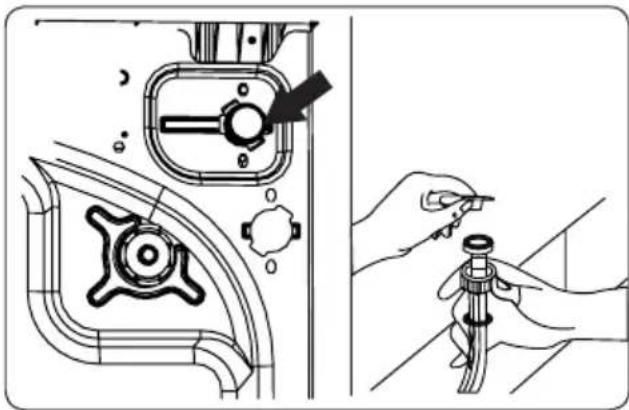
ATTENTION: The filters on the water supply valve may be clogged due to poor water quality or insufficient maintenance and may be damaged. This could cause a water leak. Such malfunctions are not covered by the warranty.
Pump filter
The pump filtration system in your washing machine extends the life of the pump by preventing dirt from entering the washing machine. We recommend to clean the pump filter every 2 months.
The pump filter is located behind the cover in the lower right front corner.
Pump filter cleaning:
- Open the cover. You can use the liquid detergent partition, see picture.
- Insert the end of detergent measuring scoop or liquid detergent dipstick into the opening of the cover and gently push it backward. The cover opens.
- Before opening, place a container under the filter cover that catches any water left in the washing machine.
- Release the filter by turning it counterclockwise and pulling to remove it. Wait until the water drains.
NOTE: Depending on the amount of water inside the washing machine, it may be necessary to empty the water collection container several times.
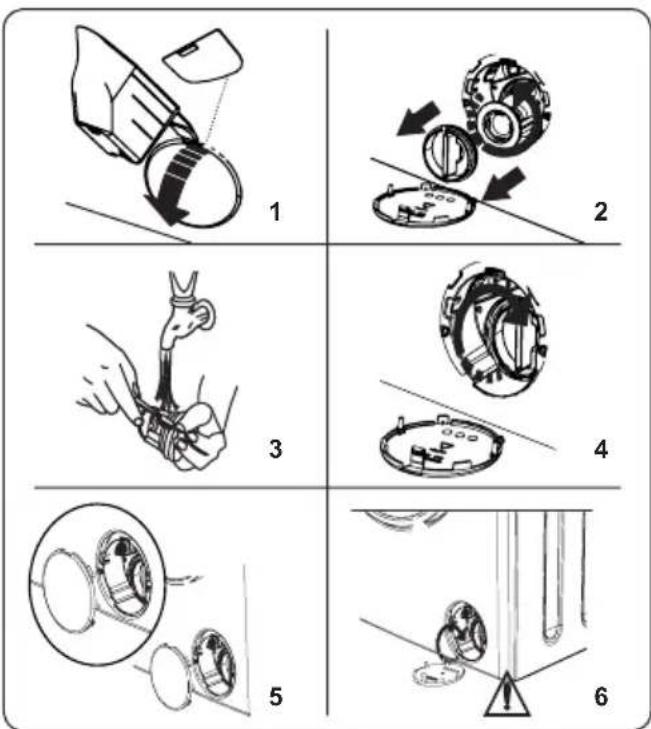
- Use a soft brush to remove all foreign materials from the filter.
- After cleaning, replace the filter and turn it clockwise to secure it.
- When closing the filter cover, make sure that the brackets inside the cover fit into the holes on the front panel side.
- Close the filter cover.
WARNING: The water in the pump may be hot, wait for it to cool before cleaning or maintenance.
Detergent drawer
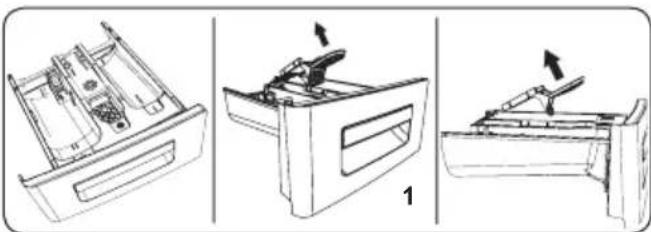
The use of detergent can eventually lead to residues in the detergent drawer. We recommend removing the drawer every 2 months and cleaning up the accumulated residues.
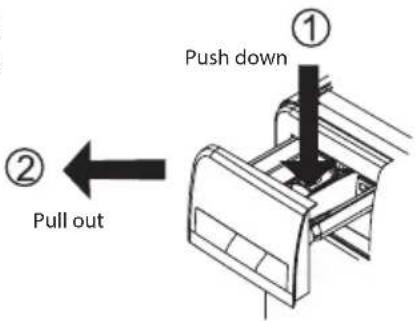
Removal of the detergent drawer:
• Pull the drawer forward so that it is fully out.
- Carefully push on the drawer (see figure below) and pull it out.
- Clean the drawer with water and a soft brush.
- If there is any dirt left in the drawer, remove it with a soft brush. Make sure that no residual dirt gets into the washing machine.
• Dry the drawer thoroughly and slide it back.
- Do not wash the detergent drawer in the dishwasher.
Flushing plug / body / drum
1. Flushing plug
Remove the detergent drawer and remove the flushing plug. Thoroughly remove all residual softener. After cleaning, replace the flushing plug and check that it is fitted correctly.
2. Body
Use a mild non-abrasive cleaner or soap and water to clean the outer shell. Wipe dry with a soft cloth.
natural_image
Three technical line drawings of a mechanical device with no visible text or symbols3. Drum
Do not leave metal objects such as needles, paper clips, coins, etc. in the washing machine. These objects cause rust to form on the drum. Use a chlorine-free cleaner and follow the detergent manufacturer's instructions to clean the rust. Never use a scouring pad or similar hard objects to clean rust stains.
TROUBLESHOOTING
The washing machine should be repaired by an authorized service company. If the washing machine needs to be repaired or if you cannot solve the problem using the instructions below, you should:
- Unplug the washing machine from power supply.
- Close the water supply.
| ERROR POSSIBLE CAUSE TROUBLESHOOTINGU | ||
| The washing machine does not turn on. | The washing machine is not connected to electricity. | Connect the washing machine to power supply. |
| The fuses are defective. Change the fuses. | ||
| There is no electricity. Check the power supply. | ||
| The Start/Pause button was not pressed. | Press Start/Pause | |
| The program selector is on “stop”. | Switch the program selector to a required position. | |
| The door of the washing machine is not closed. | Close the washing machine door. | |
| The washing machine does not fill with water. | The water tap is closed. Open the tap. | |
| The water supply hose may be tangled. | Check the supply hose and untangle it. | |
| The water supply hose is clogged. Clean the filters of the inlet hose. (*) | The inlet filter is clogged. Clean the water supply filters. (*) | |
| The door of the washing machine is not closed. | Close the washing machine door. | |
| The washing machine does not drain water. | The drain hose is clogged or tangled. | Check the drain hose and then clean or untangle it. |
| The pump filter is clogged. Clean the pump filter. (*) | The pump filter. (*) | |
| The laundry is too pressed together in the drum. | Spread the laundry evenly in the washing machine. | |
| The washing machine vibrates. | The feet were not adjusted. Adjust the feet. (**) | |
| The shipping screws have not been removed. | Remove the shipping screws from the washing machine. (**) | |
| Small load in the drum. | This does not prevent the washing machine from operating. | |
| The washing machine is overloaded with laundry or the laundry is unevenly distributed. | Do not overload the drum. Spread the laundry evenly in the drum. | |
| The washing machine is placed on a hard surface. | Do not place the washing machine on a hard surface. | |
| Excessive foam forms in the detergent drawer. | Excessive amount of detergent was used. | Press the Start / Pause button. To stop foaming, dilute one tablespoon of the softener in 1/2 liter of water and pour it into the detergent drawer. After 5–10 minutes press Start/Pause button. |
| An unsuitable detergent was used. | Only use detergents made for automatic washing machines in the washing machine. | |
| Unsatisfactory washing results. | Your laundry is too soiled for the selected program. | Use the information in the program table to select the most suitable program. |
| Too little detergent was used. | Use the correct amount of detergent according to the instructions on the package. | |
| There is too much laundry in the washing machine. | Check that the maximum capacity for the selected program has not been exceeded. | |
| Hard water. | Increase the amount of detergent according to the manufacturer's instructions. | |
| The laundry is too pressed together in the drum. | Make sure that the laundry is evenly distributed in the drum. | |
| As soon as the washing machine is filled with water, the water is drained. | The end of the drain hose is too low for the washing machine. | Check that the drain hose is at suitable height. (**). |
| Water did not appear in the drum during washing. | There is no malfunction. The water is in the part of the drum that is not visible. | - |
| Detergent residues stick to the laundry. | Insoluble particles in some detergents may appear as white spots on your laundry. | After drying, perform another rinse or clean the laundry with a brush. |
| Gray stains appear on the laundry. | There is untreated oil, cream or ointment on your laundry. | Use the correct amount of detergent according to the instructions on the package in the next wash. |
| The spin cycle does not occur or occurs later than expected. | There is no malfunction. The unbalanced load system has been activated. | The unbalanced load control system will try to distribute the laundry evenly in the drum. The spin starts when the laudry is spread. The next time you wash, spread the laundry evenly in the drum. |
(*) See the chapter on maintenance and cleaning of the washing machine.
(**) See the chapter on installing the washing machine.
Error codes and their solution
The washing machine is equipped with a built -in malfunction detection system. Malfunctions are indicated by a combination of lit operating lights. The most common error codes are listed below.
| ERROR CODE CAUSE SOLUTION | ||
EC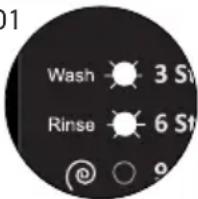 | The washing machine door is not properly closed. | Close the door properly until you hear a click. If your washing machine still shows a malfunction, switch off the washing machine, unplug it and contact the nearest authorized service center immediately. |
EC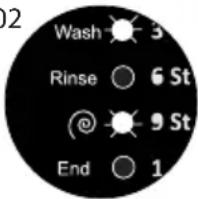 | Insufficient water pressure, or low water level inside the washing machine. | Check if the tap is open fully. The water supply may be disconnected. If the problem persists, the washing machine will stop automatically after a while. Disconnect the washing machine, close the water tap and contact the nearest authorized service center. |
EC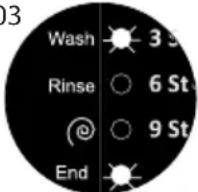 | Defective pump, clogged pump filter or faulty electrical connection of the pump. | Clean the pump filter. If the problem persists, contact the closest authorized service centre. (*) |
EC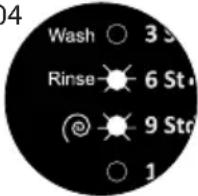 | There is an excessive amount of water in the washing machine. | The washing machine drains the water by itself. Once the water has drained, switch off the washing machine and unplug it. Close the water tap and contact the nearest authorized service center. |
(*) See the chapter on maintenance and cleaning of the washing machine.
TECHNICAL SPECIFICATIONS
| EWF 1053 MD | |
| Built-inapplianceNo | |
| Maximum load capacity (dry laundry) kg 5 | |
| Dimensions (H x W x D) [mm] 845 × 597 × 497 | |
| Nominal voltage 220 - 240 V ~ 50 Hz | |
| Power input 2100 W | |
| Lid latch 10 A | |
| Water pressure (MPA) MIN/MAX 0.1, MPA/ 1, MPA |
USE AND DISPOSAL OF WASTE
Wrapping paper and corrugated paperboard – deliver to scrapyard. Packing foil, PE bags, plastic elements – throw into plastic recycling containers.
DISPOSAL OF PRODUCTS AT THE END OF LIFETIME
Disposal of electric and electronic equipment (valid in EU member countries and other European countries with an implemented recycling system)
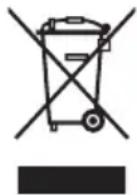
The represented symbol on the product or package means the product shall not be treated as domestic waste. Hand over the product to the specified location for recycling electric and electronic equipment. Prevent negative impacts on human health and the environment by properly recycling your product. Recycling contributes to preserving natural resources. For more information on the recycling of this product, refer to your local authority, domestic waste processing organization or store, where you purchased the product.
This product complies with EU directives on electromagnetic compatibility and electrical safety. This product meets the requirements for heavy metals in electrical equipment.
08/05

The operating manual is available at www.ecg-electro.eu.
Changes of text and technical parameters reserved.
SICHERHEITSHINWEISE
INSTALLATION
Entfernen von
natural_image
Simple line drawing of a mechanical component with a curved pipe and base (no text or symbols)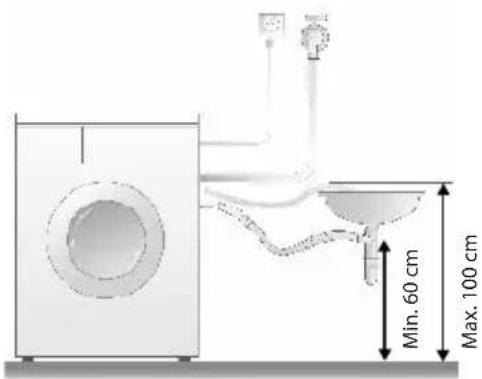
BEDIENFELD
natural_image
Line drawing of a washing machine with an inset showing internal components (no text or symbols)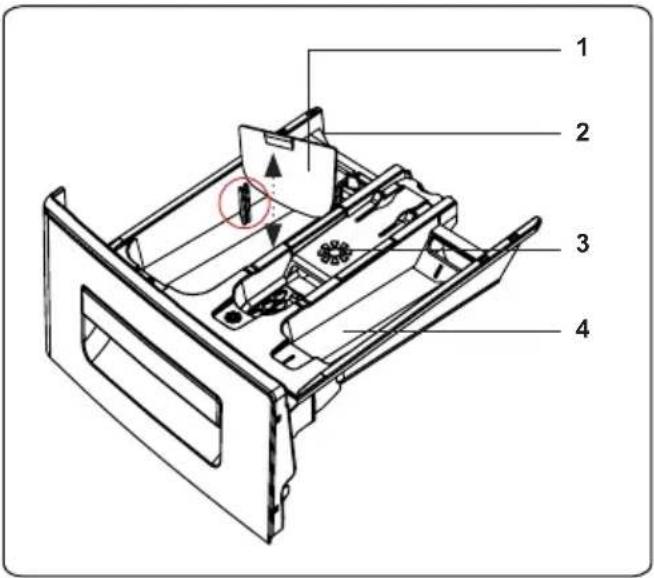
Drehknopf
natural_image
Technical illustration showing a mechanical component being inserted into a pipe, with no visible text or symbols.Punmpenfilter
natural_image
Three technical line drawings of a mechanical device with internal components, shown from different angles (no text or symbols)2. Körper
INSTALACE
natural_image
Line drawing of a washing machine with an inset showing internal components (no text or symbols)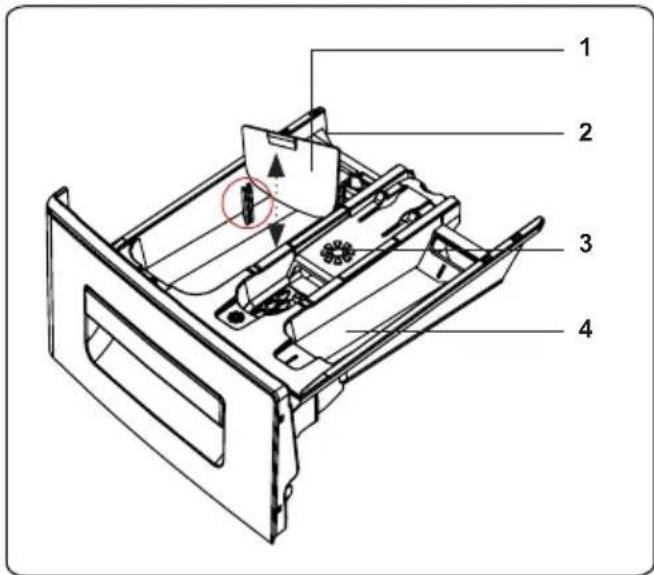
Volič programů
natural_image
Technical illustration showing a mechanical component with a valve and a hand holding a tool, alongside a close-up of the assembly (no text or symbols present)natural_image
Three technical line drawings of a printer holder panel, showing front, side, and top views with arrows indicating assembly or movement (no text or symbols present)ŘEŠENÍ PROBLÉMŮ
natural_image
Simple line drawing of a pipe fitting with a handle and outlet (no text or symbols)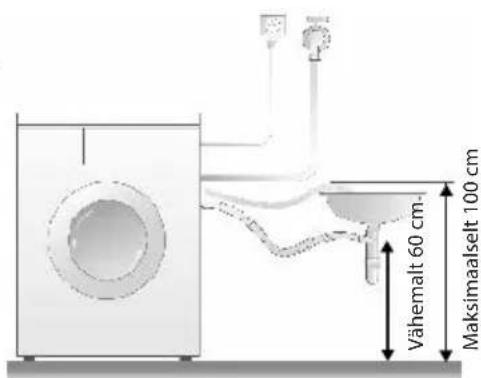
natural_image
Line drawing of a washing machine with an inset showing internal components (no text or symbols)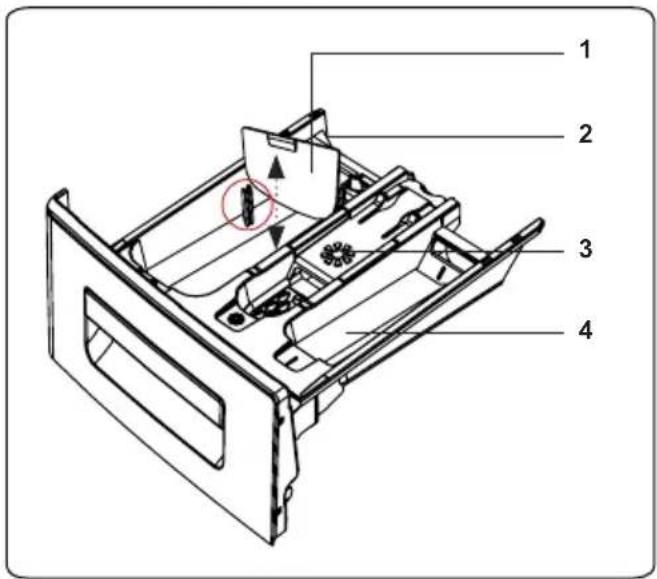
Programmi valija
natural_image
Technical illustration showing a mechanical component being inserted into a pipe fitting, with no visible text or symbols.natural_image
Three technical line drawings of a device's front panel and side view, showing internal components and assembly (no text or symbols)3. Trummel
INSTALACIJA
Uklanjanje transportnih vijaka
- Prije pokretanja perilice, uklonite 4 transportna vijka i gumene podloške sa stražnje strane perilice. Ako se vijci ne uklone, mogu uzrokovati jake vibracije, buku i kvar na perilici rublja te će poništiti jamstvo.
- Otpustite transportne vijke okrećući ih odgovarajućim ključem u smjeru kazaljke na satu.
- Uklonite transportne vijke tako da ih ravno izvlačite.
- Umetnite plastične čepove koji su isporučeni u vrećici zajedno s uređajem u rupe preostale nakon uklanjanja transportnih vijaka. Transportne vijke treba zadržati za buduću upotrebu.
Napomena: Uklonite transportne vijke prije prve upotrebe perilice za pranje rublja. Kvarovi uzrokovani radom perilice s ugrađenim transportnim vijcima nisu pokriveni jamstvom.
Podešavanje nožica za izravnavanje / podešavanje podesivih zaustavljača
natural_image
Simple line drawing of a pipe fitting with a coiled tube (no text or symbols)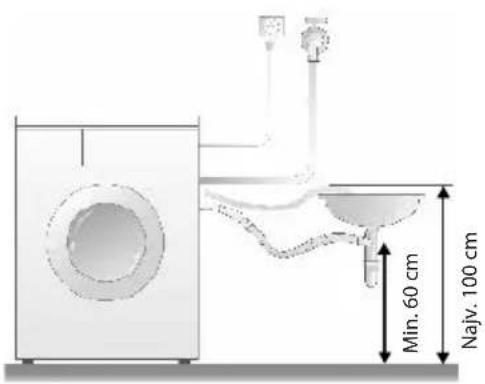
OPIS UPRAVLJAČKE PLOČE
- Odjeljak za deterdžent
- Odabir programa
- Digitalni zaslon i dodatne funkcije
natural_image
Line drawing of a washing machine with an inset showing internal components (no text or symbols)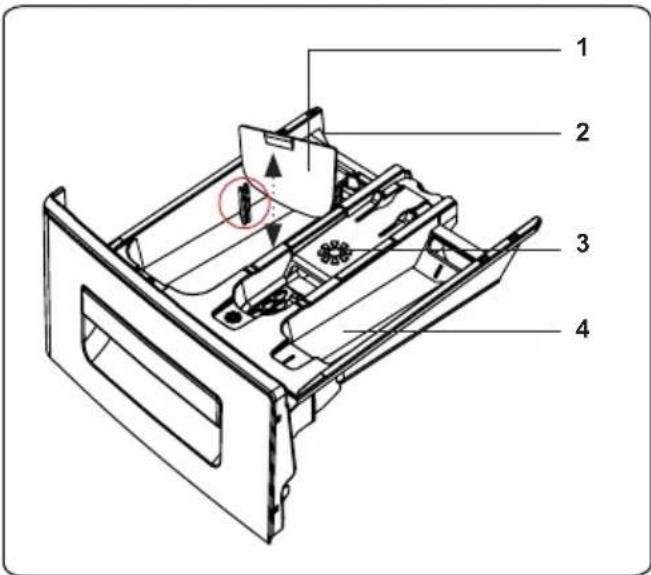
Odabir programa
natural_image
Technical illustration showing a mechanical component with a valve and a hand holding a tool, alongside a close-up of the assembly (no text or symbols present)POZOR: Filtri na ventilu za dovod vode mogu se začepiti zbog loše kvalitete vode ili lošeg održavanja i mogu biti oštećeni. To može uzrokovati curenje vode. Takvi kvarovi nisu pokriveni jamstvom.
Filtar crpke
Filtracijski sistem crpke vaše perilice rublja produljuje život crpke sprečavajući nečistoću da uđe u perilicu rublja. Preporučujemo čišćenje filtra crpke svaka 2 mjeseca.
Filtar crpke nalazi se iza poklopca u donjem desnom prednjem kutu.
Čišćenje filtra crpke:
natural_image
Three technical line drawings of a mechanical device with no visible text or symbols3. Bubanj
Ne ostavljajte metalne predmete poput igala, spajalica, novčića itd. u perilici rublja. Mogu uzrokovati nastajanje hrđe na bubnju. Za čišćenje hrđe koristite sredstvo za čišćenje bez klora i slijedite upute proizvođača deterdženta. Nikada nemojte koristiti žičanu četku ili slične tvrde predmete za čišćenje mrlja od hrđe.
RJEŠENJE PROBLEMA
natural_image
Pure diagram of a mechanical component with no text, numbers, or symbols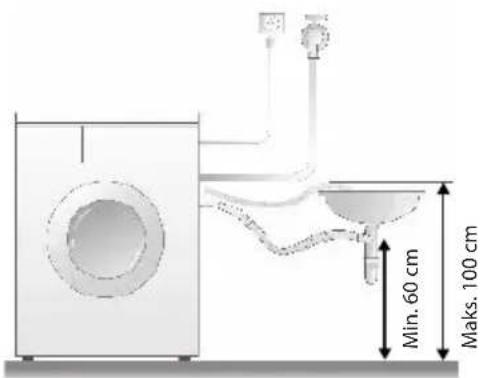
VADĪBAS PANELA PĀRSKATS
natural_image
Line drawing of a washing machine with an inset showing internal components (no text or symbols)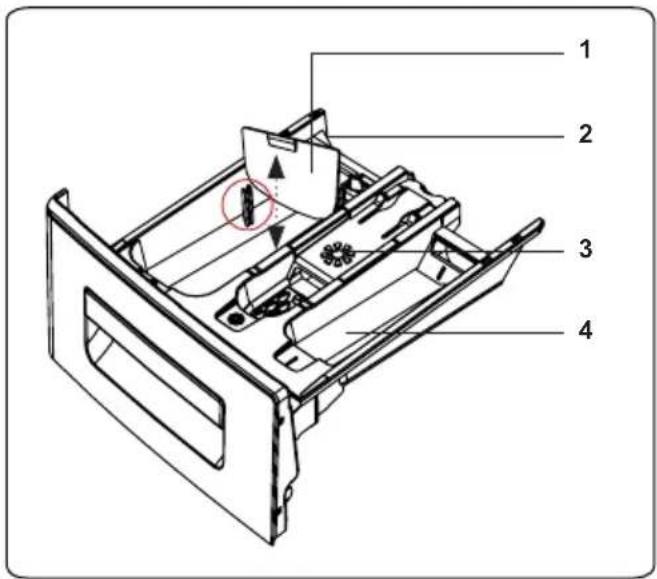
Programmu regulators
natural_image
Three technical line drawings of a mechanical device with internal components, shown from front, side, and top views (no text or symbols)PROBLÉMU NOVĚRŠANA
IRENGIMAS
natural_image
Line drawing of a washing machine with an inset showing internal components (no text or symbols)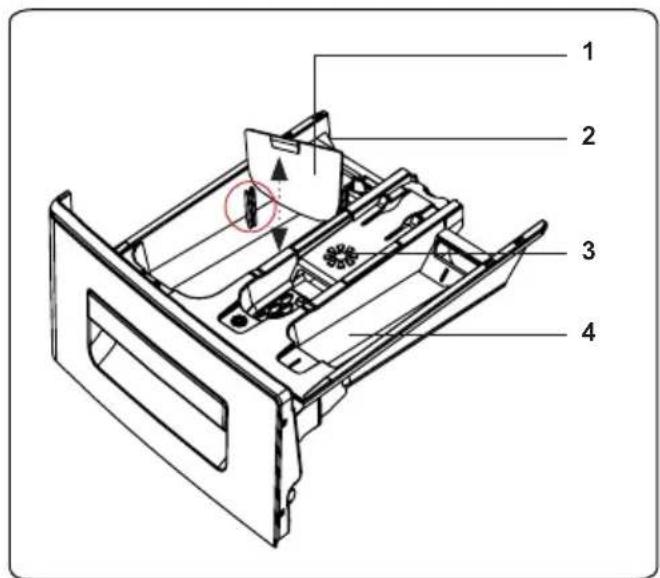
natural_image
Technical illustration showing a mechanical component being inserted into a pipe, with no visible text or symbols.natural_image
Three technical line drawings of a device with internal components, showing front, side, and top views (no text or symbols)3. Bügnas
natural_image
Line drawing of a washing machine with an inset showing internal components (no text or symbols)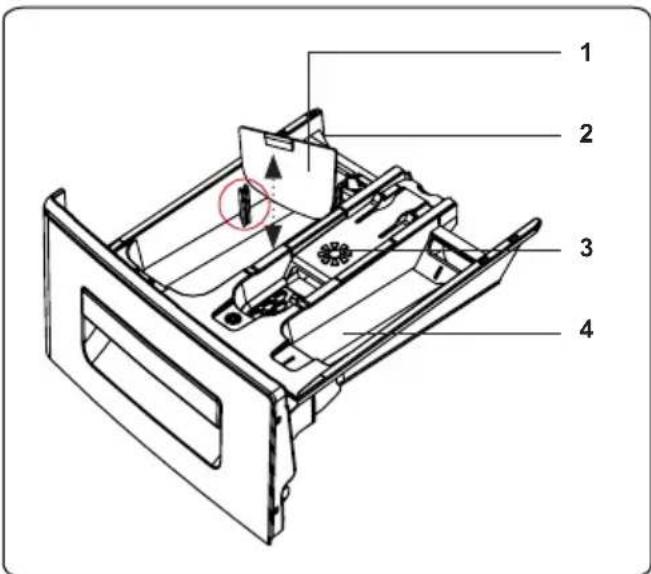
Programválasztó
natural_image
Technical illustration showing a mechanical component being adjusted for installation, with no visible text or symbols.natural_image
Three technical line drawings of a mechanical device with no visible text or symbols2. Ház
natural_image
Line drawing of a washing machine with an inset showing internal components (no text or symbols)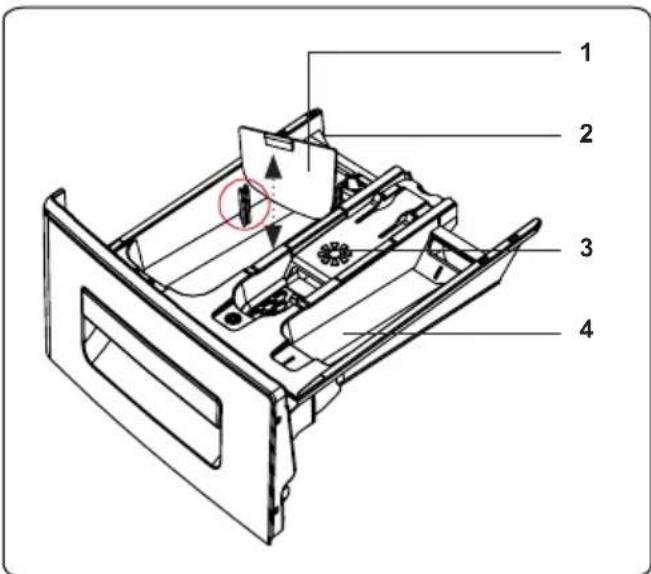
natural_image
Technical illustration showing a mechanical component being inserted into a pipe fitting, with no visible text or symbols.natural_image
Three technical line drawings of a mechanical device with internal components and directional arrows, no text or symbols present.3. Bęben
natural_image
Simple line drawing of a pipe fitting with a coiled tube (no text or symbols)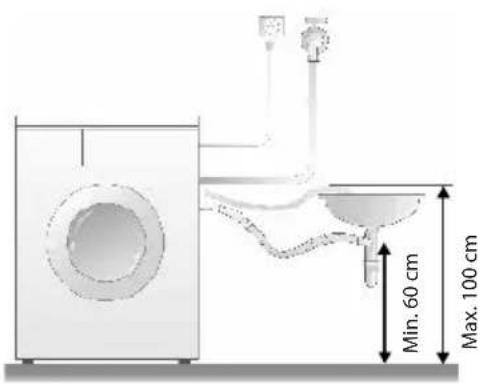
PREH'AD OVLÁDACIEHO PANELU
natural_image
Line drawing of a washing machine with an inset showing internal components (no text or symbols)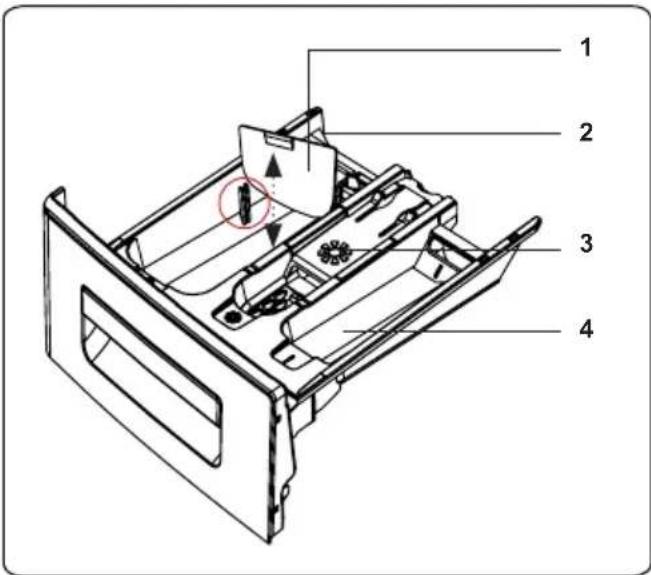
Volič programov
natural_image
Three technical line drawings of a printer holder panel, showing front, side, and top views with arrows indicating assembly or movement (no text or symbols present)RIEŠENIE PROBLÉMOV
Električna vezava
natural_image
Simple line drawing of a pipe fitting with a coiled tube (no text or symbols)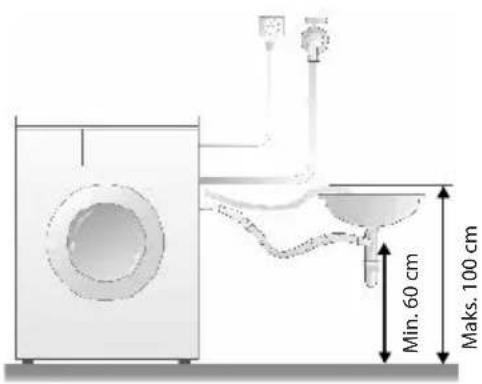
natural_image
Line drawing of a washing machine with an inset showing internal components (no text or symbols)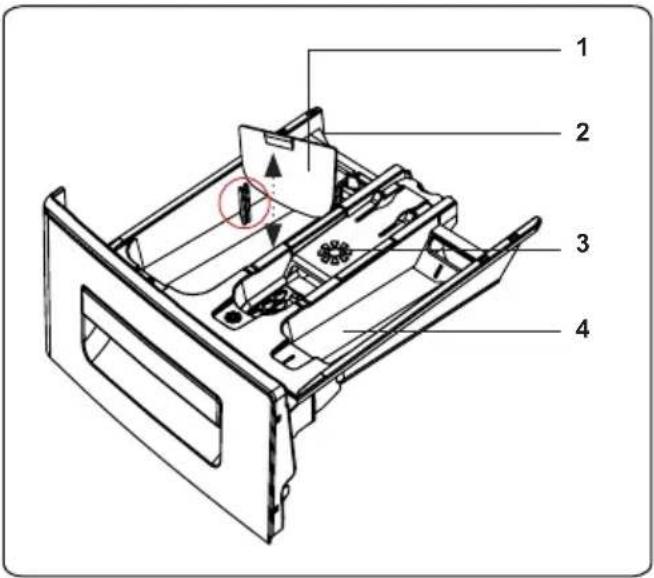
Gumb za izbiro programa
- Za izbor želenega programa vrtite gumb za izbiro programa v smeri ali v nasprotni smeri urnega kazalca, dokler oznaka na gumbu ne pokaže na želeni program.
- Prepričajte se, da kaže gumb za izbiro programa natančno na program, ki ga želite izbrati.
Elektronski zaslon
UPORABA PRALNEGA STROJA
Priprava perila
natural_image
Three technical line drawings of a mechanical device with internal components, shown from front, side, and top views (no text or symbols)3. Boben
250 69 Klíčany, Czech Rep. e-post: ECG@kbexpert.cz
Hrvatski
K+B Progres, a.s.
U Expertu 91 tel.: +420 272 122 111
250 69 Kličany, Czech Rep. e-mail: informacije@kbprogres.cz
Bosanski
K+B Progres, a.s.
U Expertu 91 tel.: +420 272 122 111
250 69 Kličany, Czech Rep. e-mail: informacije@kbprogres.cz
Latviešu valoda
K+B Progres, a.s.
U Expertu 91 tel.: +420 272 122 111
250 69 Kličany, Czech Rep. e-pasts: ECG@kbexpert.cz
Lietuviu kalba
K+B Progres, a.s.
U Expertu 91 tel.: +420 272 122 111
250 69 Klíčany, Czech Rep. el. paštas: ECG@kbexpert.cz
Magyar
K+B Progres, a.s.
U Expertu 91 tel.: +420 272 122 111
250 69 Kličany, Czech Rep. e-mail: ECG@kbexpert.cz
Polski
K+B Progres, a.s.
U Expertu 91 tel.: +420 272 122 111
250 69 Klíčany, Czech Rep. e-mail: ECG@kbexpert.cz
Slovenčina



- Read carefully and save for future use!
- RECOMMENDATION
- Danger of flooding
- Danger of fall or injury
- Children's safety
- DESCRIPTION
- INSTALLATION
- Shipping screws removal
- Adjusting the leveling feet / adjusting the adjustable stops
- Power connection
- Water supply hose
- Connecting water drain hose
- CONTROL PANEL OVERVIEW
- Detergent drawer
- Sections
- Detergent dispenser:
- Softener, starch, detergent:
- Detergent dispenser for prewash:
- Program selector
- Electronic display
- USING THE WASHING MACHINE
- Laundry preparation
- Putting laundry in the washing machine
- Tablecloth 250
- Adding detergent to the washing machine
- Washing machine operation
- Program selection
- Half load detection system
- Delay start timer
- Quick wash: additional function
- Start/Pause button
- Child lock
- Cancelling program
- End of program
- Important information
- CLEANING AND MAINTENANCE
- Warning
- Filters for water supply
- Pump filter
- Flushing plug / body / drum
- Flushing plug
- Body
- Drum
- TROUBLESHOOTING
- Error codes and their solution
- USE AND DISPOSAL OF WASTE
- DISPOSAL OF PRODUCTS AT THE END OF LIFETIME
- Disposal of electric and electronic equipment (valid in EU member countries and other European countries with an implemented recycling system)
- SICHERHEITSHINWEISE
- Entfernen von
- BEDIENFELD
- Drehknopf
- Punmpenfilter
- Körper
- INSTALACE
- Volič programů
- ŘEŠENÍ PROBLÉMŮ
- Programmi valija
- Trummel
- INSTALACIJA
- Uklanjanje transportnih vijaka
- Podešavanje nožica za izravnavanje / podešavanje podesivih zaustavljača
- OPIS UPRAVLJAČKE PLOČE
- Odabir programa
- Filtar crpke
- Bubanj
- RJEŠENJE PROBLEMA
- VADĪBAS PANELA PĀRSKATS
- Programmu regulators
- PROBLÉMU NOVĚRŠANA
- IRENGIMAS
- Bügnas
- Programválasztó
- Ház
- Bęben
- PREH'AD OVLÁDACIEHO PANELU
- Volič programov
- RIEŠENIE PROBLÉMOV
- Električna vezava
- Gumb za izbiro programa
- Elektronski zaslon
- UPORABA PRALNEGA STROJA
- Priprava perila
- Boben
- Hrvatski
- Bosanski
- Latviešu valoda
- Lietuviu kalba
- Magyar
- Polski
- Slovenčina
Brand : ECG
Model : EWF 1053 MD
Category : Washing machine