G-Tech X72 - Caméra auto Neoline - Free user manual and instructions
Find the device manual for free G-Tech X72 Neoline in PDF.


User questions about G-Tech X72 Neoline
0 question about this device. Answer the ones you know or ask your own.
Ask a new question about this device
Download the instructions for your Caméra auto in PDF format for free! Find your manual G-Tech X72 - Neoline and take your electronic device back in hand. On this page are published all the documents necessary for the use of your device. G-Tech X72 by Neoline.
USER MANUAL G-Tech X72 Neoline
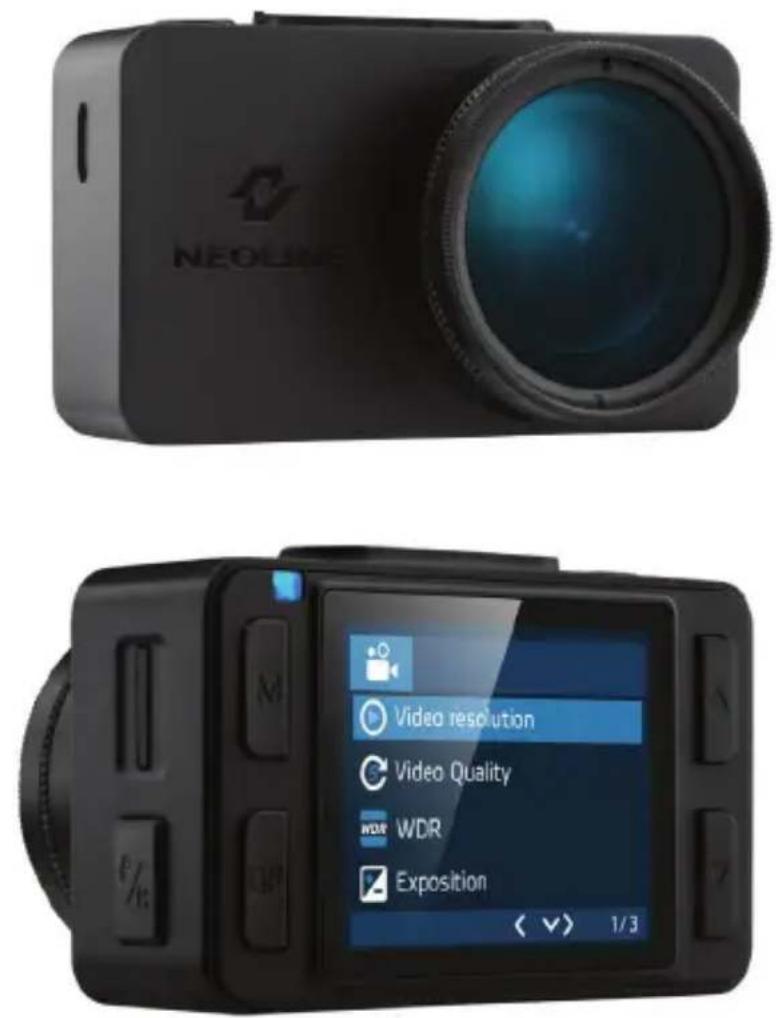
natural_image
Black NEOLINE camera with lens and logo (no additional text or symbols visible)User's Manual
Dear customer!
Thank you for purchasing the Neoline G-Tech X72 car video recorder! Please read this manual carefully and all through to ensure proper use and longer service life of the device. Keep the user manual to consult it when necessary.
Content
- Operation Conditions....3
- Specifications ....5
- Equipment....6
- Description of the device and its buttons ....7
- Installing the DVR....9
- Device operation ....11
- Possible problems and their causes....18
1. Operation Conditions
- Read the terms of the warranty service.
- Do not insert or remove a memory card while the DVR is turned on. It may cause damage to the device, memory card and recorded video files.
- Use only high-quality microSD cards of at least class 10 providing for the UHS-I protocol to avoid recording failures and playback delays.
- It is recommended to use 8 GB to 128 GB memory cards.
- The device should only be used with the accessories supplied. Where third-party accessories are used, Neoline bears no responsibility for any damage to the product.
- Do not expose the product to fire, moisture or chemicals (gasoline, solvent, reagents, etc.).
- Do not disassemble or modify the product.
- Neoline is not responsible for any data loss and/or direct or indirect damage caused to the user or a third party by misuse of the device or software, their incorrect installation, or the use of accessories not included in the package.
- Attention! In some cars, the power is supplied to the 12/24V socket even when the ignition is off. It is recommended to disconnect the device from the vehicle network to avoid battery discharging.
- Format the microSD card at least once every two months to avoid damage to its file system.
-
Follow the storage and operation temperature conditions (see technical specifications). Do not expose the unit to sunlight for too long.
-
The device is designed to be used in cars with a transparent windshield or light-tone heat shield for glass. Where the windshield is tinted or covered with dark heat shield film, the video quality decreases.
• Install the DVR in such a way as to get the maximum field of view. DO NOT place the DVR in a place where it can block the view and compromise your safe driving. Neoline and its authorized partners ARE NOT responsible for any damage or data loss due to improper installation of the holder.
- The built-in supercapacitor helps you finish your recording correctly. Normal operation of the device requires an external power source.
- Do not manipulate the device while driving to be sure you are driving safe. Please, observe the local law.
- Set the correct date and time before using the device.
• Heating of the case during operation is normal. - Handle the device with due care; avoid dropping/crushing the device.
The manufacturer reserves the right to change the equipment list, hardware and software of the device without prior notice.
It is assumed that you agree with the provisions above before you start using the system.
This user manual is valid at the time of printing. See the updates at www.neoline.com (Download).
2. Specifications:
• Video resolution: Full HD Max (1920x1080/30 fps) advanced bitrate
Full HD Eco (1920x1080/30 fps) standard bitrate
HD 60fps HD 60 fps (1280x720 / 60 fps)
HD 30fps (1280x720 / 30 fps) VGA (640x480 / 30 fps)
- Sony sensor
- Viewing angle: 140^
• Screen size: 2 inches, IPS
• Built-in supercapacitor* - Anti-glare CPL filter
• Video recording format: MP4
• Built-in microphone / speaker - WDR function
- G-sensor
- Parking mode
- Night mode
- Loop recording: 1/2/3/5 min
• Continuous recording - Auto Power On
- Date / time stamp
• State number stamp
• 8GB to 128GB MicroSD (Class 10)
• Storage temperature: -20^ to +70^ - Operating temperature: -10^ to +60^
- Input voltage: 5VDC, 1.5A
- Charging input voltage: 12-24VDC
• Dimensions: 74 x 42 x 34.5 mm - Weight: 87 g
*The DVR is designed to operate under a wide range of temperatures. Unlike a battery, a supercapacitor is more durable and can work more efficiently both at low and high ambient temperatures.
3. Equipment:
• Neoline G-Tech X72 car digital video recorder (DVR)
• Magnet holder on scotch tape
- Anti-glare CPL filter
• Car charger (2 USB connectors)
- User manual
- Warranty card
- Description of the device and its buttons
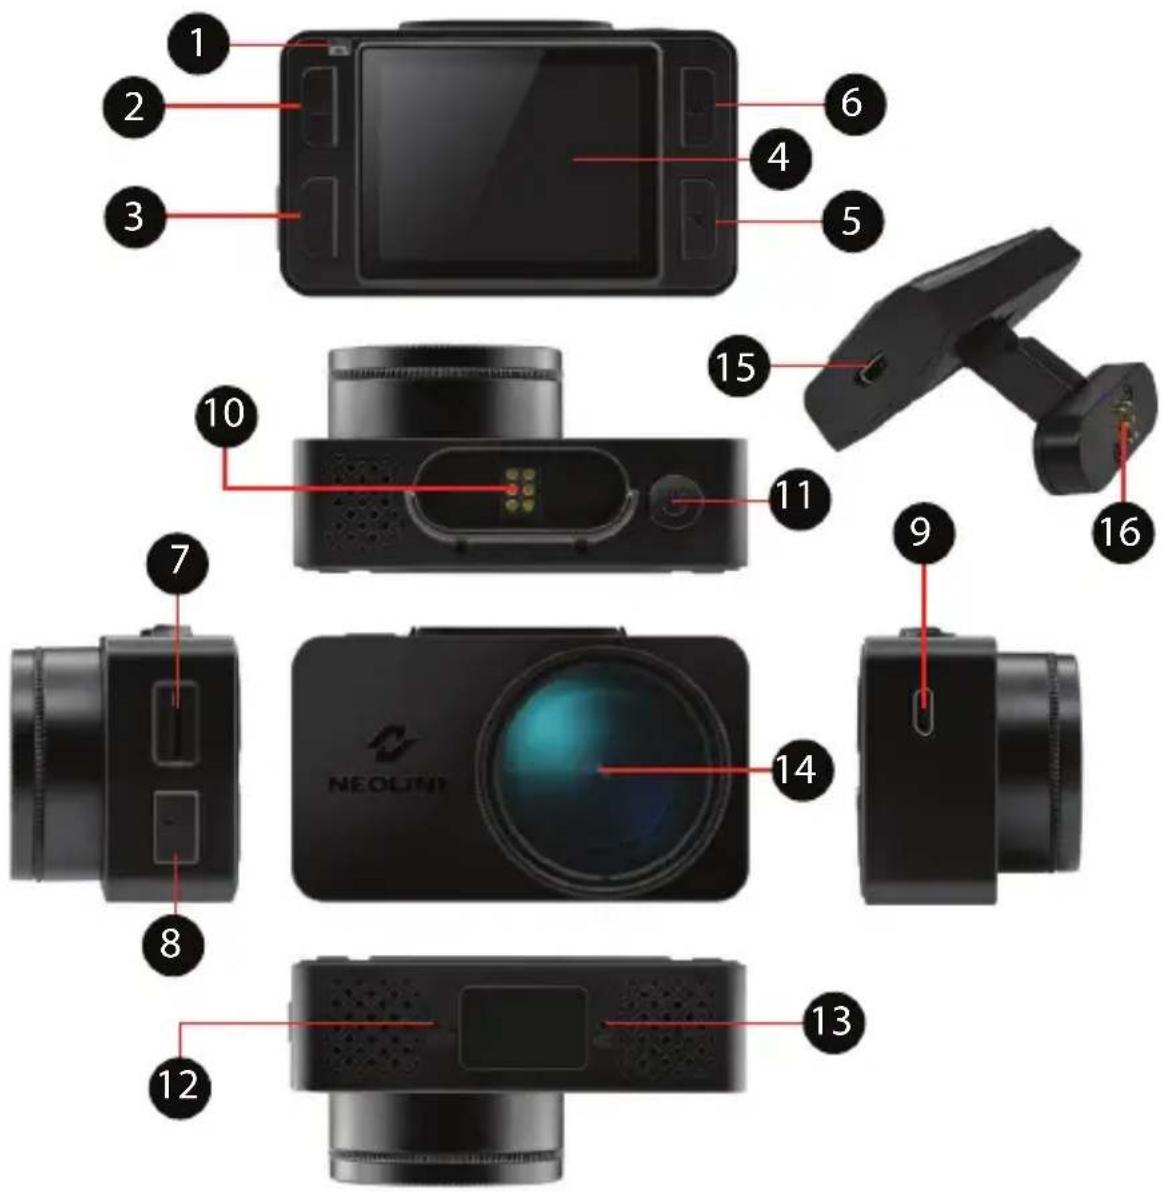
text_image
1 2 3 4 5 6 7 8 NEOLINT 10 11 12 13 14 15 16 9- Operation indicator
- Mode selection button M
- Confirmation button OK
- Display
- DOWN button
- UP button
- Memory card slot
- Hot-key button
-
Power cable connector (microUSB)
-
Contact area
- ON / OFF button
- RESET button
- Microphone
- Lens with a removable CPL filter
- Power cable connector (microUSB)
- Contact area
Button description
| Button | Description |
| ON/OFF | Press to turn the device on. Press and hold to turn the device off. When the device is on, press to turn the backlight off. |
| M | In standby mode (no recording), press to enter/ exit the Menu. Press and hold to switch between VIDEO-PHOTO PLAYBACK. |
| OK | Press to start/stop recording. When in the menu, use to confirm the selected menu item. |
| UP | Press to move up the menu. In the VIDEO and PHOTO mode, press and hold to zoom in; in Playback mode, use to select a file. |
| DOWN | Press to move down the menu. In the VIDEO and PHOTO mode, press and hold to delete the image (if you used zoom + before); in the Playback mode, press to select a file. |
| HOT-KEY | Press to block video recording. Press and hold to activate an additional feature (for example, Parking Mode). |
| RESET | Press to reboot, if no other button responds. |
Description of the indicator
| Status | Value |
| Flashing red | Recording |
| Flaring red | Software update in progress |
5. Installing the DVR
Installation on the windshield
- Choose the installation location in advance, as the adhesive tape on the mount is of single use.
- Degrease the mounting location and warm it up to ensure strong adhesion.
- Install the magnet holder into the device and turn the DVR on. When evaluating the display image, make sure that the horizontal is kept and the lens captures the image symmetrically both on the left and right. Then remove the protective film from the surface of the adhesive tape and lean and press the mount against the windshield.
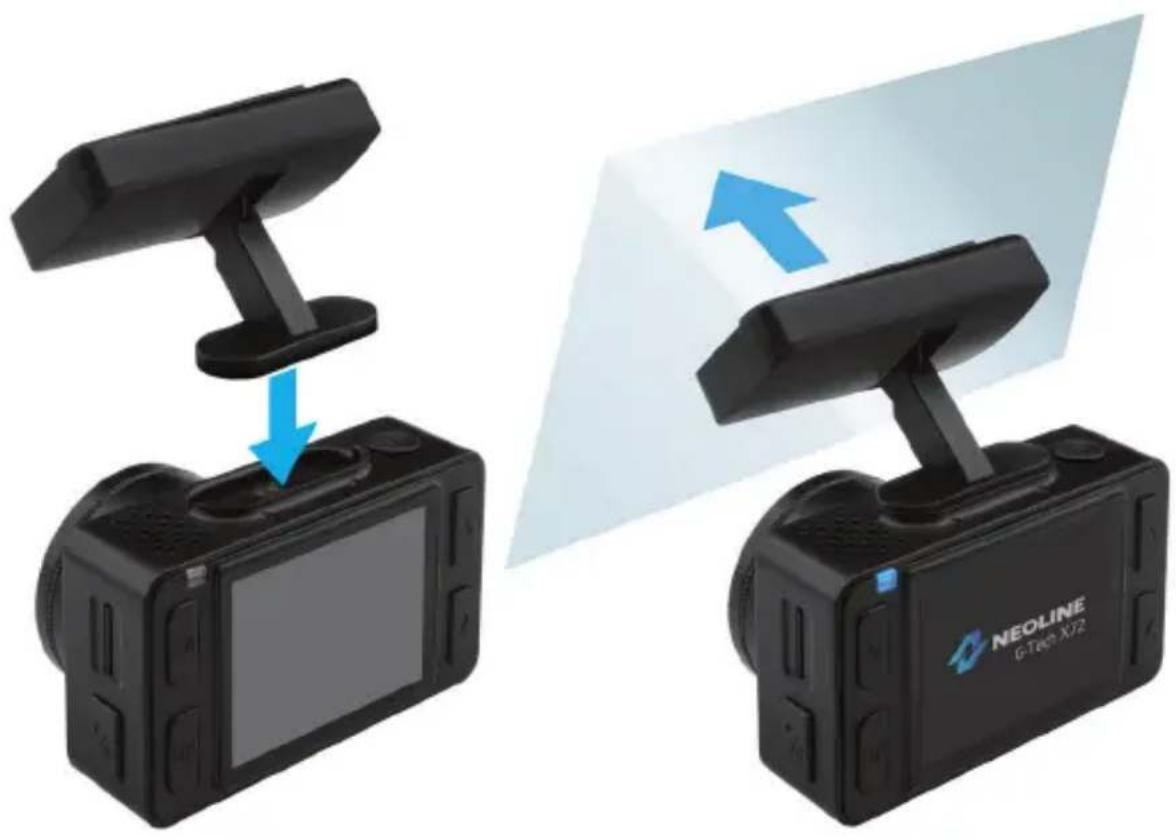
natural_image
Two black NEOLINE G-Tax X72 camera modules with a blue arrow indicating rotation, shown from different angles (no text or symbols on devices)Adjusting the viewing angle
ATTENTION! Adjusting the viewing angle can only be done along the vertical line, so be sure to position the device correctly on the windshield along the horizontal line as close as possible to the windshield's center.
While pulling or pushing the device in the holder, ensure that the camera captures the image in proportion of 30% sky / 70% road.
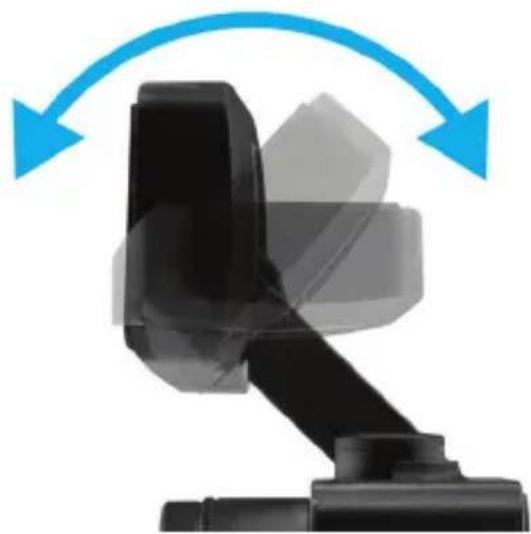
natural_image
Close-up of a black mechanical component with blue curved arrows indicating rotation or direction (no text or symbols)Power connection
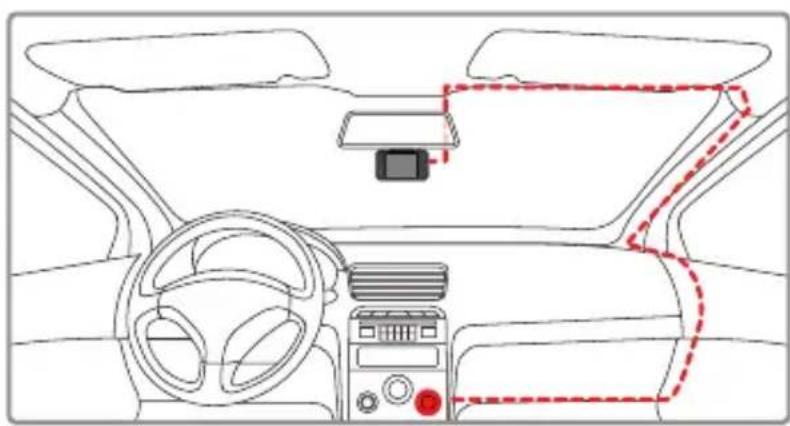
To power the device and charge the battery, use only the power adapter included. Connect the power cable to the mount or DVR, then plug the charger plug into the car's cigarette lighter/socket.
When the car engine starts, the device turns on automatically.
natural_image
Interior view of a car dashboard and steering wheel (no text or symbols visible)Note.
For best view, the device should be installed near the rear-view mirror in the center top of the windshield. Mount the lens so that the recorder captures 30% sky and 70% road.
Anti-glare filter (CPL filter)
The anti-glare (CPL) filter is an optical filter to ensure there are no glares and reflections on the windshield to improve video quality.
When using a CPL filter, follow the instructions below for the best video results:
- Install the DVR on the windshield in accordance with the recommendations above.
- Put a sheet of white paper on the dashboard
- Rotate the CPL filter until the reflection of a sheet of white paper on the DVR screen is minimal.
At night, it is recommended to remove the CPL filter to achieve the best recording result.
After adjusting the position of the CPL filter, remember the position of the guide line on the outer ring of the filter to be sure the next time setting the correct position takes less time.
6. Device operation
Device preparation
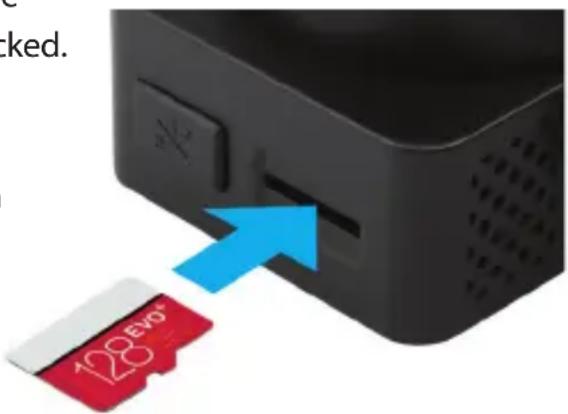
A. Insert the microSD card into the memory card slot.
Before installing a memory card, turn off the device; insert the memory card until it is locked.
Installing the card:
Turn the microSD card to the slot as shown in the picture and insert it until it clicks.
Removing a card: press the card slightly and then remove it from the slot.
text_image
eked. 128 EVOATTENTION: Attempting to insert a memory card wrong may damage the device and/or the memory card itself. Make sure the memory card is in the correct position.
Warning: Do not apply excessive force when inserting a memory card to avoid damage to the device. To insert a memory card, insert the microSD card into the slot until it locks (clicks); if necessary, use a needle to push the card further. To remove the memory card, push the card until it clicks and remove the card from the slot, if necessary, use a needle to push the card.
Turning the device on/off.
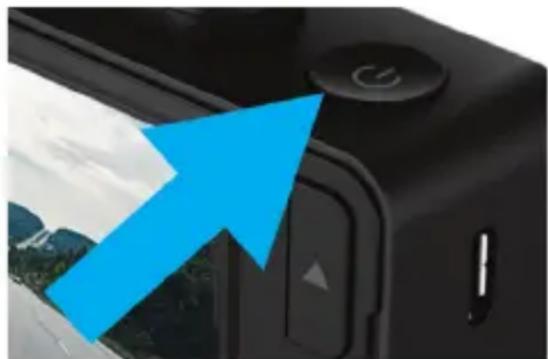
When the car engine starts, the device turns on automatically.
To turn the device on manually, press the power button.
To turn the device off, press and hold the power button for 3 seconds.
natural_image
Close-up of a black camera module with a blue arrow pointing to the button (no text or symbols visible)Loop recording
1) Insert the microSD card into the memory card slot; the Loop Recording mode turns on automatically.
2) It is recommended to set a 3-minute cycle (Settings).
3) When there is no more space left on the memory card, the device will automatically replaces the oldest video file with the newest one; exception is the files protected from deletion.
4) Video recordings taken in Loop Recording mode are stored in the Driving folder.
Emergency recording
Emergency recording is to protect the current video file from being overwritten and deleted. In order to protect the current video file,

press the Hot-key button; now the current video file is marked to prevent it from being deleted/overwritten. An icon appears on the screen.
Emergency recording is activated automatically when the G-sensor triggers (sudden acceleration/deceleration), or at collision. Emergency recording is locked automatically to avoid erasing during loop recording. The files protected from overwriting are stored on the memory card in the Locked folder.
ATTENTION! Files in the Locked folder can occupy no more than \~30% of the memory card space (depending on the file size). Once the Locked folder is full, the device starts a loop recording into the Locked folder. When the device is on, the display shows the warning "Locked folder is full!" To avoid losing the necessary files, please, transfer them from the memory card (for example, to a PC) in due time.
Night mode
When this feature is on, the device determines the light level and reduces the color of the image automatically to reduce noise for better resolution.
Parking mode
To activate the parking mode, press and hold the Hot-key button (if the Parking mode is assigned as an additional function in the settings menu).
If you use the original accessory to connect the DVR to the fuse box, turn on the Parking Mode in the menu.
When the original accessory to connect to the fuse box is used and the Parking mode is on, the device activates the parking mode when the ignition turns off. Videos recorded in the parking mode are of 30 seconds. To access the parking mode settings, select Parking mode, then On, and then press OK to access the submenu.
Settings available:
- Resolution: 1080p30fps / 720fps30fps / 720p25fps (XXXXp is the resolution and XXfps is the frame rate of recording in the parking mode)
- G-sensor sensitivity: 1 to 10 (where 10 is the maximum, and 1 is 1 means the minimum levels of sensitivity of the shock sensor)
- Parking duration: Off / 6 hours / 12 hours / 24 hours / 36 hours / 48 hours (once a specified period expires, the device turns off)
- Interval recording: Off / 125ms / 200ms / 250ms / 500ms / 1000ms
| Setting value | Real time within a 30 second video when recording a 30 fps (25 fps) video |
| 125ms | 112.5 s (93.75 s) |
| 200ms | 180 s (150 s) |
| 250ms | 225 s (187.5 s) |
| 500ms | 450 s (375 s) |
| 1000ms | 900 s (750 s) |
- Trigger Mode: By motion sensor * / By shock sensor / Both
ATTENTION! When the motion sensor is on, the device consumes the car battery more actively.
*Every time a motion is detected in front of the DVR, the DVR starts recording automatically.
All files recorded in the Parking Mode are stored in the Parking folder.
Playback/Delete Files
Playback
- In the standby mode, press and hold the M button to switch to the view mode.
- Select the file to view using the Up / Down and Confirm buttons.
- Using the Up / Down buttons, select the file you need to view and click the Confirm button to start playback.
Deletion
- Press the M button to enter the submenu.
- Use the UP / DOWN buttons to select Delete and press the OK button.
| Item | Description |
| Delete one | Delete this file. |
| Delete all | Delete all files. |
- Select the option to delete all files/one file, then confirm your choice by following the instructions on the display.
ATTENTION! Locked files can only be deleted when unlocked; to unlock them, use the Lock item of the submenu in the Playback mode. Another way to delete locked files is to format the memory card.
Note.
Deleted files cannot be restored. Backup necessary files before proceed with deletion.
Menu items
VIDEO mode
- Resolution: Full HD Max (1920 * 1080p 30 fps, max. detalization)
Full HD ECO (1920 * 1080p, 30 fps, normal detalization)
HD 60FPS (1280 * 720p, 60 fps)
HD 30FPS (1280 * 720, 30 fps)
VGA (640 * 480)
- Hot-key: Parking mode
This setting assigns an additional function to the Hot-key. As you launch of the original accessories, the firmware upgrades and the list of options for this setting expands.
- Parking mode: Off / On
When On is selected, the display shows a list of Parking mode settings. See "Parking mode".
- WDR: On/off.
It is not recommended to turn off this setting, since WDR provides quick exposure setting when the recording conditions suddenly change.
- Night mode: On/off/Auto
- Exposition: -2 to +2 (step = 1/3)
- Sharpness: Sharp/Standard/Soft
- Sound recording: On/off.
- G-sensor sensitivity: 1 to 10 (step = 1; max. 10)
Set the appropriate level depending on the operating conditions. Too high level will result in a large number of locked files.
- State number: Enter the vehicle's state number using numbers and letters of the Latin alphabet.
- Date / time stamp: On/off.
- Date/Time: use the buttons to set the current date
- Auto display off: Off / 7 sec / 30 sec / 1 min / 3 min
- Button sound: On/off.
- Language: select the preferred menu language from the list
- Formatting reminder: Off / 15d / 30d / 60d
- Formatting: Use the display instructions to format the memory card.
ATTENTION! After formatting a memory card, files cannot be recovered.
Before formatting, save the necessary files to your computer.
- Reset: use to reset the device to factory settings
- Software version: use to view the software version
PHOTO mode
- Resolution: 3M/2M/1.3M/VGA
- White balance: Auto balance / Sunny / Cloudy / Tungsten / Fluorescent
- ISO: Auto balance / 100/200/400
- Exposition: -2 to +2 (step = 1/3)
- Stabilization: On/off.
- Quick view: Off / 2 sec. / 5 sec.
- Date / time stamp: Off / Date / Date and Time
PLAYBACK mode
- Delete: Delete current file / Delete all files
- Block: Lock File / Unlock File / Lock All / Unlock All
- Slide show: 2 seconds / 5 seconds / 8 seconds
Updating Firmware
1) Download the firmware file at www.neoline.com and extract the file from the archive.
2) Format the memory card and transfer the extracted file to the microSD memory card.
3) Insert the memory card with the downloaded file into the DVR slot.
4) Connect the device to a power source and turn it on.
5) The indicator light will flash while the firmware file is being downloaded to the device.
6) Upon completion of the process, the device will reboot automatically.
7) Check in the settings menu if the correct firmware version is displayed.
8) Format the memory card with the DVR menu. ATTENTION! If the memory card is not formatted after the update, the update process will be started again the next time it is turned on.
ATTENTION! Do not turn off the DVR power during the firmware update.
7. Possible problems and their causes
This section helps you to eliminate problems the device may have under normal operation.
- Failure to photograph/record video.
Check if there is enough free space on the microSD card and if it is not blocked.
- Spontaneous stop at recording.
Too many video files stored. Only use at least class 10 high-speed microSD cards by proven manufacturers.
- When you try to view a photo/play a video file, the "wrong file" message appears.
File writing failure due to microSD card file system error. Format the microSD card.
- Blurred image.
Check for dirt on the lens and the CPL filter. If there is any, wipe the lens with a soft cloth before use (it is recommended to use special care products for the optics in order not to damage the surface of the lens).
- Darkened image when photographing the sky or water. Too much contrast in the scene may affect the exposure. Change the exposure in the settings menu.
- Hangup (no image, no button response).
Press the RESET button to reboot the device.
CE EAC F© RoHS
Manufactured for "Neolainas" LTD
Vilnius, Lithuania
Made in PRC
Official site: www.neoline.com
Technical support: support@neoline.com
Warranty: 12 months
Service life: 36 months
5VDC, 1.5A
Operating temperature: -10 °C to + 60 °C
Importer and authorized service organization:
see individual packaging