
ESC-1 - Uncategorized RAIN BIRD - Free user manual and instructions
Find the device manual for free ESC-1 RAIN BIRD in PDF.


| Product Type | Sprinkler Controller |
| Brand | Rain Bird |
| Model | ESC-1 |
| Dimensions | 8.5 x 6.5 x 2.5 inches |
| Weight | 1.2 lbs |
| Power Supply | 24V AC, 60Hz |
| Number of Zones | 4 |
| Waterproof Rating | Indoor use only |
| Compatibility | Rain Bird RSD series sensors |
| Programming | Easy push-button with LCD display |
| Manual Operation | Yes, manual start/stop per zone |
| Seasonal Adjustment | 0% to 200% in 10% increments |
| Rain Delay | Up to 72 hours |
| Warranty | 2 years limited |
| Included Accessories | Mounting screws, user manual |
| Certifications | UL, FCC |
Frequently Asked Questions - ESC-1 RAIN BIRD
User questions about ESC-1 RAIN BIRD
0 question about this device. Answer the ones you know or ask your own.
Ask a new question about this device
Download the instructions for your Uncategorized in PDF format for free! Find your manual ESC-1 - RAIN BIRD and take your electronic device back in hand. On this page are published all the documents necessary for the use of your device. ESC-1 by RAIN BIRD.
USER MANUAL ESC-1 RAIN BIRD
flowchart
graph TD
    A["Start"] --> B["Station Wearing Time"]
    B --> C["Warming Start Times"]
    C --> D["MV Pump Start"]
    D --> E["Program Overlap"]
    E --> F["Time Calendar"]
    F --> G["Event Day Off"]
    G --> H["Rain Delay"]
    H --> I["Man"]
    I --> J["Tug"]
    J --> K["Wad"]
    K --> L["Wed"]
    L --> M["Sun"]
    M --> N["Sat"]
    N --> O["Fri"]
    O --> P["Thu"]
    P --> Q["Cyclical Bar Cycle"]
    Q --> R["Custom"]
    R --> S["Cyclical"]
    S --> T["Odd Day Cycle"]
    T --> U["Pump MV Station"]
    U --> V["Event Day Cycle"]
    V --> W["Station Status"]
    W --> X["Cyclical Bar Cycle"]
    X --> Y["Custom Bar Cycle"]
    Y --> Z["Day Off"]
    Z --> AA["Pump MV Station"]
    AA --> AB["Event Day Cycle"]
    AB --> AC["Station Status"]
    AC --> AD["Cyclical Bar Cycle"]
    AD --> AE["Custom Bar Cycle"]
Contents
Introduction .... 1
Controls & Indicators .... 1
Quick Programming Guide ......2
Programming Instructions ...... 3
Set Time & Date....3
Select Program ....4
Select Watering Cycle ....4
Even / Odd Days 4
Cyclical 5
Custom 6
Set Station Watering Times ....6
Set Program Start Time(s) ......7
Set Program Stack / Overlap ......8
Set MV/Pump Start 8
Set Rain Delay 9
Set Water Budget 9
Set Event Day Off ....10
Set Delay Between Stations ....10
Operating Instructions ...... 11
Operate Automatically ....11
Operate Program(s) Manually ..... 11
Operate Station(s) Manually....12
Use Test Program ....13
Check Fuse Operation ....14
Use Diagnostic Circuit Breaker .....14
Index 15
Introduction
Using the buttons and dial on the ESC-1 faceplate, you can set up the controller to operate automatically, using programs. You can also run programs and stations manually, without making changes to the existing programs.
This manual provides step-by-step instructions for programming and operating the ESC-1.
Controls & Indicators
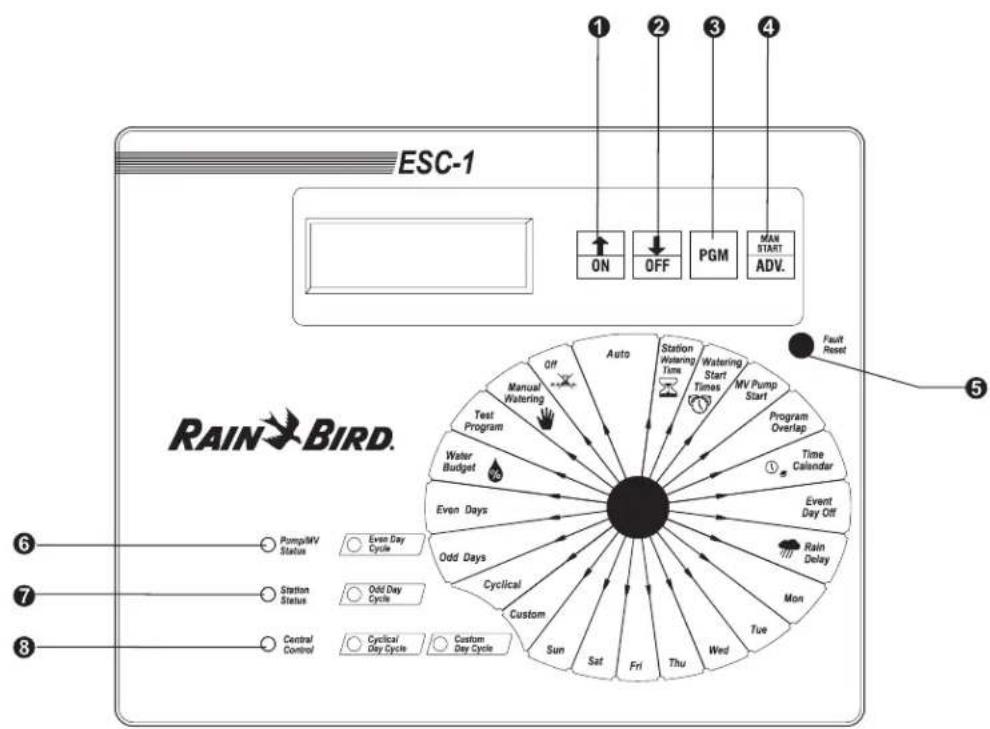
Before beginning, take a moment to familiarize yourself with the controller's faceplate. The following are short descriptions of each button and indicator.
① ON: Press to turn a setting on or to advance the setting in the display.
② OFF: Press to turn a setting off or to decrease the setting in the display.
③ PGM: Press to select the program. The indicator in the display cycles through programs A, B, C, and D.
④ MAN START/ADV: Press to advance to the next setting in the display or to start an operation.
⑤ FAULT RESET: Press to clear the fault reading from the display. Press this button after you have fixed a short circuit identified by the controller.
⑥ PUMP/MV STATUS: This light indicates that the Master Valve 1 (MV1) circuit is enabled for the active station.
⑦ STATION STATUS: This light indicates that a station valve is active.
⑧ CENTRAL CONTROL: This light indicates that the controller is in the central control position and is physically linked to the central control system.
flowchart
graph TD
    A["ESC-1"] --> B["1 ON"]
    A --> C["2 OFF"]
    A --> D["3 PGM"]
    A --> E["4 MAN START ADV."]
    F["RAIN-BIRD."] --> G["6 Pump/IV Status"]
    F --> H["7 Station Status"]
    F --> I["8 Central Control"]
    J["Fault Reset"] --> K["5 Event Day Off"]
    K --> L["6 Odd Days"]
    K --> M["7 Cycliclical"]
    K --> N["8 Custom"]
    K --> O["9 Sun"]
    K --> P["10 Sat"]
    K --> Q["11 Fri"]
    K --> R["12 Thu"]
    K --> S["13 Mon"]
    K --> T["14 Tue"]
    K --> U["15 Wed"]
    K --> V["16 Mon"]
    K --> W["17 Tue"]
    K --> X["18 Wed"]
    K --> Y["19 Day"]
    K --> Z["20 Mon"]
    K --> AA["21 Tue"]
    K --> AB["22 Wed"]
    K --> AC["23 Mon"]
    K --> AD["24 Tue"]
    K --> AE["25 Wed"]
    K --> AF["26 Mon"]
    K --> AG["27 Tue"]
    K --> AH["28 Wed"]
    K --> AI["29 Mon"]
    K --> AJ["30 Tue"]
    K --> AK["31 Wed"]
    K --> AL["32 Mon"]
    K --> AM["33 Tue"]
    K --> AN["34 Wed"]
    K --> AO["35 Mon"]
    K --> AP["36 Tue"]
    K --> AQ["37 Wed"]
    K --> AR["38 Mon"]
    K --> AS["39 Tue"]
    K --> AT["40 Wed"]
    K --> AU["41 Mon"]
    K --> AV["42 Tue"]
    K --> AW["43 Wed"]
    K --> AX["44 Mon"]
    K --> AY["45 Tue"]
    K --> AZ["46 Wed"]
    K --> BA["47 Mon"]
    K --> BB["48 Tue"]
    K --> BC["49 Wed"]
    K --> BD["50 Mon"]
    K --> BE["51 Tue"]
    K --> BF["52 Wed"]
    K --> BG["53 Mon"]
    K --> BH["54 Tue"]
    K --> BI["55 Wed"]
    K --> BJ["56 Mon"]
    K --> BK["57 Tue"]
    K --> BL["58 Wed"]
    K --> BM["59 Mon"]
    K --> BN["60 Tue"]
    K --> BO["61 Wed"]
    K --> BP["62 Mon"]
    K --> BQ["63 Tue"]
    K --> BR["64 Wed"]
    K --> BS["65 Mon"]
    K --> BT["66 Tue"]
    K --> BU["67 Wed"]
    K --> BV["68 Mon"]
    K --> BW["69 Tue"]
    K --> BX["70 Wed"]
    K --> BY["71 Mon"]
    K --> BZ["72 Tue"]
    K --> CA["73 Wed"]
    K --> CB["74 Mon"]
RAIN BIRD®
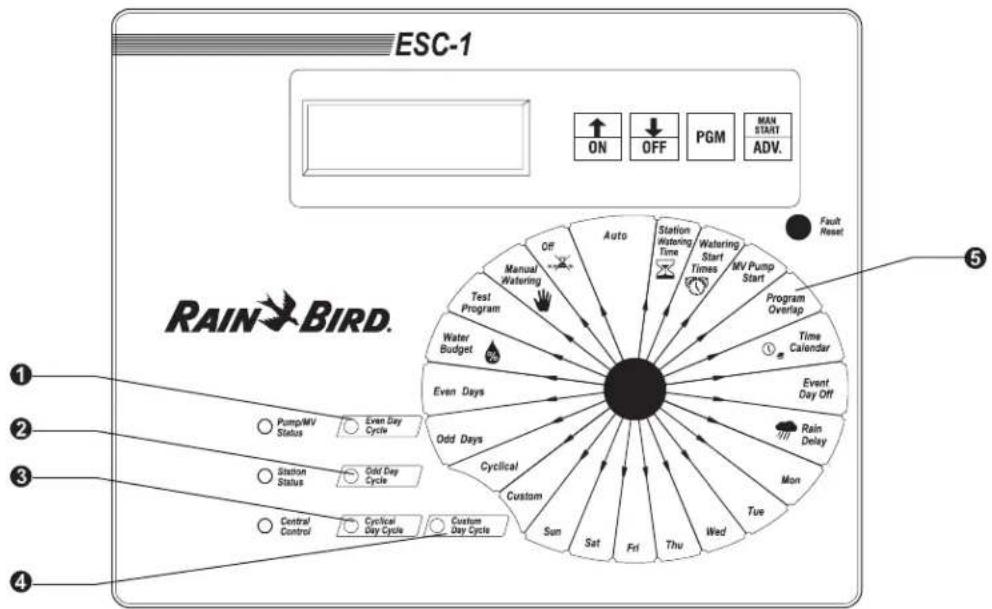
① EVEN DAY CYCLE: This light indicates that the controller's active program will water on even days of the month.
② ODD DAY CYCLE: This light indicates that the controller's active program will water on odd days of the month.
③ CYCLICAL DAY CYCLE: This light indicates that the controller's active program will water in a cycle with a specified number of days.
④ CUSTOM DAY CYCLE: This light indicates that the controller's active program will water on specific days of the week.
⑤ PROGRAMMING DIAL: Used to program and operate various functions of the controller.
Quick Programming Guide
Before you begin programming the ESC-1, we recommend that you write down the stations connected to the controller on the ESC-1 Quick Programming Guide.
You can find a blank copy of this form inside the door of the controller.
flowchart
graph TD
    A["ESC-1"] --> B["↑ ON"]
    B --> C["↓ OFF"]
    C --> D["PGM"]
    D --> E["MAIN START ADV."]
    F["RAIN-BIRD."] --> G["1"]
    F --> H["2"]
    F --> I["3"]
    F --> J["4"]
    F --> K["5"]
    L["Pump/MV Status"] --> M["Even Day Cycle"]
    N["Suston Status"] --> O["Odd Day Cycle"]
    P["Central Control"] --> Q["Cyclical Day Cycle"]
    R["Custom"] --> S["Cyclical"]
    T["Custom"] --> U["Cyclical"]
    V["Event Day Off"] --> W["Rain Delay"]
    X["Water Budget"] --> Y["Even Days"]
    Z["Program Overlap"] --> AA["Time Calendar"]
    AB["Fault Reset"] --> AC["Off Manual Watering"]
    AD["Manual Watering"] --> AE["Test Program"]
    AF["Water"] --> AG["Event Day Off"]
    AH["Event Day Off"] --> AI["Day Off"]
    AJ["Day Off"] --> AK["Day Off"]
    AL["Day Off"] --> AM["Day Off"]
    AN["Day Off"] --> AO["Day Off"]
    AP["Day Off"] --> AQ["Day Off"]
    AR["Day Off"] --> AS["Day Off"]
    AT["Day Off"] --> AU["Day Off"]
    AV["Day Off"] --> AW["Day Off"]
    AX["Day Off"] --> AY["Day Off"]
    AZ["Day Off"] --> BA["Day Off"]
    BB["Day Off"] --> BC["Day Off"]
    BD["Day Off"] --> BE["Day Off"]
    BF["Day Off"] --> BG["Day Off"]
    BH["Day Off"] --> BI["Day Off"]
    BJ["Day Off"] --> BK["Day Off"]
    BL["Day Off"] --> BM["Day Off"]
    BN["Day Off"] --> BO["Day Off"]
    BP["Day Off"] --> BQ["Cyclical"]
    BR["Cyclical"] --> BS["Cyclical"]
    BT["Cyclical"] --> BU["Cyclical"]
    BV["Cyclical"] --> BW["Cyclical"]
    BX["Cyclical"] --> BY["Cyclical"]
    BZ["Cyclical"] --> CA["Cyclical"]
    CB["Cyclical"] --> CC["Cyclical"]
    CD["Cyclical"] --> CE["Cyclical"]
    CF["Cyclical"] --> GD["Cyclical"]
    HE["Cyclical"] --> ID["Cyclical"]
    AJC["Cyclical"] --> AJ["Cyclical"]
    AKC["Cyclical"] --> AK["Cyclical"]
    ALC["Cyclical"] --> AL["Cyclical"]
    AMC["Cyclical"] --> AM["Cyclical"]
    ANC["Cyclical"] --> AN["Cyclical"]
    AOC["Cyclical"] --> AO["Cyclical"]
    APC["Cyclical"] --> AP["Cyclical"]
    AQC["Cyclical"] --> AQ["Cyclical"]
    ARC["Cyclical"] --> AR["Cyclical"]
Programming Instructions
Set Time & Date
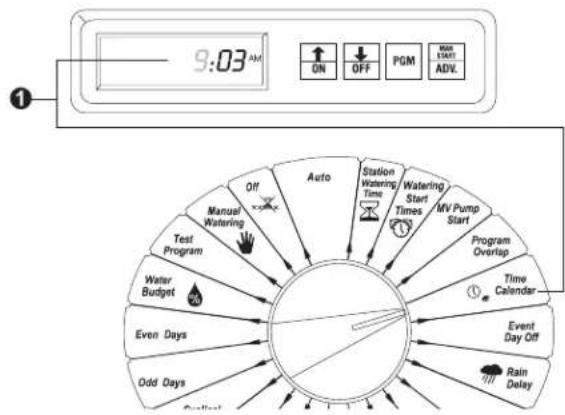
To program the controller, you must first set the internal clock and calendar:
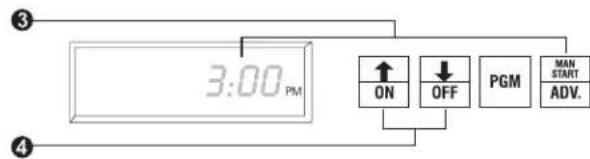
① Turn the dial to TIME/CALENDAR. The hour digits in the display flash.
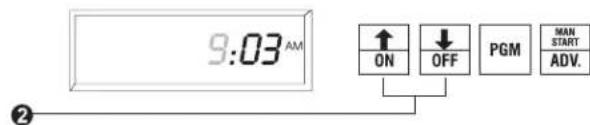
② Use the arrow keys to set the hour to the current time.

NOTE: The 60 Hz model displays time in 12-hour am/pm mode. The 50 Hz model displays time in 24-hour mode. If you have a 60 Hz model, the am/pm designation changes as you pass 12:00.
③ Press MAN START/ADV. The minute digits flash.
④ Use the arrow keys to set the minutes to the current time.
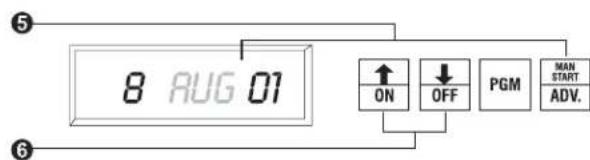
⑤ Press MAN START/ADV. A new display appears with the day, month, and year. The month flashes.
⑥ Use the arrow keys to set the month, day, and year the same way you set the hour and minutes.
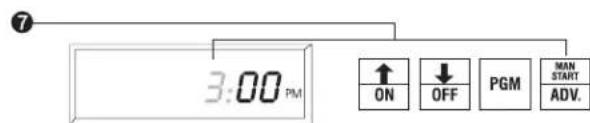
⑦ Press MAN START/ADV to return to the time of day display. The hour continues to flash as long as the dial is left at TIME/CALENDAR.
⑧ Return the dial to AUTO. The display shows the day of the week and time of day.
flowchart
graph TD
    A["9:03 AM"] --> B["ON"]
    A --> C["OFF"]
    A --> D["PGM"]
    A --> E["MAX START ADV"]
    F["Manual Watering"] --> G["Off"]
    G --> H["Auto"]
    H --> I["Station Watering Time"]
    H --> J["Watering Start Times"]
    H --> K["MV Pump Start"]
    L["Test Program"] --> M["Water Budget"]
    M --> N["Even Days"]
    M --> O["Odd Days"]
    P["Program Overlap"] --> Q["Time Calendar"]
    Q --> R["Event Day Off"]
    S["Rain Delay"] --> T["Rain Delay"]
    U["Off"] --> V["Manual Watering"]
    W["Off"] --> X["Manual Watering"]
    Y["Off"] --> Z["Manual Watering"]
RAIN BIRD®
Select Program
The ESC-1 offers four program settings: A, B, C, and D. You can set each program to water according to your needs.
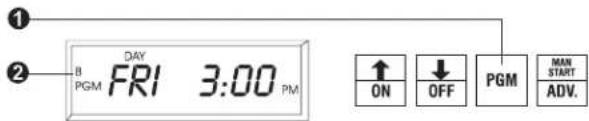
① Press PGM to cycle through the available programs.
② The program indicator on the far left side of the display shows the currently selected program, A, B, C, or D.

NOTE: We recommend that you enter all information for one program before you begin another program. Switching back and forth between programs can be confusing.
Select Watering Cycle
Each program can operate in one of four cycle modes. All programs default to the CUSTOM cycle.
- CUSTOM waters on the days of the week you select.
• CYCLICAL waters according to a cycle with a specified number of days. - ODD waters only on odd-numbered days of the month.
• EVEN waters only on even days of the month.
Even / Odd Days
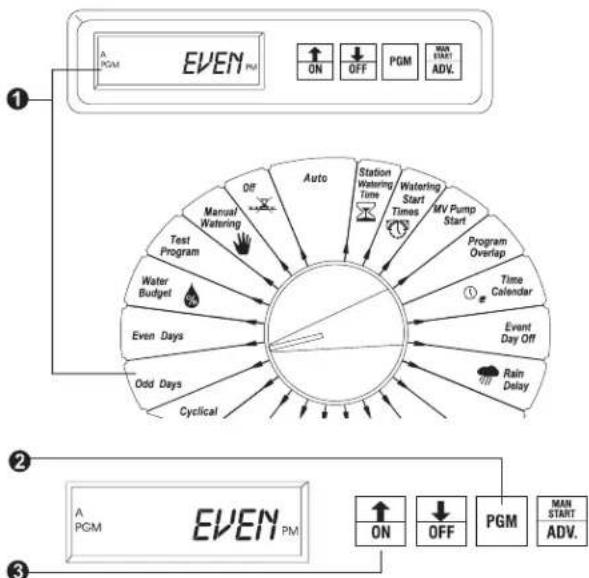
To set a program to water on ODD or EVEN days:
① Turn the dial to ODD DAYS or EVEN DAYS. The display shows the selected program and ODD or EVEN. If the display shows USED, the program is active and using a different cycle mode. If this is the case, any changes you make will override the previous cycle setting.
② Press PGM to display the program you want to set or change.
③ Press ON. The display shows either ODD or EVEN, and the corresponding light on the faceplate comes on.
flowchart
graph TD
    A["1: A PGM"] --> B["2: A PGM"]
    B --> C["3: EVEN PM"]
    C --> D["↑ ON"]
    C --> E["↓ OFF"]
    C --> F["PGM"]
    C --> G["MAN START ADV."]
    B --> H["Off Manual Watering"]
    B --> I["Test Program"]
    B --> J["Water Budgel"]
    B --> K["Even Days"]
    B --> L["Odd Days"]
    B --> M["Cyclical"]
    B --> N["Auto"]
    B --> O["Station Watering Time"]
    B --> P["Watering Start Times"]
    B --> Q["MV Pump Start"]
    B --> R["Program Overlap"]
    B --> S["Time Calendar"]
    B --> T["Event Day Off"]
    B --> U["Rain Delay"]
ESC-1 Operation Manual4
④ Return the dial to AUTO. The controller displays the time of day.

NOTE: The 31 ^st day of the month defaults to ON. If you do not want to water on the 31 ^st , you must set that day to OFF. For more information, see “Set Event Day Off” on page 10.
Cyclical
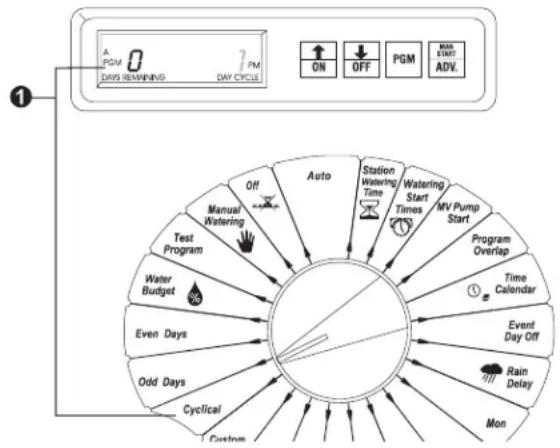
To set a program to water at specified intervals:
① Turn the dial to CYCLICAL. The left side of the display shows the number of days remaining in the cycle. The right side shows the total number of days in the cycle. The number on the right flashes.
If the display shows USED, the program is active and using a different cycle mode. To change the program, continue following these steps.
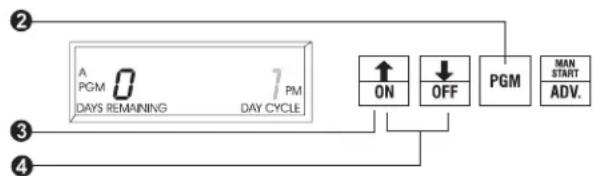
② Press PGM to display the program you want to set or change.
③ Press ON. The cyclical display appears, and the cyclical light on the faceplate comes on. The number on the right of the display flashes.
If the number on the left flashes after you push ON, press MAN START/ADV to select the number on the right.
④ Use the arrow keys to set the number of days in the cycle. For example, if you set a 3-day cycle, the controller skips two days and waters on the third day.
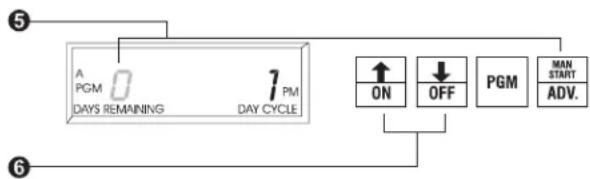
⑤ Press MAN START/ADV to select the number on the left side of the display. This number flashes.
⑥ Use the arrow keys to set the number of days remaining before the next watering day. This tells the controller where today is in the cycle you have just set.
⑦ Return the dial to AUTO. The controller displays the time of day.
flowchart
graph TD
    A["A PCM 0 DAYS REMAINING"] --> B["1 PM DAY CIRCLE"]
    B --> C["ON"]
    B --> D["OFF"]
    B --> E["PGM"]
    B --> F["RAT START ADV."]
    G["Auto"] --> H["Station Watering Time"]
    G --> I["Watering Start Times"]
    G --> J["MV Pump Start"]
    G --> K["Program Overlap"]
    G --> L["Time Calendar"]
    M["Manual Watering"] --> N["Test Program"]
    O["Water Budget"] --> P["Even Days"]
    Q["Odd Days"] --> R["Cyclical"]
    S["Custom"] --> T["Event Day Off"]
    U["Rain Delay"] --> V["Mon"]
flowchart
graph TD
    A["② A PGM 0 DAYS REMAINING 7 PM DAY CYCLE"] --> B["↑ ON"]
    B --> C["↓ OFF"]
    C --> D["PGM"]
    D --> E["MAN START ADV."]
    F["③"] --> B
    G["④"] --> B
flowchart
graph TD
    A["7 PM DAY CYCLE"] --> B["ON"]
    A --> C["OFF"]
    A --> D["PGM"]
    A --> E["MAN START ADV."]
    F["A PGM DAYS REMAINING"] --> A
RAIN BIRD®
Custom
To set a program to water on specified days:
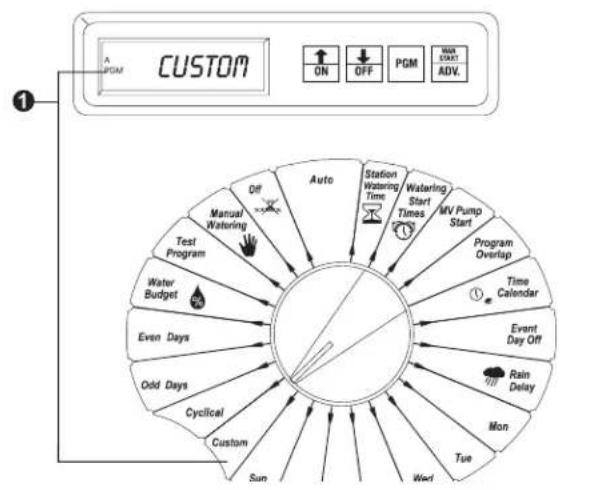
① Turn the dial to CUSTOM. The display shows the program and CUSTOM.
If the display shows USED, the program is active and using a different cycle mode. To change the program, continue following these steps.
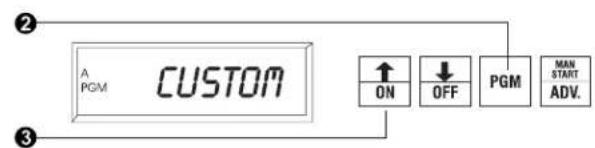
② Press PGM to display the program you want to set or change.
③ Press ON. The display shows CUSTOM and the custom light on the faceplate comes on.
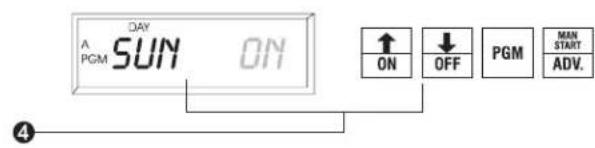
④ Turn the dial to the first day of the week. Use the ON and OFF keys to turn the day on or off. The display shows the day and the ON/OFF setting.
⑤ Repeat step 4 for all days of the week.
⑥ Return the dial to AUTO. The controller displays the time of day.
Set Station Watering Times
Within the program you are setting, you can set the length of a station's watering time from 0 minutes to 12 hours. Set the time in one-minute increments for up to two hours and in 10-minute increments from two hours to 12 hours.
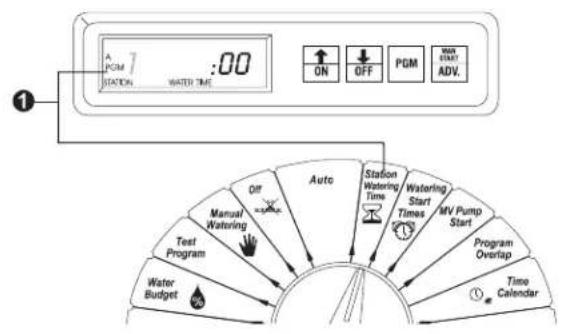
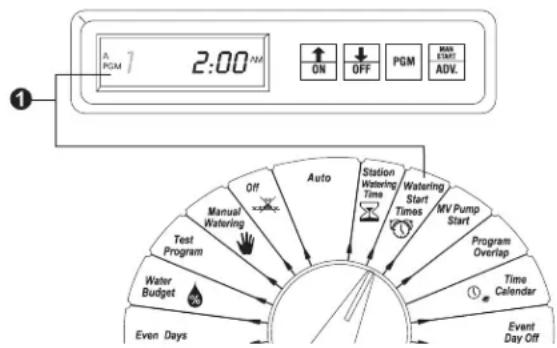
① Turn the dial to STATION WATERING TIME. The display shows the program, the station number, and the length of watering time. The station number flashes. If the station is included in any other program, the controller will display USED.
② Press PGM to display the program you want to set or change.
③ Use the arrow keys to change the number on the left side of the screen until it displays the station number you want to set.
flowchart
graph TD
    A["Custom"] --> B["Manual Watering"]
    B --> C["Test Program"]
    C --> D["Water Budget"]
    D --> E["Even Days"]
    E --> F["Cyclical"]
    F --> G["Cyclical"]
    G --> H["Custom"]
    H --> I["Sun"]
    I --> J["Day Off"]
    J --> K["Event Day Off"]
    K --> L["Rain Delay"]
    L --> M["Tue"]
    M --> N["Mon"]
    N --> O["Program Overlap"]
    O --> P["Time Calendar"]
    P --> Q["Water Pump Start"]
    Q --> R["MV Pump Start"]
    R --> S["Watering Start Times"]
    S --> T["Station Watering Time"]
    T --> U["Auto"]
    U --> V["OFF"]
    V --> W["ON"]
    W --> X["PGM"]
    X --> Y["PGM"]
    Y --> Z["PGM"]
    Z --> AA["PGM"]
ESC-1 Operation Manual6
RAIN BIRD®
④ Press MAN START/ADV to select the numbers on the right side of the screen. These numbers flash.
⑤ Use the arrow keys to set the length of watering time. If USED shows, you can still set the length of time. (You can include the same station in different programs and give that station different lengths of watering time.)
⑥ Return the dial to AUTO. The controller displays the time of day.
Set Program Start Time(s)
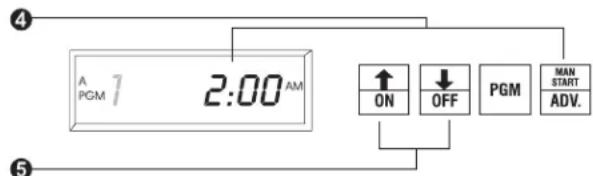
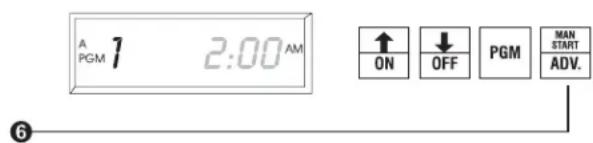
You may assign each program up to eight start times per day, available on the quarter hour.
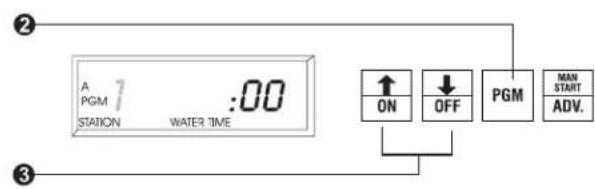
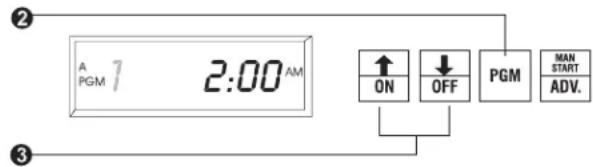
① Turn the dial to WATERING START TIME. The display shows the program, the number of the start time, and the start time. The number of the start time flashes.
② Press PGM to display the program you want to set or change.
③ Use the arrow keys to select one of the eight start times. Any unprogrammed start time will display OFF on the right side of the screen.
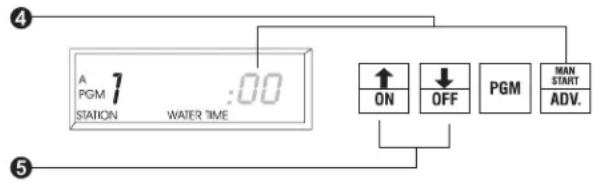
④ Press MAN START/ADV to toggle to the right side of the display. The start time flashes.
⑤ Us the arrow keys to select a start time. Start times are available in fifteen minute intervals, with an OFF setting available between the 11:45 pm and 12:00 am options on the 60 Hz (23:45 and 24:00 on the 50 Hz model).

NOTE: Start times appear in chronological order. If you add a start time or delete one by setting it OFF, the controller automatically reorganizes the times so that they appear in chronological order. This reorganizing occurs when you move the dial off WATERING START TIMES.
⑥ If you want to set additional start times, press MAN START/ADV to select the left side of the display and the next available start time number. Set the next start time in the same way as the first.
⑦ Return the dial to AUTO. The controller displays the time of day.
ESC-1 Operation Manual
flowchart
graph TD
    A["Event Day Off"] --> B["Event Calendar"]
    B --> C["Water Budget"]
    C --> D["Test Program"]
    D --> E["Manual Watering"]
    E --> F["Auto"]
    F --> G["Station Watering Time"]
    G --> H["Watering Start Times"]
    H --> I["MV Pump Start"]
    I --> J["Program Overlap"]
    J --> K["ON OFF PGM MAX END ADV."]
    style A fill:#f9f,stroke:#333
    style B fill:#ccf,stroke:#333
    style C fill:#cfc,stroke:#333
    style D fill:#fcc,stroke:#333
    style E fill:#cff,stroke:#333
    style F fill:#ffc,stroke:#333
    style G fill:#cfc,stroke:#333
    style H fill:#cfc,stroke:#333
    style I fill:#cfc,stroke:#333
    style J fill:#cfc,stroke:#333
    style K fill:#cfc,stroke:#333
    style_L["A PGM 7 2:00 PM"] --> M["ON OFF PGM MAX END ADV."]
RAIN BIRD®
Set Program Stack / Overlap
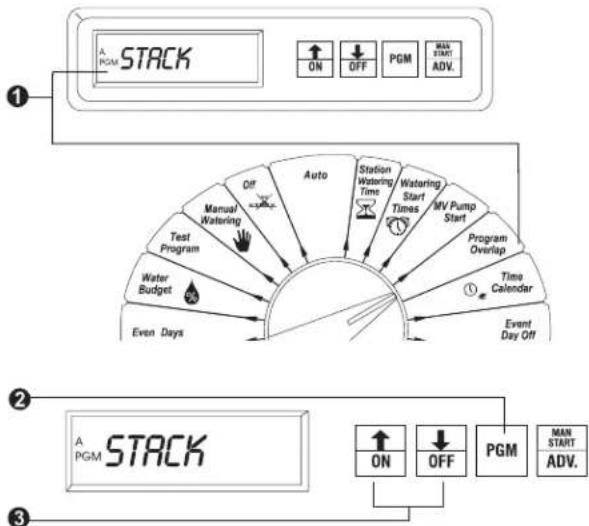
You can set a program to stack (run one at a time) or overlap (run simultaneously). The ESC-1 can run up to nine valves simultaneously. The default setting is to stack all programs.
① Turn the dial to PROGRAM OVERLAP. The display shows the program and STACK or OVERLAP.
② Press PGM to display the program you want to set or change.
③ Use the arrow keys to set the program to either STACK or OVERLAP.
④ Return the dial to AUTO. The controller display the time of day.
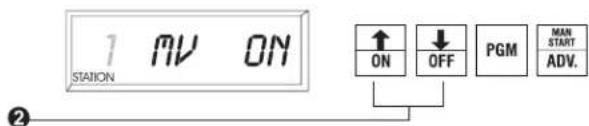
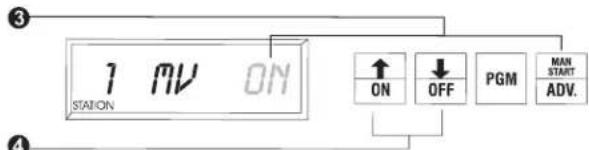
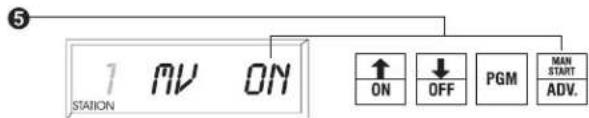
Set MV/Pump Start
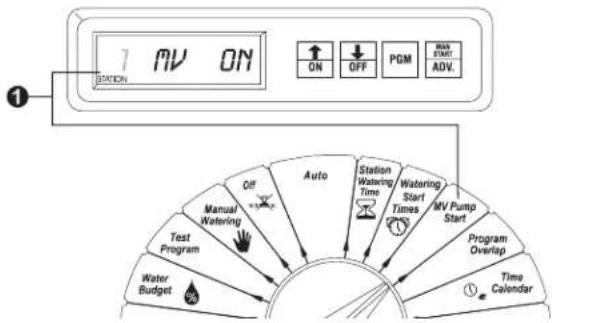
The ESC-1 has two master valve terminals on its circuit board. The operation of any station activates MV2 (master valve 2). You can activate or deactivate MV1 (master valve 1) for each individual station.
① Turn the dial to MV PUMP START. The display shows the station number and MV ON or OFF. The station number flashes.
② Use the arrow keys to select the station number.
③ Press MAN START/ADV to toggle to the right side of the display. ON or OFF flashes.
④ Press either the ON or OFF key.
⑤ If you want to set another station, press MAN START/ADV to return to the left side of the display and continue setting stations.
⑥ When you finish setting stations, return the dial to AUTO. The controller displays the time of day.
flowchart
graph TD
    A["1: A PGM STACK"] --> B["ON"]
    B --> C["OFF"]
    C --> D["PGM"]
    D --> E["MAX START ADV."]
    F["2: A PGM STACK"] --> G["ON"]
    G --> H["OFF"]
    H --> I["PGM"]
    I --> J["MAX START ADV."]
    K["3: Event Day Off"] --> L["Event Day Off"]
    M["Water Budget"] --> N["Manual Watering"]
    O["Even Days"] --> P["Off"]
    Q["Test Program"] --> R["Auto"]
    S["Water"] --> T["Station Watering Time"]
    U["Testing"] --> V["Starting Times"]
    W["Water/Watering"] --> X["MV Pump Start"]
    Y["Program Overlap"] --> Z["Time Calendar"]
flowchart
graph TD
    A["1"] --> B["ON"]
    B --> C["OFF"]
    C --> D["PGM"]
    D --> E["RAN FROM ADV."]
    A --> F["Water Budget"]
    F --> G["Manual Watering"]
    G --> H["Test Program"]
    H --> I["Off"]
    I --> J["Auto"]
    J --> K["Station Watering Time"]
    K --> L["Watering Start Times"]
    L --> M["MV Pump Start"]
    M --> N["Program Overlap"]
    N --> O["Time Calendar"]
ESC-1 Operation Manual8
RAIN BIRD®
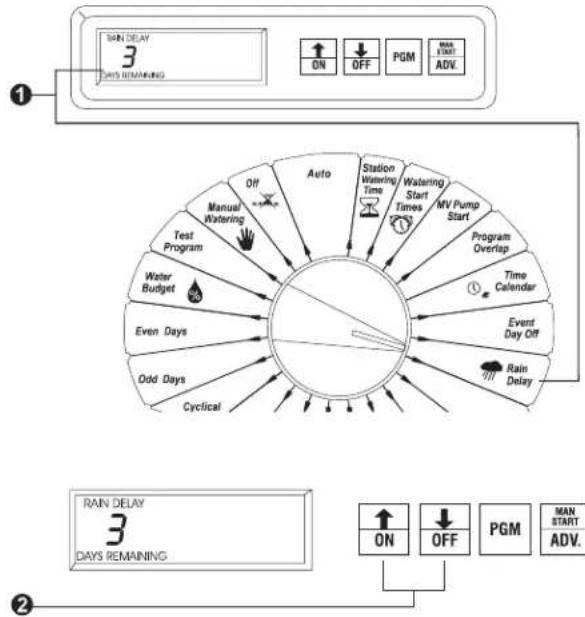
Set Rain Delay
The ESC-1 lets you delay watering for a specified number of days. The rain delay setting affects all programs.
① Turn the dial to RAIN DELAY. The display shows RAIN DELAY and the number of days until the next cycle.
② Use the arrow keys to set the number of days to the next cycle.
③ Return the dial to AUTO. The controller displays the time of day and delays watering for the number of days you specified.
④ To cancel a Rain Delay, reset the number of days to 0.
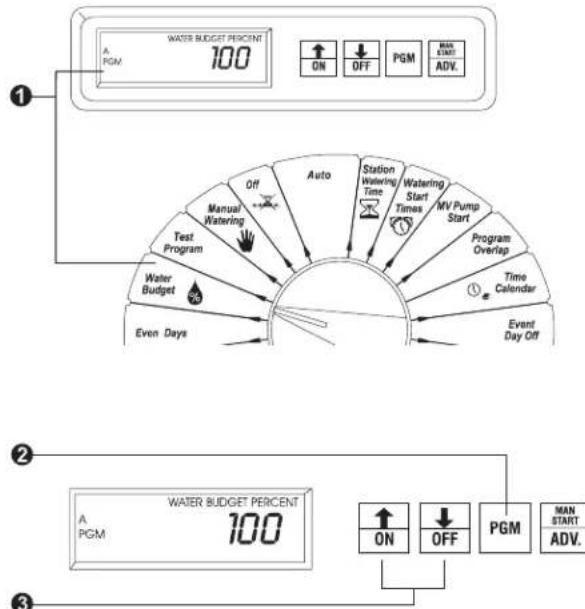
Set Water Budget
The water budget feature lets you increase or decrease a program's watering time in increments of one percent without having to reset the timing for each station in the program. You can set the budget for 0% to 300% . You can use the 0% setting to shut a program down temporarily.
① Turn the dial to WATER BUDGET. The display shows the program and the water budget percentage.
② Press PGM to display the program you want to set or change.
③ Use the arrow keys to set the percentage.
④ Return the dial to AUTO. The controller displays the time of day.
The default percentage for all programs is 100%. If the water budget for a program is set to other than 100%, WATER BUDGET shows in the display when you select that program.
flowchart
graph TD
    A["1: Rain Delay 3 DAYS REMAINING"] --> B["2: Rain Delay 3 DAYS REMAINING"]
    B --> C["Manual Watering"]
    C --> D["Test Program"]
    D --> E["Water Budget"]
    E --> F["Even Days"]
    F --> G["Odd Days"]
    G --> H["Cyclical"]
    H --> I["Auto"]
    I --> J["Station Watering/Time"]
    J --> K["Watering Start Times"]
    K --> L["MV Pump Start"]
    L --> M["Program Overlap"]
    M --> N["Time Calendar"]
    N --> O["Event Day Off"]
    O --> P["Rain Delay"]
    P --> Q["ON"]
    Q --> R["OFF"]
    R --> S["PGM"]
    S --> T["MAN START ADV."]
    T --> U["↑ ON"]
    U --> V["↓ OFF"]
    V --> W["↑ ON"]
    W --> X["↓ OFF"]
    X --> Y["PGM"]
    Y --> Z["MAN START ADV."]
flowchart
graph TD
    A["1: Water Budget Percent"] --> B["100% PGM"]
    B --> C["ON"]
    B --> D["OFF"]
    B --> E["PGM"]
    B --> F["MAN START ADV."]
    G["2: Water Budget Percent"] --> H["100% PGM"]
    H --> I["ON"]
    H --> J["OFF"]
    H --> K["PGM"]
    H --> L["MAN START ADV."]
    M["3: Water Budget Percent"] --> N["100% PGM"]
    N --> O["ON"]
    N --> P["OFF"]
    N --> Q["PGM"]
    N --> R["MAN START ADV."]
RAIN BIRD®
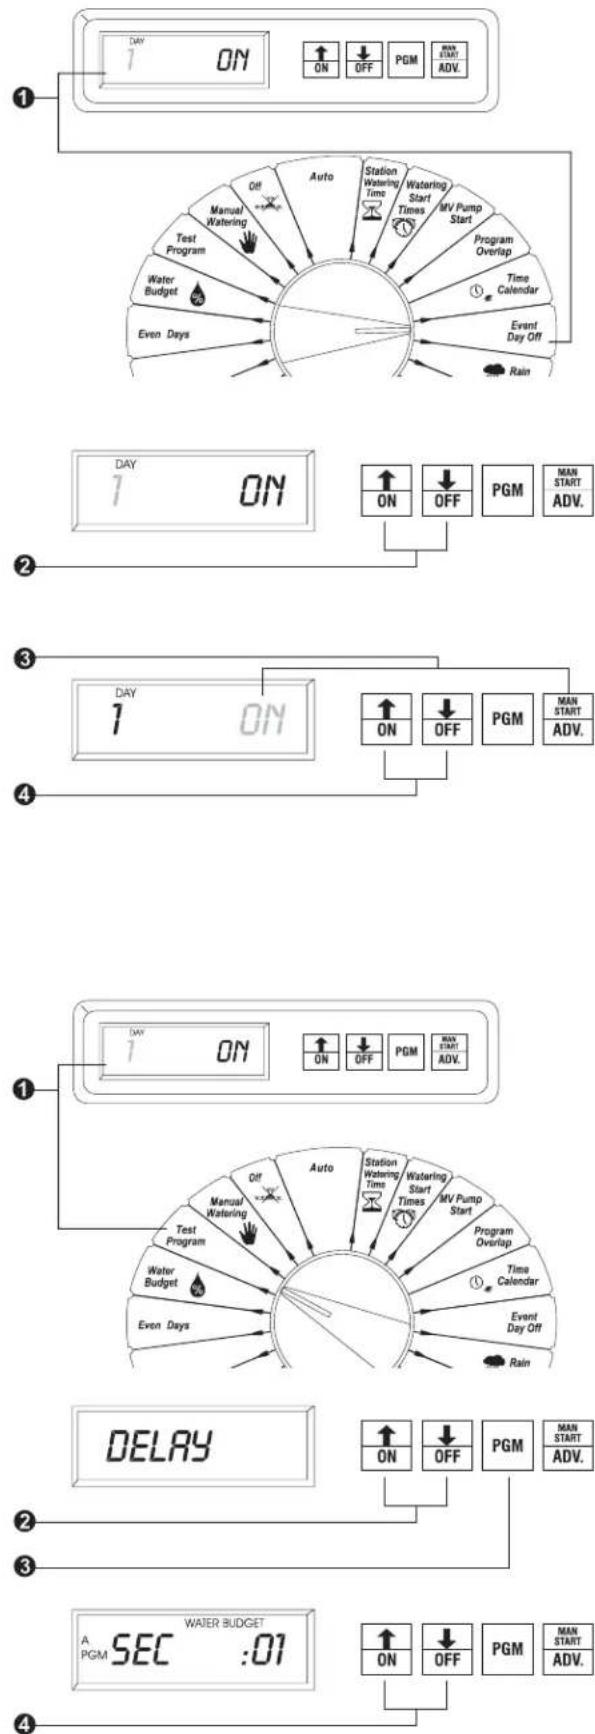
Set Event Day Off
The Event Day Off feature lets you temporarily skip watering on specific days of the month. After a selected date passes, that day returns to the default setting. The default setting for all days is ON.
If you set the 31 ^st to OFF, it remains off until you set it back to ON. This feature is useful in areas that prohibit irrigation consecutive days, such as the on the 31 ^st and the 1 ^st .
① Turn the dial to EVENT DAY OFF. The display shows the day of the month on the left side and the ON or OFF setting on the right. The day of the month flashes.
② Use the arrow keys to set the day of the month you want to turn off.
③ Press MAN START/ADV to select the right side of the display. The ON/OFF setting flashes.
④ Use the ON/OFF buttons to set the day on or off.
⑤ Return the dial to AUTO. The controller displays the time of day. When a day off arrives, the display will show NON (non-watering day) and the controller will not allow watering.
Set Delay Between Stations
The ESC-1 lets you set a delay between stations for each program. The delay can be from 0 seconds (default) to nine hours.
① Turn the dial to TEST PROGRAM.
② Press both the ON and OFF buttons simultaneously. The display shows DELAY.
③ Press the PGM button to select the program you want to delay.
④ Use the arrow keys to select the delay time. Set the time in one-second increments for up to five minutes, and in one-minute increments from five minutes to nine hours.
flowchart
graph TD
    A["1: DAY 7 ON"] --> B["2: DAY 7 ON"]
    B --> C["3: DAY 7 ON"]
    C --> D["4: DAY 7 ON"]

    subgraph Panel_1
        A1["ON"] --> A2["OFF"] --> A3["PGM"] --> A4["MAIN START ADV."]
        A5["Manual Watering"] --> A6["Off"] --> A7["Auto"] --> A8["Station Watering Time"] --> A9["Watering Start Times"] --> A10["MV Pump Start"]
        A11["Test Program"] --> A12["Off"] --> A13["Water Budget"] --> A14["Event Days"]
        A15["Water Budget"] --> A16["Off"] --> A17["Event Day Off"]
        A18["Event Days"] --> A19["Off"] --> A20["Rain"]
    end

    subgraph Panel_2
        B1["ON"] --> B2["OFF"] --> B3["PGM"] --> B4["MAIN START ADV."]
        B5["Manual Watering"] --> B6["Off"] --> B7["Auto"] --> B8["Station Watering Time"] --> B9["Watering Start Times"] --> B10["MV Pump Start"]
        B11["Test Program"] --> B12["Off"] --> B13["Water Budget"] --> B14["Event Days"]
        B15["Water Budget"] --> B16["Off"] --> B17["Event Day Off"]
        B18["Event Days"] --> B19["Off"] --> B20["Rain"]
    end

    subgraph Panel_3
        C1["ON"] --> C2["OFF"] --> C3["PGM"] --> C4["MAIN START ADV."]
        C5["Manual Watering"] --> C6["Off"] --> C7["Auto"] --> C8["Station Watering Time"] --> C9["Watering Start Times"] --> C10["MV Pump Start"]
        C11["Test Program"] --> C12["Off"] --> C13["Water Budget"] --> C14["Event Days"]
        C15["Water Budget"] --> C16["Off"] --> C17["Event Day Off"]
        C18["Event Days"] --> C19["Off"] --> C20["Rain"]
    end

    subgraph Panel_4
        D1["ON"] --> D2["OFF"] --> D3["PGM"] --> D4["MAIN START ADV."]
        D5["Manual Watering"] --> D6["Off"] --> D7["Auto"] --> D8["Station Watering Time"] --> D9["Watering Start Times"] --> D10["MV Pump Start"]
        D11["Test Program"] --> D12["Off"] --> D13["Water Budget"] --> D14["Event Days"]
        D15["Water Budget"] --> D16["Off"] --> D17["Event Day Off"]
        D18["Event Days"] --> D19["Off"] --> D20["Rain"]
    end

    subgraph Panel_5
        E1["ON"] --> E2["OFF"] --> E3["PGM"] --> E4["MAIN START ADV."]
        E5["Manual Watering"] --> E6["Off"] --> E7["Auto"] --> E8["Station Watering Time"] --> E9["Watering Start Times"] --> E10["MV Pump Start"]
        E11["Test Program"] --> E12["Off"] --> E13["Water Budget"] --> E14["Event Days"]
        E15["Water Budget"] --> E16["Off"] --> E17["Event Day Off"]
        E18["Event Days"] --> E19["Off"] --> E20["Rain"]
    end

    subgraph Panel_6
        F1["ON"] --> F2["OFF"] --> F3["PGM"] --> F4["MAIN START ADV."]
        F5["Manual Watering"] --> F6["Off"] --> F7["Auto"] --> F8["Station Watering Time"] --> F9["Watering Start Times"] --> F10["MV Pump Start"]
        F11["Test Program"] --> F12["Off"] --> F13["Water Budget"] --> F14["Event Days"]
        F15["Water Budget"] --> F16["Off"] --> F17["Event Day Off"]
        F18["Event Days"] --> F19["Off"] --> F20["Rain"]
    end

    subgraph Panel_7
        G1["ON"] --> G2["OFF"] --> G3["PGM"] --> G4["MAIN START ADV."]
        G5["Manual Watering"] --> G6["Off"] --> G7["Auto"] --> G8["Station Watering Time"] --> G9["Watering Start Times"] --> G10["MV Pump Start"]
        G11["Test Program"] --> G12["Off"] --> G13["Water Budget"] --> G14["Event Days"]
        G15["Water Budget"] --> G16["Off"] --> G17["Event Day Off"]
        G18["Event Days"] --> G19["Off"] --> G20["Rain"]
    end

    subgraph Panel_8
        H1["ON"] --> H2["OFF"] --> H3["PGM"] --> H4["MAIN START ADV."]
        H5["Manual Watering"] --> H6["Off"] --> H7["Auto"] --> H8["Station Watering Time"] --> H9["Watering Start Times"] --> H10["MV Pump Start"]
        H11["Test Program"] --> H12["Off"] --> H13["Water Budget"] --> H14["Event Days"]
        H15["Water Budget"] --> H16["Off"] --> H17["Event Day Off"]
        H18["Event Days"] --> H19["Off"] --> H20["Rain"]
    end
ESC-1 Operation Manual10
Operating Instructions
Once you have programmed the ESC-1, you may let it operate automatically, or you can operate it manually. When you operate the ESC-1 manually, you do not affect any of the programmed instructions.
Operate Automatically
To operate the controller automatically, turn the dial to AUTO. The controller automatically runs the programs you have entered, on the days and times you have selected.
To stop a program from operating during its normal cycle, turn the dial to the OFF position. The program will not start again until its next start time.
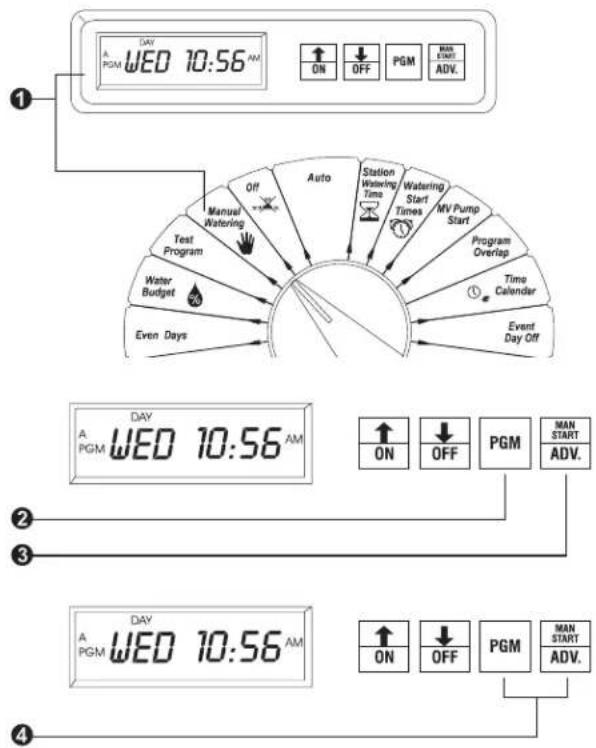
Operate Program(s) Manually
You can select, start, and manually advance programs for semiautomatic operation.
① Turn the dial to AUTO. The display shows the day of the week and the time of day.
② Press PGM to display the program you want to operate.
③ Press MAN START/ADV to start the selected program.
④ To operate more than one program, press PGM to select another program. Press MAN START/ADV again. The second program begins when the first finishes. You can stack all four programs this way.
RAIN BIRD®
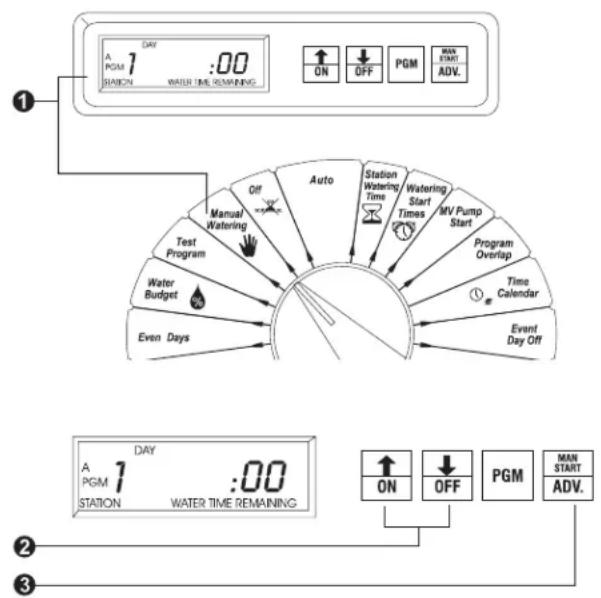
Operate Station(s) Manually
You can manually operate a single station or several stations. If you operate more than one station, they will run in the order in which they were selected.
① Turn the dial to MANUAL WATERING. The display shows the program, station number, and any watering time remaining on that station.
② Use the arrow keys to select the station you want to operate.
③ Press MAN START/ADV to start the selected station.
④ To operate more than one station, repeat steps 2 through 4.
⑤ Return the dial to AUTO. The controller returns to the time of day display and the stations operate in the sequence in which they were selected. After the stations finish watering, the controller returns to automatic mode.

NOTES: When you operate a station manually, you cannot set the amount of time the station waters. It will run for the amount of time already programmed. However, you can shut the station off by pressing MAN START/ADV again or turning the dial to the OFF position.
If you want to see the run time remaining for a manually started station, turn the dial to AUTO. If you view the display with the dial set to MANUAL WATERING, the run time will not count down.
RAIN BIRD®
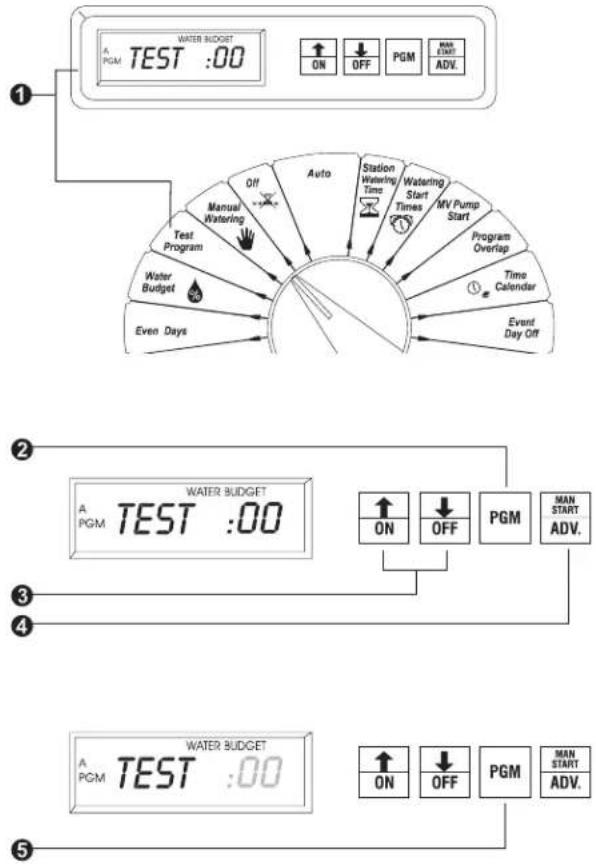
Use Test Program
The ESC-1 lets you run a test cycle for all the stations on a particular program. You may choose how long the test lasts. The default value is two minutes per station.
① Turn the dial to TEST PROGRAM. The display shows the program, TEST, and the length of time to test each station.
② Press PGM to display the program you want to test.
③ Use the arrow keys to set the length of time to test each station, from 1 to 99 minutes.
4 Press MAN START/ADV to start the test. The test time flashes. The controller suspends any irrigation in process and runs the test program immediately.
⑤ To add other programs to the test, press PGM to select the program. Press MAN START/ADV to stack the new program after the first one. You can stack all four programs.
⑥ To cancel the test on all programs, turn the dial to OFF.
RAIN BIRD®
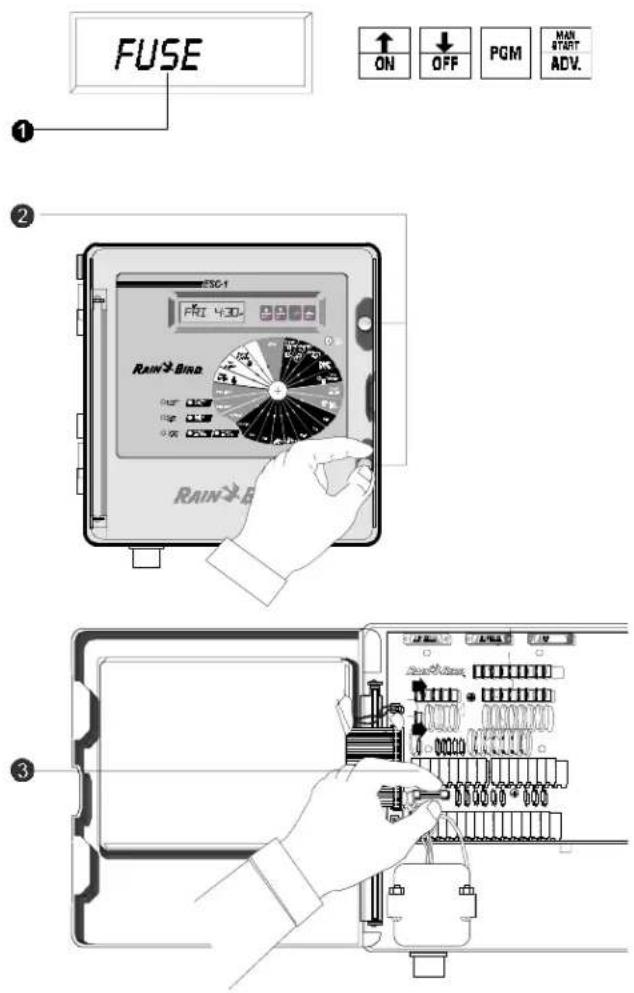
Check Fuse Operation
① The controller will show FUSE if a fuse is missing or blown.
② To replace the fuse, gently pull out the two white plastic snap latches on the right side of the faceplate. Then swing the panel open.
③ The fuse is located in the lower left corner of the controller's circuit board, just above the terminal strip. Remove the blown fuse and replace with a 2.5A slow-blow fuse.
Use Diagnostic Circuit Breaker
The ESC-1 has a circuit overload protection system. This system causes the controller to skip a station that has an electrical short circuit, rather than blow a fuse, which would shut down the entire system. The diagnostic circuit breaker detects short circuits on all valves, including the master valve.
When the controller tries to start a station that has a short, the electronic circuit breaker senses the short circuit and skips that station. The controller flashes the skipped station number and "FAULT" in the display.
If this occurs, correct the problem causing the short. Then push the FAULT RESET button to clear the flashing fault indicator.
Index
12-hour am/pm time mode 3
24-hour time mode 3
31st day of month 5, 10
50 Hz model 3
60 Hz model 3
A
Automatic operation 11
B
Budget, water 9
C
Central Control light 1
Circuit breaker, diagnostic 14
Controls & indicators 1
Custom cycle 6
Custom Day Cycle light 2
Cycle, watering 4
Cyclical Day Cycle light 2
Cyclical watering schedule 5, 6
D
Date, setting 3
Delay between stations 10
Diagnostic circuit breaker 14
Dial, programming 2
E
Even / odd days 4
Even Day Cycle light 2
Event day off 10
F
Fault
message in display 14 reset 14
Fault Reset button 1
Fuse
blown 14 replacing 14
M
Man. Start/Adv button 1
Manual program operation 11
Master valve 8
MV1 and MV2 8
0
Odd Day Cycle light 2
OFF button 1
ON button 1
Operate
program(s) manually 11 station(s) manually 12
Operating instructions 11
Overlap program 8
Overload protection 14
P
Pgm button 1,4
Program
manual operation 11 select 4
stack or overlap 8
start time(s) 7
stop during normal cycle 11
test 13
USED 6
Programming dial 2
instructions 3
Pump start 8
Pump/MV Status light 1
Q
Quick Programming Guide 2
R
Rain delay 9
Replacing fuse 14
S
Select
program 4,7 watering cycle 4
Set
delay between stations 10 event day off 10
master valve/pump start 8
program stack or overlap 8
program start time(s) 7 rain delay 9
station watering times 6 time & date 3
water budget 9
Short circuit 14
Snap latches 14
Stack program automatic operation 8 manual operation 11
Start time(s) 7
Station
delay between 10 USED 7
watering times 6
Station Status light 1
Stopping a program 11
T
Test program 13
Time
mode 3 set 3
U
USED
program 6 station 7
W
Water budget 9
Watering
custom cycle 4
cyclical cycle 4
even / odd days 4
select cycle 4 times 6
NOTES
Warning: This equipment has been tested and found to comply with the limits for a Class A digital device, pursuant to Part 15 of the FCC Rules. These limits are designed to provide reasonable protection against harmful interference when the equipment is operated in a commercial environment. This equipment generates, uses and can radiate radio frequency energy and, if not installed and used in accordance with the instructions, may cause interference to
radio communications. Operation of this equipment in a residential area is likely to cause harmful interference in which case the user will be required to correct the interference at their own expense.
Changes or modifications not expressly approved by Rain Bird Sprinkler Mfg. Corp. could void the user's authority to operate the equipment.

Rain Bird Irrigation Corporation
Golf Division
970 W. Sierra Madre Ave.
Azusa, CA 91702
www.rainbird.com
- Contents
- Introduction .... 1
- Programming Instructions ...... 3
- Operating Instructions ...... 11
- Index 15
- Introduction
- Controls & Indicators
- RAIN BIRD®
- Quick Programming Guide
- Programming Instructions
- Set Time & Date
- Select Program
- Select Watering Cycle
- Even / Odd Days
- Cyclical
- Custom
- Set Station Watering Times
- Set Program Start Time(s)
- Set Program Stack / Overlap
- Set MV/Pump Start
- Set Rain Delay
- Set Water Budget
- Set Event Day Off
- Set Delay Between Stations
- Operating Instructions
- Operate Automatically
- Operate Program(s) Manually
- Operate Station(s) Manually
- Use Test Program
- Check Fuse Operation
- Use Diagnostic Circuit Breaker
- Index
- A
- B
- C
- D
- E
- F
- M
- 0
- P
- Q
- R
- S
- T
- U
- W
Brand : RAIN BIRD
Model : ESC-1
Category : Uncategorized