PH-ABT-HC-UCBI-0420 - Freezer American BioTech Supply - Free user manual and instructions
Find the device manual for free PH-ABT-HC-UCBI-0420 American BioTech Supply in PDF.


User questions about PH-ABT-HC-UCBI-0420 American BioTech Supply
0 question about this device. Answer the ones you know or ask your own.
Ask a new question about this device
Download the instructions for your Freezer in PDF format for free! Find your manual PH-ABT-HC-UCBI-0420 - American BioTech Supply and take your electronic device back in hand. On this page are published all the documents necessary for the use of your device. PH-ABT-HC-UCBI-0420 by American BioTech Supply.
USER MANUAL PH-ABT-HC-UCBI-0420 American BioTech Supply
American BioTech Supply
Owner's Guide
PREMIERE PHARMACY / VACCINE UNDERCOUNTER BUILT IN FREEZERS
PH-ABT-UCBI-0420, PH-ABT-UCBI-0420SS OWNER'S INSTRUCTIONS
This manual describes how to operate and care for your appliance to get the best, most ecient, performance.
READ THIS BOOK!
Note to Customer:
This merchandise was carefully packed and thoroughly inspected before leaving our plant. Responsibility for its safe delivery was assumed by the carrier upon acceptance of the shipment. As directed on the side of your packing carton, claims for loss or damage sustained in transit must be made on the carrier as follows:
A.) Visible Loss, Damage, Shortage External Evidence of Loss or Damage: This type of damage must be noted on the freight bill and acknowledged by the carrier's agent (driver) at time of delivery. Make sure you get a signed copy. Send a written request for an inspecon to the carrier.
B.) Concealed Damage: This type of damage may not be discovered until the unit is being unpacked. When concealed damage is discovered, stop unpacking immediately and contact the carrier immediately to report the claim and request an inspecon. This should be done as soon as possible and, in any case, must be done within 15 days or receiving the merchandise. If at all possible, do not move the item and save all packaging material for carrier's inspection.
C.) FAILURE TO FOLLOW THESE INSTRUCTIONS MAY RESULT IN THE CARRIER REFUSING TO HONOR YOUR COMPANY'S CLAIM. UNDER NO CIRCUMSTANCES SHOULD THE MERCHANDISE BE RETURNED TO THE MANUFACTURER. NO RETURNS WILL BE ACCEPTED WITHOUT PRIOR AUTHORIZATION.
Horizon Scientific
125 Varnfield Drive
Summerville, SC 29483
Phone: 800-648-4041
Fax: 843-821-8051
Warranty:
Two-Year Parts and Labor
5 Years Compressor Parts
Revision Date
03/08/2013
TABLE OF CONTENTS
RECEIVING 3
INSTALLATION INSTRUCTIONS....4
MAINTENANCE AND CLEANING....12
PRODUCT WARRANTY INFORMATION......15
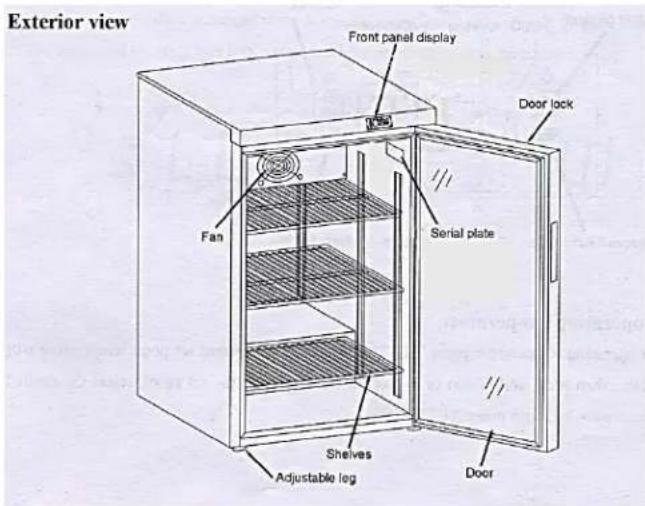
BEFORE CALLING THE MANUFACTURER'S TECHNICAL SERVICE, please have the unit's model and serial number ready as well as the problem descripon. The model and serial number is located on the serial tag which can be found on the interior le OR right upper wall of the unit.
For convenience, you may want to record the following informaon here for easy access in the future.
Model number: ____
Serial number: ____
Date of delivery: ____
RECEIVING
Your unit was built, packaged, and inspected with extreme care. We shipped it to you using carriers we trust with a proven track record of careful handling, good customer service, and on me delivery. Unfortunately, regardless of all of these eorts somemes accidents happen and occasionally those accidents result in shipping damage. When the carrier picked up the merchandise from us, they assumed responsibility for its condion en route to you. Thus, any claims for shipping damage must be led with the carrier. Like anybody else, carriers don't like to pay out on insurance claims, so their claims procedures and requirements are very restrictive. You should consult the carrier's website for their specic claims procedures. You should also know that me is of the essence.
There are two general types of shipping damage. The rst is visible damage. This type of damage includes visible loss, damage, shortage or any external evidence of loss or damage that is visible at me of delivery. This type of damage must be noted in detail on your delivery receipt. Make sure the driver signs and dates the delivery receipt, acknowledging the damage. This has to happen at the me of delivery or it won't happen at all. Keep a copy for your records and send another to the carrier's damage claims department along with a formal request for an inspecon report. Follow up with a phone call. Their contact informaon can be found on the carrier's web site.
The second type of shipping damage is concealed damage. This type of damage will probably not be apparent at me of delivery and may not be discovered until unpacking and inspecing the unit. Remember, me is of the essence here. You should unpack and inspect the unit as soon as possible. Each day that passes reduces the likelihood that the carrier will pay the claim. As soon as the concealed damage is discovered, stop unpacking and retain all packing materials. Contact the carrier by phone to report the claim. Note the date and me and person you spoke with. Get a claim number. Follow up with a written leer referencing the claim number and including a formal request for an inspecon. Again, consult the carrier's website for specific claim instrucons and follow them precisely.
AS STATED ABOVE, THE CARRIER IS YOUR SOLE SOURCE FOR SATISFACTION OF A DAMAGE CLAIM. UNDER NO CIRCUMSTANCES SHOULD THE MERCHANDISE BE RETURNED TO THE MANUFACTURER. NO RETURNS WILL BE ACCEPTED WITHOUT PRIOR AUTHORIZATION.
INSTALLATION INSTRUCTIONS
UNCRATING
Move your refrigerator as close to the nal locaon as possible before unpacking. Remove the carton and the styrofoam strips. The locaon should be as close as possible to the power outlet so no extension cord is needed.
LEVELING
You can level your unit with the screwtype adjustable leveling legs on the front corners of the unit. Turn counterclockwise to raise the corner; turn clockwise to lower it. Leveling legs are required in front only. Unit may have a slight lt from front to back. This is acceptable and is recommended on this unit.
text_image
Exterior view Front panel display Fan Serial plate Door lock Shelves Adjustable leg DoorPOWER SOURCE
natural_image
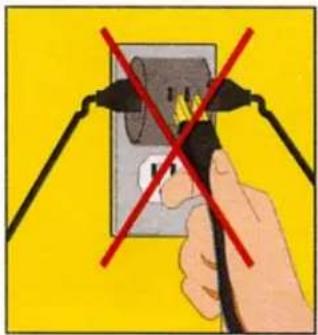
Hand holding a black electrical socket with red prohibition signs against a yellow background (no text or symbols)Never plug in more than one unit per electrical outlet. The supply circuit to this cabinet must conform to all Naonal and Local Electrical Codes. Consult the cabinet Serial-Data plate for voltage, cycle, phase, and amp requirements before making conncon. VOLTAGE SHOULD NOT VARY MORE THAN 5% FROM SERIAL PLATE RATINGS. A
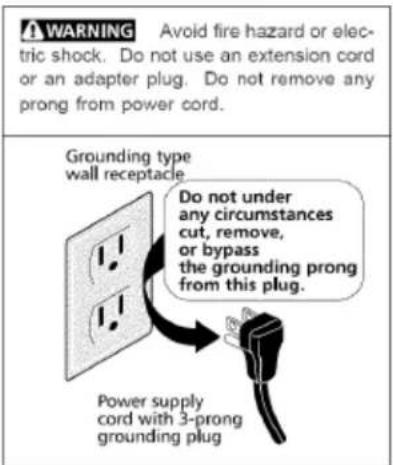
separate circuit is recommended to prevent possible loss of product due to over-loading or failure of other equipment on the same circuit. PROTECT THE CIRCUIT WITH A 20 AMP DELAY-TYPE FUSE OR CIRCUIT BREAKER. Do not use an extension cord. Be sure your unit is properly grounded. Use the 3-prong plug provided into a 3-prong grounded outlet. (Only this method complies with naonal electrical codes, local codes and ordinances.) Unless the above grounding method is followed, you are not protected against severe or lethal shock in the event of a short circuit of an electrical component or wiring of the unit.
text_image
WARNING Avoid fire hazard or electric shock. Do not use an extension cord or an adapter plug. Do not remove any prong from power cord. Grounding type wall receptacle Do not under any circumstances cut, remove, or bypass the grounding prong from this plug. Power supply cord with 3-prong grounding plugSTARTING
There are no compressor shipping bolts to loosen or valves to open. All that is necessary aer the unit has been properly leveled is to plug the service cord into an electrical outlet. When starng this new appliance, allow the cabinet to operate a minimum of four hours or unl it has started cycling normally before placing product in the cabinet. The motor compressor may start and stop several mes when the unit is rst started or aer defrosng, especially if the weather is very hot. This is normal. The motor compressor will cycle normally as soon as the excess heat has been removed.
TEMPERATURE CONTROL
NOTE: The control is preset at the factory to provide the desired air and product temperatures inside of the unit and requires no further adjustment. Please contact the manufacturer's Technical Service Department before making any adjustments to determine if adjustment is necessary and, if so, to make sure it is performed properly.
This unit has an electronic temperature controller located on the front panel above the door. This controller controls the compressor. Operaon of this controller is described starng on page 7 of this manual.
FREEZER OPERATION
Aer the unit is properly installed and power is applied, it will take some me before the system is cooled down to temperature and cycling normally. You should wait 4 hours on the rst startup before beginning to add product to the unit. This ensures that the unit is installed and operang properly before being put into service. Aer this wait me, the unit should be cycling in the desired temperature band. The units are calibrated before leaving the factory, so no adjustment should be necessary.
Loading the units will again cause temperature to rise as the warmer product is introduced into the compartment. If a large amount of product is to be introduced, it is a good idea to do it in stages, allowing several hours between stages to allow temperature to stabilize again before introducing additional warm product. This will minimize the temperature transient while loading. Other ps for successful loading include:
- Leave about 2-3 inches of free space along the back and sides of the unit to allow for proper air ow and, therefore, more even cooling of the product.
- When loading the top shelf, avoid blocking the evaporator fan(s) (if installed). There should be at least 4 inches of clearance around the fan to allow proper air ow.
- Do not overload the unit. Maximum suggested load is about 75% of the chamber volume. Additionally, the load should be distributed evenly from top to boom and side to side for best results.
- Minimize the me the door is open. On top of leng the cold air out, you are also leng warm, moist air in which can result in more condensaon and/or frost in the unit.
Remember that the units are calibrated to the desired temperature band before leaving the factory. We also do extensive tesng to ensure that these temperatures will result in product temperatures in the desired band. There should be no need to adjust the temperature control on these units, but if it is necessary, they can be adjusted using the electronic temperature control on the front of the unit.
It is STRONGLY RECOMMENDED that you contact the manufacturer's Technical Support Department prior to performing any temperature adjustments to ensure the adjustment is necessary and, if so, it is performed correctly.
ELECTRONIC TEMPERATURE CONTROL
Descripon and Funcons
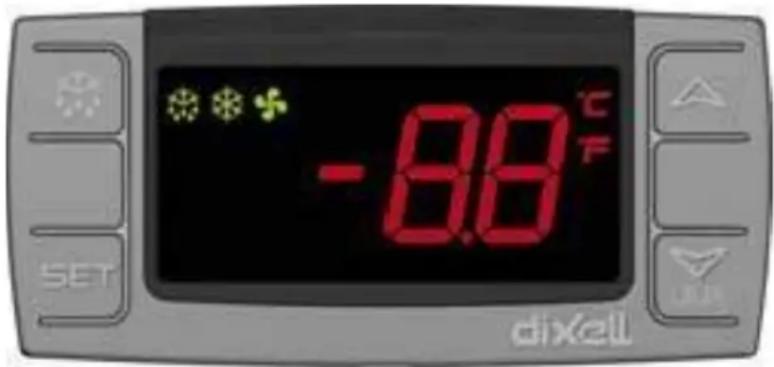
The Electronic Temperature Control is a digital microprocessor based temperature control, indicaon, and alarm system. It connuously monitors the temperature of the refrigerator/freezer through its sensor assembly. When the temperature warms to the point where it reaches the upper temperature limit, the controller sends a signal to turn on the compressor, which cools the unit. The snowake icon will illuminate on the display. The compressor is kept running until the temperature reaches the cold seng. When this lower temperature set point is reached the controller turns o the compressor and the snowake icon exnguishes. The refrigerator/freezer warms over me and the process connues.
The Electronic Temperature Control also provides the following funcons:
- Red LED for visual indication of an alarm condition
- Beeper for audible indication of an alarm condition
- A preprogrammed 5 minute delay from the me a set point is aained until an alarm condition is declared. This prevents spurious alarms for things like door openings.
text_image
-8.8°C -8.8°F SET dixelOperang Mode
The Electronic Temperature Control normally displays the current interior temperature in degrees Celsius. To display the compressor o set point, press the SET buon and release. The display will momentarily display the set point and then revert to the current temperature.
The control also records the warmest and the coldest temperatures seen by the controller since the memory was last reset. To access these temperatures, press the up arrow for the warmest temperature or press the down arrow for the coldest temperature. To clear out the memory, press the corresponding arrow buon. Immediately press and hold the SET buon until the "rSt" message is displayed. The corresponding temperature memory is now erased.
Programming Mode
Note: The programming mode gives access to several funcons that are not intended for user adjustment. The procedures below provide direcon to the funcons that you can adjust. Please do not aempt to change any of the other funcons in the programming area or your unit may be damaged or become unstable.
Locking and Unlocking the Control
The control keys can be locked out to prevent inadvertent operaon.
To lock the control keys, simultaneously press and hold the up arrow and the down arrow. The display will show "POF". At this point you can only use keys to view the SET temp and the minimum and maximum stored temperatures.
To unlock the control keys, simultaneously press and hold the up arrow and the down arrow. The display will show "Pon". The control keys are now unlocked and you can perform the programming funcons below.
Adjusng the temperature control set points:
NOTE: The temperature control set points are preset at the factory to provide the desired air and product temperatures inside of the unit and require no further adjustment. Please contact the manufacturer's Technical Service Department before making any adjustments to determine if adjustment is necessary and, if so, to make sure it is performed properly.
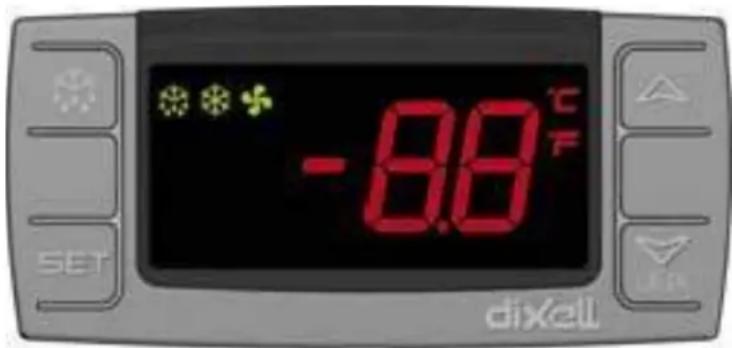
text_image
-8.8°C F SET dixell- To set the compressor o set point, press and hold the SET key for 2 seconds. The current value will be displayed and the C or F icon will ash. Use the up or down keys to change the value. Press SET again to lock in the value.
- To set the compressor on set point, you will need to adjust the dierenal, or Hysteresis seng. This is the number of degrees the controller will allow temperature to dri up until it restarts the compressor. For example, if the SET point is 3 degrees Celsius and the
Hysteresis is set at 3, then the compressor will cycle from 3 to 6 degrees Celsius. To change this value, press SET and DOWN keys for 3 seconds to enter programming mode. "Hy" will display meaning Hysteresis. Press Set again and the current value will be displayed. Use the UP and/or DOWN arrow keys to adjust the value and press SET again to lock it in. Press SET and UP to return to Operang Mode.
Adjusng other User Adjustable sengs:
- To change between Celsius and Fahrenheit scales, press SET and DOWN keys for 3 seconds to enter programming mode. "Hy" will display. Press the UP or DOWN keys several mes to cycle through the parameters unl "CF" is displayed. Press SET to display the current seng (either C for Celsius or F for Fahrenheit). Use the UP or DOWN key to choose the desired seng. Press SET again to lock it in. Press SET and UP to return to Operang Mode. To change the Hi or Low Alarm set points, press SET and DOWN keys for 3 seconds to enter programming mode. "Hy" will display. Press the UP or DOWN keys several mes to cycle through the parameters unl "ALU" for Alarm Upper (High Temperature Alarm) or ALL for Alarm Lower (Low Temperature Alarm) is displayed. Press SET to display the current value. Use the UP and/or DOWN key to choose the desired value. Press SET again to lock it in. Press SET and UP to return to Operang Mode.
QUICK TROUBLESHOOTING GUIDE
Check these items before calling for service
| PROBLEM: | POSSIBLE CAUSE / SOULTIONS: |
| Unit does not run | Electrical circuit is not 110-120V 60Hz.The power cord is not plugged in.No power at electrical outlet. Check to make sure breaker is not tripped or fuse is not blown. Additionally, make sure unit is not plugged into a Ground Fault Circuit Interrupter (GFCI) type of outlet. |
| Unit does not maintain at the proper temperature | Check the room temperature. We recommend the refrigerator or freezer should be placed in the air condioned room between 65°F to 85°F. If the room temp is too warm, the refrigerator or freezer may not be able to maintain the interior temp at proper range.Door is not closed properly.Amount of stored product is overloaded.Product replacements are pushed against rear wall or interrupted the proper refrigerator air circulaon. For the proper air circulaon, place the products evenly on each shelf. Do not push against the refrigerator's rear or side walls.Evaporator is blocked by frost or ice. Remove the products, unplug the refrigerator or freezer power, and allow the unit to defrost. If the problem sll exists, call for service. |
| Appliance runs too long | Prolong door openings.Control set too cold.Room temperature is high which will make the unit work harder to keep cool. |
| Temperature of external wall surface is warm | The exterior walls can be as much as 30 degrees warmer than room temperature due to the embedded condenser coils. This is normal when the unit is operang. |
| Compressor noises | Check the unit level. Also ensure none of the pipes in the compressor area are touching each other or against the side.Compressor may be overheated. Please check the room temp and ensure the range is within 65°F to 85°F.A buzzing noise may indicate improper voltage to the compressor. Check supply voltage.If the problem sll exists, call for service. |
| Moisture collects inside | Door gasket is not sealing properly. Check for debris, cracks, and items passing through door at the gasket.The refrigerator or freezer is facing a doorway or is underneath of air condioning vent. Relocate the unit or redirect air vent.Too many door openings. Minimize me door is open.Hot, humid weather increases condensaon.Make sure there is a water trap (U-shaped loop) in the drain tube near the compressor. This will “trap” a small amount of water in the loop and prevent air from entering the chamber through the tube. |
| Moisture collects on outside surface | Hot, humid weather increases condensaon.As humidity decreases, moisture will disappear. |
| The display shows “SO” and the compressor does not run | The temperature sensor is open. Call for service. |
| The display shows “SC” and the compressor does not run | The temperature sensor is shorted. Call for service. |
| The display shows “HH” and the compressor does not run | The ambient temperature is above 40C/104F. Stop using immediately. |
| The display shows “LL” and the compressor does not run | The ambient temperature is below -40C/-40F. Stop using immediately. |
MOISTURE DURING THE SUMMER SEASON
The amount of moisture, condensaon, or high humidity related issues increase during the summer and, in most cases, will self-resolve when the weather cools down. Please note a refrigeration system does NOT generate moisture or water but simply condenses the moisture that is already in the chamber. Keeping the unit in an air conditioned, low humidity space will resolve many issues. Other things you should check
- Locaon of the refrigerator (See Quick Troubleshoong Guide above)
- Door sealing and frequency of door opening event (See Quick Troubleshoong Guide above)
- Make sure there is a water trap (U-shaped loop) in the drain tube near the end. This will "trap" a small amount of water in the loop and prevent air from entering the chamber through the tube.
BEFORE CALLING THE MANUFACTURER'S TECHNICAL SUPPORT DEPARTMENT, please have the unit's model and serial number ready as well as the problem descripon. The model and serial number is located on the serial tag which can be found on the interior le upper wall of the unit.
MAINTENANCE AND CLEANING
These units require very lile maintenance. They should be cleaned periodically to keep them running eciently. Use the cleaning agents and suggesons below for best results.
If 14 to 12 inch of frost accumulates or if the unit will not maintain proper temperature, it should be defrosted per the procedure on page 14.
CLEANING
| PART | CLEANING AGENTS | TIPS AND PRECAUTIONS |
| Interior and Door Liners | Soap and waterBaking soda and water | Use 2 tablespoons of baking soda in 1 quart of warm waterBe sure to wring excess water out of sponge or cloth before cleaning around controls, light bulb or any electrical parts. |
| Glass Doors (if applicable) | Soap and water | Clean the glass with a mild detergent and water on a so cloth or sponge. Rinse with water and wipe dry |
| Door Gaskets | Soap and water | Wipe gaskets and their seang surfaces with a clean so cloth |
| Shelves | Soap and water | Do not wash removable shelves in dishwasher |
| Exterior and Handles | Soap and waterNon Abrasive Glass Cleaner | Do not use commercial household cleaners, ammonia, or alcohol to clean handlesUse a so cloth to clean smooth handlesDo not use a dry cloth to clean smooth handles |
STAINLESS STEEL CARE AND CLEANING
Use the proper tools- When cleaning stainless steel surfaces; take care to use non-abrasive tools. So cloths and plasc scouring pads will not harm the steel's passive layer. Stainless steel pads may be used but be sure to always scrub in the direcon of the polishing lines.
Clean with the polish lines- Some stainless steels come with visible polishing lines or "grain". When visible lines are present, you should always scrub in a moon that is parallel to them. When the grain cannot be seen, play it safe and use a so cloth or plasc scouring pad.
Use alkaline, alkaline chlorinated or non-chloride containing cleaners- While many traditional cleaners are loaded with chlorides, there is now an ever increasing choice of non-chloride cleaners. If you are not sure of your cleaner chloride content, contact your cleaner supplier. If they tell you that your present cleaner contains chlorides, ask if they have an alternate. Avoid cleaners containing quaternary salts as they also can each stainless steel and cause ping and rusng.
Treat your water- Though this is not always praccal, soening hard water can do much to reduce deposits. There are certain Iters that can be installed to remove corrosive elements. If you are not sure of the proper water treatment, call a treatment specialist.
Keep your equipment clean- Use proper cleaners at recommended strength. Clean frequently to avoid build-up of hard stubborn stains.
Rinse thoroughly - If chlorinated cleaners are used, you must rinse and wipe dry immediately. The sooner you wipe o standing water, the beer. Aer wiping the unit down, allow it to air dry. The oxygen helps maintain the stainless steels passivity lm.
Never use hydrochloric acid (muriac acid) on stainless steel.
| Job | Cleaning Agent | Comments |
| Roune Cleaning | Soap, ammonia, detergent medallion | Apply with cloth or sponge |
| Fingerprints & smears | Arcal 20, Lac-O-Nu Ecoshine | Provides barrier rm |
| Stubborn stains & discoloraon | Cameo, Talc, Zud, First Impression | Rub in direcon of polish lines |
| Grease & fay acids, blood | Easy-o, DeGrease It Over Aid | Excellent removal on all nishes |
| Grease & oil | Any good commercial detergent | Apply with a sponge or cloth |
| Restoraon – Passivaon | Benet, Super Sheen |
Passive Film Breakdown
- Corrosion on metals is everywhere. We recognize it quickly on iron and steel as unsightly yellow/orange rust. Such metals are called “acve” because they acvely corrode in the natural environment.
- Contrary to popular belief, Stainless Steels are susceptible to rusng. The rst signs are on the microscopic level. If you were to look at them under a microscope or through a magnifying glass, you would see small pits and cracks will grow and deepen while all the me exuding unsightly, red-orange rust. More severe and visible cracking can also take place.
- Stainless steels are protected by a thin layer of chromium oxide, and it important to keep that lm of chromium oxide intact. If the passive lm of your stainless steel has been broken, you are subject to corrosion and rust. The integrity of the chromium oxide can be compromised by:
- Mechanical abrasion from steel pads, brushes, and scrapers.
- Hard Water leaves mineral deposits behind that, if le to dry will break down the passive layer and rust your stainless steel.
- Chlorides are in water, food, and table salt, but most prominently in cleaning agents.
DEFROSTING
It is important to defrost and clean the freezer when 14 to 12 inch of frost has accumulated. Frost may tend to accumulate faster on upper part of the freezer due to warm, moist air entering the freezer when the door is opened. Between defrost evoluons; you can minimize frost build-up by using a plasc scraper to remove frost. Scrape with a pulling moon. Never use a metal instrument to remove frost. Never use a damp cloth or wet hands as they will sick to the inside surfaces when cold. When defrosng becomes necessary, disconnect freezer from power source by unplugging to avoid electrical hazard. DO NOT ADJUST THE TEMPERATURE CONTROL. Remove the product and leave the door open while defrosng the freezer.
Place towels in the boom of the freezer to catch the frost. When all frost has fallen, remove the towels.
Defrosng ps – If the frost is so, remove it with a plastic scraper. If the frost is glazed and hard, ll deep pans with hot water and place them inside on the freezer boom. Close the freezer door. Frost should soon in about 15 minutes. Repeat this procedure as necessary until all frost is removed.
Aer defrosng - Remove any towels, tools, or pans from the interior of the unit. Clean the interior and exterior using the cleaning suggestions on the previous pages. Plug the unit back in and restore it to service per the operaon secon of this manual.
PRODUCT WARRANTY INFORMATION
HORIZON SCIENTIFIC, INC. PRODUCT WARRANTY
Horizon Scienc, Inc. warrants to the original purchaser every new Horizon Scienc, Inc. refrigerated unit, the cabinet and all parts thereof, to be free from defects in material or workmanship, when such unit is installed, used, and maintained in accordance with provided instrucons, for a period of two (2) years. The warranty period starts two weeks from the date of shipment from Horizon Scienc, Inc. This two week period allows ample shipping me so that the warranty will go into eect at approximately the same me your equipment is delivered. Unless subject to prior written agreement with Horizon Scienc, Inc., this warranty does not allow for any warranty start deferment greater than two weeks from date of shipment due to a delayed installaon and/or start-up. By purchasing any product from Horizon Scienc, Inc., you and any entry for which you are purchasing acknowledge and agree to each and every provision contained herein, and all other Noces and Terms provided to Purchaser by Horizon Scienc, Inc., which are hereby incorporated.
Under this warranty, Horizon Scienc, Inc., through its authorized service organizaons, will repair, or at its opon, replace any part found to contain a manufacturing defect in material or workmanship without charge to the owner for parts and service labor. Replacement or repaired parts will be warranted for only the unexpired poron of the original warranty. Horizon Scienc, Inc. will not assume any shipping or cartage costs for parts under warranty. These costs shall be paid by the customer.
ADDITIONAL THREE YEAR COMPRESSOR WARRANTY
In addition to the two (2) year warranty stated above, Horizon Scienc, Inc. warrants its hermecally and semi-hermecally sealed compressors to be free from defects in both material and workmanship under normal use and service for a period of three (3) additional years from the end of the initial two (2) year warranty period, but not to exceed ve (5) years aer shipment from Horizon Scienc, Inc.
Compressors determined by Horizon Scienc, Inc. to have been defective within this extended me period will, at Horizon Scienc, Inc.'s opon, be either repaired or replaced with a compressor or compressor parts of similar design and capacity.
The three (3) year extended compressor warranty applies only to hermecally and semi-hermecally sealed parts of the compressor and does not apply to any other parts or components, including, but not limited to, cabinet, paint nish, temperature control, refrigerant, metering device, driers, motor starng equipment, fan assembly or any other electrical components.
Horizon Scienc, Inc.'s sole obligaon under this warranty is limited to either repair or replacement of parts, subject to the additional limitaons below. This warranty neither assumes nor authorizes any person to assume obligaons other than expressly covered by this warranty.
NO CONSEQUENTIAL DAMAGES. Horizon Scienc, Inc. is not responsible for economic loss; prot loss; or special, indirect or consequential damages, including without limitaon, losses or damages arising from contents spoilage claims whether or not on account of refrigeraon failure, electrical failure, power failure, or compressor failure. HORIZON SCIENTIFIC, INC.'S MAXIMUM CUMULATIVE LIABILITY RELATIVE TO ALL CLAIMS AND LIABILITIES, INCLUDING OBLIGATIONS UNDER ANY INDEMNITY, WHETHER
OR NOT INSURED, SHALL NOT EXCEED THE COST OF THE PRODUCT(S) GIVING RISE TO THE CLAIM OR LIABILITY.
WARRANTY IS NOT TRANSFERABLE. This warranty is not assignable and applies only in favor of the original purchaser/user to whom delivered. Any such assignment or transfer shall void the warranes herein made and shall void all warranes, express or implied, including any warranty of merchantability or tness for a parcular purpose.
NO IMPLIED WARRANTY OF MERCHANTABILITY OR FITNESS FOR A PARTICULAR PURPOSE. There are no other warranes, express, implied, or statutory, except the two (2) year warranty and the additional three (3) year compressor warranty as described above. These warranes are exclusive and in lieu of all other warranes, including implied warranty and merchantability or tness for a parcular purpose. There are no warranes which extend beyond the descripon on the face hereof, whether based on contract, warranty, tort (including negligence), strict liability, indemnity, or any other legal theory, and whether arising out of warranes, representaons, instrucons, installaons, or non-conformies from any cause. Purchaser further acknowledges that the purchase price of the Product reects these warranty terms and remedies.
ALTERATION, NEGLECT, ABUSE, MISUSE, ACCIDENT, DAMAGE DURING TRANSIT OR INSTALLATION, FIRE, FLOOD OR OTHER EXTERNAL CAUSES.
Horizon Scienc, Inc. is not responsible for the repair or replacement of any parts that Horizon Scienc, Inc. determines have been subjected aer the date of manufacture to alteraon, neglect, abuse, misuse, accident, damage during transit or installaon, re, ood or other external causes. It does not apply to defects resulting from failure to properly install, operate or maintain the product in accordance with the printed instrucons provided, or damage caused by the storage of any corrosive material that comes in contact with the interior or exterior porons of the cabinet, or the use of spark producing equipment or containers (such as galvanized or carbonized steel containers) that come in contact with any interior poron of the cabinet.
OUTSIDE U.S./CANADA. This warranty does not apply to, and Horizon Scienc, Inc. is not responsible for, any warranty claims made on products sold or used outside the United States and Canada.
CHOICE OF LAW/VENUE. The laws of the State of South Carolina shall govern the validity, interpretaon and enforcement of this warranty, regardless of conicts of law principles. Purchaser agrees that proper venue for any acon to enforce the terms of this warranty shall be the Dorchester County District Courts, South Carolina. Purchaser submits the jurisdicon of such courts over the Purchaser and the subject maer of any such acon. Any acon for breach of these warranty provisions must be commenced within one (1) year aer that cause of acon has accrued.
WARRANTY CLAIMS. To obtain prompt warranty service, simply contact the manufacturer at 800-648-4041. Horizon Scienc, Inc.'s shipping records showing date of shipment shall be conclusive in establishing the warranty period. All claims should include: model number of the refrigerator, the serial number of the cabinet, proof of purchase, date of installaon, and all pernent informaon supporting the existence of the alleged defect. Any repairs must be authorized by Horizon in order for the warranty to be honored.