
QX12PA - Loudspeaker Qtx - Free user manual and instructions
Find the device manual for free QX12PA Qtx in PDF.


| Product Type | Portable PA Unit with Bluetooth and VHF |
| Model | QX12PA |
| Main Driver | 300mm (12") |
| HF Driver | 25mm (1") Titanium compression driver |
| Amplifier Output | 50 + 50Wrms |
| Dimensions (H x W x D) | 565 x 345 x 325mm |
| Weight | 12.8kg |
| Power Supply | 220-240Vac 50/60Hz (IEC), external 12Vdc, internal 12V rechargeable battery |
| Battery Life | Up to 8 hours |
| Wireless Microphone Frequencies | 174.1MHz + 175.0MHz |
| Bluetooth Version | 2.1 |
| Dispersion | 90° x 60° (H x V) |
| Inputs | 2 x 6.3mm mic/guitar jacks, 1 x 3.5mm aux, 2 x RCA line inputs |
| Outputs | 2 x RCA mix line output |
| Media Player | USB/SD/MMC, FM tuner, Bluetooth audio playback |
| Controls | Volume, Bass, Treble, Echo, Mic vol, VHF vol, Contour, Talkover |
| Special Features | VHF wireless microphones included, IR remote control, integral trolley with telescopic handle, 35mm pole mount, Talk Over mic override |
| Safety | Do not expose to rain or moisture; no user-serviceable parts; must be earthed |
| Cleaning | Use a soft cloth with a neutral detergent; avoid solvents |
| Package Contents | QXPA unit, 2 x VHF handheld microphones, mains power lead, IR remote control, user manual |
Frequently Asked Questions - QX12PA Qtx
User questions about QX12PA Qtx
0 question about this device. Answer the ones you know or ask your own.
Ask a new question about this device
Download the instructions for your Loudspeaker in PDF format for free! Find your manual QX12PA - Qtx and take your electronic device back in hand. On this page are published all the documents necessary for the use of your device. QX12PA by Qtx.
USER MANUAL QX12PA Qtx
Portable PA Units with Bluetooth and VHF
Order ref: QX12PA (178.853UK)
QX15PA (178.856UK)
User Manual
natural_image
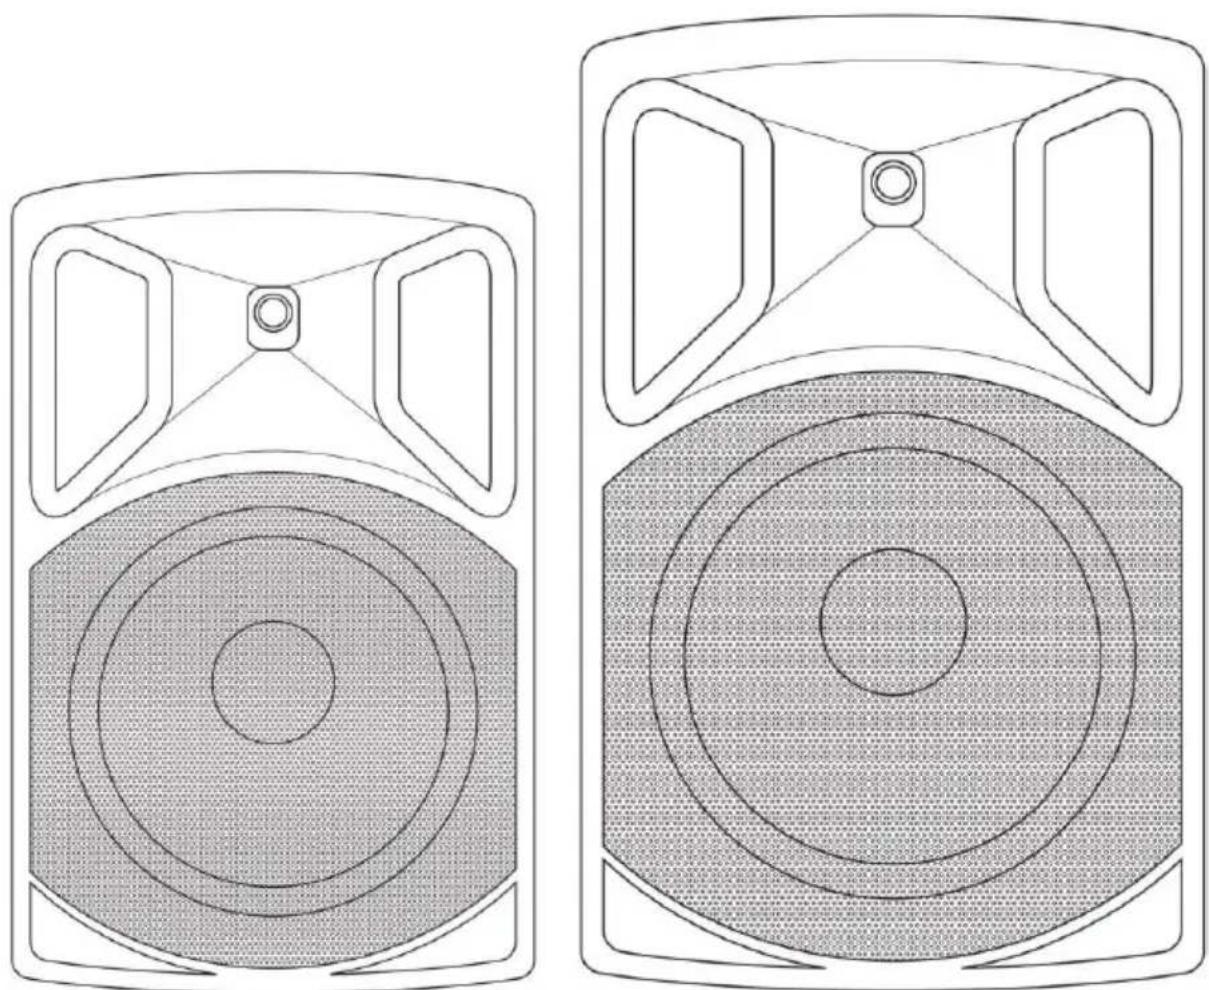
Technical line drawings of two speaker speakers with concentric circular design (no text or symbols)VERSION 1.1

Caution: Please read this manual carefully before operating Damage caused by misuse is not covered by the warranty
Introduction
Thank you for choosing the QX series portable PA unit. Please read this manual prior to use to ensure correct operation and avoid damage through misuse.
This versatile portable PA unit is packed with features in a compact, manageable enclosure and is suitable for a wide array of applications ranging from public address for presentations to outdoor karaoke.
• External mains or D.C. power supply
- Internal 12V rechargeable battery
• VHF wireless microphones included
• Microphone inputs (6.3mm jack)
• Master 2 band EQ and Echo effect for microphones
- Internal USB/SD/FM/Bluetooth digital audio media player
• Talk Over Control mic override function
- AUX line inputs
• Infra-red remote control for media player
• Integral trolley with telescopic handle
• Integral 35mm pole mount
This product contains no user-serviceable parts so make no attempt to try to fix or modify this item yourself as this will invalidate the warranty. We recommend you keep the original package and proof of purchase for any possible replacement or returned demand.
Safety: Labelling Conventions

CAUTION RISK OF ELECTRIC SHOCK DO NOT OPEN
AVIS RISQUE DE CHOC ELECTRIQUE NE PAS OUVRIR


This symbol indicates that dangerous voltage constituting a risk of electric shock is present within this unit

This symbol indicates that there are important operating and maintenance instructions in the literature accompanying this unit.
Prior to connecting mains, check the supply voltage is correct and the mains lead is OK. Avoid ingress of water or particles into the enclosure.
If the mains or D.C. fuse blows, refer the unit to qualified service personnel

Warning: THIS UNIT MUST BE EARTHED
Warning
To prevent the risk of fire or electric shock, do not expose this appliance to rain or moisture. To prevent electric shock do not remove the cover. No user serviceable parts inside. Refer servicing to qualified service personnel.
Safety
Prior to connecting mains, ensure that the supply voltage is correct and the mains lead is in good condition.
Avoid ingress of water or particles into the enclosure.
If the mains or D.C. fuse blows, refer the unit to qualified service personnel
If the VHF microphones are to be unused for a long period of time, remove the batteries and store for later use.
Placement
Keep the unit out of direct sunlight and away from heat sources. Place the unit in an upright position during use and storage. Keep the unit away from moisture or dusty environments.
Cleaning
Use a soft cloth with a neutral detergent to clean the cabinet, panel and controls. To avoid damage, do not use solvents to clean this equipment.
Package Contents
Please check the contents to ensure that the product has been received in good condition.
• QXPA portable PA unit
• 2 x VHF handheld microphones
- Mains power lead(s)
• IR Remote control for media player
- User manual
If you find any accessory is missing or the product has arrived with any problems, please contact your retailer at once.
Controls
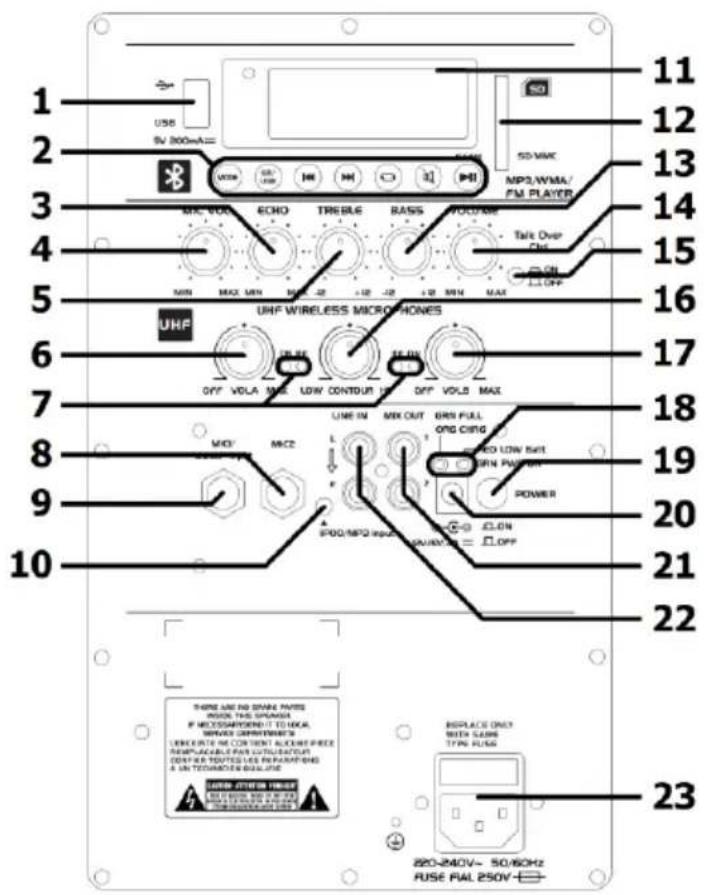
- USB input
- Media player controls
- Echo effect level
- Wired microphone(s)/guitar volume
- Treble EQ boost/cut
- VHF microphone A volume
- VHF carrier and audio signal indicators
- Wired microphone input jack 2
- Wired microphone/guitar input jack 1
- 3.5mm auxiliary line input
- Media player LCD display
- SD/MMC card slot
- Bass EQ boost/cut
- Main volume level
- Talk over control on/off
- VHF microphones mid contour EQ
- VHF microphone B volume
- Mains and battery charge indicators
- Power on/off button
- DC power inlet jack (5.5 x 2.1mm)
- Mix line output 2 x RCA
- Line input 2 x RCA
- IEC mains inlet & fuse holder
Connection
Your new QXPA unit may arrive with you with the internal battery charged. Before connecting to the mains, switch the unit on and check the POWER LED. If it is green, there is charge in the battery. If it is red, then you will need to charge the battery before using away from a mains supply (see "Charging the battery" below)
Connect the QXPA unit to the mains using the appropriate mains IEC lead supplied. You may otherwise opt to connect the spring terminals at the rear to an external 12Vdc supply, such as a car battery, or use the internal battery if charged.
Charging the battery
When not in use but connected to the mains, if the POWER switch (19) is in the off position, the internal battery will be re-charged from the mains supply. This can be observed by the CHARGE LED which will light orange when charging. When fully charged, the CHARGE LED will change to green.
Powering Up
Turn the VOLUME, ECHO, VHF and MIC VOLUME controls down (anti-clockwise) and turn the POWER switch on (the power LED should light).
BASS and TREBLE controls should remain pointing vertically (12-o-clock position).
Switch the "Talk Over Ctrl" off (i.e. press the button so that it is in the out position)
Your QXPA unit should now be ready to operate.
VHF Wireless Microphones
Insert the supplied AA batteries into the handheld microphones by carefully unscrewing the base of each and connecting the "+" and "-" terminals of the battery to the corresponding clips inside the microphone body, taking care to observe the correct polarity.
Connect each antenna to the connectors at the rear and extend them fully at an angle.
Switch on each wireless mic by turning up its volume control – the RF LEDs should light. If the LED on the transmitter lights dimly, change the battery.
Gradually increase VHF volume controls, testing each mic for output through the speaker.
Take care not to incur "feedback" (howling or screeching sound through the speaker) by keeping the microphone a sensible distance from the speaker and pointing away from the speaker so that it doesn't "hear" the speaker output.
Turning the ECHO control clockwise introduces a pre-set echo function for singing and special effects. BASS and TREBLE can be cut by turning anti-clockwise or boosted by turning clockwise.
In addition, the wireless microphones have a CONTOUR control, which adjusts the mid tone character of both microphones. This can vary how prominent they are in the mix.
When not in use, switch the VHF wireless microphones off.
External Inputs
In addition to the unit's own VHF microphones, 6.3mm jack inputs are provided to connect external wired (or additional wireless) microphones, which are both governed by the MIC VOLUME control.
Mic 1 input jack can also accept a guitar input instead of a microphone if required.
The music level can be automatically muted when speaking into a microphone by pressing in the "Talk Over Ctrl" button. Any audio from the internal media player will be reduced in volume when a sound is detected from the microphones and return to normal volume when there is no sound from the microphones, allowing announcements to override playback.
Internal media player
At the top of the rear panel is the media player section, which can provide playback of recorded material internally or from external sources. Controls for this are shown below.

Select player mode between USB, SD, FM tuner or Bluetooth

For mp3 media, select between USB or SD/MMC memory device

Previous track / FM station

Next track / FM station

Repeat mode: single track or all tracks

Mute media player output

Play/Pause (scan in FM tuner mode)
By default, the media player starts up in "AUX" mode, which accepts a line input via the RCA line input sockets (24) or 3.5mm jack input (11). Output level for the media player is governed by the main VOLUME control (15) or muted by pressing the MUTE button.
Adjacent to the RCA line input is a twin RCA line output carrying the overall main mix for connection onto further recording or PA equipment.
FM Tuner
Press the MODE button until the media player is in "FM tuner" mode. The display will show the radio frequency that the media player is tuned to.
To tune the FM radio to available stations in the reception area, press and hold the PLAY/PAUSE button for 3 seconds and the media player will scan all available stations and store them as numbered presets. These can then be selected using the PREVIOUS and NEXT buttons.
USB/SD player
Insert a USB memory stick or an SD/MMC card with mp3 or wma media stored on it into the USB port or SD card slot and the media player can enter another mode. Pressing the MODE button will now toggle between AUX, FM tuner and USB/SD playback.
Files on the USB or SD device must be mp3 or wma format for the media player to read them. PLAY/PAUSE, PREVIOUS and NEXT buttons control playback and track navigation. If both USB and SD/MMC media are connected, the USB/SD button will toggle between these.
Pressing the REPEAT button will toggle between 2 repeat play modes. "RPT ONE" repeats the current track and "RPT ALL" repeats all tracks in the current folder.
Bluetooth connection
To connect a smart phone or tablet to the media player for wireless playback, select Bluetooth mode on the media player, enable Bluetooth on the sending device and scan for available devices. The Bluetooth ID for the media player is "PA SYSTEM".
Select to pair the device and connect with the media player. Playback of tracks on the sending device should be heard through the speaker. PLAY/PAUSE, PREVIOUS and NEXT buttons will also send control signals back to the sending device for track control and navigation.
Bluetooth connection has a range of 5-8m. When the sending device is out of range, the connection will be lost and will need to be connected again once back within range.
Remote control
In addition to the panel controls, an infra-red remote control is provided for the USB/SD player which adds some further functions to allow greater control over the media player.
To operate, remove the clear plastic tab from the remote to activate the battery. Point the remote control towards the media player display to operate.
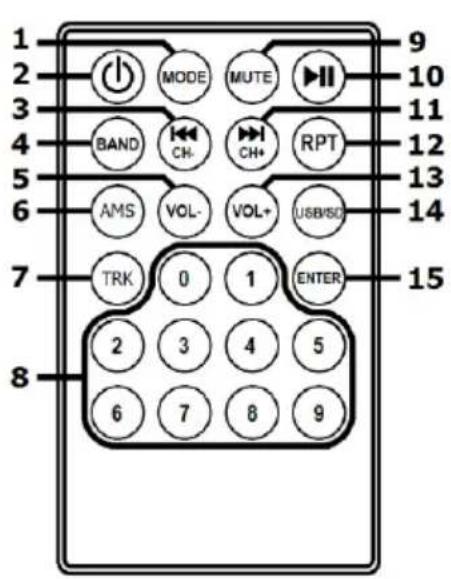
1 MODE select
2 Media player power on/standby
3 Previous track / FM station
4 "BAND" displays track information
5 Decrease volume
6 "AMS" displays track information
7 TRK – press to enter a track number for playback
8 Number keys – press to key in the track number
9 Mute media player output
10 Play/Pause
11 Next track / FM station
12 Select repeat mode – "RPT ONE" or "RPT ALL"
13 Increase volume
14 For mp3 media, select between USB or SD/MMC
15 ENTER - press to select entered track number
Many of the remote-control functions mirror the buttons beneath the media player display.
BAND and AMS (4, 6) functions have no special function and only display track information. The remote control has additional buttons to increase or decrease volume (5, 13) Individual track select is available by pressing the TRK button (7), then keying in a track number (8) followed by ENTER (15)
Turn down all volume controls on the QXPA unit before powering down to avoid loud noises.
Specifications
| Model | QX12PA | QX15PA |
| Main driver | 300mm (12") | 380mm (15") |
| Dimensions | 565 x 345 x 325mm | 675 x 420 x 395mm |
| Weight | 12.8kg | 18.1kg |
| Power supply | 220-240Vac, 50/60Hz (IEC) / external 12Vdc / internal battery | |
| HF driver | 25mm (1") Titanium compression driver | |
| Wireless mic. frequencies | 174.1MHz + 175.0MHz | |
| RF power | 10mW | |
| Amplifier output | 50 + 50Wrms | |
| Battery life | Up to 8 hours | |
| Controls | Volume, Bass, Treble, Echo, Mic vol, VHF vol, Contour, Talkover | |
| Inputs | 2 wired mic (jack) and aux (RCA & 3.5mm) | |
| Bluetooth version | 2.1 | |
| Dispersion | 90° x 60° (H x V) | |
Troubleshooting
| No output and no LEDs lit | Check POWER switch is on |
| Check battery is not drained fully | |
| Check mains lead is connected | |
| Check mains or D.C. fuse hasn't blown | |
| Power LED lit but no VHF output | Check AA batteries in wireless transmitters |
| Check wireless transmitters are switched on | |
| Check VHF POWER is switched on (turn volume controls up) | |
| Check RF A and RF B LEDs for RF carrier signal | |
| Music level off / cutting out | Check that Talk Over is not switched on (will mute upon mic. signal) |
| Power LED lit but no USB/SD player output | Check USB or SD has mp3 or wma audio files (FAT32 formatted) |
| Check USB or SD card is inserted properly | |
| Press MODE button and try the Play/Pause button | |
| Check main VOLUME control is not turned down | |
| If no display, press power on/standby button on the remote control | |
| Press and hold “VOL +” button on the remote control | |
| Check LCD display to see moving numbers | |
| Power LED lit but no sound from external inputs | Check leads are OK and connected properly |
| Check volume and on/off switch on external mic or line source | |
| Check main VOLUME or MIC VOLUME control is not fully down |

Disposal: The "Crossed Wheelie Bin" symbol on the product means that the product is classed as Electrical or Electronic equipment and should not be disposed with other household or commercial waste at the end of its useful life. The goods must be disposed of according to your local council guidelines.


- Portable PA Units with Bluetooth and VHF
- Introduction
- Safety: Labelling Conventions
- Warning
- Safety
- Placement
- Cleaning
- Package Contents
- Controls
- Connection
- Charging the battery
- Powering Up
- VHF Wireless Microphones
- External Inputs
- Internal media player
- FM Tuner
- USB/SD player
- Bluetooth connection
- Remote control
Brand : Qtx
Model : QX12PA
Category : Loudspeaker